- Welcome to the Kancolle Wiki!
- If you have any questions regarding site content, account registration, etc., please visit the KanColle Wiki Discord
Difference between revisions of "Summer 2022 Event/E-2"
| (26 intermediate revisions by 7 users not shown) | |||
| Line 18: | Line 18: | ||
|map_5_text=LBAS | |map_5_text=LBAS | ||
|boss_hard= 1300 TP + 3200 HP | |boss_hard= 1300 TP + 3200 HP | ||
| − | |boss_medium= 1000 TP + | + | |boss_medium= 1000 TP + 2700 HP |
| − | |boss_easy= | + | |boss_easy= 850 TP + 2400 HP |
| − | |boss_casual= | + | |boss_casual= 300 TP + 2400 HP |
|reward_all= | |reward_all= | ||
|phase_1_boss= {{EnemyLink|Heavy Cruiser Summer Princess}} | |phase_1_boss= {{EnemyLink|Heavy Cruiser Summer Princess}} | ||
| Line 50: | Line 50: | ||
|A -> C/empty = * Meet '''ALL''' of the following requirements: | |A -> C/empty = * Meet '''ALL''' of the following requirements: | ||
** If slow fleet, meet '''ALL''' of the following requirements: | ** If slow fleet, meet '''ALL''' of the following requirements: | ||
| − | *** Amount of (F)BB(V) = 0 | + | *** Amount of (F)BB(V) + CV(B) = 0 |
| − | ***Amount of DD ≥ 4 | + | *** Amount of DD ≥ 4 |
| − | |||
** Amount of CL ≥ 1 | ** Amount of CL ≥ 1 | ||
| − | ** Amount of DD ≥ 3 | + | ** Amount of DD ≥ 3 |
** Amount of SS(V) = 0 | ** Amount of SS(V) = 0 | ||
|C/empty -> D,E/empty = Choose your own adventure! | |C/empty -> D,E/empty = Choose your own adventure! | ||
| − | |D -> L = * Does not meet the requirements to go to M or O | + | |D -> L = * Meet '''ALL''' of the following requirements: |
| + | ** Does not meet the requirements to go to M or O | ||
| + | ** Pass the LoS Check | ||
|D -> M = * Meet '''ALL''' of the following requirements: | |D -> M = * Meet '''ALL''' of the following requirements: | ||
| + | ** Does not meet the requirements to go to O | ||
** Fast Fleet | ** Fast Fleet | ||
** Amount of CV(B) ≤ 2(?) | ** Amount of CV(B) ≤ 2(?) | ||
** Amount of (F)BB(V) + CV(L/B) ≤ 3(?) | ** Amount of (F)BB(V) + CV(L/B) ≤ 3(?) | ||
** Amount of DD ≥ 3(?) | ** Amount of DD ≥ 3(?) | ||
| + | ** Pass the LoS check | ||
|D -> N/empty = * '''Force N''' if fail the LoS Check | |D -> N/empty = * '''Force N''' if fail the LoS Check | ||
|D -> O = * Meet '''ALL''' of the following requirements: | |D -> O = * Meet '''ALL''' of the following requirements: | ||
** If Slow, meet '''ALL''' of the following requirements: | ** If Slow, meet '''ALL''' of the following requirements: | ||
*** Amount of (F)BB(V) ≤ 1 | *** Amount of (F)BB(V) ≤ 1 | ||
| − | |||
** Fleet does '''not''' contain CV(B) | ** Fleet does '''not''' contain CV(B) | ||
** Amount of DD ≥ 3(?) | ** Amount of DD ≥ 3(?) | ||
| − | ** Pass the LoS Check ( | + | ** Pass the LoS Check (Cn4 = 70 on Hard) |
|E/empty -> F,H/empty = Choose your own adventure! | |E/empty -> F,H/empty = Choose your own adventure! | ||
|H/empty -> I,J = Choose your own adventure! | |H/empty -> I,J = Choose your own adventure! | ||
| Line 79: | Line 81: | ||
** Amount of CL ≥ 1(?) | ** Amount of CL ≥ 1(?) | ||
** Amount of DD ≥ 3(?) | ** Amount of DD ≥ 3(?) | ||
| − | ** Pass the LoS Check ( | + | ** Pass the LoS Check (Cn3 = 60? on Hard) |
}} | }} | ||
| Line 86: | Line 88: | ||
|id = 55-2c | |id = 55-2c | ||
|order = P,H,S | |order = P,H,S | ||
| − | |P/empty -> P1 = * Force P1, if fleet contains SS(V) | + | |P/empty -> P1 = * '''Force P1''', if fleet contains SS(V) |
* Does not meet the requirements to go to Q or P2 | * Does not meet the requirements to go to Q or P2 | ||
|P/empty -> P2 = * Meet '''ALL''' of the following requirements: | |P/empty -> P2 = * Meet '''ALL''' of the following requirements: | ||
** Does not meet the requirements to go to Q | ** Does not meet the requirements to go to Q | ||
** Fleet does '''not''' contain SS(V) | ** Fleet does '''not''' contain SS(V) | ||
| + | ** If Slow, amount of CL + DD ≥ 4(?) | ||
** ??? | ** ??? | ||
|P/empty -> Q = * Meet '''ALL''' of the following requirements: | |P/empty -> Q = * Meet '''ALL''' of the following requirements: | ||
** Fleet does '''not''' contain SS(V) | ** Fleet does '''not''' contain SS(V) | ||
** Amount of CV(B) ≤ 2 | ** Amount of CV(B) ≤ 2 | ||
| − | ** Amount of CA(V) ≥ 1 | + | ** Amount of AV + CA(V) ≥ 1 |
** Amount of CL ≥ 2 | ** Amount of CL ≥ 2 | ||
** If Slow fleet, amount of DD ≥ 4 | ** If Slow fleet, amount of DD ≥ 4 | ||
|H -> I,J = Choose your own adventure! | |H -> I,J = Choose your own adventure! | ||
|S -> T/empty = * '''Force T''' if fail the LoS Check | |S -> T/empty = * '''Force T''' if fail the LoS Check | ||
| − | |S -> U = * Pass the LoS Check | + | |S -> U = * Pass the LoS Check |
* Does not meet the requirements to go to V | * Does not meet the requirements to go to V | ||
|S -> V = * Meet '''ALL''' of the following requirements: | |S -> V = * Meet '''ALL''' of the following requirements: | ||
** If Slow fleet, meet '''ALL''' of the following requirements: | ** If Slow fleet, meet '''ALL''' of the following requirements: | ||
| − | *** Amount of (F)BB(V) + CV(B) ≤ 3 ('''Casual/Easy/Normal''') | + | *** Amount of (F)BB(V) + CV(B) ≤ 3 '''and''' (F)BB(V) + CVL ≤ 4 ('''Casual/Easy/Normal''') |
| − | *** Amount of (F)BB(V) + CV(B) ≤ 2 ('''Hard''') | + | *** Amount of (F)BB(V) + CV(B) ≤ 2 '''and''' (F)BB(V) + CVL ≤ 3 ('''Hard''') |
*** ??? | *** ??? | ||
| − | ** Amount of DD ≥ 4(?) | + | ** If CTF, meet '''ANY''' of the following requirements: |
| − | ** Pass the LoS Check ( | + | *** Amount of DD ≥ 4 (?) |
| + | *** Amount of CL ≥ 3 (?) | ||
| + | ** If STF, meet '''ANY''' of the following requirements: | ||
| + | *** Amount of CA(V) ≥ 4 (?) | ||
| + | *** Amount of CL + DD ≥ 6 (?) | ||
| + | ** If Single Fleet, amount of DD ≥ 1 (?) | ||
| + | ** Pass the LoS Check (Cn3 = 120? on Hard) | ||
}} | }} | ||
| Line 122: | Line 131: | ||
** [[File:{{ROOTPAGENAME}} Tag 3.png]] ''' Expeditionary Fleet Advance Team''' (combined fleets) | ** [[File:{{ROOTPAGENAME}} Tag 3.png]] ''' Expeditionary Fleet Advance Team''' (combined fleets) | ||
* After completing an optional unlock phase, 1 [[LBAS]] will be available to sortie. | * After completing an optional unlock phase, 1 [[LBAS]] will be available to sortie. | ||
| + | |||
| + | Fuel {{Fuel}} can be farm extensively on node {{MapRoute|G|green}}, see ''[[#Fuel Farming|below]]''. | ||
==Phase 1 - Deliver Supplies to the Coast of Yemen== | ==Phase 1 - Deliver Supplies to the Coast of Yemen== | ||
| Line 130: | Line 141: | ||
* Route: {{MapRoute|1||A|red|C|blue|E|blue|H|blue|I|red|I1|green|K|red}} | * Route: {{MapRoute|1||A|red|C|blue|E|blue|H|blue|I|red|I1|green|K|red}} | ||
** XX cannot be SS(V) | ** XX cannot be SS(V) | ||
| − | ** (F)BB(V) may be included if the fleet is Fast, but at the cost of a slower TP rate | + | ** Must include 4DD if the fleet is Slow to avoid {{MapRoute|B|red}} |
| + | ** (F)BB(V) or CV(B) may be included if the fleet is Fast, but at the cost of a slower TP rate | ||
| + | * Boss Support expedition is highly recommended to help secure A rank consistently. | ||
|-|Heavy Fleet= | |-|Heavy Fleet= | ||
| Line 138: | Line 151: | ||
</tabber> | </tabber> | ||
| + | * Los Note: There is no LOS check here to get to the boss. | ||
* Node {{MapRoute|K|red}} contains [[PT Imp]]s along with other surface ships | * Node {{MapRoute|K|red}} contains [[PT Imp]]s along with other surface ships | ||
{{Anti-PT Imp Setups}} | {{Anti-PT Imp Setups}} | ||
| − | == | + | ==Phase 1.25 - Unlock LBAS and Node O== |
| − | This | + | This phase has only 1 requirement: |
* Reach node {{MapRoute|G|green}} | * Reach node {{MapRoute|G|green}} | ||
** For the fleet used, refer to Phase 1 as it is the same fleet | ** For the fleet used, refer to Phase 1 as it is the same fleet | ||
** Route: {{MapRoute|1||A|red|C|blue|E|blue|F|red|G|green}} | ** Route: {{MapRoute|1||A|red|C|blue|E|blue|F|red|G|green}} | ||
| + | * This task can be done at any time, but the unlocks will not occur until after finishing the TP Phase (Phase 1) | ||
| + | ** This will unlock 1 LBAS to Sortie, as well as the path to node {{MapRoute|O|red}} | ||
==Phase 1.5 - Unlock the Second Start Point and the Second Boss== | ==Phase 1.5 - Unlock the Second Start Point and the Second Boss== | ||
| Line 153: | Line 169: | ||
| Hard || S|| A+ x3 | | Hard || S|| A+ x3 | ||
|- | |- | ||
| − | | Medium || S|| A+ | + | | Medium || S|| A+ x2 |
|- | |- | ||
| − | | Easy || | + | | Easy || A+|| A+ x2 |
|- | |- | ||
| − | | Casual || | + | | Casual || A+|| A+ |
|} | |} | ||
| Line 170: | Line 186: | ||
** [[Installation|Anti-installation]] equipment are required to clear this node. | ** [[Installation|Anti-installation]] equipment are required to clear this node. | ||
** XX cannot be SS(V) | ** XX cannot be SS(V) | ||
| + | ** There is a LoS check to enter node {{MapRoute|O|red}} | ||
** A second (F)BB(V) or CVL may be included if the fleet is '''Fast''' (?) | ** A second (F)BB(V) or CVL may be included if the fleet is '''Fast''' (?) | ||
*** Including either type in a '''Slow''' fleet will encounter extra battles at B, L, and Air Node M | *** Including either type in a '''Slow''' fleet will encounter extra battles at B, L, and Air Node M | ||
| Line 179: | Line 196: | ||
|-|STF= | |-|STF= | ||
* Surface Task Force: '''2(F)BB(V), 1CV(L/B), 2CA(V), 1CL + 1CL, 4DD, 0-1CLT, 0-1CA(V)''' [[File:{{ROOTPAGENAME}} Tag 3.png|30px]] | * Surface Task Force: '''2(F)BB(V), 1CV(L/B), 2CA(V), 1CL + 1CL, 4DD, 0-1CLT, 0-1CA(V)''' [[File:{{ROOTPAGENAME}} Tag 3.png|30px]] | ||
| − | * Route: {{MapRoute|2||P|blue|Q|red|H|blue|J|red|R||S|red|V|red}} | + | * Route: {{MapRoute|2||P|blue|Q|red|H|blue|J|red|R|green|S|red|V|red}} |
|-|CTF= | |-|CTF= | ||
* Carrier Task Force: '''2CV(B), 0-1CVL, 1CL, 2-3XX + 1CL, 3-4DD, 1-2XX''' (Fast) [[File:{{ROOTPAGENAME}} Tag 3.png|30px]] | * Carrier Task Force: '''2CV(B), 0-1CVL, 1CL, 2-3XX + 1CL, 3-4DD, 1-2XX''' (Fast) [[File:{{ROOTPAGENAME}} Tag 3.png|30px]] | ||
** At least 1 XX must be a CA(V) | ** At least 1 XX must be a CA(V) | ||
| − | * Route: {{MapRoute|2||P|blue|Q|red|H|blue|J|red|R||S|red|V|red}} | + | * Route: {{MapRoute|2||P|blue|Q|red|H|blue|J|red|R|green|S|red|V|red}} |
|-|Single Fleet= | |-|Single Fleet= | ||
| Line 195: | Line 212: | ||
</tabber> | </tabber> | ||
| + | * There is a LoS check to enter node {{MapRoute|V|red}} | ||
| + | ** Cn1: Casual/Easy/Medium/Hard = 21/??/??/32 | ||
* LBAS Range = 3 to {{MapRoute|V|red}} | * LBAS Range = 3 to {{MapRoute|V|red}} | ||
| − | ** AD/AP at Boss | + | * In-route [[Support Expedition]] is needed for higher difficulties to try and reach the boss node. |
| + | ** AD/AP at Boss {{MapRoute|V|red}} is 56/112 on Hard | ||
** Increases to 112/224 on Last Dance | ** Increases to 112/224 on Last Dance | ||
| + | |||
| + | ==Fuel Farming== | ||
| + | <div class="mw-collapsible mw-collapsed"><h4>Guide to Farm Fuel on E2</h4> | ||
| + | <div class="mw-collapsible-content"> | ||
| + | Node {{MapRoute|G|green}} is a resource Node on this map that can be farmed for fuel: | ||
| + | |||
| + | {|class="wikitable" style="text-align:center; margin:auto" | ||
| + | ! Resources earnings | ||
| + | ! {{Fuel}} | ||
| + | |- | ||
| + | ! Base | ||
| + | | 30 | ||
| + | |- | ||
| + | ! Maximum | ||
| + | | 140 | ||
| + | |} | ||
| + | |||
| + | {|class="wikitable mw-collapsible mw-collapsed" style="text-align:center; margin:auto" | ||
| + | !colspan=4| Equipment Bonuses | ||
| + | |- | ||
| + | ! Type | ||
| + | ! Name | ||
| + | ! {{Fuel}} | ||
| + | |- | ||
| + | ! rowspan=7| {{LandingCraft}} | ||
| + | ! {{EquipmentLink|Daihatsu Landing Craft}} | ||
| + | | rowspan=8| +11 | ||
| + | |- | ||
| + | ! {{EquipmentLink|Toku Daihatsu Landing Craft}} | ||
| + | |- | ||
| + | ! {{EquipmentLink|Daihatsu Landing Craft (Type 89 Medium Tank & Landing Force)|text=DLC + T89 Tank}} | ||
| + | |- | ||
| + | ! {{EquipmentLink|Armed Daihatsu}} | ||
| + | |- | ||
| + | ! {{EquipmentLink|Soukoutei (Armored Boat Class)|text=Soukoutei}} | ||
| + | |- | ||
| + | ! {{EquipmentLink|Daihatsu Landing Craft (Panzer II/North African Specification)|text=DLC + Panzer II}} | ||
| + | |- | ||
| + | ! {{EquipmentLink|Toku Daihatsu Landing Craft + Type 1 Gun Tank|text=Toku DLC + Ho-Ni Tank}} | ||
| + | |- | ||
| + | ! {{Amphibious Tank}} | ||
| + | ! {{EquipmentLink|Special Type 2 Amphibious Tank|text=Ka-Mi Tank}} | ||
| + | |- | ||
| + | ! {{Drum}} | ||
| + | ! {{EquipmentLink|Drum Canister (Transport Use)|text=Drums}} | ||
| + | | +9 | ||
| + | |- | ||
| + | ! rowspan=3| {{LandingCraft}} | ||
| + | ! {{EquipmentLink|Toku Daihatsu Landing Craft + 11th Tank Regiment|text=Toku DLC + 11th Reg}} | ||
| + | |rowspan=3| 0 | ||
| + | |- | ||
| + | ! {{EquipmentLink|Toku Daihatsu Landing Craft + Panzer III (North African Specification)|text=Toku DLC + Panzer III}} | ||
| + | |- | ||
| + | ! {{EquipmentLink|M4A1 DD}} | ||
| + | |} | ||
| + | ;Recommended fleet: | ||
| + | *'''1CL, 3DD, 2XX''' Fast | ||
| + | *'''1CL, 4DD, 1XX''' Slow | ||
| + | *Route: {{MapRoute|1||A|red|C|blue|E|blue|F|red|G|green}} | ||
| + | **XX is mostly free, but AV/CL/DD are recommended. | ||
| + | **The 2 combat nodes are a Subarmine node at {{MapRoute|A|red}} and a Surface Combat node at {{MapRoute|F|red}} containing a light enemy surface fleet. | ||
| + | |||
| + | ;Notes: | ||
| + | * It is safe to advance even after a ship in the fleet is '''{{color|red|heavily damaged (大破)}}''' and put into taiha-state at Node {{MapRoute|F|red}} as the following Resource Node is not a combat node. Double-check the status of the fleet before reentering the map. | ||
| + | * Fodder use and zero morale farming is possible but will likely be less efficient due to retreats at the sub-node | ||
| + | * If the map is not started yet, it is possible to farm fuel on Casual difficulty to make the combat nodes easier. | ||
| + | * Be aware that locks still get applied to ships used to farm fuel here, so plan locks accordingly | ||
| + | * As 2 Abyssal Transports exist at {{MapRoute|F|red}} on all difficulties, this can also be used for transport quests while farming Fuel. | ||
| + | |||
| + | ;Loadout Notes: | ||
| + | * 10 {{LandingCraft}}/{{Amphibious Tank}} or 13 {{Drum}} will reach the fuel reward cap | ||
| + | ** This makes it possible to reach the cap with just the minimum fleet of 4 ships (more if using Drums instead of DLC) | ||
| + | * LBAS on ASW duty can be used to help avoid retreats at {{MapRoute|A|red}} but will reduce the net gain in Fuel | ||
| + | * Line Abreast with multiple OASW at {{MapRoute|A|red}} | ||
| + | * Vanguard at {{MapRoute|F|red}} unless aiming for Transport kills | ||
| + | </div></div> | ||
==Enemy Compositions== | ==Enemy Compositions== | ||
Latest revision as of 00:14, 4 October 2022
 
| |||||||||
|---|---|---|---|---|---|---|---|---|---|
|
Time remaining until Event ends:
| |||||||||
アデン湾を抜けて
![]()
![]()


| Information | ||||
|---|---|---|---|---|
| Event Tag | ||||
| Boss Gauges | Hard (甲): 1300 TP + 3200 HP | |||
| Medium (乙): 1000 TP + 2700 HP | ||||
| Easy (丙): 850 TP + 2400 HP | ||||
| Casual (丁): 300 TP + 2400 HP | ||||
| Map Bosses | Heavy Cruiser Summer Princess
| |||
Battleship Summer Princess
| ||||
| Rewards[edit] | ||||
|---|---|---|---|---|
| Choice | 丁 Casual |
丙 Easy |
乙 Medium |
甲 Hard |
Fuel |
4000 | 5000 | 7000 | 8000 |
| OR | ||||
Hayasui |
1 | 1 | 1 | 1 |
| Reward | 丁 Casual |
丙 Easy |
乙 Medium |
甲 Hard |
|---|---|---|---|---|
Skilled Crew Member |
1 | 1 | 1 | 1 |
New Model Aerial Armament Material |
1 | 1 | 2 | |
Action Report |
1 | 1 | 1 | |
Medal |
1 | |||
 Skilled Deck Personnel |
1 | 1 | 2 | 2 |
 F4U-2 Night Corsair |
1 | 1 | ||
 Skilled Deck Personnel + Aviation Maintenance Hands |
1 |

The event guides are to be constructed through the respective Event map page guide sandbox and reviewed by editors before being approved here.
- Do not update the guides through this page unless it is a minor fix. Please only update guides through their respective sandbox pages.
Branching Table
| E-2 Start Point | ||
|---|---|---|
| Nodes | Rules | |
| Start | 1 |
|
2 |
| |
| E-2 Branching Rules (Start Point 1) | ||
|---|---|---|
| Nodes | Rules | |
A |
B |
|
C |
| |
C |
D |
Choose your own adventure! |
E | ||
D |
L |
|
M |
| |
N |
| |
O |
| |
E |
F |
Choose your own adventure! |
H | ||
H |
I |
Choose your own adventure! |
J | ||
S |
T |
|
U |
| |
V |
| |
| E-2 Branching Rules (Start Point 2) | ||
|---|---|---|
| Nodes | Rules | |
P |
P1 |
|
P2 |
| |
Q |
| |
H |
I |
Choose your own adventure! |
J | ||
S |
T |
|
U |
| |
V |
| |
Branching compositions were reported over the course of the event. (NGA and KCNav)
Ship Bonuses
DISCLAIMER: This information is based on user submitted data and is subject to revisions as more data is gathered. Any version of the ship receives the bonus regardless of remodel.
Ship Bonuses
| Ships[1] | Node K Enemy Flagship Only
|
Node V Enemy Flagship Only
| ||
|---|---|---|---|---|
| 1.1x | ||||
| 1.15x | 1.1x | |||
|
1.1x | 1.2x | ||
|
x1 | 1.15x | ||
| x2 | 1.2075x | |||
| Equipment | Node O |
|---|---|

|
1.35x |
Map overview
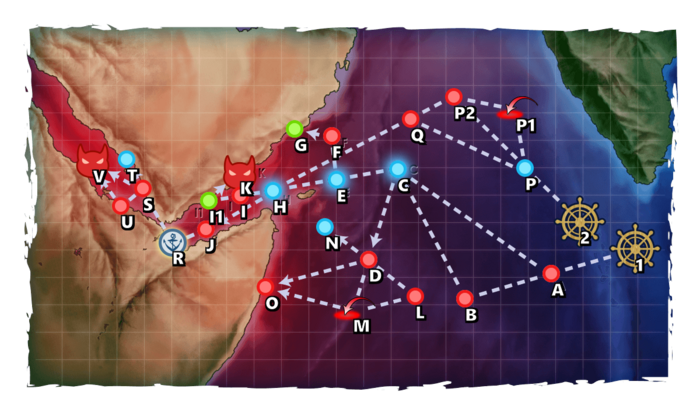
E2 is a two-phase map using both Single Fleets and Combined Fleets.
- This map uses two locks:
 Expeditionary Reconnaissance Unit (single fleets)
 Expeditionary Fleet Advance Team (combined fleets)
- After completing an optional unlock phase, 1 LBAS will be available to sortie.
Fuel ![]() can be farm extensively on node G, see below.
can be farm extensively on node G, see below.
Phase 1 - Deliver Supplies to the Coast of Yemen
A TP Phase where supplies must be delivered to the coast of Yemen.
- Single Fleet: 0-2XX, 1CL, 3-5DD

- Route: 1 A C E H I I1 K
- XX cannot be SS(V)
- Must include 4DD if the fleet is Slow to avoid B
- (F)BB(V) or CV(B) may be included if the fleet is Fast, but at the cost of a slower TP rate
- Boss Support expedition is highly recommended to help secure A rank consistently.
- Single Fleet: 1-2(F)BB(V), 0-1CVL, 0-2CL(T), 3-5DD, 0-1SS(V)
- Route: 1 A B C E H I I1 K
- A heavier fleet at the cost of a slower TP rate
- Los Note: There is no LOS check here to get to the boss.
- Node K contains PT Imps along with other surface ships
| Anti-PT boat | |||||||||||||||||||||||||||||||||||||||||||||||||||||||||||||||||||||||||||||||||||||||||||||||||||||||||||||||||||||||||||||||||||||||||||
|---|---|---|---|---|---|---|---|---|---|---|---|---|---|---|---|---|---|---|---|---|---|---|---|---|---|---|---|---|---|---|---|---|---|---|---|---|---|---|---|---|---|---|---|---|---|---|---|---|---|---|---|---|---|---|---|---|---|---|---|---|---|---|---|---|---|---|---|---|---|---|---|---|---|---|---|---|---|---|---|---|---|---|---|---|---|---|---|---|---|---|---|---|---|---|---|---|---|---|---|---|---|---|---|---|---|---|---|---|---|---|---|---|---|---|---|---|---|---|---|---|---|---|---|---|---|---|---|---|---|---|---|---|---|---|---|---|---|---|---|
Unlike most standard Abyssals, "PT boats" (PT Imp Pack & Schnellboot Imp Pack & Schnellboot Imp Pack ) are "very small and fast". ) are "very small and fast".
During Events, some special bonuses may be added, with "historical" ships and equipment gaining some accuracy bonuses[10].
| |||||||||||||||||||||||||||||||||||||||||||||||||||||||||||||||||||||||||||||||||||||||||||||||||||||||||||||||||||||||||||||||||||||||||||
| [edit] | |||||||||||||||||||||||||||||||||||||||||||||||||||||||||||||||||||||||||||||||||||||||||||||||||||||||||||||||||||||||||||||||||||||||||||


Phase 1.25 - Unlock LBAS and Node O
This phase has only 1 requirement:
- Reach node G
- For the fleet used, refer to Phase 1 as it is the same fleet
- Route: 1 A C E F G
- This task can be done at any time, but the unlocks will not occur until after finishing the TP Phase (Phase 1)
- This will unlock 1 LBAS to Sortie, as well as the path to node O
Phase 1.5 - Unlock the Second Start Point and the Second Boss
| J | O | |
|---|---|---|
| Hard | S | A+ x3 |
| Medium | S | A+ x2 |
| Easy | A+ | A+ x2 |
| Casual | A+ | A+ |
- For the fleet used, refer to Phase 1 as it is the same fleet
- Route: 1 A C E H J
- Single Fleet: 0-2XX, 0-1(F)BB(V), 0-1CVL, 1CL, 3-5DD
- Route: 1 A C D O
- Anti-installation equipment are required to clear this node.
- XX cannot be SS(V)
- There is a LoS check to enter node O
- A second (F)BB(V) or CVL may be included if the fleet is Fast (?)
- Including either type in a Slow fleet will encounter extra battles at B, L, and Air Node M
Phase 2 - Eliminate the Battleship Princess from the Strait
- Surface Task Force: 2(F)BB(V), 1CV(L/B), 2CA(V), 1CL + 1CL, 4DD, 0-1CLT, 0-1CA(V)

- Route: 2 P Q H J R S V
- Carrier Task Force: 2CV(B), 0-1CVL, 1CL, 2-3XX + 1CL, 3-4DD, 1-2XX (Fast)
- At least 1 XX must be a CA(V)
- Route: 2 P Q H J R S V
- Single Fleet: 0-1(F)BB(V), 1-2CV(B), 1CL, 3DD (Fast)
- Route: 1 A C E H J R S V
- This fleet relies on strong Support Expeditions and LBAS
- This fleet is designed to save on Ship Locks and may have trouble killing the boss
- There is a significant Air Presence at node S and boss node V
- Bringing an AACI capable ship is recommended due to the strong air presence
- There is a LoS check to enter node V
- Cn1: Casual/Easy/Medium/Hard = 21/??/??/32
- LBAS Range = 3 to V
- In-route Support Expedition is needed for higher difficulties to try and reach the boss node.
- AD/AP at Boss V is 56/112 on Hard
- Increases to 112/224 on Last Dance
Fuel Farming
Guide to Farm Fuel on E2
Node G is a resource Node on this map that can be farmed for fuel:
| Resources earnings | |
|---|---|
| Base | 30 |
| Maximum | 140 |
| Equipment Bonuses | |||
|---|---|---|---|
| Type | Name | ||
Daihatsu Landing Craft
|
+11 | ||
Toku Daihatsu Landing Craft
| |||
DLC + T89 Tank
| |||
Armed Daihatsu
| |||
Soukoutei
| |||
| DLC + Panzer II
| |||
Toku DLC + Ho-Ni Tank
| |||
Ka-Mi Tank
| |||
Drums
|
+9 | ||
Toku DLC + 11th Reg
|
0 | ||
Toku DLC + Panzer III
| |||
M4A1 DD
| |||
- Recommended fleet
- 1CL, 3DD, 2XX Fast
- 1CL, 4DD, 1XX Slow
- Route: 1 A C E F G
- XX is mostly free, but AV/CL/DD are recommended.
- The 2 combat nodes are a Subarmine node at A and a Surface Combat node at F containing a light enemy surface fleet.
- Notes
- It is safe to advance even after a ship in the fleet is heavily damaged (大破) and put into taiha-state at Node F as the following Resource Node is not a combat node. Double-check the status of the fleet before reentering the map.
- Fodder use and zero morale farming is possible but will likely be less efficient due to retreats at the sub-node
- If the map is not started yet, it is possible to farm fuel on Casual difficulty to make the combat nodes easier.
- Be aware that locks still get applied to ships used to farm fuel here, so plan locks accordingly
- As 2 Abyssal Transports exist at F on all difficulties, this can also be used for transport quests while farming Fuel.
- Loadout Notes
- 10
 /
/ or 13
or 13  will reach the fuel reward cap
- This makes it possible to reach the cap with just the minimum fleet of 4 ships (more if using Drums instead of DLC)
- LBAS on ASW duty can be used to help avoid retreats at A but will reduce the net gain in Fuel
- Line Abreast with multiple OASW at A
- Vanguard at F unless aiming for Transport kills
Enemy Compositions
| Type | Ships |
|---|---|
| DD |
| Type | Ships |
|---|---|
| DE | |
| DD |
| Type | Ships |
|---|---|
| DE | |
| DD |
| Type | Ships |
|---|---|
| DE | |
| DD | |
| SSV | |
| AS |
| Type | Ships |
|---|---|
| DE | |
| DD | |
| SSV | |
| AS |
| Type | Ships |
|---|---|
| DD |
| Type | Ships |
|---|---|
| DE | |
| DD |
| Type | Ships |
|---|---|
| DE | |
| DD | |
| CA | |
| SS | |
| AV | |
| AO |
| # | Formation | Normal Battle Node | AD/AP AS/AS+ |
|---|---|---|---|
| A | Echelon Line Abreast Phases: 1, 2 |
0/0 0/0 | |
| Echelon Line Abreast Phases: 1, 2 |
0/0 0/0 | ||
| Echelon Line Abreast Phases: 1, 2 |
0/0 0/0 | ||
| # | Formation | Normal Battle Node | AD/AP AS/AS+ |
| # | Formation | Normal Battle Node | AD/AP AS/AS+ |
|---|---|---|---|
| B | Line Ahead Echelon Vanguard Phases: 1, 2 |
0/0 0/0 | |
| # | Formation | Normal Battle Node | AD/AP AS/AS+ |
| # | Selection Node | ||
|---|---|---|---|
| C | 艦隊の針路を選択できます。提督、どちらの針路をとられますか? You can decide the fleet's course. Admiral, which heading should we take? | ||
| # | Selection Node | ||
| # | Formation | Normal Battle Node | AD/AP AS/AS+ |
|---|---|---|---|
| D | Diamond Phases: 1, 2 |
26/52 116/231 | |
| Diamond Phases: 2 |
32/63 140/279 | ||
| Diamond Phases: 2 |
36/72 161/321 | ||
| # | Formation | Normal Battle Node | AD/AP AS/AS+ |
| # | Selection Node | ||
|---|---|---|---|
| E | 艦隊の針路を選択できます。提督、どちらの針路をとられますか? You can decide the fleet's course. Admiral, which heading should we take? | ||
| # | Selection Node | ||
| # | Formation | Normal Battle Node | AD/AP AS/AS+ |
|---|---|---|---|
| F | Double Line Diamond Vanguard Phases: 1, 2 |
0/0 0/0 | |
| # | Formation | Normal Battle Node | AD/AP AS/AS+ |
| # | Resource Node | ||
|---|---|---|---|
| # | Resource Node | ||
| # | Selection Node | ||
|---|---|---|---|
| H | 遠征艦隊、アデン湾方面へ進出せよ! Expeditionary fleet, advance towards the Gulf of Aden! | ||
| # | Selection Node | ||
| # | Formation | Normal Battle Node | AD/AP AS/AS+ |
|---|---|---|---|
| I | Line Ahead Echelon Phases: 1, 2 |
0/0 0/0 | |
| Line Ahead Phases: 1, 2 |
0/0 0/0 | ||
| # | Formation | Normal Battle Node | AD/AP AS/AS+ |
| # | Landing Node | ||
|---|---|---|---|
| I1 | 輸送物資の揚陸地点に到達しました。本海域の輸送作戦は無事完了しています。 The landing point of the convoy has been reached. The transport operation here has already been completed successfully. | ||
| # | Landing Node | ||
| # | Formation | Normal Battle Node | AD/AP AS/AS+ |
|---|---|---|---|
| J | Line Ahead Double Line Phases: 1, 2 |
0/0 0/0 | |
| Line Ahead Phases: 2 |
0/0 0/0 | ||
| # | Formation | Normal Battle Node | AD/AP AS/AS+ |
| # | Formation | Boss Battle Node | AD/AP AS/AS+ |
|---|---|---|---|
| K | Line Ahead Phases: 1, 2 |
0/0 0/0 | |
| Line Ahead Phases: 1, 2 |
0/0 0/0 | ||
| Line Ahead Phases: 1, 2 (Final)
|
36/72 161/321 | ||
| # | Formation | Boss Battle Node | AD/AP AS/AS+ |
| # | Formation | Normal Battle Node | AD/AP AS/AS+ |
|---|---|---|---|
| L | Echelon Line Abreast Phases: 2 |
0/0 0/0 | |
| Echelon Phases: 2 |
0/0 0/0 | ||
| # | Formation | Normal Battle Node | AD/AP AS/AS+ |
| # | Formation | Air Defense Node | AD/AP AS/AS+ |
|---|---|---|---|
| M | Diamond Phases: 2 |
112/223 501/1002 | |
| Diamond Phases: 2 |
98/196 440/879 | ||
| # | Formation | Air Defense Node | AD/AP AS/AS+ |
| # | Empty Node | ||
|---|---|---|---|
| N | 敵影を見ず。 No enemy spotted. | ||
| # | Empty Node | ||
| # | Formation | Normal Battle Node | AD/AP AS/AS+ |
|---|---|---|---|
| O | Diamond Phases: 2 |
112/223 501/1002 | |
| Diamond Phases: 2 |
98/196 440/879 | ||
| Diamond | 46/91 204/408 | ||
| # | Formation | Normal Battle Node | AD/AP AS/AS+ |
| # | Empty Node | ||
|---|---|---|---|
| P | 気のせいだった。 遠征艦隊、アデン湾方面へ進出せよ! Must be my imagination. Expeditionary fleet, advance towards the Gulf of Aden! | ||
| # | Empty Node | ||
| # | Formation | Air Defense Node | AD/AP AS/AS+ |
|---|---|---|---|
| P1 | Diamond Phases: 2 |
91/182 408/816 | |
| Diamond Phases: 2 |
106/212 476/951 | ||
| Diamond Phases: 2 |
113/225 504/1008 | ||
| # | Formation | Air Defense Node | AD/AP AS/AS+ |
| # | Formation | Normal Battle Node | AD/AP AS/AS+ |
|---|---|---|---|
| P2 | Echelon Line Abreast Phases: 2 |
0/0 0/0 | |
| Echelon Line Abreast Phases: 2 |
0/0 0/0 | ||
| Echelon Line Abreast Phases: 2 |
0/0 0/0 | ||
| # | Formation | Normal Battle Node | AD/AP AS/AS+ |
| # | Formation | Normal Battle Node | AD/AP AS/AS+ |
|---|---|---|---|
| Q | Diamond Phases: 2 |
91/182 408/816 | |
| Diamond Phases: 2 |
106/212 476/951 | ||
| Diamond Phases: 2 |
113/225 504/1008 | ||
| # | Formation | Normal Battle Node | AD/AP AS/AS+ |
| # | Repair Node | ||
|---|---|---|---|
| # | Repair Node | ||
| # | Formation | Normal Battle Node | AD/AP AS/AS+ |
|---|---|---|---|
| S | Line Ahead Double Line Diamond Phases: 2 |
57/113 252/504 | |
| # | Formation | Normal Battle Node | AD/AP AS/AS+ |
| # | Empty Node | ||
|---|---|---|---|
| T | 敵影を見ず。 遠征艦隊、アデン湾方面へ進出せよ! No enemy spotted. Expeditionary fleet, advance towards the Gulf of Aden! | ||
| # | Empty Node | ||
| # | Formation | Normal Battle Node | AD/AP AS/AS+ |
|---|---|---|---|
| U | Line Ahead Echelon Phases: 2 |
0/0 0/0 | |
| Line Ahead Phases: 2 |
0/0 0/0 | ||
| # | Formation | Normal Battle Node | AD/AP AS/AS+ |
| # | Formation | Boss Battle Node | AD/AP AS/AS+ |
|---|---|---|---|
| V | Cruising Formation 4 Phases: 2 |
57/113 252/504 | |
| Cruising Formation 4 Phases: 2 (Final)
|
113/225 504/1008 | ||
| # | Formation | Boss Battle Node | AD/AP AS/AS+ |
| Type | Ships |
|---|---|
| DD |
| Type | Ships |
|---|---|
| DD |
| Type | Ships |
|---|---|
| DD |
| Type | Ships |
|---|---|
| DE | |
| DD | |
| SSV | |
| AS |
| Type | Ships |
|---|---|
| DE | |
| DD | |
| SSV | |
| AS |
| Type | Ships |
|---|---|
| DD |
| Type | Ships |
|---|---|
| DE | |
| DD |
| Type | Ships |
|---|---|
| DE | |
| DD | |
| CA | |
| SS | |
| AV | |
| AO |
| # | Formation | Normal Battle Node | AD/AP AS/AS+ |
|---|---|---|---|
| A | Echelon Line Abreast Phases: 1, 2 |
0/0 0/0 | |
| Echelon Line Abreast Phases: 1, 2 |
0/0 0/0 | ||
| Echelon Line Abreast Phases: 1, 2 |
0/0 0/0 | ||
| # | Formation | Normal Battle Node | AD/AP AS/AS+ |
| # | Formation | Normal Battle Node | AD/AP AS/AS+ |
|---|---|---|---|
| B | Line Ahead Echelon Vanguard Phases: 1, 2 |
0/0 0/0 | |
| # | Formation | Normal Battle Node | AD/AP AS/AS+ |
| # | Selection Node | ||
|---|---|---|---|
| C | 艦隊の針路を選択できます。提督、どちらの針路をとられますか? You can decide the fleet's course. Admiral, which heading should we take? | ||
| # | Selection Node | ||
| # | Formation | Normal Battle Node | AD/AP AS/AS+ |
|---|---|---|---|
| D | Diamond Phases: 2 |
24/47 104/207 | |
| Diamond Phases: 2 |
24/47 104/207 | ||
| Diamond Phases: 2 |
24/47 104/207 | ||
| # | Formation | Normal Battle Node | AD/AP AS/AS+ |
| # | Selection Node | ||
|---|---|---|---|
| E | 艦隊の針路を選択できます。提督、どちらの針路をとられますか? You can decide the fleet's course. Admiral, which heading should we take? | ||
| # | Selection Node | ||
| # | Formation | Normal Battle Node | AD/AP AS/AS+ |
|---|---|---|---|
| F | Double Line Diamond Vanguard Phases: 1, 2 |
0/0 0/0 | |
| # | Formation | Normal Battle Node | AD/AP AS/AS+ |
| # | Resource Node | ||
|---|---|---|---|
| # | Resource Node | ||
| # | Selection Node | ||
|---|---|---|---|
| H | 遠征艦隊、アデン湾方面へ進出せよ! Expeditionary fleet, advance towards the Gulf of Aden! | ||
| # | Selection Node | ||
| # | Formation | Normal Battle Node | AD/AP AS/AS+ |
|---|---|---|---|
| I | Line Ahead Echelon Phases: 1, 2 |
0/0 0/0 | |
| Line Ahead Phases: 1, 2 |
0/0 0/0 | ||
| # | Formation | Normal Battle Node | AD/AP AS/AS+ |
| # | Landing Node | ||
|---|---|---|---|
| I1 | 輸送物資の揚陸地点に到達しました。本海域の輸送作戦は無事完了しています。 The landing point of the convoy has been reached. The transport operation here has already been completed successfully. | ||
| # | Landing Node | ||
| # | Formation | Normal Battle Node | AD/AP AS/AS+ |
|---|---|---|---|
| J | Line Ahead Double Line Phases: 1, 2 |
0/0 0/0 | |
| Line Ahead Phases: 2 |
0/0 0/0 | ||
| # | Formation | Normal Battle Node | AD/AP AS/AS+ |
| # | Formation | Boss Battle Node | AD/AP AS/AS+ |
|---|---|---|---|
| K | Line Ahead Phases: 1, 2 |
0/0 0/0 | |
| Line Ahead Phases: 1, 2 |
0/0 0/0 | ||
| Line Ahead Phases: 1, 2 (Final)
|
32/63 140/279 | ||
| # | Formation | Boss Battle Node | AD/AP AS/AS+ |
| # | Formation | Normal Battle Node | AD/AP AS/AS+ |
|---|---|---|---|
| L | Line Abreast Phases: 2 |
0/0 0/0 | |
| Echelon Line Abreast |
0/0 0/0 | ||
| Line Abreast | 0/0 0/0 | ||
| # | Formation | Normal Battle Node | AD/AP AS/AS+ |
| # | Formation | Air Defense Node | AD/AP AS/AS+ |
|---|---|---|---|
| M | Diamond Phases: 2 |
81/162 363/726 | |
| Diamond Phases: 2 |
102/203 456/912 | ||
| # | Formation | Air Defense Node | AD/AP AS/AS+ |
| # | Empty Node | ||
|---|---|---|---|
| N | 敵影を見ず。 No enemy spotted. | ||
| # | Empty Node | ||
| # | Formation | Normal Battle Node | AD/AP AS/AS+ |
|---|---|---|---|
| O | Diamond Phases: 2 |
81/162 363/726 | |
| Diamond Phases: 2 |
102/203 456/912 | ||
| Diamond | 37/73 162/324 | ||
| # | Formation | Normal Battle Node | AD/AP AS/AS+ |
| # | Empty Node | ||
|---|---|---|---|
| P | 気のせいだった。 遠征艦隊、アデン湾方面へ進出せよ! Must be my imagination. Expeditionary fleet, advance towards the Gulf of Aden! | ||
| # | Empty Node | ||
| # | Formation | Air Defense Node | AD/AP AS/AS+ |
|---|---|---|---|
| P1 | Diamond | 91/182 408/816 | |
| Diamond | 96/191 428/855 | ||
| Diamond | 100/199 447/894 | ||
| # | Formation | Air Defense Node | AD/AP AS/AS+ |
| # | Formation | Normal Battle Node | AD/AP AS/AS+ |
|---|---|---|---|
| P2 | Echelon Line Abreast Phases: 2 |
0/0 0/0 | |
| Echelon Line Abreast Phases: 2 |
0/0 0/0 | ||
| Echelon Line Abreast Phases: 2 |
0/0 0/0 | ||
| # | Formation | Normal Battle Node | AD/AP AS/AS+ |
| # | Formation | Normal Battle Node | AD/AP AS/AS+ |
|---|---|---|---|
| Q | Diamond Phases: 2 |
91/182 408/816 | |
| Diamond Phases: 2 |
96/191 428/855 | ||
| Diamond Phases: 2 |
100/199 447/894 | ||
| # | Formation | Normal Battle Node | AD/AP AS/AS+ |
| # | Repair Node | ||
|---|---|---|---|
| # | Repair Node | ||
| # | Formation | Normal Battle Node | AD/AP AS/AS+ |
|---|---|---|---|
| S | Line Ahead Double Line Diamond Phases: 2 |
50/100 224/447 | |
| # | Formation | Normal Battle Node | AD/AP AS/AS+ |
| # | Empty Node | ||
|---|---|---|---|
| T | 敵影を見ず。 遠征艦隊、アデン湾方面へ進出せよ! No enemy spotted. Expeditionary fleet, advance towards the Gulf of Aden! | ||
| # | Empty Node | ||
| # | Formation | Normal Battle Node | AD/AP AS/AS+ |
|---|---|---|---|
| U | Line Ahead Echelon Phases: 2 |
0/0 0/0 | |
| Line Ahead Phases: 2 |
0/0 0/0 | ||
| # | Formation | Normal Battle Node | AD/AP AS/AS+ |
| # | Formation | Boss Battle Node | AD/AP AS/AS+ |
|---|---|---|---|
| V | Cruising Formation 4 Phases: 2 |
50/100 224/447 | |
| Cruising Formation 4 Phases: 2 (Final)
|
100/199 447/894 | ||
| # | Formation | Boss Battle Node | AD/AP AS/AS+ |
| Type | Ships |
|---|---|
| DD |
| Type | Ships |
|---|---|
| DD |
| Type | Ships |
|---|---|
| DD |
| Type | Ships |
|---|---|
| DE | |
| DD | |
| SSV | |
| AS |
| Type | Ships |
|---|---|
| DE | |
| DD | |
| SSV | |
| AS |
| Type | Ships |
|---|---|
| DD |
| Type | Ships |
|---|---|
| DE | |
| DD |
| Type | Ships |
|---|---|
| DE | |
| DD | |
| CA | |
| SS | |
| AV | |
| AO |
| # | Formation | Normal Battle Node | AD/AP AS/AS+ |
|---|---|---|---|
| A | Echelon Line Abreast Phases: 1, 2 |
0/0 0/0 | |
| Echelon Line Abreast Phases: 1, 2 |
0/0 0/0 | ||
| Echelon Line Abreast Phases: 1, 2 |
0/0 0/0 | ||
| # | Formation | Normal Battle Node | AD/AP AS/AS+ |
| # | Formation | Normal Battle Node | AD/AP AS/AS+ |
|---|---|---|---|
| B | Line Ahead Echelon Vanguard Phases: 1, 2 |
0/0 0/0 | |
| # | Formation | Normal Battle Node | AD/AP AS/AS+ |
| # | Selection Node | ||
|---|---|---|---|
| C | 艦隊の針路を選択できます。提督、どちらの針路をとられますか? You can decide the fleet's course. Admiral, which heading should we take? | ||
| # | Selection Node | ||
| # | Formation | Normal Battle Node | AD/AP AS/AS+ |
|---|---|---|---|
| D | Diamond Phases: 2 |
9/17 36/72 | |
| Diamond Phases: 1, 2 |
9/17 36/72 | ||
| Diamond Phases: 2 |
9/17 36/72 | ||
| # | Formation | Normal Battle Node | AD/AP AS/AS+ |
| # | Selection Node | ||
|---|---|---|---|
| E | 艦隊の針路を選択できます。提督、どちらの針路をとられますか? You can decide the fleet's course. Admiral, which heading should we take? | ||
| # | Selection Node | ||
| # | Formation | Normal Battle Node | AD/AP AS/AS+ |
|---|---|---|---|
| F | Double Line Diamond Vanguard Phases: 1, 2 |
0/0 0/0 | |
| # | Formation | Normal Battle Node | AD/AP AS/AS+ |
| # | Resource Node | ||
|---|---|---|---|
| # | Resource Node | ||
| # | Selection Node | ||
|---|---|---|---|
| H | 遠征艦隊、アデン湾方面へ進出せよ! Expeditionary fleet, advance towards the Gulf of Aden! | ||
| # | Selection Node | ||
| # | Formation | Normal Battle Node | AD/AP AS/AS+ |
|---|---|---|---|
| I | Line Ahead Echelon Phases: 1, 2 |
0/0 0/0 | |
| Line Ahead Phases: 1, 2 |
0/0 0/0 | ||
| # | Formation | Normal Battle Node | AD/AP AS/AS+ |
| # | Landing Node | ||
|---|---|---|---|
| I1 | 輸送物資の揚陸地点に到達しました。本海域の輸送作戦は無事完了しています。 The landing point of the convoy has been reached. The transport operation here has already been completed successfully. | ||
| # | Landing Node | ||
| # | Formation | Normal Battle Node | AD/AP AS/AS+ |
|---|---|---|---|
| J | Line Ahead Double Line Phases: 1, 2 |
0/0 0/0 | |
| Line Ahead Phases: 2 |
0/0 0/0 | ||
| # | Formation | Normal Battle Node | AD/AP AS/AS+ |
| # | Formation | Boss Battle Node | AD/AP AS/AS+ |
|---|---|---|---|
| K | Line Ahead Phases: 1, 2 |
0/0 0/0 | |
| Line Ahead Phases: 1, 2 |
0/0 0/0 | ||
| Line Ahead Phases: 1, 2 (Final)
|
24/47 104/207 | ||
| # | Formation | Boss Battle Node | AD/AP AS/AS+ |
| # | Formation | Normal Battle Node | AD/AP AS/AS+ |
|---|---|---|---|
| L | Echelon Line Abreast Phases: 2 |
0/0 0/0 | |
| Echelon Line Abreast Phases: 2 |
0/0 0/0 | ||
| Echelon Phases: 2 |
0/0 0/0 | ||
| # | Formation | Normal Battle Node | AD/AP AS/AS+ |
| # | Formation | Air Defense Node | AD/AP AS/AS+ |
|---|---|---|---|
| M | Diamond Phases: 2 |
40/79 177/354 | |
| Diamond Phases: 2 |
45/90 201/402 | ||
| # | Formation | Air Defense Node | AD/AP AS/AS+ |
| # | Empty Node | ||
|---|---|---|---|
| N | 敵影を見ず。 No enemy spotted. | ||
| # | Empty Node | ||
| # | Formation | Normal Battle Node | AD/AP AS/AS+ |
|---|---|---|---|
| O | Diamond Phases: 2 |
40/79 177/354 | |
| Diamond Phases: 2 |
45/90 201/402 | ||
| Diamond Phases: 2 |
24/47 105/210 | ||
| # | Formation | Normal Battle Node | AD/AP AS/AS+ |
| # | Empty Node | ||
|---|---|---|---|
| P | 気のせいだった。 遠征艦隊、アデン湾方面へ進出せよ! Must be my imagination. Expeditionary fleet, advance towards the Gulf of Aden! | ||
| # | Empty Node | ||
| # | Formation | Air Defense Node | AD/AP AS/AS+ |
|---|---|---|---|
| P1 | Diamond | 51/101 225/450 | |
| Diamond Phases: 2 |
85/169 378/756 | ||
| Diamond | 88/175 393/786 | ||
| # | Formation | Air Defense Node | AD/AP AS/AS+ |
| # | Formation | Normal Battle Node | AD/AP AS/AS+ |
|---|---|---|---|
| P2 | Echelon Line Abreast Phases: 2 |
0/0 0/0 | |
| Echelon Line Abreast Phases: 2 |
0/0 0/0 | ||
| Echelon Line Abreast Phases: 2 |
0/0 0/0 | ||
| # | Formation | Normal Battle Node | AD/AP AS/AS+ |
| # | Formation | Normal Battle Node | AD/AP AS/AS+ |
|---|---|---|---|
| Q | Diamond Phases: 2 |
51/101 225/450 | |
| Diamond Phases: 2 |
85/169 378/756 | ||
| Diamond Phases: 2 |
88/175 393/786 | ||
| # | Formation | Normal Battle Node | AD/AP AS/AS+ |
| # | Repair Node | ||
|---|---|---|---|
| # | Repair Node | ||
| # | Formation | Normal Battle Node | AD/AP AS/AS+ |
|---|---|---|---|
| S | Line Ahead Double Line Diamond Phases: 2 |
46/91 204/408 | |
| # | Formation | Normal Battle Node | AD/AP AS/AS+ |
| # | Empty Node | ||
|---|---|---|---|
| T | 敵影を見ず。 遠征艦隊、アデン湾方面へ進出せよ! No enemy spotted. Expeditionary fleet, advance towards the Gulf of Aden! | ||
| # | Empty Node | ||
| # | Formation | Normal Battle Node | AD/AP AS/AS+ |
|---|---|---|---|
| U | Line Ahead Echelon Phases: 2 |
0/0 0/0 | |
| Line Ahead Phases: 2 |
0/0 0/0 | ||
| # | Formation | Normal Battle Node | AD/AP AS/AS+ |
| # | Formation | Boss Battle Node | AD/AP AS/AS+ |
|---|---|---|---|
| V | Cruising Formation 4 Phases: 2 |
46/91 204/408 | |
| Cruising Formation 4 Phases: 2 (Final)
|
91/182 408/816 | ||
| # | Formation | Boss Battle Node | AD/AP AS/AS+ |
| Type | Ships |
|---|---|
| DD |
| Type | Ships |
|---|---|
| DD |
| Type | Ships |
|---|---|
| DD |
| Type | Ships |
|---|---|
| DE | |
| DD | |
| SSV |
| Type | Ships |
|---|---|
| DE | |
| DD | |
| SSV | |
| AS |
| Type | Ships |
|---|---|
| DD |
| Type | Ships |
|---|---|
| DD |
| Type | Ships |
|---|---|
| DE | |
| DD | |
| CA | |
| SS | |
| AV | |
| AO |
| # | Formation | Normal Battle Node | AD/AP AS/AS+ |
|---|---|---|---|
| A | Echelon Line Abreast Phases: 1, 2 |
0/0 0/0 | |
| Echelon Line Abreast Phases: 1, 2 |
0/0 0/0 | ||
| # | Formation | Normal Battle Node | AD/AP AS/AS+ |
| # | Formation | Normal Battle Node | AD/AP AS/AS+ |
|---|---|---|---|
| B | Line Ahead Echelon Vanguard Phases: 1, 2 |
0/0 0/0 | |
| # | Formation | Normal Battle Node | AD/AP AS/AS+ |
| # | Selection Node | ||
|---|---|---|---|
| C | 艦隊の針路を選択できます。提督、どちらの針路をとられますか? You can decide the fleet's course. Admiral, which heading should we take? | ||
| # | Selection Node | ||
| # | Formation | Normal Battle Node | AD/AP AS/AS+ |
|---|---|---|---|
| D | Diamond Phases: 1, 2 |
3/6 12/24 | |
| Diamond Phases: 1, 2 |
9/17 36/72 | ||
| Diamond Phases: 1, 2 |
9/17 36/72 | ||
| # | Formation | Normal Battle Node | AD/AP AS/AS+ |
| # | Selection Node | ||
|---|---|---|---|
| E | 艦隊の針路を選択できます。提督、どちらの針路をとられますか? You can decide the fleet's course. Admiral, which heading should we take? | ||
| # | Selection Node | ||
| # | Formation | Normal Battle Node | AD/AP AS/AS+ |
|---|---|---|---|
| F | Double Line Diamond Vanguard Phases: 1, 2 |
0/0 0/0 | |
| # | Formation | Normal Battle Node | AD/AP AS/AS+ |
| # | Resource Node | ||
|---|---|---|---|
| # | Resource Node | ||
| # | Selection Node | ||
|---|---|---|---|
| H | 遠征艦隊、アデン湾方面へ進出せよ! Expeditionary fleet, advance towards the Gulf of Aden! | ||
| # | Selection Node | ||
| # | Formation | Normal Battle Node | AD/AP AS/AS+ |
|---|---|---|---|
| I | Line Ahead Echelon Phases: 1, 2 |
0/0 0/0 | |
| Line Ahead Phases: 1, 2 |
0/0 0/0 | ||
| # | Formation | Normal Battle Node | AD/AP AS/AS+ |
| # | Landing Node | ||
|---|---|---|---|
| I1 | 輸送物資の揚陸地点に到達しました。本海域の輸送作戦は無事完了しています。 The landing point of the convoy has been reached. The transport operation here has already been completed successfully. | ||
| # | Landing Node | ||
| # | Formation | Normal Battle Node | AD/AP AS/AS+ |
|---|---|---|---|
| J | Line Ahead Double Line Phases: 1, 2 |
0/0 0/0 | |
| Line Ahead Phases: 2 |
0/0 0/0 | ||
| # | Formation | Normal Battle Node | AD/AP AS/AS+ |
| # | Formation | Boss Battle Node | AD/AP AS/AS+ |
|---|---|---|---|
| K | Line Ahead Phases: 1, 2 |
0/0 0/0 | |
| Line Ahead Phases: 1, 2 |
0/0 0/0 | ||
| Line Ahead Phases: 1 (Final)
|
9/17 36/72 | ||
| # | Formation | Boss Battle Node | AD/AP AS/AS+ |
| # | Formation | Normal Battle Node | AD/AP AS/AS+ |
|---|---|---|---|
| L | Echelon Line Abreast Phases: 2 |
0/0 0/0 | |
| Echelon Line Abreast Phases: 2 |
0/0 0/0 | ||
| # | Formation | Normal Battle Node | AD/AP AS/AS+ |
| # | Formation | Air Defense Node | AD/AP AS/AS+ |
|---|---|---|---|
| M | Diamond Phases: 2 |
29/58 129/258 | |
| Diamond Phases: 2 |
32/63 141/282 | ||
| # | Formation | Air Defense Node | AD/AP AS/AS+ |
| # | Empty Node | ||
|---|---|---|---|
| N | 敵影を見ず。 No enemy spotted. | ||
| # | Empty Node | ||
| # | Formation | Normal Battle Node | AD/AP AS/AS+ |
|---|---|---|---|
| O | Diamond Phases: 2 |
29/58 129/258 | |
| Diamond Phases: 2 |
32/63 141/282 | ||
| Diamond | 24/47 105/210 | ||
| # | Formation | Normal Battle Node | AD/AP AS/AS+ |
| # | Empty Node | ||
|---|---|---|---|
| P | 気のせいだった。 遠征艦隊、アデン湾方面へ進出せよ! Must be my imagination. Expeditionary fleet, advance towards the Gulf of Aden! | ||
| # | Empty Node | ||
| # | Formation | Air Defense Node | AD/AP AS/AS+ |
|---|---|---|---|
| P1 | Diamond | 43/85 189/378 | |
| Diamond | 45/90 201/402 | ||
| Diamond | 51/101 225/450 | ||
| # | Formation | Air Defense Node | AD/AP AS/AS+ |
| # | Formation | Normal Battle Node | AD/AP AS/AS+ |
|---|---|---|---|
| P2 | Echelon Line Abreast Phases: 2 |
0/0 0/0 | |
| Echelon Line Abreast Phases: 2 |
0/0 0/0 | ||
| # | Formation | Normal Battle Node | AD/AP AS/AS+ |
| # | Formation | Normal Battle Node | AD/AP AS/AS+ |
|---|---|---|---|
| Q | Diamond Phases: 2 |
43/85 189/378 | |
| Diamond Phases: 2 |
45/90 201/402 | ||
| Diamond Phases: 2 |
51/101 225/450 | ||
| # | Formation | Normal Battle Node | AD/AP AS/AS+ |
| # | Repair Node | ||
|---|---|---|---|
| # | Repair Node | ||
| # | Formation | Normal Battle Node | AD/AP AS/AS+ |
|---|---|---|---|
| S | Line Ahead Double Line Diamond Phases: 2 |
41/81 180/360 | |
| # | Formation | Normal Battle Node | AD/AP AS/AS+ |
| # | Empty Node | ||
|---|---|---|---|
| T | 敵影を見ず。 遠征艦隊、アデン湾方面へ進出せよ! No enemy spotted. Expeditionary fleet, advance towards the Gulf of Aden! | ||
| # | Empty Node | ||
| # | Formation | Normal Battle Node | AD/AP AS/AS+ |
|---|---|---|---|
| U | Line Ahead Echelon Phases: 2 |
0/0 0/0 | |
| Line Ahead Phases: 2 |
0/0 0/0 | ||
| # | Formation | Normal Battle Node | AD/AP AS/AS+ |
| # | Formation | Boss Battle Node | AD/AP AS/AS+ |
|---|---|---|---|
| V | Cruising Formation 4 Phases: 2 |
9/17 36/72 | |
| Cruising Formation 4 Phases: 2 (Final)
|
41/81 180/360 | ||
| # | Formation | Boss Battle Node | AD/AP AS/AS+ |
Ship Drops
| Ship drops | |||||||||||||||||||||||||||||||||||||||||||||||||||||||||||||||||||||||||||||||||||||||||||||||||||
|---|---|---|---|---|---|---|---|---|---|---|---|---|---|---|---|---|---|---|---|---|---|---|---|---|---|---|---|---|---|---|---|---|---|---|---|---|---|---|---|---|---|---|---|---|---|---|---|---|---|---|---|---|---|---|---|---|---|---|---|---|---|---|---|---|---|---|---|---|---|---|---|---|---|---|---|---|---|---|---|---|---|---|---|---|---|---|---|---|---|---|---|---|---|---|---|---|---|---|---|
| Type | Ship? | D | I | J | K | O | Q | S | V | ||||||||||||||||||||||||||||||||||||||||||||||||||||||||||||||||||||||||||||||||||||||||||
| DE | Shimushu | Casual+ | Casual+ | Medium+ | |||||||||||||||||||||||||||||||||||||||||||||||||||||||||||||||||||||||||||||||||||||||||||||||
| DE | Kunashiri | Hard+ | Hard+ | Casual+ | Casual+ | Easy+ | |||||||||||||||||||||||||||||||||||||||||||||||||||||||||||||||||||||||||||||||||||||||||||||
| DE | Hirato | Casual+ | |||||||||||||||||||||||||||||||||||||||||||||||||||||||||||||||||||||||||||||||||||||||||||||||||
| DE | Fukae | Casual+ | |||||||||||||||||||||||||||||||||||||||||||||||||||||||||||||||||||||||||||||||||||||||||||||||||
| DD | Natsugumo | Casual+ | |||||||||||||||||||||||||||||||||||||||||||||||||||||||||||||||||||||||||||||||||||||||||||||||||
| DD | Usugumo | Casual+ | Easy+ | Casual+ | Casual+ | Casual+ | |||||||||||||||||||||||||||||||||||||||||||||||||||||||||||||||||||||||||||||||||||||||||||||
| DD | Uranami | Casual+ | Casual+ | Casual+ | Easy+ | Casual+ | |||||||||||||||||||||||||||||||||||||||||||||||||||||||||||||||||||||||||||||||||||||||||||||
| DD | Amagiri | Medium+ | Medium+ | Casual+ | Casual+ | Casual+ | |||||||||||||||||||||||||||||||||||||||||||||||||||||||||||||||||||||||||||||||||||||||||||||
| DD | Sagiri | Casual+ | Casual+ | Casual+ | Casual+ | Casual+ | |||||||||||||||||||||||||||||||||||||||||||||||||||||||||||||||||||||||||||||||||||||||||||||
| DD | Harusame | Casual+ | Casual+ | Casual+ | Casual+ | Casual+ | Casual+ | Casual+ | |||||||||||||||||||||||||||||||||||||||||||||||||||||||||||||||||||||||||||||||||||||||||||
| DD | Umikaze | Hard+ | Casual+ | Casual+ | Casual+ | Casual+ | Casual+ | ||||||||||||||||||||||||||||||||||||||||||||||||||||||||||||||||||||||||||||||||||||||||||||
| DD | Yamakaze | Hard+ | Casual+ | Casual+ | Casual+ | Casual+ | Hard+ | Casual+ | |||||||||||||||||||||||||||||||||||||||||||||||||||||||||||||||||||||||||||||||||||||||||||
| DD | Kawakaze | Easy+ | Casual+ | Casual+ | Casual+ | Casual+ | Casual+ | Casual+ | |||||||||||||||||||||||||||||||||||||||||||||||||||||||||||||||||||||||||||||||||||||||||||
| DD | Tanikaze | Casual+ | Casual+ | Casual+ | Casual+ | Casual+ | |||||||||||||||||||||||||||||||||||||||||||||||||||||||||||||||||||||||||||||||||||||||||||||
| DD | Fujinami | Medium+ | Casual+ | Casual+ | Casual+ | Casual+ | Easy+ | Casual+ | |||||||||||||||||||||||||||||||||||||||||||||||||||||||||||||||||||||||||||||||||||||||||||
| DD | Hayanami | Casual+ | |||||||||||||||||||||||||||||||||||||||||||||||||||||||||||||||||||||||||||||||||||||||||||||||||
| DD | Kishinami | Medium+ | Casual+ | Casual+ | Casual+ | Casual+ | Easy+ | Casual+ | |||||||||||||||||||||||||||||||||||||||||||||||||||||||||||||||||||||||||||||||||||||||||||
| DD | Akishimo | Casual+ | |||||||||||||||||||||||||||||||||||||||||||||||||||||||||||||||||||||||||||||||||||||||||||||||||
| DD | Libeccio | Easy+ | Casual+ | Casual+ | Casual+ | Casual+ | Casual+ | Casual+ | |||||||||||||||||||||||||||||||||||||||||||||||||||||||||||||||||||||||||||||||||||||||||||
| CA | Pola | Casual+ | |||||||||||||||||||||||||||||||||||||||||||||||||||||||||||||||||||||||||||||||||||||||||||||||||
| SS | I-47 | Casual+ | |||||||||||||||||||||||||||||||||||||||||||||||||||||||||||||||||||||||||||||||||||||||||||||||||
| SSV | I-400 | Casual+ | Casual+ | ||||||||||||||||||||||||||||||||||||||||||||||||||||||||||||||||||||||||||||||||||||||||||||||||
| AV | Mizuho | Casual+ | |||||||||||||||||||||||||||||||||||||||||||||||||||||||||||||||||||||||||||||||||||||||||||||||||
| AV | Commandant Teste | Casual+ | |||||||||||||||||||||||||||||||||||||||||||||||||||||||||||||||||||||||||||||||||||||||||||||||||
| AS | Jingei | Easy+ | Casual+ | ||||||||||||||||||||||||||||||||||||||||||||||||||||||||||||||||||||||||||||||||||||||||||||||||
| AS | Taigei | Easy+ | Casual+ | ||||||||||||||||||||||||||||||||||||||||||||||||||||||||||||||||||||||||||||||||||||||||||||||||
| AO | Kamoi | Casual+ | |||||||||||||||||||||||||||||||||||||||||||||||||||||||||||||||||||||||||||||||||||||||||||||||||
| DD | Hamakaze | Casual+ | Casual+ | Casual+ | Casual+ | Casual+ | |||||||||||||||||||||||||||||||||||||||||||||||||||||||||||||||||||||||||||||||||||||||||||||
| CL | Kinu | Casual+ | |||||||||||||||||||||||||||||||||||||||||||||||||||||||||||||||||||||||||||||||||||||||||||||||||
| CL | Abukuma | Medium+ | Casual+ | Casual+ | Casual+ | Casual+ | Medium+ | Casual+ | Casual+ | ||||||||||||||||||||||||||||||||||||||||||||||||||||||||||||||||||||||||||||||||||||||||||
| CL | Yuubari | Casual+ | Casual+ | Hard+ | |||||||||||||||||||||||||||||||||||||||||||||||||||||||||||||||||||||||||||||||||||||||||||||||
| CA | Kinugasa | Casual+ | |||||||||||||||||||||||||||||||||||||||||||||||||||||||||||||||||||||||||||||||||||||||||||||||||
| CA | Myoukou | Casual+ | |||||||||||||||||||||||||||||||||||||||||||||||||||||||||||||||||||||||||||||||||||||||||||||||||
| CA | Takao | Casual+ | |||||||||||||||||||||||||||||||||||||||||||||||||||||||||||||||||||||||||||||||||||||||||||||||||
| CA | Tone | Casual+ | |||||||||||||||||||||||||||||||||||||||||||||||||||||||||||||||||||||||||||||||||||||||||||||||||
| CA | Chikuma | Casual+ | |||||||||||||||||||||||||||||||||||||||||||||||||||||||||||||||||||||||||||||||||||||||||||||||||
| CVL | Ryuujou | Casual+ | Casual+ | Casual+ | Casual+ | Casual+ | Casual+ | Casual+ | |||||||||||||||||||||||||||||||||||||||||||||||||||||||||||||||||||||||||||||||||||||||||||
| CVL | Zuihou | Casual+ | |||||||||||||||||||||||||||||||||||||||||||||||||||||||||||||||||||||||||||||||||||||||||||||||||
| CVL | Hiyou | Casual+ | |||||||||||||||||||||||||||||||||||||||||||||||||||||||||||||||||||||||||||||||||||||||||||||||||
| FBB | Kongou | Casual+ | |||||||||||||||||||||||||||||||||||||||||||||||||||||||||||||||||||||||||||||||||||||||||||||||||
| FBB | Hiei | Medium+ | Medium+ | Casual+ | Casual+ | Casual+ | Casual+ | ||||||||||||||||||||||||||||||||||||||||||||||||||||||||||||||||||||||||||||||||||||||||||||
| FBB | Haruna | Casual+ | |||||||||||||||||||||||||||||||||||||||||||||||||||||||||||||||||||||||||||||||||||||||||||||||||
| FBB | Kirishima | Easy+ | Easy+ | Casual+ | Casual+ | Casual+ | Casual+ | ||||||||||||||||||||||||||||||||||||||||||||||||||||||||||||||||||||||||||||||||||||||||||||
| BB | Fusou | Casual+ | |||||||||||||||||||||||||||||||||||||||||||||||||||||||||||||||||||||||||||||||||||||||||||||||||
| BB | Yamashiro | Casual+ | |||||||||||||||||||||||||||||||||||||||||||||||||||||||||||||||||||||||||||||||||||||||||||||||||
| BB | Ise | Casual+ | |||||||||||||||||||||||||||||||||||||||||||||||||||||||||||||||||||||||||||||||||||||||||||||||||
| BB | Hyuuga | Casual+ | |||||||||||||||||||||||||||||||||||||||||||||||||||||||||||||||||||||||||||||||||||||||||||||||||
| BB | Nagato | Casual+ | |||||||||||||||||||||||||||||||||||||||||||||||||||||||||||||||||||||||||||||||||||||||||||||||||
| BB | Mutsu | Casual+ | |||||||||||||||||||||||||||||||||||||||||||||||||||||||||||||||||||||||||||||||||||||||||||||||||
| CV | Shoukaku | Casual+ | |||||||||||||||||||||||||||||||||||||||||||||||||||||||||||||||||||||||||||||||||||||||||||||||||
| CV | Zuikaku | Casual+ | |||||||||||||||||||||||||||||||||||||||||||||||||||||||||||||||||||||||||||||||||||||||||||||||||
| SS | I-58 | Easy+ | Casual+ | ||||||||||||||||||||||||||||||||||||||||||||||||||||||||||||||||||||||||||||||||||||||||||||||||
|
| |||||||||
|---|---|---|---|---|---|---|---|---|---|
|
Time remaining until Event ends:
| |||||||||