- Welcome to the Kancolle Wiki!
- If you have any questions regarding site content, account registration, etc., please visit the KanColle Wiki Discord
Difference between revisions of "Spring 2021 Event/E-5"
(Colour highlights for tags) |
(→E-5) |
||
| (35 intermediate revisions by 13 users not shown) | |||
| Line 1: | Line 1: | ||
===E-5=== | ===E-5=== | ||
{{EventInfoBox | {{EventInfoBox | ||
| − | |title_en | + | |title_en= Second Night Battle off Lunga Point |
| − | + | |title_jp= 第二次ルンガ沖夜戦 | |
|tag=[[File:Spring2021EventTag4.png]] | |tag=[[File:Spring2021EventTag4.png]] | ||
|tag2=[[File:Spring2021EventTag6.png]] | |tag2=[[File:Spring2021EventTag6.png]] | ||
|tag3=[[File:Spring2021EventTag9.png]] | |tag3=[[File:Spring2021EventTag9.png]] | ||
| − | |tag_text= | + | |tag_text={{Shiplock|Spring2021EventTag4}}Orange Tag: 2nd Torpedo Squadron<br/>{{Shiplock|Spring2021EventTag6}}Grey Tag: 8th Fleet<br/>{{Shiplock|Spring2021EventTag9}}Green Tag: 2nd Fleet |
|header_thumb=[[File:Spring2021_E5BossThumb.png]] | |header_thumb=[[File:Spring2021_E5BossThumb.png]] | ||
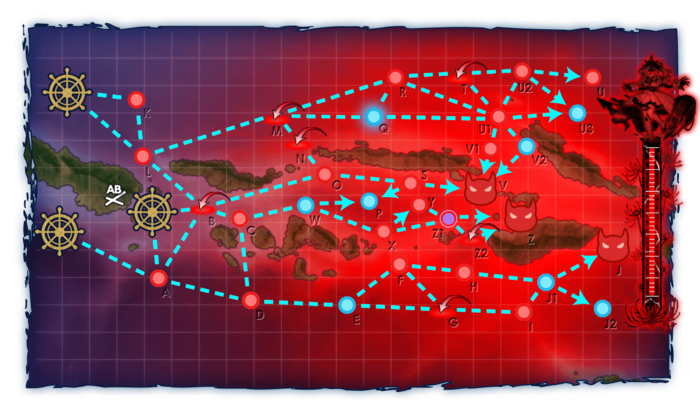
|map_1=[[File:Spring2021E-5Map.png|450px]] | |map_1=[[File:Spring2021E-5Map.png|450px]] | ||
| Line 14: | Line 14: | ||
|map_3=[[File:Spring2021E-5MapP2.png|450px]] | |map_3=[[File:Spring2021E-5MapP2.png|450px]] | ||
|map_3_text=Phase 2 | |map_3_text=Phase 2 | ||
| − | |map_4=[[File:Spring2021E-5LBASMap.png|450px]] | + | |map_4=[[File:Spring2021E-5MapP3.png|450px]] |
| − | | | + | |map_4_text=Phase 3 |
| − | |boss_hard= | + | |map_5=[[File:Spring2021E-5LBASMap.png|450px]] |
| − | |boss_medium= | + | |map_5_text=LBAS |
| − | |boss_easy= | + | |boss_hard= 2400 HP, 5880 HP, 6720 HP |
| − | |boss_casual= | + | |boss_medium= 2400 HP, 5880 HP, 6720 HP |
| + | |boss_easy= 2400 HP, 5880 HP, 6720 HP | ||
| + | |boss_casual= 2400 HP, 5880 HP, 6720 HP | ||
|phase_1_boss= | |phase_1_boss= | ||
|phase_2_boss= | |phase_2_boss= | ||
| Line 69: | Line 71: | ||
|expand = true | |expand = true | ||
|id = 50-5 | |id = 50-5 | ||
| − | |order = | + | |order = |
| − | | | + | |0 -> 1, 2, 3 = *Start at 1 if the other starting point(s) are not unlocked |
| − | + | *If starting point 3 is '''not''' unlocked: | |
| + | **Single Fleet starts at 1 | ||
| + | **Combined Fleet starts at 2 | ||
| + | *Else, if starting point 3 '''is''' unlocked: | ||
| + | **Combined Fleet starts at 2 | ||
| + | **An '''Orange-Tagged''' fleet starts at 3 | ||
| + | **Other fleets start at 1 | ||
| − | | | + | |2 -> K = *Force K if using Transport Combined Fleet |
| + | *Does not meet the requirements to go to L | ||
| + | |2 -> L = *'''Fast''' fleet | ||
| + | *Else, meet '''ALL''' of the following requirements to go to L: | ||
| + | **(F)BB(V) + CV(B/L) < 6 | ||
| + | **(F)BB(V) ≤ 4 '''and''' CV(B) ≤ 2 | ||
| − | | | + | |3 -> A = *Fleet contains CLT |
| + | |3 -> B = *Does not meet the requirements to go to A | ||
| − | |B -> D = | + | |A -> B = *Meet '''ANY''' of the following requirements to go to B: |
| + | **Combined Fleet | ||
| + | **Fleet contains CV(B/L) | ||
| + | **(F)BB(V) ≥ 3 | ||
| + | **Fleet is '''Orange-Tagged''', '''and''' contains CLT | ||
| + | |A -> D = *Does not meet the requirements to go to B | ||
| − | |C -> | + | |B -> C = *Node O is not unlocked |
| + | *Single Fleet | ||
| + | |B -> O = *Combined Fleet | ||
| − | |C -> | + | |C -> D = *Node W is not unlocked |
| − | | | + | *Fleet began from starting point 1 |
| + | |C -> W/empty = *Fleet began from starting point 3 | ||
| − | | | + | |E/empty -> F = *Does not meet the requirements to go to G |
| − | | | + | |E/empty -> G = *Fleet is '''Orange-Tagged''' |
| − | | | + | |F -> G = *Meet '''ANY''' of the following requirements to go to G: |
| − | | | + | **Fleet contains CV(B/L) |
| + | **DD < 2 | ||
| + | |F -> H = *Does not meet the requirements to go to G | ||
| + | |J1/empty -> J = *Pass the LoS check | ||
| + | |J1/empty -> J2/empty = *Fail the LoS check | ||
| − | | | + | |L -> B = *Transport Combined Fleet |
| − | | | + | |L -> M = *Other fleets |
| − | |N/ | + | |M -> N, Q/empty, R = *Force R if using Carrier Task Force |
| − | | | + | *Meet '''ANY''' of the following requirements to go to Q: |
| + | **Fleet contains CV(B/L) | ||
| + | **(F)BB(V) ≥ 3 | ||
| + | **DD ≤ 3 | ||
| + | **'''Slow''' fleet | ||
| + | *Otherwise, route to N | ||
| + | |||
| + | |Q/empty -> R, U1 = *Active branching | ||
| + | |||
| + | |R -> T = *Does not meet the requirements to go to U1 | ||
| + | |R -> U1 = *Meet '''ANY''' of the following requirements to go to U1: | ||
| + | **Surface Task Force | ||
| + | **Slow Fleet | ||
| + | **CV(B/L) ≥ 4 | ||
| + | **CV(B) ≥ 3 | ||
| + | |||
| + | |S -> P/empty = *Fail the LoS check | ||
| + | |S -> V = *Pass the LoS check | ||
| + | |||
| + | |T -> U2 = *Fixed routing | ||
| + | |||
| + | |U1 -> T, U2, U3/empty, V1, V2/empty = *Fail the LoS check to go to U3 | ||
| + | *For Carrier Task Force: | ||
| + | **Meet '''ANY''' of the following requirements to go to T: | ||
| + | ***(F)BB(V) + CV(B/L) ≥ 5 | ||
| + | ***CV(B) ≥ 3 | ||
| + | **Otherwise, route to U2 | ||
| + | *For Surface Task Force: | ||
| + | **If fleet does not contain CV(B/L): | ||
| + | ***Route to V2 if fleet contains [[Akashi Kai]] or [[Akitsushima Kai]] | ||
| + | ***Otherwise, route to V1 | ||
| + | **If fleet contains at least one CV(B/L): | ||
| + | ***Route to U2 if DD ≥ 3 | ||
| + | ***Otherwise, route to T | ||
| + | |||
| + | |U2 -> U = *Pass the LoS check | ||
| + | |U2 -> U3/empty = *Fail the LoS check | ||
| + | |||
| + | |W/empty -> P/empty = *Fail the LoS check | ||
| + | |W/empty -> X = *Pass the LoS check | ||
| + | |||
| + | |X -> Y = *Node Z1 is not unlocked | ||
| + | *Meet '''ANY''' of the following requirements to go to Y: | ||
| + | **Fleet contains CLT | ||
| + | **'''Slow''' fleet | ||
| + | |X -> Z1/night = *Does not meet the requirements to go to Y | ||
| + | |||
| + | |Z1/night -> Z = *Does not meet the requirements to go to Z2 | ||
| + | |Z1/night -> Z2 = *Fleet contains CLT | ||
}} | }} | ||
| Line 105: | Line 179: | ||
{{clear}} | {{clear}} | ||
| + | |||
| + | ==Ship Bonuses (Tentative)== | ||
| + | |||
| + | {{:{{BASEPAGENAME}}/E-5/Historical_Ships}} | ||
| + | |||
| + | ==General Guidelines== | ||
| + | * Unlike the previous event's final map, you can only use 1 Land Base for sortie all throughout E5. The other 2 land bases will be used for defense throughout this map. | ||
| + | * All the locks within E5 are recycled locks from previous maps: | ||
| + | **{{Shiplock|Spring2021EventTag6}}8th Fleet, Grey tag (E3 unlocking) | ||
| + | **{{Shiplock|Spring2021EventTag4}}2nd Torpedo Squadron, Orange tag (E3P1 and P3) | ||
| + | **{{Shiplock|Spring2021EventTag9}}2nd Fleet, Green tag (E4P4) | ||
| + | * Once you unlocked the third starting point (2nd Torpedo Squadron point), all ships that are untagged and in a single fleet will be designated as Grey lock (8th Fleet). | ||
| + | |||
| + | ==Phase 1: Defeat Buff Wa class Transport== | ||
| + | The objective is to defeat the boss node {{MapRoute|J|red}} featuring Wa class transports <br> | ||
| + | There are two different options for this part. | ||
| + | <tabber> | ||
| + | |-| 2nd Torpedo Squadron Method = | ||
| + | * Composition:{{Shiplock|Spring2021EventTag4}}{{ToolTip|[Orange Tag]|'''2nd Torpedo Squadron'''}} Strike Force: 1 CL 5-6 DD | ||
| + | * Route: {{MapRoute |A|red|D|red|E|blue|G|red|I|red|J1|blue|J|red}} for Strike Force (Orange Tag) | ||
| + | |-| 8th Fleet Method = | ||
| + | * Composition:{{Shiplock|Spring2021EventTag6}}{{ToolTip|[Grey Tag]|'''8th Fleet'''}} 2 BBV, 2 CA, 2 CAV, 1 CLT | ||
| + | * Grey Tag routing {{MapRoute |A|red|D|red|E|blue|F|red|G|red|I|red|J1|blue|J|red}} | ||
| + | * This is a much heavier fleet that can route to the boss. | ||
| + | </tabber> | ||
| + | * LBAS Range = 10. There is no air power until last dance where a Nu class carrier will appear. AD/AP = 45/89 ('''HARD''') | ||
| + | * LOS: '''Casual/Easy/Medium/Hard''' is '''???/???/54.0/66.0''' with Formula Cn3. | ||
| + | * Note: Unlike in E4, you can only send 1 LBAS throughout the map. Have 1 LBAS with bombers and send them to the preboss to help you pass through the node easily if you're not bringing node support. | ||
| + | |||
| + | ==Phase 2: Defeat New Battleship Hime== | ||
| + | This phase will be available to you right after you cleared Phase 1. The boss is very tanky and the composition needed to reach the boss will need 3-4 Battleships , but you can go up to 6 Battleships if your whole fleet is '''fast'''. | ||
| + | |||
| + | <tabber> | ||
| + | |-|4 Battleship Method= | ||
| + | * Composition:{{Shiplock|Spring2021EventTag9}}{{ToolTip|[Green Tag]|'''2nd Fleet'''}} 4(F)BB(V), 1 CA(V) or CL, {{Ship/Link|Akitsushima}}/{{Ship/Link|Akashi}} + 1 CL, 3 CA(V)/CLT, 2 DD | ||
| + | * In this fleet speed does not matter, slow ships are allowed. | ||
| + | * It is recommended to use Nagato and Mutsu's broadside special attack. | ||
| + | * As Mutsu has a damage bonus here, it is recommended to use her as the Flagship so she gets two hits in. | ||
| + | |-|6 Battleship Method = | ||
| + | * Composition:{{Shiplock|Spring2021EventTag9}}{{ToolTip|[Green Tag]|'''2nd Fleet'''}} 4(F)BB(V), 1 CA(V) or CL, {{Ship/Link|Akitsushima}}/{{Ship/Link|Akashi}} + 2 FBB, 1CL 1 (CA(V) or CLT), 2 DD (All Fast) | ||
| + | * All ship must be fast, speeding modding your slow ships will work in this process | ||
| + | ** If fleet is not fast, you will go to Node K first | ||
| + | * Consider using the Nagato/Mutsu special attack for day battle or the Kongou-Class special attack in night battle | ||
| + | ** Remember that only one special attack can be procced in a sortie, you cannot proc both in the same sortie. | ||
| + | </tabber> | ||
| + | * Route: {{MapRoute |L|red|M|red|Q|blue|U1|red|V2|blue|V|red}} | ||
| + | * LBAS Range: 7. There is no air power at the boss | ||
| + | * Note: Node {{MapRoute |V2|blue}} is a repair node. The boss node has very high Anti-Air. Both compositions above have the Second Fleet Tag (green) to them. | ||
| + | |||
| + | ==Phase 2.5: Unlock new Starting point for the 2nd Torpedo Squadron (Orange tag)== | ||
| + | There are 2 main requirements to unlock | ||
| + | {| class="wikitable" | ||
| + | |- | ||
| + | ! Node | ||
| + | ! B | ||
| + | ! U | ||
| + | |- | ||
| + | | Hard | ||
| + | | AS x2 | ||
| + | | A+ x2 | ||
| + | |- | ||
| + | | Medium | ||
| + | | - | ||
| + | | A+ x2 | ||
| + | |- | ||
| + | | Easy | ||
| + | | - | ||
| + | | A+ x2 | ||
| + | |- | ||
| + | | Casual | ||
| + | | - | ||
| + | | A+ x2 | ||
| + | |} | ||
| + | <tabber> | ||
| + | |-|Node B= | ||
| + | * Composition:{{Shiplock|Spring2021EventTag6}}{{ToolTip|[Grey Tag]|'''8th Fleet'''}} Single Fleet: 2 CVL, 4 DD | ||
| + | * Route: {{MapRoute |A|red|B|red}} | ||
| + | * LBAS Range = 2, AP/AS = 169/380 for ('''HARD''') | ||
| + | * Notes: You can make use of your LBAS with fighters and sweep the node along with your fighter mule CV to secure AS on the node. Make sure your DD equip with ASW equipment to pass through {{MapRoute |A|red}} | ||
| + | |-|Node U= | ||
| + | You have the option to use either an STF Fleet or a CTF Fleet in order to reach node {{MapRoute|U|red}}. Use of CTF will force you to node {{MapRoute|R|red}} which contains the new Submarine Princess. | ||
| + | * Composition:{{Shiplock|Spring2021EventTag9}}{{ToolTip|[Green Tag]|'''2nd Fleet'''}} STF: 3(F)BB(V), 1 CV(B), 2(CA(V) or AV) + 1 CL, 1-2 CA(V), 1-2 CLT, 2-3 DD | ||
| + | * Route: {{MapRoute|L|red|M|red|Q|blue|U1|red|U2|red|U|red}} | ||
| + | * Composition:{{Shiplock|Spring2021EventTag9}}{{ToolTip|[Green Tag]|'''2nd Fleet'''}} CTF: 2(F)BB(V), 2 CV(B), 2 CA(V) or AV + 1 CL 1-2 CA(V), 1-2 CLT, 2-3 DD. You can use 2 CV(B) + CVL as an alternative and have the FBB in the Escort Fleet | ||
| + | * Route: {{MapRoute |L|red|M|red|R|red|T|red|U2|red|U|red}} | ||
| + | * LBAS Range = 10 AP/AS: 406/912 | ||
| + | * Notes: The target node has heavy airpower and requires long range LBAS to reach it. Support Expeditions are optional as only an A Rank is required. | ||
| + | ** The AV '''Cannot''' be [[Akitsushima]] if you choose to use an AV in the main fleet. | ||
| + | * STF Fleet note: You need a minimum of 3 DDs to route from {{MapRoute|U1|red}} to {{MapRoute|U2|red}}. Otherwise, you will be routed to {{MapRoute |T|red}}. | ||
| + | </tabber> | ||
| + | |||
| + | ==Phase 2.75: Unlock the path to Node {{MapRoute |Z|red}}== | ||
| + | There are a total of 6 requirements needed to unlock | ||
| + | {| class="wikitable" | ||
| + | |- | ||
| + | ! Node | ||
| + | ! B | ||
| + | ! U | ||
| + | ! S | ||
| + | ! V | ||
| + | ! Y | ||
| + | ! Land Base | ||
| + | |- | ||
| + | | Hard | ||
| + | | AS x2 | ||
| + | | A+ x2 | ||
| + | | S x2 | ||
| + | | A+x2 | ||
| + | | A+ x2 | ||
| + | | AS x2 | ||
| + | |- | ||
| + | | Medium | ||
| + | | AS | ||
| + | | A+ | ||
| + | | - | ||
| + | | A+ | ||
| + | | A+ x2 | ||
| + | | AS x2 | ||
| + | |- | ||
| + | | Easy | ||
| + | | - | ||
| + | | A+ | ||
| + | | - | ||
| + | | A+ | ||
| + | | A+ x2 | ||
| + | | - | ||
| + | |- | ||
| + | | Casual | ||
| + | | - | ||
| + | | - | ||
| + | | - | ||
| + | | A+ | ||
| + | | A+ x2 | ||
| + | | - | ||
| + | |}<tabber> | ||
| + | |-|Node B= | ||
| + | * This is the same phase as phase 2.5 for Node {{MapRoute |B|red}} | ||
| + | |-|Node U= | ||
| + | * This is the same phase as phase 2.5 for Node {{MapRoute |U|red}} | ||
| + | |-|Node S= | ||
| + | * Composition:{{Shiplock|Spring2021EventTag9}}{{ToolTip|[Green Tag]|'''2nd Fleet'''}} STF: 2(F)BB(V), 3 CA(V), 0-1 CL, 0-1 DD + 1 CL, 1 CA(V), 0-1 CLT, 3-4 DD('''Fast CF''') | ||
| + | * Route: {{MapRoute |L|red|M|red|N|red|O|red|S|red}} | ||
| + | * LBAS Range = 6, no air power | ||
| + | * Note: You need to have a minimum of 4 DDs in the fleet for routing. | ||
| + | |-|Node V= | ||
| + | * You can use the same fleet as in '''Phase 2''' | ||
| + | * Composition:{{Shiplock|Spring2021EventTag9}}{{ToolTip|[Green Tag]|'''2nd Fleet'''}} STF: 4(F)BB(V), 1 CA(V) or CL, {{Ship/Link|Akitsushima}}/{{Ship/Link|Akashi}} + 1 CL, 3 (CA(V) or CLT), 2 DD | ||
| + | * Route: {{MapRoute|L|red|M|red|Q|blue|U1|red|V2|blue|V|red}} | ||
| + | * Note: Since you don't need to S rank the boss, you can have your DD be OASW to help pass through the sub-node | ||
| + | ** Support Expedition is optional but can be used if you are having trouble passing through the pre boss node {{MapRoute|U1|red}} | ||
| + | |-|Node Y= | ||
| + | * Composition:{{Shiplock|Spring2021EventTag4}}{{ToolTip|[Orange Tag]|'''2nd Torpedo Squadron'''}} Strike Force: 1 CL 6 DD | ||
| + | * Route: {{MapRoute|B|red|C|red|W|blue|X|red|Y|red}} | ||
| + | * LBAS Range = 6, 72/161 AP/AS for Hard | ||
| + | </tabber> | ||
| + | |||
| + | ==Phase 3: Defeat New Light Cruiser Hime== | ||
| + | * Composition:{{Shiplock|Spring2021EventTag4}}{{ToolTip|[Orange Tag]|'''2nd Torpedo Squadron'''}} Strike Force: 1 CL 6 DD | ||
| + | * Route: {{MapRoute |B|red|C|red|W|blue|X|red|Z1|purple|Z|red}} | ||
| + | * LBAS Range = 8, no air power | ||
| + | * LOS: '''Casual/Easy/Medium/Hard''' = '''55.0/55.00/62.0/81.0''' for Cn3 formula | ||
| + | * Note: Due to the nature of the LOS requirement and the fleet, uses of GTRL (Gun, Torpedo, Radar, and Skilled lookout) is essential to both meet the LOS requirements for routing and damage output | ||
| + | * Special Note: For this specific boss and the current bonus, it is possible to make uses of Vanguard formation at the boss for the kill instead of utilizing Line ahead as normal at the boss. | ||
| + | * Special Note 2: Bear in mind that Boss support apparently does not suffer damage penalties from Vanguard formation when used against enemy combined fleets. | ||
| + | |||
| + | ==Debuff Phase== | ||
| + | There are 7 requirements to complete the debuffing phase for New Light Cruiser Hime. The majority of the comps for each of these requirements will be the same compositions used in the previous phases | ||
| + | * AS Node {{MapRoute|B|red}} | ||
| + | * A+ Node {{MapRoute |V|red}} | ||
| + | * S rank Node {{MapRoute |H|red}} | ||
| + | ** This can be achieved by using a Single Fleet with Grey Tag. 2 BBV, 2 CA(V), 2 DD | ||
| + | ** Route: {{MapRoute |A|red|D|red|E|blue|F|red|H|red}} | ||
| + | * A+ rank Node {{MapRoute |J|red}} | ||
| + | * AS rank Node {{MapRoute |N|red}} (Hard only) | ||
| + | * A+ rank Node {{MapRoute |U|red}} | ||
| + | * S rank Node {{MapRoute |V1|red}} | ||
| + | ** Use the same fleet you used for '''Phase 2''' but replace {{Ship/Link|Akitsushima}}/{{Ship/Link|Akashi}} for another AV to route to {{MapRoute|V1|red}} | ||
==Enemy Compositions== | ==Enemy Compositions== | ||
Latest revision as of 17:38, 21 June 2021
E-5
第二次ルンガ沖夜戦
![]()
![]()
![]()


| Information | ||||
|---|---|---|---|---|
| Event Tag | ||||
| Boss Gauges | Hard (甲): 2400 HP, 5880 HP, 6720 HP | |||
| Medium (乙): 2400 HP, 5880 HP, 6720 HP | ||||
| Easy (丙): 2400 HP, 5880 HP, 6720 HP | ||||
| Casual (丁): 2400 HP, 5880 HP, 6720 HP | ||||
| Map Bosses | ||||
| Rewards | ||||
|---|---|---|---|---|
| All | ||||

| ||||
| Equipment/Item | 丁 Casual |
丙 Easy |
乙 Medium |
甲 Hard |
Medal |
1 | 1 | 2 | |
Improvement Material |
5 | 8 | 10 | |
Action Report |
1 | |||
 Type 0 Fighter Model 32 (Tainan Air Group) |
1 (★2) | |||
 Type 0 Fighter Model 22 (251 Air Group) |
1 (★2) | |||
 SO3C Seamew Kai |
1 | 1 (★2) | ||
First Class Medal |
1 | |||

| E-5 Branching Rules | ||
|---|---|---|
| Nodes | Rules | |
| Start | 1 |
|
2 | ||
3 | ||
2 |
K |
|
L |
| |
3 |
A |
|
B |
| |
A |
B |
|
D |
| |
B |
C |
|
O |
| |
C |
D |
|
W |
| |
E |
F |
|
G |
| |
F |
G |
|
H |
| |
J1 |
J |
|
J2 |
| |
L |
B |
|
M |
| |
M |
N |
|
Q | ||
R | ||
Q |
R |
|
U1 | ||
R |
T |
|
U1 |
| |
S |
P |
|
V |
| |
T |
U2 |
|
U1 |
T |
|
U2 | ||
U3 | ||
V1 | ||
V2 | ||
U2 |
U |
|
U3 |
| |
W |
P |
|
X |
| |
X |
Y |
|
Z1 |
| |
Z1 |
Z |
|
Z2 |
| |
Branching compositions were reported over the course of the event.
The event guides are to be constructed through the respective Event map page guide and reviewed by editor staff / collaboration committee before being approved here. Do not under any circumstance update the guides through this page or attempt to fix them through this page. Please only update guides through their respective sandbox pages.
Ship Bonuses (Tentative)
DISCLAIMER: This information is based on user submitted data and is subject to revisions as more data is gathered. Any version of the ship receives the bonus regardless of remodel.
| Ships | Nodes A/D/F/H/J | Nodes U1 | Nodes V1 |
Nodes V |
Nodes X/Y | Nodes Z | ||
|---|---|---|---|---|---|---|---|---|
| 1.2x | 1.15x | 1.38x | ||||||
| 1.15x | 1.39x | |||||||
| - | ||||||||
| - | - | 1.15x | 1.2x | 1.15x | 1.39x | |||
| - | - | 1.15x | 1.39x | |||||
| 1.2x | 1.12x | 1.35x | ||||||
| - | - | |||||||
| 1.25x | 1.2x | 1.15x | 1.38x | 1.2x | 1.48x | |||
| - | ||||||||
| 1.15x | ||||||||
| - | ||||||||
| 1.32x | ||||||||
| - | 1.39x | |||||||
| Bonuses (Stacks with above) | Multiplier |
|---|---|
| Debuff Bonuses | |
| IJN Destroyers (DD) | 1.35x |
| IJN Light Cruisers (CL) | 1.2x |
| Against Boss Flagship | 1.15x |
General Guidelines
- Unlike the previous event's final map, you can only use 1 Land Base for sortie all throughout E5. The other 2 land bases will be used for defense throughout this map.
- All the locks within E5 are recycled locks from previous maps:
 8th Fleet, Grey tag (E3 unlocking)
 2nd Torpedo Squadron, Orange tag (E3P1 and P3)
 2nd Fleet, Green tag (E4P4)
- Once you unlocked the third starting point (2nd Torpedo Squadron point), all ships that are untagged and in a single fleet will be designated as Grey lock (8th Fleet).
Phase 1: Defeat Buff Wa class Transport
The objective is to defeat the boss node J featuring Wa class transports
There are two different options for this part.
- Composition:[Orange Tag]2nd Torpedo Squadron Strike Force: 1 CL 5-6 DD
- Route: A D E G I J1 J for Strike Force (Orange Tag)
- Composition:[Grey Tag]8th Fleet 2 BBV, 2 CA, 2 CAV, 1 CLT
- Grey Tag routing A D E F G I J1 J
- This is a much heavier fleet that can route to the boss.
- LBAS Range = 10. There is no air power until last dance where a Nu class carrier will appear. AD/AP = 45/89 (HARD)
- LOS: Casual/Easy/Medium/Hard is ???/???/54.0/66.0 with Formula Cn3.
- Note: Unlike in E4, you can only send 1 LBAS throughout the map. Have 1 LBAS with bombers and send them to the preboss to help you pass through the node easily if you're not bringing node support.
Phase 2: Defeat New Battleship Hime
This phase will be available to you right after you cleared Phase 1. The boss is very tanky and the composition needed to reach the boss will need 3-4 Battleships , but you can go up to 6 Battleships if your whole fleet is fast.
- Composition:[Green Tag]2nd Fleet 4(F)BB(V), 1 CA(V) or CL, Akitsushima
 /Akashi
 + 1 CL, 3 CA(V)/CLT, 2 DD
 - In this fleet speed does not matter, slow ships are allowed.
- It is recommended to use Nagato and Mutsu's broadside special attack.
- As Mutsu has a damage bonus here, it is recommended to use her as the Flagship so she gets two hits in.
- Composition:[Green Tag]2nd Fleet 4(F)BB(V), 1 CA(V) or CL, Akitsushima/Akashi + 2 FBB, 1CL 1 (CA(V) or CLT), 2 DD (All Fast)
- All ship must be fast, speeding modding your slow ships will work in this process
- If fleet is not fast, you will go to Node K first
- Consider using the Nagato/Mutsu special attack for day battle or the Kongou-Class special attack in night battle
- Remember that only one special attack can be procced in a sortie, you cannot proc both in the same sortie.
- Route: L M Q U1 V2 V
- LBAS Range: 7. There is no air power at the boss
- Note: Node V2 is a repair node. The boss node has very high Anti-Air. Both compositions above have the Second Fleet Tag (green) to them.
Phase 2.5: Unlock new Starting point for the 2nd Torpedo Squadron (Orange tag)
There are 2 main requirements to unlock
| Node | B | U |
|---|---|---|
| Hard | AS x2 | A+ x2 |
| Medium | - | A+ x2 |
| Easy | - | A+ x2 |
| Casual | - | A+ x2 |
- Composition:[Grey Tag]8th Fleet Single Fleet: 2 CVL, 4 DD
- Route: A B
- LBAS Range = 2, AP/AS = 169/380 for (HARD)
- Notes: You can make use of your LBAS with fighters and sweep the node along with your fighter mule CV to secure AS on the node. Make sure your DD equip with ASW equipment to pass through A
You have the option to use either an STF Fleet or a CTF Fleet in order to reach node U. Use of CTF will force you to node R which contains the new Submarine Princess.
- Composition:[Green Tag]2nd Fleet STF: 3(F)BB(V), 1 CV(B), 2(CA(V) or AV) + 1 CL, 1-2 CA(V), 1-2 CLT, 2-3 DD
- Route: L M Q U1 U2 U
- Composition:[Green Tag]2nd Fleet CTF: 2(F)BB(V), 2 CV(B), 2 CA(V) or AV + 1 CL 1-2 CA(V), 1-2 CLT, 2-3 DD. You can use 2 CV(B) + CVL as an alternative and have the FBB in the Escort Fleet
- Route: L M R T U2 U
- LBAS Range = 10 AP/AS: 406/912
- Notes: The target node has heavy airpower and requires long range LBAS to reach it. Support Expeditions are optional as only an A Rank is required.
- The AV Cannot be Akitsushima if you choose to use an AV in the main fleet.
- STF Fleet note: You need a minimum of 3 DDs to route from U1 to U2. Otherwise, you will be routed to T.
Phase 2.75: Unlock the path to Node Z
There are a total of 6 requirements needed to unlock
| Node | B | U | S | V | Y | Land Base |
|---|---|---|---|---|---|---|
| Hard | AS x2 | A+ x2 | S x2 | A+x2 | A+ x2 | AS x2 |
| Medium | AS | A+ | - | A+ | A+ x2 | AS x2 |
| Easy | - | A+ | - | A+ | A+ x2 | - |
| Casual | - | - | - | A+ | A+ x2 | - |
- This is the same phase as phase 2.5 for Node B
- This is the same phase as phase 2.5 for Node U
- Composition:[Green Tag]2nd Fleet STF: 2(F)BB(V), 3 CA(V), 0-1 CL, 0-1 DD + 1 CL, 1 CA(V), 0-1 CLT, 3-4 DD(Fast CF)
- Route: L M N O S
- LBAS Range = 6, no air power
- Note: You need to have a minimum of 4 DDs in the fleet for routing.
- You can use the same fleet as in Phase 2
- Composition:[Green Tag]2nd Fleet STF: 4(F)BB(V), 1 CA(V) or CL, Akitsushima/Akashi + 1 CL, 3 (CA(V) or CLT), 2 DD
- Route: L M Q U1 V2 V
- Note: Since you don't need to S rank the boss, you can have your DD be OASW to help pass through the sub-node
- Support Expedition is optional but can be used if you are having trouble passing through the pre boss node U1
- Composition:[Orange Tag]2nd Torpedo Squadron Strike Force: 1 CL 6 DD
- Route: B C W X Y
- LBAS Range = 6, 72/161 AP/AS for Hard
Phase 3: Defeat New Light Cruiser Hime
- Composition:[Orange Tag]2nd Torpedo Squadron Strike Force: 1 CL 6 DD
- Route: B C W X Z1 Z
- LBAS Range = 8, no air power
- LOS: Casual/Easy/Medium/Hard = 55.0/55.00/62.0/81.0 for Cn3 formula
- Note: Due to the nature of the LOS requirement and the fleet, uses of GTRL (Gun, Torpedo, Radar, and Skilled lookout) is essential to both meet the LOS requirements for routing and damage output
- Special Note: For this specific boss and the current bonus, it is possible to make uses of Vanguard formation at the boss for the kill instead of utilizing Line ahead as normal at the boss.
- Special Note 2: Bear in mind that Boss support apparently does not suffer damage penalties from Vanguard formation when used against enemy combined fleets.
Debuff Phase
There are 7 requirements to complete the debuffing phase for New Light Cruiser Hime. The majority of the comps for each of these requirements will be the same compositions used in the previous phases
- AS Node B
- A+ Node V
- S rank Node H
- This can be achieved by using a Single Fleet with Grey Tag. 2 BBV, 2 CA(V), 2 DD
- Route: A D E F H
- A+ rank Node J
- AS rank Node N (Hard only)
- A+ rank Node U
- S rank Node V1
- Use the same fleet you used for Phase 2 but replace Akitsushima/Akashi for another AV to route to V1
- Use the same fleet you used for Phase 2 but replace Akitsushima
Enemy Compositions
| # | Formation | Air Raids | AD/AP AS/AS+ |
|---|---|---|---|
| AB | Diamond | 67/133 297/594 | |
| Diamond | 76/151 338/675 | ||
| Diamond | 80/160 359/717 | ||
| Diamond | 85/169 380/759 | ||
| Diamond | 96/192 431/861 | ||
| # | Formation | Air Raids | AD/AP AS/AS+ |
| # | Formation | Normal Battle Node | AD/AP AS/AS+ |
|---|---|---|---|
| A | Echelon Line Abreast Phases: 1, 2, 3 |
0/0 0/0 | |
| Echelon Line Abreast Phases: 1, 2, 3 |
0/0 0/0 | ||
| Echelon Line Abreast Phases: 1, 2, 3 |
0/0 0/0 | ||
| # | Formation | Normal Battle Node | AD/AP AS/AS+ |
| # | Formation | Air Defense Node | AD/AP AS/AS+ |
|---|---|---|---|
| B | Diamond Phases: 2, 3 |
69/137 308/615 | |
| Diamond Phases: 2, 3 |
67/133 297/594 | ||
| Diamond Phases: 3 |
76/151 338/675 | ||
| Diamond Phases: 2, 3 |
80/160 359/717 | ||
| Diamond Phases: 3 |
85/169 380/759 | ||
| # | Formation | Air Defense Node | AD/AP AS/AS+ |
| # | Formation | Normal Battle Node | AD/AP AS/AS+ |
|---|---|---|---|
| C | Echelon Line Abreast Phases: 3 |
0/0 0/0 | |
| Echelon Phases: 3 |
0/0 0/0 | ||
| # | Formation | Normal Battle Node | AD/AP AS/AS+ |
| # | Formation | Normal Battle Node | AD/AP AS/AS+ |
|---|---|---|---|
| D | Line Ahead Vanguard Phases: 1, 2, 3 |
0/0 0/0 | |
| Line Ahead Phases: 1, 2, 3 |
0/0 0/0 | ||
| # | Formation | Normal Battle Node | AD/AP AS/AS+ |
| # | Empty Node | ||
|---|---|---|---|
| E | 気のせいだった。 対水上、対空、それぞれ見張りを厳とせよ! Must be my imagination. Be on high alert for surface and air threats! | ||
| # | Empty Node | ||
| # | Formation | Normal Battle Node | AD/AP AS/AS+ |
|---|---|---|---|
| F | Line Ahead Echelon Vanguard Phases: 1, 2, 3 |
0/0 0/0 | |
| # | Formation | Normal Battle Node | AD/AP AS/AS+ |
| # | Formation | Air Defense Node | AD/AP AS/AS+ |
|---|---|---|---|
| G | Diamond Phases: 1, 2, 3 |
69/137 308/615 | |
| Diamond Phases: 1, 2, 3 |
67/133 297/594 | ||
| Diamond Phases: 1, 2, 3 |
76/151 338/675 | ||
| Diamond Phases: 1, 2, 3 |
80/160 359/717 | ||
| Diamond Phases: 1, 2, 3 |
85/169 380/759 | ||
| # | Formation | Air Defense Node | AD/AP AS/AS+ |
| # | Formation | Normal Battle Node | AD/AP AS/AS+ |
|---|---|---|---|
| H | Diamond Phases: 1, 3 |
87/173 387/774 | |
| Diamond Phases: 1, 3 |
80/160 359/717 | ||
| Diamond Phases: 1, 3 |
95/189 423/846 | ||
| # | Formation | Normal Battle Node | AD/AP AS/AS+ |
| # | Formation | Normal Battle Node | AD/AP AS/AS+ |
|---|---|---|---|
| I | Line Ahead Echelon Vanguard Phases: 1, 2, 3 |
0/0 0/0 | |
| # | Formation | Normal Battle Node | AD/AP AS/AS+ |
| # | Formation | Boss Battle Node | AD/AP AS/AS+ |
|---|---|---|---|
| J | Cruising Formation 3 Phases: 1, 2, 3 |
0/0 0/0 | |
| Cruising Formation 3 Phases: 1 (Final)
|
45/89 198/396 | ||
| # | Formation | Boss Battle Node | AD/AP AS/AS+ |
| # | Empty Node | ||
|---|---|---|---|
| J1 | 気のせいだった。 これより敵補給船団を捜索、撃滅する!敵の兵站を遮断する! Must be my imagination. Now proceeding to search and destroy the enemy supply convoy! Cut off the enemy's supply lines! | ||
| # | Empty Node | ||
| # | Empty Node | ||
|---|---|---|---|
| J2 | 敵影を見ず。 これより敵補給船団を捜索、撃滅する!敵の兵站を遮断する! No enemy spotted. Now proceeding to search and destroy the enemy supply convoy! Cut off the enemy's supply lines! | ||
| # | Empty Node | ||
| # | Formation | Normal Battle Node | AD/AP AS/AS+ |
|---|---|---|---|
| K | Echelon Line Abreast Phases: 2, 3 |
0/0 0/0 | |
| Echelon Line Abreast Phases: 2, 3 |
0/0 0/0 | ||
| Echelon Line Abreast Phases: 2, 3 |
0/0 0/0 | ||
| # | Formation | Normal Battle Node | AD/AP AS/AS+ |
| # | Formation | Normal Battle Node | AD/AP AS/AS+ |
|---|---|---|---|
| L | Echelon Line Abreast Phases: 2, 3 |
0/0 0/0 | |
| Echelon Line Abreast Phases: 2, 3 |
0/0 0/0 | ||
| Echelon Line Abreast Phases: 2, 3 |
0/0 0/0 | ||
| # | Formation | Normal Battle Node | AD/AP AS/AS+ |
| # | Formation | Air Defense Node | AD/AP AS/AS+ |
|---|---|---|---|
| M | Diamond Phases: 2, 3 |
102/203 456/912 | |
| Diamond Phases: 2, 3 |
138/275 617/1233 | ||
| Diamond Phases: 2 |
203/406 912/1824 | ||
| # | Formation | Air Defense Node | AD/AP AS/AS+ |
| # | Formation | Air Defense Node | AD/AP AS/AS+ |
|---|---|---|---|
| N | Diamond Phases: 3 |
69/137 308/615 | |
| Diamond Phases: 3 |
67/133 297/594 | ||
| Diamond Phases: 3 |
76/151 338/675 | ||
| Diamond Phases: 3 |
80/160 359/717 | ||
| Diamond Phases: 3 |
85/169 380/759 | ||
| # | Formation | Air Defense Node | AD/AP AS/AS+ |
| # | Formation | Normal Battle Node | AD/AP AS/AS+ |
|---|---|---|---|
| O | Line Ahead Vanguard Phases: 3 |
0/0 0/0 | |
| Line Ahead Phases: 3 |
0/0 0/0 | ||
| # | Formation | Normal Battle Node | AD/AP AS/AS+ |
| # | Empty Node | ||
|---|---|---|---|
| P | 敵影を見ず。 我が艦隊は、これより敵艦隊を撃滅する!対水上見張りを厳に!合戦用意!艦隊、突入! No enemy spotted. Our fleet will now destroy the enemy fleet. Stay on high alert for surface threats! Battle stations! Fleet, move in! | ||
| # | Empty Node | ||
| # | Selection Node | ||
|---|---|---|---|
| Q | 艦隊の針路を選択できます。提督、どちらの針路をとられますか? You can decide the fleet's course. Admiral, which heading should we take? | ||
| # | Selection Node | ||
| # | Formation | Normal Battle Node | AD/AP AS/AS+ |
|---|---|---|---|
| R | Echelon Line Abreast Phases: 3 |
0/0 0/0 | |
| Echelon Phases: 3 |
0/0 0/0 | ||
| # | Formation | Normal Battle Node | AD/AP AS/AS+ |
| # | Formation | Normal Battle Node | AD/AP AS/AS+ |
|---|---|---|---|
| S | Cruising Formation 4 Phases: 3 |
0/0 0/0 | |
| # | Formation | Normal Battle Node | AD/AP AS/AS+ |
| # | Formation | Air Defense Node | AD/AP AS/AS+ |
|---|---|---|---|
| T | Diamond Phases: 2, 3 |
138/275 617/1233 | |
| Diamond Phases: 2, 3 |
168/335 752/1503 | ||
| Diamond Phases: 2, 3 |
203/406 912/1824 | ||
| # | Formation | Air Defense Node | AD/AP AS/AS+ |
| # | Formation | Normal Battle Node | AD/AP AS/AS+ |
|---|---|---|---|
| U | Cruising Formation 3 Phases: 2, 3 |
168/335 752/1503 | |
| Cruising Formation 3 Phases: 2, 3 |
203/406 912/1824 | ||
| # | Formation | Normal Battle Node | AD/AP AS/AS+ |
| # | Formation | Normal Battle Node | AD/AP AS/AS+ |
|---|---|---|---|
| U1 | Cruising Formation 4 Phases: 2, 3 |
0/0 0/0 | |
| Cruising Formation 4 Phases: 2 |
0/0 0/0 | ||
| # | Formation | Normal Battle Node | AD/AP AS/AS+ |
| # | Formation | Normal Battle Node | AD/AP AS/AS+ |
|---|---|---|---|
| U2 | Cruising Formation 3 Phases: 2, 3 |
55/109 245/489 | |
| Cruising Formation 3 Phases: 2, 3 |
91/181 405/810 | ||
| # | Formation | Normal Battle Node | AD/AP AS/AS+ |
| # | Empty Node | ||
|---|---|---|---|
| U3 | 敵影を見ず。 No enemy spotted. | ||
| # | Empty Node | ||
| # | Formation | Boss Battle Node | AD/AP AS/AS+ |
|---|---|---|---|
| V | Cruising Formation 4 Phases: 2, 3 |
0/0 0/0 | |
| Cruising Formation 4 Phases: 2 (Final)
|
0/0 0/0 | ||
| # | Formation | Boss Battle Node | AD/AP AS/AS+ |
| # | Formation | Normal Battle Node | AD/AP AS/AS+ |
|---|---|---|---|
| V1 | Diamond | 87/173 387/774 | |
| Diamond Phases: 3 |
80/160 359/717 | ||
| Diamond Phases: 3 |
95/189 423/846 | ||
| # | Formation | Normal Battle Node | AD/AP AS/AS+ |
| # | Repair Node | ||
|---|---|---|---|
| # | Repair Node | ||
| # | Empty Node | ||
|---|---|---|---|
| W | 気のせいだった。 我が艦隊は、これより敵艦隊を撃滅する!対水上見張りを厳に!合戦用意!艦隊、突入! Must be my imagination. Our fleet will now destroy the enemy fleet. Stay on high alert for surface threats! Battle stations! Fleet, move in! | ||
| # | Empty Node | ||
| # | Formation | Normal Battle Node | AD/AP AS/AS+ |
|---|---|---|---|
| X | Line Ahead Double Line Echelon Phases: 3 |
0/0 0/0 | |
| # | Formation | Normal Battle Node | AD/AP AS/AS+ |
| # | Formation | Normal Battle Node | AD/AP AS/AS+ |
|---|---|---|---|
| Y | Line Ahead Diamond Vanguard Phases: 3 |
36/72 161/321 | |
| # | Formation | Normal Battle Node | AD/AP AS/AS+ |
| # | Formation | Boss Battle Node | AD/AP AS/AS+ |
|---|---|---|---|
| Z | Cruising Formation 4 Phases: 3 |
0/0 0/0 | |
| Cruising Formation 4 Phases: 3 (Final)
|
0/0 0/0 | ||
| # | Formation | Boss Battle Node | AD/AP AS/AS+ |
| # | Formation | Night Battle Node | AD/AP AS/AS+ |
|---|---|---|---|
| Z1 | Line Ahead Double Line Echelon Phases: 3 |
0/0 0/0 | |
| # | Formation | Night Battle Node | AD/AP AS/AS+ |
| # | Formation | Air Raids | AD/AP AS/AS+ |
|---|---|---|---|
| AB | Diamond | 55/110 246/492 | |
| Diamond | 60/119 267/534 | ||
| Diamond | 67/133 297/594 | ||
| Diamond | 76/151 338/675 | ||
| Diamond | 80/160 359/717 | ||
| # | Formation | Air Raids | AD/AP AS/AS+ |
| # | Formation | Normal Battle Node | AD/AP AS/AS+ |
|---|---|---|---|
| A | Echelon Line Abreast Phases: 1, 2, 3 |
0/0 0/0 | |
| Echelon Line Abreast Phases: 1, 2, 3 |
0/0 0/0 | ||
| Echelon Line Abreast Phases: 1, 2, 3 |
0/0 0/0 | ||
| # | Formation | Normal Battle Node | AD/AP AS/AS+ |
| # | Formation | Air Defense Node | AD/AP AS/AS+ |
|---|---|---|---|
| B | Diamond Phases: 3 |
55/110 246/492 | |
| Diamond Phases: 2, 3 |
60/119 267/534 | ||
| Diamond Phases: 3 |
69/137 308/615 | ||
| Diamond Phases: 3 |
67/133 297/594 | ||
| # | Formation | Air Defense Node | AD/AP AS/AS+ |
| # | Formation | Normal Battle Node | AD/AP AS/AS+ |
|---|---|---|---|
| C | Echelon Line Abreast Phases: 3 |
0/0 0/0 | |
| Echelon Phases: 3 |
0/0 0/0 | ||
| # | Formation | Normal Battle Node | AD/AP AS/AS+ |
| # | Formation | Normal Battle Node | AD/AP AS/AS+ |
|---|---|---|---|
| D | Line Ahead Vanguard Phases: 1, 2, 3 |
0/0 0/0 | |
| Line Ahead Phases: 1, 2, 3 |
0/0 0/0 | ||
| # | Formation | Normal Battle Node | AD/AP AS/AS+ |
| # | Empty Node | ||
|---|---|---|---|
| E | 気のせいだった。 対水上、対空、それぞれ見張りを厳とせよ! Must be my imagination. Be on high alert for surface and air threats! | ||
| # | Empty Node | ||
| # | Formation | Normal Battle Node | AD/AP AS/AS+ |
|---|---|---|---|
| F | Line Ahead Echelon Vanguard Phases: 1, 3 |
0/0 0/0 | |
| # | Formation | Normal Battle Node | AD/AP AS/AS+ |
| # | Formation | Air Defense Node | AD/AP AS/AS+ |
|---|---|---|---|
| G | Diamond Phases: 1, 2, 3 |
55/110 246/492 | |
| Diamond Phases: 1, 2 |
60/119 267/534 | ||
| Diamond Phases: 1 |
69/137 308/615 | ||
| Diamond Phases: 1, 2 |
67/133 297/594 | ||
| # | Formation | Air Defense Node | AD/AP AS/AS+ |
| # | Formation | Normal Battle Node | AD/AP AS/AS+ |
|---|---|---|---|
| H | Diamond Phases: 3 |
85/169 378/756 | |
| Diamond | 72/143 321/642 | ||
| Diamond | 87/173 387/774 | ||
| # | Formation | Normal Battle Node | AD/AP AS/AS+ |
| # | Formation | Normal Battle Node | AD/AP AS/AS+ |
|---|---|---|---|
| I | Line Ahead Echelon Vanguard Phases: 1, 2, 3 |
0/0 0/0 | |
| # | Formation | Normal Battle Node | AD/AP AS/AS+ |
| # | Formation | Boss Battle Node | AD/AP AS/AS+ |
|---|---|---|---|
| J | Cruising Formation 3 Phases: 1, 2, 3 |
0/0 0/0 | |
| Cruising Formation 3 Phases: 1 (Final)
|
36/72 161/321 | ||
| # | Formation | Boss Battle Node | AD/AP AS/AS+ |
| # | Empty Node | ||
|---|---|---|---|
| J1 | 気のせいだった。 これより敵補給船団を捜索、撃滅する!敵の兵站を遮断する! Must be my imagination. Now proceeding to search and destroy the enemy supply convoy! Cut off the enemy's supply lines! | ||
| # | Empty Node | ||
| # | Empty Node | ||
|---|---|---|---|
| J2 | 敵影を見ず。 これより敵補給船団を捜索、撃滅する!敵の兵站を遮断する! No enemy spotted. Now proceeding to search and destroy the enemy supply convoy! Cut off the enemy's supply lines! | ||
| # | Empty Node | ||
| # | Formation | Normal Battle Node | AD/AP AS/AS+ |
|---|---|---|---|
| K | Echelon Line Abreast Phases: 3 |
0/0 0/0 | |
| Echelon Line Abreast |
0/0 0/0 | ||
| Echelon Line Abreast |
0/0 0/0 | ||
| # | Formation | Normal Battle Node | AD/AP AS/AS+ |
| # | Formation | Normal Battle Node | AD/AP AS/AS+ |
|---|---|---|---|
| L | Echelon Line Abreast Phases: 2, 3 |
0/0 0/0 | |
| Echelon Line Abreast Phases: 2, 3 |
0/0 0/0 | ||
| Echelon Line Abreast Phases: 2, 3 |
0/0 0/0 | ||
| # | Formation | Normal Battle Node | AD/AP AS/AS+ |
| # | Formation | Air Defense Node | AD/AP AS/AS+ |
|---|---|---|---|
| M | Diamond Phases: 2, 3 |
86/171 383/765 | |
| Diamond Phases: 2, 3 |
109/217 486/972 | ||
| # | Formation | Air Defense Node | AD/AP AS/AS+ |
| # | Formation | Air Defense Node | AD/AP AS/AS+ |
|---|---|---|---|
| N | Diamond Phases: 3 |
55/110 246/492 | |
| Diamond Phases: 3 |
60/119 267/534 | ||
| Diamond Phases: 3 |
69/137 308/615 | ||
| Diamond Phases: 3 |
67/133 297/594 | ||
| # | Formation | Air Defense Node | AD/AP AS/AS+ |
| # | Formation | Normal Battle Node | AD/AP AS/AS+ |
|---|---|---|---|
| O | Line Ahead Vanguard Phases: 3 |
0/0 0/0 | |
| Line Ahead Phases: 3 |
0/0 0/0 | ||
| # | Formation | Normal Battle Node | AD/AP AS/AS+ |
| # | Empty Node | ||
|---|---|---|---|
| P | 敵影を見ず。 我が艦隊は、これより敵艦隊を撃滅する!対水上見張りを厳に!合戦用意!艦隊、突入! No enemy spotted. Our fleet will now destroy the enemy fleet. Stay on high alert for surface threats! Battle stations! Fleet, move in! | ||
| # | Empty Node | ||
| # | Selection Node | ||
|---|---|---|---|
| Q | 艦隊の針路を選択できます。提督、どちらの針路をとられますか? You can decide the fleet's course. Admiral, which heading should we take? | ||
| # | Selection Node | ||
| # | Formation | Normal Battle Node | AD/AP AS/AS+ |
|---|---|---|---|
| R | Echelon Line Abreast Phases: 3 |
0/0 0/0 | |
| Echelon Phases: 3 |
0/0 0/0 | ||
| # | Formation | Normal Battle Node | AD/AP AS/AS+ |
| # | Formation | Normal Battle Node | AD/AP AS/AS+ |
|---|---|---|---|
| S | Cruising Formation 4 Phases: 3 |
0/0 0/0 | |
| # | Formation | Normal Battle Node | AD/AP AS/AS+ |
| # | Formation | Air Defense Node | AD/AP AS/AS+ |
|---|---|---|---|
| T | Diamond Phases: 3 |
86/171 383/765 | |
| Diamond | 109/217 486/972 | ||
| # | Formation | Air Defense Node | AD/AP AS/AS+ |
| # | Formation | Normal Battle Node | AD/AP AS/AS+ |
|---|---|---|---|
| U | Cruising Formation 3 Phases: 2, 3 |
109/217 486/972 | |
| Cruising Formation 3 Phases: 2, 3 |
148/295 662/1323 | ||
| # | Formation | Normal Battle Node | AD/AP AS/AS+ |
| # | Formation | Normal Battle Node | AD/AP AS/AS+ |
|---|---|---|---|
| U1 | Cruising Formation 4 Phases: 2, 3 |
0/0 0/0 | |
| Cruising Formation 4 Phases: 2 |
0/0 0/0 | ||
| # | Formation | Normal Battle Node | AD/AP AS/AS+ |
| # | Formation | Normal Battle Node | AD/AP AS/AS+ |
|---|---|---|---|
| U2 | Cruising Formation 3 Phases: 2, 3 |
56/111 249/498 | |
| Cruising Formation 3 Phases: 3 |
42/84 188/375 | ||
| # | Formation | Normal Battle Node | AD/AP AS/AS+ |
| # | Empty Node | ||
|---|---|---|---|
| U3 | 敵影を見ず。 No enemy spotted. | ||
| # | Empty Node | ||
| # | Formation | Boss Battle Node | AD/AP AS/AS+ |
|---|---|---|---|
| V | Cruising Formation 4 Phases: 2, 3 |
0/0 0/0 | |
| Cruising Formation 4 Phases: 2 (Final)
|
0/0 0/0 | ||
| # | Formation | Boss Battle Node | AD/AP AS/AS+ |
| # | Formation | Normal Battle Node | AD/AP AS/AS+ |
|---|---|---|---|
| V1 | Diamond Phases: 2, 3 |
85/169 378/756 | |
| Diamond Phases: 2 |
72/143 321/642 | ||
| Diamond Phases: 2, 3 |
87/173 387/774 | ||
| # | Formation | Normal Battle Node | AD/AP AS/AS+ |
| # | Repair Node | ||
|---|---|---|---|
| # | Repair Node | ||
| # | Empty Node | ||
|---|---|---|---|
| W | 気のせいだった。 我が艦隊は、これより敵艦隊を撃滅する!対水上見張りを厳に!合戦用意!艦隊、突入! Must be my imagination. Our fleet will now destroy the enemy fleet. Stay on high alert for surface threats! Battle stations! Fleet, move in! | ||
| # | Empty Node | ||
| # | Formation | Normal Battle Node | AD/AP AS/AS+ |
|---|---|---|---|
| X | Line Ahead Double Line Echelon Phases: 3 |
0/0 0/0 | |
| # | Formation | Normal Battle Node | AD/AP AS/AS+ |
| # | Formation | Normal Battle Node | AD/AP AS/AS+ |
|---|---|---|---|
| Y | Line Ahead Diamond Vanguard Phases: 3 |
30/59 132/264 | |
| # | Formation | Normal Battle Node | AD/AP AS/AS+ |
| # | Formation | Boss Battle Node | AD/AP AS/AS+ |
|---|---|---|---|
| Z | Cruising Formation 4 Phases: 3 |
0/0 0/0 | |
| Cruising Formation 4 Phases: 3 (Final)
|
?/? ?/? | ||
| # | Formation | Boss Battle Node | AD/AP AS/AS+ |
| # | Formation | Night Battle Node | AD/AP AS/AS+ |
|---|---|---|---|
| Z1 | Line Ahead Double Line Echelon Phases: 3 |
0/0 0/0 | |
| # | Formation | Night Battle Node | AD/AP AS/AS+ |
| # | Formation | Air Raids | AD/AP AS/AS+ |
|---|---|---|---|
| AB | Diamond | 44/87 195/390 | |
| Diamond | 55/110 246/492 | ||
| Diamond | 60/119 267/534 | ||
| Diamond | 23/46 102/204 | ||
| Diamond | 67/133 297/594 | ||
| # | Formation | Air Raids | AD/AP AS/AS+ |
| # | Formation | Normal Battle Node | AD/AP AS/AS+ |
|---|---|---|---|
| A | Echelon Line Abreast Phases: 1, 3 |
0/0 0/0 | |
| Echelon Line Abreast Phases: 1, 3 |
0/0 0/0 | ||
| Echelon Line Abreast Phases: 1, 3 |
0/0 0/0 | ||
| # | Formation | Normal Battle Node | AD/AP AS/AS+ |
| # | Formation | Air Defense Node | AD/AP AS/AS+ |
|---|---|---|---|
| B | Diamond Phases: 3 |
44/87 195/390 | |
| Diamond Phases: 3 |
17/33 72/144 | ||
| Diamond Phases: 3 |
55/110 246/492 | ||
| Diamond Phases: 3 |
60/119 267/534 | ||
| Diamond Phases: 3 |
67/133 297/594 | ||
| # | Formation | Air Defense Node | AD/AP AS/AS+ |
| # | Formation | Normal Battle Node | AD/AP AS/AS+ |
|---|---|---|---|
| C | Echelon Line Abreast Phases: 3 |
0/0 0/0 | |
| Echelon Phases: 3 |
0/0 0/0 | ||
| # | Formation | Normal Battle Node | AD/AP AS/AS+ |
| # | Formation | Normal Battle Node | AD/AP AS/AS+ |
|---|---|---|---|
| D | Line Ahead Vanguard Phases: 1, 3 |
0/0 0/0 | |
| Line Ahead Phases: 1, 3 |
0/0 0/0 | ||
| # | Formation | Normal Battle Node | AD/AP AS/AS+ |
| # | Empty Node | ||
|---|---|---|---|
| E | 気のせいだった。 対水上、対空、それぞれ見張りを厳とせよ! Must be my imagination. Be on high alert for surface and air threats! | ||
| # | Empty Node | ||
| # | Formation | Normal Battle Node | AD/AP AS/AS+ |
|---|---|---|---|
| F | Line Ahead Echelon Vanguard Phases: 1, 3 |
0/0 0/0 | |
| # | Formation | Normal Battle Node | AD/AP AS/AS+ |
| # | Formation | Air Defense Node | AD/AP AS/AS+ |
|---|---|---|---|
| G | Diamond Phases: 1, 3 |
44/87 195/390 | |
| Diamond Phases: 1, 3 |
55/110 246/492 | ||
| Diamond Phases: 1, 3 |
60/119 267/534 | ||
| Diamond Phases: 1, 3 |
67/133 297/594 | ||
| # | Formation | Air Defense Node | AD/AP AS/AS+ |
| # | Formation | Normal Battle Node | AD/AP AS/AS+ |
|---|---|---|---|
| H | Diamond Phases: 3 |
36/72 161/321 | |
| Diamond Phases: 3 |
78/156 350/699 | ||
| # | Formation | Normal Battle Node | AD/AP AS/AS+ |
| # | Formation | Normal Battle Node | AD/AP AS/AS+ |
|---|---|---|---|
| I | Line Ahead Echelon Vanguard Phases: 1, 3 |
0/0 0/0 | |
| # | Formation | Normal Battle Node | AD/AP AS/AS+ |
| # | Formation | Boss Battle Node | AD/AP AS/AS+ |
|---|---|---|---|
| J | Cruising Formation 3 Phases: 1, 3 |
0/0 0/0 | |
| Cruising Formation 3 Phases: 1 (Final)
|
9/17 36/72 | ||
| # | Formation | Boss Battle Node | AD/AP AS/AS+ |
| # | Empty Node | ||
|---|---|---|---|
| J1 | 気のせいだった。 これより敵補給船団を捜索、撃滅する!敵の兵站を遮断する! Must be my imagination. Now proceeding to search and destroy the enemy supply convoy! Cut off the enemy's supply lines! | ||
| # | Empty Node | ||
| # | Empty Node | ||
|---|---|---|---|
| J2 | 敵影を見ず。 これより敵補給船団を捜索、撃滅する!敵の兵站を遮断する! No enemy spotted. Now proceeding to search and destroy the enemy supply convoy! Cut off the enemy's supply lines! | ||
| # | Empty Node | ||
| # | Formation | Normal Battle Node | AD/AP AS/AS+ |
|---|---|---|---|
| K | Echelon Line Abreast |
0/0 0/0 | |
| Echelon Line Abreast Phases: 3 |
0/0 0/0 | ||
| Echelon Line Abreast |
0/0 0/0 | ||
| # | Formation | Normal Battle Node | AD/AP AS/AS+ |
| # | Formation | Normal Battle Node | AD/AP AS/AS+ |
|---|---|---|---|
| L | Echelon Line Abreast Phases: 2, 3 |
0/0 0/0 | |
| Echelon Line Abreast Phases: 2, 3 |
0/0 0/0 | ||
| Echelon Line Abreast Phases: 2, 3 |
0/0 0/0 | ||
| # | Formation | Normal Battle Node | AD/AP AS/AS+ |
| # | Formation | Air Defense Node | AD/AP AS/AS+ |
|---|---|---|---|
| M | Diamond Phases: 2, 3 |
73/145 326/651 | |
| Diamond Phases: 2, 3 |
96/191 429/858 | ||
| # | Formation | Air Defense Node | AD/AP AS/AS+ |
| # | Formation | Air Defense Node | AD/AP AS/AS+ |
|---|---|---|---|
| N | Diamond Phases: 3 |
44/87 195/390 | |
| Diamond Phases: 3 |
17/33 72/144 | ||
| Diamond Phases: 3 |
55/110 246/492 | ||
| Diamond Phases: 3 |
60/119 267/534 | ||
| Diamond | 67/133 297/594 | ||
| # | Formation | Air Defense Node | AD/AP AS/AS+ |
| # | Formation | Normal Battle Node | AD/AP AS/AS+ |
|---|---|---|---|
| O | Line Ahead Vanguard Phases: 3 |
0/0 0/0 | |
| Line Ahead Phases: 3 |
0/0 0/0 | ||
| # | Formation | Normal Battle Node | AD/AP AS/AS+ |
| # | Empty Node | ||
|---|---|---|---|
| P | 敵影を見ず。 我が艦隊は、これより敵艦隊を撃滅する!対水上見張りを厳に!合戦用意!艦隊、突入! No enemy spotted. Our fleet will now destroy the enemy fleet. Stay on high alert for surface threats! Battle stations! Fleet, move in! | ||
| # | Empty Node | ||
| # | Selection Node | ||
|---|---|---|---|
| Q | 艦隊の針路を選択できます。提督、どちらの針路をとられますか? You can decide the fleet's course. Admiral, which heading should we take? | ||
| # | Selection Node | ||
| # | Formation | Normal Battle Node | AD/AP AS/AS+ |
|---|---|---|---|
| R | Echelon Line Abreast Phases: 3 |
0/0 0/0 | |
| Echelon Phases: 3 |
0/0 0/0 | ||
| # | Formation | Normal Battle Node | AD/AP AS/AS+ |
| # | Formation | Normal Battle Node | AD/AP AS/AS+ |
|---|---|---|---|
| S | Cruising Formation 4 Phases: 3 |
0/0 0/0 | |
| # | Formation | Normal Battle Node | AD/AP AS/AS+ |
| # | Formation | Air Defense Node | AD/AP AS/AS+ |
|---|---|---|---|
| T | Diamond Phases: 3 |
73/145 326/651 | |
| Diamond Phases: 3 |
96/191 429/858 | ||
| # | Formation | Air Defense Node | AD/AP AS/AS+ |
| # | Formation | Normal Battle Node | AD/AP AS/AS+ |
|---|---|---|---|
| U | Cruising Formation 3 Phases: 3 |
96/191 429/858 | |
| Cruising Formation 3 Phases: 3 |
122/244 548/1095 | ||
| # | Formation | Normal Battle Node | AD/AP AS/AS+ |
| # | Formation | Normal Battle Node | AD/AP AS/AS+ |
|---|---|---|---|
| U1 | Cruising Formation 4 Phases: 2, 3 |
0/0 0/0 | |
| Cruising Formation 4 Phases: 2 |
0/0 0/0 | ||
| # | Formation | Normal Battle Node | AD/AP AS/AS+ |
| # | Formation | Normal Battle Node | AD/AP AS/AS+ |
|---|---|---|---|
| U2 | Cruising Formation 3 Phases: 3 |
56/111 248/495 | |
| Cruising Formation 3 Phases: 3 |
42/83 186/372 | ||
| # | Formation | Normal Battle Node | AD/AP AS/AS+ |
| # | Empty Node | ||
|---|---|---|---|
| U3 | 敵影を見ず。 No enemy spotted. | ||
| # | Empty Node | ||
| # | Formation | Boss Battle Node | AD/AP AS/AS+ |
|---|---|---|---|
| V | Cruising Formation 4 Phases: 2, 3 |
0/0 0/0 | |
| Cruising Formation 4 Phases: 2 (Final)
|
0/0 0/0 | ||
| # | Formation | Boss Battle Node | AD/AP AS/AS+ |
| # | Formation | Normal Battle Node | AD/AP AS/AS+ |
|---|---|---|---|
| V1 | Diamond Phases: 2, 3 |
43/85 189/378 | |
| Diamond Phases: 2 |
36/72 161/321 | ||
| Diamond Phases: 2, 3 |
78/156 350/699 | ||
| # | Formation | Normal Battle Node | AD/AP AS/AS+ |
| # | Repair Node | ||
|---|---|---|---|
| # | Repair Node | ||
| # | Empty Node | ||
|---|---|---|---|
| W | 気のせいだった。 我が艦隊は、これより敵艦隊を撃滅する!対水上見張りを厳に!合戦用意!艦隊、突入! Must be my imagination. Our fleet will now destroy the enemy fleet. Stay on high alert for surface threats! Battle stations! Fleet, move in! | ||
| # | Empty Node | ||
| # | Formation | Normal Battle Node | AD/AP AS/AS+ |
|---|---|---|---|
| X | Line Ahead Double Line Echelon Phases: 3 |
0/0 0/0 | |
| # | Formation | Normal Battle Node | AD/AP AS/AS+ |
| # | Formation | Normal Battle Node | AD/AP AS/AS+ |
|---|---|---|---|
| Y | Line Ahead Diamond Vanguard Phases: 3 |
21/42 93/186 | |
| # | Formation | Normal Battle Node | AD/AP AS/AS+ |
| # | Formation | Boss Battle Node | AD/AP AS/AS+ |
|---|---|---|---|
| Z | Cruising Formation 4 Phases: 3 |
0/0 0/0 | |
| Cruising Formation 4 Phases: 3 (Final)
|
0/0 0/0 | ||
| # | Formation | Boss Battle Node | AD/AP AS/AS+ |
| # | Formation | Night Battle Node | AD/AP AS/AS+ |
|---|---|---|---|
| Z1 | Line Ahead Double Line Echelon Phases: 3 |
0/0 0/0 | |
| # | Formation | Night Battle Node | AD/AP AS/AS+ |
| # | Formation | Air Raids | AD/AP AS/AS+ |
|---|---|---|---|
| AB | Diamond | 44/87 195/390 | |
| Diamond | 55/110 246/492 | ||
| Diamond | 23/46 102/204 | ||
| # | Formation | Air Raids | AD/AP AS/AS+ |
| # | Formation | Normal Battle Node | AD/AP AS/AS+ |
|---|---|---|---|
| A | Echelon Line Abreast Phases: 1, 3 |
0/0 0/0 | |
| Echelon Line Abreast Phases: 1, 3 |
0/0 0/0 | ||
| # | Formation | Normal Battle Node | AD/AP AS/AS+ |
| # | Formation | Air Defense Node | AD/AP AS/AS+ |
|---|---|---|---|
| B | Diamond Phases: 3 |
44/87 195/390 | |
| Diamond Phases: 3 |
17/33 72/144 | ||
| Diamond Phases: 3 |
55/110 246/492 | ||
| # | Formation | Air Defense Node | AD/AP AS/AS+ |
| # | Formation | Normal Battle Node | AD/AP AS/AS+ |
|---|---|---|---|
| C | Echelon Phases: 3 |
0/0 0/0 | |
| Echelon Phases: 3 |
0/0 0/0 | ||
| Line Abreast Phases: 3 |
0/0 0/0 | ||
| # | Formation | Normal Battle Node | AD/AP AS/AS+ |
| # | Formation | Normal Battle Node | AD/AP AS/AS+ |
|---|---|---|---|
| D | Line Ahead Vanguard Phases: 1, 3 |
0/0 0/0 | |
| Line Ahead Phases: 1, 3 |
0/0 0/0 | ||
| # | Formation | Normal Battle Node | AD/AP AS/AS+ |
| # | Empty Node | ||
|---|---|---|---|
| E | 気のせいだった。 対水上、対空、それぞれ見張りを厳とせよ! Must be my imagination. Be on high alert for surface and air threats! | ||
| # | Empty Node | ||
| # | Formation | Normal Battle Node | AD/AP AS/AS+ |
|---|---|---|---|
| F | Line Ahead Echelon Vanguard Phases: 1, 3 |
0/0 0/0 | |
| # | Formation | Normal Battle Node | AD/AP AS/AS+ |
| # | Formation | Air Defense Node | AD/AP AS/AS+ |
|---|---|---|---|
| G | Diamond Phases: 1, 3 |
44/87 195/390 | |
| Diamond Phases: 1, 3 |
17/33 72/144 | ||
| Diamond Phases: 1, 3 |
55/110 246/492 | ||
| # | Formation | Air Defense Node | AD/AP AS/AS+ |
| # | Formation | Normal Battle Node | AD/AP AS/AS+ |
|---|---|---|---|
| H | Diamond Phases: 1 |
36/72 161/321 | |
| Diamond Phases: 1, 3 |
43/85 189/378 | ||
| Diamond Phases: 1 |
36/72 161/321 | ||
| # | Formation | Normal Battle Node | AD/AP AS/AS+ |
| # | Formation | Normal Battle Node | AD/AP AS/AS+ |
|---|---|---|---|
| I | Line Ahead Echelon Vanguard Phases: 1, 3 |
0/0 0/0 | |
| # | Formation | Normal Battle Node | AD/AP AS/AS+ |
| # | Formation | Boss Battle Node | AD/AP AS/AS+ |
|---|---|---|---|
| J | Cruising Formation 3 Phases: 1, 3 |
0/0 0/0 | |
| Cruising Formation 3 Phases: 1 (Final)
|
3/6 12/24 | ||
| # | Formation | Boss Battle Node | AD/AP AS/AS+ |
| # | Empty Node | ||
|---|---|---|---|
| J1 | 気のせいだった。 これより敵補給船団を捜索、撃滅する!敵の兵站を遮断する! Must be my imagination. Now proceeding to search and destroy the enemy supply convoy! Cut off the enemy's supply lines! | ||
| # | Empty Node | ||
| # | Empty Node | ||
|---|---|---|---|
| J2 | 敵影を見ず。 これより敵補給船団を捜索、撃滅する!敵の兵站を遮断する! No enemy spotted. Now proceeding to search and destroy the enemy supply convoy! Cut off the enemy's supply lines! | ||
| # | Empty Node | ||
| # | Formation | Normal Battle Node | AD/AP AS/AS+ |
|---|---|---|---|
| K | Echelon Line Abreast Phases: 2, 3 |
0/0 0/0 | |
| Echelon Line Abreast |
0/0 0/0 | ||
| # | Formation | Normal Battle Node | AD/AP AS/AS+ |
| # | Formation | Normal Battle Node | AD/AP AS/AS+ |
|---|---|---|---|
| L | Echelon Line Abreast Phases: 2, 3 |
0/0 0/0 | |
| Echelon Line Abreast Phases: 2, 3 |
0/0 0/0 | ||
| # | Formation | Normal Battle Node | AD/AP AS/AS+ |
| # | Formation | Air Defense Node | AD/AP AS/AS+ |
|---|---|---|---|
| M | Diamond Phases: 2, 3 |
?/? ?/? | |
| Diamond Phases: 2, 3 |
?/? ?/? | ||
| # | Formation | Air Defense Node | AD/AP AS/AS+ |
| # | Formation | Air Defense Node | AD/AP AS/AS+ |
|---|---|---|---|
| N | Diamond Phases: 3 |
44/87 195/390 | |
| Diamond Phases: 3 |
17/33 72/144 | ||
| Diamond Phases: 3 |
55/110 246/492 | ||
| # | Formation | Air Defense Node | AD/AP AS/AS+ |
| # | Formation | Normal Battle Node | AD/AP AS/AS+ |
|---|---|---|---|
| O | Line Ahead Vanguard Phases: 3 |
0/0 0/0 | |
| Line Ahead Phases: 3 |
0/0 0/0 | ||
| # | Formation | Normal Battle Node | AD/AP AS/AS+ |
| # | Empty Node | ||
|---|---|---|---|
| P | 敵影を見ず。 我が艦隊は、これより敵艦隊を撃滅する!対水上見張りを厳に!合戦用意!艦隊、突入! No enemy spotted. Our fleet will now destroy the enemy fleet. Stay on high alert for surface threats! Battle stations! Fleet, move in! | ||
| # | Empty Node | ||
| # | Selection Node | ||
|---|---|---|---|
| Q | 艦隊の針路を選択できます。提督、どちらの針路をとられますか? You can decide the fleet's course. Admiral, which heading should we take? | ||
| # | Selection Node | ||
| # | Formation | Normal Battle Node | AD/AP AS/AS+ |
|---|---|---|---|
| R | Line Abreast Phases: 3 |
0/0 0/0 | |
| Echelon Phases: 3 |
0/0 0/0 | ||
| Echelon Phases: 3 |
0/0 0/0 | ||
| # | Formation | Normal Battle Node | AD/AP AS/AS+ |
| # | Formation | Normal Battle Node | AD/AP AS/AS+ |
|---|---|---|---|
| S | Cruising Formation 4 Phases: 3 |
0/0 0/0 | |
| Cruising Formation 4 | 0/0 0/0 | ||
| # | Formation | Normal Battle Node | AD/AP AS/AS+ |
| # | Formation | Air Defense Node | AD/AP AS/AS+ |
|---|---|---|---|
| T | Diamond Phases: 2, 3 |
?/? ?/? | |
| Diamond Phases: 3 |
?/? ?/? | ||
| # | Formation | Air Defense Node | AD/AP AS/AS+ |
| # | Formation | Normal Battle Node | AD/AP AS/AS+ |
|---|---|---|---|
| U | Cruising Formation 3 Phases: 2, 3 |
50/99 222/444 | |
| Cruising Formation 3 Phases: 3 |
73/145 326/651 | ||
| # | Formation | Normal Battle Node | AD/AP AS/AS+ |
| # | Formation | Normal Battle Node | AD/AP AS/AS+ |
|---|---|---|---|
| U1 | Cruising Formation 4 Phases: 2, 3 |
0/0 0/0 | |
| Cruising Formation 4 Phases: 2 |
0/0 0/0 | ||
| # | Formation | Normal Battle Node | AD/AP AS/AS+ |
| # | Formation | Normal Battle Node | AD/AP AS/AS+ |
|---|---|---|---|
| U2 | Cruising Formation 3 Phases: 2, 3 |
24/47 104/207 | |
| Cruising Formation 3 Phases: 2, 3 |
33/65 144/288 | ||
| # | Formation | Normal Battle Node | AD/AP AS/AS+ |
| # | Empty Node | ||
|---|---|---|---|
| U3 | 敵影を見ず。 No enemy spotted. | ||
| # | Empty Node | ||
| # | Formation | Boss Battle Node | AD/AP AS/AS+ |
|---|---|---|---|
| V | Cruising Formation 3 Phases: 2, 3 |
0/0 0/0 | |
| Cruising Formation 3 Phases: 2 (Final)
|
0/0 0/0 | ||
| # | Formation | Boss Battle Node | AD/AP AS/AS+ |
| # | Formation | Normal Battle Node | AD/AP AS/AS+ |
|---|---|---|---|
| V1 | Diamond Phases: 2, 3 |
36/72 161/321 | |
| Diamond Phases: 2, 3 |
43/85 189/378 | ||
| Diamond Phases: 2, 3 |
36/72 161/321 | ||
| # | Formation | Normal Battle Node | AD/AP AS/AS+ |
| # | Repair Node | ||
|---|---|---|---|
| # | Repair Node | ||
| # | Empty Node | ||
|---|---|---|---|
| W | 気のせいだった。 我が艦隊は、これより敵艦隊を撃滅する!対水上見張りを厳に!合戦用意!艦隊、突入! Must be my imagination. Our fleet will now destroy the enemy fleet. Stay on high alert for surface threats! Battle stations! Fleet, move in! | ||
| # | Empty Node | ||
| # | Formation | Normal Battle Node | AD/AP AS/AS+ |
|---|---|---|---|
| X | Line Ahead Double Line Echelon Phases: 3 |
0/0 0/0 | |
| # | Formation | Normal Battle Node | AD/AP AS/AS+ |
| # | Formation | Normal Battle Node | AD/AP AS/AS+ |
|---|---|---|---|
| Y | Line Ahead Diamond Vanguard Phases: 3 |
21/42 93/186 | |
| # | Formation | Normal Battle Node | AD/AP AS/AS+ |
| # | Formation | Boss Battle Node | AD/AP AS/AS+ |
|---|---|---|---|
| Z | Cruising Formation 4 Phases: 3 |
0/0 0/0 | |
| Cruising Formation 4 Phases: 3 (Final)
|
0/0 0/0 | ||
| # | Formation | Boss Battle Node | AD/AP AS/AS+ |
| # | Formation | Night Battle Node | AD/AP AS/AS+ |
|---|---|---|---|
| Z1 | Line Ahead Double Line Echelon Phases: 3 |
0/0 0/0 | |
| # | Formation | Night Battle Node | AD/AP AS/AS+ |
Ship Drops:
| Ship drops | |||||||||||||||||||||||||||||||||||||||||||||||||||||||||||||||||||||||||||||||||||||||||||||||||||
|---|---|---|---|---|---|---|---|---|---|---|---|---|---|---|---|---|---|---|---|---|---|---|---|---|---|---|---|---|---|---|---|---|---|---|---|---|---|---|---|---|---|---|---|---|---|---|---|---|---|---|---|---|---|---|---|---|---|---|---|---|---|---|---|---|---|---|---|---|---|---|---|---|---|---|---|---|---|---|---|---|---|---|---|---|---|---|---|---|---|---|---|---|---|---|---|---|---|---|---|
| Type | Ship? | J | U | U2 | V | Y | Z | ||||||||||||||||||||||||||||||||||||||||||||||||||||||||||||||||||||||||||||||||||||||||||||
| DE | Tsushima | Hard+ | Casual+ | ||||||||||||||||||||||||||||||||||||||||||||||||||||||||||||||||||||||||||||||||||||||||||||||||
| DE | Mikura | Medium+ | Casual+ | ||||||||||||||||||||||||||||||||||||||||||||||||||||||||||||||||||||||||||||||||||||||||||||||||
| DE | Kaiboukan No.4 | Medium+ | Casual+ | Casual+ | |||||||||||||||||||||||||||||||||||||||||||||||||||||||||||||||||||||||||||||||||||||||||||||||
| DD | Uzuki | Medium+ | Casual+ | Casual+ | |||||||||||||||||||||||||||||||||||||||||||||||||||||||||||||||||||||||||||||||||||||||||||||||
| DD | Uranami | Hard+ | Casual+ | ||||||||||||||||||||||||||||||||||||||||||||||||||||||||||||||||||||||||||||||||||||||||||||||||
| DD | Ariake | Hard+ | Hard+ | Casual+ | Casual+ | Casual+ | |||||||||||||||||||||||||||||||||||||||||||||||||||||||||||||||||||||||||||||||||||||||||||||
| DD | Hatsukaze | Casual+ | |||||||||||||||||||||||||||||||||||||||||||||||||||||||||||||||||||||||||||||||||||||||||||||||||
| DD | Isokaze | Hard+ | Easy+ | ||||||||||||||||||||||||||||||||||||||||||||||||||||||||||||||||||||||||||||||||||||||||||||||||
| DD | Tanikaze | Casual+ | Casual+ | Easy+ | |||||||||||||||||||||||||||||||||||||||||||||||||||||||||||||||||||||||||||||||||||||||||||||||
| DD | Nowaki | Medium+ | |||||||||||||||||||||||||||||||||||||||||||||||||||||||||||||||||||||||||||||||||||||||||||||||||
| CL | Agano | Casual+ | Casual+ | Casual+ | |||||||||||||||||||||||||||||||||||||||||||||||||||||||||||||||||||||||||||||||||||||||||||||||
| CL | Sakawa | Casual+ | Casual+ | Casual+ | |||||||||||||||||||||||||||||||||||||||||||||||||||||||||||||||||||||||||||||||||||||||||||||||
| CL | Helena | Easy+ | Casual+ | ||||||||||||||||||||||||||||||||||||||||||||||||||||||||||||||||||||||||||||||||||||||||||||||||
| CA | Mikuma | Casual+ | |||||||||||||||||||||||||||||||||||||||||||||||||||||||||||||||||||||||||||||||||||||||||||||||||
| FBB | Washington | Casual+ | |||||||||||||||||||||||||||||||||||||||||||||||||||||||||||||||||||||||||||||||||||||||||||||||||
| AV | Akitsushima | Hard+ | Medium+ | ||||||||||||||||||||||||||||||||||||||||||||||||||||||||||||||||||||||||||||||||||||||||||||||||
| AO | Souya | Hard+ | Medium+ | Casual+ | |||||||||||||||||||||||||||||||||||||||||||||||||||||||||||||||||||||||||||||||||||||||||||||||
| DD | Yukikaze | Casual+ | |||||||||||||||||||||||||||||||||||||||||||||||||||||||||||||||||||||||||||||||||||||||||||||||||
| DD | Urakaze | Casual+ | Medium+ | Hard+ | |||||||||||||||||||||||||||||||||||||||||||||||||||||||||||||||||||||||||||||||||||||||||||||||
| DD | Hamakaze | Casual+ | Casual+ | Casual+ | |||||||||||||||||||||||||||||||||||||||||||||||||||||||||||||||||||||||||||||||||||||||||||||||
| DD | Shimakaze | Casual+ | |||||||||||||||||||||||||||||||||||||||||||||||||||||||||||||||||||||||||||||||||||||||||||||||||
| CL | Kitakami | Casual+ | |||||||||||||||||||||||||||||||||||||||||||||||||||||||||||||||||||||||||||||||||||||||||||||||||
| CL | Ooi | Casual+ | |||||||||||||||||||||||||||||||||||||||||||||||||||||||||||||||||||||||||||||||||||||||||||||||||
| CL | Nagara | Casual+ | Casual+ | Casual+ | Casual+ | Casual+ | Casual+ | ||||||||||||||||||||||||||||||||||||||||||||||||||||||||||||||||||||||||||||||||||||||||||||
| CL | Kinu | Casual+ | Casual+ | Casual+ | |||||||||||||||||||||||||||||||||||||||||||||||||||||||||||||||||||||||||||||||||||||||||||||||
| CL | Abukuma | Casual+ | Casual+ | Casual+ | |||||||||||||||||||||||||||||||||||||||||||||||||||||||||||||||||||||||||||||||||||||||||||||||
| CL | Sendai | Casual+ | Casual+ | Casual+ | Casual+ | Casual+ | |||||||||||||||||||||||||||||||||||||||||||||||||||||||||||||||||||||||||||||||||||||||||||||
| CA | Myoukou | Casual+ | Casual+ | Casual+ | Casual+ | Casual+ | Casual+ | ||||||||||||||||||||||||||||||||||||||||||||||||||||||||||||||||||||||||||||||||||||||||||||
| CA | Atago | Casual+ | Casual+ | Casual+ | |||||||||||||||||||||||||||||||||||||||||||||||||||||||||||||||||||||||||||||||||||||||||||||||
| CA | Suzuya | Casual+ | Casual+ | Casual+ | |||||||||||||||||||||||||||||||||||||||||||||||||||||||||||||||||||||||||||||||||||||||||||||||
| CA | Kumano | Casual+ | Casual+ | Casual+ | |||||||||||||||||||||||||||||||||||||||||||||||||||||||||||||||||||||||||||||||||||||||||||||||
| CA | Chikuma | Casual+ | Casual+ | Casual+ | |||||||||||||||||||||||||||||||||||||||||||||||||||||||||||||||||||||||||||||||||||||||||||||||
| CVL | Ryuujou | Casual+ | Casual+ | ||||||||||||||||||||||||||||||||||||||||||||||||||||||||||||||||||||||||||||||||||||||||||||||||
| CVL | Zuihou | Casual+ | |||||||||||||||||||||||||||||||||||||||||||||||||||||||||||||||||||||||||||||||||||||||||||||||||
| CVL | Junyou | Casual+ | Easy+ | ||||||||||||||||||||||||||||||||||||||||||||||||||||||||||||||||||||||||||||||||||||||||||||||||
| FBB | Kongou | Casual+ | Casual+ | Casual+ | |||||||||||||||||||||||||||||||||||||||||||||||||||||||||||||||||||||||||||||||||||||||||||||||
| FBB | Hiei | Medium+ | Casual+ | ||||||||||||||||||||||||||||||||||||||||||||||||||||||||||||||||||||||||||||||||||||||||||||||||
| FBB | Haruna | Casual+ | Casual+ | Casual+ | |||||||||||||||||||||||||||||||||||||||||||||||||||||||||||||||||||||||||||||||||||||||||||||||
| FBB | Kirishima | Hard+ | Easy+ | Casual+ | |||||||||||||||||||||||||||||||||||||||||||||||||||||||||||||||||||||||||||||||||||||||||||||||
| BB | Fusou | Casual+ | Casual+ | Casual+ | |||||||||||||||||||||||||||||||||||||||||||||||||||||||||||||||||||||||||||||||||||||||||||||||
| BB | Yamashiro | Casual+ | Casual+ | Casual+ | |||||||||||||||||||||||||||||||||||||||||||||||||||||||||||||||||||||||||||||||||||||||||||||||
| BB | Ise | Casual+ | Casual+ | Casual+ | |||||||||||||||||||||||||||||||||||||||||||||||||||||||||||||||||||||||||||||||||||||||||||||||
| BB | Hyuuga | Casual+ | Casual+ | Casual+ | |||||||||||||||||||||||||||||||||||||||||||||||||||||||||||||||||||||||||||||||||||||||||||||||
| BB | Nagato | Casual+ | |||||||||||||||||||||||||||||||||||||||||||||||||||||||||||||||||||||||||||||||||||||||||||||||||
| BB | Mutsu | Casual+ | |||||||||||||||||||||||||||||||||||||||||||||||||||||||||||||||||||||||||||||||||||||||||||||||||
| CV | Shoukaku | Casual+ | |||||||||||||||||||||||||||||||||||||||||||||||||||||||||||||||||||||||||||||||||||||||||||||||||
| CV | Zuikaku | Casual+ | |||||||||||||||||||||||||||||||||||||||||||||||||||||||||||||||||||||||||||||||||||||||||||||||||
| E-5 Clear Message |
|---|