|
Time remaining until Event ends [1]:
1 May 2023 11:00:00 +0900
The Early Spring 2023 Event has ended!
|
KC anniversary maintenance has started, time remaining until maintenance ends [2]: (~4h event pause)
23 April 2023 20:30:00 +0900
The maintenance has ended. See 2023-04-23 patch notes.
|
|
|
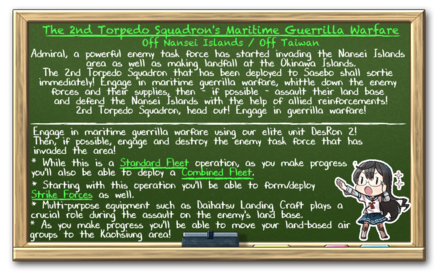
2nd Torpedo Squadron's Martime Guerrilla Warfare
第二水雷戦隊 海上遊撃戦
| Rewards
|
| All
|
|
|
| Equipment/Item
|
丁
Casual
|
丙
Easy
|
乙
Medium
|
甲
Hard
|
|
|
|
|
|
|
|
|
|
|
|
|
|
|
|
|
|
|
|
|
|
|
|
|
|
|
|
|
|
|
|
|
|
|
|
|
|
|
|
|
|
|
|
|
|
|
|
|
|
|
|
|
|
|
|
|
|
|
|
|
|
|
|
|
|
|
The event guides are to be constructed through the respective Event map page guide sandbox and reviewed by editors before being approved here.
- Do not update the guides through this page unless it is a minor fix. Please only update guides through their respective sandbox pages.
Branching Table
| E-2 Branching Rules (Start Point)
|
| Nodes |
Rules
|
| Start
|
|
- Single Fleet
- 2nd Torpedo Squadron Tag only (Normal/Hard)
|
|
|
- Combined Fleet
- Supporting Combined Fleet Tag only (Normal/Hard)
|
| E-2 Branching Rules (Start Point 1)
|
| Nodes |
Rules
|
|
|
|
|
|
|
|
|
|
|
- Does not meet the requirements to go to B2
|
|
|
- Meet ANY of the following requirements:
- Fast fleet that does not meet the requirements to go to C
- If slow, amount of (F)BB(V) + CV(B) + CA(V) = 0
|
|
|
- Meet ALL of the following requirements:
- Fast Fleet
- Amount of (F)BB(V) + CV(B) ≤ 1
|
|
|
|
- Does not meet the requirements to go to E
|
|
|
- Meet ALL of the following requirements:
- Amount of (F)BB(V) ≤ 1
- Amount of DD ≥ 3
- If slow:
- Amount of CL ≥ 1
- Amount of CVL ≤ 1
|
|
|
|
Fail the LoS check
|
|
|
- Does not meet the requirements to go to G
- Pass the LoS check (Cn4=73 Hard)
|
|
|
- Meet ALL of the following requirements:
- Amount of CV(B) = 0
- Amount of CL ≥ 1 or amount of DD ≥ 3
- Pass the LoS check (Cn4=73 Hard)
|
|
|
|
Active Branching
|
|
|
|
|
|
- Meet ALL of the following requirements:
- Amount of SS(V) = 0
- Amount of CVL ≤ 1 ?
- ???
|
|
|
- Does not meet the requirements to go to H
|
|
|
|
|
|
|
- Does not meet the requirements to go to J
- Pass the LoS check
|
|
|
- Meet ALL of the following requirements:
- Amount of (F)BB(V) ≤ 1
- Amount of CL + DD ≥ 4
- Pass the LoS check
- ???
|
| E-2 Branching Rules (Start Point 2)
|
| Nodes |
Rules
|
|
|
|
- Does not meet the requirements to go to M
|
|
|
- Meet ALL of the following requirements:
- Fast Fleet
- Amount of (F)BB(V) + CV(B) ≤ 2
|
|
|
|
???
|
|
|
- Amount of (F)BB(V) + CV(B) ≤ 4
- If slow, amount of (F)BB(V) + CV(B) ≤ 3
|
|
|
|
- Does not meet the requirements to go to O
|
|
|
- Meet ALL of the following requirements:
- Fast Fleet
- Amount of CV(B) ≤ 1
- Amount of SS(V) = 0
|
|
|
|
- Does not meet the requirements to go to Q
|
|
|
- Meet ALL of the following requirements:
- Fast Fleet (Hard only?)
- Amount of (F)BB(V) ≤ 2
- Amount of CVL ≤ 2
- Amount of SS(V) = 0
- If slow, amount of BB ≤ 1
|
|
|
|
Active Branching
|
|
|
|
|
|
|
|
|
|
|
|
|
- Pass the LoS check
- Does not meet the requirements to go to W
|
|
|
|
|
|
- Meet ALL of the following requirements:
- Amount of CV(B) ≤ 2
- If slow, amount of CA(V) ≤ 2
- Pass the LoS check
|
Branching compositions were reported over the course of the event. (NGA and KCNav)
Historical Bonuses
DISCLAIMER: This information is based on user-submitted data and is subject to revisions as more data is gathered. Any version of the ship receives the bonus regardless of remodel.
Ship Bonuses
| Ships
|
Damage
|
Acc/Eva
|
| Mapwide
|
E2?/J?/U/W
|
| All DE
|
1.12x
|
-
|
-
|
| All DD (stacks with below)
|
1.03x
|
-
|
-
|
| All CA, CAV, CL, CLT, DD (does not stack with below)
|
-
|
1.08x
|
1.12x
|
| All CV, CVB, CVL (does not stack with below)
|
-
|
1.05x
|
 |
 |

|
1.15x
|
1.18x
|
1.27x
|
 |
 |

|
 |
 |

|
 |
 |

|
 |
 |

|
1.08x
|
1.15x
|
1.20x
|
 |
 |

|
 |
 |

|
- Evasion bonus is only roughly checked as it is hard to estimate. The info will be updated if an inconsistency is found (@Divinity_123).
[3][4][5][6]
[7][8]
Map Overview
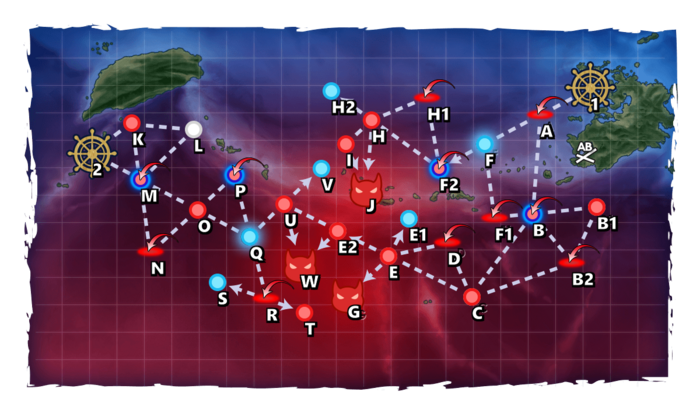
E-2 consists of 3 main phases and requires the use of Single Fleets, Striking Forces, and Combined Fleets.
- This map uses 2 locks:
 2nd Torpedo Squadron (reused in E-3) for the 1st starting point,
 Supporting Combined Fleet for the 2nd starting point.
- 2 LBAS are available on this map:
- Only 1 can be set on Sortie, the other being limited to Defense.
- After completing phase 2, the LBAS is relocated closer to the final boss.
- Be aware that High Altitude LBAS defense is required for the debuff. It is advised to check if the required AS values can be achieved with the planes available before starting the map on higher difficulties.
- "Airstrike Supported Battle" nodes are present on B F2 M P
 |
This map is extremely hard to clear on all difficulties.
Please wait for information regarding compositions, historical bonuses, and friendly fleets across the event before starting it. |
Phase 1
- Striking Force: 0-1FBB, 0-1CVL, 1CAV, 0-1CL, 0-1CLT, 3-4DD (Fast)

- Route: 1 A B C E G
- Striking Force: 1FBB, 3CVL, 3DD (Fast)
- Route: 1 A B C E G
- Heaviest fleet for this route.
- Striking Force: 1FBB, 1CVL, 1CAV/CLT, 3DD, 1SS(V) (Fast)
- Route: 1 A B C E G
- Several Night Cut-Ins are required to clear the boss, especially on LD and in higher difficulties.
- Bringing an AACI capable ship is recommended to pass through the air node.
- Bringing an OASW capable ship is recommended to pass through the new node.
- Striking Force fleets can utilize the
 SFFCF SFFCF
 .
.
Phase 2
- Striking Force: 1(F)BB(V), 1CVL, 0-1CAV, 1CL, 3-4DD (SLOW)
- Route: 1 A F F2 H J
- The boss is an Installation and requires appropriate gear to be defeated,
- She is especially weak to "Nuke" setups
- Fleet has to be SLOW Speed. Fast Fleet will off-route to B
- The boss fleet includes one or two PT Imp Packs, requiring appropriate gear to be defeated (these can be ignored as S-rank is optional):
| ExpandAnti-PT boat
|
Unlike most standard Abyssals, "PT boats" (PT Imp Pack & Schnellboot Imp Pack & Schnellboot Imp Pack ) are "very small and fast". ) are "very small and fast".
- All ship types suffer a severe
 accuracy and accuracy and  firepower penalty against PT boats. firepower penalty against PT boats.
- Attacking them with larger guns is not very effective, smaller guns being recommended instead.
- Support Expeditions are not affect by any of the following[1].
| ExpandAttack formula against PT boats
|
The Attack formula against PT boats:[2][3]
- Jet Assault & Airstrike
- [math]\displaystyle{ \text{Damage}_\text{PT}= \text{Atk}_\text{post-cap} \times \text{Rand} [0.5 ; 0.8] }[/math]
- LBAS[4]
- [math]\displaystyle{ \text{Damage}_\text{PT}= \text{Atk}_\text{post-cap} \times \text{Rand} [0.4 ; 0.7] }[/math]
- Shelling
- [math]\displaystyle{ \text{Damage}_\text{PT}= ( 0.3 \times \text{Atk}_\text{post-cap} + \sqrt{\text{Atk}_\text{post-cap}} + 10 ) \times \prod^{All Equipment}{\text{Mod}_\text{EquipmentAtk}} }[/math]
- Opening & Closing Torpedo Salvos
- [math]\displaystyle{ \text{Damage}_\text{PT}= 0.3 \times \text{Atk}_\text{post-cap} + \sqrt{\text{Atk}_\text{post-cap}} + 10 }[/math]
- Night Battle
- Night Battle data are unclear yet.
- With
- [math]\displaystyle{ \text{Atk}_\text{post-cap} }[/math] the post cap attack power defined here,
- [math]\displaystyle{ \text{Mod}_\text{EquipmentAtk} }[/math] the bonuses given by equipment, described below.
|
| ExpandAccuracy formula against PT boats
|
The Accuracy formula against PT boats:[5][6][7][8]
| [math]\displaystyle{ \text{Hit Rate}_\text{vs.PT} \text{%} = \Big\lfloor ( 0.3 \times \text{Accuracy}_\text{Atk} + \sqrt{\text{Accuracy}_\text{Atk}} + 15 ) \times 1.2 \times \text{Mod}_\text{Ship} \times \Big( \prod^{All Equipment}{\text{Mod}_\text{EquipmentAcc}} \Big) \times \text{Mod}_\text{Night} \Big\rfloor - \text{EVA}_\text{PT} + 1 }[/math]
|
- With
- [math]\displaystyle{ \text{Acc}_\text{Atk} }[/math] the standard accuracy described here
- PT boats are "DDs" in the game, so the [math]\displaystyle{ \text{Mod}_\text{formation} }[/math] for vanguard is 1.1 during shelling, and 1.2 during the torpedo phase.
- Historical accuracy bonuses during Events are included in the Standard Accuracy Term, i.e. it is affected by the [math]\displaystyle{ \text{Mod}_\text{PT} }[/math] modifier.
- [math]\displaystyle{ \text{EVA}_\text{PT} }[/math] the PT estimated evasion
 described bellow, described bellow,
- The main Accuracy modifiers are
- [math]\displaystyle{ \text{Mod}_\text{Amagiri} }[/math] being include in [math]\displaystyle{ \text{Acc}_\text{Atk} }[/math]:
- [math]\displaystyle{ \text{Mod}_\text{Ship} }[/math] the bonus given by ship types, described below,
- [math]\displaystyle{ \text{Mod}_\text{EquipmentAcc} }[/math] the bonuses given by equipment, described below,
- [math]\displaystyle{ \text{Mod}_\text{Night} }[/math] being 0.7 during night battle, 1 during day battle.
|
Amagiri Kai Ni/D
 has the ability to prioritize focusing on attacking PT imps with significantly increased accuracy if any are present. has the ability to prioritize focusing on attacking PT imps with significantly increased accuracy if any are present.
- DD placed in the composition slots above and below her will gain a noticeable accuracy boost and will prioritize attacking PT boats if any are present.
- The PT boat targeting rate is 100% for all affected ships [9].
During Events, some special bonuses may be added, with "historical" ships and equipment gaining some accuracy bonuses[10].
| Ship Type |
[math]\displaystyle{ \text{Mod}_\text{Ship} }[/math]
|
| DD & DE |
1.0
|
| CL, CLT, & CT |
0.82
|
| All other types |
0.7
|
- Notes
- It is recommended to use anti-PT setups on DDs only, such setups compromising overall combat effectiveness.
- Having a Reinforcement Expansion is important because it can save a ship slot by containing a machine gun or skilled lookouts.
- Combining equipment is recommended to see significant boosts to accuracy.
- The
 Ka-Tsu Tanks Ka-Tsu Tanks
 bonus does not stack with the bonus does not stack with the  Armed Boats Armed Boats
 ones. ones.
- Using other setups improving accuracy is also advisable:
|
|
|
| [edit]
|
- Bringing an AACI capable ship is recommended to pass through the air node.
After completing phase 2, the LBAS is relocated closer to the final boss.
Phase 2.5 - Gimmicks
The following steps have to be performed to unlock the final boss:
|
E2 |
T |
U
|
| Hard |
S |
S |
S
|
| Medium |
S |
A+ |
A+
|
| Easy |
S |
A+ |
A+
|
| Casual |
- |
A+ |
A+
|
- Striking Force: 1CV, 1CVL, 1CL, 0-1CLT, 3-4DD (Fast)
- Route: 1 A B C E E2
- STF: 2FBB, 2CVL, 2CAV + 1CL, 0-1CLT, 0-1CA, 3-5DD (Fast)

- Route: 2 M N O Q R T
- Use the same fleet as T
- Route: 2 M N O Q U
Phase 3
- STF/CTF: 2(F)BB, 2CVL, 2CAV + 0-1CA(V) 1CL, 1-2CLT, 2-3DD (Fast)
- Route: 2 M O Q U W
- This fleet can be either an STF or a CTF, with no difference between both.
- This fleet can bring high Air Power.
- The (F)BB can potentially utilize a Special Attack.
- CTF: 1CV, 2CVL, 3CA(V) + 0-1CA(V) 1CL, 1-2CLT, 2-3DD (Fast)
- Route: 2 M O Q U W
- This fleet can bring the highest Air Power for this route.
- LoS check: ??
- Bringing an AACI capable ship is recommended against the boss.
- Bringing an OASW capable ship is recommended to pass through the new node.
Debuff
Once LD has been reached, the following steps have to be performed to debuff the boss
|
G |
D |
J |
E2 |
LBAS
|
| Hard |
S |
AS |
S |
S |
AS
|
| Medium |
- |
AS |
S |
S |
AS
|
| Easy |
- |
- |
S |
S |
AS
|
| Casual |
- |
- |
A+ |
S |
-
|
- Refer to #Phase 1's fleet for composition and routing.
- Striking Force: 1CV, 1CVL, 1-2CA, 1CL, 2DD
- Route: 1 A B C D
- Having less than 3 DD and 2 CV(L) will route to D.
|
AP |
AS
|
| Hard |
184 |
413
|
| Medium |
162 |
363
|
| Easy |
143 |
320
|
| Casual |
126 |
282
|
- Refer to #Phase 2's fleet for composition and routing.
- This step can be accomplished by sending 1 SS(V) until the Air Raid is triggered.
|
AP |
AS
|
| Hard |
461 |
1035
|
| Medium |
417 |
938
|
| Easy |
375 |
842
|
| Casual |
352 |
791
|
Once Debuff is complete the CG will change to the following:
Enemy Compositions
| Type | Ships |
|---|
| DE |  |
|---|
E-2 Hard AB
| #
|
Formation
|
Air Raids
|
AD/AP
AS/AS+
|
| AB
|
Diamond
|
     
|
157/314
705/1410
|
| Diamond
|
|
207/413
929/1857
|
| Diamond
|
  
|
231/462
1038/2076
|
| #
|
Formation
|
Air Raids
|
AD/AP
AS/AS+
|
E-2 Hard A: 深海空母機動部隊 艦載機群 (
PoiDB)
| #
|
Formation
|
Air Defense Node
|
AD/AP
AS/AS+
|
| A
|
Diamond
Phases: 1, 2, 3
|
    
|
45/89
198/396
|
Diamond
Phases: 1, 2, 3
|

|
87/173
387/774
|
Diamond
Phases: 1
|
 
|
80/159
357/714
|
| #
|
Formation
|
Air Defense Node
|
AD/AP
AS/AS+
|
E-2 Hard B: 深海潜水艦隊・深海航空支援 (
PoiDB)
| #
|
Formation
|
Supported Battle Node
|
AD/AP
AS/AS+
|
| B
|
Echelon
Line Abreast
Phases: 1, 3
|
 
|
43/85
189/378
|
Echelon
Line Abreast
Phases: 1, 2, 3
|
|
78/155
348/696
|
Echelon
Line Abreast
Phases: 1, 2, 3
|
|
85/169
378/756
|
| #
|
Formation
|
Supported Battle Node
|
AD/AP
AS/AS+
|
E-2 Hard B1: 深海潜水艦隊 種子島沖哨戒群 (
PoiDB)
| #
|
Formation
|
Normal Battle Node
|
AD/AP
AS/AS+
|
| B1
|
Echelon
Line Abreast
|
|
0/0
0/0
|
Echelon
Line Abreast
Phases: 1, 3
|
|
0/0
0/0
|
Echelon
Line Abreast
Phases: 1, 3
|
|
0/0
0/0
|
| #
|
Formation
|
Normal Battle Node
|
AD/AP
AS/AS+
|
E-2 Hard B2: 深海空母機動部隊 艦載機群 (
PoiDB)
| #
|
Formation
|
Air Defense Node
|
AD/AP
AS/AS+
|
| B2
|
Diamond
Phases: 1
|
  
|
92/184
413/825
|
Diamond
Phases: 1, 3
|
|
63/125
279/558
|
Diamond
Phases: 1, 3
|
|
86/171
384/768
|
| #
|
Formation
|
Air Defense Node
|
AD/AP
AS/AS+
|
E-2 Hard C: 深海任務部隊 ピケット艦隊 II群 (
PoiDB)
| #
|
Formation
|
Normal Battle Node
|
AD/AP
AS/AS+
|
| C
|
Line Ahead
Echelon
Phases: 1, 2, 3
|
|
0/0
0/0
|
Line Ahead
Phases: 1
|
|
0/0
0/0
|
| #
|
Formation
|
Normal Battle Node
|
AD/AP
AS/AS+
|
E-2 Hard D: 深海空母機動部隊 艦載機群 (
PoiDB)
| #
|
Formation
|
Air Defense Node
|
AD/AP
AS/AS+
|
| D
|
Diamond
Phases: 1, 3
|
|
92/184
413/825
|
Diamond
Phases: 1, 3
|
|
63/125
279/558
|
Diamond
Phases: 1, 3
|
|
86/171
384/768
|
| #
|
Formation
|
Air Defense Node
|
AD/AP
AS/AS+
|
E-2 Hard E: 深海任務部隊 護衛空母群 A戦隊 (
PoiDB)
| #
|
Formation
|
Normal Battle Node
|
AD/AP
AS/AS+
|
| E
|
Double Line
Diamond
Phases: 1, 2, 3
|
|
45/89
198/396
|
Diamond
Phases: 1
|
|
89/177
396/792
|
| #
|
Formation
|
Normal Battle Node
|
AD/AP
AS/AS+
|
E-2 Hard E1
| #
|
Empty Node
|
| E1
|
敵影を見ず。
No enemy spotted.
|
| #
|
Empty Node
|
E-2 Hard E2: 深海任務部隊 戦艦戦隊 (
PoiDB)
| #
|
Formation
|
Normal Battle Node
|
AD/AP
AS/AS+
|
| E2
|
Line Ahead
Double Line
Phases: 1, 3
|
 
|
0/0
0/0
|
Line Ahead
Phases: 3
|
|
0/0
0/0
|
| #
|
Formation
|
Normal Battle Node
|
AD/AP
AS/AS+
|
E-2 Hard F
| #
|
Selection Node
|
| F
|
艦隊の針路を選択できます。提督、どちらの針路をとられますか?
You can decide the fleet's course. Admiral, which heading should we take?
|
| #
|
Selection Node
|
E-2 Hard F1: 深海空母機動部隊 艦載機群 (
PoiDB)
| #
|
Formation
|
Air Defense Node
|
AD/AP
AS/AS+
|
| F1
|
Diamond
Phases: 1, 3
|
|
92/184
413/825
|
Diamond
Phases: 1, 3
|
|
63/125
279/558
|
Diamond
Phases: 1, 3
|
|
86/171
384/768
|
| #
|
Formation
|
Air Defense Node
|
AD/AP
AS/AS+
|
E-2 Hard F2: 深海潜水艦隊・深海航空支援 (
PoiDB)
| #
|
Formation
|
Supported Battle Node
|
AD/AP
AS/AS+
|
| F2
|
Echelon
Line Abreast
Phases: 2, 3
|

|
43/85
189/378
|
Echelon
Line Abreast
Phases: 2, 3
|
|
36/71
159/318
|
Echelon
Line Abreast
Phases: 2, 3
|
|
36/71
159/318
|
| #
|
Formation
|
Supported Battle Node
|
AD/AP
AS/AS+
|
E-2 Hard G: 深海任務部隊 兵站補給部隊主隊 (
PoiDB)
E-2 Hard H: 深海任務部隊 ピケット艦隊 I群 (
PoiDB)
| #
|
Formation
|
Normal Battle Node
|
AD/AP
AS/AS+
|
| H
|
Line Ahead
Echelon
Phases: 2, 3
|
|
0/0
0/0
|
Line Ahead
Phases: 2
|
|
0/0
0/0
|
| #
|
Formation
|
Normal Battle Node
|
AD/AP
AS/AS+
|
E-2 Hard H1: 深海空母機動部隊 艦載機群 (
PoiDB)
| #
|
Formation
|
Air Defense Node
|
AD/AP
AS/AS+
|
| H1
|
Diamond
Phases: 2
|
|
92/184
413/825
|
Diamond
Phases: 2
|
|
63/125
279/558
|
Diamond
Phases: 2, 3
|
|
86/171
384/768
|
| #
|
Formation
|
Air Defense Node
|
AD/AP
AS/AS+
|
E-2 Hard H2
| #
|
Empty Node
|
| H2
|
敵影を見ず。
No enemy spotted.
|
| #
|
Empty Node
|
E-2 Hard I: 深海潜水艦隊 沖縄沖哨戒群 (
PoiDB)
| #
|
Formation
|
Normal Battle Node
|
AD/AP
AS/AS+
|
| I
|
Echelon
Line Abreast
Phases: 2
|
|
0/0
0/0
|
Echelon
Line Abreast
Phases: 2
|
|
0/0
0/0
|
Echelon
Line Abreast
Phases: 2, 3
|
|
0/0
0/0
|
| #
|
Formation
|
Normal Battle Node
|
AD/AP
AS/AS+
|
E-2 Hard J: 深海上陸侵攻部隊 上陸橋頭堡 (
PoiDB)
E-2 Hard K: 深海潜水艦隊 台湾沖哨戒線 I群 (
PoiDB)
| #
|
Formation
|
Normal Battle Node
|
AD/AP
AS/AS+
|
| K
|
Echelon
Line Abreast
Phases: 3
|

|
0/0
0/0
|
Echelon
Line Abreast
Phases: 3
|
|
0/0
0/0
|
Echelon
Line Abreast
Phases: 3
|
|
0/0
0/0
|
| #
|
Formation
|
Normal Battle Node
|
AD/AP
AS/AS+
|
| #
|
Formation
|
Normal Battle Node
|
AD/AP
AS/AS+
|
| #
|
Formation
|
Normal Battle Node
|
AD/AP
AS/AS+
|
E-2 Hard M: 深海潜水艦隊・深海航空支援 (
PoiDB)
| #
|
Formation
|
Supported Battle Node
|
AD/AP
AS/AS+
|
| M
|
Echelon
Line Abreast
Phases: 3
|
|
100/199
447/894
|
Echelon
Line Abreast
Phases: 3
|
|
106/212
476/951
|
Echelon
Line Abreast
Phases: 3
|
|
113/225
504/1008
|
| #
|
Formation
|
Supported Battle Node
|
AD/AP
AS/AS+
|
E-2 Hard N: 深海空母機動部隊 艦載機群 (
PoiDB)
| #
|
Formation
|
Air Defense Node
|
AD/AP
AS/AS+
|
| N
|
Diamond
Phases: 3
|
|
157/314
705/1410
|
Diamond
Phases: 3
|
|
207/413
929/1857
|
| #
|
Formation
|
Air Defense Node
|
AD/AP
AS/AS+
|
E-2 Hard O: 深海任務部隊 護衛空母群 B戦隊 (
PoiDB)
| #
|
Formation
|
Normal Battle Node
|
AD/AP
AS/AS+
|
| O
|
Double Line
Diamond
Phases: 3
|
|
45/89
198/396
|
Diamond
Phases: 3
|
|
89/177
396/792
|
| #
|
Formation
|
Normal Battle Node
|
AD/AP
AS/AS+
|
E-2 Hard P: 深海潜水艦隊・深海航空支援 (
PoiDB)
| #
|
Formation
|
Supported Battle Node
|
AD/AP
AS/AS+
|
| P
|
Echelon
Line Abreast
|
|
106/212
476/951
|
| Line Abreast
|
|
113/225
504/1008
|
| #
|
Formation
|
Supported Battle Node
|
AD/AP
AS/AS+
|
E-2 Hard Q
| #
|
Selection Node
|
| Q
|
艦隊の針路を選択できます。提督、どちらの針路をとられますか?
You can decide the fleet's course. Admiral, which heading should we take?
|
| #
|
Selection Node
|
E-2 Hard R: 深海空母機動部隊 艦載機群 (
PoiDB)
| #
|
Formation
|
Air Defense Node
|
AD/AP
AS/AS+
|
| R
|
Diamond
Phases: 3
|
|
157/314
705/1410
|
Diamond
Phases: 3
|
|
207/413
929/1857
|
| #
|
Formation
|
Air Defense Node
|
AD/AP
AS/AS+
|
E-2 Hard S
| #
|
Empty Node
|
| S
|
敵影を見ず。
No enemy spotted.
|
| #
|
Empty Node
|
E-2 Hard T: 深海任務部隊 兵站輸送船団 (
PoiDB)
| #
|
Formation
|
Normal Battle Node
|
AD/AP
AS/AS+
|
| T
|
Double Line
Diamond
Vanguard
Phases: 3
|
|
45/89
198/396
|
| #
|
Formation
|
Normal Battle Node
|
AD/AP
AS/AS+
|
E-2 Hard U: 深海任務部隊 護衛空母群 C戦隊 (
PoiDB)
| #
|
Formation
|
Normal Battle Node
|
AD/AP
AS/AS+
|
| U
|
Double Line
Diamond
Phases: 3
|
|
45/89
198/396
|
Diamond
Phases: 3
|
|
89/177
396/792
|
| #
|
Formation
|
Normal Battle Node
|
AD/AP
AS/AS+
|
E-2 Hard V
| #
|
Empty Node
|
| V
|
気のせいだった。
Must be my imagination.
|
| #
|
Empty Node
|
E-2 Hard W: 深海任務部隊 空母機動部隊主力 (
PoiDB)
E-2 Medium AB
| #
|
Formation
|
Air Raids
|
AD/AP
AS/AS+
|
| AB
|
Diamond
|

|
136/272
611/1221
|
| Diamond
|
|
182/363
815/1629
|
| Diamond
|
|
210/419
941/1881
|
| #
|
Formation
|
Air Raids
|
AD/AP
AS/AS+
|
E-2 Medium A: 深海空母機動部隊 艦載機群 (
PoiDB)
| #
|
Formation
|
Air Defense Node
|
AD/AP
AS/AS+
|
| A
|
Diamond
Phases: 1, 2, 3
|
|
44/87
195/390
|
Diamond
Phases: 1
|
|
71/142
318/636
|
Diamond
Phases: 1, 2, 3
|
|
78/155
348/696
|
| #
|
Formation
|
Air Defense Node
|
AD/AP
AS/AS+
|
E-2 Medium B: 深海潜水艦隊・深海航空支援 (
PoiDB)
| #
|
Formation
|
Supported Battle Node
|
AD/AP
AS/AS+
|
| B
|
Echelon
Line Abreast
Phases: 1, 2, 3
|
|
9/17
36/72
|
Echelon
Line Abreast
Phases: 1, 2, 3
|
|
43/85
189/378
|
Echelon
Line Abreast
Phases: 1, 2, 3
|
|
43/85
189/378
|
| #
|
Formation
|
Supported Battle Node
|
AD/AP
AS/AS+
|
E-2 Medium B1: 深海潜水艦隊 種子島沖哨戒群 (
PoiDB)
| #
|
Formation
|
Normal Battle Node
|
AD/AP
AS/AS+
|
| B1
|
Echelon
Line Abreast
Phases: 1, 3
|
|
0/0
0/0
|
Echelon
Line Abreast
Phases: 1, 3
|
|
0/0
0/0
|
Echelon
Line Abreast
Phases: 1, 3
|
|
0/0
0/0
|
| #
|
Formation
|
Normal Battle Node
|
AD/AP
AS/AS+
|
E-2 Medium B2: 深海空母機動部隊 艦載機群 (
PoiDB)
| #
|
Formation
|
Air Defense Node
|
AD/AP
AS/AS+
|
| B2
|
Diamond
Phases: 1, 3
|
 
|
52/103
231/462
|
Diamond
Phases: 1, 3
|
|
77/153
344/687
|
Diamond
Phases: 1
|
|
81/162
363/726
|
| #
|
Formation
|
Air Defense Node
|
AD/AP
AS/AS+
|
E-2 Medium C: 深海任務部隊 ピケット艦隊 II群 (
PoiDB)
| #
|
Formation
|
Normal Battle Node
|
AD/AP
AS/AS+
|
| C
|
Line Ahead
Echelon
Phases: 1, 2, 3
|
 
|
0/0
0/0
|
Line Ahead
Phases: 1
|
|
0/0
0/0
|
| #
|
Formation
|
Normal Battle Node
|
AD/AP
AS/AS+
|
E-2 Medium D: 深海空母機動部隊 艦載機群 (
PoiDB)
| #
|
Formation
|
Air Defense Node
|
AD/AP
AS/AS+
|
| D
|
Diamond
Phases: 1, 2, 3
|
|
52/103
231/462
|
Diamond
Phases: 1, 3
|
|
77/153
344/687
|
Diamond
Phases: 1, 3
|
|
81/162
363/726
|
| #
|
Formation
|
Air Defense Node
|
AD/AP
AS/AS+
|
E-2 Medium E: 深海任務部隊 護衛空母群 A戦隊 (
PoiDB)
| #
|
Formation
|
Normal Battle Node
|
AD/AP
AS/AS+
|
| E
|
Double Line
Diamond
Phases: 1, 2, 3
|
|
36/71
159/318
|
Diamond
Phases: 1
|
|
71/142
318/636
|
| #
|
Formation
|
Normal Battle Node
|
AD/AP
AS/AS+
|
E-2 Medium E1
| #
|
Empty Node
|
| E1
|
敵影を見ず。
No enemy spotted.
|
| #
|
Empty Node
|
E-2 Medium E2: 深海任務部隊 戦艦戦隊 (
PoiDB)
| #
|
Formation
|
Normal Battle Node
|
AD/AP
AS/AS+
|
| E2
|
Line Ahead
Double Line
Phases: 1, 3
|
|
0/0
0/0
|
Line Ahead
Phases: 3
|
|
0/0
0/0
|
| #
|
Formation
|
Normal Battle Node
|
AD/AP
AS/AS+
|
E-2 Medium F
| #
|
Selection Node
|
| F
|
艦隊の針路を選択できます。提督、どちらの針路をとられますか?
You can decide the fleet's course. Admiral, which heading should we take?
|
| #
|
Selection Node
|
E-2 Medium F1: 深海空母機動部隊 艦載機群 (
PoiDB)
| #
|
Formation
|
Air Defense Node
|
AD/AP
AS/AS+
|
| F1
|
Diamond
Phases: 1, 3
|
|
52/103
231/462
|
Diamond
Phases: 1, 3
|
|
77/153
344/687
|
Diamond
Phases: 1, 3
|
|
81/162
363/726
|
| #
|
Formation
|
Air Defense Node
|
AD/AP
AS/AS+
|
E-2 Medium F2: 深海潜水艦隊・深海航空支援 (
PoiDB)
| #
|
Formation
|
Supported Battle Node
|
AD/AP
AS/AS+
|
| F2
|
Echelon
Line Abreast
Phases: 1, 2, 3
|
|
9/17
36/72
|
Echelon
Line Abreast
Phases: 2, 3
|
|
43/85
189/378
|
Echelon
Line Abreast
Phases: 2, 3
|
|
43/85
189/378
|
| #
|
Formation
|
Supported Battle Node
|
AD/AP
AS/AS+
|
E-2 Medium G: 深海任務部隊 兵站補給部隊主隊 (
PoiDB)
E-2 Medium H: 深海任務部隊 ピケット艦隊 I群 (
PoiDB)
| #
|
Formation
|
Normal Battle Node
|
AD/AP
AS/AS+
|
| H
|
Line Ahead
Echelon
Phases: 2, 3
|
|
0/0
0/0
|
Line Ahead
Phases: 2
|
|
0/0
0/0
|
| #
|
Formation
|
Normal Battle Node
|
AD/AP
AS/AS+
|
E-2 Medium H1: 深海空母機動部隊 艦載機群 (
PoiDB)
| #
|
Formation
|
Air Defense Node
|
AD/AP
AS/AS+
|
| H1
|
Diamond
Phases: 2
|
|
52/103
231/462
|
Diamond
Phases: 2, 3
|
|
77/153
344/687
|
Diamond
Phases: 2, 3
|
|
81/162
363/726
|
| #
|
Formation
|
Air Defense Node
|
AD/AP
AS/AS+
|
E-2 Medium H2
| #
|
Empty Node
|
| H2
|
敵影を見ず。
No enemy spotted.
|
| #
|
Empty Node
|
E-2 Medium I: 深海潜水艦隊 沖縄沖哨戒群 (
PoiDB)
| #
|
Formation
|
Normal Battle Node
|
AD/AP
AS/AS+
|
| I
|
Echelon
Line Abreast
Phases: 3
|
|
0/0
0/0
|
Echelon
Line Abreast
Phases: 2, 3
|
|
0/0
0/0
|
Echelon
Line Abreast
Phases: 2, 3
|
|
0/0
0/0
|
| #
|
Formation
|
Normal Battle Node
|
AD/AP
AS/AS+
|
E-2 Medium J: 深海上陸侵攻部隊 上陸橋頭堡 (
PoiDB)
E-2 Medium K: 深海潜水艦隊 台湾沖哨戒線 I群 (
PoiDB)
| #
|
Formation
|
Normal Battle Node
|
AD/AP
AS/AS+
|
| K
|
Echelon
Line Abreast
Phases: 3
|

|
0/0
0/0
|
Echelon
Line Abreast
Phases: 3
|
|
0/0
0/0
|
Echelon
Line Abreast
Phases: 3
|
|
0/0
0/0
|
| #
|
Formation
|
Normal Battle Node
|
AD/AP
AS/AS+
|
E-2 Medium L: 深海潜水艦隊 台湾沖哨戒線 II群 (
PoiDB)
| #
|
Formation
|
Normal Battle Node
|
AD/AP
AS/AS+
|
| L
|
Echelon
|
|
0/0
0/0
|
| #
|
Formation
|
Normal Battle Node
|
AD/AP
AS/AS+
|
E-2 Medium M: 深海潜水艦隊・深海航空支援 (
PoiDB)
| #
|
Formation
|
Supported Battle Node
|
AD/AP
AS/AS+
|
| M
|
Echelon
Line Abreast
Phases: 3
|
|
46/91
204/408
|
Echelon
Line Abreast
Phases: 3
|
|
91/182
408/816
|
Echelon
Line Abreast
Phases: 3
|
|
100/199
447/894
|
| #
|
Formation
|
Supported Battle Node
|
AD/AP
AS/AS+
|
E-2 Medium N: 深海空母機動部隊 艦載機群 (
PoiDB)
| #
|
Formation
|
Air Defense Node
|
AD/AP
AS/AS+
|
| N
|
Diamond
Phases: 3
|
|
136/272
611/1221
|
Diamond
Phases: 3
|
|
182/363
815/1629
|
Diamond
Phases: 3
|
|
210/419
941/1881
|
| #
|
Formation
|
Air Defense Node
|
AD/AP
AS/AS+
|
E-2 Medium O: 深海任務部隊 護衛空母群 B戦隊 (
PoiDB)
| #
|
Formation
|
Normal Battle Node
|
AD/AP
AS/AS+
|
| O
|
Double Line
Diamond
Phases: 3
|
|
36/71
159/318
|
Diamond
Phases: 3
|
|
71/142
318/636
|
| #
|
Formation
|
Normal Battle Node
|
AD/AP
AS/AS+
|
E-2 Medium P: 深海潜水艦隊・深海航空支援 (
PoiDB)
| #
|
Formation
|
Supported Battle Node
|
AD/AP
AS/AS+
|
| P
|
Echelon
Line Abreast
|
|
46/91
204/408
|
Echelon
Line Abreast
Phases: 3
|
|
91/182
408/816
|
Echelon
Line Abreast
Phases: 3
|
|
100/199
447/894
|
| #
|
Formation
|
Supported Battle Node
|
AD/AP
AS/AS+
|
E-2 Medium Q
| #
|
Selection Node
|
| Q
|
艦隊の針路を選択できます。提督、どちらの針路をとられますか?
You can decide the fleet's course. Admiral, which heading should we take?
|
| #
|
Selection Node
|
E-2 Medium R: 深海空母機動部隊 艦載機群 (
PoiDB)
| #
|
Formation
|
Air Defense Node
|
AD/AP
AS/AS+
|
| R
|
Diamond
Phases: 3
|
|
136/272
611/1221
|
Diamond
Phases: 3
|
|
182/363
815/1629
|
Diamond
Phases: 3
|
|
210/419
941/1881
|
| #
|
Formation
|
Air Defense Node
|
AD/AP
AS/AS+
|
E-2 Medium S
| #
|
Empty Node
|
| S
|
敵影を見ず。
No enemy spotted.
|
| #
|
Empty Node
|
E-2 Medium T: 深海任務部隊 兵站輸送船団 (
PoiDB)
| #
|
Formation
|
Normal Battle Node
|
AD/AP
AS/AS+
|
| T
|
Double Line
Diamond
Vanguard
Phases: 3
|
|
36/71
159/318
|
| #
|
Formation
|
Normal Battle Node
|
AD/AP
AS/AS+
|
E-2 Medium U: 深海任務部隊 護衛空母群 C戦隊 (
PoiDB)
| #
|
Formation
|
Normal Battle Node
|
AD/AP
AS/AS+
|
| U
|
Double Line
Diamond
Phases: 3
|
|
36/71
159/318
|
Diamond
Phases: 3
|
|
71/142
318/636
|
| #
|
Formation
|
Normal Battle Node
|
AD/AP
AS/AS+
|
E-2 Medium V
| #
|
Empty Node
|
| V
|
気のせいだった。
Must be my imagination.
|
| #
|
Empty Node
|
E-2 Medium W: 深海任務部隊 空母機動部隊主力 (
PoiDB)
E-2 Easy AB
| #
|
Formation
|
Air Raids
|
AD/AP
AS/AS+
|
| AB
|
Diamond
|
|
125/250
561/1122
|
| Diamond
|
|
165/330
741/1482
|
| Diamond
|
|
188/376
845/1689
|
| #
|
Formation
|
Air Raids
|
AD/AP
AS/AS+
|
E-2 Easy A: 深海空母機動部隊 艦載機群 (
PoiDB)
| #
|
Formation
|
Air Defense Node
|
AD/AP
AS/AS+
|
| A
|
Diamond
Phases: 1, 2, 3
|

|
45/90
201/402
|
Diamond
Phases: 1, 2, 3
|
|
51/101
225/450
|
Diamond
Phases: 1
|
|
85/169
378/756
|
| #
|
Formation
|
Air Defense Node
|
AD/AP
AS/AS+
|
E-2 Easy B: 深海潜水艦隊・深海航空支援 (
PoiDB)
| #
|
Formation
|
Supported Battle Node
|
AD/AP
AS/AS+
|
| B
|
Echelon
Line Abreast
Phases: 1, 2, 3
|
|
3/6
12/24
|
Echelon
Line Abreast
Phases: 1, 2, 3
|
|
9/17
36/72
|
Echelon
Line Abreast
Phases: 1, 2, 3
|
|
43/85
189/378
|
| #
|
Formation
|
Supported Battle Node
|
AD/AP
AS/AS+
|
E-2 Easy B1: 深海潜水艦隊 種子島沖哨戒群 (
PoiDB)
| #
|
Formation
|
Normal Battle Node
|
AD/AP
AS/AS+
|
| B1
|
Echelon
Line Abreast
Phases: 1
|
|
0/0
0/0
|
Echelon
Line Abreast
Phases: 1, 3
|
|
0/0
0/0
|
Echelon
Line Abreast
Phases: 1, 3
|
|
0/0
0/0
|
| #
|
Formation
|
Normal Battle Node
|
AD/AP
AS/AS+
|
E-2 Easy B2: 深海空母機動部隊 艦載機群 (
PoiDB)
| #
|
Formation
|
Air Defense Node
|
AD/AP
AS/AS+
|
| B2
|
Diamond
Phases: 1, 3
|

|
47/93
207/414
|
Diamond
Phases: 1, 3
|
|
64/127
284/567
|
Diamond
Phases: 1
|
|
72/143
320/639
|
| #
|
Formation
|
Air Defense Node
|
AD/AP
AS/AS+
|
E-2 Easy C: 深海任務部隊 ピケット艦隊 II群 (
PoiDB)
| #
|
Formation
|
Normal Battle Node
|
AD/AP
AS/AS+
|
| C
|
Line Ahead
Echelon
Phases: 1, 2, 3
|
|
0/0
0/0
|
Line Ahead
Phases: 1
|
|
0/0
0/0
|
| #
|
Formation
|
Normal Battle Node
|
AD/AP
AS/AS+
|
E-2 Easy D: 深海空母機動部隊 艦載機群 (
PoiDB)
| #
|
Formation
|
Air Defense Node
|
AD/AP
AS/AS+
|
| D
|
Diamond
Phases: 1, 2, 3
|
|
47/93
207/414
|
Diamond
Phases: 1, 2, 3
|
|
64/127
284/567
|
Diamond
Phases: 1, 2, 3
|
|
72/143
320/639
|
| #
|
Formation
|
Air Defense Node
|
AD/AP
AS/AS+
|
E-2 Easy E: 深海任務部隊 護衛空母群 A戦隊 (
PoiDB)
| #
|
Formation
|
Normal Battle Node
|
AD/AP
AS/AS+
|
| E
|
Double Line
Diamond
Phases: 1, 2, 3
|
|
51/101
225/450
|
Diamond
Phases: 1
|
|
85/169
378/756
|
| #
|
Formation
|
Normal Battle Node
|
AD/AP
AS/AS+
|
E-2 Easy E1
| #
|
Empty Node
|
| E1
|
敵影を見ず。
No enemy spotted.
|
| #
|
Empty Node
|
E-2 Easy E2: 深海任務部隊 戦艦戦隊 (
PoiDB)
| #
|
Formation
|
Normal Battle Node
|
AD/AP
AS/AS+
|
| E2
|
Line Ahead
Double Line
Phases: 1, 2, 3
|
|
0/0
0/0
|
Line Ahead
Phases: 3
|
|
0/0
0/0
|
| #
|
Formation
|
Normal Battle Node
|
AD/AP
AS/AS+
|
E-2 Easy F
| #
|
Selection Node
|
| F
|
艦隊の針路を選択できます。提督、どちらの針路をとられますか?
You can decide the fleet's course. Admiral, which heading should we take?
|
| #
|
Selection Node
|
E-2 Easy F1: 深海空母機動部隊 艦載機群 (
PoiDB)
| #
|
Formation
|
Air Defense Node
|
AD/AP
AS/AS+
|
| F1
|
Diamond
Phases: 1, 3
|
|
47/93
207/414
|
Diamond
Phases: 1, 2, 3
|
|
64/127
284/567
|
Diamond
Phases: 1, 3
|
|
72/143
320/639
|
| #
|
Formation
|
Air Defense Node
|
AD/AP
AS/AS+
|
E-2 Easy F2: 深海潜水艦隊・深海航空支援 (
PoiDB)
| #
|
Formation
|
Supported Battle Node
|
AD/AP
AS/AS+
|
| F2
|
Echelon
Line Abreast
Phases: 1, 2, 3
|
|
3/6
12/24
|
Echelon
Line Abreast
Phases: 1, 2, 3
|
|
9/17
36/72
|
Echelon
Line Abreast
Phases: 1, 2, 3
|
|
43/85
189/378
|
| #
|
Formation
|
Supported Battle Node
|
AD/AP
AS/AS+
|
E-2 Easy G: 深海任務部隊 兵站補給部隊主隊 (
PoiDB)
E-2 Easy H: 深海任務部隊 ピケット艦隊 I群 (
PoiDB)
| #
|
Formation
|
Normal Battle Node
|
AD/AP
AS/AS+
|
| H
|
Line Ahead
Echelon
Phases: 2, 3
|
|
0/0
0/0
|
Line Ahead
Phases: 2
|
|
0/0
0/0
|
| #
|
Formation
|
Normal Battle Node
|
AD/AP
AS/AS+
|
E-2 Easy H1: 深海空母機動部隊 艦載機群 (
PoiDB)
| #
|
Formation
|
Air Defense Node
|
AD/AP
AS/AS+
|
| H1
|
Diamond
Phases: 2, 3
|
|
47/93
207/414
|
Diamond
Phases: 2, 3
|
|
64/127
284/567
|
Diamond
Phases: 3
|
|
72/143
320/639
|
| #
|
Formation
|
Air Defense Node
|
AD/AP
AS/AS+
|
E-2 Easy H2
| #
|
Empty Node
|
| H2
|
敵影を見ず。
No enemy spotted.
|
| #
|
Empty Node
|
E-2 Easy I: 深海潜水艦隊 沖縄沖哨戒群 (
PoiDB)
| #
|
Formation
|
Normal Battle Node
|
AD/AP
AS/AS+
|
| I
|
Echelon
Line Abreast
Phases: 2
|
|
0/0
0/0
|
Echelon
Line Abreast
Phases: 2
|
|
0/0
0/0
|
Echelon
Line Abreast
Phases: 2, 3
|
|
0/0
0/0
|
| #
|
Formation
|
Normal Battle Node
|
AD/AP
AS/AS+
|
E-2 Easy J: 深海上陸侵攻部隊 上陸橋頭堡 (
PoiDB)
E-2 Easy K: 深海潜水艦隊 台湾沖哨戒線 I群 (
PoiDB)
| #
|
Formation
|
Normal Battle Node
|
AD/AP
AS/AS+
|
| K
|
Echelon
Line Abreast
Phases: 3
|

|
0/0
0/0
|
Echelon
Line Abreast
Phases: 3
|
|
0/0
0/0
|
Echelon
Line Abreast
Phases: 3
|
|
0/0
0/0
|
| #
|
Formation
|
Normal Battle Node
|
AD/AP
AS/AS+
|
E-2 Easy L: 深海潜水艦隊 台湾沖哨戒線 II群 (
PoiDB)
| #
|
Formation
|
Normal Battle Node
|
AD/AP
AS/AS+
|
| L
|
Line Abreast
Phases: 3
|
|
0/0
0/0
|
Line Abreast
Phases: 3
|
|
0/0
0/0
|
Echelon
Line Abreast
Phases: 3
|
|
0/0
0/0
|
| #
|
Formation
|
Normal Battle Node
|
AD/AP
AS/AS+
|
E-2 Easy M: 深海潜水艦隊・深海航空支援 (
PoiDB)
| #
|
Formation
|
Supported Battle Node
|
AD/AP
AS/AS+
|
| M
|
Echelon
Line Abreast
Phases: 3
|
|
41/81
180/360
|
Echelon
Line Abreast
Phases: 3
|
|
46/91
204/408
|
Echelon
Line Abreast
Phases: 3
|
|
91/182
408/816
|
| #
|
Formation
|
Supported Battle Node
|
AD/AP
AS/AS+
|
E-2 Easy N: 深海空母機動部隊 艦載機群 (
PoiDB)
| #
|
Formation
|
Air Defense Node
|
AD/AP
AS/AS+
|
| N
|
Diamond
Phases: 3
|
|
125/250
561/1122
|
Diamond
Phases: 3
|
|
165/330
741/1482
|
Diamond
Phases: 3
|
|
188/376
845/1689
|
| #
|
Formation
|
Air Defense Node
|
AD/AP
AS/AS+
|
E-2 Easy O: 深海任務部隊 護衛空母群 B戦隊 (
PoiDB)
| #
|
Formation
|
Normal Battle Node
|
AD/AP
AS/AS+
|
| O
|
Double Line
Diamond
Phases: 3
|
|
51/101
225/450
|
Diamond
Phases: 3
|
|
85/169
378/756
|
| #
|
Formation
|
Normal Battle Node
|
AD/AP
AS/AS+
|
E-2 Easy P: 深海潜水艦隊・深海航空支援 (
PoiDB)
| #
|
Formation
|
Supported Battle Node
|
AD/AP
AS/AS+
|
| P
|
Line Abreast
|
|
41/81
180/360
|
Echelon
Line Abreast
Phases: 3
|
|
46/91
204/408
|
Echelon
Line Abreast
Phases: 3
|
|
91/182
408/816
|
| #
|
Formation
|
Supported Battle Node
|
AD/AP
AS/AS+
|
E-2 Easy Q
| #
|
Selection Node
|
| Q
|
艦隊の針路を選択できます。提督、どちらの針路をとられますか?
You can decide the fleet's course. Admiral, which heading should we take?
|
| #
|
Selection Node
|
E-2 Easy R: 深海空母機動部隊 艦載機群 (
PoiDB)
| #
|
Formation
|
Air Defense Node
|
AD/AP
AS/AS+
|
| R
|
Diamond
Phases: 3
|
|
125/250
561/1122
|
Diamond
Phases: 3
|
|
165/330
741/1482
|
Diamond
Phases: 3
|
|
188/376
845/1689
|
| #
|
Formation
|
Air Defense Node
|
AD/AP
AS/AS+
|
E-2 Easy S
| #
|
Empty Node
|
| S
|
敵影を見ず。
No enemy spotted.
|
| #
|
Empty Node
|
E-2 Easy T: 深海任務部隊 兵站輸送船団 (
PoiDB)
| #
|
Formation
|
Normal Battle Node
|
AD/AP
AS/AS+
|
| T
|
Double Line
Diamond
Vanguard
Phases: 3
|
|
43/85
189/378
|
| #
|
Formation
|
Normal Battle Node
|
AD/AP
AS/AS+
|
E-2 Easy U: 深海任務部隊 護衛空母群 C戦隊 (
PoiDB)
| #
|
Formation
|
Normal Battle Node
|
AD/AP
AS/AS+
|
| U
|
Double Line
Diamond
Phases: 3
|
|
51/101
225/450
|
Diamond
Phases: 3
|
|
85/169
378/756
|
| #
|
Formation
|
Normal Battle Node
|
AD/AP
AS/AS+
|
E-2 Easy V
| #
|
Empty Node
|
| V
|
気のせいだった。
Must be my imagination.
|
| #
|
Empty Node
|
E-2 Easy W: 深海任務部隊 空母機動部隊主力 (
PoiDB)
E-2 Casual AB
| #
|
Formation
|
Air Raids
|
AD/AP
AS/AS+
|
| AB
|
Diamond
|

|
89/177
396/792
|
| Diamond
|
|
126/251
564/1128
|
| Diamond
|
|
178/355
798/1596
|
| #
|
Formation
|
Air Raids
|
AD/AP
AS/AS+
|
E-2 Casual A: 深海空母機動部隊 艦載機群 (
PoiDB)
| #
|
Formation
|
Air Defense Node
|
AD/AP
AS/AS+
|
| A
|
Diamond
Phases: 1, 2, 3
|
|
43/85
189/378
|
Diamond
Phases: 1, 2, 3
|
|
45/90
201/402
|
Diamond
Phases: 1
|
|
51/101
225/450
|
| #
|
Formation
|
Air Defense Node
|
AD/AP
AS/AS+
|
E-2 Casual B: 深海潜水艦隊・深海航空支援 (
PoiDB)
| #
|
Formation
|
Supported Battle Node
|
AD/AP
AS/AS+
|
| B
|
Echelon
Line Abreast
Phases: 1, 2, 3
|
|
3/6
12/24
|
Echelon
Line Abreast
Phases: 1, 2, 3
|
|
9/17
36/72
|
| #
|
Formation
|
Supported Battle Node
|
AD/AP
AS/AS+
|
E-2 Casual B1: 深海潜水艦隊 種子島沖哨戒群 (
PoiDB)
| #
|
Formation
|
Normal Battle Node
|
AD/AP
AS/AS+
|
| B1
|
Echelon
Line Abreast
Phases: 1, 3
|
|
0/0
0/0
|
Echelon
Line Abreast
Phases: 1
|
|
0/0
0/0
|
| #
|
Formation
|
Normal Battle Node
|
AD/AP
AS/AS+
|
E-2 Casual B2: 深海空母機動部隊 艦載機群 (
PoiDB)
| #
|
Formation
|
Air Defense Node
|
AD/AP
AS/AS+
|
| B2
|
Diamond
Phases: 1, 3
|

|
24/47
104/207
|
Diamond
Phases: 1, 3
|
|
32/63
140/279
|
Diamond
Phases: 1
|
|
64/127
284/567
|
| #
|
Formation
|
Air Defense Node
|
AD/AP
AS/AS+
|
E-2 Casual C: 深海任務部隊 ピケット艦隊 II群 (
PoiDB)
| #
|
Formation
|
Normal Battle Node
|
AD/AP
AS/AS+
|
| C
|
Line Ahead
Echelon
Phases: 1, 2, 3
|

|
0/0
0/0
|
Line Ahead
Phases: 1
|
|
0/0
0/0
|
| #
|
Formation
|
Normal Battle Node
|
AD/AP
AS/AS+
|
E-2 Casual D: 深海空母機動部隊 艦載機群 (
PoiDB)
| #
|
Formation
|
Air Defense Node
|
AD/AP
AS/AS+
|
| D
|
Diamond
Phases: 1, 3
|
|
24/47
104/207
|
Diamond
Phases: 1, 3
|
|
32/63
140/279
|
Diamond
Phases: 1, 3
|
|
64/127
284/567
|
| #
|
Formation
|
Air Defense Node
|
AD/AP
AS/AS+
|
E-2 Casual E: 深海任務部隊 護衛空母群 A戦隊 (
PoiDB)
| #
|
Formation
|
Normal Battle Node
|
AD/AP
AS/AS+
|
| E
|
Double Line
Diamond
Phases: 1, 2, 3
|
|
43/85
189/378
|
Diamond
Phases: 1
|
|
45/90
201/402
|
| #
|
Formation
|
Normal Battle Node
|
AD/AP
AS/AS+
|
E-2 Casual E1
| #
|
Empty Node
|
| E1
|
敵影を見ず。
No enemy spotted.
|
| #
|
Empty Node
|
E-2 Casual E2: 深海任務部隊 戦艦戦隊 (
PoiDB)
| #
|
Formation
|
Normal Battle Node
|
AD/AP
AS/AS+
|
| E2
|
Line Ahead
Double Line
Phases: 1, 2, 3
|
|
0/0
0/0
|
Line Ahead
Phases: 3
|
|
0/0
0/0
|
| #
|
Formation
|
Normal Battle Node
|
AD/AP
AS/AS+
|
E-2 Casual F
| #
|
Selection Node
|
| F
|
艦隊の針路を選択できます。提督、どちらの針路をとられますか?
You can decide the fleet's course. Admiral, which heading should we take?
|
| #
|
Selection Node
|
E-2 Casual F1: 深海空母機動部隊 艦載機群 (
PoiDB)
| #
|
Formation
|
Air Defense Node
|
AD/AP
AS/AS+
|
| F1
|
Diamond
Phases: 1, 3
|
|
24/47
104/207
|
Diamond
Phases: 1, 3
|
|
32/63
140/279
|
Diamond
Phases: 1
|
|
64/127
284/567
|
| #
|
Formation
|
Air Defense Node
|
AD/AP
AS/AS+
|
E-2 Casual F2: 深海潜水艦隊・深海航空支援 (
PoiDB)
| #
|
Formation
|
Supported Battle Node
|
AD/AP
AS/AS+
|
| F2
|
Echelon
Line Abreast
Phases: 1, 2, 3
|
|
3/6
12/24
|
Echelon
Line Abreast
Phases: 1, 2, 3
|
|
9/17
36/72
|
| #
|
Formation
|
Supported Battle Node
|
AD/AP
AS/AS+
|
E-2 Casual G: 深海任務部隊 兵站補給部隊主隊 (
PoiDB)
E-2 Casual H: 深海任務部隊 ピケット艦隊 I群 (
PoiDB)
| #
|
Formation
|
Normal Battle Node
|
AD/AP
AS/AS+
|
| H
|
Line Ahead
Echelon
Phases: 2, 3
|
|
0/0
0/0
|
Line Ahead
Phases: 2
|
|
0/0
0/0
|
| #
|
Formation
|
Normal Battle Node
|
AD/AP
AS/AS+
|
E-2 Casual H1: 深海空母機動部隊 艦載機群 (
PoiDB)
| #
|
Formation
|
Air Defense Node
|
AD/AP
AS/AS+
|
| H1
|
Diamond
|
|
24/47
104/207
|
Diamond
Phases: 2, 3
|
|
32/63
140/279
|
Diamond
Phases: 2
|
|
64/127
284/567
|
| #
|
Formation
|
Air Defense Node
|
AD/AP
AS/AS+
|
E-2 Casual H2
| #
|
Empty Node
|
| H2
|
敵影を見ず。
No enemy spotted.
|
| #
|
Empty Node
|
E-2 Casual I: 深海潜水艦隊 沖縄沖哨戒群 (
PoiDB)
| #
|
Formation
|
Normal Battle Node
|
AD/AP
AS/AS+
|
| I
|
Echelon
Line Abreast
Phases: 2, 3
|
|
0/0
0/0
|
Echelon
Line Abreast
Phases: 2
|
|
0/0
0/0
|
| #
|
Formation
|
Normal Battle Node
|
AD/AP
AS/AS+
|
E-2 Casual J: 深海上陸侵攻部隊 上陸橋頭堡 (
PoiDB)
E-2 Casual K: 深海潜水艦隊 台湾沖哨戒線 I群 (
PoiDB)
| #
|
Formation
|
Normal Battle Node
|
AD/AP
AS/AS+
|
| K
|
Echelon
Line Abreast
Phases: 3
|
|
0/0
0/0
|
Echelon
Line Abreast
Phases: 3
|
|
0/0
0/0
|
| #
|
Formation
|
Normal Battle Node
|
AD/AP
AS/AS+
|
E-2 Casual L: 深海潜水艦隊 台湾沖哨戒線 II群 (
PoiDB)
| #
|
Formation
|
Normal Battle Node
|
AD/AP
AS/AS+
|
| L
|
Echelon
|
|
0/0
0/0
|
| #
|
Formation
|
Normal Battle Node
|
AD/AP
AS/AS+
|
E-2 Casual M: 深海潜水艦隊・深海航空支援 (
PoiDB)
| #
|
Formation
|
Supported Battle Node
|
AD/AP
AS/AS+
|
| M
|
Echelon
Line Abreast
Phases: 3
|
|
41/81
180/360
|
Echelon
Line Abreast
Phases: 3
|
|
46/91
204/408
|
| #
|
Formation
|
Supported Battle Node
|
AD/AP
AS/AS+
|
E-2 Casual N: 深海空母機動部隊 艦載機群 (
PoiDB)
| #
|
Formation
|
Air Defense Node
|
AD/AP
AS/AS+
|
| N
|
Diamond
Phases: 3
|
|
88/175
393/786
|
Diamond
Phases: 3
|
|
125/250
561/1122
|
Diamond
Phases: 3
|
|
178/355
797/1593
|
| #
|
Formation
|
Air Defense Node
|
AD/AP
AS/AS+
|
E-2 Casual O: 深海任務部隊 護衛空母群 B戦隊 (
PoiDB)
| #
|
Formation
|
Normal Battle Node
|
AD/AP
AS/AS+
|
| O
|
Double Line
Diamond
Phases: 3
|
|
43/85
189/378
|
Diamond
Phases: 3
|
|
45/90
201/402
|
| #
|
Formation
|
Normal Battle Node
|
AD/AP
AS/AS+
|
E-2 Casual P: 深海潜水艦隊・深海航空支援 (
PoiDB)
| #
|
Formation
|
Supported Battle Node
|
AD/AP
AS/AS+
|
| P
|
Echelon
Line Abreast
Phases: 3
|
|
41/81
180/360
|
Echelon
Line Abreast
Phases: 3
|
|
46/91
204/408
|
| #
|
Formation
|
Supported Battle Node
|
AD/AP
AS/AS+
|
E-2 Casual Q
| #
|
Selection Node
|
| Q
|
艦隊の針路を選択できます。提督、どちらの針路をとられますか?
You can decide the fleet's course. Admiral, which heading should we take?
|
| #
|
Selection Node
|
E-2 Casual R: 深海空母機動部隊 艦載機群 (
PoiDB)
| #
|
Formation
|
Air Defense Node
|
AD/AP
AS/AS+
|
| R
|
Diamond
Phases: 3
|
|
88/175
393/786
|
Diamond
Phases: 3
|
|
125/250
561/1122
|
| #
|
Formation
|
Air Defense Node
|
AD/AP
AS/AS+
|
E-2 Casual S
| #
|
Empty Node
|
| S
|
敵影を見ず。
No enemy spotted.
|
| #
|
Empty Node
|
E-2 Casual T: 深海任務部隊 兵站輸送船団 (
PoiDB)
| #
|
Formation
|
Normal Battle Node
|
AD/AP
AS/AS+
|
| T
|
Double Line
Diamond
Vanguard
Phases: 3
|
|
43/85
189/378
|
| #
|
Formation
|
Normal Battle Node
|
AD/AP
AS/AS+
|
E-2 Casual U: 深海任務部隊 護衛空母群 C戦隊 (
PoiDB)
| #
|
Formation
|
Normal Battle Node
|
AD/AP
AS/AS+
|
| U
|
Double Line
Diamond
Phases: 3
|
|
43/85
189/378
|
Diamond
Phases: 3
|
|
45/90
201/402
|
| #
|
Formation
|
Normal Battle Node
|
AD/AP
AS/AS+
|
E-2 Casual V
| #
|
Empty Node
|
| V
|
気のせいだった。
Must be my imagination.
|
| #
|
Empty Node
|
E-2 Casual W: 深海任務部隊 空母機動部隊主力 (
PoiDB)
Ship Drops
|
|
Time remaining until Event ends [9]:
1 May 2023 11:00:00 +0900
The Early Spring 2023 Event has ended!
|
KC anniversary maintenance has started, time remaining until maintenance ends [10]: (~4h event pause)
23 April 2023 20:30:00 +0900
The maintenance has ended. See 2023-04-23 patch notes.
|
|
|


 .
.