- Welcome to the Kancolle Wiki!
- If you have any questions regarding site content, account registration, etc., please visit the KanColle Wiki Discord
Difference between revisions of "Early Spring 2023 Event/E-2"
| Line 130: | Line 130: | ||
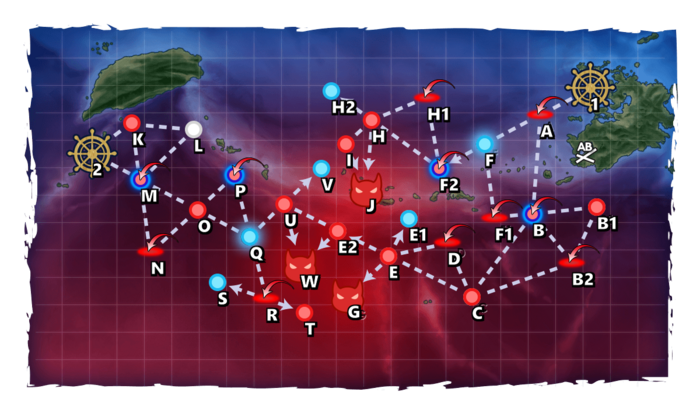
==Map overview== | ==Map overview== | ||
| − | + | ==Map Overview== | |
| + | E-2 consists of 3 main phases and requires the use of Single Fleets, Striking Forces, and Combined Fleets. | ||
| + | * This map uses 2 locks: | ||
| + | ** [[File:{{ROOTPAGENAME}} Tag 2.png]] '''2nd Torpedo Squadron''' (reused in E-3) for the 1st starting point | ||
| + | ** [[File:{{ROOTPAGENAME}} Tag 3.png]] '''Supporting Combined Fleet''' for the 2nd starting point | ||
| + | * 2 [[LBAS]] are available to sortie into this map. | ||
| + | ** After phase 1 ??, the LBAS is relocated closer to the final boss. | ||
| + | ** Be aware that [[Land-Based_Air_Squadron#High_Altitude_Air-Raid|High Altitude LBAS defense]] is required for the debuff. It is advised to check if the required AS values can be achieved with the planes available before starting the map on higher difficulties. | ||
| + | * '''[[Early Spring 2023 Event#New Mechanics|"Airstrike Supported Battle" nodes]]''' are present on {{MapRoute|B|darkorange|F2|darkorange|M|darkorange|P|darkorange}} | ||
| + | {{imbox|type=content|textstyle = color:red; font-weight:bold; font-style:italic|text='''This map is extremely hard to clear on all difficulties.<br>Please wait for information regarding compositions, historical bonuses, and friendly fleets across the event before starting it.'''}} | ||
| − | {{ | + | ==Phase 1== |
| + | <tabber> | ||
| + | |-|Light Fleet= | ||
| + | * Striking Force: '''1CL, 0-2CLT, 3-6DD''' [[File:{{ROOTPAGENAME}} Tag 2.png|30px]] | ||
| + | * Route: {{MapRoute|1||A|pink|B|darkorange|C|red|E|red|G|red}} | ||
| + | **The lightest fleet for this route. | ||
| + | **This fleet should utilize the {{IconText|{{CommandFacility}}|ETSCF}} {{Equipment/Link|Elite Torpedo Squadron Command Facility|text=ETSCF|link=Evacuation#Elite Torpedo Squadron Command Facility}}. | ||
| + | |||
| + | |-|Heavy Fleet= | ||
| + | * Striking Force: '''0-1FBB, 0-1CVL, 1CAV, 0-1CLT, 3-4DD''' [[File:{{ROOTPAGENAME}} Tag 2.png|30px]] | ||
| + | * Route: {{MapRoute|1||A|pink|B|darkorange|C|red|E|red|G|red}} | ||
| + | |||
| + | |-|Heaviest Fleet= | ||
| + | * Striking Force: '''1FBB, 3CVL, 3DD''' (Fast) [[File:{{ROOTPAGENAME}} Tag 2.png|30px]] | ||
| + | * Route: {{MapRoute|1||A|pink|B|darkorange|C|red|E|red|G|red}} | ||
| + | **Heaviest fleet for this route. | ||
| + | |||
| + | |-|Sub Fleet= | ||
| + | * Striking Force: '''1FBB, 1CVL, 1CAV/CLT, 3DD, 1SS(V)''' [[File:{{ROOTPAGENAME}} Tag 2.png|30px]] | ||
| + | * Route: {{MapRoute|1||A|pink|B|darkorange|C|red|E|red|G|red}} | ||
| + | **This use an SS(V) for Sub-Tanking. | ||
| + | **Highly recommend to use Repair Team/Goddess on Submarine for passing rate | ||
| + | </tabber> | ||
| + | * Bringing an [[AACI]] capable ship is recommended to pass through the air node. | ||
| + | * Bringing an [[OASW]] capable ship is recommended to pass through the new node. | ||
| + | |||
| + | *Striking Force fleets can utilize the {{IconText|{{CommandFacility}}|SFFCF}} {{Equipment/Link|Striking Force Fleet Command Facility|text=SFFCF|link=Evacuation#Striking Force Fleet Command Facility}}. | ||
| + | |||
| + | ==Phase 2== | ||
| + | * Striking Force: '''1(F)BB(V), 1CVL, 0-1CAV, 1CL, 3-4DD''' [[File:{{ROOTPAGENAME}} Tag 2.png|30px]] | ||
| + | * Route: {{MapRoute|1||A|pink|B|orange|C|red|E|red|E2|red}} | ||
| + | ** The boss is an '''[[Installation]]''' and requires appropriate gear to be defeated, | ||
| + | ***She is especially weak to "Nuke" setups | ||
| + | ** The boss fleet includes one or two [[PT Imp Pack]]s, requiring appropriate gear to be defeated (these can be ignored as S-rank is optional): | ||
| + | {{Anti-PT Imp Setups}} | ||
| + | * Bringing an [[AACI]] capable ship is recommended to pass through the air node. | ||
| + | |||
| + | ==Phase 2.5 - Gimmicks== | ||
| + | The following steps have to be performed to unlock the final boss: | ||
| + | {|class="wikitable" | ||
| + | ! !! E2!! T!! V | ||
| + | |- | ||
| + | | Hard || S?|| S?|| S? | ||
| + | |- | ||
| + | | Medium|| S?|| S?|| ? | ||
| + | |- | ||
| + | | Easy || S?|| S?|| - | ||
| + | |- | ||
| + | | Casual|| S?|| S?||- | ||
| + | |} | ||
| + | |||
| + | <tabber> | ||
| + | |-|Node E2= | ||
| + | * Striking Force: '''1CV, 1CVL, 1CL, 0-1CLT, 3-4DD''' [[File:{{ROOTPAGENAME}} Tag 2.png|30px]] | ||
| + | * Route: {{MapRoute|1||A|pink|B|orange|C|red|E|red|E2|red}} | ||
| + | |||
| + | |-|Node T= | ||
| + | * STF: '''2FBB, 2CVL, 2CAV + 1CL, 0-1CLT, 0-1CA, 3-5DD''' (FAST) [[File:{{ROOTPAGENAME}} Tag 3.png|30px]] | ||
| + | * Route: {{MapRoute|2||M|orange|N|pink|O|red|Q|blue|R|pink|T|red}} | ||
| + | ** {{MapRoute|Q|blue}} is a selection node. | ||
| + | |||
| + | |-|Node V= | ||
| + | * Use the same fleet as {{MapRoute|T|red}} | ||
| + | * Route: {{MapRoute|2||M|orange|N|pink|O|red|Q|blue|U|red|V|blue}} | ||
| + | ** {{MapRoute|Q|blue}} is a selection node. | ||
| + | </tabber> | ||
| + | |||
| + | ==Phase 3== | ||
| + | <tabber> | ||
| + | |-|STF/CTF BB= | ||
| + | * STF/CTF: '''2F(BB), 2CVL, 2CAV + 0-1CA(V) 1CL, 1-2CLT, 2-3DD''' (Fast) [[File:{{ROOTPAGENAME}} Tag 3.png|30px]] | ||
| + | * Route: {{MapRoute|2||M|darkorange|O|red|Q|blue|U|red|W|red}} | ||
| + | **This fleet can be either an STF or a CTF, with no difference between both. | ||
| + | **This fleet can bring high Air Power. | ||
| + | **The (F)BB can potentially utilize a [[Special Attack]]. | ||
| + | |||
| + | |-|CTF CV= | ||
| + | * CTF: '''1CV, 2CVL, 3CA(V) + 0-1CA(V) 1CL, 1-2CLT, 2-3DD''' (Fast) [[File:{{ROOTPAGENAME}} Tag 3.png|30px]] | ||
| + | * Route: {{MapRoute|2||M|darkorange|O|red|Q|blue|U|red|W|red}} | ||
| + | **This fleet can bring the highest Air Power for this route. | ||
| + | </tabber> | ||
| + | *LoS check: ?? | ||
| + | * Bringing an [[AACI]] capable ship is recommended against the boss. | ||
| + | * Bringing an [[OASW]] capable ship is recommended to pass through the new node. | ||
| + | |||
| + | ==Debuff== | ||
| + | Once LD has been reached, the following steps have to be performed to debuff the boss | ||
| + | |||
| + | {|class="wikitable" | ||
| + | ! !! G!! D!! J!! E2!! LBAS | ||
| + | |- | ||
| + | |Hard || S|| AS|| S|| S|| AS | ||
| + | |- | ||
| + | |Medium|| -|| AS|| S|| S|| AS | ||
| + | |- | ||
| + | |Easy || -|| -|| S|| S|| AS | ||
| + | |- | ||
| + | |Casual|| -|| -|| A+|| S|| AS? | ||
| + | |} | ||
| + | |||
| + | <tabber> | ||
| + | |-|Node G= | ||
| + | * Refer to Phase 1 fleet for composition and routing | ||
| + | |||
| + | |-|Node D= | ||
| + | * CTF: '''1 CV, 1 CVL, 1-2 CA, 1 CL, 2 DD''' [[File:{{ROOTPAGENAME}} Tag 2.png|30px]] | ||
| + | * Route: {{MapRoute|1||A|pink|B|darkorange|C|red|D|pink}} | ||
| + | * Having DD less than 3 and 2 CV(L) will route to D | ||
| + | |||
| + | |-|Node J= | ||
| + | * Refer to Phase 2 fleet for composition and routing | ||
| + | |||
| + | |-|Node E2= | ||
| + | *It's the same fleet for Phase 2.5 Gimmick | ||
| + | |||
| + | |-|LBAS= | ||
| + | *Can be accomplished by sending 1 sub until the Air raid is triggered | ||
| + | {|class="wikitable" | ||
| + | ! !! AP !! AS | ||
| + | |- | ||
| + | |Hard || 461|| 1035 | ||
| + | |- | ||
| + | |Medium|| 417|| 938 | ||
| + | |- | ||
| + | |Easy || 375|| 842 | ||
| + | |- | ||
| + | |Casual|| 352|| 791 | ||
| + | |} | ||
| + | </tabber> | ||
| + | |||
| + | |||
| + | Once Debuff is complete the CG will change to the following: | ||
| + | {|class="wikitable" | ||
| + | ![[European Armored Carrier Princess]] | ||
| + | |- | ||
| + | |<gallery> | ||
| + | Enemy Full European Armored Carrier Princess.png|Regular | ||
| + | Enemy Full European Armored Carrier Princess Damaged.png|Last Dance | ||
| + | Enemy Full European Armored Carrier Princess Debuffed.png|Debuffed | ||
| + | </gallery> | ||
| + | |} | ||
==Enemy Compositions== | ==Enemy Compositions== | ||
Revision as of 22:36, 6 March 2023
 
| ||||||||
|---|---|---|---|---|---|---|---|---|
|
Time remaining until Event ends [1]:
| ||||||||
| ||||||||
第二水雷戦隊 海上遊撃戦
![]()
![]()


| Information | ||||
|---|---|---|---|---|
| Event Tag | ||||
| Boss Gauges | Hard (甲): 2800 HP + 30000 HP + 6480 HP | |||
| Medium (乙): ? HP | ||||
| Easy (丙): ? HP | ||||
| Casual (丁): ? HP | ||||
| Map Bosses | Battleship Princess Kai
| |||
Supply Depot Princess C
| ||||
European Armored Carrier Princess
| ||||
| Rewards[edit] |
|---|
| Reward | 丁 Casual |
丙 Easy |
乙 Medium |
甲 Hard |
|---|---|---|---|---|
Food Supply Ship Mamiya |
1 | 1 | 2 | 3 |
Action Report |
1 | 1 | 1 | 1 |
New Model Aerial Armament Material |
1 | 2 | ||
 Skilled Lookouts |
1 | |||
 Torpedo Squadron Skilled Lookouts |
1 | 1 (★2) | 1 (★4) | |
 Type 1 Fighter Hayabusa Model II Kai (20th Squadron) |
1 | 1 | ||
 Shiden Kai (343 Air Group) 407th Fighter Squadron |
1 | 1 (★2) | ||
 Skilled Deck Personnel |
1 | |||
 Night Operation Aviation Personnel + Skilled Deckhands |
1 | |||
 Type 1 Fighter Hayabusa Model III Kai (Skilled/20th Squadron) |
1 |

The event guides are to be constructed through the respective Event map page guide sandbox and reviewed by editors before being approved here.
- Do not update the guides through this page unless it is a minor fix. Please only update guides through their respective sandbox pages.
Branching Table
| E-2 Branching Rules (Start Point) | ||
|---|---|---|
| Nodes | Rules | |
| Start | 1 |
|
2 |
| |
| E-2 Branching Rules (Start Point 1) | ||
|---|---|---|
| Nodes | Rules | |
A |
B |
|
F |
| |
B |
B1 |
|
B2 |
| |
C |
| |
C |
D |
|
E |
| |
E |
E1 |
Fail the LoS check |
E2 |
| |
G |
| |
F |
F1 |
Active Branching |
F2 | ||
F2 |
H |
|
H1 |
| |
H |
H2 |
|
I |
| |
J |
| |
| E-2 Branching Rules (Start Point 2) | ||
|---|---|---|
| Nodes | Rules | |
2 |
K |
|
M |
| |
K |
L |
??? |
M |
??? | |
M |
N |
|
O |
| |
O |
P |
|
Q |
| |
Q |
R |
Active Branching |
U | ||
R |
S |
??? |
T |
??? | |
U |
E2 |
|
V |
| |
W |
| |
Branching compositions were reported over the course of the event. (NGA and KCNav)
Historical Bonuses
DISCLAIMER: This information is based on user-submitted data and is subject to revisions as more data is gathered. Any version of the ship receives the bonus regardless of remodel.
Ship Bonuses
| Ships | Damage | Acc/Eva | |||
|---|---|---|---|---|---|
| Mapwide | E2?/J?/U/W | ||||
| All DE | 1.12x | - | - | ||
| All DD (stacks with below) | 1.03x | - | - | ||
| All CA, CAV, CL, CLT, DD (does not stack with below) | - | 1.08x | 1.12x | ||
| All CV, CVB, CVL (does not stack with below) | - | 1.05x | |||
| 1.15x | 1.18x | 1.27x | |||
| 1.08x | 1.15x | 1.20x | |||
- Evasion bonus is only roughly checked as it is hard to estimate. The info will be updated if an inconsistency is found (@Divinity_123).
Debuff
| Debuffs | |
|---|---|
| Ships | Node W |
| -48 | |
Map overview
Map Overview
E-2 consists of 3 main phases and requires the use of Single Fleets, Striking Forces, and Combined Fleets.
- This map uses 2 locks:
 2nd Torpedo Squadron (reused in E-3) for the 1st starting point
 Supporting Combined Fleet for the 2nd starting point
- 2 LBAS are available to sortie into this map.
- After phase 1 ??, the LBAS is relocated closer to the final boss.
- Be aware that High Altitude LBAS defense is required for the debuff. It is advised to check if the required AS values can be achieved with the planes available before starting the map on higher difficulties.
- "Airstrike Supported Battle" nodes are present on B F2 M P
|
|
This map is extremely hard to clear on all difficulties. Please wait for information regarding compositions, historical bonuses, and friendly fleets across the event before starting it. |
Phase 1
- Striking Force: 1CL, 0-2CLT, 3-6DD

- Route: 1 A B C E G
- The lightest fleet for this route.
- This fleet should utilize the
 ETSCF ETSCF
 .
.
- Striking Force: 0-1FBB, 0-1CVL, 1CAV, 0-1CLT, 3-4DD
- Route: 1 A B C E G
- Striking Force: 1FBB, 3CVL, 3DD (Fast)
- Route: 1 A B C E G
- Heaviest fleet for this route.
- Striking Force: 1FBB, 1CVL, 1CAV/CLT, 3DD, 1SS(V)
- Route: 1 A B C E G
- This use an SS(V) for Sub-Tanking.
- Highly recommend to use Repair Team/Goddess on Submarine for passing rate
- Bringing an AACI capable ship is recommended to pass through the air node.
- Bringing an OASW capable ship is recommended to pass through the new node.
- Striking Force fleets can utilize the SFFCF SFFCF
 .
.
Phase 2
- Striking Force: 1(F)BB(V), 1CVL, 0-1CAV, 1CL, 3-4DD
- Route: 1 A B C E E2
- The boss is an Installation and requires appropriate gear to be defeated,
- She is especially weak to "Nuke" setups
- The boss fleet includes one or two PT Imp Packs, requiring appropriate gear to be defeated (these can be ignored as S-rank is optional):
- The boss is an Installation and requires appropriate gear to be defeated,
| Anti-PT boat | |||||||||||||||||||||||||||||||||||||||||||||||||||||||||||||||||||||||||||||||||||||||||||||||||||||||||||||||||||||||||||||||||||||||||||
|---|---|---|---|---|---|---|---|---|---|---|---|---|---|---|---|---|---|---|---|---|---|---|---|---|---|---|---|---|---|---|---|---|---|---|---|---|---|---|---|---|---|---|---|---|---|---|---|---|---|---|---|---|---|---|---|---|---|---|---|---|---|---|---|---|---|---|---|---|---|---|---|---|---|---|---|---|---|---|---|---|---|---|---|---|---|---|---|---|---|---|---|---|---|---|---|---|---|---|---|---|---|---|---|---|---|---|---|---|---|---|---|---|---|---|---|---|---|---|---|---|---|---|---|---|---|---|---|---|---|---|---|---|---|---|---|---|---|---|---|
Unlike most standard Abyssals, "PT boats" (PT Imp Pack & Schnellboot Imp Pack & Schnellboot Imp Pack ) are "very small and fast". ) are "very small and fast".
During Events, some special bonuses may be added, with "historical" ships and equipment gaining some accuracy bonuses[10].
| |||||||||||||||||||||||||||||||||||||||||||||||||||||||||||||||||||||||||||||||||||||||||||||||||||||||||||||||||||||||||||||||||||||||||||
| [edit] | |||||||||||||||||||||||||||||||||||||||||||||||||||||||||||||||||||||||||||||||||||||||||||||||||||||||||||||||||||||||||||||||||||||||||||


- Bringing an AACI capable ship is recommended to pass through the air node.
Phase 2.5 - Gimmicks
The following steps have to be performed to unlock the final boss:
| E2 | T | V | |
|---|---|---|---|
| Hard | S? | S? | S? |
| Medium | S? | S? | ? |
| Easy | S? | S? | - |
| Casual | S? | S? | - |
- Striking Force: 1CV, 1CVL, 1CL, 0-1CLT, 3-4DD
- Route: 1 A B C E E2
- STF: 2FBB, 2CVL, 2CAV + 1CL, 0-1CLT, 0-1CA, 3-5DD (FAST)

- Route: 2 M N O Q R T
- Q is a selection node.
- Use the same fleet as T
- Route: 2 M N O Q U V
- Q is a selection node.
Phase 3
- STF/CTF: 2F(BB), 2CVL, 2CAV + 0-1CA(V) 1CL, 1-2CLT, 2-3DD (Fast)
- Route: 2 M O Q U W
- This fleet can be either an STF or a CTF, with no difference between both.
- This fleet can bring high Air Power.
- The (F)BB can potentially utilize a Special Attack.
- CTF: 1CV, 2CVL, 3CA(V) + 0-1CA(V) 1CL, 1-2CLT, 2-3DD (Fast)
- Route: 2 M O Q U W
- This fleet can bring the highest Air Power for this route.
- LoS check: ??
- Bringing an AACI capable ship is recommended against the boss.
- Bringing an OASW capable ship is recommended to pass through the new node.
Debuff
Once LD has been reached, the following steps have to be performed to debuff the boss
| G | D | J | E2 | LBAS | |
|---|---|---|---|---|---|
| Hard | S | AS | S | S | AS |
| Medium | - | AS | S | S | AS |
| Easy | - | - | S | S | AS |
| Casual | - | - | A+ | S | AS? |
- Refer to Phase 1 fleet for composition and routing
- CTF: 1 CV, 1 CVL, 1-2 CA, 1 CL, 2 DD
- Route: 1 A B C D
- Having DD less than 3 and 2 CV(L) will route to D
- Refer to Phase 2 fleet for composition and routing
- It's the same fleet for Phase 2.5 Gimmick
- Can be accomplished by sending 1 sub until the Air raid is triggered
| AP | AS | |
|---|---|---|
| Hard | 461 | 1035 |
| Medium | 417 | 938 |
| Easy | 375 | 842 |
| Casual | 352 | 791 |
Once Debuff is complete the CG will change to the following:
| European Armored Carrier Princess |
|---|
|


Enemy Compositions
| Type | Ships |
|---|---|
| DE | |
| DD | |
| AS |
| Type | Ships |
|---|---|
| DE | |
| DD |
| Type | Ships |
|---|---|
| DE | |
| DD | |
| AR | |
| AS |
| Type | Ships |
|---|---|
| DE | |
| DD |
| Type | Ships |
|---|---|
| DE |
| Type | Ships |
|---|---|
| DE | |
| DD |
| Type | Ships |
|---|---|
| DE | |
| DD | |
| CL | |
| BB | |
| CV | |
| AR |
| # | Formation | Air Raids | AD/AP AS/AS+ |
|---|---|---|---|
| AB | Diamond | 157/314 705/1410 | |
| Diamond | 207/413 929/1857 | ||
| Diamond | 231/462 1038/2076 | ||
| # | Formation | Air Raids | AD/AP AS/AS+ |
| # | Formation | Air Defense Node | AD/AP AS/AS+ |
|---|---|---|---|
| A | Diamond Phases: 1, 2, 3 |
45/89 198/396 | |
| Diamond Phases: 1, 2, 3 |
87/173 387/774 | ||
| Diamond Phases: 1 |
80/159 357/714 | ||
| # | Formation | Air Defense Node | AD/AP AS/AS+ |
| # | Formation | Supported Battle Node | AD/AP AS/AS+ |
|---|---|---|---|
| B | Echelon Line Abreast Phases: 1, 3 |
43/85 189/378 | |
| Echelon Line Abreast Phases: 1, 2, 3 |
78/155 348/696 | ||
| Echelon Line Abreast Phases: 1, 2, 3 |
85/169 378/756 | ||
| # | Formation | Supported Battle Node | AD/AP AS/AS+ |
| # | Formation | Normal Battle Node | AD/AP AS/AS+ |
|---|---|---|---|
| B1 | Echelon Line Abreast |
0/0 0/0 | |
| Echelon Line Abreast Phases: 1, 3 |
0/0 0/0 | ||
| Echelon Line Abreast Phases: 1, 3 |
0/0 0/0 | ||
| # | Formation | Normal Battle Node | AD/AP AS/AS+ |
| # | Formation | Air Defense Node | AD/AP AS/AS+ |
|---|---|---|---|
| B2 | Diamond Phases: 1 |
92/184 413/825 | |
| Diamond Phases: 1, 3 |
63/125 279/558 | ||
| Diamond Phases: 1, 3 |
86/171 384/768 | ||
| # | Formation | Air Defense Node | AD/AP AS/AS+ |
| # | Formation | Normal Battle Node | AD/AP AS/AS+ |
|---|---|---|---|
| C | Line Ahead Echelon Phases: 1, 2, 3 |
0/0 0/0 | |
| Line Ahead Phases: 1 |
0/0 0/0 | ||
| # | Formation | Normal Battle Node | AD/AP AS/AS+ |
| # | Formation | Air Defense Node | AD/AP AS/AS+ |
|---|---|---|---|
| D | Diamond Phases: 1, 3 |
92/184 413/825 | |
| Diamond Phases: 1, 3 |
63/125 279/558 | ||
| Diamond Phases: 1, 3 |
86/171 384/768 | ||
| # | Formation | Air Defense Node | AD/AP AS/AS+ |
| # | Formation | Normal Battle Node | AD/AP AS/AS+ |
|---|---|---|---|
| E | Double Line Diamond Phases: 1, 2, 3 |
45/89 198/396 | |
| Diamond Phases: 1 |
89/177 396/792 | ||
| # | Formation | Normal Battle Node | AD/AP AS/AS+ |
| # | Empty Node | ||
|---|---|---|---|
| E1 | 敵影を見ず。 No enemy spotted. | ||
| # | Empty Node | ||
| # | Formation | Normal Battle Node | AD/AP AS/AS+ |
|---|---|---|---|
| E2 | Line Ahead Double Line Phases: 1, 3 |
0/0 0/0 | |
| Line Ahead Phases: 3 |
0/0 0/0 | ||
| # | Formation | Normal Battle Node | AD/AP AS/AS+ |
| # | Selection Node | ||
|---|---|---|---|
| F | 艦隊の針路を選択できます。提督、どちらの針路をとられますか? You can decide the fleet's course. Admiral, which heading should we take? | ||
| # | Selection Node | ||
| # | Formation | Air Defense Node | AD/AP AS/AS+ |
|---|---|---|---|
| F1 | Diamond Phases: 1, 3 |
92/184 413/825 | |
| Diamond Phases: 1, 3 |
63/125 279/558 | ||
| Diamond Phases: 1, 3 |
86/171 384/768 | ||
| # | Formation | Air Defense Node | AD/AP AS/AS+ |
| # | Formation | Supported Battle Node | AD/AP AS/AS+ |
|---|---|---|---|
| F2 | Echelon Line Abreast Phases: 2, 3 |
43/85 189/378 | |
| Echelon Line Abreast Phases: 2, 3 |
36/71 159/318 | ||
| Echelon Line Abreast Phases: 2, 3 |
36/71 159/318 | ||
| # | Formation | Supported Battle Node | AD/AP AS/AS+ |
| # | Formation | Boss Battle Node | AD/AP AS/AS+ |
|---|---|---|---|
| G | Cruising Formation 4 Phases: 1, 2, 3 |
50/100 224/447 | |
| Cruising Formation 4 Phases: 1 (Final)
|
57/113 252/504 | ||
| # | Formation | Boss Battle Node | AD/AP AS/AS+ |
| # | Formation | Normal Battle Node | AD/AP AS/AS+ |
|---|---|---|---|
| H | Line Ahead Echelon Phases: 2, 3 |
0/0 0/0 | |
| Line Ahead Phases: 2 |
0/0 0/0 | ||
| # | Formation | Normal Battle Node | AD/AP AS/AS+ |
| # | Formation | Air Defense Node | AD/AP AS/AS+ |
|---|---|---|---|
| H1 | Diamond Phases: 2 |
92/184 413/825 | |
| Diamond Phases: 2 |
63/125 279/558 | ||
| Diamond Phases: 2, 3 |
86/171 384/768 | ||
| # | Formation | Air Defense Node | AD/AP AS/AS+ |
| # | Empty Node | ||
|---|---|---|---|
| H2 | 敵影を見ず。 No enemy spotted. | ||
| # | Empty Node | ||
| # | Formation | Normal Battle Node | AD/AP AS/AS+ |
|---|---|---|---|
| I | Echelon Line Abreast Phases: 2 |
0/0 0/0 | |
| Echelon Line Abreast Phases: 2 |
0/0 0/0 | ||
| Echelon Line Abreast Phases: 2, 3 |
0/0 0/0 | ||
| # | Formation | Normal Battle Node | AD/AP AS/AS+ |
| # | Formation | Boss Battle Node | AD/AP AS/AS+ |
|---|---|---|---|
| J | Double Line Phases: 2 |
25/49 108/216 | |
| Double Line Phases: 3 |
0/0 0/0 | ||
| Double Line Phases: 2 (Final)
|
0/0 0/0 | ||
| # | Formation | Boss Battle Node | AD/AP AS/AS+ |
| # | Formation | Normal Battle Node | AD/AP AS/AS+ |
|---|---|---|---|
| K | Echelon Line Abreast Phases: 3 |
0/0 0/0 | |
| Echelon Line Abreast Phases: 3 |
0/0 0/0 | ||
| Echelon Line Abreast Phases: 3 |
0/0 0/0 | ||
| # | Formation | Normal Battle Node | AD/AP AS/AS+ |
| # | Formation | Normal Battle Node | AD/AP AS/AS+ |
|---|---|---|---|
| # | Formation | Normal Battle Node | AD/AP AS/AS+ |
| # | Formation | Supported Battle Node | AD/AP AS/AS+ |
|---|---|---|---|
| M | Echelon Line Abreast Phases: 3 |
100/199 447/894 | |
| Echelon Line Abreast Phases: 3 |
106/212 476/951 | ||
| Echelon Line Abreast Phases: 3 |
113/225 504/1008 | ||
| # | Formation | Supported Battle Node | AD/AP AS/AS+ |
| # | Formation | Air Defense Node | AD/AP AS/AS+ |
|---|---|---|---|
| N | Diamond Phases: 3 |
157/314 705/1410 | |
| Diamond Phases: 3 |
207/413 929/1857 | ||
| # | Formation | Air Defense Node | AD/AP AS/AS+ |
| # | Formation | Normal Battle Node | AD/AP AS/AS+ |
|---|---|---|---|
| O | Double Line Diamond Phases: 3 |
45/89 198/396 | |
| Diamond Phases: 3 |
89/177 396/792 | ||
| # | Formation | Normal Battle Node | AD/AP AS/AS+ |
| # | Formation | Supported Battle Node | AD/AP AS/AS+ |
|---|---|---|---|
| P | Echelon Line Abreast |
106/212 476/951 | |
| Line Abreast | 113/225 504/1008 | ||
| # | Formation | Supported Battle Node | AD/AP AS/AS+ |
| # | Selection Node | ||
|---|---|---|---|
| Q | 艦隊の針路を選択できます。提督、どちらの針路をとられますか? You can decide the fleet's course. Admiral, which heading should we take? | ||
| # | Selection Node | ||
| # | Formation | Air Defense Node | AD/AP AS/AS+ |
|---|---|---|---|
| R | Diamond Phases: 3 |
157/314 705/1410 | |
| Diamond Phases: 3 |
207/413 929/1857 | ||
| # | Formation | Air Defense Node | AD/AP AS/AS+ |
| # | Empty Node | ||
|---|---|---|---|
| S | 敵影を見ず。 No enemy spotted. | ||
| # | Empty Node | ||
| # | Formation | Normal Battle Node | AD/AP AS/AS+ |
|---|---|---|---|
| T | Double Line Diamond Vanguard Phases: 3 |
45/89 198/396 | |
| # | Formation | Normal Battle Node | AD/AP AS/AS+ |
| # | Formation | Normal Battle Node | AD/AP AS/AS+ |
|---|---|---|---|
| U | Double Line Diamond Phases: 3 |
45/89 198/396 | |
| Diamond Phases: 3 |
89/177 396/792 | ||
| # | Formation | Normal Battle Node | AD/AP AS/AS+ |
| # | Empty Node | ||
|---|---|---|---|
| V | 気のせいだった。 Must be my imagination. | ||
| # | Empty Node | ||
| # | Formation | Boss Battle Node | AD/AP AS/AS+ |
|---|---|---|---|
| W | Cruising Formation 4 Phases: 3 |
207/413 929/1857 | |
| Cruising Formation 4 Phases: 3 (Final)
|
231/462 1038/2076 | ||
| # | Formation | Boss Battle Node | AD/AP AS/AS+ |
| Type | Ships |
|---|---|
| DE | |
| DD |
| Type | Ships |
|---|---|
| DE | |
| DD |
| Type | Ships |
|---|---|
| DE | |
| DD | |
| AR | |
| AS |
| Type | Ships |
|---|---|
| DE | |
| DD |
| Type | Ships |
|---|---|
| DE |
| Type | Ships |
|---|---|
| DE | |
| DD |
| Type | Ships |
|---|---|
| DE | |
| DD | |
| CL | |
| BB | |
| CV | |
| AR |
| # | Formation | Air Raids | AD/AP AS/AS+ |
|---|---|---|---|
| AB | Diamond | 136/272 611/1221 | |
| Diamond | 182/363 815/1629 | ||
| Diamond | 210/419 941/1881 | ||
| # | Formation | Air Raids | AD/AP AS/AS+ |
| # | Formation | Air Defense Node | AD/AP AS/AS+ |
|---|---|---|---|
| A | Diamond Phases: 1, 2, 3 |
44/87 195/390 | |
| Diamond Phases: 1 |
71/142 318/636 | ||
| Diamond Phases: 1, 2, 3 |
78/155 348/696 | ||
| # | Formation | Air Defense Node | AD/AP AS/AS+ |
| # | Formation | Supported Battle Node | AD/AP AS/AS+ |
|---|---|---|---|
| B | Echelon Line Abreast Phases: 1, 2, 3 |
9/17 36/72 | |
| Echelon Line Abreast Phases: 1, 2, 3 |
43/85 189/378 | ||
| Echelon Line Abreast Phases: 1, 2, 3 |
43/85 189/378 | ||
| # | Formation | Supported Battle Node | AD/AP AS/AS+ |
| # | Formation | Normal Battle Node | AD/AP AS/AS+ |
|---|---|---|---|
| B1 | Echelon Line Abreast Phases: 1, 3 |
0/0 0/0 | |
| Echelon Line Abreast Phases: 1, 3 |
0/0 0/0 | ||
| Echelon Line Abreast Phases: 1, 3 |
0/0 0/0 | ||
| # | Formation | Normal Battle Node | AD/AP AS/AS+ |
| # | Formation | Air Defense Node | AD/AP AS/AS+ |
|---|---|---|---|
| B2 | Diamond Phases: 1, 3 |
52/103 231/462 | |
| Diamond Phases: 1, 3 |
77/153 344/687 | ||
| Diamond Phases: 1 |
81/162 363/726 | ||
| # | Formation | Air Defense Node | AD/AP AS/AS+ |
| # | Formation | Normal Battle Node | AD/AP AS/AS+ |
|---|---|---|---|
| C | Line Ahead Echelon Phases: 1, 2, 3 |
0/0 0/0 | |
| Line Ahead Phases: 1 |
0/0 0/0 | ||
| # | Formation | Normal Battle Node | AD/AP AS/AS+ |
| # | Formation | Air Defense Node | AD/AP AS/AS+ |
|---|---|---|---|
| D | Diamond Phases: 1, 2, 3 |
52/103 231/462 | |
| Diamond Phases: 1, 3 |
77/153 344/687 | ||
| Diamond Phases: 1, 3 |
81/162 363/726 | ||
| # | Formation | Air Defense Node | AD/AP AS/AS+ |
| # | Formation | Normal Battle Node | AD/AP AS/AS+ |
|---|---|---|---|
| E | Double Line Diamond Phases: 1, 2, 3 |
36/71 159/318 | |
| Diamond Phases: 1 |
71/142 318/636 | ||
| # | Formation | Normal Battle Node | AD/AP AS/AS+ |
| # | Empty Node | ||
|---|---|---|---|
| E1 | 敵影を見ず。 No enemy spotted. | ||
| # | Empty Node | ||
| # | Formation | Normal Battle Node | AD/AP AS/AS+ |
|---|---|---|---|
| E2 | Line Ahead Double Line Phases: 1, 3 |
0/0 0/0 | |
| Line Ahead Phases: 3 |
0/0 0/0 | ||
| # | Formation | Normal Battle Node | AD/AP AS/AS+ |
| # | Selection Node | ||
|---|---|---|---|
| F | 艦隊の針路を選択できます。提督、どちらの針路をとられますか? You can decide the fleet's course. Admiral, which heading should we take? | ||
| # | Selection Node | ||
| # | Formation | Air Defense Node | AD/AP AS/AS+ |
|---|---|---|---|
| F1 | Diamond Phases: 1, 3 |
52/103 231/462 | |
| Diamond Phases: 1, 3 |
77/153 344/687 | ||
| Diamond Phases: 1, 3 |
81/162 363/726 | ||
| # | Formation | Air Defense Node | AD/AP AS/AS+ |
| # | Formation | Supported Battle Node | AD/AP AS/AS+ |
|---|---|---|---|
| F2 | Echelon Line Abreast Phases: 1, 2, 3 |
9/17 36/72 | |
| Echelon Line Abreast Phases: 2, 3 |
43/85 189/378 | ||
| Echelon Line Abreast Phases: 2, 3 |
43/85 189/378 | ||
| # | Formation | Supported Battle Node | AD/AP AS/AS+ |
| # | Formation | Boss Battle Node | AD/AP AS/AS+ |
|---|---|---|---|
| G | Cruising Formation 4 Phases: 1, 2, 3 |
46/91 204/408 | |
| Cruising Formation 4 Phases: 1 (Final)
|
50/100 224/447 | ||
| # | Formation | Boss Battle Node | AD/AP AS/AS+ |
| # | Formation | Normal Battle Node | AD/AP AS/AS+ |
|---|---|---|---|
| H | Line Ahead Echelon Phases: 2, 3 |
0/0 0/0 | |
| Line Ahead Phases: 2 |
0/0 0/0 | ||
| # | Formation | Normal Battle Node | AD/AP AS/AS+ |
| # | Formation | Air Defense Node | AD/AP AS/AS+ |
|---|---|---|---|
| H1 | Diamond Phases: 2 |
52/103 231/462 | |
| Diamond Phases: 2, 3 |
77/153 344/687 | ||
| Diamond Phases: 2, 3 |
81/162 363/726 | ||
| # | Formation | Air Defense Node | AD/AP AS/AS+ |
| # | Empty Node | ||
|---|---|---|---|
| H2 | 敵影を見ず。 No enemy spotted. | ||
| # | Empty Node | ||
| # | Formation | Normal Battle Node | AD/AP AS/AS+ |
|---|---|---|---|
| I | Echelon Line Abreast Phases: 3 |
0/0 0/0 | |
| Echelon Line Abreast Phases: 2, 3 |
0/0 0/0 | ||
| Echelon Line Abreast Phases: 2, 3 |
0/0 0/0 | ||
| # | Formation | Normal Battle Node | AD/AP AS/AS+ |
| # | Formation | Boss Battle Node | AD/AP AS/AS+ |
|---|---|---|---|
| J | Double Line Phases: 2 |
19/38 84/168 | |
| Double Line Phases: 3 |
0/0 0/0 | ||
| Double Line Phases: 2 (Final)
|
0/0 0/0 | ||
| # | Formation | Boss Battle Node | AD/AP AS/AS+ |
| # | Formation | Normal Battle Node | AD/AP AS/AS+ |
|---|---|---|---|
| K | Echelon Line Abreast Phases: 3 |
0/0 0/0 | |
| Echelon Line Abreast Phases: 3 |
0/0 0/0 | ||
| Echelon Line Abreast Phases: 3 |
0/0 0/0 | ||
| # | Formation | Normal Battle Node | AD/AP AS/AS+ |
| # | Formation | Normal Battle Node | AD/AP AS/AS+ |
|---|---|---|---|
| L | Echelon | 0/0 0/0 | |
| # | Formation | Normal Battle Node | AD/AP AS/AS+ |
| # | Formation | Supported Battle Node | AD/AP AS/AS+ |
|---|---|---|---|
| M | Echelon Line Abreast Phases: 3 |
46/91 204/408 | |
| Echelon Line Abreast Phases: 3 |
91/182 408/816 | ||
| Echelon Line Abreast Phases: 3 |
100/199 447/894 | ||
| # | Formation | Supported Battle Node | AD/AP AS/AS+ |
| # | Formation | Air Defense Node | AD/AP AS/AS+ |
|---|---|---|---|
| N | Diamond Phases: 3 |
136/272 611/1221 | |
| Diamond Phases: 3 |
182/363 815/1629 | ||
| Diamond Phases: 3 |
210/419 941/1881 | ||
| # | Formation | Air Defense Node | AD/AP AS/AS+ |
| # | Formation | Normal Battle Node | AD/AP AS/AS+ |
|---|---|---|---|
| O | Double Line Diamond Phases: 3 |
36/71 159/318 | |
| Diamond Phases: 3 |
71/142 318/636 | ||
| # | Formation | Normal Battle Node | AD/AP AS/AS+ |
| # | Formation | Supported Battle Node | AD/AP AS/AS+ |
|---|---|---|---|
| P | Echelon Line Abreast |
46/91 204/408 | |
| Echelon Line Abreast Phases: 3 |
91/182 408/816 | ||
| Echelon Line Abreast Phases: 3 |
100/199 447/894 | ||
| # | Formation | Supported Battle Node | AD/AP AS/AS+ |
| # | Selection Node | ||
|---|---|---|---|
| Q | 艦隊の針路を選択できます。提督、どちらの針路をとられますか? You can decide the fleet's course. Admiral, which heading should we take? | ||
| # | Selection Node | ||
| # | Formation | Air Defense Node | AD/AP AS/AS+ |
|---|---|---|---|
| R | Diamond Phases: 3 |
136/272 611/1221 | |
| Diamond Phases: 3 |
182/363 815/1629 | ||
| Diamond Phases: 3 |
210/419 941/1881 | ||
| # | Formation | Air Defense Node | AD/AP AS/AS+ |
| # | Empty Node | ||
|---|---|---|---|
| S | 敵影を見ず。 No enemy spotted. | ||
| # | Empty Node | ||
| # | Formation | Normal Battle Node | AD/AP AS/AS+ |
|---|---|---|---|
| T | Double Line Diamond Vanguard Phases: 3 |
36/71 159/318 | |
| # | Formation | Normal Battle Node | AD/AP AS/AS+ |
| # | Formation | Normal Battle Node | AD/AP AS/AS+ |
|---|---|---|---|
| U | Double Line Diamond Phases: 3 |
36/71 159/318 | |
| Diamond Phases: 3 |
71/142 318/636 | ||
| # | Formation | Normal Battle Node | AD/AP AS/AS+ |
| # | Empty Node | ||
|---|---|---|---|
| V | 気のせいだった。 Must be my imagination. | ||
| # | Empty Node | ||
| # | Formation | Boss Battle Node | AD/AP AS/AS+ |
|---|---|---|---|
| W | Cruising Formation 4 Phases: 3 |
182/363 815/1629 | |
| Cruising Formation 4 Phases: 3 (Final)
|
210/419 941/1881 | ||
| # | Formation | Boss Battle Node | AD/AP AS/AS+ |
| # | Formation | Air Raids | AD/AP AS/AS+ |
|---|---|---|---|
| AB | Diamond | 125/250 561/1122 | |
| Diamond | 165/330 741/1482 | ||
| Diamond | 188/376 845/1689 | ||
| # | Formation | Air Raids | AD/AP AS/AS+ |
| # | Formation | Air Defense Node | AD/AP AS/AS+ |
|---|---|---|---|
| A | Diamond Phases: 1, 2, 3 |
45/90 201/402 | |
| Diamond Phases: 1, 2, 3 |
51/101 225/450 | ||
| Diamond Phases: 1 |
85/169 378/756 | ||
| # | Formation | Air Defense Node | AD/AP AS/AS+ |
| # | Formation | Supported Battle Node | AD/AP AS/AS+ |
|---|---|---|---|
| B | Echelon Line Abreast Phases: 1, 2, 3 |
3/6 12/24 | |
| Echelon Line Abreast Phases: 1, 2, 3 |
9/17 36/72 | ||
| Echelon Line Abreast Phases: 1, 2, 3 |
43/85 189/378 | ||
| # | Formation | Supported Battle Node | AD/AP AS/AS+ |
| # | Formation | Normal Battle Node | AD/AP AS/AS+ |
|---|---|---|---|
| B1 | Echelon Line Abreast Phases: 1 |
0/0 0/0 | |
| Echelon Line Abreast Phases: 1, 3 |
0/0 0/0 | ||
| Echelon Line Abreast Phases: 1, 3 |
0/0 0/0 | ||
| # | Formation | Normal Battle Node | AD/AP AS/AS+ |
| # | Formation | Air Defense Node | AD/AP AS/AS+ |
|---|---|---|---|
| B2 | Diamond Phases: 1, 3 |
47/93 207/414 | |
| Diamond Phases: 1, 3 |
64/127 284/567 | ||
| Diamond Phases: 1 |
72/143 320/639 | ||
| # | Formation | Air Defense Node | AD/AP AS/AS+ |
| # | Formation | Normal Battle Node | AD/AP AS/AS+ |
|---|---|---|---|
| C | Line Ahead Echelon Phases: 1, 2, 3 |
0/0 0/0 | |
| Line Ahead Phases: 1 |
0/0 0/0 | ||
| # | Formation | Normal Battle Node | AD/AP AS/AS+ |
| # | Formation | Air Defense Node | AD/AP AS/AS+ |
|---|---|---|---|
| D | Diamond Phases: 1, 2, 3 |
47/93 207/414 | |
| Diamond Phases: 1, 2, 3 |
64/127 284/567 | ||
| Diamond Phases: 1, 2, 3 |
72/143 320/639 | ||
| # | Formation | Air Defense Node | AD/AP AS/AS+ |
| # | Formation | Normal Battle Node | AD/AP AS/AS+ |
|---|---|---|---|
| E | Double Line Diamond Phases: 1, 2, 3 |
51/101 225/450 | |
| Diamond Phases: 1 |
85/169 378/756 | ||
| # | Formation | Normal Battle Node | AD/AP AS/AS+ |
| # | Empty Node | ||
|---|---|---|---|
| E1 | 敵影を見ず。 No enemy spotted. | ||
| # | Empty Node | ||
| # | Formation | Normal Battle Node | AD/AP AS/AS+ |
|---|---|---|---|
| E2 | Line Ahead Double Line Phases: 1, 2, 3 |
0/0 0/0 | |
| Line Ahead Phases: 3 |
0/0 0/0 | ||
| # | Formation | Normal Battle Node | AD/AP AS/AS+ |
| # | Selection Node | ||
|---|---|---|---|
| F | 艦隊の針路を選択できます。提督、どちらの針路をとられますか? You can decide the fleet's course. Admiral, which heading should we take? | ||
| # | Selection Node | ||
| # | Formation | Air Defense Node | AD/AP AS/AS+ |
|---|---|---|---|
| F1 | Diamond Phases: 1, 3 |
47/93 207/414 | |
| Diamond Phases: 1, 2, 3 |
64/127 284/567 | ||
| Diamond Phases: 1, 3 |
72/143 320/639 | ||
| # | Formation | Air Defense Node | AD/AP AS/AS+ |
| # | Formation | Supported Battle Node | AD/AP AS/AS+ |
|---|---|---|---|
| F2 | Echelon Line Abreast Phases: 1, 2, 3 |
3/6 12/24 | |
| Echelon Line Abreast Phases: 1, 2, 3 |
9/17 36/72 | ||
| Echelon Line Abreast Phases: 1, 2, 3 |
43/85 189/378 | ||
| # | Formation | Supported Battle Node | AD/AP AS/AS+ |
| # | Formation | Boss Battle Node | AD/AP AS/AS+ |
|---|---|---|---|
| G | Cruising Formation 4 Phases: 1, 2, 3 |
41/81 180/360 | |
| Cruising Formation 4 Phases: 1 (Final)
|
46/91 204/408 | ||
| # | Formation | Boss Battle Node | AD/AP AS/AS+ |
| # | Formation | Normal Battle Node | AD/AP AS/AS+ |
|---|---|---|---|
| H | Line Ahead Echelon Phases: 2, 3 |
0/0 0/0 | |
| Line Ahead Phases: 2 |
0/0 0/0 | ||
| # | Formation | Normal Battle Node | AD/AP AS/AS+ |
| # | Formation | Air Defense Node | AD/AP AS/AS+ |
|---|---|---|---|
| H1 | Diamond Phases: 2, 3 |
47/93 207/414 | |
| Diamond Phases: 2, 3 |
64/127 284/567 | ||
| Diamond Phases: 3 |
72/143 320/639 | ||
| # | Formation | Air Defense Node | AD/AP AS/AS+ |
| # | Empty Node | ||
|---|---|---|---|
| H2 | 敵影を見ず。 No enemy spotted. | ||
| # | Empty Node | ||
| # | Formation | Normal Battle Node | AD/AP AS/AS+ |
|---|---|---|---|
| I | Echelon Line Abreast Phases: 2 |
0/0 0/0 | |
| Echelon Line Abreast Phases: 2 |
0/0 0/0 | ||
| Echelon Line Abreast Phases: 2, 3 |
0/0 0/0 | ||
| # | Formation | Normal Battle Node | AD/AP AS/AS+ |
| # | Formation | Boss Battle Node | AD/AP AS/AS+ |
|---|---|---|---|
| J | Double Line Phases: 2 |
19/38 84/168 | |
| Double Line Phases: 3 |
0/0 0/0 | ||
| Double Line Phases: 2 (Final)
|
0/0 0/0 | ||
| # | Formation | Boss Battle Node | AD/AP AS/AS+ |
| # | Formation | Normal Battle Node | AD/AP AS/AS+ |
|---|---|---|---|
| K | Echelon Line Abreast Phases: 3 |
0/0 0/0 | |
| Echelon Line Abreast Phases: 3 |
0/0 0/0 | ||
| Echelon Line Abreast Phases: 3 |
0/0 0/0 | ||
| # | Formation | Normal Battle Node | AD/AP AS/AS+ |
| # | Formation | Normal Battle Node | AD/AP AS/AS+ |
|---|---|---|---|
| L | Line Abreast Phases: 3 |
0/0 0/0 | |
| Line Abreast Phases: 3 |
0/0 0/0 | ||
| Echelon Line Abreast Phases: 3 |
0/0 0/0 | ||
| # | Formation | Normal Battle Node | AD/AP AS/AS+ |
| # | Formation | Supported Battle Node | AD/AP AS/AS+ |
|---|---|---|---|
| M | Echelon Line Abreast Phases: 3 |
41/81 180/360 | |
| Echelon Line Abreast Phases: 3 |
46/91 204/408 | ||
| Echelon Line Abreast Phases: 3 |
91/182 408/816 | ||
| # | Formation | Supported Battle Node | AD/AP AS/AS+ |
| # | Formation | Air Defense Node | AD/AP AS/AS+ |
|---|---|---|---|
| N | Diamond Phases: 3 |
125/250 561/1122 | |
| Diamond Phases: 3 |
165/330 741/1482 | ||
| Diamond Phases: 3 |
188/376 845/1689 | ||
| # | Formation | Air Defense Node | AD/AP AS/AS+ |
| # | Formation | Normal Battle Node | AD/AP AS/AS+ |
|---|---|---|---|
| O | Double Line Diamond Phases: 3 |
51/101 225/450 | |
| Diamond Phases: 3 |
85/169 378/756 | ||
| # | Formation | Normal Battle Node | AD/AP AS/AS+ |
| # | Formation | Supported Battle Node | AD/AP AS/AS+ |
|---|---|---|---|
| P | Line Abreast | 41/81 180/360 | |
| Echelon Line Abreast Phases: 3 |
46/91 204/408 | ||
| Echelon Line Abreast Phases: 3 |
91/182 408/816 | ||
| # | Formation | Supported Battle Node | AD/AP AS/AS+ |
| # | Selection Node | ||
|---|---|---|---|
| Q | 艦隊の針路を選択できます。提督、どちらの針路をとられますか? You can decide the fleet's course. Admiral, which heading should we take? | ||
| # | Selection Node | ||
| # | Formation | Air Defense Node | AD/AP AS/AS+ |
|---|---|---|---|
| R | Diamond Phases: 3 |
125/250 561/1122 | |
| Diamond Phases: 3 |
165/330 741/1482 | ||
| Diamond Phases: 3 |
188/376 845/1689 | ||
| # | Formation | Air Defense Node | AD/AP AS/AS+ |
| # | Empty Node | ||
|---|---|---|---|
| S | 敵影を見ず。 No enemy spotted. | ||
| # | Empty Node | ||
| # | Formation | Normal Battle Node | AD/AP AS/AS+ |
|---|---|---|---|
| T | Double Line Diamond Vanguard Phases: 3 |
43/85 189/378 | |
| # | Formation | Normal Battle Node | AD/AP AS/AS+ |
| # | Formation | Normal Battle Node | AD/AP AS/AS+ |
|---|---|---|---|
| U | Double Line Diamond Phases: 3 |
51/101 225/450 | |
| Diamond Phases: 3 |
85/169 378/756 | ||
| # | Formation | Normal Battle Node | AD/AP AS/AS+ |
| # | Empty Node | ||
|---|---|---|---|
| V | 気のせいだった。 Must be my imagination. | ||
| # | Empty Node | ||
| # | Formation | Boss Battle Node | AD/AP AS/AS+ |
|---|---|---|---|
| W | Cruising Formation 4 Phases: 3 |
165/330 741/1482 | |
| Cruising Formation 4 Phases: 3 (Final)
|
188/376 845/1689 | ||
| # | Formation | Boss Battle Node | AD/AP AS/AS+ |
| # | Formation | Air Raids | AD/AP AS/AS+ |
|---|---|---|---|
| AB | Diamond | 89/177 396/792 | |
| Diamond | 126/251 564/1128 | ||
| Diamond | 178/355 798/1596 | ||
| # | Formation | Air Raids | AD/AP AS/AS+ |
| # | Formation | Air Defense Node | AD/AP AS/AS+ |
|---|---|---|---|
| A | Diamond Phases: 1, 2, 3 |
43/85 189/378 | |
| Diamond Phases: 1, 2, 3 |
45/90 201/402 | ||
| Diamond Phases: 1 |
51/101 225/450 | ||
| # | Formation | Air Defense Node | AD/AP AS/AS+ |
| # | Formation | Supported Battle Node | AD/AP AS/AS+ |
|---|---|---|---|
| B | Echelon Line Abreast Phases: 1, 2, 3 |
3/6 12/24 | |
| Echelon Line Abreast Phases: 1, 2, 3 |
9/17 36/72 | ||
| # | Formation | Supported Battle Node | AD/AP AS/AS+ |
| # | Formation | Normal Battle Node | AD/AP AS/AS+ |
|---|---|---|---|
| B1 | Echelon Line Abreast Phases: 1, 3 |
0/0 0/0 | |
| Echelon Line Abreast Phases: 1 |
0/0 0/0 | ||
| # | Formation | Normal Battle Node | AD/AP AS/AS+ |
| # | Formation | Air Defense Node | AD/AP AS/AS+ |
|---|---|---|---|
| B2 | Diamond Phases: 1, 3 |
24/47 104/207 | |
| Diamond Phases: 1, 3 |
32/63 140/279 | ||
| Diamond Phases: 1 |
64/127 284/567 | ||
| # | Formation | Air Defense Node | AD/AP AS/AS+ |
| # | Formation | Normal Battle Node | AD/AP AS/AS+ |
|---|---|---|---|
| C | Line Ahead Echelon Phases: 1, 2, 3 |
0/0 0/0 | |
| Line Ahead Phases: 1 |
0/0 0/0 | ||
| # | Formation | Normal Battle Node | AD/AP AS/AS+ |
| # | Formation | Air Defense Node | AD/AP AS/AS+ |
|---|---|---|---|
| D | Diamond Phases: 1, 3 |
24/47 104/207 | |
| Diamond Phases: 1, 3 |
32/63 140/279 | ||
| Diamond Phases: 1, 3 |
64/127 284/567 | ||
| # | Formation | Air Defense Node | AD/AP AS/AS+ |
| # | Formation | Normal Battle Node | AD/AP AS/AS+ |
|---|---|---|---|
| E | Double Line Diamond Phases: 1, 2, 3 |
43/85 189/378 | |
| Diamond Phases: 1 |
45/90 201/402 | ||
| # | Formation | Normal Battle Node | AD/AP AS/AS+ |
| # | Empty Node | ||
|---|---|---|---|
| E1 | 敵影を見ず。 No enemy spotted. | ||
| # | Empty Node | ||
| # | Formation | Normal Battle Node | AD/AP AS/AS+ |
|---|---|---|---|
| E2 | Line Ahead Double Line Phases: 1, 2, 3 |
0/0 0/0 | |
| Line Ahead Phases: 3 |
0/0 0/0 | ||
| # | Formation | Normal Battle Node | AD/AP AS/AS+ |
| # | Selection Node | ||
|---|---|---|---|
| F | 艦隊の針路を選択できます。提督、どちらの針路をとられますか? You can decide the fleet's course. Admiral, which heading should we take? | ||
| # | Selection Node | ||
| # | Formation | Air Defense Node | AD/AP AS/AS+ |
|---|---|---|---|
| F1 | Diamond Phases: 1, 3 |
24/47 104/207 | |
| Diamond Phases: 1, 3 |
32/63 140/279 | ||
| Diamond Phases: 1 |
64/127 284/567 | ||
| # | Formation | Air Defense Node | AD/AP AS/AS+ |
| # | Formation | Supported Battle Node | AD/AP AS/AS+ |
|---|---|---|---|
| F2 | Echelon Line Abreast Phases: 1, 2, 3 |
3/6 12/24 | |
| Echelon Line Abreast Phases: 1, 2, 3 |
9/17 36/72 | ||
| # | Formation | Supported Battle Node | AD/AP AS/AS+ |
| # | Formation | Boss Battle Node | AD/AP AS/AS+ |
|---|---|---|---|
| G | Cruising Formation 4 Phases: 1, 2, 3 |
3/6 12/24 | |
| Cruising Formation 4 Phases: 1 (Final)
|
41/81 180/360 | ||
| # | Formation | Boss Battle Node | AD/AP AS/AS+ |
| # | Formation | Normal Battle Node | AD/AP AS/AS+ |
|---|---|---|---|
| H | Line Ahead Echelon Phases: 2, 3 |
0/0 0/0 | |
| Line Ahead Phases: 2 |
0/0 0/0 | ||
| # | Formation | Normal Battle Node | AD/AP AS/AS+ |
| # | Formation | Air Defense Node | AD/AP AS/AS+ |
|---|---|---|---|
| H1 | Diamond | 24/47 104/207 | |
| Diamond Phases: 2, 3 |
32/63 140/279 | ||
| Diamond Phases: 2 |
64/127 284/567 | ||
| # | Formation | Air Defense Node | AD/AP AS/AS+ |
| # | Empty Node | ||
|---|---|---|---|
| H2 | 敵影を見ず。 No enemy spotted. | ||
| # | Empty Node | ||
| # | Formation | Normal Battle Node | AD/AP AS/AS+ |
|---|---|---|---|
| I | Echelon Line Abreast Phases: 2, 3 |
0/0 0/0 | |
| Echelon Line Abreast Phases: 2 |
0/0 0/0 | ||
| # | Formation | Normal Battle Node | AD/AP AS/AS+ |
| # | Formation | Boss Battle Node | AD/AP AS/AS+ |
|---|---|---|---|
| J | Double Line Phases: 2 |
10/19 42/84 | |
| Double Line Phases: 2 |
0/0 0/0 | ||
| Double Line Phases: 3 (Final)
|
0/0 0/0 | ||
| # | Formation | Boss Battle Node | AD/AP AS/AS+ |
| # | Formation | Normal Battle Node | AD/AP AS/AS+ |
|---|---|---|---|
| K | Echelon Line Abreast Phases: 3 |
0/0 0/0 | |
| Echelon Line Abreast Phases: 3 |
0/0 0/0 | ||
| # | Formation | Normal Battle Node | AD/AP AS/AS+ |
| # | Formation | Normal Battle Node | AD/AP AS/AS+ |
|---|---|---|---|
| L | Echelon | 0/0 0/0 | |
| # | Formation | Normal Battle Node | AD/AP AS/AS+ |
| # | Formation | Supported Battle Node | AD/AP AS/AS+ |
|---|---|---|---|
| M | Echelon Line Abreast Phases: 3 |
41/81 180/360 | |
| Echelon Line Abreast Phases: 3 |
46/91 204/408 | ||
| # | Formation | Supported Battle Node | AD/AP AS/AS+ |
| # | Formation | Air Defense Node | AD/AP AS/AS+ |
|---|---|---|---|
| N | Diamond Phases: 3 |
88/175 393/786 | |
| Diamond Phases: 3 |
125/250 561/1122 | ||
| Diamond Phases: 3 |
178/355 797/1593 | ||
| # | Formation | Air Defense Node | AD/AP AS/AS+ |
| # | Formation | Normal Battle Node | AD/AP AS/AS+ |
|---|---|---|---|
| O | Double Line Diamond Phases: 3 |
43/85 189/378 | |
| Diamond Phases: 3 |
45/90 201/402 | ||
| # | Formation | Normal Battle Node | AD/AP AS/AS+ |
| # | Formation | Supported Battle Node | AD/AP AS/AS+ |
|---|---|---|---|
| P | Echelon Line Abreast Phases: 3 |
41/81 180/360 | |
| Echelon Line Abreast Phases: 3 |
46/91 204/408 | ||
| # | Formation | Supported Battle Node | AD/AP AS/AS+ |
| # | Selection Node | ||
|---|---|---|---|
| Q | 艦隊の針路を選択できます。提督、どちらの針路をとられますか? You can decide the fleet's course. Admiral, which heading should we take? | ||
| # | Selection Node | ||
| # | Formation | Air Defense Node | AD/AP AS/AS+ |
|---|---|---|---|
| R | Diamond Phases: 3 |
88/175 393/786 | |
| Diamond Phases: 3 |
125/250 561/1122 | ||
| # | Formation | Air Defense Node | AD/AP AS/AS+ |
| # | Empty Node | ||
|---|---|---|---|
| S | 敵影を見ず。 No enemy spotted. | ||
| # | Empty Node | ||
| # | Formation | Normal Battle Node | AD/AP AS/AS+ |
|---|---|---|---|
| T | Double Line Diamond Vanguard Phases: 3 |
43/85 189/378 | |
| # | Formation | Normal Battle Node | AD/AP AS/AS+ |
| # | Formation | Normal Battle Node | AD/AP AS/AS+ |
|---|---|---|---|
| U | Double Line Diamond Phases: 3 |
43/85 189/378 | |
| Diamond Phases: 3 |
45/90 201/402 | ||
| # | Formation | Normal Battle Node | AD/AP AS/AS+ |
| # | Empty Node | ||
|---|---|---|---|
| V | 気のせいだった。 Must be my imagination. | ||
| # | Empty Node | ||
| # | Formation | Boss Battle Node | AD/AP AS/AS+ |
|---|---|---|---|
| W | Cruising Formation 4 Phases: 3 |
125/250 561/1122 | |
| Cruising Formation 4 Phases: 3 (Final)
|
178/355 797/1593 | ||
| # | Formation | Boss Battle Node | AD/AP AS/AS+ |
Ship Drops
| Ship drops | |||||||||||||||||||||||||||||||||||||||||||||||||||||||||||||||||||||||||||||||||||||||||||||||||||
|---|---|---|---|---|---|---|---|---|---|---|---|---|---|---|---|---|---|---|---|---|---|---|---|---|---|---|---|---|---|---|---|---|---|---|---|---|---|---|---|---|---|---|---|---|---|---|---|---|---|---|---|---|---|---|---|---|---|---|---|---|---|---|---|---|---|---|---|---|---|---|---|---|---|---|---|---|---|---|---|---|---|---|---|---|---|---|---|---|---|---|---|---|---|---|---|---|---|---|---|
| Type | Ship? | E | E2 | G | O | T | U | W | |||||||||||||||||||||||||||||||||||||||||||||||||||||||||||||||||||||||||||||||||||||||||||
| DE | Hachijou | Casual+ | Medium+ | Casual+ | Casual+ | Easy+ | Casual+ | Casual+ | |||||||||||||||||||||||||||||||||||||||||||||||||||||||||||||||||||||||||||||||||||||||||||
| DE | Ishigaki | Casual+ | Medium+ | Casual+ | Casual+ | Easy+ | Casual+ | Casual+ | |||||||||||||||||||||||||||||||||||||||||||||||||||||||||||||||||||||||||||||||||||||||||||
| DD | Yuugure | Casual+ | Casual+ | ||||||||||||||||||||||||||||||||||||||||||||||||||||||||||||||||||||||||||||||||||||||||||||||||
| DD | Heywood L. Edwards | Casual+ | |||||||||||||||||||||||||||||||||||||||||||||||||||||||||||||||||||||||||||||||||||||||||||||||||
| DD | Ariake | Casual+ | Casual+ | ||||||||||||||||||||||||||||||||||||||||||||||||||||||||||||||||||||||||||||||||||||||||||||||||
| DD | Umikaze | Easy+ | Medium+ | Easy+ | Casual+ | Casual+ | Casual+ | ||||||||||||||||||||||||||||||||||||||||||||||||||||||||||||||||||||||||||||||||||||||||||||
| DD | Yamakaze | Casual+ | |||||||||||||||||||||||||||||||||||||||||||||||||||||||||||||||||||||||||||||||||||||||||||||||||
| DD | Kawakaze | Easy+ | Hard+ | Easy+ | Casual+ | Casual+ | Casual+ | ||||||||||||||||||||||||||||||||||||||||||||||||||||||||||||||||||||||||||||||||||||||||||||
| DD | Isokaze | Hard+ | Casual+ | Casual+ | |||||||||||||||||||||||||||||||||||||||||||||||||||||||||||||||||||||||||||||||||||||||||||||||
| DD | Asashimo | Casual+ | |||||||||||||||||||||||||||||||||||||||||||||||||||||||||||||||||||||||||||||||||||||||||||||||||
| DD | Suzutsuki | Casual+ | |||||||||||||||||||||||||||||||||||||||||||||||||||||||||||||||||||||||||||||||||||||||||||||||||
| CL | Agano | Casual+ | |||||||||||||||||||||||||||||||||||||||||||||||||||||||||||||||||||||||||||||||||||||||||||||||||
| CL | Yahagi | Casual+ | |||||||||||||||||||||||||||||||||||||||||||||||||||||||||||||||||||||||||||||||||||||||||||||||||
| CL | Sakawa | Casual+ | |||||||||||||||||||||||||||||||||||||||||||||||||||||||||||||||||||||||||||||||||||||||||||||||||
| BB | Yamato | Casual+ | |||||||||||||||||||||||||||||||||||||||||||||||||||||||||||||||||||||||||||||||||||||||||||||||||
| CV | Unryuu | Casual+ | |||||||||||||||||||||||||||||||||||||||||||||||||||||||||||||||||||||||||||||||||||||||||||||||||
| AR | Akashi | Casual+ | Casual+ | ||||||||||||||||||||||||||||||||||||||||||||||||||||||||||||||||||||||||||||||||||||||||||||||||
| AS | Jingei | Hard+ | Casual+ | ||||||||||||||||||||||||||||||||||||||||||||||||||||||||||||||||||||||||||||||||||||||||||||||||
| DD | Yukikaze | Casual+ | Casual+ | ||||||||||||||||||||||||||||||||||||||||||||||||||||||||||||||||||||||||||||||||||||||||||||||||
| DD | Urakaze | Casual+ | |||||||||||||||||||||||||||||||||||||||||||||||||||||||||||||||||||||||||||||||||||||||||||||||||
| DD | Hamakaze | Casual+ | |||||||||||||||||||||||||||||||||||||||||||||||||||||||||||||||||||||||||||||||||||||||||||||||||
| CL | Nagara | Hard+ | Casual+ | ||||||||||||||||||||||||||||||||||||||||||||||||||||||||||||||||||||||||||||||||||||||||||||||||
| CL | Kinu | Casual+ | |||||||||||||||||||||||||||||||||||||||||||||||||||||||||||||||||||||||||||||||||||||||||||||||||
| CL | Abukuma | Casual+ | Medium+ | Casual+ | Casual+ | Medium+ | Casual+ | Casual+ | |||||||||||||||||||||||||||||||||||||||||||||||||||||||||||||||||||||||||||||||||||||||||||
| CA | Kinugasa | Casual+ | |||||||||||||||||||||||||||||||||||||||||||||||||||||||||||||||||||||||||||||||||||||||||||||||||
| CA | Takao | Casual+ | |||||||||||||||||||||||||||||||||||||||||||||||||||||||||||||||||||||||||||||||||||||||||||||||||
| CA | Mogami | Casual+ | Medium+ | Casual+ | Casual+ | Casual+ | Casual+ | ||||||||||||||||||||||||||||||||||||||||||||||||||||||||||||||||||||||||||||||||||||||||||||
| CA | Tone | Hard+ | Casual+ | Casual+ | |||||||||||||||||||||||||||||||||||||||||||||||||||||||||||||||||||||||||||||||||||||||||||||||
| CVL | Zuihou | Casual+ | |||||||||||||||||||||||||||||||||||||||||||||||||||||||||||||||||||||||||||||||||||||||||||||||||
| FBB | Kongou | Hard+ | Casual+ | Casual+ | |||||||||||||||||||||||||||||||||||||||||||||||||||||||||||||||||||||||||||||||||||||||||||||||
| FBB | Hiei | Casual+ | |||||||||||||||||||||||||||||||||||||||||||||||||||||||||||||||||||||||||||||||||||||||||||||||||
| FBB | Haruna | Casual+ | |||||||||||||||||||||||||||||||||||||||||||||||||||||||||||||||||||||||||||||||||||||||||||||||||
| FBB | Kirishima | Casual+ | |||||||||||||||||||||||||||||||||||||||||||||||||||||||||||||||||||||||||||||||||||||||||||||||||
| BB | Fusou | Casual+ | |||||||||||||||||||||||||||||||||||||||||||||||||||||||||||||||||||||||||||||||||||||||||||||||||
| BB | Yamashiro | Casual+ | |||||||||||||||||||||||||||||||||||||||||||||||||||||||||||||||||||||||||||||||||||||||||||||||||
| BB | Ise | Hard+ | Casual+ | Casual+ | |||||||||||||||||||||||||||||||||||||||||||||||||||||||||||||||||||||||||||||||||||||||||||||||
| BB | Hyuuga | Hard+ | Casual+ | Casual+ | |||||||||||||||||||||||||||||||||||||||||||||||||||||||||||||||||||||||||||||||||||||||||||||||
| BB | Nagato | Casual+ | |||||||||||||||||||||||||||||||||||||||||||||||||||||||||||||||||||||||||||||||||||||||||||||||||
| BB | Mutsu | Casual+ | |||||||||||||||||||||||||||||||||||||||||||||||||||||||||||||||||||||||||||||||||||||||||||||||||
| CV | Souryuu | Casual+ | |||||||||||||||||||||||||||||||||||||||||||||||||||||||||||||||||||||||||||||||||||||||||||||||||
| CV | Hiryuu | Casual+ | |||||||||||||||||||||||||||||||||||||||||||||||||||||||||||||||||||||||||||||||||||||||||||||||||
|
| ||||||||
|---|---|---|---|---|---|---|---|---|
|
Time remaining until Event ends [9]:
| ||||||||
KC anniversary maintenance has started, time remaining until maintenance ends [10]:
(~4h event pause)
| ||||||||
| ||||||||