|
|
| (35 intermediate revisions by 8 users not shown) |
| Line 1: |
Line 1: |
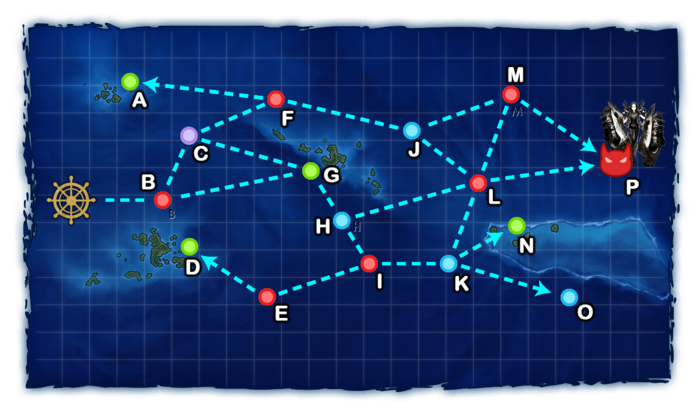
| − | ==World 2-4: 沖ノ島海域 Okinoshima Island==
| + | {{World/Hub}} |
| | + | =World 2-4: 沖ノ島海域 - Okinoshima Island= |
| | {{LabSortieworld | | {{LabSortieworld |
| − | | map = 2-4 Map.png | + | | page = World 2/2-4 |
| | | difficulty = ☆ ☆ ☆ ☆ ☆ ☆ | | | difficulty = ☆ ☆ ☆ ☆ ☆ ☆ |
| | | item = {{Fuel}} {{Ammo}} {{IR}} {{DM}} | | | item = {{Fuel}} {{Ammo}} {{IR}} {{DM}} |
| | | exp = 300 | | | exp = 300 |
| − | | code = あ号艦隊決戦 ([[wikipedia:Battle_of_the_Philippine_Sea|Operation A-Go: The Fleet's Decisive Battle]]) | + | | code = あ号艦隊決戦<br>[[wikipedia:Battle_of_the_Philippine_Sea|Operation A-Go: The Fleet's Decisive Battle]] |
| | | jptext = 沖ノ島海域に襲来した有力な敵機動部隊を迎撃する。艦隊全力出撃で、これを捕捉撃滅せよ! | | | jptext = 沖ノ島海域に襲来した有力な敵機動部隊を迎撃する。艦隊全力出撃で、これを捕捉撃滅せよ! |
| | | entext = A powerful enemy battlegroup is invading the waters around Okinoshima Island. Sail out in full force and annihilate them! | | | entext = A powerful enemy battlegroup is invading the waters around Okinoshima Island. Sail out in full force and annihilate them! |
| | + | | aircon = |
| | + | {{AirConKai |
| | + | |AS=0 |
| | + | |ASr=84 |
| | + | }} |
| | + | }} |
| | + | |
| | + | {{MapUnlock |
| | + | | unlock= [[2-3]] |
| | + | | clear= the boss's flagship must be sunk once |
| | }} | | }} |
| | | | |
| Line 13: |
Line 24: |
| | {{MapBranchingTable | | {{MapBranchingTable |
| | |title = 2-4 Branching Rules | | |title = 2-4 Branching Rules |
| − | |expand = true
| |
| | |id = 2-4 | | |id = 2-4 |
| | |B -> C/storm,G/resource= | | |B -> C/storm,G/resource= |
| | *Meet '''ANY''' of the following to go to C | | *Meet '''ANY''' of the following to go to C |
| − | **(F)BB(V)+CV(L/B) ≥ 5 | + | **(F)BB(V)+CV(B/L) ≥ 5 |
| − | **CV(L/B) ≥ 3 '''AND''' DD ≤ 2 | + | **CV(B/L) ≥ 3 '''AND''' DD ≤ 2 |
| | **(F)BB(V)+CV(B) ≥ 3 '''AND''' DD ≤ 2 | | **(F)BB(V)+CV(B) ≥ 3 '''AND''' DD ≤ 2 |
| | *Meet '''ALL''' of the following to go to G | | *Meet '''ALL''' of the following to go to G |
| − | **No (F)BB(V), CV(L/B), AV, CLT or SS(V) | + | **No (F)BB(V), CV(B/L), AV, CLT or SS(V) |
| | **CL = 1 | | **CL = 1 |
| | **DD ≥ 4 | | **DD ≥ 4 |
| | **Amount of ships in fleet = 6 | | **Amount of ships in fleet = 6 |
| | *Otherwise, random routing | | *Otherwise, random routing |
| − | **80% G if (F)BB(V)+CV(B) ≥ 2 | + | **20% G if (F)BB(V)+CV(B) ≥ 2 |
| − | **60% G if CV(B) ≥ 1 or SS(V) ≥ 1 | + | **40% G if CV(B) ≥ 1 or SS(V) ≥ 1 |
| − | **40% G otherwise | + | **60% G otherwise |
| | | | |
| | |C/storm -> F,G/resource= | | |C/storm -> F,G/resource= |
| Line 35: |
Line 45: |
| | | | |
| | |F -> A/resource, J/empty= | | |F -> A/resource, J/empty= |
| − | *Go to A if fleet contains no CVL '''AND''' DD ≤ 1 | + | *95% J if CVL ≥ 1 and DD ≥ 2 |
| − | *Otherwise, random routing
| + | *75% J if CVL ≥ 1 or DD ≥ 2 |
| | + | *Otherwise, go to A if fleet contains no CVL '''AND''' DD ≤ 1 |
| | | | |
| | |H/empty -> I,L= | | |H/empty -> I,L= |
| | *Meet '''ALL''' of the following requirements to go to L: | | *Meet '''ALL''' of the following requirements to go to L: |
| − | **Your fleet must contain 6 ships. | + | **Fleet must contain 6 ships. |
| | **DD ≥ 4 | | **DD ≥ 4 |
| | **CL+CT ≤ 2 | | **CL+CT ≤ 2 |
| − | **CA ≤ 1 | + | **CA(V) ≤ 1 |
| | **No other ship types are allowed. | | **No other ship types are allowed. |
| | *Otherwise, go to I. | | *Otherwise, go to I. |
| Line 49: |
Line 60: |
| | |I -> E,K/empty= | | |I -> E,K/empty= |
| | *Random routing | | *Random routing |
| − | **If fleet contains CL '''AND''' CVL, 90% K | + | **If fleet contains CL '''AND''' CVL, 95% K |
| | **If fleet contains CVL, 80% K | | **If fleet contains CVL, 80% K |
| | **If fleet contains CL, 75% K | | **If fleet contains CL, 75% K |
| Line 56: |
Line 67: |
| | |J/empty -> L,M= | | |J/empty -> L,M= |
| | *Meet '''ANY''' of the following to go to L | | *Meet '''ANY''' of the following to go to L |
| − | **(F)BB(V)+CV(L/B) ≥ 4 | + | **(F)BB(V)+CV(B/L) ≥ 4 |
| | **No CV(B) | | **No CV(B) |
| | *Meet '''ANY''' of the following to go to M | | *Meet '''ANY''' of the following to go to M |
| − | **(F)BB(V)+CV(L/B) = 3 | + | **(F)BB(V)+CV(B/L) = 3 |
| | **CV(B) = 2 | | **CV(B) = 2 |
| | *Otherwise, random routing | | *Otherwise, random routing |
| Line 67: |
Line 78: |
| | *Go to L if DD ≥ 2 | | *Go to L if DD ≥ 2 |
| | *Otherwise, random routing between L and O | | *Otherwise, random routing between L and O |
| − | **If fleet contains DD, you will more likely to go to L | + | **If fleet contains DD, more likely to go to L |
| − | **If fleet doesn't contain DD, you will more likely to go to O | + | **If fleet doesn't contain DD, more likely to go to O |
| | | | |
| | |L -> M= | | |L -> M= |
| − | *(F)BB(V)+CV(L/B) ≥ 4 | + | *(F)BB(V)+CV(B/L) ≥ 4 |
| − | *Random routing if you don't meet any conditions | + | *Random routing if no condition is met |
| | |L -> P= | | |L -> P= |
| | *(F)BB(V)+CV(B) ≤ 2 | | *(F)BB(V)+CV(B) ≤ 2 |
| − | *Random routing if you don't meet any conditions | + | *Random routing if no condition is met |
| | }} | | }} |
| | | | |
| − | {{AirControlSystem | + | ===Tips=== |
| − | | Map = 2-4 | + | This map will feature a series of fights involving mostly smaller surface ships with some carrier fights in between. |
| − | | Fleet = | + | |
| | + | ===Recommended Fleets=== |
| | + | {{FleetGuide |
| | + | | Map = Heavy Fleets |
| | + | | Fleet = '''1 CV(B), 1 CVL, 1 CA(V)/CLT, 1 CL, 2 DD |
| | + | '''2 (F)BB(V)/CV(B), 1 CVL, 1 CL, 2 DD |
| | + | | Route = Random |
| | | AS = 84 | | | AS = 84 |
| − | | Notes = AS value for Nodes '''M''' & '''L''' | + | | Note = Random routing across the map, but it is allowed to bring a much stronger fleet to fight the boss node. |
| | + | *{{MapRoute|J|blue|M|red}}, {{MapRoute|K|blue|L|red}}, and {{MapRoute|L|red|M|red}} branches should be guaranteed though. |
| | + | *Having both CVL and CL will ensure 95% of not rolling dead-end {{MapRoute|I|red|E|red}} and {{MapRoute|F|red|A|green}} |
| | + | *Having an AV on the fleet introduces a chance to roll the dead-end {{MapRoute|K|blue|N|green}} |
| | + | | Quest = |
| | }} | | }} |
| | | | |
| − | === Tips === | + | {{FleetGuide |
| − | *This map will feature a series of fights involving mostly smaller surface ships with some carrier fights in between.
| + | | Map = Light Fleet |
| − | <br/>'''Recommended Fleet'''
| + | | Fleet = '''1 CAV, 1 CL, 4 DD |
| − | *'''1 CAV, 1 CL, 4 DD''' routes '''B-G-H-L-P'''
| + | | Route = {{MapRoute|B|red|G|green|H|blue|L|red|P|red}} |
| − | **Takes you down the quickest path to the boss node with only 2 battles prior to boss node
| + | | AS = 84 |
| − | **May present possible difficulty due to lack of air power your fleet will have in nodes L
| + | | Note = Takes the quickest path to the boss node with only 2 battles prior to the boss node, but may present difficulties due to lack of airpower of the fleet for nodes {{MapRoute|L|red}}. |
| − | **Boss node can also be difficult if your CL and DD aren't high-leveled.
| + | Boss node can also be difficult if CL and DD are not high-leveled, therefore it is not suitable for early players. |
| − | **Probably not suitable much for early players
| + | | Quest = |
| − | *'''1 CVL 1 CV(B) 1 CL 1 CA(V)/CLT/AV 2 DD'''
| + | }} |
| − | *'''2 (F)BB(V)+CV(B) 1 CVL 1 CL 2 DD'''
| |
| − | **'''Random routing''' across the map, but you are allowed to bring a much stronger fleet to fight the boss node
| |
| − | ***'''J-M, K-L and L-P''' branches should be guaranteed though.
| |
| − | ***Having both CVL and CL will ensure 90% of not rolling deadend '''I-E'''
| |
| − | **Whatever path you will take, you will fight a total of 3 battles prior to the boss node.
| |
| − | ***The top path does have a chance of hitting the bucket node (Node A)
| |
| − | ***Bottom path lets you gather Development Materials, and the fights are slightly easier
| |
| | | | |
| − | ====Development Material Farming==== | + | {{FleetGuide |
| − | It's possible to farm development material in node G by using the fleet consisted of '''1 AO/AS 2 CVL 3 CLT/CL'''. Simply equip your ships full of torpedo bombers and opening torpedoes, then retreat after fighting node I.
| + | | Map = Torpedo Squadron |
| − | *It's recommended to use CVL instead of CV(B) for 60% of avoiding the maelstrom node. | + | | Fleet = '''{{color|red|"Torpedo Squadron"}}: 1 CL (flagship), 5 DD |
| | + | | Route = {{MapRoute|B|red|G|green|H|blue|L|red|P|red}} |
| | + | | AS = 84 |
| | + | | Note = This solution requires more advanced equipment, and might be out of reach of new players. {{color|red|'''It is required to bring'''}} an {{Command Facility}} FCF capable CL as flagship, preferably an {{Class|Agano|Kai+}}, equipped with: |
| | + | *2 {{Med Gun}} [[Main Gun]]s, |
| | + | *1 {{Night SPB}} {{EquipmentLink|Prototype Night Zuiun (Attack Equipment)}}, |
| | + | *'''And''' the {{IconText|{{Command Facility}}|ETSCF}} {{EquipmentLink|Elite Torpedo Squadron Command Facility}} (preferably in the [[RE]]). |
| | + | The best comp for farming boss node, having the highest pass rate thanks to the usage of [[ETSCF]] in case a ship got heavily damaged. |
| | | | |
| − | ===Nodes and Enemy Encounters===
| + | Do note that the [[Night Zuiun]] will likely be shot down completely due to fighting under AI. |
| − | {{#invoke:EnemyEncounters2|encounterTemplate
| + | | Quest = |
| − | |A_label = '''<span style="color:green">Resource Node</span>'''
| |
| − | |A1_node_info = instantrepair + 1
| |
| − | |
| |
| − | |B_label = 敵前衛巡洋艦戦隊
| |
| − | |B-1_node_info = ca_ri-class_elite ca_ri-class_elite ca_ri-class_elite cl_he-class_elite dd_ro-class_late_model dd_ro-class_late_model
| |
| − | |B-1_form = double_line line_ahead
| |
| − | |B-1_xp =
| |
| − | |B-1_enemy_air_power =
| |
| − | |B-2_node_info = ca_ri-class_elite ca_ri-class_elite ca_ri-class cl_he-class dd_ro-class_late_model dd_ro-class_late_model
| |
| − | |B-2_form = line_ahead double_line
| |
| − | |B-2_xp =
| |
| − | |B-2_enemy_air_power =
| |
| − | |B-3_node_info = ca_ri-class_elite ca_ri-class_elite ca_ri-class dd_ro-class_late_model dd_ro-class dd_ro-class
| |
| − | |B-3_form = line_ahead double_line
| |
| − | |B-3_xp =
| |
| − | |B-3_enemy_air_power =
| |
| − | |B-4_node_info = ca_ri-class_elite ca_ri-class ca_ri-class cl_ho-class dd_i-class dd_i-class
| |
| − | |B-4_form = line_ahead double_line
| |
| − | |B-4_xp =
| |
| − | |B-4_enemy_air_power =
| |
| − | |
| |
| − | |C_label = '''<span style="color:purple">Maelstrom Node</span>'''
| |
| − | |C1_node_info = fuel - ?
| |
| − | |
| |
| − | |D_label = '''<span style="color:green">Resource Node</span>'''
| |
| − | |D1_node_info = fuel + ?
| |
| − | |
| |
| − | |E_label = 敵侵攻高速軽快部隊
| |
| − | |E-1_node_info = ca_ri-class_elite cl_ho-class_elite dd_ro-class_late_model dd_ro-class_late_model dd_ro-class_late_model dd_ro-class_late_model
| |
| − | |E-1_form = line_ahead
| |
| − | |E-1_xp =
| |
| − | |E-1_enemy_air_power =
| |
| − | |E-2_node_info = ca_ri-class_elite cl_ho-class_elite dd_ro-class_late_model dd_ro-class_late_model dd_ro-class dd_ro-class
| |
| − | |E-2_form = line_ahead double_line
| |
| − | |E-2_xp =
| |
| − | |E-2_enemy_air_power =
| |
| − | |E-3_node_info = cl_ho-class_elite dd_ro-class_late_model dd_ro-class_late_model dd_ro-class dd_ro-class dd_ro-class
| |
| − | |E-3_form = line_ahead double_line
| |
| − | |E-3_xp =
| |
| − | |E-3_enemy_air_power =
| |
| − | |E-4_node_info = cl_ho-class_elite dd_ro-class_late_model dd_ro-class dd_ro-class dd_ro-class dd_ro-class
| |
| − | |E-4_form = line_ahead double_line
| |
| − | |E-4_xp =
| |
| − | |E-4_enemy_air_power =
| |
| − | |E-5_node_info = cl_ho-class_elite dd_ro-class_late_model dd_ro-class dd_ro-class dd_ro-class
| |
| − | |E-5_form = double_line line_ahead
| |
| − | |E-5_xp =
| |
| − | |E-5_enemy_air_power =
| |
| − | |
| |
| − | |F_label = 前衛機動部隊
| |
| − | |F-1_node_info = cvl_nu-class_elite cvl_nu-class_elite ca_ri-class_elite cl_ho-class_elite dd_ro-class_late_model dd_ro-class_late_model
| |
| − | |F-1_form = diamond
| |
| − | |F-1_xp =
| |
| − | |F-1_enemy_air_power = 48
| |
| − | |F-2_node_info = cvl_nu-class_flagship cvl_nu-class_elite ca_ri-class_elite cl_ho-class_elite dd_ro-class_late_model dd_ro-class_late_model
| |
| − | |F-2_form = diamond
| |
| − | |F-2_xp =
| |
| − | |F-2_enemy_air_power = 47
| |
| − | |F-3_node_info = cvl_nu-class_elite cvl_nu-class_elite ca_ri-class_elite dd_ro-class_late_model dd_ro-class dd_ro-class
| |
| − | |F-3_form = diamond
| |
| − | |F-3_xp =
| |
| − | |F-3_enemy_air_power = 48
| |
| − | |F-4_node_info = cvl_nu-class_elite cvl_nu-class_elite ca_ri-class dd_ro-class_late_model dd_ro-class dd_ro-class
| |
| − | |F-4_form = diamond
| |
| − | |F-4_xp =
| |
| − | |F-4_enemy_air_power = 48
| |
| − | |F-5_node_info = cvl_nu-class_elite cvl_nu-class_elite ca_ri-class dd_ro-class dd_ro-class dd_ro-class
| |
| − | |F-5_form = diamond
| |
| − | |F-5_xp =
| |
| − | |F-5_enemy_air_power = 48
| |
| − | |F-6_node_info = cvl_nu-class_elite cvl_nu-class ca_ri-class dd_ro-class dd_ro-class dd_ro-class
| |
| − | |F-6_form = diamond
| |
| − | |F-6_xp =
| |
| − | |F-6_enemy_air_power = 32
| |
| − | |
| |
| − | |G_label = '''<span style="color:green">Resource Node</span>'''
| |
| − | |G1_node_info = devmat + 1
| |
| − | |
| |
| − | |H_label = '''<span style="color:blue">Battle Avoided</span>'''
| |
| − | |H1_node_info = "Must be my imagination" (battle avoided)
| |
| − | |
| |
| − | |I_label = 敵精鋭水雷戦隊
| |
| − | |I-1_node_info = cl_he-class_flagship dd_ro-class_late_model dd_ro-class_late_model dd_i-class_late_model dd_i-class_late_model dd_i-class_late_model
| |
| − | |I-1_form = line_ahead double_line
| |
| − | |I-1_xp =
| |
| − | |I-1_enemy_air_power =
| |
| − | |I-2_node_info = cl_he-class_elite dd_ro-class_late_model dd_ro-class_late_model dd_i-class_late_model dd_i-class_late_model dd_i-class_late_model
| |
| − | |I-2_form = line_ahead double_line
| |
| − | |I-2_xp =
| |
| − | |I-2_enemy_air_power =
| |
| − | |I-3_node_info = cl_he-class_elite dd_ro-class_late_model dd_ro-class_late_model dd_i-class_late_model dd_i-class dd_i-class
| |
| − | |I-3_form = double_line line_ahead
| |
| − | |I-3_xp =
| |
| − | |I-3_enemy_air_power =
| |
| − | |I-4_node_info = cl_he-class_elite dd_ro-class_late_model dd_ro-class_late_model dd_i-class dd_i-class dd_i-class
| |
| − | |I-4_form = line_ahead double_line
| |
| − | |I-4_xp =
| |
| − | |I-4_enemy_air_power =
| |
| − | |I-5_node_info = cl_he-class_elite dd_ro-class_late_model dd_i-class dd_i-class dd_i-class dd_i-class
| |
| − | |I-5_form = line_ahead
| |
| − | |I-5_xp =
| |
| − | |I-5_enemy_air_power =
| |
| − | |
| |
| − | |J_label = '''<span style="color:blue">Battle Avoided</span>'''
| |
| − | |J1_node_info = "Must be my imagination" (battle avoided)
| |
| − | |
| |
| − | |K_label = '''<span style="color:blue">Battle Avoided</span>'''
| |
| − | |K1_node_info = "Must be my imagination" (battle avoided)
| |
| − | |
| |
| − | |L_label = 敵機動部隊 B群
| |
| − | |L-1_node_info = cv_wo-class_flagship cv_wo-class_flagship ca_ri-class_flagship cl_ho-class_flagship dd_ro-class_late_model dd_ro-class_late_model
| |
| − | |L-1_form = diamond
| |
| − | |L-1_xp =
| |
| − | |L-1_enemy_air_power = 56
| |
| − | |L-2_node_info = cv_wo-class_flagship cv_wo-class_flagship ca_ri-class_elite cl_ho-class_elite dd_ro-class_late_model dd_ro-class_late_model
| |
| − | |L-2_form = diamond
| |
| − | |L-2_xp =
| |
| − | |L-2_enemy_air_power = 56
| |
| − | |L-3_node_info = cv_wo-class_flagship cv_wo-class_flagship ca_ri-class_flagship cl_ho-class_elite dd_ro-class_late_model dd_ro-class_late_model
| |
| − | |L-3_form = diamond
| |
| − | |L-3_xp =
| |
| − | |L-3_enemy_air_power = 56
| |
| − | |L-4_node_info = cv_wo-class_flagship cv_wo-class_elite ca_ri-class_elite cl_ho-class_elite dd_ro-class_late_model dd_ro-class_late_model
| |
| − | |L-4_form = diamond
| |
| − | |L-4_xp =
| |
| − | |L-4_enemy_air_power = 55
| |
| − | |L-5_node_info = cv_wo-class_flagship cv_wo-class_elite ca_ri-class_elite dd_ro-class_late_model dd_ro-class dd_ro-class
| |
| − | |L-5_form = diamond
| |
| − | |L-5_xp =
| |
| − | |L-5_enemy_air_power = 55
| |
| − | |L-6_node_info = cv_wo-class_elite cv_wo-class_elite ca_ri-class_elite dd_ro-class_late_model dd_ro-class dd_ro-class
| |
| − | |L-6_form = diamond
| |
| − | |L-6_xp =
| |
| − | |L-6_enemy_air_power = 54
| |
| − | |
| |
| − | |M_label = 敵機動部隊 A群
| |
| − | |M-1_node_info = cv_wo-class_flagship cv_wo-class_flagship bb_ru-class_flagship cl_he-class_flagship dd_ro-class_late_model dd_ro-class_late_model
| |
| − | |M-1_form = diamond
| |
| − | |M-1_xp =
| |
| − | |M-1_enemy_air_power = 56
| |
| − | |M-2_node_info = cv_wo-class_flagship cv_wo-class_flagship bb_ru-class_flagship cl_he-class_elite dd_ro-class_late_model dd_ro-class_late_model
| |
| − | |M-2_form = diamond
| |
| − | |M-2_xp =
| |
| − | |M-2_enemy_air_power = 56
| |
| − | |M-3_node_info = cv_wo-class_flagship cv_wo-class_flagship bb_ru-class_elite cl_he-class_elite dd_ro-class_late_model dd_ro-class_late_model
| |
| − | |M-3_form = diamond
| |
| − | |M-3_xp =
| |
| − | |M-3_enemy_air_power = 56
| |
| − | |M-4_node_info = cv_wo-class_flagship cv_wo-class_elite bb_ru-class_elite cl_he-class_elite dd_ro-class_late_model dd_ro-class_late_model
| |
| − | |M-4_form = diamond
| |
| − | |M-4_xp =
| |
| − | |M-4_enemy_air_power = 55
| |
| − | |M-5_node_info = cv_wo-class_flagship cv_wo-class_elite bb_ru-class_elite dd_ro-class_late_model dd_ro-class dd_ro-class
| |
| − | |M-5_form = diamond
| |
| − | |M-5_xp =
| |
| − | |M-5_enemy_air_power = 55
| |
| − | |M-6_node_info = cv_wo-class_elite cv_wo-class_elite bb_ru-class_elite dd_ro-class_late_model dd_ro-class dd_ro-class
| |
| − | |M-6_form = diamond
| |
| − | |M-6_xp =
| |
| − | |M-6_enemy_air_power = 54
| |
| − | |
| |
| − | |N_label = '''<span style="color:green">Resource Node</span>'''
| |
| − | |N1_node_info = ammo + ?
| |
| − | |
| |
| − | |O_label = '''<span style="color:blue">Battle Avoided</span>'''
| |
| − | |O1_node_info = "Must be my imagination" (battle avoided)
| |
| − | |
| |
| − | |P_label = 敵侵攻中核水上打撃部隊
| |
| − | |P-1_node_info = bb_ru-class_flagship bb_ru-class_flagship bb_ru-class_flagship cl_he-class_flagship dd_ro-class_late_model dd_ro-class_late_model
| |
| − | |P-1_form = line_ahead
| |
| − | |P-1_xp =
| |
| − | |P-1_enemy_air_power =
| |
| − | |P-2_node_info = bb_ru-class_flagship bb_ru-class_elite bb_ru-class_elite cl_ho-class_elite dd_ro-class_late_model dd_ro-class_late_model
| |
| − | |P-2_form = line_ahead
| |
| − | |P-2_xp =
| |
| − | |P-2_enemy_air_power =
| |
| − | |P-3_node_info = bb_ru-class_flagship bb_ru-class_flagship bb_ru-class_elite cl_he-class_elite dd_ro-class_late_model dd_ro-class_late_model
| |
| − | |P-3_form = line_ahead
| |
| − | |P-3_xp =
| |
| − | |P-3_enemy_air_power =
| |
| − | |P-4_node_info = bb_ru-class_elite bb_ru-class_elite bb_ru-class_elite cl_ho-class_elite dd_ro-class_late_model dd_ro-class_late_model
| |
| − | |P-4_form = line_ahead
| |
| − | |P-4_xp =
| |
| − | |P-4_enemy_air_power =
| |
| − | |P-5_node_info = bb_ru-class_flagship bb_ru-class_flagship bb_ru-class_flagship cl_he-class_elite dd_ro-class_late_model dd_ro-class_late_model
| |
| − | |P-5_form = line_ahead
| |
| − | |P-5_xp =
| |
| − | |P-5_enemy_air_power =
| |
| − | |
| |
| − | |final_form =
| |
| − | |boss_node = P | |
| | }} | | }} |
| | | | |
| − | ===Drops=== | + | ===Resource Nodes=== |
| − | <div class="mw-customtoggle-2-4-drop globalbutton">Show/Hide Drops</div>
| + | {{MapRoute|D|green|G|green|N|green}} are "Normal Resource Nodes" rewarding respectively fuel {{Fuel}}, development materials {{DM}}, and ammo {{Ammo}}. |
| − | {| class="mw-collapsible mw-collapsed wikitable" id="mw-customcollapsible-2-4-drop" | + | |
| − | !Node
| + | {{MapRoute|A|green}} is a "Special Resource Node" rewarding instant repair materials {{IR}}. |
| − | !Destroyers
| + | *''See [[Resource Node|here]] for more details. |
| − | !Light Cruisers
| + | |
| − | !Heavy Cruisers
| + | ===Bucket & DevMat Farming=== |
| − | !Seaplane Tender
| + | It is possible to farm buckets or/and DevMats on nodes {{MapRoute|A|green}} and {{MapRoute|G|green}} respectively. |
| − | !Submarine Tender
| + | *Depending on the fleet used, it is possible to either focus the farming on both consumables, or only on DevMats. |
| − | !Aircraft Carrier
| + | *When focussing on DevMats, it is recommended to use CVL instead of CV(B) for 60% of avoiding the maelstrom node. |
| − | !Battleship
| + | *When farming both, using 4+ {{Landing Craft}}/{{Amphibious Tank}} is recommended to farm buckets, and {{Radar}} to pass the maelstrom. |
| − | |-
| + | *See [[Resource Farming]] for more details. |
| − | | style="text-align:center;" |A
| + | |
| − | | style="text-align:center;" |[[Shimakaze|'''<span style="color:red">Shimakaze</span>''']], [[Fubuki]], [[Hatsuyuki]], [[Miyuki]], [[Murakumo]], [[Isonami]], [[Ayanami]], [[Shikinami]], [[Shigure]], [[Asashio]], [[Ooshio]], [[Michishio]], [[Arashio]], [[Arare]], [[Kasumi]], [[Kagerou]], [[Shiranui]], [[Kuroshio]]
| + | {{Map/Footer|2-4| |
| − | | style="text-align:center;" |[[Ooi]], [[Kitakami]], [[Tenryuu]], [[Tatsuta]], [[Tama]], [[Kiso]], [[Isuzu]], [[Natori]], [[Yura]], [[Sendai]], [[Jintsuu]], [[Naka]], [[Yuubari|'''<span style="color:red">Yuubari</span>''']]
| + | |
| − | | style="text-align:center;" |[[Takao]], [[Atago]], [[Mogami]], [[Kako]], [[Myoukou]], [[Nachi]], [[Ashigara]], [[Haguro]], [[Maya]], [[Choukai]], [[Tone]], [[Chikuma]]
| + | |enemycompsnotes= |
| − | | style="text-align:center;" |[[Chitose]], [[Chiyoda]]
| + | |
| − | |
| + | |shipdropnotes= |
| − | | style="text-align:center;" |[[Souryuu]], [[Ryuujou]], [[Hiyou]], [[Jun'you]], [[Shouhou]]
| + | |
| − | | style="text-align:center;" |[[Ise]], [[Hyuuga]], [[Fusou]], [[Yamashiro]], [[Kongou]], [[Hiei]], [[Kirishima]]
| + | }} |
| − | |-
| |
| − | | style="text-align:center;" |C
| |
| − | | style="text-align:center;" |[[Shimakaze|'''<span style="color:red">Shimakaze</span>''']], [[Fubuki]], [[Miyuki]], [[Murakumo]], [[Ayanami]], [[Asashio]], [[Michishio]], [[Arashio]], [[Arare]], [[Kagerou]], [[Kuroshio]]
| |
| − | | style="text-align:center;" |[[Ooi]], [[Kitakami]], [[Tenryuu]], [[Tama]], [[Kiso]], [[Isuzu]], [[Natori]], [[Yura]], [[Sendai]], [[Jintsuu]], [[Naka]]
| |
| − | | style="text-align:center;" |[[Mogami]], [[Myoukou]], [[Nachi]], [[Ashigara]], [[Haguro]], [[Takao]], [[Atago]], [[Maya]], [[Choukai]], [[Tone]], [[Chikuma]]
| |
| − | | style="text-align:center;" |[[Chitose]], [[Chiyoda]]
| |
| − | |
| |
| − | | style="text-align:center;" |[[Ryuujou]], [[Hiyou]], [[Jun'you]], [[Shouhou]]
| |
| − | | style="text-align:center;" |[[Ise]], [[Hyuuga]], [[Fusou]], [[Yamashiro]]
| |
| − | |-
| |
| − | | style="text-align:center;" |D
| |
| − | | style="text-align:center;" |[[Yukikaze|'''<span style="color:red">Yukikaze</span>''']], [[Fubuki]], [[Shirayuki]], [[Miyuki]], [[Hatsuyuki]], [[Isonami]], [[Shikinami]], [[Kisaragi]], [[Inazuma]], [[Nenohi]], [[Wakaba]], [[Ooshio]], [[Michishio]], [[Arare]], [[Kagerou]], [[Shiranui]], [[Kuroshio]]
| |
| − | | style="text-align:center;" |[[Ooi]], [[Kitakami]], [[Tenryuu]], [[Isuzu]], [[Natori]], [[Sendai]], [[Jintsuu]]
| |
| − | | style="text-align:center;" |[[Kako]], [[Myoukou]], [[Nachi]], [[Ashigara]], [[Haguro]], [[Takao]], [[Atago]], [[Maya]], [[Choukai]], [[Chikuma]]
| |
| − | | style="text-align:center;" |[[Chitose]], [[Chiyoda]]
| |
| − | |
| |
| − | | style="text-align:center;" |[[Ryuujou]], [[Hiyou]], [[Jun'you]], [[Shouhou]]
| |
| − | | style="text-align:center;" |[[Ise]], [[Hyuuga]], [[Fusou]], [[Yamashiro]]
| |
| − | |-
| |
| − | | style="text-align:center;" |F
| |
| − | | style="text-align:center;" |[[Shimakaze|'''<span style="color:red">Shimakaze</span>''']], [[Hatsuyuki]], [[Murakumo]], [[Ayanami]], [[Nenohi]], [[Asashio]], [[Michishio]], [[Arashio]], [[Kagerou]], [[Shiranui]], [[Kuroshio]]
| |
| − | | style="text-align:center;" |[[Ooi]], [[Kitakami]], [[Tenryuu]], [[Tatsuta]], [[Kiso]], [[Isuzu]], [[Sendai]], [[Naka]]
| |
| − | | style="text-align:center;" |[[Mogami]], [[Nachi]], [[Ashigara]], [[Haguro]], [[Takao]], [[Atago]], [[Choukai]], [[Tone]], [[Chikuma]]
| |
| − | | style="text-align:center;" |[[Chitose]]
| |
| − | |
| |
| − | | style="text-align:center;" |[[Ryuujou]], [[Hiyou]], [[Shouhou]]
| |
| − | | style="text-align:center;" |[[Ise]], [[Hyuuga]], [[Hiei]], [[Fusou]], [[Yamashiro]]
| |
| − | |-
| |
| − | | style="text-align:center;" |G
| |
| − | | style="text-align:center;" |[[Shimakaze|'''<span style="color:red">Shimakaze</span>''']], [[Fubuki]], [[Miyuki]], [[Murakumo]], [[Shikinami]], [[Kuroshio]] | |
| − | | style="text-align:center;" |[[Ooi]], [[Tatsuta]], [[Sendai]], [[Jintsuu]]
| |
| − | | style="text-align:center;" |[[Mogami]], [[Kako]], [[Ashigara]], [[Haguro]], [[Choukai]] | |
| − | |
| |
| − | |
| |
| − | | style="text-align:center;" |[[Jun'you]], [[Shouhou]]
| |
| − | | style="text-align:center;" |[[Ise]], [[Hyuuga]], [[Fusou]]
| |
| − | |-
| |
| − | | style="text-align:center;" |H
| |
| − | | style="text-align:center;" |[[Shimakaze|'''<span style="color:red">Shimakaze</span>''']], [[Fubuki]], [[Ushio]], [[Asashio]], [[Arashio]], [[Arare]], [[Kagerou]], [[Shiranui]], [[Uranami|'''<span style="color:red">Uranami</span>''']]
| |
| − | | style="text-align:center;" |[[Ooi]], [[Kitakami]], [[Kiso]], [[Jintsuu]], [[Kinu|'''<span style="color:red">Kinu</span>''']]
| |
| − | | style="text-align:center;" |[[Mogami]], [[Kako]], [[Myoukou]], [[Nachi]], [[Ashigara]], [[Haguro]], [[Takao]], [[Atago]]
| |
| − | | style="text-align:center;" |[[Chiyoda]]
| |
| − | |
| |
| − | | style="text-align:center;" |[[Ryuujou]], [[Jun'you]], [[Shouhou]]
| |
| − | | style="text-align:center;" |[[Ise]], [[Hyuuga]], [[Kirishima]], [[Fusou]], [[Yamashiro]]
| |
| − | |-
| |
| − | | style="text-align:center;" |I
| |
| − | | style="text-align:center;" |[[Shimakaze|'''<span style="color:red">Shimakaze</span>''']], [[Fubuki]], [[Hatsuyuki]], [[Kagerou]], [[Shiranui]], [[Kuroshio]], [[Arare]]
| |
| − | | style="text-align:center;" |[[Ooi]], [[Tenryuu]], [[Tama]], [[Sendai]], [[Jintsuu]]
| |
| − | | style="text-align:center;" |[[Takao]], [[Tone]], [[Chikuma]]
| |
| − | | style="text-align:center;" |[[Chiyoda]]
| |
| − | |
| |
| − | | style="text-align:center;" |[[Ryuujou]], [[Jun'you]]
| |
| − | | style="text-align:center;" |[[Ise]], [[Hyuuga]], [[Fusou]]
| |
| − | |-
| |
| − | | style="text-align:center;" |'''<span style="color:red">J</span>'''
| |
| − | | style="text-align:center;" |[[Yukikaze|'''<span style="color:red">Yukikaze</span>''']], [[Shimakaze|'''<span style="color:red">Shimakaze</span>''']], [[Makigumo|'''<span style="color:red">Makigumo</span>''']], [[Asashio]], [[Ooshio]], [[Kagerou]], [[Isonami]], [[Uranami|'''<span style="color:red">Uranami</span>''']] | |
| − | | style="text-align:center;" |[[Ooi]], [[Kitakami]], [[Tenryuu]], [[Tatsuta]], [[Jintsuu]], [[Kinu|'''<span style="color:red">Kinu</span>''']]
| |
| − | | style="text-align:center;" |[[Mogami]], [[Myoukou]], [[Nachi]], [[Ashigara]], [[Haguro]], [[Takao]], [[Atago]], [[Maya]], [[Choukai]], [[Tone]], [[Chikuma]]
| |
| − | |
| |
| − | | style="text-align:center;" |[[Taigei|'''<span style="color:red">Taigei</span>''']]
| |
| − | | style="text-align:center;" |[[Akagi]], [[Kaga]], [[Souryuu]], [[Ryuujou]], [[Hiyou]], [[Shouhou]]
| |
| − | | style="text-align:center;" |[[Nagato|'''<span style="color:red">Nagato</span>''']], [[Mutsu|'''<span style="color:red">Mutsu</span>''']], [[Ise]], [[Hyuuga]], [[Kongou]], [[Hiei]], [[Kirishima]], [[Haruna]], [[Fusou]], [[Yamashiro]]
| |
| − | |-
| |
| − | | style="text-align:center;" |L
| |
| − | | style="text-align:center;" |[[Shimakaze|'''<span style="color:red">Shimakaze</span>''']], [[Fubuki]], [[Murakumo]], [[Ayanami]], [[Asashio]], [[Ooshio]], [[Michishio]], [[Kagerou]], [[Kuroshio]]
| |
| − | | style="text-align:center;" |[[Ooi]], [[Kitakami]], [[Tenryuu]], [[Tatsuta]], [[Tama]], [[Kiso]], [[Isuzu]], [[Natori]], [[Yura]], [[Sendai]], [[Jintsuu]], [[Naka]]
| |
| − | | style="text-align:center;" |[[Mogami]], [[Myoukou]], [[Nachi]], [[Ashigara]], [[Haguro]], [[Takao]], [[Atago]], [[Maya]], [[Choukai]], [[Tone]], [[Chikuma]]
| |
| − | | style="text-align:center;" |[[Chitose]], [[Chiyoda]]
| |
| − | |
| |
| − | | style="text-align:center;" |[[Ryuujou]], [[Jun'you]], [[Shouhou]], [[Hiyou]]
| |
| − | | style="text-align:center;" |[[Ise]], [[Hyuuga]], [[Fusou]], [[Yamashiro]]
| |
| − | |-
| |
| − | | style="text-align:center;" |N
| |
| − | | style="text-align:center;" |[[Shimakaze|'''<span style="color:red">Shimakaze</span>''']], [[Fubuki]], [[Hatsuyuki]], [[Miyuki]], [[Ayanami]], [[Asashio]], [[Michishio]], [[Arashio]], [[Arare]], [[Kagerou]]
| |
| − | | style="text-align:center;" |[[Ooi]], [[Kitakami]], [[Tenryuu]], [[Tama]], [[Yura]], [[Sendai]], [[Jintsuu]], [[Naka]], [[Kiso]] | |
| − | | style="text-align:center;" |[[Mogami]], [[Kako]], [[Myoukou]], [[Nachi]], [[Haguro]], [[Atago]], [[Takao]], [[Choukai]], [[Tone]], [[Chikuma]]
| |
| − | | style="text-align:center;" |[[Chitose]], [[Chiyoda]]
| |
| − | |
| |
| − | | style="text-align:center;" |[[Ryuujou]], [[Hiyou]], [[Jun'you]], [[Shouhou]]
| |
| − | | style="text-align:center;" |[[Ise]], [[Hyuuga]], [[Fusou]], [[Yamashiro]] | |
| − | |-
| |
| − | | style="text-align:center;" |O | |
| − | | style="text-align:center;" |[[Shimakaze|'''<span style="color:red">Shimakaze</span>''']], [[Fubuki]], [[Hatsuyuki]], [[Shikinami]], [[Ooshio]], [[Arare]], [[Kagerou]], [[Kuroshio]], [[Michishio]]
| |
| − | | style="text-align:center;" |[[Ooi]], [[Kitakami]], [[Tenryuu]], [[Tama]], [[Yura]], [[Sendai]], [[Jintsuu]], [[Naka]]
| |
| − | | style="text-align:center;" |[[Nachi]], [[Ashigara]], [[Haguro]], [[Atago]], [[Choukai]], [[Tone]], [[Chikuma]], [[Maya]]
| |
| − | | style="text-align:center;" |[[Chitose]], [[Chiyoda]]
| |
| − | |
| |
| − | | style="text-align:center;" |[[Ryuujou]], [[Shouhou]]
| |
| − | | style="text-align:center;" |[[Ise]], [[Hyuuga]], [[Fusou]], [[Yamashiro]]
| |
| − | |-
| |
| − | | style="text-align:center;" |P
| |
| − | | style="text-align:center;" |[[Shimakaze|'''<span style="color:red">Shimakaze</span>''']], [[Fubuki]], [[Hatsuyuki]], [[Miyuki]], [[Isonami]], [[Asashio]], [[Kagerou]], [[Kuroshio]], [[Uranami|'''<span style="color:red">Uranami</span>''']]
| |
| − | | style="text-align:center;" |[[Ooi]], [[Kitakami]], [[Tenryuu]], [[Natori]], [[Naka]]
| |
| − | | style="text-align:center;" |[[Mogami]], [[Kako]], [[Myoukou]], [[Nachi]], [[Ashigara]], [[Takao]], [[Atago]], [[Maya]], [[Tone]]
| |
| − | | style="text-align:center;" |[[Chitose]], [[Chiyoda]]
| |
| − | |
| |
| − | | style="text-align:center;" |[[Ryuujou]], [[Hiyou]], [[Jun'you]], [[Shouhou]]
| |
| − | | style="text-align:center;" |[[Ise]], [[Hyuuga]], [[Fusou]], [[Yamashiro]]
| |
| − | |}<nowiki/>
| |


 /
/ is recommended to farm buckets, and
  to pass the maelstrom.