- Welcome to the Kancolle Wiki!
- If you have any questions regarding site content, account registration, etc., please visit the KanColle Wiki Discord
Difference between revisions of "World 3/3-3"
< World 3
Jump to navigation
Jump to search
Jigaraphale (talk | contribs) |
|||
| (24 intermediate revisions by 8 users not shown) | |||
| Line 1: | Line 1: | ||
| − | + | {{World/Hub}} | |
| + | =World 3-3: アルフォンシーノ方面 - [[wikipedia:en:Aleutian Islands|Alfonsino Region]]= | ||
{{LabSortieworld | {{LabSortieworld | ||
| page = World 3/3-3 | | page = World 3/3-3 | ||
| Line 5: | Line 6: | ||
| item = {{FBmedium}} {{FBlarge}} | | item = {{FBmedium}} {{FBlarge}} | ||
| exp = 330 | | exp = 330 | ||
| − | | code = アルフォンシーノ方面進出 | + | | code = アルフォンシーノ方面進出<br>Advance into Alfonsino Region |
| − | | jptext = | + | | jptext = 空母2隻以上を擁する空母機動部隊などの有力な艦隊をもって北方海域に進出。同戦力により敵情の強行偵察を敢行せよ! |
| − | | entext = | + | | entext = Use a strong fleet for example a carrier task force that two or more aircraft carriers belong to, or other fleets, advance into the Northern Waters with it. With the same forces, conduct a forced reconnaissance for enemy movements! |
| − | | aircon = | + | | aircon = |
| − | {{ | + | {{AirConKai |
| − | | | + | |AS=36 |
| − | + | |ASr=108 | |
| − | | | ||
| − | |||
| − | |||
}} | }} | ||
| − | |||
| − | |||
| − | |||
| − | |||
| − | |||
| − | |||
| − | |||
| − | |||
| − | |||
| − | |||
| − | |||
| − | |||
| − | |||
}} | }} | ||
| + | |||
| + | {{MapUnlock | ||
| + | | unlock= [[3-2]] | ||
| + | | clear= the boss's flagship must be sunk once | ||
}} | }} | ||
| + | |||
===Stage Guide=== | ===Stage Guide=== | ||
{{MapBranchingTable | {{MapBranchingTable | ||
| Line 67: | Line 57: | ||
|G -> I/empty, M = | |G -> I/empty, M = | ||
* Meet '''ALL''' of the following requirements to go to M: | * Meet '''ALL''' of the following requirements to go to M: | ||
| − | ** Amount of (F)BB(V)+CV(L | + | ** Amount of (F)BB(V)+CV(B/L) ≤ 3 |
** No SS(V) | ** No SS(V) | ||
* Otherwise, random routing. | * Otherwise, random routing. | ||
| Line 85: | Line 75: | ||
===Tips=== | ===Tips=== | ||
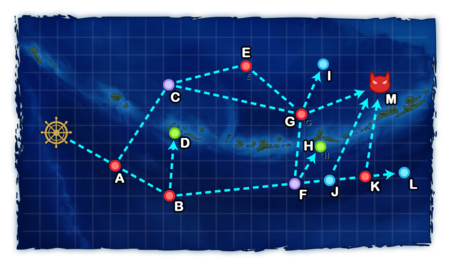
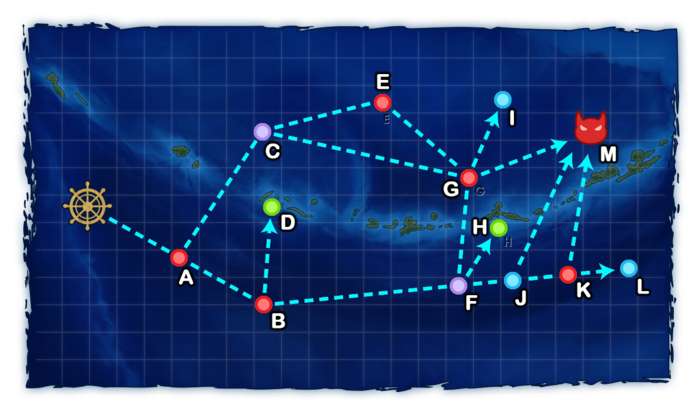
| − | On this map, | + | On this map, all paths pass through a '''[[maelstrom]] node'''. It is recommended to have some radars equipped on 1 to 3 ships to minimize the loss of fuel here. |
*This is also an excellent map to farm [[Mutsu]] for her 41 cm guns to upgrade equipment. | *This is also an excellent map to farm [[Mutsu]] for her 41 cm guns to upgrade equipment. | ||
| + | ===Recommended Fleets=== | ||
| + | {{FleetGuide | ||
| + | | Map = Light North Route | ||
| + | | Fleet = '''1 (F)BB(V)/CVL, 1 CV(B), 2 CA(V)/CL(T)/AV, 2 DD | ||
| + | | Route = {{MapRoute|A|red|C|violet|G|red|M|red}} | ||
| + | | AS = 78 | ||
| + | | Note = Quickest path in the north route. Most enemies won't be a threat, except for {{MapRoute|G|red}} which will have some carriers and Ru-class BBs, but having a properly trained fleet should help bypass this node with minimal issue. | ||
| + | | Quest = | ||
| + | }} | ||
| + | |||
| + | {{FleetGuide | ||
| + | | Map = Heavy North Route | ||
| + | | Fleet = '''1 (F)BB(V)/CVL, 2 CV(B), 3 XX''' (XX = CA(V)/CL(T)/DD/AV) | ||
| + | | Route = {{MapRoute|A|red|C|violet|E|red|G|red|M|red}} | ||
| + | | AS = 108 | ||
| + | | Note = Stronger fleet, but passes through an extra node. | ||
| + | | Quest = | ||
| + | }} | ||
| + | |||
| + | {{FleetGuide | ||
| + | | Map = Torpedo Squadron | ||
| + | | Fleet = '''{{color|red|"Torpedo Squadron"}}: 1 CL (flagship), 1 CLT, 4 DD | ||
| + | | Route = {{MapRoute|A|red|B|red|F|violet|J|blue|M|red}} | ||
| + | | AS = 36 | ||
| + | | Note = This solution requires more advanced gears, and might be out of reach of new players. {{color|red|'''It is required to bring'''}} an {{Command Facility}} FCF capable CL as flagship, preferably an {{Class|Agano|Kai+}}, equipped with: | ||
| + | *2 {{Med Gun}} [[Main Gun]]s, | ||
| + | *1 {{Night SPB}} {{EquipmentLink|Prototype Night Zuiun (Attack Equipment)}}, | ||
| + | *'''And''' the {{IconText|{{Command Facility}}|ETSCF}} {{EquipmentLink|Elite Torpedo Squadron Command Facility}} (preferably in the [[RE]]). | ||
| + | The best comp for farming boss node, having the highest pass rate thanks to the usage of [[ETSCF]] in case a ship got heavily damaged. | ||
| + | |||
| + | The [[Evacuation]] mechanic of the ETSCF should be used if needed, as long as the routing is maintained. | ||
| + | *The boss routing is secured as long as '''4 DD remain in the fleet'''. | ||
| + | | Quest = | ||
| + | }} | ||
| − | = | + | {{FleetGuide |
| − | + | | Map = Light South Route | |
| − | + | | Fleet = '''1 CA(V)/CLT/AV, 1 CL, 4 DD | |
| − | + | | Route = {{MapRoute|A|red|B|red|F|violet|J|blue|M|red}} | |
| − | + | | AS = 36 | |
| − | * | + | | Note = Cheap light fleet with only 2 pre-boss battles |
| − | + | *High-level DD with good surface combat stats (FP, armor) are preferred. On pre-boss nodes, they need to disable enemy ships without a second round of shelling, or dodge/tank closing torpedoes. | |
| − | + | *Needs minimum 2 radar-equipped ships as {{MapRoute|F|violet}} is a '''strong maelstrom''' node and has a 25% chance to deplete 100% of remaining fuel for fleets with 0-1 radars. | |
| − | + | | Quest = | |
| + | }} | ||
| + | |||
| + | {{FleetGuide | ||
| + | | Map = Heavy South Route | ||
| + | | Fleet = '''1 (F)BB(V)/CVL, 2 CA(V)/CLT, 1 CL, 2 DD | ||
| + | | Route = {{MapRoute|A|red|B|red|F|violet|J|blue|K|red|M|red}} | ||
| + | | AS = 36 | ||
| + | | Note = Going the bottom path to the boss, will save bauxite cost, but will cost more fuel and ammo along with possible buckets due to the number of encounters faced. | ||
| + | | Quest = | ||
| + | }} | ||
| + | |||
| + | ===Resource Nodes=== | ||
| + | {{MapRoute|D|green|H|green}} are "Normal Resource Nodes" rewarding respectively medium furniture box {{FBmedium}}, and large furniture box {{FBlarge}}. | ||
| + | *''See [[Resource Node|here]] for more details. | ||
| − | + | ====Furniture Box Farming==== | |
| − | + | Collecting furniture boxes in the South route requires a "light fleet": | |
| − | |||
| − | |||
| − | |||
| − | |||
| − | = | + | {{FleetGuide |
| − | + | | Map = Farming Fleet | |
| − | + | | Fleet = '''3 CVL, 2 DD, 1 CA/CLT | |
| + | | LOS = | ||
| + | | Speed = | ||
| + | | Route = Random: | ||
*Route = {{MapRoute|A|red|B|red|D|green}} | *Route = {{MapRoute|A|red|B|red|D|green}} | ||
*Route = {{MapRoute|A|red|B|red|F|violet|H|green}} | *Route = {{MapRoute|A|red|B|red|F|violet|H|green}} | ||
| − | *This fleet | + | *Route = {{MapRoute|A|red|B|red|F|violet|J|blue}}+ |
| + | | AS = 0 | ||
| + | | Note = This fleet is strong enough to survive the battles on the way, however, there is a chance that both nodes are avoided. In this case, consider retreating once hitting Node {{MapRoute|K|red}}, or reset before it. | ||
| + | *Using a CAV makes node {{MapRoute|H|green}} out of reach. | ||
| + | | Quest = | ||
| + | }} | ||
{{Map/Footer|3-3| | {{Map/Footer|3-3| | ||
Latest revision as of 08:39, 9 March 2025
World 3-3: アルフォンシーノ方面 - Alfonsino Region
| Strategy Name | アルフォンシーノ方面進出 Advance into Alfonsino Region |
|---|---|
| Difficulty | ☆ ☆ ☆ ☆ ☆ ☆ ☆ |
| Item | |
| Strategy Content | 空母2隻以上を擁する空母機動部隊などの有力な艦隊をもって北方海域に進出。同戦力により敵情の強行偵察を敢行せよ! Use a strong fleet for example a carrier task force that two or more aircraft carriers belong to, or other fleets, advance into the Northern Waters with it. With the same forces, conduct a forced reconnaissance for enemy movements! |
| Boss Air Control | |||
|---|---|---|---|
| AD | AP | AS | AS+ |
| 11 | 16 | 36 | 72 |
| Boss Route Air Control | |||
| AD | AP | AS | AS+ |
| 32 | 48 | 108 | 216 |
| 3-3 Unlocking & Progression | ||||
|---|---|---|---|---|
| Unlock conditions | 3-3 is unlocked after clearing 3-2 | |||
| Clear conditions | To clear the map: the boss's flagship must be sunk once | |||
Stage Guide
| 3-3 Branching Rules | ||
|---|---|---|
| Nodes | Rules | |
A |
B |
|
C |
| |
B |
D |
|
F | ||
C |
E |
|
G |
| |
F |
G |
|
H | ||
J | ||
G |
I |
|
M | ||
J |
K |
|
M |
| |
K |
L |
|
M | ||
Tips
On this map, all paths pass through a maelstrom node. It is recommended to have some radars equipped on 1 to 3 ships to minimize the loss of fuel here.
- This is also an excellent map to farm Mutsu for her 41 cm guns to upgrade equipment.
Recommended Fleets
| Light North Route | |||||||||||||||||||||||||||||||||
|---|---|---|---|---|---|---|---|---|---|---|---|---|---|---|---|---|---|---|---|---|---|---|---|---|---|---|---|---|---|---|---|---|---|
|
| ||||||||||||||||||||||||||||||||
| Fleet Notes | |||||||||||||||||||||||||||||||||
| Quickest path in the north route. Most enemies won't be a threat, except for G which will have some carriers and Ru-class BBs, but having a properly trained fleet should help bypass this node with minimal issue. | |||||||||||||||||||||||||||||||||
| Heavy North Route | |||||||||||||||||||||||||||||||||
|---|---|---|---|---|---|---|---|---|---|---|---|---|---|---|---|---|---|---|---|---|---|---|---|---|---|---|---|---|---|---|---|---|---|
|
| ||||||||||||||||||||||||||||||||
| Fleet Notes | |||||||||||||||||||||||||||||||||
| Stronger fleet, but passes through an extra node. | |||||||||||||||||||||||||||||||||
| Torpedo Squadron | |||||||||||||||||||||||||||||||||
|---|---|---|---|---|---|---|---|---|---|---|---|---|---|---|---|---|---|---|---|---|---|---|---|---|---|---|---|---|---|---|---|---|---|
|
| ||||||||||||||||||||||||||||||||
| Fleet Notes | |||||||||||||||||||||||||||||||||
This solution requires more advanced gears, and might be out of reach of new players. It is required to bring an
The best comp for farming boss node, having the highest pass rate thanks to the usage of ETSCF in case a ship got heavily damaged. The Evacuation mechanic of the ETSCF should be used if needed, as long as the routing is maintained.
| |||||||||||||||||||||||||||||||||

| Light South Route | |||||||||||||||||||||||||||||||||
|---|---|---|---|---|---|---|---|---|---|---|---|---|---|---|---|---|---|---|---|---|---|---|---|---|---|---|---|---|---|---|---|---|---|
|
| ||||||||||||||||||||||||||||||||
| Fleet Notes | |||||||||||||||||||||||||||||||||
Cheap light fleet with only 2 pre-boss battles
| |||||||||||||||||||||||||||||||||
| Heavy South Route | |||||||||||||||||||||||||||||||||
|---|---|---|---|---|---|---|---|---|---|---|---|---|---|---|---|---|---|---|---|---|---|---|---|---|---|---|---|---|---|---|---|---|---|
|
| ||||||||||||||||||||||||||||||||
| Fleet Notes | |||||||||||||||||||||||||||||||||
| Going the bottom path to the boss, will save bauxite cost, but will cost more fuel and ammo along with possible buckets due to the number of encounters faced. | |||||||||||||||||||||||||||||||||
Resource Nodes
D H are "Normal Resource Nodes" rewarding respectively medium furniture box ![]() , and large furniture box
, and large furniture box ![]() .
.
- See here for more details.
Furniture Box Farming
Collecting furniture boxes in the South route requires a "light fleet":
| Farming Fleet | |||||||||||||||||||||||||||||||||
|---|---|---|---|---|---|---|---|---|---|---|---|---|---|---|---|---|---|---|---|---|---|---|---|---|---|---|---|---|---|---|---|---|---|
|
| ||||||||||||||||||||||||||||||||
| Fleet Notes | |||||||||||||||||||||||||||||||||
This fleet is strong enough to survive the battles on the way, however, there is a chance that both nodes are avoided. In this case, consider retreating once hitting Node K, or reset before it.
| |||||||||||||||||||||||||||||||||
Enemy Compositions
3-3 A: 敵前衛艦隊 (PoiDB)
| # | Enemy Form. |
Base EXP | Normal Battle Node | AD/AP AS/AS+ |
|---|---|---|---|---|
| A | Line Ahead Echelon |
150 | 0/0 0/0 | |
| Line Ahead Echelon |
160 | 0/0 0/0 | ||
| Line Ahead Echelon |
170 | 0/0 0/0 | ||
| # | Enemy Form. |
Base EXP | Normal Battle Node | AD/AP AS/AS+ |
3-3 B: 敵北方巡洋艦戦隊 B群 (PoiDB)
| # | Enemy Form. |
Base EXP | Normal Battle Node | AD/AP AS/AS+ |
|---|---|---|---|---|
| B | Line Ahead | 180 | 0/0 0/0 | |
| Line Ahead | 190 | 0/0 0/0 | ||
| Line Ahead | 200 | 0/0 0/0 | ||
| Line Ahead | 210 | 0/0 0/0 | ||
| # | Enemy Form. |
Base EXP | Normal Battle Node | AD/AP AS/AS+ |
3-3 C
| # | Maelstrom Node | ||
|---|---|---|---|
| C | Lost Normal | ||
| # | Maelstrom Node | ||
3-3 D
| # | Resource Node | ||
|---|---|---|---|
| D | Gained 1 | ||
| # | Resource Node | ||
3-3 E: 敵北方護衛空母群 (PoiDB)
| # | Enemy Form. |
Base EXP | Normal Battle Node | AD/AP AS/AS+ |
|---|---|---|---|---|
| E | Diamond | 200 | 25/49 108/216 | |
| Diamond | 210 | 24/48 107/213 | ||
| Diamond | 220 | 24/48 107/213 | ||
| Diamond | 230 | 24/47 105/210 | ||
| # | Enemy Form. |
Base EXP | Normal Battle Node | AD/AP AS/AS+ |
3-3 F
| # | Maelstrom Node | ||
|---|---|---|---|
| F | Lost Strong | ||
| # | Maelstrom Node | ||
3-3 G: 敵北方機動部隊 (PoiDB)
| # | Enemy Form. |
Base EXP | Normal Battle Node | AD/AP AS/AS+ |
|---|---|---|---|---|
| G | Diamond | 290 | 18/35 78/156 | |
| Diamond | 300 | 18/35 78/156 | ||
| Diamond | 310 | 18/35 78/156 | ||
| Diamond | 320 | 18/35 78/156 | ||
| Diamond | 330 | 18/35 77/153 | ||
| # | Enemy Form. |
Base EXP | Normal Battle Node | AD/AP AS/AS+ |
3-3 H
| # | Resource Node | ||
|---|---|---|---|
| H | Gained 1 | ||
| # | Resource Node | ||
3-3 I
| # | Empty Node | ||
|---|---|---|---|
| I | 気のせいだった。/敵影を見ず。/穏やかな海です。/穏やかな海峡です。/警戒が必要です。/静かな海です。 Must be my imagination./No enemy spotted./Calm seas./Calm straits./Be alert./Peaceful seas. | ||
| # | Empty Node | ||
3-3 J
| # | Empty Node | ||
|---|---|---|---|
| J | 気のせいだった。/敵影を見ず。/穏やかな海です。/穏やかな海峡です。/警戒が必要です。/静かな海です。 Must be my imagination./No enemy spotted./Calm seas./Calm straits./Be alert./Peaceful seas. | ||
| # | Empty Node | ||
3-3 K: 敵北方巡洋艦戦隊 A群 (PoiDB)
| # | Enemy Form. |
Base EXP | Normal Battle Node | AD/AP AS/AS+ |
|---|---|---|---|---|
| K | Line Ahead | 250 | 0/0 0/0 | |
| Line Ahead | 260 | 0/0 0/0 | ||
| Line Ahead | 270 | 0/0 0/0 | ||
| Line Ahead | 280 | 0/0 0/0 | ||
| Line Ahead | 290 | 0/0 0/0 | ||
| # | Enemy Form. |
Base EXP | Normal Battle Node | AD/AP AS/AS+ |
3-3 L
| # | Empty Node | ||
|---|---|---|---|
| L | 気のせいだった。/敵影を見ず。/穏やかな海です。/穏やかな海峡です。/警戒が必要です。/静かな海です。 Must be my imagination./No enemy spotted./Calm seas./Calm straits./Be alert./Peaceful seas. | ||
| # | Empty Node | ||
3-3 M: 敵深海北方泊地艦隊 (PoiDB)
| # | Enemy Form. |
Base EXP | Boss Battle Node | AD/AP AS/AS+ |
|---|---|---|---|---|
| M | Line Ahead | 350 | 9/17 36/72 | |
| Line Ahead | 360 | 9/17 36/72 | ||
| Line Ahead | 370 | 9/17 36/72 | ||
| Line Ahead | 380 | 9/17 36/72 | ||
| Line Ahead | 390 | 8/16 35/69 | ||
| # | Enemy Form. |
Base EXP | Boss Battle Node | AD/AP AS/AS+ |
Ship Drops
| Ship drops | |||||||||||||||||||||||||||||||||||||||||||||||||||||||||||||||||||||||||||||||||||||||||||||||||||
|---|---|---|---|---|---|---|---|---|---|---|---|---|---|---|---|---|---|---|---|---|---|---|---|---|---|---|---|---|---|---|---|---|---|---|---|---|---|---|---|---|---|---|---|---|---|---|---|---|---|---|---|---|---|---|---|---|---|---|---|---|---|---|---|---|---|---|---|---|---|---|---|---|---|---|---|---|---|---|---|---|---|---|---|---|---|---|---|---|---|---|---|---|---|---|---|---|---|---|---|
| Type | Ship? | A | B | E | G | K | M | ||||||||||||||||||||||||||||||||||||||||||||||||||||||||||||||||||||||||||||||||||||||||||||
| DD | Maikaze | ✔️ | ✔️ | ✔️ | ✔️ | ✔️ | |||||||||||||||||||||||||||||||||||||||||||||||||||||||||||||||||||||||||||||||||||||||||||||
| DD | Yayoi | ✔️ | |||||||||||||||||||||||||||||||||||||||||||||||||||||||||||||||||||||||||||||||||||||||||||||||||
| DD | Yamagumo | ✔️ | |||||||||||||||||||||||||||||||||||||||||||||||||||||||||||||||||||||||||||||||||||||||||||||||||
| DD | Yukikaze | ✔️ | |||||||||||||||||||||||||||||||||||||||||||||||||||||||||||||||||||||||||||||||||||||||||||||||||
| DD | Hamakaze | ✔️ | |||||||||||||||||||||||||||||||||||||||||||||||||||||||||||||||||||||||||||||||||||||||||||||||||
| CL | Kitakami | ✔️ | ✔️ | ✔️ | |||||||||||||||||||||||||||||||||||||||||||||||||||||||||||||||||||||||||||||||||||||||||||||||
| CL | Ooi | ✔️ | ✔️ | ✔️ | |||||||||||||||||||||||||||||||||||||||||||||||||||||||||||||||||||||||||||||||||||||||||||||||
| CL | Sendai | ✔️ | ✔️ | ✔️ | ✔️ | ✔️ | ✔️ | ||||||||||||||||||||||||||||||||||||||||||||||||||||||||||||||||||||||||||||||||||||||||||||
| CA | Kinugasa | ✔️ | |||||||||||||||||||||||||||||||||||||||||||||||||||||||||||||||||||||||||||||||||||||||||||||||||
| CA | Myoukou | ✔️ | ✔️ | ✔️ | ✔️ | ✔️ | ✔️ | ||||||||||||||||||||||||||||||||||||||||||||||||||||||||||||||||||||||||||||||||||||||||||||
| CA | Takao | ✔️ | ✔️ | ✔️ | ✔️ | ✔️ | |||||||||||||||||||||||||||||||||||||||||||||||||||||||||||||||||||||||||||||||||||||||||||||
| CA | Atago | ✔️ | ✔️ | ✔️ | ✔️ | ✔️ | ✔️ | ||||||||||||||||||||||||||||||||||||||||||||||||||||||||||||||||||||||||||||||||||||||||||||
| CA | Mogami | ✔️ | ✔️ | ✔️ | ✔️ | ✔️ | ✔️ | ||||||||||||||||||||||||||||||||||||||||||||||||||||||||||||||||||||||||||||||||||||||||||||
| CA | Tone | ✔️ | ✔️ | ✔️ | ✔️ | ✔️ | ✔️ | ||||||||||||||||||||||||||||||||||||||||||||||||||||||||||||||||||||||||||||||||||||||||||||
| CA | Chikuma | ✔️ | ✔️ | ✔️ | ✔️ | ✔️ | ✔️ | ||||||||||||||||||||||||||||||||||||||||||||||||||||||||||||||||||||||||||||||||||||||||||||
| CVL | Ryuujou | ✔️ | ✔️ | ✔️ | ✔️ | ✔️ | ✔️ | ||||||||||||||||||||||||||||||||||||||||||||||||||||||||||||||||||||||||||||||||||||||||||||
| CVL | Shouhou | ✔️ | ✔️ | ✔️ | ✔️ | ✔️ | ✔️ | ||||||||||||||||||||||||||||||||||||||||||||||||||||||||||||||||||||||||||||||||||||||||||||
| CVL | Hiyou | ✔️ | ✔️ | ✔️ | ✔️ | ✔️ | ✔️ | ||||||||||||||||||||||||||||||||||||||||||||||||||||||||||||||||||||||||||||||||||||||||||||
| CVL | Junyou | ✔️ | ✔️ | ✔️ | ✔️ | ✔️ | ✔️ | ||||||||||||||||||||||||||||||||||||||||||||||||||||||||||||||||||||||||||||||||||||||||||||
| FBB | Kongou | ✔️ | |||||||||||||||||||||||||||||||||||||||||||||||||||||||||||||||||||||||||||||||||||||||||||||||||
| FBB | Hiei | ✔️ | |||||||||||||||||||||||||||||||||||||||||||||||||||||||||||||||||||||||||||||||||||||||||||||||||
| FBB | Haruna | ✔️ | |||||||||||||||||||||||||||||||||||||||||||||||||||||||||||||||||||||||||||||||||||||||||||||||||
| FBB | Kirishima | ✔️ | |||||||||||||||||||||||||||||||||||||||||||||||||||||||||||||||||||||||||||||||||||||||||||||||||
| BB | Fusou | ✔️ | ✔️ | ✔️ | |||||||||||||||||||||||||||||||||||||||||||||||||||||||||||||||||||||||||||||||||||||||||||||||
| BB | Yamashiro | ✔️ | ✔️ | ✔️ | |||||||||||||||||||||||||||||||||||||||||||||||||||||||||||||||||||||||||||||||||||||||||||||||
| BB | Ise | ✔️ | ✔️ | ✔️ | |||||||||||||||||||||||||||||||||||||||||||||||||||||||||||||||||||||||||||||||||||||||||||||||
| BB | Hyuuga | ✔️ | ✔️ | ✔️ | |||||||||||||||||||||||||||||||||||||||||||||||||||||||||||||||||||||||||||||||||||||||||||||||
| BB | Nagato | ✔️ | |||||||||||||||||||||||||||||||||||||||||||||||||||||||||||||||||||||||||||||||||||||||||||||||||
| BB | Mutsu | ✔️ | ✔️ | ||||||||||||||||||||||||||||||||||||||||||||||||||||||||||||||||||||||||||||||||||||||||||||||||
| CV | Akagi | ✔️ | |||||||||||||||||||||||||||||||||||||||||||||||||||||||||||||||||||||||||||||||||||||||||||||||||
| CV | Kaga | ✔️ | |||||||||||||||||||||||||||||||||||||||||||||||||||||||||||||||||||||||||||||||||||||||||||||||||
| CV | Souryuu | ✔️ | |||||||||||||||||||||||||||||||||||||||||||||||||||||||||||||||||||||||||||||||||||||||||||||||||
| CV | Hiryuu | ✔️ | |||||||||||||||||||||||||||||||||||||||||||||||||||||||||||||||||||||||||||||||||||||||||||||||||
| DD | Hatsuyuki | ✔️ | ✔️ | ✔️ | ✔️ | ✔️ | |||||||||||||||||||||||||||||||||||||||||||||||||||||||||||||||||||||||||||||||||||||||||||||
| DD | Miyuki | ✔️ | ✔️ | ✔️ | ✔️ | ✔️ | |||||||||||||||||||||||||||||||||||||||||||||||||||||||||||||||||||||||||||||||||||||||||||||
| DD | Murakumo | ✔️ | ✔️ | ✔️ | ✔️ | ✔️ | |||||||||||||||||||||||||||||||||||||||||||||||||||||||||||||||||||||||||||||||||||||||||||||
| DD | Isonami | ✔️ | ✔️ | ✔️ | ✔️ | ✔️ | |||||||||||||||||||||||||||||||||||||||||||||||||||||||||||||||||||||||||||||||||||||||||||||
| DD | Shikinami | ✔️ | ✔️ | ✔️ | ✔️ | ✔️ | |||||||||||||||||||||||||||||||||||||||||||||||||||||||||||||||||||||||||||||||||||||||||||||
| DD | Asashio | ✔️ | ✔️ | ✔️ | ✔️ | ✔️ | |||||||||||||||||||||||||||||||||||||||||||||||||||||||||||||||||||||||||||||||||||||||||||||
| DD | Ooshio | ✔️ | ✔️ | ✔️ | ✔️ | ✔️ | |||||||||||||||||||||||||||||||||||||||||||||||||||||||||||||||||||||||||||||||||||||||||||||
| DD | Michishio | ✔️ | ✔️ | ✔️ | ✔️ | ✔️ | |||||||||||||||||||||||||||||||||||||||||||||||||||||||||||||||||||||||||||||||||||||||||||||
| DD | Arashio | ✔️ | ✔️ | ✔️ | ✔️ | ✔️ | |||||||||||||||||||||||||||||||||||||||||||||||||||||||||||||||||||||||||||||||||||||||||||||
| DD | Arare | ✔️ | ✔️ | ✔️ | ✔️ | ✔️ | |||||||||||||||||||||||||||||||||||||||||||||||||||||||||||||||||||||||||||||||||||||||||||||
| DD | Kasumi | ✔️ | ✔️ | ✔️ | ✔️ | ✔️ | |||||||||||||||||||||||||||||||||||||||||||||||||||||||||||||||||||||||||||||||||||||||||||||
| DD | Kagerou | ✔️ | ✔️ | ✔️ | ✔️ | ✔️ | |||||||||||||||||||||||||||||||||||||||||||||||||||||||||||||||||||||||||||||||||||||||||||||
| DD | Shiranui | ✔️ | ✔️ | ✔️ | ✔️ | ✔️ | |||||||||||||||||||||||||||||||||||||||||||||||||||||||||||||||||||||||||||||||||||||||||||||
| DD | Kuroshio | ✔️ | ✔️ | ✔️ | ✔️ | ✔️ | |||||||||||||||||||||||||||||||||||||||||||||||||||||||||||||||||||||||||||||||||||||||||||||
| CL | Tenryuu | ✔️ | ✔️ | ✔️ | ✔️ | ✔️ | |||||||||||||||||||||||||||||||||||||||||||||||||||||||||||||||||||||||||||||||||||||||||||||
| CL | Tatsuta | ✔️ | ✔️ | ✔️ | ✔️ | ✔️ | |||||||||||||||||||||||||||||||||||||||||||||||||||||||||||||||||||||||||||||||||||||||||||||
| CL | Kuma | ✔️ | ✔️ | ✔️ | ✔️ | ✔️ | |||||||||||||||||||||||||||||||||||||||||||||||||||||||||||||||||||||||||||||||||||||||||||||
| CL | Tama | ✔️ | ✔️ | ✔️ | ✔️ | ✔️ | |||||||||||||||||||||||||||||||||||||||||||||||||||||||||||||||||||||||||||||||||||||||||||||
| CL | Kiso | ✔️ | ✔️ | ✔️ | ✔️ | ✔️ | |||||||||||||||||||||||||||||||||||||||||||||||||||||||||||||||||||||||||||||||||||||||||||||
| CL | Isuzu | ✔️ | ✔️ | ✔️ | ✔️ | ✔️ | |||||||||||||||||||||||||||||||||||||||||||||||||||||||||||||||||||||||||||||||||||||||||||||
| CL | Natori | ✔️ | ✔️ | ✔️ | ✔️ | ✔️ | |||||||||||||||||||||||||||||||||||||||||||||||||||||||||||||||||||||||||||||||||||||||||||||
| CL | Yura | ✔️ | ✔️ | ✔️ | ✔️ | ✔️ | |||||||||||||||||||||||||||||||||||||||||||||||||||||||||||||||||||||||||||||||||||||||||||||
| CL | Jintsuu | ✔️ | ✔️ | ✔️ | ✔️ | ✔️ | |||||||||||||||||||||||||||||||||||||||||||||||||||||||||||||||||||||||||||||||||||||||||||||
| CL | Naka | ✔️ | ✔️ | ✔️ | ✔️ | ✔️ | |||||||||||||||||||||||||||||||||||||||||||||||||||||||||||||||||||||||||||||||||||||||||||||
| CA | Nachi | ✔️ | ✔️ | ✔️ | ✔️ | ✔️ | ✔️ | ||||||||||||||||||||||||||||||||||||||||||||||||||||||||||||||||||||||||||||||||||||||||||||
| CA | Ashigara | ✔️ | ✔️ | ✔️ | ✔️ | ✔️ | ✔️ | ||||||||||||||||||||||||||||||||||||||||||||||||||||||||||||||||||||||||||||||||||||||||||||
| CA | Haguro | ✔️ | ✔️ | ✔️ | ✔️ | ✔️ | ✔️ | ||||||||||||||||||||||||||||||||||||||||||||||||||||||||||||||||||||||||||||||||||||||||||||
| CA | Maya | ✔️ | ✔️ | ✔️ | ✔️ | ✔️ | ✔️ | ||||||||||||||||||||||||||||||||||||||||||||||||||||||||||||||||||||||||||||||||||||||||||||
| CA | Choukai | ✔️ | ✔️ | ✔️ | ✔️ | ✔️ | ✔️ | ||||||||||||||||||||||||||||||||||||||||||||||||||||||||||||||||||||||||||||||||||||||||||||
| SS | I-168 | ✔️ | ✔️ | ✔️ | ✔️ | ✔️ | ✔️ | ||||||||||||||||||||||||||||||||||||||||||||||||||||||||||||||||||||||||||||||||||||||||||||
| AV | Chitose | ✔️ | ✔️ | ✔️ | ✔️ | ✔️ | ✔️ | ||||||||||||||||||||||||||||||||||||||||||||||||||||||||||||||||||||||||||||||||||||||||||||
| AV | Chiyoda | ✔️ | ✔️ | ✔️ | ✔️ | ✔️ | ✔️ | ||||||||||||||||||||||||||||||||||||||||||||||||||||||||||||||||||||||||||||||||||||||||||||