E-1
Commence! Operation MG1
発動!MG1作戦
| Rewards
|
| All
|
|
|
| Equipment/Item
|
丁
Casual
|
丙
Easy
|
乙
Medium
|
甲
Hard
|
 Food Supply Ship Mamiya |
1
|
1
|
2
|
2
|
 Food Supply Ship Irako |
|
|
2
|
2
|
 Emergency Repair Goddess |
|
1
|
2
|
2
|
 New Model Aerial Armament Material |
|
|
1
|
2
|
 120mm/50 Twin Gun Mount mod.1936 |
1
|
|
|
1 (★2)
|
 120mm/50 Twin Gun Mount Kai A.mod.1937 |
|
1
|
1
|
1 (★2)
|
|
|
|
|
|
|
|
|
|
|
|
|
|
|
|
|
|
|
|
|
|
|
|
|
|
|
|
|
|
|
| E-1 Branching Rules
|
| Nodes |
Rules
|
|
|
|
- Do not meet the requirements to go to either B or C.
|
|
|
- Meet ALL of the following requirements:
- Do not meet the requirements to go to C.
- Amount of CV ≤ 1
- Amount of (F)BB(V)+CV(L/B) ≤ 2
|
|
|
- Meet ALL of the following requirements:
- Amount of CL+DD+DE ≥ 3 and CL ≥ 1 OR amount of CL+DD+DE ≥ 4
- If Slow, amount of CL+DD+DE ≥ 4
- Amount of CV(L/B) ≤ 1
- Amount of (F)BB(V)+CV(L/B)+CAV+CL ≤ 3
- No LHA, AV or BB
- Alternatively, bring a Fast+ Fleet
|
|
|
|
- Meet ALL of the following requirements:
- Fast Fleet OR amount of DD+DE ≥ 3
- No LHA
|
|
|
- Do not meet the requirements to go to C.
|
|
|
|
- If amount of ships ≥ 2, meet ANY of the following requirements:
- Fleet is Slow AND contains AO or AV
- No DD/DE in fleet.
|
|
|
- Do not meet the requirements to go to E.
|
|
|
|
- Choose your own adventure!
|
|
|
|
|
|
|
|
|
|
|
|
|
- Do not meet the requirements to go to N.
|
|
|
- Meet ALL of the following requirements:
- Amount of DD+DE ≥ 4
- No SS(V)
|
|
|
|
|
|
|
|
|
|
|
|
|
|
|
Branching compositions were reported over the course of the event.
Disclaimer: The following guide is a preliminary release for this event map, it contains information from early tests, do note that some things are subject to change as more information is gathered over the event and thus the guide is subject to change.
The event guides are to be constructed through the respective Event map page guide and reviewed by editor staff / collaboration committee before being approved here. Do not under any circumstance update the guides through this page or attempt to fix them through this page. Please only update guides through their respective sandbox pages.
General Guidelines
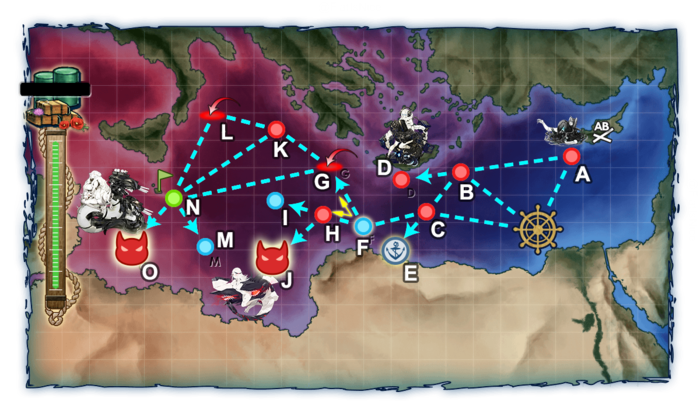
E-1 is a 2.5 Phase Single-Fleet Map consisting of a Transport, Unlock and TP Phase. It is also possible to farm fuel in large quantities on this map. See the collapsible guide below for more information.
Ship Bonuses (Tentative)
DISCLAIMER: This information is based on user submitted data and is subject to revisions as more data is gathered. Any version of the ship receives the bonus regardless of remodel.
| Ships
|
Mapwide
|
Nodes H,J,O
|

|

|

|
1.1x
|
1.1x (1.21x)
|
|
|

|

|
|
1.15x
|
1.15x (1.32x)
|

|

|

|
1.18x (1.36x)
|

|

|

|

|

|
|
|
|
|

|

|

|
1.322x (1.52x)
|

|

|

|
1.357x (1.56x)
|
| French BB Hime Only Bonus Modifiers
|
|
|
1.17x
|
 AP Shell AP Shell
|
1.2x
|
 Seaplane Fighter/Bomber Seaplane Fighter/Bomber
|
1.1x
|
| Laté 298B
|
1.3x
|
 1 Dive Bomber 1 Dive Bomber
|
1.1x
|
| 2+ Dive Bombers
|
1.27x
|
Map Phases Breakdown
Guide to Fuel Farming on E1
Node E is a resource Node on this map that can be farmed for fuel. Its maximum reward of 200 Fuel is calculated as:
[math]\displaystyle{ \text{Fuel}= \text{min}\begin{cases} 20 + 15\times\text{N}_\text{Drum} + 20 \times\text{N}_\text{DLC} \\
200 \end{cases} }[/math]
The Ships required for the shortest routing (Start-C-E) are 1AO 4DD, the remaining slot can be filled by a CV(L)/SS(V). In case of AV/CV(L) they should be set up with a full bombing setup as the opening airstrike is not affected by Morale. The single Combat Node is C, containing a light enemy Torpedo Squadron.
Notes:
- You can advance even after a ship in your fleet was heavily damaged (大破) and put into taiha-state at Node C as the following Resource Node is not a combat node. Doublecheck your fleets status before reentering the map
- Fodder use and zero morale farming is possible
- Kamoi is the recommended pick for AO as Hayasui is more expensive to sortie. Kamoi Kai is not a AO, but an AV.
- If you havent started the Event yet, you can farm fuel on Casual difficulty to make the combat node easier
- Be aware that locks still get applied to ships you use to farm fuel here, so plan accordingly if you plan to clear maps on higher difficulties
"I dont have a Fleet Oiler, what are my options?"
A Fast+ Fleet without DDs routes C-E as well.
While not recommended it is also possible to get to the Fuel Node with a slow fleet consisting of AV CVL 4DD, but it takes the additional combat Node B, greatly impacting efficiency due to lower speed, higher cost and retreat rates.
Phase 1: Defeat Mediterranean CL Princess
The goal of this phase is to deplete the HP Bar and defeat the CL Princess found at Node J. Aside from a Nu Class Flagship Kai Light Carrier in some compositions her escorts are not a threat. Only she herself with 740HP and up to 228 Armour on Hard Mode can be considered troublesome. One to three historical ships to deal with her are recommended.
- Recommended Fleet: 1FBB 1CA 1CL 1CV 2DD (Fast Fleet)
- Route: C F H J
- LBAS: Range 6, 100/225 Airpower for AP/AS
- Additional Notes: Vanguard Formation can be utilized to help with preboss Nodes. Support Expeditions are not needed
Phase 1.5: Unlock the TP Node
This is not required on lower difficulties. On Hard Mode, you need to A+-Rank Node D consisting of up to 3 Supply Depot Hime, 1-2 Artillery Imps and 2 PT Imps. Set up your Ships with the according equipment to deal with them as outlined here. PT Imps are weak to AA Guns + Skilled Lookouts on your DDs.
- Recommended Fleet: 1FBB 1CA 1CL 1CVL 2DD (Slow Fleet)
- Route: B D
- LBAS: Range 3, 136 Airpower for AP
- Additional Notes: Support Expeditions are not needed but node support can be used to deal with PT Imps
Phase 2: Deplete the TP Gauge
The Goal of this Phase is to deplete the TP Gauge. The TP boss can consist of (French BB Hime) and a weaker variant of the Mediterranean CL Hime accompanied by some elite DDs. To deplete the Gauge faster, it is recommended to take Transport Equipment like Drums and Daihatsu-Class landing craft on your weak surface combatants. AACI for the preboss Air Raid is recommended.
- Recommended Fleet: 1FBB 1CV 4DD
- Route: C F G N O
- LBAS: Range 7, 101 Airpower for AS (108 LD)
- Additional Notes: It might be preferable to gun for A-Ranks here as French BB Hime still has relatively high Armour, at 256. Support Expeditions are not needed unless going for S ranks. If only a few Points are remaining you can start replacing Transport Equipment for Combat Equipment.
Friend Fleets
Enemy Compositions
E-1 Hard A: 深海地中海艦隊 警戒潜水艦群 (
PoiDB)
| #
|
Formation
|
Normal Battle Node
|
AD/AP
AS/AS+
|
| A
|
Echelon
Line Abreast
|
|
0/0
0/0
|
Echelon
Line Abreast
|
|
0/0
0/0
|
| #
|
Formation
|
Normal Battle Node
|
AD/AP
AS/AS+
|
E-1 Hard B: 深海地中海艦隊 警戒駆逐隊 (
PoiDB)
| #
|
Formation
|
Normal Battle Node
|
AD/AP
AS/AS+
|
| B
|
Line Ahead
Double Line
|
|
0/0
0/0
|
Line Ahead
Double Line
|
|
0/0
0/0
|
Line Ahead
Double Line
|
|
0/0
0/0
|
| #
|
Formation
|
Normal Battle Node
|
AD/AP
AS/AS+
|
E-1 Hard C: 深海地中海艦隊 前衛水雷戦隊 (
PoiDB)
| #
|
Formation
|
Normal Battle Node
|
AD/AP
AS/AS+
|
| C
|
Line Ahead
Double Line
|
|
0/0
0/0
|
Line Ahead
Double Line
|
|
0/0
0/0
|
Line Ahead
Double Line
|
|
0/0
0/0
|
| #
|
Formation
|
Normal Battle Node
|
AD/AP
AS/AS+
|
E-1 Hard D: 深海クレタ島物資集積地 (
PoiDB)
| #
|
Formation
|
Normal Battle Node
|
AD/AP
AS/AS+
|
| D
|
Double Line
|
|
46/91
204/408
|
| Double Line
|
|
46/91
204/408
|
| Double Line
|
|
69/137
306/612
|
| #
|
Formation
|
Normal Battle Node
|
AD/AP
AS/AS+
|
E-1 Hard E
| #
|
Resource Node
|
| #
|
Resource Node
|
E-1 Hard F
| #
|
Selection Node
|
| F
|
艦隊の針路を選択できます。提督、どちらの針路をとられますか?
You can decide the fleet's course. Admiral, which heading should we take?
|
| #
|
Selection Node
|
E-1 Hard G: 深海地中海方面 基地航空隊 (
PoiDB)
| #
|
Formation
|
Air Defense Node
|
AD/AP
AS/AS+
|
| G
|
Diamond
|
|
33/65
144/288
|
| Diamond
|
|
44/87
195/390
|
| Diamond
|
|
49/97
216/432
|
| #
|
Formation
|
Air Defense Node
|
AD/AP
AS/AS+
|
E-1 Hard H: 深海地中海艦隊 巡洋艦戦隊 (
PoiDB)
| #
|
Formation
|
Normal Battle Node
|
AD/AP
AS/AS+
|
| H
|
Line Ahead
Echelon
|
|
0/0
0/0
|
Line Ahead
Echelon
|
|
0/0
0/0
|
Line Ahead
Echelon
|
|
0/0
0/0
|
| #
|
Formation
|
Normal Battle Node
|
AD/AP
AS/AS+
|
E-1 Hard I
| #
|
Empty Node
|
| I
|
敵影を見ず。
No enemy spotted.
|
| #
|
Empty Node
|
E-1 Hard J: 深海地中海艦隊 主力艦隊 (
PoiDB)
| #
|
Formation
|
Boss Battle Node
|
AD/AP
AS/AS+
|
| J
|
Line Ahead
|
|
0/0
0/0
|
| Line Ahead
|
|
51/101
225/450
|
Line Ahead
(Final)
|
|
51/101
225/450
|
| #
|
Formation
|
Boss Battle Node
|
AD/AP
AS/AS+
|
E-1 Hard K: 深海地中海艦隊 魚雷艇戦隊 (
PoiDB)
| #
|
Formation
|
Normal Battle Node
|
AD/AP
AS/AS+
|
| K
|
Echelon
|
|
0/0
0/0
|
| Echelon
|
|
0/0
0/0
|
| Echelon
|
|
0/0
0/0
|
| #
|
Formation
|
Normal Battle Node
|
AD/AP
AS/AS+
|
E-1 Hard L: 深海地中海方面 基地航空隊 (
PoiDB)
| #
|
Formation
|
Air Defense Node
|
AD/AP
AS/AS+
|
| L
|
Diamond
|
|
33/65
144/288
|
| #
|
Formation
|
Air Defense Node
|
AD/AP
AS/AS+
|
E-1 Hard M
| #
|
Empty Node
|
| M
|
敵影を見ず。
No enemy spotted.
|
| #
|
Empty Node
|
E-1 Hard N
| #
|
Landing Node
|
| #
|
Landing Node
|
E-1 Hard O: 深海地中海艦隊 増援急派部隊 (
PoiDB)
| #
|
Formation
|
Boss Battle Node
|
AD/AP
AS/AS+
|
| O
|
Line Ahead
|
|
23/45
101/201
|
| Line Ahead
|
|
23/45
101/201
|
Line Ahead
(Final)
|
|
25/49
108/216
|
| #
|
Formation
|
Boss Battle Node
|
AD/AP
AS/AS+
|
E-1 Medium A: 深海地中海艦隊 警戒潜水艦群 (
PoiDB)
| #
|
Formation
|
Normal Battle Node
|
AD/AP
AS/AS+
|
| A
|
Echelon
Line Abreast
|
|
0/0
0/0
|
Echelon
Line Abreast
|
|
0/0
0/0
|
Echelon
Line Abreast
|
|
0/0
0/0
|
Echelon
Line Abreast
|
|
0/0
0/0
|
| #
|
Formation
|
Normal Battle Node
|
AD/AP
AS/AS+
|
E-1 Medium B: 深海地中海艦隊 警戒駆逐隊 (
PoiDB)
| #
|
Formation
|
Normal Battle Node
|
AD/AP
AS/AS+
|
| B
|
Line Ahead
Double Line
|
|
0/0
0/0
|
Line Ahead
Double Line
|
|
0/0
0/0
|
Line Ahead
Double Line
|
|
0/0
0/0
|
| #
|
Formation
|
Normal Battle Node
|
AD/AP
AS/AS+
|
E-1 Medium C: 深海地中海艦隊 前衛水雷戦隊 (
PoiDB)
| #
|
Formation
|
Normal Battle Node
|
AD/AP
AS/AS+
|
| C
|
Line Ahead
Double Line
|
|
0/0
0/0
|
Line Ahead
Double Line
|
|
0/0
0/0
|
Line Ahead
Double Line
|
|
0/0
0/0
|
| #
|
Formation
|
Normal Battle Node
|
AD/AP
AS/AS+
|
E-1 Medium D: 深海クレタ島物資集積地 (
PoiDB)
| #
|
Formation
|
Normal Battle Node
|
AD/AP
AS/AS+
|
| D
|
Double Line
|
|
33/65
144/288
|
| Double Line
|
|
33/65
144/288
|
| Double Line
|
|
49/97
216/432
|
| #
|
Formation
|
Normal Battle Node
|
AD/AP
AS/AS+
|
E-1 Medium E
| #
|
Resource Node
|
| #
|
Resource Node
|
E-1 Medium F
| #
|
Selection Node
|
| F
|
艦隊の針路を選択できます。提督、どちらの針路をとられますか?
You can decide the fleet's course. Admiral, which heading should we take?
|
| #
|
Selection Node
|
E-1 Medium G: 深海地中海方面 基地航空隊 (
PoiDB)
| #
|
Formation
|
Air Defense Node
|
AD/AP
AS/AS+
|
| G
|
Diamond
|
|
28/55
123/246
|
| Diamond
|
|
35/69
153/306
|
| Diamond
|
|
39/78
174/348
|
| #
|
Formation
|
Air Defense Node
|
AD/AP
AS/AS+
|
E-1 Medium H: 深海地中海艦隊 巡洋艦戦隊 (
PoiDB)
| #
|
Formation
|
Normal Battle Node
|
AD/AP
AS/AS+
|
| H
|
Line Ahead
Echelon
|
|
0/0
0/0
|
Line Ahead
Echelon
|
|
0/0
0/0
|
Line Ahead
Echelon
|
|
0/0
0/0
|
| #
|
Formation
|
Normal Battle Node
|
AD/AP
AS/AS+
|
E-1 Medium I
| #
|
Empty Node
|
| I
|
敵影を見ず。
No enemy spotted.
|
| #
|
Empty Node
|
E-1 Medium J: 深海地中海艦隊 主力艦隊 (
PoiDB)
| #
|
Formation
|
Boss Battle Node
|
AD/AP
AS/AS+
|
| J
|
Line Ahead
|
|
0/0
0/0
|
| Line Ahead
|
|
36/72
161/321
|
Line Ahead
(Final)
|
|
45/89
198/396
|
| #
|
Formation
|
Boss Battle Node
|
AD/AP
AS/AS+
|
E-1 Medium K: 深海地中海艦隊 魚雷艇戦隊 (
PoiDB)
| #
|
Formation
|
Normal Battle Node
|
AD/AP
AS/AS+
|
| K
|
Echelon
|
|
0/0
0/0
|
| Echelon
|
|
0/0
0/0
|
| Echelon
|
|
0/0
0/0
|
| #
|
Formation
|
Normal Battle Node
|
AD/AP
AS/AS+
|
| #
|
Formation
|
Air Defense Node
|
AD/AP
AS/AS+
|
| #
|
Formation
|
Air Defense Node
|
AD/AP
AS/AS+
|
E-1 Medium M
| #
|
Empty Node
|
| M
|
敵影を見ず。
No enemy spotted.
|
| #
|
Empty Node
|
E-1 Medium N
| #
|
Landing Node
|
| #
|
Landing Node
|
E-1 Medium O: 深海地中海艦隊 増援急派部隊 (
PoiDB)
| #
|
Formation
|
Boss Battle Node
|
AD/AP
AS/AS+
|
| O
|
Line Ahead
|
|
22/43
96/192
|
| Line Ahead
|
|
22/43
96/192
|
Line Ahead
(Final)
|
|
23/45
101/201
|
| #
|
Formation
|
Boss Battle Node
|
AD/AP
AS/AS+
|
E-1 Easy A: 深海地中海艦隊 警戒潜水艦群 (
PoiDB)
| #
|
Formation
|
Normal Battle Node
|
AD/AP
AS/AS+
|
| A
|
Echelon
Line Abreast
|
|
0/0
0/0
|
Echelon
Line Abreast
|
|
0/0
0/0
|
Echelon
Line Abreast
|
|
0/0
0/0
|
Echelon
Line Abreast
|
|
0/0
0/0
|
| #
|
Formation
|
Normal Battle Node
|
AD/AP
AS/AS+
|
E-1 Easy B: 深海地中海艦隊 警戒駆逐隊 (
PoiDB)
| #
|
Formation
|
Normal Battle Node
|
AD/AP
AS/AS+
|
| B
|
Line Ahead
Double Line
|
|
0/0
0/0
|
Line Ahead
Double Line
|
|
0/0
0/0
|
Line Ahead
Double Line
|
|
0/0
0/0
|
| #
|
Formation
|
Normal Battle Node
|
AD/AP
AS/AS+
|
E-1 Easy C: 深海地中海艦隊 前衛水雷戦隊 (
PoiDB)
| #
|
Formation
|
Normal Battle Node
|
AD/AP
AS/AS+
|
| C
|
Line Ahead
Double Line
|
|
0/0
0/0
|
Line Ahead
Double Line
|
|
0/0
0/0
|
Line Ahead
Double Line
|
|
0/0
0/0
|
| #
|
Formation
|
Normal Battle Node
|
AD/AP
AS/AS+
|
E-1 Easy D: 深海クレタ島物資集積地 (
PoiDB)
| #
|
Formation
|
Normal Battle Node
|
AD/AP
AS/AS+
|
| D
|
Double Line
|
|
23/46
102/204
|
| Double Line
|
|
23/46
102/204
|
| Double Line
|
|
35/69
153/306
|
| #
|
Formation
|
Normal Battle Node
|
AD/AP
AS/AS+
|
E-1 Easy E
| #
|
Resource Node
|
| #
|
Resource Node
|
E-1 Easy F
| #
|
Selection Node
|
| F
|
艦隊の針路を選択できます。提督、どちらの針路をとられますか?
You can decide the fleet's course. Admiral, which heading should we take?
|
| #
|
Selection Node
|
E-1 Easy G: 深海地中海方面 基地航空隊 (
PoiDB)
| #
|
Formation
|
Air Defense Node
|
AD/AP
AS/AS+
|
| G
|
Diamond
|
|
12/23
51/102
|
| Diamond
|
|
17/33
72/144
|
| Diamond
|
|
23/46
102/204
|
| Diamond
|
|
28/55
123/246
|
| #
|
Formation
|
Air Defense Node
|
AD/AP
AS/AS+
|
E-1 Easy H: 深海地中海艦隊 巡洋艦戦隊 (
PoiDB)
| #
|
Formation
|
Normal Battle Node
|
AD/AP
AS/AS+
|
| H
|
Line Ahead
Echelon
|
|
0/0
0/0
|
Line Ahead
Echelon
|
|
0/0
0/0
|
Line Ahead
Echelon
|
|
0/0
0/0
|
| #
|
Formation
|
Normal Battle Node
|
AD/AP
AS/AS+
|
E-1 Easy I
| #
|
Empty Node
|
| I
|
敵影を見ず。
No enemy spotted.
|
| #
|
Empty Node
|
E-1 Easy J: 深海地中海艦隊 主力艦隊 (
PoiDB)
| #
|
Formation
|
Boss Battle Node
|
AD/AP
AS/AS+
|
| J
|
Line Ahead
|
|
0/0
0/0
|
| Line Ahead
|
|
9/17
36/72
|
Line Ahead
(Final)
|
|
45/89
198/396
|
| #
|
Formation
|
Boss Battle Node
|
AD/AP
AS/AS+
|
E-1 Easy K: 深海地中海艦隊 魚雷艇戦隊 (
PoiDB)
| #
|
Formation
|
Normal Battle Node
|
AD/AP
AS/AS+
|
| K
|
Echelon
|
|
0/0
0/0
|
| Echelon
|
|
0/0
0/0
|
| Echelon
|
|
0/0
0/0
|
| #
|
Formation
|
Normal Battle Node
|
AD/AP
AS/AS+
|
E-1 Easy L: 深海地中海方面 基地航空隊 (
PoiDB)
| #
|
Formation
|
Air Defense Node
|
AD/AP
AS/AS+
|
| L
|
Diamond
|
|
23/46
102/204
|
| Diamond
|
|
28/55
123/246
|
| #
|
Formation
|
Air Defense Node
|
AD/AP
AS/AS+
|
E-1 Easy M
| #
|
Empty Node
|
| M
|
敵影を見ず。
No enemy spotted.
|
| #
|
Empty Node
|
E-1 Easy N
| #
|
Landing Node
|
| #
|
Landing Node
|
E-1 Easy O: 深海地中海艦隊 増援急派部隊 (
PoiDB)
| #
|
Formation
|
Boss Battle Node
|
AD/AP
AS/AS+
|
| O
|
Line Ahead
|
|
19/37
83/165
|
| Line Ahead
|
|
19/37
83/165
|
Line Ahead
(Final)
|
|
22/43
96/192
|
| #
|
Formation
|
Boss Battle Node
|
AD/AP
AS/AS+
|
E-1 Casual A: 深海地中海艦隊 警戒潜水艦群 (
PoiDB)
| #
|
Formation
|
Normal Battle Node
|
AD/AP
AS/AS+
|
| A
|
Echelon
Line Abreast
|
|
0/0
0/0
|
Echelon
Line Abreast
|
|
0/0
0/0
|
| #
|
Formation
|
Normal Battle Node
|
AD/AP
AS/AS+
|
E-1 Casual B: 深海地中海艦隊 警戒駆逐隊 (
PoiDB)
| #
|
Formation
|
Normal Battle Node
|
AD/AP
AS/AS+
|
| B
|
Line Ahead
Double Line
|
|
0/0
0/0
|
Line Ahead
Double Line
|
|
0/0
0/0
|
| #
|
Formation
|
Normal Battle Node
|
AD/AP
AS/AS+
|
E-1 Casual C: 深海地中海艦隊 前衛水雷戦隊 (
PoiDB)
| #
|
Formation
|
Normal Battle Node
|
AD/AP
AS/AS+
|
| C
|
Line Ahead
Double Line
|
|
0/0
0/0
|
Line Ahead
Double Line
|
|
0/0
0/0
|
| #
|
Formation
|
Normal Battle Node
|
AD/AP
AS/AS+
|
E-1 Casual D: 深海クレタ島物資集積地 (
PoiDB)
| #
|
Formation
|
Normal Battle Node
|
AD/AP
AS/AS+
|
| D
|
Double Line
|
|
12/23
51/102
|
| Double Line
|
|
12/23
51/102
|
| Double Line
|
|
23/46
102/204
|
| #
|
Formation
|
Normal Battle Node
|
AD/AP
AS/AS+
|
E-1 Casual E
| #
|
Resource Node
|
| #
|
Resource Node
|
E-1 Casual F
| #
|
Selection Node
|
| F
|
艦隊の針路を選択できます。提督、どちらの針路をとられますか?
You can decide the fleet's course. Admiral, which heading should we take?
|
| #
|
Selection Node
|
E-1 Casual G: 深海地中海方面 基地航空隊 (
PoiDB)
| #
|
Formation
|
Air Defense Node
|
AD/AP
AS/AS+
|
| G
|
Diamond
|
|
12/23
51/102
|
| Diamond
|
|
17/33
72/144
|
| Diamond
|
|
23/46
102/204
|
| #
|
Formation
|
Air Defense Node
|
AD/AP
AS/AS+
|
E-1 Casual H: 深海地中海艦隊 巡洋艦戦隊 (
PoiDB)
| #
|
Formation
|
Normal Battle Node
|
AD/AP
AS/AS+
|
| H
|
Line Ahead
Echelon
|
|
0/0
0/0
|
Line Ahead
Echelon
|
|
0/0
0/0
|
| #
|
Formation
|
Normal Battle Node
|
AD/AP
AS/AS+
|
E-1 Casual I
| #
|
Empty Node
|
| I
|
敵影を見ず。
No enemy spotted.
|
| #
|
Empty Node
|
E-1 Casual J: 深海地中海艦隊 主力艦隊 (
PoiDB)
| #
|
Formation
|
Boss Battle Node
|
AD/AP
AS/AS+
|
| J
|
Line Ahead
|
|
0/0
0/0
|
| Line Ahead
|
|
0/0
0/0
|
Line Ahead
(Final)
|
|
0/0
0/0
|
| #
|
Formation
|
Boss Battle Node
|
AD/AP
AS/AS+
|
E-1 Casual K: 深海地中海艦隊 魚雷艇戦隊 (
PoiDB)
| #
|
Formation
|
Normal Battle Node
|
AD/AP
AS/AS+
|
| K
|
Echelon
|
|
0/0
0/0
|
| Echelon
|
|
0/0
0/0
|
| Echelon
|
|
0/0
0/0
|
| #
|
Formation
|
Normal Battle Node
|
AD/AP
AS/AS+
|
E-1 Casual L: 深海地中海方面 基地航空隊 (
PoiDB)
| #
|
Formation
|
Air Defense Node
|
AD/AP
AS/AS+
|
| L
|
Diamond
|
|
12/23
51/102
|
| Diamond
|
|
17/33
72/144
|
| Diamond
|
|
23/46
102/204
|
| #
|
Formation
|
Air Defense Node
|
AD/AP
AS/AS+
|
E-1 Casual M
| #
|
Empty Node
|
| M
|
敵影を見ず。
No enemy spotted.
|
| #
|
Empty Node
|
E-1 Casual N
| #
|
Landing Node
|
| #
|
Landing Node
|
E-1 Casual O: 深海地中海艦隊 増援急派部隊 (
PoiDB)
| #
|
Formation
|
Boss Battle Node
|
AD/AP
AS/AS+
|
| O
|
Line Ahead
|
|
19/37
83/165
|
| Line Ahead
|
|
19/37
83/165
|
Line Ahead
(Final)
|
|
22/43
96/192
|
| #
|
Formation
|
Boss Battle Node
|
AD/AP
AS/AS+
|
Ship Drops:
| ExpandE-1 Clear Message
|
| Convoy Transport Operation to Malta, succeeded!
Deployed in the Mediterranean Sea, our fleet and our land-based
corps have defeated the enemy Abyssal Mediterranean fleet, and
have admirably completed the convoy transport operation to Malta!
Our fleet will now be advancing towards the United Kingdom!
|