- Welcome to the Kancolle Wiki!
- If you have any questions regarding site content, account registration, etc., please visit the KanColle Wiki Discord
Winter 2022 Event/E-3
Jump to navigation
Jump to search
E-3
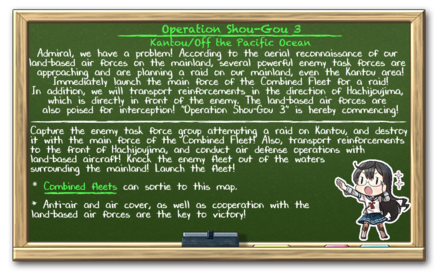
Commence! Operation Sho-Go 3
発令!「捷三号作戦警戒」
発令!「捷三号作戦警戒」
![]()
![]()


| Information | ||||
|---|---|---|---|---|
| Event Tag | ||||
| Boss Gauges | Hard (甲): 3000 HP + 750 TP + 5040 HP | |||
| Medium (乙): ? | ||||
| Easy (丙): ? | ||||
| Casual (丁): ? | ||||
| Map Bosses | Aircraft Carrier Princess Kai III
| |||
Heavy Cruiser Ne-Class Kai III
| ||||
Yokohama Wharf Princess
| ||||
| Rewards | ||||
|---|---|---|---|---|
| All | ||||
 Yamashio Maru | ||||
| Equipment/Item | 丁 Casual |
丙 Easy |
乙 Medium |
甲 Hard |
Medal |
1 | 2 | ||
Emergency Repair Material |
2 | 3 | ||
New Model Gun Mount Improvement Material |
2 | |||
Improvement Material |
4 | 5 | 6 | |
 SK + SG Radar |
1 (★3) | |||
 Type 3 Command Liaison Aircraft Kai |
1 | 1 (★2) | 1 (★3) | |

Branching Table
| E-3 Branching Rules | ||
|---|---|---|
| Nodes | Rules | |
Branching compositions were reported over the course of the event. (NGA and KCNav)
The event guides are to be constructed through the respective Event map page guide and reviewed by editors before being approved here. Do not under any circumstance update the guides through this page or attempt to fix them through this page. Please only update guides through their respective sandbox pages.
Ship Bonuses
DISCLAIMER: This information is based on user submitted data and is subject to revisions as more data is gathered. Any version of the ship receives the bonus regardless of remodel.
Ship Bonuses
| Ships | Map-wide | Part 1 (G, I, J, L) |
Part 3 (X, V2, Z) |
Acccuracy / Evasion | ||
|---|---|---|---|---|---|---|
| 1.26x | 1.05x | |||||
| 1.1x | ||||||
| - | - | |||||
| 1.26x | ||||||
| - | ||||||
| 1.26x | ||||||
| - | ||||||
| Coastal Defense Ships (DE) | ||||||
| Node Z Bonuses (Stacks with above) |
Multiplier | |
|---|---|---|
| Ships | Debuff Bonus | Boss Debuff (Against Enemy Flagship  Only) Only)
|
| Fast Battleships (FBB) | 1.3x | 1.1x |
| Carriers & Light Carriers (CV(L/B)) | ||
| Destroyers (DD) | ||
| Light Cruisers (CL(T)) | ||
| Battleships (BB) | 1.15x | |
| Heavy Cruisers (CA(V)) | ||
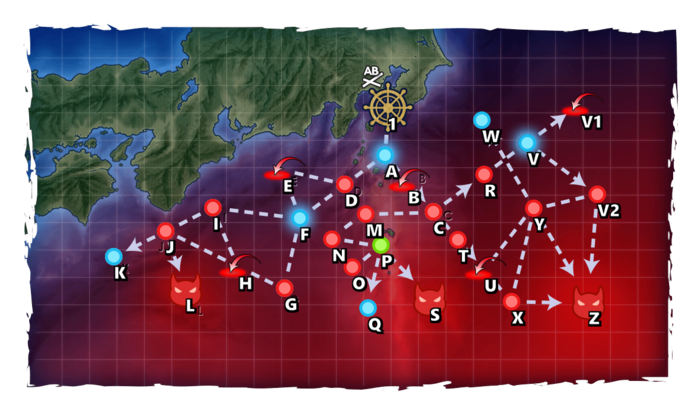
Map Overview
- This map uses two locks:
 "Combined Fleet" is used for Surface Task Force and Carrier Task Force.
 "Transport Unit" is used for Transport Combined Fleet once the transport phase is open.
- 2 LBASs are available to sortie, a third base is only able to be used in defense.
- Air raids will occur on this map.
Phase 1: Defeat the Enemy Carrier Task Force at L
- STF = 2(F)BB(V), 1CV, 2CA(V), 1CL + 0-2CLT, 0-1CA(V), 1CL, 2-4DD
- Route: 1 A D F I J L
- LBAS: 137/274 AD/AP on Hard Mode (7 Range). It is recommended to send both bases to L.
- Strong AACI as well as some ASW is recommended to be taken on a support ship (Fletcher/Akizuki-Class).
- Offloading Fighter Power to SPF-Muling CAV to enable stronger daytime shelling by the (F)BB(V) as well as CV is recommended especially for last dance.
Phase 2: Deplete the TP Gauge at S
- TCF = 1AV, 4DD, 1XX + 1CL, 1-2XX, 3-4DD
- Main fleet XX can be CL, CAV, or DD; escort fleet XX can be CL, CA(V), or DD.
- Route: 1 A B C M P S
- LoS (Cn1) = 20.0 (on Hard)
- LBAS: 72/161 AP/AS on Hard Mode (6 Range). It is recommended to send both bases to S. One base with high accuracy Bombers could be sent to M (3 Range) to help increase the pass rate.
- One or two strong ASW ships are recommended for C.
- One AACI is recommended for B.
- Due to the boss node containing up to two Ne-Class Kai it is recommended to forgo trying to S-Rank the boss and load out the Escort Fleet for more reliable A-Ranks instead.
Phase 2.5: Unlock the Final Boss at Z
- There are up to 5 requirements to unlock Yokohama Wharf Princess at Z for Phase 3:
| Node | L | LBAS | U | V1 | V2 |
|---|---|---|---|---|---|
| Hard | A+ | AS | AS | AS | S |
| Medium | - | ? | AS(?) | AS | S |
| Easy | - | ? | - | AS | S |
| Casual | - | ? | - | AS | S |
Phase 3: Defeat Yokohama Wharf Princess at Z
- 2(F)BB, 3-4CV(L/B), 0-1CA(V), 0-1SS(V) + 1-2CLT, 0-1CA(V), 0-1FBB, 1CL, 2-3DD
- Route: 1 A B C R V V2 Z
- LBAS: 133/266 AD/AP on Hard (Range 8). It is recommended to send both bases to the Boss.
- This fleet has very high firepower against the boss, but has several shortcomings:
- Carrier Task Force Shelling order may lead to problems on-route with nodes R and V2 as the escort engages first. Sending an LBAS Base to V2 might help alleviate that problem.
- Node R has a torpedo squadron fleet that will be forced on vanguard in last-dance.
- High AA at the Boss and the Route may lead to deplaning of slots.
- A submarine may be used to tank enemy fire on the route and at the boss. This is not recommended on Last Dance and if you want to use special attacks.
- The same AACI/ASW DD as used in Phase 1 may be recycled here.
Debuff Phase
- It is highly recommended to debuff the boss.
- There are up to 5 requirements needed to debuff the boss once she reaches Last Dance.
| Node | B | E | LBAS | S | Y |
|---|---|---|---|---|---|
| Hard | AS | AS | AS x2 | A+ | S |
| Medium | AS | AS | A+ | S(?) | |
| Easy | ? | ? | ? | ? | ? |
| Casual | ? | ? | ? | ? | ? |
- Most compositions that pass through B can be used.
| LBAS | AP | AS | AS+ |
|---|---|---|---|
| Hard | 134 | 300 | 600 |
| Medium | 98 | 219 | 438 |
| Easy | 93 | 207 | 414 |
| Casual | 63 | 140 | 279 |
Enemy Compositions
| Type | Ships |
|---|---|
| DD |
| Type | Ships |
|---|---|
| DD |
| Type | Ships |
|---|---|
| DD |
| Type | Ships |
|---|---|
| DE | |
| DD | |
| CL | |
| BB | |
| SSV |
| Type | Ships |
|---|---|
| DD |
| Type | Ships |
|---|---|
| DD |
| Type | Ships |
|---|---|
| DE | |
| DD | |
| CL | |
| FBB | |
| BB | |
| CV | |
| AV | |
| AS | |
| AO |
| Type | Ships |
|---|---|
| DD |
| Type | Ships |
|---|---|
| DE | |
| DD | |
| BB | |
| SSV |
| Type | Ships |
|---|---|
| DE | |
| DD | |
| BB | |
| SSV |
| Type | Ships |
|---|---|
| DE | |
| DD | |
| CL | |
| BB | |
| SSV |
| Type | Ships |
|---|---|
| DE | |
| DD | |
| CL | |
| FBB | |
| BB | |
| CV | |
| AV | |
| AS | |
| AO |
E-3 Hard AB
| # | Formation | Air Raids | AD/AP AS/AS+ |
|---|---|---|---|
| AB | Diamond | 130/259 582/1164 | |
| Diamond | 100/199 446/891 | ||
| Diamond | 135/269 603/1206 | ||
| # | Formation | Air Raids | AD/AP AS/AS+ |
E-3 Hard A
| # | Selection Node | ||
|---|---|---|---|
| A | 艦隊の針路を選択できます。提督、どちらの針路をとられますか? You can decide the fleet's course. Admiral, which heading should we take? | ||
| # | Selection Node | ||
E-3 Hard B: 深海任務部隊 空母艦載機群 (PoiDB)
| # | Formation | Air Defense Node | AD/AP AS/AS+ |
|---|---|---|---|
| B | Diamond Phases: 2, 3 |
55/109 243/486 | |
| Diamond Phases: 2, 3 |
59/118 264/528 | ||
| Diamond Phases: 2, 3 |
67/134 300/600 | ||
| # | Formation | Air Defense Node | AD/AP AS/AS+ |
E-3 Hard C: 深海潜水艦隊 東部群狼集団 (PoiDB)
| # | Formation | Normal Battle Node | AD/AP AS/AS+ |
|---|---|---|---|
| C | Echelon Line Abreast Phases: 2, 3 |
0/0 0/0 | |
| Echelon Line Abreast Phases: 2, 3 |
0/0 0/0 | ||
| Echelon Line Abreast Phases: 2, 3 |
0/0 0/0 | ||
| # | Formation | Normal Battle Node | AD/AP AS/AS+ |
E-3 Hard D: 深海潜水艦隊 西部群狼集団 (PoiDB)
| # | Formation | Normal Battle Node | AD/AP AS/AS+ |
|---|---|---|---|
| D | Echelon Line Abreast Phases: 1, 3 |
0/0 0/0 | |
| Echelon Line Abreast Phases: 1, 3 |
0/0 0/0 | ||
| Echelon Line Abreast Phases: 1, 2, 3 |
0/0 0/0 | ||
| # | Formation | Normal Battle Node | AD/AP AS/AS+ |
E-3 Hard E: 深海任務部隊 空母艦載機群 (PoiDB)
| # | Formation | Air Defense Node | AD/AP AS/AS+ |
|---|---|---|---|
| E | Diamond Phases: 1, 3 |
118/235 527/1053 | |
| Diamond Phases: 1, 3 |
128/256 575/1149 | ||
| Diamond Phases: 1 |
138/275 617/1233 | ||
| # | Formation | Air Defense Node | AD/AP AS/AS+ |
E-3 Hard F
| # | Selection Node | ||
|---|---|---|---|
| F | 艦隊の針路を選択できます。提督、どちらの針路をとられますか? You can decide the fleet's course. Admiral, which heading should we take? | ||
| # | Selection Node | ||
E-3 Hard G: 深海任務部隊 前衛巡洋艦戦隊 (PoiDB)
| # | Formation | Normal Battle Node | AD/AP AS/AS+ |
|---|---|---|---|
| G | Line Ahead Double Line Vanguard Phases: 1, 3 |
0/0 0/0 | |
| # | Formation | Normal Battle Node | AD/AP AS/AS+ |
E-3 Hard H: 深海任務部隊 空母艦載機群 (PoiDB)
| # | Formation | Air Defense Node | AD/AP AS/AS+ |
|---|---|---|---|
| H | Diamond Phases: 1, 3 |
118/235 527/1053 | |
| Diamond Phases: 1, 3 |
128/256 575/1149 | ||
| Diamond Phases: 1 |
138/275 617/1233 | ||
| # | Formation | Air Defense Node | AD/AP AS/AS+ |
E-3 Hard I: 深海任務部隊 高速戦艦戦隊 (PoiDB)
| # | Formation | Normal Battle Node | AD/AP AS/AS+ |
|---|---|---|---|
| I | Line Ahead Double Line Phases: 1, 2, 3 |
0/0 0/0 | |
| Line Ahead Phases: 1 |
0/0 0/0 | ||
| # | Formation | Normal Battle Node | AD/AP AS/AS+ |
E-3 Hard J: 深海任務部隊 支援艦隊 (PoiDB)
| # | Formation | Normal Battle Node | AD/AP AS/AS+ |
|---|---|---|---|
| J | Line Ahead Diamond Phases: 1, 2, 3 |
32/63 140/279 | |
| Line Ahead Phases: 1 |
36/72 161/321 | ||
| # | Formation | Normal Battle Node | AD/AP AS/AS+ |
E-3 Hard K
| # | Empty Node | ||
|---|---|---|---|
| K | 敵影を見ず。 No enemy spotted. | ||
| # | Empty Node | ||
E-3 Hard L: 深海任務部隊 先鋒空母集団 (PoiDB)
| # | Formation | Boss Battle Node | AD/AP AS/AS+ |
|---|---|---|---|
| L | Cruising Formation 3 Phases: 1, 2, 3 |
128/256 575/1149 | |
| Cruising Formation 3 Phases: 1 (Final)
|
138/275 617/1233 | ||
| # | Formation | Boss Battle Node | AD/AP AS/AS+ |
E-3 Hard M: 深海任務部隊 中央前衛水雷戦隊 (PoiDB)
| # | Formation | Normal Battle Node | AD/AP AS/AS+ |
|---|---|---|---|
| M | Line Ahead Double Line Vanguard Phases: 2, 3 |
0/0 0/0 | |
| # | Formation | Normal Battle Node | AD/AP AS/AS+ |
E-3 Hard N: 深海任務部隊 中央前衛支援集団 (PoiDB)
| # | Formation | Normal Battle Node | AD/AP AS/AS+ |
|---|---|---|---|
| N | Vanguard Phases: 2 |
0/0 0/0 | |
| Diamond | 26/52 116/231 | ||
| Double Line Phases: 2 |
0/0 0/0 | ||
| # | Formation | Normal Battle Node | AD/AP AS/AS+ |
E-3 Hard O: 深海任務部隊 中央集団補給船団 (PoiDB)
| # | Formation | Normal Battle Node | AD/AP AS/AS+ |
|---|---|---|---|
| O | Vanguard Phases: 2 |
26/52 116/231 | |
| # | Formation | Normal Battle Node | AD/AP AS/AS+ |
E-3 Hard P
| # | Landing Node | ||
|---|---|---|---|
| # | Landing Node | ||
E-3 Hard Q
| # | Empty Node | ||
|---|---|---|---|
| Q | 敵影を見ず。 No enemy spotted. | ||
| # | Empty Node | ||
E-3 Hard R: 深海任務部隊 本隊ピケット艦隊 (PoiDB)
| # | Formation | Normal Battle Node | AD/AP AS/AS+ |
|---|---|---|---|
| R | Echelon Vanguard Phases: 3 |
0/0 0/0 | |
| Vanguard Phases: 3 |
0/0 0/0 | ||
| # | Formation | Normal Battle Node | AD/AP AS/AS+ |
E-3 Hard S: 深海任務部隊 中央集団旗艦艦隊 (PoiDB)
| # | Formation | Boss Battle Node | AD/AP AS/AS+ |
|---|---|---|---|
| S | Line Ahead Phases: 2, 3 |
32/63 140/279 | |
| Line Ahead Phases: 2, 3 |
36/72 161/321 | ||
| Line Ahead Phases: 2, 3 (Final)
|
36/72 161/321 | ||
| # | Formation | Boss Battle Node | AD/AP AS/AS+ |
E-3 Hard T: 深海任務部隊 水上打撃部隊 (PoiDB)
| # | Formation | Normal Battle Node | AD/AP AS/AS+ |
|---|---|---|---|
| T | Line Ahead Double Line Phases: 3 |
0/0 0/0 | |
| Line Ahead Phases: 3 |
0/0 0/0 | ||
| # | Formation | Normal Battle Node | AD/AP AS/AS+ |
E-3 Hard U: 深海任務部隊 空母艦載機群 (PoiDB)
| # | Formation | Air Defense Node | AD/AP AS/AS+ |
|---|---|---|---|
| U | Diamond Phases: 3 |
123/245 551/1101 | |
| Diamond Phases: 3 |
126/251 563/1125 | ||
| Diamond Phases: 3 |
164/328 737/1473 | ||
| # | Formation | Air Defense Node | AD/AP AS/AS+ |
E-3 Hard V
| # | Selection Node | ||
|---|---|---|---|
| V | 艦隊の針路を選択できます。提督、どちらの針路をとられますか? You can decide the fleet's course. Admiral, which heading should we take? | ||
| # | Selection Node | ||
E-3 Hard V1: 深海任務部隊 空母艦載機群 (PoiDB)
| # | Formation | Air Defense Node | AD/AP AS/AS+ |
|---|---|---|---|
| V1 | Diamond Phases: 3 |
99/197 441/882 | |
| Diamond Phases: 3 |
107/213 477/954 | ||
| Diamond Phases: 3 |
111/222 498/996 | ||
| # | Formation | Air Defense Node | AD/AP AS/AS+ |
E-3 Hard V2: 深海任務部隊 空母打撃群C集団 (PoiDB)
| # | Formation | Normal Battle Node | AD/AP AS/AS+ |
|---|---|---|---|
| V2 | Diamond Phases: 3 |
99/197 441/882 | |
| Diamond Phases: 3 |
107/213 477/954 | ||
| Diamond Phases: 3 |
111/222 498/996 | ||
| # | Formation | Normal Battle Node | AD/AP AS/AS+ |
E-3 Hard W
| # | Empty Node | ||
|---|---|---|---|
| W | 敵影を見ず。 No enemy spotted. | ||
| # | Empty Node | ||
E-3 Hard X: 深海任務部隊 空母打撃群B集団 (PoiDB)
| # | Formation | Normal Battle Node | AD/AP AS/AS+ |
|---|---|---|---|
| X | Diamond Phases: 3 |
99/197 441/882 | |
| Diamond Phases: 3 |
107/213 477/954 | ||
| Diamond Phases: 3 |
111/222 498/996 | ||
| # | Formation | Normal Battle Node | AD/AP AS/AS+ |
E-3 Hard Y: 深海任務部隊 空母打撃群A集団 (PoiDB)
| # | Formation | Normal Battle Node | AD/AP AS/AS+ |
|---|---|---|---|
| Y | Diamond Phases: 3 |
92/183 411/822 | |
| Diamond Phases: 3 |
97/194 435/870 | ||
| Diamond Phases: 3 |
102/203 456/912 | ||
| # | Formation | Normal Battle Node | AD/AP AS/AS+ |
E-3 Hard Z: 深海任務部隊 主力空母打撃群 (PoiDB)
| # | Formation | Boss Battle Node | AD/AP AS/AS+ |
|---|---|---|---|
| Z | Cruising Formation 3 Phases: 3 |
100/199 447/894 | |
| Cruising Formation 3 Phases: 3 (Final)
|
139/277 621/1242 | ||
| # | Formation | Boss Battle Node | AD/AP AS/AS+ |
Ship Drops
| ExpandShip drops |
|---|