|
|
| (63 intermediate revisions by 11 users not shown) |
| Line 1: |
Line 1: |
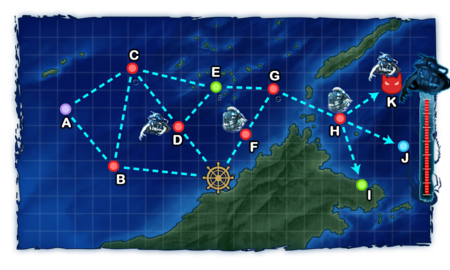
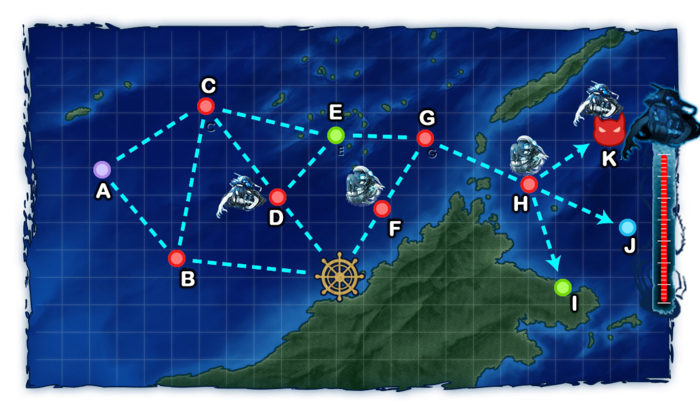
| − | =={{Anchor|2-1}}World 7-1: ブルネイ泊地沖 Brunei Anchorage Sea==
| + | {{:{{BASEPAGENAME}}/7-1}} |
| − | {{LabSortieworld
| |
| − | | map = 07_01.png
| |
| − | | difficulty = ☆ ☆ ☆ ☆ ☆
| |
| − | | item = {{fuel}}
| |
| − | | exp = varies
| |
| − | | code = ブルネイ泊地沖哨戒 (Brunei Anchorage Sea Patrol)
| |
| − | | jptext = 燃料の豊かなブルネイ泊地近海に敵潜水艦の跳梁が見られる。これを捜索制圧し、重要拠点である同泊地周辺の安全を図れ!
| |
| − | | entext = Enemy submarines have been sighted near Brunei Anchorage where fuel reserves are aplenty. Search for and suppress them in order to secure the area surrounding the anchorage, an important stronghold!
| |
| − | }} | |
| | | | |
| − | === Stage Guide ===
| + | [[Category:Sortie]] |
| − | {{MapBranchingTable
| |
| − | |title = 7-1 Branching Rules
| |
| − | |expand = true
| |
| − | |id = 7-1
| |
| − | |0 -> B, D, F =
| |
| − | * Meet '''ALL''' of the following requirements to go to F:
| |
| − | ** Amount of ships in fleet ≤ 4
| |
| − | ** No (F)BB(V) or CV(L/B)
| |
| − | ** No SS(V)
| |
| − | ** No AO
| |
| − | * Meet '''ALL''' of the following requirements to go to D:
| |
| − | ** Amount of ships in fleet = 5 '''OR''' Fleet contains AO.
| |
| − | ** Amount of ships in fleet ≤ 5
| |
| − | ** No (F)BB(V) or CV(L/B)
| |
| − | ** No SS(V)
| |
| − | * Meet '''ANY''' of the following requirements to go to B:
| |
| − | ** Amount of ships in fleet = 6
| |
| − | ** Fleet contains (F)BB(V) or CV(L/B) '''AND''' no SS(V)
| |
| − | * If fleet contains '''SS(V)''':
| |
| − | ** If amount of ships ≤ 4, random routing between B, D and F.
| |
| − | ** If amount of ships ≥ 5, random routing between B and D.
| |
| − | ** If fleet contains (F)BB(V) or CV(L/B), random routing between B and D.
| |
| − | | |
| − | |B -> A/storm = * Do not meet the requirements to go to C.
| |
| − | |B -> C =
| |
| − | * Meet '''ALL''' of the following requirements:
| |
| − | ** Amount of CV(L) ≤ 1
| |
| − | ** No (F)BB(V) or CV(B)
| |
| − | ** No SS(V)
| |
| − | | |
| − | |D -> C =
| |
| − | * Meeting '''ANY''' of the following requirements will '''FORCE''' you to C:
| |
| − | ** Amount of CL ≥ 2
| |
| − | ** Fleet contains CA(V)
| |
| − | ** Fleet contains CLT
| |
| − | ** Fleet contains (F)BB(V) or CV(L/B)
| |
| − | ** Fleet contains SS(V)
| |
| − | |D -> E/resource =
| |
| − | * Meet '''ANY''' of the following requirements:
| |
| − | ** Amount of CT+DD+DE ≥ 5
| |
| − | ** Amount of CL+CT+DD ≥ 4
| |
| − | ** Fleet contains DD '''AND''' amount of DE ≥ 3
| |
| − | | |
| − | |H -> I/resource, J/empty, K =
| |
| − | * Fleets that contain (F)BB(V) or CV(B) are '''FORCED''' to J.
| |
| − | * Meeting '''ANY''' of the following requirements routes you to K:
| |
| − | ** Fleet contains DD '''AND''' amount of DE ≥ 3
| |
| − | ** Amount of CL = 1 '''AND''' amount of DD ≥ 4
| |
| − | * Else, random routing between I, J and K.
| |
| − | }}
| |
| − | | |
| − | | |
| − | {{AirControlSystem
| |
| − | | Map = 7-1
| |
| − | | AS = 0
| |
| − | }}
| |
| − | | |
| − | ===Nodes and Enemy Encounters===
| |
| − | {{#invoke:EnemyEncounters2|encounterTemplate
| |
| − | |A_label = '''<span style="color:purple">Maelstrom Node</span>'''
| |
| − | |A-1_node_info = fuel - ?
| |
| − | |
| |
| − | |B_label = 敵通商破壊侵入艦隊
| |
| − | |B-1_node_info = cl_he-class_flagship ca_ne-class_elite ca_ne-class_elite cl_tsu-class_elite dd_ro-class_late_model dd_ro-class_late_model
| |
| − | |B-1_form = line_ahead line_abreast
| |
| − | |B-1_xp =
| |
| − | |B-1_enemy_air_power =
| |
| − | |B-2_node_info = cvl_nu-class_flagship ca_ri-class_flagship ca_ri-class_flagship cl_he-class_flagship dd_ro-class_late_model dd_ro-class_late_model
| |
| − | |B-2_form = echelon double_line
| |
| − | |B-2_xp =
| |
| − | |B-2_enemy_air_power = 23
| |
| − | |B-3_node_info = cvl_nu-class_flagship ca_ri-class_flagship cl_he-class_flagship cl_ho-class_flagship dd_ro-class_late_model dd_ro-class_late_model
| |
| − | |B-3_form = echelon double_line
| |
| − | |B-3_xp =
| |
| − | |B-3_enemy_air_power = 23
| |
| − | |
| |
| − | |C_label = 敵通商破壊侵入 高速機動部隊
| |
| − | |C-1_node_info = cv_wo-class_flagship_2 bb_ta-class_flagship ca_ne-class_elite cl_tsu-class_elite dd_ro-class_late_model dd_ro-class_late_model
| |
| − | |C-1_form = echelon double_line
| |
| − | |C-1_xp =
| |
| − | |C-1_enemy_air_power = 84
| |
| − | |C-2_node_info = cv_wo-class_flagship_2 ca_ne-class_elite cl_tsu-class_elite dd_ro-class_late_model dd_ro-class_late_model dd_ro-class_late_model
| |
| − | |C-2_form = echelon double_line
| |
| − | |C-2_xp =
| |
| − | |C-2_enemy_air_power = 84
| |
| − | |C-3_node_info = cv_wo-class_flagship_2 ca_ne-class_elite ca_ne-class_elite cl_tsu-class_elite dd_ro-class_late_model dd_ro-class_late_model
| |
| − | |C-3_form = echelon double_line
| |
| − | |C-3_xp =
| |
| − | |C-3_enemy_air_power = 84
| |
| − | |
| |
| − | |D_label = 深海潜水艦隊 II群
| |
| − | |D-1_node_info = ss_so-class_elite ss_ka-class ss_ka-class ss_ka-class ss_ka-class
| |
| − | |D-1_form = line_abreast diamond
| |
| − | |D-1_xp =
| |
| − | |D-1_enemy_air_power =
| |
| − | |D-2_node_info = ss_so-class_elite ss_ka-class ss_ka-class ss_ka-class
| |
| − | |D-2_form = diamond line_abreast
| |
| − | |D-2_xp =
| |
| − | |D-2_enemy_air_power =
| |
| − | |D-3_node_info = ss_so-class_elite ss_ka-class_elite ss_ka-class ss_ka-class ss_ka-class
| |
| − | |D-3_form = line_abreast diamond
| |
| − | |D-3_xp =
| |
| − | |D-3_enemy_air_power =
| |
| − | |D-4_node_info = ss_so-class_elite ss_ka-class_elite ss_ka-class_elite ss_ka-class ss_ka-class
| |
| − | |D-4_form = diamond
| |
| − | |D-4_xp =
| |
| − | |D-4_enemy_air_power =
| |
| − | |
| |
| − | |E_label = '''<span style="color:green">Resource Node</span>'''
| |
| − | |E-1_node_info = fuel + 10 15 20
| |
| − | |
| |
| − | |F_label = 深海潜水艦隊 III群
| |
| − | |F-1_node_info = ss_yo-class_elite ss_ka-class ss_ka-class
| |
| − | |F-1_form = diamond line_abreast
| |
| − | |F-1_xp =
| |
| − | |F-1_enemy_air_power =
| |
| − | |F-2_node_info = ss_yo-class_elite ss_ka-class ss_ka-class ss_ka-class
| |
| − | |F-2_form = diamond line_abreast
| |
| − | |F-2_xp =
| |
| − | |F-2_enemy_air_power =
| |
| − | |F-3_node_info = ss_yo-class_elite ss_yo-class ss_yo-class ss_yo-class
| |
| − | |F-3_form = diamond line_abreast
| |
| − | |F-3_xp =
| |
| − | |F-3_enemy_air_power =
| |
| − | |F-4_node_info = ss_yo-class_elite ss_yo-class ss_yo-class ss_ka-class
| |
| − | |F-4_form = diamond line_abreast
| |
| − | |F-4_xp =
| |
| − | |F-4_enemy_air_power =
| |
| − | |F-5_node_info = ss_yo-class_elite ss_yo-class_elite ss_yo-class ss_yo-class
| |
| − | |F-5_form = diamond
| |
| − | |F-5_xp =
| |
| − | |F-5_enemy_air_power =
| |
| − | |
| |
| − | |G_label = 敵哨戒部隊
| |
| − | |G-1_node_info = cl_he-class_flagship cl_ho-class_flagship dd_ro-class_late_model dd_ro-class_late_model dd_ro-class_late_model
| |
| − | |G-1_form = line_ahead double_line
| |
| − | |G-1_xp =
| |
| − | |G-1_enemy_air_power =
| |
| − | |G-2_node_info = cl_he-class_flagship dd_ro-class_late_model dd_ro-class_late_model dd_i-class dd_i-class
| |
| − | |G-2_form = line_ahead double_line
| |
| − | |G-2_xp =
| |
| − | |G-2_enemy_air_power =
| |
| − | |G-3_node_info = cl_he-class_flagship dd_ro-class_late_model dd_i-class dd_i-class
| |
| − | |G-3_form = line_ahead line_abreast
| |
| − | |G-3_xp =
| |
| − | |G-3_enemy_air_power =
| |
| − | |
| |
| − | |H_label = 深海潜水艦隊 I群
| |
| − | |H-1_node_info = ss_so-class_elite ss_yo-class_elite ss_yo-class ss_yo-class
| |
| − | |H-1_form = diamond line_abreast
| |
| − | |H-1_xp =
| |
| − | |H-1_enemy_air_power =
| |
| − | |H-2_node_info = ss_so-class_elite ss_yo-class_elite ss_yo-class
| |
| − | |H-2_form = diamond line_abreast
| |
| − | |H-2_xp =
| |
| − | |H-2_enemy_air_power =
| |
| − | |H-3_node_info = ss_so-class_elite ss_so-class_elite ss_yo-class ss_yo-class
| |
| − | |H-3_form = diamond
| |
| − | |H-3_xp =
| |
| − | |H-3_enemy_air_power =
| |
| − | |H-4_node_info = ss_yo-class_elite ss_yo-class ss_ka-class ss_ka-class
| |
| − | |H-4_form = diamond line_abreast
| |
| − | |H-4_xp =
| |
| − | |H-4_enemy_air_power =
| |
| − | |H-5_node_info = ss_yo-class_elite ss_yo-class_elite ss_yo-class
| |
| − | |H-5_form = line_abreast diamond
| |
| − | |H-5_xp =
| |
| − | |H-5_enemy_air_power =
| |
| − | |
| |
| − | |I_label = '''<span style="color:green">Resource Node</span>'''
| |
| − | |I-1_node_info = fuel + ?
| |
| − | |
| |
| − | |J_label = '''<span style="color:blue">Battle Avoided</span>'''
| |
| − | |J-1_node_info = "Must be my imagination" (battle avoided)
| |
| − | |
| |
| − | |K_label = 深海潜水艦隊集団 旗艦戦隊
| |
| − | |K-1_node_info = ss_so-class_flagship ss_yo-class_elite ss_yo-class_elite
| |
| − | |K-1_form = diamond
| |
| − | |K-1_xp =
| |
| − | |K-1_enemy_air_power =
| |
| − | |K-2_node_info = ss_so-class_flagship ss_ka-class_elite ss_ka-class_elite
| |
| − | |K-2_form = diamond
| |
| − | |K-2_xp =
| |
| − | |K-2_enemy_air_power =
| |
| − | |K-3_node_info = ss_so-class_flagship ss_ka-class ss_ka-class
| |
| − | |K-3_form = diamond
| |
| − | |K-3_xp =
| |
| − | |K-3_enemy_air_power =
| |
| − | |
| |
| − | |final_form =
| |
| − | |boss_node = K
| |
| − | }}
| |
| − | | |
| − | ===Drops===
| |
| − | <!---<div class="mw-customtoggle-2-1-drop globalbutton">Show/Hide Drops</div>
| |
| − | {| class="mw-collapsible mw-collapsed wikitable" id="mw-customcollapsible-2-1-drop"
| |
| − | !Node
| |
| − | !Destroyers
| |
| − | !Light Cruisers
| |
| − | !Heavy Cruisers
| |
| − | !Seaplane Tender
| |
| − | !Aircraft Carrier
| |
| − | !Battleship
| |
| − | |-
| |
| − | | style="text-align:center;" |A
| |
| − | | style="text-align:center;" |[[Kisaragi]], [[Samidare]], [[Shirayuki]], [[Shikinami]], [[Mutsuki]], [[Nenohi]], [[Kuroshio]], [[Ooshio]], [[Hatsuyuki]], [[Michishio]], [[Murasame]], [[Yuudachi]]
| |
| − | | style="text-align:center;" |[[Nagara]], [[Naka]], [[Sendai]], [[Tama]], [[Kuma]], [[Isuzu]], [[Jintsuu]]
| |
| − | | style="text-align:center;" |[[Aoba]], [[Ashigara]], [[Nachi]], [[Kako]], [[Maya]], [[Furutaka]], [[Choukai]], [[Haguro]], [[Atago]], [[Myoukou]], [[Mogami]]
| |
| − | | style="text-align:center;" |[[Chitose]], [[Chiyoda]]
| |
| − | | style="text-align:center;" |[[Shouhou]], [[Houshou]], [[Hiyou]], [[Jun'you]]
| |
| − | | style="text-align:center;" |[[Ise]], [[Hyuuga]], [[Haruna]], [[Kirishima]], [[Fusou]], [[Yamashiro]]
| |
| − | |-
| |
| − | | style="text-align:center;" |C
| |
| − | | style="text-align:left;" |
| |
| − | <p style="text-align:center;">[[Shiranui]], [[Murasame]], [[Mikazuki]], [[Hatsuyuki]], [[Shigure]], [[Nenohi]], [[Kuroshio]], [[Kasumi]], [[Isonami]], [[Mochizuki|Mochizuki,]] [[Shimakaze]], [[Wakaba]], [[Miyuki]], [[Fumizuki]]</p>
| |
| − | | style="text-align:center;" |[[Yura]], [[Isuzu]], [[Sendai]]
| |
| − | | style="text-align:center;" |[[Aoba]], [[Ashigara]], [[Nachi]], [[Maya]], [[Furutaka]], [[Mogami]], [[Choukai]], [[Kako]], [[Haguro]]
| |
| − | | style="text-align:center;" |[[Chitose]], [[Chiyoda]]
| |
| − | | style="text-align:center;" |[[Shouhou]], [[Hiyou]]
| |
| − | | style="text-align:center;" |[[Ise]], [[Haruna]], [[Fusou]], [[Yamashiro]]
| |
| − | |-
| |
| − | | style="text-align:center;" |'''<font color="#ff0000">E Boss Node</font>'''
| |
| − | | style="text-align:center;" |[[Mikazuki]], [[Satsuki]]
| |
| − | | style="text-align:center;" |[[Naka]], [[Kiso]], [[Jintsuu]], [[Kuma]], [[Isuzu]], [[Kitakami]], [[Tatsuta]], [[Natori]], [[Yura]]
| |
| − | | style="text-align:center;" |[[Haguro]], [[Aoba]], [[Ashigara]], [[Takao]], [[Choukai]], [[Atago]], [[Chikuma]], [[Nachi]], [[Tone]], [[Maya]]
| |
| − | | style="text-align:center;" |[[Chitose]], [[Chiyoda]]
| |
| − | | style="text-align:center;" |[[Shouhou]], <span style="color:rgb(0,0,0);">[[Jun'you]], [[Ryuujou]] </span>
| |
| − | | style="text-align:center;" |[[Kongou]], [[Hiei]], [[Haruna]], [[Kirishima]], [[Fusou]], [[Yamashiro]]
| |
| − | |-
| |
| − | | style="text-align:center;" |F
| |
| − | | style="text-align:center;" |
| |
| − | [[Samidare]], [[Michishio]], [[Ooshio]], [[Hatsuyuki]], [[Shiranui]]
| |
| − | | style="text-align:center;" |[[Tama]], <span style="color:rgb(0,0,0);text-align:start;">[[Isuzu]], [[Natori]], [[Yura|Yura]], </span>[[Sendai]]
| |
| − | | style="text-align:center;" |[[Ashigara]], [[Kako]], [[Furutaka]], [[Aoba]], [[Mogami]]
| |
| − | | style="text-align:center;" |[[Chitose]], [[Chiyoda]]
| |
| − | | style="text-align:center;" |[[Shouhou]], [[Ryuujou]]
| |
| − | |
| |
| − | |}--->
| |
| − | | |
| − | =={{Anchor|7-2}}World 7-2: タウイタウイ泊地沖 Tawi-Tawi Anchorage Sea==
| |
| − | {{LabSortieworld
| |
| − | | map = 07_02.png
| |
| − | | difficulty = ☆ ☆ ☆ ☆ ☆ ☆ ☆ ☆
| |
| − | | item = {{fuel}}
| |
| − | | exp = varies
| |
| − | | code = セレベス海戦闘哨戒 (Celebes Sea Combat Patrol)
| |
| − | | jptext = 我が機動部隊の出撃拠点であるタウイタウイ泊地沖に敵戦力の跳梁が確認されている。哨戒を厳として、これらを制圧せよ!
| |
| − | | entext =Our Naval Task Force has detected an enemy force closing in on Tawi-Tawi Ancorage. Conduct a Combat patrol to take them out!
| |
| − | }}
| |
| − | | |
| − | === Stage Guide ===
| |
| − | {{MapBranchingTable
| |
| − | |title = 7-2 Branching Rules Part 1
| |
| − | |expand = true
| |
| − | |id = 7-2A
| |
| − | | |
| − | |0 -> A/storm = * Do not meet the requirements to go to either B or C.
| |
| − | |0 -> B =
| |
| − | * Meet '''ALL''' of the following requirements:
| |
| − | ** Do not meet the requirements to go to C.
| |
| − | ** Amount of DE+DD ≥ 2
| |
| − | ** Amount of CV(B) ≤ 1
| |
| − | ** Amount of (F)BB(V)+CV(B) ≤ 3
| |
| − | ** No SS(V)
| |
| − | |0 -> C =
| |
| − | * Meet '''ALL''' of the following requirements:
| |
| − | ** Amount of DE+DD ≥ 3
| |
| − | ** Amount of ships in fleet ≤ 5
| |
| − | ** Amount of ships in fleet ≤ 4 '''OR''' amount of DE ≥ 3
| |
| − | ** No (F)BB(V) or CV(B)
| |
| − | ** No SS(V)
| |
| − | | |
| − | |C -> D/storm = * Do not meet the requirements to go to E.
| |
| − | |C -> E =
| |
| − | * Meet '''ALL''' of the following requirements:
| |
| − | ** No (F)BB(V) or CV(B)
| |
| − | ** No SS(V)
| |
| − | ** And meet '''ONE''' of the following requirements:
| |
| − | *** Amount of DE ≥ 3
| |
| − | *** Amount of DD ≥ 4
| |
| − | *** Amount of ships in fleet ≤ 4
| |
| − | | |
| − | |E -> F, G =
| |
| − | * ??? (2 ≥ CL?)
| |
| − | * Otherwise, go to G.
| |
| − | }}
| |
| − | | |
| − | {{MapBranchingTable
| |
| − | |title = 7-2 Branching Rules Part 2
| |
| − | |expand = true
| |
| − | |id = 7-2B
| |
| − | | |
| − | |D/empty -> H, I =
| |
| − | * Meet '''ALL''' of the following requirements to go to I:
| |
| − | ** Fast Fleet '''OR''' Submarine fleet?
| |
| − | ** Amount of (F)BB(V)+CV(L/B) ≤ 3
| |
| − | * If Slow Fleet '''AND''' amount of (F)BB(V)+CV(L/B) ≤ 2, Random Routing.
| |
| − | * Otherwise, go to H.
| |
| − | | |
| − | |I -> J = * Fleet contains AO?
| |
| − | |I -> L =
| |
| − | * Meet '''ALL''' of the following requirements:
| |
| − | ** Fail the LoS check.
| |
| − | ** No AO?
| |
| − | |I -> M =
| |
| − | * Meet '''ALL''' of the following requirements:
| |
| − | ** Pass the LoS check.
| |
| − | ** No AO?
| |
| − | }}
| |
| − | | |
| − | {{AirControlSystem
| |
| − | | Map = 7-2
| |
| − | | AS = 0
| |
| − | }}
| |
| − | | |
| − | '''Tips'''
| |
| − | * This map will consist of 2 phases which you'll need to defeat a Submarine fleet and a Carrier Fleet a certain amount of times.
| |
| − | * This map will reset at the end of each month and you'll need to deplete the enemy's HP bar all over again.
| |
| − | | |
| − | '''7-2-1: Eliminate the Submarine Fleet'''
| |
| − | | |
| − | '''Recommeded Fleet'''
| |
| − | | |
| − | '''1 CVL, 3 DD or 1 CL, 4 DD'''<br>
| |
| − | '''Path:
| |
| − | * The submarine boss fleet will mainly consist of 3 subs and some surface ships.
| |
| − | * Defeat the submarine fleet 3 time to open up the path to the 2nd part of the map.
| |
| − | | |
| − | '''7-2-2: Eliminate the Carrier Fleet'''
| |
| − | | |
| − | ===Nodes and Enemy Encounters===
| |
| − | <!---{{#invoke:EnemyEncounters2|encounterTemplate
| |
| − | |A_label = '''<span style="color:purple">Maelstrom Node</span>'''
| |
| − | |A-1_node_info = fuel - ?
| |
| − | |
| |
| − | |B_label = 敵通商破壊侵入艦隊
| |
| − | |B-1_node_info = cl_he-class_flagship ca_ne-class_elite ca_ne-class_elite cl_tsu-class_elite dd_ro-class_late_model dd_ro-class_late_model
| |
| − | |B-1_form = line_ahead line_abreast
| |
| − | |B-1_xp =
| |
| − | |B-1_enemy_air_power =
| |
| − | |B-2_node_info = cvl_nu-class_flagship ca_ri-class_flagship ca_ri-class_flagship cl_he-class_flagship dd_ro-class_late_model dd_ro-class_late_model
| |
| − | |B-2_form = echelon double_line
| |
| − | |B-2_xp =
| |
| − | |B-2_enemy_air_power = 23
| |
| − | |B-3_node_info = cvl_nu-class_flagship ca_ri-class_flagship cl_he-class_flagship cl_ho-class_flagship dd_ro-class_late_model dd_ro-class_late_model
| |
| − | |B-3_form = echelon double_line
| |
| − | |B-3_xp =
| |
| − | |B-3_enemy_air_power = 23
| |
| − | |
| |
| − | |C_label = 敵通商破壊侵入 高速機動部隊
| |
| − | |C-1_node_info = cv_wo-class_flagship_2 bb_ta-class_flagship ca_ne-class_elite cl_tsu-class_elite dd_ro-class_late_model dd_ro-class_late_model
| |
| − | |C-1_form = echelon double_line
| |
| − | |C-1_xp =
| |
| − | |C-1_enemy_air_power = 84
| |
| − | |C-2_node_info = cv_wo-class_flagship_2 ca_ne-class_elite cl_tsu-class_elite dd_ro-class_late_model dd_ro-class_late_model dd_ro-class_late_model
| |
| − | |C-2_form = echelon double_line
| |
| − | |C-2_xp =
| |
| − | |C-2_enemy_air_power = 84
| |
| − | |C-3_node_info = cv_wo-class_flagship_2 ca_ne-class_elite ca_ne-class_elite cl_tsu-class_elite dd_ro-class_late_model dd_ro-class_late_model
| |
| − | |C-3_form = echelon double_line
| |
| − | |C-3_xp =
| |
| − | |C-3_enemy_air_power = 84
| |
| − | |
| |
| − | |D_label = 深海潜水艦隊 II群
| |
| − | |D-1_node_info = ss_so-class_elite ss_ka-class ss_ka-class ss_ka-class ss_ka-class
| |
| − | |D-1_form = line_abreast diamond
| |
| − | |D-1_xp =
| |
| − | |D-1_enemy_air_power =
| |
| − | |D-2_node_info = ss_so-class_elite ss_ka-class ss_ka-class ss_ka-class
| |
| − | |D-2_form = diamond line_abreast
| |
| − | |D-2_xp =
| |
| − | |D-2_enemy_air_power =
| |
| − | |D-3_node_info = ss_so-class_elite ss_ka-class_elite ss_ka-class ss_ka-class ss_ka-class
| |
| − | |D-3_form = line_abreast diamond
| |
| − | |D-3_xp =
| |
| − | |D-3_enemy_air_power =
| |
| − | |D-4_node_info = ss_so-class_elite ss_ka-class_elite ss_ka-class_elite ss_ka-class ss_ka-class
| |
| − | |D-4_form = diamond
| |
| − | |D-4_xp =
| |
| − | |D-4_enemy_air_power =
| |
| − | |
| |
| − | |E_label = '''<span style="color:green">Resource Node</span>'''
| |
| − | |E-1_node_info = fuel + 10 15 20
| |
| − | |
| |
| − | |F_label = 深海潜水艦隊 III群
| |
| − | |F-1_node_info = ss_yo-class_elite ss_ka-class ss_ka-class
| |
| − | |F-1_form = diamond line_abreast
| |
| − | |F-1_xp =
| |
| − | |F-1_enemy_air_power =
| |
| − | |F-2_node_info = ss_yo-class_elite ss_ka-class ss_ka-class ss_ka-class
| |
| − | |F-2_form = diamond line_abreast
| |
| − | |F-2_xp =
| |
| − | |F-2_enemy_air_power =
| |
| − | |F-3_node_info = ss_yo-class_elite ss_yo-class ss_yo-class ss_yo-class
| |
| − | |F-3_form = diamond line_abreast
| |
| − | |F-3_xp =
| |
| − | |F-3_enemy_air_power =
| |
| − | |F-4_node_info = ss_yo-class_elite ss_yo-class ss_yo-class ss_ka-class
| |
| − | |F-4_form = diamond line_abreast
| |
| − | |F-4_xp =
| |
| − | |F-4_enemy_air_power =
| |
| − | |F-5_node_info = ss_yo-class_elite ss_yo-class_elite ss_yo-class ss_yo-class
| |
| − | |F-5_form = diamond
| |
| − | |F-5_xp =
| |
| − | |F-5_enemy_air_power =
| |
| − | |
| |
| − | |G_label = 敵哨戒部隊
| |
| − | |G-1_node_info = cl_he-class_flagship cl_ho-class_flagship dd_ro-class_late_model dd_ro-class_late_model dd_ro-class_late_model
| |
| − | |G-1_form = line_ahead double_line
| |
| − | |G-1_xp =
| |
| − | |G-1_enemy_air_power =
| |
| − | |G-2_node_info = cl_he-class_flagship dd_ro-class_late_model dd_ro-class_late_model dd_i-class dd_i-class
| |
| − | |G-2_form = line_ahead double_line
| |
| − | |G-2_xp =
| |
| − | |G-2_enemy_air_power =
| |
| − | |G-3_node_info = cl_he-class_flagship dd_ro-class_late_model dd_i-class dd_i-class
| |
| − | |G-3_form = line_ahead line_abreast
| |
| − | |G-3_xp =
| |
| − | |G-3_enemy_air_power =
| |
| − | |
| |
| − | |H_label = 深海潜水艦隊 I群
| |
| − | |H-1_node_info = ss_so-class_elite ss_yo-class_elite ss_yo-class ss_yo-class
| |
| − | |H-1_form = diamond line_abreast
| |
| − | |H-1_xp =
| |
| − | |H-1_enemy_air_power =
| |
| − | |H-2_node_info = ss_so-class_elite ss_yo-class_elite ss_yo-class
| |
| − | |H-2_form = diamond line_abreast
| |
| − | |H-2_xp =
| |
| − | |H-2_enemy_air_power =
| |
| − | |H-3_node_info = ss_so-class_elite ss_so-class_elite ss_yo-class ss_yo-class
| |
| − | |H-3_form = diamond
| |
| − | |H-3_xp =
| |
| − | |H-3_enemy_air_power =
| |
| − | |H-4_node_info = ss_yo-class_elite ss_yo-class ss_ka-class ss_ka-class
| |
| − | |H-4_form = diamond line_abreast
| |
| − | |H-4_xp =
| |
| − | |H-4_enemy_air_power =
| |
| − | |H-5_node_info = ss_yo-class_elite ss_yo-class_elite ss_yo-class
| |
| − | |H-5_form = line_abreast diamond
| |
| − | |H-5_xp =
| |
| − | |H-5_enemy_air_power =
| |
| − | |
| |
| − | |I_label = '''<span style="color:green">Resource Node</span>'''
| |
| − | |I-1_node_info = fuel + ?
| |
| − | |
| |
| − | |J_label = '''<span style="color:blue">Battle Avoided</span>'''
| |
| − | |J-1_node_info = "Must be my imagination" (battle avoided)
| |
| − | |
| |
| − | |K_label = 深海潜水艦隊集団 旗艦戦隊
| |
| − | |K-1_node_info = ss_so-class_flagship ss_yo-class_elite ss_yo-class_elite
| |
| − | |K-1_form = diamond
| |
| − | |K-1_xp =
| |
| − | |K-1_enemy_air_power =
| |
| − | |K-2_node_info = ss_so-class_flagship ss_ka-class_elite ss_ka-class_elite
| |
| − | |K-2_form = diamond
| |
| − | |K-2_xp =
| |
| − | |K-2_enemy_air_power =
| |
| − | |K-3_node_info = ss_so-class_flagship ss_ka-class ss_ka-class
| |
| − | |K-3_form = diamond
| |
| − | |K-3_xp =
| |
| − | |K-3_enemy_air_power =
| |
| − | |
| |
| − | |final_form =
| |
| − | |boss_node = K
| |
| − | }}--->
| |
| − | | |
| − | ===Drops===
| |
| − | <!---<div class="mw-customtoggle-2-1-drop globalbutton">Show/Hide Drops</div>
| |
| − | {| class="mw-collapsible mw-collapsed wikitable" id="mw-customcollapsible-2-1-drop"
| |
| − | !Node
| |
| − | !Destroyers
| |
| − | !Light Cruisers
| |
| − | !Heavy Cruisers
| |
| − | !Seaplane Tender
| |
| − | !Aircraft Carrier
| |
| − | !Battleship
| |
| − | |-
| |
| − | | style="text-align:center;" |A
| |
| − | | style="text-align:center;" |[[Kisaragi]], [[Samidare]], [[Shirayuki]], [[Shikinami]], [[Mutsuki]], [[Nenohi]], [[Kuroshio]], [[Ooshio]], [[Hatsuyuki]], [[Michishio]], [[Murasame]], [[Yuudachi]]
| |
| − | | style="text-align:center;" |[[Nagara]], [[Naka]], [[Sendai]], [[Tama]], [[Kuma]], [[Isuzu]], [[Jintsuu]]
| |
| − | | style="text-align:center;" |[[Aoba]], [[Ashigara]], [[Nachi]], [[Kako]], [[Maya]], [[Furutaka]], [[Choukai]], [[Haguro]], [[Atago]], [[Myoukou]], [[Mogami]]
| |
| − | | style="text-align:center;" |[[Chitose]], [[Chiyoda]]
| |
| − | | style="text-align:center;" |[[Shouhou]], [[Houshou]], [[Hiyou]], [[Jun'you]]
| |
| − | | style="text-align:center;" |[[Ise]], [[Hyuuga]], [[Haruna]], [[Kirishima]], [[Fusou]], [[Yamashiro]]
| |
| − | |-
| |
| − | | style="text-align:center;" |C
| |
| − | | style="text-align:left;" |
| |
| − | <p style="text-align:center;">[[Shiranui]], [[Murasame]], [[Mikazuki]], [[Hatsuyuki]], [[Shigure]], [[Nenohi]], [[Kuroshio]], [[Kasumi]], [[Isonami]], [[Mochizuki|Mochizuki,]] [[Shimakaze]], [[Wakaba]], [[Miyuki]], [[Fumizuki]]</p>
| |
| − | | style="text-align:center;" |[[Yura]], [[Isuzu]], [[Sendai]]
| |
| − | | style="text-align:center;" |[[Aoba]], [[Ashigara]], [[Nachi]], [[Maya]], [[Furutaka]], [[Mogami]], [[Choukai]], [[Kako]], [[Haguro]]
| |
| − | | style="text-align:center;" |[[Chitose]], [[Chiyoda]]
| |
| − | | style="text-align:center;" |[[Shouhou]], [[Hiyou]]
| |
| − | | style="text-align:center;" |[[Ise]], [[Haruna]], [[Fusou]], [[Yamashiro]]
| |
| − | |-
| |
| − | | style="text-align:center;" |'''<font color="#ff0000">E Boss Node</font>'''
| |
| − | | style="text-align:center;" |[[Mikazuki]], [[Satsuki]]
| |
| − | | style="text-align:center;" |[[Naka]], [[Kiso]], [[Jintsuu]], [[Kuma]], [[Isuzu]], [[Kitakami]], [[Tatsuta]], [[Natori]], [[Yura]]
| |
| − | | style="text-align:center;" |[[Haguro]], [[Aoba]], [[Ashigara]], [[Takao]], [[Choukai]], [[Atago]], [[Chikuma]], [[Nachi]], [[Tone]], [[Maya]]
| |
| − | | style="text-align:center;" |[[Chitose]], [[Chiyoda]]
| |
| − | | style="text-align:center;" |[[Shouhou]], <span style="color:rgb(0,0,0);">[[Jun'you]], [[Ryuujou]] </span>
| |
| − | | style="text-align:center;" |[[Kongou]], [[Hiei]], [[Haruna]], [[Kirishima]], [[Fusou]], [[Yamashiro]]
| |
| − | |-
| |
| − | | style="text-align:center;" |F
| |
| − | | style="text-align:center;" |
| |
| − | [[Samidare]], [[Michishio]], [[Ooshio]], [[Hatsuyuki]], [[Shiranui]]
| |
| − | | style="text-align:center;" |[[Tama]], <span style="color:rgb(0,0,0);text-align:start;">[[Isuzu]], [[Natori]], [[Yura|Yura]], </span>[[Sendai]]
| |
| − | | style="text-align:center;" |[[Ashigara]], [[Kako]], [[Furutaka]], [[Aoba]], [[Mogami]]
| |
| − | | style="text-align:center;" |[[Chitose]], [[Chiyoda]]
| |
| − | | style="text-align:center;" |[[Shouhou]], [[Ryuujou]]
| |
| − | |
| |
| − | |}--->
| |
| − | | |
| − | | |
| − | {{Navbox World}}
| |