• Welcome to the Kancolle Wiki!
  • If you have any questions regarding site content, account registration, etc., please visit the KanColle Wiki Discord

Difference between revisions of "World 1/1-3"

From Kancolle Wiki
Jump to navigation Jump to search
Line 204: Line 204:
 
|-
 
|-
 
| style="text-align:center;" |'''<span class="wikicolor" style="color:Red">J</span>'''
 
| style="text-align:center;" |'''<span class="wikicolor" style="color:Red">J</span>'''
| style="text-align:center;" |[[Fubuki]], [[Shirayuki]], [[Miyuki]], [[Murakumo]], [[Isonami]], [[Ayanami]], [[Shikinami]], [[Kisaragi]], [[Kikuzuki]], [[Mikazuki]], [[Mochizuki]], [[Oboro]], [[Sazanami]], [[Ushio]], [[Hibiki]], [[Ikazuchi]], [[Inazuma]], [[Hatsuharu]], [[Nenohi]], [[Wakaba]], [[Hatsushimo]], [[Shiratsuyu]], [[Shigure]], [[Murasame]], [[Yuudachi]], [[Yamakaze|'''<span class="wikicolor" style="color:Red">Yamakaze</snap>''']], [[Samidare]], [[Suzukaze]], [[Ooshio]], [[Arare]], [[Shiranui]], [[Kuroshio]]
+
| style="text-align:center;" |[[Fubuki]], [[Shirayuki]], [[Miyuki]], [[Murakumo]], [[Isonami]], [[Ayanami]], [[Shikinami]], [[Kisaragi]], [[Kikuzuki]], [[Mikazuki]], [[Mochizuki]], [[Oboro]], [[Sazanami]], [[Ushio]], [[Hibiki]], [[Ikazuchi]], [[Inazuma]], [[Hatsuharu]], [[Nenohi]], [[Wakaba]], [[Hatsushimo]], [[Shiratsuyu]], [[Shigure]], [[Murasame]], [[Yuudachi]], [[Yamakaze|'''<span style="color:red">Yamakaze</span>''']], [[Samidare]], [[Suzukaze]], [[Ooshio]], [[Arare]], [[Shiranui]], [[Kuroshio]]
 
| style="text-align:center;" |[[Sendai]], [[Jintsuu]], [[Naka]], [[Yuubari]], [[Nagara]], [[Isuzu]], [[Natori]], [[Yura]], [[Kuma]], [[Tama]], [[Kitakami]], [[Kiso]], [[Tenryuu]], [[Tatsuta]]
 
| style="text-align:center;" |[[Sendai]], [[Jintsuu]], [[Naka]], [[Yuubari]], [[Nagara]], [[Isuzu]], [[Natori]], [[Yura]], [[Kuma]], [[Tama]], [[Kitakami]], [[Kiso]], [[Tenryuu]], [[Tatsuta]]
 
| style="text-align:center;" |[[Aoba]], [[Kinugasa]], [[Furutaka]], [[Kako]]
 
| style="text-align:center;" |[[Aoba]], [[Kinugasa]], [[Furutaka]], [[Kako]]

Revision as of 17:23, 25 June 2021

World 1-3: 製油所地帯沿岸 Coastal Refinery Zone

Strategy Name
海上護衛作戦 (Maritime Escort Operation)
Difficulty
☆ ☆
Item
Fuel
Strategy Content
製油所地帯沿岸部の海上輸送ラインを防衛せよ!
Protect the supply lines around our coastal refineries!
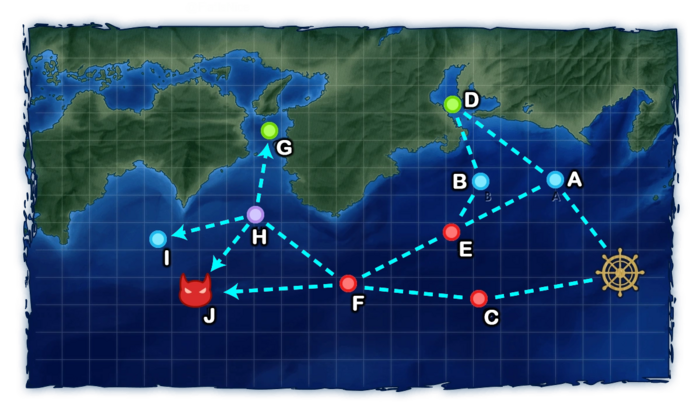
1-3 Branching Rules
Nodes Rules
Start
A
  • Go to A if fleet contains AO or AV
  • Go to C if fleet contains CV(L)
  • Otherwise, random routing
C
A
D
  • Meet ANY of the following to go to D
    • Fleet contains AO
    • DE ≥ 4
  • Go to E if fleet only contains SS(V)
  • 80% to D if fleet contains AV and DD+DE ≥ 4
  • Otherwise, random routing
E
F
H
  • Go to H if fleet contains any CV(B), slow BBs (BBV doesn't count)
  • Meet ANY of the following to go to J
    • DD ≥ 4
    • Fleet contains CL and DD+DE ≥ 4
  • Otherwise, random routing (The more CV(L/B) you bring, the higher chance you will go to node H)
J
H
G
  • Go to G if fleet contains AO
  • Go to J if fleet contains CL and DD ≥ 2, or fleet contains AV
  • Otherwise
    • If DD ≥ 3, random routing (Very small chance for I)
    • If DD ≤ 2, random routing (Very small chance for G)
I
J


Stage Guide


Recommended Fleet

  • 2 XX 4 DD (XX can't be any heavy ships such as (F)BB or CV, BBV and CVL are fine though) guarantees F-J branching


Oil Refinery Farming

  • The Oil Refinery area is now the new hot spot for farming for Fuel since the former "Orel Cruise" has become insufficient due to the increase difficulty subs will face on 2-3. As such Node D of this map now serves as a major area to farm for fuel.
    • 1 AV, 4-5 D, 0-1 SS / Kamoi, 4-5 DD, SS (Luigi Torelli recommended)
      • Requires Drum Canister and Daihatsu type equipment to increase fuel gain
      • You will only have around 80% of reaching node D if you are using the AV comp. If the fleet you are using contains AO such as Kamoi, however, will guarantee node D instead
      • Node D will provide you with with a base amount of 10/15/20 Fuel
      • In addition to this, each Drum Canister and Landing Craft you equip will give the following bonuses:
        • +2 Fuel per Drum Canister
        • +3 Fuel per Landing Craft
      • With enough Drum Canister and Landing Craft it can become possible to gain a large amount of resources if you make constant trips to this spot.
      • Once you complete your first battle, return to your base and refuel your fleet before going back out again.
      • If done correctly, this can result in an alarming fuel gain that can end up possibly surpassing any fuel base expedition making this become the ideal location to farm for fuel.
      • If you use throwaway DDs, remember to remove their Drum Canister once they run out of fuel and ammo or are critically damaged before scrapping them before proceeding to replace them with another DD that will use the Drum Canisters to run the map to continue the cycle.

Nodes and Enemy Encounters

Show/Hide Nodes and Enemy Encounters
Nodes and Enemy Encounters
NodePatternXpNode InfoFormAir
A
Battle Avoided
Pattern 1"Must be my imagination" (battle avoided)
B
Battle Avoided
Pattern 1"Must be my imagination" (battle avoided)
C
敵前衛艦隊
Enemy Vanguard Fleet
Pattern 1 Light Cruiser He-ClassDestroyer Ha-ClassDestroyer Ha-Class
Formation 1: Line Ahead
Pattern 2 Light Cruiser He-ClassDestroyer Ha-ClassDestroyer Ro-ClassDestroyer Ro-Class
Formation 1: Line Ahead
Pattern 3 Light Cruiser Ho-ClassDestroyer Ro-ClassDestroyer Ro-Class
Formation 1: Line Ahead
Pattern 4 Light Cruiser Ho-ClassDestroyer I-ClassDestroyer I-Class
Formation 1: Line Ahead
Pattern 5 Light Cruiser He-ClassDestroyer Ro-ClassDestroyer Ro-Class
Formation 1: Line Ahead
Pattern 6 Light Cruiser Ho-ClassDestroyer Ha-ClassDestroyer Ha-Class
Formation 1: Line Ahead
D
Resource Node
Pattern 1Fuel + 10 20
E
敵前衛艦隊
Enemy Vanguard Fleet
Pattern 1 Light Cruiser He-ClassDestroyer Ha-ClassDestroyer Ro-ClassDestroyer Ro-Class
Formation 1: Line Ahead
Pattern 2 Light Cruiser He-ClassDestroyer Ha-ClassDestroyer Ha-Class
Formation 1: Line Ahead
Pattern 3 Light Cruiser He-ClassDestroyer Ro-ClassDestroyer Ro-Class
Formation 1: Line Ahead
Pattern 4 Light Cruiser Ho-ClassDestroyer Ha-ClassDestroyer Ha-Class
Formation 1: Line Ahead
Pattern 5 Light Cruiser Ho-ClassDestroyer I-ClassDestroyer I-Class
Formation 1: Line Ahead
Pattern 6 Light Cruiser Ho-ClassDestroyer Ro-ClassDestroyer Ro-Class
Formation 1: Line Ahead
F
敵支援艦隊
Enemy Support Fleet
Pattern 1 Heavy Cruiser Ri-ClassDestroyer Ro-ClassDestroyer Ro-ClassDestroyer Ro-Class
Formation 2: Double Line
Formation 1: Line Ahead
Pattern 2 Heavy Cruiser Ri-ClassHeavy Cruiser Ri-ClassDestroyer Ro-ClassDestroyer Ro-Class
Formation 1: Line Ahead
Formation 2: Double Line
Pattern 3 Heavy Cruiser Ri-ClassTorpedo Cruiser Chi-ClassDestroyer Ro-ClassDestroyer Ro-Class
Formation 2: Double Line
Formation 1: Line Ahead
Pattern 4 Heavy Cruiser Ri-ClassDestroyer I-ClassDestroyer I-ClassDestroyer I-Class
Formation 2: Double Line
Formation 1: Line Ahead
G
Resource Node
Pattern 1Fuel + ?
H
Maelstrom Node
Pattern 1Ammo - ?
I
Battle Avoided
Pattern 1"Must be my imagination" (battle avoided)
J
敵主力艦隊
Main Enemy Fleet
Pattern 1 Battleship Ru-ClassTorpedo Cruiser Chi-ClassLight Cruiser He-ClassDestroyer Ro-ClassDestroyer Ro-Class
Formation 1: Line Ahead
Formation 2: Double Line
Pattern 2 Battleship Ru-ClassTorpedo Cruiser Chi-ClassLight Cruiser He-ClassDestroyer I-ClassDestroyer I-Class
Formation 1: Line Ahead
Formation 2: Double Line
Pattern 3 Battleship Ru-ClassLight Cruiser He-ClassDestroyer I-ClassDestroyer I-ClassDestroyer I-Class
Formation 1: Line Ahead
Formation 2: Double Line

Drops

Show/Hide Drops
Node Destroyers Light Cruisers Heavy Cruisers Seaplane Tender Aircraft Carrier
C Hatsuyuki, Isonami, Shikinami, Mutsuki, Kisaragi, Satsuki, Fumizuki, Nagatsuki, Kikuzuki, Mikazuki, Mochizuki, Oboro, Akebono, Ushio, Akatsuki, Hibiki, Ikazuchi, Inazuma, Hatsuharu Wakaba, Hatsushimo, Shiratsuyu, Shigure, Murasame, Yuudachi, Suzukaze, Ooshio, Michishio, Arashio, Arare, Shiranui, Kuroshio Sendai, Jintsuu, Naka, Tama, Kiso - - -
E Hatsuyuki, Isonami, Shikinami, Mutsuki, Kisaragi, Satsuki, Fumizuki, Nagatsuki, Kikuzuki, Mikazuki, Mochizuki, Oboro, Akebono, Ushio, Akatsuki, Hibiki, Ikazuchi, Inazuma, Hatsuharu Wakaba, Hatsushimo, Shiratsuyu, Shigure, Murasame, Yuudachi, Suzukaze, Ooshio, Michishio, Arashio, Arare, Shiranui, Kuroshio Sendai, Jintsuu, Naka, Tama, Kiso - - -
F Shirayuki, Hatsuyuki, Miyuki, Isonami, Shikinami, Mutsuki, Kisaragi, Satsuki, Fumizuki, Nagatsuki, Kikuzuki, Mikazuki, Mochizuki, Akebono, Akatsuki, Hibiki, Ikazuchi, Inazuma, Hatsuharu, Nenohi, Wakaba, Hatsushimo, Shiratsuyu, Shigure, Murasame, Yuudachi, Suzukaze, Ooshio, Michishio, Arashio, Arare, Kasumi, Shiranui, Kuroshio Sendai, Jintsuu, Naka, Nagara, Isuzu, Natori, Yura, Tama, Kiso - Chitose, Chiyoda -
J Fubuki, Shirayuki, Miyuki, Murakumo, Isonami, Ayanami, Shikinami, Kisaragi, Kikuzuki, Mikazuki, Mochizuki, Oboro, Sazanami, Ushio, Hibiki, Ikazuchi, Inazuma, Hatsuharu, Nenohi, Wakaba, Hatsushimo, Shiratsuyu, Shigure, Murasame, Yuudachi, Yamakaze, Samidare, Suzukaze, Ooshio, Arare, Shiranui, Kuroshio Sendai, Jintsuu, Naka, Yuubari, Nagara, Isuzu, Natori, Yura, Kuma, Tama, Kitakami, Kiso, Tenryuu, Tatsuta Aoba, Kinugasa, Furutaka, Kako Chitose, Chiyoda Houshou