- Welcome to the Kancolle Wiki!
- If you have any questions regarding site content, account registration, etc., please visit the KanColle Wiki Discord
Difference between revisions of "World 3/3-1"
< World 3
Jump to navigation
Jump to search
Jigaraphale (talk | contribs) |
Jigaraphale (talk | contribs) |
||
| (4 intermediate revisions by 2 users not shown) | |||
| Line 1: | Line 1: | ||
{{World/Hub}} | {{World/Hub}} | ||
| − | + | =World 3-1: モーレイ海 - The Moray Sea= | |
{{LabSortieworld | {{LabSortieworld | ||
| page = World 3/3-1 | | page = World 3/3-1 | ||
| Line 9: | Line 9: | ||
| jptext = 北方海域に艦隊を進出させ、モーレイ海を哨戒せよ! | | jptext = 北方海域に艦隊を進出させ、モーレイ海を哨戒せよ! | ||
| entext = Advance into Northern waters and patrol the Moray Sea! | | entext = Advance into Northern waters and patrol the Moray Sea! | ||
| + | | aircon = | ||
| + | {{AirConKai | ||
| + | |AS=42 | ||
| + | |ASr=36 | ||
| + | }} | ||
}} | }} | ||
| Line 50: | Line 55: | ||
{{FleetGuide | {{FleetGuide | ||
| Map = South Route | | Map = South Route | ||
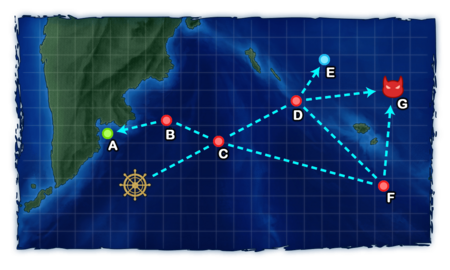
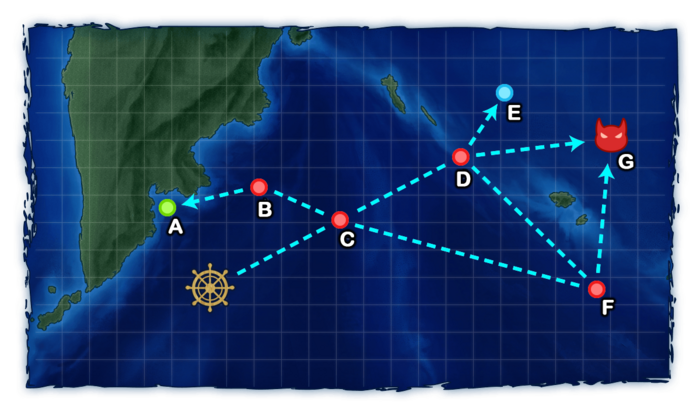
| − | | Fleet = '''2 (F)BB(V)/CV(B/L), 2 DD, 2 XX | + | | Fleet = '''2 (F)BB(V)/CV(B/L), 2 DD, 2 XX''' (XX cannot be (F)BB(V)/CV(B/L)/AV/AO) |
| Route = {{MapRoute|C|red|F|red|G|red}} | | Route = {{MapRoute|C|red|F|red|G|red}} | ||
| AS = 42 | | AS = 42 | ||
| Note = XX can be 1 CA and 1 CL(T) for a cheap effective fleet. | | Note = XX can be 1 CA and 1 CL(T) for a cheap effective fleet. | ||
| − | |||
As the boss node already has battleships, it is not necessary to bring one, unless node {{MapRoute|F|red}} closing torpedo salvo causes problems. | As the boss node already has battleships, it is not necessary to bring one, unless node {{MapRoute|F|red}} closing torpedo salvo causes problems. | ||
*In this case, ensure to obtain AS or AS+ in all nodes. | *In this case, ensure to obtain AS or AS+ in all nodes. | ||
Latest revision as of 08:40, 9 March 2025
World 3-1: モーレイ海 - The Moray Sea
| Strategy Name | モーレイ海哨戒 Moray Sea Patrol |
|---|---|
| Difficulty | ☆ ☆ ☆ ☆ |
| Item | |
| Strategy Content | 北方海域に艦隊を進出させ、モーレイ海を哨戒せよ! Advance into Northern waters and patrol the Moray Sea! |
| Boss Air Control | |||
|---|---|---|---|
| AD | AP | AS | AS+ |
| 13 | 19 | 42 | 84 |
| Boss Route Air Control | |||
| AD | AP | AS | AS+ |
| 11 | 16 | 36 | 72 |
| 3-1 Unlocking & Progression | ||||
|---|---|---|---|---|
| Unlock conditions | 3-1 is unlocked after clearing 2-4 | |||
| Clear conditions | To clear the map: the boss's flagship must be sunk once | |||
Stage Guide
| 3-1 Branching Rules |
|---|
Tips
This map does not present any significant challenge, as it is possible to bring various strong fleets on a direct routing.
Recommended Fleets
| ExpandSouth Route |
|---|
Resource Nodes
A is a "Normal Resource Node" rewarding ammo ![]() .
.
- See here for more details.
Enemy CompositionsCollapse
3-1 A
| # | Resource Node | ||
|---|---|---|---|
| A | Gained 35~140 | ||
| # | Resource Node | ||
3-1 B: 敵哨戒艦隊 (PoiDB)
| # | Enemy Form. |
Base EXP | Normal Battle Node | AD/AP AS/AS+ |
|---|---|---|---|---|
| B | Line Ahead | 130 | 0/0 0/0 | |
| Line Ahead Double Line |
150 | 0/0 0/0 | ||
| Line Ahead Double Line |
170 | 0/0 0/0 | ||
| # | Enemy Form. |
Base EXP | Normal Battle Node | AD/AP AS/AS+ |
3-1 C: 敵通商破壊侵入水雷戦隊 (PoiDB)
| # | Enemy Form. |
Base EXP | Normal Battle Node | AD/AP AS/AS+ |
|---|---|---|---|---|
| C | Line Ahead Double Line |
130 | 0/0 0/0 | |
| Line Ahead Double Line |
160 | 0/0 0/0 | ||
| Line Ahead Double Line |
180 | 0/0 0/0 | ||
| # | Enemy Form. |
Base EXP | Normal Battle Node | AD/AP AS/AS+ |
3-1 D: 敵北方支援任務部隊 (PoiDB)
| # | Enemy Form. |
Base EXP | Normal Battle Node | AD/AP AS/AS+ |
|---|---|---|---|---|
| D | Diamond | 150 | 9/17 36/72 | |
| Diamond | 160 | 9/17 36/72 | ||
| Diamond | 170 | 8/16 35/69 | ||
| Diamond | 180 | 8/16 35/69 | ||
| Diamond | 190 | 8/16 35/69 | ||
| Diamond | 200 | 8/16 35/69 | ||
| # | Enemy Form. |
Base EXP | Normal Battle Node | AD/AP AS/AS+ |
3-1 E
| # | Empty Node | ||
|---|---|---|---|
| E | 気のせいだった。/敵影を見ず。/穏やかな海です。/穏やかな海峡です。/警戒が必要です。/静かな海です。 Must be my imagination./No enemy spotted./Calm seas./Calm straits./Be alert./Peaceful seas. | ||
| # | Empty Node | ||
3-1 F: 敵北方任務部隊 (PoiDB)
| # | Enemy Form. |
Base EXP | Normal Battle Node | AD/AP AS/AS+ |
|---|---|---|---|---|
| F | Line Ahead Double Line |
150 | 0/0 0/0 | |
| Line Ahead Double Line |
180 | 0/0 0/0 | ||
| Line Ahead Double Line |
200 | 0/0 0/0 | ||
| Line Ahead Double Line |
220 | 0/0 0/0 | ||
| # | Enemy Form. |
Base EXP | Normal Battle Node | AD/AP AS/AS+ |
3-1 G: 敵北方侵攻艦隊 (PoiDB)
| # | Enemy Form. |
Base EXP | Boss Battle Node | AD/AP AS/AS+ |
|---|---|---|---|---|
| G | Line Ahead | 320 | 0/0 0/0 | |
| Line Ahead | 330 | 0/0 0/0 | ||
| Line Ahead | 340 | 0/0 0/0 | ||
| Line Ahead | 350 | 0/0 0/0 | ||
| Line Ahead | 360 | 0/0 0/0 | ||
| Line Ahead | 370 | 10/19 42/84 | ||
| # | Enemy Form. |
Base EXP | Boss Battle Node | AD/AP AS/AS+ |
Ship Drops
This map currently has "limited-time" drops that don't appear in the table below, see Drop List for more info.
☒ All drops (disabled, only rare drops)
| ExpandShip drops |
|---|
| ||