- Welcome to the Kancolle Wiki!
- If you have any questions regarding site content, account registration, etc., please visit the KanColle Wiki Discord
Difference between revisions of "World 3/3-4"
< World 3
Jump to navigation
Jump to search
Jigaraphale (talk | contribs) |
Jigaraphale (talk | contribs) |
||
| (2 intermediate revisions by the same user not shown) | |||
| Line 1: | Line 1: | ||
{{World/Hub}} | {{World/Hub}} | ||
| − | + | =World 3-4: 北方海域全域 - Throughout the Northern Sea= | |
{{LabSortieworld | {{LabSortieworld | ||
| page = World 3/3-4 | | page = World 3/3-4 | ||
| Line 9: | Line 9: | ||
| jptext = 北方海域奥地に敵艦隊の大規模泊地を発見!我が艦隊の総力を 挙げてこれを撃滅せよ! | | jptext = 北方海域奥地に敵艦隊の大規模泊地を発見!我が艦隊の総力を 挙げてこれを撃滅せよ! | ||
| entext = A major enemy anchorage has been discovered deep in the northern sea. Sail out in an all-out attack to destroy it! | | entext = A major enemy anchorage has been discovered deep in the northern sea. Sail out in an all-out attack to destroy it! | ||
| − | | aircon = | + | | aircon = |
| − | {{ | + | {{AirConKai |
| − | + | |AS=84 | |
| − | + | |ASr=69 | |
| − | |||
| − | | AS = 84 | ||
| − | |||
| − | |||
| − | | | ||
| − | |||
| − | |||
| − | |||
| − | |||
| − | |||
| − | |||
| − | |||
| − | |||
| − | |||
| − | |||
}} | }} | ||
}} | }} | ||
| Line 103: | Line 88: | ||
===Tips=== | ===Tips=== | ||
| − | *This map | + | *This map requires to use specific compositions to prevent being thrown into dead ends or having too long routes. |
| − | *Node {{MapRoute|D|violet}} is a regular maelstrom node, and {{MapRoute|F|violet}} is a '''strong maelstrom''' node with a 25% chance to wipe all of | + | *Node {{MapRoute|D|violet}} is a regular maelstrom node, and {{MapRoute|F|violet}} is a '''strong maelstrom''' node with a 25% chance to wipe all of the remaining fuel for fleets with less than 2 radar-equipped ships. It is therefore recommended to bring at least 2 radars for routes going through {{MapRoute|F|violet}}. |
===Recommended Fleets=== | ===Recommended Fleets=== | ||
| − | + | {{FleetGuide | |
| − | | | + | | Map = North-Middle Route |
| − | + | | Fleet = '''2 CV(B), 2 CVL, 1 CL, 1 AV | |
| − | + | | Route = {{MapRoute|A|red|C|red|E|green|G|red|J|blue|P|red}} | |
| − | + | | AS = 84 | |
| + | | Note = Standard fleet for this map. Most battles should be straightforward to the boss. There is also a bauxite node on the way. | ||
| + | | Quest = | ||
| + | }} | ||
| − | | | + | {{FleetGuide |
| − | + | | Map = North Fast+ Route | |
| − | + | | Fleet = '''2 CV(B), 1 CVL, 1 CL, 2 DD | |
| − | + | | Speed = Fast+ | |
| − | + | | Route = {{MapRoute|A|red|C|red|F|violet|J|blue|P|red}} | |
| + | | AS = 84 | ||
| + | | Note = Only 2 battles before the boss, but requires {{EquipmentLink|Improved Kanhon Type Turbine|Enhanced Kanhon Type Boiler|New Model High Temperature High Pressure Boiler|text=Speed modifiers}} to form a Fast+ fleet. | ||
| + | Recommended to bring radars to reduce the loss at the maelstrom node {{MapRoute|F|violet}}. | ||
| + | | Quest = | ||
| + | }} | ||
| − | | | + | {{FleetGuide |
| − | + | | Map = Middle Route | |
| − | + | | Fleet = '''1 (F)BB(V)/CV(B), 4 CA(V)/CL(T), 1 CL | |
| − | + | | LOS = | |
| − | + | | Speed = | |
| + | | Route = {{MapRoute|B|red|H|red|G|red|J|blue|P|red}} | ||
| + | | AS = 84 | ||
| + | | Note = Uses BBV/CV and CAV to get some airstrike and fighter power. | ||
| + | CLT and [[Opening Torpedo Salvo]] capable CAV/CL can enable powerful opening attacks. | ||
| + | | Quest = | ||
| + | }} | ||
| − | | | + | {{FleetGuide |
| − | + | | Map = South Route | |
| − | + | | Fleet = '''1 CAV, 2 CL, 3 DD | |
| − | + | | Route = {{MapRoute|D|violet|H|red|L|blue|J|blue|P|red}} | |
| − | + | | AS = 84 | |
| + | | Note = Gives the shortest path to the boss node, only facing one battle and a maelstrom node. | ||
| + | However, such a light fleet might have some issues passing the only preboss node and winning the boss fight. | ||
| + | | Quest = | ||
| + | }} | ||
===Resource Nodes=== | ===Resource Nodes=== | ||
Latest revision as of 08:37, 9 March 2025
World 3-4: 北方海域全域 - Throughout the Northern Sea
| Strategy Name | 北方海域艦隊決戦 Northern Sea Fleet Decisive Battle |
|---|---|
| Difficulty | ☆ ☆ ☆ ☆ ☆ ☆ ☆ ☆ ☆ |
| Item | |
| Strategy Content | 北方海域奥地に敵艦隊の大規模泊地を発見!我が艦隊の総力を 挙げてこれを撃滅せよ! A major enemy anchorage has been discovered deep in the northern sea. Sail out in an all-out attack to destroy it! |
| Boss Air Control | |||
|---|---|---|---|
| AD | AP | AS | AS+ |
| 25 | 38 | 84 | 168 |
| Boss Route Air Control | |||
| AD | AP | AS | AS+ |
| 21 | 31 | 69 | 138 |
| 3-4 Unlocking & Progression | ||||
|---|---|---|---|---|
| Unlock conditions | 3-4 is unlocked after clearing 3-3 | |||
| Clear conditions | To clear the map: the boss's flagship must be sunk once | |||
Stage Guide
| 3-4 Branching Rules |
|---|
Tips
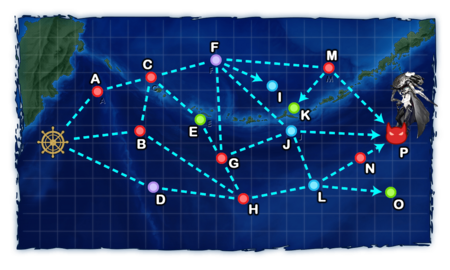
- This map requires to use specific compositions to prevent being thrown into dead ends or having too long routes.
- Node D is a regular maelstrom node, and F is a strong maelstrom node with a 25% chance to wipe all of the remaining fuel for fleets with less than 2 radar-equipped ships. It is therefore recommended to bring at least 2 radars for routes going through F.
Recommended Fleets
| ExpandNorth-Middle Route |
|---|
| ExpandNorth Fast+ Route |
|---|
| ExpandMiddle Route |
|---|
| ExpandSouth Route |
|---|
Resource Nodes
E is a "Normal Resource Node" rewarding bauxite ![]() .
.
K O are "Special Resource Nodes" rewarding respectively large furniture box ![]() , and medium furniture box
, and medium furniture box ![]() .
.
- See here for more details.
Enemy CompositionsCollapse

3-4 A: 敵北方艦隊 哨戒部隊 (PoiDB)
| # | Enemy Form. |
Base EXP | Normal Battle Node | AD/AP AS/AS+ |
|---|---|---|---|---|
| A | Line Ahead Echelon |
160 | 0/0 0/0 | |
| Line Ahead Echelon |
180 | 0/0 0/0 | ||
| Line Ahead Echelon |
190 | 0/0 0/0 | ||
| # | Enemy Form. |
Base EXP | Normal Battle Node | AD/AP AS/AS+ |
3-4 B: 敵北方艦隊 哨戒部隊 (PoiDB)
| # | Enemy Form. |
Base EXP | Normal Battle Node | AD/AP AS/AS+ |
|---|---|---|---|---|
| B | Line Ahead Echelon |
160 | 0/0 0/0 | |
| Line Ahead Echelon |
180 | 0/0 0/0 | ||
| Line Ahead Echelon |
190 | 0/0 0/0 | ||
| # | Enemy Form. |
Base EXP | Normal Battle Node | AD/AP AS/AS+ |
3-4 C: 敵北方艦隊 前衛部隊 (PoiDB)
| # | Enemy Form. |
Base EXP | Normal Battle Node | AD/AP AS/AS+ |
|---|---|---|---|---|
| C | Line Ahead Double Line |
180 | 9/17 36/72 | |
| Line Ahead Double Line |
200 | 9/17 36/72 | ||
| Line Ahead Double Line |
220 | 8/16 35/69 | ||
| # | Enemy Form. |
Base EXP | Normal Battle Node | AD/AP AS/AS+ |
3-4 D
| # | Maelstrom Node | ||
|---|---|---|---|
| D | Lost Normal | ||
| # | Maelstrom Node | ||
3-4 E
| # | Resource Node | ||
|---|---|---|---|
| E | Gained 25~150 | ||
| # | Resource Node | ||
3-4 F
| # | Maelstrom Node | ||
|---|---|---|---|
| F | Lost Strong | ||
| # | Maelstrom Node | ||
3-4 G: 敵北方艦隊 機動部隊 (PoiDB)
| # | Enemy Form. |
Base EXP | Normal Battle Node | AD/AP AS/AS+ |
|---|---|---|---|---|
| G | Line Ahead Double Line Diamond |
300 | 10/19 42/84 | |
| Line Ahead Double Line Diamond |
320 | 10/19 42/84 | ||
| # | Enemy Form. |
Base EXP | Normal Battle Node | AD/AP AS/AS+ |
3-4 H: 敵北方艦隊 重水雷戦隊 (PoiDB)
| # | Enemy Form. |
Base EXP | Normal Battle Node | AD/AP AS/AS+ |
|---|---|---|---|---|
| H | Line Ahead | 200 | 0/0 0/0 | |
| Line Ahead | 210 | 0/0 0/0 | ||
| Line Ahead Double Line |
220 | 0/0 0/0 | ||
| Line Ahead Double Line |
230 | 0/0 0/0 | ||
| # | Enemy Form. |
Base EXP | Normal Battle Node | AD/AP AS/AS+ |
3-4 I
| # | Empty Node | ||
|---|---|---|---|
| I | 気のせいだった。/敵影を見ず。/穏やかな海です。/穏やかな海峡です。/警戒が必要です。/静かな海です。 Must be my imagination./No enemy spotted./Calm seas./Calm straits./Be alert./Peaceful seas. | ||
| # | Empty Node | ||
3-4 J
| # | Empty Node | ||
|---|---|---|---|
| J | 気のせいだった。/敵影を見ず。/穏やかな海です。/穏やかな海峡です。/警戒が必要です。/静かな海です。 Must be my imagination./No enemy spotted./Calm seas./Calm straits./Be alert./Peaceful seas. | ||
| # | Empty Node | ||
3-4 K
| # | Resource Node | ||
|---|---|---|---|
| K | Gained 1 | ||
| # | Resource Node | ||
3-4 L
| # | Empty Node | ||
|---|---|---|---|
| L | 気のせいだった。/敵影を見ず。/穏やかな海です。/穏やかな海峡です。/警戒が必要です。/静かな海です。 Must be my imagination./No enemy spotted./Calm seas./Calm straits./Be alert./Peaceful seas. | ||
| # | Empty Node | ||
3-4 M: 敵北方艦隊 泊地防衛部隊 (PoiDB)
| # | Enemy Form. |
Base EXP | Normal Battle Node | AD/AP AS/AS+ |
|---|---|---|---|---|
| M | Line Ahead Double Line |
250 | 16/31 69/138 | |
| Line Ahead Double Line |
270 | 16/31 69/138 | ||
| Line Ahead Double Line |
280 | 16/31 69/138 | ||
| # | Enemy Form. |
Base EXP | Normal Battle Node | AD/AP AS/AS+ |
3-4 N: 敵北方艦隊 泊地防衛部隊 (PoiDB)
| # | Enemy Form. |
Base EXP | Normal Battle Node | AD/AP AS/AS+ |
|---|---|---|---|---|
| N | Line Ahead Double Line |
250 | 16/31 69/138 | |
| Line Ahead Double Line |
270 | 16/31 69/138 | ||
| Line Ahead Double Line |
280 | 16/31 69/138 | ||
| # | Enemy Form. |
Base EXP | Normal Battle Node | AD/AP AS/AS+ |
3-4 O
| # | Resource Node | ||
|---|---|---|---|
| O | Gained 1 | ||
| # | Resource Node | ||
3-4 P: 深海棲艦 北方艦隊中枢 (PoiDB)
| # | Enemy Form. |
Base EXP | Boss Battle Node | AD/AP AS/AS+ |
|---|---|---|---|---|
| P | Line Ahead | 420 | 10/19 42/84 | |
| Line Ahead | 420 | 10/19 42/84 | ||
| Line Ahead | 400 | 19/38 84/168 | ||
| Line Ahead | 410 | 19/38 84/168 | ||
| Line Ahead | 420 | 19/38 84/168 | ||
| # | Enemy Form. |
Base EXP | Boss Battle Node | AD/AP AS/AS+ |
Ship Drops
This map previously had "limited-time" drops, see Drop List for more info.
- The below table contains limited-time drop data and is not up to date.
☒ All drops (disabled, only rare drops)
| ExpandShip drops |
|---|
| ||