- Welcome to the Kancolle Wiki!
- If you have any questions regarding site content, account registration, etc., please visit the KanColle Wiki Discord
Difference between revisions of "Winter 2015 Event"
Jump to navigation
Jump to search
>Alexanderex (→E-4) |
m (events portal add) |
||
| (27 intermediate revisions by 17 users not shown) | |||
| Line 2: | Line 2: | ||
==Introduction== | ==Introduction== | ||
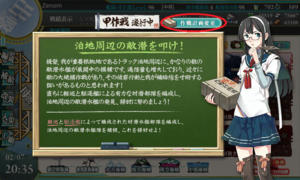
| − | The Winter 2015 Event, 【Counter-attack! Assault on Truk Anchorage】 | + | The Winter 2015 Event, 【Counter-attack! Assault on Truk Anchorage】 began on February 6th, ending two weeks later on February 23rd. (11AM JST) |
| − | It is based around Operation Hailstone | + | It is based around Operation Hailstone. |
==Patch Notes== | ==Patch Notes== | ||
| Line 47: | Line 47: | ||
# There is no ship locking for this event. | # There is no ship locking for this event. | ||
# The boss HP gauges does not regenerate over time in any map in any difficulty. | # The boss HP gauges does not regenerate over time in any map in any difficulty. | ||
| − | # [ | + | # [[Expeditions#Support_Expeditions|Support expeditions]] are available. Expedition 141 Focuses on Support for Normal Nodes, Whereas Expedition 142 Focuses Support on Boss Nodes. The Expeditions DO REQUIRE that you have 2 DDs in your fleet. Do take note that their expeditions will end early after you finish one sortie, so try to make the most use out of them. |
==Event Maps== | ==Event Maps== | ||
| Line 75: | Line 75: | ||
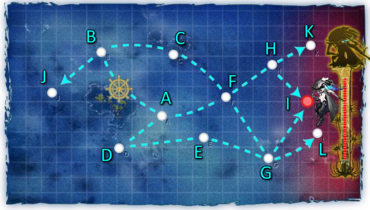
*LOS check from G to I | *LOS check from G to I | ||
*LOS check from H to I (Apparently requires more LOS than G to I) | *LOS check from H to I (Apparently requires more LOS than G to I) | ||
| − | *<s>LOS must be 120 or higher to avoid going from H to J (On easy difficulties, still need more data)</s> LOS is affected by HQ level. This number is useless without a HQ level as a | + | *<s>LOS must be 120 or higher to avoid going from H to J (On easy difficulties, still need more data)</s> |
| + | *<s>LOS requirement is 90 and above. Lower than that will send you to Node J if you're from Node H and Node K if you're from Node G (Tested and confirmed on Easy and Medium Difficulty)</s>.LOS is affected by HQ level. This number is useless without a HQ level as a reference. | ||
*Recommended [[Line of Sight|ELOS]] (new formula) of 50 or more. (Needs confirmation, seems much too high) | *Recommended [[Line of Sight|ELOS]] (new formula) of 50 or more. (Needs confirmation, seems much too high) | ||
|tips = | |tips = | ||
| Line 102: | Line 103: | ||
*Boss: (Node '''I''') [[Standard Carrier Wo-Class|Standard Carrier Wo-Class Flagship II]] (甲)<br/>Final Form: (Node '''I''') [[Standard Carrier Wo-Class|Standard Carrier Wo-Class Kai Flagship]] (甲) | *Boss: (Node '''I''') [[Standard Carrier Wo-Class|Standard Carrier Wo-Class Flagship II]] (甲)<br/>Final Form: (Node '''I''') [[Standard Carrier Wo-Class|Standard Carrier Wo-Class Kai Flagship]] (甲) | ||
*Reward upon clear: | *Reward upon clear: | ||
| − | **Clearing on Hard (甲): Irako , 3 Improvement Materials, 1 [[Ryuusei (601 Air Group)]], 1 [[ | + | **Clearing on Hard (甲): Irako , 3 Improvement Materials, 1 [[Ryuusei (601 Air Group)]], 1 [[Prototype 51cm Twin Cannon]] |
**Clearing on Medium (乙): Irako, 1 [[Repair Team]], 1 [[Ryuusei (601 Air Group)]] | **Clearing on Medium (乙): Irako, 1 [[Repair Team]], 1 [[Ryuusei (601 Air Group)]] | ||
**Clearing on Easy (丙): Irako, 1 [[Repair Team]], 1 [[Tenzan (601 Air Group)]] | **Clearing on Easy (丙): Irako, 1 [[Repair Team]], 1 [[Tenzan (601 Air Group)]] | ||
| Line 140: | Line 141: | ||
|dropsA = [[Akebono]], [[Hatsuharu]], [[Hibiki]], [[Inazuma]], [[Miyuki]], [[Murakumo]], [[Nenohi]], [[Shigure]], [[Shirayuki]], [[Shiratsuyu]], [[Ushio]], [[Yuudachi]] | |dropsA = [[Akebono]], [[Hatsuharu]], [[Hibiki]], [[Inazuma]], [[Miyuki]], [[Murakumo]], [[Nenohi]], [[Shigure]], [[Shirayuki]], [[Shiratsuyu]], [[Ushio]], [[Yuudachi]] | ||
|dropsB = -- Maelstrom node -- | |dropsB = -- Maelstrom node -- | ||
| − | |dropsC = [[Hatsuharu]], [[Mochizuki]], [[Murakumo]] | + | |dropsC = [[Hatsuharu]], [[Mochizuki]], [[Murakumo]], [[Shigure]] |
|dropsD = -- No battle node -- | |dropsD = -- No battle node -- | ||
| − | |dropsE = [[Murakumo]] | + | |dropsE = [[Murakumo]], [[Mochizuki]] |
|dropsF = [[Agano]], [[Akatsuki]], [[Akebono]], [[Fubuki]], [[Fumizuki]], [[Noshiro]], [[Ushio]], [[Uzuki]], [[Yayoi]], [[Hamakaze]], [[Hibiki]], [[Inazuma]], [[Isonami]], [[Murakumo]], [[Murasame]], [[Naka]], [[Nagatsuki]] '''<span style="color:#f00 !important;">[[Ooyodo|'''<span style="color:red">Ooyodo</span>''']]</span>''', [[Shiratsuyu]], [[Shirayuki]], [[Shikinami]], [[Shigure]] | |dropsF = [[Agano]], [[Akatsuki]], [[Akebono]], [[Fubuki]], [[Fumizuki]], [[Noshiro]], [[Ushio]], [[Uzuki]], [[Yayoi]], [[Hamakaze]], [[Hibiki]], [[Inazuma]], [[Isonami]], [[Murakumo]], [[Murasame]], [[Naka]], [[Nagatsuki]] '''<span style="color:#f00 !important;">[[Ooyodo|'''<span style="color:red">Ooyodo</span>''']]</span>''', [[Shiratsuyu]], [[Shirayuki]], [[Shikinami]], [[Shigure]] | ||
|dropsH = [[Agano]], '''<span style="color:#f00 !important;">[[Amatsukaze|'''<span style="color:red">Amatsukaze</span>''']]</span>''', [[Fumizuki]], [[Hamakaze]], [[Ikazuchi]], [[Mikazuki]],[[Miyuki]], [[Murakumo]], [[Nagatsuki]], [[Naka]], [[Noshiro]], '''<span style="color:#f00 !important;">[[Ooyodo|'''<span style="color:red">Ooyodo</span>''']]</span>''', [[Sendai]], [[Shiratsuyu]], [[Ushio]], [[Uzuki]], [[Wakaba]], [[Yayoi]] | |dropsH = [[Agano]], '''<span style="color:#f00 !important;">[[Amatsukaze|'''<span style="color:red">Amatsukaze</span>''']]</span>''', [[Fumizuki]], [[Hamakaze]], [[Ikazuchi]], [[Mikazuki]],[[Miyuki]], [[Murakumo]], [[Nagatsuki]], [[Naka]], [[Noshiro]], '''<span style="color:#f00 !important;">[[Ooyodo|'''<span style="color:red">Ooyodo</span>''']]</span>''', [[Sendai]], [[Shiratsuyu]], [[Ushio]], [[Uzuki]], [[Wakaba]], [[Yayoi]] | ||
| − | |dropsI = [[Agano]], [[Akigumo]], '''<span style="color:#f00 !important;">[[Amatsukaze|'''<span style="color:red">Amatsukaze</span>''']]</span>''', '''<span style="color:#f00 !important;">[[Asagumo|'''<span style="color:red">Asagumo</span>''']]</span>''', '''<span style="color:#f00 !important;">[[Asashimo|'''<span style="color:red">Asashimo</span>''']]</span>''', [[Atago]], [[Chikuma]], [[Fusou]], [[Hamakaze]], [[Haruna]], [[Hatsukaze]], [[Hiei]], [[Hiyou]], [[Houshou]], [[Hyuuga]], [[Ise]], [[Isuzu]], [[Kirishima]], [[Kitakami]], [[Kiyoshimo]], [[Kongou]], [[Kuma]], [[Maya]], [[Maikaze]], [[Mogami]], [[Naganami]], [[Nagara]], [[Naka]], [[Noshiro]], '''<span style="color:#f00 !important;">[[Ooyodo|'''<span style="color:red">Ooyodo</span>''']]</span>''', [[Sendai]], [[Takao]], [[Tanikaze]], [[Tone]], [[Uzuki]], [[Yamashiro]], [[Yayoi]]|dropsG = [[Agano]], '''<span style="color:#f00 !important;">[[Amatsukaze|'''<span style="color:red">Amatsukaze</span>''']]</span>''', [[Hamakaze]], [[Nagatsuki]], [[Nenohi]], [[Noshiro]], '''<span style="color:#f00 !important;">[[Ooyodo|'''<span style="color:red">Ooyodo</span>''']]</span>''', [[Murakumo]], [[Yayoi]]|dropsK = -- no enemy encounter --}} | + | |dropsI = [[Agano]], [[Akigumo]], '''<span style="color:#f00 !important;">[[Amatsukaze|'''<span style="color:red">Amatsukaze</span>''']]</span>''', '''<span style="color:#f00 !important;">[[Asagumo|'''<span style="color:red">Asagumo</span>''']]</span>''', '''<span style="color:#f00 !important;">[[Asashimo|'''<span style="color:red">Asashimo</span>''']]</span>''', [[Atago]], [[Chikuma]], [[Fusou]], [[Hamakaze]], [[Haruna]], [[Hatsukaze]], [[Hiei]], [[Hiyou]], [[Houshou]], [[Hyuuga]], [[Ise]], [[Isuzu]], [[Kirishima]], [[Kitakami]], [[Kiyoshimo]], [[Kongou]], [[Kuma]], [[Maya]], [[Maikaze]], [[Mogami]], [[Naganami]], [[Nagara]], [[Naka]], [[Noshiro]], '''<span style="color:#f00 !important;">[[Ooyodo|'''<span style="color:red">Ooyodo</span>''']]</span>''', [[Sendai]], [[Takao]], [[Tanikaze]], [[Tone]], [[Uzuki]], [[Yamashiro]], [[Yayoi]]|dropsG = [[Agano]], '''<span style="color:#f00 !important;">[[Amatsukaze|'''<span style="color:red">Amatsukaze</span>''']]</span>''', [[Hamakaze]], [[Nagatsuki]], [[Nenohi]], [[Noshiro]], '''<span style="color:#f00 !important;">[[Ooyodo|'''<span style="color:red">Ooyodo</span>''']]</span>''', [[Murakumo]], [[Yayoi]], [[Uzuki]]|dropsK = -- no enemy encounter --}} |
===E-3=== | ===E-3=== | ||
| Line 184: | Line 185: | ||
|dropsA = No battle node | |dropsA = No battle node | ||
|dropsB = [[Fubuki]], [[Inazuma]], [[Kisaragi]] | |dropsB = [[Fubuki]], [[Inazuma]], [[Kisaragi]] | ||
| − | |dropsC = [[Akatsuki]], [[Fumizuki]], [[Hatsuyuki]], [[Hibiki]],[[Isonami]], [[Inazuma]], [[Kikuzuki]], [[Kisaragi]],[[Murakumo]], [[Mutsuki]], [[Sendai]] | + | |dropsC = [[Akatsuki]], [[Fumizuki]], [[Hatsuyuki]], [[Hibiki]], [[Isonami]], [[Inazuma]], [[Kikuzuki]], [[Kisaragi]], [[Murakumo]], [[Mutsuki]], [[Sendai]] |
|dropsD = ? | |dropsD = ? | ||
|dropsE = Maelstrom node | |dropsE = Maelstrom node | ||
| − | |dropsF = [[Ikazuchi]], [[Murakumo]], [[Mutsuki]], [[Nagatsuki]],[[Naka]], [[Suzuya]]|dropsG = [[Kisaragi]]|dropsH = [[Agano]], [[Akebono]], [[Fubuki]], [[Fumizuki]], [[Fusou]], '''<span style="color:#f00 !important;">[[Harusame|'''<span style="color:red">Harusame</span>''']]</span>''',[[Hiryuu]], [[Isonami]], [[Kisaragi]], '''<span style="color:#f00 !important;">[[Maikaze|'''<span style="color:red">Maikaze</span>''']]</span>''', [[Maruyu]], [[Miyuki]], [[Mochizuki]], [[Murakumo]], [[Mutsu]], [[Mutsuki]], [[Nagato]], [[Nagatsuki]], [[Oboro]], [[Satsuki]], [[Sendai]], [[Shirayuki]], [[Souryuu]], [[Suzuya]],'''<span style="color:#f00 !important;">[[Tanikaze|'''<span style="color:red">Tanikaze</span>''']]</span>''', [[Yamashiro]]|dropsI = [[Fubuki]], [[Ikazuchi]], [[Isonami]], [[Nagato]], [[Suzuya]]|dropsJ = ?|dropsK = [[Agano]], [[Akitsumaru]], '''<span style="color:#f00 !important;">[[Asagumo|'''<span style="color:red">Asagumo</span>''']]</span>''', '''<span style="color:#f00 !important;">[[Asashimo|'''<span style="color:red">Asashimo</span>''']]</span>''', [[Atago]], [[Chikuma]], [[Hamakaze]], '''<span style="color:#f00 !important;">[[Harusame|'''<span style="color:red">Harusame</span>''']]</span>''', [[Haruna]], '''<span style="color:#f00 !important;">[[Hayashimo|'''<span style="color:red">Hayashimo</span>''']]</span>''', [[Hiei]], [[Hiryuu]], [[Hyuuga]], [[I-8]], [[Ise]], [[Kirishima]], [[Kitakami]], [[Kongou]], [[Kuma]], [[Maruyu]], [[Mutsu]], [[Nagato]], [[Natori]], [[Noshiro]], [[Souryuu]], [[Takao]], '''<span style="color:#f00 !important;">[[Tokitsukaze|'''<span style="color:red">Tokitsukaze</span>''']]</span>''', [[Tone]], [[Yamashiro]], [[Yukikaze]], [[Yuubari]]}} | + | |dropsF = [[Ikazuchi]], [[Murakumo]], [[Mutsuki]], [[Nagatsuki]],[[Naka]], [[Suzuya]]|dropsG = [[Kisaragi]]|dropsH = [[Agano]], [[Akebono]], [[Fubuki]], [[Fumizuki]], [[Fusou]], '''<span style="color:#f00 !important;">[[Harusame|'''<span style="color:red">Harusame</span>''']]</span>''',[[Hiryuu]], [[Isonami]], [[Kisaragi]], '''<span style="color:#f00 !important;">[[Maikaze|'''<span style="color:red">Maikaze</span>''']]</span>''', [[Maruyu]], [[Miyuki]], [[Mochizuki]], [[Murakumo]], [[Mutsu]], [[Mutsuki]], [[Nagato]], [[Nagatsuki]], [[Oboro]], [[Satsuki]], [[Sendai]], [[Shirayuki]], [[Souryuu]], [[Suzuya]],'''<span style="color:#f00 !important;">[[Tanikaze|'''<span style="color:red">Tanikaze</span>''']]</span>''', [[Yamashiro]], [[Kumano]]|dropsI = [[Fubuki]], [[Ikazuchi]], [[Isonami]], [[Nagato]], [[Suzuya]]|dropsJ = ?|dropsK = [[Agano]], [[Akitsumaru]], '''<span style="color:#f00 !important;">[[Asagumo|'''<span style="color:red">Asagumo</span>''']]</span>''', '''<span style="color:#f00 !important;">[[Asashimo|'''<span style="color:red">Asashimo</span>''']]</span>''', [[Atago]], [[Chikuma]], [[Hamakaze]], '''<span style="color:#f00 !important;">[[Harusame|'''<span style="color:red">Harusame</span>''']]</span>''', [[Haruna]], '''<span style="color:#f00 !important;">[[Hayashimo|'''<span style="color:red">Hayashimo</span>''']]</span>''', [[Hiei]], [[Hiryuu]], [[Hyuuga]], [[I-8]], [[Ise]], [[Kirishima]], [[Kitakami]], [[Kongou]], [[Kuma]], [[Maruyu]], [[Mutsu]], [[Nagato]], [[Natori]], [[Noshiro]], [[Souryuu]], [[Takao]], '''<span style="color:#f00 !important;">[[Tokitsukaze|'''<span style="color:red">Tokitsukaze</span>''']]</span>''', [[Tone]], [[Yamashiro]], [[Yukikaze]], [[Yuubari]]}} |
===E-4=== | ===E-4=== | ||
| Line 206: | Line 207: | ||
** Clearing on Easy (丙): [[Katori]] | ** Clearing on Easy (丙): [[Katori]] | ||
|branching = | |branching = | ||
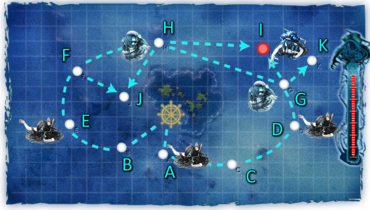
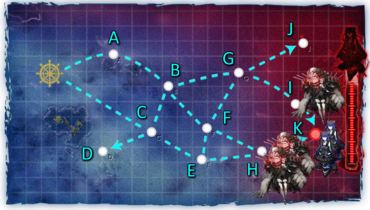
| − | *At least | + | *At least 2 DD are REQUIRED. |
| − | * | + | *Start to A/B/E: |
| − | **2 or more CLT goes to A. | + | **2 or more CLT goes to A. |
| − | ** | + | **All fast and 2+ CV(L) will go to A. |
| − | + | **All fast, 1 CV(L) and 3DD or 1CL+2DD will go to A. | |
| − | *All fast | + | **CL, 4DD and a CLT, CA(V) or DD goes directly to E (maelstrom). |
| − | *CL, 4DD and a CLT | + | **Otherwise B. |
| − | * | + | *B to D/F: |
| − | + | **All fast and no CV, CVL or CLT will go to D. | |
**[[Naka]] or [[Agano]] will guarantee B to D. [[Maikaze]] and [[Nowaki]] together also guarantees B to D. | **[[Naka]] or [[Agano]] will guarantee B to D. [[Maikaze]] and [[Nowaki]] together also guarantees B to D. | ||
| − | ** | + | ***Unless no CLT, no CV, no CVL and no slow speed. |
| − | ** 2 | + | **Otherwise F. |
| − | * | + | *H to J/I: |
| + | **2 CV(L) goes to J. | ||
| + | **2 BBV goes to J? | ||
| + | **Otherwise I. | ||
| + | *LOS checks at I and J. | ||
|tips = | |tips = | ||
*E node Maelstrom, B node no battle, G is an easy transport node, and I node Night Battle. | *E node Maelstrom, B node no battle, G is an easy transport node, and I node Night Battle. | ||
| − | * | + | *The boss has a lot of fighters and good bombers, so using large capacity CVs like Taihou or Kaga is recommended. |
| − | *47 ELOS | + | *Hard: 47 ELOS confirmed to reach boss. |
| − | + | *The boss node flagship [[Aircraft Carrier Princess]] has 150 armor and 350 endurance, thus it is unlikely she will be damaged heavily without artillery spotting, strong night battle setups, or critical hits. | |
| − | + | *High luck stat DD (''e.g.'' [[Yukikaze]], [[Shigure]], [[Ayanami]]) are very useful for cut-in attack during night battle. | |
| − | + | *Destroyers equipped for AA cut-in and double attack are good when placed towards the top of the formation. | |
| − | |||
| − | |||
| − | |||
| − | |||
| − | |||
| − | *High luck stat DD ( | ||
*Especially for Hard difficulty, boss node support expedition is strongly recommended. | *Especially for Hard difficulty, boss node support expedition is strongly recommended. | ||
| − | * The boss BGM is [海色] the Opening theme of the anime, | + | *Fighter Air Power |
| + | **Hard: 228 for superiority at boss & about 102 for parity. | ||
| + | **Medium: 231 for superiority at boss & about 103 for parity. | ||
| + | **Easy: 183 for superiority at boss & about 82 for parity. | ||
| + | **Keep in mind there are air battles along any route which will reduce fighters from their initial counts, especially for single CV fleets. | ||
| + | **At least air parity is recommended to prevent enemy artillery spotting and reduce opening airstrike damage. | ||
| + | Recommended Formations: | ||
| + | *Middle routes | ||
| + | **2BB 2DD 2CV (include a slow battleship). BFHJK route. | ||
| + | **2BB 2DD CV CLT (include a slow battleship). BFHIK route. | ||
| + | *South route (AA cut-ins and boss support recommended) | ||
| + | **2DD BB(slow) CLT CV Agano or Naka | ||
| + | **Maikaze Nowaki BB(slow) BB CLT CV | ||
| + | **4CA(V) 2DD | ||
| + | **2FBB 2CA(V) 2DD | ||
| + | *Northern routes are not recommended. | ||
| + | |||
| + | * The boss BGM is [海色] the Opening theme of the anime. However, it starts from a different stanza than the one used in E-3. | ||
|dropsA = [[Michishio]], [[Shiratsuyu]], [[Tatsuta]], [[Yuudachi]] | |dropsA = [[Michishio]], [[Shiratsuyu]], [[Tatsuta]], [[Yuudachi]] | ||
|dropsB = No battle node | |dropsB = No battle node | ||
| Line 305: | Line 321: | ||
|dropsH = [[Agano]], [[Akebono]], '''[[Asashimo|<span style="color:#f00">Asashimo</span>]]''', [[Hatsukaze]], [[Hatsuyuki]], [[Kisaragi]], '''[[Maruyu|<span style="color:#f00">Maruyu</span>]]''', [[Mikuma]], [[Mochizuki]], [[Mutsuki]], [[Naka]], [[Tanikaze]] | |dropsH = [[Agano]], [[Akebono]], '''[[Asashimo|<span style="color:#f00">Asashimo</span>]]''', [[Hatsukaze]], [[Hatsuyuki]], [[Kisaragi]], '''[[Maruyu|<span style="color:#f00">Maruyu</span>]]''', [[Mikuma]], [[Mochizuki]], [[Mutsuki]], [[Naka]], [[Tanikaze]] | ||
|dropsI = ? | |dropsI = ? | ||
| − | |dropsJ = [[Abukuma]], [[Agano]], [[Akagi]], [[Atago]], [[Fusou]], [[Hamakaze]], [[Hiei]], [[Hiyou]], [[Ise]], '''[[Isokaze|<span style="color:#f00">Isokaze</span>]]''', [[Junyou]], [[Kaga]], [[Kinugasa]], [[Kitakami]], [[Kiyoshimo]],[[Kumano]], [[Maikaze]], '''[[Maruyu|<span style="color:#f00">Maruyu</span>]]''', [[Mikazuki]], [[Mogami]], [[Mutsu]], [[Nagato]], [[Ryuujou]], [[Suzuya]], [[Takao]], [[Tanikaze]], [[Urakaze]], [[Yamashiro]], [[Yukikaze]] | + | |dropsJ = [[Abukuma]], [[Agano]], [[Akagi]], [[Atago]], [[Fusou]], [[Hamakaze]], [[Hiei]], [[Hiyou]], [[Ise]], '''[[Isokaze|<span style="color:#f00">Isokaze</span>]]''', [[Junyou]], [[Kaga]], [[Kinugasa]], [[Kitakami]], [[Kiyoshimo]],[[Kumano]], [[Maikaze]], '''[[Maruyu|<span style="color:#f00">Maruyu</span>]]''', [[Mikazuki]], [[Mogami]], [[Mutsu]], [[Nagato]], [[Ryuujou]], [[Suzuya]], [[Takao]], [[Tanikaze]], [[Urakaze]], [[Yamashiro]], [[Yukikaze]], [[Hayashimo]] |
|dropsK = ? | |dropsK = ? | ||
|dropsL = ? | |dropsL = ? | ||
| Line 315: | Line 331: | ||
* [[Wikipedia:Operation_Hailstone|Wikipedia entry on Operation Hailstone]] | * [[Wikipedia:Operation_Hailstone|Wikipedia entry on Operation Hailstone]] | ||
* [http://wikiwiki.jp/kancolle/?%B7%DE%B7%E2%A1%AA%A5%C8%A5%E9%A5%C3%A5%AF%C7%F1%C3%CF%B6%AF%BD%B1 Wikiwiki link] | * [http://wikiwiki.jp/kancolle/?%B7%DE%B7%E2%A1%AA%A5%C8%A5%E9%A5%C3%A5%AF%C7%F1%C3%CF%B6%AF%BD%B1 Wikiwiki link] | ||
| − | |||
===Tools=== | ===Tools=== | ||
| Line 322: | Line 337: | ||
* [http://www.kancolle-calc.net/aircrafts.html Air Superiority Calculator] (in Japanese) | * [http://www.kancolle-calc.net/aircrafts.html Air Superiority Calculator] (in Japanese) | ||
* [http://tsoft-web.com/sub/kancolle/2-5/ Effective LoS Calculator] (in Japanese) | * [http://tsoft-web.com/sub/kancolle/2-5/ Effective LoS Calculator] (in Japanese) | ||
| − | |||
| − | |||
| − | |||
| − | |||
| − | |||
| − | |||
| − | |||
| − | |||
===Player Live Streams=== | ===Player Live Streams=== | ||
*KanColle U.S.A. Streamers | *KanColle U.S.A. Streamers | ||
| − | **Zak提督's stream: [http://www.twitch.tv/bl2w twitch.tv/bl2w] (will be playing every day from 8:00 PM - 10:00 PM EST / 10:00 AM - 12:00 PM JST) | + | **Zak提督's stream: [http://www.twitch.tv/bl2w twitch.tv/bl2w] (will be playing every day from 8:00 PM - 10:00 PM EST / 10:00 AM - 12:00 PM JST) (Cleared E5 2/20/2015) |
** Ok1n´s stream : http://www.twitch.tv/ok1n | ** Ok1n´s stream : http://www.twitch.tv/ok1n | ||
** <s>Yamato_kai2000's stream: http://www.twitch.tv/yamato_kai2000 (schedule 7:30 PM - 9:20PM PST (Mondays, Wednesdays, Fridays, and Saturdays) / 12:30 PM - 2:20 PM JST Tuesdays, Thursdays, Saturdays, and Sundays)</s> (finished standard operations E1-3; 4-5 cancelled due to insufficient open slots) | ** <s>Yamato_kai2000's stream: http://www.twitch.tv/yamato_kai2000 (schedule 7:30 PM - 9:20PM PST (Mondays, Wednesdays, Fridays, and Saturdays) / 12:30 PM - 2:20 PM JST Tuesdays, Thursdays, Saturdays, and Sundays)</s> (finished standard operations E1-3; 4-5 cancelled due to insufficient open slots) | ||
| − | **Totaku's stream: [http://www.livestream.com/totaku Totaku's Livestream] (will be playing on weekends from 1:30 AM - 6:00 AM CST / 4:30 PM - 9:00 PM JST) | + | **Totaku's stream: [http://www.livestream.com/totaku Totaku's Livestream] (will be playing on weekends from 1:30 AM - 6:00 AM CST / 4:30 PM - 9:00 PM JST) (Event Cleared) |
| − | **DS4's stream 1: [http://www.twitch.tv/deltasierra4 twitch.tv/deltasierra4] (will be playing on weekends from 9:00 PM - 3:00 AM CST / 12:00 PM - 6:00 PM JST. More stream announcements will be made on the wiki chat) | + | **<s>DS4's stream 1: [http://www.twitch.tv/deltasierra4 twitch.tv/deltasierra4] (will be playing on weekends from 9:00 PM - 3:00 AM CST / 12:00 PM - 6:00 PM JST. More stream announcements will be made on the wiki chat)</s> (E6 clear! See y'all at the next event!) |
| − | **DS4's stream 2: [http://www.livestream.com/deltasierra DS4 on Livestream] | + | **<s>DS4's stream 2: [http://www.livestream.com/deltasierra DS4 on Livestream]</s> |
**Remi_Scarlet's stream: [http://www.twitch.tv/remi_scarlet twitch.tv/remi_scarlet] | **Remi_Scarlet's stream: [http://www.twitch.tv/remi_scarlet twitch.tv/remi_scarlet] | ||
**NikaidoAkiBro's stream: [http://www.twitch.tv/nikaidorumibro twitch.tv/nikaidorumibro] | **NikaidoAkiBro's stream: [http://www.twitch.tv/nikaidorumibro twitch.tv/nikaidorumibro] | ||
| Line 357: | Line 364: | ||
** <del>[http://www.twitch.tv/jetrico dragonjet's Twitch]</del> | ** <del>[http://www.twitch.tv/jetrico dragonjet's Twitch]</del> | ||
** [http://www.twitch.tv/elinasama Lolibunny's twitch] (GMT +8 2100- 0100) (Snowballing on feb 13) | ** [http://www.twitch.tv/elinasama Lolibunny's twitch] (GMT +8 2100- 0100) (Snowballing on feb 13) | ||
| − | ** [http://www.twitch.tv/bason8 TempestaMkII's Twitch] (Watch me fail horribly at this event) (GMT+8 2100 - 0000(On weekdays and weekends) / 1000 - 1200 (On weekends)) | + | ** [http://www.twitch.tv/bason8 <s>TempestaMkII's Twitch</s>]<s> (Watch me fail horribly at this event) (GMT+8 2100 - 0000(On weekdays and weekends) / 1000 - 1200 (On weekends))</s> |
* Kancolle E.A. Streamers | * Kancolle E.A. Streamers | ||
** pcp8p67's Stream: http://www.twitch.tv/pcp8p67 (W.G. Forum mainstream, Korean base.) | ** pcp8p67's Stream: http://www.twitch.tv/pcp8p67 (W.G. Forum mainstream, Korean base.) | ||
** Xiei's stream: http://twitch.tv/xiei (Live from Japan in English, Event Finished) | ** Xiei's stream: http://twitch.tv/xiei (Live from Japan in English, Event Finished) | ||
| + | {{EventsPortal}} | ||
[[Category:Events]] | [[Category:Events]] | ||
Latest revision as of 03:07, 6 August 2015
Introduction
The Winter 2015 Event, 【Counter-attack! Assault on Truk Anchorage】 began on February 6th, ending two weeks later on February 23rd. (11AM JST)
It is based around Operation Hailstone.
Patch Notes
See Recent Updates for more info.
- New Ships
- New Enemy Vessels
- Light Cruiser Demon (軽巡棲鬼)
- Battleship Water Demon (戦艦水鬼)
- New Equipment
- Prototype 51cm Twin Cannon (E-2 Hard only clear reward)
- WG42 (Wurfgerät 42) (E-3 Hard and Medium only clear reward and U-511 stock equipment)
- Prototype FaT Type 95 Oxygen Torpedo Kai (Ro-500 (aka U-511 Kai Ni) stock equipment)
- Voice and other Updates
Mechanics
Participation requirements
- Must have a 75% sortie win ratio
- Must have 5 empty ship slots for new ships
- Must have 20 free equipment slots
Special Mechanics
- Combined Fleet (E-3 and E-5)
- Line of Sight requirements on all maps.
- Selectable and changeable difficulty
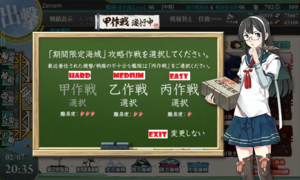
- This event has 3 ranks: easy (丙), medium (乙), hard (甲).
- HQ Level 35 unlocks medium, HQ Level 80 unlocks hard.
- You can choose the difficulty in each map separately.
- Different difficulties give different medals, equipment and materials when clearing the maps.
- Ships rewards (U-511, Katori and Amagi) will appear regardless of the difficulty.
- Difficulties probably affect drop rates, but most drops are possible on any difficulty.
- When the difficulty is changed, the boss's health bar will be reset.
- Once the map is cleared (boss HP bar is depleted and killed), you CANNOT go back and change the difficulty.
- The First Class Medal symbol (the one that appears beside your name in your Admiral page) is given, along with the medal item (the one in your inventory) the moment you clear E-5 on hard, regardless of the difficulties chosen for previous maps.
- This event has 3 ranks: easy (丙), medium (乙), hard (甲).
- There is no ship locking for this event.
- The boss HP gauges does not regenerate over time in any map in any difficulty.
- Support expeditions are available. Expedition 141 Focuses on Support for Normal Nodes, Whereas Expedition 142 Focuses Support on Boss Nodes. The Expeditions DO REQUIRE that you have 2 DDs in your fleet. Do take note that their expeditions will end early after you finish one sortie, so try to make the most use out of them.
Event Maps
E-1
Information
|
|||
|
Branching rules
| |||
|
Tips
| |||
E-2
Information
|
|||
|
Branching rules
| |||
|
Tips
| |||
E-3
Information
|
|||
|
Branching rules
| |||
|
Tips
| |||
E-4
Information
|
|||
|
Branching rules
| |||
|
Tips
Recommended Formations:
| |||
E-5
Information
|
|||
|
Branching rules
| |||
|
Tips
| |||
See Also
References
Tools
- Air Superiority Calculator by Ofi123 (Not 100% translated.)
- KanColle Calculator and tools by no1244 (in Japanese)
- Air Superiority Calculator (in Japanese)
- Effective LoS Calculator (in Japanese)
Player Live Streams
- KanColle U.S.A. Streamers
- Zak提督's stream: twitch.tv/bl2w (will be playing every day from 8:00 PM - 10:00 PM EST / 10:00 AM - 12:00 PM JST) (Cleared E5 2/20/2015)
- Ok1n´s stream : http://www.twitch.tv/ok1n
Yamato_kai2000's stream: http://www.twitch.tv/yamato_kai2000 (schedule 7:30 PM - 9:20PM PST (Mondays, Wednesdays, Fridays, and Saturdays) / 12:30 PM - 2:20 PM JST Tuesdays, Thursdays, Saturdays, and Sundays)(finished standard operations E1-3; 4-5 cancelled due to insufficient open slots)- Totaku's stream: Totaku's Livestream (will be playing on weekends from 1:30 AM - 6:00 AM CST / 4:30 PM - 9:00 PM JST) (Event Cleared)
DS4's stream 1: twitch.tv/deltasierra4 (will be playing on weekends from 9:00 PM - 3:00 AM CST / 12:00 PM - 6:00 PM JST. More stream announcements will be made on the wiki chat)(E6 clear! See y'all at the next event!)DS4's stream 2: DS4 on Livestream- Remi_Scarlet's stream: twitch.tv/remi_scarlet
- NikaidoAkiBro's stream: twitch.tv/nikaidorumibro
- HandgunOtonashi's stream : twitch.tv/handgunotonashi EST 1200 onwards.
- SlashZero's stream: hitbox.tv/JenXIII (main) twitch.tv/jenxiii (mirror)
- Kevadu's stream: http://www.twitch.tv/kevadu/ (will be frontlining, staying up all night to try and clear the event as quickly as possible after maintenance finishes)
- Sekronashi's stream: http://www.twitch.tv/sekronashi
- Crescentia's stream: http://www.hitbox.tv/crescentia (main) twitch.tv/crescentia (backup)
Gensui Hime's Stream: http://www.twitch.tv/gensuihime (All day Friday after 5PM, based on CST)c0mpl3x1ty & DeepDFantasy: http://twitch.tv/c0mpl3x1ty (Friday at 9:00PM EST)finishedkeemeef~'s stream http://www.twitch.tv/keemeef/ (6:00pm PST onwards; usually late hours)Blizzie's stream: twitch.tv/blizzietv (Speedrun attempt -- Sat, Feb 7 @ 1 PM PST)
- Kancolle E.U Streamers
- jeftai's stream: http://www.twitch.tv/jefferytai (will be playing randomly)
- ArcticaFrost http://www.twitch.tv/SaberFrost
- Naikon http://www.twitch.tv/naikon86
- Kancolle S.E.A. Streamers
dragonjet's Twitch- Lolibunny's twitch (GMT +8 2100- 0100) (Snowballing on feb 13)
TempestaMkII's Twitch(Watch me fail horribly at this event) (GMT+8 2100 - 0000(On weekdays and weekends) / 1000 - 1200 (On weekends))
- Kancolle E.A. Streamers
- pcp8p67's Stream: http://www.twitch.tv/pcp8p67 (W.G. Forum mainstream, Korean base.)
- Xiei's stream: http://twitch.tv/xiei (Live from Japan in English, Event Finished)
| ||||||||||||||||||||||||||||||||||||||||||||||||||||||||||

