Introduction
The Summer 2016 Event "CounterAttack! The Second Battle off Malay Peninsula!" is planned to start on August 12, 2016. As of current, information regarding the event was revealed during the 3rd Kantai Collection Naval Review Meeting set for August 7th at Yokohama PACIFICO Convention. The Event is planned to feature a mixture of surface combat, Anti-Submarine Warfare, and the usage of Land-Based Air Squadrons.
The event is noted to be a CounterAttack / Intercreption Operation that will have you battling against the Abyssal Fleet in an disadvantaged situation on a what if battle that will be loosely based upon the Sinking of Prince of Wales and Repulse based on the details that were given so far from the Naval Review and Comtiq Magazine.
Additional tweets have noted that the event will have you conducting ASW patrols with torpedo squadrons and aviation units performing transport operations for the First part of the campaign. The Second Half of the campaign will be using combined fleets and your main fleet forces for an interception/counter attack along with Land Based Air Squadrons against the main Abyssal Forces in the western part of the Ocean.
Taking this information into account, we can expect this event to use all of the major event mechanic elements it has used up to this point which include:
Information
New Ship Girls
- The Mutsuki-Class Destroyer Minazuki, who will be voiced by Hikada Rina and drawn by Kusada Souta (as mentioned and shown in the Kancolle Naval Review. The Illustration shown at the Review has her depicted as a purplish-blue, short haired girl.
- The Warspite, the second of the Queen Elizabeth Class Battleships
- The Aquila, an Italian CV
- I-26, a Japanese submarine (nickname Nimu)
Abyssals
- Kancolle Naval Review and September Comtiq Magazine reveals that a 1 Abyssal Hime Type will be getting her own "Swimsuit Mode" during event.
- Within the September Comtiq Magazine it's been hints suggested between Kensuke Tanaka and the interviewer that there are plans what might be an Abyssal version of "Fortress Singapore" which suggest an Installation Battle will be present.
New Equipment
Five new peices of equipment have been added to the game:
- The Re. 2005 Kai fighter
- The Type 3 Fighter Hien Model 1D
- The 38.1cm Mk.I Cannon
- The QF 2-pounder Octuple "Pom Pom" Naval Gun Mount
- The Ginga
Mechanics
Participation requirements
- Must have a 75% sortie win ratio.
- Must have 5 empty ship slots for new ships.
- Must have 20 free equipment slots.
Special Mechanics
- The difficulty system first used in Spring 2015 Event returns: you can choose between Operation A (甲, Hard), Operation B (乙, Medium) or Operation C (丙, Easy).
- Choosing A or B requires certain HQ Level (HQ Lv 35 for B / 80 for A in Spring 2015 Event).
Event Maps
Quick Info Table
| Classification
|
Map
|
Name
|
Combined Fleet?
|
Land-Based Air Squadron?
|
Color of Tag
|
Tag Condition & Deployment Restriction
|
Difficulty Restrictions
|
Notes
|
| Main Operation
|
E-1
|
|
No
|
No
|
BLUE
|
Tagging:
Ships not already color-tagged will be tagged with the color associated with the map when deployed. This tag exists on all difficulties and is not reset on remodel, etc.
Deployment Restriction:
Normal or Hard: Must have either the same-colored tag or no tag.
Easy: No restrictions.
|
No restrictions. All difficulties OK
|
|
| E-2
|
|
No
Transport Operation
|
Yes
|
GREEN
|
In order to play these maps on hard, you must complete the previous map* on either normal or hard.
(e.g., to do E-4 on hard, you must complete E-3 on normal or hard.)
|
| E-3
|
|
Yes
|
Yes
|
YELLOW
|
| Extra Operation
|
E-4
|
|
|
Yes
|
NA
|
E-1

| Buntan Naval Patrol
|
| ブンタン沖海戦
|
Information
- I-26 Drops from Boss-node on easy mode (source: Chronomeister)
|
|
|
Branching rules
Show/Hide Branching Rules
| Branching Rules |
|---|
| Node | Split | Condition |
|---|
| START | A | Not have 3 DD in fleet | | B | 3DD? | | B | C | FBB, < 3 DD | | D | No FBB + 3DD AND fast fleet? | | E | FBB + 4 DD or SLOW fleet? | | G | H | LOS < 15
LOS 15-25 is possible | | I | LOS ~30 guarantees
LOS 15-25 is possible |
|
|
Tips
- Need around 30 LOS to guarantee Boss routing. Reports of 24 LOS show that some routings direct the fleet to node H. Greater than 15 will allow the possibility of Boss routing.
- 1 CL 5 DD will route to BDFG.
- This should avoid going onto an extra battle.
- 1-2 CL 3DD 1CVL will easily clear LOS with a Saiun on the CVL. This also routes to BDFG, assuming a fast CVL (any except Hiyou, Jun'you, Houshou, or Ryuuhou).
- 1 FBB 1 CL 4DD will route to BEFD and face the weak surface fleet there. This allows for a second round of attacks on the boss, though at a lower fuel and ammo level.
- ASW power is affected by equipment stats only and not by aircraft quantity size, Zuihou and Shouhou are ideal ASW CVLs if you're looking to save your CVLs for later maps. (Not counting their opening airstrike)
- With a >> Seaplane on a CL, around 30 LOS can easily be achieved.
- Nodes B and F are sub nodes.
- Remember that CTs (Training Cruisers) are SLOW, and may be negatively affected by branching at B node
- Slow BB(V)s and any CVs are not allowed on this map.
- FBBs are allowed. They will route B -> E.
- Node G has transports, so it is good to clear the transport quest.
|
|
|
|
|
E-2

|
Information
Transport Points: 400 (Hard) 340 (Medium) 280 (Easy)
(Operation is complete once Transport Points have been depleted)
- This is a Transport Operation --Not a combined fleet
- Hard mode requires only 400 Transport points to clear (340 for Medium)
- There is a drum check (at least 1 drum required) and a LOS check to get to the boss.
|
|
|
Branching rules
Show/Hide Branching Rules
| Branching Rules |
|---|
| Node | Split | Condition |
|---|
| START | C | If Fleet consist of a capital ship | | F | If fleet does not have a Capital Ship | | C | A | Active Branching | | D | Active Branching | | I | J | LOS | | L | LOS (fail) | | J | K | LOS + Drum Check (No drums) (fail) | | M | LOS + Drum Check (1 Drum) |
|
|
Tips
- As with all Transport Operations, you only need to score an A rank on the boss node to be able to deplete the TP gauge, though scoring an S-rank on the boss will deplete it faster.
- Bringing plenty of Daihatsu will deplete the gauge quickly
- If you have Daihatsu-class Landing Craft (Type 89 Medium Tanks & Marines) bring them as well since they'll give out more points compared to normal daihatsu.
- In-Route Support will help you minimize the damage you'll take along the way to the boss node.
- A good enough boss support fleet may guarantee an A-rank
- While 1CL 5DD will take the fleet down the western route, it has trouble gaining enough LOS to get to the boss node (1 recon plane + 2 radar 33 passed the LoS check)
- 1BBV 1CAV 1CL 3DD is recommended, but you have to enter an extra BATTLE node.
- 1CAV 1CL 3DD 1AV is recommended if you want to skip the extra node
- You can consider deploying Land-Based Air Squadrons along with an Akizuki-class DD to help remove the CVL's planes on pre-boss node to minimize the damage from them.
- Seaplane fighters are recommended for some of preboss nodes which have CVLs
Show/Hide Nodes and Enemy Encounters
| Nodes and Enemy Encounters |
|---|
| Node | Pattern | Xp | Node Info | Form | Air |
|---|
A
| Pattern 1 | | | | | | Pattern 2 | | | | | | Pattern 3 | | | | | B
| Pattern 1 | | | | | | Pattern 2 | | | | | | Pattern 3 | | | | | C
Active Branching | Pattern 1 | | Active Branching | | | D
| Pattern 1 | | | | | | Pattern 2 | | | | | | Pattern 3 | | | | | E
| Pattern 1 | | | | | F
| Pattern 1 | | | | | G
| Pattern 1 | | | | | | Pattern 2 | | | | | H
| Pattern 1 | | Air Battle Node | | | | Pattern 2 | | | | | I
| Pattern 1 | | | | | | Pattern 2 | | | | | J
| Pattern 1 | | Transport Drop-off Location | | | K
| Pattern 1 | | | | | | Pattern 2 | | | | | L
| Pattern 1 | | | | | | Pattern 2 | | | | | M
| Pattern 1 | | | | | | Pattern 2 | | | | |
|
|
|
|
|
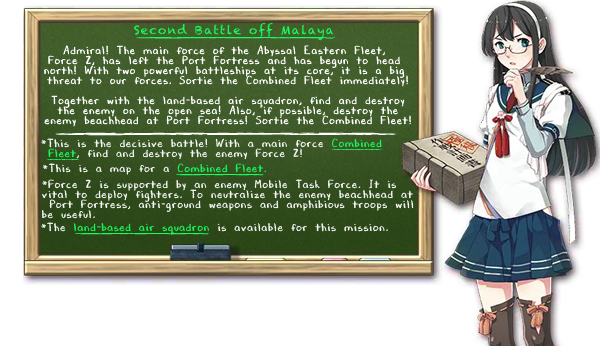
E-3
|
Information
- Rewards upon clearance:
- Aquila confirmed for E-3 Drop
|
|
|
Branching rules
Show/Hide Branching Rules
| Branching Rules |
|---|
| Node | Split | Condition |
|---|
| B | A | Surface Task Force Fleet consisting of a less than 6 Malaya Historical Fleet Members + 4 FBB/BB/BBV | | C | If Surface Task Force Fleet consist and 6 or more Malaya Historic Members and <4 FBB/BB/BBV | | C | D | Carrier Task force consisting of less than 6 Malaya Historical Fleet Members | | E | Fleet consisting of less than 6 Malaya Historical Fleet Members, a chance if 6 members are present in fleet. | | G | Fleet consisting of 7 Malaya Historical Fleet Members, a chance if 6 members are present in fleet. | | G | H | LOS check | | I | LOS check (Fail) |
|
|
Tips
- To ensure the quickest and safest passage to the boss node, you'll need to form a combined fleet consisting of ships from the Malaya Historical Fleet, i.e. Kongou, Haruna, Choukai, Mogami, Mikuma, Suzuya, Kumano, Yura, Kinu, Fubuki, Shirayuki, and Hatsuyuki
- Information regarding the use of this composition can be found here. [1]
- It's hypothesized that having at least three of each of the above in each fleet is required for superior routing, with at least seven of the named ships in the combined fleet as a whole.
- Node B is a sub node.
- Node D is a land-based airstrike.
- The boss is an installation-type, as such, bringing landing forces, WG42s and AP (strong against artillery imps) or Type 3 Shell (against Supply Depot Hime) is advised.
- On hard, it is the Summer Harbor Princess, Supply Depot Princess, Two Artillery Imps and two destroyers in line ahead formation.
- Do consider the use of CAVs instead of CAs in the escort fleet for their ability to equip WG42s
- Consider concentrating as much air strikes as possible from your LBAS as possible on the boss node since it'll help wipe out some of the installations.
- Recommended LBAS comp for boss node attack:
- 2 fighters with a distance of 5 minimum and Land Attackers for both squadrons. (for concentrated damaged on installation damage)
- Otherwise, if you lack in Land Based Attackers, use 1-2 fighters and Torpedo Bombers (which while isn't nearly as effective, will still help)
- Boss Support is recommended especially on the final kill
- 150 Air power secures Air Superiority at the boss node.
- There is a method to do Armor Reduction the Harbor Summer Princess, which while isn't required, will make things easier for admirals. In order to complete this process you need to do the following:
- Score an S-rank at node A (Surface Task Force is required, need approximately 4 FBB/BB)
- Score an S-Rank at Node D (Carrier Task Force is required, need 4 CV/CVL)
- Successfully completely intercept an Air Raid against your Land Base. (Take no damage from the Air Raid to your Land bases thus receiving a message in white which may require both land base defending)
- Completing this step result in a "ding" sound that will be heard upon returning to base, this indicates you have successfully completed the debuff and the Harbor Summer Princess will become easier to defeat now.
- Node B is a good location to train planes; have a fleet of a single submarine and launch your planes against that node.
- As a small trivia piece, Force Z (Node H) is named after the historical Force Z, which comprised the Prince of Wales, Repulse, and four escorting destroyers.
Show/Hide Nodes and Enemy Encounters
| Nodes and Enemy Encounters |
|---|
| Node | Pattern | Xp | Node Info | Form | Air |
|---|
A
| Pattern 1 | | | | | | Pattern 2 | | | | | | Pattern 3 | | | | | B
| Pattern 1 | | | | | | Pattern 2 | | | | | | Pattern 3 | | | | | C
| Pattern 1 | | | | | | Pattern 2 | | | | | D
| Pattern 1 | | | | | | Pattern 2 | | | | | | Pattern 3 | | | | | E
| Pattern 1 | | | | | F
| Pattern 1 | | | | | G
| Pattern 1 | | | | | | Pattern 2 | | | | | H
| Pattern 1 | | | | | | Pattern 2 | | | | | I
| Pattern 1 | | | | | | Pattern 2 | | | | | J
| Pattern 1 | | | | | | Pattern 2 | | | | | | Pattern 3 | | | | |
|
|
|
|
|
E-4
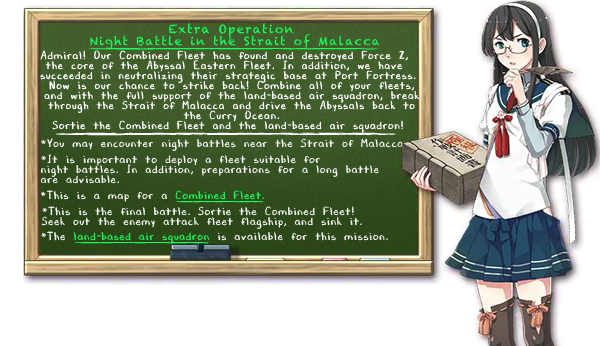
| Battle off the Malacca Strait
|
| 南西海域 マラッカ海峡沖
|
Information
- Rewards upon clearance: Warspite
- Clearing on Hard (甲): Re.2005 Kai, Improvement materials x8, Medal x2, Hard-mode Medal
- Clearing on Medium (乙): Re.2005 Kai, Improvement materials x8, Medal x2
- Clearing on Easy (丙): Medal
|
|
|
Branching rules
Show/Hide Branching Rules
| Branching Rules |
|---|
| Node | Split | Condition |
|---|
| B | A | | | D | |
|
|
Tips
- Due to the Distance your Land-Based Air Squadrons must travel to reach the boss node, you will need to prepare to use a Type 2 Flying Boat or PBY-5A_Catalina on each squadron you wish to attack the boss node.
- The boss's armor debuff requires S-ranking nodes C, D, H, and I. After returning to the naval base, you will hear a ding, and the boss's quotes will change.
Show/Hide Nodes and Enemy Encounters
| Nodes and Enemy Encounters |
|---|
| Node | Pattern | Xp | Node Info | Form | Air |
|---|
A
| Pattern 1 | | | | | | Pattern 2 | | | | | | Pattern 3 | | | | | B
| Pattern 1 | | | | | | Pattern 2 | | | | | | Pattern 3 | | | | | C
| Pattern 1 | | | | | | Pattern 2 | | | | | D
| Pattern 1 | | | | | | Pattern 2 | | | | | | Pattern 3 | | | | | E
| Pattern 1 | | | | | F
| Pattern 1 | | | | | G
| Pattern 1 | | | | | | Pattern 2 | | | | | H
| Pattern 1 | | | | | | Pattern 2 | | | | | I
| Pattern 1 | | | | | | Pattern 2 | | | | | J
| Pattern 1 | | | | | | Pattern 2 | | | | | | Pattern 3 | | | | |
|
|
|
|
|
|
Events |
|---|
|
2013 | | |
2014 | | |
2015 | | |
2016 | | |
2017 | | |
2018 | | |
2019 | | |
2020 | | |
2021 | | |
2022 | | |
2023 | | |
2024 | | | |
|
2015 · 2016 · 2017 · 2018 · 2019(& sardine) · 2021(large) · 2022 · 2023 | | |
2015 · 2016(simple quest) · 2017(simple quest) · 2020(large) · 2021 · 2022(simple quest) | | |
2019 · 2020 · 2021 · 2022 · 2023 · 2024 | | |
2022 · 2023 | | |
2018 | | |
2014 · 2015 |
|
|
zh:迎击!第二次马来亚海战


