- Welcome to the Kancolle Wiki!
- If you have any questions regarding site content, account registration, etc., please visit the KanColle Wiki Discord
Spring 2014 Event
Revision as of 04:24, 28 April 2014 by >Asashio (→Drops)
The Spring 2014 event started on April 23th and will last until May 9th 1100 JST
Official Twitter
Information from the official Twitter:
- Event Name "Recon planes, launching!"
- High LOS will be the key to increase the chances of reaching the boss nodes.
- To achieve a high value, use of seaplanes, recon aircraft and ships with high LOS is strongly recommended
- A special animation plays showing your planes attempting to find the node when approaching. If there is a positive reaction from your fleet's leader, you will then proceed to fight the boss.
- Event lasts 2 weeks from April 23rd.
- Boss health in this event does not regenerate so stay calm and don't rush. Take it easy.
- Requires at least 75% sortie win ratio to participate.
- At least 5 free ship slots for new girls to join your fleet before sortie.
- At least 20 free equipment slots before sortie.
- 4 new ships added: DD Amatsukaze, DD Tanikaze, repair ship Akashi, and CL Sakawa.
- Amatsukaze is an E-3 Reward (Port Darwin Area).
- Tanikaze can be obtained from drops (E2, E3, E4 boss nodes are confirmed to drop her).
- Akashi is an E-2 Reward (Battle of Sunda Strait), she can repair ships mid sortie (down to moderate damage). A new item, Ship Repair Facility, allows her to repair 2 ships at the same time. The times where she is allowed to repair are limited, however, she will get more functionality in the future.
- Sakawa is an E-5 reward.
- Tone, Chikuma and Bismarck received a second remodel, with Tone-class being reclassified as CAVs. This can be unlocked by using a special Blueprint item, obtainable by trading Extra Operation and Event maps badges.
- New BGM added.
- New Recon Plane functionality:
- Increased effectiveness in the aerial combat phase from successful scouting with carrier-based scouts and seaplane scouts
- Effect depends on whether air superiority or air supremacy is obtained
- Special bonus in shelling phase from seaplane scouts
- Achieving Air Superiority / Air Supremacy allows ships with Recon Planes to do Double Attacks and Cut-Ins during Day Battle
- Increased effectiveness in the aerial combat phase from successful scouting with carrier-based scouts and seaplane scouts
- Reward for clearing event maps:
- E-1: Medal, Reppuu Kai, Contruction Fairy, Damecon.
- E-2: Medal, Akashi.
- E-3: Medal x2, Amatsukaze.
- E-4: Medal x1, New High-pressure, High-temperature Steam Boiler, Ship Repair Facility, Damecon
- E-5: Medal x3, Sakawa.
Map details
E-1 - Southwest of Samewani Sea - Battle of Samewani Sea
File:6-1.jpg
E-1 Map
- 100 exp
- Node B contains 1 flagship and 1 elite Ka-class submarines
- Rewards Furniture Fairy, Emergency Repair, Reppu Kai, and a Medal upon clear
- Killing the boss 6 times will empty its HP gauge. Not being able to kill it by the end of boss battle will still do some damage to the gauge.
- Boss is CA Ri-Class flagship Kai
Branching rules
- A to B :Fleet with at least two standard carrier (Taihou included. Light carrier won't count). Fleet not meeting any rules goes random.
- A to C, and E to G :Fleet with at least two heavy cruiser (not aviation) and two ships carrying total of 4 drums (E.g. first ship bring 3 drums, another ship bring 1 drum).
- CLT-CLT-CAV-BB-CV-CV seems to be the best fleet composition so far.
- Recon aircraft are required to get to the boss node. Bomber seaplanes such as the Zuiun and Seiran are not considered recon planes.
Tips
- Use expedition 117 if you think you need more damage during sortie.
- Easy grinding setup : 2CA, 1CAV, 1DD, 2CLT (or 1CLT+1BB/CVL). Must bring total 3 drums on 2 ships (e.g. 2 on DD, 1 on CAV) and a seaplane with AA to gain air superiority. There will be no LOS requirement for A C E G H route and only two battle on your way to boss - best of all, you won't encounter any enemy carrier at all and gain some steel in node G for your repairs.
Drops
| Destroyer | Light Cruiser | Heavy Cruiser | Seaplane Tender | Aircraft Carrier | Submarine | Battleship | |
|---|---|---|---|---|---|---|---|
| A | Samidare, Michishio, Yuudachi, Ooshio, Akebono | Naka | Haguro, Nachi | Ryuujou | |||
| B | Yuudachi, Arashio | Haguro, Nachi, Ashigara | |||||
| C | Nothing | ||||||
| D | Uzuki, Yukikaze | Naka | Haguro, Myoukou, Ashigara | ||||
| E | |||||||
| F | Nothing | ||||||
| G | Steel | ||||||
| H | Hatsukaze, Yukikaze | Atago, Tone, Chikuma, Maya, Myoukou, Nachi, Haguro, Furutaka | Chiyoda, Chitose | I-168, Maruyu | Fusou, Ise, Yamashiro, Kongou, Hiei, Haruna, Kirishima | ||
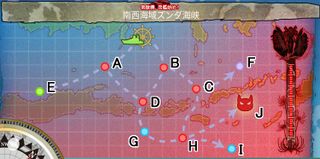
E-2 - Southwest of Zunda Strait - Across The Zunda Strait
- Rewards a Medal and Construction Ship Akashi upon clear
- 150 exp
- Map gauge has 6 hp
- Node H is night battle
- Boss is BB Ru-Class Flagship Kai
Branching rules
- 2 BB, 1 CLT, 1 CAV, 2 CV with BB and CAV equiped with Type 0 is really likely to reach boss node
- 2 BB, 2 CV, 2 BBv with 300+ LOS and Type 0 will 85% getting to boss node (so far).
Tips
- Expedition 117 can be use for extra damage during sortie.
- If pre-boss night battle is too hard, bring in a submarine with Emergency Repair + Turbine/Boiler, you must reach night battle before your SS sustains heavy damage (red hp). Do not set SS as flagship. Or you could use a searchlight.
- Using line abreast in the night battle node may help to lower damage from enemy attacks. (even though formation in night battle does not show up on screen)
Drops
| Destroyer | Light Cruiser | Heavy Cruiser | Seaplane Tender | Aircraft Carrier | Submarine | Battleship | |
|---|---|---|---|---|---|---|---|
| A | Fubuki, Fumizuki, Hatsuyuki, Shiratsuyu, Murakumo, Shirayuki, Yuudachi, Shikinami, Samidare, Nagatsuki | Naka, Sendai, Natori | Mogami, Ashigara | I-58, I-168 | |||
| B | Murakumo, Hatsuyuki | Naka | |||||
| C | |||||||
| D | Shiratsuyu, Shirayuki, Murakumo, Fubuki, Hatsuyuki | Mogami, Ashigara | |||||
| E | Bauxite | ||||||
| F | Maelstrom | ||||||
| G | Nothing | ||||||
| H | Fubuki, Shirayuki, Fumizuki | Natori, Abukuma | Akagi | ||||
| I | Nothing | ||||||
| J | Fubuki, Shirayuki, Hatsukaze, Maikaze, Tanikaze, Hamakaze, Shikinami, Nagatsuki | Kitakami, Naka, Agano, Ooi | Mikuma, Kako, Aoba, Tone, Maya, Atago, Mogami | Chiyoda | Kaga, Hiryuu, Souryuu, Zuihou, Hiyou, Ryuujou | I-168 | Haruna, Kirishima, Mutsu, Nagato |
E-3 - Port Wine Area - Assault! Destroy Port Wine Operation
File:6-3.jpg
E-3 Map
- Rewards Amatsukaze and two Medals upon clear
- 200 exp
- Killing the boss 7 times will empty its HP gauge. Not being able to kill it by the end of boss battle will still do some damage to the gauge.
- Node-A contains 2 Ka-class Submarines
- Node-B contains 3 Ka-class Submarines
- Boss is Harbour Princess
Branching rules
- Using 4 BB + 2 CV with 352+ LOS seems to give a 100% chance to reach the Boss node
- From C to E: 2+ CVs (not CVL). Other compositions are random between F and E.
- Using all fast ships(?), and/or CVL will sometimes result in route C-F-I. There are no air battles here, but I node is a night battle.
- A certain amount of LOS is required to reach the boss node L from preboss nodes H or I.
Tips
- Ships without high health & armor are susceptable to taking high damage from the enemy submarines.
- Avoiding the night battle node by bringing two CVs is recommended.
- Using Sanshiki gives you a damage bonus against the Boss, especially at night.
- Use expedition 118 if you think you need more damage in the boss node.
Drops
| Destroyer | Light Cruiser | Heavy Cruiser | Seaplane Tender | Aircraft Carrier | Submarine | Battleship | |
|---|---|---|---|---|---|---|---|
| A | Fumizuki, Arare, Shigure, Kasumi, Shikinami, Akebono, Michishio | Natori | |||||
| B | |||||||
| C | |||||||
| D | |||||||
| E | Shiratsuyu, Shigure, Yuudachi, Arare, Arashio, Nagatsuki, Ooshio, Fumizuki | Jintsuu, Natori, Abukuma | Myoukou, Tone, Chikuma | ||||
| F | |||||||
| G | |||||||
| H | Hamakaze, Murasame, Shiratsuyu, Yuudachi, Kasumi, Samidare, Shigure, Hatsuyuki | Abukuma | Haguro, Ashigara, Tone, Nachi | Akagi, Kaga, Ryuujou, Hiryuu | |||
| I | |||||||
| J | |||||||
| K | |||||||
| L | Naganami, Maikaze, Tanikaze, Hamakaze, Hatsuyuki, Makigumo | Sendai, Agano, Isuzu, Ooi, Kitakami, Yuubari, Abukuma | Kinugasa, Suzuya, Tone, Chikuma, Takao, Mogami | Zuikaku, Shoukaku, Zuihou, Souryuu, Hiryuu, Akagi, Kaga, Junyou, Hiyou | I-58, Maruyu, I-168 | Kongou, Haruna, Hyuuga, Ise, Nagato, Mutsu, Fusou, Yamashiro, Hiei |
E-4 - Central Pacific Sea - Sweep Against Subs in the Frontline
File:6-4.jpg
E-4 Map
- Rewards New High-pressure, High-temperature Steam Boiler, Repair Goddess , Ship Repair Facility and one Medal upon clear
- Node C has no battle.
- Imuya, Goya, and Hachi drop on all nodes of this map.
- Boss is Submarine So-Class Elite
Branching rules
- From C to D: Fleet with 5 DD or 4DD + 1CL
- From C to E: Any other composition
- E to D or G is random
Tips
- Use double line formation for pre-boss node, and line abreast for the rest.
- If you're feeling lazy, equip your DDs with damage control.
- Recommended compositions:
- 4 DD, 1 CL and 1 CV. Equip your CV with anti-air fighters and the rest of your fleet with ASW. The CV's role is to prevent enemy air superiority, and thus reduce damage taken in the shelling phase.
- DD BB DD DD DD CL. Equip BB with three main guns and a good surface radar. The BB's role is to damage enemy ships to reduce damage taken from them. Using a BBV instead for anti-sub may not be necessary since it gives a second shelling phase for the DDs/CL.
Drops
| Destroyer | Light Cruiser | Heavy Cruiser | Seaplane Tender | Aircraft Carrier | Submarine | Battleship | |
|---|---|---|---|---|---|---|---|
| A | Shikinami, Akatsuki, Mutsuki, Kagerou | Kitakami, Kuma, Kiso, Yura, Sendai, Naka, Tenryuu, Yuubari | Myoukou, Nachi, Mogami, Kako, Atago | I-168, I-58, I-8 | Hyuuga, Ise | ||
| B | |||||||
| C | Nothing | ||||||
| D | Ayanami, Mutsuki, Kagerou | Atago | |||||
| E | Uzuki | Tatsuta, Natori | Atago | I-168 , I-19 | |||
| F | |||||||
| G | Kuroshio | Yamashiro | |||||
| H | Shikinami, Makigumo, Naganami, Tanikaze, Shimakaze | Ooi, Noshiro | Mogami, Mikuma, Kumano, Suzuya, Takao, Atago, Kinugasa | Zuihou | I-8, I-58, I-19, I-168, Maruyu | Ise, Kongou, Haruna, Kirishima |
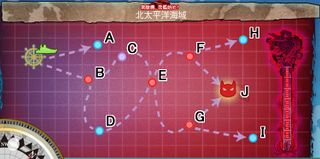
E-5 - North Pacific Sea - Capture Peacock Island Operation
- Rewards Sakawa and three Medals upon clear.
- Boss is Isolated Island Demon
Branching rules
- Starting point to A : Fleet contain 3 or more submarines.
- B → C : Fleet with fast ship only.
- B → D : Fleet with slow ship(s).
- From F or G to J (boss node) : With a certain LOS, otherwise, send you to dead end (H or I)
- From F to H or G to I : Low Fleet LoS or fleet contains submarine.
Tips
- Use at least one slow BB to avoid the fuel maelstrom at node C.
- 4 BB and 2 CV. Fill your Carriers with Reppu (or better), put your best fighter in your carrier's largest slot, with this you can win air superiority in the boss node.
- 3+ Fast BB sends you to south preboss node.
- 3+ Slow BB (excluding BBV) sends you to south preboss node.
- Other compositions seem to be random between north and south.
- 3 BB and 3 CV. Equip at least 6 Reppu and 1 Reppu Kai.
- In contrast to the previous composition, you have room to equip bombers that allow your carriers to attack.
- This composition gets an arguably easier preboss node (north) guaranteed as well.
- 5 Reppu, 1 Reppu Kai, and a Type 62 Zero Fighter-bomber is also sufficient for air superiority at the boss (assuming the Reppu Kai is in Kaga's large slot), and provides slightly more firepower.
- Equipment for battleships : Two 46cm, recon plane, Type 3 Shell (you will need type 3 to deal with the boss). Alternatively, you can add type 91 ammo or Type 32 radar instead of recon planes if you're not going for air superiority.
- Choose line ahead in boss node to deliver highest firepower.
- Both support expeditions are recommended to increase damage output at all nodes.
- 2 DD 2 CVL is a cost-efficient fleet.
- 2 DD 2 CV/CVL 2 BB gives maximum firepower.
- Remember, support expeditions only require the ammo to be resupplied after each sortie. Half of each ships remaining fuel is used for each expedition, giving 4-5 runs before needing to refuel.
- Some (real life) luck is required to sink the boss Isolated Island Demon, since her node also contains a Battleship Princess that is hard to sink.
Drops
| Destroyer | Light Cruiser | Heavy Cruiser | Seaplane Tender | Aircraft Carrier | Submarine | Battleship | |
|---|---|---|---|---|---|---|---|
| A | |||||||
| B | Mutsuki, Kisaragi, Yayoi | Nagara, Tatsuta | Kinugasa | ||||
| C | |||||||
| D | Nothing | ||||||
| E | Kisaragi | Yuubari | Takao | ||||
| F | |||||||
| G | |||||||
| H | |||||||
| I | |||||||
| J | Tanikaze | Yuubari, Ooi, Tama | Hiryuu | I-58 | |||


