- Welcome to the Kancolle Wiki!
- If you have any questions regarding site content, account registration, etc., please visit the KanColle Wiki Discord
Difference between revisions of "Fall 2014 Event"
Jump to navigation
Jump to search
>Joker The ????? m (→E-3: 第三次渾作戦) |
Jigaraphale (talk | contribs) |
||
| (36 intermediate revisions by 27 users not shown) | |||
| Line 1: | Line 1: | ||
[[File:Bn 141114 on.jpg|700px]] | [[File:Bn 141114 on.jpg|700px]] | ||
| − | + | =Introduction= | |
| − | The Fall 2014 Event | + | The Fall 2014 Event began on 14 November 2014, and lasted until 1 December 2014. It is based on the [[wikipedia:Western_New_Guinea_campaign|Western New Guinea campaign]] |
| − | == Participation requirements == | + | ==Participation requirements== |
* Must have a 75% sortie win ratio | * Must have a 75% sortie win ratio | ||
* Must have 5 empty ship slots for new ships | * Must have 5 empty ship slots for new ships | ||
| Line 10: | Line 10: | ||
* Must use combined fleet for maps that require it (refer to [[Fall 2014 Event#Special Mechanics|Special mechanics]] section). | * Must use combined fleet for maps that require it (refer to [[Fall 2014 Event#Special Mechanics|Special mechanics]] section). | ||
* Ships that are used in E-1 and E-2 can not be used in E-3 (and vice versa). | * Ships that are used in E-1 and E-2 can not be used in E-3 (and vice versa). | ||
| + | * There's no shiplocking at E-4, all ships that previously went to E-1, E-2, and E-3 can be used in E-4. | ||
| + | |||
==Patch Notes== | ==Patch Notes== | ||
# '''[[Ship Class|New Ships]]''' | # '''[[Ship Class|New Ships]]''' | ||
| Line 45: | Line 47: | ||
# After you unlock E-4 you will be given the option to form Carrier-Escort Combined fleet when attempting to form a combined fleet (Left option). Right option allows you to form a Surface Fleet for E-1 and E-3. | # After you unlock E-4 you will be given the option to form Carrier-Escort Combined fleet when attempting to form a combined fleet (Left option). Right option allows you to form a Surface Fleet for E-1 and E-3. | ||
| − | == Support Expeditions == | + | ==Support Expeditions== |
* '''Expedition #133''' is for the non-boss battles. | * '''Expedition #133''' is for the non-boss battles. | ||
| Line 52: | Line 54: | ||
See [[Expedition#Support Expeditions|Support Expeditions]] section for details. | See [[Expedition#Support Expeditions|Support Expeditions]] section for details. | ||
| − | |||
| − | ===E-1 第一次渾作戦 | + | =Event Maps= |
| + | ==E-1 第一次渾作戦== | ||
{{EventMap1 | {{EventMap1 | ||
|map_name = First Operation Kon | |map_name = First Operation Kon | ||
| Line 78: | Line 80: | ||
*1BBV 1CAV 2CA 1DD 1CVL + 1CL 5DD will lead to A-C-E-F. (proved wrong) | *1BBV 1CAV 2CA 1DD 1CVL + 1CL 5DD will lead to A-C-E-F. (proved wrong) | ||
| − | * 1BBV 2CA 2DD 1CVL will sometimes lead you to B-D-F | + | * 1BBV 2CA 2DD 1CVL will sometimes lead you to B-D-F. |
* 1fBB 3CAV 2DD (BDEF) 2BB 2CAV 1CAV 1CV | * 1fBB 3CAV 2DD (BDEF) 2BB 2CAV 1CAV 1CV | ||
| Line 84: | Line 86: | ||
* 2BB 2CA 1CV 1CLT (BDEF) | * 2BB 2CA 1CV 1CLT (BDEF) | ||
* 1BB 3CA 2CVL (BDEF) | * 1BB 3CA 2CVL (BDEF) | ||
| − | * 1BBV 2CA 3DD (BDF/ | + | * 1BBV 2CA 3DD (BDF/ACEF) |
| + | * 1BBV 1BB 1CAV 3CA + 1CL 5DD (ACEF) | ||
* 1BB 1fBB 2CA 1CAV 1CV (ABDEF) | * 1BB 1fBB 2CA 1CAV 1CV (ABDEF) | ||
* 2fBB 1BBV 1CA 2CAV (ACEF) 2CA 4DD | * 2fBB 1BBV 1CA 2CAV (ACEF) 2CA 4DD | ||
* 2fBB 1BBV 1CA 1CAV 1CV (ACDEF) 1CL 1 CLT 2DD 2SS | * 2fBB 1BBV 1CA 1CAV 1CV (ACDEF) 1CL 1 CLT 2DD 2SS | ||
* 1CL 1BB 1CA 2CAV 1CV(ACDEF) 1CA 1CAV 4DD | * 1CL 1BB 1CA 2CAV 1CV(ACDEF) 1CA 1CAV 4DD | ||
| − | |||
* Most likely to South route on E-1 (will skipping 4th battle on E node): | * Most likely to South route on E-1 (will skipping 4th battle on E node): | ||
** For first fleet: 1xBBV, 2xCAV, 1xCA, 2xDD. Second fleet: 1xCL, 5xDD [not always southern route, also northern route A-E-F] | ** For first fleet: 1xBBV, 2xCAV, 1xCA, 2xDD. Second fleet: 1xCL, 5xDD [not always southern route, also northern route A-E-F] | ||
| − | |||
* 1x FBB, 2x CA, 1x CAV, 2x DD + 1x CL, 5x DD | * 1x FBB, 2x CA, 1x CAV, 2x DD + 1x CL, 5x DD | ||
| + | * 2BB, 3 CA(V), 1 CL + 1 CL, 5 DD will go ACDF or BDF avoiding E altogether. High LOS requirements so at least 2 CAVs recommended and recon planes for ships that can carry it. DDs should have radars. Aviation BBs might be a consideration if you still can't make the LOS requirement but consider the loss in firepower. | ||
* Gold Ru at node D | * Gold Ru at node D | ||
| Line 99: | Line 101: | ||
|tips = | |tips = | ||
|dropsA = | |dropsA = | ||
| − | |dropsC = [[Hatsuyuki]] [[Inazuma]] [[Haguro]] [[Nenohi]] [[Akatsuki]] [[Kasumi]] [[Ayanami]] [[Akebono]] [[Shikinami]] [[Hatsushimo]]|dropsF = [[Atago]] [[Chikuma]] [[I-58]] [[I-19]] [[Haruna]] [[Hyuuga]] [[Kitakami]] [[Hiryuu]] [[Kongou]] '''[[Kiyoshimo]]''' [[Yuugumo]] [[Takao]] [[Natori]] [[Kumano]] [[Makigumo]] [[Mogami]] [[Urakaze]] [[Hiei]] [[Kuma]] '''[[Taigei]]''' '''[[Akashi]]''' [[Houshou]] [[Samidare]] '''[[Harusame]]''' [[Yamashiro]] [[Ise]] [[Zuihou]] [[Shouhou]] [[Souryuu]] [[Kinu]] [[Junyou]] [[Myoukou]] [[Kirishima]] [[Sendai]] [[Abukuma]] [[Tone]] [[Suzuya]]|dropsB = [[Miyuki]] [[Ushio]] [[Akebono]] [[Hatsuharu]] | + | |dropsC = [[Hatsuyuki]] [[Inazuma]] [[Haguro]] [[Nenohi]] [[Akatsuki]] [[Kasumi]] [[Ayanami]] [[Akebono]] [[Shikinami]] [[Hatsushimo]] [[Hibiki]]|dropsF = [[Atago]] [[Chikuma]] [[I-58]] '''[[I-19]]''' [[Haruna]] [[Hyuuga]] [[Kitakami]] [[Hiryuu]] [[Kongou]] '''[[Kiyoshimo]]''' [[Yuugumo]] [[Takao]] [[Natori]] [[Kumano]] [[Makigumo]] [[Mogami]] '''[[Urakaze]]''' [[Hiei]] [[Kuma]] '''[[Taigei]]''' '''[[Akashi]]''' [[Houshou]] [[Samidare]] '''[[Harusame]]''' [[Yamashiro]] [[Ise]] [[Zuihou]] [[Shouhou]] [[Souryuu]] [[Kinu]] [[Junyou]] [[Myoukou]] [[Kirishima]] [[Sendai]] [[Abukuma]] [[Tone]] [[Suzuya]] [[Fubuki]]|dropsB = [[Miyuki]] [[Ushio]] [[Akebono]] [[Hatsuharu]] [[Michishio]] |
|dropsD = [[Ushio]] [[Asashio]] [[Nenohi]] [[Kiso]] [[Ikazuchi]] [[Shiratsuyu]] [[Hibiki]] [[Kasumi]] [[Fubuki]] [[Akatsuki]] [[Miyuki]] [[Fusou]] [[Arare]] [[Isonami]] [[Hatsuyuki]] [[Wakaba]] | |dropsD = [[Ushio]] [[Asashio]] [[Nenohi]] [[Kiso]] [[Ikazuchi]] [[Shiratsuyu]] [[Hibiki]] [[Kasumi]] [[Fubuki]] [[Akatsuki]] [[Miyuki]] [[Fusou]] [[Arare]] [[Isonami]] [[Hatsuyuki]] [[Wakaba]] | ||
| − | |dropsE = [[Aoba]] [[Murakumo]] [[Hatsushimo]] '''[[Akashi]]''' [[Arare]] [[Myoukou]] [[Shirayuki]] [[Kiso]] [[Tama]] [[Hatsuharu]] [[Yamashiro]] [[Hibiki]]}} | + | |dropsE = [[Aoba]] [[Murakumo]] [[Hatsushimo]] '''[[Akashi]]''' [[Arare]] [[Myoukou]] [[Shirayuki]] [[Kiso]] [[Tama]] [[Hatsuharu]] [[Yamashiro]] [[Hibiki]] [[Wakaba]]}} |
| − | + | ==E-2: 第二次渾作戦== | |
{{EventMap1 | {{EventMap1 | ||
|map_name = Second Operation Kon | |map_name = Second Operation Kon | ||
| Line 121: | Line 123: | ||
'''Rewards''' | '''Rewards''' | ||
* 1x Medal | * 1x Medal | ||
| − | * [[Shop#Consumables|Cash-only furniture token]] | + | * [[Shop#Consumables|Cash-only furniture token]] |
* 5x Improvement Materials [[file:Improvement Materials.png|20px]] | * 5x Improvement Materials [[file:Improvement Materials.png|20px]] | ||
* [[Type 91 Anti-Aircraft Fire Director]] | * [[Type 91 Anti-Aircraft Fire Director]] | ||
| Line 134: | Line 136: | ||
*Having one or no CL allows for to C-G-I routing (1 CL 5 DD or 6 DD). | *Having one or no CL allows for to C-G-I routing (1 CL 5 DD or 6 DD). | ||
* If you have difficulty with boss, you can run a light support expedition (2 DD 1 CA 1 CL 2 CVL) to give your fleet an edge. If that proves insufficient, Boss Support Expedition fleet of 2xBB(V) + 2xCVL + 2xDD provides good firepower (damage) albeit with increased fuel/ammo consumption. | * If you have difficulty with boss, you can run a light support expedition (2 DD 1 CA 1 CL 2 CVL) to give your fleet an edge. If that proves insufficient, Boss Support Expedition fleet of 2xBB(V) + 2xCVL + 2xDD provides good firepower (damage) albeit with increased fuel/ammo consumption. | ||
| − | |dropsA = [[Hatsuharu]] [[Yuudachi]] [[Mochizuki]] | + | |dropsA = [[Hatsuharu]] [[Yuudachi]] [[Mochizuki]] [[Nenohi]] |
| − | |dropsI = '''[[Ooyodo]]''' '''[[Asagumo]]''' [[Atago]] [[Maikaze]] '''[[Amatsukaze]]''' [[Hamakaze]] '''[[Hayashimo]]''' [[Uzuki]] [[Kirishima]] [[Ise]] [[Haruna]] [[Naganami]] [[Hatsukaze]] [[Hyuuga]] [[I-168]] [[Nagara]] [[Yuugumo]] [[Akagi]] [[Tone]] [[Myoukou]] '''[[Harusame]]''' [[Kaga]] [[Yamashiro]] [[Fusou]] [[Akigumo]] [[Hiei]] [[Shouhou]] [[Mogami]] [[Takao]] [[Hiyou]] [[Yayoi]] [[Kongou]] [[Shigure]] [[Tanikaze]] [[I-8]] [[Sendai]] [[Kitakami]] [[Houshou]] [[ | + | |dropsI = '''[[Ooyodo]]''' '''[[Asagumo]]''' [[Atago]] '''[[Maikaze]]''' '''[[Amatsukaze]]''' '''[[Hamakaze]]''' '''[[Hayashimo]]''' '''[[Uzuki]]''' [[Kirishima]] [[Ise]] [[Haruna]] '''[[Naganami]]''' '''[[Hatsukaze]]''' [[Hyuuga]] [[I-168]] [[Nagara]] [[Yuugumo]] [[Akagi]] [[Tone]] [[Myoukou]] '''[[Harusame]]''' [[Kaga]] [[Yamashiro]] [[Fusou]] [[Akigumo]] [[Hiei]] [[Shouhou]] [[Mogami]] [[Takao]] [[Hiyou]] [[Yayoi]] [[Kongou]] [[Shigure]] [[Tanikaze]] [[I-8]] [[Sendai]] [[Kitakami]] [[Houshou]] [[Shiratsuyu]] [[Chikuma]]|dropsG = '''[[Ooyodo]]''' [[Akigumo]] [[Tanikaze]] [[Uzuki]] [[Yayoi]] [[Murasame]] [[Hatsuharu]] [[Maikaze]] [[Naganami]] [[Ooshio]] [[Arashio]] [[Kikuzuki]] [[Samidare]] [[Shiratsuyu]] [[Shigure]] [[Yuudachi]] [[Fumizuki]] [[Shikinami]] [[Wakaba]] [[Kiyoshimo]] [[Mochizuki]] [[Mikazuki]] [[Mutsuki]] [[Nagatsuki]]|dropsC = [[Ushio]] [[Mochizuki]] [[Ooshio]] [[Kikuzuki]] [[Kisaragi]] [[Michishio]] [[Hatsuharu]]|dropsD = [[Satsuki]] [[Suzukaze]] [[Mutsuki]] [[Nenohi]] [[Wakaba]] [[Hatsuharu]] [[Hatsushimo]] [[Naganami]] [[Akigumo]] [[Yuudachi]] [[Nagatsuki]] [[Arare]] [[Mochizuki]]|dropsB = [[Ooshio]]|dropsF = [[Shigure]] [[Myoukou]]|dropsH = [[Haguro]]}} |
| − | + | ==E-3== | |
{{EventMap1 | {{EventMap1 | ||
|map_name = Third Operation Kon | |map_name = Third Operation Kon | ||
| Line 146: | Line 148: | ||
|information =* Combined Fleet | |information =* Combined Fleet | ||
* Boss: (Node '''I''') [[Battleship Princess]] | * Boss: (Node '''I''') [[Battleship Princess]] | ||
| − | * Killing the boss '''5''' times will empty its HP gauge | + | * Killing the boss '''5''' times will empty its HP gauge |
| − | * The boss node fleet will change after | + | * The boss node fleet will change after the health bar has been reduced to 20% |
'''Rewards''' | '''Rewards''' | ||
* 1x Medal | * 1x Medal | ||
| Line 167: | Line 169: | ||
* To go start->B (and avoid the first maelstrom) you cannot have more than 1 CLT and your first fleet must contain either a CL, DD, or Akitsumaru and have 2 BB + 2 CA (other combinations may work, still needs testing) | * To go start->B (and avoid the first maelstrom) you cannot have more than 1 CLT and your first fleet must contain either a CL, DD, or Akitsumaru and have 2 BB + 2 CA (other combinations may work, still needs testing) | ||
* [[Akitsu Maru]] can guarantee F->H, plus she can carry Reppuus ('''Kai only''') so Akitsumaru + a CV can get you air superiority at all nodes. Combined with the previous rule this makes easy B->F->H->I routing. | * [[Akitsu Maru]] can guarantee F->H, plus she can carry Reppuus ('''Kai only''') so Akitsumaru + a CV can get you air superiority at all nodes. Combined with the previous rule this makes easy B->F->H->I routing. | ||
| − | * Myoukou and Haguro in first fleet can also guarantee F-H | + | * Myoukou and Haguro in first fleet can also guarantee F-H. Having one in the main fleet and the other in the second fleet may also guarantee F->H. |
* Going east (C-E-G-I) is possible without carriers. This is probably the best way for farming with 1 fuel maelstrom and easier preboss nodes. Akitsumaru, 2 BBV, 2 CAV, 1 CL + 3 DD, 1 CL, 1 BB, 1 CLT can be used (126 AS for HQ99+ final boss). One DD can replace by one SS for opening salvo, recommented I-58 for higher chance to cut-in attack. | * Going east (C-E-G-I) is possible without carriers. This is probably the best way for farming with 1 fuel maelstrom and easier preboss nodes. Akitsumaru, 2 BBV, 2 CAV, 1 CL + 3 DD, 1 CL, 1 BB, 1 CLT can be used (126 AS for HQ99+ final boss). One DD can replace by one SS for opening salvo, recommented I-58 for higher chance to cut-in attack. | ||
* Boss Support Expedition recommended | * Boss Support Expedition recommended | ||
|dropsA = | |dropsA = | ||
| − | |dropsI = '''[[Akitsumaru]]''' '''[[Amatsukaze]]''' '''[[Asagumo]]''' [[Fusou]] [[Harusame]] [[Hiei]] [[Hyuuga]] [[I-8]] [[Ise]] [[Kinugasa]] '''[[Kiyoshimo]]''' [[Kongou]] '''[[Maruyu]]''' '''[[Mikuma]]''' [[Shimakaze]] '''[[Tokitsukaze]]''' [[Noshiro]] [[Tone]] [[Yuubari]] [[Houshou]] '''[[Nagato]]''' [[Mutsu]] [[Kuma]] [[Nagara]] [[Kirishima]] [[Takao]] [[Yamashiro]]|dropsJ = [[Asagumo]]|dropsH = '''[[Maruyu]]''' [[Harusame]] [[Myoukou]] [[Hibiki]] [[Natori]] [[Samidare]] [[Shimakaze]] [[Yuubari]] [[Kinu]] [[Ooi]] [[Maikaze]] [[Suzukaze]] [[Yamashiro]]|dropsF = [[Shimakaze]] [[Kinu]] [[Isuzu]]|dropsB = [[Shigure]] [[Arashio]]|dropsG = [[Shimakaze]] '''[[Maruyu]]''' [[Aoba]] [[Yamashiro]] '''[[Maikaze]]'''}} | + | |dropsI = '''[[Akitsumaru]]''' '''[[Amatsukaze]]''' '''[[Asagumo]]''' [[Fusou]] [[Harusame]] [[Hiei]] [[Hyuuga]] [[I-8]] [[Ise]] [[Kinugasa]] '''[[Kiyoshimo]]''' [[Kongou]] '''[[Maruyu]]''' '''[[Mikuma]]''' [[Shimakaze]] '''[[Tokitsukaze]]''' [[Noshiro]] [[Tone]] [[Yuubari]] [[Houshou]] '''[[Nagato]]''' [[Mutsu]] [[Kuma]] [[Nagara]] [[Kirishima]] [[Takao]] [[Yamashiro]] [[Kitakami]] [[Sendai]]|dropsJ = [[Asagumo]]|dropsH = '''[[Maruyu]]''' [[Harusame]] [[Myoukou]] [[Hibiki]] [[Natori]] [[Samidare]] [[Shimakaze]] [[Yuubari]] [[Kinu]] [[Ooi]] [[Maikaze]] [[Suzukaze]] [[Yamashiro]]|dropsF = [[Shimakaze]] [[Kinu]] [[Isuzu]]|dropsB = [[Shigure]] [[Arashio]]|dropsG = [[Shimakaze]] '''[[Maruyu]]''' [[Aoba]] [[Yamashiro]] '''[[Maikaze]]'''}} |
| − | + | ==E-4== | |
{{EventMap1 | {{EventMap1 | ||
|map_name = Operation Intercept Task Force | |map_name = Operation Intercept Task Force | ||
| Line 190: | Line 192: | ||
|branching =* B/C depends on the second fleet composition. 2 DD + 2 CLT guarantees C, while 5 DD gives a high chance of B. More DDs increases the chances of going to B. | |branching =* B/C depends on the second fleet composition. 2 DD + 2 CLT guarantees C, while 5 DD gives a high chance of B. More DDs increases the chances of going to B. | ||
* C to D/E is random. | * C to D/E is random. | ||
| − | * C to D | + | * There is a LoS check for both C to D and C to E. |
| − | * D to E is possible | + | * D to E is possible if you have a high number of BB/BBV/CA/CAV, or 3 CLT. |
| − | * G to I if you have more than 2 CV | + | * G to I if you have more than 2 CV. |
* G to H if you have more than 2 BB in your first fleet. | * G to H if you have more than 2 BB in your first fleet. | ||
* G to J if you have less than two CV or have Akitsumaru. | * G to J if you have less than two CV or have Akitsumaru. | ||
| Line 206: | Line 208: | ||
* The enemy fleet after 5 complete kills has lower fighter power ([[Aircraft Carrier Water Demon]] and 2 [[Armored Carrier Princess]]es). Saiun is recommended to ensure a better engaging form. | * The enemy fleet after 5 complete kills has lower fighter power ([[Aircraft Carrier Water Demon]] and 2 [[Armored Carrier Princess]]es). Saiun is recommended to ensure a better engaging form. | ||
* If you find yourself taking too much damage from shelling/night battle during the final kill, consider adding a sub to your secondary fleet. She'll divert the attacks from both [[Armored Carrier Princess]]es as well as the two accompanying destroyers. Do keep in mind that a sub may have some trouble surviving until the final node. | * If you find yourself taking too much damage from shelling/night battle during the final kill, consider adding a sub to your secondary fleet. She'll divert the attacks from both [[Armored Carrier Princess]]es as well as the two accompanying destroyers. Do keep in mind that a sub may have some trouble surviving until the final node. | ||
| − | |dropsC = [[Naka]] [[Sendai]] [[Asashio]] [[Arashio]]|dropsJ = '''[[Asagumo]]''' '''[[Ooyodo]]''' '''[[I-401]]''' '''[[Maruyu]]''' [[Kongou]] [[Mutsu]] [[Nagato]] [[Ise]] [[Fusou]] [[Yamashiro]] [[Mogami]] [[Takao]] [[Atago]] [[Nagara]] [[Kuma]] [[Kitakami]] [[Hayashimo]] [[Kiyoshimo]] [[Tanikaze]] [[Zuikaku]] [[Shoukaku]] [[Zuihou]] [[Hiryuu]] [[Souryuu]] [[Kaga]] [[Akagi]] [[Hiyou]] [[Jun'you]] [[Shouhou]] [[I-8]] [[I-19]] [[I-58]] [[I-168]] [[Chikuma]] [[Myoukou]]|dropsG = [[Zuikaku]] [[Shoukaku]] [[Makigumo]] '''[[Maruyu]]''' [[Natori]] [[Arare]] [[Shiranui]] [[Fubuki]] [[Nenohi]] [[Yuudachi]] [[Hatsuyuki]] [[Asashio]] [[Akigumo]] | + | |dropsC = [[Naka]] [[Sendai]] [[Asashio]] [[Arashio]] [[Shiratsuyu]] [[Wakaba]] [[Miyuki]]|dropsJ = '''[[Asagumo]]''' '''[[Ooyodo]]''' '''[[I-401]]''' '''[[Maruyu]]''' [[Kongou]] [[Mutsu]] [[Nagato]] [[Ise]] [[Fusou]] [[Yamashiro]] [[Mogami]] [[Takao]] [[Atago]] [[Nagara]] [[Kuma]] [[Kitakami]] '''[[Hayashimo]]''' '''[[Kiyoshimo]]''' '''[[Tanikaze]]''' [[Zuikaku]] [[Shoukaku]] [[Zuihou]] [[Hiryuu]] [[Souryuu]] [[Kaga]] [[Akagi]] [[Hiyou]] [[Jun'you]] [[Shouhou]] [[I-8]] [[I-19]] [[I-58]] [[I-168]] [[Chikuma]] [[Myoukou]]|dropsG = [[Zuikaku]] [[Shoukaku]] [[Makigumo]] '''[[Maruyu]]''' [[Natori]] [[Arare]] [[Shiranui]] [[Fubuki]] [[Nenohi]] [[Yuudachi]] [[Hatsuyuki]] [[Asashio]] [[Akigumo]] |
| − | [[Kaga]] [[Naka]]|dropsD = [[Asashio]] [[Michishio]] [[Naka]] [[Sendai]] [[Tatsuta]] [[Kasumi]] [[Arashio]] [[Miyuki]] [[Chiyoda]] [[Samidare]] [[Hatsuharu]]|dropsE = [[Akigumo]] [[Yuudachi]] [[Souryuu]] [[Shouhou]] '''[[Maruyu]]''' [[Ryujo]] [[Hatsushimo]] [[Makigumo]] [[Naka]] [[Hatsuharu]] [[Tenryuu]] [[Tatsuta]]}} | + | [[Kaga]] [[Naka]]|dropsD = [[Asashio]] [[Michishio]] [[Naka]] [[Sendai]] [[Tatsuta]] [[Kasumi]] [[Arashio]] [[Miyuki]] [[Chiyoda]] [[Samidare]] [[Hatsuharu]] '''[[Souryuu]]'''|dropsE = [[Akigumo]] [[Yuudachi]] [[Souryuu]] [[Shouhou]] '''[[Maruyu]]''' [[Ryujo]] [[Hatsushimo]] [[Makigumo]] [[Naka]] [[Hatsuharu]] [[Tenryuu]] [[Tatsuta]]}} |
| − | + | =See Also= | |
| − | + | ;References | |
* [http://wikiwiki.jp/kancolle/?%C8%AF%C6%B0%A1%AA%DE%D5%BA%EE%C0%EF WikiWiki.jp Fall 2014 Event Page] | * [http://wikiwiki.jp/kancolle/?%C8%AF%C6%B0%A1%AA%DE%D5%BA%EE%C0%EF WikiWiki.jp Fall 2014 Event Page] | ||
| − | |||
| − | + | ;Tools | |
* [https://bf30afb8137feaf6980d72ac8cc5692c5d8ed45d.googledrive.com/host/0B37L_d6zeTfUQWFXVWNSWWtaNFE/ Air Superiority Calculator by Ofi123] | * [https://bf30afb8137feaf6980d72ac8cc5692c5d8ed45d.googledrive.com/host/0B37L_d6zeTfUQWFXVWNSWWtaNFE/ Air Superiority Calculator by Ofi123] | ||
| + | * [http://www.kancolle-calc.net/index.html KanColle Calculator and tools] by [http://www.nicovideo.jp/user/458233 艦載機厨] (in Japanese) | ||
| − | + | ;Player Live Streams | |
| − | |||
| − | |||
| − | |||
| − | |||
* [[User:Kevadu|@Kevadu]] http://www.twitch.tv/kevadu/ | * [[User:Kevadu|@Kevadu]] http://www.twitch.tv/kevadu/ | ||
* http://www.twitch.tv/Elinasama (lolibunny) (Finished) | * http://www.twitch.tv/Elinasama (lolibunny) (Finished) | ||
| Line 230: | Line 228: | ||
* http://www.twitch.tv/jenxiii/profile | * http://www.twitch.tv/jenxiii/profile | ||
* http://www.livestream.com/totaku (plays 12:30 AM ~ 6:00 AM CST On weekends) | * http://www.livestream.com/totaku (plays 12:30 AM ~ 6:00 AM CST On weekends) | ||
| − | + | {{EventsPortal}} | |
Latest revision as of 17:19, 21 July 2024
Introduction
The Fall 2014 Event began on 14 November 2014, and lasted until 1 December 2014. It is based on the Western New Guinea campaign
Participation requirements
- Must have a 75% sortie win ratio
- Must have 5 empty ship slots for new ships
- Must have 20 free equipment slots
- Must use combined fleet for maps that require it (refer to Special mechanics section).
- Ships that are used in E-1 and E-2 can not be used in E-3 (and vice versa).
- There's no shiplocking at E-4, all ships that previously went to E-1, E-2, and E-3 can be used in E-4.
Patch Notes
- New Ships
- Prinz Eugen, Admiral Hipper-class Heavy Cruiser (Kai Level 45,
 600
600  700)
700) - Asagumo, Asashio-class Destroyer (Kai Level 35,
 140
140  110)
110) - Nowaki, Kagerou-class Destroyer (Kai Level 35,
 140
140  110)
110) - Akizuki, Akizuki-class Destroyer (Kai Level 40,
 270
270  170)
170)
- Prinz Eugen, Admiral Hipper-class Heavy Cruiser (Kai Level 45,
- New Remodels
- Ushio Kai2 (Level 60,
 30
30  170)
170)
- Ushio Kai2 (Level 60,
- New Enemy Vessels
- Heavy Cruiser Ne-Class (重巡ネ級)
- Heavy Cruiser Ne-Class Elite (重巡ネ級 elite)
- Destroyer Princess (駆逐棲姫) - 2 types
- Aircraft Carrier Water Demon (空母水鬼) - 2 types
- New Equipment
- New Equipment Type:
 Anti-Aircraft Fire Director (高射装置)
- Can be equipped on all ship types except: 潜水艦, 潜水空母 (submarines and submarine carriers)
- Type 91 Anti-Aircraft Fire Director
- Type 94 Anti-Aircraft Fire Director
- 10cm Twin High-angle Mount + Anti-Aircraft Fire Director
- SKC34 20.3cm Twin Cannon
- FuMO25 Radar
- New Equipment Type:
- Voice and other Updates
- Akebono Kai voice
- Hatsuharu Kai/Kai2 voice
- Nenohi Kai voice
- Home Port Expansion maximum 220 ships / 980 equipment
Special Mechanics
- Combined Fleet - Surface Fleet combined fleet added and required for E-1 and E-3. E-4 may use either the original MI style Carrier-Escort combined fleet or a Surface Fleet.
- Surface Fleet combined fleet has different ship requirements. First Fleet now only allows maximum of 1 CV(B) or 2 CVLs, 4 BBs and 1 Wild card that is not BB, CV or CVL. Second Fleet requires 1 CL 2 DD.
- Form a combined fleet by dragging the fleet number 2 over fleet number 1.
- Change in combat nodes - Surface Fleet Combined Fleet will now have to go through shelling phrase rather that only having aerial phrase. However, First Fleet will begin shelling first before Second Fleet does.
- Ships that are used in E1 and E2 cannot be used in E-3 (as well as ships used in E3 cannot be used in E1 and E2). However, you can use all your ships (even those used in E1, E2 and E3) in E4. No one is locked out of E4.
- After you unlock E-4 you will be given the option to form Carrier-Escort Combined fleet when attempting to form a combined fleet (Left option). Right option allows you to form a Surface Fleet for E-1 and E-3.
Support Expeditions
- Expedition #133 is for the non-boss battles.
- Expedition #134 is for the boss battle.
Requirements for both expeditions: At least 2 destroyers
See Support Expeditions section for details.
Event Maps
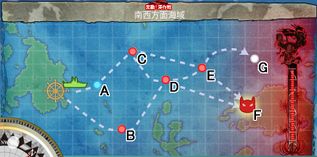
E-1 第一次渾作戦
Information
Rewards
|
|||
|
Branching rules
| |||
|
Tips | |||
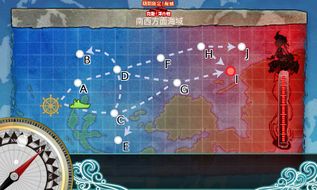
E-2: 第二次渾作戦
Information
Rewards
|
|||
|
Branching rules
| |||
|
Tips
| |||
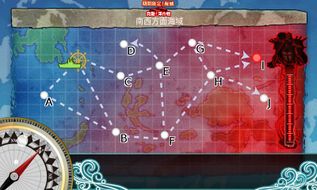
E-3
Information
Rewards
|
|||
|
Branching rules | |||
|
Tips
| |||
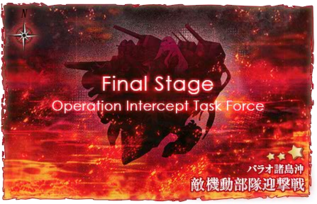
E-4
Information
Rewards
|
|||
|
Branching rules
| |||
|
Tips
| |||
See Also
- References
- Tools
- Air Superiority Calculator by Ofi123
- KanColle Calculator and tools by 艦載機厨 (in Japanese)
- Player Live Streams
- @Kevadu http://www.twitch.tv/kevadu/
- http://www.twitch.tv/Elinasama (lolibunny) (Finished)
- @HandgunOtonashi http://www.twitch.tv/handgunotonashi
- http://www.twitch.tv/bl2w (plays 8:30-10:00 PM EST every day)
- http://www.livestream.com/deltasierra (DeltaSierra4)
- http://www.twitch.tv/keemeef/ (keemeef~)
- http://www.twitch.tv/jenxiii/profile
- http://www.livestream.com/totaku (plays 12:30 AM ~ 6:00 AM CST On weekends)
| ||||||||||||||||||||||||||||||||||||||||||||||||||||||||||


