- Welcome to the Kancolle Wiki!
- If you have any questions regarding site content, account registration, etc., please visit the KanColle Wiki Discord
Spring 2025 Event/E-1
 
| |||||||||
|---|---|---|---|---|---|---|---|---|---|
 
The 2nd Stage Operations have been released!
FF release: TBA Approximate time until the end of the event: ([3][4] after KC 12th anniversary)
22 days, 5 hours, 11 minutes and 50 seconds
| |||||||||
北海道防衛作戦
![]()
![]()


| Information | ||||
|---|---|---|---|---|
| Event Tag | ||||
| Boss Gauges | Hard (甲): 2400 HP | |||
| Medium (乙): ? HP | ||||
| Easy (丙): ? HP | ||||
| Casual (丁): ? HP | ||||
| Map Bosses | Transport Ship Wa-Class B (Landing) Flagship
| |||
| Rewards[edit] | ||||
|---|---|---|---|---|
| Choice | 丁 Casual |
丙 Easy |
乙 Medium |
甲 Hard |
Food Supply Ship Mamiya |
1 | 1 | 1 | 1 |
| OR | ||||
Medal |
1 | 1 | 1 | 1 |
| THEN | ||||
Equipment Slots |
3 | 4 | 5 | |
| OR | ||||
Development Material |
12 | 16 | 20 | |
| THEN | ||||
Fuel |
1600 | 2000 | 4000 | |
| OR | ||||
Emergency Repair Goddess |
1 | 1 | 2 | |
| THEN | ||||
Improvement Material |
5 | 5 | ||
| OR | ||||
 Arctic Gear & Deck Personnel |
1 | 1 | ||
| THEN | ||||
Emergency Repair Goddess |
1 | |||
| OR | ||||
 Arctic Camouflage (+ Arctic Equipment) |
1 | 1 (★7) | 1 (★8) | 1 (★9) |
| Reward | 丁 Casual |
丙 Easy |
乙 Medium |
甲 Hard |
|---|---|---|---|---|
Food Supply Ship Irako |
1 | 1 | 2 | 3 |
Medal |
1 | |||
White Tasuki |
1 |
The event guides are to be constructed through the respective Event map page guide sandbox and reviewed by editors before being approved here.
- Do not update the guides through this page unless it is a minor fix. Please only update guides through their respective sandbox pages.
Branching Table
| E-1 Branching Rules (Start Points) ▼/▲ |
|---|
| E-1 Branching Rules ▼/▲ |
|---|
* = Rule under review
? = Ship type/amount under review
Branching compositions are reported over the course of the event.
- Please refer to KCNav for up to date map content (fleets used, LoS/speed requirements/drops/LBAS ranges, ...)
Historical Bonuses
| Ships [1] [Toggle Names] |
Map-wide | Nodes J/K/M/O Stacks with Map-wide | |||
|---|---|---|---|---|---|
| Damage | Damage | ||||
| Coastal Defense Ships (DE) | 1.12x | - | |||
| Destroyers (DD) | 1.03x | ||||
| Light Cruisers (CL) NOT CLT |
1.04x | ||||
| Seaplane Tenders (AV) | 1.08x | ||||
| Submarine Tenders (AS) | 1.08x | ||||
| 1.28x | - | ||||
|
1.16x | ||||
|
1.11x | ||||
|
- | 1.16x | |||


Map Overview
E1 is a single fleet, two-phase map consisting of one transport and one boss phase.
- 2 LBAS are available on this map:
- Only 1 can be set on Sortie, the other being limited to Defense,
- This map uses 2 locks:
 104th Squadron, Starting point 1 (reused in E-3)
 1st Fleet, Starting point 2 (reused in E-2)
The use of ![]() AGDP AGDP
AGDP AGDP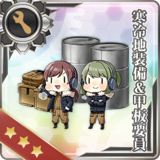 on CV(B/L), Ise-class Kai Ni, Akitsu Maru Kai, Kumano Maru, and Yamashio Maru, is required to sortie these ships on the map.
- Node C2 is a resource node.
Gimmick 1 - Unlock
To unlock the next part of the map, the following steps have to be performed:
| C | E | C2 | |
|---|---|---|---|
| Hard | S x3 | S x3 | Reach x2 |
| Medium | S x2 | A x2 | Reach x2 |
| Easy | ? | ? | ? |
| Casual | ? | ? | ? |
| ExpandNode C |
|---|
| ExpandNode C2 |
|---|
| ExpandNode E Fast |
|---|
| ExpandNode E Slow |
|---|
Gimmick 2 - Unlock
To unlock the boss, the following steps have to be performed:
| H | G | C2 | |
|---|---|---|---|
| Hard | S x3 | S? x3 | Reach |
| Medium | S x2 | S x2 | Reach |
| Easy | ? | ? | ? |
| Casual | ? | ? | ? |
| ExpandNode H Fast |
|---|
| ExpandNode H Slow |
|---|
| ExpandNode G Tag 1 |
|---|
| ExpandNode G Tag 2 |
|---|
- Node C2
- Refer to #Gimmick 1 - Unlock's fleet for composition and routing.
Phase 1 - Boss
| ExpandHeavy Fleet |
|---|
| ExpandSuper Heavy Fleet |
|---|
| ExpandLight Fleet |
|---|
![]() AGDP is required for all carriers.
AGDP is required for all carriers.
M includes the new Destroyer Ra-class α, which does oTorps and has good combat strength.
 Smokees are highly recommended for M along with Vanguard formation to avoid taking damage.
Boss Fleet will consist of the new Transport Ship Wa-Class B (Landing) Elite unit that has high AA strength and is armed with a ![]() Barrage Balloon to mitigate damage from carriers and LBAS.
Barrage Balloon to mitigate damage from carriers and LBAS.
- Be advised that if a land bases is sent to O, planes and rank loss will be significantly higher.
- Using Boss support is highly recommended.
- The Wa-class, while it has high HP, does however lack strong armor, it is possible to defeat it using double attacks.
Enemy Compositions

| # | Selection Node | ||
|---|---|---|---|
| A | 艦隊の針路を選択できます。提督、どちらの針路をとられますか? You can decide the fleet's course. Admiral, which heading should we take? | ||
| # | Selection Node | ||
| # | Empty Node | ||
|---|---|---|---|
| B | 気のせいだった。 Must be my imagination. | ||
| # | Empty Node | ||
| # | Formation | Normal Battle Node | AD/AP AS/AS+ |
|---|---|---|---|
| B1 | Echelon Line Abreast |
0/0 0/0 | |
| Echelon Line Abreast |
0/0 0/0 | ||
| Echelon Line Abreast |
0/0 0/0 | ||
| # | Formation | Normal Battle Node | AD/AP AS/AS+ |
| # | Formation | Air Defense Node | AD/AP AS/AS+ |
|---|---|---|---|
| B2 | Diamond (HA) |
47/94 210/420 | |
| Diamond | 23/45 99/198 | ||
| Diamond | 27/54 120/240 | ||
| Diamond (HA) |
51/101 227/453 | ||
| # | Formation | Air Defense Node | AD/AP AS/AS+ |
| # | Formation | Normal Battle Node | AD/AP AS/AS+ |
|---|---|---|---|
| C | Line Ahead Vanguard |
0/0 0/0 | |
| Line Ahead Vanguard |
0/0 0/0 | ||
| # | Formation | Normal Battle Node | AD/AP AS/AS+ |
| # | Formation | Normal Battle Node | AD/AP AS/AS+ |
|---|---|---|---|
| C1 | Line Ahead Vanguard |
0/0 0/0 | |
| Line Ahead Vanguard |
0/0 0/0 | ||
| # | Formation | Normal Battle Node | AD/AP AS/AS+ |
| # | Resource Node | ||
|---|---|---|---|
| # | Resource Node | ||
| # | Formation | Normal Battle Node | AD/AP AS/AS+ |
|---|---|---|---|
| D | Echelon Line Abreast |
0/0 0/0 | |
| Echelon Line Abreast |
0/0 0/0 | ||
| Echelon Line Abreast |
0/0 0/0 | ||
| # | Formation | Normal Battle Node | AD/AP AS/AS+ |
| # | Empty Node | ||
|---|---|---|---|
| D1 | 敵影を見ず。 No enemy spotted. | ||
| # | Empty Node | ||
| # | Formation | Normal Battle Node | AD/AP AS/AS+ |
|---|---|---|---|
| D2 | Line Ahead Vanguard |
0/0 0/0 | |
| Line Ahead Vanguard |
0/0 0/0 | ||
| # | Formation | Normal Battle Node | AD/AP AS/AS+ |
| # | Formation | Air Defense Node | AD/AP AS/AS+ |
|---|---|---|---|
| D3 | Diamond (HA) |
47/94 210/420 | |
| Diamond | 23/45 99/198 | ||
| Diamond | 27/54 120/240 | ||
| Diamond (HA) |
51/101 227/453 | ||
| # | Formation | Air Defense Node | AD/AP AS/AS+ |
| # | Formation | Normal Battle Node | AD/AP AS/AS+ |
|---|---|---|---|
| E | Echelon Line Abreast |
0/0 0/0 | |
| Echelon Line Abreast |
0/0 0/0 | ||
| Echelon Line Abreast |
0/0 0/0 | ||
| # | Formation | Normal Battle Node | AD/AP AS/AS+ |
| # | Empty Node | ||
|---|---|---|---|
| F | 気のせいだった。 Must be my imagination. | ||
| # | Empty Node | ||
| # | Formation | Normal Battle Node | AD/AP AS/AS+ |
|---|---|---|---|
| G | Line Ahead Double Line |
0/0 0/0 | |
| Line Ahead Double Line |
0/0 0/0 | ||
| # | Formation | Normal Battle Node | AD/AP AS/AS+ |
| # | Formation | Normal Battle Node | AD/AP AS/AS+ |
|---|---|---|---|
| H | Line Ahead Double Line Echelon |
0/0 0/0 | |
| # | Formation | Normal Battle Node | AD/AP AS/AS+ |
| # | Empty Node | ||
|---|---|---|---|
| I | 気のせいだった。 Must be my imagination. | ||
| # | Empty Node | ||
| # | Formation | Normal Battle Node | AD/AP AS/AS+ |
|---|---|---|---|
| J | Echelon Line Abreast |
0/0 0/0 | |
| Echelon Line Abreast |
0/0 0/0 | ||
| Echelon Line Abreast |
0/0 0/0 | ||
| # | Formation | Normal Battle Node | AD/AP AS/AS+ |
| # | Formation | Normal Battle Node | AD/AP AS/AS+ |
|---|---|---|---|
| K | Echelon Line Abreast |
0/0 0/0 | |
| Echelon Line Abreast |
0/0 0/0 | ||
| Echelon Line Abreast |
0/0 0/0 | ||
| # | Formation | Normal Battle Node | AD/AP AS/AS+ |
| # | Formation | Air Defense Node | AD/AP AS/AS+ |
|---|---|---|---|
| L | Diamond (HA) |
47/94 210/420 | |
| Diamond | 23/45 99/198 | ||
| Diamond | 27/54 120/240 | ||
| Diamond (HA) |
51/101 227/453 | ||
| # | Formation | Air Defense Node | AD/AP AS/AS+ |
| # | Formation | Normal Battle Node | AD/AP AS/AS+ |
|---|---|---|---|
| M | Line Ahead Double Line |
0/0 0/0 | |
| Line Ahead | 0/0 0/0 | ||
| # | Formation | Normal Battle Node | AD/AP AS/AS+ |
| # | Empty Node | ||
|---|---|---|---|
| N | 敵影を見ず。 No enemy spotted. | ||
| # | Empty Node | ||
| # | Formation | Boss Battle Node | AD/AP AS/AS+ |
|---|---|---|---|
| O | Double Line | 0/0 0/0 | |
| Double Line | 0/0 0/0 | ||
| Double Line (Final)
|
0/0 0/0 | ||
| # | Formation | Boss Battle Node | AD/AP AS/AS+ |
Ship Drops
| ExpandShip drops |
|---|
|
| |||||||||
|---|---|---|---|---|---|---|---|---|---|
|
The 2nd Stage Operations have been released!
FF release: TBA Approximate time until the end of the event: ([5][6] after KC 12th anniversary)
22 days, 5 hours, 11 minutes and 50 seconds
| |||||||||
Trivia
?