- Welcome to the Kancolle Wiki!
- If you have any questions regarding site content, account registration, etc., please visit the KanColle Wiki Discord
Early Spring 2023 Event/E-3/Sandbox
Sandbox Rules
This sandbox is to be used to construct an event guide for the above-mentioned event map. These guides are to all of the following requirements:
- An overview of the map, including ship/equipment bonuses, Ship Locks, and special mechanics,
- List of branching unlocking requirements (if there are multiple requirements, compositions for each path along with the below requirements will be needed to discuss the unlocking requirements in question),
- A list of working compositions that work: (T=these must have possible alternatives for players who may or may not have all ships needed for a specific path),
- The Paths said compositions will take (to explain each path the composition will/can take),
- A summary or description of what kind of obstacles a composition will face.
- A description of the boss node: what it consists of, and a descriptive guide on what the player should consider for a course of action to successfully win the battle,
- Optional: Tips/guides to farm certain ships and/or resources (this can also require compositions, paths, and possible descriptions).
Editors are to construct their own version of the guide/part of the guide, and complete it in a timely fashion.
No editor is allowed to edit over other editors' work without the consent of the editor and his approval to do so.
Several versions will be constructed through this page and will be reviewed and approved by the staff/collaboration committee before being moved for the Early Spring 2023 Event, being reviewed and updated once more before it can be released.
Overall there should be 3 versions of the guide that have to be constructed, including: Preliminary > Polished > Finalized Guides
With each approval of each version of the guide, the said guide will be updated to the main page, and construction of the next version will begin.
All guides outside of the approved version will be removed and work will begin from the approved version to make it better for the next version until the finalized version is made.
Branch Rules
Branching Table
| E-3 Branching Rules (Start Points) | ||
|---|---|---|
| Nodes | Rules | |
| Start | 1 |
|
2 |
| |
3 |
| |
| E-3 Branching Rules (Single / Striking Force Fleet) | ||
|---|---|---|
| Nodes | Rules | |
A |
B |
Active Branching |
F | ||
B |
B1 |
|
C |
??? | |
F |
| |
B1 |
B2 |
Does not meet the requirements to go to C |
C |
| |
D |
E |
|
K |
| |
G |
H |
Active Branching |
J | ||
H |
H1 |
|
I |
| |
H1 |
H2 |
|
I |
| |
J |
N |
Does not meet the requirements to go to O |
O2 |
| |
N |
O2 |
|
P |
| |
O2 |
P |
|
Q |
| |
| E-3 Branching Rules (Combined Fleet) | ||
|---|---|---|
| Nodes | Rules | |
J |
N |
|
O |
| |
O1 |
| |
M |
J |
Does not meet the requirements to go to O |
O |
| |
N |
O2 |
|
O1 |
O |
|
O2 |
Does not meet the requirements to go to O | |
O2 |
P |
|
Q |
| |
R |
S |
|
S1 |
| |
V2 |
| |
S |
Q |
|
S2 |
| |
T |
| |
U |
U1 |
|
U2 |
| |
V |
| |
U2 |
U3 |
??? |
V1 |
??? | |
V |
V1 |
Does not meet the requirements to go to V2 |
V2 |
| |
V1 |
U2 |
??? |
V2 |
??? | |
V2 |
W |
|
X |
| |
Jiga's Initial Guide
Map Overview
E-3 consists of 3 main phases and requires the use of Single Fleets, Striking Forces, and Combined Fleets.
- This map uses 3 locks:
 2nd Torpedo Squadron (from E-2), 1st starting point,
 Combined Fleet, 2nd starting point,
 Carrier Task Force, 3rd starting point.
- 2 LBAS are available to sortie into this map.
- After phase 1 ??, the LBAS is relocated closer to the final boss.
- "Airstrike Supported Battle" nodes are present on J U U1

Phase 1 - TP
Phase 1 is a "Transport Operation":
- Single Fleet: 1CL, 5DD

- Route: 1 A B B1 C D K
- LoS check: 55 Cn3 ?
Phase 1.5
The following steps have to be performed to unlock the 2nd boss:
| ?? | ?? | ?? | LBAS | |
|---|---|---|---|---|
| Hard | ?? | ?? | ?? | AS |
| Medium | ?? | ?? | ?? | ?? |
| Easy | ?? | ?? | ?? | ?? |
| Casual | ?? | ?? | ?? | ?? |
Phase 2
- CTF: 1-2FBB, 2-3CV, 1CA, 1CL + 1CL, 0-1CLT, 1-5DD (Fast)

- Route: 2 M O R S T
- STF: 3(F)BB, 1CV, 1CAV, 1CL + 1CL, 5DD (Fast)
- Route: 2 M O R S T
LoS check: ??
Phase 2.5
The following steps have to be performed to unlock the 3rd boss:
| ?? | ?? | ?? | LBAS | |
|---|---|---|---|---|
| Hard | ?? | ?? | ?? | AS |
| Medium | ?? | ?? | ?? | ?? |
| Easy | ?? | ?? | ?? | ?? |
| Casual | ?? | ?? | ?? | ?? |
Phase 3
- CTF: 2(F)BB, 2-3CV, 0-1CVL, 1CA, 0-1CL, 0-1AV + 0-1CA, 1CL, 1-2CLT, 2-4DD

- Route: 3 U V V2 X
- LoS check: ??
Debuff
Once LD has been reached, the following steps have to be performed to debuff the boss
| ?? | ?? | ?? | LBAS | |
|---|---|---|---|---|
| Hard | ?? | ?? | ?? | AS |
| Medium | ?? | ?? | ?? | ?? |
| Easy | ?? | ?? | ?? | ?? |
| Casual | ?? | ?? | ?? | ?? |
????
Once Debuff is complete the CG will change to the following:
| Remodeled Wartime Cargo Princess |
|---|
|


Various gimmicks
A+ rank:
- Use #Phase 1 - TP's fleet
S rank:
S rank:
- Single Fleet // Striking Force: "0-1FBB/CV(L)/CAV, 1-2CL, 4-5DD"
- Route: 1 A F G H I
- Bringing an AACI capable ship is recommended to pass through the air node.
S rank:
- Striking Force: "0-1FBB/CVL/CAV, 1-2CL(T), 4-5DD"
- Route: 1 A F G J N P
- Bringing an AACI capable ship is recommended to pass through the air node.
- CTF: "1-2FBB, 2CV(L), 1-2CA(V), 0-1CL, 0-AV + 1CL, 0-2CLT, 3-5DD"
- Route: 2 L M J N O2 P
- STF: "2FBB, 1CV(L), 1-2CA(V), 0-1CL + 1CL, 0-2CLT, 3-5DD"
- Route: 2 L M J N O2 P
Reach:
S rank:
- Use #Phase 2's fleet
??
YY's Guide
Historical Bonuses
DISCLAIMER: This information is based on user-submitted data and is subject to revisions as more data is gathered. Any version of the ship receives the bonus regardless of remodel.
Ship Bonuses
| Ships | Mapwide | B/B2/C/H/H1/K | J/M/N/O1/O2/S | I/P/T | U/U1?/U2/U3/V/V2 | X | ||
|---|---|---|---|---|---|---|---|---|
| All CA, CAV, CL, CLT, DD | 1.03x | - | - | - | - | - | ||
| All DE | 1.12x | - | - | - | - | - | ||
| 1.08x | 1.25x1.16x1.08 | 1.25x1.16x1.08 | 1.27x1.18x1.08 | 1.08x | 1.08x | |||
| 1.04x | 1.21x1.16x1.04 | 1.21x1.16x1.04 | 1.23x1.18x1.04 | 1.04x | 1.04x | |||
| - | 1.16x | 1.16x | 1.18x | - | - | |||
| - | 1.15x | 1.45x | ||||||
| - | - | 2.83~2.87x | 1.15x | - | - | |||
| - | - | 1.14x | 1.15x | - | - | |||
| - | - | 1.15x | 1.45x | |||||
| ! |
- | - | - | - | ||||
| - | - | - | - | 1.24x1.15x1.08 | 1.67x1.45x1.15 | |||
(* = not confirmed in TsunDB)
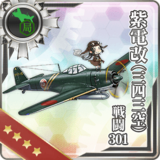
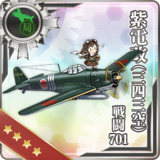
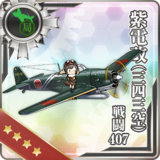
Equipment Bonuses
| Equipment | Map-wide |
|---|---|
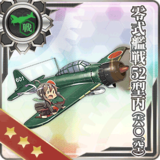 · Reppuu (601) · Reppuu (601) |
??x each (stackable) |
| ??x each (not stackable) |


Debuff
| Ships | Node X |
|---|---|
| -48 | |
| -19 |