|
|
| (34 intermediate revisions by 11 users not shown) |
| Line 1: |
Line 1: |
| | + | {{:{{BASEPAGENAME}}/2-1}} |
| | | | |
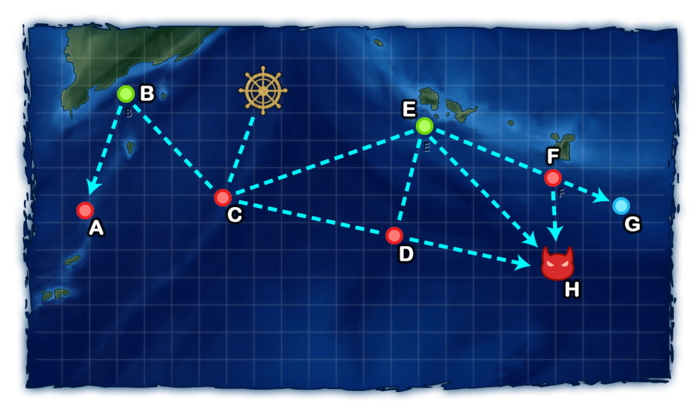
| − | =={{Anchor|2-1}}World 2-1: 南西諸島近海 Nansei Islands Coastal Waters==
| + | [[Category:Sortie]] |
| − | {{LabSortieworld
| |
| − | | map = 02_01.png
| |
| − | | difficulty = ☆ ☆ ☆
| |
| − | | item = {{steel}} {{IC}}
| |
| − | | exp = 120
| |
| − | | code = 南西諸島哨戒 (Nansei Islands Patrol)
| |
| − | | jptext = 艦隊を南西諸島方面に展開!同海域の哨戒を実施、同水域に侵入した敵を排除、南西航路の安全を確保せよ!
| |
| − | | entext = (Pending Translation)
| |
| − | }}
| |
| − | ===Stage Guide===
| |
| − | {{MapBranchingTable
| |
| − | |title = 2-1 Branching Rules
| |
| − | |expand = true
| |
| − | |id = 2-1
| |
| − | |C -> B/resource, D, E/resource =
| |
| − | * Meeting '''ANY''' of the following requirements to '''FORCE''' B:
| |
| − | ** Amount of CV(L/B) ≥ 3
| |
| − | ** Amount of BBV ≥ 2
| |
| − | *If fleet contains AO
| |
| − | **Go to B if fleet contains no SS(V)
| |
| − | **Random between D and E otherwise
| |
| − | *If fleet contains BBV, no AO
| |
| − | **Random routing between B and E if fleet also contains AV or SS(V).
| |
| − | **Random routing between B and D otherwise
| |
| − | *Go to E if fleet contains AV.
| |
| − | *Otherwise, random routing between D and E.
| |
| − | | |
| − | |E/resource -> D, F, H =
| |
| − | *Go to F if (F)BB(V)+CV(B/L) ≥ 5
| |
| − | *Go to D if fleet contains any (F)BB(V), SS(V) or CV(B/L) '''and''' contains 6 ships (Random between F and D if the amount of ships in fleet is not 6)
| |
| − | *Meet '''ANY''' of the following to go to H
| |
| − | **Fast fleet, amount of ships in fleet ≤ 5, CL = 1 and DD ≥ 3 ('''Overrides D node branching above''')
| |
| − | **CL ≤ 1 and DD+DE ≥ 5
| |
| − | **Fast fleet, CL = 1 and DD ≥ 4
| |
| − | *Go to D if fleet doesn't meet any of the above conditions and contains 6 ships
| |
| − | *Otherwise, F
| |
| − | | |
| − | |F -> G/empty, H =
| |
| − | *Go to G if the amount of ships in fleet = 6
| |
| − | *Otherwise, random routing
| |
| − | }}
| |
| − | | |
| − | {{AirControlSystem
| |
| − | | Map = 2-1
| |
| − | | AS = 81
| |
| − | }}
| |
| − | | |
| − | ===Tips===
| |
| − | * This map is fairly simple as long as you remember that all maps in World 2 have routing restrictions on the maximum number of CV(L)s. With a limited number of these, your path to the boss is guaranteed.
| |
| − | <br/>'''Recommended Fleet'''
| |
| − | *'''1 (F)BB, 1CV, 1 AV, 1 CL, 2 DD''' routes '''C - E - D - H'''
| |
| − | **Good for ensuring '''you can get both a flamethrower while playing through and reaching the boss node each run'''
| |
| − | <br/>'''Steel and Transport Farming'''
| |
| − | *'''3CV/CVL, 3XX''' routes '''C - B - A'''
| |
| − | **Good for collecting 2 transports per run and gathering a small amount of steel
| |
| − | ***But 2-2 is probably better for farming transports, as the 2-2 node (see below) does not include an enemy CVL and is therefore less likely to damage your fleet during the opening air combat phase.
| |
| − | **Bringing additional drums and Daihatsu will help you farm additional steel.
| |
| − | | |
| − | ===Nodes and Enemy Encounters===
| |
| − | {{#invoke:EnemyEncounters2|encounterTemplate
| |
| − | |A_label = 敵上陸船団
| |
| − | |A-1_node_info = cvl_nu-class_elite cl_ho-class_elite transport_wa-class_elite transport_wa-class_elite dd_i-class_late_model dd_i-class_late_model
| |
| − | | |
| − | |A-1_form = double_line diamond
| |
| − | |A-1_xp =
| |
| − | |A-1_enemy_air_power = 24
| |
| − | |A-2_node_info = cvl_nu-class_elite cl_ho-class_elite transport_wa-class_elite transport_wa-class_elite dd_i-class dd_i-class
| |
| − | |A-2_form = double_line diamond
| |
| − | |A-2_xp =
| |
| − | |A-2_enemy_air_power = 24
| |
| − | |A-3_node_info = cvl_nu-class_elite cl_ho-class_elite transport_wa-class transport_wa-class dd_i-class dd_i-class
| |
| − | |A-3_form = double_line diamond
| |
| − | |A-3_xp =
| |
| − | |A-3_enemy_air_power = 24
| |
| − | |
| |
| − | |B_label = '''<span style="color:green">Resource Node</span>'''
| |
| − | |B1_node_info = steel + 10 15 20 25
| |
| − | |
| |
| − | |C_label = 敵前衛部隊
| |
| − | |C-1_node_info = ca_ri-class_elite cl_he-class cl_he-class dd_i-class dd_i-class dd_i-class
| |
| − | |C-1_form = line_ahead double_line
| |
| − | |C-1_xp =
| |
| − | |C-1_enemy_air_power =
| |
| − | |C-2_node_info = ca_ri-class_elite ca_ri-class_elite cl_he-class dd_i-class dd_i-class dd_i-class
| |
| − | |C-2_form = line_ahead double_line
| |
| − | |C-2_xp =
| |
| − | |C-2_enemy_air_power =
| |
| − | |C-3_node_info = ca_ri-class_elite cl_he-class cl_he-class dd_i-class dd_i-class
| |
| − | |C-3_form = line_ahead double_line
| |
| − | |C-3_xp =
| |
| − | |C-3_enemy_air_power =
| |
| − | |
| |
| − | |D_label = 敵護衛空母群
| |
| − | |D-1_node_info = cvl_nu-class_elite cvl_nu-class_elite ca_ri-class_elite cl_ho-class_elite dd_i-class_late_model dd_i-class_late_model
| |
| − | |D-1_form = diamond
| |
| − | |D-1_xp =
| |
| − | |D-1_enemy_air_power = 48
| |
| − | |D-2_node_info = cvl_nu-class_elite cvl_nu-class_elite ca_ri-class_elite cl_ho-class_elite dd_i-class dd_i-class
| |
| − | |D-2_form = diamond
| |
| − | |D-2_xp =
| |
| − | |D-2_enemy_air_power = 48
| |
| − | |D-3_node_info = cvl_nu-class_elite cvl_nu-class_elite ca_ri-class_elite cl_ho-class dd_i-class dd_i-class
| |
| − | |D-3_form = diamond
| |
| − | |D-3_xp =
| |
| − | |D-3_enemy_air_power = 48
| |
| − | |D-4_node_info = cvl_nu-class cvl_nu-class ca_ri-class cl_ho-class dd_i-class dd_i-class
| |
| − | |D-4_form = diamond
| |
| − | |D-4_xp =
| |
| − | |D-4_enemy_air_power = 16
| |
| − | |D-5_node_info = cvl_nu-class_elite cvl_nu-class_elite ca_ri-class cl_ho-class dd_i-class dd_i-class
| |
| − | |D-5_form = diamond
| |
| − | |D-5_xp =
| |
| − | |D-5_enemy_air_power = 48
| |
| − | |D-6_node_info = cvl_nu-class_elite cvl_nu-class ca_ri-class cl_ho-class dd_i-class dd_i-class
| |
| − | |D-6_form = diamond
| |
| − | |D-6_xp =
| |
| − | |D-6_enemy_air_power = 32
| |
| − | |
| |
| − | |E_label = '''<span style="color:green">Resource Node</span>'''
| |
| − | |E1_node_info = instantconstruction + 1
| |
| − | |
| |
| − | |F_label = 敵機動部隊群
| |
| − | |F-1_node_info = cv_wo-class_elite cv_wo-class_elite ca_ri-class_elite cl_ho-class_elite dd_i-class_late_model dd_i-class_late_model
| |
| − | |F-1_form = diamond
| |
| − | |F-1_xp =
| |
| − | |F-1_enemy_air_power = 54
| |
| − | |F-2_node_info = cv_wo-class_elite cv_wo-class_elite ca_ri-class_elite cl_ho-class_elite dd_i-class dd_i-class
| |
| − | |F-2_form = diamond
| |
| − | |F-2_xp =
| |
| − | |F-2_enemy_air_power = 54
| |
| − | |F-3_node_info = cv_wo-class_elite cv_wo-class_elite ca_ri-class_elite cl_ho-class dd_i-class dd_i-class
| |
| − | |F-3_form = diamond
| |
| − | |F-3_xp =
| |
| − | |F-3_enemy_air_power = 54
| |
| − | |F-4_node_info = cv_wo-class cv_wo-class ca_ri-class cl_ho-class dd_i-class dd_i-class
| |
| − | |F-4_form = diamond
| |
| − | |F-4_xp =
| |
| − | |F-4_enemy_air_power = 20
| |
| − | |F-5_node_info = cv_wo-class_elite cv_wo-class_elite ca_ri-class cl_ho-class dd_i-class dd_i-class
| |
| − | |F-5_form = diamond
| |
| − | |F-5_xp =
| |
| − | |F-5_enemy_air_power = 54
| |
| − | |F-6_node_info = cv_wo-class_elite cv_wo-class ca_ri-class cl_ho-class dd_i-class dd_i-class
| |
| − | |F-6_form = diamond
| |
| − | |F-6_xp =
| |
| − | |F-6_enemy_air_power = 37
| |
| − | |
| |
| − | |G_label = '''<span style="color:blue">Battle Avoided</span>'''
| |
| − | |G1_node_info = "Must be my imagination" (battle avoided)
| |
| − | |
| |
| − | |H_label = 敵主力艦隊
| |
| − | |H-1_node_info = bb_ru-class_elite cv_wo-class_elite cv_wo-class_elite ca_ri-class_elite dd_i-class_late_model dd_i-class_late_model
| |
| − | |H-1_form = diamond
| |
| − | |H-1_xp =
| |
| − | |H-1_enemy_air_power = 54
| |
| − | |H-2_node_info = bb_ru-class_elite cv_wo-class_elite cv_wo-class_elite ca_ri-class_elite dd_i-class dd_i-class
| |
| − | |H-2_form = diamond
| |
| − | |H-2_xp =
| |
| − | |H-2_enemy_air_power = 54
| |
| − | |H-3_node_info = bb_ru-class_elite cv_wo-class_elite cvl_nu-class_elite ca_ri-class dd_i-class dd_i-class
| |
| − | |H-3_form = diamond
| |
| − | |H-3_xp =
| |
| − | |H-3_enemy_air_power = 51
| |
| − | |H-4_node_info = bb_ru-class_elite cv_wo-class_elite cv_wo-class_elite ca_ri-class dd_i-class dd_i-class
| |
| − | |H-4_form = double_line
| |
| − | |H-4_xp =
| |
| − | |H-4_enemy_air_power = 54
| |
| − | |H-5_node_info = bb_ru-class cv_wo-class cvl_nu-class ca_ri-class dd_i-class dd_i-class
| |
| − | |H-5_form = diamond
| |
| − | |H-5_xp =
| |
| − | |H-5_enemy_air_power = 18
| |
| − | |H-6_node_info = bb_ru-class_elite cv_wo-class cvl_nu-class ca_ri-class dd_i-class dd_i-class
| |
| − | |H-6_form = double_line
| |
| − | |H-6_xp =
| |
| − | |H-6_enemy_air_power = 18
| |
| − | |
| |
| − | |final_form =
| |
| − | |boss_node = H
| |
| − | }}
| |
| − | | |
| − | ===Drops===
| |
| − | <div class="mw-customtoggle-2-1-drop globalbutton">Show/Hide Drops</div>
| |
| − | {| class="mw-collapsible mw-collapsed wikitable" id="mw-customcollapsible-2-1-drop"
| |
| − | !Node
| |
| − | !Destroyers
| |
| − | !Light Cruisers
| |
| − | !Heavy Cruisers
| |
| − | !Seaplane Tender
| |
| − | !Aircraft Carrier
| |
| − | !Battleship
| |
| − | |-
| |
| − | | style="text-align:center;" |A
| |
| − | | style="text-align:center;" |[[Kisaragi]], [[Samidare]], [[Shirayuki]], [[Shikinami]], [[Mutsuki]], [[Nenohi]], [[Kuroshio]], [[Ooshio]], [[Hatsuyuki]], [[Michishio]], [[Murasame]], [[Yuudachi]]
| |
| − | | style="text-align:center;" |[[Nagara]], [[Naka]], [[Sendai]], [[Tama]], [[Kuma]], [[Isuzu]], [[Jintsuu]]
| |
| − | | style="text-align:center;" |[[Aoba]], [[Ashigara]], [[Nachi]], [[Kako]], [[Maya]], [[Furutaka]], [[Choukai]], [[Haguro]], [[Atago]], [[Myoukou]], [[Mogami]]
| |
| − | | style="text-align:center;" |[[Chitose]], [[Chiyoda]]
| |
| − | | style="text-align:center;" |[[Shouhou]], [[Houshou]], [[Hiyou]], [[Jun'you]]
| |
| − | | style="text-align:center;" |[[Ise]], [[Hyuuga]], [[Haruna]], [[Kirishima]], [[Fusou]], [[Yamashiro]]
| |
| − | |-
| |
| − | | style="text-align:center;" |C
| |
| − | | style="text-align:left;" |
| |
| − | <p style="text-align:center;">[[Shiranui]], [[Murasame]], [[Mikazuki]], [[Hatsuyuki]], [[Shigure]], [[Nenohi]], [[Kuroshio]], [[Kasumi]], [[Isonami]], [[Mochizuki|Mochizuki,]] [[Shimakaze]], [[Wakaba]], [[Miyuki]], [[Fumizuki]]</p>
| |
| − | | style="text-align:center;" |[[Yura]], [[Isuzu]], [[Sendai]]
| |
| − | | style="text-align:center;" |[[Aoba]], [[Ashigara]], [[Nachi]], [[Maya]], [[Furutaka]], [[Mogami]], [[Choukai]], [[Kako]], [[Haguro]]
| |
| − | | style="text-align:center;" |[[Chitose]], [[Chiyoda]]
| |
| − | | style="text-align:center;" |[[Shouhou]], [[Hiyou]]
| |
| − | | style="text-align:center;" |[[Ise]], [[Haruna]], [[Fusou]], [[Yamashiro]]
| |
| − | |-
| |
| − | | style="text-align:center;" |'''<font color="#ff0000">E Boss Node</font>'''
| |
| − | | style="text-align:center;" |[[Mikazuki]], [[Satsuki]]
| |
| − | | style="text-align:center;" |[[Naka]], [[Kiso]], [[Jintsuu]], [[Kuma]], [[Isuzu]], [[Kitakami]], [[Tatsuta]], [[Natori]], [[Yura]]
| |
| − | | style="text-align:center;" |[[Haguro]], [[Aoba]], [[Ashigara]], [[Takao]], [[Choukai]], [[Atago]], [[Chikuma]], [[Nachi]], [[Tone]], [[Maya]]
| |
| − | | style="text-align:center;" |[[Chitose]], [[Chiyoda]]
| |
| − | | style="text-align:center;" |[[Shouhou]], <span style="color:rgb(0,0,0);">[[Jun'you]], [[Ryuujou]] </span>
| |
| − | | style="text-align:center;" |[[Kongou]], [[Hiei]], [[Haruna]], [[Kirishima]], [[Fusou]], [[Yamashiro]]
| |
| − | |-
| |
| − | | style="text-align:center;" |F
| |
| − | | style="text-align:center;" |
| |
| − | [[Samidare]], [[Michishio]], [[Ooshio]], [[Hatsuyuki]], [[Shiranui]]
| |
| − | | style="text-align:center;" |[[Tama]], <span style="color:rgb(0,0,0);text-align:start;">[[Isuzu]], [[Natori]], [[Yura|Yura]], </span>[[Sendai]]
| |
| − | | style="text-align:center;" |[[Ashigara]], [[Kako]], [[Furutaka]], [[Aoba]], [[Mogami]]
| |
| − | | style="text-align:center;" |[[Chitose]], [[Chiyoda]]
| |
| − | | style="text-align:center;" |[[Shouhou]], [[Ryuujou]]
| |
| − | |
| |
| − | |}
| |
| − | | |
| − | =={{Anchor|2-2}}World 2-2: バシー島海峡 Bashi Island Strait==
| |
| − | {{LabSortieworld
| |
| − | | map = 02_02.png
| |
| − | | difficulty = ☆ ☆ ☆ ☆
| |
| − | | item = {{Bauxite}} {{IC}}
| |
| − | | exp = 150
| |
| − | | code = 柳輸送作戦 ([[wikipedia:ja:柳船|Weeping Willow Transport]] Tactics)
| |
| − | | jptext = 艦隊をバシー海峡に展開せよ!同方面の制海権を確保し、南方からの資源輸送の安全に務め、防衛体制を強化せよ!
| |
| − | |entext = (Pending translation)
| |
| − | }}
| |
| − | <br />
| |
| − | ===Stage Guide===
| |
| − | {{MapBranchingTable
| |
| − | |title = 2-2 Branching Rules
| |
| − | |expand = true
| |
| − | |id = 2-2
| |
| − | |C/empty -> B, D, E =
| |
| − | * Meeting '''ANY''' of the following requirements forces you to B:
| |
| − | ** Amount of CV(L/B) ≥ 3
| |
| − | ** Amount of BBV ≥ 2
| |
| − | ** Fleet contains AO, but no SS(V).
| |
| − | *Go to E if fleet contains SS(V) but no BBV
| |
| − | * Random routing between B and E if fleet contains both BBV and AV/AS.
| |
| − | * Random routing between B and D if fleet contains BBV.
| |
| − | * Go to E if fleet contains AV/AS
| |
| − | * Otherwise, random routing between D and E.
| |
| − | | |
| − | |E -> F/resource, G, K =
| |
| − | * Go to G if amount of CV(L/B)+(F)BB(V) ≥ 4
| |
| − | *Go to F if DE ≥ 2
| |
| − | *Random routing between G and K if fleet contains any CV(L/B)+(F)BB(V) '''or''' DD+DE ≤ 1
| |
| − | *Go to K if fleet contains CL and the fleet is fast
| |
| − | * Otherwise, random routing between F and K.
| |
| − | | |
| − | |G -> H/empty, K =
| |
| − | *Meet '''ANY''' of the following to go to H
| |
| − | **Fleet contains CV(L/B)
| |
| − | **Fleet contains no DDs
| |
| − | *Otherwise, random routing
| |
| − | | |
| − | |H/empty -> I/empty, J/resource, K =
| |
| − | *Random between I and K if
| |
| − | **(F)BB(V)+CV(L/B) ≥ 4
| |
| − | **Fleet contains SS(V)
| |
| − | *Go to K if fleet contains CV(L/B) or AV
| |
| − | *Otherwise, random between J and K if fleet contains CL and DD
| |
| − | *Otherwise, random between I and K
| |
| − | }}
| |
| − | | |
| − | {{AirControlSystem
| |
| − | | Map = 2-2
| |
| − | | AS = 41
| |
| − | }}
| |
| − | | |
| − | ===Tips===
| |
| − | <br/>'''Recommended Fleet'''
| |
| − | *'''1 AV, 2 CVL, 2 DE, 1 CL''' routes '''C-E-F-H-K'''
| |
| − | **Takes a fixed route with 1 surface battle and a bauxite node '''F''' before routing directly to the boss.
| |
| − | **Taking a CL that can carry '''[[Daihatsu|DLC]]''' will allow you to maximize on resource pickup.
| |
| − | *'''1 AV, 2 DD, 3 XX (XX being any CLT, CA(V), CL or AV)''' routes '''C-E-K or C-E-F-H-K'''
| |
| − | **Avoid Node G, which contains Ru-class BBs
| |
| − | **Be sure your Seaplane tenders and Aviation cruisers (If used) bring enough Zuiuns or Seaplane Fighters to help over power the boss composition's air power as there will be a Wo-class Elite or Nu-class Elite present at the boss node in all compositions
| |
| − | **Path '''C-E-K''' is guaranteed if your fleet contains any CL
| |
| − | <br/>'''Transport Kills'''
| |
| − | *This map is ideal for farming transport kills for [[Quests#Bw3|Bw3]] and [[Quests#Bw4|Bw4]], as node B contains 2 transports per run and can be reached consistently with the fleet '''3 CVL, 3 XX''' going '''C - B - A'''
| |
| − | **Having '''3 or more carriers''' in your fleet will '''always''' route you to B allowing you to fight 2 transports and score bauxite every run. With the right carriers and/or equipment, it is possible to break even on bauxite consumption (or even make a net gain) while farming the transports.
| |
| − | | |
| − | ===Nodes and Enemy Encounters===
| |
| − | {{#invoke:EnemyEncounters2|encounterTemplate
| |
| − | |A_label = '''<span style="color:green">Resource Node</span>'''
| |
| − | |A1_node_info = bauxite + 10 20
| |
| − | |
| |
| − | |B_label = 敵上陸船団
| |
| − | |B-1_node_info = cl_ho-class_elite transport_wa-class_elite transport_wa-class_elite dd_i-class_late_model dd_i-class_late_model dd_i-class_late_model
| |
| − | |B-1_form = double_line
| |
| − | |B-1_xp =
| |
| − | |B-1_enemy_air_power =
| |
| − | |B-2_node_info = cl_ho-class_elite transport_wa-class_elite transport_wa-class_elite dd_i-class_late_model dd_i-class dd_i-class
| |
| − | |B-2_form = double_line
| |
| − | |B-2_xp =
| |
| − | |B-2_enemy_air_power =
| |
| − | |B-3_node_info = cl_ho-class_elite transport_wa-class transport_wa-class dd_i-class_late_model dd_i-class dd_i-class
| |
| − | |B-3_form = double_line
| |
| − | |B-3_xp =
| |
| − | |B-3_enemy_air_power =
| |
| − | |B-4_node_info = transport_wa-class_elite transport_wa-class_elite cl_ho-class_elite dd_i-class_late_model dd_i-class dd_i-class
| |
| − | |B-4_form = diamond
| |
| − | |B-4_xp =
| |
| − | |B-4_enemy_air_power =
| |
| − | |B-5_node_info = transport_wa-class_elite transport_wa-class_elite cl_ho-class_elite dd_i-class_late_model dd_i-class_late_model dd_i-class_late_model
| |
| − | |B-5_form = diamond
| |
| − | |B-5_xp =
| |
| − | |B-5_enemy_air_power =
| |
| − | |B-6_node_info = transport_wa-class transport_wa-class cl_ho-class_elite dd_i-class_late_model dd_i-class dd_i-class
| |
| − | |B-6_form = diamond
| |
| − | |B-6_xp =
| |
| − | |B-6_enemy_air_power =
| |
| − | |
| |
| − | |C_label = '''<span style="color:blue">Battle Avoided</span>'''
| |
| − | |C1_node_info = "Must be my imagination" (battle avoided)
| |
| − | |
| |
| − | |D_label = 敵上陸船団
| |
| − | |D-1_node_info = cl_ho-class_elite transport_wa-class_elite transport_wa-class_elite dd_i-class_late_model dd_i-class_late_model dd_i-class_late_model
| |
| − | |D-1_form = double_line
| |
| − | |D-1_xp =
| |
| − | |D-1_enemy_air_power =
| |
| − | |D-2_node_info = cl_ho-class_elite transport_wa-class_elite transport_wa-class_elite dd_i-class_late_model dd_i-class dd_i-class
| |
| − | |D-2_form = double_line
| |
| − | |D-2_xp =
| |
| − | |D-2_enemy_air_power =
| |
| − | |D-3_node_info = cl_ho-class_elite transport_wa-class transport_wa-class dd_i-class_late_model dd_i-class dd_i-class
| |
| − | |D-3_form = double_line
| |
| − | |D-3_xp =
| |
| − | |D-3_enemy_air_power =
| |
| − | |D-4_node_info = transport_wa-class_elite transport_wa-class_elite cl_ho-class_elite dd_i-class_late_model dd_i-class dd_i-class
| |
| − | |D-4_form = diamond
| |
| − | |D-4_xp =
| |
| − | |D-4_enemy_air_power =
| |
| − | |D-5_node_info = transport_wa-class_elite transport_wa-class_elite cl_ho-class_elite dd_i-class_late_model dd_i-class_late_model dd_i-class_late_model
| |
| − | |D-5_form = diamond
| |
| − | |D-5_xp =
| |
| − | |D-5_enemy_air_power =
| |
| − | |D-6_node_info = transport_wa-class transport_wa-class cl_ho-class_elite dd_i-class_late_model dd_i-class dd_i-class
| |
| − | |D-6_form = diamond
| |
| − | |D-6_xp =
| |
| − | |D-6_enemy_air_power =
| |
| − | |
| |
| − | |E_label = 敵水雷戦隊
| |
| − | |E-1_node_info = cl_ho-class_elite clt_chi-class_elite clt_chi-class_elite dd_i-class dd_i-class dd_i-class
| |
| − | |E-1_form = double_line line_ahead
| |
| − | |E-1_xp =
| |
| − | |E-1_enemy_air_power =
| |
| − | |E-2_node_info = cl_ho-class_elite clt_chi-class clt_chi-class dd_i-class dd_i-class dd_i-class
| |
| − | |E-2_form = double_line line_ahead
| |
| − | |E-2_xp =
| |
| − | |E-2_enemy_air_power =
| |
| − | |E-3_node_info = cl_ho-class clt_chi-class clt_chi-class dd_i-class dd_i-class dd_i-class
| |
| − | |E-3_form = line_ahead double_line
| |
| − | |E-3_xp =
| |
| − | |E-3_enemy_air_power =
| |
| − | |
| |
| − | |F_label = '''<span style="color:green">Resource Node</span>'''
| |
| − | |F1_node_info = bauxite + 15 35
| |
| − | |
| |
| − | |G_label = 敵水上打撃部隊
| |
| − | |G-1_node_info = bb_ru-class_elite bb_ru-class_elite ca_ri-class_elite cl_ho-class_elite dd_i-class_late_model dd_i-class_late_model
| |
| − | |G-1_form = double_line line_ahead
| |
| − | |G-1_xp =
| |
| − | |G-1_enemy_air_power =
| |
| − | |G-2_node_info = bb_ru-class_elite bb_ru-class cl_ho-class_elite dd_i-class_late_model dd_i-class dd_i-class
| |
| − | |G-2_form = double_line line_ahead
| |
| − | |G-2_xp =
| |
| − | |G-2_enemy_air_power =
| |
| − | |G-3_node_info = bb_ru-class bb_ru-class cl_ho-class_elite dd_i-class dd_i-class dd_i-class
| |
| − | |G-3_form = double_line line_ahead
| |
| − | |G-3_xp =
| |
| − | |G-3_enemy_air_power =
| |
| − | |
| |
| − | |H_label = '''<span style="color:blue">Battle Avoided</span>'''
| |
| − | |H1_node_info = "Must be my imagination" (battle avoided)
| |
| − | |
| |
| − | |I_label = '''<span style="color:blue">Battle Avoided</span>'''
| |
| − | |I1_node_info = "Must be my imagination" (battle avoided)
| |
| − | |
| |
| − | |J_label = '''<span style="color:green">Resource Node</span>'''
| |
| − | |J1_node_info = instantconstruction + 1
| |
| − | |
| |
| − | |K_label = 敵通商破壊機動部隊 主力艦隊
| |
| − | |K-1_node_info = cv_wo-class_elite bb_ru-class_elite bb_ru-class_elite cl_he-class_elite dd_i-class_late_model dd_i-class_late_model
| |
| − | |K-1_form = diamond line_ahead
| |
| − | |K-1_xp =
| |
| − | |K-1_enemy_air_power = 27
| |
| − | |K-2_node_info = cv_wo-class_elite ca_ri-class_elite ca_ri-class_elite cl_he-class_elite dd_i-class_late_model dd_i-class_late_model
| |
| − | |K-2_form = diamond line_ahead
| |
| − | |K-2_xp =
| |
| − | |K-2_enemy_air_power = 27
| |
| − | |K-3_node_info = cvl_nu-class_elite ca_ri-class_elite ca_ri-class_elite dd_i-class_late_model dd_i-class dd_i-class
| |
| − | |K-3_form = diamond line_ahead
| |
| − | |K-3_xp =
| |
| − | |K-3_enemy_air_power = 24
| |
| − | |K-4_node_info = ca_ri-class_elite ca_ri-class_elite cl_ho-class_elite dd_i-class dd_i-class dd_i-class
| |
| − | |K-4_form = line_ahead
| |
| − | |K-4_xp =
| |
| − | |K-4_enemy_air_power =
| |
| − | |K-5_node_info = cvl_nu-class_elite ca_ri-class_elite cl_ho-class dd_i-class dd_i-class dd_i-class
| |
| − | |K-5_form = diamond
| |
| − | |K-5_xp =
| |
| − | |K-5_enemy_air_power = 24
| |
| − | |
| |
| − | |final_form =
| |
| − | |boss_node = K
| |
| − | }}
| |
| − | | |
| − | ===Drops===
| |
| − | | |
| − | <div class="mw-customtoggle-2-2-drop globalbutton">Show/Hide Drops</div>
| |
| − | | |
| − | {| class="mw-collapsible mw-collapsed wikitable" id="mw-customcollapsible-2-2-drop"
| |
| − | !Node
| |
| − | !Destroyers
| |
| − | !Light Cruisers
| |
| − | !Heavy Cruisers
| |
| − | !Seaplane Tender
| |
| − | !Aircraft Carrier
| |
| − | !Battleship
| |
| − | |-
| |
| − | | style="text-align:center;" |A
| |
| − | | style="text-align:center;" |[[Fubuki]], [[Wakaba]], [[Kuroshio]], [[Hatsuharu]], [[Kasumi]], [[Nenohi]], [[Shiranui]], [[Kagerou]], [[Yuudachi]], [[Murasame]], [[Hibiki]]
| |
| − | | style="text-align:center;" |[[Ooi]], [[Kitakami]], [[Tenryuu]], [[Tatsuta]], [[Nagara]], [[Isuzu]], [[Natori]], [[Yura]], [[Sendai]], [[Jintsuu]], [[Naka]]
| |
| − | | style="text-align:center;" |[[Furutaka]], [[Kako]], [[Aoba]], [[Tone]], [[Atago]], [[Takao]], [[Chikuma]], [[Mogami]], [[Ashigara]], [[Myoukou]], [[Nachi]], [[Maya]], [[Choukai]]
| |
| − | | style="text-align:center;" |
| |
| − | | style="text-align:center;" |[[Ryuujou]], [[Hiyou]], [[Jun'you]], [[Shouhou]]
| |
| − | | style="text-align:center;" |[[Kirishima]], [[Fusou]], [[Yamashiro]]
| |
| − | |-
| |
| − | | style="text-align:center;" |D
| |
| − | | style="text-align:center;" |[[Hatsuharu]], [[Michishio]], [[Shigure]], [[Mochizuki]], [[Fubuki]], [[Kagerou]], [[Hatsushimo]]
| |
| − | | style="text-align:center;" |[[Tenryuu]], [[Tatsuta]], [[Isuzu]], [[Natori]], [[Sendai]], [[Naka]]
| |
| − | | style="text-align:center;" |[[Ashigara]], [[Aoba]], [[Nachi]], [[Kako]], [[Takao|Takao,]] [[Myoukou]], [[Haguro|Haguro]], [[Mogami]], [[Maya]]
| |
| − | | style="text-align:center;" |
| |
| − | | style="text-align:center;" |[[Ryuujou]], [[Hiyou]], [[Jun'you]], [[Shouhou]]
| |
| − | | style="text-align:center;" |[[Kirishima]], [[Fusou]], [[Yamashiro]]
| |
| − | |-
| |
| − | | style="text-align:center;" |'''<span style="color:red">F</span>'''
| |
| − | | style="text-align:center;" |[[Hamakaze|'''<span style="color:red">Hamakaze</span>''']], [[Yayoi|'''<span style="color:red">Yayoi</span>''']]
| |
| − | | style="text-align:center;" |[[Kitakami]], [[Kuma]], [[Tama]], [[Kiso]], [[Isuzu]], [[Sendai]], [[Jintsuu]], [[Naka]], [[Yura]], [[Natori]]
| |
| − | | style="text-align:center;" |[[Takao]], [[Tone]], [[Atago]], [[Nachi]], [[Maya]], [[Kako]], [[Choukai]], [[Mogami]], [[Chikuma]], [[Myoukou]], [[Haguro]]
| |
| − | | style="text-align:center;" |[[Chitose]], [[Chiyoda]]
| |
| − | | style="text-align:center;" |[[Kaga]], [[Ryuujou]], [[Hiyou]], [[Jun'you]], [[Shouhou]], [[Souryuu]]
| |
| − | | style="text-align:center;" |[[Ise]], [[Hyuuga]], [[Kongou]], [[Hiei]], [[Kirishima]], [[Fusou]], [[Yamashiro]]
| |
| − | |-
| |
| − | | style="text-align:center;" |G
| |
| − | | style="text-align:center;" |
| |
| − | [[Mikazuki]], [[Nagatsuki]], [[Hibiki]], [[Ikazuchi]], [[Hatsuharu]], [[Arare]], [[Kuroshio]], [[Ooshio]], [[Kagerou]], [[Akatsuki]], [[Murasame]], [[Samidare]]
| |
| − | | style="text-align:center;" |[[Tenryuu]], [[Tatsuta]], [[Isuzu]], [[Natori]], [[Sendai]], [[Jintsuu]], [[Naka]], [[Kitakami]]
| |
| − | | style="text-align:center;" |[[Furutaka]], [[Aoba]], [[Takao]], [[Haguro]], [[Ashigara]], [[Kako]], [[Atago]], [[Mogami]]
| |
| − | | style="text-align:center;" |
| |
| − | | style="text-align:center;" |[[Ryuujou]], [[Hiyou]], [[Jun'you]], [[Shouhou]]
| |
| − | | style="text-align:center;" |[[Kirishima]], [[Fusou]], [[Yamashiro]]
| |
| − | |}
| |
| − | | |
| − | =={{Anchor|2-3}}World 2-3: 東部オリョール海 Eastern Orel Bay==
| |
| − | {{LabSortieworld
| |
| − | | map = 2-3 Map.png
| |
| − | | difficulty = ☆ ☆ ☆ ☆ ☆
| |
| − | | item = {{Fuel}} {{Ammo}}
| |
| − | | exp = 200
| |
| − | | code = オリョール哨戒 (Orel Patrol)
| |
| − | | jptext = オリョール海に進出、同海域を哨戒。敵通商破壊艦隊を排除、我が方り海上輸送ラインの防衛に努めよ!
| |
| − | | entext = Enter Orel Bay and conduct a patrol. Destroy the enemy transport fleet while protecting our own supply lines!
| |
| − | }}
| |
| − | | |
| − | === Stage Guide ===
| |
| − | {{MapBranchingTable
| |
| − | |title = 2-3 Branching Rules
| |
| − | |expand = true
| |
| − | |id = 2-3
| |
| − | |0 -> A, B, C/empty =
| |
| − | *Go to C if fleet contains only SS(V).
| |
| − | * Random between A & B otherwise.
| |
| − | |C/empty -> D/resource, F =
| |
| − | * Random routing
| |
| − | |D/resource -> F,G/resource=
| |
| − | *Go to G if fleet contains AV and DD+DE ≥ 2
| |
| − | *Otherwise, random routing (The more (F)BB(V) and CV(L) you have in the fleet, the higher chance you will go to node F)
| |
| − | |F -> H/resource, J, G/resource =
| |
| − | * Random between J & G if the fleet contains any AV, CV(B/L) or CL (Higher chance for J)
| |
| − | * Random between H, J, and G otherwise.
| |
| − | |G/resource -> I/resource, K =
| |
| − | *Go to K if fleet contains any (F)BB(V) or CV(L/B) '''and''' CL+DD+DE ≤ 1
| |
| − | *Otherwise, random routing
| |
| − | |J -> L/empty, M, N =
| |
| − | *Go to L if (F)BB(V) + CV(L/B) = 6
| |
| − | *Meet '''ANY''' of the following to go to N ('''Overrides any SS(V) rule below''')
| |
| − | **Fleet contains CL and DD ≥ 4
| |
| − | **Fleet contains CL and CA(V) ≥ 4
| |
| − | *Random between M and N if fleet contains only SS(V)
| |
| − | *Random between L, M and N if fleet contains any SS(V)
| |
| − | *Otherwise, random between L and N, but the heavier the fleet (as in more BB or CV(L)), the more likely you will go to L
| |
| − | }}
| |
| − | | |
| − | {{AirControlSystem
| |
| − | | Map = 2-3
| |
| − | | AS = 81
| |
| − | }}
| |
| − | | |
| − | === Tips ===
| |
| − | *Due to the danger of Late Model Destroyers present in Easter Orel Sea, Orel cruising has been rendered difficult to achieve and thus, can be rendered obsolete by changes to 2-3 after the HTML5 update.
| |
| − | *Path to the boss node is very randomized on this map, although it's known that if you have 2 CV(L) or less in the fleet, you should reach the boss node most of the times.
| |
| − | *Some important factors regarding the branching that can be noted are:
| |
| − | **SS/SSV do have a chance of reaching dead end nodes which includes nodes H, L and M
| |
| − | **All other comps have a chance of reaching boss node with a smaller chance of hitting dead end nodes.
| |
| − | | |
| − | <br/>'''Recommended Fleet'''
| |
| − | *'''1 (F)BB(V)/CV(L/B) 1 CL 4 DD (J-N path is guaranteed)'''
| |
| − | *'''1 (F)BB(V)/CV(L/B) 1 CL 4 CA(V) (J-N path is guaranteed)'''
| |
| − | * '''1 (F)BB, 2 CV(B)(L), 0-1 CA, 0-1 CL/CT/CLT, 2 DD'''
| |
| − | * '''2 (F)BB, 1 CV, 0-1 CA, 0-1 CL/CT/CLT, 2 DD'''
| |
| − | * '''2 CV(B)(L), 0-2 CA, 0-2 CL/CT/CLT, 2 DD'''
| |
| − | | |
| − | ===Nodes and Enemy Encounters===
| |
| − | {{#invoke:EnemyEncounters2|encounterTemplate
| |
| − | |A_label = 敵前衛警戒部隊
| |
| − | |A-1_node_info = cl_ho-class_elite dd_i-class_late_model dd_i-class_late_model dd_i-class dd_i-class dd_i-class
| |
| − | |A-1_form = double_line line_ahead
| |
| − | |A-1_xp =
| |
| − | |A-1_enemy_air_power =
| |
| − | |A-2_node_info = cl_ho-class_elite dd_i-class_late_model dd_i-class dd_i-class dd_i-class dd_i-class
| |
| − | |A-2_form = double_line line_ahead
| |
| − | |A-2_xp =
| |
| − | |A-2_enemy_air_power =
| |
| − | |A-3_node_info = cl_ho-class_elite dd_i-class_late_model dd_i-class dd_i-class dd_i-class
| |
| − | |A-3_form = double_line line_ahead
| |
| − | |A-3_xp =
| |
| − | |A-3_enemy_air_power =
| |
| − | |A-4_node_info = cl_ho-class_elite dd_i-class_late_model dd_i-class dd_i-class
| |
| − | |A-4_form = double_line line_ahead
| |
| − | |A-4_xp =
| |
| − | |A-4_enemy_air_power =
| |
| − | |A-5_node_info = cl_ho-class_elite dd_i-class dd_i-class dd_i-class
| |
| − | |A-5_form = line_ahead
| |
| − | |A-5_xp =
| |
| − | |A-5_enemy_air_power =
| |
| − | |
| |
| − | |B_label = '''<span style="color:blue">Battle Avoided</span>'''
| |
| − | |B1_node_info = "Must be my imagination" (battle avoided)
| |
| − | |
| |
| − | |C_label = '''<span style="color:blue">Battle Avoided</span>'''
| |
| − | |C1_node_info = "Must be my imagination" (battle avoided)
| |
| − | |
| |
| − | |D_label = '''<span style="color:green">Resource Node</span>'''
| |
| − | |D1_node_info = fuel + ?
| |
| − | |
| |
| − | |E_label = 敵前衛警戒部隊
| |
| − | |E-1_node_info = cl_ho-class_elite dd_i-class_late_model dd_i-class_late_model dd_i-class dd_i-class dd_i-class
| |
| − | |E-1_form = double_line line_ahead
| |
| − | |E-1_xp =
| |
| − | |E-1_enemy_air_power =
| |
| − | |E-2_node_info = cl_ho-class_elite dd_i-class_late_model dd_i-class dd_i-class dd_i-class dd_i-class
| |
| − | |E-2_form = line_ahead double_line
| |
| − | |E-2_xp =
| |
| − | |E-2_enemy_air_power =
| |
| − | |E-3_node_info = cl_ho-class_elite dd_i-class_late_model dd_i-class dd_i-class dd_i-class
| |
| − | |E-3_form = double_line line_ahead
| |
| − | |E-3_xp =
| |
| − | |E-3_enemy_air_power =
| |
| − | |E-4_node_info = cl_ho-class_elite dd_i-class_late_model dd_i-class dd_i-class
| |
| − | |E-4_form = line_ahead double_line
| |
| − | |E-4_xp =
| |
| − | |E-4_enemy_air_power =
| |
| − | |E-5_node_info = cl_ho-class_elite dd_i-class dd_i-class dd_i-class
| |
| − | |E-5_form = line_ahead
| |
| − | |E-5_xp =
| |
| − | |E-5_enemy_air_power =
| |
| − | |
| |
| − | |F_label = 敵水雷戦隊
| |
| − | |F-1_node_info = cl_ho-class_elite clt_chi-class_elite clt_chi-class_elite dd_i-class_late_model dd_i-class dd_i-class
| |
| − | |F-1_form = line_ahead double_line
| |
| − | |F-1_xp =
| |
| − | |F-1_enemy_air_power =
| |
| − | |F-2_node_info = cl_ho-class_elite clt_chi-class clt_chi-class dd_i-class_late_model dd_i-class dd_i-class
| |
| − | |F-2_form = line_ahead double_line
| |
| − | |F-2_xp =
| |
| − | |F-2_enemy_air_power =
| |
| − | |F-3_node_info = cl_ho-class_elite clt_chi-class clt_chi-class dd_i-class dd_i-class dd_i-class
| |
| − | |F-3_form = line_ahead double_line
| |
| − | |F-3_xp =
| |
| − | |F-3_enemy_air_power =
| |
| − | |
| |
| − | |G_label = '''<span style="color:green">Resource Node</span>'''
| |
| − | |G1_node_info = ammo + ?
| |
| − | |
| |
| − | |H_label = '''<span style="color:green">Resource Node</span>'''
| |
| − | |H1_node_info = ammo + ?
| |
| − | |
| |
| − | |I_label = '''<span style="color:green">Resource Node</span>'''
| |
| − | |I1_node_info = fuel + ?
| |
| − | |
| |
| − | |J_label = 敵巡洋艦戦隊
| |
| − | |J-1_node_info = ca_ri-class_elite ca_ri-class_elite clt_chi-class_elite dd_i-class_late_model dd_i-class dd_i-class
| |
| − | |J-1_form = line_ahead diamond
| |
| − | |J-1_xp =
| |
| − | |J-1_enemy_air_power =
| |
| − | |J-2_node_info = ca_ri-class_elite ca_ri-class_elite clt_chi-class_elite cl_he-class_elite dd_i-class_late_model dd_i-class_late_model
| |
| − | |J-2_form = double_line line_ahead
| |
| − | |J-2_xp =
| |
| − | |J-2_enemy_air_power =
| |
| − | |J-3_node_info = ca_ri-class_elite ca_ri-class_elite clt_chi-class cl_ho-class dd_i-class dd_i-class
| |
| − | |J-3_form = line_ahead
| |
| − | |J-3_xp =
| |
| − | |J-3_enemy_air_power =
| |
| − | |J-4_node_info = ca_ri-class_elite ca_ri-class clt_chi-class cl_ho-class dd_i-class dd_i-class
| |
| − | |J-4_form = double_line line_ahead
| |
| − | |J-4_xp =
| |
| − | |J-4_enemy_air_power =
| |
| − | |J-5_node_info = clt_chi-class_elite ca_ri-class ca_ri-class cl_ho-class dd_i-class dd_i-class
| |
| − | |J-5_form = line_ahead
| |
| − | |J-5_xp =
| |
| − | |J-5_enemy_air_power =
| |
| − | |
| |
| − | |K_label = 敵巡洋艦戦隊
| |
| − | |K-1_node_info = ca_ri-class_elite ca_ri-class_elite clt_chi-class_elite dd_i-class_late_model dd_i-class dd_i-class
| |
| − | |K-1_form = line_ahead diamond
| |
| − | |K-1_xp =
| |
| − | |K-1_enemy_air_power =
| |
| − | |K-2_node_info = ca_ri-class_elite ca_ri-class_elite clt_chi-class_elite cl_he-class_elite dd_i-class_late_model dd_i-class_late_model
| |
| − | |K-2_form = double_line line_ahead
| |
| − | |K-2_xp =
| |
| − | |K-2_enemy_air_power =
| |
| − | |K-3_node_info = ca_ri-class_elite ca_ri-class_elite clt_chi-class cl_ho-class dd_i-class dd_i-class
| |
| − | |K-3_form = line_ahead
| |
| − | |K-3_xp =
| |
| − | |K-3_enemy_air_power =
| |
| − | |K-4_node_info = ca_ri-class_elite ca_ri-class clt_chi-class cl_ho-class dd_i-class dd_i-class
| |
| − | |K-4_form = double_line line_ahead
| |
| − | |K-4_xp =
| |
| − | |K-4_enemy_air_power =
| |
| − | |K-5_node_info = clt_chi-class_elite ca_ri-class ca_ri-class cl_ho-class dd_i-class dd_i-class
| |
| − | |K-5_form = line_ahead
| |
| − | |K-5_xp =
| |
| − | |K-5_enemy_air_power =
| |
| − | |
| |
| − | |L_label = '''<span style="color:blue">Battle Avoided</span>'''
| |
| − | |L1_node_info = "Must be my imagination" (battle avoided)
| |
| − | |
| |
| − | |M_label = 敵揚陸艦隊
| |
| − | |M-1_node_info = cl_ho-class_elite transport_wa-class transport_wa-class transport_wa-class dd_i-class_late_model dd_i-class_late_model
| |
| − | |M-1_form = double_line
| |
| − | |M-1_xp =
| |
| − | |M-1_enemy_air_power =
| |
| − | |M-2_node_info = cl_ho-class_elite transport_wa-class_elite transport_wa-class_elite transport_wa-class dd_i-class_late_model dd_i-class_late_model
| |
| − | |M-2_form = double_line
| |
| − | |M-2_xp =
| |
| − | |M-2_enemy_air_power =
| |
| − | |M-3_node_info = cl_ho-class_elite transport_wa-class_elite transport_wa-class_elite transport_wa-class_elite dd_i-class_late_model dd_i-class_late_model
| |
| − | |M-3_form = double_line
| |
| − | |M-3_xp =
| |
| − | |M-3_enemy_air_power =
| |
| − | |M-4_node_info = cl_ho-class_elite transport_wa-class_elite transport_wa-class transport_wa-class dd_i-class_late_model dd_i-class_late_model
| |
| − | |M-4_form = double_line
| |
| − | |M-4_xp =
| |
| − | |M-4_enemy_air_power =
| |
| − | |
| |
| − | |N_label = 敵主力打撃群
| |
| − | |N-1_node_info = bb_ru-class_elite cv_wo-class_elite cvl_nu-class_elite dd_ro-class_late_model dd_ro-class dd_ro-class
| |
| − | |N-1_form = line_ahead
| |
| − | |N-1_xp =
| |
| − | |N-1_enemy_air_power = 51
| |
| − | |N-2_node_info = bb_ru-class_flagship cv_wo-class_elite cvl_nu-class_elite dd_ro-class_late_model dd_ro-class_late_model dd_ro-class
| |
| − | |N-2_form = line_ahead
| |
| − | |N-2_xp =
| |
| − | |N-2_enemy_air_power = 51
| |
| − | |N-3_node_info = bb_ru-class_flagship cv_wo-class_elite cvl_nu-class_elite dd_ro-class_late_model dd_ro-class dd_ro-class
| |
| − | |N-3_form = line_ahead
| |
| − | |N-3_xp =
| |
| − | |N-3_enemy_air_power = 51
| |
| − | |N-4_node_info = bb_ru-class_flagship cv_wo-class_elite cvl_nu-class_elite cl_he-class_elite dd_ro-class_late_model dd_ro-class_late_model
| |
| − | |N-4_form = line_ahead
| |
| − | |N-4_xp =
| |
| − | |N-4_enemy_air_power = 51
| |
| − | |N-5_node_info = bb_ru-class_flagship cv_wo-class_elite cv_wo-class_elite cl_he-class_elite dd_ro-class_late_model dd_ro-class_late_model
| |
| − | |N-5_form = line_ahead
| |
| − | |N-5_xp =
| |
| − | |N-5_enemy_air_power = 54
| |
| − | |N-6_node_info = bb_ru-class_elite cv_wo-class_elite cvl_nu-class_elite dd_ro-class dd_ro-class dd_ro-class
| |
| − | |N-6_form = line_ahead
| |
| − | |N-6_xp =
| |
| − | |N-6_enemy_air_power = 51
| |
| − | |N-7_node_info = bb_ru-class_elite cv_wo-class_elite cvl_nu-class dd_ro-class dd_ro-class dd_ro-class
| |
| − | |N-7_form = line_ahead
| |
| − | |N-7_xp =
| |
| − | |N-7_enemy_air_power = 35
| |
| − | |N-8_node_info = bb_ru-class_elite cv_wo-class cvl_nu-class dd_ro-class dd_ro-class dd_ro-class
| |
| − | |N-8_form = line_ahead
| |
| − | |N-8_xp =
| |
| − | |N-8_enemy_air_power = 18
| |
| − | |
| |
| − | |final_form =
| |
| − | |boss_node = N
| |
| − | }}
| |
| − | | |
| − | ===Drops===
| |
| − | | |
| − | <div class="mw-customtoggle-2-3-drop globalbutton">Show/Hide Drops</div>
| |
| − | | |
| − | {| class="mw-collapsible mw-collapsed wikitable" id="mw-customcollapsible-2-3-drop"
| |
| − | !Node
| |
| − | !Destroyers
| |
| − | !Light Cruisers
| |
| − | !Heavy Cruisers
| |
| − | !Seaplane Tender
| |
| − | !Aircraft Carrier
| |
| − | !Battleship
| |
| − | !Submarine
| |
| − | |-
| |
| − | | style="text-align:center;" |B
| |
| − | | style="text-align:center;" |[[Miyuki]], [[Ayanami]], [[Mutsuki]], [[Hibiki]], [[Inazuma]], [[Hatsuharu]], [[Wakaba]], [[Murasame]], [[Samidare]], [[Suzukaze]], [[Asashio]], [[Arare]], [[Kasumi]], [[Kagerou]], [[Shiranui]], [[Kuroshio]], [[Ooshio]], [[Shikinami]]
| |
| − | | style="text-align:center;" |[[Tama]], [[Kiso]], [[Sendai]], [[Naka]], [[Natori]], [[Isuzu]], [[Tenryuu]]
| |
| − | | style="text-align:center;" |[[Nachi]], [[Ashigara]], [[Haguro]], [[Takao]], [[Atago]], [[Maya]], [[Choukai]], [[Tone]], [[Chikuma]]
| |
| − | |
| |
| − | | style="text-align:center;" |[[Hiyou]], [[Jun'you]], [[Shouhou]], [[Ryuujou]]
| |
| − | | style="text-align:center;" |[[Fusou]], [[Yamashiro]]
| |
| − | |
| |
| − | |-
| |
| − | | style="text-align:center;" |C
| |
| − | | style="text-align:center;" |[[Arare]], [[Arashio]], [[Hibiki]], [[Ikazuchi]], [[Miyuki]], [[Mutsuki]], [[Nenohi]], [[Suzukaze]], [[Kasumi]], [[Kagerou]], [[Shiranui]], [[Isonami]], [[Hatsuharu]], [[Hatsuyuki]]
| |
| − | | style="text-align:center;" |[[Natori]], [[Sendai]], [[Jintsuu]], [[Isuzu]],[[Tenryuu]]
| |
| − | | style="text-align:center;" |[[Myoukou]], [[Nachi]], [[Ashigara]], [[Takao]], [[Atago]], [[Maya]], [[Choukai]], [[Chikuma]]
| |
| − | |
| |
| − | | style="text-align:center;" |[[Ryuujou]], [[Shouhou]], [[Jun'you]]
| |
| − | | style="text-align:center;" |[[Ise]], [[Fusou]], [[Yamashiro]]
| |
| − | |
| |
| − | |-
| |
| − | | style="text-align:center;" |F
| |
| − | | style="text-align:center;" |[[Michishio]], [[Mutsuki]], [[Hatsuharu]], [[Suzukaze]], [[Arashio]], [[Arare]], [[Shiranui]], [[Kuroshio]], [[Samidare]], [[Kagerou]], [[Ikazuchi]], [[Inazuma]], [[Hibiki]]
| |
| − | | style="text-align:center;" |[[Tama]], [[Kiso]], [[Yura]], [[Naka]], [[Tenryuu]], [[Sendai]]
| |
| − | | style="text-align:center;" |[[Takao]], [[Atago]], [[Myoukou]], [[Maya]], [[Ashigara]], [[Haguro]], [[Tone]], [[Mogami]], [[Chikuma]], [[Choukai]]
| |
| − | |
| |
| − | | style="text-align:center;" |[[Hiyou]], [[Shouhou]], [[Jun'you]]
| |
| − | | style="text-align:center;" |[[Ise]], [[Kongou]], [[Fusou]], [[Yamashiro]]
| |
| − | |
| |
| − | |-
| |
| − | | style="text-align:center; color:red;" |'''G'''
| |
| − | | style="text-align:center;" |[[Makigumo|'''<span style="color:red">Makigumo</span>''']], [[Arashio]], [[Michishio]]
| |
| − | | style="text-align:center;" |[[Jintsuu]], [[Natori]], [[Nagara]], [[Isuzu]], [[Ooi]], [[Kitakami]], [[Kiso]], [[Sendai]]
| |
| − | | style="text-align:center;" | [[Kako]], [[Myoukou]], [[Nachi]], [[Ashigara]], [[Haguro]], [[Takao]], [[Atago]], [[Maya]], [[Choukai]], [[Tone]], [[Chikuma]], [[Mogami]], [[Furutaka]]
| |
| − | | style="text-align:center;" |[[Chitose]], [[Chiyoda]]
| |
| − | | style="text-align:center;" |[[Akagi]], [[Kaga]], [[Souryuu]], [[Hiryuu|'''<span style="color:red">Hiryuu</span>''']], [[Ryuujou]], [[Jun'you]], [[Shouhou]]
| |
| − | | style="text-align:center;" |[[Ise]], [[Hyuuga]], [[Kongou]], [[Hiei]], [[Haruna]], [[Kirishima]], [[Fusou]], [[Yamashiro]]
| |
| − | | style="text-align:center;" |[[I-168|'''<span style="color:red">I-168</span>''']]
| |
| − | |-
| |
| − | | style="text-align:center;" |H
| |
| − | | style="text-align:center;" |[[Mutsuki]], [[Kuroshio]], [[Shigure]], [[Arare]], [[Hatsuyuki]]
| |
| − | | style="text-align:center;" |[[Tama]], [[Isuzu]]
| |
| − | | style="text-align:center;" |[[Nachi]], [[Atago]], [[Tone]]
| |
| − | |
| |
| − | | style="text-align:center;" |[[Hiyou]], [[Shouhou]], [[Ryuujou]]
| |
| − | | style="text-align:center;" |[[Kirishima]], [[Fusou]], [[Yamashiro]]
| |
| − | |
| |
| − | |-
| |
| − | | style="text-align:center;" |K
| |
| − | | style="text-align:center;" |[[Arashio]], [[Nenohi]], [[Satsuki]], [[Miyuki]], [[Ikazuchi]]
| |
| − | | style="text-align:center;" |[[Yura]], [[Isuzu]], [[Jintsuu]]
| |
| − | | style="text-align:center;" |[[Haguro]], [[Mogami]], [[Atago]]
| |
| − | |
| |
| − | | style="text-align:center;" |[[Ryuujou]]
| |
| − | | style="text-align:center;" |[[Fusou]], [[Yamashiro]]
| |
| − | |
| |
| − | |}
| |
| − | | |
| − | =={{Anchor|2-4}}World 2-4: 沖ノ島海域 Okinoshima Island==
| |
| − | {{LabSortieworld
| |
| − | | map = 2-4 Map.png
| |
| − | | difficulty = ☆ ☆ ☆ ☆ ☆ ☆
| |
| − | | item = {{Fuel}} {{Ammo}} {{IR}} {{DM}}
| |
| − | | exp = 300
| |
| − | | code = あ号艦隊決戦 ([[wikipedia:Battle_of_the_Philippine_Sea|Operation A-Go: The Fleet's Decisive Battle]])
| |
| − | | jptext = 沖ノ島海域に襲来した有力な敵機動部隊を迎撃する。艦隊全力出撃で、これを捕捉撃滅せよ!
| |
| − | | entext = A powerful enemy battlegroup is invading the waters around Okinoshima Island. Sail out in full force and annihilate them!
| |
| − | }}
| |
| − | | |
| − | ===Stage Guide===
| |
| − | {{MapBranchingTable
| |
| − | |title = 2-4 Branching Rules
| |
| − | |expand = true
| |
| − | |id = 2-4
| |
| − | |B -> C/storm,G/resource=
| |
| − | *Meet '''ANY''' of the following to go to C
| |
| − | **(F)BB(V)+CV(L/B) ≥ 5
| |
| − | **CV(L/B) ≥ 3 '''AND''' DD ≤ 2
| |
| − | **(F)BB(V)+CV(B) ≥ 3 '''AND''' DD ≤ 2
| |
| − | *Meet '''ALL''' of the following to go to G
| |
| − | **No (F)BB(V), CV(L/B), AV or SS(V)
| |
| − | **CL = 1
| |
| − | **DD ≥ 4
| |
| − | *Otherwise, random routing
| |
| − | | |
| − | |C/storm -> F,G/resource=
| |
| − | *Go to G if fleet contains AO
| |
| − | *Otherwise, random routing
| |
| − | | |
| − | |F -> A/resource, J/empty=
| |
| − | *Go to A if fleet contains no CVL '''AND''' DD ≤ 1
| |
| − | *Otherwise, random routing
| |
| − | | |
| − | |H/empty -> I,L=
| |
| − | *Meet '''ALL''' of the following requirements to go to L:
| |
| − | **Your fleet must contain 6 ships.
| |
| − | **DD ≥ 4
| |
| − | **CL+CT ≤ 2
| |
| − | **CA ≤ 1
| |
| − | **No other ship types are allowed.
| |
| − | *Otherwise, go to I.
| |
| − | | |
| − | |I -> E,K/empty=
| |
| − | *Random (25% E, 75% K)
| |
| − | | |
| − | |J/empty -> L,M=
| |
| − | *Meet '''ANY''' of the following to go to L
| |
| − | **(F)BB(V)+CV(L/B) ≥ 4
| |
| − | **No CV(B)
| |
| − | *Meet '''ANY''' of the following to go to M
| |
| − | **(F)BB(V)+CV(L/B) = 3
| |
| − | **CV(B) = 2
| |
| − | *Otherwise, random routing
| |
| − | | |
| − | |K/empty -> L,N/resource,O/empty=
| |
| − | *Random routing, with higher chance of going to N if fleet contains AV or SS(V) ('''Overrides every other rules''')
| |
| − | *Go to L if DD ≥ 2
| |
| − | *Otherwise, random routing between L and O
| |
| − | **If fleet contains DD, you will more likely to go to L
| |
| − | **If fleet doesn't contain DD, you will more likely to go to O
| |
| − | | |
| − | |L -> M=
| |
| − | *(F)BB(V)+CV(L/B) ≥ 4
| |
| − | *Random routing if you don't meet any conditions
| |
| − | |L -> P=
| |
| − | *(F)BB(V)+CV(B) ≤ 2
| |
| − | *Random routing if you don't meet any conditions
| |
| − | }}
| |
| − | | |
| − | {{AirControlSystem
| |
| − | | Map = 2-4
| |
| − | | Fleet =
| |
| − | | AS = 84
| |
| − | | Notes = AS value for Nodes '''M''' & '''L'''
| |
| − | }}
| |
| − | | |
| − | === Tips ===
| |
| − | *This map will feature a series of fights involving mostly smaller surface ships with some carrier fights in between.
| |
| − | <br/>'''Recommended Fleet'''
| |
| − | *'''1 CAV, 1 CL, 4 DD''' routes '''B-G-H-L-P'''
| |
| − | **Takes you down the quickest path to the boss node with only 2 battles prior to boss node
| |
| − | **May present possible difficulty due to lack of air power your fleet will have in nodes L
| |
| − | **Boss node can also be difficult if your CL and DD aren't high-leveled.
| |
| − | **Probably not suitable much for early players
| |
| − | *'''2 CV(B), 2 [CA(V)+CLT], 2 DD / 1 (F)BB(V), 1 CV(B), 1 CVL, 1 CA(V), 2 DD'''
| |
| − | **'''Random routing''' across the map, but you are allowed to bring a much stronger fleet to fight the boss node
| |
| − | ***'''J-M, K-L and L-P''' branches should be guaranteed though.
| |
| − | **Whatever path you will take, you will fight a total of 3 battles prior to the boss node.
| |
| − | ***The top path does have a chance of hitting the bucket node (Node A)
| |
| − | ***Bottom path lets you gather Development Materials, and the fights are slightly easier
| |
| − | | |
| − | ===Nodes and Enemy Encounters===
| |
| − | {{#invoke:EnemyEncounters2|encounterTemplate
| |
| − | |A_label = '''<span style="color:green">Resource Node</span>'''
| |
| − | |A1_node_info = instantrepair + 1
| |
| − | |
| |
| − | |B_label = 敵前衛巡洋艦戦隊
| |
| − | |B-1_node_info = ca_ri-class_elite ca_ri-class_elite ca_ri-class_elite cl_he-class_elite dd_ro-class_late_model dd_ro-class_late_model
| |
| − | |B-1_form = double_line line_ahead
| |
| − | |B-1_xp =
| |
| − | |B-1_enemy_air_power =
| |
| − | |B-2_node_info = ca_ri-class_elite ca_ri-class_elite ca_ri-class cl_he-class dd_ro-class_late_model dd_ro-class_late_model
| |
| − | |B-2_form = line_ahead double_line
| |
| − | |B-2_xp =
| |
| − | |B-2_enemy_air_power =
| |
| − | |B-3_node_info = ca_ri-class_elite ca_ri-class_elite ca_ri-class dd_ro-class_late_model dd_ro-class dd_ro-class
| |
| − | |B-3_form = line_ahead double_line
| |
| − | |B-3_xp =
| |
| − | |B-3_enemy_air_power =
| |
| − | |B-4_node_info = ca_ri-class_elite ca_ri-class ca_ri-class cl_ho-class dd_i-class dd_i-class
| |
| − | |B-4_form = line_ahead double_line
| |
| − | |B-4_xp =
| |
| − | |B-4_enemy_air_power =
| |
| − | |
| |
| − | |C_label = '''<span style="color:purple">Maelstrom Node</span>'''
| |
| − | |C1_node_info = fuel - ?
| |
| − | |
| |
| − | |D_label = '''<span style="color:green">Resource Node</span>'''
| |
| − | |D1_node_info = fuel + ?
| |
| − | |
| |
| − | |E_label = 敵侵攻高速軽快部隊
| |
| − | |E-1_node_info = ca_ri-class_elite cl_ho-class_elite dd_ro-class_late_model dd_ro-class_late_model dd_ro-class_late_model dd_ro-class_late_model
| |
| − | |E-1_form = line_ahead
| |
| − | |E-1_xp =
| |
| − | |E-1_enemy_air_power =
| |
| − | |E-2_node_info = ca_ri-class_elite cl_ho-class_elite dd_ro-class_late_model dd_ro-class_late_model dd_ro-class dd_ro-class
| |
| − | |E-2_form = line_ahead double_line
| |
| − | |E-2_xp =
| |
| − | |E-2_enemy_air_power =
| |
| − | |E-3_node_info = cl_ho-class_elite dd_ro-class_late_model dd_ro-class_late_model dd_ro-class dd_ro-class dd_ro-class
| |
| − | |E-3_form = line_ahead double_line
| |
| − | |E-3_xp =
| |
| − | |E-3_enemy_air_power =
| |
| − | |E-4_node_info = cl_ho-class_elite dd_ro-class_late_model dd_ro-class dd_ro-class dd_ro-class dd_ro-class
| |
| − | |E-4_form = line_ahead double_line
| |
| − | |E-4_xp =
| |
| − | |E-4_enemy_air_power =
| |
| − | |E-5_node_info = cl_ho-class_elite dd_ro-class_late_model dd_ro-class dd_ro-class dd_ro-class
| |
| − | |E-5_form = double_line line_ahead
| |
| − | |E-5_xp =
| |
| − | |E-5_enemy_air_power =
| |
| − | |
| |
| − | |F_label = 前衛機動部隊
| |
| − | |F-1_node_info = cvl_nu-class_elite cvl_nu-class_elite ca_ri-class_elite cl_ho-class_elite dd_ro-class_late_model dd_ro-class_late_model
| |
| − | |F-1_form = diamond
| |
| − | |F-1_xp =
| |
| − | |F-1_enemy_air_power = 48
| |
| − | |F-2_node_info = cvl_nu-class_flagship cvl_nu-class_elite ca_ri-class_elite cl_ho-class_elite dd_ro-class_late_model dd_ro-class_late_model
| |
| − | |F-2_form = diamond
| |
| − | |F-2_xp =
| |
| − | |F-2_enemy_air_power = 47
| |
| − | |F-3_node_info = cvl_nu-class_elite cvl_nu-class_elite ca_ri-class_elite dd_ro-class_late_model dd_ro-class dd_ro-class
| |
| − | |F-3_form = diamond
| |
| − | |F-3_xp =
| |
| − | |F-3_enemy_air_power = 48
| |
| − | |F-4_node_info = cvl_nu-class_elite cvl_nu-class_elite ca_ri-class dd_ro-class_late_model dd_ro-class dd_ro-class
| |
| − | |F-4_form = diamond
| |
| − | |F-4_xp =
| |
| − | |F-4_enemy_air_power = 48
| |
| − | |F-5_node_info = cvl_nu-class_elite cvl_nu-class_elite ca_ri-class dd_ro-class dd_ro-class dd_ro-class
| |
| − | |F-5_form = diamond
| |
| − | |F-5_xp =
| |
| − | |F-5_enemy_air_power = 48
| |
| − | |F-6_node_info = cvl_nu-class_elite cvl_nu-class ca_ri-class dd_ro-class dd_ro-class dd_ro-class
| |
| − | |F-6_form = diamond
| |
| − | |F-6_xp =
| |
| − | |F-6_enemy_air_power = 32
| |
| − | |
| |
| − | |G_label = '''<span style="color:green">Resource Node</span>'''
| |
| − | |G1_node_info = devmat + 1
| |
| − | |
| |
| − | |H_label = '''<span style="color:blue">Battle Avoided</span>'''
| |
| − | |H1_node_info = "Must be my imagination" (battle avoided)
| |
| − | |
| |
| − | |I_label = 敵精鋭水雷戦隊
| |
| − | |I-1_node_info = cl_he-class_flagship dd_ro-class_late_model dd_ro-class_late_model dd_i-class_late_model dd_i-class_late_model dd_i-class_late_model
| |
| − | |I-1_form = line_ahead double_line
| |
| − | |I-1_xp =
| |
| − | |I-1_enemy_air_power =
| |
| − | |I-2_node_info = cl_he-class_elite dd_ro-class_late_model dd_ro-class_late_model dd_i-class_late_model dd_i-class_late_model dd_i-class_late_model
| |
| − | |I-2_form = line_ahead double_line
| |
| − | |I-2_xp =
| |
| − | |I-2_enemy_air_power =
| |
| − | |I-3_node_info = cl_he-class_elite dd_ro-class_late_model dd_ro-class_late_model dd_i-class_late_model dd_i-class dd_i-class
| |
| − | |I-3_form = double_line line_ahead
| |
| − | |I-3_xp =
| |
| − | |I-3_enemy_air_power =
| |
| − | |I-4_node_info = cl_he-class_elite dd_ro-class_late_model dd_ro-class_late_model dd_i-class dd_i-class dd_i-class
| |
| − | |I-4_form = line_ahead double_line
| |
| − | |I-4_xp =
| |
| − | |I-4_enemy_air_power =
| |
| − | |I-5_node_info = cl_he-class_elite dd_ro-class_late_model dd_i-class dd_i-class dd_i-class dd_i-class
| |
| − | |I-5_form = line_ahead
| |
| − | |I-5_xp =
| |
| − | |I-5_enemy_air_power =
| |
| − | |
| |
| − | |J_label = '''<span style="color:blue">Battle Avoided</span>'''
| |
| − | |J1_node_info = "Must be my imagination" (battle avoided)
| |
| − | |
| |
| − | |K_label = '''<span style="color:blue">Battle Avoided</span>'''
| |
| − | |K1_node_info = "Must be my imagination" (battle avoided)
| |
| − | |
| |
| − | |L_label = 敵機動部隊 B群
| |
| − | |L-1_node_info = cv_wo-class_flagship cv_wo-class_flagship ca_ri-class_flagship cl_ho-class_flagship dd_ro-class_late_model dd_ro-class_late_model
| |
| − | |L-1_form = diamond
| |
| − | |L-1_xp =
| |
| − | |L-1_enemy_air_power = 56
| |
| − | |L-2_node_info = cv_wo-class_flagship cv_wo-class_flagship ca_ri-class_elite cl_ho-class_elite dd_ro-class_late_model dd_ro-class_late_model
| |
| − | |L-2_form = diamond
| |
| − | |L-2_xp =
| |
| − | |L-2_enemy_air_power = 56
| |
| − | |L-3_node_info = cv_wo-class_flagship cv_wo-class_flagship ca_ri-class_flagship cl_ho-class_elite dd_ro-class_late_model dd_ro-class_late_model
| |
| − | |L-3_form = diamond
| |
| − | |L-3_xp =
| |
| − | |L-3_enemy_air_power = 56
| |
| − | |L-4_node_info = cv_wo-class_flagship cv_wo-class_elite ca_ri-class_elite cl_ho-class_elite dd_ro-class_late_model dd_ro-class_late_model
| |
| − | |L-4_form = diamond
| |
| − | |L-4_xp =
| |
| − | |L-4_enemy_air_power = 55
| |
| − | |L-5_node_info = cv_wo-class_flagship cv_wo-class_elite ca_ri-class_elite dd_ro-class_late_model dd_ro-class dd_ro-class
| |
| − | |L-5_form = diamond
| |
| − | |L-5_xp =
| |
| − | |L-5_enemy_air_power = 55
| |
| − | |L-6_node_info = cv_wo-class_elite cv_wo-class_elite ca_ri-class_elite dd_ro-class_late_model dd_ro-class dd_ro-class
| |
| − | |L-6_form = diamond
| |
| − | |L-6_xp =
| |
| − | |L-6_enemy_air_power = 54
| |
| − | |
| |
| − | |M_label = 敵機動部隊 A群
| |
| − | |M-1_node_info = cv_wo-class_flagship cv_wo-class_flagship bb_ru-class_flagship cl_he-class_flagship dd_ro-class_late_model dd_ro-class_late_model
| |
| − | |M-1_form = diamond
| |
| − | |M-1_xp =
| |
| − | |M-1_enemy_air_power = 56
| |
| − | |M-2_node_info = cv_wo-class_flagship cv_wo-class_flagship bb_ru-class_flagship cl_he-class_elite dd_ro-class_late_model dd_ro-class_late_model
| |
| − | |M-2_form = diamond
| |
| − | |M-2_xp =
| |
| − | |M-2_enemy_air_power = 56
| |
| − | |M-3_node_info = cv_wo-class_flagship cv_wo-class_flagship bb_ru-class_elite cl_he-class_elite dd_ro-class_late_model dd_ro-class_late_model
| |
| − | |M-3_form = diamond
| |
| − | |M-3_xp =
| |
| − | |M-3_enemy_air_power = 56
| |
| − | |M-4_node_info = cv_wo-class_flagship cv_wo-class_elite bb_ru-class_elite cl_he-class_elite dd_ro-class_late_model dd_ro-class_late_model
| |
| − | |M-4_form = diamond
| |
| − | |M-4_xp =
| |
| − | |M-4_enemy_air_power = 55
| |
| − | |M-5_node_info = cv_wo-class_flagship cv_wo-class_elite bb_ru-class_elite dd_ro-class_late_model dd_ro-class dd_ro-class
| |
| − | |M-5_form = diamond
| |
| − | |M-5_xp =
| |
| − | |M-5_enemy_air_power = 55
| |
| − | |M-6_node_info = cv_wo-class_elite cv_wo-class_elite bb_ru-class_elite dd_ro-class_late_model dd_ro-class dd_ro-class
| |
| − | |M-6_form = diamond
| |
| − | |M-6_xp =
| |
| − | |M-6_enemy_air_power = 54
| |
| − | |
| |
| − | |N_label = '''<span style="color:green">Resource Node</span>'''
| |
| − | |N1_node_info = ammo + ?
| |
| − | |
| |
| − | |O_label = '''<span style="color:blue">Battle Avoided</span>'''
| |
| − | |O1_node_info = "Must be my imagination" (battle avoided)
| |
| − | |
| |
| − | |P_label = 敵侵攻中核水上打撃部隊
| |
| − | |P-1_node_info = bb_ru-class_flagship bb_ru-class_flagship bb_ru-class_flagship cl_he-class_flagship dd_ro-class_late_model dd_ro-class_late_model
| |
| − | |P-1_form = line_ahead
| |
| − | |P-1_xp =
| |
| − | |P-1_enemy_air_power =
| |
| − | |P-2_node_info = bb_ru-class_flagship bb_ru-class_elite bb_ru-class_elite cl_ho-class_elite dd_ro-class_late_model dd_ro-class_late_model
| |
| − | |P-2_form = line_ahead
| |
| − | |P-2_xp =
| |
| − | |P-2_enemy_air_power =
| |
| − | |P-3_node_info = bb_ru-class_flagship bb_ru-class_flagship bb_ru-class_elite cl_he-class_elite dd_ro-class_late_model dd_ro-class_late_model
| |
| − | |P-3_form = line_ahead
| |
| − | |P-3_xp =
| |
| − | |P-3_enemy_air_power =
| |
| − | |P-4_node_info = bb_ru-class_elite bb_ru-class_elite bb_ru-class_elite cl_ho-class_elite dd_ro-class_late_model dd_ro-class_late_model
| |
| − | |P-4_form = line_ahead
| |
| − | |P-4_xp =
| |
| − | |P-4_enemy_air_power =
| |
| − | |P-5_node_info = bb_ru-class_flagship bb_ru-class_flagship bb_ru-class_flagship cl_he-class_elite dd_ro-class_late_model dd_ro-class_late_model
| |
| − | |P-5_form = line_ahead
| |
| − | |P-5_xp =
| |
| − | |P-5_enemy_air_power =
| |
| − | |
| |
| − | |final_form =
| |
| − | |boss_node = P
| |
| − | }}
| |
| − | | |
| − | ===Drops===
| |
| − | <div class="mw-customtoggle-2-4-drop globalbutton">Show/Hide Drops</div>
| |
| − | {| class="mw-collapsible mw-collapsed wikitable" id="mw-customcollapsible-2-4-drop"
| |
| − | !Node
| |
| − | !Destroyers
| |
| − | !Light Cruisers
| |
| − | !Heavy Cruisers
| |
| − | !Seaplane Tender
| |
| − | !Submarine Tender
| |
| − | !Aircraft Carrier
| |
| − | !Battleship
| |
| − | |-
| |
| − | | style="text-align:center;" |A
| |
| − | | style="text-align:center;" |[[Shimakaze|'''<span style="color:red">Shimakaze</span>''']], [[Fubuki]], [[Hatsuyuki]], [[Miyuki]], [[Murakumo]], [[Isonami]], [[Ayanami]], [[Shikinami]], [[Shigure]], [[Asashio]], [[Ooshio]], [[Michishio]], [[Arashio]], [[Arare]], [[Kasumi]], [[Kagerou]], [[Shiranui]], [[Kuroshio]]
| |
| − | | style="text-align:center;" |[[Ooi]], [[Kitakami]], [[Tenryuu]], [[Tatsuta]], [[Tama]], [[Kiso]], [[Isuzu]], [[Natori]], [[Yura]], [[Sendai]], [[Jintsuu]], [[Naka]], [[Yuubari|'''<span style="color:red">Yuubari</span>''']]
| |
| − | | style="text-align:center;" |[[Takao]], [[Atago]], [[Mogami]], [[Kako]], [[Myoukou]], [[Nachi]], [[Ashigara]], [[Haguro]], [[Maya]], [[Choukai]], [[Tone]], [[Chikuma]]
| |
| − | | style="text-align:center;" |[[Chitose]], [[Chiyoda]]
| |
| − | |
| |
| − | | style="text-align:center;" |[[Souryuu]], [[Ryuujou]], [[Hiyou]], [[Jun'you]], [[Shouhou]]
| |
| − | | style="text-align:center;" |[[Ise]], [[Hyuuga]], [[Fusou]], [[Yamashiro]], [[Kongou]], [[Hiei]], [[Kirishima]]
| |
| − | |-
| |
| − | | style="text-align:center;" |C
| |
| − | | style="text-align:center;" |[[Shimakaze|'''<span style="color:red">Shimakaze</span>''']], [[Fubuki]], [[Miyuki]], [[Murakumo]], [[Ayanami]], [[Asashio]], [[Michishio]], [[Arashio]], [[Arare]], [[Kagerou]], [[Kuroshio]]
| |
| − | | style="text-align:center;" |[[Ooi]], [[Kitakami]], [[Tenryuu]], [[Tama]], [[Kiso]], [[Isuzu]], [[Natori]], [[Yura]], [[Sendai]], [[Jintsuu]], [[Naka]]
| |
| − | | style="text-align:center;" |[[Mogami]], [[Myoukou]], [[Nachi]], [[Ashigara]], [[Haguro]], [[Takao]], [[Atago]], [[Maya]], [[Choukai]], [[Tone]], [[Chikuma]]
| |
| − | | style="text-align:center;" |[[Chitose]], [[Chiyoda]]
| |
| − | |
| |
| − | | style="text-align:center;" |[[Ryuujou]], [[Hiyou]], [[Jun'you]], [[Shouhou]]
| |
| − | | style="text-align:center;" |[[Ise]], [[Hyuuga]], [[Fusou]], [[Yamashiro]]
| |
| − | |-
| |
| − | | style="text-align:center;" |D
| |
| − | | style="text-align:center;" |[[Yukikaze|'''<span style="color:red">Yukikaze</span>''']], [[Fubuki]], [[Shirayuki]], [[Miyuki]], [[Hatsuyuki]], [[Isonami]], [[Shikinami]], [[Kisaragi]], [[Inazuma]], [[Nenohi]], [[Wakaba]], [[Ooshio]], [[Michishio]], [[Arare]], [[Kagerou]], [[Shiranui]], [[Kuroshio]]
| |
| − | | style="text-align:center;" |[[Ooi]], [[Kitakami]], [[Tenryuu]], [[Isuzu]], [[Natori]], [[Sendai]], [[Jintsuu]]
| |
| − | | style="text-align:center;" |[[Kako]], [[Myoukou]], [[Nachi]], [[Ashigara]], [[Haguro]], [[Takao]], [[Atago]], [[Maya]], [[Choukai]], [[Chikuma]]
| |
| − | | style="text-align:center;" |[[Chitose]], [[Chiyoda]]
| |
| − | |
| |
| − | | style="text-align:center;" |[[Ryuujou]], [[Hiyou]], [[Jun'you]], [[Shouhou]]
| |
| − | | style="text-align:center;" |[[Ise]], [[Hyuuga]], [[Fusou]], [[Yamashiro]]
| |
| − | |-
| |
| − | | style="text-align:center;" |F
| |
| − | | style="text-align:center;" |[[Shimakaze|'''<span style="color:red">Shimakaze</span>''']], [[Hatsuyuki]], [[Murakumo]], [[Ayanami]], [[Nenohi]], [[Asashio]], [[Michishio]], [[Arashio]], [[Kagerou]], [[Shiranui]], [[Kuroshio]]
| |
| − | | style="text-align:center;" |[[Ooi]], [[Kitakami]], [[Tenryuu]], [[Tatsuta]], [[Kiso]], [[Isuzu]], [[Sendai]], [[Naka]]
| |
| − | | style="text-align:center;" |[[Mogami]], [[Nachi]], [[Ashigara]], [[Haguro]], [[Takao]], [[Atago]], [[Choukai]], [[Tone]], [[Chikuma]]
| |
| − | | style="text-align:center;" |[[Chitose]]
| |
| − | |
| |
| − | | style="text-align:center;" |[[Ryuujou]], [[Hiyou]], [[Shouhou]]
| |
| − | | style="text-align:center;" |[[Ise]], [[Hyuuga]], [[Hiei]], [[Fusou]], [[Yamashiro]]
| |
| − | |-
| |
| − | | style="text-align:center;" |G
| |
| − | | style="text-align:center;" |[[Shimakaze|'''<span style="color:red">Shimakaze</span>''']], [[Fubuki]], [[Miyuki]], [[Murakumo]], [[Shikinami]], [[Kuroshio]]
| |
| − | | style="text-align:center;" |[[Ooi]], [[Tatsuta]], [[Sendai]], [[Jintsuu]]
| |
| − | | style="text-align:center;" |[[Mogami]], [[Kako]], [[Ashigara]], [[Haguro]], [[Choukai]]
| |
| − | |
| |
| − | |
| |
| − | | style="text-align:center;" |[[Jun'you]], [[Shouhou]]
| |
| − | | style="text-align:center;" |[[Ise]], [[Hyuuga]], [[Fusou]]
| |
| − | |-
| |
| − | | style="text-align:center;" |H
| |
| − | | style="text-align:center;" |[[Shimakaze|'''<span style="color:red">Shimakaze</span>''']], [[Fubuki]], [[Ushio]], [[Asashio]], [[Arashio]], [[Arare]], [[Kagerou]], [[Shiranui]], [[Uranami|'''<span style="color:red">Uranami</span>''']]
| |
| − | | style="text-align:center;" |[[Ooi]], [[Kitakami]], [[Kiso]], [[Jintsuu]], [[Kinu|'''<span style="color:red">Kinu</span>''']]
| |
| − | | style="text-align:center;" |[[Mogami]], [[Kako]], [[Myoukou]], [[Nachi]], [[Ashigara]], [[Haguro]], [[Takao]], [[Atago]]
| |
| − | | style="text-align:center;" |[[Chiyoda]]
| |
| − | |
| |
| − | | style="text-align:center;" |[[Ryuujou]], [[Jun'you]], [[Shouhou]]
| |
| − | | style="text-align:center;" |[[Ise]], [[Hyuuga]], [[Kirishima]], [[Fusou]], [[Yamashiro]]
| |
| − | |-
| |
| − | | style="text-align:center;" |I
| |
| − | | style="text-align:center;" |[[Shimakaze|'''<span style="color:red">Shimakaze</span>''']], [[Fubuki]], [[Hatsuyuki]], [[Kagerou]], [[Shiranui]], [[Kuroshio]], [[Arare]]
| |
| − | | style="text-align:center;" |[[Ooi]], [[Tenryuu]], [[Tama]], [[Sendai]], [[Jintsuu]]
| |
| − | | style="text-align:center;" |[[Takao]], [[Tone]], [[Chikuma]]
| |
| − | | style="text-align:center;" |[[Chiyoda]]
| |
| − | |
| |
| − | | style="text-align:center;" |[[Ryuujou]], [[Jun'you]]
| |
| − | | style="text-align:center;" |[[Ise]], [[Hyuuga]], [[Fusou]]
| |
| − | |-
| |
| − | | style="text-align:center;" |'''<span style="color:red">J</span>'''
| |
| − | | style="text-align:center;" |[[Yukikaze|'''<span style="color:red">Yukikaze</span>''']], [[Shimakaze|'''<span style="color:red">Shimakaze</span>''']], [[Makigumo|'''<span style="color:red">Makigumo</span>''']], [[Asashio]], [[Ooshio]], [[Kagerou]], [[Isonami]], [[Uranami|'''<span style="color:red">Uranami</span>''']]
| |
| − | | style="text-align:center;" |[[Ooi]], [[Kitakami]], [[Tenryuu]], [[Tatsuta]], [[Jintsuu]], [[Kinu|'''<span style="color:red">Kinu</span>''']]
| |
| − | | style="text-align:center;" |[[Mogami]], [[Myoukou]], [[Nachi]], [[Ashigara]], [[Haguro]], [[Takao]], [[Atago]], [[Maya]], [[Choukai]], [[Tone]], [[Chikuma]]
| |
| − | |
| |
| − | | style="text-align:center;" |[[Taigei|'''<span style="color:red">Taigei</span>''']]
| |
| − | | style="text-align:center;" |[[Akagi]], [[Kaga]], [[Souryuu]], [[Ryuujou]], [[Hiyou]], [[Shouhou]]
| |
| − | | style="text-align:center;" |[[Nagato|'''<span style="color:red">Nagato</span>''']], [[Mutsu|'''<span style="color:red">Mutsu</span>''']], [[Ise]], [[Hyuuga]], [[Kongou]], [[Hiei]], [[Kirishima]], [[Haruna]], [[Fusou]], [[Yamashiro]]
| |
| − | |-
| |
| − | | style="text-align:center;" |L
| |
| − | | style="text-align:center;" |[[Shimakaze|'''<span style="color:red">Shimakaze</span>''']], [[Fubuki]], [[Murakumo]], [[Ayanami]], [[Asashio]], [[Ooshio]], [[Michishio]], [[Kagerou]], [[Kuroshio]]
| |
| − | | style="text-align:center;" |[[Ooi]], [[Kitakami]], [[Tenryuu]], [[Tatsuta]], [[Tama]], [[Kiso]], [[Isuzu]], [[Natori]], [[Yura]], [[Sendai]], [[Jintsuu]], [[Naka]]
| |
| − | | style="text-align:center;" |[[Mogami]], [[Myoukou]], [[Nachi]], [[Ashigara]], [[Haguro]], [[Takao]], [[Atago]], [[Maya]], [[Choukai]], [[Tone]], [[Chikuma]]
| |
| − | | style="text-align:center;" |[[Chitose]], [[Chiyoda]]
| |
| − | |
| |
| − | | style="text-align:center;" |[[Ryuujou]], [[Jun'you]], [[Shouhou]], [[Hiyou]]
| |
| − | | style="text-align:center;" |[[Ise]], [[Hyuuga]], [[Fusou]], [[Yamashiro]]
| |
| − | |-
| |
| − | | style="text-align:center;" |N
| |
| − | | style="text-align:center;" |[[Shimakaze|'''<span style="color:red">Shimakaze</span>''']], [[Fubuki]], [[Hatsuyuki]], [[Miyuki]], [[Ayanami]], [[Asashio]], [[Michishio]], [[Arashio]], [[Arare]], [[Kagerou]]
| |
| − | | style="text-align:center;" |[[Ooi]], [[Kitakami]], [[Tenryuu]], [[Tama]], [[Yura]], [[Sendai]], [[Jintsuu]], [[Naka]], [[Kiso]]
| |
| − | | style="text-align:center;" |[[Mogami]], [[Kako]], [[Myoukou]], [[Nachi]], [[Haguro]], [[Atago]], [[Takao]], [[Choukai]], [[Tone]], [[Chikuma]]
| |
| − | | style="text-align:center;" |[[Chitose]], [[Chiyoda]]
| |
| − | |
| |
| − | | style="text-align:center;" |[[Ryuujou]], [[Hiyou]], [[Jun'you]], [[Shouhou]]
| |
| − | | style="text-align:center;" |[[Ise]], [[Hyuuga]], [[Fusou]], [[Yamashiro]]
| |
| − | |-
| |
| − | | style="text-align:center;" |O
| |
| − | | style="text-align:center;" |[[Shimakaze|'''<span style="color:red">Shimakaze</span>''']], [[Fubuki]], [[Hatsuyuki]], [[Shikinami]], [[Ooshio]], [[Arare]], [[Kagerou]], [[Kuroshio]], [[Michishio]]
| |
| − | | style="text-align:center;" |[[Ooi]], [[Kitakami]], [[Tenryuu]], [[Tama]], [[Yura]], [[Sendai]], [[Jintsuu]], [[Naka]]
| |
| − | | style="text-align:center;" |[[Nachi]], [[Ashigara]], [[Haguro]], [[Atago]], [[Choukai]], [[Tone]], [[Chikuma]], [[Maya]]
| |
| − | | style="text-align:center;" |[[Chitose]], [[Chiyoda]]
| |
| − | |
| |
| − | | style="text-align:center;" |[[Ryuujou]], [[Shouhou]]
| |
| − | | style="text-align:center;" |[[Ise]], [[Hyuuga]], [[Fusou]], [[Yamashiro]]
| |
| − | |-
| |
| − | | style="text-align:center;" |P
| |
| − | | style="text-align:center;" |[[Shimakaze|'''<span style="color:red">Shimakaze</span>''']], [[Fubuki]], [[Hatsuyuki]], [[Miyuki]], [[Isonami]], [[Asashio]], [[Kagerou]], [[Kuroshio]], [[Uranami|'''<span style="color:red">Uranami</span>''']]
| |
| − | | style="text-align:center;" |[[Ooi]], [[Kitakami]], [[Tenryuu]], [[Natori]], [[Naka]]
| |
| − | | style="text-align:center;" |[[Mogami]], [[Kako]], [[Myoukou]], [[Nachi]], [[Ashigara]], [[Takao]], [[Atago]], [[Maya]], [[Tone]]
| |
| − | | style="text-align:center;" |[[Chitose]], [[Chiyoda]]
| |
| − | |
| |
| − | | style="text-align:center;" |[[Ryuujou]], [[Hiyou]], [[Jun'you]], [[Shouhou]]
| |
| − | | style="text-align:center;" |[[Ise]], [[Hyuuga]], [[Fusou]], [[Yamashiro]]
| |
| − | |}<nowiki/>
| |
| − | | |
| − | =={{Anchor|2-5}} World 2-5 【Extra Operation】<br/>沖ノ島沖戦闘哨戒 Combat Patrol Off Okinoshima==
| |
| − | {{LabSortieworld
| |
| − | | map = 2-5 Map.png
| |
| − | | difficulty = ☆ ☆ ☆ ☆ ☆ ☆ ☆ ☆
| |
| − | | item = {{Fuel}} {{Steel}}
| |
| − | | exp = 250
| |
| − | | code = 沖ノ島沖戦闘哨戒 (Okinoshima Patrol Battles)
| |
| − | | jptext = 同方面に敵反攻の兆候が報告された。巡洋艦を中心に哨戒部隊を編成、敵艦隊の動向を探れ!
| |
| − | | entext = There are reports of an enemy counteroffensive. Form a cruiser patrol group and track their movements!
| |
| − | }}
| |
| − | | |
| − | ===Stage Guide===
| |
| − | {{MapBranchingTable
| |
| − | |title = 2-5 Branching Rules
| |
| − | |expand = true
| |
| − | |id = 2-5
| |
| − | |0 -> B , C =
| |
| − | * Meet '''ANY''' of the following to go to B
| |
| − | **DD+DE >= 4
| |
| − | **Fleet contains CL and DD ≥ 3
| |
| − | **Amount of ships equipped with drum canisters ≥ 2
| |
| − | **SS(V) ≥ 4 ('''Overrides C node branching''')
| |
| − | * Meet '''ANY''' of the following to '''FORCE''' C
| |
| − | **Fleet contains CV(B/L)
| |
| − | **AV >= 2
| |
| − | *Otherwise, random routing, with higher chance of going to C
| |
| − | | |
| − | |B -> A/empty = * Do not meet the requirement to go to F.
| |
| − | |B -> F = * Amount of SS(V) ≤ 2
| |
| − | | |
| − | |C -> D/empty, E =
| |
| − | * Meeting '''ANY''' of the following '''FORCES''' you to D
| |
| − | ** Amount of CV(L/B) ≥ 3
| |
| − | ** Amount of (F)BB(V) ≥ 3
| |
| − | * Meet '''ANY''' of the following requirements to go to E
| |
| − | **Fleet contains CL and DD >= 2
| |
| − | **CAV >= 2 and DD >= 2
| |
| − | * Otherwise, random routing.
| |
| − | | |
| − | |E -> G/storm = * Do not meet the requirements to go to I.
| |
| − | |E -> I/empty =
| |
| − | * Meet '''ALL''' of the following requirements:
| |
| − | ** Fast Fleet
| |
| − | ** Amount of DD ≥ 3
| |
| − | ** Fleet contains CL
| |
| − | ** Amount of CVL ≤ 2
| |
| − | ** Amount of CA(V)+CV(B) ≤ 1
| |
| − | ** No (F)BB(V)
| |
| − | | |
| − | |F -> E, J =
| |
| − | * Meet '''ALL''' of the following requirements to go to E:
| |
| − | ** Fast Fleet
| |
| − | ** Fleet contains CL
| |
| − | ** Amount of DD ≥ 2
| |
| − | * Go to J if Slow Fleet or (F)BB(V) >= 3
| |
| − | * Otherwise, 40% E, 60% J.
| |
| − | | |
| − | |G/storm -> I/empty =
| |
| − | * Meet '''ALL''' of the following requirements
| |
| − | **Fleet contains no (F)BB(V) or CV(L/B)
| |
| − | **CL+DD ≥ 4
| |
| − | **CL <= 1
| |
| − | | |
| − | |G/storm -> K/empty, L=
| |
| − | * LoS check using the F33 formula (Cn=1):
| |
| − | ** Go to L if LoS ≥ 41
| |
| − | ** Go to K if LoS < 34
| |
| − | ** Otherwise, random routing between K and L.
| |
| − | | |
| − | |I/empty -> H/empty, O =
| |
| − | * LoS check using the F33 formula (Cn=1):
| |
| − | ** Go to O if LoS ≥ 34
| |
| − | ** Go to H if LoS < 31
| |
| − | ** Otherwise, random routing.
| |
| − | | |
| − | |J -> H/empty, O =
| |
| − | * LoS check using the F33 formula (Cn=1):
| |
| − | ** Go to O if LoS ≥ 49
| |
| − | ** Go to H if LoS < 42
| |
| − | ** Otherwise, random between H and O
| |
| − | |J -> M/resource = *Fleet that contains (F)BB(V) >= 4 has a chance to go to M
| |
| − | | |
| − | |L -> N/resource, O =
| |
| − | * Meet '''ALL''' of the following requirements to go to O:
| |
| − | ** Amount of DD ≥ 2
| |
| − | ** Fleet contains CL
| |
| − | * Otherwise, random routing
| |
| − | }}
| |
| − | | |
| − | {|
| |
| − | |- style="vertical-align: top;"
| |
| − | |{{AirControlSystem
| |
| − | | Map =2-5
| |
| − | | AS =42
| |
| − | | Fleet =
| |
| − | | Notes =
| |
| − | }}
| |
| − | |}
| |
| − | | |
| − | ===Tips===
| |
| − | *You are required to '''sink''' the flagship at boss node 4 times to clear the map. The reward for clearing the map is '''100 points''' and a '''medal.''' Boss's HP Bar will reset at midnight at the beginning of each month.
| |
| − | *This map requires your fleet to have a certain amount of Line of Sight (LoS) in order to route to the boss. It uses [[Line_of_Sight#Formula%2033|Formula 33 (F33)]] to calculate the LoS of your fleet to determine if you meet the LoS check.
| |
| − | ** Fleets routing from '''I-O requires Cn1 = 34'''
| |
| − | ** Fleets routing from '''J-O require Cn1 = 49'''
| |
| − | *[[Akashi]] can drop with a small chance in 2-5, but only for Admirals who have do not have her yet in their base. If you already have her, she will not drop in this map anymore.
| |
| − | | |
| − | <br/>'''Recommended Fleet'''
| |
| − | *There are 3 routes you can go
| |
| − | **The middle route is the preferred route used for clearing since it allows for 1 CV and 1 CVL to be brought, enabling powerful opening air strikes.
| |
| − | **The top north route should be considered for clearing quests such as [[Quests#BM1|BM1]], it can also be used for clearing despite the high cost
| |
| − | **The north-middle route should only be used for clearing quests that banned heavy ships and only allow up to 1 CA(V) such as [[Quests#BM7|BM7]]
| |
| − | | |
| − | <br/><u>'''Middle route C-E-I-O: 1 CV 1 CVL 1 CL 3 DD / 2 CVL 1 CL 3 DD (All Fast)'''</u>
| |
| − | * Attention should be given to fleet ordering to ensure you maximize for day battle performance.
| |
| − | * Use CV(L) that are able to perform strong opening air strikes.
| |
| − | * Ensure that the fleet speed is '''fast'''.
| |
| − | * Ensure that you meet the required LoS to route to the boss node ('''>= 34 Cn1''')
| |
| − | *Carriers should be equipped to utilize '''CVCI''' to maximize accuracy and shelling power against the enemies at the boss node.
| |
| − | | |
| − | <br/><u>'''Top north route B-F-J-O: 1 BBV 2 CAV 3 CA (each CAV carrying 1 drum canisters)'''</u>
| |
| − | *All enemy compositions before the boss do not have any air power making it easy to secure Air Supremacy (AS+) with a minimal of 1 Seaplane Bomber (SPB) on a CAV or BBV.
| |
| − | *'''[[Artillery_Spotting|Artillery spotting]]''' should be used to increase the likelihood of reaching the boss node.
| |
| − | *Ensure that you meet the required LoS to route to the boss node ('''>= 49 Cn1''')
| |
| − | *This composition is recommended to be used when attempting to clear the monthly quest [[Quests#Bm1|BM1]].
| |
| − | *The boss formation is random between 3 Ru class battleships or 2 Ru class battleships and 1 Wo class carrier. You are required to bring more seaplane bombers if you wish to secure AS at boss as well
| |
| − | | |
| − | <br/><u>'''North-middle route B-F-E-I-O: 1 CA 1 CL 4 DD'''</u>
| |
| − | *This composition is recommended to be used when attempting to clear the monthly quest [[Quests#Bm7|BM7]].
| |
| − | *Ensure that you meet the required LoS to route to the boss node ('''>= 34 Cn1''')
| |
| − | *This route is difficult without access to ships that are able to equip seaplane bomber or seaplane fighter to gain some air power
| |
| − | **'''[[Zara|Zara Due]]''' is the ideal choice due to her large first slot ensuring that the seaplane bomber can survive until the boss node and potentially securing AS+ against the triple Ru-class battleship formation. You may also wish to include a seaplane fighter (along with the seaplane bomber) to ensure that you are able to secure AS in the event that you face the boss formation that contains a Wo class carrier.
| |
| − | **Otherwise any single '''Zara or Agano class''' with a seaplane bomber will be sufficient to secure [[Artillery Spotting]] for the pre-boss nodes.
| |
| − | *Please note that as your fleet for this route is pretty light, there is a good chance you will get heavily damaged before reaching the boss node. Sparkling is recommended for boss node reaching consistency
| |
| − | | |
| − | ===Nodes and Enemy Encounters===
| |
| − | {{#invoke:EnemyEncounters2|encounterTemplate
| |
| − | |A_label = '''<span style="color:blue">Battle Avoided</span>'''
| |
| − | |A1_node_info = "Must be my imagination" (battle avoided)
| |
| − | |
| |
| − | |B_label = 敵侵攻前衛艦隊 B群
| |
| − | |B-1_node_info = ca_ri-class_flagship cl_he-class_elite dd_ro-class_late_model dd_ro-class_late_model dd_ro-class dd_ro-class
| |
| − | |B-1_form = double_line line_ahead
| |
| − | |B-1_xp =
| |
| − | |B-1_enemy_air_power =
| |
| − | |B-2_node_info = ca_ri-class_flagship cl_he-class_elite dd_ro-class_late_model dd_ro-class_late_model dd_ro-class_late_model dd_ro-class
| |
| − | |B-2_form = line_ahead double_line
| |
| − | |B-2_xp =
| |
| − | |B-2_enemy_air_power =
| |
| − | |B-3_node_info = ca_ri-class_elite cl_he-class_elite dd_ro-class_late_model dd_ro-class_late_model dd_ro-class dd_ro-class
| |
| − | |B-3_form = line_ahead double_line
| |
| − | |B-3_xp =
| |
| − | |B-3_enemy_air_power =
| |
| − | |B-4_node_info = ca_ri-class_flagship cl_he-class_elite dd_ro-class_late_model dd_ro-class_late_model dd_ro-class_late_model dd_ro-class_late_model
| |
| − | |B-4_form = line_ahead
| |
| − | |B-4_xp =
| |
| − | |B-4_enemy_air_power =
| |
| − | |B-5_node_info = ca_ri-class_elite cl_he-class_elite dd_ro-class_late_model dd_ro-class dd_ro-class dd_ro-class
| |
| − | |B-5_form = double_line line_ahead
| |
| − | |B-5_xp =
| |
| − | |B-5_enemy_air_power =
| |
| − | |
| |
| − | |C_label = 敵侵攻前衛艦隊 A群
| |
| − | |C-1_node_info = cvl_nu-class_flagship ca_ri-class_flagship dd_ro-class_late_model dd_ro-class_late_model dd_ro-class dd_ro-class
| |
| − | |C-1_form = diamond line_ahead
| |
| − | |C-1_xp =
| |
| − | |C-1_enemy_air_power = 23
| |
| − | |C-2_node_info = cvl_nu-class_flagship ca_ri-class_flagship ca_ri-class_elite dd_ro-class_late_model dd_ro-class_late_model dd_ro-class_late_model
| |
| − | |C-2_form = diamond line_ahead
| |
| − | |C-2_xp =
| |
| − | |C-2_enemy_air_power = 23
| |
| − | |C-3_node_info = cvl_nu-class_flagship ca_ri-class_elite dd_ro-class_late_model dd_ro-class_late_model dd_ro-class dd_ro-class
| |
| − | |C-3_form = diamond line_ahead
| |
| − | |C-3_xp =
| |
| − | |C-3_enemy_air_power = 23
| |
| − | |C-4_node_info = cvl_nu-class_flagship ca_ri-class_flagship ca_ri-class_flagship dd_ro-class_late_model dd_ro-class_late_model dd_ro-class_late_model
| |
| − | |C-4_form = line_ahead
| |
| − | |C-4_xp =
| |
| − | |C-4_enemy_air_power = 23
| |
| − | |C-5_node_info = cvl_nu-class_elite ca_ri-class_elite dd_ro-class_late_model dd_ro-class_late_model dd_ro-class dd_ro-class
| |
| − | |C-5_form = line_ahead diamond
| |
| − | |C-5_xp =
| |
| − | |C-5_enemy_air_power = 24
| |
| − | |
| |
| − | |D_label = '''<span style="color:blue">Battle Avoided</span>'''
| |
| − | |D1_node_info = "Must be my imagination" (battle avoided)
| |
| − | |
| |
| − | |E_label = 敵侵攻重巡戦隊
| |
| − | |E-1_node_info = ca_ri-class_flagship ca_ri-class_flagship ca_ri-class_elite cl_ho-class_elite dd_ro-class_late_model dd_ro-class_late_model
| |
| − | |E-1_form = double_line line_ahead
| |
| − | |E-1_xp =
| |
| − | |E-1_enemy_air_power =
| |
| − | |E-2_node_info = ca_ri-class_flagship ca_ri-class_flagship ca_ri-class_flagship cl_ho-class_flagship dd_ro-class_late_model dd_ro-class_late_model
| |
| − | |E-2_form = double_line line_ahead
| |
| − | |E-2_xp =
| |
| − | |E-2_enemy_air_power =
| |
| − | |E-3_node_info = ca_ri-class_flagship ca_ri-class_flagship ca_ri-class_flagship cl_he-class_flagship dd_ro-class_late_model dd_ro-class_late_model
| |
| − | |E-3_form = line_ahead
| |
| − | |E-3_xp =
| |
| − | |E-3_enemy_air_power =
| |
| − | |E-4_node_info = ca_ri-class_flagship ca_ri-class_elite ca_ri-class_elite cl_ho-class_elite dd_ro-class_late_model dd_ro-class_late_model
| |
| − | |E-4_form = double_line line_ahead
| |
| − | |E-4_xp =
| |
| − | |E-4_enemy_air_power =
| |
| − | |E-5_node_info = ca_ri-class_flagship ca_ri-class_elite ca_ri-class_elite dd_ro-class_late_model dd_ro-class dd_ro-class
| |
| − | |E-5_form = double_line line_ahead
| |
| − | |E-5_xp =
| |
| − | |E-5_enemy_air_power =
| |
| − | |
| |
| − | |F_label = 敵侵攻水雷戦隊
| |
| − | |F-1_node_info = cl_he-class_flagship clt_chi-class_flagship clt_chi-class_flagship dd_ro-class_late_model dd_i-class_late_model dd_i-class_late_model
| |
| − | |F-1_form = line_ahead echelon
| |
| − | |F-1_xp =
| |
| − | |F-1_enemy_air_power =
| |
| − | |F-2_node_info = cl_he-class_flagship clt_chi-class_elite clt_chi-class_elite dd_ro-class_late_model dd_i-class_late_model dd_i-class_late_model
| |
| − | |F-2_form = line_ahead echelon
| |
| − | |F-2_xp =
| |
| − | |F-2_enemy_air_power =
| |
| − | |F-3_node_info = cl_he-class_flagship clt_chi-class_flagship clt_chi-class_flagship dd_ro-class_late_model dd_ro-class_late_model dd_ro-class_late_model
| |
| − | |F-3_form = line_ahead
| |
| − | |F-3_xp =
| |
| − | |F-3_enemy_air_power =
| |
| − | |F-4_node_info = cl_he-class_flagship clt_chi-class_elite clt_chi-class_elite dd_ro-class_late_model dd_i-class dd_i-class
| |
| − | |F-4_form = line_ahead echelon
| |
| − | |F-4_xp =
| |
| − | |F-4_enemy_air_power =
| |
| − | |F-5_node_info = cl_he-class_elite clt_chi-class_elite clt_chi-class_elite dd_ro-class_late_model dd_i-class dd_i-class
| |
| − | |F-5_form = echelon line_ahead
| |
| − | |F-5_xp =
| |
| − | |F-5_enemy_air_power =
| |
| − | |
| |
| − | |G_label = '''<span style="color:purple">Maelstrom Node</span>'''
| |
| − | |G1_node_info = fuel - ?
| |
| − | |
| |
| − | |H_label = '''<span style="color:blue">Battle Avoided</span>'''
| |
| − | |H1_node_info = "Must be my imagination" (battle avoided)
| |
| − | |
| |
| − | |I_label = '''<span style="color:blue">Battle Avoided</span>'''
| |
| − | |I1_node_info = "Must be my imagination" (battle avoided)
| |
| − | |
| |
| − | |J_label = 敵侵攻水上打撃部隊
| |
| − | |J-1_node_info = bb_ru-class_flagship ca_ri-class_flagship ca_ri-class_flagship cl_he-class_flagship dd_ro-class_late_model dd_ro-class_late_model
| |
| − | |J-1_form = double_line echelon
| |
| − | |J-1_xp =
| |
| − | |J-1_enemy_air_power =
| |
| − | |J-2_node_info = bb_ru-class_flagship ca_ri-class_flagship ca_ri-class_elite cl_ho-class_elite dd_ro-class_late_model dd_ro-class_late_model
| |
| − | |J-2_form = echelon double_line line_ahead
| |
| − | |J-2_xp =
| |
| − | |J-2_enemy_air_power =
| |
| − | |J-3_node_info = bb_ru-class_flagship ca_ri-class_flagship ca_ri-class_flagship cl_ho-class_flagship dd_ro-class_late_model dd_ro-class_late_model
| |
| − | |J-3_form = line_ahead
| |
| − | |J-3_xp =
| |
| − | |J-3_enemy_air_power =
| |
| − | |J-4_node_info = bb_ru-class_flagship ca_ri-class_flagship ca_ri-class_elite dd_ro-class_late_model dd_ro-class dd_ro-class
| |
| − | |J-4_form = echelon double_line line_ahead
| |
| − | |J-4_xp =
| |
| − | |J-4_enemy_air_power =
| |
| − | |
| |
| − | |K_label = '''<span style="color:blue">Battle Avoided</span>'''
| |
| − | |K1_node_info = "Must be my imagination" (battle avoided)
| |
| − | |
| |
| − | |L_label = 敵侵攻機動部隊
| |
| − | |L-1_node_info = cv_wo-class_flagship cvl_nu-class_flagship cvl_nu-class_elite bb_ru-class_flagship dd_ro-class_late_model dd_ro-class_late_model
| |
| − | |L-1_form = diamond
| |
| − | |L-1_xp =
| |
| − | |L-1_enemy_air_power = 75
| |
| − | |L-2_node_info = cv_wo-class_flagship cvl_nu-class_elite cvl_nu-class_elite bb_ru-class_flagship dd_ro-class_late_model dd_ro-class_late_model
| |
| − | |L-2_form = diamond
| |
| − | |L-2_xp =
| |
| − | |L-2_enemy_air_power = 76
| |
| − | |L-3_node_info = cv_wo-class_flagship cvl_nu-class_flagship cvl_nu-class_flagship bb_ru-class_flagship dd_ro-class_late_model dd_ro-class_late_model
| |
| − | |L-3_form = diamond
| |
| − | |L-3_xp =
| |
| − | |L-3_enemy_air_power = 74
| |
| − | |L-4_node_info = cv_wo-class_flagship cvl_nu-class_elite cvl_nu-class_elite bb_ru-class_elite dd_ro-class_late_model dd_ro-class_late_model
| |
| − | |L-4_form = diamond
| |
| − | |L-4_xp =
| |
| − | |L-4_enemy_air_power = 76
| |
| − | |L-5_node_info = cv_wo-class_flagship cvl_nu-class_elite bb_ru-class_elite cl_ho-class_elite dd_ro-class_late_model dd_ro-class_late_model
| |
| − | |L-5_form = diamond
| |
| − | |L-5_xp =
| |
| − | |L-5_enemy_air_power = 52
| |
| − | |L-6_node_info = cv_wo-class_flagship cvl_nu-class_elite bb_ru-class_elite dd_ro-class_late_model dd_ro-class dd_ro-class
| |
| − | |L-6_form = diamond
| |
| − | |L-6_xp =
| |
| − | |L-6_enemy_air_power = 52
| |
| − | |L-7_node_info = cv_wo-class_elite cvl_nu-class_elite bb_ru-class_elite dd_ro-class_late_model dd_ro-class dd_ro-class
| |
| − | |L-7_form = diamond
| |
| − | |L-7_xp =
| |
| − | |L-7_enemy_air_power = 51
| |
| − | |
| |
| − | |M_label = '''<span style="color:green">Resource Node</span>'''
| |
| − | |M-1_node_info = fuel + ?
| |
| − | |
| |
| − | |N_label = '''<span style="color:green">Resource Node</span>'''
| |
| − | |N-1_node_info = steel +50/55/60
| |
| − | |
| |
| − | |O_label = 敵侵攻中核艦隊
| |
| − | |O-1_node_info = cv_wo-class_flagship bb_ru-class_flagship bb_ru-class_flagship cl_he-class_flagship dd_ro-class_late_model dd_ro-class_late_model
| |
| − | |O-1_form = diamond double_line
| |
| − | |O-1_xp =
| |
| − | |O-1_enemy_air_power = 28
| |
| − | |O-2_node_info = bb_ru-class_flagship bb_ru-class_flagship bb_ru-class_flagship cl_he-class_flagship dd_ro-class_late_model dd_ro-class_late_model
| |
| − | |O-2_form = line_ahead
| |
| − | |O-2_xp =
| |
| − | |O-2_enemy_air_power =
| |
| − | |O-3_node_info = cv_wo-class_flagship bb_ru-class_flagship bb_ru-class_elite cl_he-class_elite dd_ro-class_late_model dd_ro-class_late_model
| |
| − | |O-3_form = double_line diamond
| |
| − | |O-3_xp =
| |
| − | |O-3_enemy_air_power = 28
| |
| − | |O-4_node_info = bb_ru-class_flagship bb_ru-class_flagship bb_ru-class_elite cl_he-class_elite dd_ro-class_late_model dd_ro-class_late_model
| |
| − | |O-4_form = line_ahead
| |
| − | |O-4_xp =
| |
| − | |O-4_enemy_air_power =
| |
| − | |O-5_node_info = cv_wo-class_flagship bb_ru-class_flagship bb_ru-class_elite dd_ro-class_late_model dd_ro-class dd_ro-class
| |
| − | |O-5_form = diamond double_line
| |
| − | |O-5_xp =
| |
| − | |O-5_enemy_air_power = 28
| |
| − | |O-6_node_info = bb_ru-class_flagship bb_ru-class_flagship bb_ru-class_elite dd_ro-class_late_model dd_ro-class dd_ro-class
| |
| − | |O-6_form = line_ahead
| |
| − | |O-6_xp =
| |
| − | |O-6_enemy_air_power =
| |
| − | |
| |
| − | |final_form =
| |
| − | |boss_node = O
| |
| − | }}
| |
| − | | |
| − | ===Drops===
| |
| − | | |
| − | <div class="mw-customtoggle-2-5-drop globalbutton">Show/Hide Drops</div>
| |
| − | | |
| − | {| class="mw-collapsible mw-collapsed wikitable" id="mw-customcollapsible-2-5-drop" style="text-align: center;"
| |
| − | ! colspan="9" style="text-align:center;" |Drops
| |
| − | |-
| |
| − | !Node
| |
| − | !Destroyers
| |
| − | !Light Cruisers
| |
| − | !Heavy Cruisers
| |
| − | !Seaplane Tender
| |
| − | !Aircraft Carrier
| |
| − | !Battleship
| |
| − | !Submarine
| |
| − | !Other
| |
| − | |-
| |
| − | | A
| |
| − | |[[Ooshio]], [[Hatsuyuki]], [[Ushio]], [[Miyuki]], [[Mutsuki]], [[Kisaragi]], [[Akebono]], [[Suzukaze]]
| |
| − | |[[Tatsuta]], [[Nagara]], [[Sendai]], [[Kuma]]
| |
| − | |[[Ashigara]], [[Haguro]], [[Kako]]
| |
| − | |[[Chiyoda]]
| |
| − | |
| |
| − | |
| |
| − | |
| |
| − | |
| |
| − | |-
| |
| − | | B
| |
| − | |[[Shirayuki]], [[Suzukaze]], [[Samidare]], [[Ayanami]], [[Isonami]], [[Shikinami]], [[Asashio]], [[Ooshio]], [[Kisaragi]], [[Hatsuyuki]], [[Ushio]], [[Akebono]], [[Satsuki]]
| |
| − | |[[Kuma]], [[Naka]], [[Tama]], [[Tatsuta]], [[Tenryuu]], [[Nagara]], [[Isuzu]], [[Yura]], [[Kiso]]
| |
| − | |[[Furutaka]], [[Kako]], [[Aoba]], [[Haguro]], [[Choukai]], [[Maya]], [[Mogami]]
| |
| − | |[[Chitose]], [[Chiyoda]]
| |
| − | |
| |
| − | [[Ryuujou]], [[Hiyou]], [[Junyou|Jun'you]], [[Shouhou]]
| |
| − | |
| |
| − | |
| |
| − | |
| |
| − | |-
| |
| − | | D
| |
| − | |[[Shikinami]], [[Hatsuyuki]]
| |
| − | |[[Isuzu]], [[Nagara]]
| |
| − | |[[Aoba]], [[Kako]], [[Furutaka]], [[Mogami]]
| |
| − | |[[Chitose]], [[Chiyoda]]
| |
| − | |
| |
| − | |[[Ise]]
| |
| − | |
| |
| − | |
| |
| − | |-
| |
| − | | E
| |
| − | |[[Ayanami]], [[Satsuki]], [[Kisaragi]], [[Shikinami]], [[Shirayuki]], [[Mutsuki]], [[Hamakaze|'''<span style="color:red">Hamakaze</span>''']]
| |
| − | |[[Isuzu]], [[Tenryuu]], [[Tatsuta]], [[Natori]], [[Jintsuu]], [[Ooi]], [[Naka|Naka, ]][[Tama]], [[Yura]], [[Sendai]]
| |
| − | |[[Furutaka]], [[Kako]], [[Aoba]], [[Kinugasa|'''<span style="color:red">Kinugasa</span>''']], [[Myoukou]], [[Haguro]], [[Ashigara]], [[Maya]], [[Chokai]], [[Tone]], [[Chikuma]], [[Mogami]]
| |
| − | |[[Chitose]], [[Chiyoda]]
| |
| − | |
| |
| − | [[Ryuujou]], [[Shouhou]], [[Hiyou]], [[Jun'you]]
| |
| − | |
| |
| − | [[Fusou]], [[Yamashiro]], [[Ise]], [[Hyuuga]],
| |
| − | |
| |
| − | |
| |
| − | |-
| |
| − | | I
| |
| − | |
| |
| − | [[Ayanami]], [[Shikinami]] , [[Mutsuki]] , [[Kisaragi]]<span style="font-size:14px;">, </span>[[Asashio]]<span style="font-size:14px;">, </span>[[Hatsuyuki]]<span style="font-size:14px;">, [[Satsuki]] , </span>[[Hamakaze|'''<span style="color:red">Hamakaze</span>''']]
| |
| − | |[[Tenryuu]], [[Tatsuta]], [[Isuzu]], [[Yura]], [[Naka]], [[Sendai]] , [[Ooi]], [[Kuma]], [[Tama]]
| |
| − | |
| |
| − | [[Furutaka]], [[Kako]], [[Aoba]], [[Kinugasa|'''<span style="color:red">Kinugasa</span>''']], [[Takao]], [[Atago]], [[Choukai]], [[Tone]], [[Chikuma]], [[Myoukou]], [[Mogami]]
| |
| − | |[[Chitose]], [[Chiyoda]]
| |
| − | |
| |
| − | [[Ryuujou]], [[Shouhou]], [[Jun'you]], [[Hiyou]]
| |
| − | |[[Yamashiro]], [[Ise]]
| |
| − | |
| |
| − | |
| |
| − | |-
| |
| − | | J
| |
| − | |[[Satsuki]], [[Hamakaze|'''<span style="color:red">Hamakaze</span>''']]
| |
| − | |[[Kuma]], [[Tatsuta]], [[Jintsu]], [[Isuzu]], [[Sendai]], [[Ooi]]
| |
| − | |[[Aoba]], [[Mogami]], [[Kako]], [[Tone]]
| |
| − | |[[Chitose]]
| |
| − | |[[Ryuujou]]
| |
| − | |[[Yamashiro]], [[Fusou]], [[Ise]]
| |
| − | |
| |
| − | |
| |
| − | |-
| |
| − | | '''<span style="color:red">L</span>'''
| |
| − | |
| |
| − | [[Fubuki]], [[Uzuki|'''<span style="color:red">Uzuki</span>''']], [[Yayoi|'''<span style="color:red">Yayoi</span>''']], [[Shimakaze|'''<span style="color:red">Shimakaze</span>''']], [[Hamakaze|'''<span style="color:red">Hamakaze</span>''']], [[Urakaze|'''<span style="color:red">Urakaze</span>''']], [[Yuugumo|'''<span style="color:red">Yuugumo</span>''']], [[Makigumo|'''<span style="color:red">Makigumo</span>''']]'''<span style="color:red">, [[Kawakaze|'''<span style="color:red">Kawakaze</span>''']]</span>'''
| |
| − | |[[Kuma]], [[Kitakami]], [[Nagara]], [[Kinu]], [[Sendai]], [[Abukuma|'''<span style="color:red">Abukuma</span>''']]
| |
| − | |[[Takao]], [[Atago]], [[Tone]], [[Chikuma]], [[Suzuya]], [[Kumano]], [[Mogami]]
| |
| − | |
| |
| − | |[[Kaga]], [[Shouhou]], [[Zuihou]], [[Souryuu]], [[Hiryuu]], [[Ryuujou]]
| |
| − | |[[Kongou]], [[Hiei]], [[Haruna]], [[Kirishima]], [[Fusou]], [[Yamashiro]], [[Ise]], [[Hyuuga]]
| |
| − | |
| |
| − | [[I-58|'''<span style="color:red">I-58</span>''']], [[I-168|'''<span style="color:red">I-168</span>''']], [[I-19|'''<span style="color:red">I-19</span>''']]
| |
| − | |[[Taigei|'''<span style="color:red">Taigei</span>''']]<br />[[Akashi|'''<span style="color:red">Akashi***</span>''']]
| |
| − | |}
| |
| − | | |
| − | {{Navbox World}}
| |
| − | [[ko:2해역]] | |
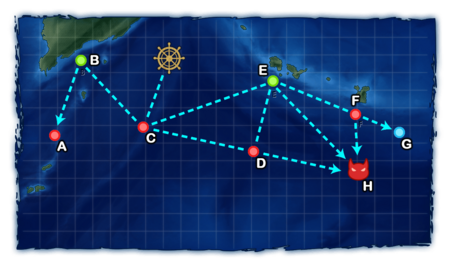
 Seaplane Fighters.
 , Landing Craft
 , and Tanks
 will help to farm additional steel.