• Welcome to the Kancolle Wiki!
  • If you have any questions regarding site content, account registration, etc., please visit the KanColle Wiki Discord

Summer 2021 Event/E-2

From Kancolle Wiki
< Summer 2021 Event
Revision as of 07:52, 31 August 2021 by Sin sin (talk | contribs) (→‎E-2: fix tp gauge for easy)
Jump to navigation Jump to search

E-2

Summer 2021 Event E-2 Map.png

Summmer2021E-2MapP1.png

Summer2021E-2MapP2.png

Summer2021E-2MapP3.png

Summer2021E-2LBASMapP1.png

Summer2021E-2LBASMapP2.png

Information
Event Tag Summer2021EventTag3.png Blue Tag: 2nd Special Squadron
Summer2021EventTag4.png Green Tag: Force H
Boss Gauges Hard (): 900 TP + 7750 HP + 5000 HP
Medium (): 500 TP + 5250 HP + 4800 HP
Easy (): 330 TP + 3750 HP + 3600 HP
Casual (): 300 TP + 3750 HP + 3600 HP
Map Bosses
Rewards
All
Ship Banner Conte di Cavour.png
Equipment/Item
Casual

Easy

Medium

Hard
Item Icon Medal.png
Medal
1 1
Item Icon Reinforcement Expansion.png
Reinforcement Expansion
1 1 1
Item Icon Submarine Supply Material.png
Submarine Supply Material
2 3 3
Item Icon Improvement Material.png
Improvement Material
7
Equipment Card SM.79.png
SM.79
1 1 (★2)
Equipment Card SM.79 bis.png
SM.79 bis
1 (★2)
Equipment Card Barracuda Mk.II.png
Barracuda Mk.II
1 (★2)
OoyodoE-2Summer2021.png
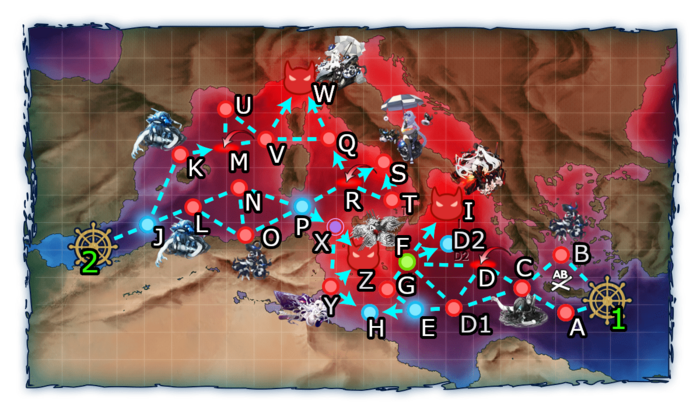
E-2 Branching Rules - From Point 1
Nodes Rules
Start
1
  • Do not meet the requirements to start at 2.
2
  • Meet ALL of the following requirements:
    • TP Phase cleared.
    • Combined Fleet
1
A
  • Do not meet the requirements to go to B.
B
  • Meet ALL of the following requirements:
    • Fleet contains no (F)BB(V) or CV(L/B)
    • No SS(V)
    • No Akitsu Maru
C
D
  • If Fast+ Fleet, meet ALL of the following requirements:
    • No (F)BB(V) or CV(L/B)
    • Amount of DD ≥ 4
    • Failure to meet the above rules will FORCE you to D1.
  • Else, meet ALL of the following requirements:
    • Fast Fleet
    • Amount of DD ≥ 4
    • No CVL, (F)BB(V) or CA(V)
  • Finally, meet ANY of the following:
    • Fleet contains CV(B)
    • Amount of (F)BB(V)+CVL ≥ 2
    • Amount of DD ≤ 2 AND fleet contains CVL or (F)BB(V)
    • If fleet is Slow, amount DD ≤ 2 AND amount of CL ≤ 2
D1
  • Do not meet the requirements to go to D.
D
D1
  • Do not meet the requirements to go to F.
F
  • Meet ALL of the following requirements:
    • No (F)BB(V) or CV(B)
    • Amount of DD ≥ 4
D1
E
  • Do not meet the requirements to go to F.
F
  • Meet ALL of the following requirements:
    • Amount of DD ≥ 3
    • Fast+ Fleet OR amount of DD+DE ≥ 6
    • Fast+ Fleet OR fleet only contains DD/DE
E
G
  • Choose your own adventure!
H
F
D2
  • Fail the LoS check.
I
  • Pass the LoS check.


E-2 Branching Rules - From Point 2
Nodes Rules
Start
1
  • Do not meet the requirements to start at 2.
2
  • Meet ALL of the following requirements:
    • TP Phase cleared.
    • Combined Fleet
J
K
  • Choose your own adventure!
L
M
U
  • Do not meet the requirements to go to V.
V
  • Meet ALL of the following requirements:
    • If Slow Fleet, amount of (F)BB(V) ≤ 1
    • Amount of (F)BB(V)+CV(L/B) ≤ 5
V
Q
  • Do not meet the requirements to go to W.
W
  • Meet ANY of the following requirements:
    • Amount of CV(B) ≥ 3
    • Amount of (F)BB(V) ≥ 5
    • Fast Fleet AND amount of DD ≥ 6 AND amount of CL ≥ 2
L
N
  • Meet ALL of the following requirements:
    • Fast Fleet
    • Amount of DD ≥ 6
    • Amount of CL ≥ 3
    • Amount of (F)BB(V)+CV(L/B) ≤ 1
  • Alternatively, meet ANY of the following:
    • Fast+ Fleet AND amount of CL ≥ 2
    • Fleet contains SS(V)
    • Amount of (F)BB(V) ≥ 5
O

Do not meet the requirements to go to N.

N
O
  • Do not meet the requirements to go to P.
P
  • Meet ALL of the following requirements:
    • Amount of (F)BB(V)+CV(L/B) ≤ 5
    • No SS(V)
  • Alternatively, Fast+ Fleet AND amount of CL ≥ 2
P
R
  • Choose your own adventure!
X
R
Q
  • Carrier Task Force
S
  • Transport Combined Fleet
T
  • Surface Task Force
X
Y
  • Do not meet the requirements to go to Z.
Z
  • Meet ALL of the following requirements:
    • Pass the LoS check.
    • No SS(V)
    • Amount of CV(L/B) ≤ 3
    • Amount of (F)BB(V) ≤ 3
    • Amount of (F)BB(V)+CV(L/B) ≤ 4 OR amount of DD ≥ 5
  • Alternatively, use a Fast+ Fleet AND pass the LoS check.
Y
H
  • Fail the LoS check.
Z
  • Pass the LoS check.

Branching compositions were reported over the course of the event. (NGA and KCNav)

The event guides are to be constructed through the respective Event map page guide and reviewed by editor staff / collaboration committee before being approved here. Do not under any circumstance update the guides through this page or attempt to fix them through this page. Please only update guides through their respective sandbox pages.

General Overview

  • It is recommended to have the event quest completed which unlocks the Strike Force for fleet 3.
  • This map utilizes the Summer2021EventTag3.png[Blue Tag]2nd Special Squadron and Summer2021EventTag4.png[Green Tag]Force H
  • The LBAS Location will change once Phase 1 is completed. Refer to the LBAS Range map for the changes in combat radius before and after Phase 1.

Phase 1: TP Phase to relocate Land Base to Malta

Summer2021EventTag3.png[Blue Tag]2nd Special Squadron Single/Striking Force Fleet: 4-7 DD, 0-3 XX (Fast)

  • Route: 1 A/B C D F I
  • Fleet must pass LoS to reach I
  • Fleet must be FAST
  • Fleet must contain 0 CV(L/B)+(F)BB(V)+CA(V)

Summer2021EventTag3.png[Blue Tag]2nd Special Squadron Single/Striking Force Fleet: 1 CVL or (F)BB(V), 3-6 DD, 0-3 XX

  • Route: 1 A C D1 E G F I
  • Fleet must pass LoS to reach I
  • XX cannot be CV(L/B)/(F)BB(V)

LBAS

  • Range = 4
    • Range = 3 (After clearing TP Phase)
  • AP/AS = 93/207 (HARD)

Strategic Notes:

  • It is recommended to send all LBAS with multiple bombers to the boss.
  • Do not worry about achieving S-Rank at the boss on harder difficulties; instead, focus on a large amount of TP per A-Rank.
  • PT-Imps are present at B. Vanguard Formation can make it easy to pass by without much damage.

Once the TP phase is complete, the land base will be relocated to Malta.

Phase 1.5: Unlock Node W

Requirements to unlock Node W (2nd Boss)

Node S Q M R
Hard A+ x2 S AS AS
Medium A+ x2 S AS -
Easy A+ x2 - - -
Casual - - - -

Method #1: Summer2021EventTag4.png[Green Tag]Force H TCF: 0-1 CVE, 0-2 BBV, 0-2 AV, 0-2 CAV, 0-2 CL, 4 DD + 1-2 CL, 0-2 CA(V), 3-5 DD (Fast)

  • Route: 2 J L N/O P R S
  • To route N P, meet all of the following:
    • Fleet must contain ≥3 CL
    • Fleet must be FAST
    • Fleet must contain ≤1 CVE/BBV
  • Routing through O instead may be acceptable as the fleet can be equipped to handle it and S at the same time
Method #2: Summer2021EventTag4.png[Green Tag]Force H Medium/Heavy STF: 2-3 (F)BB(V), 0-1CV(B)/0-2 CVL, 1-4 XX + CL 2 DD, 3 XX
  • Route: 2 J L O P R T S
    • Note: Much heavier composition with one extra node before reaching S
  • Fleet must contain 0 SS(V)
  • Fleet must contain ≤5 (F)BB(V) + CV(L/B)
    • Bring exactly 5 (F)BB(V) with 0 CV(L/B) to route N P instead
LBAS
  • Range = 3
  • AP/AS = 66/147 for (HARD)
Strategic Notes:
  • Use anti-installation setups to deal with the Supply Depot Princesses and Artillery Imps
    • Nuke setups may be required to eliminate the Supply Depot Princesses due to their large HP pools

Method #1: Summer2021EventTag4.png[Green Tag]Force H CTF: 2-4 CV(L/B), 0-2 (F)BB(V), 2 XX + 1 CL, 2 DD, 3 XX

  • Route: 2 J L O P R Q
  • Fleet must contain no SS(V)
Method #2: Summer2021EventTag4.png[Green Tag]Force H Fast+ CTF: 2 CV(L/B), 1 CL, 3 XX + 1 CL, 2 DD, 3 XX (FAST+)
  • Route: 2 J L N P R Q
  • Fleet must be FAST+
  • Fleet must contain ≥2 CL
  • XX can be anything
LBAS
  • Range = 4
  • AD/AP/AS/AS+ = 72/143/321/642 (HARD)
Strategic Notes:
  • It is recommended to send the LBAS to O or L to help increase the pass rate.
    • Another option is to fighter sweep R for the (HARD) unlock.

Summer2021EventTag4.png[Green Tag]Force H Combined Fleet: Any Fleet

  • Route: 2 J K M
  • There are no limitations for fleet compositions that can reach M
  • Equip as much Fighter Power, AA, and ASW gear as possible
LBAS
  • Range = 6
  • AP/AS = 155/348 (HARD)
  • LBAS can be sent to ASW sweep K, Fighter sweep to M, or one base to each depending on the fleet composition and equipment.

  • This can be done with any fleet that can reach S or Q.
  • Depending on the fleet, LBAS can be set to bomb O, ASW sweep L, or fighter sweep R.

Phase 2: Defeat Summer Harbor Princess

Method #1: Summer2021EventTag4.png[Green Tag]Force H Heavy CTF : 3 CV(B), 3-4 XX + 1 CL, 2 DD, 3 XX

  • Route: 2 J K M V W
  • If fleet is Slow, max of (F)BB(V)
  • Fleet must contain ≥3 CV(B), CVL do not count
  • XX can contain ≤2 additional CV(L/B)+(F)BB(V)

Method #2: Summer2021EventTag4.png[Green Tag]Force H Medium STF/CTF : 0-2 (F)BB(V) or CV(L/B), 1 CL, 1 DD, 2-4 XX + 1 CL, 3 DD, 2 XX (Fast)

  • Route: 2 J K M V W
  • Fleet must be FAST
  • At least 2 XX must be DDs
  • Fleet must contain ≤5 (F)BB(V)+CV(L/B)

Method #3: Summer2021EventTag4.png[Green Tag]Force H Heavy STF : 3-4 (F)BB(V), 2-3 XX + 1 CL, 2 DD, 1-2 FBB, 1-2 XX (Fast)

  • Route: 2 J K M V W
  • Fleet must be FAST
  • XX must NOT be CV(L/B)
  • Fleet must contain exactly 5 (F)BB(V)

LBAS

  • Range = 6
  • Pre-LD: AD/AP/AS/AS+ = 44/87/195/390 (Hard)
  • LD: AD/AP/AS/AS+ = 49/97/216/432 (Hard)

Strategic Notes:

  • Note: The Summer Harbor Princess is an installation. Anti-installation nuke setups are recommended to defeat this boss.
  • W contains an Airfield Princess (only on higher difficulties), PT-Imps, and Artillery Imps. Equip accordingly.

Phase 2.5: Unlock Node Z

To unlock the 3rd boss, Z, you need to :

Node G H LBAS
Hard S Reach AS
Medium S ?? Reach AS
Easy - - -
Casual - - -
  • Composition: Summer2021EventTag3.png[Blue Tag]2nd Special Squadron Striking Force Fleet: 1 CVL, 1 AV, 1 CL, 4 DD
  • Route: 1 A C D1 E H or 1 A C D1 E G
  • LBAS: Either send LBAS to D1 to assist with passing the node or set them up as LBAS Defense for the air defense requirement unlock
  • Note: The same fleet can be used to complete all 3 requirements in 2-3 different sorties.
    • E is a choice node. The player can choose to either go to G or H for both the requirements.

Phase 3: Eliminate the Mediterranean Fleet at Z

The final boss at Z can only be reached from starting point 2.

  • Composition: Summer2021EventTag4.png[Green Tag]Force H STF : 0-1 CV(B)/(F)BB, 1-2 CA(V), 2 CL, 1-2 DD + 1 CL, 4-5 DD, 0-1 CA
    • Route: 2 J L N P X Z
  • Routing for this comp is the same as FAST+ CTF but has significantly less firepower at the boss.
  • Both Node and Boss support expeditions are recommended.

  • Composition: Summer2021EventTag4.png[Green Tag]Force H STF : 2-4 (F)BB, 1-2 CVL, 1-2 CA + 1 CAV, 1 CA, 1 CL, 3 DD
    • Route: 2 J L O P X Z
  • Regular composition without having to rely on Fast+. The routing is much harder due to passing through O which has both PT Imps & Supply Depot Hime. Anti PT-Imp equipment is recommended. A single anti installation nuke may also be used for the Supply Depot Hime
  • Node expedition Support is highly recommended to help pass-through O & X

  • Composition: Summer2021EventTag4.png[Green Tag]Force H CTF : 4 CV, 0-1 CA(V), 1 CL + 0-2 FBB, 1 CL, 2-5 DD, 0-1 CA (Fast+)
    • Route: 2 J L N P X Z
  • This composition requires 10-12 RE'd ships in order for the ships to go Fast+ & keep their combat capabilities.
  • The routing goes to N instead of O.
  • This comp allows you to skip O and skip using anti imp and anti installation gear.
  • Ships without REs may be used but they will have reduced damage potential and is not recommended for Hard

  • LBAS range to Z= 1, AP/AS = 96/215 pre-LD and 214/482 LD (HARD). It is recommended to send all LBAS to Boss node Z
  • It is highly recommended to use bombers with historical bonuses on your carriers. Those planes have a significant damage modifier against the boss. Please refer to the chart on the E-1 Page.

Phase 3.5: Debuff

There are 5 requirements needed to debuff the boss after reaching Last Dance.

Node S G Y X R
Hard S S S A+ AS
Medium S ? S ? S ?? A+ ??
Easy A+ S ? - A+ -
Casual ?? ?? - ?? -

  • Composition: Summer2021EventTag4.png[Green Tag]Force H TCF: 0-1 AV, 0-1 CVL, 1-2 CL, 4 DD + 1-2 CL, 0-1 CAV, 3-4 DD
    • Route: 2 J L O P R S
    • Ship restrictions: AV + CVL <= 1, AV + CVL + CA(V) <=2
  • Use anti-installation setups to deal with the Supply Depot Princess and Artillery Imps
  • Composition: Summer2021EventTag4.png[Green Tag]Force H STF: 2 BB, 1CV OR 2 CVL, 1-2 CA(V), 0-1 CL, 0-2 DD + 2 CA(V), 1 CL, 3 DD
    • Route: 2 J L O P R T S
      • Note: Much heavier composition with one extra node before reaching S
  • Use anti-installation setups to deal with the Supply Depot Princess and Artillery Imps
  • LBAS range = 3 for S, AP/AS = 66/147 for (HARD)

  • This uses the same composition for reaching S.
  • Either bring as much airpower as possible and LBAS bomb O or send LBAS fighter sweep to R

  • Composition: Summer2021EventTag3.png[Blue Tag]2nd Special Squadron Striking Force Fleet: 1 CVL, 1 AV, 1 CL, 4 DD
  • Route: 1 A C D1 E G
  • Either rest your LBAS or use them to bomb the nodes on the route

Composition: Summer2021EventTag4.png[Green Tag]Force H STF: 2 BB, 1 CV or 2 CVL, 1-2 CA(V), 0-1 CL, 0-2 DD + 2 CA(V), 1 CL, 3 DD

  • Route: 2 J L O P X Y
Composition: Summer2021EventTag4.png[Green Tag]Force H STF: 1 CV, 2 CA(V), 2 CL, 1 DD + 1 CL, 5 DD
  • Route: 2 J L N P X Y
  • Must fail LoS check
LBAS: Either Toukai/ASW node Y to S rank it or send normal LBAS to O to help pass the node. Note: You can also A+ rank X at the same time. Node support expedition is recommended if you choose to do so.

  • You can S do Node X along with Y in the same sortie
  • It is highly recommended to use Node support expeditions as this node contain a Re-Class BB

Finishing the Mediterranean Fleet at Z

Now that the debuff has been applied, there are 4 main options available for finishing off the boss.

Summer2021EventTag4.png[Green Tag]Force H CTF: 4 CV(L/B), 1 CL, 2 XX + CL, 2 DD, 0-2 FBB, 0-1 CVL, 0-3 XX (FAST+)

  • Route: 2 J L N P X Z
  • Fleet must be FAST+
  • Fleet must pass LoS to route X Z
  • Fleet must contain ≥2 CL to avoid O which contains Installations and PT-Imps
  • Allows as heavy of a fleet as desired
  • Bringing a FAST+ I-203 can attract enemy fire away from more valuable targets

Summer2021EventTag4.png[Green Tag]Force H STF: 1 CV(L/B), 2 CL, 1-4 DD, 1-2 CA(V) + 1 CL, 2-5 DD, 0-3 CA(V)/CLT (FAST)

  • Route: 2 J L N P X Z
  • Fleet must be FAST
  • Fleet must pass LoS to route X Z
  • Fleet must include ≥3 CL
  • Fleet must include ≥6 DD
  • No (F)BB(V) allowed
  • This method sacrifices a heavier fleet to allow more damage-dealing equipment to be brought to battle while still avoiding node O
  • Due to the high air-power at the boss and the limit on CV(L/B), equipping 1 or more CAVs as SPF-mules may be required to reach the desired air-state

Summer2021EventTag4.png[Green Tag]Force H STF: 0-1 CV(B), 0-2 CVL, 3 (F)BB(V), 1-3 XX + CL, 2 DD, 3XX

  • Route: 2 J L O P X Z
  • Fleet must pass LoS to route X Z
  • Fleet must contain no SS(V)
  • Fleet must contain ≥5 DD OR ≤4 CV(L/B)+(F)BB(V)
  • Fleet must contain ≤3 CV(L/B)
  • Fleet must contain ≤3 (F)BB(V)
  • Kongou/Hiei Night Cut-In (requires swapping BBs to the escort fleet) or NagaMutsu Touch can be used here
  • Routes through O which contains Installations and PT-Imps
  • Allows for a very heavy fleet without sacrificing combat equipment for speed

Summer2021EventTag4.png[Green Tag]Force H CTF: 2 CV(L/B), 2 (F)BB(V), 2 XX + 1 CL, 2 DD, 3XX

  • Route: 2 J L O P X Z
  • Fleet must pass LoS to route X Z
  • Fleet must contain no SS(V)
  • Fleet must contain ≥5 DD OR no additional CV(L/B)/FBB
  • Fleet must contain ≤3 CV(L/B)
  • Fleet must contain ≤3 (F)BB(V)
  • Kongou/Hiei Night Cut-In (requires swapping BBs to the escort fleet) or NagaMutsu Touch can be used here
  • Routes through O which contains Installations and PT-Imps
  • Allows for a very heavy fleet without sacrificing combat equipment for speed

LBAS

  • Range = 1
  • LD: AD/AP/AS = 92/184/414 (Hard)
  • It is recommended to send all LBAS to the Boss node Z

Shared Strategic Notes:

  • It is highly recommended to use bombers with historical bonuses on your carriers due to their significant damage modifier against the boss. Please refer to the chart from the E-1 Page.
  • Destroying the boss will rely largely on TCIs.
    • Some ships with Historical bonuses (primarily CLs & CAs) may be able to reach sufficient damage with DA setups

Enemy Compositions

E-2 Hard AB
# Formation Air Raids AD/AP
AS/AS+
AB Diamond
Airfield Princess VI (1651): 140 Armor, 500 HP, 48 APAbyssal Liberation Land-based Dive Bomber Ace 562 Equipment.pngAbyssal Liberation Land-based Dive Bomber 561 Equipment.pngBattle Card Flagship Icon.png Airfield Princess V (1650): 140 Armor, 500 HP, 34 APAbyssal Liberation Land-based Dive Bomber 561 Equipment.png Airfield Princess V (1650): 140 Armor, 500 HP, 34 APAbyssal Liberation Land-based Dive Bomber 561 Equipment.png
39/78
174/348
Diamond
Airfield Princess VI (1651): 140 Armor, 500 HP, 48 APAbyssal Liberation Land-based Dive Bomber Ace 562 Equipment.pngAbyssal Liberation Land-based Dive Bomber 561 Equipment.pngBattle Card Flagship Icon.png Airfield Princess VI (1651): 140 Armor, 500 HP, 48 APAbyssal Liberation Land-based Dive Bomber Ace 562 Equipment.pngAbyssal Liberation Land-based Dive Bomber 561 Equipment.png Airfield Princess V (1650): 140 Armor, 500 HP, 34 APAbyssal Liberation Land-based Dive Bomber 561 Equipment.png
44/87
195/390
Diamond
Airfield Princess VII (1652): 140 Armor, 500 HP, 68 APAbyssal Liberation Land-based Dive Bomber Ace 562 Equipment.pngAbyssal Liberation Land-based Dive Bomber Ace 562 Equipment.pngBattle Card Flagship Icon.png Airfield Princess VI (1651): 140 Armor, 500 HP, 48 APAbyssal Liberation Land-based Dive Bomber Ace 562 Equipment.pngAbyssal Liberation Land-based Dive Bomber 561 Equipment.png Airfield Princess V (1650): 140 Armor, 500 HP, 34 APAbyssal Liberation Land-based Dive Bomber 561 Equipment.png
51/101
225/450
Diamond
Airfield Princess VII (1652): 140 Armor, 500 HP, 68 APAbyssal Liberation Land-based Dive Bomber Ace 562 Equipment.pngAbyssal Liberation Land-based Dive Bomber Ace 562 Equipment.pngBattle Card Flagship Icon.png Airfield Princess VI (1651): 140 Armor, 500 HP, 48 APAbyssal Liberation Land-based Dive Bomber Ace 562 Equipment.pngAbyssal Liberation Land-based Dive Bomber 561 Equipment.png Airfield Princess VI (1651): 140 Armor, 500 HP, 48 APAbyssal Liberation Land-based Dive Bomber Ace 562 Equipment.pngAbyssal Liberation Land-based Dive Bomber 561 Equipment.png Airfield Princess V (1650): 140 Armor, 500 HP, 34 APAbyssal Liberation Land-based Dive Bomber 561 Equipment.png
67/133
297/594
# Formation Air Raids AD/AP
AS/AS+
E-2 Hard A: 深海地中海艦隊 先遣偵察隊 (PoiDB)
# Formation Normal Battle Node AD/AP
AS/AS+
A Line Ahead
Double Line
Phases: 1, 2, 3
Light Cruiser Ho-Class Flagship (1554): 36 Armor, 53 HPBattle Card Flagship Icon.png Light Cruiser Tsu-Class (1591): 55 Armor, 48 HP Destroyer Ro-Class Late Model (1576): 26 Armor, 37 HP Destroyer Ro-Class Late Model (1576): 26 Armor, 37 HP Destroyer I-Class Late Model (1575): 22 Armor, 35 HP Destroyer I-Class Late Model (1575): 22 Armor, 35 HP
0/0
0/0
Line Ahead
Phases: 3
Light Cruiser Ho-Class Flagship (1554): 36 Armor, 53 HPBattle Card Flagship Icon.png Light Cruiser Tsu-Class Elite (1592): 68 Armor, 66 HP Destroyer Ro-Class Late Model Elite (1622): 36 Armor, 43 HP Destroyer Ro-Class Late Model Elite (1622): 36 Armor, 43 HP Destroyer Ro-Class Late Model (1576): 26 Armor, 37 HP Destroyer Ro-Class Late Model (1576): 26 Armor, 37 HP
0/0
0/0
# Formation Normal Battle Node AD/AP
AS/AS+
E-2 Hard B: 深海地中海艦隊 クレタ海哨戒群 (PoiDB)
# Formation Normal Battle Node AD/AP
AS/AS+
B Line Ahead
Double Line
Echelon
Phases: 1, 2, 3
Destroyer Ro-Class Late Model (1576): 26 Armor, 37 HPBattle Card Flagship Icon.png Destroyer Ro-Class Late Model (1576): 26 Armor, 37 HP PT Imp Pack IV (1640): 39 Armor, 18 HP PT Imp Pack III (1639): 29 Armor, 15 HP PT Imp Pack III (1639): 29 Armor, 15 HP
0/0
0/0
# Formation Normal Battle Node AD/AP
AS/AS+
E-2 Hard C: 深海潜水艦隊 クレタ島沖哨戒線 (PoiDB)
# Formation Normal Battle Node AD/AP
AS/AS+
C Echelon
Line Abreast
Phases: 1, 2, 3
Submarine Ka-Class Flagship (1534): 30 Armor, 37 HPBattle Card Flagship Icon.png Submarine Ka-Class Elite (1532): 21 Armor, 27 HP Submarine Ka-Class Elite (1532): 21 Armor, 27 HP
0/0
0/0
Echelon
Line Abreast
Phases: 1, 2, 3
Submarine Ka-Class Flagship (1534): 30 Armor, 37 HPBattle Card Flagship Icon.png Submarine Ka-Class Elite (1532): 21 Armor, 27 HP Submarine Ka-Class Elite (1532): 21 Armor, 27 HP Submarine Ka-Class Elite (1532): 21 Armor, 27 HP
0/0
0/0
Echelon
Line Abreast
Phases: 1, 2, 3
Submarine Ka-Class Flagship (1534): 30 Armor, 37 HPBattle Card Flagship Icon.png Submarine Ka-Class Flagship (1534): 30 Armor, 37 HP Submarine Ka-Class Elite (1532): 21 Armor, 27 HP Submarine Ka-Class Elite (1532): 21 Armor, 27 HP
0/0
0/0
# Formation Normal Battle Node AD/AP
AS/AS+
E-2 Hard D: 深海地中海方面 基地航空隊 (PoiDB)
# Formation Air Defense Node AD/AP
AS/AS+
D Diamond
Phases: 1, 2, 3
Supply Depot Princess B Vacation Mode IV (2018): 199 Armor, 4800 HP, 49 APBattle Card Flagship Icon.png Airfield Princess VI (1651): 140 Armor, 500 HP, 48 APAbyssal Liberation Land-based Dive Bomber Ace 562 Equipment.pngAbyssal Liberation Land-based Dive Bomber 561 Equipment.png Airfield Princess VI (1651): 140 Armor, 500 HP, 48 APAbyssal Liberation Land-based Dive Bomber Ace 562 Equipment.pngAbyssal Liberation Land-based Dive Bomber 561 Equipment.png
49/97
218/435
Diamond
Phases: 1, 2, 3
Supply Depot Princess B Vacation Mode IV (2018): 199 Armor, 4800 HP, 49 APBattle Card Flagship Icon.png Airfield Princess VI (1651): 140 Armor, 500 HP, 48 APAbyssal Liberation Land-based Dive Bomber Ace 562 Equipment.pngAbyssal Liberation Land-based Dive Bomber 561 Equipment.png Airfield Princess VI (1651): 140 Armor, 500 HP, 48 APAbyssal Liberation Land-based Dive Bomber Ace 562 Equipment.pngAbyssal Liberation Land-based Dive Bomber 561 Equipment.png Airfield Princess V (1650): 140 Armor, 500 HP, 34 APAbyssal Liberation Land-based Dive Bomber 561 Equipment.png
60/120
269/537
Diamond
Phases: 1, 2, 3
Supply Depot Princess B Vacation Mode IV (2018): 199 Armor, 4800 HP, 49 APBattle Card Flagship Icon.png Airfield Princess VII (1652): 140 Armor, 500 HP, 68 APAbyssal Liberation Land-based Dive Bomber Ace 562 Equipment.pngAbyssal Liberation Land-based Dive Bomber Ace 562 Equipment.png Airfield Princess VI (1651): 140 Armor, 500 HP, 48 APAbyssal Liberation Land-based Dive Bomber Ace 562 Equipment.pngAbyssal Liberation Land-based Dive Bomber 561 Equipment.png Airfield Princess V (1650): 140 Armor, 500 HP, 34 APAbyssal Liberation Land-based Dive Bomber 561 Equipment.png
67/133
299/597
# Formation Air Defense Node AD/AP
AS/AS+
E-2 Hard D1: 深海地中海艦隊 軽空母部隊 (PoiDB)
# Formation Normal Battle Node AD/AP
AS/AS+
D1 Double Line
Diamond
Phases: 1, 2, 3
Light Carrier Nu-Class Flagship III (1764): 70 Armor, 84 HP, 93 APAbyssal Cat Fighter Kai 556 Equipment.pngBattle Card Flagship Icon.png Light Cruiser Ho-Class Flagship (1554): 36 Armor, 53 HP Light Cruiser Tsu-Class (1591): 55 Armor, 48 HP Destroyer Ro-Class Late Model (1576): 26 Armor, 37 HP Destroyer Ro-Class Late Model (1576): 26 Armor, 37 HP Destroyer Ro-Class Late Model (1576): 26 Armor, 37 HP
32/63
140/279
Diamond
Phases: 1, 2, 3
Light Carrier Nu-Class Kai Flagship III (1779): 93 Armor, 118 HP, 107 APAbyssal Hell Dive Bomber Kai.pngAbyssal Revenge Torpedo Bomber Kai.pngBattle Card Flagship Icon.png Light Cruiser Ho-Class Flagship (1554): 36 Armor, 53 HP Light Cruiser Tsu-Class Elite (1592): 68 Armor, 66 HP Destroyer Ro-Class Late Model Elite (1622): 36 Armor, 43 HP Destroyer Ro-Class Late Model (1576): 26 Armor, 37 HP Destroyer Ro-Class Late Model (1576): 26 Armor, 37 HP
36/72
161/321
# Formation Normal Battle Node AD/AP
AS/AS+
E-2 Hard D2
# Empty Node
D2 敵影を見ず。
最前線マルタ島です。周辺警戒を厳に!

No enemy spotted.
The front line is at Malta. Be on high alert!
# Empty Node
E-2 Hard E
# Selection Node
E 艦隊の針路を選択できます。提督、どちらの針路をとられますか?
You can decide the fleet's course. Admiral, which heading should we take?
# Selection Node
E-2 Hard F
# Empty Node
F 気のせいだった。
最前線マルタ島です。周辺警戒を厳に!

Must be my imagination.
The front line is at Malta. Be on high alert!
# Empty Node
E-2 Hard G: 深海艦隊 マルタ島攻略上陸船団 (PoiDB)
# Formation Normal Battle Node AD/AP
AS/AS+
G Double Line
Diamond
Phases: 1, 2, 3
Transport Ship Wa-Class Flagship (1558): 65 Armor, 130 HPBattle Card Flagship Icon.png Transport Ship Wa-Class Flagship (1558): 65 Armor, 130 HP Light Cruiser He-Class Flagship (1555): 39 Armor, 57 HP Light Cruiser Tsu-Class (1591): 55 Armor, 48 HP Destroyer Ro-Class Late Model (1576): 26 Armor, 37 HP Destroyer Ro-Class Late Model (1576): 26 Armor, 37 HP
0/0
0/0
Diamond
Phases: 1, 2, 3
Transport Ship Wa-Class Flagship (1558): 65 Armor, 130 HPBattle Card Flagship Icon.png Transport Ship Wa-Class Flagship (1558): 65 Armor, 130 HP Light Cruiser He-Class Flagship (1555): 39 Armor, 57 HP Light Cruiser Tsu-Class Elite (1592): 68 Armor, 66 HP Destroyer Ro-Class Late Model Elite (1622): 36 Armor, 43 HP Destroyer Ro-Class Late Model Elite (1622): 36 Armor, 43 HP
0/0
0/0
# Formation Normal Battle Node AD/AP
AS/AS+
E-2 Hard H
# Empty Node
H 気のせいだった。
敵影見ず…されど敵艦隊らしき通信を傍受せり。警戒を厳に。周辺海域捜索の要を認む!

Must be my imagination.
No sign of the enemy... But we've intercepted enemy communications. Be on high alert. Eyes on the horizon!
# Empty Node
E-2 Hard I: 深海地中海艦隊 新設空母集団 (PoiDB)
# Formation Boss Battle Node AD/AP
AS/AS+
I Diamond
Phases: 1, 2
Aircraft Carrier Summer Princess B (1964): 239 Armor, 880 HP, 138 APBattle Card Flagship Icon.png Heavy Cruiser Ne-Class Kai B Summer Mode (1956): 244 Armor, 470 HP Light Cruiser He-Class Flagship (1555): 39 Armor, 57 HP Light Cruiser Tsu-Class Elite (1592): 68 Armor, 66 HP Destroyer Ro-Class Late Model (1576): 26 Armor, 37 HP Destroyer Ro-Class Late Model (1576): 26 Armor, 37 HP
47/93
207/414
Diamond
Phases: 1
Aircraft Carrier Summer Princess B (1964): 239 Armor, 880 HP, 138 APBattle Card Flagship Icon.png Heavy Cruiser Ne-Class Kai B Summer Mode (1956): 244 Armor, 470 HP Light Cruiser He-Class Kai Flagship (1904): 69 Armor, 115 HP Light Cruiser Tsu-Class Elite (1592): 68 Armor, 66 HP Destroyer Ro-Class Late Model Elite (1622): 36 Armor, 43 HP Destroyer Ro-Class Late Model Elite (1622): 36 Armor, 43 HP
47/93
207/414
Diamond
Phases: 1, 2, 3
(Final)
Aircraft Carrier Summer Princess B (1964): 239 Armor, 880 HP, 138 APBattle Card Flagship Icon.png Heavy Cruiser Ne-Class Kai B Summer Mode (1956): 244 Armor, 470 HP Light Cruiser He-Class Kai Flagship II (1905): 89 Armor, 150 HP Light Cruiser Tsu-Class Elite (1592): 68 Armor, 66 HP Destroyer Na-Class Late Model II Elite (1951): 69 Armor, 66 HP Destroyer Na-Class Late Model II Elite (1951): 69 Armor, 66 HP
47/93
207/414
# Formation Boss Battle Node AD/AP
AS/AS+
E-2 Hard J
# Selection Node
J ForceH、出撃する!敵港湾拠点を叩き、敵地中海艦隊主力第1及び第2艦隊を捜索、これを撃滅せよ!
Force H, sortieing! Hit the enemy-controlled harbour, then find and destroy the enemy's 1st and 2nd Mediterranean fleets!
# Selection Node
E-2 Hard K: 深海潜水艦隊 バレアレス海哨戒線 (PoiDB)
# Formation Normal Battle Node AD/AP
AS/AS+
K Echelon
Line Abreast
Phases: 2, 3
Submarine Yo-Class Elite (1533): 27 Armor, 34 HPBattle Card Flagship Icon.png Submarine Yo-Class Elite (1533): 27 Armor, 34 HP Submarine Yo-Class Elite (1533): 27 Armor, 34 HP Submarine Ka-Class (1530): 7 Armor, 19 HP
0/0
0/0
Echelon
Line Abreast
Phases: 2, 3
Submarine Yo-Class Elite (1533): 27 Armor, 34 HPBattle Card Flagship Icon.png Submarine Yo-Class Elite (1533): 27 Armor, 34 HP Submarine Yo-Class Elite (1533): 27 Armor, 34 HP Submarine Yo-Class Elite (1533): 27 Armor, 34 HP
0/0
0/0
Echelon
Line Abreast
Phases: 2, 3
Submarine Yo-Class Flagship (1535): 36 Armor, 44 HPBattle Card Flagship Icon.png Submarine Yo-Class Elite (1533): 27 Armor, 34 HP Submarine Yo-Class Elite (1533): 27 Armor, 34 HP Submarine Yo-Class Elite (1533): 27 Armor, 34 HP
0/0
0/0
# Formation Normal Battle Node AD/AP
AS/AS+
E-2 Hard L: 深海潜水艦隊 地中海主力阻止線 (PoiDB)
# Formation Normal Battle Node AD/AP
AS/AS+
L Echelon
Line Abreast
Phases: 2, 3
Submarine Yo-Class Elite (1533): 27 Armor, 34 HPBattle Card Flagship Icon.png Submarine Yo-Class Elite (1533): 27 Armor, 34 HP Submarine Yo-Class Elite (1533): 27 Armor, 34 HP Submarine Yo-Class Elite (1533): 27 Armor, 34 HP
0/0
0/0
Echelon
Line Abreast
Phases: 2, 3
Submarine Yo-Class Flagship (1535): 36 Armor, 44 HPBattle Card Flagship Icon.png Submarine Yo-Class Elite (1533): 27 Armor, 34 HP Submarine Yo-Class Elite (1533): 27 Armor, 34 HP Submarine Yo-Class Elite (1533): 27 Armor, 34 HP
0/0
0/0
Echelon
Line Abreast
Phases: 2, 3
Submarine Yo-Class Flagship (1535): 36 Armor, 44 HPBattle Card Flagship Icon.png Submarine Yo-Class Flagship (1535): 36 Armor, 44 HP Submarine Yo-Class Elite (1533): 27 Armor, 34 HP Submarine Yo-Class Elite (1533): 27 Armor, 34 HP
0/0
0/0
# Formation Normal Battle Node AD/AP
AS/AS+
E-2 Hard M: 深海地中海方面 基地航空隊 (PoiDB)
# Formation Air Defense Node AD/AP
AS/AS+
M Diamond
Phases: 3
Harbour Summer Princess B Damaged III (2028): 240 Armor, 1550 HP, 96 APBattle Card Flagship Icon.png Airfield Princess VII (1652): 140 Armor, 500 HP, 68 APAbyssal Liberation Land-based Dive Bomber Ace 562 Equipment.pngAbyssal Liberation Land-based Dive Bomber Ace 562 Equipment.png
55/110
246/492
Diamond
Phases: 2
Harbour Summer Princess B III (2025): 220 Armor, 1550 HP, 96 APBattle Card Flagship Icon.png Airfield Princess VII (1652): 140 Armor, 500 HP, 68 APAbyssal Liberation Land-based Dive Bomber Ace 562 Equipment.pngAbyssal Liberation Land-based Dive Bomber Ace 562 Equipment.png Airfield Princess V (1650): 140 Armor, 500 HP, 34 APAbyssal Liberation Land-based Dive Bomber 561 Equipment.png
67/133
297/594
Diamond
Phases: 2
Harbour Summer Princess B III (2025): 220 Armor, 1550 HP, 96 APBattle Card Flagship Icon.png Airfield Princess VII (1652): 140 Armor, 500 HP, 68 APAbyssal Liberation Land-based Dive Bomber Ace 562 Equipment.pngAbyssal Liberation Land-based Dive Bomber Ace 562 Equipment.png Airfield Princess V (1650): 140 Armor, 500 HP, 34 APAbyssal Liberation Land-based Dive Bomber 561 Equipment.png Airfield Princess V (1650): 140 Armor, 500 HP, 34 APAbyssal Liberation Land-based Dive Bomber 561 Equipment.png
78/155
348/696
# Formation Air Defense Node AD/AP
AS/AS+
E-2 Hard N: 深海地中海艦隊 警戒軽巡戦隊 (PoiDB)
# Formation Normal Battle Node AD/AP
AS/AS+
N Line Ahead
Double Line
Phases: 2, 3
Light Cruiser He-Class Kai Flagship (1904): 69 Armor, 115 HPBattle Card Flagship Icon.png Light Cruiser Ho-Class Flagship (1554): 36 Armor, 53 HP Light Cruiser Ho-Class Flagship (1554): 36 Armor, 53 HP Light Cruiser Tsu-Class (1591): 55 Armor, 48 HP Destroyer Ha-Class Late Model (1577): 29 Armor, 38 HP Destroyer Ha-Class Late Model (1577): 29 Armor, 38 HP
0/0
0/0
Line Ahead
Phases: 3
Light Cruiser He-Class Kai Flagship (1904): 69 Armor, 115 HPBattle Card Flagship Icon.png Light Cruiser Ho-Class Flagship (1554): 36 Armor, 53 HP Light Cruiser Ho-Class Flagship (1554): 36 Armor, 53 HP Light Cruiser Tsu-Class Elite (1592): 68 Armor, 66 HP Destroyer Ha-Class Late Model (1577): 29 Armor, 38 HP Destroyer Ha-Class Late Model (1577): 29 Armor, 38 HP
0/0
0/0
# Formation Normal Battle Node AD/AP
AS/AS+
E-2 Hard O: 深海地中海艦隊 アルジェ防備隊 (PoiDB)
# Formation Normal Battle Node AD/AP
AS/AS+
O Double Line
Phases: 2
PT Imp Pack IV (1640): 39 Armor, 18 HPBattle Card Flagship Icon.png PT Imp Pack IV (1640): 39 Armor, 18 HP PT Imp Pack IV (1640): 39 Armor, 18 HP Artillery Imp II (1666): 105 Armor, 130 HP Supply Depot Princess B Vacation Mode IV (2018): 199 Armor, 4800 HP, 49 AP Transport Ship Wa-Class Flagship (1558): 65 Armor, 130 HP
17/33
74/147
Double Line
Phases: 2
PT Imp Pack IV (1640): 39 Armor, 18 HPBattle Card Flagship Icon.png PT Imp Pack IV (1640): 39 Armor, 18 HP Artillery Imp II (1666): 105 Armor, 130 HP Artillery Imp II (1666): 105 Armor, 130 HP Supply Depot Princess B Vacation Mode IV (2018): 199 Armor, 4800 HP, 49 AP Transport Ship Wa-Class Flagship (1558): 65 Armor, 130 HP
17/33
74/147
Double Line
Phases: 3
PT Imp Pack IV (1640): 39 Armor, 18 HPBattle Card Flagship Icon.png PT Imp Pack IV (1640): 39 Armor, 18 HP PT Imp Pack IV (1640): 39 Armor, 18 HP Artillery Imp II (1666): 105 Armor, 130 HP Supply Depot Princess B Vacation Mode Damaged IV (2022): 222 Armor, 4800 HP Transport Ship Wa-Class Flagship (1558): 65 Armor, 130 HP
0/0
0/0
# Formation Normal Battle Node AD/AP
AS/AS+
E-2 Hard P
# Selection Node
P 対空、対水上警戒を厳とせよ!合戦用意!全艦隊、戦闘態勢をとれ!
Be on high anti-air and anti-surface alert! Battle stations! All fleets, prepare for battle!
# Selection Node
E-2 Hard Q: 深海地中海艦隊 増援空母群 (PoiDB)
# Formation Normal Battle Node AD/AP
AS/AS+
Q Diamond
Phases: 2
Light Carrier Nu-Class Flagship III (1764): 70 Armor, 84 HP, 93 APAbyssal Cat Fighter Kai 556 Equipment.pngBattle Card Flagship Icon.png Light Carrier Nu-Class Flagship III (1764): 70 Armor, 84 HP, 93 APAbyssal Cat Fighter Kai 556 Equipment.png Heavy Cruiser Ne-Class Elite (1595): 89 Armor, 88 HP Light Cruiser Tsu-Class (1591): 55 Armor, 48 HP Destroyer Ro-Class Late Model (1576): 26 Armor, 37 HP Destroyer Ro-Class Late Model (1576): 26 Armor, 37 HP
63/125
279/558
Diamond
Phases: 2, 3
Light Carrier Nu-Class Kai Flagship III (1779): 93 Armor, 118 HP, 107 APAbyssal Hell Dive Bomber Kai.pngAbyssal Revenge Torpedo Bomber Kai.pngBattle Card Flagship Icon.png Light Carrier Nu-Class Flagship III (1764): 70 Armor, 84 HP, 93 APAbyssal Cat Fighter Kai 556 Equipment.png Heavy Cruiser Ne-Class Elite (1595): 89 Armor, 88 HP Light Cruiser Tsu-Class (1591): 55 Armor, 48 HP Destroyer Ro-Class Late Model (1576): 26 Armor, 37 HP Destroyer Ro-Class Late Model (1576): 26 Armor, 37 HP
67/134
300/600
Diamond
Phases: 2, 3
Light Carrier Nu-Class Kai Flagship III (1779): 93 Armor, 118 HP, 107 APAbyssal Hell Dive Bomber Kai.pngAbyssal Revenge Torpedo Bomber Kai.pngBattle Card Flagship Icon.png Light Carrier Nu-Class Kai Flagship III (1779): 93 Armor, 118 HP, 107 APAbyssal Hell Dive Bomber Kai.pngAbyssal Revenge Torpedo Bomber Kai.png Heavy Cruiser Ne-Class Elite (1595): 89 Armor, 88 HP Light Cruiser Tsu-Class Elite (1592): 68 Armor, 66 HP Destroyer Ro-Class Late Model Elite (1622): 36 Armor, 43 HP Destroyer Ro-Class Late Model Elite (1622): 36 Armor, 43 HP
72/143
321/642
# Formation Normal Battle Node AD/AP
AS/AS+
E-2 Hard R: 深海地中海方面 基地航空隊 (PoiDB)
# Formation Air Defense Node AD/AP
AS/AS+
R Diamond
Phases: 3
Harbour Summer Princess B Damaged III (2028): 240 Armor, 1550 HP, 96 APBattle Card Flagship Icon.png Airfield Princess VII (1652): 140 Armor, 500 HP, 68 APAbyssal Liberation Land-based Dive Bomber Ace 562 Equipment.pngAbyssal Liberation Land-based Dive Bomber Ace 562 Equipment.png
55/110
246/492
Diamond
Phases: 2
Harbour Summer Princess B III (2025): 220 Armor, 1550 HP, 96 APBattle Card Flagship Icon.png Airfield Princess VII (1652): 140 Armor, 500 HP, 68 APAbyssal Liberation Land-based Dive Bomber Ace 562 Equipment.pngAbyssal Liberation Land-based Dive Bomber Ace 562 Equipment.png Airfield Princess V (1650): 140 Armor, 500 HP, 34 APAbyssal Liberation Land-based Dive Bomber 561 Equipment.png
67/133
297/594
Diamond
Phases: 2
Harbour Summer Princess B III (2025): 220 Armor, 1550 HP, 96 APBattle Card Flagship Icon.png Airfield Princess VII (1652): 140 Armor, 500 HP, 68 APAbyssal Liberation Land-based Dive Bomber Ace 562 Equipment.pngAbyssal Liberation Land-based Dive Bomber Ace 562 Equipment.png Airfield Princess V (1650): 140 Armor, 500 HP, 34 APAbyssal Liberation Land-based Dive Bomber 561 Equipment.png Airfield Princess V (1650): 140 Armor, 500 HP, 34 APAbyssal Liberation Land-based Dive Bomber 561 Equipment.png
78/155
348/696
# Formation Air Defense Node AD/AP
AS/AS+
E-2 Hard S: 深海地中海艦隊 南部物資集積地 (PoiDB)
# Formation Normal Battle Node AD/AP
AS/AS+
S Cruising Formation 4
Phases: 2
Supply Depot Princess B Vacation Mode IV (2018): 199 Armor, 4800 HP, 49 APBattle Card Flagship Icon.png Supply Depot Princess B Vacation Mode IV (2018): 199 Armor, 4800 HP, 49 AP Artillery Imp II (1666): 105 Armor, 130 HP Artillery Imp II (1666): 105 Armor, 130 HP PT Imp Pack IV (1640): 39 Armor, 18 HP Transport Ship Wa-Class Flagship (1558): 65 Armor, 130 HP
Light Cruiser Tsu-Class Elite (1592): 68 Armor, 66 HP Destroyer Na-Class Late Model II Elite (1951): 69 Armor, 66 HP Destroyer Na-Class Late Model II Elite (1951): 69 Armor, 66 HP Destroyer Ha-Class Late Model (1577): 29 Armor, 38 HP Destroyer Ha-Class Late Model (1577): 29 Armor, 38 HP PT Imp Pack IV (1640): 39 Armor, 18 HP
33/66
147/294
Cruising Formation 4
Phases: 3
Supply Depot Princess B Vacation Mode Damaged IV (2022): 222 Armor, 4800 HPBattle Card Flagship Icon.png Supply Depot Princess B Vacation Mode Damaged IV (2022): 222 Armor, 4800 HP Artillery Imp II (1666): 105 Armor, 130 HP Artillery Imp II (1666): 105 Armor, 130 HP Transport Ship Wa-Class Flagship (1558): 65 Armor, 130 HP Transport Ship Wa-Class Flagship (1558): 65 Armor, 130 HP
Light Cruiser Tsu-Class Elite (1592): 68 Armor, 66 HP Destroyer Ha-Class Late Model (1577): 29 Armor, 38 HP Destroyer Ha-Class Late Model (1577): 29 Armor, 38 HP Destroyer Ha-Class Late Model (1577): 29 Armor, 38 HP Destroyer Ha-Class Late Model (1577): 29 Armor, 38 HP PT Imp Pack IV (1640): 39 Armor, 18 HP
0/0
0/0
# Formation Normal Battle Node AD/AP
AS/AS+
E-2 Hard T: 深海地中海艦隊 低速戦艦戦隊 (PoiDB)
# Formation Normal Battle Node AD/AP
AS/AS+
T Line Ahead
Double Line
Vanguard
Phases: 2, 3
Battleship Ru-Class Flagship (1529): 99 Armor, 98 HPBattle Card Flagship Icon.png Battleship Ru-Class Flagship (1529): 99 Armor, 98 HP Light Cruiser Ho-Class Flagship (1554): 36 Armor, 53 HP Light Cruiser Tsu-Class (1591): 55 Armor, 48 HP Destroyer Ha-Class Late Model (1577): 29 Armor, 38 HP Destroyer Ha-Class Late Model (1577): 29 Armor, 38 HP
0/0
0/0
# Formation Normal Battle Node AD/AP
AS/AS+
E-2 Hard U: 深海地中海艦隊 巡洋艦戦隊 (PoiDB)
# Formation Normal Battle Node AD/AP
AS/AS+
U Line Ahead
Double Line
Vanguard
Phases: 2
Heavy Cruiser Ri-Class Flagship (1527): 70 Armor, 76 HPBattle Card Flagship Icon.png Heavy Cruiser Ri-Class Flagship (1527): 70 Armor, 76 HP Torpedo Cruiser Chi-Class Flagship (1559): 60 Armor, 70 HP Light Cruiser Tsu-Class (1591): 55 Armor, 48 HP Destroyer Ha-Class Late Model (1577): 29 Armor, 38 HP Destroyer Ha-Class Late Model (1577): 29 Armor, 38 HP
0/0
0/0
# Formation Normal Battle Node AD/AP
AS/AS+
E-2 Hard V: 深海地中海艦隊 増援巡洋艦群 (PoiDB)
# Formation Normal Battle Node AD/AP
AS/AS+
V Line Ahead
Double Line
Phases: 2
Heavy Cruiser Ne-Class Elite (1595): 89 Armor, 88 HPBattle Card Flagship Icon.png Heavy Cruiser Ne-Class Elite (1595): 89 Armor, 88 HP Light Cruiser Tsu-Class Elite (1592): 68 Armor, 66 HP Light Cruiser Tsu-Class (1591): 55 Armor, 48 HP Destroyer Ro-Class Late Model (1576): 26 Armor, 37 HP Destroyer Ro-Class Late Model (1576): 26 Armor, 37 HP
0/0
0/0
Line Ahead
Phases: 2, 3
Heavy Cruiser Ne-Class Elite (1595): 89 Armor, 88 HPBattle Card Flagship Icon.png Heavy Cruiser Ne-Class Elite (1595): 89 Armor, 88 HP Light Cruiser Tsu-Class Elite (1592): 68 Armor, 66 HP Light Cruiser Tsu-Class Elite (1592): 68 Armor, 66 HP Destroyer Ro-Class Late Model Elite (1622): 36 Armor, 43 HP Destroyer Ro-Class Late Model Elite (1622): 36 Armor, 43 HP
0/0
0/0
# Formation Normal Battle Node AD/AP
AS/AS+
E-2 Hard W: 深海占拠中 ジェノヴァ港湾要塞 (PoiDB)
# Formation Boss Battle Node AD/AP
AS/AS+
W Cruising Formation 4
Phases: 2, 3
Harbour Summer Princess B III (2025): 220 Armor, 1550 HP, 96 APBattle Card Flagship Icon.png Airfield Princess V (1650): 140 Armor, 500 HP, 34 APAbyssal Liberation Land-based Dive Bomber 561 Equipment.png Artillery Imp II (1666): 105 Armor, 130 HP Artillery Imp II (1666): 105 Armor, 130 HP Transport Ship Wa-Class Flagship (1558): 65 Armor, 130 HP Transport Ship Wa-Class Flagship (1558): 65 Armor, 130 HP
Heavy Cruiser Ri-Class Flagship (1527): 70 Armor, 76 HP Light Cruiser Tsu-Class Elite (1592): 68 Armor, 66 HP Destroyer Ro-Class Late Model Elite (1622): 36 Armor, 43 HP Destroyer Ro-Class Late Model Elite (1622): 36 Armor, 43 HP PT Imp Pack IV (1640): 39 Armor, 18 HP PT Imp Pack IV (1640): 39 Armor, 18 HP
44/87
195/390
Cruising Formation 4
Phases: 2
(Final)
Harbour Summer Princess B Damaged III (2028): 240 Armor, 1550 HP, 96 APBattle Card Flagship Icon.png Heavy Cruiser Ne-Class Kai B Summer Mode (1956): 244 Armor, 470 HP Airfield Princess VI (1651): 140 Armor, 500 HP, 48 APAbyssal Liberation Land-based Dive Bomber Ace 562 Equipment.pngAbyssal Liberation Land-based Dive Bomber 561 Equipment.png Artillery Imp II (1666): 105 Armor, 130 HP Artillery Imp II (1666): 105 Armor, 130 HP Transport Ship Wa-Class Flagship (1558): 65 Armor, 130 HP
Heavy Cruiser Ne-Class Kai B Summer Mode (1956): 244 Armor, 470 HP Light Cruiser Tsu-Class Flagship (1862): 108 Armor, 130 HP Destroyer Na-Class Late Model II Elite (1951): 69 Armor, 66 HP Destroyer Na-Class Late Model II Elite (1951): 69 Armor, 66 HP PT Imp Pack IV (1640): 39 Armor, 18 HP PT Imp Pack IV (1640): 39 Armor, 18 HP
49/97
216/432
# Formation Boss Battle Node AD/AP
AS/AS+
E-2 Hard X: 深海水上打撃部隊 突撃戦闘群 (PoiDB)
# Formation Night Battle Node AD/AP
AS/AS+
X Line Ahead
Echelon
Phases: 2, 3
Heavy Cruiser Ne-Class Elite (1595): 89 Armor, 88 HPBattle Card Flagship Icon.png Heavy Cruiser Ne-Class Elite (1595): 89 Armor, 88 HP Light Cruiser Tsu-Class Elite (1592): 68 Armor, 66 HP Destroyer Ha-Class Late Model Elite (1623): 36 Armor, 46 HP Destroyer Ha-Class Late Model (1577): 29 Armor, 38 HP Destroyer Ha-Class Late Model (1577): 29 Armor, 38 HP
0/0
0/0
Line Ahead
Phases: 3
Battleship Re-Class Elite (1562): 130 Armor, 270 HP, 107 APBattle Card Flagship Icon.png Heavy Cruiser Ne-Class Elite (1595): 89 Armor, 88 HP Heavy Cruiser Ne-Class Elite (1595): 89 Armor, 88 HP Light Cruiser Tsu-Class Elite (1592): 68 Armor, 66 HP Destroyer Ha-Class Late Model (1577): 29 Armor, 38 HP Destroyer Ha-Class Late Model (1577): 29 Armor, 38 HP
36/72
161/321
# Formation Night Battle Node AD/AP
AS/AS+
E-2 Hard Y: 深海潜水艦隊 司令潜水艦 (PoiDB)
# Formation Normal Battle Node AD/AP
AS/AS+
Y Echelon
Line Abreast
Phases: 3
Submarine Summer Princess B Flagship II (1978): 39 Armor, 198 HPBattle Card Flagship Icon.png Submarine Yo-Class Elite (1533): 27 Armor, 34 HP Submarine Yo-Class Elite (1533): 27 Armor, 34 HP
0/0
0/0
Echelon
Phases: 3
Submarine Summer Princess B Flagship II (1978): 39 Armor, 198 HPBattle Card Flagship Icon.png Submarine So-Class Elite (1571): 30 Armor, 45 HP Submarine Yo-Class Elite (1533): 27 Armor, 34 HP Submarine Yo-Class Elite (1533): 27 Armor, 34 HP
0/0
0/0
# Formation Normal Battle Node AD/AP
AS/AS+
E-2 Hard Z: 深海地中海艦隊 主力水上打撃群 (PoiDB)
# Formation Boss Battle Node AD/AP
AS/AS+
Z Cruising Formation 4
Phases: 3
Mediterranean Dreadnought Water Princess III (2031): 255 Armor, 930 HPBattle Card Flagship Icon.png Aircraft Carrier Summer Princess B (1964): 239 Armor, 880 HP, 138 AP Battleship Ta-Class Flagship (1543): 96 Armor, 90 HP Battleship Ta-Class Flagship (1543): 96 Armor, 90 HP Heavy Cruiser Ne-Class Kai B Summer Mode (1956): 244 Armor, 470 HP Heavy Cruiser Ne-Class Kai B Summer Mode (1956): 244 Armor, 470 HP
Heavy Cruiser Ri-Class B Flagship (1999): 72 Armor, 80 HP Light Cruiser Tsu-Class Elite (1592): 68 Armor, 66 HP Destroyer Ha-Class Late Model Elite (1623): 36 Armor, 46 HP Destroyer Ha-Class Late Model Elite (1623): 36 Armor, 46 HP Destroyer Ha-Class Late Model Elite (1623): 36 Armor, 46 HP Destroyer Ha-Class Late Model Elite (1623): 36 Armor, 46 HP
47/93
207/414
Cruising Formation 4
Phases: 3
(Final)
Mediterranean Dreadnought Water Princess Damaged III (2034): 344 Armor, 930 HPBattle Card Flagship Icon.png Aircraft Carrier Summer Princess B (1964): 239 Armor, 880 HP, 138 AP Aircraft Carrier Summer Princess B (1964): 239 Armor, 880 HP, 138 AP Battleship Ta-Class Flagship (1543): 96 Armor, 90 HP Heavy Cruiser Ne-Class Kai B Summer Mode (1956): 244 Armor, 470 HP Heavy Cruiser Ne-Class Kai B Summer Mode (1956): 244 Armor, 470 HP
Heavy Cruiser Ri-Class B Flagship (1999): 72 Armor, 80 HP Light Cruiser Tsu-Class Flagship (1862): 108 Armor, 130 HP Destroyer Na-Class Late Model II Elite (1951): 69 Armor, 66 HP Destroyer Na-Class Late Model II Elite (1951): 69 Armor, 66 HP Destroyer Ha-Class Late Model Elite (1623): 36 Armor, 46 HP Destroyer Ha-Class Late Model Elite (1623): 36 Armor, 46 HP
93/185
414/828
# Formation Boss Battle Node AD/AP
AS/AS+

E-2 Medium AB
# Formation Air Raids AD/AP
AS/AS+
AB Diamond
Airfield Princess VI (1651): 140 Armor, 500 HP, 48 APAbyssal Liberation Land-based Dive Bomber Ace 562 Equipment.pngAbyssal Liberation Land-based Dive Bomber 561 Equipment.pngBattle Card Flagship Icon.png Airfield Princess V (1650): 140 Armor, 500 HP, 34 APAbyssal Liberation Land-based Dive Bomber 561 Equipment.png
28/55
123/246
Diamond
Airfield Princess V (1650): 140 Armor, 500 HP, 34 APAbyssal Liberation Land-based Dive Bomber 561 Equipment.pngBattle Card Flagship Icon.png Airfield Princess V (1650): 140 Armor, 500 HP, 34 APAbyssal Liberation Land-based Dive Bomber 561 Equipment.png Airfield Princess V (1650): 140 Armor, 500 HP, 34 APAbyssal Liberation Land-based Dive Bomber 561 Equipment.png
35/69
153/306
Diamond
Airfield Princess VI (1651): 140 Armor, 500 HP, 48 APAbyssal Liberation Land-based Dive Bomber Ace 562 Equipment.pngAbyssal Liberation Land-based Dive Bomber 561 Equipment.pngBattle Card Flagship Icon.png Airfield Princess V (1650): 140 Armor, 500 HP, 34 APAbyssal Liberation Land-based Dive Bomber 561 Equipment.png Airfield Princess V (1650): 140 Armor, 500 HP, 34 APAbyssal Liberation Land-based Dive Bomber 561 Equipment.png
39/78
174/348
# Formation Air Raids AD/AP
AS/AS+
E-2 Medium A: 深海地中海艦隊 先遣偵察隊 (PoiDB)
# Formation Normal Battle Node AD/AP
AS/AS+
A Line Ahead
Double Line
Phases: 1, 2, 3
Light Cruiser Ho-Class Flagship (1554): 36 Armor, 53 HPBattle Card Flagship Icon.png Light Cruiser Tsu-Class (1591): 55 Armor, 48 HP Destroyer Ro-Class Late Model (1576): 26 Armor, 37 HP Destroyer I-Class (1501): 5 Armor, 20 HP Destroyer I-Class (1501): 5 Armor, 20 HP Destroyer I-Class (1501): 5 Armor, 20 HP
0/0
0/0
Line Ahead
Phases: 3
Light Cruiser Ho-Class Flagship (1554): 36 Armor, 53 HPBattle Card Flagship Icon.png Light Cruiser Tsu-Class (1591): 55 Armor, 48 HP Destroyer Ro-Class Late Model (1576): 26 Armor, 37 HP Destroyer Ro-Class Late Model (1576): 26 Armor, 37 HP Destroyer I-Class (1501): 5 Armor, 20 HP Destroyer I-Class (1501): 5 Armor, 20 HP
0/0
0/0
# Formation Normal Battle Node AD/AP
AS/AS+
E-2 Medium B: 深海地中海艦隊 クレタ海哨戒群 (PoiDB)
# Formation Normal Battle Node AD/AP
AS/AS+
B Line Ahead
Double Line
Echelon
Phases: 1, 2, 3
Destroyer Ro-Class Elite (1515): 12 Armor, 35 HPBattle Card Flagship Icon.png Destroyer Ro-Class Elite (1515): 12 Armor, 35 HP PT Imp Pack III (1639): 29 Armor, 15 HP PT Imp Pack II (1638): 29 Armor, 9 HP PT Imp Pack II (1638): 29 Armor, 9 HP
0/0
0/0
# Formation Normal Battle Node AD/AP
AS/AS+
E-2 Medium C: 深海潜水艦隊 クレタ島沖哨戒線 (PoiDB)
# Formation Normal Battle Node AD/AP
AS/AS+
C Echelon
Line Abreast
Phases: 1, 2, 3
Submarine Ka-Class Elite (1532): 21 Armor, 27 HPBattle Card Flagship Icon.png Submarine Ka-Class (1530): 7 Armor, 19 HP Submarine Ka-Class (1530): 7 Armor, 19 HP
0/0
0/0
Echelon
Line Abreast
Phases: 1, 2, 3
Submarine Ka-Class Flagship (1534): 30 Armor, 37 HPBattle Card Flagship Icon.png Submarine Ka-Class Elite (1532): 21 Armor, 27 HP Submarine Ka-Class Elite (1532): 21 Armor, 27 HP
0/0
0/0
Echelon
Line Abreast
Phases: 1, 2, 3
Submarine Ka-Class Elite (1532): 21 Armor, 27 HPBattle Card Flagship Icon.png Submarine Ka-Class (1530): 7 Armor, 19 HP Submarine Ka-Class (1530): 7 Armor, 19 HP Submarine Ka-Class (1530): 7 Armor, 19 HP
0/0
0/0
# Formation Normal Battle Node AD/AP
AS/AS+
E-2 Medium D: 深海地中海方面 基地航空隊 (PoiDB)
# Formation Air Defense Node AD/AP
AS/AS+
D Diamond
Phases: 1, 2, 3
Supply Depot Princess B Vacation Mode II (2016): 133 Armor, 1200 HP, 40 APBattle Card Flagship Icon.png Airfield Princess VI (1651): 140 Armor, 500 HP, 48 APAbyssal Liberation Land-based Dive Bomber Ace 562 Equipment.pngAbyssal Liberation Land-based Dive Bomber 561 Equipment.png Airfield Princess V (1650): 140 Armor, 500 HP, 34 APAbyssal Liberation Land-based Dive Bomber 561 Equipment.png
41/82
183/366
Diamond
Phases: 1, 2, 3
Supply Depot Princess B Vacation Mode III (2017): 166 Armor, 3200 HP, 46 APBattle Card Flagship Icon.png Airfield Princess V (1650): 140 Armor, 500 HP, 34 APAbyssal Liberation Land-based Dive Bomber 561 Equipment.png Airfield Princess V (1650): 140 Armor, 500 HP, 34 APAbyssal Liberation Land-based Dive Bomber 561 Equipment.png Airfield Princess V (1650): 140 Armor, 500 HP, 34 APAbyssal Liberation Land-based Dive Bomber 561 Equipment.png
50/99
222/444
Diamond
Phases: 1, 2, 3
Supply Depot Princess B Vacation Mode III (2017): 166 Armor, 3200 HP, 46 APBattle Card Flagship Icon.png Airfield Princess VI (1651): 140 Armor, 500 HP, 48 APAbyssal Liberation Land-based Dive Bomber Ace 562 Equipment.pngAbyssal Liberation Land-based Dive Bomber 561 Equipment.png Airfield Princess V (1650): 140 Armor, 500 HP, 34 APAbyssal Liberation Land-based Dive Bomber 561 Equipment.png Airfield Princess V (1650): 140 Armor, 500 HP, 34 APAbyssal Liberation Land-based Dive Bomber 561 Equipment.png
55/109
243/486
# Formation Air Defense Node AD/AP
AS/AS+
E-2 Medium D1: 深海地中海艦隊 軽空母部隊 (PoiDB)
# Formation Normal Battle Node AD/AP
AS/AS+
D1 Double Line
Diamond
Phases: 1, 2, 3
Light Carrier Nu-Class Flagship II (1763): 70 Armor, 84 HP, 77 APHell plane 1.pngBattle Card Flagship Icon.png Light Cruiser Ho-Class Flagship (1554): 36 Armor, 53 HP Light Cruiser Tsu-Class (1591): 55 Armor, 48 HP Destroyer Ro-Class Late Model (1576): 26 Armor, 37 HP Destroyer I-Class (1501): 5 Armor, 20 HP Destroyer I-Class (1501): 5 Armor, 20 HP
26/52
116/231
Diamond
Phases: 1, 2, 3
Light Carrier Nu-Class Flagship III (1764): 70 Armor, 84 HP, 93 APAbyssal Cat Fighter Kai 556 Equipment.pngBattle Card Flagship Icon.png Light Cruiser Ho-Class Flagship (1554): 36 Armor, 53 HP Light Cruiser Tsu-Class (1591): 55 Armor, 48 HP Destroyer Ro-Class Late Model (1576): 26 Armor, 37 HP Destroyer Ro-Class Late Model (1576): 26 Armor, 37 HP Destroyer I-Class (1501): 5 Armor, 20 HP
32/63
140/279
# Formation Normal Battle Node AD/AP
AS/AS+
E-2 Medium D2
# Empty Node
D2 敵影を見ず。
最前線マルタ島です。周辺警戒を厳に!

No enemy spotted.
The front line is at Malta. Be on high alert!
# Empty Node
E-2 Medium E
# Selection Node
E 艦隊の針路を選択できます。提督、どちらの針路をとられますか?
You can decide the fleet's course. Admiral, which heading should we take?
# Selection Node
E-2 Medium F
# Empty Node
F 気のせいだった。
最前線マルタ島です。周辺警戒を厳に!

Must be my imagination.
The front line is at Malta. Be on high alert!
# Empty Node
E-2 Medium G: 深海艦隊 マルタ島攻略上陸船団 (PoiDB)
# Formation Normal Battle Node AD/AP
AS/AS+
G Double Line
Diamond
Phases: 1, 2, 3
Transport Ship Wa-Class Elite (1526): 35 Armor, 80 HPBattle Card Flagship Icon.png Transport Ship Wa-Class Elite (1526): 35 Armor, 80 HP Light Cruiser Ho-Class Flagship (1554): 36 Armor, 53 HP Destroyer Ro-Class Late Model (1576): 26 Armor, 37 HP Destroyer Ro-Class Late Model (1576): 26 Armor, 37 HP Destroyer Ro-Class Late Model (1576): 26 Armor, 37 HP
0/0
0/0
Diamond
Phases: 1, 2, 3
Transport Ship Wa-Class Elite (1526): 35 Armor, 80 HPBattle Card Flagship Icon.png Transport Ship Wa-Class Elite (1526): 35 Armor, 80 HP Light Cruiser Ho-Class Flagship (1554): 36 Armor, 53 HP Light Cruiser Tsu-Class (1591): 55 Armor, 48 HP Destroyer Ro-Class Late Model (1576): 26 Armor, 37 HP Destroyer Ro-Class Late Model (1576): 26 Armor, 37 HP
0/0
0/0
# Formation Normal Battle Node AD/AP
AS/AS+
E-2 Medium H
# Empty Node
H 気のせいだった。
敵影見ず…されど敵艦隊らしき通信を傍受せり。警戒を厳に。周辺海域捜索の要を認む!

Must be my imagination.
No sign of the enemy... But we've intercepted enemy communications. Be on high alert. Eyes on the horizon!
# Empty Node
E-2 Medium I: 深海地中海艦隊 新設空母集団 (PoiDB)
# Formation Boss Battle Node AD/AP
AS/AS+
I Diamond
Phases: 1, 3
Aircraft Carrier Summer Princess IV (1963): 189 Armor, 640 HP, 119 APBattle Card Flagship Icon.png Heavy Cruiser Ne-Class Kai Summer Mode III (1955): 211 Armor, 390 HP Light Cruiser Tsu-Class (1591): 55 Armor, 48 HP Destroyer Ro-Class Late Model (1576): 26 Armor, 37 HP Destroyer Ro-Class Late Model (1576): 26 Armor, 37 HP Destroyer Ro-Class Late Model (1576): 26 Armor, 37 HP
40/80
179/357
Diamond
Phases: 1, 2, 3
Aircraft Carrier Summer Princess IV (1963): 189 Armor, 640 HP, 119 APBattle Card Flagship Icon.png Light Cruiser Ho-Class Flagship (1554): 36 Armor, 53 HP Light Cruiser Tsu-Class (1591): 55 Armor, 48 HP Destroyer Ro-Class Late Model (1576): 26 Armor, 37 HP Destroyer Ro-Class Late Model (1576): 26 Armor, 37 HP Destroyer Ro-Class Late Model (1576): 26 Armor, 37 HP
40/80
179/357
Diamond
Phases: 1, 2, 3
(Final)
Aircraft Carrier Summer Princess IV (1963): 189 Armor, 640 HP, 119 APBattle Card Flagship Icon.png Heavy Cruiser Ne-Class Kai Summer Mode III (1955): 211 Armor, 390 HP Light Cruiser Ho-Class Flagship (1554): 36 Armor, 53 HP Light Cruiser Tsu-Class (1591): 55 Armor, 48 HP Destroyer Ro-Class Late Model (1576): 26 Armor, 37 HP Destroyer Ro-Class Late Model (1576): 26 Armor, 37 HP
40/80
179/357
# Formation Boss Battle Node AD/AP
AS/AS+
E-2 Medium J
# Selection Node
J ForceH、出撃する!敵港湾拠点を叩き、敵地中海艦隊主力第1及び第2艦隊を捜索、これを撃滅せよ!
Force H, sortieing! Hit the enemy-controlled harbour, then find and destroy the enemy's 1st and 2nd Mediterranean fleets!
# Selection Node
E-2 Medium K: 深海潜水艦隊 バレアレス海哨戒線 (PoiDB)
# Formation Normal Battle Node AD/AP
AS/AS+
K Echelon
Line Abreast
Phases: 2, 3
Submarine Yo-Class Elite (1533): 27 Armor, 34 HPBattle Card Flagship Icon.png Submarine Yo-Class (1531): 9 Armor, 24 HP Submarine Ka-Class (1530): 7 Armor, 19 HP Submarine Ka-Class (1530): 7 Armor, 19 HP
0/0
0/0
Echelon
Line Abreast
Phases: 2, 3
Submarine Yo-Class Elite (1533): 27 Armor, 34 HPBattle Card Flagship Icon.png Submarine Yo-Class Elite (1533): 27 Armor, 34 HP Submarine Ka-Class (1530): 7 Armor, 19 HP Submarine Ka-Class (1530): 7 Armor, 19 HP
0/0
0/0
Echelon
Line Abreast
Phases: 2, 3
Submarine Yo-Class Elite (1533): 27 Armor, 34 HPBattle Card Flagship Icon.png Submarine Yo-Class Elite (1533): 27 Armor, 34 HP Submarine Yo-Class Elite (1533): 27 Armor, 34 HP Submarine Ka-Class (1530): 7 Armor, 19 HP
0/0
0/0
Echelon
Line Abreast
Phases: 2
Submarine Yo-Class Elite (1533): 27 Armor, 34 HPBattle Card Flagship Icon.png Submarine Yo-Class Elite (1533): 27 Armor, 34 HP Submarine Yo-Class Elite (1533): 27 Armor, 34 HP Submarine Yo-Class Elite (1533): 27 Armor, 34 HP
0/0
0/0
# Formation Normal Battle Node AD/AP
AS/AS+
E-2 Medium L: 深海潜水艦隊 地中海主力阻止線 (PoiDB)
# Formation Normal Battle Node AD/AP
AS/AS+
L Echelon
Line Abreast
Phases: 2, 3
Submarine Yo-Class Elite (1533): 27 Armor, 34 HPBattle Card Flagship Icon.png Submarine Yo-Class Elite (1533): 27 Armor, 34 HP Submarine Ka-Class (1530): 7 Armor, 19 HP Submarine Ka-Class (1530): 7 Armor, 19 HP
0/0
0/0
Echelon
Line Abreast
Phases: 2, 3
Submarine Yo-Class Elite (1533): 27 Armor, 34 HPBattle Card Flagship Icon.png Submarine Yo-Class Elite (1533): 27 Armor, 34 HP Submarine Yo-Class Elite (1533): 27 Armor, 34 HP Submarine Ka-Class (1530): 7 Armor, 19 HP
0/0
0/0
Echelon
Line Abreast
Phases: 2, 3
Submarine Yo-Class Elite (1533): 27 Armor, 34 HPBattle Card Flagship Icon.png Submarine Yo-Class Elite (1533): 27 Armor, 34 HP Submarine Yo-Class Elite (1533): 27 Armor, 34 HP Submarine Yo-Class Elite (1533): 27 Armor, 34 HP
0/0
0/0
Echelon
Line Abreast
Phases: 2, 3
Submarine Yo-Class Flagship (1535): 36 Armor, 44 HPBattle Card Flagship Icon.png Submarine Yo-Class Elite (1533): 27 Armor, 34 HP Submarine Yo-Class Elite (1533): 27 Armor, 34 HP Submarine Yo-Class Elite (1533): 27 Armor, 34 HP
0/0
0/0
# Formation Normal Battle Node AD/AP
AS/AS+
E-2 Medium M: 深海地中海方面 基地航空隊 (PoiDB)
# Formation Air Defense Node AD/AP
AS/AS+
M Diamond
Phases: 3
Harbour Summer Princess B Damaged II (2027): 210 Armor, 1050 HP, 75 APBattle Card Flagship Icon.png Airfield Princess V (1650): 140 Armor, 500 HP, 34 APAbyssal Liberation Land-based Dive Bomber 561 Equipment.png
37/73
164/327
Diamond
Phases: 2
Harbour Summer Princess B II (2024): 180 Armor, 1050 HP, 75 APBattle Card Flagship Icon.png Airfield Princess VI (1651): 140 Armor, 500 HP, 48 APAbyssal Liberation Land-based Dive Bomber Ace 562 Equipment.pngAbyssal Liberation Land-based Dive Bomber 561 Equipment.png Airfield Princess V (1650): 140 Armor, 500 HP, 34 APAbyssal Liberation Land-based Dive Bomber 561 Equipment.png
53/105
236/471
Diamond
Phases: 2
Harbour Summer Princess B II (2024): 180 Armor, 1050 HP, 75 APBattle Card Flagship Icon.png Airfield Princess VI (1651): 140 Armor, 500 HP, 48 APAbyssal Liberation Land-based Dive Bomber Ace 562 Equipment.pngAbyssal Liberation Land-based Dive Bomber 561 Equipment.png Airfield Princess V (1650): 140 Armor, 500 HP, 34 APAbyssal Liberation Land-based Dive Bomber 561 Equipment.png Airfield Princess V (1650): 140 Armor, 500 HP, 34 APAbyssal Liberation Land-based Dive Bomber 561 Equipment.png
64/128
287/573
# Formation Air Defense Node AD/AP
AS/AS+
E-2 Medium N: 深海地中海艦隊 警戒軽巡戦隊 (PoiDB)
# Formation Normal Battle Node AD/AP
AS/AS+
N Line Ahead
Double Line
Phases: 2, 3
Light Cruiser He-Class Flagship (1555): 39 Armor, 57 HPBattle Card Flagship Icon.png Light Cruiser Ho-Class Flagship (1554): 36 Armor, 53 HP Light Cruiser Tsu-Class (1591): 55 Armor, 48 HP Destroyer Ha-Class Late Model (1577): 29 Armor, 38 HP Destroyer I-Class (1501): 5 Armor, 20 HP Destroyer I-Class (1501): 5 Armor, 20 HP
0/0
0/0
Line Ahead
Phases: 3
Light Cruiser He-Class Flagship (1555): 39 Armor, 57 HPBattle Card Flagship Icon.png Light Cruiser Ho-Class Flagship (1554): 36 Armor, 53 HP Light Cruiser Tsu-Class (1591): 55 Armor, 48 HP Destroyer Ha-Class Late Model (1577): 29 Armor, 38 HP Destroyer Ha-Class Late Model (1577): 29 Armor, 38 HP Destroyer I-Class (1501): 5 Armor, 20 HP
0/0
0/0
# Formation Normal Battle Node AD/AP
AS/AS+
E-2 Medium O: 深海地中海艦隊 アルジェ防備隊 (PoiDB)
# Formation Normal Battle Node AD/AP
AS/AS+
O Double Line
Phases: 2
PT Imp Pack III (1639): 29 Armor, 15 HPBattle Card Flagship Icon.png PT Imp Pack III (1639): 29 Armor, 15 HP PT Imp Pack III (1639): 29 Armor, 15 HP Artillery Imp II (1666): 105 Armor, 130 HP Supply Depot Princess B Vacation Mode III (2017): 166 Armor, 3200 HP, 46 AP Transport Ship Wa-Class Elite (1526): 35 Armor, 80 HP
16/31
69/138
Double Line
Phases: 2
PT Imp Pack III (1639): 29 Armor, 15 HPBattle Card Flagship Icon.png PT Imp Pack III (1639): 29 Armor, 15 HP Artillery Imp II (1666): 105 Armor, 130 HP Artillery Imp II (1666): 105 Armor, 130 HP Supply Depot Princess B Vacation Mode III (2017): 166 Armor, 3200 HP, 46 AP Transport Ship Wa-Class Elite (1526): 35 Armor, 80 HP
16/31
69/138
Double Line
Phases: 3
PT Imp Pack III (1639): 29 Armor, 15 HPBattle Card Flagship Icon.png PT Imp Pack III (1639): 29 Armor, 15 HP PT Imp Pack III (1639): 29 Armor, 15 HP Artillery Imp II (1666): 105 Armor, 130 HP Supply Depot Princess B Vacation Mode Damaged III (2021): 199 Armor, 3200 HP Transport Ship Wa-Class Elite (1526): 35 Armor, 80 HP
0/0
0/0
# Formation Normal Battle Node AD/AP
AS/AS+
E-2 Medium P
# Selection Node
P 対空、対水上警戒を厳とせよ!合戦用意!全艦隊、戦闘態勢をとれ!
Be on high anti-air and anti-surface alert! Battle stations! All fleets, prepare for battle!
# Selection Node
E-2 Medium Q: 深海地中海艦隊 増援空母群 (PoiDB)
# Formation Normal Battle Node AD/AP
AS/AS+
Q Diamond
Phases: 2
Light Carrier Nu-Class Elite II (1762): 35 Armor, 70 HP, 69 APHell plane 1.pngBattle Card Flagship Icon.png Light Carrier Nu-Class Elite II (1762): 35 Armor, 70 HP, 69 APHell plane 1.png Heavy Cruiser Ne-Class Elite (1595): 89 Armor, 88 HP Light Cruiser Tsu-Class (1591): 55 Armor, 48 HP Destroyer Ro-Class Late Model (1576): 26 Armor, 37 HP Destroyer I-Class (1501): 5 Armor, 20 HP
47/93
207/414
Diamond
Phases: 2, 3
Light Carrier Nu-Class Elite II (1762): 35 Armor, 70 HP, 69 APHell plane 1.pngBattle Card Flagship Icon.png Light Carrier Nu-Class Elite II (1762): 35 Armor, 70 HP, 69 APHell plane 1.png Heavy Cruiser Ne-Class Elite (1595): 89 Armor, 88 HP Light Cruiser Tsu-Class (1591): 55 Armor, 48 HP Destroyer Ro-Class Late Model (1576): 26 Armor, 37 HP Destroyer Ro-Class Late Model (1576): 26 Armor, 37 HP
47/93
207/414
Diamond
Phases: 2, 3
Light Carrier Nu-Class Flagship III (1764): 70 Armor, 84 HP, 93 APAbyssal Cat Fighter Kai 556 Equipment.pngBattle Card Flagship Icon.png Light Carrier Nu-Class Elite II (1762): 35 Armor, 70 HP, 69 APHell plane 1.png Heavy Cruiser Ne-Class Elite (1595): 89 Armor, 88 HP Light Cruiser Tsu-Class (1591): 55 Armor, 48 HP Destroyer Ro-Class Late Model (1576): 26 Armor, 37 HP Destroyer Ro-Class Late Model (1576): 26 Armor, 37 HP
55/109
243/486
# Formation Normal Battle Node AD/AP
AS/AS+
E-2 Medium R: 深海地中海方面 基地航空隊 (PoiDB)
# Formation Air Defense Node AD/AP
AS/AS+
R Diamond
Phases: 3
Harbour Summer Princess B Damaged II (2027): 210 Armor, 1050 HP, 75 APBattle Card Flagship Icon.png Airfield Princess V (1650): 140 Armor, 500 HP, 34 APAbyssal Liberation Land-based Dive Bomber 561 Equipment.png
37/73
164/327
Diamond
Phases: 2
Harbour Summer Princess B II (2024): 180 Armor, 1050 HP, 75 APBattle Card Flagship Icon.png Airfield Princess VI (1651): 140 Armor, 500 HP, 48 APAbyssal Liberation Land-based Dive Bomber Ace 562 Equipment.pngAbyssal Liberation Land-based Dive Bomber 561 Equipment.png Airfield Princess V (1650): 140 Armor, 500 HP, 34 APAbyssal Liberation Land-based Dive Bomber 561 Equipment.png
53/105
236/471
Diamond
Phases: 2
Harbour Summer Princess B II (2024): 180 Armor, 1050 HP, 75 APBattle Card Flagship Icon.png Airfield Princess VI (1651): 140 Armor, 500 HP, 48 APAbyssal Liberation Land-based Dive Bomber Ace 562 Equipment.pngAbyssal Liberation Land-based Dive Bomber 561 Equipment.png Airfield Princess V (1650): 140 Armor, 500 HP, 34 APAbyssal Liberation Land-based Dive Bomber 561 Equipment.png Airfield Princess V (1650): 140 Armor, 500 HP, 34 APAbyssal Liberation Land-based Dive Bomber 561 Equipment.png
64/128
287/573
# Formation Air Defense Node AD/AP
AS/AS+
E-2 Medium S: 深海地中海艦隊 南部物資集積地 (PoiDB)
# Formation Normal Battle Node AD/AP
AS/AS+
S Cruising Formation 4
Phases: 2
Supply Depot Princess B Vacation Mode III (2017): 166 Armor, 3200 HP, 46 APBattle Card Flagship Icon.png Supply Depot Princess B Vacation Mode III (2017): 166 Armor, 3200 HP, 46 AP Artillery Imp II (1666): 105 Armor, 130 HP Artillery Imp II (1666): 105 Armor, 130 HP PT Imp Pack III (1639): 29 Armor, 15 HP Transport Ship Wa-Class Elite (1526): 35 Armor, 80 HP
Light Cruiser Tsu-Class (1591): 55 Armor, 48 HP Destroyer Ro-Class Late Model (1576): 26 Armor, 37 HP Destroyer Ro-Class Late Model (1576): 26 Armor, 37 HP Destroyer Ro-Class Late Model (1576): 26 Armor, 37 HP Destroyer I-Class (1501): 5 Armor, 20 HP PT Imp Pack III (1639): 29 Armor, 15 HP
31/62
138/276
Cruising Formation 4
Phases: 3
Supply Depot Princess B Vacation Mode Damaged III (2021): 199 Armor, 3200 HPBattle Card Flagship Icon.png Supply Depot Princess B Vacation Mode Damaged III (2021): 199 Armor, 3200 HP Artillery Imp II (1666): 105 Armor, 130 HP Artillery Imp II (1666): 105 Armor, 130 HP Transport Ship Wa-Class Elite (1526): 35 Armor, 80 HP Transport Ship Wa-Class Elite (1526): 35 Armor, 80 HP
Light Cruiser Tsu-Class (1591): 55 Armor, 48 HP Destroyer Ha-Class Late Model (1577): 29 Armor, 38 HP Destroyer Ha-Class Late Model (1577): 29 Armor, 38 HP Destroyer I-Class (1501): 5 Armor, 20 HP Destroyer I-Class (1501): 5 Armor, 20 HP PT Imp Pack III (1639): 29 Armor, 15 HP
0/0
0/0
# Formation Normal Battle Node AD/AP
AS/AS+
E-2 Medium T: 深海地中海艦隊 低速戦艦戦隊 (PoiDB)
# Formation Normal Battle Node AD/AP
AS/AS+
T Line Ahead
Double Line
Vanguard
Phases: 2, 3
Battleship Ru-Class Elite (1524): 85 Armor, 90 HPBattle Card Flagship Icon.png Battleship Ru-Class Elite (1524): 85 Armor, 90 HP Light Cruiser Ho-Class Flagship (1554): 36 Armor, 53 HP Light Cruiser Tsu-Class (1591): 55 Armor, 48 HP Destroyer Ro-Class Late Model (1576): 26 Armor, 37 HP Destroyer Ro-Class Late Model (1576): 26 Armor, 37 HP
0/0
0/0
# Formation Normal Battle Node AD/AP
AS/AS+
E-2 Medium U: 深海地中海艦隊 巡洋艦戦隊 (PoiDB)
# Formation Normal Battle Node AD/AP
AS/AS+
U Line Ahead
Double Line
Vanguard
Phases: 2, 3
Heavy Cruiser Ri-Class Elite (1522): 60 Armor, 60 HPBattle Card Flagship Icon.png Heavy Cruiser Ri-Class Elite (1522): 60 Armor, 60 HP Torpedo Cruiser Chi-Class Elite (1521): 34 Armor, 50 HP Light Cruiser Tsu-Class (1591): 55 Armor, 48 HP Destroyer Ro-Class Late Model (1576): 26 Armor, 37 HP Destroyer Ro-Class Late Model (1576): 26 Armor, 37 HP
0/0
0/0
# Formation Normal Battle Node AD/AP
AS/AS+
E-2 Medium V: 深海地中海艦隊 増援巡洋艦群 (PoiDB)
# Formation Normal Battle Node AD/AP
AS/AS+
V Line Ahead
Double Line
Phases: 2
Heavy Cruiser Ne-Class (1594): 82 Armor, 80 HPBattle Card Flagship Icon.png Heavy Cruiser Ne-Class (1594): 82 Armor, 80 HP Light Cruiser Tsu-Class (1591): 55 Armor, 48 HP Destroyer Ro-Class Late Model (1576): 26 Armor, 37 HP Destroyer Ro-Class Late Model (1576): 26 Armor, 37 HP Destroyer Ro-Class Late Model (1576): 26 Armor, 37 HP
0/0
0/0
Line Ahead
Phases: 2, 3
Heavy Cruiser Ne-Class Elite (1595): 89 Armor, 88 HPBattle Card Flagship Icon.png Heavy Cruiser Ne-Class (1594): 82 Armor, 80 HP Light Cruiser Tsu-Class (1591): 55 Armor, 48 HP Light Cruiser Tsu-Class (1591): 55 Armor, 48 HP Destroyer Ro-Class Late Model (1576): 26 Armor, 37 HP Destroyer Ro-Class Late Model (1576): 26 Armor, 37 HP
0/0
0/0
# Formation Normal Battle Node AD/AP
AS/AS+
E-2 Medium W: 深海占拠中 ジェノヴァ港湾要塞 (PoiDB)
# Formation Boss Battle Node AD/AP
AS/AS+
W Cruising Formation 4
Phases: 2, 3
Harbour Summer Princess B II (2024): 180 Armor, 1050 HP, 75 APBattle Card Flagship Icon.png Airfield Princess V (1650): 140 Armor, 500 HP, 34 APAbyssal Liberation Land-based Dive Bomber 561 Equipment.png Artillery Imp II (1666): 105 Armor, 130 HP Artillery Imp II (1666): 105 Armor, 130 HP Transport Ship Wa-Class Elite (1526): 35 Armor, 80 HP Transport Ship Wa-Class Elite (1526): 35 Armor, 80 HP
Light Cruiser Tsu-Class (1591): 55 Armor, 48 HP Destroyer Ro-Class Late Model (1576): 26 Armor, 37 HP Destroyer Ro-Class Late Model (1576): 26 Armor, 37 HP Destroyer Ro-Class Late Model (1576): 26 Armor, 37 HP PT Imp Pack III (1639): 29 Armor, 15 HP PT Imp Pack III (1639): 29 Armor, 15 HP
37/73
164/327
Cruising Formation 4
Phases: 2
(Final)
Harbour Summer Princess B Damaged II (2027): 210 Armor, 1050 HP, 75 APBattle Card Flagship Icon.png Heavy Cruiser Ne-Class Kai Summer Mode III (1955): 211 Armor, 390 HP Airfield Princess V (1650): 140 Armor, 500 HP, 34 APAbyssal Liberation Land-based Dive Bomber 561 Equipment.png Artillery Imp II (1666): 105 Armor, 130 HP Artillery Imp II (1666): 105 Armor, 130 HP Transport Ship Wa-Class Elite (1526): 35 Armor, 80 HP
Light Cruiser Tsu-Class Elite (1592): 68 Armor, 66 HP Destroyer Na-Class Late Model II Elite (1951): 69 Armor, 66 HP Destroyer Ro-Class Late Model (1576): 26 Armor, 37 HP Destroyer Ro-Class Late Model (1576): 26 Armor, 37 HP PT Imp Pack III (1639): 29 Armor, 15 HP PT Imp Pack III (1639): 29 Armor, 15 HP
37/73
164/327
# Formation Boss Battle Node AD/AP
AS/AS+
E-2 Medium X: 深海水上打撃部隊 突撃戦闘群 (PoiDB)
# Formation Night Battle Node AD/AP
AS/AS+
X Line Ahead
Echelon
Phases: 3
Heavy Cruiser Ne-Class (1594): 82 Armor, 80 HPBattle Card Flagship Icon.png Heavy Cruiser Ne-Class (1594): 82 Armor, 80 HP Light Cruiser He-Class (1506): 18 Armor, 36 HP Destroyer Ha-Class Late Model (1577): 29 Armor, 38 HP Destroyer Ro-Class Late Model (1576): 26 Armor, 37 HP Destroyer Ro-Class Late Model (1576): 26 Armor, 37 HP
0/0
0/0
Line Ahead
Phases: 3
Battleship Re-Class (1561): 110 Armor, 180 HP, 94 APBattle Card Flagship Icon.png Heavy Cruiser Ne-Class (1594): 82 Armor, 80 HP Heavy Cruiser Ne-Class (1594): 82 Armor, 80 HP Light Cruiser He-Class (1506): 18 Armor, 36 HP Destroyer Ha-Class Late Model (1577): 29 Armor, 38 HP Destroyer Ha-Class Late Model (1577): 29 Armor, 38 HP
32/63
141/282
# Formation Night Battle Node AD/AP
AS/AS+
E-2 Medium Y: 深海潜水艦隊 司令潜水艦 (PoiDB)
# Formation Normal Battle Node AD/AP
AS/AS+
Y Echelon
Line Abreast
Phases: 3
Submarine Summer Princess B Flagship (1977): 19 Armor, 108 HPBattle Card Flagship Icon.png Submarine Yo-Class Elite (1533): 27 Armor, 34 HP Submarine Yo-Class Elite (1533): 27 Armor, 34 HP
0/0
0/0
Echelon
Phases: 3
Submarine Summer Princess B Flagship (1977): 19 Armor, 108 HPBattle Card Flagship Icon.png Submarine Yo-Class Elite (1533): 27 Armor, 34 HP Submarine Yo-Class Elite (1533): 27 Armor, 34 HP Submarine Yo-Class Elite (1533): 27 Armor, 34 HP
0/0
0/0
# Formation Normal Battle Node AD/AP
AS/AS+
E-2 Medium Z: 深海地中海艦隊 主力水上打撃群 (PoiDB)
# Formation Boss Battle Node AD/AP
AS/AS+
Z Cruising Formation 4
Phases: 3
Mediterranean Dreadnought Water Princess II (2030): 211 Armor, 880 HPBattle Card Flagship Icon.png Light Carrier Nu-Class Kai Elite III (1778): 73 Armor, 88 HP, 132 APAbyssal Night Cat Fighter 581 Equipment.pngAbyssal Night Revenge Torpedo Bomber 583 Equipment.png Battleship Ta-Class Elite (1542): 88 Armor, 88 HP Heavy Cruiser Ne-Class Kai Summer Mode III (1955): 211 Armor, 390 HP Heavy Cruiser Ne-Class Kai Summer Mode III (1955): 211 Armor, 390 HP Light Cruiser Tsu-Class (1591): 55 Armor, 48 HP
Heavy Cruiser Ri-Class Flagship (1527): 70 Armor, 76 HP Light Cruiser He-Class Elite (1519): 32 Armor, 52 HP Destroyer Ha-Class Late Model (1577): 29 Armor, 38 HP Destroyer Ha-Class Late Model (1577): 29 Armor, 38 HP Destroyer Ha-Class Late Model (1577): 29 Armor, 38 HP Destroyer I-Class (1501): 5 Armor, 20 HP
45/89
198/396
Cruising Formation 4
Phases: 3
(Final)
Mediterranean Dreadnought Water Princess Damaged II (2033): 255 Armor, 880 HPBattle Card Flagship Icon.png Aircraft Carrier Summer Princess IV (1963): 189 Armor, 640 HP, 119 AP Battleship Ta-Class Elite (1542): 88 Armor, 88 HP Battleship Ta-Class Elite (1542): 88 Armor, 88 HP Heavy Cruiser Ne-Class Kai Summer Mode III (1955): 211 Armor, 390 HP Heavy Cruiser Ne-Class Kai Summer Mode III (1955): 211 Armor, 390 HP
Heavy Cruiser Ri-Class Flagship (1527): 70 Armor, 76 HP Light Cruiser Tsu-Class Elite (1592): 68 Armor, 66 HP Destroyer Ha-Class Late Model Elite (1623): 36 Armor, 46 HP Destroyer Ha-Class Late Model (1577): 29 Armor, 38 HP Destroyer Ha-Class Late Model (1577): 29 Armor, 38 HP Destroyer I-Class (1501): 5 Armor, 20 HP
40/80
179/357
# Formation Boss Battle Node AD/AP
AS/AS+

E-2 Easy AB
# Formation Air Raids AD/AP
AS/AS+
AB Diamond
Airfield Princess VI (1651): 140 Armor, 500 HP, 48 APAbyssal Liberation Land-based Dive Bomber Ace 562 Equipment.pngAbyssal Liberation Land-based Dive Bomber 561 Equipment.pngBattle Card Flagship Icon.png
17/33
72/144
Diamond
Airfield Princess V (1650): 140 Armor, 500 HP, 34 APAbyssal Liberation Land-based Dive Bomber 561 Equipment.pngBattle Card Flagship Icon.png Airfield Princess V (1650): 140 Armor, 500 HP, 34 APAbyssal Liberation Land-based Dive Bomber 561 Equipment.png
23/46
102/204
Diamond
Airfield Princess VI (1651): 140 Armor, 500 HP, 48 APAbyssal Liberation Land-based Dive Bomber Ace 562 Equipment.pngAbyssal Liberation Land-based Dive Bomber 561 Equipment.pngBattle Card Flagship Icon.png Airfield Princess V (1650): 140 Armor, 500 HP, 34 APAbyssal Liberation Land-based Dive Bomber 561 Equipment.png
28/55
123/246
# Formation Air Raids AD/AP
AS/AS+
E-2 Easy A: 深海地中海艦隊 先遣偵察隊 (PoiDB)
# Formation Normal Battle Node AD/AP
AS/AS+
A Line Ahead
Double Line
Phases: 1, 2, 3
Light Cruiser Ho-Class Flagship (1554): 36 Armor, 53 HPBattle Card Flagship Icon.png Destroyer Ro-Class Late Model (1576): 26 Armor, 37 HP Destroyer I-Class (1501): 5 Armor, 20 HP Destroyer I-Class (1501): 5 Armor, 20 HP Destroyer I-Class (1501): 5 Armor, 20 HP Destroyer I-Class (1501): 5 Armor, 20 HP
0/0
0/0
Line Ahead
Phases: 3
Light Cruiser Ho-Class Flagship (1554): 36 Armor, 53 HPBattle Card Flagship Icon.png Light Cruiser Tsu-Class (1591): 55 Armor, 48 HP Destroyer Ro-Class Late Model (1576): 26 Armor, 37 HP Destroyer I-Class (1501): 5 Armor, 20 HP Destroyer I-Class (1501): 5 Armor, 20 HP Destroyer I-Class (1501): 5 Armor, 20 HP
0/0
0/0
# Formation Normal Battle Node AD/AP
AS/AS+
E-2 Easy B: 深海地中海艦隊 クレタ海哨戒群 (PoiDB)
# Formation Normal Battle Node AD/AP
AS/AS+
B Line Ahead
Double Line
Echelon
Phases: 1, 2, 3
Destroyer Ro-Class (1502): 6 Armor, 22 HPBattle Card Flagship Icon.png Destroyer Ro-Class (1502): 6 Armor, 22 HP PT Imp Pack II (1638): 29 Armor, 9 HP PT Imp Pack (1637): 19 Armor, 9 HP PT Imp Pack (1637): 19 Armor, 9 HP
0/0
0/0
# Formation Normal Battle Node AD/AP
AS/AS+
E-2 Easy C: 深海潜水艦隊 クレタ島沖哨戒線 (PoiDB)
# Formation Normal Battle Node AD/AP
AS/AS+
C Echelon
Line Abreast
Phases: 1, 2, 3
Submarine Ka-Class (1530): 7 Armor, 19 HPBattle Card Flagship Icon.png Submarine Ka-Class (1530): 7 Armor, 19 HP Submarine Ka-Class (1530): 7 Armor, 19 HP
0/0
0/0
Echelon
Line Abreast
Phases: 1, 2, 3
Submarine Ka-Class Elite (1532): 21 Armor, 27 HPBattle Card Flagship Icon.png Submarine Ka-Class (1530): 7 Armor, 19 HP Submarine Ka-Class (1530): 7 Armor, 19 HP
0/0
0/0
Echelon
Line Abreast
Phases: 1, 2, 3
Submarine Ka-Class Elite (1532): 21 Armor, 27 HPBattle Card Flagship Icon.png Submarine Ka-Class (1530): 7 Armor, 19 HP Submarine Ka-Class (1530): 7 Armor, 19 HP Submarine Ka-Class (1530): 7 Armor, 19 HP
0/0
0/0
# Formation Normal Battle Node AD/AP
AS/AS+
E-2 Easy D: 深海地中海方面 基地航空隊 (PoiDB)
# Formation Air Defense Node AD/AP
AS/AS+
D Diamond
Phases: 1, 2, 3
Supply Depot Princess B Vacation Mode II (2016): 133 Armor, 1200 HP, 40 APBattle Card Flagship Icon.png Airfield Princess VI (1651): 140 Armor, 500 HP, 48 APAbyssal Liberation Land-based Dive Bomber Ace 562 Equipment.pngAbyssal Liberation Land-based Dive Bomber 561 Equipment.png
30/59
132/264
Diamond
Phases: 1, 2, 3
Supply Depot Princess B Vacation Mode II (2016): 133 Armor, 1200 HP, 40 APBattle Card Flagship Icon.png Airfield Princess V (1650): 140 Armor, 500 HP, 34 APAbyssal Liberation Land-based Dive Bomber 561 Equipment.png Airfield Princess V (1650): 140 Armor, 500 HP, 34 APAbyssal Liberation Land-based Dive Bomber 561 Equipment.png
37/73
162/324
Diamond
Phases: 1, 2, 3
Supply Depot Princess B Vacation Mode II (2016): 133 Armor, 1200 HP, 40 APBattle Card Flagship Icon.png Airfield Princess VI (1651): 140 Armor, 500 HP, 48 APAbyssal Liberation Land-based Dive Bomber Ace 562 Equipment.pngAbyssal Liberation Land-based Dive Bomber 561 Equipment.png Airfield Princess V (1650): 140 Armor, 500 HP, 34 APAbyssal Liberation Land-based Dive Bomber 561 Equipment.png
41/82
183/366
# Formation Air Defense Node AD/AP
AS/AS+
E-2 Easy D1: 深海地中海艦隊 軽空母部隊 (PoiDB)
# Formation Normal Battle Node AD/AP
AS/AS+
D1 Double Line
Diamond
Phases: 1, 2, 3
Light Carrier Nu-Class Elite II (1762): 35 Armor, 70 HP, 69 APHell plane 1.pngBattle Card Flagship Icon.png Light Cruiser Ho-Class Elite (1518): 30 Armor, 48 HP Light Cruiser Tsu-Class (1591): 55 Armor, 48 HP Destroyer Ro-Class Late Model (1576): 26 Armor, 37 HP Destroyer I-Class (1501): 5 Armor, 20 HP Destroyer I-Class (1501): 5 Armor, 20 HP
24/47
104/207
Diamond
Phases: 1, 2, 3
Light Carrier Nu-Class Elite II (1762): 35 Armor, 70 HP, 69 APHell plane 1.pngBattle Card Flagship Icon.png Light Cruiser Ho-Class Flagship (1554): 36 Armor, 53 HP Light Cruiser Tsu-Class (1591): 55 Armor, 48 HP Destroyer Ro-Class Late Model (1576): 26 Armor, 37 HP Destroyer I-Class (1501): 5 Armor, 20 HP Destroyer I-Class (1501): 5 Armor, 20 HP
24/47
104/207
# Formation Normal Battle Node AD/AP
AS/AS+
E-2 Easy D2
# Empty Node
D2 敵影を見ず。
最前線マルタ島です。周辺警戒を厳に!

No enemy spotted.
The front line is at Malta. Be on high alert!
# Empty Node
E-2 Easy E
# Selection Node
E 艦隊の針路を選択できます。提督、どちらの針路をとられますか?
You can decide the fleet's course. Admiral, which heading should we take?
# Selection Node
E-2 Easy F
# Empty Node
F 気のせいだった。
最前線マルタ島です。周辺警戒を厳に!

Must be my imagination.
The front line is at Malta. Be on high alert!
# Empty Node
E-2 Easy G: 深海艦隊 マルタ島攻略上陸船団 (PoiDB)
# Formation Normal Battle Node AD/AP
AS/AS+
G Double Line
Diamond
Phases: 1, 2, 3
Transport Ship Wa-Class (1513): 10 Armor, 70 HPBattle Card Flagship Icon.png Transport Ship Wa-Class (1513): 10 Armor, 70 HP Light Cruiser Ho-Class Flagship (1554): 36 Armor, 53 HP Destroyer Ro-Class Late Model (1576): 26 Armor, 37 HP Destroyer Ro-Class Late Model (1576): 26 Armor, 37 HP Destroyer I-Class (1501): 5 Armor, 20 HP
0/0
0/0
Diamond
Phases: 1, 2, 3
Transport Ship Wa-Class Elite (1526): 35 Armor, 80 HPBattle Card Flagship Icon.png Transport Ship Wa-Class (1513): 10 Armor, 70 HP Light Cruiser Ho-Class Flagship (1554): 36 Armor, 53 HP Destroyer Ro-Class Late Model (1576): 26 Armor, 37 HP Destroyer Ro-Class Late Model (1576): 26 Armor, 37 HP Destroyer I-Class (1501): 5 Armor, 20 HP
0/0
0/0
# Formation Normal Battle Node AD/AP
AS/AS+
E-2 Easy H
# Empty Node
H 気のせいだった。
敵影見ず…されど敵艦隊らしき通信を傍受せり。警戒を厳に。周辺海域捜索の要を認む!

Must be my imagination.
No sign of the enemy... But we've intercepted enemy communications. Be on high alert. Eyes on the horizon!
# Empty Node
E-2 Easy I: 深海地中海艦隊 新設空母集団 (PoiDB)
# Formation Boss Battle Node AD/AP
AS/AS+
I Diamond
Phases: 1, 2, 3
Aircraft Carrier Summer Princess III (1962): 169 Armor, 540 HP, 117 APBattle Card Flagship Icon.png Light Cruiser Tsu-Class (1591): 55 Armor, 48 HP Destroyer Ro-Class Late Model (1576): 26 Armor, 37 HP Destroyer I-Class (1501): 5 Armor, 20 HP Destroyer I-Class (1501): 5 Armor, 20 HP Destroyer I-Class (1501): 5 Armor, 20 HP
40/79
176/351
Diamond
Phases: 1, 2, 3
Aircraft Carrier Summer Princess III (1962): 169 Armor, 540 HP, 117 APBattle Card Flagship Icon.png Heavy Cruiser Ne-Class Kai Summer Mode II (1954): 133 Armor, 360 HP Light Cruiser Tsu-Class (1591): 55 Armor, 48 HP Destroyer Ro-Class Late Model (1576): 26 Armor, 37 HP Destroyer I-Class (1501): 5 Armor, 20 HP Destroyer I-Class (1501): 5 Armor, 20 HP
40/79
176/351
Diamond
Phases: 1, 2, 3
(Final)
Aircraft Carrier Summer Princess III (1962): 169 Armor, 540 HP, 117 APBattle Card Flagship Icon.png Heavy Cruiser Ne-Class Kai Summer Mode II (1954): 133 Armor, 360 HP Light Cruiser Tsu-Class (1591): 55 Armor, 48 HP Destroyer Ro-Class Late Model (1576): 26 Armor, 37 HP Destroyer Ro-Class Late Model (1576): 26 Armor, 37 HP Destroyer I-Class (1501): 5 Armor, 20 HP
40/79
176/351
# Formation Boss Battle Node AD/AP
AS/AS+
E-2 Easy J
# Selection Node
J ForceH、出撃する!敵港湾拠点を叩き、敵地中海艦隊主力第1及び第2艦隊を捜索、これを撃滅せよ!
Force H, sortieing! Hit the enemy-controlled harbour, then find and destroy the enemy's 1st and 2nd Mediterranean fleets!
# Selection Node
E-2 Easy K: 深海潜水艦隊 バレアレス海哨戒線 (PoiDB)
# Formation Normal Battle Node AD/AP
AS/AS+
K Echelon
Line Abreast
Phases: 2, 3
Submarine Yo-Class (1531): 9 Armor, 24 HPBattle Card Flagship Icon.png Submarine Yo-Class (1531): 9 Armor, 24 HP Submarine Ka-Class (1530): 7 Armor, 19 HP Submarine Ka-Class (1530): 7 Armor, 19 HP
0/0
0/0
Echelon
Line Abreast
Phases: 2, 3
Submarine Yo-Class Elite (1533): 27 Armor, 34 HPBattle Card Flagship Icon.png Submarine Yo-Class (1531): 9 Armor, 24 HP Submarine Ka-Class (1530): 7 Armor, 19 HP Submarine Ka-Class (1530): 7 Armor, 19 HP
0/0
0/0
Echelon
Line Abreast
Phases: 2, 3
Submarine Yo-Class Elite (1533): 27 Armor, 34 HPBattle Card Flagship Icon.png Submarine Yo-Class Elite (1533): 27 Armor, 34 HP Submarine Ka-Class (1530): 7 Armor, 19 HP Submarine Ka-Class (1530): 7 Armor, 19 HP
0/0
0/0
# Formation Normal Battle Node AD/AP
AS/AS+
E-2 Easy L: 深海潜水艦隊 地中海主力阻止線 (PoiDB)
# Formation Normal Battle Node AD/AP
AS/AS+
L Echelon
Line Abreast
Phases: 2, 3
Submarine Yo-Class Elite (1533): 27 Armor, 34 HPBattle Card Flagship Icon.png Submarine Yo-Class (1531): 9 Armor, 24 HP Submarine Ka-Class (1530): 7 Armor, 19 HP Submarine Ka-Class (1530): 7 Armor, 19 HP
0/0
0/0
Echelon
Line Abreast
Phases: 2, 3
Submarine Yo-Class Elite (1533): 27 Armor, 34 HPBattle Card Flagship Icon.png Submarine Yo-Class Elite (1533): 27 Armor, 34 HP Submarine Ka-Class (1530): 7 Armor, 19 HP Submarine Ka-Class (1530): 7 Armor, 19 HP
0/0
0/0
Echelon
Line Abreast
Phases: 2, 3
Submarine Yo-Class Elite (1533): 27 Armor, 34 HPBattle Card Flagship Icon.png Submarine Yo-Class Elite (1533): 27 Armor, 34 HP Submarine Yo-Class Elite (1533): 27 Armor, 34 HP Submarine Ka-Class (1530): 7 Armor, 19 HP
0/0
0/0
# Formation Normal Battle Node AD/AP
AS/AS+
E-2 Easy M: 深海地中海方面 基地航空隊 (PoiDB)
# Formation Air Defense Node AD/AP
AS/AS+
M Diamond
Phases: 3
Harbour Summer Princess B Damaged (2026): 12 Armor, 750 HP, 54 APBattle Card Flagship Icon.png
19/37
81/162
Diamond
Phases: 2
Harbour Summer Princess B (2023): 8 Armor, 750 HP, 54 APBattle Card Flagship Icon.png Airfield Princess V (1650): 140 Armor, 500 HP, 34 APAbyssal Liberation Land-based Dive Bomber 561 Equipment.png
30/59
132/264
Diamond
Phases: 2
Harbour Summer Princess B (2023): 8 Armor, 750 HP, 54 APBattle Card Flagship Icon.png Airfield Princess VI (1651): 140 Armor, 500 HP, 48 APAbyssal Liberation Land-based Dive Bomber Ace 562 Equipment.pngAbyssal Liberation Land-based Dive Bomber 561 Equipment.png Airfield Princess V (1650): 140 Armor, 500 HP, 34 APAbyssal Liberation Land-based Dive Bomber 561 Equipment.png
46/91
204/408
# Formation Air Defense Node AD/AP
AS/AS+
E-2 Easy N: 深海地中海艦隊 警戒軽巡戦隊 (PoiDB)
# Formation Normal Battle Node AD/AP
AS/AS+
N Line Ahead
Double Line
Phases: 2, 3
Light Cruiser He-Class Flagship (1555): 39 Armor, 57 HPBattle Card Flagship Icon.png Light Cruiser Ho-Class Elite (1518): 30 Armor, 48 HP Light Cruiser Tsu-Class (1591): 55 Armor, 48 HP Destroyer Ro-Class Late Model (1576): 26 Armor, 37 HP Destroyer I-Class (1501): 5 Armor, 20 HP Destroyer I-Class (1501): 5 Armor, 20 HP
0/0
0/0
Line Ahead
Phases: 3
Light Cruiser He-Class Flagship (1555): 39 Armor, 57 HPBattle Card Flagship Icon.png Light Cruiser Ho-Class Flagship (1554): 36 Armor, 53 HP Light Cruiser Tsu-Class (1591): 55 Armor, 48 HP Destroyer Ro-Class Late Model (1576): 26 Armor, 37 HP Destroyer I-Class (1501): 5 Armor, 20 HP Destroyer I-Class (1501): 5 Armor, 20 HP
0/0
0/0
# Formation Normal Battle Node AD/AP
AS/AS+
E-2 Easy O: 深海地中海艦隊 アルジェ防備隊 (PoiDB)
# Formation Normal Battle Node AD/AP
AS/AS+
O Double Line
Phases: 2
PT Imp Pack II (1638): 29 Armor, 9 HPBattle Card Flagship Icon.png PT Imp Pack II (1638): 29 Armor, 9 HP PT Imp Pack II (1638): 29 Armor, 9 HP Artillery Imp II (1666): 105 Armor, 130 HP Supply Depot Princess B Vacation Mode II (2016): 133 Armor, 1200 HP, 40 AP Transport Ship Wa-Class (1513): 10 Armor, 70 HP
14/27
60/120
Double Line
Phases: 2
PT Imp Pack II (1638): 29 Armor, 9 HPBattle Card Flagship Icon.png PT Imp Pack II (1638): 29 Armor, 9 HP Artillery Imp (1665): 110 Armor, 130 HP Artillery Imp II (1666): 105 Armor, 130 HP Supply Depot Princess B Vacation Mode II (2016): 133 Armor, 1200 HP, 40 AP Transport Ship Wa-Class (1513): 10 Armor, 70 HP
14/27
60/120
Double Line
Phases: 3
PT Imp Pack II (1638): 29 Armor, 9 HPBattle Card Flagship Icon.png PT Imp Pack II (1638): 29 Armor, 9 HP PT Imp Pack II (1638): 29 Armor, 9 HP Artillery Imp II (1666): 105 Armor, 130 HP Supply Depot Princess B Vacation Mode Damaged II (2020): 166 Armor, 1200 HP Transport Ship Wa-Class (1513): 10 Armor, 70 HP
0/0
0/0
# Formation Normal Battle Node AD/AP
AS/AS+
E-2 Easy P
# Selection Node
P 対空、対水上警戒を厳とせよ!合戦用意!全艦隊、戦闘態勢をとれ!
Be on high anti-air and anti-surface alert! Battle stations! All fleets, prepare for battle!
# Selection Node
E-2 Easy Q: 深海地中海艦隊 増援空母群 (PoiDB)
# Formation Normal Battle Node AD/AP
AS/AS+
Q Diamond
Phases: 2
Light Carrier Nu-Class Elite II (1762): 35 Armor, 70 HP, 69 APHell plane 1.pngBattle Card Flagship Icon.png Heavy Cruiser Ne-Class (1594): 82 Armor, 80 HP Light Cruiser Tsu-Class (1591): 55 Armor, 48 HP Destroyer Ro-Class Late Model (1576): 26 Armor, 37 HP Destroyer Ro-Class Late Model (1576): 26 Armor, 37 HP Destroyer I-Class (1501): 5 Armor, 20 HP
24/47
104/207
Diamond
Phases: 2
Light Carrier Nu-Class Elite II (1762): 35 Armor, 70 HP, 69 APHell plane 1.pngBattle Card Flagship Icon.png Light Carrier Nu-Class Elite II (1762): 35 Armor, 70 HP, 69 APHell plane 1.png Heavy Cruiser Ne-Class (1594): 82 Armor, 80 HP Light Cruiser Tsu-Class (1591): 55 Armor, 48 HP Destroyer Ro-Class Late Model (1576): 26 Armor, 37 HP Destroyer I-Class (1501): 5 Armor, 20 HP
47/93
207/414
Diamond
Phases: 2, 3
Light Carrier Nu-Class Elite II (1762): 35 Armor, 70 HP, 69 APHell plane 1.pngBattle Card Flagship Icon.png Light Carrier Nu-Class Elite II (1762): 35 Armor, 70 HP, 69 APHell plane 1.png Heavy Cruiser Ne-Class (1594): 82 Armor, 80 HP Light Cruiser Tsu-Class (1591): 55 Armor, 48 HP Destroyer Ro-Class Late Model (1576): 26 Armor, 37 HP Destroyer Ro-Class Late Model (1576): 26 Armor, 37 HP
47/93
207/414
# Formation Normal Battle Node AD/AP
AS/AS+
E-2 Easy R: 深海地中海方面 基地航空隊 (PoiDB)
# Formation Air Defense Node AD/AP
AS/AS+
R Diamond
Phases: 3
Harbour Summer Princess B Damaged (2026): 12 Armor, 750 HP, 54 APBattle Card Flagship Icon.png
19/37
81/162
Diamond
Phases: 2
Harbour Summer Princess B (2023): 8 Armor, 750 HP, 54 APBattle Card Flagship Icon.png Airfield Princess V (1650): 140 Armor, 500 HP, 34 APAbyssal Liberation Land-based Dive Bomber 561 Equipment.png
30/59
132/264
Diamond
Phases: 2
Harbour Summer Princess B (2023): 8 Armor, 750 HP, 54 APBattle Card Flagship Icon.png Airfield Princess VI (1651): 140 Armor, 500 HP, 48 APAbyssal Liberation Land-based Dive Bomber Ace 562 Equipment.pngAbyssal Liberation Land-based Dive Bomber 561 Equipment.png Airfield Princess V (1650): 140 Armor, 500 HP, 34 APAbyssal Liberation Land-based Dive Bomber 561 Equipment.png
46/91
204/408
# Formation Air Defense Node AD/AP
AS/AS+
E-2 Easy S: 深海地中海艦隊 南部物資集積地 (PoiDB)
# Formation Normal Battle Node AD/AP
AS/AS+
S Cruising Formation 4
Phases: 2
Supply Depot Princess B Vacation Mode II (2016): 133 Armor, 1200 HP, 40 APBattle Card Flagship Icon.png Supply Depot Princess B Vacation Mode II (2016): 133 Armor, 1200 HP, 40 AP Artillery Imp II (1666): 105 Armor, 130 HP Artillery Imp II (1666): 105 Armor, 130 HP PT Imp Pack II (1638): 29 Armor, 9 HP Transport Ship Wa-Class (1513): 10 Armor, 70 HP
Light Cruiser Tsu-Class (1591): 55 Armor, 48 HP Destroyer Ro-Class Late Model (1576): 26 Armor, 37 HP Destroyer Ro-Class Late Model (1576): 26 Armor, 37 HP Destroyer I-Class (1501): 5 Armor, 20 HP Destroyer I-Class (1501): 5 Armor, 20 HP PT Imp Pack II (1638): 29 Armor, 9 HP
27/54
120/240
Cruising Formation 4
Phases: 3
Supply Depot Princess B Vacation Mode Damaged II (2020): 166 Armor, 1200 HPBattle Card Flagship Icon.png Supply Depot Princess B Vacation Mode Damaged II (2020): 166 Armor, 1200 HP Artillery Imp II (1666): 105 Armor, 130 HP Artillery Imp II (1666): 105 Armor, 130 HP Transport Ship Wa-Class (1513): 10 Armor, 70 HP Transport Ship Wa-Class (1513): 10 Armor, 70 HP
Light Cruiser He-Class Elite (1519): 32 Armor, 52 HP Destroyer Ro-Class Late Model (1576): 26 Armor, 37 HP Destroyer Ro-Class Late Model (1576): 26 Armor, 37 HP Destroyer I-Class (1501): 5 Armor, 20 HP Destroyer I-Class (1501): 5 Armor, 20 HP PT Imp Pack II (1638): 29 Armor, 9 HP
0/0
0/0
# Formation Normal Battle Node AD/AP
AS/AS+
E-2 Easy T: 深海地中海艦隊 低速戦艦戦隊 (PoiDB)
# Formation Normal Battle Node AD/AP
AS/AS+
T Line Ahead
Double Line
Vanguard
Phases: 2, 3
Battleship Ru-Class Elite (1524): 85 Armor, 90 HPBattle Card Flagship Icon.png Battleship Ru-Class Elite (1524): 85 Armor, 90 HP Light Cruiser Ho-Class Flagship (1554): 36 Armor, 53 HP Destroyer Ro-Class Late Model (1576): 26 Armor, 37 HP Destroyer Ro-Class Late Model (1576): 26 Armor, 37 HP Destroyer I-Class (1501): 5 Armor, 20 HP
0/0
0/0
# Formation Normal Battle Node AD/AP
AS/AS+
E-2 Easy U: 深海地中海艦隊 巡洋艦戦隊 (PoiDB)
# Formation Normal Battle Node AD/AP
AS/AS+
U Line Ahead
Double Line
Vanguard
Phases: 2, 3
Heavy Cruiser Ri-Class Elite (1522): 60 Armor, 60 HPBattle Card Flagship Icon.png Heavy Cruiser Ri-Class Elite (1522): 60 Armor, 60 HP Torpedo Cruiser Chi-Class Elite (1521): 34 Armor, 50 HP Destroyer Ro-Class Late Model (1576): 26 Armor, 37 HP Destroyer Ro-Class Late Model (1576): 26 Armor, 37 HP Destroyer I-Class (1501): 5 Armor, 20 HP
0/0
0/0
# Formation Normal Battle Node AD/AP
AS/AS+
E-2 Easy V: 深海地中海艦隊 増援巡洋艦群 (PoiDB)
# Formation Normal Battle Node AD/AP
AS/AS+
V Line Ahead
Double Line
Phases: 2, 3
Heavy Cruiser Ne-Class (1594): 82 Armor, 80 HPBattle Card Flagship Icon.png Light Cruiser Tsu-Class (1591): 55 Armor, 48 HP Destroyer Ro-Class Late Model (1576): 26 Armor, 37 HP Destroyer Ro-Class Late Model (1576): 26 Armor, 37 HP Destroyer I-Class (1501): 5 Armor, 20 HP Destroyer I-Class (1501): 5 Armor, 20 HP
0/0
0/0
Line Ahead
Phases: 2, 3
Heavy Cruiser Ne-Class (1594): 82 Armor, 80 HPBattle Card Flagship Icon.png Heavy Cruiser Ne-Class (1594): 82 Armor, 80 HP Light Cruiser Tsu-Class (1591): 55 Armor, 48 HP Destroyer Ro-Class Late Model (1576): 26 Armor, 37 HP Destroyer Ro-Class Late Model (1576): 26 Armor, 37 HP Destroyer I-Class (1501): 5 Armor, 20 HP
0/0
0/0
# Formation Normal Battle Node AD/AP
AS/AS+
E-2 Easy W: 深海占拠中 ジェノヴァ港湾要塞 (PoiDB)
# Formation Boss Battle Node AD/AP
AS/AS+
W Cruising Formation 4
Phases: 2, 3
Harbour Summer Princess B (2023): 8 Armor, 750 HP, 54 APBattle Card Flagship Icon.png Artillery Imp II (1666): 105 Armor, 130 HP Artillery Imp II (1666): 105 Armor, 130 HP Light Cruiser Tsu-Class (1591): 55 Armor, 48 HP Transport Ship Wa-Class Elite (1526): 35 Armor, 80 HP Transport Ship Wa-Class Elite (1526): 35 Armor, 80 HP
Light Cruiser He-Class Elite (1519): 32 Armor, 52 HP Destroyer Ro-Class Late Model (1576): 26 Armor, 37 HP Destroyer I-Class (1501): 5 Armor, 20 HP Destroyer I-Class (1501): 5 Armor, 20 HP PT Imp Pack II (1638): 29 Armor, 9 HP PT Imp Pack II (1638): 29 Armor, 9 HP
19/37
81/162
Cruising Formation 4
Phases: 2
(Final)
Harbour Summer Princess B Damaged (2026): 12 Armor, 750 HP, 54 APBattle Card Flagship Icon.png Airfield Princess V (1650): 140 Armor, 500 HP, 34 APAbyssal Liberation Land-based Dive Bomber 561 Equipment.png Artillery Imp II (1666): 105 Armor, 130 HP Artillery Imp II (1666): 105 Armor, 130 HP Transport Ship Wa-Class Elite (1526): 35 Armor, 80 HP Transport Ship Wa-Class Elite (1526): 35 Armor, 80 HP
Light Cruiser Tsu-Class (1591): 55 Armor, 48 HP Destroyer Ro-Class Late Model (1576): 26 Armor, 37 HP Destroyer Ro-Class Late Model (1576): 26 Armor, 37 HP Destroyer I-Class (1501): 5 Armor, 20 HP PT Imp Pack II (1638): 29 Armor, 9 HP PT Imp Pack II (1638): 29 Armor, 9 HP
30/59
132/264
# Formation Boss Battle Node AD/AP
AS/AS+
E-2 Easy X: 深海水上打撃部隊 突撃戦闘群 (PoiDB)
# Formation Night Battle Node AD/AP
AS/AS+
X Line Ahead
Echelon
Phases: 2, 3
Heavy Cruiser Ne-Class (1594): 82 Armor, 80 HPBattle Card Flagship Icon.png Heavy Cruiser Ri-Class (1509): 28 Armor, 58 HP Destroyer Ro-Class Late Model (1576): 26 Armor, 37 HP Destroyer Ro-Class Late Model (1576): 26 Armor, 37 HP Destroyer I-Class (1501): 5 Armor, 20 HP Destroyer I-Class (1501): 5 Armor, 20 HP
0/0
0/0
Line Ahead
Phases: 3
Heavy Cruiser Ne-Class (1594): 82 Armor, 80 HPBattle Card Flagship Icon.png Heavy Cruiser Ne-Class (1594): 82 Armor, 80 HP Light Cruiser He-Class (1506): 18 Armor, 36 HP Destroyer Ro-Class Late Model (1576): 26 Armor, 37 HP Destroyer Ro-Class Late Model (1576): 26 Armor, 37 HP Destroyer I-Class (1501): 5 Armor, 20 HP
0/0
0/0
# Formation Night Battle Node AD/AP
AS/AS+
E-2 Easy Y: 深海潜水艦隊 司令潜水艦 (PoiDB)
# Formation Normal Battle Node AD/AP
AS/AS+
Y Echelon
Line Abreast
Phases: 3
Submarine Summer Princess B Flagship (1977): 19 Armor, 108 HPBattle Card Flagship Icon.png Submarine Yo-Class (1531): 9 Armor, 24 HP Submarine Yo-Class (1531): 9 Armor, 24 HP
0/0
0/0
Echelon
Phases: 3
Submarine Summer Princess B Flagship (1977): 19 Armor, 108 HPBattle Card Flagship Icon.png Submarine Yo-Class Elite (1533): 27 Armor, 34 HP Submarine Yo-Class (1531): 9 Armor, 24 HP Submarine Yo-Class (1531): 9 Armor, 24 HP
0/0
0/0
# Formation Normal Battle Node AD/AP
AS/AS+
E-2 Easy Z: 深海地中海艦隊 主力水上打撃群 (PoiDB)
# Formation Boss Battle Node AD/AP
AS/AS+
Z Cruising Formation 4
Phases: 3
Mediterranean Dreadnought Water Princess (2029): 166 Armor, 680 HPBattle Card Flagship Icon.png Light Carrier Nu-Class Elite IV (1777): 35 Armor, 70 HP, 107 APAbyssal Night Revenge Torpedo Bomber 583 Equipment.png Battleship Ta-Class (1541): 80 Armor, 84 HP Heavy Cruiser Ne-Class Kai Summer Mode (1953): 111 Armor, 330 HP Heavy Cruiser Ne-Class Kai Summer Mode (1953): 111 Armor, 330 HP Light Cruiser Tsu-Class (1591): 55 Armor, 48 HP
Heavy Cruiser Ri-Class Elite (1522): 60 Armor, 60 HP Light Cruiser He-Class Elite (1519): 32 Armor, 52 HP Destroyer Ha-Class Late Model (1577): 29 Armor, 38 HP Destroyer Ha-Class Late Model (1577): 29 Armor, 38 HP Destroyer I-Class (1501): 5 Armor, 20 HP Destroyer I-Class (1501): 5 Armor, 20 HP
36/72
161/321
Cruising Formation 4
Phases: 3
(Final)
Mediterranean Dreadnought Water Princess Damaged (2032): 211 Armor, 680 HPBattle Card Flagship Icon.png Aircraft Carrier Summer Princess III (1962): 169 Armor, 540 HP, 117 AP Battleship Ta-Class (1541): 80 Armor, 84 HP Heavy Cruiser Ne-Class Kai Summer Mode II (1954): 133 Armor, 360 HP Heavy Cruiser Ne-Class Kai Summer Mode II (1954): 133 Armor, 360 HP Light Cruiser Tsu-Class (1591): 55 Armor, 48 HP
Heavy Cruiser Ri-Class Flagship (1527): 70 Armor, 76 HP Light Cruiser He-Class Elite (1519): 32 Armor, 52 HP Destroyer Ha-Class Late Model (1577): 29 Armor, 38 HP Destroyer Ha-Class Late Model (1577): 29 Armor, 38 HP Destroyer I-Class (1501): 5 Armor, 20 HP Destroyer I-Class (1501): 5 Armor, 20 HP
40/79
176/351
# Formation Boss Battle Node AD/AP
AS/AS+

E-2 Casual AB
# Formation Air Raids AD/AP
AS/AS+
AB Diamond
Airfield Princess V (1650): 140 Armor, 500 HP, 34 APAbyssal Liberation Land-based Dive Bomber 561 Equipment.pngBattle Card Flagship Icon.png
12/23
51/102
Diamond
Airfield Princess VI (1651): 140 Armor, 500 HP, 48 APAbyssal Liberation Land-based Dive Bomber Ace 562 Equipment.pngAbyssal Liberation Land-based Dive Bomber 561 Equipment.pngBattle Card Flagship Icon.png
17/33
72/144
Diamond
Airfield Princess V (1650): 140 Armor, 500 HP, 34 APAbyssal Liberation Land-based Dive Bomber 561 Equipment.pngBattle Card Flagship Icon.png Airfield Princess V (1650): 140 Armor, 500 HP, 34 APAbyssal Liberation Land-based Dive Bomber 561 Equipment.png
23/46
102/204
# Formation Air Raids AD/AP
AS/AS+
E-2 Casual A: 深海地中海艦隊 先遣偵察隊 (PoiDB)
# Formation Normal Battle Node AD/AP
AS/AS+
A Line Ahead
Double Line
Phases: 1, 2, 3
Light Cruiser Ho-Class Elite (1518): 30 Armor, 48 HPBattle Card Flagship Icon.png Destroyer I-Class Late Model (1575): 22 Armor, 35 HP Destroyer I-Class (1501): 5 Armor, 20 HP Destroyer I-Class (1501): 5 Armor, 20 HP
0/0
0/0
Line Ahead
Phases: 3
Light Cruiser Ho-Class Elite (1518): 30 Armor, 48 HPBattle Card Flagship Icon.png Destroyer I-Class Late Model (1575): 22 Armor, 35 HP Destroyer I-Class (1501): 5 Armor, 20 HP Destroyer I-Class (1501): 5 Armor, 20 HP Destroyer I-Class (1501): 5 Armor, 20 HP
0/0
0/0
# Formation Normal Battle Node AD/AP
AS/AS+
E-2 Casual B: 深海地中海艦隊 クレタ海哨戒群 (PoiDB)
# Formation Normal Battle Node AD/AP
AS/AS+
B Line Ahead
Double Line
Echelon
Phases: 1, 2, 3
Destroyer Ro-Class (1502): 6 Armor, 22 HPBattle Card Flagship Icon.png Destroyer I-Class (1501): 5 Armor, 20 HP PT Imp Pack (1637): 19 Armor, 9 HP PT Imp Pack (1637): 19 Armor, 9 HP PT Imp Pack (1637): 19 Armor, 9 HP
0/0
0/0
# Formation Normal Battle Node AD/AP
AS/AS+
E-2 Casual C: 深海潜水艦隊 クレタ島沖哨戒線 (PoiDB)
# Formation Normal Battle Node AD/AP
AS/AS+
C Echelon
Line Abreast
Phases: 1, 2, 3
Submarine Ka-Class (1530): 7 Armor, 19 HPBattle Card Flagship Icon.png Submarine Ka-Class (1530): 7 Armor, 19 HP Submarine Ka-Class (1530): 7 Armor, 19 HP
0/0
0/0
Echelon
Line Abreast
Phases: 1, 2, 3
Submarine Ka-Class Elite (1532): 21 Armor, 27 HPBattle Card Flagship Icon.png Submarine Ka-Class (1530): 7 Armor, 19 HP Submarine Ka-Class (1530): 7 Armor, 19 HP
0/0
0/0
# Formation Normal Battle Node AD/AP
AS/AS+
E-2 Casual D: 深海地中海方面 基地航空隊 (PoiDB)
# Formation Air Defense Node AD/AP
AS/AS+
D Diamond
Phases: 1, 2, 3
Airfield Princess V (1650): 140 Armor, 500 HP, 34 APAbyssal Liberation Land-based Dive Bomber 561 Equipment.pngBattle Card Flagship Icon.png
12/23
51/102
Diamond
Phases: 1, 2, 3
Supply Depot Princess B Vacation Mode II (2016): 133 Armor, 1200 HP, 40 APBattle Card Flagship Icon.png Airfield Princess VI (1651): 140 Armor, 500 HP, 48 APAbyssal Liberation Land-based Dive Bomber Ace 562 Equipment.pngAbyssal Liberation Land-based Dive Bomber 561 Equipment.png
30/59
132/264
Diamond
Phases: 1, 2, 3
Supply Depot Princess B Vacation Mode II (2016): 133 Armor, 1200 HP, 40 APBattle Card Flagship Icon.png Airfield Princess V (1650): 140 Armor, 500 HP, 34 APAbyssal Liberation Land-based Dive Bomber 561 Equipment.png Airfield Princess V (1650): 140 Armor, 500 HP, 34 APAbyssal Liberation Land-based Dive Bomber 561 Equipment.png
37/73
162/324
# Formation Air Defense Node AD/AP
AS/AS+
E-2 Casual D1: 深海地中海艦隊 軽空母部隊 (PoiDB)
# Formation Normal Battle Node AD/AP
AS/AS+
D1 Double Line
Diamond
Phases: 1, 2, 3
Light Carrier Nu-Class Elite II (1762): 35 Armor, 70 HP, 69 APHell plane 1.pngBattle Card Flagship Icon.png Light Cruiser Ho-Class Elite (1518): 30 Armor, 48 HP Destroyer I-Class Late Model (1575): 22 Armor, 35 HP Destroyer I-Class (1501): 5 Armor, 20 HP Destroyer I-Class (1501): 5 Armor, 20 HP Destroyer I-Class (1501): 5 Armor, 20 HP
24/47
104/207
Diamond
Phases: 1, 2, 3
Light Carrier Nu-Class Elite II (1762): 35 Armor, 70 HP, 69 APHell plane 1.pngBattle Card Flagship Icon.png Light Cruiser Ho-Class Elite (1518): 30 Armor, 48 HP Light Cruiser Tsu-Class (1591): 55 Armor, 48 HP Destroyer I-Class Late Model (1575): 22 Armor, 35 HP Destroyer I-Class (1501): 5 Armor, 20 HP Destroyer I-Class (1501): 5 Armor, 20 HP
24/47
104/207
# Formation Normal Battle Node AD/AP
AS/AS+
E-2 Casual D2
# Empty Node
D2 敵影を見ず。
最前線マルタ島です。周辺警戒を厳に!

No enemy spotted.
The front line is at Malta. Be on high alert!
# Empty Node
E-2 Casual E
# Selection Node
E 艦隊の針路を選択できます。提督、どちらの針路をとられますか?
You can decide the fleet's course. Admiral, which heading should we take?
# Selection Node
E-2 Casual F
# Empty Node
F 気のせいだった。
最前線マルタ島です。周辺警戒を厳に!

Must be my imagination.
The front line is at Malta. Be on high alert!
# Empty Node
E-2 Casual G: 深海艦隊 マルタ島攻略上陸船団 (PoiDB)
# Formation Normal Battle Node AD/AP
AS/AS+
G Double Line
Diamond
Phases: 1, 2, 3
Transport Ship Wa-Class (1513): 10 Armor, 70 HPBattle Card Flagship Icon.png Transport Ship Wa-Class (1513): 10 Armor, 70 HP Light Cruiser Ho-Class Elite (1518): 30 Armor, 48 HP Destroyer Ro-Class Late Model (1576): 26 Armor, 37 HP Destroyer I-Class (1501): 5 Armor, 20 HP Destroyer I-Class (1501): 5 Armor, 20 HP
0/0
0/0
Diamond
Phases: 1, 2, 3
Transport Ship Wa-Class (1513): 10 Armor, 70 HPBattle Card Flagship Icon.png Transport Ship Wa-Class (1513): 10 Armor, 70 HP Light Cruiser Ho-Class Flagship (1554): 36 Armor, 53 HP Destroyer Ro-Class Late Model (1576): 26 Armor, 37 HP Destroyer I-Class (1501): 5 Armor, 20 HP Destroyer I-Class (1501): 5 Armor, 20 HP
0/0
0/0
# Formation Normal Battle Node AD/AP
AS/AS+
E-2 Casual H
# Empty Node
H 気のせいだった。
敵影見ず…されど敵艦隊らしき通信を傍受せり。警戒を厳に。周辺海域捜索の要を認む!

Must be my imagination.
No sign of the enemy... But we've intercepted enemy communications. Be on high alert. Eyes on the horizon!
# Empty Node
E-2 Casual I: 深海地中海艦隊 新設空母集団 (PoiDB)
# Formation Boss Battle Node AD/AP
AS/AS+
I Diamond
Phases: 1, 2, 3
Aircraft Carrier Summer Princess II (1961): 149 Armor, 440 HP, 114 APBattle Card Flagship Icon.png Light Cruiser Ho-Class Elite (1518): 30 Armor, 48 HP Destroyer Ro-Class Late Model (1576): 26 Armor, 37 HP Destroyer I-Class (1501): 5 Armor, 20 HP Destroyer I-Class (1501): 5 Armor, 20 HP
39/77
171/342
Diamond
Phases: 1, 2, 3
Aircraft Carrier Summer Princess II (1961): 149 Armor, 440 HP, 114 APBattle Card Flagship Icon.png Heavy Cruiser Ne-Class Kai Summer Mode (1953): 111 Armor, 330 HP Light Cruiser Ho-Class Elite (1518): 30 Armor, 48 HP Destroyer I-Class (1501): 5 Armor, 20 HP Destroyer I-Class (1501): 5 Armor, 20 HP
39/77
171/342
Diamond
Phases: 1, 2, 3
(Final)
Aircraft Carrier Summer Princess II (1961): 149 Armor, 440 HP, 114 APBattle Card Flagship Icon.png Heavy Cruiser Ne-Class Kai Summer Mode (1953): 111 Armor, 330 HP Light Cruiser Ho-Class Elite (1518): 30 Armor, 48 HP Destroyer Ro-Class Late Model (1576): 26 Armor, 37 HP Destroyer I-Class (1501): 5 Armor, 20 HP Destroyer I-Class (1501): 5 Armor, 20 HP
39/77
171/342
# Formation Boss Battle Node AD/AP
AS/AS+
E-2 Casual J
# Selection Node
J ForceH、出撃する!敵港湾拠点を叩き、敵地中海艦隊主力第1及び第2艦隊を捜索、これを撃滅せよ!
Force H, sortieing! Hit the enemy-controlled harbour, then find and destroy the enemy's 1st and 2nd Mediterranean fleets!
# Selection Node
E-2 Casual K: 深海潜水艦隊 バレアレス海哨戒線 (PoiDB)
# Formation Normal Battle Node AD/AP
AS/AS+
K Echelon
Line Abreast
Phases: 2, 3
Submarine Yo-Class (1531): 9 Armor, 24 HPBattle Card Flagship Icon.png Submarine Yo-Class (1531): 9 Armor, 24 HP Submarine Ka-Class (1530): 7 Armor, 19 HP Submarine Ka-Class (1530): 7 Armor, 19 HP
0/0
0/0
Echelon
Line Abreast
Phases: 2, 3
Submarine Yo-Class Elite (1533): 27 Armor, 34 HPBattle Card Flagship Icon.png Submarine Yo-Class (1531): 9 Armor, 24 HP Submarine Ka-Class (1530): 7 Armor, 19 HP Submarine Ka-Class (1530): 7 Armor, 19 HP
0/0
0/0
# Formation Normal Battle Node AD/AP
AS/AS+
E-2 Casual L: 深海潜水艦隊 地中海主力阻止線 (PoiDB)
# Formation Normal Battle Node AD/AP
AS/AS+
L Echelon
Line Abreast
Phases: 2, 3
Submarine Yo-Class Elite (1533): 27 Armor, 34 HPBattle Card Flagship Icon.png Submarine Yo-Class (1531): 9 Armor, 24 HP Submarine Ka-Class (1530): 7 Armor, 19 HP Submarine Ka-Class (1530): 7 Armor, 19 HP
0/0
0/0
Echelon
Line Abreast
Phases: 2, 3
Submarine Yo-Class Elite (1533): 27 Armor, 34 HPBattle Card Flagship Icon.png Submarine Yo-Class Elite (1533): 27 Armor, 34 HP Submarine Ka-Class (1530): 7 Armor, 19 HP Submarine Ka-Class (1530): 7 Armor, 19 HP
0/0
0/0
# Formation Normal Battle Node AD/AP
AS/AS+
E-2 Casual M: 深海地中海方面 基地航空隊 (PoiDB)
# Formation Air Defense Node AD/AP
AS/AS+
M Diamond
Phases: 3
Harbour Summer Princess B Damaged (2026): 12 Armor, 750 HP, 54 APBattle Card Flagship Icon.png
19/37
81/162
Diamond
Phases: 2
Harbour Summer Princess B (2023): 8 Armor, 750 HP, 54 APBattle Card Flagship Icon.png Airfield Princess V (1650): 140 Armor, 500 HP, 34 APAbyssal Liberation Land-based Dive Bomber 561 Equipment.png
30/59
132/264
Diamond
Phases: 2
Harbour Summer Princess B (2023): 8 Armor, 750 HP, 54 APBattle Card Flagship Icon.png Airfield Princess VI (1651): 140 Armor, 500 HP, 48 APAbyssal Liberation Land-based Dive Bomber Ace 562 Equipment.pngAbyssal Liberation Land-based Dive Bomber 561 Equipment.png Airfield Princess V (1650): 140 Armor, 500 HP, 34 APAbyssal Liberation Land-based Dive Bomber 561 Equipment.png
46/91
204/408
# Formation Air Defense Node AD/AP
AS/AS+
E-2 Casual N: 深海地中海艦隊 警戒軽巡戦隊 (PoiDB)
# Formation Normal Battle Node AD/AP
AS/AS+
N Line Ahead
Double Line
Phases: 2, 3
Light Cruiser Ho-Class Elite (1518): 30 Armor, 48 HPBattle Card Flagship Icon.png Light Cruiser Tsu-Class (1591): 55 Armor, 48 HP Destroyer Ro-Class Late Model (1576): 26 Armor, 37 HP Destroyer I-Class (1501): 5 Armor, 20 HP Destroyer I-Class (1501): 5 Armor, 20 HP Destroyer I-Class (1501): 5 Armor, 20 HP
0/0
0/0
Line Ahead
Phases: 3
Light Cruiser Ho-Class Elite (1518): 30 Armor, 48 HPBattle Card Flagship Icon.png Light Cruiser Ho-Class Elite (1518): 30 Armor, 48 HP Light Cruiser Tsu-Class (1591): 55 Armor, 48 HP Destroyer Ro-Class Late Model (1576): 26 Armor, 37 HP Destroyer I-Class (1501): 5 Armor, 20 HP Destroyer I-Class (1501): 5 Armor, 20 HP
0/0
0/0
# Formation Normal Battle Node AD/AP
AS/AS+
E-2 Casual O: 深海地中海艦隊 アルジェ防備隊 (PoiDB)
# Formation Normal Battle Node AD/AP
AS/AS+
O Double Line
Phases: 2
PT Imp Pack (1637): 19 Armor, 9 HPBattle Card Flagship Icon.png PT Imp Pack (1637): 19 Armor, 9 HP PT Imp Pack (1637): 19 Armor, 9 HP Supply Depot Princess B Vacation Mode (2015): 22 Armor, 440 HP, 16 AP Transport Ship Wa-Class (1513): 10 Armor, 70 HP
6/11
24/48
Double Line
Phases: 2
PT Imp Pack (1637): 19 Armor, 9 HPBattle Card Flagship Icon.png PT Imp Pack (1637): 19 Armor, 9 HP Artillery Imp II (1666): 105 Armor, 130 HP Supply Depot Princess B Vacation Mode (2015): 22 Armor, 440 HP, 16 AP Transport Ship Wa-Class (1513): 10 Armor, 70 HP
6/11
24/48
Double Line
Phases: 3
PT Imp Pack (1637): 19 Armor, 9 HPBattle Card Flagship Icon.png PT Imp Pack (1637): 19 Armor, 9 HP PT Imp Pack (1637): 19 Armor, 9 HP Supply Depot Princess B Vacation Mode Damaged (2019): 44 Armor, 440 HP Transport Ship Wa-Class (1513): 10 Armor, 70 HP
0/0
0/0
# Formation Normal Battle Node AD/AP
AS/AS+
E-2 Casual P
# Selection Node
P 対空、対水上警戒を厳とせよ!合戦用意!全艦隊、戦闘態勢をとれ!
Be on high anti-air and anti-surface alert! Battle stations! All fleets, prepare for battle!
# Selection Node
E-2 Casual Q: 深海地中海艦隊 増援空母群 (PoiDB)
# Formation Normal Battle Node AD/AP
AS/AS+
Q Diamond
Phases: 2
Light Carrier Nu-Class Elite II (1762): 35 Armor, 70 HP, 69 APHell plane 1.pngBattle Card Flagship Icon.png Light Cruiser Ho-Class Elite (1518): 30 Armor, 48 HP Destroyer Ro-Class Late Model (1576): 26 Armor, 37 HP Destroyer Ro-Class Late Model (1576): 26 Armor, 37 HP Destroyer I-Class (1501): 5 Armor, 20 HP Destroyer I-Class (1501): 5 Armor, 20 HP
24/47
104/207
Diamond
Phases: 2
Light Carrier Nu-Class Elite II (1762): 35 Armor, 70 HP, 69 APHell plane 1.pngBattle Card Flagship Icon.png Light Cruiser Ho-Class Elite (1518): 30 Armor, 48 HP Light Cruiser Tsu-Class (1591): 55 Armor, 48 HP Destroyer Ro-Class Late Model (1576): 26 Armor, 37 HP Destroyer Ro-Class Late Model (1576): 26 Armor, 37 HP Destroyer I-Class (1501): 5 Armor, 20 HP
24/47
104/207
Diamond
Phases: 2
Light Carrier Nu-Class Elite II (1762): 35 Armor, 70 HP, 69 APHell plane 1.pngBattle Card Flagship Icon.png Light Cruiser Ho-Class Elite (1518): 30 Armor, 48 HP Light Cruiser Tsu-Class (1591): 55 Armor, 48 HP Destroyer Ro-Class Late Model (1576): 26 Armor, 37 HP Destroyer Ro-Class Late Model (1576): 26 Armor, 37 HP Destroyer Ro-Class Late Model (1576): 26 Armor, 37 HP
24/47
104/207
# Formation Normal Battle Node AD/AP
AS/AS+
E-2 Casual R: 深海地中海方面 基地航空隊 (PoiDB)
# Formation Air Defense Node AD/AP
AS/AS+
R Diamond
Phases: 3
Harbour Summer Princess B Damaged (2026): 12 Armor, 750 HP, 54 APBattle Card Flagship Icon.png
19/37
81/162
Diamond
Phases: 2
Harbour Summer Princess B (2023): 8 Armor, 750 HP, 54 APBattle Card Flagship Icon.png Airfield Princess V (1650): 140 Armor, 500 HP, 34 APAbyssal Liberation Land-based Dive Bomber 561 Equipment.png
30/59
132/264
Diamond
Phases: 2
Harbour Summer Princess B (2023): 8 Armor, 750 HP, 54 APBattle Card Flagship Icon.png Airfield Princess VI (1651): 140 Armor, 500 HP, 48 APAbyssal Liberation Land-based Dive Bomber Ace 562 Equipment.pngAbyssal Liberation Land-based Dive Bomber 561 Equipment.png Airfield Princess V (1650): 140 Armor, 500 HP, 34 APAbyssal Liberation Land-based Dive Bomber 561 Equipment.png
46/91
204/408
# Formation Air Defense Node AD/AP
AS/AS+
E-2 Casual S: 深海地中海艦隊 南部物資集積地 (PoiDB)
# Formation Normal Battle Node AD/AP
AS/AS+
S Cruising Formation 4
Phases: 2
Supply Depot Princess B Vacation Mode (2015): 22 Armor, 440 HP, 16 APBattle Card Flagship Icon.png Supply Depot Princess B Vacation Mode (2015): 22 Armor, 440 HP, 16 AP Artillery Imp II (1666): 105 Armor, 130 HP Artillery Imp II (1666): 105 Armor, 130 HP PT Imp Pack (1637): 19 Armor, 9 HP Transport Ship Wa-Class (1513): 10 Armor, 70 HP
Light Cruiser Ho-Class Elite (1518): 30 Armor, 48 HP Destroyer Ro-Class Late Model (1576): 26 Armor, 37 HP Destroyer Ro-Class Late Model (1576): 26 Armor, 37 HP Destroyer I-Class (1501): 5 Armor, 20 HP Destroyer I-Class (1501): 5 Armor, 20 HP PT Imp Pack (1637): 19 Armor, 9 HP
11/22
48/96
Cruising Formation 4
Phases: 3
Supply Depot Princess B Vacation Mode Damaged (2019): 44 Armor, 440 HPBattle Card Flagship Icon.png Supply Depot Princess B Vacation Mode Damaged (2019): 44 Armor, 440 HP Artillery Imp II (1666): 105 Armor, 130 HP Destroyer I-Class (1501): 5 Armor, 20 HP Transport Ship Wa-Class (1513): 10 Armor, 70 HP Transport Ship Wa-Class (1513): 10 Armor, 70 HP
Destroyer Ro-Class Late Model (1576): 26 Armor, 37 HP Destroyer Ro-Class Late Model (1576): 26 Armor, 37 HP Destroyer I-Class (1501): 5 Armor, 20 HP Destroyer I-Class (1501): 5 Armor, 20 HP Destroyer I-Class (1501): 5 Armor, 20 HP PT Imp Pack (1637): 19 Armor, 9 HP
0/0
0/0
# Formation Normal Battle Node AD/AP
AS/AS+
E-2 Casual T: 深海地中海艦隊 低速戦艦戦隊 (PoiDB)
# Formation Normal Battle Node AD/AP
AS/AS+
T Line Ahead
Double Line
Vanguard
Phases: 2, 3
Battleship Ru-Class (1511): 70 Armor, 90 HPBattle Card Flagship Icon.png Battleship Ru-Class (1511): 70 Armor, 90 HP Light Cruiser Ho-Class Elite (1518): 30 Armor, 48 HP Destroyer Ro-Class Late Model (1576): 26 Armor, 37 HP Destroyer Ro-Class Late Model (1576): 26 Armor, 37 HP Destroyer I-Class (1501): 5 Armor, 20 HP
0/0
0/0
# Formation Normal Battle Node AD/AP
AS/AS+
E-2 Casual U: 深海地中海艦隊 巡洋艦戦隊 (PoiDB)
# Formation Normal Battle Node AD/AP
AS/AS+
U Line Ahead
Double Line
Vanguard
Phases: 2
Heavy Cruiser Ri-Class (1509): 28 Armor, 58 HPBattle Card Flagship Icon.png Heavy Cruiser Ri-Class (1509): 28 Armor, 58 HP Torpedo Cruiser Chi-Class Elite (1521): 34 Armor, 50 HP Destroyer Ro-Class Late Model (1576): 26 Armor, 37 HP Destroyer Ro-Class Late Model (1576): 26 Armor, 37 HP Destroyer I-Class (1501): 5 Armor, 20 HP
0/0
0/0
# Formation Normal Battle Node AD/AP
AS/AS+
E-2 Casual V: 深海地中海艦隊 増援巡洋艦群 (PoiDB)
# Formation Normal Battle Node AD/AP
AS/AS+
V Line Ahead
Double Line
Phases: 2
Heavy Cruiser Ne-Class (1594): 82 Armor, 80 HPBattle Card Flagship Icon.png Light Cruiser Tsu-Class (1591): 55 Armor, 48 HP Destroyer Ro-Class Late Model (1576): 26 Armor, 37 HP Destroyer I-Class (1501): 5 Armor, 20 HP Destroyer I-Class (1501): 5 Armor, 20 HP
0/0
0/0
Line Ahead
Phases: 2, 3
Heavy Cruiser Ne-Class (1594): 82 Armor, 80 HPBattle Card Flagship Icon.png Light Cruiser Tsu-Class (1591): 55 Armor, 48 HP Destroyer Ro-Class Late Model (1576): 26 Armor, 37 HP Destroyer Ro-Class Late Model (1576): 26 Armor, 37 HP Destroyer I-Class (1501): 5 Armor, 20 HP
0/0
0/0
# Formation Normal Battle Node AD/AP
AS/AS+
E-2 Casual W: 深海占拠中 ジェノヴァ港湾要塞 (PoiDB)
# Formation Boss Battle Node AD/AP
AS/AS+
W Cruising Formation 4
Phases: 2, 3
Harbour Summer Princess B (2023): 8 Armor, 750 HP, 54 APBattle Card Flagship Icon.png Destroyer I-Class (1501): 5 Armor, 20 HP Destroyer I-Class (1501): 5 Armor, 20 HP Destroyer Ro-Class Late Model (1576): 26 Armor, 37 HP Transport Ship Wa-Class (1513): 10 Armor, 70 HP Transport Ship Wa-Class (1513): 10 Armor, 70 HP
Light Cruiser Ho-Class Elite (1518): 30 Armor, 48 HP Destroyer Ro-Class Late Model (1576): 26 Armor, 37 HP Destroyer I-Class (1501): 5 Armor, 20 HP Destroyer I-Class (1501): 5 Armor, 20 HP Destroyer I-Class (1501): 5 Armor, 20 HP PT Imp Pack (1637): 19 Armor, 9 HP
19/37
81/162
Cruising Formation 4
Phases: 2
(Final)
Harbour Summer Princess B Damaged (2026): 12 Armor, 750 HP, 54 APBattle Card Flagship Icon.png Artillery Imp II (1666): 105 Armor, 130 HP Destroyer Ro-Class Late Model (1576): 26 Armor, 37 HP Destroyer I-Class (1501): 5 Armor, 20 HP Transport Ship Wa-Class (1513): 10 Armor, 70 HP Transport Ship Wa-Class (1513): 10 Armor, 70 HP
Light Cruiser He-Class Elite (1519): 32 Armor, 52 HP Destroyer Ro-Class Late Model (1576): 26 Armor, 37 HP Destroyer I-Class (1501): 5 Armor, 20 HP Destroyer I-Class (1501): 5 Armor, 20 HP PT Imp Pack (1637): 19 Armor, 9 HP PT Imp Pack (1637): 19 Armor, 9 HP
19/37
81/162
# Formation Boss Battle Node AD/AP
AS/AS+
E-2 Casual X: 深海水上打撃部隊 突撃戦闘群 (PoiDB)
# Formation Night Battle Node AD/AP
AS/AS+
X Line Ahead
Echelon
Phases: 3
Heavy Cruiser Ne-Class (1594): 82 Armor, 80 HPBattle Card Flagship Icon.png Light Cruiser He-Class (1506): 18 Armor, 36 HP Destroyer Ro-Class Late Model (1576): 26 Armor, 37 HP Destroyer I-Class (1501): 5 Armor, 20 HP Destroyer I-Class (1501): 5 Armor, 20 HP Destroyer I-Class (1501): 5 Armor, 20 HP
0/0
0/0
Line Ahead
Phases: 3
Heavy Cruiser Ne-Class (1594): 82 Armor, 80 HPBattle Card Flagship Icon.png Heavy Cruiser Ri-Class (1509): 28 Armor, 58 HP Destroyer Ro-Class Late Model (1576): 26 Armor, 37 HP Destroyer Ro-Class Late Model (1576): 26 Armor, 37 HP Destroyer I-Class (1501): 5 Armor, 20 HP Destroyer I-Class (1501): 5 Armor, 20 HP
0/0
0/0
# Formation Night Battle Node AD/AP
AS/AS+
E-2 Casual Y: 深海潜水艦隊 司令潜水艦 (PoiDB)
# Formation Normal Battle Node AD/AP
AS/AS+
Y Echelon
Phases: 3
Submarine Summer Princess B Flagship (1977): 19 Armor, 108 HPBattle Card Flagship Icon.png
0/0
0/0
Echelon
Line Abreast
Phases: 3
Submarine Summer Princess B Flagship (1977): 19 Armor, 108 HPBattle Card Flagship Icon.png Submarine Ka-Class (1530): 7 Armor, 19 HP
0/0
0/0
Echelon
Phases: 3
Submarine Summer Princess B Flagship (1977): 19 Armor, 108 HPBattle Card Flagship Icon.png Submarine Yo-Class (1531): 9 Armor, 24 HP Submarine Yo-Class (1531): 9 Armor, 24 HP
0/0
0/0
# Formation Normal Battle Node AD/AP
AS/AS+
E-2 Casual Z: 深海地中海艦隊 主力水上打撃群 (PoiDB)
# Formation Boss Battle Node AD/AP
AS/AS+
Z Cruising Formation 4
Phases: 3
Mediterranean Dreadnought Water Princess (2029): 166 Armor, 680 HPBattle Card Flagship Icon.png Battleship Ta-Class (1541): 80 Armor, 84 HP Light Carrier Nu-Class Elite (1523): 35 Armor, 70 HP, 24 AP Heavy Cruiser Ri-Class Elite (1522): 60 Armor, 60 HP Heavy Cruiser Ri-Class Elite (1522): 60 Armor, 60 HP Light Cruiser Tsu-Class (1591): 55 Armor, 48 HP
Destroyer Ro-Class Late Model (1576): 26 Armor, 37 HP Destroyer Ro-Class Late Model (1576): 26 Armor, 37 HP Destroyer I-Class (1501): 5 Armor, 20 HP Destroyer I-Class (1501): 5 Armor, 20 HP Destroyer I-Class (1501): 5 Armor, 20 HP Destroyer I-Class (1501): 5 Armor, 20 HP
9/17
36/72
Cruising Formation 4
Phases: 3
(Final)
Mediterranean Dreadnought Water Princess Damaged (2032): 211 Armor, 680 HPBattle Card Flagship Icon.png Light Carrier Nu-Class Elite IV (1777): 35 Armor, 70 HP, 107 APAbyssal Night Revenge Torpedo Bomber 583 Equipment.png Battleship Ta-Class (1541): 80 Armor, 84 HP Heavy Cruiser Ne-Class Kai Summer Mode (1953): 111 Armor, 330 HP Heavy Cruiser Ri-Class Elite (1522): 60 Armor, 60 HP Light Cruiser Tsu-Class (1591): 55 Armor, 48 HP
Light Cruiser He-Class Elite (1519): 32 Armor, 52 HP Destroyer Ro-Class Late Model (1576): 26 Armor, 37 HP Destroyer Ro-Class Late Model (1576): 26 Armor, 37 HP Destroyer I-Class (1501): 5 Armor, 20 HP Destroyer I-Class (1501): 5 Armor, 20 HP Destroyer I-Class (1501): 5 Armor, 20 HP
36/72
161/321
# Formation Boss Battle Node AD/AP
AS/AS+

Ship Drops

Ship drops
Type Ship? D1 I N Q S V W X Z
DE Shimushu Easy+
DE Kunashiri Casual+
DE Hachijou Easy+ Casual+ Medium+
DE Ishigaki Easy+ Casual+
DD Amagiri Casual+ Casual+ Casual+ Casual+ Hard+ Hard+
DD Sagiri Casual+ Casual+ Casual+ Casual+ Medium+ Hard+ Medium+
DD Harusame Medium+ Casual+ Medium+
DD Kazagumo Casual+
DD Jervis Casual+
DD Janus Casual+
CL Sheffield Medium+ Casual+
CA Zara Casual+ Casual+ Hard+ Medium+ Casual+
CA Pola Casual+
FBB Littorio Casual+
FBB Roma Hard+ Casual+
FBB Richelieu Casual+
FBB Gangut Medium+ Casual+
BB Warspite Casual+
BB Nelson Casual+
CV Aquila Casual+
CV Ark Royal Casual+
SS U-511 Casual+
AV Mizuho Hard+ Casual+
DD Akigumo Hard+ Casual+ Hard+
CL Kitakami Casual+
CL Ooi Casual+
CL Nagara Casual+ Casual+ Casual+ Casual+ Easy+ Casual+ Casual+ Casual+ Casual+
CL Sendai Casual+ Casual+ Casual+ Casual+ Casual+ Casual+ Medium+ Casual+ Casual+
CA Myoukou Casual+ Casual+
CA Atago Casual+ Casual+
CA Suzuya Casual+ Casual+
CA Kumano Casual+ Casual+
CA Tone Easy+ Casual+ Hard+ Hard+ Casual+
CA Chikuma Casual+ Casual+
CVL Shouhou Casual+
CVL Hiyou Casual+
CVL Junyou Casual+ Hard+
FBB Kongou Casual+ Easy+ Casual+
FBB Hiei Casual+ Casual+ Casual+
FBB Haruna Casual+ Casual+ Casual+
FBB Kirishima Casual+ Casual+ Casual+
BB Fusou Casual+
BB Yamashiro Casual+
BB Ise Casual+
BB Hyuuga Medium+ Casual+
BB Nagato Casual+
BB Mutsu Casual+
CV Souryuu Casual+
CV Hiryuu Casual+