- Welcome to the Kancolle Wiki!
- If you have any questions regarding site content, account registration, etc., please visit the KanColle Wiki Discord
Difference between revisions of "Early Spring 2023 Event/E-1"
Jump to navigation
Jump to search

| Line 83: | Line 83: | ||
{{/Historical_Ships}} | {{/Historical_Ships}} | ||
| − | ==Map | + | ==Map Overview== |
| − | + | E1 consists of 2 main phases and only allows the use of a Single Fleet. | |
| + | * This map uses 1 lock | ||
| + | ** [[File:{{ROOTPAGENAME}} Tag 1.png]] '''Yokosuka Defence Squadron''' | ||
| + | * 1 [[LBAS]] will be available to sortie into this map | ||
| + | * New node type Airstrike Supported Sub Node/Airstrike Supported Combat Node is introduced in this map. | ||
| + | * CT can be a good replacement for CL throughout the map. | ||
| + | ** CL/CT must be able to [[OASW]] | ||
| + | |||
| + | ==Phase 0.5: Unlock the first Boss Node== | ||
| + | The following steps have to be performed to unlock the first boss: | ||
| + | {|class="wikitable" | ||
| + | ! !! C2 !! G2 !! J | ||
| + | |- | ||
| + | | Hard || S || S || S | ||
| + | |- | ||
| + | | Medium|| ? || ? || ? | ||
| + | |- | ||
| + | | Easy || A+ || A+ || A+ | ||
| + | |- | ||
| + | | Casual|| ? || ? ||? | ||
| + | |} | ||
| + | |||
| + | <tabber> | ||
| + | |-|Node C2= | ||
| + | * Single Fleet: '''0-1CV, 0-1 CL/CT, 5-6 DD''' | ||
| + | * Route: {{MapRoute|1||A|blue|B|red|C|blue|C1|pink|C2|red}} | ||
| + | ** Same idea as {{MapRoute|G2|red}} | ||
| + | ** Bring 1 [[AACI]] DD to help pass through the air node. | ||
| + | |||
| + | |-|Node G2= | ||
| + | * Single Fleet: '''0-1CV, 5-6 DD''' | ||
| + | * Route: {{MapRoute|1||A|blue|E|blue|F|red|G|pink|G2|red}} | ||
| + | ** 6 DD fleet will skip node {{MapRoute|G1|red}} | ||
| + | ** {{MapRoute|G2|red}} is a Submarine node. Bring ASW Equipment for S rank | ||
| + | ** LBAS Strike at {{MapRoute|G1|red}} if not using a 6 DD Fleet. | ||
| + | ** Bring 1 [[AACI]] DD to help pass through the air node. | ||
| + | |||
| + | |-|Node J= | ||
| + | * Single Fleet: '''1 CL/CT, 5DD''' | ||
| + | * Route: {{MapRoute|1||A|blue|E|blue|F|red|H|blue|H1|pink|J|red}} | ||
| + | ** Same idea as {{MapRoute|G2|red}} | ||
| + | ** Bring 1 [[AACI]] DD to help pass through the air node. | ||
| + | </tabber> | ||
| + | |||
| + | ==Phase 1: Destroy the first Boss== | ||
| + | ** AD/AP = 89/177 on '''HARD''' | ||
| + | ** {{MapRoute|H2|darkorange}} is the new Airstrike Supported Sub Node. | ||
| + | *** The CVL at the node is unkillable. | ||
| + | ** Have 1 ship capable of [[AACI]] to help pass through the node and for the boss. | ||
| + | ** LBAS Range = 7 to {{MapRoute|M|red}}. | ||
| + | ** {{MapRoute|M|red}} is a gimmick needed to unlock Phase 2. B rank is only needed. | ||
| + | |||
| + | <tabber> | ||
| + | |-|Light Fleet= | ||
| + | * Single Fleet: '''CL/CT, 5 DD''' | ||
| + | * Route: {{MapRoute|1||A|blue|E|blue|F|red|H|blue|H2|darkorange|K|red|M|red}} | ||
| + | ** AD/AP = 89/177 on '''HARD''' | ||
| + | ** Support Expedition may be needed for the light fleet. | ||
| + | |||
| + | |-|Heavy Fleet= | ||
| + | * Single Fleet: '''1 CVL, 1 CAV, 0-1 CLT, 1 CL/CT, 2 DD''' | ||
| + | * Route: {{MapRoute|1||A|blue|E|blue|F|red|H|blue|H2|darkorange|K|red|M|red}} | ||
| + | ** Heaviest fleet possible for this node. | ||
| + | |||
| + | </tabber> | ||
| + | |||
| + | ==Phase 2: Submerge the Submarine Princess== | ||
| + | * Single Fleet: '''1 CVL, 0-1 CLT, 1 CL/CT, 3 DD''' | ||
| + | * Route: {{MapRoute|1||A|blue|B|red|C|blue|C3|red|O|blue|P|darkorange|S|red}} | ||
| + | ** Fleet must contain at least 1 CL/CT 3 DD. | ||
| + | ** The flagship is [[Submarine Princess]]. | ||
| + | *** Bring ASW on your ships and focus on killing the flagship; ignore the other ships. | ||
| + | ** LBAS Range = 2. AD/AP = 89/177 for '''HARD''' | ||
| + | ** Use of ASW LBAS is recommended if your ships cannot kill the boss effectively. | ||
| + | ** Have 1 ship capable of [[AACI]] to help pass through the node and for the boss. | ||
| + | ** {{MapRoute|P|darkorange}} is the new Airstrike Supported Sub Node. | ||
| + | *** The CVL at the node is unkillable. | ||
==Enemy Compositions== | ==Enemy Compositions== | ||
Revision as of 22:22, 2 March 2023
 
| ||||||||
|---|---|---|---|---|---|---|---|---|
|
Time remaining until Event ends [1]:
| ||||||||
| ||||||||
Operation S21
S21作戦
S21作戦
![]()


| Information | ||||
|---|---|---|---|---|
| Event Tag | ||||
| Boss Gauges | Hard (甲): 470 HP + 1950 HP | |||
| Medium (乙): ? HP | ||||
| Easy (丙): ? HP | ||||
| Casual (丁): ? HP | ||||
| Map Bosses | Light Carrier Nu-Class Kai Flagship
| |||
Submarine Princess Kai B Flagship IV
| ||||
| Rewards[edit] | ||||
|---|---|---|---|---|
| Choice | 丁 Casual |
丙 Easy |
乙 Medium |
甲 Hard |
Food Supply Ship Mamiya |
1 | 1 | 2 | |
| OR | ||||
Improvement Material |
3 | 3 | 6 | |
| THEN | ||||
 Type 2 Depth Charge |
1 | 1 | 2 | 2 |
| OR | ||||
Fuel |
2000 | 2000 | 4000 | 4000 |
| THEN | ||||
Medal |
1 | 1 | 1 | 1 |
| OR | ||||
Akashi |
1 | 1 | 1 | 1 |
| Reward | 丁 Casual |
丙 Easy |
乙 Medium |
甲 Hard |
|---|---|---|---|---|
Food Supply Ship Irako |
1 | 1 | 2 | 3 |
Emergency Repair Goddess |
1 | 2 | ||
Reinforcement Expansion |
1 | 1 | ||
 Type 3 Command Liaison Aircraft Kai |
1 (★1) | 1 (★3) | 1 (★5) | |
 Type 1 Fighter Hayabusa Model II Kai (20th Squadron) |
1 |

The event guides are to be constructed through the respective Event map page guide sandbox and reviewed by editors before being approved here.
- Do not update the guides through this page unless it is a minor fix. Please only update guides through their respective sandbox pages.
Branching Table
| E-1 Branching Rules | ||
|---|---|---|
| Nodes | Rules | |
A |
B |
Active Branching |
E | ||
C |
C1 |
Active Branching |
C3 | ||
C1 |
C2 |
Pass the LoS check (Cn3=40~45 Hard) |
D |
Fail the LoS check | |
C3 |
N |
Fail the LoS check |
O |
Pass the LoS check (Cn3=38~44 Hard) | |
F |
G |
|
H |
| |
G |
G1 |
|
G2 |
| |
H |
H1 |
Active Branching |
H2 | ||
H1 |
H2 |
|
J |
| |
H2 |
I |
|
K |
| |
K |
L |
|
M |
| |
P |
Q |
|
S |
| |
Q |
R |
|
S |
| |
Branching compositions were reported over the course of the event. (NGA and KCNav)
Ship Bonuses
DISCLAIMER: This information is based on user submitted data and is subject to revisions as more data is gathered. Any version of the ship receives the bonus regardless of remodel.
Ship Bonuses
| Ships | Map-wide | |
|---|---|---|
| Damage | Acc/Eva | |
| Coastal Defense Ships (DE) | 1.12x | 1.12x |
| Destroyers (DD) | 1.03x | 1.03x |
| Light Cruisers (CL) Torpedo Cruisers (CLT) |
1.02x | 1.05x |
| Seaplane Tenders (AV) | 1.14x | - |
| 1.16x | - | |
| 1.28x(?) | - | |
Equipment Bonuses
| Equipment | Damage Map-wide |
|---|---|
|
1.05x each (stackable) |
|
1.07x each (stackable) |
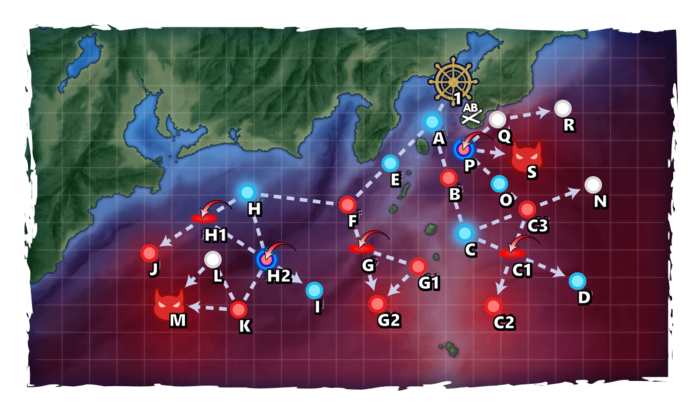
Map Overview
E1 consists of 2 main phases and only allows the use of a Single Fleet.
- This map uses 1 lock
 Yokosuka Defence Squadron
- 1 LBAS will be available to sortie into this map
- New node type Airstrike Supported Sub Node/Airstrike Supported Combat Node is introduced in this map.
- CT can be a good replacement for CL throughout the map.
- CL/CT must be able to OASW
Phase 0.5: Unlock the first Boss Node
The following steps have to be performed to unlock the first boss:
| C2 | G2 | J | |
|---|---|---|---|
| Hard | S | S | S |
| Medium | ? | ? | ? |
| Easy | A+ | A+ | A+ |
| Casual | ? | ? | ? |
- Single Fleet: 0-1CV, 0-1 CL/CT, 5-6 DD
- Route: 1 A B C C1 C2
- Same idea as G2
- Bring 1 AACI DD to help pass through the air node.
- Single Fleet: 0-1CV, 5-6 DD
- Route: 1 A E F G G2
- 6 DD fleet will skip node G1
- G2 is a Submarine node. Bring ASW Equipment for S rank
- LBAS Strike at G1 if not using a 6 DD Fleet.
- Bring 1 AACI DD to help pass through the air node.
- Single Fleet: 1 CL/CT, 5DD
- Route: 1 A E F H H1 J
- Same idea as G2
- Bring 1 AACI DD to help pass through the air node.
Phase 1: Destroy the first Boss
- AD/AP = 89/177 on HARD
- H2 is the new Airstrike Supported Sub Node.
- The CVL at the node is unkillable.
- Have 1 ship capable of AACI to help pass through the node and for the boss.
- LBAS Range = 7 to M.
- M is a gimmick needed to unlock Phase 2. B rank is only needed.
- Single Fleet: CL/CT, 5 DD
- Route: 1 A E F H H2 K M
- AD/AP = 89/177 on HARD
- Support Expedition may be needed for the light fleet.
- Single Fleet: 1 CVL, 1 CAV, 0-1 CLT, 1 CL/CT, 2 DD
- Route: 1 A E F H H2 K M
- Heaviest fleet possible for this node.
Phase 2: Submerge the Submarine Princess
- Single Fleet: 1 CVL, 0-1 CLT, 1 CL/CT, 3 DD
- Route: 1 A B C C3 O P S
- Fleet must contain at least 1 CL/CT 3 DD.
- The flagship is Submarine Princess.
- Bring ASW on your ships and focus on killing the flagship; ignore the other ships.
- LBAS Range = 2. AD/AP = 89/177 for HARD
- Use of ASW LBAS is recommended if your ships cannot kill the boss effectively.
- Have 1 ship capable of AACI to help pass through the node and for the boss.
- P is the new Airstrike Supported Sub Node.
- The CVL at the node is unkillable.
Enemy Compositions
E-1 Hard AB
| # | Formation | Air Raids | AD/AP AS/AS+ |
|---|---|---|---|
| AB | Line Ahead | 86/171 384/768 | |
| Line Ahead | 100/200 449/897 | ||
| Line Ahead | 72/143 320/639 | ||
| # | Formation | Air Raids | AD/AP AS/AS+ |
E-1 Hard A
| # | Selection Node | ||
|---|---|---|---|
| A | 艦隊の針路を選択できます。提督、どちらの針路をとられますか? You can decide the fleet's course. Admiral, which heading should we take? | ||
| # | Selection Node | ||
E-1 Hard B: 深海潜水艦隊 侵入哨戒 I群 (PoiDB)
| # | Formation | Normal Battle Node | AD/AP AS/AS+ |
|---|---|---|---|
| B | Echelon Line Abreast Phases: 1, 2 |
0/0 0/0 | |
| Echelon Line Abreast Phases: 1, 2 |
0/0 0/0 | ||
| Echelon Line Abreast Phases: 1, 2 |
0/0 0/0 | ||
| # | Formation | Normal Battle Node | AD/AP AS/AS+ |
E-1 Hard C
| # | Selection Node | ||
|---|---|---|---|
| C | 艦隊の針路を選択できます。提督、どちらの針路をとられますか? You can decide the fleet's course. Admiral, which heading should we take? | ||
| # | Selection Node | ||
E-1 Hard C1: 深海空母機動部隊 艦載機群 (PoiDB)
| # | Formation | Air Defense Node | AD/AP AS/AS+ |
|---|---|---|---|
| C1 | Diamond Phases: 1, 2 |
36/71 159/318 | |
| Diamond Phases: 1, 2 |
71/142 318/636 | ||
| Diamond Phases: 1, 2 |
78/155 348/696 | ||
| # | Formation | Air Defense Node | AD/AP AS/AS+ |
E-1 Hard C2: 深海潜水艦隊 第二哨戒線 A群 (PoiDB)
| # | Formation | Normal Battle Node | AD/AP AS/AS+ |
|---|---|---|---|
| C2 | Echelon Line Abreast Phases: 1, 2 |
0/0 0/0 | |
| Echelon Line Abreast Phases: 1, 2 |
0/0 0/0 | ||
| Echelon Line Abreast Phases: 1, 2 |
0/0 0/0 | ||
| # | Formation | Normal Battle Node | AD/AP AS/AS+ |
E-1 Hard C3: 深海任務部隊 前衛ピケット線 A群 (PoiDB)
| # | Formation | Normal Battle Node | AD/AP AS/AS+ |
|---|---|---|---|
| C3 | Line Ahead Double Line Phases: 1, 2 |
0/0 0/0 | |
| Line Ahead Phases: 1, 2 |
0/0 0/0 | ||
| # | Formation | Normal Battle Node | AD/AP AS/AS+ |
E-1 Hard D
| # | Empty Node | ||
|---|---|---|---|
| D | 敵影を見ず。 No enemy spotted. | ||
| # | Empty Node | ||
E-1 Hard E
| # | Empty Node | ||
|---|---|---|---|
| E | 気のせいだった。 Must be my imagination. | ||
| # | Empty Node | ||
E-1 Hard F: 深海潜水艦隊 侵入哨戒 II群 (PoiDB)
| # | Formation | Normal Battle Node | AD/AP AS/AS+ |
|---|---|---|---|
| F | Echelon Line Abreast Phases: 1, 2 |
0/0 0/0 | |
| Echelon Line Abreast Phases: 1, 2 |
0/0 0/0 | ||
| Echelon Line Abreast Phases: 1, 2 |
0/0 0/0 | ||
| # | Formation | Normal Battle Node | AD/AP AS/AS+ |
E-1 Hard G: 深海空母機動部隊 艦載機群 (PoiDB)
| # | Formation | Air Defense Node | AD/AP AS/AS+ |
|---|---|---|---|
| G | Diamond Phases: 1 |
36/71 159/318 | |
| Diamond Phases: 1 |
71/142 318/636 | ||
| Diamond Phases: 1 |
78/155 348/696 | ||
| # | Formation | Air Defense Node | AD/AP AS/AS+ |
E-1 Hard G1: 深海任務部隊 前衛偵察機動部隊 (PoiDB)
| # | Formation | Normal Battle Node | AD/AP AS/AS+ |
|---|---|---|---|
| G1 | Diamond Phases: 1 |
36/71 159/318 | |
| Diamond Phases: 1 |
71/142 318/636 | ||
| Diamond Phases: 1 |
36/71 159/318 | ||
| # | Formation | Normal Battle Node | AD/AP AS/AS+ |
E-1 Hard G2: 深海潜水艦隊 第二哨戒線 B群 (PoiDB)
| # | Formation | Normal Battle Node | AD/AP AS/AS+ |
|---|---|---|---|
| G2 | Echelon Line Abreast Phases: 1 |
0/0 0/0 | |
| Echelon Line Abreast Phases: 1 |
0/0 0/0 | ||
| Echelon Line Abreast Phases: 1 |
0/0 0/0 | ||
| # | Formation | Normal Battle Node | AD/AP AS/AS+ |
E-1 Hard H
| # | Selection Node | ||
|---|---|---|---|
| H | 艦隊の針路を選択できます。提督、どちらの針路をとられますか? You can decide the fleet's course. Admiral, which heading should we take? | ||
| # | Selection Node | ||
E-1 Hard H1: 深海空母機動部隊 艦載機群 (PoiDB)
| # | Formation | Air Defense Node | AD/AP AS/AS+ |
|---|---|---|---|
| H1 | Diamond Phases: 1, 2 |
78/155 348/696 | |
| Diamond Phases: 1, 2 |
85/169 378/756 | ||
| Diamond Phases: 1, 2 |
71/142 318/636 | ||
| # | Formation | Air Defense Node | AD/AP AS/AS+ |
E-1 Hard H2: 深海潜水艦隊・深海航空支援 (PoiDB)
| # | Formation | Supported Battle Node | AD/AP AS/AS+ |
|---|---|---|---|
| H2 | Echelon Line Abreast Phases: 1, 2 |
43/85 189/378 | |
| Echelon Line Abreast Phases: 1, 2 |
36/71 159/318 | ||
| Echelon Line Abreast Phases: 1, 2 |
36/71 159/318 | ||
| # | Formation | Supported Battle Node | AD/AP AS/AS+ |
E-1 Hard I
| # | Empty Node | ||
|---|---|---|---|
| I | 敵影を見ず。 No enemy spotted. | ||
| # | Empty Node | ||
E-1 Hard J: 深海潜水艦隊 第二哨戒線 C群 (PoiDB)
| # | Formation | Normal Battle Node | AD/AP AS/AS+ |
|---|---|---|---|
| J | Echelon Line Abreast Phases: 1, 2 |
0/0 0/0 | |
| Echelon Line Abreast Phases: 1, 2 |
0/0 0/0 | ||
| Echelon Line Abreast Phases: 1 |
0/0 0/0 | ||
| # | Formation | Normal Battle Node | AD/AP AS/AS+ |
E-1 Hard K: 深海任務部隊 機動部隊随伴護衛 (PoiDB)
| # | Formation | Normal Battle Node | AD/AP AS/AS+ |
|---|---|---|---|
| K | Line Ahead Double Line Phases: 1, 2 |
0/0 0/0 | |
| Line Ahead Phases: 1 |
0/0 0/0 | ||
| # | Formation | Normal Battle Node | AD/AP AS/AS+ |
E-1 Hard L: 深海潜水艦隊 第二哨戒線 D群 (PoiDB)
| # | Formation | Normal Battle Node | AD/AP AS/AS+ |
|---|---|---|---|
| L | Echelon Line Abreast Phases: 1, 2 |
0/0 0/0 | |
| Echelon Line Abreast Phases: 1, 2 |
0/0 0/0 | ||
| Echelon Line Abreast Phases: 1 |
0/0 0/0 | ||
| # | Formation | Normal Battle Node | AD/AP AS/AS+ |
E-1 Hard M: 深海任務部隊 前衛空襲機動部隊 (PoiDB)
| # | Formation | Boss Battle Node | AD/AP AS/AS+ |
|---|---|---|---|
| M | Line Ahead Diamond Phases: 1, 2 |
87/173 387/774 | |
| Line Ahead Phases: 1 (Final)
|
89/177 396/792 | ||
| # | Formation | Boss Battle Node | AD/AP AS/AS+ |
E-1 Hard N
| # | Empty Node | ||
|---|---|---|---|
| N | 敵影を見ず。 No enemy spotted. | ||
| # | Empty Node | ||
E-1 Hard O
| # | Empty Node | ||
|---|---|---|---|
| O | 気のせいだった。 Must be my imagination. | ||
| # | Empty Node | ||
E-1 Hard P: 深海潜水艦隊・深海航空支援 (PoiDB)
| # | Formation | Supported Battle Node | AD/AP AS/AS+ |
|---|---|---|---|
| P | Echelon Line Abreast Phases: 2 |
43/85 189/378 | |
| Echelon Line Abreast Phases: 2 |
36/71 159/318 | ||
| Echelon Line Abreast Phases: 2 |
36/71 159/318 | ||
| # | Formation | Supported Battle Node | AD/AP AS/AS+ |
E-1 Hard Q: 深海潜水艦隊・深海航空支援 (PoiDB)
| # | Formation | Supported Battle Node | AD/AP AS/AS+ |
|---|---|---|---|
| Q | Echelon Line Abreast Phases: 2 |
36/71 159/318 | |
| Echelon Line Abreast Phases: 2 |
36/71 159/318 | ||
| Echelon Line Abreast Phases: 2 |
36/71 159/318 | ||
| # | Formation | Supported Battle Node | AD/AP AS/AS+ |
E-1 Hard R
| # | Empty Node | ||
|---|---|---|---|
| R | 敵影を見ず。 No enemy spotted. | ||
| # | Empty Node | ||
E-1 Hard S: 深海任務部隊 前衛指揮潜水艦 (PoiDB)
| # | Formation | Boss Battle Node | AD/AP AS/AS+ |
|---|---|---|---|
| S | Line Ahead Phases: 2 |
86/171 383/765 | |
| Line Ahead Phases: 2 |
71/142 318/636 | ||
| Line Ahead Phases: 2 (Final)
|
89/177 396/792 | ||
| # | Formation | Boss Battle Node | AD/AP AS/AS+ |
E-1 Medium AB
| # | Formation | Air Raids | AD/AP AS/AS+ |
|---|---|---|---|
| AB | Line Ahead | 49/97 218/435 | |
| Line Ahead | 54/108 242/483 | ||
| Line Ahead | 92/183 410/819 | ||
| # | Formation | Air Raids | AD/AP AS/AS+ |
E-1 Medium A
| # | Selection Node | ||
|---|---|---|---|
| A | 艦隊の針路を選択できます。提督、どちらの針路をとられますか? You can decide the fleet's course. Admiral, which heading should we take? | ||
| # | Selection Node | ||
E-1 Medium B: 深海潜水艦隊 侵入哨戒 I群 (PoiDB)
| # | Formation | Normal Battle Node | AD/AP AS/AS+ |
|---|---|---|---|
| B | Echelon Line Abreast Phases: 1, 2 |
0/0 0/0 | |
| Echelon Line Abreast Phases: 1, 2 |
0/0 0/0 | ||
| Echelon Line Abreast Phases: 1, 2 |
0/0 0/0 | ||
| # | Formation | Normal Battle Node | AD/AP AS/AS+ |
E-1 Medium C
| # | Selection Node | ||
|---|---|---|---|
| C | 艦隊の針路を選択できます。提督、どちらの針路をとられますか? You can decide the fleet's course. Admiral, which heading should we take? | ||
| # | Selection Node | ||
E-1 Medium C1: 深海空母機動部隊 艦載機群 (PoiDB)
| # | Formation | Air Defense Node | AD/AP AS/AS+ |
|---|---|---|---|
| C1 | Diamond Phases: 1 |
45/90 201/402 | |
| Diamond Phases: 1, 2 |
85/169 378/756 | ||
| Diamond Phases: 1, 2 |
51/101 225/450 | ||
| # | Formation | Air Defense Node | AD/AP AS/AS+ |
E-1 Medium C2: 深海潜水艦隊 第二哨戒線 A群 (PoiDB)
| # | Formation | Normal Battle Node | AD/AP AS/AS+ |
|---|---|---|---|
| C2 | Echelon Line Abreast Phases: 1 |
0/0 0/0 | |
| Echelon Line Abreast Phases: 1, 2 |
0/0 0/0 | ||
| Echelon Line Abreast Phases: 1 |
0/0 0/0 | ||
| # | Formation | Normal Battle Node | AD/AP AS/AS+ |
E-1 Medium C3: 深海任務部隊 前衛ピケット線 A群 (PoiDB)
| # | Formation | Normal Battle Node | AD/AP AS/AS+ |
|---|---|---|---|
| C3 | Line Ahead Double Line Phases: 1, 2 |
0/0 0/0 | |
| Line Ahead Phases: 1, 2 |
0/0 0/0 | ||
| # | Formation | Normal Battle Node | AD/AP AS/AS+ |
E-1 Medium D
| # | Empty Node | ||
|---|---|---|---|
| D | 敵影を見ず。 No enemy spotted. | ||
| # | Empty Node | ||
E-1 Medium E
| # | Empty Node | ||
|---|---|---|---|
| E | 気のせいだった。 Must be my imagination. | ||
| # | Empty Node | ||
E-1 Medium F: 深海潜水艦隊 侵入哨戒 II群 (PoiDB)
| # | Formation | Normal Battle Node | AD/AP AS/AS+ |
|---|---|---|---|
| F | Echelon Line Abreast Phases: 1, 2 |
0/0 0/0 | |
| Echelon Line Abreast Phases: 1, 2 |
0/0 0/0 | ||
| Echelon Line Abreast Phases: 1, 2 |
0/0 0/0 | ||
| # | Formation | Normal Battle Node | AD/AP AS/AS+ |
E-1 Medium G: 深海空母機動部隊 艦載機群 (PoiDB)
| # | Formation | Air Defense Node | AD/AP AS/AS+ |
|---|---|---|---|
| G | Diamond Phases: 1 |
45/90 201/402 | |
| Diamond Phases: 1 |
85/169 378/756 | ||
| Diamond Phases: 1 |
51/101 225/450 | ||
| # | Formation | Air Defense Node | AD/AP AS/AS+ |
E-1 Medium G1: 深海任務部隊 前衛偵察機動部隊 (PoiDB)
| # | Formation | Normal Battle Node | AD/AP AS/AS+ |
|---|---|---|---|
| G1 | Diamond Phases: 1 |
43/85 189/378 | |
| Diamond Phases: 1 |
85/169 378/756 | ||
| Diamond Phases: 1 |
43/85 189/378 | ||
| # | Formation | Normal Battle Node | AD/AP AS/AS+ |
E-1 Medium G2: 深海潜水艦隊 第二哨戒線 B群 (PoiDB)
| # | Formation | Normal Battle Node | AD/AP AS/AS+ |
|---|---|---|---|
| G2 | Echelon Line Abreast Phases: 1 |
0/0 0/0 | |
| Echelon Line Abreast Phases: 1 |
0/0 0/0 | ||
| Echelon Line Abreast Phases: 1 |
0/0 0/0 | ||
| # | Formation | Normal Battle Node | AD/AP AS/AS+ |
E-1 Medium H
| # | Selection Node | ||
|---|---|---|---|
| H | 艦隊の針路を選択できます。提督、どちらの針路をとられますか? You can decide the fleet's course. Admiral, which heading should we take? | ||
| # | Selection Node | ||
E-1 Medium H1: 深海空母機動部隊 艦載機群 (PoiDB)
| # | Formation | Air Defense Node | AD/AP AS/AS+ |
|---|---|---|---|
| H1 | Diamond Phases: 1 |
45/90 201/402 | |
| Diamond Phases: 1 |
51/101 225/450 | ||
| Diamond Phases: 1 |
85/169 378/756 | ||
| # | Formation | Air Defense Node | AD/AP AS/AS+ |
E-1 Medium H2: 深海潜水艦隊・深海航空支援 (PoiDB)
| # | Formation | Supported Battle Node | AD/AP AS/AS+ |
|---|---|---|---|
| H2 | Echelon Line Abreast Phases: 1, 2 |
3/6 12/24 | |
| Echelon Line Abreast Phases: 1, 2 |
43/85 189/378 | ||
| Echelon Line Abreast Phases: 1, 2 |
43/85 189/378 | ||
| # | Formation | Supported Battle Node | AD/AP AS/AS+ |
E-1 Medium I
| # | Empty Node | ||
|---|---|---|---|
| I | 敵影を見ず。 No enemy spotted. | ||
| # | Empty Node | ||
E-1 Medium J: 深海潜水艦隊 第二哨戒線 C群 (PoiDB)
| # | Formation | Normal Battle Node | AD/AP AS/AS+ |
|---|---|---|---|
| J | Echelon Line Abreast Phases: 1 |
0/0 0/0 | |
| Echelon Line Abreast Phases: 1 |
0/0 0/0 | ||
| Echelon Line Abreast Phases: 1 |
0/0 0/0 | ||
| # | Formation | Normal Battle Node | AD/AP AS/AS+ |
E-1 Medium K: 深海任務部隊 機動部隊随伴護衛 (PoiDB)
| # | Formation | Normal Battle Node | AD/AP AS/AS+ |
|---|---|---|---|
| K | Line Ahead Double Line Phases: 1, 2 |
0/0 0/0 | |
| Line Ahead Phases: 1 |
0/0 0/0 | ||
| # | Formation | Normal Battle Node | AD/AP AS/AS+ |
E-1 Medium L: 深海潜水艦隊 第二哨戒線 D群 (PoiDB)
| # | Formation | Normal Battle Node | AD/AP AS/AS+ |
|---|---|---|---|
| L | Echelon Line Abreast Phases: 1 |
0/0 0/0 | |
| Line Abreast | 0/0 0/0 | ||
| Echelon Line Abreast Phases: 1 |
0/0 0/0 | ||
| # | Formation | Normal Battle Node | AD/AP AS/AS+ |
E-1 Medium M: 深海任務部隊 前衛空襲機動部隊 (PoiDB)
| # | Formation | Boss Battle Node | AD/AP AS/AS+ |
|---|---|---|---|
| M | Line Ahead Diamond Phases: 1, 2 |
51/101 225/450 | |
| Line Ahead Phases: 1 (Final)
|
85/169 378/756 | ||
| # | Formation | Boss Battle Node | AD/AP AS/AS+ |
E-1 Medium N
| # | Empty Node | ||
|---|---|---|---|
| N | 敵影を見ず。 No enemy spotted. | ||
| # | Empty Node | ||
E-1 Medium O
| # | Empty Node | ||
|---|---|---|---|
| O | 気のせいだった。 Must be my imagination. | ||
| # | Empty Node | ||
E-1 Medium P: 深海潜水艦隊・深海航空支援 (PoiDB)
| # | Formation | Supported Battle Node | AD/AP AS/AS+ |
|---|---|---|---|
| P | Echelon Line Abreast Phases: 2 |
3/6 12/24 | |
| Echelon Line Abreast Phases: 2 |
43/85 189/378 | ||
| Echelon Line Abreast Phases: 2 |
43/85 189/378 | ||
| # | Formation | Supported Battle Node | AD/AP AS/AS+ |
E-1 Medium Q: 深海潜水艦隊・深海航空支援 (PoiDB)
| # | Formation | Supported Battle Node | AD/AP AS/AS+ |
|---|---|---|---|
| Q | Echelon Line Abreast Phases: 2 |
3/6 12/24 | |
| Echelon Line Abreast Phases: 2 |
43/85 189/378 | ||
| Echelon Line Abreast Phases: 2 |
36/71 159/318 | ||
| # | Formation | Supported Battle Node | AD/AP AS/AS+ |
E-1 Medium R
| # | Empty Node | ||
|---|---|---|---|
| R | 敵影を見ず。 No enemy spotted. | ||
| # | Empty Node | ||
E-1 Medium S: 深海任務部隊 前衛指揮潜水艦 (PoiDB)
| # | Formation | Boss Battle Node | AD/AP AS/AS+ |
|---|---|---|---|
| S | Line Ahead Phases: 2 |
46/91 204/408 | |
| Line Ahead Phases: 2 |
54/107 240/480 | ||
| Line Ahead Phases: 2 (Final)
|
91/182 408/816 | ||
| # | Formation | Boss Battle Node | AD/AP AS/AS+ |
E-1 Easy AB
| # | Formation | Air Raids | AD/AP AS/AS+ |
|---|---|---|---|
| AB | Line Ahead | 46/92 206/411 | |
| Line Ahead | 49/97 218/435 | ||
| Line Ahead | 54/108 242/483 | ||
| # | Formation | Air Raids | AD/AP AS/AS+ |
E-1 Easy A
| # | Selection Node | ||
|---|---|---|---|
| A | 艦隊の針路を選択できます。提督、どちらの針路をとられますか? You can decide the fleet's course. Admiral, which heading should we take? | ||
| # | Selection Node | ||
E-1 Easy B: 深海潜水艦隊 侵入哨戒 I群 (PoiDB)
| # | Formation | Normal Battle Node | AD/AP AS/AS+ |
|---|---|---|---|
| B | Echelon Line Abreast Phases: 1, 2 |
0/0 0/0 | |
| Echelon Line Abreast Phases: 1, 2 |
0/0 0/0 | ||
| Echelon Line Abreast Phases: 1, 2 |
0/0 0/0 | ||
| # | Formation | Normal Battle Node | AD/AP AS/AS+ |
E-1 Easy C
| # | Selection Node | ||
|---|---|---|---|
| C | 艦隊の針路を選択できます。提督、どちらの針路をとられますか? You can decide the fleet's course. Admiral, which heading should we take? | ||
| # | Selection Node | ||
E-1 Easy C1: 深海空母機動部隊 艦載機群 (PoiDB)
| # | Formation | Air Defense Node | AD/AP AS/AS+ |
|---|---|---|---|
| C1 | Diamond Phases: 1, 2 |
43/85 189/378 | |
| Diamond Phases: 1 |
51/101 225/450 | ||
| Diamond Phases: 1, 2 |
45/90 201/402 | ||
| # | Formation | Air Defense Node | AD/AP AS/AS+ |
E-1 Easy C2: 深海潜水艦隊 第二哨戒線 A群 (PoiDB)
| # | Formation | Normal Battle Node | AD/AP AS/AS+ |
|---|---|---|---|
| C2 | Echelon Line Abreast Phases: 1, 2 |
0/0 0/0 | |
| Echelon Line Abreast Phases: 1, 2 |
0/0 0/0 | ||
| Echelon Line Abreast Phases: 1, 2 |
0/0 0/0 | ||
| # | Formation | Normal Battle Node | AD/AP AS/AS+ |
E-1 Easy C3: 深海任務部隊 前衛ピケット線 A群 (PoiDB)
| # | Formation | Normal Battle Node | AD/AP AS/AS+ |
|---|---|---|---|
| C3 | Line Ahead Double Line Phases: 1, 2 |
0/0 0/0 | |
| Line Ahead Phases: 1, 2 |
0/0 0/0 | ||
| # | Formation | Normal Battle Node | AD/AP AS/AS+ |
E-1 Easy D
| # | Empty Node | ||
|---|---|---|---|
| D | 敵影を見ず。 No enemy spotted. | ||
| # | Empty Node | ||
E-1 Easy E
| # | Empty Node | ||
|---|---|---|---|
| E | 気のせいだった。 Must be my imagination. | ||
| # | Empty Node | ||
E-1 Easy F: 深海潜水艦隊 侵入哨戒 II群 (PoiDB)
| # | Formation | Normal Battle Node | AD/AP AS/AS+ |
|---|---|---|---|
| F | Echelon Line Abreast Phases: 1, 2 |
0/0 0/0 | |
| Echelon Line Abreast Phases: 1, 2 |
0/0 0/0 | ||
| Echelon Line Abreast Phases: 1, 2 |
0/0 0/0 | ||
| # | Formation | Normal Battle Node | AD/AP AS/AS+ |
E-1 Easy G: 深海空母機動部隊 艦載機群 (PoiDB)
| # | Formation | Air Defense Node | AD/AP AS/AS+ |
|---|---|---|---|
| G | Diamond Phases: 1, 2 |
43/85 189/378 | |
| Diamond Phases: 1 |
51/101 225/450 | ||
| Diamond Phases: 1, 2 |
45/90 201/402 | ||
| # | Formation | Air Defense Node | AD/AP AS/AS+ |
E-1 Easy G1: 深海任務部隊 前衛偵察機動部隊 (PoiDB)
| # | Formation | Normal Battle Node | AD/AP AS/AS+ |
|---|---|---|---|
| G1 | Diamond Phases: 1 |
43/85 189/378 | |
| Diamond Phases: 1 |
51/101 225/450 | ||
| Diamond Phases: 1 |
43/85 189/378 | ||
| # | Formation | Normal Battle Node | AD/AP AS/AS+ |
E-1 Easy G2: 深海潜水艦隊 第二哨戒線 B群 (PoiDB)
| # | Formation | Normal Battle Node | AD/AP AS/AS+ |
|---|---|---|---|
| G2 | Echelon Line Abreast Phases: 1 |
0/0 0/0 | |
| Echelon Line Abreast Phases: 1 |
0/0 0/0 | ||
| Echelon Line Abreast Phases: 1, 2 |
0/0 0/0 | ||
| # | Formation | Normal Battle Node | AD/AP AS/AS+ |
E-1 Easy H
| # | Selection Node | ||
|---|---|---|---|
| H | 艦隊の針路を選択できます。提督、どちらの針路をとられますか? You can decide the fleet's course. Admiral, which heading should we take? | ||
| # | Selection Node | ||
E-1 Easy H1: 深海空母機動部隊 艦載機群 (PoiDB)
| # | Formation | Air Defense Node | AD/AP AS/AS+ |
|---|---|---|---|
| H1 | Diamond Phases: 1, 2 |
43/85 189/378 | |
| Diamond Phases: 1, 2 |
45/90 201/402 | ||
| Diamond Phases: 1 |
51/101 225/450 | ||
| # | Formation | Air Defense Node | AD/AP AS/AS+ |
E-1 Easy H2: 深海潜水艦隊・深海航空支援 (PoiDB)
| # | Formation | Supported Battle Node | AD/AP AS/AS+ |
|---|---|---|---|
| H2 | Echelon Line Abreast Phases: 1, 2 |
0/0 0/0 | |
| Echelon Line Abreast Phases: 1, 2 |
3/6 12/24 | ||
| Echelon Line Abreast Phases: 1, 2 |
43/85 189/378 | ||
| # | Formation | Supported Battle Node | AD/AP AS/AS+ |
E-1 Easy I
| # | Empty Node | ||
|---|---|---|---|
| I | 敵影を見ず。 No enemy spotted. | ||
| # | Empty Node | ||
E-1 Easy J: 深海潜水艦隊 第二哨戒線 C群 (PoiDB)
| # | Formation | Normal Battle Node | AD/AP AS/AS+ |
|---|---|---|---|
| J | Echelon Line Abreast Phases: 1 |
0/0 0/0 | |
| Echelon Line Abreast Phases: 1, 2 |
0/0 0/0 | ||
| Echelon Line Abreast Phases: 1 |
0/0 0/0 | ||
| # | Formation | Normal Battle Node | AD/AP AS/AS+ |
E-1 Easy K: 深海任務部隊 機動部隊随伴護衛 (PoiDB)
| # | Formation | Normal Battle Node | AD/AP AS/AS+ |
|---|---|---|---|
| K | Line Ahead Phases: 1 |
0/0 0/0 | |
| Line Ahead Double Line Phases: 1, 2 |
0/0 0/0 | ||
| # | Formation | Normal Battle Node | AD/AP AS/AS+ |
E-1 Easy L: 深海潜水艦隊 第二哨戒線 D群 (PoiDB)
| # | Formation | Normal Battle Node | AD/AP AS/AS+ |
|---|---|---|---|
| L | Echelon Line Abreast Phases: 1 |
0/0 0/0 | |
| Echelon Line Abreast Phases: 1 |
0/0 0/0 | ||
| Echelon Line Abreast Phases: 1 |
0/0 0/0 | ||
| # | Formation | Normal Battle Node | AD/AP AS/AS+ |
E-1 Easy M: 深海任務部隊 前衛空襲機動部隊 (PoiDB)
| # | Formation | Boss Battle Node | AD/AP AS/AS+ |
|---|---|---|---|
| M | Line Ahead Diamond Phases: 1, 2 |
45/90 201/402 | |
| Line Ahead Phases: 1 |
51/101 225/450 | ||
| Line Ahead Phases: 1 (Final)
|
51/101 225/450 | ||
| # | Formation | Boss Battle Node | AD/AP AS/AS+ |
E-1 Easy N
| # | Empty Node | ||
|---|---|---|---|
| N | 敵影を見ず。 No enemy spotted. | ||
| # | Empty Node | ||
E-1 Easy O
| # | Empty Node | ||
|---|---|---|---|
| O | 気のせいだった。 Must be my imagination. | ||
| # | Empty Node | ||
E-1 Easy P: 深海潜水艦隊・深海航空支援 (PoiDB)
| # | Formation | Supported Battle Node | AD/AP AS/AS+ |
|---|---|---|---|
| P | Echelon Line Abreast Phases: 2 |
0/0 0/0 | |
| Echelon Line Abreast Phases: 2 |
3/6 12/24 | ||
| Echelon Line Abreast Phases: 2 |
43/85 189/378 | ||
| # | Formation | Supported Battle Node | AD/AP AS/AS+ |
E-1 Easy Q: 深海潜水艦隊・深海航空支援 (PoiDB)
| # | Formation | Supported Battle Node | AD/AP AS/AS+ |
|---|---|---|---|
| Q | Echelon Line Abreast Phases: 2 |
0/0 0/0 | |
| Echelon Line Abreast Phases: 2 |
3/6 12/24 | ||
| Echelon Line Abreast Phases: 2 |
43/85 189/378 | ||
| # | Formation | Supported Battle Node | AD/AP AS/AS+ |
E-1 Easy R
| # | Empty Node | ||
|---|---|---|---|
| R | 敵影を見ず。 No enemy spotted. | ||
| # | Empty Node | ||
E-1 Easy S: 深海任務部隊 前衛指揮潜水艦 (PoiDB)
| # | Formation | Boss Battle Node | AD/AP AS/AS+ |
|---|---|---|---|
| S | Line Ahead Phases: 2 |
45/90 201/402 | |
| Line Ahead Phases: 2 |
49/97 216/432 | ||
| Line Ahead Phases: 2 (Final)
|
54/107 240/480 | ||
| # | Formation | Boss Battle Node | AD/AP AS/AS+ |
E-1 Casual AB
| # | Formation | Air Raids | AD/AP AS/AS+ |
|---|---|---|---|
| AB | Line Ahead | 9/17 38/75 | |
| Line Ahead | 46/92 206/411 | ||
| Line Ahead | 49/97 218/435 | ||
| # | Formation | Air Raids | AD/AP AS/AS+ |
E-1 Casual A
| # | Selection Node | ||
|---|---|---|---|
| A | 艦隊の針路を選択できます。提督、どちらの針路をとられますか? You can decide the fleet's course. Admiral, which heading should we take? | ||
| # | Selection Node | ||
E-1 Casual B: 深海潜水艦隊 侵入哨戒 I群 (PoiDB)
| # | Formation | Normal Battle Node | AD/AP AS/AS+ |
|---|---|---|---|
| B | Echelon Line Abreast Phases: 1, 2 |
0/0 0/0 | |
| Echelon Line Abreast Phases: 1, 2 |
0/0 0/0 | ||
| # | Formation | Normal Battle Node | AD/AP AS/AS+ |
E-1 Casual C
| # | Selection Node | ||
|---|---|---|---|
| C | 艦隊の針路を選択できます。提督、どちらの針路をとられますか? You can decide the fleet's course. Admiral, which heading should we take? | ||
| # | Selection Node | ||
E-1 Casual C1: 深海空母機動部隊 艦載機群 (PoiDB)
| # | Formation | Air Defense Node | AD/AP AS/AS+ |
|---|---|---|---|
| C1 | Diamond Phases: 1, 2 |
9/17 36/72 | |
| Diamond Phases: 1, 2 |
43/85 189/378 | ||
| Diamond Phases: 1 |
45/90 201/402 | ||
| # | Formation | Air Defense Node | AD/AP AS/AS+ |
E-1 Casual C2: 深海潜水艦隊 第二哨戒線 A群 (PoiDB)
| # | Formation | Normal Battle Node | AD/AP AS/AS+ |
|---|---|---|---|
| C2 | Echelon Line Abreast Phases: 1, 2 |
0/0 0/0 | |
| Echelon Line Abreast Phases: 1, 2 |
0/0 0/0 | ||
| # | Formation | Normal Battle Node | AD/AP AS/AS+ |
E-1 Casual C3: 深海任務部隊 前衛ピケット線 A群 (PoiDB)
| # | Formation | Normal Battle Node | AD/AP AS/AS+ |
|---|---|---|---|
| C3 | Line Ahead Double Line Phases: 1, 2 |
0/0 0/0 | |
| Line Ahead Phases: 1, 2 |
0/0 0/0 | ||
| # | Formation | Normal Battle Node | AD/AP AS/AS+ |
E-1 Casual D
| # | Empty Node | ||
|---|---|---|---|
| D | 敵影を見ず。 No enemy spotted. | ||
| # | Empty Node | ||
E-1 Casual E
| # | Empty Node | ||
|---|---|---|---|
| E | 気のせいだった。 Must be my imagination. | ||
| # | Empty Node | ||
E-1 Casual F: 深海潜水艦隊 侵入哨戒 II群 (PoiDB)
| # | Formation | Normal Battle Node | AD/AP AS/AS+ |
|---|---|---|---|
| F | Echelon Line Abreast Phases: 1, 2 |
0/0 0/0 | |
| Echelon Line Abreast Phases: 1, 2 |
0/0 0/0 | ||
| # | Formation | Normal Battle Node | AD/AP AS/AS+ |
E-1 Casual G: 深海空母機動部隊 艦載機群 (PoiDB)
| # | Formation | Air Defense Node | AD/AP AS/AS+ |
|---|---|---|---|
| G | Diamond Phases: 1 |
9/17 36/72 | |
| Diamond Phases: 1 |
43/85 189/378 | ||
| Diamond Phases: 1 |
45/90 201/402 | ||
| # | Formation | Air Defense Node | AD/AP AS/AS+ |
E-1 Casual G1: 深海任務部隊 前衛偵察機動部隊 (PoiDB)
| # | Formation | Normal Battle Node | AD/AP AS/AS+ |
|---|---|---|---|
| G1 | Diamond Phases: 1 |
43/85 189/378 | |
| Diamond Phases: 1 |
43/85 189/378 | ||
| Diamond Phases: 1 |
45/90 201/402 | ||
| # | Formation | Normal Battle Node | AD/AP AS/AS+ |
E-1 Casual G2: 深海潜水艦隊 第二哨戒線 B群 (PoiDB)
| # | Formation | Normal Battle Node | AD/AP AS/AS+ |
|---|---|---|---|
| G2 | Echelon Line Abreast Phases: 1 |
0/0 0/0 | |
| Echelon Line Abreast Phases: 1 |
0/0 0/0 | ||
| # | Formation | Normal Battle Node | AD/AP AS/AS+ |
E-1 Casual H
| # | Selection Node | ||
|---|---|---|---|
| H | 艦隊の針路を選択できます。提督、どちらの針路をとられますか? You can decide the fleet's course. Admiral, which heading should we take? | ||
| # | Selection Node | ||
E-1 Casual H1: 深海空母機動部隊 艦載機群 (PoiDB)
| # | Formation | Air Defense Node | AD/AP AS/AS+ |
|---|---|---|---|
| H1 | Diamond Phases: 1 |
3/6 12/24 | |
| Diamond Phases: 1 |
9/17 36/72 | ||
| Diamond Phases: 1 |
43/85 189/378 | ||
| # | Formation | Air Defense Node | AD/AP AS/AS+ |
E-1 Casual H2: 深海潜水艦隊・深海航空支援 (PoiDB)
| # | Formation | Supported Battle Node | AD/AP AS/AS+ |
|---|---|---|---|
| H2 | Echelon Line Abreast Phases: 1, 2 |
0/0 0/0 | |
| Echelon Line Abreast Phases: 1, 2 |
3/6 12/24 | ||
| # | Formation | Supported Battle Node | AD/AP AS/AS+ |
E-1 Casual I
| # | Empty Node | ||
|---|---|---|---|
| I | 敵影を見ず。 No enemy spotted. | ||
| # | Empty Node | ||
E-1 Casual J: 深海潜水艦隊 第二哨戒線 C群 (PoiDB)
| # | Formation | Normal Battle Node | AD/AP AS/AS+ |
|---|---|---|---|
| J | Echelon Line Abreast Phases: 1 |
0/0 0/0 | |
| Echelon Line Abreast Phases: 1 |
0/0 0/0 | ||
| # | Formation | Normal Battle Node | AD/AP AS/AS+ |
E-1 Casual K: 深海任務部隊 機動部隊随伴護衛 (PoiDB)
| # | Formation | Normal Battle Node | AD/AP AS/AS+ |
|---|---|---|---|
| K | Line Ahead Double Line Phases: 1, 2 |
0/0 0/0 | |
| Line Ahead Phases: 1 |
0/0 0/0 | ||
| # | Formation | Normal Battle Node | AD/AP AS/AS+ |
E-1 Casual L: 深海潜水艦隊 第二哨戒線 D群 (PoiDB)
| # | Formation | Normal Battle Node | AD/AP AS/AS+ |
|---|---|---|---|
| L | Echelon Line Abreast Phases: 1 |
0/0 0/0 | |
| Echelon Line Abreast Phases: 1 |
0/0 0/0 | ||
| # | Formation | Normal Battle Node | AD/AP AS/AS+ |
E-1 Casual M: 深海任務部隊 前衛空襲機動部隊 (PoiDB)
| # | Formation | Boss Battle Node | AD/AP AS/AS+ |
|---|---|---|---|
| M | Line Ahead Diamond Phases: 1, 2 |
9/17 36/72 | |
| Line Ahead Phases: 1 (Final)
|
43/85 189/378 | ||
| # | Formation | Boss Battle Node | AD/AP AS/AS+ |
E-1 Casual N
| # | Empty Node | ||
|---|---|---|---|
| N | 敵影を見ず。 No enemy spotted. | ||
| # | Empty Node | ||
E-1 Casual O
| # | Empty Node | ||
|---|---|---|---|
| O | 気のせいだった。 Must be my imagination. | ||
| # | Empty Node | ||
E-1 Casual P: 深海潜水艦隊・深海航空支援 (PoiDB)
| # | Formation | Supported Battle Node | AD/AP AS/AS+ |
|---|---|---|---|
| P | Echelon Line Abreast Phases: 2 |
0/0 0/0 | |
| Echelon Line Abreast Phases: 2 |
3/6 12/24 | ||
| # | Formation | Supported Battle Node | AD/AP AS/AS+ |
E-1 Casual Q: 深海潜水艦隊・深海航空支援 (PoiDB)
| # | Formation | Supported Battle Node | AD/AP AS/AS+ |
|---|---|---|---|
| Q | Echelon Line Abreast Phases: 2 |
0/0 0/0 | |
| Echelon Line Abreast Phases: 2 |
3/6 12/24 | ||
| # | Formation | Supported Battle Node | AD/AP AS/AS+ |
E-1 Casual R
| # | Empty Node | ||
|---|---|---|---|
| R | 敵影を見ず。 No enemy spotted. | ||
| # | Empty Node | ||
E-1 Casual S: 深海任務部隊 前衛指揮潜水艦 (PoiDB)
| # | Formation | Boss Battle Node | AD/AP AS/AS+ |
|---|---|---|---|
| S | Line Ahead Phases: 2 |
9/17 36/72 | |
| Line Ahead Phases: 2 |
43/85 189/378 | ||
| Line Ahead Phases: 2 (Final)
|
45/90 201/402 | ||
| # | Formation | Boss Battle Node | AD/AP AS/AS+ |
Ship Drops
| Ship drops | |||||||||||||||||||||||||||||||||||||||||||||||||||||||||||||||||||||||||||||||||||||||||||||||||||
|---|---|---|---|---|---|---|---|---|---|---|---|---|---|---|---|---|---|---|---|---|---|---|---|---|---|---|---|---|---|---|---|---|---|---|---|---|---|---|---|---|---|---|---|---|---|---|---|---|---|---|---|---|---|---|---|---|---|---|---|---|---|---|---|---|---|---|---|---|---|---|---|---|---|---|---|---|---|---|---|---|---|---|---|---|---|---|---|---|---|---|---|---|---|---|---|---|---|---|---|
| Type | Ship? | K | M | S | |||||||||||||||||||||||||||||||||||||||||||||||||||||||||||||||||||||||||||||||||||||||||||||||
| DE | Kaiboukan No.4 | Casual+ | |||||||||||||||||||||||||||||||||||||||||||||||||||||||||||||||||||||||||||||||||||||||||||||||||
| DD | Asakaze | Easy+ | Casual+ | ||||||||||||||||||||||||||||||||||||||||||||||||||||||||||||||||||||||||||||||||||||||||||||||||
| DD | Harukaze | Easy+ | Casual+ | ||||||||||||||||||||||||||||||||||||||||||||||||||||||||||||||||||||||||||||||||||||||||||||||||
| DD | Matsukaze | Casual+ | Casual+ | ||||||||||||||||||||||||||||||||||||||||||||||||||||||||||||||||||||||||||||||||||||||||||||||||
| DD | Hatakaze | Casual+ | Casual+ | ||||||||||||||||||||||||||||||||||||||||||||||||||||||||||||||||||||||||||||||||||||||||||||||||
| DD | Usugumo | Casual+ | |||||||||||||||||||||||||||||||||||||||||||||||||||||||||||||||||||||||||||||||||||||||||||||||||
| DD | Uranami | Casual+ | |||||||||||||||||||||||||||||||||||||||||||||||||||||||||||||||||||||||||||||||||||||||||||||||||
| CL | Noshiro | Casual+ | |||||||||||||||||||||||||||||||||||||||||||||||||||||||||||||||||||||||||||||||||||||||||||||||||
| AS | Taigei | Casual+ | Casual+ | ||||||||||||||||||||||||||||||||||||||||||||||||||||||||||||||||||||||||||||||||||||||||||||||||
| AO | Yamashio Maru | Casual+ | Casual+ | ||||||||||||||||||||||||||||||||||||||||||||||||||||||||||||||||||||||||||||||||||||||||||||||||
| AO | Souya | Casual+ | Casual+ | ||||||||||||||||||||||||||||||||||||||||||||||||||||||||||||||||||||||||||||||||||||||||||||||||
| CL | Kitakami | Casual+ | Casual+ | Casual+ | |||||||||||||||||||||||||||||||||||||||||||||||||||||||||||||||||||||||||||||||||||||||||||||||
| CL | Ooi | Casual+ | Casual+ | ||||||||||||||||||||||||||||||||||||||||||||||||||||||||||||||||||||||||||||||||||||||||||||||||
| CL | Nagara | Casual+ | Casual+ | Casual+ | |||||||||||||||||||||||||||||||||||||||||||||||||||||||||||||||||||||||||||||||||||||||||||||||
| CL | Sendai | Easy+ | Casual+ | ||||||||||||||||||||||||||||||||||||||||||||||||||||||||||||||||||||||||||||||||||||||||||||||||
| CA | Kinugasa | Casual+ | |||||||||||||||||||||||||||||||||||||||||||||||||||||||||||||||||||||||||||||||||||||||||||||||||
| CA | Myoukou | Casual+ | Casual+ | Casual+ | |||||||||||||||||||||||||||||||||||||||||||||||||||||||||||||||||||||||||||||||||||||||||||||||
| CA | Takao | Casual+ | Casual+ | Casual+ | |||||||||||||||||||||||||||||||||||||||||||||||||||||||||||||||||||||||||||||||||||||||||||||||
| CA | Atago | Casual+ | Casual+ | ||||||||||||||||||||||||||||||||||||||||||||||||||||||||||||||||||||||||||||||||||||||||||||||||
| CA | Mogami | Casual+ | Casual+ | ||||||||||||||||||||||||||||||||||||||||||||||||||||||||||||||||||||||||||||||||||||||||||||||||
| CA | Suzuya | Casual+ | Casual+ | ||||||||||||||||||||||||||||||||||||||||||||||||||||||||||||||||||||||||||||||||||||||||||||||||
| CA | Kumano | Casual+ | |||||||||||||||||||||||||||||||||||||||||||||||||||||||||||||||||||||||||||||||||||||||||||||||||
| CA | Tone | Casual+ | |||||||||||||||||||||||||||||||||||||||||||||||||||||||||||||||||||||||||||||||||||||||||||||||||
| CA | Chikuma | Casual+ | |||||||||||||||||||||||||||||||||||||||||||||||||||||||||||||||||||||||||||||||||||||||||||||||||
| CVL | Ryuujou | Casual+ | |||||||||||||||||||||||||||||||||||||||||||||||||||||||||||||||||||||||||||||||||||||||||||||||||
| CVL | Shouhou | Hard+ | Casual+ | Casual+ | |||||||||||||||||||||||||||||||||||||||||||||||||||||||||||||||||||||||||||||||||||||||||||||||
| CVL | Zuihou | Casual+ | |||||||||||||||||||||||||||||||||||||||||||||||||||||||||||||||||||||||||||||||||||||||||||||||||
| FBB | Kongou | Casual+ | |||||||||||||||||||||||||||||||||||||||||||||||||||||||||||||||||||||||||||||||||||||||||||||||||
| FBB | Hiei | Casual+ | |||||||||||||||||||||||||||||||||||||||||||||||||||||||||||||||||||||||||||||||||||||||||||||||||
| FBB | Haruna | Casual+ | |||||||||||||||||||||||||||||||||||||||||||||||||||||||||||||||||||||||||||||||||||||||||||||||||
| FBB | Kirishima | Casual+ | |||||||||||||||||||||||||||||||||||||||||||||||||||||||||||||||||||||||||||||||||||||||||||||||||
| BB | Fusou | Hard+ | Casual+ | Casual+ | |||||||||||||||||||||||||||||||||||||||||||||||||||||||||||||||||||||||||||||||||||||||||||||||
| BB | Yamashiro | Easy+ | Casual+ | Casual+ | |||||||||||||||||||||||||||||||||||||||||||||||||||||||||||||||||||||||||||||||||||||||||||||||
| BB | Nagato | Casual+ | Casual+ | Casual+ | |||||||||||||||||||||||||||||||||||||||||||||||||||||||||||||||||||||||||||||||||||||||||||||||
| BB | Mutsu | Casual+ | |||||||||||||||||||||||||||||||||||||||||||||||||||||||||||||||||||||||||||||||||||||||||||||||||
| CV | Hiryuu | Casual+ | |||||||||||||||||||||||||||||||||||||||||||||||||||||||||||||||||||||||||||||||||||||||||||||||||
| CV | Shoukaku | Casual+ | |||||||||||||||||||||||||||||||||||||||||||||||||||||||||||||||||||||||||||||||||||||||||||||||||
|
| ||||||||
|---|---|---|---|---|---|---|---|---|
|
Time remaining until Event ends [11]:
| ||||||||
KC anniversary maintenance has started, time remaining until maintenance ends [12]:
(~4h event pause)
| ||||||||
| ||||||||