Fall 2020 Event/E-1
E-1

Information
(Phase 1 - ??? Phase):
Key Rewards:
|
  | |||||||||||||||||||||||||||||||||||||||||||||||||||||||||||||||||||||||||||||||||||||||||||||||||||||||||||||||||||||||||||||||||||||||||||||||||||||||||||||||||||||||||||||||||||||||||||||||||||||||||||||||||||||||||||||||||||||||||||||||||||||||||||||||||||||||||||||||||||||||||||||||||||||||||||||||||||||||||||||||||||||||||||||||||||||||||||||||||||||||||||||||||||||||||||||||||||||||||||||||||||||||||||||||||||||||||||||||||||||||||||||||||||||||||||||||||||||||||||||||||||||||||||||||||||||||||||||||||||||||||||||||||||||||||||||||||||||||||||||||||||||||||||||||||||||||||||||||||||||||||||||||||||||||||||||||||||||||||||||||||||||||||||||||||||||||||||||||||||||||||||||||||||||||||||||||||||||||||||||||||||||||||||||||||||||||||||||||||||||||||||||||||||||||||||||||||||||||||||||||||||||||||||||||||||||||||||||||||||||||||||||||||||||||||||||||||||||||||||||||||||||||||||||||||||||||
|
Branching rules
| ||||||||||||||||||||||||||||||||||||||||||||||||||||||||||||||||||||||||||||||||||||||||||||||||||||||||||||||||||||||||||||||||||||||||||||||||||||||||||||||||||||||||||||||||||||||||||||||||||||||||||||||||||||||||||||||||||||||||||||||||||||||||||||||||||||||||||||||||||||||||||||||||||||||||||||||||||||||||||||||||||||||||||||||||||||||||||||||||||||||||||||||||||||||||||||||||||||||||||||||||||||||||||||||||||||||||||||||||||||||||||||||||||||||||||||||||||||||||||||||||||||||||||||||||||||||||||||||||||||||||||||||||||||||||||||||||||||||||||||||||||||||||||||||||||||||||||||||||||||||||||||||||||||||||||||||||||||||||||||||||||||||||||||||||||||||||||||||||||||||||||||||||||||||||||||||||||||||||||||||||||||||||||||||||||||||||||||||||||||||||||||||||||||||||||||||||||||||||||||||||||||||||||||||||||||||||||||||||||||||||||||||||||||||||||||||||||||||||||||||||||||||||||||||||||||||||
|
Tips
Ship Bonuses (Tentative) DISCLAIMER: This information is based on user submitted data and is subject to revisions as more data is gathered. Any version of the ship receives the bonus regardless of remodel.
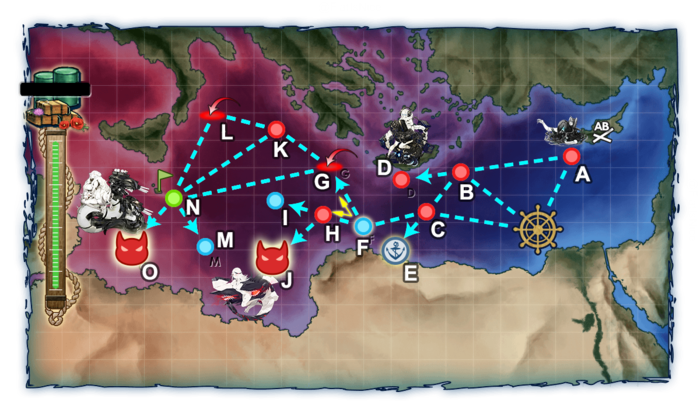
E-1 is a 2.5 Phase Single-Fleet Map consisting of a Transport, Unlock and TP Phase. Phase 1: Defeat Mediterranean CL Princess The goal of this phase is to deplete the HP Bar and defeat the CL Princess found at Node J. Aside from a Nu Class Flagship Kai Light Carrier in some compositions her escorts are not a threat. Only she herself with 740HP and up to 228 Armour on Hard Mode can be considered troublesome. One to three historical ships to deal with her are recommended.
Phase 1.5: Unlock the TP Node This is not required on lower difficulties. On Hard Mode, you need to A+-Rank Node D consisting of 2 Supply Depot Hime, Artillery Imps and PT Imps each. Set up your Ships with the according equipment to deal with them as outlined here. PT Imps are weak to AA Guns + Skilled Lookouts on your DDs.
Phase 2: Deplete the TP Gauge The Goal of this Phase is to deplete the TP Gauge. The TP boss can consist of (French BB Hime) and a weaker variant of the Mediterranean CL Hime accompanied by some elite DDs. To deplete the Gauge faster, it is recommended to take Transport Equipment like Drums and Daihatsu-Class landing craft on your weak surface combattants. AACI for the preboss Air Raid is recommended.
The event guides are to be constructed through the respective Event map page guide and reviewed by editor staff / collaboration committee before being approved here. Do not under any circumstance update the guides through this page or attempt to fix them through this page. Please only update guides through their respective sandbox pages. | ||||||||||||||||||||||||||||||||||||||||||||||||||||||||||||||||||||||||||||||||||||||||||||||||||||||||||||||||||||||||||||||||||||||||||||||||||||||||||||||||||||||||||||||||||||||||||||||||||||||||||||||||||||||||||||||||||||||||||||||||||||||||||||||||||||||||||||||||||||||||||||||||||||||||||||||||||||||||||||||||||||||||||||||||||||||||||||||||||||||||||||||||||||||||||||||||||||||||||||||||||||||||||||||||||||||||||||||||||||||||||||||||||||||||||||||||||||||||||||||||||||||||||||||||||||||||||||||||||||||||||||||||||||||||||||||||||||||||||||||||||||||||||||||||||||||||||||||||||||||||||||||||||||||||||||||||||||||||||||||||||||||||||||||||||||||||||||||||||||||||||||||||||||||||||||||||||||||||||||||||||||||||||||||||||||||||||||||||||||||||||||||||||||||||||||||||||||||||||||||||||||||||||||||||||||||||||||||||||||||||||||||||||||||||||||||||||||||||||||||||||||||||||||||||||||||||
|
Enemy comps
E-1 Hard A: 深海地中海艦隊 警戒潜水艦群 (PoiDB)
E-1 Hard B: 深海地中海艦隊 警戒駆逐隊 (PoiDB)
E-1 Hard C: 深海地中海艦隊 前衛水雷戦隊 (PoiDB)
E-1 Hard D: 深海クレタ島物資集積地 (PoiDB)
E-1 Hard E
E-1 Hard F
E-1 Hard G: 深海地中海方面 基地航空隊 (PoiDB)
E-1 Hard H: 深海地中海艦隊 巡洋艦戦隊 (PoiDB)
E-1 Hard I
E-1 Hard J: 深海地中海艦隊 主力艦隊 (PoiDB)
E-1 Hard K: 深海地中海艦隊 魚雷艇戦隊 (PoiDB)
E-1 Hard L: 深海地中海方面 基地航空隊 (PoiDB)
E-1 Hard M
E-1 Hard N
E-1 Hard O: 深海地中海艦隊 増援急派部隊 (PoiDB)
E-1 Medium A: 深海地中海艦隊 警戒潜水艦群 (PoiDB)
E-1 Medium B: 深海地中海艦隊 警戒駆逐隊 (PoiDB)
E-1 Medium C: 深海地中海艦隊 前衛水雷戦隊 (PoiDB)
E-1 Medium D: 深海クレタ島物資集積地 (PoiDB)
E-1 Medium E
E-1 Medium F
E-1 Medium G: 深海地中海方面 基地航空隊 (PoiDB)
E-1 Medium H: 深海地中海艦隊 巡洋艦戦隊 (PoiDB)
E-1 Medium I
E-1 Medium J: 深海地中海艦隊 主力艦隊 (PoiDB)
E-1 Medium K: 深海地中海艦隊 魚雷艇戦隊 (PoiDB)
E-1 Medium L (PoiDB)
E-1 Medium M
E-1 Medium N
E-1 Medium O: 深海地中海艦隊 増援急派部隊 (PoiDB)
E-1 Easy A: 深海地中海艦隊 警戒潜水艦群 (PoiDB)
E-1 Easy B: 深海地中海艦隊 警戒駆逐隊 (PoiDB)
E-1 Easy C: 深海地中海艦隊 前衛水雷戦隊 (PoiDB)
E-1 Easy D: 深海クレタ島物資集積地 (PoiDB)
E-1 Easy E
E-1 Easy F
E-1 Easy G: 深海地中海方面 基地航空隊 (PoiDB)
E-1 Easy H: 深海地中海艦隊 巡洋艦戦隊 (PoiDB)
E-1 Easy I
E-1 Easy J: 深海地中海艦隊 主力艦隊 (PoiDB)
E-1 Easy K: 深海地中海艦隊 魚雷艇戦隊 (PoiDB)
E-1 Easy L: 深海地中海方面 基地航空隊 (PoiDB)
E-1 Easy M
E-1 Easy N
E-1 Easy O: 深海地中海艦隊 増援急派部隊 (PoiDB)
E-1 Casual A: 深海地中海艦隊 警戒潜水艦群 (PoiDB)
E-1 Casual B: 深海地中海艦隊 警戒駆逐隊 (PoiDB)
E-1 Casual C: 深海地中海艦隊 前衛水雷戦隊 (PoiDB)
E-1 Casual D: 深海クレタ島物資集積地 (PoiDB)
E-1 Casual E
E-1 Casual F
E-1 Casual G: 深海地中海方面 基地航空隊 (PoiDB)
E-1 Casual H: 深海地中海艦隊 巡洋艦戦隊 (PoiDB)
E-1 Casual I
E-1 Casual J: 深海地中海艦隊 主力艦隊 (PoiDB)
E-1 Casual K: 深海地中海艦隊 魚雷艇戦隊 (PoiDB)
E-1 Casual L: 深海地中海方面 基地航空隊 (PoiDB)
E-1 Casual M
E-1 Casual N
E-1 Casual O: 深海地中海艦隊 増援急派部隊 (PoiDB)
| ||||||||||||||||||||||||||||||||||||||||||||||||||||||||||||||||||||||||||||||||||||||||||||||||||||||||||||||||||||||||||||||||||||||||||||||||||||||||||||||||||||||||||||||||||||||||||||||||||||||||||||||||||||||||||||||||||||||||||||||||||||||||||||||||||||||||||||||||||||||||||||||||||||||||||||||||||||||||||||||||||||||||||||||||||||||||||||||||||||||||||||||||||||||||||||||||||||||||||||||||||||||||||||||||||||||||||||||||||||||||||||||||||||||||||||||||||||||||||||||||||||||||||||||||||||||||||||||||||||||||||||||||||||||||||||||||||||||||||||||||||||||||||||||||||||||||||||||||||||||||||||||||||||||||||||||||||||||||||||||||||||||||||||||||||||||||||||||||||||||||||||||||||||||||||||||||||||||||||||||||||||||||||||||||||||||||||||||||||||||||||||||||||||||||||||||||||||||||||||||||||||||||||||||||||||||||||||||||||||||||||||||||||||||||||||||||||||||||||||||||||||||||||||||||||||||||
|
Ship drops
| ||||||||||||||||||||||||||||||||||||||||||||||||||||||||||||||||||||||||||||||||||||||||||||||||||||||||||||||||||||||||||||||||||||||||||||||||||||||||||||||||||||||||||||||||||||||||||||||||||||||||||||||||||||||||||||||||||||||||||||||||||||||||||||||||||||||||||||||||||||||||||||||||||||||||||||||||||||||||||||||||||||||||||||||||||||||||||||||||||||||||||||||||||||||||||||||||||||||||||||||||||||||||||||||||||||||||||||||||||||||||||||||||||||||||||||||||||||||||||||||||||||||||||||||||||||||||||||||||||||||||||||||||||||||||||||||||||||||||||||||||||||||||||||||||||||||||||||||||||||||||||||||||||||||||||||||||||||||||||||||||||||||||||||||||||||||||||||||||||||||||||||||||||||||||||||||||||||||||||||||||||||||||||||||||||||||||||||||||||||||||||||||||||||||||||||||||||||||||||||||||||||||||||||||||||||||||||||||||||||||||||||||||||||||||||||||||||||||||||||||||||||||||||||||||||||||||
| E-1 Clear Message |
|---|