- Welcome to the Kancolle Wiki!
- If you have any questions regarding site content, account registration, etc., please visit the KanColle Wiki Discord
Difference between revisions of "Spring 2022 Event/E-3/Enemy comps"
< Spring 2022 Event | E-3
Jump to navigation
Jump to search
(Created page with "<tabber> |-|Hard= {{Map/Image|page=Spring 2022 Event/E-3| {{Map/ImageNode|1|Hard|E-3|x=597|y=97}} {{Map/ImageNode|AB|Hard|E-3|x=586|y=130}} {{Map/ImageNode|A|Hard|E-3|x=516|y=...") |
|||
| Line 21: | Line 21: | ||
{{Map/ImageNode|N|Hard|E-3|x=536|y=261|drops=<table class="wikitable"><tr><th>Type</th><th>Ships</th></tr><tr><th>DD</th><td>{{Ship/Banner|small=true|Amagiri}}{{Ship/Banner|small=true|Maikaze}}{{Ship/Banner|small=true|Sagiri}}<br>{{Ship/Banner|small=true|Tanikaze}}{{Ship/Banner|small=true|Tokitsukaze}}</td></tr></table>}} | {{Map/ImageNode|N|Hard|E-3|x=536|y=261|drops=<table class="wikitable"><tr><th>Type</th><th>Ships</th></tr><tr><th>DD</th><td>{{Ship/Banner|small=true|Amagiri}}{{Ship/Banner|small=true|Maikaze}}{{Ship/Banner|small=true|Sagiri}}<br>{{Ship/Banner|small=true|Tanikaze}}{{Ship/Banner|small=true|Tokitsukaze}}</td></tr></table>}} | ||
{{Map/ImageNode|O|Hard|E-3|x=472|y=289}} | {{Map/ImageNode|O|Hard|E-3|x=472|y=289}} | ||
| − | {{Map/ImageNode|P|Hard|E-3|x=417|y=289|drops=<table class="wikitable"><tr><th>Type</th><th>Ships</th></tr><tr><th>DE</th><td>{{Ship/Banner|small=true|Daitou}}{{Ship/Banner|small=true|Matsuwa}}</td></tr><tr><th>DD</th><td>{{Ship/Banner|small=true|Amagiri}}{{Ship/Banner|small=true|Arashi}}{{Ship/Banner|small=true|Asagumo}}<br>{{Ship/Banner|small=true|Hatsukaze}}{{Ship/Banner|small=true|Isokaze}}{{Ship/Banner|small=true|Maikaze}}<br>{{Ship/Banner|small=true|Oyashio}}{{Ship/Banner|small=true|Sagiri}}{{Ship/Banner|small=true|Takanami}} | + | {{Map/ImageNode|P|Hard|E-3|x=417|y=289|drops=<table class="wikitable"><tr><th>Type</th><th>Ships</th></tr><tr><th>DE</th><td>{{Ship/Banner|small=true|Daitou}}{{Ship/Banner|small=true|Matsuwa}}</td></tr><tr><th>DD</th><td>{{Ship/Banner|small=true|Amagiri}}{{Ship/Banner|small=true|Arashi}}{{Ship/Banner|small=true|Asagumo}}<br>{{Ship/Banner|small=true|Hatsukaze}}{{Ship/Banner|small=true|Isokaze}}{{Ship/Banner|small=true|Maikaze}}<br>{{Ship/Banner|small=true|Nowaki}}{{Ship/Banner|small=true|Oyashio}}{{Ship/Banner|small=true|Sagiri}}<br>{{Ship/Banner|small=true|Takanami}}{{Ship/Banner|small=true|Tanikaze}}{{Ship/Banner|small=true|Tokitsukaze}}<br></td></tr><tr><th>CVL</th><td>{{Ship/Banner|small=true|Gambier Bay}}</td></tr><tr><th>SSV</th><td>{{Ship/Banner|small=true|I-14}}</td></tr><tr><th>AO</th><td>{{Ship/Banner|small=true|Souya}}</td></tr></table>}} |
{{Map/ImageNode|Q'|Hard|E-3|x=361|y=310}} | {{Map/ImageNode|Q'|Hard|E-3|x=361|y=310}} | ||
| − | {{Map/ImageNode|Q|Hard|E-3|x=324|y=250|drops=<table class="wikitable"><tr><th>Type</th><th>Ships</th></tr><tr><th>DE</th><td>{{Ship/Banner|small=true|Hiburi}}{{Ship/Banner|small=true|Shimushu}}</td></tr><tr><th>DD</th><td>{{Ship/Banner|small=true|Amatsukaze}}{{Ship/Banner|small=true|Ariake}}{{Ship/Banner|small=true| | + | {{Map/ImageNode|Q|Hard|E-3|x=324|y=250|drops=<table class="wikitable"><tr><th>Type</th><th>Ships</th></tr><tr><th>DE</th><td>{{Ship/Banner|small=true|Hiburi}}{{Ship/Banner|small=true|Shimushu}}</td></tr><tr><th>DD</th><td>{{Ship/Banner|small=true|Amatsukaze}}{{Ship/Banner|small=true|Ariake}}{{Ship/Banner|small=true|Harusame}}<br>{{Ship/Banner|small=true|Oyashio}}{{Ship/Banner|small=true|Takanami}}{{Ship/Banner|small=true|Tamanami}}<br>{{Ship/Banner|small=true|Tokitsukaze}}</td></tr><tr><th>CL</th><td>{{Ship/Banner|small=true|Ooyodo}}{{Ship/Banner|small=true|Yahagi}}</td></tr><tr><th>CA</th><td>{{Ship/Banner|small=true|Mikuma}}{{Ship/Banner|small=true|Prinz Eugen}}</td></tr><tr><th>CVL</th><td>{{Ship/Banner|small=true|Shinyou}}</td></tr><tr><th>BB</th><td>{{Ship/Banner|small=true|Yamato}}</td></tr><tr><th>SSV</th><td>{{Ship/Banner|small=true|I-13}}</td></tr><tr><th>CT</th><td>{{Ship/Banner|small=true|Kashima}}</td></tr></table>}} |
{{Map/ImageNode|R|Hard|E-3|x=247|y=179}} | {{Map/ImageNode|R|Hard|E-3|x=247|y=179}} | ||
{{Map/ImageNode|Start 2|Hard|E-3|x=621|y=150}} | {{Map/ImageNode|Start 2|Hard|E-3|x=621|y=150}} | ||
{{Map/ImageNode|Start 3|Hard|E-3|x=379|y=113}} | {{Map/ImageNode|Start 3|Hard|E-3|x=379|y=113}} | ||
| − | {{Map/ImageNode|S|Hard|E-3|x=201|y=272|drops=<table class="wikitable"><tr><th>Type</th><th>Ships</th></tr><tr><th>DD</th><td>{{Ship/Banner|small=true|Amagiri}}</td></tr></table>}} | + | {{Map/ImageNode|S|Hard|E-3|x=201|y=272|drops=<table class="wikitable"><tr><th>Type</th><th>Ships</th></tr><tr><th>DD</th><td>{{Ship/Banner|small=true|Amagiri}}{{Ship/Banner|small=true|Maikaze}}{{Ship/Banner|small=true|Sagiri}}<br>{{Ship/Banner|small=true|Tokitsukaze}}</td></tr></table>}} |
{{Map/ImageNode|T|Hard|E-3|x=132|y=250}} | {{Map/ImageNode|T|Hard|E-3|x=132|y=250}} | ||
{{Map/ImageNode|U'|Hard|E-3|x=209|y=303}} | {{Map/ImageNode|U'|Hard|E-3|x=209|y=303}} | ||
| − | {{Map/ImageNode|U|Hard|E-3|x=162|y=308|drops=<table class="wikitable"><tr><th>Type</th><th>Ships</th></tr><tr><th>DD</th><td>{{Ship/Banner|small=true|Amagiri}}{{Ship/Banner|small=true|Asagumo}}{{Ship/Banner|small=true|Sagiri}}<br>{{Ship/Banner|small=true|Tokitsukaze}}</td></tr></table>}} | + | {{Map/ImageNode|U|Hard|E-3|x=162|y=308|drops=<table class="wikitable"><tr><th>Type</th><th>Ships</th></tr><tr><th>DE</th><td>{{Ship/Banner|small=true|Daitou}}{{Ship/Banner|small=true|Matsuwa}}</td></tr><tr><th>DD</th><td>{{Ship/Banner|small=true|Amagiri}}{{Ship/Banner|small=true|Arashi}}{{Ship/Banner|small=true|Asagumo}}<br>{{Ship/Banner|small=true|Hatsukaze}}{{Ship/Banner|small=true|Isokaze}}{{Ship/Banner|small=true|Maikaze}}<br>{{Ship/Banner|small=true|Nowaki}}{{Ship/Banner|small=true|Oyashio}}{{Ship/Banner|small=true|Sagiri}}<br>{{Ship/Banner|small=true|Takanami}}{{Ship/Banner|small=true|Tanikaze}}{{Ship/Banner|small=true|Tokitsukaze}}<br></td></tr><tr><th>CVL</th><td>{{Ship/Banner|small=true|Gambier Bay}}</td></tr><tr><th>SSV</th><td>{{Ship/Banner|small=true|I-14}}</td></tr><tr><th>AO</th><td>{{Ship/Banner|small=true|Souya}}</td></tr></table>}} |
{{Map/ImageNode|V|Hard|E-3|x=233|y=284}} | {{Map/ImageNode|V|Hard|E-3|x=233|y=284}} | ||
{{Map/ImageNode|W|Hard|E-3|x=277|y=206}} | {{Map/ImageNode|W|Hard|E-3|x=277|y=206}} | ||
| − | {{Map/ImageNode|X|Hard|E-3|x=267|y=251|drops=<table class="wikitable"><tr><th>Type</th><th>Ships</th></tr><tr><th>DE</th><td>{{Ship/Banner|small=true|Matsuwa}}</td></tr><tr><th>DD</th><td>{{Ship/Banner|small=true|Amagiri}}{{Ship/Banner|small=true|Arashi}}{{Ship/Banner|small=true|Asagumo}}<br>{{Ship/Banner|small=true|Hatsukaze}}{{Ship/Banner|small=true|Isokaze}}{{Ship/Banner|small=true|Maikaze}}<br>{{Ship/Banner|small=true|Oyashio}}{{Ship/Banner|small=true|Sagiri}}{{Ship/Banner|small=true|Takanami}} | + | {{Map/ImageNode|X|Hard|E-3|x=267|y=251|drops=<table class="wikitable"><tr><th>Type</th><th>Ships</th></tr><tr><th>DE</th><td>{{Ship/Banner|small=true|Daitou}}{{Ship/Banner|small=true|Matsuwa}}</td></tr><tr><th>DD</th><td>{{Ship/Banner|small=true|Amagiri}}{{Ship/Banner|small=true|Arashi}}{{Ship/Banner|small=true|Asagumo}}<br>{{Ship/Banner|small=true|Hatsukaze}}{{Ship/Banner|small=true|Isokaze}}{{Ship/Banner|small=true|Maikaze}}<br>{{Ship/Banner|small=true|Nowaki}}{{Ship/Banner|small=true|Oyashio}}{{Ship/Banner|small=true|Sagiri}}<br>{{Ship/Banner|small=true|Takanami}}{{Ship/Banner|small=true|Tanikaze}}{{Ship/Banner|small=true|Tokitsukaze}}<br></td></tr></table>}} |
{{Map/ImageNode|Y'|Hard|E-3|x=267|y=305}} | {{Map/ImageNode|Y'|Hard|E-3|x=267|y=305}} | ||
| − | {{Map/ImageNode|Y|Hard|E-3|x=307|y=290|drops=<table class="wikitable"><tr><th>Type</th><th>Ships</th></tr><tr><th>DE</th><td>{{Ship/Banner|small=true|Hiburi}}{{Ship/Banner|small=true|Shimushu}}</td></tr><tr><th>DD</th><td>{{Ship/Banner|small=true|Ariake}}{{Ship/Banner|small=true|Oyashio}}{{Ship/Banner|small=true|Takanami}}<br></td></tr><tr><th>CL</th><td>{{Ship/Banner|small=true|Ooyodo}}</td></tr><tr><th>CVL</th><td>{{Ship/Banner|small=true|Shinyou}}</td></tr><tr><th>SSV</th><td>{{Ship/Banner|small=true|I-13}}</td></tr><tr><th>CT</th><td>{{Ship/Banner|small=true|Kashima}}</td></tr></table>}} | + | {{Map/ImageNode|Y|Hard|E-3|x=307|y=290|drops=<table class="wikitable"><tr><th>Type</th><th>Ships</th></tr><tr><th>DE</th><td>{{Ship/Banner|small=true|Hiburi}}{{Ship/Banner|small=true|Shimushu}}</td></tr><tr><th>DD</th><td>{{Ship/Banner|small=true|Amatsukaze}}{{Ship/Banner|small=true|Ariake}}{{Ship/Banner|small=true|Harusame}}<br>{{Ship/Banner|small=true|Oyashio}}{{Ship/Banner|small=true|Takanami}}{{Ship/Banner|small=true|Tamanami}}<br>{{Ship/Banner|small=true|Tokitsukaze}}</td></tr><tr><th>CL</th><td>{{Ship/Banner|small=true|Ooyodo}}{{Ship/Banner|small=true|Yahagi}}</td></tr><tr><th>CA</th><td>{{Ship/Banner|small=true|Mikuma}}{{Ship/Banner|small=true|Prinz Eugen}}</td></tr><tr><th>CVL</th><td>{{Ship/Banner|small=true|Shinyou}}</td></tr><tr><th>BB</th><td>{{Ship/Banner|small=true|Yamato}}</td></tr><tr><th>SSV</th><td>{{Ship/Banner|small=true|I-13}}</td></tr><tr><th>CT</th><td>{{Ship/Banner|small=true|Kashima}}</td></tr></table>}} |
}} | }} | ||
<div class="map-nodes"> | <div class="map-nodes"> | ||
| Line 41: | Line 41: | ||
|AB | |AB | ||
|Raid | |Raid | ||
| − | |{{TooltipSimple|Diamond|7% ( | + | |{{TooltipSimple|Diamond|7% (707/10851)}} |
|Airfield Princess/VII | |Airfield Princess/VII | ||
|Airfield Princess/VI | |Airfield Princess/VI | ||
| Line 47: | Line 47: | ||
|AB | |AB | ||
|Raid | |Raid | ||
| − | |{{TooltipSimple|Diamond| | + | |{{TooltipSimple|Diamond|32% (3444/10851)}} |
|Airfield Princess/VII | |Airfield Princess/VII | ||
|Airfield Princess/VI | |Airfield Princess/VI | ||
| Line 54: | Line 54: | ||
|AB | |AB | ||
|Raid | |Raid | ||
| − | |{{TooltipSimple|Diamond| | + | |{{TooltipSimple|Diamond|26% (2856/10851)}} |
|Airfield Princess/VII | |Airfield Princess/VII | ||
|Airfield Princess/VII | |Airfield Princess/VII | ||
| Line 61: | Line 61: | ||
|AB | |AB | ||
|Raid | |Raid | ||
| − | |{{TooltipSimple|Diamond| | + | |{{TooltipSimple|Diamond|22% (2363/10851)}} |
|Airfield Princess/VII | |Airfield Princess/VII | ||
|Airfield Princess/VII | |Airfield Princess/VII | ||
| Line 68: | Line 68: | ||
|AB | |AB | ||
|Raid | |Raid | ||
| − | |{{TooltipSimple|Diamond| | + | |{{TooltipSimple|Diamond|14% (1481/10851)}} |
|Airfield Princess/VII | |Airfield Princess/VII | ||
|Airfield Princess/VII | |Airfield Princess/VII | ||
| Line 76: | Line 76: | ||
|A | |A | ||
|Normal | |Normal | ||
| − | |{{TooltipSimple|Echelon| | + | |{{TooltipSimple|Echelon|16% (3040/19189, HQ: 106-120)}}<br>{{TooltipSimple|Line Abreast|17% (3231/19189, HQ: 105-120)}}<br>{{TooltipSimple|''Phases: 1, 2, 3''|Samples: 256, 1491, 299}} |
|Submarine Ka-Class/Flagship | |Submarine Ka-Class/Flagship | ||
|Submarine Ka-Class/Elite | |Submarine Ka-Class/Elite | ||
| Line 83: | Line 83: | ||
|A | |A | ||
|Normal | |Normal | ||
| − | |{{TooltipSimple|Echelon| | + | |{{TooltipSimple|Echelon|16% (3113/19189, HQ: 105-120)}}<br>{{TooltipSimple|Line Abreast|17% (3190/19189, HQ: 106-120)}}<br>{{TooltipSimple|''Phases: 1, 2, 3''|Samples: 240, 1508, 307}} |
|Submarine Ka-Class/Flagship | |Submarine Ka-Class/Flagship | ||
|Submarine Ka-Class/Elite | |Submarine Ka-Class/Elite | ||
| Line 91: | Line 91: | ||
|A | |A | ||
|Normal | |Normal | ||
| − | |{{TooltipSimple|Echelon|17% ( | + | |{{TooltipSimple|Echelon|17% (3312/19189, HQ: 105-120)}}<br>{{TooltipSimple|Line Abreast|17% (3303/19189, HQ: 108-120)}}<br>{{TooltipSimple|''Phases: 1, 2, 3''|Samples: 199, 1670, 221}} |
|Submarine Ka-Class/Flagship | |Submarine Ka-Class/Flagship | ||
|Submarine Ka-Class/Flagship | |Submarine Ka-Class/Flagship | ||
| Line 100: | Line 100: | ||
|B | |B | ||
|Defense | |Defense | ||
| − | |{{TooltipSimple|Diamond| | + | |{{TooltipSimple|Diamond|41% (1478/3566, HQ: 105-120)}}<br>{{TooltipSimple|''Phases: 1, 2, 3''|Samples: 166, 280, 102}} |
|Aircraft Carrier Water Demon/II | |Aircraft Carrier Water Demon/II | ||
|Light Carrier Nu-Class/Flagship III | |Light Carrier Nu-Class/Flagship III | ||
| Line 110: | Line 110: | ||
|B | |B | ||
|Defense | |Defense | ||
| − | |{{TooltipSimple|Diamond|2% ( | + | |{{TooltipSimple|Diamond|2% (56/3566, HQ: 113-120)}}<br>{{TooltipSimple|''Phases: 2''|Samples: 23}} |
|Aircraft Carrier Water Demon/II | |Aircraft Carrier Water Demon/II | ||
|Light Carrier Nu-Class/Kai Flagship III | |Light Carrier Nu-Class/Kai Flagship III | ||
| Line 120: | Line 120: | ||
|B | |B | ||
|Defense | |Defense | ||
| − | |{{TooltipSimple|Diamond| | + | |{{TooltipSimple|Diamond|57% (2032/3566, HQ: 105-120)}}<br>{{TooltipSimple|''Phases: 1, 2, 3''|Samples: 260, 399, 134}} |
|Aircraft Carrier Water Demon/II | |Aircraft Carrier Water Demon/II | ||
|Light Carrier Nu-Class/Flagship III | |Light Carrier Nu-Class/Flagship III | ||
| Line 131: | Line 131: | ||
|C | |C | ||
|Normal | |Normal | ||
| − | |{{TooltipSimple|Echelon| | + | |{{TooltipSimple|Echelon|18% (976/5553, HQ: 109-120)}}<br>{{TooltipSimple|Line Abreast|17% (964/5553, HQ: 105-120)}}<br>{{TooltipSimple|''Phases: 1, 2, 3''|Samples: 97, 222, 314}} |
|Submarine Ka-Class/Flagship | |Submarine Ka-Class/Flagship | ||
|Submarine Ka-Class/Elite | |Submarine Ka-Class/Elite | ||
| Line 138: | Line 138: | ||
|C | |C | ||
|Normal | |Normal | ||
| − | |{{TooltipSimple|Echelon| | + | |{{TooltipSimple|Echelon|17% (932/5553, HQ: 106-120)}}<br>{{TooltipSimple|Line Abreast|17% (971/5553, HQ: 109-120)}}<br>{{TooltipSimple|''Phases: 1, 2, 3''|Samples: 109, 218, 352}} |
|Submarine Ka-Class/Flagship | |Submarine Ka-Class/Flagship | ||
|Submarine Ka-Class/Elite | |Submarine Ka-Class/Elite | ||
| Line 146: | Line 146: | ||
|C | |C | ||
|Normal | |Normal | ||
| − | |{{TooltipSimple|Echelon| | + | |{{TooltipSimple|Echelon|15% (842/5553, HQ: 108-120)}}<br>{{TooltipSimple|Line Abreast|16% (868/5553, HQ: 109-120)}}<br>{{TooltipSimple|''Phases: 1, 2, 3''|Samples: 71, 269, 280}} |
|Submarine Ka-Class/Flagship | |Submarine Ka-Class/Flagship | ||
|Submarine Ka-Class/Flagship | |Submarine Ka-Class/Flagship | ||
| Line 156: | Line 156: | ||
|E | |E | ||
|Defense | |Defense | ||
| − | |{{TooltipSimple|Diamond| | + | |{{TooltipSimple|Diamond|37% (6646/18183, HQ: 105-120)}}<br>{{TooltipSimple|''Phases: 1, 2, 3''|Samples: 268, 1569, 300}} |
|Airfield Princess/VII | |Airfield Princess/VII | ||
|Airfield Princess/XVII | |Airfield Princess/XVII | ||
| Line 162: | Line 162: | ||
|E | |E | ||
|Defense | |Defense | ||
| − | |{{TooltipSimple|Diamond| | + | |{{TooltipSimple|Diamond|36% (6543/18183, HQ: 106-120)}}<br>{{TooltipSimple|''Phases: 1, 2, 3''|Samples: 241, 1637, 298}} |
|Airfield Princess/VI | |Airfield Princess/VI | ||
|Airfield Princess/XVII | |Airfield Princess/XVII | ||
| Line 169: | Line 169: | ||
|E | |E | ||
|Defense | |Defense | ||
| − | |{{TooltipSimple|Diamond| | + | |{{TooltipSimple|Diamond|14% (2514/18183, HQ: 105-120)}}<br>{{TooltipSimple|''Phases: 1, 2, 3''|Samples: 55, 619, 80}} |
|Airfield Princess/VII | |Airfield Princess/VII | ||
|Airfield Princess/XVII | |Airfield Princess/XVII | ||
| Line 176: | Line 176: | ||
|E | |E | ||
|Defense | |Defense | ||
| − | |{{TooltipSimple|Diamond| | + | |{{TooltipSimple|Diamond|12% (2143/18183, HQ: 105-120)}}<br>{{TooltipSimple|''Phases: 1, 2, 3''|Samples: 70, 538, 79}} |
|Airfield Princess/VII | |Airfield Princess/VII | ||
|Airfield Princess/XVIII | |Airfield Princess/XVIII | ||
| Line 183: | Line 183: | ||
|E | |E | ||
|Defense | |Defense | ||
| − | |{{TooltipSimple|Diamond|1% ( | + | |{{TooltipSimple|Diamond|1% (156/18183, HQ: 111-120)}}<br>{{TooltipSimple|''Phases: 2''|Samples: 45}} |
|Airfield Princess/VII | |Airfield Princess/VII | ||
|Airfield Princess/XVIII | |Airfield Princess/XVIII | ||
|Airfield Princess/VI | |Airfield Princess/VI | ||
| + | |- | ||
| + | |E | ||
| + | |Defense | ||
| + | |{{TooltipSimple|Diamond|1% (181/18183, HQ: 111-120)}}<br>{{TooltipSimple|''Phases: 2''|Samples: 50}} | ||
| + | |Airfield Princess/VII | ||
| + | |Airfield Princess/XVIII | ||
| + | |Airfield Princess/VII | ||
}} | }} | ||
{{Map/Nodes|diff=Hard|name=深海基地航空隊 | {{Map/Nodes|diff=Hard|name=深海基地航空隊 | ||
|F | |F | ||
|Defense | |Defense | ||
| − | |{{TooltipSimple|Diamond| | + | |{{TooltipSimple|Diamond|27% (1000/3647, HQ: 109-120)}}<br>{{TooltipSimple|''Phases: 1, 2, 3''|Samples: 48, 233, 124}} |
|Airfield Princess/VII | |Airfield Princess/VII | ||
|Airfield Princess/XVII | |Airfield Princess/XVII | ||
| Line 197: | Line 204: | ||
|F | |F | ||
|Defense | |Defense | ||
| − | |{{TooltipSimple|Diamond| | + | |{{TooltipSimple|Diamond|27% (977/3647, HQ: 105-120)}}<br>{{TooltipSimple|''Phases: 1, 2, 3''|Samples: 45, 203, 127}} |
|Airfield Princess/VI | |Airfield Princess/VI | ||
|Airfield Princess/XVII | |Airfield Princess/XVII | ||
| Line 204: | Line 211: | ||
|F | |F | ||
|Defense | |Defense | ||
| − | |{{TooltipSimple|Diamond| | + | |{{TooltipSimple|Diamond|22% (787/3647, HQ: 106-120)}}<br>{{TooltipSimple|''Phases: 1, 2, 3''|Samples: 8, 95, 187}} |
|Airfield Princess/VII | |Airfield Princess/VII | ||
|Airfield Princess/XVII | |Airfield Princess/XVII | ||
| Line 211: | Line 218: | ||
|F | |F | ||
|Defense | |Defense | ||
| − | |{{TooltipSimple|Diamond| | + | |{{TooltipSimple|Diamond|15% (538/3647, HQ: 109-120)}}<br>{{TooltipSimple|''Phases: 1, 2, 3''|Samples: 16, 67, 109}} |
|Airfield Princess/VII | |Airfield Princess/VII | ||
|Airfield Princess/XVIII | |Airfield Princess/XVIII | ||
|Airfield Princess/V | |Airfield Princess/V | ||
| + | |- | ||
| + | |F | ||
| + | |Defense | ||
| + | |{{TooltipSimple|Diamond|5% (174/3647, HQ: 109-120)}}<br>{{TooltipSimple|''Phases: 2, 3''|Samples: 11, 62}} | ||
| + | |Airfield Princess/VII | ||
| + | |Airfield Princess/XVIII | ||
| + | |Airfield Princess/VI | ||
| + | |- | ||
| + | |F | ||
| + | |Defense | ||
| + | |{{TooltipSimple|Diamond|5% (171/3647, HQ: 109-120)}}<br>{{TooltipSimple|''Phases: 2, 3''|Samples: 4, 51}} | ||
| + | |Airfield Princess/VII | ||
| + | |Airfield Princess/XVIII | ||
| + | |Airfield Princess/VII | ||
}} | }} | ||
{{Map/Nodes|diff=Hard|name=深海潜水艦隊 偵察前衛哨戒 III線 | {{Map/Nodes|diff=Hard|name=深海潜水艦隊 偵察前衛哨戒 III線 | ||
|G | |G | ||
|Normal | |Normal | ||
| − | |{{TooltipSimple|Echelon| | + | |{{TooltipSimple|Echelon|12% (2276/18393, HQ: 109-120)}}<br>{{TooltipSimple|Line Abreast|12% (2280/18393, HQ: 108-120)}}<br>{{TooltipSimple|''Phases: 1, 2, 3''|Samples: 36, 226, 983}} |
|Submarine Ka-Class/Flagship | |Submarine Ka-Class/Flagship | ||
|Submarine Ka-Class/Elite | |Submarine Ka-Class/Elite | ||
| Line 227: | Line 248: | ||
|G | |G | ||
|Normal | |Normal | ||
| − | |{{TooltipSimple|Echelon| | + | |{{TooltipSimple|Echelon|9% (1688/18393, HQ: 109-120)}}<br>{{TooltipSimple|Line Abreast|10% (1754/18393, HQ: 109-120)}}<br>{{TooltipSimple|''Phases: 1, 2, 3''|Samples: 26, 175, 752}} |
|Submarine Ka-Class/Flagship | |Submarine Ka-Class/Flagship | ||
|Submarine Ka-Class/Flagship | |Submarine Ka-Class/Flagship | ||
| Line 235: | Line 256: | ||
|G | |G | ||
|Normal | |Normal | ||
| − | |{{TooltipSimple|Echelon| | + | |{{TooltipSimple|Echelon|28% (5141/18393, HQ: 106-120)}}<br>{{TooltipSimple|Line Abreast|29% (5254/18393, HQ: 106-120)}}<br>{{TooltipSimple|''Phases: 1, 2, 3''|Samples: 24, 165, 2773}} |
|Submarine Ka-Class/Flagship | |Submarine Ka-Class/Flagship | ||
|Submarine Ka-Class/Flagship | |Submarine Ka-Class/Flagship | ||
| Line 245: | Line 266: | ||
|I | |I | ||
|Defense | |Defense | ||
| − | |{{TooltipSimple|Diamond| | + | |{{TooltipSimple|Diamond|23% (1775/7569, HQ: 105-120)}}<br>{{TooltipSimple|''Phases: 1, 2, 3''|Samples: 18, 43, 474}} |
|Airfield Princess/VII | |Airfield Princess/VII | ||
|Airfield Princess/XVII | |Airfield Princess/XVII | ||
| Line 251: | Line 272: | ||
|I | |I | ||
|Defense | |Defense | ||
| − | |{{TooltipSimple|Diamond| | + | |{{TooltipSimple|Diamond|24% (1795/7569, HQ: 106-120)}}<br>{{TooltipSimple|''Phases: 1, 2, 3''|Samples: 21, 42, 487}} |
|Airfield Princess/VI | |Airfield Princess/VI | ||
|Airfield Princess/XVII | |Airfield Princess/XVII | ||
| Line 258: | Line 279: | ||
|I | |I | ||
|Defense | |Defense | ||
| − | |{{TooltipSimple|Diamond| | + | |{{TooltipSimple|Diamond|24% (1790/7569, HQ: 106-120)}}<br>{{TooltipSimple|''Phases: 1, 2, 3''|Samples: 10, 13, 546}} |
|Airfield Princess/VII | |Airfield Princess/VII | ||
|Airfield Princess/XVII | |Airfield Princess/XVII | ||
| Line 265: | Line 286: | ||
|I | |I | ||
|Defense | |Defense | ||
| − | |{{TooltipSimple|Diamond| | + | |{{TooltipSimple|Diamond|16% (1240/7569, HQ: 109-120)}}<br>{{TooltipSimple|''Phases: 1, 2, 3''|Samples: 4, 12, 381}} |
|Airfield Princess/VII | |Airfield Princess/VII | ||
|Airfield Princess/XVIII | |Airfield Princess/XVIII | ||
| Line 272: | Line 293: | ||
|I | |I | ||
|Defense | |Defense | ||
| − | |{{TooltipSimple|Diamond| | + | |{{TooltipSimple|Diamond|6% (467/7569, HQ: 109-120)}}<br>{{TooltipSimple|''Phases: 3''|Samples: 152}} |
|Airfield Princess/VII | |Airfield Princess/VII | ||
|Airfield Princess/XVIII | |Airfield Princess/XVIII | ||
| Line 279: | Line 300: | ||
|I | |I | ||
|Defense | |Defense | ||
| − | |{{TooltipSimple|Diamond| | + | |{{TooltipSimple|Diamond|7% (502/7569, HQ: 109-120)}}<br>{{TooltipSimple|''Phases: 2, 3''|Samples: 1, 167}} |
|Airfield Princess/VII | |Airfield Princess/VII | ||
|Airfield Princess/XVIII | |Airfield Princess/XVIII | ||
| Line 287: | Line 308: | ||
|J | |J | ||
|Normal | |Normal | ||
| − | |{{TooltipSimple|Echelon| | + | |{{TooltipSimple|Echelon|9% (1718/18920, HQ: 105-120)}}<br>{{TooltipSimple|Line Abreast|9% (1724/18920, HQ: 109-120)}}<br>{{TooltipSimple|''Phases: 1, 2, 3''|Samples: 175, 150, 673}} |
|Submarine Yo-Class/Flagship | |Submarine Yo-Class/Flagship | ||
|Submarine Yo-Class/Elite | |Submarine Yo-Class/Elite | ||
| Line 294: | Line 315: | ||
|J | |J | ||
|Normal | |Normal | ||
| − | |{{TooltipSimple|Echelon| | + | |{{TooltipSimple|Echelon|12% (2322/18920, HQ: 105-120)}}<br>{{TooltipSimple|Line Abreast|12% (2217/18920, HQ: 106-120)}}<br>{{TooltipSimple|''Phases: 1, 2, 3''|Samples: 213, 198, 867}} |
|Submarine Yo-Class/Flagship | |Submarine Yo-Class/Flagship | ||
|Submarine Yo-Class/Elite | |Submarine Yo-Class/Elite | ||
| Line 302: | Line 323: | ||
|J | |J | ||
|Normal | |Normal | ||
| − | |{{TooltipSimple|Echelon| | + | |{{TooltipSimple|Echelon|29% (5433/18920, HQ: 105-120)}}<br>{{TooltipSimple|Line Abreast|29% (5506/18920, HQ: 106-120)}}<br>{{TooltipSimple|''Phases: 1, 2, 3''|Samples: 231, 174, 2646}} |
|Submarine Yo-Class/Flagship | |Submarine Yo-Class/Flagship | ||
|Submarine Yo-Class/Flagship | |Submarine Yo-Class/Flagship | ||
| Line 312: | Line 333: | ||
|L | |L | ||
|Defense | |Defense | ||
| − | |{{TooltipSimple|Diamond| | + | |{{TooltipSimple|Diamond|18% (5668/32044, HQ: 105-120)}}<br>{{TooltipSimple|''Phases: 1, 2, 3''|Samples: 165, 974, 609}} |
|Airfield Princess/VI | |Airfield Princess/VI | ||
|Airfield Princess/XVI | |Airfield Princess/XVI | ||
| Line 320: | Line 341: | ||
|L | |L | ||
|Defense | |Defense | ||
| − | |{{TooltipSimple|Diamond| | + | |{{TooltipSimple|Diamond|19% (6185/32044, HQ: 108-120)}}<br>{{TooltipSimple|''Phases: 1, 2, 3''|Samples: 116, 981, 788}} |
|Airfield Princess/VI | |Airfield Princess/VI | ||
|Airfield Princess/XVII | |Airfield Princess/XVII | ||
| Line 328: | Line 349: | ||
|L | |L | ||
|Defense | |Defense | ||
| − | |{{TooltipSimple|Diamond| | + | |{{TooltipSimple|Diamond|18% (5905/32044, HQ: 106-120)}}<br>{{TooltipSimple|''Phases: 1, 2, 3''|Samples: 129, 876, 831}} |
|Airfield Princess/VII | |Airfield Princess/VII | ||
|Airfield Princess/XVII | |Airfield Princess/XVII | ||
| Line 336: | Line 357: | ||
|L | |L | ||
|Defense | |Defense | ||
| − | |{{TooltipSimple|Diamond| | + | |{{TooltipSimple|Diamond|18% (5752/32044, HQ: 106-120)}}<br>{{TooltipSimple|''Phases: 1, 2, 3''|Samples: 92, 686, 940}} |
|Airfield Princess/VII | |Airfield Princess/VII | ||
|Airfield Princess/XVIII | |Airfield Princess/XVIII | ||
| Line 344: | Line 365: | ||
|L | |L | ||
|Defense | |Defense | ||
| − | |{{TooltipSimple|Diamond| | + | |{{TooltipSimple|Diamond|21% (6875/32044, HQ: 105-120)}}<br>{{TooltipSimple|''Phases: 1, 2, 3''|Samples: 127, 918, 1085}} |
|Airfield Princess/VII | |Airfield Princess/VII | ||
|Airfield Princess/XVIII | |Airfield Princess/XVIII | ||
| Line 352: | Line 373: | ||
|L | |L | ||
|Defense | |Defense | ||
| − | |{{TooltipSimple|Diamond| | + | |{{TooltipSimple|Diamond|5% (1659/32044, HQ: 109-120)}}<br>{{TooltipSimple|''Phases: 3''|Samples: 498}} |
|Airfield Princess/VII | |Airfield Princess/VII | ||
|Airfield Princess/XVIII | |Airfield Princess/XVIII | ||
| Line 361: | Line 382: | ||
|M | |M | ||
|Normal | |Normal | ||
| − | |{{TooltipSimple|Echelon| | + | |{{TooltipSimple|Echelon|10% (810/7756, HQ: 105-120)}}<br>{{TooltipSimple|Line Abreast|11% (851/7756, HQ: 105-120)}}<br>{{TooltipSimple|''Phases: 1, 2, 3''|Samples: 382, 29, 71}} |
|Submarine Ka-Class/Flagship | |Submarine Ka-Class/Flagship | ||
|Submarine Ka-Class/Elite | |Submarine Ka-Class/Elite | ||
| Line 368: | Line 389: | ||
|M | |M | ||
|Normal | |Normal | ||
| − | |{{TooltipSimple|Echelon| | + | |{{TooltipSimple|Echelon|13% (1013/7756, HQ: 105-120)}}<br>{{TooltipSimple|Line Abreast|14% (1057/7756, HQ: 105-120)}}<br>{{TooltipSimple|''Phases: 1, 2, 3''|Samples: 544, 46, 109}} |
|Submarine Ka-Class/Flagship | |Submarine Ka-Class/Flagship | ||
|Submarine Ka-Class/Elite | |Submarine Ka-Class/Elite | ||
| Line 376: | Line 397: | ||
|M | |M | ||
|Normal | |Normal | ||
| − | |{{TooltipSimple|Echelon| | + | |{{TooltipSimple|Echelon|27% (2064/7756, HQ: 105-120)}}<br>{{TooltipSimple|Line Abreast|25% (1961/7756, HQ: 105-120)}}<br>{{TooltipSimple|''Phases: 1, 2, 3''|Samples: 1215, 48, 99}} |
|Submarine Ka-Class/Flagship | |Submarine Ka-Class/Flagship | ||
|Submarine Ka-Class/Flagship | |Submarine Ka-Class/Flagship | ||
| Line 385: | Line 406: | ||
|M1 | |M1 | ||
|Defense | |Defense | ||
| − | |{{TooltipSimple|Diamond| | + | |{{TooltipSimple|Diamond|51% (165/324, HQ: 106-120)}}<br>{{TooltipSimple|''Phases: 1, 3''|Samples: 72, 4}} |
|Aircraft Carrier Water Demon/II | |Aircraft Carrier Water Demon/II | ||
|Light Carrier Nu-Class/Flagship III | |Light Carrier Nu-Class/Flagship III | ||
| Line 395: | Line 416: | ||
|M1 | |M1 | ||
|Defense | |Defense | ||
| − | |{{TooltipSimple|Diamond| | + | |{{TooltipSimple|Diamond|27% (88/324, HQ: 113-120)}}<br>{{TooltipSimple|''Phases: 1''|Samples: 69}} |
|Aircraft Carrier Water Demon/II | |Aircraft Carrier Water Demon/II | ||
|Light Carrier Nu-Class/Kai Flagship III | |Light Carrier Nu-Class/Kai Flagship III | ||
| Line 405: | Line 426: | ||
|M1 | |M1 | ||
|Defense | |Defense | ||
| − | |{{TooltipSimple|Diamond| | + | |{{TooltipSimple|Diamond|22% (71/324, HQ: 112-120)}}<br>{{TooltipSimple|''Phases: 1, 3''|Samples: 35, 3}} |
|Aircraft Carrier Water Demon/II | |Aircraft Carrier Water Demon/II | ||
|Light Carrier Nu-Class/Flagship III | |Light Carrier Nu-Class/Flagship III | ||
| Line 416: | Line 437: | ||
|M2 | |M2 | ||
|Normal | |Normal | ||
| − | |{{TooltipSimple|Line Abreast| | + | |{{TooltipSimple|Echelon|4% (2/49, HQ: 114-117)}}<br>{{TooltipSimple|Line Abreast|6% (3/49, HQ: 117-120)}}<br>{{TooltipSimple|''Phases: 1, 3''|Samples: 5, 1}} |
|Submarine Yo-Class/Flagship | |Submarine Yo-Class/Flagship | ||
|Submarine Yo-Class/Elite | |Submarine Yo-Class/Elite | ||
| + | |Submarine Yo-Class/Elite | ||
| + | |- | ||
| + | |M2 | ||
| + | |Normal | ||
| + | |{{TooltipSimple|Echelon|14% (7/49, HQ: 117-120)}}<br>{{TooltipSimple|Line Abreast|8% (4/49, HQ: 120)}}<br>{{TooltipSimple|''Phases: 1, 3''|Samples: 2, 2}} | ||
| + | |Submarine Yo-Class/Flagship | ||
|Submarine Yo-Class/Elite | |Submarine Yo-Class/Elite | ||
|Submarine Yo-Class/Elite | |Submarine Yo-Class/Elite | ||
| − | + | |Submarine Yo-Class/Elite | |
| − | + | |- | |
| − | | | + | |M2 |
|Normal | |Normal | ||
| − | |{{TooltipSimple|Line Ahead| | + | |{{TooltipSimple|Echelon|37% (18/49, HQ: 117-120)}}<br>{{TooltipSimple|Line Abreast|31% (15/49, HQ: 106-120)}}<br>{{TooltipSimple|''Phases: 1, 3''|Samples: 22, 2}} |
| + | |Submarine Yo-Class/Flagship | ||
| + | |Submarine Yo-Class/Flagship | ||
| + | |Submarine Yo-Class/Elite | ||
| + | |Submarine Yo-Class/Elite | ||
| + | }} | ||
| + | {{Map/Nodes|diff=Hard|name=深海急派増援群 前衛偵察部隊 | ||
| + | |N | ||
| + | |Normal | ||
| + | |{{TooltipSimple|Line Ahead|43% (3226/7424, HQ: 105-120)}}<br>{{TooltipSimple|Echelon|30% (2228/7424, HQ: 105-120)}}<br>{{TooltipSimple|Line Abreast|27% (1970/7424, HQ: 105-120)}}<br>{{TooltipSimple|''Phases: 1, 2, 3''|Samples: 2067, 120, 246}} | ||
|Heavy Cruiser Ri-Class/Flagship | |Heavy Cruiser Ri-Class/Flagship | ||
|Light Cruiser Ho-Class/Flagship | |Light Cruiser Ho-Class/Flagship | ||
| Line 436: | Line 472: | ||
|O | |O | ||
|Defense | |Defense | ||
| − | |{{TooltipSimple|Diamond| | + | |{{TooltipSimple|Diamond|19% (1366/7181, HQ: 105-120)}}<br>{{TooltipSimple|''Phases: 1, 2, 3''|Samples: 324, 25, 60}} |
|Airfield Princess/VI | |Airfield Princess/VI | ||
|Airfield Princess/Patrol Aircraft Deployment II | |Airfield Princess/Patrol Aircraft Deployment II | ||
| Line 444: | Line 480: | ||
|O | |O | ||
|Defense | |Defense | ||
| − | |{{TooltipSimple|Diamond| | + | |{{TooltipSimple|Diamond|18% (1271/7181, HQ: 108-120)}}<br>{{TooltipSimple|''Phases: 1, 2, 3''|Samples: 332, 25, 65}} |
|Airfield Princess/VII | |Airfield Princess/VII | ||
|Airfield Princess/Patrol Aircraft Deployment II | |Airfield Princess/Patrol Aircraft Deployment II | ||
| Line 452: | Line 488: | ||
|O | |O | ||
|Defense | |Defense | ||
| − | |{{TooltipSimple|Diamond| | + | |{{TooltipSimple|Diamond|25% (1776/7181, HQ: 105-120)}}<br>{{TooltipSimple|''Phases: 1, 2, 3''|Samples: 522, 37, 49}} |
|Airfield Princess/VII | |Airfield Princess/VII | ||
|Airfield Princess/Patrol Aircraft Deployment III | |Airfield Princess/Patrol Aircraft Deployment III | ||
| Line 460: | Line 496: | ||
|O | |O | ||
|Defense | |Defense | ||
| − | |{{TooltipSimple|Diamond| | + | |{{TooltipSimple|Diamond|29% (2081/7181, HQ: 105-120)}}<br>{{TooltipSimple|''Phases: 1, 2, 3''|Samples: 559, 30, 69}} |
|Airfield Princess/VII | |Airfield Princess/VII | ||
|Airfield Princess/Patrol Aircraft Deployment III | |Airfield Princess/Patrol Aircraft Deployment III | ||
| Line 468: | Line 504: | ||
|O | |O | ||
|Defense | |Defense | ||
| − | |{{TooltipSimple|Diamond| | + | |{{TooltipSimple|Diamond|10% (687/7181, HQ: 105-120)}}<br>{{TooltipSimple|''Phases: 1''|Samples: 254}} |
|Airfield Princess/VII | |Airfield Princess/VII | ||
|Airfield Princess/XVIII | |Airfield Princess/XVIII | ||
| Line 477: | Line 513: | ||
|P | |P | ||
|Normal | |Normal | ||
| − | |{{TooltipSimple|Diamond| | + | |{{TooltipSimple|Diamond|22% (1526/6811, HQ: 105-120)}}<br>{{TooltipSimple|''Phases: 1, 2, 3''|Samples: 432, 32, 58}} |
|Light Carrier Nu-Class/Flagship II | |Light Carrier Nu-Class/Flagship II | ||
|Light Carrier Nu-Class/Flagship II | |Light Carrier Nu-Class/Flagship II | ||
| Line 487: | Line 523: | ||
|P | |P | ||
|Normal | |Normal | ||
| − | |{{TooltipSimple|Diamond| | + | |{{TooltipSimple|Diamond|53% (3598/6811, HQ: 105-120)}}<br>{{TooltipSimple|''Phases: 1, 2, 3''|Samples: 951, 63, 158}} |
|Light Carrier Nu-Class/Flagship III | |Light Carrier Nu-Class/Flagship III | ||
|Light Carrier Nu-Class/Flagship III | |Light Carrier Nu-Class/Flagship III | ||
| Line 497: | Line 533: | ||
|P | |P | ||
|Normal | |Normal | ||
| − | |{{TooltipSimple|Diamond| | + | |{{TooltipSimple|Diamond|25% (1687/6811, HQ: 105-120)}}<br>{{TooltipSimple|''Phases: 1, 2, 3''|Samples: 547, 22, 22}} |
|Light Carrier Nu-Class/Kai Flagship III | |Light Carrier Nu-Class/Kai Flagship III | ||
|Light Carrier Nu-Class/Flagship III | |Light Carrier Nu-Class/Flagship III | ||
| Line 508: | Line 544: | ||
|Q | |Q | ||
|Boss | |Boss | ||
| − | |{{TooltipSimple|Cruising Formation 4| | + | |{{TooltipSimple|Cruising Formation 4|77% (4525/5880, HQ: 105-120)}}<br>{{TooltipSimple|''Phases: 1, 2, 3''|Samples: 1113, 113, 223}} |
|Aircraft Carrier Water Demon/II | |Aircraft Carrier Water Demon/II | ||
|Battleship Princess | |Battleship Princess | ||
| Line 524: | Line 560: | ||
|Q | |Q | ||
|Boss/Final | |Boss/Final | ||
| − | |{{TooltipSimple|Cruising Formation 4| | + | |{{TooltipSimple|Cruising Formation 4|23% (1355/5880, HQ: 105-120)}}<br>{{TooltipSimple|''Phases: 1''|Samples: 431}} |
|Aircraft Carrier Water Demon/II | |Aircraft Carrier Water Demon/II | ||
|Battleship Princess | |Battleship Princess | ||
| Line 538: | Line 574: | ||
|Destroyer Ha-Class/Late Model Elite | |Destroyer Ha-Class/Late Model Elite | ||
}} | }} | ||
| + | {{Map/Nodes|diff=Hard|Q'|Empty|kind=1}} | ||
{{Map/Nodes|diff=Hard|name=海峡配備 深海魚雷艇部隊 | {{Map/Nodes|diff=Hard|name=海峡配備 深海魚雷艇部隊 | ||
|R | |R | ||
|Normal | |Normal | ||
| − | |{{TooltipSimple|Diamond| | + | |{{TooltipSimple|Diamond|21% (3320/15562, HQ: 108-120)}}<br>{{TooltipSimple|''Phases: 1, 2, 3''|Samples: 6, 1006, 30}} |
|PT Imp Pack/III | |PT Imp Pack/III | ||
|PT Imp Pack/II | |PT Imp Pack/II | ||
| Line 550: | Line 587: | ||
|R | |R | ||
|Normal | |Normal | ||
| − | |{{TooltipSimple|Diamond| | + | |{{TooltipSimple|Diamond|67% (10480/15562, HQ: 108-120)}}<br>{{TooltipSimple|''Phases: 1, 2, 3''|Samples: 29, 3066, 270}} |
|PT Imp Pack/III | |PT Imp Pack/III | ||
|PT Imp Pack/II | |PT Imp Pack/II | ||
| Line 560: | Line 597: | ||
|R | |R | ||
|Normal | |Normal | ||
| − | | | + | |{{TooltipSimple|Echelon|11% (1762/15562, HQ: 109-120)}}<br>{{TooltipSimple|''Phases: 2, 3''|Samples: 2, 556}} |
|PT Imp Pack/IV | |PT Imp Pack/IV | ||
|PT Imp Pack/III | |PT Imp Pack/III | ||
| Line 571: | Line 608: | ||
|S | |S | ||
|Normal | |Normal | ||
| − | |{{TooltipSimple|Line Ahead|45% ( | + | |{{TooltipSimple|Line Ahead|45% (5952/13305, HQ: 108-120)}}<br>{{TooltipSimple|Double Line|30% (4020/13305, HQ: 108-120)}}<br>{{TooltipSimple|Echelon|25% (3333/13305, HQ: 109-120)}}<br>{{TooltipSimple|''Phases: 2, 3''|Samples: 3638, 562}} |
|Light Cruiser He-Class/Flagship | |Light Cruiser He-Class/Flagship | ||
|Heavy Cruiser Ne-Class/Elite | |Heavy Cruiser Ne-Class/Elite | ||
| Line 583: | Line 620: | ||
|U | |U | ||
|Boss | |Boss | ||
| − | |{{TooltipSimple|Line Ahead| | + | |{{TooltipSimple|Line Ahead|46% (5001/10967, HQ: 109-120)}}<br>{{TooltipSimple|''Phases: 2, 3''|Samples: 1335, 197}} |
|New Southern Battleship Princess/III | |New Southern Battleship Princess/III | ||
|Standard Carrier Wo-Class/Kai Flagship II | |Standard Carrier Wo-Class/Kai Flagship II | ||
| Line 593: | Line 630: | ||
|U | |U | ||
|Boss | |Boss | ||
| − | |{{TooltipSimple|Line Ahead| | + | |{{TooltipSimple|Line Ahead|44% (4800/10967, HQ: 108-120)}}<br>{{TooltipSimple|''Phases: 2, 3''|Samples: 1234, 208}} |
|New Southern Battleship Princess/III | |New Southern Battleship Princess/III | ||
|Standard Carrier Wo-Class/Kai Flagship III | |Standard Carrier Wo-Class/Kai Flagship III | ||
| Line 603: | Line 640: | ||
|U | |U | ||
|Boss/Final | |Boss/Final | ||
| − | |{{TooltipSimple|Line Ahead| | + | |{{TooltipSimple|Line Ahead|11% (1166/10967, HQ: 109-120)}}<br>{{TooltipSimple|''Phases: 2''|Samples: 294}} |
|New Southern Battleship Princess/Damaged III | |New Southern Battleship Princess/Damaged III | ||
|Standard Carrier Wo-Class/Kai Flagship IV | |Standard Carrier Wo-Class/Kai Flagship IV | ||
| Line 615: | Line 652: | ||
|V | |V | ||
|Defense | |Defense | ||
| − | |{{TooltipSimple|Diamond| | + | |{{TooltipSimple|Diamond|18% (72/408, HQ: 110-120)}}<br>{{TooltipSimple|''Phases: 3''|Samples: 12}} |
|Airfield Princess/VII | |Airfield Princess/VII | ||
|Airfield Princess/Patrol Aircraft Deployment II | |Airfield Princess/Patrol Aircraft Deployment II | ||
| Line 623: | Line 660: | ||
|V | |V | ||
|Defense | |Defense | ||
| − | |{{TooltipSimple|Diamond| | + | |{{TooltipSimple|Diamond|32% (129/408, HQ: 110-120)}}<br>{{TooltipSimple|''Phases: 3''|Samples: 30}} |
|Airfield Princess/VII | |Airfield Princess/VII | ||
|Airfield Princess/Patrol Aircraft Deployment III | |Airfield Princess/Patrol Aircraft Deployment III | ||
| Line 631: | Line 668: | ||
|V | |V | ||
|Defense | |Defense | ||
| − | |{{TooltipSimple|Diamond| | + | |{{TooltipSimple|Diamond|34% (138/408, HQ: 112-120)}}<br>{{TooltipSimple|''Phases: 3''|Samples: 38}} |
|Airfield Princess/VII | |Airfield Princess/VII | ||
|Airfield Princess/Patrol Aircraft Deployment III | |Airfield Princess/Patrol Aircraft Deployment III | ||
|Airfield Princess/XVII | |Airfield Princess/XVII | ||
| + | |Airfield Princess/XVI | ||
| + | |- | ||
| + | |V | ||
| + | |Defense | ||
| + | |{{TooltipSimple|Diamond|17% (69/408, HQ: 116-120)}}<br>{{TooltipSimple|''Phases: 3''|Samples: 26}} | ||
| + | |Airfield Princess/VII | ||
| + | |Airfield Princess/XVIII | ||
| + | |Airfield Princess/Patrol Aircraft Deployment III | ||
|Airfield Princess/XVI | |Airfield Princess/XVI | ||
}} | }} | ||
| Line 641: | Line 686: | ||
|X | |X | ||
|Normal | |Normal | ||
| − | |{{TooltipSimple|Line Ahead|52% ( | + | |{{TooltipSimple|Line Ahead|52% (6493/12472, HQ: 109-120)}}<br>{{TooltipSimple|Double Line|15% (1823/12472, HQ: 109-120)}}<br>{{TooltipSimple|Vanguard|33% (4156/12472, HQ: 109-120)}}<br>{{TooltipSimple|''Phases: 3''|Samples: 3575}} |
|Heavy Cruiser Ri-Class/B Flagship | |Heavy Cruiser Ri-Class/B Flagship | ||
|Torpedo Cruiser Chi-Class/Flagship | |Torpedo Cruiser Chi-Class/Flagship | ||
| Line 652: | Line 697: | ||
|Y | |Y | ||
|Boss | |Boss | ||
| − | |{{TooltipSimple|Cruising Formation 4| | + | |{{TooltipSimple|Cruising Formation 4|68% (6211/9117, HQ: 109-120)}}<br>{{TooltipSimple|''Phases: 3''|Samples: 1722}} |
|Outer Southern Sea Destroyer Princess/II | |Outer Southern Sea Destroyer Princess/II | ||
|Abyssal Nimbus Princess/II | |Abyssal Nimbus Princess/II | ||
| Line 668: | Line 713: | ||
|Y | |Y | ||
|Boss/Final | |Boss/Final | ||
| − | |{{TooltipSimple|Cruising Formation 4| | + | |{{TooltipSimple|Cruising Formation 4|32% (2906/9117, HQ: 109-120)}}<br>{{TooltipSimple|''Phases: 3''|Samples: 1107}} |
|Outer Southern Sea Destroyer Princess/Damaged II | |Outer Southern Sea Destroyer Princess/Damaged II | ||
|Abyssal Nimbus Princess/II | |Abyssal Nimbus Princess/II | ||
| Line 703: | Line 748: | ||
{{Map/ImageNode|M2|Medium|E-3|x=557|y=305}} | {{Map/ImageNode|M2|Medium|E-3|x=557|y=305}} | ||
{{Map/ImageNode|M|Medium|E-3|x=610|y=229}} | {{Map/ImageNode|M|Medium|E-3|x=610|y=229}} | ||
| − | {{Map/ImageNode|N|Medium|E-3|x=536|y=261|drops=<table class="wikitable"><tr><th>Type</th><th>Ships</th></tr><tr><th>DD</th><td>{{Ship/Banner|small=true|Maikaze}}</td></tr></table>}} | + | {{Map/ImageNode|N|Medium|E-3|x=536|y=261|drops=<table class="wikitable"><tr><th>Type</th><th>Ships</th></tr><tr><th>DD</th><td>{{Ship/Banner|small=true|Amagiri}}{{Ship/Banner|small=true|Maikaze}}{{Ship/Banner|small=true|Sagiri}}<br>{{Ship/Banner|small=true|Tanikaze}}{{Ship/Banner|small=true|Tokitsukaze}}</td></tr></table>}} |
{{Map/ImageNode|O|Medium|E-3|x=472|y=289}} | {{Map/ImageNode|O|Medium|E-3|x=472|y=289}} | ||
| − | {{Map/ImageNode|P|Medium|E-3|x=417|y=289|drops=<table class="wikitable"><tr><th>Type</th><th>Ships</th></tr><tr><th>DD</th><td>{{Ship/Banner|small=true|Arashi}}</td></tr></table>}} | + | {{Map/ImageNode|P|Medium|E-3|x=417|y=289|drops=<table class="wikitable"><tr><th>Type</th><th>Ships</th></tr><tr><th>DE</th><td>{{Ship/Banner|small=true|Daitou}}{{Ship/Banner|small=true|Matsuwa}}</td></tr><tr><th>DD</th><td>{{Ship/Banner|small=true|Amagiri}}{{Ship/Banner|small=true|Arashi}}{{Ship/Banner|small=true|Asagumo}}<br>{{Ship/Banner|small=true|Hatsukaze}}{{Ship/Banner|small=true|Isokaze}}{{Ship/Banner|small=true|Maikaze}}<br>{{Ship/Banner|small=true|Nowaki}}{{Ship/Banner|small=true|Oyashio}}{{Ship/Banner|small=true|Sagiri}}<br>{{Ship/Banner|small=true|Takanami}}{{Ship/Banner|small=true|Tanikaze}}{{Ship/Banner|small=true|Tokitsukaze}}<br></td></tr><tr><th>CVL</th><td>{{Ship/Banner|small=true|Gambier Bay}}</td></tr><tr><th>SSV</th><td>{{Ship/Banner|small=true|I-14}}</td></tr><tr><th>AO</th><td>{{Ship/Banner|small=true|Souya}}</td></tr></table>}} |
{{Map/ImageNode|Q'|Medium|E-3|x=361|y=310}} | {{Map/ImageNode|Q'|Medium|E-3|x=361|y=310}} | ||
| − | {{Map/ImageNode|Q|Medium|E-3|x=324|y=250|drops=<table class="wikitable"><tr><th>Type</th><th>Ships</th></tr><tr><th>CVL</th><td>{{Ship/Banner|small=true|Shinyou}}</td></tr></table>}} | + | {{Map/ImageNode|Q|Medium|E-3|x=324|y=250|drops=<table class="wikitable"><tr><th>Type</th><th>Ships</th></tr><tr><th>DE</th><td>{{Ship/Banner|small=true|Hiburi}}{{Ship/Banner|small=true|Shimushu}}</td></tr><tr><th>DD</th><td>{{Ship/Banner|small=true|Amatsukaze}}{{Ship/Banner|small=true|Ariake}}{{Ship/Banner|small=true|Harusame}}<br>{{Ship/Banner|small=true|Oyashio}}{{Ship/Banner|small=true|Takanami}}{{Ship/Banner|small=true|Tamanami}}<br>{{Ship/Banner|small=true|Tokitsukaze}}</td></tr><tr><th>CL</th><td>{{Ship/Banner|small=true|Ooyodo}}{{Ship/Banner|small=true|Yahagi}}</td></tr><tr><th>CVL</th><td>{{Ship/Banner|small=true|Shinyou}}</td></tr><tr><th>BB</th><td>{{Ship/Banner|small=true|Yamato}}</td></tr><tr><th>SSV</th><td>{{Ship/Banner|small=true|I-13}}</td></tr><tr><th>CT</th><td>{{Ship/Banner|small=true|Kashima}}</td></tr></table>}} |
{{Map/ImageNode|R|Medium|E-3|x=247|y=179}} | {{Map/ImageNode|R|Medium|E-3|x=247|y=179}} | ||
{{Map/ImageNode|Start 2|Medium|E-3|x=621|y=150}} | {{Map/ImageNode|Start 2|Medium|E-3|x=621|y=150}} | ||
{{Map/ImageNode|Start 3|Medium|E-3|x=379|y=113}} | {{Map/ImageNode|Start 3|Medium|E-3|x=379|y=113}} | ||
| − | {{Map/ImageNode|S|Medium|E-3|x=201|y=272}} | + | {{Map/ImageNode|S|Medium|E-3|x=201|y=272|drops=<table class="wikitable"><tr><th>Type</th><th>Ships</th></tr><tr><th>DD</th><td>{{Ship/Banner|small=true|Maikaze}}{{Ship/Banner|small=true|Sagiri}}{{Ship/Banner|small=true|Tokitsukaze}}<br></td></tr></table>}} |
{{Map/ImageNode|T|Medium|E-3|x=132|y=250}} | {{Map/ImageNode|T|Medium|E-3|x=132|y=250}} | ||
{{Map/ImageNode|U'|Medium|E-3|x=209|y=303}} | {{Map/ImageNode|U'|Medium|E-3|x=209|y=303}} | ||
| − | {{Map/ImageNode|U|Medium|E-3|x=162|y=308}} | + | {{Map/ImageNode|U|Medium|E-3|x=162|y=308|drops=<table class="wikitable"><tr><th>Type</th><th>Ships</th></tr><tr><th>DE</th><td>{{Ship/Banner|small=true|Daitou}}{{Ship/Banner|small=true|Matsuwa}}</td></tr><tr><th>DD</th><td>{{Ship/Banner|small=true|Amagiri}}{{Ship/Banner|small=true|Asagumo}}{{Ship/Banner|small=true|Hatsukaze}}<br>{{Ship/Banner|small=true|Isokaze}}{{Ship/Banner|small=true|Maikaze}}{{Ship/Banner|small=true|Nowaki}}<br>{{Ship/Banner|small=true|Sagiri}}{{Ship/Banner|small=true|Takanami}}{{Ship/Banner|small=true|Tanikaze}}<br>{{Ship/Banner|small=true|Tokitsukaze}}</td></tr><tr><th>SSV</th><td>{{Ship/Banner|small=true|I-14}}</td></tr><tr><th>AO</th><td>{{Ship/Banner|small=true|Souya}}</td></tr></table>}} |
{{Map/ImageNode|V|Medium|E-3|x=233|y=284}} | {{Map/ImageNode|V|Medium|E-3|x=233|y=284}} | ||
{{Map/ImageNode|W|Medium|E-3|x=277|y=206}} | {{Map/ImageNode|W|Medium|E-3|x=277|y=206}} | ||
| − | {{Map/ImageNode|X|Medium|E-3|x=267|y=251}} | + | {{Map/ImageNode|X|Medium|E-3|x=267|y=251|drops=<table class="wikitable"><tr><th>Type</th><th>Ships</th></tr><tr><th>DE</th><td>{{Ship/Banner|small=true|Daitou}}{{Ship/Banner|small=true|Matsuwa}}</td></tr><tr><th>DD</th><td>{{Ship/Banner|small=true|Amagiri}}{{Ship/Banner|small=true|Arashi}}{{Ship/Banner|small=true|Asagumo}}<br>{{Ship/Banner|small=true|Hatsukaze}}{{Ship/Banner|small=true|Isokaze}}{{Ship/Banner|small=true|Maikaze}}<br>{{Ship/Banner|small=true|Nowaki}}{{Ship/Banner|small=true|Oyashio}}{{Ship/Banner|small=true|Sagiri}}<br>{{Ship/Banner|small=true|Takanami}}{{Ship/Banner|small=true|Tanikaze}}{{Ship/Banner|small=true|Tokitsukaze}}<br></td></tr></table>}} |
{{Map/ImageNode|Y'|Medium|E-3|x=267|y=305}} | {{Map/ImageNode|Y'|Medium|E-3|x=267|y=305}} | ||
| − | {{Map/ImageNode|Y|Medium|E-3|x=307|y=290}} | + | {{Map/ImageNode|Y|Medium|E-3|x=307|y=290|drops=<table class="wikitable"><tr><th>Type</th><th>Ships</th></tr><tr><th>DE</th><td>{{Ship/Banner|small=true|Hiburi}}{{Ship/Banner|small=true|Shimushu}}</td></tr><tr><th>DD</th><td>{{Ship/Banner|small=true|Amatsukaze}}{{Ship/Banner|small=true|Ariake}}{{Ship/Banner|small=true|Harusame}}<br>{{Ship/Banner|small=true|Oyashio}}{{Ship/Banner|small=true|Takanami}}{{Ship/Banner|small=true|Tamanami}}<br>{{Ship/Banner|small=true|Tokitsukaze}}</td></tr><tr><th>CL</th><td>{{Ship/Banner|small=true|Ooyodo}}{{Ship/Banner|small=true|Yahagi}}</td></tr><tr><th>CA</th><td>{{Ship/Banner|small=true|Mikuma}}{{Ship/Banner|small=true|Prinz Eugen}}</td></tr><tr><th>CVL</th><td>{{Ship/Banner|small=true|Shinyou}}</td></tr><tr><th>BB</th><td>{{Ship/Banner|small=true|Yamato}}</td></tr><tr><th>SSV</th><td>{{Ship/Banner|small=true|I-13}}</td></tr><tr><th>CT</th><td>{{Ship/Banner|small=true|Kashima}}</td></tr></table>}} |
}} | }} | ||
<div class="map-nodes"> | <div class="map-nodes"> | ||
| − | {{Map/Nodes|diff=Medium|name= | + | {{Map/Nodes|diff=Medium|name= |
| − | | | + | |AB |
| − | | | + | |Raid |
| − | |{{TooltipSimple| | + | |{{TooltipSimple|Diamond|8% (264/3186)}} |
| − | | | + | |Airfield Princess/VI |
| − | | | + | |Airfield Princess/V |
| − | | | + | |- |
| − | }} | + | |AB |
| − | + | |Raid | |
| − | | | + | |{{TooltipSimple|Diamond|39% (1252/3186)}} |
| − | | | + | |Airfield Princess/VI |
| − | |{{TooltipSimple|Diamond| | + | |Airfield Princess/VI |
| − | | | + | |- |
| − | | | + | |AB |
| − | | | + | |Raid |
| − | | | + | |{{TooltipSimple|Diamond|35% (1130/3186)}} |
| − | | | + | |Airfield Princess/VI |
| − | | | + | |Airfield Princess/V |
| + | |Airfield Princess/V | ||
| + | |- | ||
| + | |AB | ||
| + | |Raid | ||
| + | |{{TooltipSimple|Diamond|17% (540/3186)}} | ||
| + | |Airfield Princess/VI | ||
| + | |Airfield Princess/VI | ||
| + | |Airfield Princess/V | ||
}} | }} | ||
| − | {{Map/Nodes|diff=Medium|name=深海潜水艦隊 偵察前衛哨戒 | + | {{Map/Nodes|diff=Medium|name=深海潜水艦隊 偵察前衛哨戒 I線 |
| − | | | + | |A |
|Normal | |Normal | ||
| − | |{{TooltipSimple|Line Abreast| | + | |{{TooltipSimple|Echelon|12% (832/6744, HQ: 99-120)}}<br>{{TooltipSimple|Line Abreast|12% (800/6744, HQ: 99-120)}}<br>{{TooltipSimple|''Phases: 1, 2, 3''|Samples: 81, 318, 32}} |
|Submarine Ka-Class/Elite | |Submarine Ka-Class/Elite | ||
|Submarine Ka-Class | |Submarine Ka-Class | ||
|Submarine Ka-Class | |Submarine Ka-Class | ||
|- | |- | ||
| − | | | + | |A |
|Normal | |Normal | ||
| − | |{{TooltipSimple|Echelon| | + | |{{TooltipSimple|Echelon|19% (1303/6744, HQ: 99-120)}}<br>{{TooltipSimple|Line Abreast|19% (1296/6744, HQ: 99-120)}}<br>{{TooltipSimple|''Phases: 1, 2, 3''|Samples: 127, 509, 85}} |
|Submarine Ka-Class/Elite | |Submarine Ka-Class/Elite | ||
|Submarine Ka-Class/Elite | |Submarine Ka-Class/Elite | ||
|Submarine Ka-Class | |Submarine Ka-Class | ||
|- | |- | ||
| − | | | + | |A |
|Normal | |Normal | ||
| − | |{{TooltipSimple|Echelon| | + | |{{TooltipSimple|Echelon|19% (1265/6744, HQ: 99-120)}}<br>{{TooltipSimple|Line Abreast|19% (1248/6744, HQ: 99-120)}}<br>{{TooltipSimple|''Phases: 1, 2, 3''|Samples: 76, 474, 44}} |
|Submarine Ka-Class/Flagship | |Submarine Ka-Class/Flagship | ||
|Submarine Ka-Class/Elite | |Submarine Ka-Class/Elite | ||
|Submarine Ka-Class/Elite | |Submarine Ka-Class/Elite | ||
}} | }} | ||
| − | + | {{Map/Nodes|diff=Medium|name=深海空母機動部隊 艦載機群 | |
| − | {{Map/Nodes|diff=Medium|name= | + | |B |
| − | | | ||
|Defense | |Defense | ||
| − | |{{TooltipSimple|Diamond| | + | |{{TooltipSimple|Diamond|2% (33/1801, HQ: 100-120)}}<br>{{TooltipSimple|''Phases: 2''|Samples: 12}} |
| − | | | + | |Aircraft Carrier Water Demon |
| − | | | + | |Light Carrier Nu-Class/Flagship II |
| − | + | |Light Carrier Nu-Class/Flagship II | |
| − | + | |Heavy Cruiser Ne-Class | |
| − | | | + | |Light Cruiser Tsu-Class/Elite |
| + | |Transport Ship Wa-Class/Flagship | ||
| + | |- | ||
| + | |B | ||
|Defense | |Defense | ||
| − | |{{TooltipSimple|Diamond| | + | |{{TooltipSimple|Diamond|41% (746/1801, HQ: 99-120)}}<br>{{TooltipSimple|''Phases: 1, 2, 3''|Samples: 70, 116, 24}} |
| − | | | + | |Aircraft Carrier Water Demon |
| − | | | + | |Light Carrier Nu-Class/Flagship II |
| + | |Light Carrier Nu-Class/Elite II | ||
| + | |Heavy Cruiser Ne-Class | ||
| + | |Light Cruiser Tsu-Class/Elite | ||
| + | |Light Cruiser Ho-Class/Elite | ||
|- | |- | ||
| − | | | + | |B |
|Defense | |Defense | ||
| − | |{{TooltipSimple|Diamond| | + | |{{TooltipSimple|Diamond|57% (1022/1801, HQ: 99-120)}}<br>{{TooltipSimple|''Phases: 1, 2, 3''|Samples: 121, 158, 45}} |
| − | | | + | |Aircraft Carrier Water Demon |
| − | | | + | |Light Carrier Nu-Class/Flagship II |
| − | | | + | |Battleship Princess |
| + | |Heavy Cruiser Ne-Class | ||
| + | |Light Cruiser Tsu-Class/Elite | ||
| + | |Light Cruiser Ho-Class/Elite | ||
| + | }} | ||
| + | {{Map/Nodes|diff=Medium|name=深海潜水艦隊 偵察前衛哨戒 II線 | ||
| + | |C | ||
| + | |Normal | ||
| + | |{{TooltipSimple|Echelon|13% (183/1366, HQ: 102-120)}}<br>{{TooltipSimple|Line Abreast|13% (178/1366, HQ: 100-120)}}<br>{{TooltipSimple|''Phases: 1, 2, 3''|Samples: 8, 28, 22}} | ||
| + | |Submarine Ka-Class/Elite | ||
| + | |Submarine Ka-Class | ||
| + | |Submarine Ka-Class | ||
|- | |- | ||
| − | | | + | |C |
| − | |||
| − | |||
| − | |||
| − | |||
| − | |||
| − | |||
| − | |||
| − | |||
|Normal | |Normal | ||
| − | |{{TooltipSimple|Echelon| | + | |{{TooltipSimple|Echelon|21% (285/1366, HQ: 100-120)}}<br>{{TooltipSimple|Line Abreast|19% (260/1366, HQ: 100-120)}}<br>{{TooltipSimple|''Phases: 1, 2, 3''|Samples: 22, 50, 30}} |
|Submarine Ka-Class/Elite | |Submarine Ka-Class/Elite | ||
|Submarine Ka-Class/Elite | |Submarine Ka-Class/Elite | ||
|Submarine Ka-Class | |Submarine Ka-Class | ||
| + | |- | ||
| + | |C | ||
| + | |Normal | ||
| + | |{{TooltipSimple|Echelon|17% (227/1366, HQ: 100-120)}}<br>{{TooltipSimple|Line Abreast|17% (233/1366, HQ: 99-120)}}<br>{{TooltipSimple|''Phases: 1, 2, 3''|Samples: 10, 34, 21}} | ||
| + | |Submarine Ka-Class/Flagship | ||
| + | |Submarine Ka-Class/Elite | ||
| + | |Submarine Ka-Class/Elite | ||
}} | }} | ||
| − | {{Map/Nodes|diff=Medium| | + | {{Map/Nodes|diff=Medium|D|Empty|kind=0}} |
{{Map/Nodes|diff=Medium|name=深海基地航空隊 | {{Map/Nodes|diff=Medium|name=深海基地航空隊 | ||
| − | | | + | |E |
| + | |Defense | ||
| + | |{{TooltipSimple|Diamond|4% (232/6413, HQ: 100-120)}}<br>{{TooltipSimple|''Phases: 2''|Samples: 56}} | ||
| + | |Airfield Princess/VII | ||
| + | |Airfield Princess/XVII | ||
| + | |- | ||
| + | |E | ||
|Defense | |Defense | ||
| − | |{{TooltipSimple|Diamond| | + | |{{TooltipSimple|Diamond|26% (1637/6413, HQ: 99-120)}}<br>{{TooltipSimple|''Phases: 1, 2, 3''|Samples: 80, 275, 45}} |
|Airfield Princess/XVI | |Airfield Princess/XVI | ||
|Airfield Princess/V | |Airfield Princess/V | ||
|- | |- | ||
| − | | | + | |E |
|Defense | |Defense | ||
| − | |{{TooltipSimple|Diamond| | + | |{{TooltipSimple|Diamond|27% (1725/6413, HQ: 99-120)}}<br>{{TooltipSimple|''Phases: 1, 2, 3''|Samples: 91, 331, 44}} |
|Airfield Princess/XVI | |Airfield Princess/XVI | ||
|Airfield Princess/VI | |Airfield Princess/VI | ||
| − | |||
| − | |||
| − | |||
| − | |||
| − | |||
| − | |||
| − | |||
| − | |||
|- | |- | ||
| − | | | + | |E |
| − | | | + | |Defense |
| − | |{{TooltipSimple| | + | |{{TooltipSimple|Diamond|22% (1386/6413, HQ: 99-120)}}<br>{{TooltipSimple|''Phases: 1, 2, 3''|Samples: 48, 261, 33}} |
| − | | | + | |Airfield Princess/VI |
| − | | | + | |Airfield Princess/XVI |
| − | | | + | |Airfield Princess/V |
|- | |- | ||
| − | | | + | |E |
| − | | | + | |Defense |
| − | |{{TooltipSimple| | + | |{{TooltipSimple|Diamond|22% (1433/6413, HQ: 99-120)}}<br>{{TooltipSimple|''Phases: 1, 2, 3''|Samples: 46, 324, 29}} |
| − | | | + | |Airfield Princess/VI |
| − | | | + | |Airfield Princess/XVII |
| − | | | + | |Airfield Princess/V |
}} | }} | ||
| − | {{Map/Nodes|diff=Medium| | + | {{Map/Nodes|diff=Medium|name=深海基地航空隊 |
| − | {{ | + | |F |
| − | | | + | |Defense |
| + | |{{TooltipSimple|Diamond|7% (95/1387, HQ: 104-120)}}<br>{{TooltipSimple|''Phases: 2, 3''|Samples: 3, 15}} | ||
| + | |Airfield Princess/VII | ||
| + | |Airfield Princess/XVII | ||
| + | |- | ||
| + | |F | ||
|Defense | |Defense | ||
| − | |{{TooltipSimple|Diamond| | + | |{{TooltipSimple|Diamond|23% (317/1387, HQ: 100-120)}}<br>{{TooltipSimple|''Phases: 1, 2, 3''|Samples: 7, 28, 3}} |
| + | |Airfield Princess/XVI | ||
|Airfield Princess/V | |Airfield Princess/V | ||
| + | |- | ||
| + | |F | ||
| + | |Defense | ||
| + | |{{TooltipSimple|Diamond|22% (304/1387, HQ: 100-120)}}<br>{{TooltipSimple|''Phases: 1, 2, 3''|Samples: 13, 29, 5}} | ||
|Airfield Princess/XVI | |Airfield Princess/XVI | ||
| − | |Airfield Princess/ | + | |Airfield Princess/VI |
|- | |- | ||
| − | | | + | |F |
|Defense | |Defense | ||
| − | |{{TooltipSimple|Diamond| | + | |{{TooltipSimple|Diamond|26% (355/1387, HQ: 100-120)}}<br>{{TooltipSimple|''Phases: 1, 2, 3''|Samples: 4, 28, 23}} |
|Airfield Princess/VI | |Airfield Princess/VI | ||
| − | |||
|Airfield Princess/XVI | |Airfield Princess/XVI | ||
| + | |Airfield Princess/V | ||
|- | |- | ||
| − | | | + | |F |
|Defense | |Defense | ||
| − | |{{TooltipSimple|Diamond| | + | |{{TooltipSimple|Diamond|23% (316/1387, HQ: 100-120)}}<br>{{TooltipSimple|''Phases: 1, 2, 3''|Samples: 8, 21, 22}} |
|Airfield Princess/VI | |Airfield Princess/VI | ||
| − | |Airfield Princess/ | + | |Airfield Princess/XVII |
| − | |Airfield Princess/ | + | |Airfield Princess/V |
| − | |||
}} | }} | ||
| − | {{Map/Nodes|diff=Medium|name=深海潜水艦隊 偵察前衛哨戒 | + | {{Map/Nodes|diff=Medium|name=深海潜水艦隊 偵察前衛哨戒 III線 |
| − | | | + | |G |
|Normal | |Normal | ||
| − | |{{TooltipSimple|Echelon| | + | |{{TooltipSimple|Echelon|11% (675/6414, HQ: 100-120)}}<br>{{TooltipSimple|Line Abreast|10% (665/6414, HQ: 100-120)}}<br>{{TooltipSimple|''Phases: 1, 2, 3''|Samples: 8, 25, 251}} |
| + | |Submarine Ka-Class/Elite | ||
|Submarine Ka-Class/Elite | |Submarine Ka-Class/Elite | ||
|Submarine Ka-Class | |Submarine Ka-Class | ||
| − | |||
|- | |- | ||
| − | | | + | |G |
| + | |Normal | ||
| + | |{{TooltipSimple|Echelon|13% (849/6414, HQ: 100-120)}}<br>{{TooltipSimple|Line Abreast|13% (844/6414, HQ: 100-120)}}<br>{{TooltipSimple|''Phases: 1, 2, 3''|Samples: 12, 38, 309}} | ||
| + | |Submarine Ka-Class/Elite | ||
| + | |Submarine Ka-Class/Elite | ||
| + | |Submarine Ka-Class/Elite | ||
| + | |- | ||
| + | |G | ||
|Normal | |Normal | ||
| − | |{{TooltipSimple|Echelon| | + | |{{TooltipSimple|Echelon|26% (1679/6414, HQ: 100-120)}}<br>{{TooltipSimple|Line Abreast|27% (1702/6414, HQ: 100-120)}}<br>{{TooltipSimple|''Phases: 1, 2, 3''|Samples: 10, 39, 736}} |
|Submarine Ka-Class/Flagship | |Submarine Ka-Class/Flagship | ||
| + | |Submarine Ka-Class/Elite | ||
|Submarine Ka-Class/Elite | |Submarine Ka-Class/Elite | ||
|Submarine Ka-Class/Elite | |Submarine Ka-Class/Elite | ||
}} | }} | ||
| − | {{Map/Nodes|diff=Medium| | + | {{Map/Nodes|diff=Medium|H|Empty|kind=0}} |
| − | + | {{Map/Nodes|diff=Medium|name=深海基地航空隊 | |
| − | {{Map/Nodes|diff=Medium|name= | + | |I |
| − | | | + | |Defense |
| − | | | + | |{{TooltipSimple|Diamond|10% (382/3671, HQ: 102-120)}}<br>{{TooltipSimple|''Phases: 3''|Samples: 103}} |
| − | |{{TooltipSimple| | + | |Airfield Princess/VII |
| − | | | + | |Airfield Princess/XVII |
| − | | | + | |- |
| − | | | + | |I |
| − | | | + | |Defense |
| − | | | + | |{{TooltipSimple|Diamond|19% (688/3671, HQ: 102-120)}}<br>{{TooltipSimple|''Phases: 1, 2, 3''|Samples: 4, 2, 131}} |
| − | | | + | |Airfield Princess/XVI |
| − | }} | + | |Airfield Princess/V |
| − | {{ | + | |- |
| − | | | + | |I |
| + | |Defense | ||
| + | |{{TooltipSimple|Diamond|19% (696/3671, HQ: 100-120)}}<br>{{TooltipSimple|''Phases: 1, 3''|Samples: 6, 103}} | ||
| + | |Airfield Princess/XVI | ||
| + | |Airfield Princess/VI | ||
| + | |- | ||
| + | |I | ||
|Defense | |Defense | ||
| − | |{{TooltipSimple|Diamond|25% ( | + | |{{TooltipSimple|Diamond|25% (935/3671, HQ: 102-120)}}<br>{{TooltipSimple|''Phases: 1, 3''|Samples: 4, 221}} |
| + | |Airfield Princess/VI | ||
| + | |Airfield Princess/XVI | ||
|Airfield Princess/V | |Airfield Princess/V | ||
| − | |||
| − | |||
|- | |- | ||
| − | | | + | |I |
|Defense | |Defense | ||
| − | |{{TooltipSimple|Diamond| | + | |{{TooltipSimple|Diamond|26% (970/3671, HQ: 100-120)}}<br>{{TooltipSimple|''Phases: 1, 3''|Samples: 4, 206}} |
|Airfield Princess/VI | |Airfield Princess/VI | ||
|Airfield Princess/XVII | |Airfield Princess/XVII | ||
| − | |Airfield Princess/ | + | |Airfield Princess/V |
}} | }} | ||
| − | {{Map/Nodes|diff=Medium|name= | + | {{Map/Nodes|diff=Medium|name=深海潜水艦隊 遊撃群狼A集団 |
| − | | | + | |J |
|Normal | |Normal | ||
| − | |{{TooltipSimple| | + | |{{TooltipSimple|Echelon|10% (688/6954, HQ: 99-120)}}<br>{{TooltipSimple|Line Abreast|11% (749/6954, HQ: 99-120)}}<br>{{TooltipSimple|''Phases: 1, 2, 3''|Samples: 66, 27, 206}} |
| − | | | + | |Submarine Yo-Class/Elite |
| − | | | + | |Submarine Yo-Class |
| − | | | + | |Submarine Ka-Class |
| − | | | + | |- |
| − | | | + | |J |
| − | | | + | |Normal |
| + | |{{TooltipSimple|Echelon|13% (897/6954, HQ: 99-120)}}<br>{{TooltipSimple|Line Abreast|13% (887/6954, HQ: 99-120)}}<br>{{TooltipSimple|''Phases: 1, 2, 3''|Samples: 106, 39, 275}} | ||
| + | |Submarine Yo-Class/Elite | ||
| + | |Submarine Yo-Class/Elite | ||
| + | |Submarine Ka-Class | ||
|- | |- | ||
| − | | | + | |J |
|Normal | |Normal | ||
| − | |{{TooltipSimple| | + | |{{TooltipSimple|Echelon|26% (1802/6954, HQ: 99-120)}}<br>{{TooltipSimple|Line Abreast|28% (1931/6954, HQ: 99-120)}}<br>{{TooltipSimple|''Phases: 1, 2, 3''|Samples: 97, 31, 757}} |
| − | | | + | |Submarine Yo-Class/Flagship |
| − | | | + | |Submarine Yo-Class/Elite |
| − | | | + | |Submarine Yo-Class/Elite |
| − | | | ||
| − | | | ||
| − | | | ||
}} | }} | ||
| − | {{Map/Nodes|diff=Medium| | + | {{Map/Nodes|diff=Medium|K|Empty|kind=0}} |
| − | | | + | {{Map/Nodes|diff=Medium|name=深海基地航空隊 (主力部隊A編隊) |
| − | | | + | |L |
| − | + | |Defense | |
| − | + | |{{TooltipSimple|Diamond|19% (2233/11848, HQ: 99-120)}}<br>{{TooltipSimple|''Phases: 1, 2, 3''|Samples: 53, 242, 203}} | |
| − | + | |Airfield Princess/V | |
| − | + | |Airfield Princess/XVI | |
| − | + | |Airfield Princess/XVI | |
| − | + | |- | |
| − | + | |L | |
| − | + | |Defense | |
| − | + | |{{TooltipSimple|Diamond|18% (2184/11848, HQ: 99-120)}}<br>{{TooltipSimple|''Phases: 1, 2, 3''|Samples: 69, 262, 175}} | |
| − | + | |Airfield Princess/V | |
| − | + | |Airfield Princess/XVII | |
| − | + | |Airfield Princess/XVI | |
| − | + | |- | |
| − | + | |L | |
| − | + | |Defense | |
| − | {{Map/Nodes|diff=Medium| | + | |{{TooltipSimple|Diamond|26% (3081/11848, HQ: 99-120)}}<br>{{TooltipSimple|''Phases: 1, 2, 3''|Samples: 64, 360, 302}} |
| − | + | |Airfield Princess/VI | |
| − | + | |Airfield Princess/XVII | |
| − | + | |Airfield Princess/XVI | |
| − | + | |- | |
| − | + | |L | |
| − | {{ | + | |Defense |
| − | + | |{{TooltipSimple|Diamond|31% (3645/11848, HQ: 99-120)}}<br>{{TooltipSimple|''Phases: 1, 2, 3''|Samples: 70, 345, 478}} | |
| − | {{ | + | |Airfield Princess/VI |
| − | + | |Airfield Princess/XVI | |
| − | | | + | |Airfield Princess/XVI |
| − | + | |Airfield Princess/XVI | |
| − | + | |- | |
| − | + | |L | |
| − | + | |Defense | |
| − | {{ | + | |{{TooltipSimple|Diamond|6% (705/11848, HQ: 100-120)}}<br>{{TooltipSimple|''Phases: 3''|Samples: 185}} |
| − | + | |Airfield Princess/VI | |
| − | {{ | + | |Airfield Princess/XVII |
| − | + | |Airfield Princess/XVI | |
| − | + | |Airfield Princess/XVI | |
| − | |||
| − | |||
| − | |||
| − | |||
| − | |||
| − | |||
| − | {{ | ||
| − | |||
| − | {{ | ||
| − | |||
| − | |||
| − | {{ | ||
| − | {{ | ||
| − | |||
| − | |||
| − | |||
| − | |||
| − | |||
| − | |||
| − | |||
| − | |||
| − | |||
| − | {{ | ||
| − | |||
| − | {{ | ||
| − | |||
}} | }} | ||
| − | + | {{Map/Nodes|diff=Medium|name=深海潜水艦隊 偵察前衛哨戒 IV線 | |
| − | {{Map/Nodes|diff= | + | |M |
| − | | | + | |Normal |
| − | | | + | |{{TooltipSimple|Echelon|12% (435/3560, HQ: 99-120)}}<br>{{TooltipSimple|Line Abreast|12% (434/3560, HQ: 99-120)}}<br>{{TooltipSimple|''Phases: 1, 2, 3''|Samples: 163, 2, 20}} |
| − | |{{TooltipSimple| | + | |Submarine Ka-Class/Elite |
| − | | | + | |Submarine Ka-Class |
| + | |Submarine Ka-Class | ||
|- | |- | ||
| − | | | + | |M |
| − | |||
| − | |||
| − | |||
| − | |||
| − | |||
| − | |||
| − | |||
| − | |||
| − | |||
| − | |||
| − | |||
| − | |||
| − | |||
|Normal | |Normal | ||
| − | |{{TooltipSimple|Echelon| | + | |{{TooltipSimple|Echelon|16% (573/3560, HQ: 99-120)}}<br>{{TooltipSimple|Line Abreast|15% (538/3560, HQ: 99-120)}}<br>{{TooltipSimple|''Phases: 1, 2, 3''|Samples: 182, 4, 30}} |
| − | |Submarine Ka-Class | + | |Submarine Ka-Class/Elite |
| − | |||
| − | |||
| − | |||
| − | |||
| − | |||
| − | |||
|Submarine Ka-Class/Elite | |Submarine Ka-Class/Elite | ||
| − | |||
|Submarine Ka-Class | |Submarine Ka-Class | ||
|- | |- | ||
| − | | | + | |M |
|Normal | |Normal | ||
| − | |{{TooltipSimple|Echelon| | + | |{{TooltipSimple|Echelon|22% (788/3560, HQ: 99-120)}}<br>{{TooltipSimple|Line Abreast|22% (792/3560, HQ: 99-120)}}<br>{{TooltipSimple|''Phases: 1, 2, 3''|Samples: 266, 2, 31}} |
| + | |Submarine Ka-Class/Flagship | ||
|Submarine Ka-Class/Elite | |Submarine Ka-Class/Elite | ||
|Submarine Ka-Class/Elite | |Submarine Ka-Class/Elite | ||
| − | |||
}} | }} | ||
| − | {{Map/Nodes|diff= | + | {{Map/Nodes|diff=Medium|name=深海空母機動部隊 艦載機群 |
| − | | | + | |M1 |
|Defense | |Defense | ||
| − | |{{TooltipSimple|Diamond| | + | |{{TooltipSimple|Diamond|19% (47/242, HQ: 102-120)}}<br>{{TooltipSimple|''Phases: 1''|Samples: 18}} |
|Aircraft Carrier Water Demon | |Aircraft Carrier Water Demon | ||
| + | |Light Carrier Nu-Class/Flagship II | ||
| + | |Light Carrier Nu-Class/Flagship II | ||
| + | |Heavy Cruiser Ne-Class | ||
| + | |Light Cruiser Tsu-Class/Elite | ||
| + | |Transport Ship Wa-Class/Flagship | ||
| + | |- | ||
| + | |M1 | ||
| + | |Defense | ||
| + | |{{TooltipSimple|Diamond|48% (116/242, HQ: 99-120)}}<br>{{TooltipSimple|''Phases: 1, 3''|Samples: 28, 4}} | ||
| + | |Aircraft Carrier Water Demon | ||
| + | |Light Carrier Nu-Class/Flagship II | ||
|Light Carrier Nu-Class/Elite II | |Light Carrier Nu-Class/Elite II | ||
| − | |||
|Heavy Cruiser Ne-Class | |Heavy Cruiser Ne-Class | ||
| − | |Light Cruiser Tsu-Class | + | |Light Cruiser Tsu-Class/Elite |
|Light Cruiser Ho-Class/Elite | |Light Cruiser Ho-Class/Elite | ||
|- | |- | ||
| − | | | + | |M1 |
|Defense | |Defense | ||
| − | |{{TooltipSimple|Diamond| | + | |{{TooltipSimple|Diamond|33% (79/242, HQ: 99-120)}}<br>{{TooltipSimple|''Phases: 1, 3''|Samples: 26, 4}} |
|Aircraft Carrier Water Demon | |Aircraft Carrier Water Demon | ||
| − | |Light Carrier Nu-Class/ | + | |Light Carrier Nu-Class/Flagship II |
| − | | | + | |Battleship Princess |
| − | |||
|Heavy Cruiser Ne-Class | |Heavy Cruiser Ne-Class | ||
| − | |Light Cruiser Tsu-Class | + | |Light Cruiser Tsu-Class/Elite |
| + | |Light Cruiser Ho-Class/Elite | ||
}} | }} | ||
| − | {{Map/Nodes|diff= | + | {{Map/Nodes|diff=Medium|name=深海潜水艦隊 遊撃群狼B集団 |
| − | | | + | |M2 |
|Normal | |Normal | ||
| − | |{{TooltipSimple|Line Abreast| | + | |{{TooltipSimple|Echelon|8% (7/90, HQ: 109-120)}}<br>{{TooltipSimple|Line Abreast|12% (11/90, HQ: 109-120)}}<br>{{TooltipSimple|''Phases: 1''|Samples: 2}} |
| − | |Submarine | + | |Submarine Yo-Class/Elite |
| − | |Submarine | + | |Submarine Yo-Class |
|Submarine Ka-Class | |Submarine Ka-Class | ||
|- | |- | ||
| − | | | + | |M2 |
|Normal | |Normal | ||
| − | |{{TooltipSimple|Echelon| | + | |{{TooltipSimple|Echelon|16% (14/90, HQ: 104-117)}}<br>{{TooltipSimple|Line Abreast|16% (14/90, HQ: 103-120)}}<br>{{TooltipSimple|''Phases: 1, 3''|Samples: 7, 1}} |
| − | |Submarine | + | |Submarine Yo-Class/Elite |
| − | |Submarine | + | |Submarine Yo-Class/Elite |
|Submarine Ka-Class | |Submarine Ka-Class | ||
| + | |- | ||
| + | |M2 | ||
| + | |Normal | ||
| + | |{{TooltipSimple|Echelon|26% (23/90, HQ: 103-120)}}<br>{{TooltipSimple|Line Abreast|23% (21/90, HQ: 102-120)}}<br>{{TooltipSimple|''Phases: 1''|Samples: 6}} | ||
| + | |Submarine Yo-Class/Flagship | ||
| + | |Submarine Yo-Class/Elite | ||
| + | |Submarine Yo-Class/Elite | ||
| + | }} | ||
| + | {{Map/Nodes|diff=Medium|name=深海急派増援群 前衛偵察部隊 | ||
| + | |N | ||
| + | |Normal | ||
| + | |{{TooltipSimple|Line Ahead|45% (1537/3451, HQ: 99-120)}}<br>{{TooltipSimple|Echelon|30% (1049/3451, HQ: 99-120)}}<br>{{TooltipSimple|Line Abreast|25% (865/3451, HQ: 99-120)}}<br>{{TooltipSimple|''Phases: 1, 2, 3''|Samples: 595, 8, 75}} | ||
| + | |Heavy Cruiser Ri-Class/Elite | ||
| + | |Light Cruiser Ho-Class/Elite | ||
| + | |Light Cruiser Ho-Class/Flagship | ||
| + | |Light Cruiser Tsu-Class | ||
| + | |Destroyer Ha-Class/Late Model | ||
| + | |Destroyer Ha-Class/Late Model | ||
}} | }} | ||
| − | {{Map/Nodes|diff= | + | {{Map/Nodes|diff=Medium|name=深海基地航空隊 (主力部隊B編隊) |
| − | + | |O | |
| − | | | ||
|Defense | |Defense | ||
| − | |{{TooltipSimple|Diamond| | + | |{{TooltipSimple|Diamond|17% (578/3329, HQ: 99-120)}}<br>{{TooltipSimple|''Phases: 1, 2, 3''|Samples: 106, 1, 11}} |
| − | |Airfield Princess/ | + | |Airfield Princess/V |
| + | |Airfield Princess/XVII | ||
| + | |Airfield Princess/Patrol Aircraft Deployment | ||
|- | |- | ||
| − | | | + | |O |
|Defense | |Defense | ||
| − | |{{TooltipSimple|Diamond| | + | |{{TooltipSimple|Diamond|16% (546/3329, HQ: 99-120)}}<br>{{TooltipSimple|''Phases: 1, 2, 3''|Samples: 73, 2, 21}} |
| − | |Airfield Princess/ | + | |Airfield Princess/VI |
| − | |Airfield Princess/ | + | |Airfield Princess/XVII |
| + | |Airfield Princess/Patrol Aircraft Deployment | ||
|- | |- | ||
| − | | | + | |O |
|Defense | |Defense | ||
| − | |{{TooltipSimple|Diamond| | + | |{{TooltipSimple|Diamond|30% (983/3329, HQ: 99-120)}}<br>{{TooltipSimple|''Phases: 1, 2, 3''|Samples: 169, 1, 26}} |
| + | |Airfield Princess/VI | ||
| + | |Airfield Princess/Patrol Aircraft Deployment II | ||
| + | |Airfield Princess/XVI | ||
|Airfield Princess/XVI | |Airfield Princess/XVI | ||
| − | |||
|- | |- | ||
| − | | | + | |O |
|Defense | |Defense | ||
| − | |{{TooltipSimple|Diamond| | + | |{{TooltipSimple|Diamond|31% (1047/3329, HQ: 99-120)}}<br>{{TooltipSimple|''Phases: 1, 2, 3''|Samples: 185, 4, 18}} |
| + | |Airfield Princess/VI | ||
| + | |Airfield Princess/XVI | ||
| + | |Airfield Princess/Patrol Aircraft Deployment | ||
|Airfield Princess/XVI | |Airfield Princess/XVI | ||
| − | |||
| − | |||
| − | |||
| − | |||
| − | |||
| − | |||
| − | |||
| − | |||
|- | |- | ||
| − | | | + | |O |
|Defense | |Defense | ||
| − | |{{TooltipSimple|Diamond| | + | |{{TooltipSimple|Diamond|5% (175/3329, HQ: 99-120)}}<br>{{TooltipSimple|''Phases: 1''|Samples: 34}} |
| + | |Airfield Princess/VII | ||
| + | |Airfield Princess/Patrol Aircraft Deployment II | ||
| + | |Airfield Princess/XVI | ||
|Airfield Princess/XVI | |Airfield Princess/XVI | ||
| − | |||
}} | }} | ||
| − | {{Map/Nodes|diff= | + | {{Map/Nodes|diff=Medium|name=深海急派増援群 先遣機動部隊 |
| − | | | + | |P |
|Normal | |Normal | ||
| − | |{{TooltipSimple| | + | |{{TooltipSimple|Diamond|26% (840/3224, HQ: 99-120)}}<br>{{TooltipSimple|''Phases: 1, 2, 3''|Samples: 133, 5, 24}} |
| − | | | + | |Light Carrier Nu-Class/Elite II |
| − | | | + | |Light Carrier Nu-Class/Elite II |
| − | | | + | |Heavy Cruiser Ne-Class |
| − | + | |Light Cruiser He-Class/Elite | |
| − | + | |Destroyer Ha-Class/Late Model | |
| − | + | |Destroyer Ha-Class/Late Model | |
| − | | | ||
| − | |||
| − | |||
| − | | | ||
|- | |- | ||
| − | | | + | |P |
| − | |||
| − | |||
| − | |||
| − | |||
| − | |||
| − | |||
| − | |||
|Normal | |Normal | ||
| − | |{{TooltipSimple| | + | |{{TooltipSimple|Diamond|56% (1796/3224, HQ: 99-120)}}<br>{{TooltipSimple|''Phases: 1, 2, 3''|Samples: 314, 3, 39}} |
| − | | | + | |Light Carrier Nu-Class/Flagship II |
| − | | | + | |Light Carrier Nu-Class/Elite II |
| − | | | + | |Heavy Cruiser Ne-Class |
| + | |Light Cruiser He-Class/Elite | ||
| + | |Destroyer Ha-Class/Late Model | ||
| + | |Destroyer Ha-Class/Late Model | ||
|- | |- | ||
| − | | | + | |P |
|Normal | |Normal | ||
| − | |{{TooltipSimple| | + | |{{TooltipSimple|Diamond|18% (588/3224, HQ: 99-120)}}<br>{{TooltipSimple|''Phases: 1, 3''|Samples: 109, 8}} |
| − | | | + | |Light Carrier Nu-Class/Flagship II |
| − | | | + | |Light Carrier Nu-Class/Flagship II |
| − | | | + | |Heavy Cruiser Ne-Class |
| + | |Light Cruiser He-Class/Flagship | ||
| + | |Destroyer Ha-Class/Late Model | ||
| + | |Destroyer Ha-Class/Late Model | ||
}} | }} | ||
| − | {{Map/Nodes|diff= | + | {{Map/Nodes|diff=Medium|name=深海急派増援群 空母機動部隊 |
| − | + | |Q | |
| − | | | + | |Boss |
| − | | | + | |{{TooltipSimple|Cruising Formation 4|82% (2115/2593, HQ: 99-120)}}<br>{{TooltipSimple|''Phases: 1, 2, 3''|Samples: 334, 7, 53}} |
| − | |{{TooltipSimple| | + | |Aircraft Carrier Water Demon |
| − | | | + | |Battleship Princess |
| − | | | + | |Heavy Cruiser Ne-Class |
| + | |Light Cruiser Tsu-Class/Elite | ||
| + | |Light Cruiser Ho-Class/Elite | ||
| + | |Transport Ship Wa-Class/Elite | ||
| + | |Light Cruiser He-Class/Elite | ||
| + | |Destroyer Ha-Class/Late Model | ||
| + | |Destroyer Ha-Class/Late Model | ||
| + | |Destroyer Ha-Class/Late Model | ||
| + | |Destroyer I-Class | ||
| + | |Destroyer I-Class | ||
|- | |- | ||
| − | | | + | |Q |
| − | | | + | |Boss/Final |
| − | |{{TooltipSimple| | + | |{{TooltipSimple|Cruising Formation 4|18% (478/2593, HQ: 99-120)}}<br>{{TooltipSimple|''Phases: 1''|Samples: 89}} |
| − | | | + | |Aircraft Carrier Water Demon |
| − | | | + | |Battleship Princess |
| − | | | + | |Battleship Princess |
| − | |- | + | |Heavy Cruiser Ne-Class |
| − | | | + | |Light Cruiser Tsu-Class/Elite |
| − | | | + | |Transport Ship Wa-Class/Flagship |
| − | | | + | |Light Cruiser He-Class/Flagship |
| − | | | + | |Destroyer Ha-Class/Late Model |
| − | | | + | |Destroyer Ha-Class/Late Model |
| − | | | + | |Destroyer Ha-Class/Late Model |
| + | |Destroyer I-Class | ||
| + | |Destroyer I-Class | ||
}} | }} | ||
| − | {{Map/Nodes|diff= | + | {{Map/Nodes|diff=Medium|Q'|Empty|kind=1}} |
| − | | | + | {{Map/Nodes|diff=Medium|name=海峡配備 深海魚雷艇部隊 |
| + | |R | ||
|Normal | |Normal | ||
| − | |{{TooltipSimple| | + | |{{TooltipSimple|Diamond|22% (1190/5318, HQ: 99-120)}}<br>{{TooltipSimple|''Phases: 2, 3''|Samples: 311, 4}} |
| − | | | + | |PT Imp Pack/III |
| − | | | + | |PT Imp Pack/II |
| − | | | + | |PT Imp Pack/II |
| + | |PT Imp Pack | ||
|- | |- | ||
| − | | | + | |R |
|Normal | |Normal | ||
| − | |{{TooltipSimple|Echelon| | + | |{{TooltipSimple|Diamond|70% (3730/5318, HQ: 99-120)}}<br>{{TooltipSimple|''Phases: 1, 2, 3''|Samples: 1, 852, 25}} |
| − | | | + | |PT Imp Pack/III |
| − | | | + | |PT Imp Pack/II |
| − | |Submarine | + | |PT Imp Pack/II |
| − | }} | + | |PT Imp Pack/II |
| − | {{Map/Nodes|diff= | + | |PT Imp Pack |
| − | | | + | |- |
| − | | | + | |R |
| − | |{{TooltipSimple| | + | |Normal |
| − | | | + | |{{TooltipSimple|Echelon|7% (398/5318, HQ: 102-120)}}<br>{{TooltipSimple|''Phases: 3''|Samples: 127}} |
| − | + | |PT Imp Pack/III | |
| − | | | + | |PT Imp Pack/III |
| + | |PT Imp Pack/II | ||
| + | |PT Imp Pack/II | ||
| + | |PT Imp Pack | ||
| + | }} | ||
| + | {{Map/Nodes|diff=Medium|name=深海任務部隊 ラエ輸送阻止線 | ||
| + | |S | ||
| + | |Normal | ||
| + | |{{TooltipSimple|Line Ahead|44% (1982/4549, HQ: 99-120)}}<br>{{TooltipSimple|Double Line|30% (1357/4549, HQ: 99-120)}}<br>{{TooltipSimple|Echelon|27% (1210/4549, HQ: 99-120)}}<br>{{TooltipSimple|''Phases: 2, 3''|Samples: 943, 101}} | ||
| + | |Light Cruiser He-Class/Flagship | ||
| + | |Heavy Cruiser Ne-Class | ||
| + | |Heavy Cruiser Ne-Class | ||
| + | |Destroyer Ha-Class/Late Model | ||
| + | |Destroyer Ha-Class/Late Model | ||
| + | |Submarine Yo-Class/Elite | ||
| + | }} | ||
| + | {{Map/Nodes|diff=Medium|T|Landing}} | ||
| + | {{Map/Nodes|diff=Medium|name=深海任務部隊 輸送阻止強襲群 | ||
| + | |U | ||
| + | |Boss | ||
| + | |{{TooltipSimple|Line Ahead|34% (1297/3841, HQ: 99-120)}}<br>{{TooltipSimple|''Phases: 2, 3''|Samples: 259, 33}} | ||
| + | |New Southern Battleship Princess/II | ||
| + | |Standard Carrier Wo-Class/Flagship III | ||
|Heavy Cruiser Ne-Class | |Heavy Cruiser Ne-Class | ||
|Light Cruiser Tsu-Class | |Light Cruiser Tsu-Class | ||
| − | | | + | |Destroyer Ha-Class/Late Model |
| + | |Destroyer Ha-Class/Late Model | ||
|- | |- | ||
| − | | | + | |U |
| − | | | + | |Boss |
| − | |{{TooltipSimple| | + | |{{TooltipSimple|Line Ahead|51% (1959/3841, HQ: 99-120)}}<br>{{TooltipSimple|''Phases: 2, 3''|Samples: 360, 48}} |
| − | | | + | |New Southern Battleship Princess/II |
| − | + | |Standard Carrier Wo-Class/Flagship IV | |
| − | | | + | |Heavy Cruiser Ne-Class/Elite |
| − | |Heavy Cruiser Ne-Class | ||
|Light Cruiser Tsu-Class | |Light Cruiser Tsu-Class | ||
| − | | | + | |Destroyer Ha-Class/Late Model |
| + | |Destroyer Ha-Class/Late Model | ||
|- | |- | ||
| − | | | + | |U |
| − | | | + | |Boss/Final |
| − | |{{TooltipSimple| | + | |{{TooltipSimple|Line Ahead|15% (585/3841, HQ: 100-120)}}<br>{{TooltipSimple|''Phases: 2''|Samples: 90}} |
| − | | | + | |New Southern Battleship Princess/Damaged II |
| − | + | |Standard Carrier Wo-Class/Kai Flagship II | |
| − | | | + | |Heavy Cruiser Ne-Class/Elite |
| − | |Heavy Cruiser | ||
| − | |||
|Light Cruiser Tsu-Class | |Light Cruiser Tsu-Class | ||
| − | |||
| − | |||
| − | |||
| − | |||
| − | |||
| − | |||
| − | |||
| − | |||
| − | |||
|Destroyer Ha-Class/Late Model | |Destroyer Ha-Class/Late Model | ||
|Destroyer Ha-Class/Late Model | |Destroyer Ha-Class/Late Model | ||
| − | |||
}} | }} | ||
| − | {{Map/Nodes|diff= | + | {{Map/Nodes|diff=Medium|U'|Empty|kind=1}} |
| − | | | + | {{Map/Nodes|diff=Medium|name=深海基地航空隊 (主力部隊C編隊) |
| + | |V | ||
|Defense | |Defense | ||
| − | |{{TooltipSimple|Diamond| | + | |{{TooltipSimple|Diamond|9% (35/404, HQ: 100-120)}}<br>{{TooltipSimple|''Phases: 3''|Samples: 7}} |
| − | |Airfield Princess/ | + | |Airfield Princess/V |
| + | |Airfield Princess/XVII | ||
|Airfield Princess/Patrol Aircraft Deployment | |Airfield Princess/Patrol Aircraft Deployment | ||
|- | |- | ||
| − | | | + | |V |
|Defense | |Defense | ||
| − | |{{TooltipSimple|Diamond| | + | |{{TooltipSimple|Diamond|14% (57/404, HQ: 100-120)}}<br>{{TooltipSimple|''Phases: 3''|Samples: 11}} |
| + | |Airfield Princess/VI | ||
|Airfield Princess/XVII | |Airfield Princess/XVII | ||
|Airfield Princess/Patrol Aircraft Deployment | |Airfield Princess/Patrol Aircraft Deployment | ||
|- | |- | ||
| − | | | + | |V |
|Defense | |Defense | ||
| − | |{{TooltipSimple|Diamond| | + | |{{TooltipSimple|Diamond|35% (142/404, HQ: 104-120)}}<br>{{TooltipSimple|''Phases: 3''|Samples: 43}} |
| − | |Airfield Princess/ | + | |Airfield Princess/VI |
| + | |Airfield Princess/Patrol Aircraft Deployment II | ||
| + | |Airfield Princess/XVI | ||
|Airfield Princess/XVI | |Airfield Princess/XVI | ||
| − | |||
|- | |- | ||
| − | | | + | |V |
|Defense | |Defense | ||
| − | |{{TooltipSimple|Diamond| | + | |{{TooltipSimple|Diamond|26% (105/404, HQ: 103-120)}}<br>{{TooltipSimple|''Phases: 3''|Samples: 26}} |
| − | |Airfield Princess/ | + | |Airfield Princess/VI |
| − | |Airfield Princess/ | + | |Airfield Princess/XVI |
|Airfield Princess/Patrol Aircraft Deployment | |Airfield Princess/Patrol Aircraft Deployment | ||
| + | |Airfield Princess/XVI | ||
|- | |- | ||
| − | | | + | |V |
|Defense | |Defense | ||
| − | |{{TooltipSimple|Diamond| | + | |{{TooltipSimple|Diamond|16% (65/404, HQ: 106-120)}}<br>{{TooltipSimple|''Phases: 3''|Samples: 20}} |
| − | |Airfield Princess/ | + | |Airfield Princess/VII |
| − | |Airfield Princess/ | + | |Airfield Princess/Patrol Aircraft Deployment II |
| − | |Airfield Princess/ | + | |Airfield Princess/XVI |
| + | |Airfield Princess/XVI | ||
}} | }} | ||
| − | {{Map/Nodes|diff= | + | {{Map/Nodes|diff=Medium|W|Repair}} |
| − | | | + | {{Map/Nodes|diff=Medium|name=深海急派増援群 残存再編部隊 |
| + | |X | ||
|Normal | |Normal | ||
| − | |{{TooltipSimple| | + | |{{TooltipSimple|Line Ahead|55% (2660/4871, HQ: 100-120)}}<br>{{TooltipSimple|Double Line|15% (754/4871, HQ: 100-120)}}<br>{{TooltipSimple|Vanguard|30% (1457/4871, HQ: 100-120)}}<br>{{TooltipSimple|''Phases: 3''|Samples: 1107}} |
| − | | | + | |Heavy Cruiser Ri-Class/Flagship |
| − | | | + | |Torpedo Cruiser Chi-Class/Elite |
| − | | | + | |Torpedo Cruiser Chi-Class/Elite |
| − | |Light | + | |Light Carrier Nu-Class/Kai Elite II |
|Destroyer Ha-Class/Late Model | |Destroyer Ha-Class/Late Model | ||
|Destroyer Ha-Class/Late Model | |Destroyer Ha-Class/Late Model | ||
| − | | | + | }} |
| − | | | + | {{Map/Nodes|diff=Medium|name=深海任務部隊 沈没輸送船団 |
| − | | | + | |Y |
| − | |{{TooltipSimple| | + | |Boss |
| − | |Light Carrier Nu-Class/Elite II | + | |{{TooltipSimple|Cruising Formation 4|66% (2877/4339, HQ: 100-120)}}<br>{{TooltipSimple|''Phases: 3''|Samples: 579}} |
| − | | | + | |Outer Southern Sea Destroyer Princess |
| + | |Abyssal Nimbus Princess | ||
| + | |Abyssal Nimbus Princess | ||
| + | |Light Carrier Nu-Class/Kai Elite II | ||
| + | |Transport Ship Wa-Class/Elite | ||
| + | |Transport Ship Wa-Class/Elite | ||
| + | |Light Cruiser Tsu-Class | ||
|Heavy Cruiser Ne-Class | |Heavy Cruiser Ne-Class | ||
| − | |||
|Destroyer Ha-Class/Late Model | |Destroyer Ha-Class/Late Model | ||
|Destroyer Ha-Class/Late Model | |Destroyer Ha-Class/Late Model | ||
| + | |Destroyer I-Class | ||
| + | |Destroyer I-Class | ||
|- | |- | ||
| − | | | + | |Y |
| − | | | + | |Boss/Final |
| − | |{{TooltipSimple| | + | |{{TooltipSimple|Cruising Formation 4|34% (1462/4339, HQ: 100-120)}}<br>{{TooltipSimple|''Phases: 3''|Samples: 289}} |
| − | |Light Carrier Nu-Class/ | + | |Outer Southern Sea Destroyer Princess/Damaged |
| − | |Light | + | |Abyssal Nimbus Princess |
| + | |Abyssal Nimbus Princess | ||
| + | |Aircraft Carrier Princess/III | ||
| + | |Light Carrier Nu-Class/Kai Elite II | ||
| + | |Transport Ship Wa-Class/Elite | ||
| + | |Light Cruiser Tsu-Class/Elite | ||
|Heavy Cruiser Ne-Class | |Heavy Cruiser Ne-Class | ||
| − | |||
|Destroyer Ha-Class/Late Model | |Destroyer Ha-Class/Late Model | ||
|Destroyer Ha-Class/Late Model | |Destroyer Ha-Class/Late Model | ||
| − | |||
| − | |||
| − | |||
| − | |||
| − | |||
| − | |||
| − | |||
| − | |||
| − | |||
| − | |||
| − | |||
| − | |||
|Destroyer Ha-Class/Late Model | |Destroyer Ha-Class/Late Model | ||
|Destroyer Ha-Class/Late Model | |Destroyer Ha-Class/Late Model | ||
| − | | | + | }} |
| − | | | + | {{Map/Nodes|diff=Medium|Y'|Empty|kind=1}} |
| − | | | + | </div> |
| − | |- | + | |-|Easy= |
| − | | | + | {{Map/Image|page=Spring 2022 Event/E-3| |
| − | | | + | {{Map/ImageNode|1|Easy|E-3|x=597|y=97}} |
| − | |{{ | + | {{Map/ImageNode|AB|Easy|E-3|x=586|y=130}} |
| − | | | + | {{Map/ImageNode|A|Easy|E-3|x=516|y=109}} |
| − | | | + | {{Map/ImageNode|B|Easy|E-3|x=483|y=166}} |
| − | | | + | {{Map/ImageNode|C|Easy|E-3|x=439|y=78}} |
| − | | | + | {{Map/ImageNode|D|Easy|E-3|x=426|y=138}} |
| − | | | + | {{Map/ImageNode|E|Easy|E-3|x=360|y=158}} |
| − | | | + | {{Map/ImageNode|F|Easy|E-3|x=323|y=78}} |
| − | | | + | {{Map/ImageNode|G|Easy|E-3|x=271|y=95}} |
| − | | | + | {{Map/ImageNode|H|Easy|E-3|x=261|y=132}} |
| − | | | + | {{Map/ImageNode|I|Easy|E-3|x=204|y=83}} |
| − | | | + | {{Map/ImageNode|J|Easy|E-3|x=193|y=118}} |
| − | | | + | {{Map/ImageNode|K|Easy|E-3|x=180|y=165}} |
| − | | | + | {{Map/ImageNode|L|Easy|E-3|x=230|y=236}} |
| − | }} | + | {{Map/ImageNode|M1|Easy|E-3|x=603|y=281}} |
| − | {{Map/ | + | {{Map/ImageNode|M2|Easy|E-3|x=557|y=305}} |
| − | | | + | {{Map/ImageNode|M|Easy|E-3|x=610|y=229}} |
| − | | | + | {{Map/ImageNode|N|Easy|E-3|x=536|y=261|drops=<table class="wikitable"><tr><th>Type</th><th>Ships</th></tr><tr><th>DD</th><td>{{Ship/Banner|small=true|Amagiri}}{{Ship/Banner|small=true|Maikaze}}{{Ship/Banner|small=true|Sagiri}}<br>{{Ship/Banner|small=true|Tanikaze}}{{Ship/Banner|small=true|Tokitsukaze}}</td></tr></table>}} |
| − | |{{ | + | {{Map/ImageNode|O|Easy|E-3|x=472|y=289}} |
| − | | | + | {{Map/ImageNode|P|Easy|E-3|x=417|y=289|drops=<table class="wikitable"><tr><th>Type</th><th>Ships</th></tr><tr><th>DE</th><td>{{Ship/Banner|small=true|Daitou}}{{Ship/Banner|small=true|Matsuwa}}</td></tr><tr><th>DD</th><td>{{Ship/Banner|small=true|Amagiri}}{{Ship/Banner|small=true|Arashi}}{{Ship/Banner|small=true|Asagumo}}<br>{{Ship/Banner|small=true|Hatsukaze}}{{Ship/Banner|small=true|Isokaze}}{{Ship/Banner|small=true|Maikaze}}<br>{{Ship/Banner|small=true|Nowaki}}{{Ship/Banner|small=true|Oyashio}}{{Ship/Banner|small=true|Sagiri}}<br>{{Ship/Banner|small=true|Takanami}}{{Ship/Banner|small=true|Tanikaze}}{{Ship/Banner|small=true|Tokitsukaze}}<br></td></tr><tr><th>AO</th><td>{{Ship/Banner|small=true|Souya}}</td></tr></table>}} |
| − | | | + | {{Map/ImageNode|Q'|Easy|E-3|x=361|y=310}} |
| − | | | + | {{Map/ImageNode|Q|Easy|E-3|x=324|y=250|drops=<table class="wikitable"><tr><th>Type</th><th>Ships</th></tr><tr><th>DE</th><td>{{Ship/Banner|small=true|Hiburi}}{{Ship/Banner|small=true|Shimushu}}</td></tr><tr><th>DD</th><td>{{Ship/Banner|small=true|Amatsukaze}}{{Ship/Banner|small=true|Ariake}}{{Ship/Banner|small=true|Harusame}}<br>{{Ship/Banner|small=true|Oyashio}}{{Ship/Banner|small=true|Takanami}}{{Ship/Banner|small=true|Tamanami}}<br>{{Ship/Banner|small=true|Tokitsukaze}}</td></tr><tr><th>CL</th><td>{{Ship/Banner|small=true|Ooyodo}}{{Ship/Banner|small=true|Yahagi}}</td></tr><tr><th>CVL</th><td>{{Ship/Banner|small=true|Shinyou}}</td></tr><tr><th>BB</th><td>{{Ship/Banner|small=true|Yamato}}</td></tr><tr><th>SSV</th><td>{{Ship/Banner|small=true|I-13}}</td></tr><tr><th>CT</th><td>{{Ship/Banner|small=true|Kashima}}</td></tr></table>}} |
| − | | | + | {{Map/ImageNode|R|Easy|E-3|x=247|y=179}} |
| + | {{Map/ImageNode|Start 2|Easy|E-3|x=621|y=150}} | ||
| + | {{Map/ImageNode|Start 3|Easy|E-3|x=379|y=113}} | ||
| + | {{Map/ImageNode|S|Easy|E-3|x=201|y=272|drops=<table class="wikitable"><tr><th>Type</th><th>Ships</th></tr><tr><th>DD</th><td>{{Ship/Banner|small=true|Maikaze}}{{Ship/Banner|small=true|Tokitsukaze}}</td></tr></table>}} | ||
| + | {{Map/ImageNode|T|Easy|E-3|x=132|y=250}} | ||
| + | {{Map/ImageNode|U'|Easy|E-3|x=209|y=303}} | ||
| + | {{Map/ImageNode|U|Easy|E-3|x=162|y=308|drops=<table class="wikitable"><tr><th>Type</th><th>Ships</th></tr><tr><th>DE</th><td>{{Ship/Banner|small=true|Daitou}}{{Ship/Banner|small=true|Matsuwa}}</td></tr><tr><th>DD</th><td>{{Ship/Banner|small=true|Asagumo}}{{Ship/Banner|small=true|Hatsukaze}}{{Ship/Banner|small=true|Maikaze}}<br>{{Ship/Banner|small=true|Oyashio}}{{Ship/Banner|small=true|Sagiri}}{{Ship/Banner|small=true|Takanami}}<br>{{Ship/Banner|small=true|Tanikaze}}{{Ship/Banner|small=true|Tokitsukaze}}</td></tr><tr><th>CVL</th><td>{{Ship/Banner|small=true|Gambier Bay}}</td></tr><tr><th>SSV</th><td>{{Ship/Banner|small=true|I-14}}</td></tr></table>}} | ||
| + | {{Map/ImageNode|V|Easy|E-3|x=233|y=284}} | ||
| + | {{Map/ImageNode|W|Easy|E-3|x=277|y=206}} | ||
| + | {{Map/ImageNode|X|Easy|E-3|x=267|y=251|drops=<table class="wikitable"><tr><th>Type</th><th>Ships</th></tr><tr><th>DE</th><td>{{Ship/Banner|small=true|Daitou}}</td></tr><tr><th>DD</th><td>{{Ship/Banner|small=true|Amagiri}}{{Ship/Banner|small=true|Arashi}}{{Ship/Banner|small=true|Asagumo}}<br>{{Ship/Banner|small=true|Hatsukaze}}{{Ship/Banner|small=true|Isokaze}}{{Ship/Banner|small=true|Maikaze}}<br>{{Ship/Banner|small=true|Nowaki}}{{Ship/Banner|small=true|Oyashio}}{{Ship/Banner|small=true|Sagiri}}<br>{{Ship/Banner|small=true|Takanami}}{{Ship/Banner|small=true|Tanikaze}}{{Ship/Banner|small=true|Tokitsukaze}}<br></td></tr></table>}} | ||
| + | {{Map/ImageNode|Y'|Easy|E-3|x=267|y=305}} | ||
| + | {{Map/ImageNode|Y|Easy|E-3|x=307|y=290|drops=<table class="wikitable"><tr><th>Type</th><th>Ships</th></tr><tr><th>DE</th><td>{{Ship/Banner|small=true|Hiburi}}{{Ship/Banner|small=true|Shimushu}}</td></tr><tr><th>DD</th><td>{{Ship/Banner|small=true|Amatsukaze}}{{Ship/Banner|small=true|Ariake}}{{Ship/Banner|small=true|Harusame}}<br>{{Ship/Banner|small=true|Oyashio}}{{Ship/Banner|small=true|Takanami}}{{Ship/Banner|small=true|Tamanami}}<br>{{Ship/Banner|small=true|Tokitsukaze}}</td></tr><tr><th>CL</th><td>{{Ship/Banner|small=true|Ooyodo}}{{Ship/Banner|small=true|Yahagi}}</td></tr><tr><th>CA</th><td>{{Ship/Banner|small=true|Mikuma}}{{Ship/Banner|small=true|Prinz Eugen}}</td></tr><tr><th>CVL</th><td>{{Ship/Banner|small=true|Shinyou}}</td></tr><tr><th>BB</th><td>{{Ship/Banner|small=true|Yamato}}</td></tr><tr><th>SSV</th><td>{{Ship/Banner|small=true|I-13}}</td></tr><tr><th>CT</th><td>{{Ship/Banner|small=true|Kashima}}</td></tr></table>}} | ||
| + | }} | ||
| + | <div class="map-nodes"> | ||
| + | {{Map/Nodes|diff=Easy|name= | ||
| + | |AB | ||
| + | |Raid | ||
| + | |{{TooltipSimple|Diamond|7% (98/1357)}} | ||
| + | |Airfield Princess/VI | ||
|- | |- | ||
| − | | | + | |AB |
| − | | | + | |Raid |
| − | |{{TooltipSimple|Diamond| | + | |{{TooltipSimple|Diamond|53% (720/1357)}} |
| − | | | + | |Airfield Princess/V |
| − | | | + | |Airfield Princess/V |
| − | |||
| − | |||
| − | |||
|- | |- | ||
| − | | | + | |AB |
| − | | | + | |Raid |
| − | |{{TooltipSimple|Diamond| | + | |{{TooltipSimple|Diamond|40% (539/1357)}} |
| − | + | |Airfield Princess/VI | |
| − | | | + | |Airfield Princess/V |
| − | | | ||
| − | |||
| − | |||
}} | }} | ||
| − | {{Map/Nodes|diff=Easy|name= | + | {{Map/Nodes|diff=Easy|name=深海潜水艦隊 偵察前衛哨戒 I線 |
| − | | | + | |A |
|Normal | |Normal | ||
| − | |{{TooltipSimple| | + | |{{TooltipSimple|Echelon|7% (205/2871, HQ: 80-120)}}<br>{{TooltipSimple|Line Abreast|10% (284/2871, HQ: 85-120)}}<br>{{TooltipSimple|''Phases: 1, 2, 3''|Samples: 37, 81, 11}} |
| − | | | + | |Submarine Ka-Class |
| − | | | + | |Submarine Ka-Class |
| − | |||
| − | |||
| − | |||
|Submarine Ka-Class | |Submarine Ka-Class | ||
| − | }} | + | |- |
| − | {{ | + | |A |
| − | {{Map/Nodes|diff=Easy|name= | + | |Normal |
| − | | | + | |{{TooltipSimple|Echelon|27% (785/2871, HQ: 80-120)}}<br>{{TooltipSimple|Line Abreast|24% (700/2871, HQ: 79-120)}}<br>{{TooltipSimple|''Phases: 1, 2, 3''|Samples: 90, 273, 19}} |
| − | | | + | |Submarine Ka-Class/Elite |
| − | |{{TooltipSimple| | + | |Submarine Ka-Class |
| − | | | + | |Submarine Ka-Class |
| − | | | + | |- |
| + | |A | ||
| + | |Normal | ||
| + | |{{TooltipSimple|Echelon|15% (421/2871, HQ: 85-120)}}<br>{{TooltipSimple|Line Abreast|17% (476/2871, HQ: 81-120)}}<br>{{TooltipSimple|''Phases: 1, 2, 3''|Samples: 51, 197, 6}} | ||
| + | |Submarine Ka-Class/Elite | ||
| + | |Submarine Ka-Class/Elite | ||
| + | |Submarine Ka-Class | ||
| + | }} | ||
| + | {{Map/Nodes|diff=Easy|name=深海空母機動部隊 艦載機群 | ||
| + | |B | ||
| + | |Defense | ||
| + | |{{TooltipSimple|Diamond|57% (492/868, HQ: 84-120)}}<br>{{TooltipSimple|''Phases: 1, 2, 3''|Samples: 74, 83, 15}} | ||
| + | |Aircraft Carrier Water Demon | ||
| + | |Light Carrier Nu-Class/Elite II | ||
| + | |Heavy Cruiser Ri-Class/Flagship | ||
|Heavy Cruiser Ne-Class | |Heavy Cruiser Ne-Class | ||
|Light Cruiser Tsu-Class | |Light Cruiser Tsu-Class | ||
| − | | | + | |Light Cruiser Ho-Class/Elite |
| − | |||
|- | |- | ||
| − | | | + | |B |
| − | | | + | |Defense |
| − | |{{TooltipSimple| | + | |{{TooltipSimple|Diamond|2% (14/868, HQ: 85-120)}}<br>{{TooltipSimple|''Phases: 2''|Samples: 8}} |
| − | | | + | |Aircraft Carrier Water Demon |
| − | | | + | |Light Carrier Nu-Class/Flagship II |
| + | |Light Carrier Nu-Class/Elite II | ||
| + | |Heavy Cruiser Ne-Class | ||
| + | |Light Cruiser Tsu-Class | ||
| + | |Light Cruiser Ho-Class/Elite | ||
| + | |- | ||
| + | |B | ||
| + | |Defense | ||
| + | |{{TooltipSimple|Diamond|42% (362/868, HQ: 80-120)}}<br>{{TooltipSimple|''Phases: 1, 2, 3''|Samples: 70, 77, 1}} | ||
| + | |Aircraft Carrier Water Demon | ||
| + | |Light Carrier Nu-Class/Elite II | ||
| + | |Light Carrier Nu-Class/Elite II | ||
| + | |Heavy Cruiser Ri-Class/Flagship | ||
|Heavy Cruiser Ne-Class | |Heavy Cruiser Ne-Class | ||
|Light Cruiser Tsu-Class | |Light Cruiser Tsu-Class | ||
| − | |||
| − | |||
}} | }} | ||
| − | + | {{Map/Nodes|diff=Easy|name=深海潜水艦隊 偵察前衛哨戒 II線 | |
| − | + | |C | |
| − | |||
| − | {{Map/Nodes|diff=Easy|name= | ||
| − | | | ||
|Normal | |Normal | ||
| − | |{{TooltipSimple| | + | |{{TooltipSimple|Echelon|8% (43/564, HQ: 81-120)}}<br>{{TooltipSimple|Line Abreast|12% (66/564, HQ: 99-120)}}<br>{{TooltipSimple|''Phases: 1, 2, 3''|Samples: 13, 11, 1}} |
| − | | | + | |Submarine Ka-Class |
| − | | | + | |Submarine Ka-Class |
| − | | | + | |Submarine Ka-Class |
| − | | | + | |- |
| − | | | + | |C |
| − | | | + | |Normal |
| + | |{{TooltipSimple|Echelon|26% (148/564, HQ: 80-120)}}<br>{{TooltipSimple|Line Abreast|24% (136/564, HQ: 80-120)}}<br>{{TooltipSimple|''Phases: 1, 2, 3''|Samples: 15, 44, 11}} | ||
| + | |Submarine Ka-Class/Elite | ||
| + | |Submarine Ka-Class | ||
| + | |Submarine Ka-Class | ||
| + | |- | ||
| + | |C | ||
| + | |Normal | ||
| + | |{{TooltipSimple|Echelon|16% (91/564, HQ: 80-120)}}<br>{{TooltipSimple|Line Abreast|14% (80/564, HQ: 81-120)}}<br>{{TooltipSimple|''Phases: 1, 2, 3''|Samples: 12, 13, 7}} | ||
| + | |Submarine Ka-Class/Elite | ||
| + | |Submarine Ka-Class/Elite | ||
| + | |Submarine Ka-Class | ||
}} | }} | ||
| − | {{Map/Nodes|diff=Easy|name= | + | {{Map/Nodes|diff=Easy|D|Empty|kind=0}} |
| − | | | + | {{Map/Nodes|diff=Easy|name=深海基地航空隊 |
| − | | | + | |E |
| − | |{{TooltipSimple| | + | |Defense |
| − | | | + | |{{TooltipSimple|Diamond|8% (226/2695, HQ: 80-120)}}<br>{{TooltipSimple|''Phases: 1, 2''|Samples: 13, 25}} |
| − | | | + | |Airfield Princess/V |
| − | | | + | |- |
| − | | | + | |E |
| − | | | + | |Defense |
| − | | | + | |{{TooltipSimple|Diamond|24% (649/2695, HQ: 79-120)}}<br>{{TooltipSimple|''Phases: 1, 2, 3''|Samples: 51, 118, 6}} |
| − | | | + | |Airfield Princess/XVI |
| − | | | + | |- |
| − | | | + | |E |
| − | | | + | |Defense |
| − | | | + | |{{TooltipSimple|Diamond|26% (712/2695, HQ: 80-120)}}<br>{{TooltipSimple|''Phases: 1, 2, 3''|Samples: 65, 222, 17}} |
| − | | | + | |Airfield Princess/V |
| + | |Airfield Princess/V | ||
|- | |- | ||
| − | | | + | |E |
| − | | | + | |Defense |
| − | |{{TooltipSimple| | + | |{{TooltipSimple|Diamond|27% (716/2695, HQ: 85-120)}}<br>{{TooltipSimple|''Phases: 1, 2, 3''|Samples: 36, 161, 7}} |
| − | | | + | |Airfield Princess/XVI |
| − | | | + | |Airfield Princess/V |
| − | + | |- | |
| − | | | + | |E |
| − | | | + | |Defense |
| − | | | + | |{{TooltipSimple|Diamond|15% (392/2695, HQ: 85-120)}}<br>{{TooltipSimple|''Phases: 1, 2, 3''|Samples: 15, 74, 2}} |
| − | | | + | |Airfield Princess/XVI |
| − | | | + | |Airfield Princess/VI |
| − | | | ||
| − | | | ||
| − | |||
| − | |||
}} | }} | ||
| − | {{Map/Nodes|diff=Easy| | + | {{Map/Nodes|diff=Easy|name=深海基地航空隊 |
| − | + | |F | |
| − | | | + | |Defense |
| − | + | |{{TooltipSimple|Diamond|10% (66/653, HQ: 81-120)}}<br>{{TooltipSimple|''Phases: 1, 2, 3''|Samples: 3, 6, 1}} | |
| − | {{ | + | |Airfield Princess/V |
| − | + | |- | |
| − | {{ | + | |F |
| − | + | |Defense | |
| − | + | |{{TooltipSimple|Diamond|24% (155/653, HQ: 80-120)}}<br>{{TooltipSimple|''Phases: 1, 2, 3''|Samples: 5, 11, 12}} | |
| − | + | |Airfield Princess/XVI | |
| − | + | |- | |
| − | + | |F | |
| − | + | |Defense | |
| − | + | |{{TooltipSimple|Diamond|24% (154/653, HQ: 81-120)}}<br>{{TooltipSimple|''Phases: 1, 2, 3''|Samples: 9, 2, 8}} | |
| − | {{ | + | |Airfield Princess/V |
| − | |||
| − | |||
| − | |||
| − | |||
| − | |||
| − | |||
| − | |||
| − | |||
| − | |||
| − | |||
| − | |||
| − | |||
| − | |||
| − | |||
| − | |||
| − | |||
| − | |||
| − | |||
| − | |||
| − | {{ | ||
| − | |||
| − | |||
| − | |||
| − | |||
| − | |||
| − | |||
| − | |||
| − | |||
| − | |||
|Airfield Princess/V | |Airfield Princess/V | ||
|- | |- | ||
| − | | | + | |F |
| − | | | + | |Defense |
| − | |{{TooltipSimple|Diamond| | + | |{{TooltipSimple|Diamond|23% (150/653, HQ: 80-120)}}<br>{{TooltipSimple|''Phases: 1, 2, 3''|Samples: 4, 4, 5}} |
| + | |Airfield Princess/XVI | ||
| + | |Airfield Princess/V | ||
| + | |- | ||
| + | |F | ||
| + | |Defense | ||
| + | |{{TooltipSimple|Diamond|20% (128/653, HQ: 80-120)}}<br>{{TooltipSimple|''Phases: 1, 2, 3''|Samples: 6, 3, 3}} | ||
| + | |Airfield Princess/XVI | ||
|Airfield Princess/VI | |Airfield Princess/VI | ||
| − | |||
| − | |||
| − | |||
| − | |||
| − | |||
| − | |||
}} | }} | ||
| − | {{Map/Nodes|diff= | + | {{Map/Nodes|diff=Easy|name=深海潜水艦隊 偵察前衛哨戒 III線 |
| − | | | + | |G |
|Normal | |Normal | ||
| − | |{{TooltipSimple|Echelon| | + | |{{TooltipSimple|Echelon|8% (321/3907, HQ: 80-120)}}<br>{{TooltipSimple|Line Abreast|7% (275/3907, HQ: 95-120)}}<br>{{TooltipSimple|''Phases: 1, 2, 3''|Samples: 3, 9, 88}} |
| + | |Submarine Ka-Class/Elite | ||
|Submarine Ka-Class | |Submarine Ka-Class | ||
|Submarine Ka-Class | |Submarine Ka-Class | ||
| + | |- | ||
| + | |G | ||
| + | |Normal | ||
| + | |{{TooltipSimple|Echelon|23% (909/3907, HQ: 81-120)}}<br>{{TooltipSimple|Line Abreast|24% (933/3907, HQ: 81-120)}}<br>{{TooltipSimple|''Phases: 1, 2, 3''|Samples: 14, 9, 329}} | ||
| + | |Submarine Ka-Class/Elite | ||
| + | |Submarine Ka-Class/Elite | ||
|Submarine Ka-Class | |Submarine Ka-Class | ||
|- | |- | ||
| − | | | + | |G |
|Normal | |Normal | ||
| − | |{{TooltipSimple|Echelon| | + | |{{TooltipSimple|Echelon|18% (718/3907, HQ: 81-120)}}<br>{{TooltipSimple|Line Abreast|19% (751/3907, HQ: 80-120)}}<br>{{TooltipSimple|''Phases: 1, 2, 3''|Samples: 7, 6, 274}} |
| + | |Submarine Ka-Class/Elite | ||
| + | |Submarine Ka-Class/Elite | ||
|Submarine Ka-Class/Elite | |Submarine Ka-Class/Elite | ||
| − | |||
| − | |||
}} | }} | ||
| − | {{Map/Nodes|diff= | + | {{Map/Nodes|diff=Easy|H|Empty|kind=0}} |
| − | | | + | {{Map/Nodes|diff=Easy|name=深海基地航空隊 |
| + | |I | ||
| + | |Defense | ||
| + | |{{TooltipSimple|Diamond|10% (198/1926, HQ: 94-120)}}<br>{{TooltipSimple|''Phases: 1, 3''|Samples: 1, 32}} | ||
| + | |Airfield Princess/V | ||
| + | |- | ||
| + | |I | ||
|Defense | |Defense | ||
| − | |{{TooltipSimple|Diamond| | + | |{{TooltipSimple|Diamond|25% (481/1926, HQ: 85-120)}}<br>{{TooltipSimple|''Phases: 1, 2, 3''|Samples: 4, 1, 66}} |
| − | | | + | |Airfield Princess/XVI |
| − | |||
| − | |||
| − | |||
| − | |||
| − | |||
|- | |- | ||
| − | | | + | |I |
|Defense | |Defense | ||
| − | |{{TooltipSimple|Diamond| | + | |{{TooltipSimple|Diamond|26% (495/1926, HQ: 85-120)}}<br>{{TooltipSimple|''Phases: 1, 2, 3''|Samples: 3, 4, 64}} |
| − | | | + | |Airfield Princess/V |
| − | + | |Airfield Princess/V | |
| − | | | ||
| − | |||
| − | |||
| − | |||
|- | |- | ||
| − | | | + | |I |
|Defense | |Defense | ||
| − | |{{TooltipSimple|Diamond| | + | |{{TooltipSimple|Diamond|19% (369/1926, HQ: 85-120)}}<br>{{TooltipSimple|''Phases: 1, 2, 3''|Samples: 2, 1, 54}} |
| − | | | + | |Airfield Princess/XVI |
| − | | | + | |Airfield Princess/V |
| − | | | + | |- |
| − | | | + | |I |
| − | | | + | |Defense |
| − | | | + | |{{TooltipSimple|Diamond|20% (383/1926, HQ: 85-120)}}<br>{{TooltipSimple|''Phases: 1, 2, 3''|Samples: 6, 4, 65}} |
| + | |Airfield Princess/XVI | ||
| + | |Airfield Princess/VI | ||
}} | }} | ||
| − | {{Map/Nodes|diff= | + | {{Map/Nodes|diff=Easy|name=深海潜水艦隊 遊撃群狼A集団 |
| − | | | + | |J |
|Normal | |Normal | ||
| − | |{{TooltipSimple|Echelon| | + | |{{TooltipSimple|Echelon|6% (272/4226, HQ: 80-120)}}<br>{{TooltipSimple|Line Abreast|2% (66/4226, HQ: 94-120)}}<br>{{TooltipSimple|''Phases: 1, 2, 3''|Samples: 6, 1, 58}} |
| − | |Submarine | + | |Submarine Yo-Class |
| + | |Submarine Yo-Class | ||
|Submarine Ka-Class | |Submarine Ka-Class | ||
| + | |- | ||
| + | |J | ||
| + | |Normal | ||
| + | |{{TooltipSimple|Echelon|28% (1179/4226, HQ: 80-120)}}<br>{{TooltipSimple|Line Abreast|29% (1239/4226, HQ: 81-120)}}<br>{{TooltipSimple|''Phases: 1, 2, 3''|Samples: 113, 14, 384}} | ||
| + | |Submarine Yo-Class/Elite | ||
| + | |Submarine Yo-Class | ||
|Submarine Ka-Class | |Submarine Ka-Class | ||
|- | |- | ||
| − | | | + | |J |
|Normal | |Normal | ||
| − | |{{TooltipSimple|Echelon| | + | |{{TooltipSimple|Echelon|18% (752/4226, HQ: 80-120)}}<br>{{TooltipSimple|Line Abreast|17% (718/4226, HQ: 81-120)}}<br>{{TooltipSimple|''Phases: 1, 2, 3''|Samples: 54, 8, 241}} |
| − | |Submarine | + | |Submarine Yo-Class/Elite |
| − | |Submarine | + | |Submarine Yo-Class/Elite |
|Submarine Ka-Class | |Submarine Ka-Class | ||
}} | }} | ||
| − | {{Map/Nodes|diff= | + | {{Map/Nodes|diff=Easy|K|Empty|kind=0}} |
| − | {{Map/Nodes|diff= | + | {{Map/Nodes|diff=Easy|name=深海基地航空隊 (主力部隊A編隊) |
| − | | | + | |L |
|Defense | |Defense | ||
| − | |{{TooltipSimple|Diamond| | + | |{{TooltipSimple|Diamond|30% (1793/6004, HQ: 80-120)}}<br>{{TooltipSimple|''Phases: 1, 2, 3''|Samples: 63, 158, 209}} |
| − | |Airfield Princess/ | + | |Airfield Princess/XVI |
| − | |||
| − | |||
| − | |||
| − | |||
|Airfield Princess/XVI | |Airfield Princess/XVI | ||
|- | |- | ||
| − | | | + | |L |
|Defense | |Defense | ||
| − | |{{TooltipSimple|Diamond| | + | |{{TooltipSimple|Diamond|32% (1942/6004, HQ: 80-120)}}<br>{{TooltipSimple|''Phases: 1, 2, 3''|Samples: 59, 144, 240}} |
|Airfield Princess/V | |Airfield Princess/V | ||
| − | |Airfield Princess/ | + | |Airfield Princess/XVI |
| − | |||
| − | |||
| − | |||
| − | |||
| − | |||
| − | |||
| − | |||
| − | |||
| − | |||
| − | |||
|Airfield Princess/XVI | |Airfield Princess/XVI | ||
|- | |- | ||
| − | | | + | |L |
|Defense | |Defense | ||
| − | |{{TooltipSimple|Diamond| | + | |{{TooltipSimple|Diamond|38% (2269/6004, HQ: 80-120)}}<br>{{TooltipSimple|''Phases: 1, 2, 3''|Samples: 50, 179, 290}} |
| − | | | ||
|Airfield Princess/V | |Airfield Princess/V | ||
| + | |Airfield Princess/XVII | ||
| + | |Airfield Princess/XVI | ||
}} | }} | ||
| − | {{Map/Nodes|diff= | + | {{Map/Nodes|diff=Easy|name=深海潜水艦隊 偵察前衛哨戒 IV線 |
| − | | | + | |M |
|Normal | |Normal | ||
| − | |{{TooltipSimple|Echelon| | + | |{{TooltipSimple|Echelon|7% (162/2327, HQ: 96-120)}}<br>{{TooltipSimple|Line Abreast|1% (30/2327, HQ: 102-120)}}<br>{{TooltipSimple|''Phases: 1, 2, 3''|Samples: 21, 10, 5}} |
| − | |Submarine Ka-Class | + | |Submarine Ka-Class |
|Submarine Ka-Class | |Submarine Ka-Class | ||
|Submarine Ka-Class | |Submarine Ka-Class | ||
|- | |- | ||
| − | | | + | |M |
| + | |Normal | ||
| + | |{{TooltipSimple|Echelon|31% (721/2327, HQ: 92-120)}}<br>{{TooltipSimple|Line Abreast|29% (668/2327, HQ: 80-120)}}<br>{{TooltipSimple|''Phases: 1, 2, 3''|Samples: 192, 69, 53}} | ||
| + | |Submarine Ka-Class/Elite | ||
| + | |Submarine Ka-Class | ||
| + | |Submarine Ka-Class | ||
| + | |- | ||
| + | |M | ||
|Normal | |Normal | ||
| − | |{{TooltipSimple|Echelon| | + | |{{TooltipSimple|Echelon|16% (380/2327, HQ: 80-120)}}<br>{{TooltipSimple|Line Abreast|16% (366/2327, HQ: 80-120)}}<br>{{TooltipSimple|''Phases: 1, 2, 3''|Samples: 119, 19, 28}} |
|Submarine Ka-Class/Elite | |Submarine Ka-Class/Elite | ||
|Submarine Ka-Class/Elite | |Submarine Ka-Class/Elite | ||
|Submarine Ka-Class | |Submarine Ka-Class | ||
}} | }} | ||
| − | {{Map/Nodes|diff= | + | {{Map/Nodes|diff=Easy|name=深海空母機動部隊 艦載機群 |
| − | + | |M1 | |
| − | | | ||
|Defense | |Defense | ||
| − | |{{TooltipSimple|Diamond| | + | |{{TooltipSimple|Diamond|33% (70/211, HQ: 93-120)}}<br>{{TooltipSimple|''Phases: 1, 2, 3''|Samples: 13, 1, 5}} |
| − | | | + | |Aircraft Carrier Water Demon |
| + | |Light Carrier Nu-Class/Elite II | ||
| + | |Heavy Cruiser Ri-Class/Flagship | ||
| + | |Heavy Cruiser Ne-Class | ||
| + | |Light Cruiser Tsu-Class | ||
| + | |Light Cruiser Ho-Class/Elite | ||
|- | |- | ||
| − | | | + | |M1 |
|Defense | |Defense | ||
| − | |{{TooltipSimple|Diamond| | + | |{{TooltipSimple|Diamond|11% (23/211, HQ: 93-120)}}<br>{{TooltipSimple|''Phases: 1''|Samples: 15}} |
| − | | | + | |Aircraft Carrier Water Demon |
| + | |Light Carrier Nu-Class/Flagship II | ||
| + | |Light Carrier Nu-Class/Elite II | ||
| + | |Heavy Cruiser Ne-Class | ||
| + | |Light Cruiser Tsu-Class | ||
| + | |Light Cruiser Ho-Class/Elite | ||
|- | |- | ||
| − | | | + | |M1 |
|Defense | |Defense | ||
| − | |{{TooltipSimple|Diamond| | + | |{{TooltipSimple|Diamond|56% (118/211, HQ: 93-120)}}<br>{{TooltipSimple|''Phases: 1, 2, 3''|Samples: 28, 4, 2}} |
| − | | | + | |Aircraft Carrier Water Demon |
| − | | | + | |Light Carrier Nu-Class/Elite II |
| + | |Light Carrier Nu-Class/Elite II | ||
| + | |Heavy Cruiser Ri-Class/Flagship | ||
| + | |Heavy Cruiser Ne-Class | ||
| + | |Light Cruiser Tsu-Class | ||
}} | }} | ||
| − | {{Map/Nodes|diff= | + | {{Map/Nodes|diff=Easy|name=深海潜水艦隊 遊撃群狼B集団 |
| − | | | + | |M2 |
|Normal | |Normal | ||
| − | |{{TooltipSimple|Echelon| | + | |{{TooltipSimple|Echelon|8% (5/63, HQ: 100-110)}}<br>{{TooltipSimple|''Phases: 1''|Samples: 1}} |
|Submarine Yo-Class | |Submarine Yo-Class | ||
|Submarine Yo-Class | |Submarine Yo-Class | ||
|Submarine Ka-Class | |Submarine Ka-Class | ||
|- | |- | ||
| − | | | + | |M2 |
|Normal | |Normal | ||
| − | |{{TooltipSimple|Echelon| | + | |{{TooltipSimple|Echelon|35% (22/63, HQ: 93-120)}}<br>{{TooltipSimple|Line Abreast|19% (12/63, HQ: 93-120)}}<br>{{TooltipSimple|''Phases: 1, 3''|Samples: 5, 2}} |
|Submarine Yo-Class/Elite | |Submarine Yo-Class/Elite | ||
|Submarine Yo-Class | |Submarine Yo-Class | ||
| + | |Submarine Ka-Class | ||
| + | |- | ||
| + | |M2 | ||
| + | |Normal | ||
| + | |{{TooltipSimple|Echelon|17% (11/63, HQ: 93-120)}}<br>{{TooltipSimple|Line Abreast|21% (13/63, HQ: 94-120)}}<br>{{TooltipSimple|''Phases: 1''|Samples: 3}} | ||
| + | |Submarine Yo-Class/Elite | ||
| + | |Submarine Yo-Class/Elite | ||
|Submarine Ka-Class | |Submarine Ka-Class | ||
}} | }} | ||
| − | {{Map/Nodes|diff= | + | {{Map/Nodes|diff=Easy|name=深海急派増援群 前衛偵察部隊 |
| − | {{Map/Nodes|diff= | + | |N |
| − | | | + | |Normal |
| − | |Defense | + | |{{TooltipSimple|Line Ahead|44% (1005/2266, HQ: 80-120)}}<br>{{TooltipSimple|Echelon|30% (689/2266, HQ: 80-120)}}<br>{{TooltipSimple|Line Abreast|25% (572/2266, HQ: 92-120)}}<br>{{TooltipSimple|''Phases: 1, 2, 3''|Samples: 325, 96, 83}} |
| − | |{{TooltipSimple|Diamond| | + | |Heavy Cruiser Ri-Class/Elite |
| − | |Airfield Princess/XVI | + | |Light Cruiser Ho-Class/Elite |
| − | |- | + | |Light Cruiser Ho-Class/Elite |
| − | | | + | |Destroyer Ha-Class/Late Model |
| − | |Defense | + | |Destroyer Ha-Class/Late Model |
| − | |{{TooltipSimple|Diamond| | + | |Destroyer I-Class |
| + | }} | ||
| + | {{Map/Nodes|diff=Easy|name=深海基地航空隊 (主力部隊B編隊) | ||
| + | |O | ||
| + | |Defense | ||
| + | |{{TooltipSimple|Diamond|10% (226/2255, HQ: 94-120)}}<br>{{TooltipSimple|''Phases: 1, 2, 3''|Samples: 31, 7, 14}} | ||
| + | |Airfield Princess/XVI | ||
| + | |Airfield Princess/Patrol Aircraft Deployment | ||
| + | |- | ||
| + | |O | ||
| + | |Defense | ||
| + | |{{TooltipSimple|Diamond|26% (587/2255, HQ: 80-120)}}<br>{{TooltipSimple|''Phases: 1, 2, 3''|Samples: 78, 29, 17}} | ||
|Airfield Princess/XVII | |Airfield Princess/XVII | ||
| + | |Airfield Princess/Patrol Aircraft Deployment | ||
|- | |- | ||
| − | | | + | |O |
|Defense | |Defense | ||
| − | |{{TooltipSimple|Diamond| | + | |{{TooltipSimple|Diamond|26% (587/2255, HQ: 80-120)}}<br>{{TooltipSimple|''Phases: 1, 2, 3''|Samples: 64, 33, 22}} |
| − | |Airfield Princess/ | + | |Airfield Princess/V |
|Airfield Princess/XVI | |Airfield Princess/XVI | ||
| + | |Airfield Princess/Patrol Aircraft Deployment | ||
|- | |- | ||
| − | | | + | |O |
|Defense | |Defense | ||
| − | |{{TooltipSimple|Diamond| | + | |{{TooltipSimple|Diamond|34% (758/2255, HQ: 80-120)}}<br>{{TooltipSimple|''Phases: 1, 2, 3''|Samples: 109, 26, 29}} |
|Airfield Princess/V | |Airfield Princess/V | ||
| − | |Airfield Princess/ | + | |Airfield Princess/XVII |
| − | |Airfield Princess/ | + | |Airfield Princess/Patrol Aircraft Deployment |
| − | }} | + | |- |
| − | {{Map/Nodes|diff= | + | |O |
| − | | | + | |Defense |
| + | |{{TooltipSimple|Diamond|4% (97/2255, HQ: 92-120)}}<br>{{TooltipSimple|''Phases: 1''|Samples: 35}} | ||
| + | |Airfield Princess/VI | ||
| + | |Airfield Princess/XVII | ||
| + | |Airfield Princess/Patrol Aircraft Deployment | ||
| + | }} | ||
| + | {{Map/Nodes|diff=Easy|name=深海急派増援群 先遣機動部隊 | ||
| + | |P | ||
| + | |Normal | ||
| + | |{{TooltipSimple|Diamond|27% (590/2185, HQ: 80-120)}}<br>{{TooltipSimple|''Phases: 1, 2, 3''|Samples: 77, 25, 26}} | ||
| + | |Light Carrier Nu-Class/Elite II | ||
| + | |Light Carrier Nu-Class/Elite | ||
| + | |Heavy Cruiser Ne-Class | ||
| + | |Light Cruiser He-Class/Elite | ||
| + | |Destroyer Ha-Class/Late Model | ||
| + | |Destroyer Ha-Class/Late Model | ||
| + | |- | ||
| + | |P | ||
|Normal | |Normal | ||
| − | |{{TooltipSimple| | + | |{{TooltipSimple|Diamond|58% (1265/2185, HQ: 80-120)}}<br>{{TooltipSimple|''Phases: 1, 2, 3''|Samples: 177, 62, 38}} |
| − | | | + | |Light Carrier Nu-Class/Elite II |
| − | | | + | |Light Carrier Nu-Class/Elite II |
| − | | | + | |Heavy Cruiser Ne-Class |
| + | |Light Cruiser He-Class/Elite | ||
| + | |Destroyer Ha-Class/Late Model | ||
| + | |Destroyer Ha-Class/Late Model | ||
|- | |- | ||
| − | | | + | |P |
|Normal | |Normal | ||
| − | |{{TooltipSimple|Echelon|21% ( | + | |{{TooltipSimple|Diamond|15% (330/2185, HQ: 92-120)}}<br>{{TooltipSimple|''Phases: 1, 2, 3''|Samples: 61, 8, 13}} |
| + | |Light Carrier Nu-Class/Flagship II | ||
| + | |Light Carrier Nu-Class/Elite II | ||
| + | |Heavy Cruiser Ne-Class | ||
| + | |Light Cruiser He-Class/Elite | ||
| + | |Destroyer Ha-Class/Late Model | ||
| + | |Destroyer Ha-Class/Late Model | ||
| + | }} | ||
| + | {{Map/Nodes|diff=Easy|name=深海急派増援群 空母機動部隊 | ||
| + | |Q | ||
| + | |Boss | ||
| + | |{{TooltipSimple|Cruising Formation 4|88% (1753/1997, HQ: 80-120)}}<br>{{TooltipSimple|''Phases: 1, 2, 3''|Samples: 207, 24, 70}} | ||
| + | |Aircraft Carrier Water Demon | ||
| + | |Heavy Cruiser Ri-Class/Flagship | ||
| + | |Heavy Cruiser Ne-Class | ||
| + | |Light Cruiser Tsu-Class | ||
| + | |Light Cruiser Ho-Class/Elite | ||
| + | |Transport Ship Wa-Class | ||
| + | |Light Cruiser He-Class/Elite | ||
| + | |Destroyer Ha-Class/Late Model | ||
| + | |Destroyer Ha-Class/Late Model | ||
| + | |Destroyer I-Class | ||
| + | |Destroyer I-Class | ||
| + | |Destroyer I-Class | ||
| + | |- | ||
| + | |Q | ||
| + | |Boss/Final | ||
| + | |{{TooltipSimple|Cruising Formation 4|12% (244/1997, HQ: 80-120)}}<br>{{TooltipSimple|''Phases: 1''|Samples: 55}} | ||
| + | |Aircraft Carrier Water Demon | ||
| + | |Battleship Princess | ||
| + | |Heavy Cruiser Ne-Class | ||
| + | |Light Cruiser Tsu-Class | ||
| + | |Light Cruiser Ho-Class/Elite | ||
| + | |Transport Ship Wa-Class/Elite | ||
| + | |Light Cruiser He-Class/Elite | ||
| + | |Destroyer Ha-Class/Late Model | ||
| + | |Destroyer Ha-Class/Late Model | ||
| + | |Destroyer Ha-Class/Late Model | ||
| + | |Destroyer I-Class | ||
| + | |Destroyer I-Class | ||
| + | }} | ||
| + | {{Map/Nodes|diff=Easy|Q'|Empty|kind=1}} | ||
| + | {{Map/Nodes|diff=Easy|name=海峡配備 深海魚雷艇部隊 | ||
| + | |R | ||
| + | |Normal | ||
| + | |{{TooltipSimple|Diamond|30% (672/2255, HQ: 80-120)}}<br>{{TooltipSimple|''Phases: 2, 3''|Samples: 150, 23}} | ||
| + | |PT Imp Pack/III | ||
| + | |PT Imp Pack/II | ||
| + | |PT Imp Pack | ||
| + | |PT Imp Pack | ||
| + | |- | ||
| + | |R | ||
| + | |Normal | ||
| + | |{{TooltipSimple|Diamond|35% (788/2255, HQ: 80-120)}}<br>{{TooltipSimple|''Phases: 1, 2, 3''|Samples: 1, 154, 36}} | ||
| + | |PT Imp Pack/III | ||
| + | |PT Imp Pack/II | ||
| + | |PT Imp Pack | ||
| + | |PT Imp Pack | ||
| + | |PT Imp Pack | ||
| + | |- | ||
| + | |R | ||
| + | |Normal | ||
| + | |{{TooltipSimple|Diamond|35% (795/2255, HQ: 80-120)}}<br>{{TooltipSimple|''Phases: 2, 3''|Samples: 178, 22}} | ||
| + | |PT Imp Pack/III | ||
| + | |PT Imp Pack/II | ||
| + | |PT Imp Pack/II | ||
| + | |PT Imp Pack | ||
| + | |PT Imp Pack | ||
| + | }} | ||
| + | {{Map/Nodes|diff=Easy|name=深海任務部隊 ラエ輸送阻止線 | ||
| + | |S | ||
| + | |Normal | ||
| + | |{{TooltipSimple|Line Ahead|44% (750/1686, HQ: 80-120)}}<br>{{TooltipSimple|Double Line|30% (500/1686, HQ: 81-120)}}<br>{{TooltipSimple|Echelon|26% (436/1686, HQ: 80-120)}}<br>{{TooltipSimple|''Phases: 2, 3''|Samples: 352, 20}} | ||
| + | |Light Cruiser He-Class/Elite | ||
| + | |Heavy Cruiser Ne-Class | ||
| + | |Heavy Cruiser Ne-Class | ||
| + | |Destroyer Ha-Class/Late Model | ||
| + | |Destroyer Ha-Class/Late Model | ||
| + | |Submarine Ka-Class | ||
| + | }} | ||
| + | {{Map/Nodes|diff=Easy|T|Landing}} | ||
| + | {{Map/Nodes|diff=Easy|name=深海任務部隊 輸送阻止強襲群 | ||
| + | |U | ||
| + | |Boss | ||
| + | |{{TooltipSimple|Line Ahead|37% (522/1423, HQ: 81-120)}}<br>{{TooltipSimple|''Phases: 2, 3''|Samples: 90, 2}} | ||
| + | |New Southern Battleship Princess | ||
| + | |Standard Carrier Wo-Class/Flagship III | ||
| + | |Heavy Cruiser Ne-Class | ||
| + | |Destroyer Ha-Class/Late Model | ||
| + | |Destroyer Ha-Class/Late Model | ||
| + | |Destroyer I-Class | ||
| + | |- | ||
| + | |U | ||
| + | |Boss | ||
| + | |{{TooltipSimple|Line Ahead|43% (610/1423, HQ: 80-120)}}<br>{{TooltipSimple|''Phases: 2, 3''|Samples: 105, 11}} | ||
| + | |New Southern Battleship Princess | ||
| + | |Standard Carrier Wo-Class/Flagship III | ||
| + | |Heavy Cruiser Ne-Class | ||
| + | |Light Cruiser Tsu-Class | ||
| + | |Destroyer Ha-Class/Late Model | ||
| + | |Destroyer Ha-Class/Late Model | ||
| + | |- | ||
| + | |U | ||
| + | |Boss/Final | ||
| + | |{{TooltipSimple|Line Ahead|20% (291/1423, HQ: 85-120)}}<br>{{TooltipSimple|''Phases: 2''|Samples: 46}} | ||
| + | |New Southern Battleship Princess/Damaged | ||
| + | |Standard Carrier Wo-Class/Flagship III | ||
| + | |Heavy Cruiser Ne-Class | ||
| + | |Light Cruiser Tsu-Class | ||
| + | |Destroyer Ha-Class/Late Model | ||
| + | |Destroyer Ha-Class/Late Model | ||
| + | }} | ||
| + | {{Map/Nodes|diff=Easy|U'|Empty|kind=1}} | ||
| + | {{Map/Nodes|diff=Easy|name=深海基地航空隊 (主力部隊C編隊) | ||
| + | |V | ||
| + | |Defense | ||
| + | |{{TooltipSimple|Diamond|6% (45/773, HQ: 98-120)}}<br>{{TooltipSimple|''Phases: 3''|Samples: 10}} | ||
| + | |Airfield Princess/XVI | ||
| + | |Airfield Princess/Patrol Aircraft Deployment | ||
| + | |- | ||
| + | |V | ||
| + | |Defense | ||
| + | |{{TooltipSimple|Diamond|13% (102/773, HQ: 85-120)}}<br>{{TooltipSimple|''Phases: 3''|Samples: 14}} | ||
| + | |Airfield Princess/XVII | ||
| + | |Airfield Princess/Patrol Aircraft Deployment | ||
| + | |- | ||
| + | |V | ||
| + | |Defense | ||
| + | |{{TooltipSimple|Diamond|23% (179/773, HQ: 85-120)}}<br>{{TooltipSimple|''Phases: 3''|Samples: 40}} | ||
| + | |Airfield Princess/V | ||
| + | |Airfield Princess/XVI | ||
| + | |Airfield Princess/Patrol Aircraft Deployment | ||
| + | |- | ||
| + | |V | ||
| + | |Defense | ||
| + | |{{TooltipSimple|Diamond|40% (308/773, HQ: 94-120)}}<br>{{TooltipSimple|''Phases: 3''|Samples: 71}} | ||
| + | |Airfield Princess/V | ||
| + | |Airfield Princess/XVII | ||
| + | |Airfield Princess/Patrol Aircraft Deployment | ||
| + | |- | ||
| + | |V | ||
| + | |Defense | ||
| + | |{{TooltipSimple|Diamond|18% (139/773, HQ: 94-120)}}<br>{{TooltipSimple|''Phases: 3''|Samples: 40}} | ||
| + | |Airfield Princess/VI | ||
| + | |Airfield Princess/XVII | ||
| + | |Airfield Princess/Patrol Aircraft Deployment | ||
| + | }} | ||
| + | {{Map/Nodes|diff=Easy|W|Repair}} | ||
| + | {{Map/Nodes|diff=Easy|name=深海急派増援群 残存再編部隊 | ||
| + | |X | ||
| + | |Normal | ||
| + | |{{TooltipSimple|Line Ahead|56% (1684/2988, HQ: 85-120)}}<br>{{TooltipSimple|Double Line|17% (514/2988, HQ: 85-120)}}<br>{{TooltipSimple|Vanguard|26% (790/2988, HQ: 85-120)}}<br>{{TooltipSimple|''Phases: 3''|Samples: 666}} | ||
| + | |Heavy Cruiser Ri-Class/Elite | ||
| + | |Torpedo Cruiser Chi-Class/Elite | ||
| + | |Torpedo Cruiser Chi-Class/Elite | ||
| + | |Light Carrier Nu-Class/Elite III | ||
| + | |Destroyer Ha-Class/Late Model | ||
| + | |Destroyer Ha-Class/Late Model | ||
| + | }} | ||
| + | {{Map/Nodes|diff=Easy|name=深海任務部隊 沈没輸送船団 | ||
| + | |Y | ||
| + | |Boss | ||
| + | |{{TooltipSimple|Cruising Formation 4|72% (1981/2754, HQ: 85-120)}}<br>{{TooltipSimple|''Phases: 3''|Samples: 403}} | ||
| + | |Outer Southern Sea Destroyer Princess | ||
| + | |Abyssal Nimbus Princess | ||
| + | |Light Carrier Nu-Class/Elite III | ||
| + | |Transport Ship Wa-Class/Elite | ||
| + | |Transport Ship Wa-Class/Elite | ||
| + | |Destroyer Ha-Class/Late Model | ||
| + | |Light Cruiser Tsu-Class | ||
| + | |Destroyer Ha-Class/Late Model | ||
| + | |Destroyer Ha-Class/Late Model | ||
| + | |Destroyer I-Class | ||
| + | |Destroyer I-Class | ||
| + | |Destroyer I-Class | ||
| + | |- | ||
| + | |Y | ||
| + | |Boss/Final | ||
| + | |{{TooltipSimple|Cruising Formation 4|28% (773/2754, HQ: 94-120)}}<br>{{TooltipSimple|''Phases: 3''|Samples: 133}} | ||
| + | |Outer Southern Sea Destroyer Princess/Damaged | ||
| + | |Abyssal Nimbus Princess | ||
| + | |Aircraft Carrier Princess/Kai IV | ||
| + | |Light Carrier Nu-Class/Elite III | ||
| + | |Transport Ship Wa-Class/Elite | ||
| + | |Transport Ship Wa-Class/Elite | ||
| + | |Light Cruiser Tsu-Class | ||
| + | |Heavy Cruiser Ne-Class | ||
| + | |Destroyer Ha-Class/Late Model | ||
| + | |Destroyer Ha-Class/Late Model | ||
| + | |Destroyer I-Class | ||
| + | |Destroyer I-Class | ||
| + | }} | ||
| + | {{Map/Nodes|diff=Easy|Y'|Empty|kind=1}} | ||
| + | </div> | ||
| + | |-|Casual= | ||
| + | {{Map/Image|page=Spring 2022 Event/E-3| | ||
| + | {{Map/ImageNode|1|Casual|E-3|x=597|y=97}} | ||
| + | {{Map/ImageNode|AB|Casual|E-3|x=586|y=130}} | ||
| + | {{Map/ImageNode|A|Casual|E-3|x=516|y=109}} | ||
| + | {{Map/ImageNode|B|Casual|E-3|x=483|y=166}} | ||
| + | {{Map/ImageNode|C|Casual|E-3|x=439|y=78}} | ||
| + | {{Map/ImageNode|D|Casual|E-3|x=426|y=138}} | ||
| + | {{Map/ImageNode|E|Casual|E-3|x=360|y=158}} | ||
| + | {{Map/ImageNode|F|Casual|E-3|x=323|y=78}} | ||
| + | {{Map/ImageNode|G|Casual|E-3|x=271|y=95}} | ||
| + | {{Map/ImageNode|H|Casual|E-3|x=261|y=132}} | ||
| + | {{Map/ImageNode|I|Casual|E-3|x=204|y=83}} | ||
| + | {{Map/ImageNode|J|Casual|E-3|x=193|y=118}} | ||
| + | {{Map/ImageNode|K|Casual|E-3|x=180|y=165}} | ||
| + | {{Map/ImageNode|L|Casual|E-3|x=230|y=236}} | ||
| + | {{Map/ImageNode|M1|Casual|E-3|x=603|y=281}} | ||
| + | {{Map/ImageNode|M2|Casual|E-3|x=557|y=305}} | ||
| + | {{Map/ImageNode|M|Casual|E-3|x=610|y=229}} | ||
| + | {{Map/ImageNode|N|Casual|E-3|x=536|y=261|drops=<table class="wikitable"><tr><th>Type</th><th>Ships</th></tr><tr><th>DD</th><td>{{Ship/Banner|small=true|Amagiri}}{{Ship/Banner|small=true|Maikaze}}{{Ship/Banner|small=true|Sagiri}}<br>{{Ship/Banner|small=true|Tokitsukaze}}</td></tr></table>}} | ||
| + | {{Map/ImageNode|O|Casual|E-3|x=472|y=289}} | ||
| + | {{Map/ImageNode|P|Casual|E-3|x=417|y=289|drops=<table class="wikitable"><tr><th>Type</th><th>Ships</th></tr><tr><th>DE</th><td>{{Ship/Banner|small=true|Daitou}}{{Ship/Banner|small=true|Matsuwa}}</td></tr><tr><th>DD</th><td>{{Ship/Banner|small=true|Amagiri}}{{Ship/Banner|small=true|Arashi}}{{Ship/Banner|small=true|Asagumo}}<br>{{Ship/Banner|small=true|Hatsukaze}}{{Ship/Banner|small=true|Isokaze}}{{Ship/Banner|small=true|Maikaze}}<br>{{Ship/Banner|small=true|Nowaki}}{{Ship/Banner|small=true|Oyashio}}{{Ship/Banner|small=true|Sagiri}}<br>{{Ship/Banner|small=true|Takanami}}{{Ship/Banner|small=true|Tanikaze}}{{Ship/Banner|small=true|Tokitsukaze}}<br></td></tr></table>}} | ||
| + | {{Map/ImageNode|Q'|Casual|E-3|x=361|y=310}} | ||
| + | {{Map/ImageNode|Q|Casual|E-3|x=324|y=250|drops=<table class="wikitable"><tr><th>Type</th><th>Ships</th></tr><tr><th>DE</th><td>{{Ship/Banner|small=true|Hiburi}}{{Ship/Banner|small=true|Shimushu}}</td></tr><tr><th>DD</th><td>{{Ship/Banner|small=true|Ariake}}{{Ship/Banner|small=true|Harusame}}{{Ship/Banner|small=true|Oyashio}}<br>{{Ship/Banner|small=true|Takanami}}{{Ship/Banner|small=true|Tamanami}}</td></tr><tr><th>CL</th><td>{{Ship/Banner|small=true|Ooyodo}}{{Ship/Banner|small=true|Yahagi}}</td></tr><tr><th>CVL</th><td>{{Ship/Banner|small=true|Shinyou}}</td></tr><tr><th>BB</th><td>{{Ship/Banner|small=true|Yamato}}</td></tr><tr><th>SSV</th><td>{{Ship/Banner|small=true|I-13}}</td></tr><tr><th>CT</th><td>{{Ship/Banner|small=true|Kashima}}</td></tr></table>}} | ||
| + | {{Map/ImageNode|R|Casual|E-3|x=247|y=179}} | ||
| + | {{Map/ImageNode|Start 2|Casual|E-3|x=621|y=150}} | ||
| + | {{Map/ImageNode|Start 3|Casual|E-3|x=379|y=113}} | ||
| + | {{Map/ImageNode|S|Casual|E-3|x=201|y=272|drops=<table class="wikitable"><tr><th>Type</th><th>Ships</th></tr><tr><th>DD</th><td>{{Ship/Banner|small=true|Tokitsukaze}}</td></tr></table>}} | ||
| + | {{Map/ImageNode|T|Casual|E-3|x=132|y=250}} | ||
| + | {{Map/ImageNode|U'|Casual|E-3|x=209|y=303}} | ||
| + | {{Map/ImageNode|U|Casual|E-3|x=162|y=308|drops=<table class="wikitable"><tr><th>Type</th><th>Ships</th></tr><tr><th>DE</th><td>{{Ship/Banner|small=true|Daitou}}</td></tr><tr><th>DD</th><td>{{Ship/Banner|small=true|Arashi}}{{Ship/Banner|small=true|Asagumo}}{{Ship/Banner|small=true|Nowaki}}<br>{{Ship/Banner|small=true|Sagiri}}{{Ship/Banner|small=true|Takanami}}{{Ship/Banner|small=true|Tokitsukaze}}<br></td></tr><tr><th>SSV</th><td>{{Ship/Banner|small=true|I-14}}</td></tr><tr><th>AO</th><td>{{Ship/Banner|small=true|Souya}}</td></tr></table>}} | ||
| + | {{Map/ImageNode|V|Casual|E-3|x=233|y=284}} | ||
| + | {{Map/ImageNode|W|Casual|E-3|x=277|y=206}} | ||
| + | {{Map/ImageNode|X|Casual|E-3|x=267|y=251|drops=<table class="wikitable"><tr><th>Type</th><th>Ships</th></tr><tr><th>DD</th><td>{{Ship/Banner|small=true|Amagiri}}{{Ship/Banner|small=true|Arashi}}{{Ship/Banner|small=true|Asagumo}}<br>{{Ship/Banner|small=true|Hatsukaze}}{{Ship/Banner|small=true|Isokaze}}{{Ship/Banner|small=true|Maikaze}}<br>{{Ship/Banner|small=true|Nowaki}}{{Ship/Banner|small=true|Oyashio}}{{Ship/Banner|small=true|Sagiri}}<br>{{Ship/Banner|small=true|Takanami}}{{Ship/Banner|small=true|Tanikaze}}{{Ship/Banner|small=true|Tokitsukaze}}<br></td></tr></table>}} | ||
| + | {{Map/ImageNode|Y'|Casual|E-3|x=267|y=305}} | ||
| + | {{Map/ImageNode|Y|Casual|E-3|x=307|y=290|drops=<table class="wikitable"><tr><th>Type</th><th>Ships</th></tr><tr><th>DE</th><td>{{Ship/Banner|small=true|Hiburi}}{{Ship/Banner|small=true|Shimushu}}</td></tr><tr><th>DD</th><td>{{Ship/Banner|small=true|Amatsukaze}}{{Ship/Banner|small=true|Ariake}}{{Ship/Banner|small=true|Harusame}}<br>{{Ship/Banner|small=true|Oyashio}}{{Ship/Banner|small=true|Takanami}}{{Ship/Banner|small=true|Tamanami}}<br>{{Ship/Banner|small=true|Tokitsukaze}}</td></tr><tr><th>CL</th><td>{{Ship/Banner|small=true|Ooyodo}}{{Ship/Banner|small=true|Yahagi}}</td></tr><tr><th>CA</th><td>{{Ship/Banner|small=true|Mikuma}}{{Ship/Banner|small=true|Prinz Eugen}}</td></tr><tr><th>CVL</th><td>{{Ship/Banner|small=true|Shinyou}}</td></tr><tr><th>BB</th><td>{{Ship/Banner|small=true|Yamato}}</td></tr><tr><th>SSV</th><td>{{Ship/Banner|small=true|I-13}}</td></tr><tr><th>CT</th><td>{{Ship/Banner|small=true|Kashima}}</td></tr></table>}} | ||
| + | }} | ||
| + | <div class="map-nodes"> | ||
| + | {{Map/Nodes|diff=Casual|name= | ||
| + | |AB | ||
| + | |Raid | ||
| + | |{{TooltipSimple|Diamond|31% (147/477)}} | ||
| + | |Airfield Princess/V | ||
| + | |- | ||
| + | |AB | ||
| + | |Raid | ||
| + | |{{TooltipSimple|Diamond|38% (182/477)}} | ||
| + | |Airfield Princess/VI | ||
| + | |- | ||
| + | |AB | ||
| + | |Raid | ||
| + | |{{TooltipSimple|Diamond|31% (148/477)}} | ||
| + | |Airfield Princess/V | ||
| + | |Airfield Princess/V | ||
| + | }} | ||
| + | {{Map/Nodes|diff=Casual|name=深海潜水艦隊 偵察前衛哨戒 I線 | ||
| + | |A | ||
| + | |Normal | ||
| + | |{{TooltipSimple|Echelon|31% (280/918, HQ: 52-120)}}<br>{{TooltipSimple|Line Abreast|30% (278/918, HQ: 52-120)}}<br>{{TooltipSimple|''Phases: 1, 2, 3''|Samples: 32, 108, 12}} | ||
| + | |Submarine Ka-Class | ||
| + | |Submarine Ka-Class | ||
| + | |Submarine Ka-Class | ||
| + | |- | ||
| + | |A | ||
| + | |Normal | ||
| + | |{{TooltipSimple|Echelon|21% (190/918, HQ: 53-120)}}<br>{{TooltipSimple|Line Abreast|19% (170/918, HQ: 55-120)}}<br>{{TooltipSimple|''Phases: 1, 2, 3''|Samples: 26, 58, 8}} | ||
|Submarine Ka-Class/Elite | |Submarine Ka-Class/Elite | ||
|Submarine Ka-Class | |Submarine Ka-Class | ||
| − | |Submarine Ka-Class | + | |Submarine Ka-Class |
| − | }} | + | }} |
| − | {{Map/Nodes|diff=Casual|name=深海空母機動部隊 艦載機群 | + | {{Map/Nodes|diff=Casual|name=深海空母機動部隊 艦載機群 |
| − | | | + | |B |
| − | |Defense | + | |Defense |
| − | |{{TooltipSimple|Diamond|36% (5/14, HQ: 108-114)}}<br>{{TooltipSimple|''Phases: 1''|Samples: 1}} | + | |{{TooltipSimple|Diamond|55% (118/216, HQ: 69-120)}}<br>{{TooltipSimple|''Phases: 1, 2, 3''|Samples: 29, 8, 1}} |
| − | |Aircraft Carrier Water Demon | + | |Aircraft Carrier Water Demon |
| − | |Heavy Cruiser Ri-Class | + | |Heavy Cruiser Ri-Class |
| − | |Light Cruiser Tsu-Class | + | |Light Cruiser Tsu-Class |
| − | |Light Cruiser Ho-Class/Elite | + | |Light Cruiser Ho-Class/Elite |
| − | |Light Cruiser Ho-Class | + | |Light Cruiser Ho-Class |
| − | |Transport Ship Wa-Class | + | |Transport Ship Wa-Class |
| − | |- | + | |- |
| − | |M1 | + | |B |
| − | |Defense | + | |Defense |
| − | |{{TooltipSimple|Diamond| | + | |{{TooltipSimple|Diamond|44% (96/216, HQ: 78-120)}}<br>{{TooltipSimple|''Phases: 1, 2, 3''|Samples: 10, 12, 2}} |
| − | |Aircraft Carrier Water Demon | + | |Aircraft Carrier Water Demon |
| − | |Light Carrier Nu-Class/Elite II | + | |Light Carrier Nu-Class/Elite II |
| − | |Heavy Cruiser Ri-Class | + | |Heavy Cruiser Ri-Class |
| − | |Light Cruiser Tsu-Class | + | |Light Cruiser Tsu-Class |
| − | |Light Cruiser Ho-Class/Elite | + | |Light Cruiser Ho-Class/Elite |
| − | |Light Cruiser Ho-Class | + | |Light Cruiser Ho-Class |
| + | |- | ||
| + | |B | ||
| + | |Defense | ||
| + | |{{TooltipSimple|Diamond|1% (2/216, HQ: 99-109)}}<br>{{TooltipSimple|''Phases: 2''|Samples: 1}} | ||
| + | |Aircraft Carrier Water Demon | ||
| + | |Light Carrier Nu-Class/Elite II | ||
| + | |Light Carrier Nu-Class/Elite II | ||
| + | |Heavy Cruiser Ri-Class | ||
| + | |Light Cruiser Tsu-Class | ||
| + | |Light Cruiser Ho-Class/Elite | ||
| + | }} | ||
| + | {{Map/Nodes|diff=Casual|name=深海潜水艦隊 偵察前衛哨戒 II線 | ||
| + | |C | ||
| + | |Normal | ||
| + | |{{TooltipSimple|Echelon|31% (75/240, HQ: 75-120)}}<br>{{TooltipSimple|Line Abreast|28% (67/240, HQ: 76-120)}}<br>{{TooltipSimple|''Phases: 1, 2, 3''|Samples: 37, 18, 1}} | ||
| + | |Submarine Ka-Class | ||
| + | |Submarine Ka-Class | ||
| + | |Submarine Ka-Class | ||
| + | |- | ||
| + | |C | ||
| + | |Normal | ||
| + | |{{TooltipSimple|Echelon|20% (48/240, HQ: 76-120)}}<br>{{TooltipSimple|Line Abreast|21% (50/240, HQ: 76-120)}}<br>{{TooltipSimple|''Phases: 1, 2, 3''|Samples: 16, 9, 2}} | ||
| + | |Submarine Ka-Class/Elite | ||
| + | |Submarine Ka-Class | ||
| + | |Submarine Ka-Class | ||
| + | }} | ||
| + | {{Map/Nodes|diff=Casual|D|Empty|kind=0}} | ||
| + | {{Map/Nodes|diff=Casual|name=深海基地航空隊 | ||
| + | |E | ||
| + | |Defense | ||
| + | |{{TooltipSimple|Diamond|28% (243/877, HQ: 52-120)}}<br>{{TooltipSimple|''Phases: 1, 2, 3''|Samples: 25, 43, 5}} | ||
| + | |Airfield Princess/V | ||
| + | |- | ||
| + | |E | ||
| + | |Defense | ||
| + | |{{TooltipSimple|Diamond|47% (408/877, HQ: 53-120)}}<br>{{TooltipSimple|''Phases: 1, 2, 3''|Samples: 20, 74, 6}} | ||
| + | |Airfield Princess/XVI | ||
| + | |- | ||
| + | |E | ||
| + | |Defense | ||
| + | |{{TooltipSimple|Diamond|26% (226/877, HQ: 52-120)}}<br>{{TooltipSimple|''Phases: 1, 2, 3''|Samples: 16, 47, 5}} | ||
| + | |Airfield Princess/V | ||
| + | |Airfield Princess/V | ||
| + | }} | ||
| + | {{Map/Nodes|diff=Casual|name=深海基地航空隊 | ||
| + | |F | ||
| + | |Defense | ||
| + | |{{TooltipSimple|Diamond|36% (177/490, HQ: 75-120)}}<br>{{TooltipSimple|''Phases: 1, 2, 3''|Samples: 10, 5, 6}} | ||
| + | |Airfield Princess/V | ||
| + | |- | ||
| + | |F | ||
| + | |Defense | ||
| + | |{{TooltipSimple|Diamond|40% (198/490, HQ: 75-120)}}<br>{{TooltipSimple|''Phases: 1, 2, 3''|Samples: 17, 11, 6}} | ||
| + | |Airfield Princess/XVI | ||
| + | |- | ||
| + | |F | ||
| + | |Defense | ||
| + | |{{TooltipSimple|Diamond|23% (115/490, HQ: 76-120)}}<br>{{TooltipSimple|''Phases: 1, 2, 3''|Samples: 9, 4, 3}} | ||
| + | |Airfield Princess/V | ||
| + | |Airfield Princess/V | ||
| + | }} | ||
| + | {{Map/Nodes|diff=Casual|name=深海潜水艦隊 偵察前衛哨戒 III線 | ||
| + | |G | ||
| + | |Normal | ||
| + | |{{TooltipSimple|Echelon|29% (526/1792, HQ: 55-120)}}<br>{{TooltipSimple|Line Abreast|30% (541/1792, HQ: 56-120)}}<br>{{TooltipSimple|''Phases: 1, 2, 3''|Samples: 18, 14, 166}} | ||
| + | |Submarine Ka-Class/Elite | ||
| + | |Submarine Ka-Class | ||
| + | |Submarine Ka-Class | ||
| + | |- | ||
| + | |G | ||
| + | |Normal | ||
| + | |{{TooltipSimple|Echelon|19% (344/1792, HQ: 56-120)}}<br>{{TooltipSimple|Line Abreast|21% (381/1792, HQ: 55-120)}}<br>{{TooltipSimple|''Phases: 1, 2, 3''|Samples: 14, 6, 108}} | ||
| + | |Submarine Ka-Class/Elite | ||
| + | |Submarine Ka-Class/Elite | ||
| + | |Submarine Ka-Class | ||
| + | }} | ||
| + | {{Map/Nodes|diff=Casual|H|Empty|kind=0}} | ||
| + | {{Map/Nodes|diff=Casual|name=深海基地航空隊 | ||
| + | |I | ||
| + | |Defense | ||
| + | |{{TooltipSimple|Diamond|35% (395/1142, HQ: 71-120)}}<br>{{TooltipSimple|''Phases: 1, 2, 3''|Samples: 9, 3, 42}} | ||
| + | |Airfield Princess/V | ||
| + | |- | ||
| + | |I | ||
| + | |Defense | ||
| + | |{{TooltipSimple|Diamond|40% (459/1142, HQ: 71-120)}}<br>{{TooltipSimple|''Phases: 1, 2, 3''|Samples: 6, 1, 51}} | ||
| + | |Airfield Princess/XVI | ||
| + | |- | ||
| + | |I | ||
| + | |Defense | ||
| + | |{{TooltipSimple|Diamond|25% (288/1142, HQ: 71-120)}}<br>{{TooltipSimple|''Phases: 1, 2, 3''|Samples: 5, 7, 32}} | ||
| + | |Airfield Princess/V | ||
| + | |Airfield Princess/V | ||
| + | }} | ||
| + | {{Map/Nodes|diff=Casual|name=深海潜水艦隊 遊撃群狼A集団 | ||
| + | |J | ||
| + | |Normal | ||
| + | |{{TooltipSimple|Echelon|5% (97/1890, HQ: 55-120)}}<br>{{TooltipSimple|Line Abreast|55% (1043/1890, HQ: 52-120)}}<br>{{TooltipSimple|''Phases: 1, 2, 3''|Samples: 38, 10, 164}} | ||
| + | |Submarine Yo-Class | ||
| + | |Submarine Yo-Class | ||
| + | |Submarine Ka-Class | ||
| + | |- | ||
| + | |J | ||
| + | |Normal | ||
| + | |{{TooltipSimple|Echelon|20% (383/1890, HQ: 55-120)}}<br>{{TooltipSimple|Line Abreast|19% (367/1890, HQ: 52-120)}}<br>{{TooltipSimple|''Phases: 1, 2, 3''|Samples: 26, 10, 109}} | ||
| + | |Submarine Yo-Class/Elite | ||
| + | |Submarine Yo-Class | ||
| + | |Submarine Ka-Class | ||
| + | }} | ||
| + | {{Map/Nodes|diff=Casual|K|Empty|kind=0}} | ||
| + | {{Map/Nodes|diff=Casual|name=深海基地航空隊 (主力部隊A編隊) | ||
| + | |L | ||
| + | |Defense | ||
| + | |{{TooltipSimple|Diamond|20% (516/2582, HQ: 53-120)}}<br>{{TooltipSimple|''Phases: 1, 2, 3''|Samples: 15, 38, 54}} | ||
| + | |Airfield Princess/XVI | ||
| + | |- | ||
| + | |L | ||
| + | |Defense | ||
| + | |{{TooltipSimple|Diamond|25% (645/2582, HQ: 52-120)}}<br>{{TooltipSimple|''Phases: 1, 2, 3''|Samples: 15, 42, 74}} | ||
| + | |Airfield Princess/XVII | ||
| + | |- | ||
| + | |L | ||
| + | |Defense | ||
| + | |{{TooltipSimple|Diamond|40% (1025/2582, HQ: 54-120)}}<br>{{TooltipSimple|''Phases: 1, 2, 3''|Samples: 20, 58, 114}} | ||
| + | |Airfield Princess/XVI | ||
| + | |Airfield Princess/XVI | ||
| + | |- | ||
| + | |L | ||
| + | |Defense | ||
| + | |{{TooltipSimple|Diamond|15% (396/2582, HQ: 55-120)}}<br>{{TooltipSimple|''Phases: 1, 2, 3''|Samples: 7, 29, 35}} | ||
| + | |Airfield Princess/V | ||
| + | |Airfield Princess/XVI | ||
| + | |Airfield Princess/XVI | ||
| + | }} | ||
| + | {{Map/Nodes|diff=Casual|name=深海潜水艦隊 偵察前衛哨戒 IV線 | ||
| + | |M | ||
| + | |Normal | ||
| + | |{{TooltipSimple|Echelon|4% (34/810, HQ: 74-120)}}<br>{{TooltipSimple|Line Abreast|55% (447/810, HQ: 52-120)}}<br>{{TooltipSimple|''Phases: 1, 2, 3''|Samples: 84, 38, 4}} | ||
| + | |Submarine Ka-Class | ||
| + | |Submarine Ka-Class | ||
| + | |Submarine Ka-Class | ||
| + | |- | ||
| + | |M | ||
| + | |Normal | ||
| + | |{{TooltipSimple|Echelon|20% (159/810, HQ: 53-120)}}<br>{{TooltipSimple|Line Abreast|21% (170/810, HQ: 52-120)}}<br>{{TooltipSimple|''Phases: 1, 2, 3''|Samples: 54, 20, 4}} | ||
| + | |Submarine Ka-Class/Elite | ||
| + | |Submarine Ka-Class | ||
| + | |Submarine Ka-Class | ||
| + | }} | ||
| + | {{Map/Nodes|diff=Casual|name=深海空母機動部隊 艦載機群 | ||
| + | |M1 | ||
| + | |Defense | ||
| + | |{{TooltipSimple|Diamond|40% (33/82, HQ: 74-120)}}<br>{{TooltipSimple|''Phases: 1, 3''|Samples: 8, 1}} | ||
| + | |Aircraft Carrier Water Demon | ||
| + | |Heavy Cruiser Ri-Class | ||
| + | |Light Cruiser Tsu-Class | ||
| + | |Light Cruiser Ho-Class/Elite | ||
| + | |Light Cruiser Ho-Class | ||
| + | |Transport Ship Wa-Class | ||
| + | |- | ||
| + | |M1 | ||
| + | |Defense | ||
| + | |{{TooltipSimple|Diamond|54% (44/82, HQ: 73-116)}}<br>{{TooltipSimple|''Phases: 1, 3''|Samples: 15, 2}} | ||
| + | |Aircraft Carrier Water Demon | ||
| + | |Light Carrier Nu-Class/Elite II | ||
| + | |Heavy Cruiser Ri-Class | ||
| + | |Light Cruiser Tsu-Class | ||
| + | |Light Cruiser Ho-Class/Elite | ||
| + | |Light Cruiser Ho-Class | ||
| + | |- | ||
| + | |M1 | ||
| + | |Defense | ||
| + | |{{TooltipSimple|Diamond|6% (5/82, HQ: 88-116)}}<br>{{TooltipSimple|''Phases: 1''|Samples: 2}} | ||
| + | |Aircraft Carrier Water Demon | ||
| + | |Light Carrier Nu-Class/Elite II | ||
| + | |Light Carrier Nu-Class/Elite II | ||
| + | |Heavy Cruiser Ri-Class | ||
| + | |Light Cruiser Tsu-Class | ||
| + | |Light Cruiser Ho-Class/Elite | ||
| + | }} | ||
| + | {{Map/Nodes|diff=Casual|name=深海潜水艦隊 遊撃群狼B集団 | ||
| + | |M2 | ||
| + | |Normal | ||
| + | |{{TooltipSimple|Echelon|12% (3/26, HQ: 74-101)}}<br>{{TooltipSimple|Line Abreast|54% (14/26, HQ: 74-110)}}<br>{{TooltipSimple|''Phases: 1, 3''|Samples: 1, 1}} | ||
| + | |Submarine Yo-Class | ||
| + | |Submarine Yo-Class | ||
| + | |Submarine Ka-Class | ||
|- | |- | ||
| − | |||
| − | |||
| − | |||
| − | |||
| − | |||
| − | |||
| − | |||
| − | |||
| − | |||
| − | |||
| − | |||
|M2 | |M2 | ||
|Normal | |Normal | ||
| − | |{{TooltipSimple|Echelon| | + | |{{TooltipSimple|Echelon|12% (3/26, HQ: 100-106)}}<br>{{TooltipSimple|Line Abreast|23% (6/26, HQ: 99-120)}} |
|Submarine Yo-Class/Elite | |Submarine Yo-Class/Elite | ||
|Submarine Yo-Class | |Submarine Yo-Class | ||
| Line 1,708: | Line 2,312: | ||
|N | |N | ||
|Normal | |Normal | ||
| − | |{{TooltipSimple|Line Ahead|40% ( | + | |{{TooltipSimple|Line Ahead|40% (318/801, HQ: 52-120)}}<br>{{TooltipSimple|Echelon|33% (264/801, HQ: 52-120)}}<br>{{TooltipSimple|Line Abreast|27% (219/801, HQ: 53-120)}}<br>{{TooltipSimple|''Phases: 1, 2, 3''|Samples: 134, 58, 7}} |
|Heavy Cruiser Ri-Class/Elite | |Heavy Cruiser Ri-Class/Elite | ||
|Light Cruiser Ho-Class/Elite | |Light Cruiser Ho-Class/Elite | ||
| Line 1,719: | Line 2,323: | ||
|O | |O | ||
|Defense | |Defense | ||
| − | |{{TooltipSimple|Diamond| | + | |{{TooltipSimple|Diamond|26% (205/787, HQ: 52-120)}}<br>{{TooltipSimple|''Phases: 1, 2, 3''|Samples: 26, 21, 1}} |
|Airfield Princess/Patrol Aircraft Deployment | |Airfield Princess/Patrol Aircraft Deployment | ||
|- | |- | ||
|O | |O | ||
|Defense | |Defense | ||
| − | |{{TooltipSimple|Diamond| | + | |{{TooltipSimple|Diamond|38% (300/787, HQ: 52-120)}}<br>{{TooltipSimple|''Phases: 1, 2, 3''|Samples: 49, 24, 2}} |
|Airfield Princess/XVI | |Airfield Princess/XVI | ||
|Airfield Princess/Patrol Aircraft Deployment | |Airfield Princess/Patrol Aircraft Deployment | ||
| Line 1,730: | Line 2,334: | ||
|O | |O | ||
|Defense | |Defense | ||
| − | |{{TooltipSimple|Diamond| | + | |{{TooltipSimple|Diamond|30% (238/787, HQ: 53-120)}}<br>{{TooltipSimple|''Phases: 1, 2, 3''|Samples: 43, 12, 4}} |
|Airfield Princess/XVII | |Airfield Princess/XVII | ||
|Airfield Princess/Patrol Aircraft Deployment | |Airfield Princess/Patrol Aircraft Deployment | ||
| Line 1,736: | Line 2,340: | ||
|O | |O | ||
|Defense | |Defense | ||
| − | |{{TooltipSimple|Diamond| | + | |{{TooltipSimple|Diamond|6% (44/787, HQ: 75-120)}}<br>{{TooltipSimple|''Phases: 1''|Samples: 13}} |
|Airfield Princess/V | |Airfield Princess/V | ||
|Airfield Princess/XVI | |Airfield Princess/XVI | ||
| Line 1,744: | Line 2,348: | ||
|P | |P | ||
|Normal | |Normal | ||
| − | |{{TooltipSimple|Diamond|25% ( | + | |{{TooltipSimple|Diamond|25% (191/758, HQ: 53-120)}}<br>{{TooltipSimple|''Phases: 1, 2''|Samples: 24, 17}} |
|Light Carrier Nu-Class/Elite II | |Light Carrier Nu-Class/Elite II | ||
|Light Cruiser He-Class/Elite | |Light Cruiser He-Class/Elite | ||
| Line 1,754: | Line 2,358: | ||
|P | |P | ||
|Normal | |Normal | ||
| − | |{{TooltipSimple|Diamond| | + | |{{TooltipSimple|Diamond|59% (448/758, HQ: 53-120)}}<br>{{TooltipSimple|''Phases: 1, 2, 3''|Samples: 76, 34, 6}} |
|Light Carrier Nu-Class/Elite II | |Light Carrier Nu-Class/Elite II | ||
|Light Carrier Nu-Class | |Light Carrier Nu-Class | ||
| Line 1,764: | Line 2,368: | ||
|P | |P | ||
|Normal | |Normal | ||
| − | |{{TooltipSimple|Diamond| | + | |{{TooltipSimple|Diamond|16% (119/758, HQ: 52-120)}}<br>{{TooltipSimple|''Phases: 1, 2''|Samples: 27, 4}} |
|Light Carrier Nu-Class/Elite II | |Light Carrier Nu-Class/Elite II | ||
|Light Carrier Nu-Class/Elite | |Light Carrier Nu-Class/Elite | ||
| Line 1,775: | Line 2,379: | ||
|Q | |Q | ||
|Boss | |Boss | ||
| − | |{{TooltipSimple|Cruising Formation 4| | + | |{{TooltipSimple|Cruising Formation 4|87% (642/742, HQ: 52-120)}}<br>{{TooltipSimple|''Phases: 1, 2, 3''|Samples: 87, 53, 5}} |
|Aircraft Carrier Water Demon | |Aircraft Carrier Water Demon | ||
|Heavy Cruiser Ri-Class | |Heavy Cruiser Ri-Class | ||
| Line 1,791: | Line 2,395: | ||
|Q | |Q | ||
|Boss/Final | |Boss/Final | ||
| − | |{{TooltipSimple|Cruising Formation 4| | + | |{{TooltipSimple|Cruising Formation 4|13% (100/742, HQ: 53-120)}}<br>{{TooltipSimple|''Phases: 1''|Samples: 21}} |
|Aircraft Carrier Water Demon | |Aircraft Carrier Water Demon | ||
|Heavy Cruiser Ri-Class/Flagship | |Heavy Cruiser Ri-Class/Flagship | ||
| Line 1,805: | Line 2,409: | ||
|Destroyer I-Class | |Destroyer I-Class | ||
}} | }} | ||
| + | {{Map/Nodes|diff=Casual|Q'|Empty|kind=1}} | ||
{{Map/Nodes|diff=Casual|name=海峡配備 深海魚雷艇部隊 | {{Map/Nodes|diff=Casual|name=海峡配備 深海魚雷艇部隊 | ||
|R | |R | ||
|Normal | |Normal | ||
| − | |{{TooltipSimple|Diamond| | + | |{{TooltipSimple|Diamond|32% (245/754, HQ: 54-120)}}<br>{{TooltipSimple|''Phases: 2, 3''|Samples: 45, 4}} |
|PT Imp Pack/II | |PT Imp Pack/II | ||
|PT Imp Pack | |PT Imp Pack | ||
| Line 1,816: | Line 2,421: | ||
|R | |R | ||
|Normal | |Normal | ||
| − | |{{TooltipSimple|Diamond| | + | |{{TooltipSimple|Diamond|37% (277/754, HQ: 53-120)}}<br>{{TooltipSimple|''Phases: 1, 2, 3''|Samples: 2, 70, 4}} |
|PT Imp Pack/II | |PT Imp Pack/II | ||
|PT Imp Pack/II | |PT Imp Pack/II | ||
| Line 1,824: | Line 2,429: | ||
|R | |R | ||
|Normal | |Normal | ||
| − | |{{TooltipSimple|Diamond| | + | |{{TooltipSimple|Diamond|31% (232/754, HQ: 53-120)}}<br>{{TooltipSimple|''Phases: 1, 2, 3''|Samples: 1, 38, 7}} |
|PT Imp Pack/II | |PT Imp Pack/II | ||
|PT Imp Pack/II | |PT Imp Pack/II | ||
| Line 1,834: | Line 2,439: | ||
|S | |S | ||
|Normal | |Normal | ||
| − | |{{TooltipSimple|Line Ahead| | + | |{{TooltipSimple|Line Ahead|44% (317/715, HQ: 54-120)}}<br>{{TooltipSimple|Double Line|31% (219/715, HQ: 54-120)}}<br>{{TooltipSimple|Echelon|25% (179/715, HQ: 53-120)}}<br>{{TooltipSimple|''Phases: 2, 3''|Samples: 148, 6}} |
|Light Cruiser He-Class/Elite | |Light Cruiser He-Class/Elite | ||
|Heavy Cruiser Ne-Class | |Heavy Cruiser Ne-Class | ||
| Line 1,846: | Line 2,451: | ||
|U | |U | ||
|Boss | |Boss | ||
| − | |{{TooltipSimple|Line Ahead| | + | |{{TooltipSimple|Line Ahead|40% (224/563, HQ: 53-120)}}<br>{{TooltipSimple|''Phases: 2, 3''|Samples: 49, 1}} |
|New Southern Battleship Princess | |New Southern Battleship Princess | ||
|Heavy Cruiser Ne-Class | |Heavy Cruiser Ne-Class | ||
| Line 1,856: | Line 2,461: | ||
|U | |U | ||
|Boss | |Boss | ||
| − | |{{TooltipSimple|Line Ahead| | + | |{{TooltipSimple|Line Ahead|39% (217/563, HQ: 54-120)}}<br>{{TooltipSimple|''Phases: 2, 3''|Samples: 55, 2}} |
|New Southern Battleship Princess | |New Southern Battleship Princess | ||
|Standard Carrier Wo-Class | |Standard Carrier Wo-Class | ||
| Line 1,866: | Line 2,471: | ||
|U | |U | ||
|Boss/Final | |Boss/Final | ||
| − | |{{TooltipSimple|Line Ahead| | + | |{{TooltipSimple|Line Ahead|22% (122/563, HQ: 55-120)}}<br>{{TooltipSimple|''Phases: 2''|Samples: 21}} |
|New Southern Battleship Princess/Damaged | |New Southern Battleship Princess/Damaged | ||
|Standard Carrier Wo-Class/Elite | |Standard Carrier Wo-Class/Elite | ||
| Line 1,878: | Line 2,483: | ||
|V | |V | ||
|Defense | |Defense | ||
| − | |{{TooltipSimple|Diamond| | + | |{{TooltipSimple|Diamond|26% (223/866, HQ: 55-112)}}<br>{{TooltipSimple|''Phases: 3''|Samples: 30}} |
|Airfield Princess/Patrol Aircraft Deployment | |Airfield Princess/Patrol Aircraft Deployment | ||
|- | |- | ||
|V | |V | ||
|Defense | |Defense | ||
| − | |{{TooltipSimple|Diamond| | + | |{{TooltipSimple|Diamond|42% (364/866, HQ: 55-120)}}<br>{{TooltipSimple|''Phases: 3''|Samples: 48}} |
|Airfield Princess/XVI | |Airfield Princess/XVI | ||
|Airfield Princess/Patrol Aircraft Deployment | |Airfield Princess/Patrol Aircraft Deployment | ||
| Line 1,889: | Line 2,494: | ||
|V | |V | ||
|Defense | |Defense | ||
| − | |{{TooltipSimple|Diamond| | + | |{{TooltipSimple|Diamond|32% (279/866, HQ: 55-120)}}<br>{{TooltipSimple|''Phases: 3''|Samples: 37}} |
|Airfield Princess/XVII | |Airfield Princess/XVII | ||
|Airfield Princess/Patrol Aircraft Deployment | |Airfield Princess/Patrol Aircraft Deployment | ||
| Line 1,897: | Line 2,502: | ||
|X | |X | ||
|Normal | |Normal | ||
| − | |{{TooltipSimple|Line Ahead| | + | |{{TooltipSimple|Line Ahead|59% (891/1515, HQ: 55-120)}}<br>{{TooltipSimple|Double Line|22% (339/1515, HQ: 56-120)}}<br>{{TooltipSimple|Vanguard|19% (285/1515, HQ: 56-120)}}<br>{{TooltipSimple|''Phases: 3''|Samples: 256}} |
|Heavy Cruiser Ri-Class/Elite | |Heavy Cruiser Ri-Class/Elite | ||
|Torpedo Cruiser Chi-Class/Elite | |Torpedo Cruiser Chi-Class/Elite | ||
| Line 1,908: | Line 2,513: | ||
|Y | |Y | ||
|Boss | |Boss | ||
| − | |{{TooltipSimple|Cruising Formation 4| | + | |{{TooltipSimple|Cruising Formation 4|85% (1260/1474, HQ: 55-120)}}<br>{{TooltipSimple|''Phases: 3''|Samples: 173}} |
|Outer Southern Sea Destroyer Princess | |Outer Southern Sea Destroyer Princess | ||
|Light Carrier Nu-Class/Elite III | |Light Carrier Nu-Class/Elite III | ||
| Line 1,924: | Line 2,529: | ||
|Y | |Y | ||
|Boss/Final | |Boss/Final | ||
| − | |{{TooltipSimple|Cruising Formation 4| | + | |{{TooltipSimple|Cruising Formation 4|15% (214/1474, HQ: 57-120)}}<br>{{TooltipSimple|''Phases: 3''|Samples: 43}} |
|Outer Southern Sea Destroyer Princess/Damaged | |Outer Southern Sea Destroyer Princess/Damaged | ||
|Abyssal Nimbus Princess | |Abyssal Nimbus Princess | ||
Revision as of 07:48, 17 June 2022
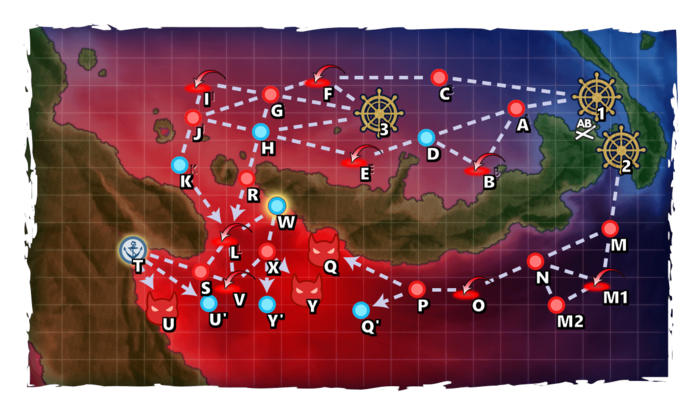
| Type | Ships |
|---|---|
| DD |
| Type | Ships |
|---|---|
| DE | |
| DD | |
| CVL | |
| SSV | |
| AO |
| Type | Ships |
|---|---|
| DE | |
| DD | |
| CL | |
| CA | |
| CVL | |
| BB | |
| SSV | |
| CT |
| Type | Ships |
|---|---|
| DD |
| Type | Ships |
|---|---|
| DE | |
| DD | |
| CVL | |
| SSV | |
| AO |
| Type | Ships |
|---|---|
| DE | |
| DD |
| Type | Ships |
|---|---|
| DE | |
| DD | |
| CL | |
| CA | |
| CVL | |
| BB | |
| SSV | |
| CT |
E-3 Hard AB
| # | Formation | Air Raids | AD/AP AS/AS+ |
|---|---|---|---|
| AB | Diamond | 39/78 174/348 | |
| Diamond | 51/101 225/450 | ||
| Diamond | 57/114 255/510 | ||
| Diamond | 62/123 276/552 | ||
| Diamond | 69/137 306/612 | ||
| # | Formation | Air Raids | AD/AP AS/AS+ |
E-3 Hard A: 深海潜水艦隊 偵察前衛哨戒 I線 (PoiDB)
| # | Formation | Normal Battle Node | AD/AP AS/AS+ |
|---|---|---|---|
| A | Echelon Line Abreast Phases: 1, 2, 3 |
0/0 0/0 | |
| Echelon Line Abreast Phases: 1, 2, 3 |
0/0 0/0 | ||
| Echelon Line Abreast Phases: 1, 2, 3 |
0/0 0/0 | ||
| # | Formation | Normal Battle Node | AD/AP AS/AS+ |
E-3 Hard B: 深海空母機動部隊 艦載機群 (PoiDB)
| # | Formation | Air Defense Node | AD/AP AS/AS+ |
|---|---|---|---|
| B | Diamond Phases: 1, 2, 3 |
100/199 446/891 | |
| Diamond Phases: 2 |
104/208 467/933 | ||
| Diamond Phases: 1, 2, 3 |
69/137 306/612 | ||
| # | Formation | Air Defense Node | AD/AP AS/AS+ |
E-3 Hard C: 深海潜水艦隊 偵察前衛哨戒 II線 (PoiDB)
| # | Formation | Normal Battle Node | AD/AP AS/AS+ |
|---|---|---|---|
| C | Echelon Line Abreast Phases: 1, 2, 3 |
0/0 0/0 | |
| Echelon Line Abreast Phases: 1, 2, 3 |
0/0 0/0 | ||
| Echelon Line Abreast Phases: 1, 2, 3 |
0/0 0/0 | ||
| # | Formation | Normal Battle Node | AD/AP AS/AS+ |
E-3 Hard D
| # | Empty Node | ||
|---|---|---|---|
| D | 気のせいだった。 上空敵機触接あり。対空警戒を厳に! Must be my imagination. Enemy aircraft in contact overhead. Keep a strict anti-aircraft vigilance! | ||
| # | Empty Node | ||
E-3 Hard E: 深海基地航空隊 (PoiDB)
| # | Formation | Air Defense Node | AD/AP AS/AS+ |
|---|---|---|---|
| E | Diamond Phases: 1, 2, 3 |
43/86 192/384 | |
| Diamond Phases: 1, 2, 3 |
48/95 213/426 | ||
| Diamond Phases: 1, 2, 3 |
55/109 243/486 | ||
| Diamond Phases: 1, 2, 3 |
60/119 267/534 | ||
| Diamond Phases: 2 |
65/129 288/576 | ||
| Diamond Phases: 2 |
71/142 318/636 | ||
| # | Formation | Air Defense Node | AD/AP AS/AS+ |
E-3 Hard F: 深海基地航空隊 (PoiDB)
| # | Formation | Air Defense Node | AD/AP AS/AS+ |
|---|---|---|---|
| F | Diamond Phases: 1, 2, 3 |
43/86 192/384 | |
| Diamond Phases: 1, 2, 3 |
48/95 213/426 | ||
| Diamond Phases: 1, 2, 3 |
55/109 243/486 | ||
| Diamond Phases: 1, 2, 3 |
60/119 267/534 | ||
| Diamond Phases: 2, 3 |
65/129 288/576 | ||
| Diamond Phases: 2, 3 |
71/142 318/636 | ||
| # | Formation | Air Defense Node | AD/AP AS/AS+ |
E-3 Hard G: 深海潜水艦隊 偵察前衛哨戒 III線 (PoiDB)
| # | Formation | Normal Battle Node | AD/AP AS/AS+ |
|---|---|---|---|
| G | Echelon Line Abreast Phases: 1, 2, 3 |
0/0 0/0 | |
| Echelon Line Abreast Phases: 1, 2, 3 |
0/0 0/0 | ||
| Echelon Line Abreast Phases: 1, 2, 3 |
0/0 0/0 | ||
| # | Formation | Normal Battle Node | AD/AP AS/AS+ |
E-3 Hard H
| # | Empty Node | ||
|---|---|---|---|
| H | 気のせいだった。 左舷にダンピール海峡!警戒を厳に! Must be my imagination. Dampier Strait to port! Hold your fire! | ||
| # | Empty Node | ||
E-3 Hard I: 深海基地航空隊 (PoiDB)
| # | Formation | Air Defense Node | AD/AP AS/AS+ |
|---|---|---|---|
| I | Diamond Phases: 1, 2, 3 |
43/86 192/384 | |
| Diamond Phases: 1, 2, 3 |
48/95 213/426 | ||
| Diamond Phases: 1, 2, 3 |
55/109 243/486 | ||
| Diamond Phases: 1, 2, 3 |
60/119 267/534 | ||
| Diamond Phases: 3 |
65/129 288/576 | ||
| Diamond Phases: 2, 3 |
71/142 318/636 | ||
| # | Formation | Air Defense Node | AD/AP AS/AS+ |
E-3 Hard J: 深海潜水艦隊 遊撃群狼A集団 (PoiDB)
| # | Formation | Normal Battle Node | AD/AP AS/AS+ |
|---|---|---|---|
| J | Echelon Line Abreast Phases: 1, 2, 3 |
0/0 0/0 | |
| Echelon Line Abreast Phases: 1, 2, 3 |
0/0 0/0 | ||
| Echelon Line Abreast Phases: 1, 2, 3 |
0/0 0/0 | ||
| # | Formation | Normal Battle Node | AD/AP AS/AS+ |
E-3 Hard K
| # | Empty Node | ||
|---|---|---|---|
| K | 気のせいだった。 これよりラエ沖に突入する!上空監視!対空警戒を厳とせよ! Must be my imagination. We are now entering the waters off Lae! Eyes overhead! Maintain strict anti-aircraft vigilance! | ||
| # | Empty Node | ||
E-3 Hard L: 深海基地航空隊 (主力部隊A編隊) (PoiDB)
| # | Formation | Air Defense Node | AD/AP AS/AS+ |
|---|---|---|---|
| L | Diamond Phases: 1, 2, 3 |
49/97 216/432 | |
| Diamond Phases: 1, 2, 3 |
58/115 258/516 | ||
| Diamond Phases: 1, 2, 3 |
65/129 288/576 | ||
| Diamond Phases: 1, 2, 3 |
70/139 312/624 | ||
| Diamond Phases: 1, 2, 3 |
79/158 354/708 | ||
| Diamond Phases: 3 |
85/169 378/756 | ||
| # | Formation | Air Defense Node | AD/AP AS/AS+ |
E-3 Hard M: 深海潜水艦隊 偵察前衛哨戒 IV線 (PoiDB)
| # | Formation | Normal Battle Node | AD/AP AS/AS+ |
|---|---|---|---|
| M | Echelon Line Abreast Phases: 1, 2, 3 |
0/0 0/0 | |
| Echelon Line Abreast Phases: 1, 2, 3 |
0/0 0/0 | ||
| Echelon Line Abreast Phases: 1, 2, 3 |
0/0 0/0 | ||
| # | Formation | Normal Battle Node | AD/AP AS/AS+ |
E-3 Hard M1: 深海空母機動部隊 艦載機群 (PoiDB)
| # | Formation | Air Defense Node | AD/AP AS/AS+ |
|---|---|---|---|
| M1 | Diamond Phases: 1, 3 |
100/199 446/891 | |
| Diamond Phases: 1 |
104/208 467/933 | ||
| Diamond Phases: 1, 3 |
69/137 306/612 | ||
| # | Formation | Air Defense Node | AD/AP AS/AS+ |
E-3 Hard M2: 深海潜水艦隊 遊撃群狼B集団 (PoiDB)
| # | Formation | Normal Battle Node | AD/AP AS/AS+ |
|---|---|---|---|
| M2 | Echelon Line Abreast Phases: 1, 3 |
0/0 0/0 | |
| Echelon Line Abreast Phases: 1, 3 |
0/0 0/0 | ||
| Echelon Line Abreast Phases: 1, 3 |
0/0 0/0 | ||
| # | Formation | Normal Battle Node | AD/AP AS/AS+ |
E-3 Hard N: 深海急派増援群 前衛偵察部隊 (PoiDB)
| # | Formation | Normal Battle Node | AD/AP AS/AS+ |
|---|---|---|---|
| N | Line Ahead Echelon Line Abreast Phases: 1, 2, 3 |
0/0 0/0 | |
| # | Formation | Normal Battle Node | AD/AP AS/AS+ |
E-3 Hard O: 深海基地航空隊 (主力部隊B編隊) (PoiDB)
| # | Formation | Air Defense Node | AD/AP AS/AS+ |
|---|---|---|---|
| O | Diamond Phases: 1, 2, 3 |
74/147 330/660 | |
| Diamond Phases: 1, 2, 3 |
81/161 360/720 | ||
| Diamond Phases: 1, 2, 3 |
90/179 402/804 | ||
| Diamond Phases: 1, 2, 3 |
99/198 444/888 | ||
| Diamond Phases: 1 |
105/209 468/936 | ||
| # | Formation | Air Defense Node | AD/AP AS/AS+ |
E-3 Hard P: 深海急派増援群 先遣機動部隊 (PoiDB)
| # | Formation | Normal Battle Node | AD/AP AS/AS+ |
|---|---|---|---|
| P | Diamond Phases: 1, 2, 3 |
52/103 231/462 | |
| Diamond Phases: 1, 2, 3 |
63/125 279/558 | ||
| Diamond Phases: 1, 2, 3 |
67/134 300/600 | ||
| # | Formation | Normal Battle Node | AD/AP AS/AS+ |
E-3 Hard Q: 深海急派増援群 空母機動部隊 (PoiDB)
| # | Formation | Boss Battle Node | AD/AP AS/AS+ |
|---|---|---|---|
| Q | Cruising Formation 4 Phases: 1, 2, 3 |
38/75 167/333 | |
| Cruising Formation 4 Phases: 1 (Final)
|
38/75 167/333 | ||
| # | Formation | Boss Battle Node | AD/AP AS/AS+ |
E-3 Hard Q'
| # | Empty Node | ||
|---|---|---|---|
| Q' | 敵影を見ず。 No enemy spotted. | ||
| # | Empty Node | ||
E-3 Hard R: 海峡配備 深海魚雷艇部隊 (PoiDB)
| # | Formation | Normal Battle Node | AD/AP AS/AS+ |
|---|---|---|---|
| R | Diamond Phases: 1, 2, 3 |
0/0 0/0 | |
| Diamond Phases: 1, 2, 3 |
0/0 0/0 | ||
| Echelon Phases: 2, 3 |
0/0 0/0 | ||
| # | Formation | Normal Battle Node | AD/AP AS/AS+ |
E-3 Hard S: 深海任務部隊 ラエ輸送阻止線 (PoiDB)
| # | Formation | Normal Battle Node | AD/AP AS/AS+ |
|---|---|---|---|
| S | Line Ahead Double Line Echelon Phases: 2, 3 |
0/0 0/0 | |
| # | Formation | Normal Battle Node | AD/AP AS/AS+ |
E-3 Hard T
| # | Landing Node | ||
|---|---|---|---|
| T | ラエに無事到着しました。 We've arrived safely at Lae. | ||
| # | Landing Node | ||
E-3 Hard U: 深海任務部隊 輸送阻止強襲群 (PoiDB)
| # | Formation | Boss Battle Node | AD/AP AS/AS+ |
|---|---|---|---|
| U | Line Ahead Phases: 2, 3 |
37/73 162/324 | |
| Line Ahead Phases: 2, 3 |
43/85 189/378 | ||
| Line Ahead Phases: 2 (Final)
|
45/89 198/396 | ||
| # | Formation | Boss Battle Node | AD/AP AS/AS+ |
E-3 Hard U'
| # | Empty Node | ||
|---|---|---|---|
| U' | 敵影を見ず。 左舷にダンピール海峡!警戒を厳に! No enemy spotted. Dampier Strait to port! Hold your fire! | ||
| # | Empty Node | ||
E-3 Hard V: 深海基地航空隊 (主力部隊C編隊) (PoiDB)
| # | Formation | Air Defense Node | AD/AP AS/AS+ |
|---|---|---|---|
| V | Diamond Phases: 3 |
81/161 360/720 | |
| Diamond Phases: 3 |
90/179 402/804 | ||
| Diamond Phases: 3 |
99/198 444/888 | ||
| Diamond Phases: 3 |
105/209 468/936 | ||
| # | Formation | Air Defense Node | AD/AP AS/AS+ |
E-3 Hard W
| # | Repair Node | ||
|---|---|---|---|
| # | Repair Node | ||
E-3 Hard X: 深海急派増援群 残存再編部隊 (PoiDB)
| # | Formation | Normal Battle Node | AD/AP AS/AS+ |
|---|---|---|---|
| X | Line Ahead Double Line Vanguard Phases: 3 |
45/89 198/396 | |
| # | Formation | Normal Battle Node | AD/AP AS/AS+ |
E-3 Hard Y: 深海任務部隊 沈没輸送船団 (PoiDB)
| # | Formation | Boss Battle Node | AD/AP AS/AS+ |
|---|---|---|---|
| Y | Cruising Formation 4 Phases: 3 |
45/89 198/396 | |
| Cruising Formation 4 Phases: 3 (Final)
|
96/191 429/858 | ||
| # | Formation | Boss Battle Node | AD/AP AS/AS+ |
E-3 Hard Y'
| # | Empty Node | ||
|---|---|---|---|
| Y' | 敵影を見ず。 左舷にダンピール海峡!警戒を厳に! No enemy spotted. Dampier Strait to port! Hold your fire! | ||
| # | Empty Node | ||
| Type | Ships |
|---|---|
| DD |
| Type | Ships |
|---|---|
| DE | |
| DD | |
| CVL | |
| SSV | |
| AO |
| Type | Ships |
|---|---|
| DE | |
| DD | |
| CL | |
| CVL | |
| BB | |
| SSV | |
| CT |
| Type | Ships |
|---|---|
| DD |
| Type | Ships |
|---|---|
| DE | |
| DD | |
| SSV | |
| AO |
| Type | Ships |
|---|---|
| DE | |
| DD |
| Type | Ships |
|---|---|
| DE | |
| DD | |
| CL | |
| CA | |
| CVL | |
| BB | |
| SSV | |
| CT |
E-3 Medium AB
| # | Formation | Air Raids | AD/AP AS/AS+ |
|---|---|---|---|
| AB | Diamond | 28/55 123/246 | |
| Diamond | 33/65 144/288 | ||
| Diamond | 39/78 174/348 | ||
| Diamond | 44/87 195/390 | ||
| # | Formation | Air Raids | AD/AP AS/AS+ |
E-3 Medium A: 深海潜水艦隊 偵察前衛哨戒 I線 (PoiDB)
| # | Formation | Normal Battle Node | AD/AP AS/AS+ |
|---|---|---|---|
| A | Echelon Line Abreast Phases: 1, 2, 3 |
0/0 0/0 | |
| Echelon Line Abreast Phases: 1, 2, 3 |
0/0 0/0 | ||
| Echelon Line Abreast Phases: 1, 2, 3 |
0/0 0/0 | ||
| # | Formation | Normal Battle Node | AD/AP AS/AS+ |
E-3 Medium B: 深海空母機動部隊 艦載機群 (PoiDB)
| # | Formation | Air Defense Node | AD/AP AS/AS+ |
|---|---|---|---|
| B | Diamond Phases: 2 |
89/177 398/795 | |
| Diamond Phases: 1, 2, 3 |
86/172 386/771 | ||
| Diamond Phases: 1, 2, 3 |
63/126 282/564 | ||
| # | Formation | Air Defense Node | AD/AP AS/AS+ |
E-3 Medium C: 深海潜水艦隊 偵察前衛哨戒 II線 (PoiDB)
| # | Formation | Normal Battle Node | AD/AP AS/AS+ |
|---|---|---|---|
| C | Echelon Line Abreast Phases: 1, 2, 3 |
0/0 0/0 | |
| Echelon Line Abreast Phases: 1, 2, 3 |
0/0 0/0 | ||
| Echelon Line Abreast Phases: 1, 2, 3 |
0/0 0/0 | ||
| # | Formation | Normal Battle Node | AD/AP AS/AS+ |
E-3 Medium D
| # | Empty Node | ||
|---|---|---|---|
| D | 気のせいだった。 上空敵機触接あり。対空警戒を厳に! Must be my imagination. Enemy aircraft in contact overhead. Keep a strict anti-aircraft vigilance! | ||
| # | Empty Node | ||
E-3 Medium E: 深海基地航空隊 (PoiDB)
| # | Formation | Air Defense Node | AD/AP AS/AS+ |
|---|---|---|---|
| E | Diamond Phases: 2 |
43/86 192/384 | |
| Diamond Phases: 1, 2, 3 |
23/45 99/198 | ||
| Diamond Phases: 1, 2, 3 |
27/54 120/240 | ||
| Diamond Phases: 1, 2, 3 |
39/77 171/342 | ||
| Diamond Phases: 1, 2, 3 |
48/95 213/426 | ||
| # | Formation | Air Defense Node | AD/AP AS/AS+ |
E-3 Medium F: 深海基地航空隊 (PoiDB)
| # | Formation | Air Defense Node | AD/AP AS/AS+ |
|---|---|---|---|
| F | Diamond Phases: 2, 3 |
43/86 192/384 | |
| Diamond Phases: 1, 2, 3 |
23/45 99/198 | ||
| Diamond Phases: 1, 2, 3 |
27/54 120/240 | ||
| Diamond Phases: 1, 2, 3 |
39/77 171/342 | ||
| Diamond Phases: 1, 2, 3 |
48/95 213/426 | ||
| # | Formation | Air Defense Node | AD/AP AS/AS+ |
E-3 Medium G: 深海潜水艦隊 偵察前衛哨戒 III線 (PoiDB)
| # | Formation | Normal Battle Node | AD/AP AS/AS+ |
|---|---|---|---|
| G | Echelon Line Abreast Phases: 1, 2, 3 |
0/0 0/0 | |
| Echelon Line Abreast Phases: 1, 2, 3 |
0/0 0/0 | ||
| Echelon Line Abreast Phases: 1, 2, 3 |
0/0 0/0 | ||
| # | Formation | Normal Battle Node | AD/AP AS/AS+ |
E-3 Medium H
| # | Empty Node | ||
|---|---|---|---|
| H | 気のせいだった。 左舷にダンピール海峡!警戒を厳に! Must be my imagination. Dampier Strait to port! Hold your fire! | ||
| # | Empty Node | ||
E-3 Medium I: 深海基地航空隊 (PoiDB)
| # | Formation | Air Defense Node | AD/AP AS/AS+ |
|---|---|---|---|
| I | Diamond Phases: 3 |
43/86 192/384 | |
| Diamond Phases: 1, 2, 3 |
23/45 99/198 | ||
| Diamond Phases: 1, 3 |
27/54 120/240 | ||
| Diamond Phases: 1, 3 |
39/77 171/342 | ||
| Diamond Phases: 1, 3 |
48/95 213/426 | ||
| # | Formation | Air Defense Node | AD/AP AS/AS+ |
E-3 Medium J: 深海潜水艦隊 遊撃群狼A集団 (PoiDB)
| # | Formation | Normal Battle Node | AD/AP AS/AS+ |
|---|---|---|---|
| J | Echelon Line Abreast Phases: 1, 2, 3 |
0/0 0/0 | |
| Echelon Line Abreast Phases: 1, 2, 3 |
0/0 0/0 | ||
| Echelon Line Abreast Phases: 1, 2, 3 |
0/0 0/0 | ||
| # | Formation | Normal Battle Node | AD/AP AS/AS+ |
E-3 Medium K
| # | Empty Node | ||
|---|---|---|---|
| K | 気のせいだった。 これよりラエ沖に突入する!上空監視!対空警戒を厳とせよ! Must be my imagination. We are now entering the waters off Lae! Eyes overhead! Maintain strict anti-aircraft vigilance! | ||
| # | Empty Node | ||
E-3 Medium L: 深海基地航空隊 (主力部隊A編隊) (PoiDB)
| # | Formation | Air Defense Node | AD/AP AS/AS+ |
|---|---|---|---|
| L | Diamond Phases: 1, 2, 3 |
33/66 147/294 | |
| Diamond Phases: 1, 2, 3 |
43/85 189/378 | ||
| Diamond Phases: 1, 2, 3 |
47/94 210/420 | ||
| Diamond Phases: 1, 2, 3 |
49/97 216/432 | ||
| Diamond Phases: 3 |
58/115 258/516 | ||
| # | Formation | Air Defense Node | AD/AP AS/AS+ |
E-3 Medium M: 深海潜水艦隊 偵察前衛哨戒 IV線 (PoiDB)
| # | Formation | Normal Battle Node | AD/AP AS/AS+ |
|---|---|---|---|
| M | Echelon Line Abreast Phases: 1, 2, 3 |
0/0 0/0 | |
| Echelon Line Abreast Phases: 1, 2, 3 |
0/0 0/0 | ||
| Echelon Line Abreast Phases: 1, 2, 3 |
0/0 0/0 | ||
| # | Formation | Normal Battle Node | AD/AP AS/AS+ |
E-3 Medium M1: 深海空母機動部隊 艦載機群 (PoiDB)
| # | Formation | Air Defense Node | AD/AP AS/AS+ |
|---|---|---|---|
| M1 | Diamond Phases: 1 |
89/177 398/795 | |
| Diamond Phases: 1, 3 |
86/172 386/771 | ||
| Diamond Phases: 1, 3 |
63/126 282/564 | ||
| # | Formation | Air Defense Node | AD/AP AS/AS+ |
E-3 Medium M2: 深海潜水艦隊 遊撃群狼B集団 (PoiDB)
| # | Formation | Normal Battle Node | AD/AP AS/AS+ |
|---|---|---|---|
| M2 | Echelon Line Abreast Phases: 1 |
0/0 0/0 | |
| Echelon Line Abreast Phases: 1, 3 |
0/0 0/0 | ||
| Echelon Line Abreast Phases: 1 |
0/0 0/0 | ||
| # | Formation | Normal Battle Node | AD/AP AS/AS+ |
E-3 Medium N: 深海急派増援群 前衛偵察部隊 (PoiDB)
| # | Formation | Normal Battle Node | AD/AP AS/AS+ |
|---|---|---|---|
| N | Line Ahead Echelon Line Abreast Phases: 1, 2, 3 |
0/0 0/0 | |
| # | Formation | Normal Battle Node | AD/AP AS/AS+ |
E-3 Medium O: 深海基地航空隊 (主力部隊B編隊) (PoiDB)
| # | Formation | Air Defense Node | AD/AP AS/AS+ |
|---|---|---|---|
| O | Diamond Phases: 1, 2, 3 |
55/110 246/492 | |
| Diamond Phases: 1, 2, 3 |
60/119 267/534 | ||
| Diamond Phases: 1, 2, 3 |
74/147 330/660 | ||
| Diamond Phases: 1, 2, 3 |
61/122 273/546 | ||
| Diamond Phases: 1 |
81/161 360/720 | ||
| # | Formation | Air Defense Node | AD/AP AS/AS+ |
E-3 Medium P: 深海急派増援群 先遣機動部隊 (PoiDB)
| # | Formation | Normal Battle Node | AD/AP AS/AS+ |
|---|---|---|---|
| P | Diamond Phases: 1, 2, 3 |
47/93 207/414 | |
| Diamond Phases: 1, 2, 3 |
49/98 219/438 | ||
| Diamond Phases: 1, 3 |
52/103 231/462 | ||
| # | Formation | Normal Battle Node | AD/AP AS/AS+ |
E-3 Medium Q: 深海急派増援群 空母機動部隊 (PoiDB)
| # | Formation | Boss Battle Node | AD/AP AS/AS+ |
|---|---|---|---|
| Q | Cruising Formation 4 Phases: 1, 2, 3 |
38/75 167/333 | |
| Cruising Formation 4 Phases: 1 (Final)
|
38/75 167/333 | ||
| # | Formation | Boss Battle Node | AD/AP AS/AS+ |
E-3 Medium Q'
| # | Empty Node | ||
|---|---|---|---|
| Q' | 敵影を見ず。 No enemy spotted. | ||
| # | Empty Node | ||
E-3 Medium R: 海峡配備 深海魚雷艇部隊 (PoiDB)
| # | Formation | Normal Battle Node | AD/AP AS/AS+ |
|---|---|---|---|
| R | Diamond Phases: 2, 3 |
0/0 0/0 | |
| Diamond Phases: 1, 2, 3 |
0/0 0/0 | ||
| Echelon Phases: 3 |
0/0 0/0 | ||
| # | Formation | Normal Battle Node | AD/AP AS/AS+ |
E-3 Medium S: 深海任務部隊 ラエ輸送阻止線 (PoiDB)
| # | Formation | Normal Battle Node | AD/AP AS/AS+ |
|---|---|---|---|
| S | Line Ahead Double Line Echelon Phases: 2, 3 |
0/0 0/0 | |
| # | Formation | Normal Battle Node | AD/AP AS/AS+ |
E-3 Medium T
| # | Landing Node | ||
|---|---|---|---|
| T | ラエに無事到着しました。 We've arrived safely at Lae. | ||
| # | Landing Node | ||
E-3 Medium U: 深海任務部隊 輸送阻止強襲群 (PoiDB)
| # | Formation | Boss Battle Node | AD/AP AS/AS+ |
|---|---|---|---|
| U | Line Ahead Phases: 2, 3 |
34/67 150/300 | |
| Line Ahead Phases: 2, 3 |
35/69 155/309 | ||
| Line Ahead Phases: 2 (Final)
|
37/73 162/324 | ||
| # | Formation | Boss Battle Node | AD/AP AS/AS+ |
E-3 Medium U'
| # | Empty Node | ||
|---|---|---|---|
| U' | 敵影を見ず。 左舷にダンピール海峡!警戒を厳に! No enemy spotted. Dampier Strait to port! Hold your fire! | ||
| # | Empty Node | ||
E-3 Medium V: 深海基地航空隊 (主力部隊C編隊) (PoiDB)
| # | Formation | Air Defense Node | AD/AP AS/AS+ |
|---|---|---|---|
| V | Diamond Phases: 3 |
55/110 246/492 | |
| Diamond Phases: 3 |
60/119 267/534 | ||
| Diamond Phases: 3 |
74/147 330/660 | ||
| Diamond Phases: 3 |
61/122 273/546 | ||
| Diamond Phases: 3 |
81/161 360/720 | ||
| # | Formation | Air Defense Node | AD/AP AS/AS+ |
E-3 Medium W
| # | Repair Node | ||
|---|---|---|---|
| # | Repair Node | ||
E-3 Medium X: 深海急派増援群 残存再編部隊 (PoiDB)
| # | Formation | Normal Battle Node | AD/AP AS/AS+ |
|---|---|---|---|
| X | Line Ahead Double Line Vanguard Phases: 3 |
36/71 159/318 | |
| # | Formation | Normal Battle Node | AD/AP AS/AS+ |
E-3 Medium Y: 深海任務部隊 沈没輸送船団 (PoiDB)
| # | Formation | Boss Battle Node | AD/AP AS/AS+ |
|---|---|---|---|
| Y | Cruising Formation 4 Phases: 3 |
36/71 159/318 | |
| Cruising Formation 4 Phases: 3 (Final)
|
87/174 390/780 | ||
| # | Formation | Boss Battle Node | AD/AP AS/AS+ |
E-3 Medium Y'
| # | Empty Node | ||
|---|---|---|---|
| Y' | 敵影を見ず。 左舷にダンピール海峡!警戒を厳に! No enemy spotted. Dampier Strait to port! Hold your fire! | ||
| # | Empty Node | ||
| Type | Ships |
|---|---|
| DD |
| Type | Ships |
|---|---|
| DE | |
| DD | |
| AO |
| Type | Ships |
|---|---|
| DE | |
| DD | |
| CL | |
| CVL | |
| BB | |
| SSV | |
| CT |
| Type | Ships |
|---|---|
| DD |
| Type | Ships |
|---|---|
| DE | |
| DD | |
| CVL | |
| SSV |
| Type | Ships |
|---|---|
| DE | |
| DD |
| Type | Ships |
|---|---|
| DE | |
| DD | |
| CL | |
| CA | |
| CVL | |
| BB | |
| SSV | |
| CT |
E-3 Easy AB
| # | Formation | Air Raids | AD/AP AS/AS+ |
|---|---|---|---|
| AB | Diamond | 17/33 72/144 | |
| Diamond | 23/46 102/204 | ||
| Diamond | 28/55 123/246 | ||
| # | Formation | Air Raids | AD/AP AS/AS+ |
E-3 Easy A: 深海潜水艦隊 偵察前衛哨戒 I線 (PoiDB)
| # | Formation | Normal Battle Node | AD/AP AS/AS+ |
|---|---|---|---|
| A | Echelon Line Abreast Phases: 1, 2, 3 |
0/0 0/0 | |
| Echelon Line Abreast Phases: 1, 2, 3 |
0/0 0/0 | ||
| Echelon Line Abreast Phases: 1, 2, 3 |
0/0 0/0 | ||
| # | Formation | Normal Battle Node | AD/AP AS/AS+ |
E-3 Easy B: 深海空母機動部隊 艦載機群 (PoiDB)
| # | Formation | Air Defense Node | AD/AP AS/AS+ |
|---|---|---|---|
| B | Diamond Phases: 1, 2, 3 |
61/121 270/540 | |
| Diamond Phases: 2 |
86/172 386/771 | ||
| Diamond Phases: 1, 2, 3 |
84/167 374/747 | ||
| # | Formation | Air Defense Node | AD/AP AS/AS+ |
E-3 Easy C: 深海潜水艦隊 偵察前衛哨戒 II線 (PoiDB)
| # | Formation | Normal Battle Node | AD/AP AS/AS+ |
|---|---|---|---|
| C | Echelon Line Abreast Phases: 1, 2, 3 |
0/0 0/0 | |
| Echelon Line Abreast Phases: 1, 2, 3 |
0/0 0/0 | ||
| Echelon Line Abreast Phases: 1, 2, 3 |
0/0 0/0 | ||
| # | Formation | Normal Battle Node | AD/AP AS/AS+ |
E-3 Easy D
| # | Empty Node | ||
|---|---|---|---|
| D | 気のせいだった。 上空敵機触接あり。対空警戒を厳に! Must be my imagination. Enemy aircraft in contact overhead. Keep a strict anti-aircraft vigilance! | ||
| # | Empty Node | ||
E-3 Easy E: 深海基地航空隊 (PoiDB)
| # | Formation | Air Defense Node | AD/AP AS/AS+ |
|---|---|---|---|
| E | Diamond Phases: 1, 2 |
12/23 51/102 | |
| Diamond Phases: 1, 2, 3 |
11/22 48/96 | ||
| Diamond Phases: 1, 2, 3 |
23/46 102/204 | ||
| Diamond Phases: 1, 2, 3 |
23/45 99/198 | ||
| Diamond Phases: 1, 2, 3 |
27/54 120/240 | ||
| # | Formation | Air Defense Node | AD/AP AS/AS+ |
E-3 Easy F: 深海基地航空隊 (PoiDB)
| # | Formation | Air Defense Node | AD/AP AS/AS+ |
|---|---|---|---|
| F | Diamond Phases: 1, 2, 3 |
12/23 51/102 | |
| Diamond Phases: 1, 2, 3 |
11/22 48/96 | ||
| Diamond Phases: 1, 2, 3 |
23/46 102/204 | ||
| Diamond Phases: 1, 2, 3 |
23/45 99/198 | ||
| Diamond Phases: 1, 2, 3 |
27/54 120/240 | ||
| # | Formation | Air Defense Node | AD/AP AS/AS+ |
E-3 Easy G: 深海潜水艦隊 偵察前衛哨戒 III線 (PoiDB)
| # | Formation | Normal Battle Node | AD/AP AS/AS+ |
|---|---|---|---|
| G | Echelon Line Abreast Phases: 1, 2, 3 |
0/0 0/0 | |
| Echelon Line Abreast Phases: 1, 2, 3 |
0/0 0/0 | ||
| Echelon Line Abreast Phases: 1, 2, 3 |
0/0 0/0 | ||
| # | Formation | Normal Battle Node | AD/AP AS/AS+ |
E-3 Easy H
| # | Empty Node | ||
|---|---|---|---|
| H | 気のせいだった。 左舷にダンピール海峡!警戒を厳に! Must be my imagination. Dampier Strait to port! Hold your fire! | ||
| # | Empty Node | ||
E-3 Easy I: 深海基地航空隊 (PoiDB)
| # | Formation | Air Defense Node | AD/AP AS/AS+ |
|---|---|---|---|
| I | Diamond Phases: 1, 3 |
12/23 51/102 | |
| Diamond Phases: 1, 2, 3 |
11/22 48/96 | ||
| Diamond Phases: 1, 2, 3 |
23/46 102/204 | ||
| Diamond Phases: 1, 2, 3 |
23/45 99/198 | ||
| Diamond Phases: 1, 2, 3 |
27/54 120/240 | ||
| # | Formation | Air Defense Node | AD/AP AS/AS+ |
E-3 Easy J: 深海潜水艦隊 遊撃群狼A集団 (PoiDB)
| # | Formation | Normal Battle Node | AD/AP AS/AS+ |
|---|---|---|---|
| J | Echelon Line Abreast Phases: 1, 2, 3 |
0/0 0/0 | |
| Echelon Line Abreast Phases: 1, 2, 3 |
0/0 0/0 | ||
| Echelon Line Abreast Phases: 1, 2, 3 |
0/0 0/0 | ||
| # | Formation | Normal Battle Node | AD/AP AS/AS+ |
E-3 Easy K
| # | Empty Node | ||
|---|---|---|---|
| K | 気のせいだった。 これよりラエ沖に突入する!上空監視!対空警戒を厳とせよ! Must be my imagination. We are now entering the waters off Lae! Eyes overhead! Maintain strict anti-aircraft vigilance! | ||
| # | Empty Node | ||
E-3 Easy L: 深海基地航空隊 (主力部隊A編隊) (PoiDB)
| # | Formation | Air Defense Node | AD/AP AS/AS+ |
|---|---|---|---|
| L | Diamond Phases: 1, 2, 3 |
22/43 96/192 | |
| Diamond Phases: 1, 2, 3 |
33/66 147/294 | ||
| Diamond Phases: 1, 2, 3 |
43/85 189/378 | ||
| # | Formation | Air Defense Node | AD/AP AS/AS+ |
E-3 Easy M: 深海潜水艦隊 偵察前衛哨戒 IV線 (PoiDB)
| # | Formation | Normal Battle Node | AD/AP AS/AS+ |
|---|---|---|---|
| M | Echelon Line Abreast Phases: 1, 2, 3 |
0/0 0/0 | |
| Echelon Line Abreast Phases: 1, 2, 3 |
0/0 0/0 | ||
| Echelon Line Abreast Phases: 1, 2, 3 |
0/0 0/0 | ||
| # | Formation | Normal Battle Node | AD/AP AS/AS+ |
E-3 Easy M1: 深海空母機動部隊 艦載機群 (PoiDB)
| # | Formation | Air Defense Node | AD/AP AS/AS+ |
|---|---|---|---|
| M1 | Diamond Phases: 1, 2, 3 |
61/121 270/540 | |
| Diamond Phases: 1 |
86/172 386/771 | ||
| Diamond Phases: 1, 2, 3 |
84/167 374/747 | ||
| # | Formation | Air Defense Node | AD/AP AS/AS+ |
E-3 Easy M2: 深海潜水艦隊 遊撃群狼B集団 (PoiDB)
| # | Formation | Normal Battle Node | AD/AP AS/AS+ |
|---|---|---|---|
| M2 | Echelon Phases: 1 |
0/0 0/0 | |
| Echelon Line Abreast Phases: 1, 3 |
0/0 0/0 | ||
| Echelon Line Abreast Phases: 1 |
0/0 0/0 | ||
| # | Formation | Normal Battle Node | AD/AP AS/AS+ |
E-3 Easy N: 深海急派増援群 前衛偵察部隊 (PoiDB)
| # | Formation | Normal Battle Node | AD/AP AS/AS+ |
|---|---|---|---|
| N | Line Ahead Echelon Line Abreast Phases: 1, 2, 3 |
0/0 0/0 | |
| # | Formation | Normal Battle Node | AD/AP AS/AS+ |
E-3 Easy O: 深海基地航空隊 (主力部隊B編隊) (PoiDB)
| # | Formation | Air Defense Node | AD/AP AS/AS+ |
|---|---|---|---|
| O | Diamond Phases: 1, 2, 3 |
35/69 153/306 | |
| Diamond Phases: 1, 2, 3 |
44/87 195/390 | ||
| Diamond Phases: 1, 2, 3 |
46/91 204/408 | ||
| Diamond Phases: 1, 2, 3 |
55/110 246/492 | ||
| Diamond Phases: 1 |
60/119 267/534 | ||
| # | Formation | Air Defense Node | AD/AP AS/AS+ |
E-3 Easy P: 深海急派増援群 先遣機動部隊 (PoiDB)
| # | Formation | Normal Battle Node | AD/AP AS/AS+ |
|---|---|---|---|
| P | Diamond Phases: 1, 2, 3 |
32/63 140/279 | |
| Diamond Phases: 1, 2, 3 |
47/93 207/414 | ||
| Diamond Phases: 1, 2, 3 |
49/98 219/438 | ||
| # | Formation | Normal Battle Node | AD/AP AS/AS+ |
E-3 Easy Q: 深海急派増援群 空母機動部隊 (PoiDB)
| # | Formation | Boss Battle Node | AD/AP AS/AS+ |
|---|---|---|---|
| Q | Cruising Formation 4 Phases: 1, 2, 3 |
38/75 167/333 | |
| Cruising Formation 4 Phases: 1 (Final)
|
38/75 167/333 | ||
| # | Formation | Boss Battle Node | AD/AP AS/AS+ |
E-3 Easy Q'
| # | Empty Node | ||
|---|---|---|---|
| Q' | 敵影を見ず。 No enemy spotted. | ||
| # | Empty Node | ||
E-3 Easy R: 海峡配備 深海魚雷艇部隊 (PoiDB)
| # | Formation | Normal Battle Node | AD/AP AS/AS+ |
|---|---|---|---|
| R | Diamond Phases: 2, 3 |
0/0 0/0 | |
| Diamond Phases: 1, 2, 3 |
0/0 0/0 | ||
| Diamond Phases: 2, 3 |
0/0 0/0 | ||
| # | Formation | Normal Battle Node | AD/AP AS/AS+ |
E-3 Easy S: 深海任務部隊 ラエ輸送阻止線 (PoiDB)
| # | Formation | Normal Battle Node | AD/AP AS/AS+ |
|---|---|---|---|
| S | Line Ahead Double Line Echelon Phases: 2, 3 |
0/0 0/0 | |
| # | Formation | Normal Battle Node | AD/AP AS/AS+ |
E-3 Easy T
| # | Landing Node | ||
|---|---|---|---|
| T | ラエに無事到着しました。 We've arrived safely at Lae. | ||
| # | Landing Node | ||
E-3 Easy U: 深海任務部隊 輸送阻止強襲群 (PoiDB)
| # | Formation | Boss Battle Node | AD/AP AS/AS+ |
|---|---|---|---|
| U | Line Ahead Phases: 2, 3 |
34/67 150/300 | |
| Line Ahead Phases: 2, 3 |
34/67 150/300 | ||
| Line Ahead Phases: 2 (Final)
|
34/67 150/300 | ||
| # | Formation | Boss Battle Node | AD/AP AS/AS+ |
E-3 Easy U'
| # | Empty Node | ||
|---|---|---|---|
| U' | 敵影を見ず。 左舷にダンピール海峡!警戒を厳に! No enemy spotted. Dampier Strait to port! Hold your fire! | ||
| # | Empty Node | ||
E-3 Easy V: 深海基地航空隊 (主力部隊C編隊) (PoiDB)
| # | Formation | Air Defense Node | AD/AP AS/AS+ |
|---|---|---|---|
| V | Diamond Phases: 3 |
35/69 153/306 | |
| Diamond Phases: 3 |
44/87 195/390 | ||
| Diamond Phases: 3 |
46/91 204/408 | ||
| Diamond Phases: 3 |
55/110 246/492 | ||
| Diamond Phases: 3 |
60/119 267/534 | ||
| # | Formation | Air Defense Node | AD/AP AS/AS+ |
E-3 Easy W
| # | Repair Node | ||
|---|---|---|---|
| # | Repair Node | ||
E-3 Easy X: 深海急派増援群 残存再編部隊 (PoiDB)
| # | Formation | Normal Battle Node | AD/AP AS/AS+ |
|---|---|---|---|
| X | Line Ahead Double Line Vanguard Phases: 3 |
43/85 189/378 | |
| # | Formation | Normal Battle Node | AD/AP AS/AS+ |
E-3 Easy Y: 深海任務部隊 沈没輸送船団 (PoiDB)
| # | Formation | Boss Battle Node | AD/AP AS/AS+ |
|---|---|---|---|
| Y | Cruising Formation 4 Phases: 3 |
43/85 189/378 | |
| Cruising Formation 4 Phases: 3 (Final)
|
89/178 399/798 | ||
| # | Formation | Boss Battle Node | AD/AP AS/AS+ |
E-3 Easy Y'
| # | Empty Node | ||
|---|---|---|---|
| Y' | 敵影を見ず。 左舷にダンピール海峡!警戒を厳に! No enemy spotted. Dampier Strait to port! Hold your fire! | ||
| # | Empty Node | ||
| Type | Ships |
|---|---|
| DD |
| Type | Ships |
|---|---|
| DE | |
| DD |
| Type | Ships |
|---|---|
| DE | |
| DD | |
| CL | |
| CVL | |
| BB | |
| SSV | |
| CT |
| Type | Ships |
|---|---|
| DD |
| Type | Ships |
|---|---|
| DE | |
| DD | |
| SSV | |
| AO |
| Type | Ships |
|---|---|
| DD |
| Type | Ships |
|---|---|
| DE | |
| DD | |
| CL | |
| CA | |
| CVL | |
| BB | |
| SSV | |
| CT |
E-3 Casual AB
| # | Formation | Air Raids | AD/AP AS/AS+ |
|---|---|---|---|
| AB | Diamond | 12/23 51/102 | |
| Diamond | 17/33 72/144 | ||
| Diamond | 23/46 102/204 | ||
| # | Formation | Air Raids | AD/AP AS/AS+ |
E-3 Casual A: 深海潜水艦隊 偵察前衛哨戒 I線 (PoiDB)
| # | Formation | Normal Battle Node | AD/AP AS/AS+ |
|---|---|---|---|
| A | Echelon Line Abreast Phases: 1, 2, 3 |
0/0 0/0 | |
| Echelon Line Abreast Phases: 1, 2, 3 |
0/0 0/0 | ||
| # | Formation | Normal Battle Node | AD/AP AS/AS+ |
E-3 Casual B: 深海空母機動部隊 艦載機群 (PoiDB)
| # | Formation | Air Defense Node | AD/AP AS/AS+ |
|---|---|---|---|
| B | Diamond Phases: 1, 2, 3 |
38/75 167/333 | |
| Diamond Phases: 1, 2, 3 |
61/121 270/540 | ||
| Diamond Phases: 2 |
84/167 374/747 | ||
| # | Formation | Air Defense Node | AD/AP AS/AS+ |
E-3 Casual C: 深海潜水艦隊 偵察前衛哨戒 II線 (PoiDB)
| # | Formation | Normal Battle Node | AD/AP AS/AS+ |
|---|---|---|---|
| C | Echelon Line Abreast Phases: 1, 2, 3 |
0/0 0/0 | |
| Echelon Line Abreast Phases: 1, 2, 3 |
0/0 0/0 | ||
| # | Formation | Normal Battle Node | AD/AP AS/AS+ |
E-3 Casual D
| # | Empty Node | ||
|---|---|---|---|
| D | 気のせいだった。 上空敵機触接あり。対空警戒を厳に! Must be my imagination. Enemy aircraft in contact overhead. Keep a strict anti-aircraft vigilance! | ||
| # | Empty Node | ||
E-3 Casual E: 深海基地航空隊 (PoiDB)
| # | Formation | Air Defense Node | AD/AP AS/AS+ |
|---|---|---|---|
| E | Diamond Phases: 1, 2, 3 |
12/23 51/102 | |
| Diamond Phases: 1, 2, 3 |
11/22 48/96 | ||
| Diamond Phases: 1, 2, 3 |
23/46 102/204 | ||
| # | Formation | Air Defense Node | AD/AP AS/AS+ |
E-3 Casual F: 深海基地航空隊 (PoiDB)
| # | Formation | Air Defense Node | AD/AP AS/AS+ |
|---|---|---|---|
| F | Diamond Phases: 1, 2, 3 |
12/23 51/102 | |
| Diamond Phases: 1, 2, 3 |
11/22 48/96 | ||
| Diamond Phases: 1, 2, 3 |
23/46 102/204 | ||
| # | Formation | Air Defense Node | AD/AP AS/AS+ |
E-3 Casual G: 深海潜水艦隊 偵察前衛哨戒 III線 (PoiDB)
| # | Formation | Normal Battle Node | AD/AP AS/AS+ |
|---|---|---|---|
| G | Echelon Line Abreast Phases: 1, 2, 3 |
0/0 0/0 | |
| Echelon Line Abreast Phases: 1, 2, 3 |
0/0 0/0 | ||
| # | Formation | Normal Battle Node | AD/AP AS/AS+ |
E-3 Casual H
| # | Empty Node | ||
|---|---|---|---|
| H | 気のせいだった。 左舷にダンピール海峡!警戒を厳に! Must be my imagination. Dampier Strait to port! Hold your fire! | ||
| # | Empty Node | ||
E-3 Casual I: 深海基地航空隊 (PoiDB)
| # | Formation | Air Defense Node | AD/AP AS/AS+ |
|---|---|---|---|
| I | Diamond Phases: 1, 2, 3 |
12/23 51/102 | |
| Diamond Phases: 1, 2, 3 |
11/22 48/96 | ||
| Diamond Phases: 1, 2, 3 |
23/46 102/204 | ||
| # | Formation | Air Defense Node | AD/AP AS/AS+ |
E-3 Casual J: 深海潜水艦隊 遊撃群狼A集団 (PoiDB)
| # | Formation | Normal Battle Node | AD/AP AS/AS+ |
|---|---|---|---|
| J | Echelon Line Abreast Phases: 1, 2, 3 |
0/0 0/0 | |
| Echelon Line Abreast Phases: 1, 2, 3 |
0/0 0/0 | ||
| # | Formation | Normal Battle Node | AD/AP AS/AS+ |
E-3 Casual K
| # | Empty Node | ||
|---|---|---|---|
| K | 気のせいだった。 これよりラエ沖に突入する!上空監視!対空警戒を厳とせよ! Must be my imagination. We are now entering the waters off Lae! Eyes overhead! Maintain strict anti-aircraft vigilance! | ||
| # | Empty Node | ||
E-3 Casual L: 深海基地航空隊 (主力部隊A編隊) (PoiDB)
| # | Formation | Air Defense Node | AD/AP AS/AS+ |
|---|---|---|---|
| L | Diamond Phases: 1, 2, 3 |
11/22 48/96 | |
| Diamond Phases: 1, 2, 3 |
21/41 90/180 | ||
| Diamond Phases: 1, 2, 3 |
22/43 96/192 | ||
| Diamond Phases: 1, 2, 3 |
33/66 147/294 | ||
| # | Formation | Air Defense Node | AD/AP AS/AS+ |
E-3 Casual M: 深海潜水艦隊 偵察前衛哨戒 IV線 (PoiDB)
| # | Formation | Normal Battle Node | AD/AP AS/AS+ |
|---|---|---|---|
| M | Echelon Line Abreast Phases: 1, 2, 3 |
0/0 0/0 | |
| Echelon Line Abreast Phases: 1, 2, 3 |
0/0 0/0 | ||
| # | Formation | Normal Battle Node | AD/AP AS/AS+ |
E-3 Casual M1: 深海空母機動部隊 艦載機群 (PoiDB)
| # | Formation | Air Defense Node | AD/AP AS/AS+ |
|---|---|---|---|
| M1 | Diamond Phases: 1, 3 |
38/75 167/333 | |
| Diamond Phases: 1, 3 |
61/121 270/540 | ||
| Diamond Phases: 1 |
84/167 374/747 | ||
| # | Formation | Air Defense Node | AD/AP AS/AS+ |
E-3 Casual M2: 深海潜水艦隊 遊撃群狼B集団 (PoiDB)
| # | Formation | Normal Battle Node | AD/AP AS/AS+ |
|---|---|---|---|
| M2 | Echelon Line Abreast Phases: 1, 3 |
0/0 0/0 | |
| Echelon Line Abreast |
0/0 0/0 | ||
| # | Formation | Normal Battle Node | AD/AP AS/AS+ |
E-3 Casual N: 深海急派増援群 前衛偵察部隊 (PoiDB)
| # | Formation | Normal Battle Node | AD/AP AS/AS+ |
|---|---|---|---|
| N | Line Ahead Echelon Line Abreast Phases: 1, 2, 3 |
0/0 0/0 | |
| # | Formation | Normal Battle Node | AD/AP AS/AS+ |
E-3 Casual O: 深海基地航空隊 (主力部隊B編隊) (PoiDB)
| # | Formation | Air Defense Node | AD/AP AS/AS+ |
|---|---|---|---|
| O | Diamond Phases: 1, 2, 3 |
24/47 105/210 | |
| Diamond Phases: 1, 2, 3 |
35/69 153/306 | ||
| Diamond Phases: 1, 2, 3 |
44/87 195/390 | ||
| Diamond Phases: 1 |
46/91 204/408 | ||
| # | Formation | Air Defense Node | AD/AP AS/AS+ |
E-3 Casual P: 深海急派増援群 先遣機動部隊 (PoiDB)
| # | Formation | Normal Battle Node | AD/AP AS/AS+ |
|---|---|---|---|
| P | Diamond Phases: 1, 2 |
24/47 104/207 | |
| Diamond Phases: 1, 2, 3 |
26/52 116/231 | ||
| Diamond Phases: 1, 2 |
32/63 140/279 | ||
| # | Formation | Normal Battle Node | AD/AP AS/AS+ |
E-3 Casual Q: 深海急派増援群 空母機動部隊 (PoiDB)
| # | Formation | Boss Battle Node | AD/AP AS/AS+ |
|---|---|---|---|
| Q | Cruising Formation 4 Phases: 1, 2, 3 |
38/75 167/333 | |
| Cruising Formation 4 Phases: 1 (Final)
|
38/75 167/333 | ||
| # | Formation | Boss Battle Node | AD/AP AS/AS+ |
E-3 Casual Q'
| # | Empty Node | ||
|---|---|---|---|
| Q' | 敵影を見ず。 No enemy spotted. | ||
| # | Empty Node | ||
E-3 Casual R: 海峡配備 深海魚雷艇部隊 (PoiDB)
| # | Formation | Normal Battle Node | AD/AP AS/AS+ |
|---|---|---|---|
| R | Diamond Phases: 2, 3 |
0/0 0/0 | |
| Diamond Phases: 1, 2, 3 |
0/0 0/0 | ||
| Diamond Phases: 1, 2, 3 |
0/0 0/0 | ||
| # | Formation | Normal Battle Node | AD/AP AS/AS+ |
E-3 Casual S: 深海任務部隊 ラエ輸送阻止線 (PoiDB)
| # | Formation | Normal Battle Node | AD/AP AS/AS+ |
|---|---|---|---|
| S | Line Ahead Double Line Echelon Phases: 2, 3 |
0/0 0/0 | |
| # | Formation | Normal Battle Node | AD/AP AS/AS+ |
E-3 Casual T
| # | Landing Node | ||
|---|---|---|---|
| T | ラエに無事到着しました。 We've arrived safely at Lae. | ||
| # | Landing Node | ||
E-3 Casual U: 深海任務部隊 輸送阻止強襲群 (PoiDB)
| # | Formation | Boss Battle Node | AD/AP AS/AS+ |
|---|---|---|---|
| U | Line Ahead Phases: 2, 3 |
0/0 0/0 | |
| Line Ahead Phases: 2, 3 |
4/7 15/30 | ||
| Line Ahead Phases: 2 (Final)
|
10/19 41/81 | ||
| # | Formation | Boss Battle Node | AD/AP AS/AS+ |
E-3 Casual U'
| # | Empty Node | ||
|---|---|---|---|
| U' | 敵影を見ず。 左舷にダンピール海峡!警戒を厳に! No enemy spotted. Dampier Strait to port! Hold your fire! | ||
| # | Empty Node | ||
E-3 Casual V: 深海基地航空隊 (主力部隊C編隊) (PoiDB)
| # | Formation | Air Defense Node | AD/AP AS/AS+ |
|---|---|---|---|
| V | Diamond Phases: 3 |
24/47 105/210 | |
| Diamond Phases: 3 |
35/69 153/306 | ||
| Diamond Phases: 3 |
44/87 195/390 | ||
| # | Formation | Air Defense Node | AD/AP AS/AS+ |
E-3 Casual W
| # | Repair Node | ||
|---|---|---|---|
| # | Repair Node | ||
E-3 Casual X: 深海急派増援群 残存再編部隊 (PoiDB)
| # | Formation | Normal Battle Node | AD/AP AS/AS+ |
|---|---|---|---|
| X | Line Ahead Double Line Vanguard Phases: 3 |
3/6 12/24 | |
| # | Formation | Normal Battle Node | AD/AP AS/AS+ |
E-3 Casual Y: 深海任務部隊 沈没輸送船団 (PoiDB)
| # | Formation | Boss Battle Node | AD/AP AS/AS+ |
|---|---|---|---|
| Y | Cruising Formation 4 Phases: 3 |
43/85 189/378 | |
| Cruising Formation 4 Phases: 3 (Final)
|
43/85 189/378 | ||
| # | Formation | Boss Battle Node | AD/AP AS/AS+ |
E-3 Casual Y'
| # | Empty Node | ||
|---|---|---|---|
| Y' | 敵影を見ず。 左舷にダンピール海峡!警戒を厳に! No enemy spotted. Dampier Strait to port! Hold your fire! | ||
| # | Empty Node | ||