|
|
| Line 900: |
Line 900: |
| | ==See Also== | | ==See Also== |
| | ===References=== | | ===References=== |
| − | * [http://ww2db.com/battle_spec.php?battle_id=6 WWIIDB article on the Battle Of Midway,]] Discussing the idea of south Pacific advances into the Indian Ocean. | + | * [http://ww2db.com/battle_spec.php?battle_id=6 WWIIDB article on the Battle Of Midway,] Discussing the idea of south Pacific advances into the Indian Ocean. |
| | *Black, Jeremy (2009). [https://www.usnwc.edu/getattachment/53ad07b4-26d4-4e55-99ce-01617bc34648/Midway-and-the-Indian-Ocean---Jeremy-Black "Midway and the Indian Ocean"]. Naval War College Review 62 (4), discussing how the idea of a Japanese advance into the Indian Ocean would affect overall pressure upon Great Britain (Along with other potential Axis and Allied movements). | | *Black, Jeremy (2009). [https://www.usnwc.edu/getattachment/53ad07b4-26d4-4e55-99ce-01617bc34648/Midway-and-the-Indian-Ocean---Jeremy-Black "Midway and the Indian Ocean"]. Naval War College Review 62 (4), discussing how the idea of a Japanese advance into the Indian Ocean would affect overall pressure upon Great Britain (Along with other potential Axis and Allied movements). |
| | * | | * |
| Line 1,130: |
Line 1,130: |
| | </div> | | </div> |
| | [[Category:Sortie]] | | [[Category:Sortie]] |
| − | [[Category:World Maps]] | + | [[Category:World Map]] |
| | [[Category: Events]] | | [[Category: Events]] |
| | [[zh:2015年春季活动]] | | [[zh:2015年春季活动]] |
Revision as of 04:11, 4 August 2015

Introduction
The (currently ongoing) Spring 2015 Event Order! Operation 11 [発令!第十一号作戦] started on April 28th, 2015 and will end on May 18th. The event will be based upon the planned Japanese Operation 11.
Like the Winter 2015 Event, it has selectable difficulties: Operation A (Hard), Operation B (Medium), and Operation C (Easy). This difficulty will be 'locked in' after you complete a map, and your choice of ships is frozen for several maps. This is a long (6 map) event, and though the maps were foretold to be relatively difficult as compared to previous events, the overall response has been that they are rather easy.
<countdown finishmessage="The event has ended." time="04/28/2015 09:20 PM UTC+900">
<D> days, <H> hours, <M> minutes and seconds remaining until the Spring 2015 Event begins.
</countdown>
Please consider filling out an event report. You can see all of our collected data so far here.
Patch Notes
- New Ships
- Two Italian BB sisters from the "main force" will be some of the drops for the event, from the Littorio class.
- Littorio, who remodels into Italia, can be found from clearing E-4.
- Roma is an E-6 random drop.
- The new CV Katsuragi is a reward for clearing E-2.
- Akitsushima can be found as a reward for clearing E-6.
- Takanami drops randomly from E2, E3 and E4.
- New Enemy Vessels
- New Equipment
Update notes (From the official twitter)
- 1. Launch of KanColle's 2015 Spring Event: Limited-time-only map areas:
- The limited-time-only maps of the KanColle 2015 Spring Event "Operation No. 11, Launch!" will be implemented through the ongoing update. Since this marks the 2nd anniversary of the game, this year's spring event will last for approximately 20 days.
- 2. 2015 Spring Event: Main operations (first half of the event):
- "Main Operations (first half of the event)" will consist of the following four map areas:
- 1st map: Preparation for Operation No.11
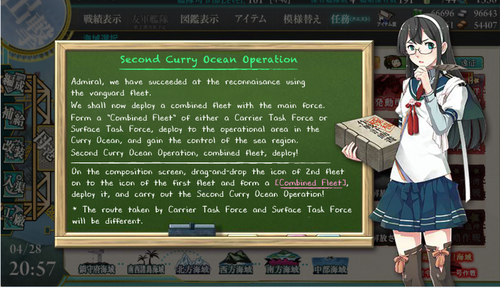
- 2nd map: Second Curry Ocean Operation
- 3rd map: Bagel Bay Transport Destruction Battle
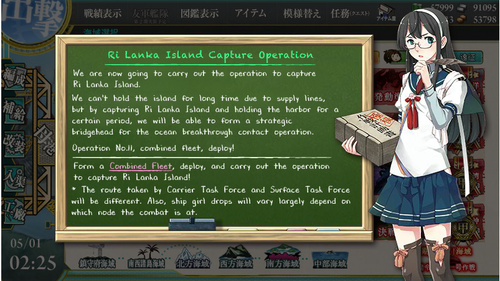
- 4th map: Final Battle! Ri Lanka Island Invasion
- 3. 2015 Spring Event: New Kanmusus:
- There will be a grand total of 3 new Kanmusus appearing in the Main operations. You can obtain the Unryuu-class standard carrier "Katsuragi" by beating E2, and you can obtain the Western Kanmusu "Littorio" through beating E4.
- 4. 2015 Spring Event: New Kanmusus, cont'd:
- Along with the 2 Kanmusus introduced above, in the first half of the event, there is a chance you can obtain Yuugumo-class destroyer Takanami in all event maps.
- NB! You can obtain her through (presumably) beating boss nodes of the latter half of the main operations.
- NB! Depending on the location within the event map, your odds of obtaining her drastically changes (again, presumably higher on boss nodes)
- 5. About the newly implemented system of "Active Branching":
- Up to this point, route determination in KanColle was done by compass routing, which could be affected by various conditions such as fleet composition; however, through today's update, some maps will have "Active Branching", a routing system that allows the admiral to determine his/her fleet's route by his/her own decision.
- 6. About the "Combined Fleet":
- E2 and E4 of the main operations use combined fleet mechanics. You can form a combined fleet by going to the fleet composition menu, then dragging the icon of the 2nd fleet to your 1st fleet (Main fleet).
- 7. About "Support fleets":
- You can provide support to your fleets or combined fleets fighting in front line by using "support fleets". You can use shelling support or aerial support fleets and send them out to either of the two "support expeditions" to the event map area (pre-boss node support, boss node support) to support your fleet fighting in front line.
- 8. Extra Operations (second half of the event):
- Upon clearing all maps in the "Main Operation (first half of the event)", you can participate in the Extra Operations of the event. The deadlier of Abyssals are focused in the Extra Operations, which consists of two maps. (NB: E-5 and E-6)
- 9. New Kanmusus (cont'd):
- In E-6 of the Extra Operations, separate from the earlier 3 Kanmusus introduced, Roma will be obtainable by beating nodes.
- NB! Depending on the location within the event map your odds of obtaining her drastically changes (again, probably hinting that she is more likely found by boss or pre-boss nodes).
- 10. 2015 Spring Event: New Kanmusus (tot. 5)
- Also, for admirals whose fleets complete all the Spring Event maps, seaplane tender "Akitsushima" will join the fleet. Although her combat ability isn't top quality, let's welcome her to the fleet! In summary, there will be a total of 5 new Kanmusus appearing in this year's Spring event.
- 11. About "Difficulty Selection":
- In the spring event maps of "Launch! Operation No. 11", each maps will feature three tiers of difficulty that can be selected by the admiral.
- NB! All admirals can participate in "Operation C" (Easy).
- NB! Higher level veteran admirals can participate in "Operation B" (Medium) or "Operation A" (Hard).
- 12. (For admirals doing A- or B-tier difficulties) About difficulty locking:
- Some maps will give sortie stamps on Kanmusus who sortied out to the map. The Kanmusus with these stamps are unable to participate in any other event maps that will give sortie stamps. Please keep this in mind.
- NB! This includes E3, E4, and E5.
- 13. New BGM implemented:
- The main theme of the first half of the event operations "Fight of the Mutsuki-Class Destroyers" and the boss node theme "Combined fleet, to the West" have been implemented. Also, the extra operations have a BGM with the Abyssal threat as its motive. Please look forward to it!
- 14. New equipment implemented:
- 15. The Type 2 Flying Boat is a item you can earn if you take time to train Akitsushima to kai.
Mechanics
Participation requirements
- Must have a 75% sortie win ratio.
- Must have 5 empty ship slots for new ships.
- Must have 20 free equipment slots.
Special Mechanics
- The difficulty system from the Winter 2015 Event is present, with three levels: Operation A (Hard), Operation B (Medium) or Operation C (Easy).
- However, you must have cleared at least Operation A or Operation B on the previous map to access Operation A (Hard) difficulty for the following map for E-3 and later maps.
- The difficulty you select will affect most rewards (including experience gain and ship drops). The only exceptions are ships rewarded as map clear bonus.
- Once you clear a map on a difficulty (besides easy), you will be locked on that difficulty.
- The ship-locking mechanic will have full sway in this event:
- Ships used in E3 cannot be used in E4 on medium or hard.
- Ships used in E3 or E4 cannot be used in E5 on medium or hard
- E2, E4, and E6 use the Combined Fleet mechanic.
Event Maps
Quick Info Table
| Map
|
Name
|
Combined?
|
Locking?
|
Difficulty Restrictions
|
| E-1
|
Preparation for Operation No.11
|
No Combined Fleet
|
No Ship Locking
|
No restrictions. All difficulties OK
|
| E-2
|
Second Curry Ocean Operation
|
Combined Fleet
|
In order to play these maps on hard, you must complete the previous map on either normal or hard.
(e.g., to do E4 on hard, you must complete E3 on normal or hard.)
|
| E-3
|
Bagel Bay Transport Destruction Battle
|
No Combined Fleet
|
Tagging:
Ships deployed to these maps are tagged (even on Easy) if they don't previously have one:
E-3: BLUE; E-4: GREEN; E-5: ORANGE
Deploying Restriction:
Normal or Hard: Must have either the same-colored tag or no tag.
Easy: No restrictions.
|
| E-4
|
Final Battle! Ri Lanka Island Invasion
|
Combined Fleet
|
| E-5
|
Attack on Apricot Atoll Anchorage
|
No Combined Fleet
|
| E-6
|
Relentless Operation! Across the Stevia Sea
|
Combined Fleet
|
No ship locking
|
E-1
| Preparation for Operation No.11
|
| 【発動準備、第十一号作戦!】
|
Information
- Boss: Heavy Cruiser Ri-Class Kai
- 5 kills required on all difficulties.
- Sparkling is advised, as this is inexpensive with light ships.
|
|
|
Branching rules
- Node B is a non-combat Active Branching node; .
- Node D is a submarine node.
- F and C have LoS checks to reach the boss node; this is relatively low (Reports indicate that 38 or above will clear this), so equipping radars on all of your DD and a recon plane on your CL will suffice.
Show/Hide Branching Rules
| Branching Rules |
|---|
| Node | Split | Condition |
|---|
| B | C | Active Branching | | D | Active Branching | | C | E | Chance of E with 4 or more CL?
Failure on LoS check to H | | H | LoS check
Failure sends to E | | F | G | 5 or more CL,
or 2-5 Fall LoS Formula≤13.6
(on Hard; unknown on other difficulties) | | H | LoS check for H.
(For Hard, 2-5 Fall LoS Formula≥14.5)
Failure sends to G |
|
|
Tips
- Use a light fleet. Compositions that work:
- CLx2 DDx4 provides for four high-evasion DDs which have a likelier chance of dodging incoming attacks.
- CLx3, DDx3 could provide more firing power, however.
- Between the north and south routes, south is preferred (Yes, you get to choose).
- The north route only has one battle before the boss but the node has considerably stronger ships, such as elite and flagship CLTs.
- The south route has four subs in one node that come in at either echelon or line abreast, so they are relatively harmless (the flagship sub has moderate accuracy in echelon, however). The second node has very weak and easy-to-clear ships such as I-class (the DDs you clobber in 1-1 for sparkling).
- The sub node does not cost you ammo; only fuel.
- Your composition for the final kill should remain the same.
- Refer to this example fleet for composition and equipment suggestion.
Enemy Encounters on Hard
Show/Hide Nodes and Enemy Encounters
| Nodes and Enemy Encounters |
|---|
| Node | Pattern | Xp | Node Info | Form |
|---|
A
深海東洋艦隊
ピケット艦 | Pattern 1 | 150 |    | | | Pattern 2 | 140 |   | | B
Active Branching | Pattern 1 | | No Combat | | C
深海東洋艦隊
警戒部隊I群 | Pattern 1 | 170 |    
| | | Pattern 2 | 160 |
| | D
深海東洋艦隊
潜水艦哨戒線 | Pattern 1 | 170 |   |
| E
No Combat | Pattern 1 | | "Must be my imagination" (battle avoided) | | F
深海東洋艦隊
警戒部隊II群 | Pattern 1 | 190 |  | | | Pattern 2 | 180 | | | G
No Combat | Pattern 1 | | "Must be my imagination" (battle avoided) | | H
深海東洋艦隊
警戒部隊旗艦 | Pattern 1 | 150 | | | | Pattern 2 | 150 |  | |
|
|
|
|
|
E-2
E-3
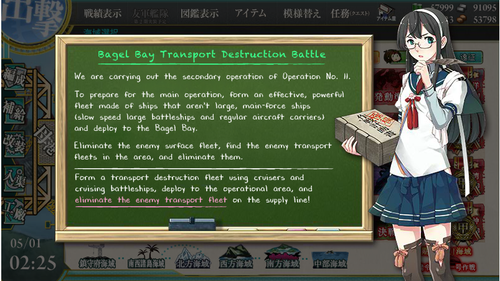
| Bagel Bay Transport Destruction Battle
|
| 【 ベーグル湾通商破壊戦】
|
Information
- Ship Locking: Ships used here cannot be used in E4 or E5 on normal and hard difficulties.
- Battleships (Aviation included, fast not included) and Standard Carriers cannot be used here!
- Boss requires 7 kills to complete on Hard (甲).
- Boss: Wa-Class Transport Flagship
- Rewards upon clearance:
- Clearing on Hard (甲): OTO 152mm triple extended machine gun, Pugliese-Type Underwater Bulkhead, Ryuusei (601 Air Group), 4 Improvement Materials, 1 Medal
- Clearing on Medium (乙): OTO 152mm triple extended machine gun, Pugliese-Type Underwater Bulkhead, Tenzan (601 Air Group), 3 Improvement Materials, Repair Team
- Clearing on Easy (丙): Pugliese-Type Underwater Bulkhead, Tenzan (601 Air Group), Repair Team
|
|
|
Branching rules
- E to J and I to J are both LoS checks. Standard LoS equipment should be enough to clear the requirement. Keep a radar on DDs.
- Node F is an Active Branching node.
- You want to pick node D if you have decently leveled ships that can survive the Light Cruiser Demon at node D.
- If your ships are lower level, you may want to try going south toward node I though you will suffer from lower ammo and the subsequent penalties
Show/Hide Branching Rules
| Branching Rules |
|---|
| Node | Split | Condition |
|---|
| START | A | 5+SS?
BB+CA+CAV≥4?
CA+CAV≥3?
Otherwise random? | | B | Random | | D | E | Fixed | | E | G | Failure on LoS check for J | | J | LoS Check
(2-5 Fall LoS Formula≥30) | | F | D | Active Branching | | H | Active Branching | | I | G | Failure on LoS check for J | | J | LoS Check |
|
|
Tips
- Be aware of the Light Cruiser Demon in one of node D's formations.
- Node C is a submarine node; however, unlike other event submarine nodes, you do use up ammo at this node.
- Boss node has a Ta-class battleship
- Possible formations:
- CA, CAV, DDx3, CLT - Provides enough firepower to comfortably take out boss node and the DDs should have high enough evasion to mostly dodge any incoming attacks. Enemy ships mostly consist of light ships like DDs, CLs and CLTs. This formation lets you conserve your CVLs if you don't have many. Keep mind you'll likely need up to 6 CV(L)s for E4 and E5. You can use mostly lower-tier ships in this map and save your best DDs and the like (one player cleared with 3 of DesDiv6 as their DDs).
- Refer to this Example Fleet for composition and equipment suggestion.
Enemy Encounters on Hard
Show/Hide Nodes and Enemy Encounters
| Nodes and Enemy Encounters |
|---|
| Node | Pattern | Xp | Node Info | Form |
|---|
| A | Pattern 1 | | No Combat | | B
ベーグル湾
警備支援部隊 | Pattern 1 | 170 | 
|
| C
ベーグル湾
哨戒線 | Pattern 1 | 160 |  
| | | Pattern 2 | 150 |
| | D
ベーグル湾
警備艦隊 | Pattern 1 | 190 | 
| | | Pattern 2 | 180 | 
| | E
深海棲艦
東洋輸送船団 II群 | Pattern 1 | 170 |  
| | | Pattern 2 | 170 |
| | | F | Pattern 1 | | No Combat | | | G | Pattern 1 | | "Must be my imagination" (battle avoided) | | H
深海棲艦
ベーグル湾支援艦隊 | Pattern 1 | 190 |  
| | | Pattern 2 | | 
| | I
深海棲艦
東洋輸送船団 I群 | Pattern 1 | 170 |
| | J
深海棲艦
東洋輸送基幹船団 | Pattern 1 | 260 | 
| | Pattern 2
Final Form | 270 |
| |
|
|
|
|
|
E-4
E-5
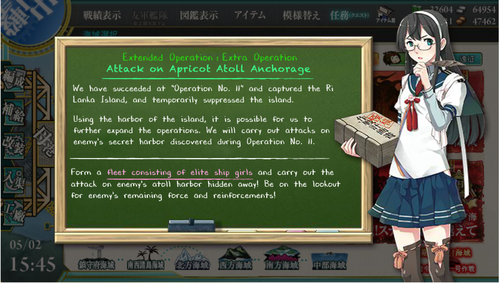
| Attack on Apricot Atoll Anchorage
|
| アンズ環礁泊地攻撃作戦
|
Information
- Ship Locking: You cannot use your E3 or E4 ships here (unless you're on easy difficulty).
- Boss requires 7 kills to complete on Hard (甲).
- Boss: Anchorage Water Demon
- Rewards upon clearance:
|
|
|
Branching rules
- Node B is a maelstrom. It has a maximum of 50 fuel penalty (subject to normal reduction via equipped Radar).
- Node F is an aerial combat node; two rounds of bombing occur, then you get the normal choice of ending the battle or enter night-time (which proceeds as a normal night battle).
- Node G is a fuel supply node.
- Node H is an Active Branching node.
- Node I is a night battle, as compensation for choosing the shorter route.
Show/Hide Branching Rules
| Branching Rules |
|---|
| Node | Split | Condition |
|---|
| START | A | Weighted random towards A if Fast BB≥1 and Slow BB≥1
Random with B otherwise | | B | Weighted random towards B if SS≥1 and 0 BBV
Random with A otherwise | | A | C | All else | | D | CV(L)≥3?, OR
Fleet includes Mogami and Mikuma OR
Suzuya and Kumano OR
Choukai and Ryuujou OR
Sendai and Fubuki | | D | F | All else | | G | Fleet contains Mogami and Mikuma OR
Suzuya and Kumano OR
2 from Yura, Choukai or Ryuujou OR
Sendai and Fubuki | | F | E | LoS check failed for H/I | | H | LoS check passed; Random with I | | I | LoS check passed; Random with H | | H | I | Active Branching | | K | Active Branching | | I | E | Failure on LoS check for N or if BB≥5 or BBV≥3 | | N | LoS check | | L | J | (F)BB(V) + CV(L)≥5 | | M | Failure on LoS check and fleet composition doesn't fit route to J | | N | LoS check. |
|
|
Tips
- Possible compositions:
- 2 BB, 1 CV, 1 SS, and [Mogami and Mikuma] or [Suzuya and Kumano] or [Choukai and Ryuujou] will allow for A/B→D→G→H→I→N. There is no battle on B (Fuel Maelstrom), G (Fuel Resource gain), and H (Active Branching).
- (F)BB x4, CV, SS - The SS will protect your fleet in the dangerous I night-battle node and even divert Anchorage Water Demon's daytime firing; suggested equipment is a torpedo and a damecon; two damecons can also be used. Double damecons will work as you might expect - damecons can activate on two separate nodes.
- (F)BB x2, CV, SS, Route-fixing Mogami-class pair - This setup will allow route-fixing for full damage on boss node.
- Equip Sanshiki on your BBs and CA(V)s to help damage the boss. Boss is an installation-type.
- Being sent to the maelstrom node really hurts as likely by the time you make it to the boss, your fleet's fuel will be completely depleted if you hit node F as well. Consider turning back if sent to Maelstrom depending on your resources, especially if you want to conserve.
- Consider sacrificing a BB/CA(V)'s daytime artillery spotting in exchange for a Radar. A radar on CV may also be useful.
- Refer to this Example Fleet for composition and equipment suggestion.
Show/Hide Nodes and Enemy Encounters
| Nodes and Enemy Encounters |
|---|
| Node | Pattern | Xp | Node Info | Form |
|---|
| A | Pattern 1 | | No Combat | | B
Maelstrom | Pattern 1 | | Maelstrom:  -40% -40% | | C
東洋艦隊
再編成水上部隊 | Pattern 1 | |
|
| | Pattern 2 | | 
| | D
東洋艦隊
残存水上部隊 | Pattern 1 | 180 | | | | Pattern 2 | 170 |  | | | E | Pattern 1 | | No Combat | | F
Aerial Phase Only東洋艦隊
残存機動部隊 | Pattern 1 | 230 |  | | | Pattern 2 | 220 | | | | G | Pattern 1 | | +50~+150 | | | H | Pattern 1 | | No Combat | | I
Night Battle Node
秘匿泊地 補給艦隊 | Pattern 1 | 260 |
| | | Pattern 2 | 250 |
| | | J | Pattern 1 | | | | K
Maelstrom | Pattern 1 | | Maelstrom - | | L
秘匿泊地
増援部隊 | Pattern 1 | | 
| | | Pattern 2 | 300 |
| | | M | Pattern 1 | | No Combat | | N
深海棲艦
アンズ環礁秘匿泊地 | Pattern 1 | 350 |    
| | | Pattern 2 | 350 | 
| |
|
|
|
|
|
E-6

| Relentless Operation! Across the Stevia Sea
|
| 『打通作戦!ステビア海を越えて』
|
Information
- Combined Fleet
- Ship-locking does not apply to this map; that is, you can use any ship you own, regardless of whether you used it in any other event maps.
- Boss: Battleship Water Demon
- Requires 7 kills to complete on Hard (甲) and 8 kills on Normal (乙)/ Easy (丙).
- Rewards upon clearance:
- This is the only map during this event where Roma is available. (Drop only)
|
|
|
Branching rules
- Nodes E and F are Active Branching nodes.
- Nodes I an J are night battles.
- M to O is a LoS check.
- The route you take will determine what branching rules apply to node L; bringing a sub through the north route is not recommended.
Show/Hide Branching Rules
| Branching Rules |
|---|
| Node | Split | Condition |
|---|
| START | B | Fast Speed Surface Task Force | | D | Carrier Task Force | | F | Mixed Speed Surface Task Force | | A | C | CLT=3 | | E | CLT≤2 | | E | H | Active Branching | | J | Active Branching | | F | G | Active Branching | | H | Active Branching | | G | I | LoS check | | L | CLT=3 or failed LoS check for I | | M | L | Failure on LoS check or SS in escort fleet
Random if SS≥1 and previous node was not K? | | O | 1 SS in main fleet and previous node was K
Random if SS≥1 and previous node was not K?
LoS check otherwise |
|
|
Tips
- The Carrier Task Force mitigates damage and sends you to Node D; branching to H is recommended as the southern route contains a night battle against a torpedo squadron led by CA Ri-Class Flagship followed by a day battle against Battleship Princess, both of which can be devastating.
- A mixed-speed Surface Task Force sends you to node F, giving you a choice between the middle route containing Anchorage Water Demon but with an extra Roma-dropping node (K, hard difficulty only), or the northern route containing a night battle node against a Battleship Princess and a day battle against a torpedo squadron.
- A fast-speed Surface Task Force fleet is first sent to A ( maelstrom) then (if not sent to C) given the same choice as the Carrier Task Force. Without question, this is NOT recommended as the fuel loss will result in you evading less attacks at pre-boss and boss nodes, reducing your combat capability.
- For final run attempts:
- With equipment designed for night battle activating, the northern route is not very threatening; Battleship Princess typically will only inflict scratch damage on your ships, and no other enemy ship in that node is equipped with DA/CI setup. Thus, a mixed-speed Surface Task Force fleet going northern route usually only has to worry about pre-boss node and the boss node; it also conserves your escort fleet's strength, with the trade off being more damage to the first fleet.
- A Carrier Task Force fleet going through the middle route can also work. You can put 3 CLTs in the fleet in this case, so your first fleet should more likely be able to focus on the boss because your escort fleet should (ideally) clean up the other mobs.
- Boss node has AS on final run attempts (Aircraft Carrier Princess on Hard and Normal, Wo-Class Flagship on Easy).
- Node M (Pre-boss) contains an Aircraft Carrier Princess (so Hard and Normal final runs see her in back-to-back nodes).
- Example compositions:
- (F)BBx3 CVLx2 CAV, CLTx2 CL CA DDx2 (Surface) [Note that you need to be mixed-speed]
- (F)BB(V)x4 CA(V) CV, CL CLTx2 BB/CA DDx2 (Surface) [alt. composition]
- BBx2 CVx4, DDx2 CL CLTx3 (or DDx2 CL CA CLTx2) (Carrier)
- Consider using a shelling support expedition to assist with the boss kill.
- Boss does not have AS prior to last kill, so a carrier support expedition may also be useful.
Show/Hide Nodes and Enemy Encounters
| Nodes and Enemy Encounters |
|---|
| Node | Pattern | Xp | Node Info | Form |
|---|
A
Maelstrom | Pattern 1 | | | | | B | Pattern 1 | | "No enemy sighted" (battle avoided) | | | C | Pattern 1 | | "Must be my imagination" (battle avoided) | | | D | Pattern 1 | | "No enemy sighted" (battle avoided) | | E
Active Branching | Pattern 1 | | (no combat) | | F
Active Branching | Pattern 1 | | (no combat) | | G
増援部隊
先遣水雷戦隊 | Pattern 1 | 250 | 
| | | Pattern 2 | 240 |
| | H
再建中
アンズ環礁泊地 | Pattern 1 | 320 |
| | | Pattern 2 | 300 |
| | I
Night Battle Only
深海棲艦
増援部隊I群 | Pattern 1 | 320 | 
|
| J
Night Battle Only
東洋艦隊再編成
水雷戦隊 | Pattern 1 | 270 |
| | K
アンズ環礁泊地
支援部隊 | Pattern 1 | 300 |
|
| | L | Pattern 1 | | "No enemy sighted" (battle avoided) | | M
ステビア海方面艦隊
機動部隊 | Pattern 1 | 360 | 
| | | Pattern 2 | 350 |
| | N
深海棲艦
増援部隊II群 | Pattern 1 | 320 |
| | O
深海棲艦
ステビア海方面艦隊 | Pattern 1 | 400 |  
| | Pattern 2
Final Form | 400 |
| |
|
|
|
|
|
See Also
References
- WWIIDB article on the Battle Of Midway, Discussing the idea of south Pacific advances into the Indian Ocean.
- Black, Jeremy (2009). "Midway and the Indian Ocean". Naval War College Review 62 (4), discussing how the idea of a Japanese advance into the Indian Ocean would affect overall pressure upon Great Britain (Along with other potential Axis and Allied movements).
Tools
Discussions
Player Live Streams
We encourage you to be social and share your gaming experience, by broadcasting your own stream and watching other player's streams! It might even help you.
Non-Gameplay
Gensui Hime's Twitch Stream - Will (attempt) to get event data before event begins, so tune in to watch me do it. or not
Gameplay
- Totaku's Livestream Will stream around 12:30 AM - 2-3 AM Central Time on weekdays and 12:30 AM - 4-5 AM Central Time on Weekends
- Remi's Twitch, aka "The Amatsukaze Guy" - lv100 and going for all hard clear;
will be broadcasting mostly for the latter half of the event due to finals (and likely snuggling with Amatsukaze and Taihou). I'm making bad decisions and streaming primarily from 5pm EST onwards into the night. May not stream some nights due to exams. E1-5 hard cleared. E6 coming up.
- Zak提督's Stream: Twitch, playing every day of the event from April 28th during 8:00 PM-10:00 PM EST
Yamato_JagdYamato (エリート大和)'s stream Twitch ((HDD and driver malfunctioned, unable to stream at this event))- Shiro's Twitch stream; probably 11 AM JST - Dinner/Work time
- Lucas's Twitch stream
- Tom's Twitch Stream; 4am EST to 6am EST daily.
- Lance's Twitch stream; 1pm PDT to 12am PDT, hard mode all the way!!
- Miguel's Twitch stream; Likely mostly at the end of the event, but also possibly some sporadic streaming in the early days.
- Hoang's Twitch stream; full marathon speedrun, hard difficulty with the final map on normal.
- Tsundereworks's Twitch stream; likely taking it slow through the event to avoid being a kuso teitoku.
- Christopher's Twitch stream; Likley will be steaming more in the latter half of the event.
- Yu-Ting's Twitch stream; Likely steaming at 1:30 AM Friday, Saturday and Sunday during the event (GMT +8, an hour earlier than JST); he is likely to wait a bit for others to clear the maps and get info on them, and then try to go all hard (but may switch to easy or normal depending on how well his resources hold up).
- Toru's Twitch stream, going to stream Tuesdays, Wednesdays and Fridays 6PM PST to 12AM PST, and Saturday and Sunday 3PM to 10PM, until he beats the event.
- Crescentia's Hitbox stream and Twitch backup.
Source Info
Original translations sourced to Himeuta Forums. Tweets are collapsed to save space.
Expand
 @KanColle_STAFF @KanColle_STAFF |
[1] |
来月四月下旬以降に、「艦これ」春イベント2015:期間限定海域を開催予定です。同春イベ海域では、新海外艦を含む複数の「新艦娘」が実装される予定です。ぜひお楽しみに!
#艦これ |
In late April, the 「KanColle」 Spring 2015 event will be held. In the spring event, a new foreign and several new kanmusu will be added. Stay tuned! |
| @KanColle_STAFF |
[2] |
今月四月下旬以降に、「艦これ」春イベント2015:期間限定海域を開催すべく、現在準備を進めています。同春イベ期間限定海域では、「イタリア生まれの艦娘」を含む複数の新艦娘を実装する予定です。お楽しみに!
#艦これ |
In late April, the 「KanColle」 Spring 2015 event will be held. Several new kanmusu including a 「Kanmusu that was born in Italy」 will be added. Stay tuned! |
| @KanColle_STAFF |
[3] |
次回の「艦これ」全サーバ群共通メンテナンス&アップデートは、来週【4/10(金曜日)】実施予定です。また、今月下旬から、春イベント2015:期間限定海域を展開予定です。同春イベでは、地中海での活躍を目指した主力艦級のイタリア艦娘も登場予定です。お楽しみに!
#艦これ |
In the Spring event, An Italian main force battleship that served in the Mediterranean Sea will be added. |
| @KanColle_STAFF |
[4] |
次回の「艦これ」全サーバ群共通メンテナンス&アップデートは、【4/10(金曜日)】に実施予定です。また、今月下旬開始に向けて春イベント2015:期間限定海域を現在準備中です!春イベでは、歴戦の提督方は高難易度作戦(甲作戦/乙作戦)も冬イベ同様に選択可能となる予定です。
#艦これ |
The next patch will be on the 10th of April. At the end of April, the spring event will start, and experienced admirals can select its difficulty just like the winter event. |
| @KanColle_STAFF |
[5] |
今月下旬から開始予定の「艦これ」春イベント2015:期間限定海域では、地中海での活躍を目指した強力なイタリア艦娘を始め、複数の【新艦娘】が登場予定です。お楽しみに!
#艦これ |
In the spring event, multiple new ships, including a strong Italian ship that was successful in the Mediterranean Sea, will be added. |
| @KanColle_STAFF |
[6] |
今月下旬から開始予定の「艦これ」春イベント2015:期間限定海域では、地中海での活躍を目指したイタリア艦娘を始め、複数の【新艦娘】が登場予定です。来たるべき春イベに高難易度作戦での作戦参加を検討中の提督の皆さんは、戦備の充実と練度向上に努めて頂けますと幸いです。
#艦これ |
Late this month, the 「KanColle」 Spring 2015 event will start! Multiple new ships, including a strong Italian ship that was successful in the Mediterranean sea, will be added. Admirals that plan to take on the hard difficulty, please stock up resources and train up your units beforehand. |
| @KanColle_STAFF |
[7] |
70数年前の今日、インド洋作戦を展開中の南雲機動部隊が英東洋艦隊と交戦、空母ハーミーズなどを撃破しました。今月下旬より展開予定の「艦これ」春イベント2015:期間限定海域では、イタリア艦娘も登場する予定です。お楽しみに!
#艦これ |
Around 70 years ago on this date, the Nagumo Mobile Task Force had a conflict with eastern British forces in the Indian Ocean, and the carrier Hermes was defeated there. Late this month, the Spring 2015 Event will start and an Italian ship will be added. Stay tuned! |
| @KanColle_STAFF |
[8] |
「艦これ」春イベント2015:期間限定海域は、四月最終週に実装/展開予定です。同作戦期間は、約20日間前後の予定です。大型主力艦級のイタリア艦娘を始め、複数の多彩な新艦娘が登場予定です。現在実装準備中の「艦これ」春イベも、どうぞお楽しみに!
#艦これ |
「KanColle」 Spring 2015 event: a limited area is planned to start on the last week of April. The event will last for around 20 days. A number of colorful new kanmusu including the main force Italian ship will be added. Please look forward to the event! |
| @KanColle_STAFF |
[9] |
今月四月最終週より、「艦これ」春イベント2015:期間限定海域【発令!第十一号作戦】を展開予定です。同作戦期間は、約20日間前後の予定です。本作戦を成功させることで、大型主力艦級のイタリア艦娘などの新艦娘と邂逅可能です。現在準備中の「艦これ」春イベも、どうぞお楽しみに!
#艦これ |
The last week of April will be start of the event 【Announcement! Operation 11】. The event will last for 20 days. Clearing the event will award an Italian main force battleship and allow you to find other new ships. Please look forward to the event! |
| @KanColle_STAFF |
[10] |
今月四月最終週より、「艦これ」春イベント2015:期間限定海域【発令!第十一号作戦】を展開予定です。作戦期間は約20日間前後、同作戦を成功させることでイタリア艦娘などの新艦娘と邂逅可能となります。作戦攻略には、航空母艦を基幹戦力とした空母機動部隊の充実も大切です!
#艦これ |
The last week of April will be start of the event 【Announcement! Operation 11】. The event will last for 20 days. Clearing the event will reward an Italian main force battleship and allow you to find other new ships.
As for strategy, preparing a fleet carrier- and escort-centric fleet is very important! |
| @KanColle_STAFF |
[11] |
「艦これ」春イベント:期間限定海域【発令!第十一号作戦】は、全ての準備が整えば、来週【4/28(火曜日)】より実装/開催予定です。※諸事情により開催日が変更される場合もあります。ご了承頂けますと幸いです。
#艦これ |
The Spring Event 【Announcement! Operation 11】 will be starting on 28th Apr. ※This is a tentative date, and you will be notified when changes are made. Please stay tuned. |
| @KanColle_STAFF |
[12] |
「艦これ」春イベント2015:期間限定海域【発令!第十一号作戦】は、全ての準備が整えば、来週【4/28(火曜日)】より開始予定です。※同開始前に一部サーバ群の過負荷対策等を優先させて頂き、開始日が変更される場合もあります。申し訳ありません、何卒ご了承頂けますと幸いです。
#艦これ |
「KanColle」 Spring 2015 Event: Time-Limited Area 【Order! Operation No. 11】 will start next week on 4/28 (Tuesday) if all preparation are in place. ※Since we need to deal with certain servers that were overloaded with traffic before the event, there's a possibility of the date being changed. We're sorry, and please understand. |
| @KanColle_STAFF |
[13] |
現在「艦これ」運営鎮守府では、春イベント2015:期間限定海域【発令!第十一号作戦】の実装準備を進めています。最近「艦これ」に着任された提督は「丙作戦」を、歴戦の提督方は「乙作戦」、そしてより攻略難易度の高い「甲作戦」への参加も選択可能です。
#艦これ |
Currently the 「Kancolle」 Operation Naval Base is working on the preparation for implementing the Time-Limited Area for the Spring 2015 Event 【Order! Operation No. 11】. New admirals can choose 「Easy」 mode, while more experienced admirals can also choose 「Medium」 and 「Hard」 modes which has a higher difficulty. |
| @KanColle_STAFF |
[14] |
【春イベ「乙作戦」「甲作戦」参加予定の提督の皆さんへ】
歴戦の提督が選択可能な「乙作戦」及び「甲作戦」は、高難易度の作戦となります。また、作戦中盤以降は各作戦海域ごとへの艦隊戦力の振り分けも重要となります。充実した艦隊戦力と戦備を持つ提督方は、参加をご検討ください!
#艦これ |
「Medium」 and 「Hard」 modes are selectable by experienced admirals, are high-difficulty operations. It is also important to figure out which ships to deploy to which map from the middle point on. Admirals who have a well-rounded fleet and stockpile should consider doing so! |
| @KanColle_STAFF |
[15] |
【春イベ「甲作戦」参加予定の提督の皆さんへ】
歴戦の提督が選択可能な「甲作戦」では、第2作戦海域以降は前作戦海域を「甲作戦」または「乙作戦」で攻略していることが次作戦参加条件となります。ご留意頂けますと幸いです。
例)【OK】丙→乙→甲
例)【NG】丙→丙→甲
#艦これ |
Starting with the 2nd map, the requirement for experienced admirals to choose 「Hard」 mode is to clear the previous map on 「Hard」 or 「Medium」. Please be aware of this.
Example: 【OK】 Easy → Medium → Hard
Example: 【Not allowed】 Easy → Easy → Hard |
| @KanColle_STAFF |
[16] |
【春イベ参加予定の全ての提督方へ】
春イベでは、全ての提督が「丙作戦」を、さらに歴戦の提督方は「乙作戦」「甲作戦」も選択可能です。どの難易度の作戦を選択しても【作戦海域突破によって邂逅できる新艦娘】は入手可能です。その他の褒賞・ドロップする艦娘・経験値などは異なります。
#艦これ |
For the Spring Event, all admirals can select 「Easy」, and more experienced admirals can also select 「Medium」 and 「Hard」. Regardless of the operation difficulty, you will be able to obtain 【ships girls encountered after clearing a map】. However, ship girl drops, experience points and other rewards will differ. |
| @KanColle_STAFF |
[17] |
【最近「艦これ」に着任された提督の皆さんへ】
春イベがもうすぐスタート致します。開催期間は約20日間ありますので、いきなりイベント海域に飛び込まず、通常海域での艦隊戦力の充実、練度の向上も併行して行って頂けると攻略の鍵がきっと見えてきます。どうぞよろしくお願い致します!
#艦これ |
The Spring Event is almost here. The event period will be about 20 days, so keys to clearing the maps will include (a) don't jump right into event maps, (b) rounding out the fleet's operational capability in regular maps, and (c) increasing the ship's experience. Please keep that in mind! |
| @KanColle_STAFF |
[18] |
現在実装準備中の「艦これ」春イベント2015:期間限定海域【発令!第十一号作戦】では、戦艦及び航空母艦を含む多彩な新艦娘たちが登場予定です。新戦艦は海外からの来訪です。「艦これ」春イベ、どうぞお楽しみに!
#艦これ |
There are plans for battleships and aircraft carriers to appear in the「KanColle」 Spring 2015 Event: Time-Limited Area 【Order! Operation No. 11】, currently being prepared for implementation. The new battleship will be a visitor from overseas. Please enjoy the 「Kancolle」 Spring Event! |
| @KanColle_STAFF |
[19] |
今春作戦開始予定の「艦これ」春イベント2015:期間限定海域【発令!第十一号作戦】は、約20日間の作戦期間となる予定です。この春イベを攻略、その海上打通作戦を成功することで、西方から来訪する最大2隻の海外戦艦姉妹との邂逅が可能です。勇戦を期待致します!
#艦これ |
The 「KanColle 」 Spring Event of 2015: Time-Limited Area 【Order! Operation No. 11】 is slated to be around for 20 days. Clearing this spring event by succeeding with the operation, will give the opportunity of meeting with up to two foreign battleships sisters from the West. We look forward to your effort! |
| @KanColle_STAFF |
[20] |
「艦これ」春イベント2015:期間限定海域【発令!第十一号作戦】の『前段作戦』は下記から構成されます!
第1作戦海域:【発動準備、第十一号作戦!】
第2作戦海域:【第二次カレー洋作戦】
第3作戦海域:【 ベーグル湾通商破壊戦】
第4作戦海域:【決戦!リランカ島攻略作戦】
#艦これ |
The 「KanColle 」 Spring Event of 2015: Time-Limited Area 【Order! Operation No. 11】 Early-Stage Operations are composed of the following below!
First Operation Sea Area: Preparation for Operation No.11
Second Operation Sea Area: Second Curry Ocean Operation
Third Operation Sea Area: Bagel Bay Transport Destruction Battle
Fourth Operation Sea Area: Final Battle! Ri Lanka Island Assault |
| @KanColle_STAFF |
[21] |
「艦これ」春イベ:期間限定海域【発令!第十一号作戦】主作戦(前段作戦)のうち、
第2作戦海域:【第二次カレー洋作戦】】及び
第4作戦海域:【決戦!リランカ島攻略作戦】
は、第1艦隊及び第2艦隊による『連合艦隊』の出撃が予定されています。
#艦これ |
「KanColle 」 Spring Event: Time Limited Area 【Order! Operation No. 11】Among part of the main early-stage operation, Second Operation Sea Area: Second Curry Ocean Operation and
Fourth Operation Sea Area: Final Battle! Ri Lanka Island Assault is being planned to involve the use of Combined Fleets in the sortie. |
| @KanColle_STAFF |
[22] |
本作戦は多段階作戦です。第3作戦海域:【ベーグル湾通商破壊戦】に使用した戦力は、第4作戦海域の「甲」及び「乙」作戦に投入できません。また、同様に第3~第4作戦海域に投入した戦力は、続く第5作戦海域の甲及び乙作戦には投入できません。
※「丙」作戦では自由に投入できます。
#艦これ |
This operation is a multi-stage operation. Ships used in Third Operation Sea Area: Bagel Bay Transport Destruction Battle operation can not participate in the fourth operation on difficulties of Normal or Hard. Also, ships in third and fourth operation cannot participate on the fifth opetation on normal or hard.
- On easy difficulty, you can put any ships freely without restriction.
|
| @KanColle_STAFF |
[23] |
「艦これ」春イベ:期間限定海域【発令!第十一号作戦】主作戦(前段作戦)を中盤までの攻略を成功させることで、航空母艦の新艦娘が入手可能です。また、主作戦を完全攻略し、海上打通作戦への橋頭堡を確立することで、【西方から来訪した海外戦艦】との邂逅が可能となります。お楽しみに! |
「KanColle 」 Spring Event: Time Limited Area 【Order! Operation No. 11】For those who complete the main early-stage operation to the half way point, a new aircraft carrier ship girl will become avalaible. Also, when all the Main Operations are completely cleared and a bridgehead is established for the Ocean Breakthrough Operation, it is possible to encounter a 【foreign battleship visitor from the west】. Please enjoy! |
| @KanColle_STAFF |
[24] |
「艦これ」春イベでは、その前半の作戦海域でも課金アイテムやレアな装備なども入手可能です。また、第2作戦海域を攻略することで、最新の新艦娘も入手可能です。最近提督に着任された方は、通常海域での戦力錬成も併用しつつ、第2作戦海域【丙作戦】攻略を目標に、挑戦をご検討ください! |
During the [KanColle] Spring Event, you are able to obtain cash-only items and rare equipments. Furthermore, upon clearing the second operation will reward you with a new kanmusu! We encourage new admirals to try the event on easy after leveling up your kanmusus in sortie. |
| @KanColle_STAFF |
[25] |
春イベ【発令!第十一号作戦】主作戦(前段作戦)を完全攻略した提督方は、続く『拡張作戦(後段作戦)』に参加することも可能です。
※拡張作戦は【二つの作戦海域】より構成されます。
※拡張作戦:最終作戦海域では、甲・乙・丙作戦共に【全ての戦力を投入することが可能】となります。 |
Spring Event 【Order! Operation No. 11】 Admrials who complete the main early stage opperations will be able to participate in the Late-Stage Extra Operations.
- Extra Operations will consist of [two operational sea areas].
- Extra Operation: In the final stage operation, you will be able to use your entire force regardless of difficulty settings you choose.
|
| @KanColle_STAFF |
[26] |
次回の「艦これ」全サーバ群共通メンテナンス&アップデートを明日【4/28(火曜日)】に実施させて頂く予定です。作業は【11:00~19:00】の予定です。同メンテに伴うアップデート完了を以て、「艦これ」春イベ:期間限定海域【発令!第十一号作戦】を実装、作戦開始予定です。 |
The next [KanColle] scheduled maintenance and update is set for [4/28 (Tuesday)] . Duration of the maintainance period is project to last from [11:00 - 19:00] . Upon completion Kancolle will reopen and release the Spring Event: Limited Sea Area【Order! Operation No. 11】 |
zh:2015年春季活动


