- Welcome to the Kancolle Wiki!
- If you have any questions regarding site content, account registration, etc., please visit the KanColle Wiki Discord
Difference between revisions of "Spring 2022 Event/E-2/Enemy comps"
< Spring 2022 Event | E-2
Jump to navigation
Jump to search
m |
m |
||
| Line 6: | Line 6: | ||
|AB | |AB | ||
|Raid | |Raid | ||
| − | |{{TooltipSimple|Diamond| | + | |{{TooltipSimple|Diamond|12% (2948/24478)}} |
|Airfield Princess/VII | |Airfield Princess/VII | ||
|Airfield Princess/VI | |Airfield Princess/VI | ||
| Line 12: | Line 12: | ||
|AB | |AB | ||
|Raid | |Raid | ||
| − | |{{TooltipSimple|Diamond|14% ( | + | |{{TooltipSimple|Diamond|14% (3406/24478)}} |
|Airfield Princess/VII | |Airfield Princess/VII | ||
|Airfield Princess/VI | |Airfield Princess/VI | ||
| Line 19: | Line 19: | ||
|AB | |AB | ||
|Raid | |Raid | ||
| − | |{{TooltipSimple|Diamond|38% ( | + | |{{TooltipSimple|Diamond|38% (9350/24478)}} |
|Airfield Princess/VII | |Airfield Princess/VII | ||
|Airfield Princess/VII | |Airfield Princess/VII | ||
| Line 26: | Line 26: | ||
|AB | |AB | ||
|Raid | |Raid | ||
| − | |{{TooltipSimple|Diamond| | + | |{{TooltipSimple|Diamond|22% (5268/24478)}} |
|Airfield Princess/VII | |Airfield Princess/VII | ||
|Airfield Princess/VII | |Airfield Princess/VII | ||
| Line 33: | Line 33: | ||
|AB | |AB | ||
|Raid | |Raid | ||
| − | |{{TooltipSimple|Diamond|14% ( | + | |{{TooltipSimple|Diamond|14% (3506/24478)}} |
|Airfield Princess/VII | |Airfield Princess/VII | ||
|Airfield Princess/VII | |Airfield Princess/VII | ||
| Line 42: | Line 42: | ||
|B | |B | ||
|Defense | |Defense | ||
| − | |{{TooltipSimple|Diamond|32% ( | + | |{{TooltipSimple|Diamond|32% (11371/35073, HQ: 101-120)}}<br>{{TooltipSimple|''Phases: 1, 2, 3''|Samples: 3668, 31, 644}} |
|Airfield Princess/VII | |Airfield Princess/VII | ||
|Airfield Princess/VI | |Airfield Princess/VI | ||
| Line 48: | Line 48: | ||
|B | |B | ||
|Defense | |Defense | ||
| − | |{{TooltipSimple|Diamond|33% ( | + | |{{TooltipSimple|Diamond|33% (11709/35073, HQ: 95-120)}}<br>{{TooltipSimple|''Phases: 1, 2, 3''|Samples: 3838, 24, 633}} |
|Airfield Princess/VI | |Airfield Princess/VI | ||
|Airfield Princess/VI | |Airfield Princess/VI | ||
| Line 55: | Line 55: | ||
|B | |B | ||
|Defense | |Defense | ||
| − | |{{TooltipSimple|Diamond|17% ( | + | |{{TooltipSimple|Diamond|17% (6014/35073, HQ: 99-120)}}<br>{{TooltipSimple|''Phases: 1, 2, 3''|Samples: 1940, 5, 154}} |
|Airfield Princess/VII | |Airfield Princess/VII | ||
|Airfield Princess/VI | |Airfield Princess/VI | ||
| Line 62: | Line 62: | ||
|B | |B | ||
|Defense | |Defense | ||
| − | |{{TooltipSimple|Diamond|14% ( | + | |{{TooltipSimple|Diamond|14% (4747/35073, HQ: 100-120)}}<br>{{TooltipSimple|''Phases: 1, 2, 3''|Samples: 1585, 10, 158}} |
|Airfield Princess/VII | |Airfield Princess/VII | ||
|Airfield Princess/VII | |Airfield Princess/VII | ||
| Line 69: | Line 69: | ||
|B | |B | ||
|Defense | |Defense | ||
| − | |{{TooltipSimple|Diamond|2% ( | + | |{{TooltipSimple|Diamond|2% (609/35073, HQ: 104-120)}}<br>{{TooltipSimple|''Phases: 1''|Samples: 197}} |
|Airfield Princess/VII | |Airfield Princess/VII | ||
|Airfield Princess/VII | |Airfield Princess/VII | ||
| Line 76: | Line 76: | ||
|B | |B | ||
|Defense | |Defense | ||
| − | |{{TooltipSimple|Diamond|2% ( | + | |{{TooltipSimple|Diamond|2% (623/35073, HQ: 104-120)}}<br>{{TooltipSimple|''Phases: 1''|Samples: 198}} |
|Airfield Princess/VII | |Airfield Princess/VII | ||
|Airfield Princess/VII | |Airfield Princess/VII | ||
| Line 84: | Line 84: | ||
|C | |C | ||
|Normal | |Normal | ||
| − | |{{TooltipSimple|Echelon|17% ( | + | |{{TooltipSimple|Echelon|17% (4845/28712, HQ: 101-120)}}<br>{{TooltipSimple|Line Abreast|8% (2439/28712, HQ: 101-120)}}<br>{{TooltipSimple|''Phases: 1, 2, 3''|Samples: 2402, 12, 405}} |
|Submarine Ka-Class/Flagship | |Submarine Ka-Class/Flagship | ||
|Submarine Ka-Class/Elite | |Submarine Ka-Class/Elite | ||
| Line 91: | Line 91: | ||
|C | |C | ||
|Normal | |Normal | ||
| − | |{{TooltipSimple|Echelon|16% ( | + | |{{TooltipSimple|Echelon|16% (4734/28712, HQ: 95-120)}}<br>{{TooltipSimple|Line Abreast|17% (4768/28712, HQ: 95-120)}}<br>{{TooltipSimple|''Phases: 1, 2, 3''|Samples: 3205, 17, 535}} |
|Submarine Ka-Class/Flagship | |Submarine Ka-Class/Flagship | ||
|Submarine Ka-Class/Elite | |Submarine Ka-Class/Elite | ||
| Line 99: | Line 99: | ||
|C | |C | ||
|Normal | |Normal | ||
| − | |{{TooltipSimple|Echelon|20% ( | + | |{{TooltipSimple|Echelon|20% (5872/28712, HQ: 100-120)}}<br>{{TooltipSimple|Line Abreast|21% (6054/28712, HQ: 95-120)}}<br>{{TooltipSimple|''Phases: 1, 2, 3''|Samples: 3992, 13, 373}} |
|Submarine Ka-Class/Flagship | |Submarine Ka-Class/Flagship | ||
|Submarine Ka-Class/Flagship | |Submarine Ka-Class/Flagship | ||
| Line 108: | Line 108: | ||
|D | |D | ||
|Defense | |Defense | ||
| − | |{{TooltipSimple|Diamond|19% ( | + | |{{TooltipSimple|Diamond|19% (297/1557, HQ: 100-120)}}<br>{{TooltipSimple|''Phases: 1, 3''|Samples: 167, 58}} |
|Airfield Princess/VII | |Airfield Princess/VII | ||
|Airfield Princess/VI | |Airfield Princess/VI | ||
| Line 114: | Line 114: | ||
|D | |D | ||
|Defense | |Defense | ||
| − | |{{TooltipSimple|Diamond|27% ( | + | |{{TooltipSimple|Diamond|27% (416/1557, HQ: 100-120)}}<br>{{TooltipSimple|''Phases: 1, 3''|Samples: 166, 75}} |
|Airfield Princess/VI | |Airfield Princess/VI | ||
|Airfield Princess/VI | |Airfield Princess/VI | ||
| Line 121: | Line 121: | ||
|D | |D | ||
|Defense | |Defense | ||
| − | |{{TooltipSimple|Diamond| | + | |{{TooltipSimple|Diamond|23% (362/1557, HQ: 105-120)}}<br>{{TooltipSimple|''Phases: 1, 3''|Samples: 196, 73}} |
|Airfield Princess/VII | |Airfield Princess/VII | ||
|Airfield Princess/VI | |Airfield Princess/VI | ||
| Line 128: | Line 128: | ||
|D | |D | ||
|Defense | |Defense | ||
| − | |{{TooltipSimple|Diamond|19% ( | + | |{{TooltipSimple|Diamond|19% (302/1557, HQ: 103-120)}}<br>{{TooltipSimple|''Phases: 1, 2, 3''|Samples: 179, 1, 76}} |
|Airfield Princess/VII | |Airfield Princess/VII | ||
|Airfield Princess/VII | |Airfield Princess/VII | ||
| Line 135: | Line 135: | ||
|D | |D | ||
|Defense | |Defense | ||
| − | |{{TooltipSimple|Diamond|11% ( | + | |{{TooltipSimple|Diamond|11% (167/1557, HQ: 105-120)}}<br>{{TooltipSimple|''Phases: 1, 3''|Samples: 74, 33}} |
|Airfield Princess/VII | |Airfield Princess/VII | ||
|Airfield Princess/VII | |Airfield Princess/VII | ||
| Line 142: | Line 142: | ||
|D | |D | ||
|Defense | |Defense | ||
| − | |{{TooltipSimple|Diamond|1% ( | + | |{{TooltipSimple|Diamond|1% (13/1557, HQ: 105-120)}}<br>{{TooltipSimple|''Phases: 1, 3''|Samples: 8, 4}} |
|Airfield Princess/VII | |Airfield Princess/VII | ||
|Airfield Princess/VII | |Airfield Princess/VII | ||
| Line 161: | Line 161: | ||
|F | |F | ||
|Normal | |Normal | ||
| − | |{{TooltipSimple|Line Ahead|50% ( | + | |{{TooltipSimple|Line Ahead|50% (11049/22017, HQ: 95-120)}}<br>{{TooltipSimple|Double Line|20% (4405/22017, HQ: 95-120)}}<br>{{TooltipSimple|Vanguard|30% (6563/22017, HQ: 95-120)}}<br>{{TooltipSimple|''Phases: 1, 3''|Samples: 8284, 329}} |
|Heavy Cruiser Ri-Class/Flagship | |Heavy Cruiser Ri-Class/Flagship | ||
|Heavy Cruiser Ri-Class/Flagship | |Heavy Cruiser Ri-Class/Flagship | ||
| Line 172: | Line 172: | ||
|G | |G | ||
|Normal | |Normal | ||
| − | |{{TooltipSimple|Echelon|17% ( | + | |{{TooltipSimple|Echelon|17% (1252/7360, HQ: 99-120)}}<br>{{TooltipSimple|Line Abreast|8% (618/7360, HQ: 99-120)}}<br>{{TooltipSimple|''Phases: 1, 2, 3''|Samples: 250, 3, 169}} |
|Submarine Ka-Class/Flagship | |Submarine Ka-Class/Flagship | ||
|Submarine Ka-Class/Elite | |Submarine Ka-Class/Elite | ||
| Line 179: | Line 179: | ||
|G | |G | ||
|Normal | |Normal | ||
| − | |{{TooltipSimple|Echelon| | + | |{{TooltipSimple|Echelon|16% (1208/7360, HQ: 99-120)}}<br>{{TooltipSimple|Line Abreast|17% (1275/7360, HQ: 99-120)}}<br>{{TooltipSimple|''Phases: 1, 3''|Samples: 304, 240}} |
|Submarine Ka-Class/Flagship | |Submarine Ka-Class/Flagship | ||
|Submarine Ka-Class/Elite | |Submarine Ka-Class/Elite | ||
| Line 187: | Line 187: | ||
|G | |G | ||
|Normal | |Normal | ||
| − | |{{TooltipSimple|Echelon|21% ( | + | |{{TooltipSimple|Echelon|21% (1517/7360, HQ: 99-120)}}<br>{{TooltipSimple|Line Abreast|20% (1490/7360, HQ: 99-120)}}<br>{{TooltipSimple|''Phases: 1, 2, 3''|Samples: 462, 4, 172}} |
|Submarine Ka-Class/Flagship | |Submarine Ka-Class/Flagship | ||
|Submarine Ka-Class/Flagship | |Submarine Ka-Class/Flagship | ||
| Line 196: | Line 196: | ||
|H | |H | ||
|Defense | |Defense | ||
| − | |{{TooltipSimple|Diamond| | + | |{{TooltipSimple|Diamond|38% (253/673, HQ: 100-120)}}<br>{{TooltipSimple|''Phases: 1, 3''|Samples: 22, 66}} |
|Airfield Princess/VII | |Airfield Princess/VII | ||
|Airfield Princess/VI | |Airfield Princess/VI | ||
| Line 202: | Line 202: | ||
|H | |H | ||
|Defense | |Defense | ||
| − | |{{TooltipSimple|Diamond| | + | |{{TooltipSimple|Diamond|38% (257/673, HQ: 101-120)}}<br>{{TooltipSimple|''Phases: 1, 2, 3''|Samples: 12, 1, 76}} |
|Airfield Princess/VI | |Airfield Princess/VI | ||
|Airfield Princess/VI | |Airfield Princess/VI | ||
| Line 209: | Line 209: | ||
|H | |H | ||
|Defense | |Defense | ||
| − | |{{TooltipSimple|Diamond|11% ( | + | |{{TooltipSimple|Diamond|11% (76/673, HQ: 103-120)}}<br>{{TooltipSimple|''Phases: 1, 3''|Samples: 4, 17}} |
|Airfield Princess/VII | |Airfield Princess/VII | ||
|Airfield Princess/VI | |Airfield Princess/VI | ||
| Line 216: | Line 216: | ||
|H | |H | ||
|Defense | |Defense | ||
| − | |{{TooltipSimple|Diamond|11% ( | + | |{{TooltipSimple|Diamond|11% (76/673, HQ: 107-120)}}<br>{{TooltipSimple|''Phases: 1, 3''|Samples: 6, 21}} |
|Airfield Princess/VII | |Airfield Princess/VII | ||
|Airfield Princess/VII | |Airfield Princess/VII | ||
| Line 223: | Line 223: | ||
|H | |H | ||
|Defense | |Defense | ||
| − | |{{TooltipSimple|Diamond| | + | |{{TooltipSimple|Diamond|1% (6/673, HQ: 117)}} |
| + | |Airfield Princess/VII | ||
| + | |Airfield Princess/VII | ||
| + | |Airfield Princess/VI | ||
| + | |- | ||
| + | |H | ||
| + | |Defense | ||
| + | |{{TooltipSimple|Diamond|1% (5/673, HQ: 117-120)}} | ||
|Airfield Princess/VII | |Airfield Princess/VII | ||
|Airfield Princess/VII | |Airfield Princess/VII | ||
| Line 256: | Line 263: | ||
|J | |J | ||
|Normal | |Normal | ||
| − | |{{TooltipSimple|Line Ahead|60% ( | + | |{{TooltipSimple|Line Ahead|60% (3877/6427, HQ: 99-120)}}<br>{{TooltipSimple|Double Line|20% (1315/6427, HQ: 99-120)}}<br>{{TooltipSimple|Echelon|19% (1235/6427, HQ: 99-120)}}<br>{{TooltipSimple|''Phases: 1, 2, 3''|Samples: 946, 4, 372}} |
|Heavy Cruiser Ri-Class/Flagship | |Heavy Cruiser Ri-Class/Flagship | ||
|Light Cruiser Ho-Class/Flagship | |Light Cruiser Ho-Class/Flagship | ||
| Line 267: | Line 274: | ||
|K | |K | ||
|Defense | |Defense | ||
| − | |{{TooltipSimple|Diamond| | + | |{{TooltipSimple|Diamond|20% (32/164, HQ: 103-120)}}<br>{{TooltipSimple|''Phases: 1, 3''|Samples: 6, 7}} |
|Airfield Princess/VII | |Airfield Princess/VII | ||
|Airfield Princess/VI | |Airfield Princess/VI | ||
| Line 273: | Line 280: | ||
|K | |K | ||
|Defense | |Defense | ||
| − | |{{TooltipSimple|Diamond| | + | |{{TooltipSimple|Diamond|26% (43/164, HQ: 103-120)}}<br>{{TooltipSimple|''Phases: 1, 3''|Samples: 6, 11}} |
|Airfield Princess/VI | |Airfield Princess/VI | ||
|Airfield Princess/VI | |Airfield Princess/VI | ||
| Line 280: | Line 287: | ||
|K | |K | ||
|Defense | |Defense | ||
| − | |{{TooltipSimple|Diamond| | + | |{{TooltipSimple|Diamond|22% (36/164, HQ: 103-120)}}<br>{{TooltipSimple|''Phases: 1, 3''|Samples: 8, 6}} |
|Airfield Princess/VII | |Airfield Princess/VII | ||
|Airfield Princess/VI | |Airfield Princess/VI | ||
| Line 287: | Line 294: | ||
|K | |K | ||
|Defense | |Defense | ||
| − | |{{TooltipSimple|Diamond|21% ( | + | |{{TooltipSimple|Diamond|21% (35/164, HQ: 103-120)}}<br>{{TooltipSimple|''Phases: 1, 3''|Samples: 6, 12}} |
|Airfield Princess/VII | |Airfield Princess/VII | ||
|Airfield Princess/VII | |Airfield Princess/VII | ||
| Line 294: | Line 301: | ||
|K | |K | ||
|Defense | |Defense | ||
| − | |{{TooltipSimple|Diamond|10% ( | + | |{{TooltipSimple|Diamond|10% (17/164, HQ: 103-120)}}<br>{{TooltipSimple|''Phases: 1, 3''|Samples: 1, 10}} |
|Airfield Princess/VII | |Airfield Princess/VII | ||
|Airfield Princess/VII | |Airfield Princess/VII | ||
|Airfield Princess/VI | |Airfield Princess/VI | ||
| + | |- | ||
| + | |K | ||
| + | |Defense | ||
| + | |{{TooltipSimple|Diamond|1% (1/164, HQ: 117)}}<br>{{TooltipSimple|''Phases: 3''|Samples: 3}} | ||
| + | |Airfield Princess/VII | ||
| + | |Airfield Princess/VII | ||
| + | |Airfield Princess/VII | ||
}} | }} | ||
{{Map/Nodes|diff=Hard|name=深海任務部隊 水上打撃集団 | {{Map/Nodes|diff=Hard|name=深海任務部隊 水上打撃集団 | ||
|L | |L | ||
|Normal | |Normal | ||
| − | |{{TooltipSimple|Line Ahead|53% ( | + | |{{TooltipSimple|Line Ahead|53% (3061/5727, HQ: 99-120)}}<br>{{TooltipSimple|Double Line|21% (1208/5727, HQ: 99-120)}}<br>{{TooltipSimple|''Phases: 1, 2, 3''|Samples: 597, 2, 258}} |
|Battleship Ru-Class/Flagship | |Battleship Ru-Class/Flagship | ||
|Heavy Cruiser Ri-Class/Flagship | |Heavy Cruiser Ri-Class/Flagship | ||
| Line 312: | Line 326: | ||
|L | |L | ||
|Normal | |Normal | ||
| − | |{{TooltipSimple|Line Ahead| | + | |{{TooltipSimple|Line Ahead|25% (1458/5727, HQ: 99-120)}}<br>{{TooltipSimple|''Phases: 1, 3''|Samples: 281, 41}} |
|Battleship Ru-Class/Flagship | |Battleship Ru-Class/Flagship | ||
|Heavy Cruiser Ri-Class/Flagship | |Heavy Cruiser Ri-Class/Flagship | ||
| Line 325: | Line 339: | ||
|O | |O | ||
|Boss | |Boss | ||
| − | |{{TooltipSimple|Line Ahead|54% ( | + | |{{TooltipSimple|Line Ahead|54% (11316/20889, HQ: 95-120)}}<br>{{TooltipSimple|Double Line|29% (5978/20889, HQ: 95-120)}}<br>{{TooltipSimple|''Phases: 1, 2, 3''|Samples: 5764, 1, 400}} |
|Anti-Air Cruiser Princess/II | |Anti-Air Cruiser Princess/II | ||
|Heavy Cruiser Ri-Class/Flagship | |Heavy Cruiser Ri-Class/Flagship | ||
| Line 335: | Line 349: | ||
|O | |O | ||
|Boss/Final | |Boss/Final | ||
| − | |{{TooltipSimple|Line Ahead|17% ( | + | |{{TooltipSimple|Line Ahead|17% (3595/20889, HQ: 101-120)}}<br>{{TooltipSimple|''Phases: 1''|Samples: 1121}} |
|Anti-Air Cruiser Princess/Damaged II | |Anti-Air Cruiser Princess/Damaged II | ||
|Heavy Cruiser Ri-Class/Flagship | |Heavy Cruiser Ri-Class/Flagship | ||
| Line 346: | Line 360: | ||
|P | |P | ||
|Normal | |Normal | ||
| − | |{{TooltipSimple|Echelon|16% ( | + | |{{TooltipSimple|Echelon|16% (12448/77010, HQ: 100-120)}}<br>{{TooltipSimple|Line Abreast|16% (12682/77010, HQ: 100-120)}}<br>{{TooltipSimple|''Phases: 2, 3''|Samples: 3389, 4812}} |
|Submarine Ka-Class/Flagship | |Submarine Ka-Class/Flagship | ||
|Submarine Ka-Class/Elite | |Submarine Ka-Class/Elite | ||
| Line 354: | Line 368: | ||
|P | |P | ||
|Normal | |Normal | ||
| − | |{{TooltipSimple|Echelon|16% ( | + | |{{TooltipSimple|Echelon|16% (12539/77010, HQ: 100-120)}}<br>{{TooltipSimple|Line Abreast|16% (12414/77010, HQ: 100-120)}}<br>{{TooltipSimple|''Phases: 2, 3''|Samples: 3307, 4822}} |
|Submarine Ka-Class/Flagship | |Submarine Ka-Class/Flagship | ||
|Submarine Ka-Class/Flagship | |Submarine Ka-Class/Flagship | ||
| Line 362: | Line 376: | ||
|P | |P | ||
|Normal | |Normal | ||
| − | |{{TooltipSimple|Echelon|18% ( | + | |{{TooltipSimple|Echelon|18% (13521/77010, HQ: 100-120)}}<br>{{TooltipSimple|Line Abreast|17% (13406/77010, HQ: 100-120)}}<br>{{TooltipSimple|''Phases: 2, 3''|Samples: 1701, 6938}} |
|Submarine Ka-Class/Flagship | |Submarine Ka-Class/Flagship | ||
|Submarine Ka-Class/Flagship | |Submarine Ka-Class/Flagship | ||
| Line 372: | Line 386: | ||
|R | |R | ||
|Normal | |Normal | ||
| − | |{{TooltipSimple|Line Ahead| | + | |{{TooltipSimple|Line Ahead|57% (28271/49218, HQ: 101-120)}}<br>{{TooltipSimple|Double Line|23% (11157/49218, HQ: 101-120)}}<br>{{TooltipSimple|Vanguard|20% (9790/49218, HQ: 101-120)}}<br>{{TooltipSimple|''Phases: 2, 3''|Samples: 51, 15111}} |
|Destroyer Na-Class/Elite | |Destroyer Na-Class/Elite | ||
|Destroyer Ro-Class/Late Model Elite | |Destroyer Ro-Class/Late Model Elite | ||
| Line 383: | Line 397: | ||
|S | |S | ||
|Normal | |Normal | ||
| − | |{{TooltipSimple|Line Ahead|58% ( | + | |{{TooltipSimple|Line Ahead|58% (13348/22851, HQ: 100-120)}}<br>{{TooltipSimple|Double Line|25% (5768/22851, HQ: 100-120)}}<br>{{TooltipSimple|Vanguard|16% (3735/22851, HQ: 100-120)}}<br>{{TooltipSimple|''Phases: 2, 3''|Samples: 7812, 320}} |
|Destroyer Ro-Class/Late Model Elite | |Destroyer Ro-Class/Late Model Elite | ||
|Destroyer Ro-Class/Late Model | |Destroyer Ro-Class/Late Model | ||
| Line 394: | Line 408: | ||
|S1 | |S1 | ||
|Normal | |Normal | ||
| − | |{{TooltipSimple|Line Ahead|58% ( | + | |{{TooltipSimple|Line Ahead|58% (12803/21918, HQ: 100-120)}}<br>{{TooltipSimple|Double Line|25% (5518/21918, HQ: 100-120)}}<br>{{TooltipSimple|''Phases: 2, 3''|Samples: 6317, 266}} |
|Light Cruiser He-Class/Flagship | |Light Cruiser He-Class/Flagship | ||
|Heavy Cruiser Ne-Class/Elite | |Heavy Cruiser Ne-Class/Elite | ||
| Line 404: | Line 418: | ||
|S1 | |S1 | ||
|Normal | |Normal | ||
| − | |{{TooltipSimple|Line Ahead|16% ( | + | |{{TooltipSimple|Line Ahead|16% (3597/21918, HQ: 101-120)}}<br>{{TooltipSimple|''Phases: 2, 3''|Samples: 1260, 26}} |
|Light Cruiser He-Class/Flagship | |Light Cruiser He-Class/Flagship | ||
|Heavy Cruiser Ne-Class/Elite | |Heavy Cruiser Ne-Class/Elite | ||
| Line 415: | Line 429: | ||
|S2 | |S2 | ||
|Normal | |Normal | ||
| − | |{{TooltipSimple|Echelon| | + | |{{TooltipSimple|Echelon|23% (12/52, HQ: 107-120)}}<br>{{TooltipSimple|Line Abreast|15% (8/52, HQ: 106-120)}}<br>{{TooltipSimple|''Phases: 2, 3''|Samples: 10, 1}} |
|Submarine Ka-Class/Flagship | |Submarine Ka-Class/Flagship | ||
|Submarine Ka-Class/Elite | |Submarine Ka-Class/Elite | ||
| Line 423: | Line 437: | ||
|S2 | |S2 | ||
|Normal | |Normal | ||
| − | |{{TooltipSimple|Echelon|13% ( | + | |{{TooltipSimple|Echelon|13% (7/52, HQ: 115-120)}}<br>{{TooltipSimple|Line Abreast|15% (8/52, HQ: 117-120)}}<br>{{TooltipSimple|''Phases: 2''|Samples: 9}} |
|Submarine Ka-Class/Flagship | |Submarine Ka-Class/Flagship | ||
|Submarine Ka-Class/Flagship | |Submarine Ka-Class/Flagship | ||
| Line 431: | Line 445: | ||
|S2 | |S2 | ||
|Normal | |Normal | ||
| − | |{{TooltipSimple|Echelon| | + | |{{TooltipSimple|Echelon|13% (7/52, HQ: 117-120)}}<br>{{TooltipSimple|Line Abreast|19% (10/52, HQ: 117-120)}}<br>{{TooltipSimple|''Phases: 2''|Samples: 10}} |
|Submarine Ka-Class/Flagship | |Submarine Ka-Class/Flagship | ||
|Submarine Ka-Class/Flagship | |Submarine Ka-Class/Flagship | ||
| Line 440: | Line 454: | ||
|S3 | |S3 | ||
|Defense | |Defense | ||
| − | |{{TooltipSimple|Diamond|35% ( | + | |{{TooltipSimple|Diamond|35% (1333/3850, HQ: 101-120)}}<br>{{TooltipSimple|''Phases: 2, 3''|Samples: 259, 11}} |
|Seaplane Tender Princess/II | |Seaplane Tender Princess/II | ||
|Light Carrier Nu-Class/Elite III | |Light Carrier Nu-Class/Elite III | ||
| Line 450: | Line 464: | ||
|S3 | |S3 | ||
|Defense | |Defense | ||
| − | |{{TooltipSimple|Diamond|27% ( | + | |{{TooltipSimple|Diamond|27% (1026/3850, HQ: 101-120)}}<br>{{TooltipSimple|''Phases: 2, 3''|Samples: 239, 7}} |
|Seaplane Tender Princess/II | |Seaplane Tender Princess/II | ||
|Light Carrier Nu-Class/Kai Flagship II | |Light Carrier Nu-Class/Kai Flagship II | ||
| Line 460: | Line 474: | ||
|S3 | |S3 | ||
|Defense | |Defense | ||
| − | |{{TooltipSimple|Diamond|39% ( | + | |{{TooltipSimple|Diamond|39% (1491/3850, HQ: 101-120)}}<br>{{TooltipSimple|''Phases: 2, 3''|Samples: 320, 15}} |
|Seaplane Tender Princess/II | |Seaplane Tender Princess/II | ||
|Light Carrier Nu-Class/Elite III | |Light Carrier Nu-Class/Elite III | ||
| Line 473: | Line 487: | ||
|T2 | |T2 | ||
|Boss | |Boss | ||
| − | |{{TooltipSimple|Diamond|50% ( | + | |{{TooltipSimple|Diamond|50% (9471/18969, HQ: 100-120)}}<br>{{TooltipSimple|''Phases: 2, 3''|Samples: 2959, 109}} |
|Seaplane Tender Princess/II | |Seaplane Tender Princess/II | ||
|Light Carrier Nu-Class/Kai Flagship II | |Light Carrier Nu-Class/Kai Flagship II | ||
| Line 483: | Line 497: | ||
|T2 | |T2 | ||
|Boss | |Boss | ||
| − | |{{TooltipSimple|Diamond|30% ( | + | |{{TooltipSimple|Diamond|30% (5645/18969, HQ: 100-120)}}<br>{{TooltipSimple|''Phases: 2, 3''|Samples: 1783, 72}} |
|Seaplane Tender Princess/II | |Seaplane Tender Princess/II | ||
|Light Carrier Nu-Class/Elite III | |Light Carrier Nu-Class/Elite III | ||
| Line 493: | Line 507: | ||
|T2 | |T2 | ||
|Boss/Final | |Boss/Final | ||
| − | |{{TooltipSimple|Diamond|20% ( | + | |{{TooltipSimple|Diamond|20% (3853/18969, HQ: 101-120)}}<br>{{TooltipSimple|''Phases: 2, 3''|Samples: 1301, 51}} |
|Seaplane Tender Princess/II | |Seaplane Tender Princess/II | ||
|Light Carrier Nu-Class/Kai Flagship II | |Light Carrier Nu-Class/Kai Flagship II | ||
| Line 504: | Line 518: | ||
|U | |U | ||
|Defense | |Defense | ||
| − | |{{TooltipSimple|Diamond|48% ( | + | |{{TooltipSimple|Diamond|48% (21782/45079, HQ: 101-120)}}<br>{{TooltipSimple|''Phases: 3''|Samples: 6777}} |
|Airfield Princess/VI | |Airfield Princess/VI | ||
|Airfield Princess/Patrol Aircraft Deployment III | |Airfield Princess/Patrol Aircraft Deployment III | ||
| Line 512: | Line 526: | ||
|U | |U | ||
|Defense | |Defense | ||
| − | |{{TooltipSimple|Diamond|43% ( | + | |{{TooltipSimple|Diamond|43% (19271/45079, HQ: 101-120)}}<br>{{TooltipSimple|''Phases: 3''|Samples: 5843}} |
|Airfield Princess/VI | |Airfield Princess/VI | ||
|Airfield Princess/Patrol Aircraft Deployment III | |Airfield Princess/Patrol Aircraft Deployment III | ||
| Line 520: | Line 534: | ||
|U | |U | ||
|Defense | |Defense | ||
| − | |{{TooltipSimple|Diamond|9% ( | + | |{{TooltipSimple|Diamond|9% (4026/45079, HQ: 101-120)}}<br>{{TooltipSimple|''Phases: 3''|Samples: 1257}} |
|Airfield Princess/VI | |Airfield Princess/VI | ||
|Airfield Princess/Patrol Aircraft Deployment III | |Airfield Princess/Patrol Aircraft Deployment III | ||
| Line 529: | Line 543: | ||
|V | |V | ||
|Normal | |Normal | ||
| − | |{{TooltipSimple|Line Ahead| | + | |{{TooltipSimple|Line Ahead|54% (457/846, HQ: 104-120)}}<br>{{TooltipSimple|Double Line|20% (172/846, HQ: 104-120)}}<br>{{TooltipSimple|Echelon|26% (217/846, HQ: 104-120)}}<br>{{TooltipSimple|''Phases: 3''|Samples: 253}} |
|PT Imp Pack/IV | |PT Imp Pack/IV | ||
|PT Imp Pack/III | |PT Imp Pack/III | ||
| Line 540: | Line 554: | ||
|W | |W | ||
|Normal | |Normal | ||
| − | |{{TooltipSimple|Line Ahead|37% ( | + | |{{TooltipSimple|Line Ahead|37% (15319/40963, HQ: 101-120)}}<br>{{TooltipSimple|Double Line|26% (10784/40963, HQ: 101-120)}}<br>{{TooltipSimple|Vanguard|36% (14860/40963, HQ: 101-120)}}<br>{{TooltipSimple|''Phases: 3''|Samples: 12894}} |
|Light Cruiser He-Class/Flagship | |Light Cruiser He-Class/Flagship | ||
|Torpedo Cruiser Chi-Class/Flagship | |Torpedo Cruiser Chi-Class/Flagship | ||
| Line 552: | Line 566: | ||
|W2 | |W2 | ||
|Boss | |Boss | ||
| − | |{{TooltipSimple|Line Ahead| | + | |{{TooltipSimple|Line Ahead|39% (14227/36671, HQ: 101-120)}}<br>{{TooltipSimple|''Phases: 3''|Samples: 4292}} |
|New Battleship Princess/II | |New Battleship Princess/II | ||
|Battleship Ta-Class/Flagship | |Battleship Ta-Class/Flagship | ||
| Line 562: | Line 576: | ||
|W2 | |W2 | ||
|Boss | |Boss | ||
| − | |{{TooltipSimple|Line Ahead|38% ( | + | |{{TooltipSimple|Line Ahead|38% (14079/36671, HQ: 101-120)}}<br>{{TooltipSimple|''Phases: 3''|Samples: 4149}} |
|New Battleship Princess/II | |New Battleship Princess/II | ||
|Battleship Ta-Class/Flagship | |Battleship Ta-Class/Flagship | ||
| Line 572: | Line 586: | ||
|W2 | |W2 | ||
|Boss/Final | |Boss/Final | ||
| − | |{{TooltipSimple|Line Ahead| | + | |{{TooltipSimple|Line Ahead|23% (8365/36671, HQ: 101-120)}}<br>{{TooltipSimple|''Phases: 3''|Samples: 2406}} |
|New Battleship Princess/Damaged II | |New Battleship Princess/Damaged II | ||
|Battleship Ta-Class/Flagship | |Battleship Ta-Class/Flagship | ||
| Line 582: | Line 596: | ||
</div> | </div> | ||
|-|Medium= | |-|Medium= | ||
| − | {{Map/Image|page=Spring 2022 Event/E-2|{{Map/ImageNode|1|Medium|E-2|x=90|y=122}}{{Map/ImageNode|AB|Medium|E-2|x=55|y=118}}{{Map/ImageNode|A|Medium|E-2|x=124|y=171}}{{Map/ImageNode|B|Medium|E-2|x=208|y=130}}{{Map/ImageNode|C|Medium|E-2|x=245|y=97}}{{Map/ImageNode|D|Medium|E-2|x=314|y=91}}{{Map/ImageNode|E|Medium|E-2|x=387|y=123}}{{Map/ImageNode|F|Medium|E-2|x=379|y=172|drops=<table class="wikitable"><tr><th>Type</th><th>Ships</th></tr><tr><th>DE</th><td>{{Ship/Banner|small=true|Hirato}}</td></tr><tr><th>DD</th><td>{{Ship/Banner|small=true|Uranami}}</td></tr></table>}}{{Map/ImageNode|G|Medium|E-2|x=137|y=246}}{{Map/ImageNode|H|Medium|E-2|x=179|y=209}}{{Map/ImageNode|I|Medium|E-2|x=219|y=287}}{{Map/ImageNode|J|Medium|E-2|x=241|y=245}}{{Map/ImageNode|K|Medium|E-2|x=270|y=190}}{{Map/ImageNode|L|Medium|E-2|x=328|y=244|drops=<table class="wikitable"><tr><th>Type</th><th>Ships</th></tr><tr><th>DD</th><td>{{Ship/Banner|small=true|Harusame}}</td></tr></table>}}{{Map/ImageNode|M|Medium|E-2|x=370|y=212}}{{Map/ImageNode|N|Medium|E-2|x=419|y=200}}{{Map/ImageNode|O|Medium|E-2|x=402|y=240|drops=<table class="wikitable"><tr><th>Type</th><th>Ships</th></tr><tr><th>DE</th><td>{{Ship/Banner|small=true|Mikura}}</td></tr><tr><th>DD</th><td>{{Ship/Banner|small=true|Amagiri}}{{Ship/Banner|small=true|Harusame}}{{Ship/Banner|small=true|Sagiri}}<br>{{Ship/Banner|small=true|Tokitsukaze}}{{Ship/Banner|small=true|Uranami}}{{Ship/Banner|small=true| | + | {{Map/Image|page=Spring 2022 Event/E-2|{{Map/ImageNode|1|Medium|E-2|x=90|y=122}}{{Map/ImageNode|AB|Medium|E-2|x=55|y=118}}{{Map/ImageNode|A|Medium|E-2|x=124|y=171}}{{Map/ImageNode|B|Medium|E-2|x=208|y=130}}{{Map/ImageNode|C|Medium|E-2|x=245|y=97}}{{Map/ImageNode|D|Medium|E-2|x=314|y=91}}{{Map/ImageNode|E|Medium|E-2|x=387|y=123}}{{Map/ImageNode|F|Medium|E-2|x=379|y=172|drops=<table class="wikitable"><tr><th>Type</th><th>Ships</th></tr><tr><th>DE</th><td>{{Ship/Banner|small=true|Hirato}}</td></tr><tr><th>DD</th><td>{{Ship/Banner|small=true|Uranami}}</td></tr></table>}}{{Map/ImageNode|G|Medium|E-2|x=137|y=246}}{{Map/ImageNode|H|Medium|E-2|x=179|y=209}}{{Map/ImageNode|I|Medium|E-2|x=219|y=287}}{{Map/ImageNode|J|Medium|E-2|x=241|y=245}}{{Map/ImageNode|K|Medium|E-2|x=270|y=190}}{{Map/ImageNode|L|Medium|E-2|x=328|y=244|drops=<table class="wikitable"><tr><th>Type</th><th>Ships</th></tr><tr><th>DD</th><td>{{Ship/Banner|small=true|Harusame}}</td></tr></table>}}{{Map/ImageNode|M|Medium|E-2|x=370|y=212}}{{Map/ImageNode|N|Medium|E-2|x=419|y=200}}{{Map/ImageNode|O|Medium|E-2|x=402|y=240|drops=<table class="wikitable"><tr><th>Type</th><th>Ships</th></tr><tr><th>DE</th><td>{{Ship/Banner|small=true|Mikura}}</td></tr><tr><th>DD</th><td>{{Ship/Banner|small=true|Amagiri}}{{Ship/Banner|small=true|Harusame}}{{Ship/Banner|small=true|Sagiri}}<br>{{Ship/Banner|small=true|Tokitsukaze}}{{Ship/Banner|small=true|Uranami}}{{Ship/Banner|small=true|Usugumo}}<br>{{Ship/Banner|small=true|Yamakaze}}</td></tr><tr><th>SSV</th><td>{{Ship/Banner|small=true|I-400}}{{Ship/Banner|small=true|I-401}}</td></tr><tr><th>AV</th><td>{{Ship/Banner|small=true|Commandant Teste}}</td></tr></table>}}{{Map/ImageNode|P|Medium|E-2|x=348|y=289}}{{Map/ImageNode|Q|Medium|E-2|x=448|y=237}}{{Map/ImageNode|R|Medium|E-2|x=503|y=246|drops=<table class="wikitable"><tr><th>Type</th><th>Ships</th></tr><tr><th>DE</th><td>{{Ship/Banner|small=true|Hirato}}{{Ship/Banner|small=true|Mikura}}</td></tr><tr><th>DD</th><td>{{Ship/Banner|small=true|Harusame}}{{Ship/Banner|small=true|Uranami}}</td></tr></table>}}{{Map/ImageNode|S1|Medium|E-2|x=520|y=172|drops=<table class="wikitable"><tr><th>Type</th><th>Ships</th></tr><tr><th>DE</th><td>{{Ship/Banner|small=true|Hirato}}{{Ship/Banner|small=true|Mikura}}</td></tr><tr><th>DD</th><td>{{Ship/Banner|small=true|Arashi}}{{Ship/Banner|small=true|Hagikaze}}{{Ship/Banner|small=true|Harusame}}<br>{{Ship/Banner|small=true|Kawakaze}}{{Ship/Banner|small=true|Sagiri}}{{Ship/Banner|small=true|Uranami}}<br>{{Ship/Banner|small=true|Yamakaze}}</td></tr></table>}}{{Map/ImageNode|S2|Medium|E-2|x=456|y=180}}{{Map/ImageNode|S3|Medium|E-2|x=499|y=112}}{{Map/ImageNode|Start 2|Medium|E-2|x=223|y=188}}{{Map/ImageNode|S|Medium|E-2|x=537|y=218|drops=<table class="wikitable"><tr><th>Type</th><th>Ships</th></tr><tr><th>DD</th><td>{{Ship/Banner|small=true|Harusame}}{{Ship/Banner|small=true|Uranami}}</td></tr></table>}}{{Map/ImageNode|T1|Medium|E-2|x=604|y=155}}{{Map/ImageNode|T2|Medium|E-2|x=559|y=114|drops=<table class="wikitable"><tr><th>Type</th><th>Ships</th></tr><tr><th>DE</th><td>{{Ship/Banner|small=true|Hirato}}{{Ship/Banner|small=true|Mikura}}</td></tr><tr><th>DD</th><td>{{Ship/Banner|small=true|Amagiri}}{{Ship/Banner|small=true|Arashi}}{{Ship/Banner|small=true|Hagikaze}}<br>{{Ship/Banner|small=true|Harusame}}{{Ship/Banner|small=true|Kawakaze}}{{Ship/Banner|small=true|Sagiri}}<br>{{Ship/Banner|small=true|Tokitsukaze}}{{Ship/Banner|small=true|Umikaze}}{{Ship/Banner|small=true|Uranami}}<br>{{Ship/Banner|small=true|Usugumo}}{{Ship/Banner|small=true|Yamakaze}}</td></tr><tr><th>CV</th><td>{{Ship/Banner|small=true|Hornet}}</td></tr><tr><th>SSV</th><td>{{Ship/Banner|small=true|I-400}}{{Ship/Banner|small=true|I-401}}</td></tr><tr><th>AV</th><td>{{Ship/Banner|small=true|Commandant Teste}}{{Ship/Banner|small=true|Mizuho}}</td></tr><tr><th>AS</th><td>{{Ship/Banner|small=true|Jingei}}</td></tr></table>}}{{Map/ImageNode|T|Medium|E-2|x=571|y=194}}{{Map/ImageNode|U|Medium|E-2|x=537|y=249}}{{Map/ImageNode|V|Medium|E-2|x=564|y=221}}{{Map/ImageNode|W1|Medium|E-2|x=583|y=291}}{{Map/ImageNode|W2|Medium|E-2|x=613|y=254|drops=<table class="wikitable"><tr><th>Type</th><th>Ships</th></tr><tr><th>DE</th><td>{{Ship/Banner|small=true|Tsushima}}{{Ship/Banner|small=true|Yashiro}}</td></tr><tr><th>DD</th><td>{{Ship/Banner|small=true|Makinami}}{{Ship/Banner|small=true|Teruzuki}}</td></tr><tr><th>SS</th><td>{{Ship/Banner|small=true|I-201}}{{Ship/Banner|small=true|I-203}}</td></tr><tr><th>AV</th><td>{{Ship/Banner|small=true|Akitsushima}}{{Ship/Banner|small=true|Mizuho}}{{Ship/Banner|small=true|Nisshin}}<br></td></tr><tr><th>AS</th><td>{{Ship/Banner|small=true|Chougei}}</td></tr></table>}}{{Map/ImageNode|W|Medium|E-2|x=573|y=251|drops=<table class="wikitable"><tr><th>Type</th><th>Ships</th></tr><tr><th>DE</th><td>{{Ship/Banner|small=true|Hirato}}{{Ship/Banner|small=true|Mikura}}</td></tr><tr><th>DD</th><td>{{Ship/Banner|small=true|Amagiri}}{{Ship/Banner|small=true|Arashi}}{{Ship/Banner|small=true|Hagikaze}}<br>{{Ship/Banner|small=true|Harusame}}{{Ship/Banner|small=true|Kawakaze}}{{Ship/Banner|small=true|Sagiri}}<br>{{Ship/Banner|small=true|Tokitsukaze}}{{Ship/Banner|small=true|Umikaze}}{{Ship/Banner|small=true|Uranami}}<br>{{Ship/Banner|small=true|Usugumo}}{{Ship/Banner|small=true|Yamakaze}}</td></tr><tr><th>SSV</th><td>{{Ship/Banner|small=true|I-400}}{{Ship/Banner|small=true|I-401}}</td></tr><tr><th>AV</th><td>{{Ship/Banner|small=true|Mizuho}}</td></tr><tr><th>AS</th><td>{{Ship/Banner|small=true|Jingei}}</td></tr></table>}}}} |
<div class="map-nodes"> | <div class="map-nodes"> | ||
{{Map/Nodes|diff=Medium|name= | {{Map/Nodes|diff=Medium|name= | ||
|AB | |AB | ||
|Raid | |Raid | ||
| − | |{{TooltipSimple|Diamond| | + | |{{TooltipSimple|Diamond|12% (430/3654)}} |
|Airfield Princess/VI | |Airfield Princess/VI | ||
|Airfield Princess/V | |Airfield Princess/V | ||
| Line 593: | Line 607: | ||
|AB | |AB | ||
|Raid | |Raid | ||
| − | |{{TooltipSimple|Diamond|40% ( | + | |{{TooltipSimple|Diamond|40% (1460/3654)}} |
|Airfield Princess/VI | |Airfield Princess/VI | ||
|Airfield Princess/VI | |Airfield Princess/VI | ||
| Line 599: | Line 613: | ||
|AB | |AB | ||
|Raid | |Raid | ||
| − | |{{TooltipSimple|Diamond|34% ( | + | |{{TooltipSimple|Diamond|34% (1248/3654)}} |
|Airfield Princess/VI | |Airfield Princess/VI | ||
|Airfield Princess/V | |Airfield Princess/V | ||
| Line 606: | Line 620: | ||
|AB | |AB | ||
|Raid | |Raid | ||
| − | |{{TooltipSimple|Diamond| | + | |{{TooltipSimple|Diamond|14% (516/3654)}} |
|Airfield Princess/VI | |Airfield Princess/VI | ||
|Airfield Princess/VI | |Airfield Princess/VI | ||
| Line 615: | Line 629: | ||
|B | |B | ||
|Defense | |Defense | ||
| − | |{{TooltipSimple|Diamond| | + | |{{TooltipSimple|Diamond|24% (1147/4858, HQ: 79-120)}}<br>{{TooltipSimple|''Phases: 1, 2, 3''|Samples: 454, 8, 20}} |
|Airfield Princess/VI | |Airfield Princess/VI | ||
|Airfield Princess/V | |Airfield Princess/V | ||
| Line 621: | Line 635: | ||
|B | |B | ||
|Defense | |Defense | ||
| − | |{{TooltipSimple|Diamond|23% ( | + | |{{TooltipSimple|Diamond|23% (1132/4858, HQ: 79-120)}}<br>{{TooltipSimple|''Phases: 1, 2, 3''|Samples: 382, 8, 26}} |
|Airfield Princess/VI | |Airfield Princess/VI | ||
|Airfield Princess/VI | |Airfield Princess/VI | ||
| Line 627: | Line 641: | ||
|B | |B | ||
|Defense | |Defense | ||
| − | |{{TooltipSimple|Diamond|7% ( | + | |{{TooltipSimple|Diamond|7% (329/4858, HQ: 99-120)}}<br>{{TooltipSimple|''Phases: 1''|Samples: 107}} |
|Airfield Princess/VII | |Airfield Princess/VII | ||
|Airfield Princess/VI | |Airfield Princess/VI | ||
| Line 633: | Line 647: | ||
|B | |B | ||
|Defense | |Defense | ||
| − | |{{TooltipSimple|Diamond|25% ( | + | |{{TooltipSimple|Diamond|25% (1214/4858, HQ: 79-120)}}<br>{{TooltipSimple|''Phases: 1, 2, 3''|Samples: 445, 3, 19}} |
|Airfield Princess/VI | |Airfield Princess/VI | ||
|Airfield Princess/V | |Airfield Princess/V | ||
| Line 640: | Line 654: | ||
|B | |B | ||
|Defense | |Defense | ||
| − | |{{TooltipSimple|Diamond| | + | |{{TooltipSimple|Diamond|21% (1036/4858, HQ: 79-120)}}<br>{{TooltipSimple|''Phases: 1, 3''|Samples: 394, 23}} |
|Airfield Princess/VI | |Airfield Princess/VI | ||
|Airfield Princess/VI | |Airfield Princess/VI | ||
| Line 648: | Line 662: | ||
|C | |C | ||
|Normal | |Normal | ||
| − | |{{TooltipSimple|Echelon|11% ( | + | |{{TooltipSimple|Echelon|11% (463/4065, HQ: 99-120)}}<br>{{TooltipSimple|Line Abreast|12% (490/4065, HQ: 100-120)}}<br>{{TooltipSimple|''Phases: 1, 3''|Samples: 373, 15}} |
|Submarine Ka-Class/Elite | |Submarine Ka-Class/Elite | ||
|Submarine Ka-Class | |Submarine Ka-Class | ||
| Line 655: | Line 669: | ||
|C | |C | ||
|Normal | |Normal | ||
| − | |{{TooltipSimple|Echelon|16% ( | + | |{{TooltipSimple|Echelon|16% (663/4065, HQ: 79-120)}}<br>{{TooltipSimple|Line Abreast|16% (665/4065, HQ: 79-120)}}<br>{{TooltipSimple|''Phases: 1, 2, 3''|Samples: 485, 3, 14}} |
|Submarine Ka-Class/Elite | |Submarine Ka-Class/Elite | ||
|Submarine Ka-Class/Elite | |Submarine Ka-Class/Elite | ||
| Line 662: | Line 676: | ||
|C | |C | ||
|Normal | |Normal | ||
| − | |{{TooltipSimple|Echelon|23% ( | + | |{{TooltipSimple|Echelon|23% (919/4065, HQ: 99-120)}}<br>{{TooltipSimple|Line Abreast|21% (865/4065, HQ: 99-120)}}<br>{{TooltipSimple|''Phases: 1, 2, 3''|Samples: 656, 1, 13}} |
|Submarine Ka-Class/Flagship | |Submarine Ka-Class/Flagship | ||
|Submarine Ka-Class/Elite | |Submarine Ka-Class/Elite | ||
| Line 670: | Line 684: | ||
|D | |D | ||
|Defense | |Defense | ||
| − | |{{TooltipSimple|Diamond|16% ( | + | |{{TooltipSimple|Diamond|16% (63/395, HQ: 100-120)}}<br>{{TooltipSimple|''Phases: 1, 3''|Samples: 30, 3}} |
|Airfield Princess/VI | |Airfield Princess/VI | ||
|Airfield Princess/V | |Airfield Princess/V | ||
| Line 676: | Line 690: | ||
|D | |D | ||
|Defense | |Defense | ||
| − | |{{TooltipSimple|Diamond|14% ( | + | |{{TooltipSimple|Diamond|14% (56/395, HQ: 100-120)}}<br>{{TooltipSimple|''Phases: 1, 3''|Samples: 38, 1}} |
|Airfield Princess/VI | |Airfield Princess/VI | ||
|Airfield Princess/VI | |Airfield Princess/VI | ||
| Line 682: | Line 696: | ||
|D | |D | ||
|Defense | |Defense | ||
| − | |{{TooltipSimple|Diamond|25% ( | + | |{{TooltipSimple|Diamond|25% (97/395, HQ: 99-120)}}<br>{{TooltipSimple|''Phases: 1, 3''|Samples: 25, 2}} |
|Airfield Princess/VII | |Airfield Princess/VII | ||
|Airfield Princess/VI | |Airfield Princess/VI | ||
| Line 688: | Line 702: | ||
|D | |D | ||
|Defense | |Defense | ||
| − | |{{TooltipSimple|Diamond|20% ( | + | |{{TooltipSimple|Diamond|20% (79/395, HQ: 99-120)}}<br>{{TooltipSimple|''Phases: 1, 3''|Samples: 34, 2}} |
|Airfield Princess/VI | |Airfield Princess/VI | ||
|Airfield Princess/V | |Airfield Princess/V | ||
| Line 695: | Line 709: | ||
|D | |D | ||
|Defense | |Defense | ||
| − | |{{TooltipSimple|Diamond| | + | |{{TooltipSimple|Diamond|25% (100/395, HQ: 100-120)}}<br>{{TooltipSimple|''Phases: 1, 3''|Samples: 22, 1}} |
|Airfield Princess/VI | |Airfield Princess/VI | ||
|Airfield Princess/VI | |Airfield Princess/VI | ||
| Line 703: | Line 717: | ||
|E | |E | ||
|Normal | |Normal | ||
| − | |{{TooltipSimple|Line Ahead| | + | |{{TooltipSimple|Line Ahead|64% (14/22, HQ: 100-112)}}<br>{{TooltipSimple|Double Line|23% (5/22, HQ: 100-112)}}<br>{{TooltipSimple|Echelon|14% (3/22, HQ: 100-112)}}<br>{{TooltipSimple|''Phases: 1''|Samples: 1}} |
|Light Cruiser Ho-Class/Flagship | |Light Cruiser Ho-Class/Flagship | ||
|Torpedo Cruiser Chi-Class/Elite | |Torpedo Cruiser Chi-Class/Elite | ||
| Line 714: | Line 728: | ||
|F | |F | ||
|Normal | |Normal | ||
| − | |{{TooltipSimple|Line Ahead|51% ( | + | |{{TooltipSimple|Line Ahead|51% (1687/3329, HQ: 79-120)}}<br>{{TooltipSimple|Double Line|20% (668/3329, HQ: 79-120)}}<br>{{TooltipSimple|Vanguard|29% (974/3329, HQ: 79-120)}}<br>{{TooltipSimple|''Phases: 1, 2, 3''|Samples: 1379, 2, 20}} |
|Heavy Cruiser Ri-Class/Elite | |Heavy Cruiser Ri-Class/Elite | ||
|Heavy Cruiser Ri-Class/Elite | |Heavy Cruiser Ri-Class/Elite | ||
| Line 725: | Line 739: | ||
|G | |G | ||
|Normal | |Normal | ||
| − | |{{TooltipSimple|Echelon| | + | |{{TooltipSimple|Echelon|14% (53/388, HQ: 102-120)}}<br>{{TooltipSimple|Line Abreast|13% (52/388, HQ: 99-120)}}<br>{{TooltipSimple|''Phases: 1, 2, 3''|Samples: 30, 1, 12}} |
|Submarine Ka-Class/Elite | |Submarine Ka-Class/Elite | ||
|Submarine Ka-Class | |Submarine Ka-Class | ||
| Line 732: | Line 746: | ||
|G | |G | ||
|Normal | |Normal | ||
| − | |{{TooltipSimple|Echelon| | + | |{{TooltipSimple|Echelon|15% (60/388, HQ: 105-120)}}<br>{{TooltipSimple|Line Abreast|19% (73/388, HQ: 99-120)}}<br>{{TooltipSimple|''Phases: 1, 2, 3''|Samples: 17, 2, 8}} |
|Submarine Ka-Class/Elite | |Submarine Ka-Class/Elite | ||
|Submarine Ka-Class/Elite | |Submarine Ka-Class/Elite | ||
| Line 739: | Line 753: | ||
|G | |G | ||
|Normal | |Normal | ||
| − | |{{TooltipSimple|Echelon| | + | |{{TooltipSimple|Echelon|19% (74/388, HQ: 103-120)}}<br>{{TooltipSimple|Line Abreast|20% (76/388, HQ: 103-120)}}<br>{{TooltipSimple|''Phases: 1, 2, 3''|Samples: 32, 2, 6}} |
|Submarine Ka-Class/Flagship | |Submarine Ka-Class/Flagship | ||
|Submarine Ka-Class/Elite | |Submarine Ka-Class/Elite | ||
| Line 747: | Line 761: | ||
|H | |H | ||
|Defense | |Defense | ||
| − | |{{TooltipSimple|Diamond| | + | |{{TooltipSimple|Diamond|35% (30/85, HQ: 99-120)}}<br>{{TooltipSimple|''Phases: 1, 3''|Samples: 10, 10}} |
|Airfield Princess/VI | |Airfield Princess/VI | ||
|Airfield Princess/V | |Airfield Princess/V | ||
| Line 753: | Line 767: | ||
|H | |H | ||
|Defense | |Defense | ||
| − | |{{TooltipSimple|Diamond|26% ( | + | |{{TooltipSimple|Diamond|26% (22/85, HQ: 105-120)}}<br>{{TooltipSimple|''Phases: 1, 3''|Samples: 3, 7}} |
|Airfield Princess/VI | |Airfield Princess/VI | ||
|Airfield Princess/VI | |Airfield Princess/VI | ||
| Line 759: | Line 773: | ||
|H | |H | ||
|Defense | |Defense | ||
| − | |{{TooltipSimple|Diamond|16% ( | + | |{{TooltipSimple|Diamond|16% (14/85, HQ: 103-113)}}<br>{{TooltipSimple|''Phases: 1, 3''|Samples: 7, 1}} |
|Airfield Princess/VI | |Airfield Princess/VI | ||
|Airfield Princess/V | |Airfield Princess/V | ||
| Line 766: | Line 780: | ||
|H | |H | ||
|Defense | |Defense | ||
| − | |{{TooltipSimple|Diamond|22% ( | + | |{{TooltipSimple|Diamond|22% (19/85, HQ: 99-116)}}<br>{{TooltipSimple|''Phases: 1, 3''|Samples: 5, 1}} |
|Airfield Princess/VI | |Airfield Princess/VI | ||
|Airfield Princess/VI | |Airfield Princess/VI | ||
| Line 782: | Line 796: | ||
|J | |J | ||
|Normal | |Normal | ||
| − | |{{TooltipSimple|Line Ahead| | + | |{{TooltipSimple|Line Ahead|65% (209/321, HQ: 102-120)}}<br>{{TooltipSimple|Double Line|15% (47/321, HQ: 103-120)}}<br>{{TooltipSimple|Echelon|20% (65/321, HQ: 103-119)}}<br>{{TooltipSimple|''Phases: 1, 2, 3''|Samples: 74, 3, 12}} |
|Heavy Cruiser Ri-Class/Elite | |Heavy Cruiser Ri-Class/Elite | ||
|Light Cruiser Ho-Class/Elite | |Light Cruiser Ho-Class/Elite | ||
| Line 799: | Line 813: | ||
|K | |K | ||
|Defense | |Defense | ||
| − | |{{TooltipSimple|Diamond|23% (6/26, HQ: 112-117)}}<br>{{TooltipSimple|''Phases: 1''|Samples: 3}} | + | |{{TooltipSimple|Diamond|23% (6/26, HQ: 112-117)}}<br>{{TooltipSimple|''Phases: 1, 3''|Samples: 3, 2}} |
|Airfield Princess/VI | |Airfield Princess/VI | ||
|Airfield Princess/VI | |Airfield Princess/VI | ||
| Line 818: | Line 832: | ||
|K | |K | ||
|Defense | |Defense | ||
| − | |{{TooltipSimple|Diamond|12% (3/26, HQ: 111-112)}}<br>{{TooltipSimple|''Phases: 1''|Samples: 1}} | + | |{{TooltipSimple|Diamond|12% (3/26, HQ: 111-112)}}<br>{{TooltipSimple|''Phases: 1, 3''|Samples: 1, 1}} |
|Airfield Princess/VI | |Airfield Princess/VI | ||
|Airfield Princess/VI | |Airfield Princess/VI | ||
| Line 826: | Line 840: | ||
|L | |L | ||
|Normal | |Normal | ||
| − | |{{TooltipSimple|Line Ahead| | + | |{{TooltipSimple|Line Ahead|57% (155/273, HQ: 103-120)}}<br>{{TooltipSimple|Double Line|26% (71/273, HQ: 103-120)}}<br>{{TooltipSimple|''Phases: 1, 2, 3''|Samples: 43, 2, 8}} |
|Battleship Ru-Class/Flagship | |Battleship Ru-Class/Flagship | ||
|Heavy Cruiser Ri-Class/Elite | |Heavy Cruiser Ri-Class/Elite | ||
| Line 836: | Line 850: | ||
|L | |L | ||
|Normal | |Normal | ||
| − | |{{TooltipSimple|Line Ahead|17% ( | + | |{{TooltipSimple|Line Ahead|17% (47/273, HQ: 103-119)}}<br>{{TooltipSimple|''Phases: 1, 3''|Samples: 20, 1}} |
|Battleship Ru-Class/Flagship | |Battleship Ru-Class/Flagship | ||
|Heavy Cruiser Ri-Class/Elite | |Heavy Cruiser Ri-Class/Elite | ||
| Line 849: | Line 863: | ||
|O | |O | ||
|Boss | |Boss | ||
| − | |{{TooltipSimple|Line Ahead|49% ( | + | |{{TooltipSimple|Line Ahead|49% (1397/2839, HQ: 99-120)}}<br>{{TooltipSimple|Double Line|29% (811/2839, HQ: 99-120)}}<br>{{TooltipSimple|''Phases: 1, 2, 3''|Samples: 848, 3, 23}} |
|Anti-Air Cruiser Princess | |Anti-Air Cruiser Princess | ||
|Heavy Cruiser Ri-Class/Elite | |Heavy Cruiser Ri-Class/Elite | ||
| Line 859: | Line 873: | ||
|O | |O | ||
|Boss/Final | |Boss/Final | ||
| − | |{{TooltipSimple|Line Ahead|22% ( | + | |{{TooltipSimple|Line Ahead|22% (631/2839, HQ: 99-120)}}<br>{{TooltipSimple|''Phases: 1''|Samples: 196}} |
|Anti-Air Cruiser Princess/Damaged | |Anti-Air Cruiser Princess/Damaged | ||
|Heavy Cruiser Ri-Class/Elite | |Heavy Cruiser Ri-Class/Elite | ||
| Line 870: | Line 884: | ||
|P | |P | ||
|Normal | |Normal | ||
| − | |{{TooltipSimple|Echelon|13% ( | + | |{{TooltipSimple|Echelon|13% (1473/11714, HQ: 99-120)}}<br>{{TooltipSimple|Line Abreast|13% (1486/11714, HQ: 99-120)}}<br>{{TooltipSimple|''Phases: 2, 3''|Samples: 400, 523}} |
|Submarine Ka-Class/Elite | |Submarine Ka-Class/Elite | ||
|Submarine Ka-Class/Elite | |Submarine Ka-Class/Elite | ||
| Line 877: | Line 891: | ||
|P | |P | ||
|Normal | |Normal | ||
| − | |{{TooltipSimple|Echelon|22% ( | + | |{{TooltipSimple|Echelon|22% (2540/11714, HQ: 99-120)}}<br>{{TooltipSimple|Line Abreast|20% (2309/11714, HQ: 99-120)}}<br>{{TooltipSimple|''Phases: 2, 3''|Samples: 658, 904}} |
|Submarine Ka-Class/Elite | |Submarine Ka-Class/Elite | ||
|Submarine Ka-Class/Elite | |Submarine Ka-Class/Elite | ||
| Line 884: | Line 898: | ||
|P | |P | ||
|Normal | |Normal | ||
| − | |{{TooltipSimple|Echelon| | + | |{{TooltipSimple|Echelon|17% (2014/11714, HQ: 99-120)}}<br>{{TooltipSimple|Line Abreast|16% (1892/11714, HQ: 99-120)}}<br>{{TooltipSimple|''Phases: 2, 3''|Samples: 247, 1158}} |
|Submarine Ka-Class/Flagship | |Submarine Ka-Class/Flagship | ||
|Submarine Ka-Class/Elite | |Submarine Ka-Class/Elite | ||
| Line 894: | Line 908: | ||
|R | |R | ||
|Normal | |Normal | ||
| − | |{{TooltipSimple|Line Ahead|58% ( | + | |{{TooltipSimple|Line Ahead|58% (4359/7537, HQ: 99-120)}}<br>{{TooltipSimple|Double Line|23% (1736/7537, HQ: 100-120)}}<br>{{TooltipSimple|Vanguard|19% (1442/7537, HQ: 99-120)}}<br>{{TooltipSimple|''Phases: 2, 3''|Samples: 2, 2359}} |
|Destroyer Ro-Class/Late Model Elite | |Destroyer Ro-Class/Late Model Elite | ||
|Destroyer Ro-Class/Late Model | |Destroyer Ro-Class/Late Model | ||
| Line 905: | Line 919: | ||
|S | |S | ||
|Normal | |Normal | ||
| − | |{{TooltipSimple|Line Ahead|58% ( | + | |{{TooltipSimple|Line Ahead|58% (2131/3697, HQ: 99-120)}}<br>{{TooltipSimple|Double Line|26% (961/3697, HQ: 99-120)}}<br>{{TooltipSimple|Vanguard|16% (605/3697, HQ: 99-120)}}<br>{{TooltipSimple|''Phases: 2, 3''|Samples: 1254, 110}} |
|Destroyer Ro-Class/Late Model Elite | |Destroyer Ro-Class/Late Model Elite | ||
|Destroyer Ro-Class/Late Model | |Destroyer Ro-Class/Late Model | ||
| Line 916: | Line 930: | ||
|S1 | |S1 | ||
|Normal | |Normal | ||
| − | |{{TooltipSimple|Line Ahead| | + | |{{TooltipSimple|Line Ahead|58% (2069/3543, HQ: 99-120)}}<br>{{TooltipSimple|Double Line|26% (937/3543, HQ: 99-120)}}<br>{{TooltipSimple|''Phases: 2, 3''|Samples: 1015, 93}} |
|Light Cruiser He-Class/Flagship | |Light Cruiser He-Class/Flagship | ||
|Heavy Cruiser Ne-Class | |Heavy Cruiser Ne-Class | ||
| Line 926: | Line 940: | ||
|S1 | |S1 | ||
|Normal | |Normal | ||
| − | |{{TooltipSimple|Line Ahead|15% ( | + | |{{TooltipSimple|Line Ahead|15% (537/3543, HQ: 99-120)}}<br>{{TooltipSimple|''Phases: 2, 3''|Samples: 204, 10}} |
|Light Cruiser He-Class/Flagship | |Light Cruiser He-Class/Flagship | ||
|Heavy Cruiser Ne-Class/Elite | |Heavy Cruiser Ne-Class/Elite | ||
| Line 937: | Line 951: | ||
|S2 | |S2 | ||
|Normal | |Normal | ||
| − | |{{TooltipSimple|Echelon| | + | |{{TooltipSimple|Echelon|22% (2/9, HQ: 107-112)}}<br>{{TooltipSimple|Line Abreast|11% (1/9, HQ: 112)}}<br>{{TooltipSimple|''Phases: 2''|Samples: 2}} |
|Submarine Ka-Class/Elite | |Submarine Ka-Class/Elite | ||
|Submarine Ka-Class/Elite | |Submarine Ka-Class/Elite | ||
| Line 944: | Line 958: | ||
|S2 | |S2 | ||
|Normal | |Normal | ||
| − | |{{TooltipSimple|Echelon| | + | |{{TooltipSimple|Echelon|33% (3/9, HQ: 109-112)}}<br>{{TooltipSimple|Line Abreast|11% (1/9, HQ: 112)}}<br>{{TooltipSimple|''Phases: 2, 3''|Samples: 3, 1}} |
|Submarine Ka-Class/Elite | |Submarine Ka-Class/Elite | ||
|Submarine Ka-Class/Elite | |Submarine Ka-Class/Elite | ||
| Line 951: | Line 965: | ||
|S2 | |S2 | ||
|Normal | |Normal | ||
| − | |{{TooltipSimple|Echelon| | + | |{{TooltipSimple|Echelon|11% (1/9, HQ: 112)}}<br>{{TooltipSimple|Line Abreast|11% (1/9, HQ: 112)}}<br>{{TooltipSimple|''Phases: 2''|Samples: 2}} |
|Submarine Ka-Class/Flagship | |Submarine Ka-Class/Flagship | ||
|Submarine Ka-Class/Elite | |Submarine Ka-Class/Elite | ||
| Line 960: | Line 974: | ||
|S3 | |S3 | ||
|Defense | |Defense | ||
| − | |{{TooltipSimple|Diamond|35% ( | + | |{{TooltipSimple|Diamond|35% (183/528, HQ: 99-120)}}<br>{{TooltipSimple|''Phases: 2, 3''|Samples: 59, 4}} |
|Seaplane Tender Princess | |Seaplane Tender Princess | ||
|Light Carrier Nu-Class/Elite III | |Light Carrier Nu-Class/Elite III | ||
| Line 970: | Line 984: | ||
|S3 | |S3 | ||
|Defense | |Defense | ||
| − | |{{TooltipSimple|Diamond|29% ( | + | |{{TooltipSimple|Diamond|29% (152/528, HQ: 99-120)}}<br>{{TooltipSimple|''Phases: 2, 3''|Samples: 35, 4}} |
|Seaplane Tender Princess | |Seaplane Tender Princess | ||
|Light Carrier Nu-Class/Kai Flagship II | |Light Carrier Nu-Class/Kai Flagship II | ||
| Line 980: | Line 994: | ||
|S3 | |S3 | ||
|Defense | |Defense | ||
| − | |{{TooltipSimple|Diamond| | + | |{{TooltipSimple|Diamond|37% (193/528, HQ: 99-120)}}<br>{{TooltipSimple|''Phases: 2, 3''|Samples: 65, 2}} |
|Seaplane Tender Princess | |Seaplane Tender Princess | ||
|Light Carrier Nu-Class/Elite III | |Light Carrier Nu-Class/Elite III | ||
| Line 993: | Line 1,007: | ||
|T2 | |T2 | ||
|Boss | |Boss | ||
| − | |{{TooltipSimple|Diamond|20% ( | + | |{{TooltipSimple|Diamond|20% (595/2965, HQ: 99-120)}}<br>{{TooltipSimple|''Phases: 2, 3''|Samples: 184, 13}} |
|Seaplane Tender Princess | |Seaplane Tender Princess | ||
|Light Carrier Nu-Class/Kai Flagship II | |Light Carrier Nu-Class/Kai Flagship II | ||
| Line 1,003: | Line 1,017: | ||
|T2 | |T2 | ||
|Boss | |Boss | ||
| − | |{{TooltipSimple|Diamond|30% ( | + | |{{TooltipSimple|Diamond|30% (897/2965, HQ: 99-120)}}<br>{{TooltipSimple|''Phases: 2, 3''|Samples: 259, 24}} |
|Seaplane Tender Princess | |Seaplane Tender Princess | ||
|Light Carrier Nu-Class/Elite III | |Light Carrier Nu-Class/Elite III | ||
| Line 1,013: | Line 1,027: | ||
|T2 | |T2 | ||
|Boss/Final | |Boss/Final | ||
| − | |{{TooltipSimple|Diamond|50% ( | + | |{{TooltipSimple|Diamond|50% (1473/2965, HQ: 99-120)}}<br>{{TooltipSimple|''Phases: 2, 3''|Samples: 443, 39}} |
|Seaplane Tender Princess | |Seaplane Tender Princess | ||
|Light Carrier Nu-Class/Elite III | |Light Carrier Nu-Class/Elite III | ||
| Line 1,024: | Line 1,038: | ||
|U | |U | ||
|Defense | |Defense | ||
| − | |{{TooltipSimple|Diamond| | + | |{{TooltipSimple|Diamond|49% (3457/7001, HQ: 99-120)}}<br>{{TooltipSimple|''Phases: 3''|Samples: 989}} |
|Airfield Princess/V | |Airfield Princess/V | ||
|Airfield Princess/Patrol Aircraft Deployment | |Airfield Princess/Patrol Aircraft Deployment | ||
| Line 1,032: | Line 1,046: | ||
|U | |U | ||
|Defense | |Defense | ||
| − | |{{TooltipSimple|Diamond|42% ( | + | |{{TooltipSimple|Diamond|42% (2957/7001, HQ: 99-120)}}<br>{{TooltipSimple|''Phases: 3''|Samples: 970}} |
|Airfield Princess/V | |Airfield Princess/V | ||
|Airfield Princess/Patrol Aircraft Deployment II | |Airfield Princess/Patrol Aircraft Deployment II | ||
| Line 1,040: | Line 1,054: | ||
|U | |U | ||
|Defense | |Defense | ||
| − | |{{TooltipSimple|Diamond|8% ( | + | |{{TooltipSimple|Diamond|8% (587/7001, HQ: 99-120)}}<br>{{TooltipSimple|''Phases: 3''|Samples: 211}} |
|Airfield Princess/V | |Airfield Princess/V | ||
|Airfield Princess/Patrol Aircraft Deployment II | |Airfield Princess/Patrol Aircraft Deployment II | ||
| Line 1,049: | Line 1,063: | ||
|V | |V | ||
|Normal | |Normal | ||
| − | |{{TooltipSimple|Line Ahead| | + | |{{TooltipSimple|Line Ahead|65% (209/323, HQ: 102-120)}}<br>{{TooltipSimple|Double Line|13% (42/323, HQ: 102-120)}}<br>{{TooltipSimple|Echelon|22% (72/323, HQ: 102-120)}}<br>{{TooltipSimple|''Phases: 3''|Samples: 81}} |
|PT Imp Pack/III | |PT Imp Pack/III | ||
|PT Imp Pack/II | |PT Imp Pack/II | ||
| Line 1,060: | Line 1,074: | ||
|W | |W | ||
|Normal | |Normal | ||
| − | |{{TooltipSimple|Line Ahead| | + | |{{TooltipSimple|Line Ahead|38% (2499/6546, HQ: 99-120)}}<br>{{TooltipSimple|Double Line|27% (1742/6546, HQ: 99-120)}}<br>{{TooltipSimple|Vanguard|35% (2305/6546, HQ: 99-120)}}<br>{{TooltipSimple|''Phases: 3''|Samples: 2070}} |
|Light Cruiser He-Class/Flagship | |Light Cruiser He-Class/Flagship | ||
|Torpedo Cruiser Chi-Class/Elite | |Torpedo Cruiser Chi-Class/Elite | ||
| Line 1,072: | Line 1,086: | ||
|W2 | |W2 | ||
|Boss | |Boss | ||
| − | |{{TooltipSimple|Line Ahead| | + | |{{TooltipSimple|Line Ahead|39% (2314/5946, HQ: 99-120)}}<br>{{TooltipSimple|''Phases: 3''|Samples: 539}} |
|New Battleship Princess | |New Battleship Princess | ||
|Battleship Ta-Class/Elite | |Battleship Ta-Class/Elite | ||
| Line 1,082: | Line 1,096: | ||
|W2 | |W2 | ||
|Boss | |Boss | ||
| − | |{{TooltipSimple|Line Ahead| | + | |{{TooltipSimple|Line Ahead|39% (2312/5946, HQ: 99-120)}}<br>{{TooltipSimple|''Phases: 3''|Samples: 556}} |
|New Battleship Princess | |New Battleship Princess | ||
|Battleship Ta-Class/Elite | |Battleship Ta-Class/Elite | ||
| Line 1,092: | Line 1,106: | ||
|W2 | |W2 | ||
|Boss/Final | |Boss/Final | ||
| − | |{{TooltipSimple|Line Ahead| | + | |{{TooltipSimple|Line Ahead|22% (1320/5946, HQ: 99-120)}}<br>{{TooltipSimple|''Phases: 3''|Samples: 431}} |
|New Battleship Princess/Damaged | |New Battleship Princess/Damaged | ||
|Battleship Ta-Class/Elite | |Battleship Ta-Class/Elite | ||
| Line 1,102: | Line 1,116: | ||
</div> | </div> | ||
|-|Easy= | |-|Easy= | ||
| − | {{Map/Image|page=Spring 2022 Event/E-2|{{Map/ImageNode|1|Easy|E-2|x=90|y=122}}{{Map/ImageNode|AB|Easy|E-2|x=55|y=118}}{{Map/ImageNode|A|Easy|E-2|x=124|y=171}}{{Map/ImageNode|B|Easy|E-2|x=208|y=130}}{{Map/ImageNode|C|Easy|E-2|x=245|y=97}}{{Map/ImageNode|D|Easy|E-2|x=314|y=91}}{{Map/ImageNode|E|Easy|E-2|x=387|y=123}}{{Map/ImageNode|F|Easy|E-2|x=379|y=172|drops=<table class="wikitable"><tr><th>Type</th><th>Ships</th></tr><tr><th>DE</th><td>{{Ship/Banner|small=true|Hirato}}{{Ship/Banner|small=true|Mikura}}</td></tr><tr><th>DD</th><td>{{Ship/Banner|small=true|Harusame}}{{Ship/Banner|small=true|Uranami}}</td></tr></table>}}{{Map/ImageNode|G|Easy|E-2|x=137|y=246}}{{Map/ImageNode|H|Easy|E-2|x=179|y=209}}{{Map/ImageNode|I|Easy|E-2|x=219|y=287}}{{Map/ImageNode|J|Easy|E-2|x=241|y=245}}{{Map/ImageNode|K|Easy|E-2|x=270|y=190}}{{Map/ImageNode|L|Easy|E-2|x=328|y=244|drops=<table class="wikitable"><tr><th>Type</th><th>Ships</th></tr><tr><th>DE</th><td>{{Ship/Banner|small=true|Hirato}}{{Ship/Banner|small=true|Mikura}}</td></tr><tr><th>DD</th><td>{{Ship/Banner|small=true|Harusame}}{{Ship/Banner|small=true|Uranami}}</td></tr></table>}}{{Map/ImageNode|M|Easy|E-2|x=370|y=212}}{{Map/ImageNode|N|Easy|E-2|x=419|y=200}}{{Map/ImageNode|O|Easy|E-2|x=402|y=240|drops=<table class="wikitable"><tr><th>Type</th><th>Ships</th></tr><tr><th>DE</th><td>{{Ship/Banner|small=true|Hirato}}</td></tr><tr><th>DD</th><td>{{Ship/Banner|small=true|Amagiri}}{{Ship/Banner|small=true|Harusame}}{{Ship/Banner|small=true|Kawakaze}}<br>{{Ship/Banner|small=true|Sagiri}}{{Ship/Banner|small=true| | + | {{Map/Image|page=Spring 2022 Event/E-2|{{Map/ImageNode|1|Easy|E-2|x=90|y=122}}{{Map/ImageNode|AB|Easy|E-2|x=55|y=118}}{{Map/ImageNode|A|Easy|E-2|x=124|y=171}}{{Map/ImageNode|B|Easy|E-2|x=208|y=130}}{{Map/ImageNode|C|Easy|E-2|x=245|y=97}}{{Map/ImageNode|D|Easy|E-2|x=314|y=91}}{{Map/ImageNode|E|Easy|E-2|x=387|y=123}}{{Map/ImageNode|F|Easy|E-2|x=379|y=172|drops=<table class="wikitable"><tr><th>Type</th><th>Ships</th></tr><tr><th>DE</th><td>{{Ship/Banner|small=true|Hirato}}{{Ship/Banner|small=true|Mikura}}</td></tr><tr><th>DD</th><td>{{Ship/Banner|small=true|Harusame}}{{Ship/Banner|small=true|Uranami}}</td></tr></table>}}{{Map/ImageNode|G|Easy|E-2|x=137|y=246}}{{Map/ImageNode|H|Easy|E-2|x=179|y=209}}{{Map/ImageNode|I|Easy|E-2|x=219|y=287}}{{Map/ImageNode|J|Easy|E-2|x=241|y=245}}{{Map/ImageNode|K|Easy|E-2|x=270|y=190}}{{Map/ImageNode|L|Easy|E-2|x=328|y=244|drops=<table class="wikitable"><tr><th>Type</th><th>Ships</th></tr><tr><th>DE</th><td>{{Ship/Banner|small=true|Hirato}}{{Ship/Banner|small=true|Mikura}}</td></tr><tr><th>DD</th><td>{{Ship/Banner|small=true|Harusame}}{{Ship/Banner|small=true|Uranami}}</td></tr></table>}}{{Map/ImageNode|M|Easy|E-2|x=370|y=212}}{{Map/ImageNode|N|Easy|E-2|x=419|y=200}}{{Map/ImageNode|O|Easy|E-2|x=402|y=240|drops=<table class="wikitable"><tr><th>Type</th><th>Ships</th></tr><tr><th>DE</th><td>{{Ship/Banner|small=true|Hirato}}{{Ship/Banner|small=true|Mikura}}</td></tr><tr><th>DD</th><td>{{Ship/Banner|small=true|Amagiri}}{{Ship/Banner|small=true|Harusame}}{{Ship/Banner|small=true|Kawakaze}}<br>{{Ship/Banner|small=true|Sagiri}}{{Ship/Banner|small=true|Tokitsukaze}}{{Ship/Banner|small=true|Usugumo}}<br>{{Ship/Banner|small=true|Yamakaze}}</td></tr><tr><th>SSV</th><td>{{Ship/Banner|small=true|I-400}}</td></tr><tr><th>AV</th><td>{{Ship/Banner|small=true|Commandant Teste}}</td></tr><tr><th>AS</th><td>{{Ship/Banner|small=true|Jingei}}</td></tr></table>}}{{Map/ImageNode|P|Easy|E-2|x=348|y=289}}{{Map/ImageNode|Q|Easy|E-2|x=448|y=237}}{{Map/ImageNode|R|Easy|E-2|x=503|y=246|drops=<table class="wikitable"><tr><th>Type</th><th>Ships</th></tr><tr><th>DE</th><td>{{Ship/Banner|small=true|Mikura}}</td></tr><tr><th>DD</th><td>{{Ship/Banner|small=true|Harusame}}{{Ship/Banner|small=true|Uranami}}</td></tr></table>}}{{Map/ImageNode|S1|Easy|E-2|x=520|y=172|drops=<table class="wikitable"><tr><th>Type</th><th>Ships</th></tr><tr><th>DE</th><td>{{Ship/Banner|small=true|Hirato}}{{Ship/Banner|small=true|Mikura}}</td></tr><tr><th>DD</th><td>{{Ship/Banner|small=true|Arashi}}{{Ship/Banner|small=true|Harusame}}{{Ship/Banner|small=true|Kawakaze}}<br>{{Ship/Banner|small=true|Sagiri}}{{Ship/Banner|small=true|Uranami}}{{Ship/Banner|small=true|Yamakaze}}<br></td></tr></table>}}{{Map/ImageNode|S2|Easy|E-2|x=456|y=180}}{{Map/ImageNode|S3|Easy|E-2|x=499|y=112}}{{Map/ImageNode|Start 2|Easy|E-2|x=223|y=188}}{{Map/ImageNode|S|Easy|E-2|x=537|y=218|drops=<table class="wikitable"><tr><th>Type</th><th>Ships</th></tr><tr><th>DD</th><td>{{Ship/Banner|small=true|Harusame}}</td></tr></table>}}{{Map/ImageNode|T1|Easy|E-2|x=604|y=155}}{{Map/ImageNode|T2|Easy|E-2|x=559|y=114|drops=<table class="wikitable"><tr><th>Type</th><th>Ships</th></tr><tr><th>DE</th><td>{{Ship/Banner|small=true|Hirato}}{{Ship/Banner|small=true|Mikura}}</td></tr><tr><th>DD</th><td>{{Ship/Banner|small=true|Amagiri}}{{Ship/Banner|small=true|Arashi}}{{Ship/Banner|small=true|Hagikaze}}<br>{{Ship/Banner|small=true|Harusame}}{{Ship/Banner|small=true|Kawakaze}}{{Ship/Banner|small=true|Sagiri}}<br>{{Ship/Banner|small=true|Tokitsukaze}}{{Ship/Banner|small=true|Umikaze}}{{Ship/Banner|small=true|Uranami}}<br>{{Ship/Banner|small=true|Usugumo}}{{Ship/Banner|small=true|Yamakaze}}</td></tr><tr><th>CV</th><td>{{Ship/Banner|small=true|Hornet}}</td></tr><tr><th>SSV</th><td>{{Ship/Banner|small=true|I-400}}{{Ship/Banner|small=true|I-401}}</td></tr><tr><th>AV</th><td>{{Ship/Banner|small=true|Commandant Teste}}{{Ship/Banner|small=true|Mizuho}}</td></tr><tr><th>AS</th><td>{{Ship/Banner|small=true|Jingei}}</td></tr></table>}}{{Map/ImageNode|T|Easy|E-2|x=571|y=194}}{{Map/ImageNode|U|Easy|E-2|x=537|y=249}}{{Map/ImageNode|V|Easy|E-2|x=564|y=221}}{{Map/ImageNode|W1|Easy|E-2|x=583|y=291}}{{Map/ImageNode|W2|Easy|E-2|x=613|y=254|drops=<table class="wikitable"><tr><th>Type</th><th>Ships</th></tr><tr><th>DE</th><td>{{Ship/Banner|small=true|Tsushima}}{{Ship/Banner|small=true|Yashiro}}</td></tr><tr><th>DD</th><td>{{Ship/Banner|small=true|Makinami}}{{Ship/Banner|small=true|Teruzuki}}</td></tr><tr><th>SS</th><td>{{Ship/Banner|small=true|I-201}}{{Ship/Banner|small=true|I-203}}</td></tr><tr><th>AV</th><td>{{Ship/Banner|small=true|Akitsushima}}{{Ship/Banner|small=true|Mizuho}}{{Ship/Banner|small=true|Nisshin}}<br></td></tr><tr><th>AS</th><td>{{Ship/Banner|small=true|Chougei}}</td></tr></table>}}{{Map/ImageNode|W|Easy|E-2|x=573|y=251|drops=<table class="wikitable"><tr><th>Type</th><th>Ships</th></tr><tr><th>DE</th><td>{{Ship/Banner|small=true|Hirato}}{{Ship/Banner|small=true|Mikura}}</td></tr><tr><th>DD</th><td>{{Ship/Banner|small=true|Amagiri}}{{Ship/Banner|small=true|Arashi}}{{Ship/Banner|small=true|Hagikaze}}<br>{{Ship/Banner|small=true|Harusame}}{{Ship/Banner|small=true|Kawakaze}}{{Ship/Banner|small=true|Sagiri}}<br>{{Ship/Banner|small=true|Tokitsukaze}}{{Ship/Banner|small=true|Umikaze}}{{Ship/Banner|small=true|Uranami}}<br>{{Ship/Banner|small=true|Usugumo}}{{Ship/Banner|small=true|Yamakaze}}</td></tr><tr><th>SSV</th><td>{{Ship/Banner|small=true|I-401}}</td></tr><tr><th>AV</th><td>{{Ship/Banner|small=true|Mizuho}}</td></tr><tr><th>AS</th><td>{{Ship/Banner|small=true|Jingei}}</td></tr></table>}}}} |
<div class="map-nodes"> | <div class="map-nodes"> | ||
{{Map/Nodes|diff=Easy|name= | {{Map/Nodes|diff=Easy|name= | ||
|AB | |AB | ||
|Raid | |Raid | ||
| − | |{{TooltipSimple|Diamond| | + | |{{TooltipSimple|Diamond|8% (216/2705)}} |
|Airfield Princess/VI | |Airfield Princess/VI | ||
|- | |- | ||
|AB | |AB | ||
|Raid | |Raid | ||
| − | |{{TooltipSimple|Diamond|46% ( | + | |{{TooltipSimple|Diamond|46% (1239/2705)}} |
|Airfield Princess/V | |Airfield Princess/V | ||
|Airfield Princess/V | |Airfield Princess/V | ||
| Line 1,118: | Line 1,132: | ||
|AB | |AB | ||
|Raid | |Raid | ||
| − | |{{TooltipSimple|Diamond| | + | |{{TooltipSimple|Diamond|46% (1250/2705)}} |
|Airfield Princess/VI | |Airfield Princess/VI | ||
|Airfield Princess/V | |Airfield Princess/V | ||
| Line 1,126: | Line 1,140: | ||
|B | |B | ||
|Defense | |Defense | ||
| − | |{{TooltipSimple|Diamond|8% ( | + | |{{TooltipSimple|Diamond|8% (254/3225, HQ: 61-120)}}<br>{{TooltipSimple|''Phases: 1, 3''|Samples: 99, 8}} |
|Airfield Princess/V | |Airfield Princess/V | ||
|- | |- | ||
|B | |B | ||
|Defense | |Defense | ||
| − | |{{TooltipSimple|Diamond| | + | |{{TooltipSimple|Diamond|23% (740/3225, HQ: 59-120)}}<br>{{TooltipSimple|''Phases: 1, 2, 3''|Samples: 262, 4, 25}} |
|Airfield Princess/VI | |Airfield Princess/VI | ||
|- | |- | ||
|B | |B | ||
|Defense | |Defense | ||
| − | |{{TooltipSimple|Diamond|23% ( | + | |{{TooltipSimple|Diamond|23% (738/3225, HQ: 59-120)}}<br>{{TooltipSimple|''Phases: 1, 2, 3''|Samples: 269, 5, 17}} |
|Airfield Princess/V | |Airfield Princess/V | ||
|Airfield Princess/V | |Airfield Princess/V | ||
| Line 1,142: | Line 1,156: | ||
|B | |B | ||
|Defense | |Defense | ||
| − | |{{TooltipSimple|Diamond| | + | |{{TooltipSimple|Diamond|29% (947/3225, HQ: 58-120)}}<br>{{TooltipSimple|''Phases: 1, 2, 3''|Samples: 260, 2, 13}} |
|Airfield Princess/VI | |Airfield Princess/VI | ||
|Airfield Princess/V | |Airfield Princess/V | ||
| Line 1,148: | Line 1,162: | ||
|B | |B | ||
|Defense | |Defense | ||
| − | |{{TooltipSimple|Diamond|17% ( | + | |{{TooltipSimple|Diamond|17% (546/3225, HQ: 59-120)}}<br>{{TooltipSimple|''Phases: 1, 2, 3''|Samples: 193, 3, 10}} |
|Airfield Princess/VI | |Airfield Princess/VI | ||
|Airfield Princess/VI | |Airfield Princess/VI | ||
| Line 1,155: | Line 1,169: | ||
|C | |C | ||
|Normal | |Normal | ||
| − | |{{TooltipSimple|Echelon| | + | |{{TooltipSimple|Echelon|8% (212/2793, HQ: 59-120)}}<br>{{TooltipSimple|Line Abreast|7% (199/2793, HQ: 61-120)}}<br>{{TooltipSimple|''Phases: 1, 3''|Samples: 162, 6}} |
|Submarine Ka-Class | |Submarine Ka-Class | ||
|Submarine Ka-Class | |Submarine Ka-Class | ||
| Line 1,162: | Line 1,176: | ||
|C | |C | ||
|Normal | |Normal | ||
| − | |{{TooltipSimple|Echelon|24% ( | + | |{{TooltipSimple|Echelon|24% (665/2793, HQ: 59-120)}}<br>{{TooltipSimple|Line Abreast|24% (674/2793, HQ: 59-120)}}<br>{{TooltipSimple|''Phases: 1, 2, 3''|Samples: 469, 2, 23}} |
|Submarine Ka-Class/Elite | |Submarine Ka-Class/Elite | ||
|Submarine Ka-Class | |Submarine Ka-Class | ||
| Line 1,169: | Line 1,183: | ||
|C | |C | ||
|Normal | |Normal | ||
| − | |{{TooltipSimple|Echelon| | + | |{{TooltipSimple|Echelon|19% (525/2793, HQ: 61-120)}}<br>{{TooltipSimple|Line Abreast|19% (518/2793, HQ: 58-120)}}<br>{{TooltipSimple|''Phases: 1, 2, 3''|Samples: 365, 1, 13}} |
|Submarine Ka-Class/Elite | |Submarine Ka-Class/Elite | ||
|Submarine Ka-Class/Elite | |Submarine Ka-Class/Elite | ||
| Line 1,177: | Line 1,191: | ||
|D | |D | ||
|Defense | |Defense | ||
| − | |{{TooltipSimple|Diamond| | + | |{{TooltipSimple|Diamond|17% (120/722, HQ: 82-120)}}<br>{{TooltipSimple|''Phases: 1, 3''|Samples: 26, 8}} |
|Airfield Princess/V | |Airfield Princess/V | ||
|- | |- | ||
|D | |D | ||
|Defense | |Defense | ||
| − | |{{TooltipSimple|Diamond| | + | |{{TooltipSimple|Diamond|15% (108/722, HQ: 82-120)}}<br>{{TooltipSimple|''Phases: 1, 3''|Samples: 33, 1}} |
|Airfield Princess/VI | |Airfield Princess/VI | ||
|- | |- | ||
|D | |D | ||
|Defense | |Defense | ||
| − | |{{TooltipSimple|Diamond| | + | |{{TooltipSimple|Diamond|16% (112/722, HQ: 58-120)}}<br>{{TooltipSimple|''Phases: 1, 3''|Samples: 45, 5}} |
|Airfield Princess/V | |Airfield Princess/V | ||
|Airfield Princess/V | |Airfield Princess/V | ||
| Line 1,193: | Line 1,207: | ||
|D | |D | ||
|Defense | |Defense | ||
| − | |{{TooltipSimple|Diamond| | + | |{{TooltipSimple|Diamond|28% (201/722, HQ: 59-120)}}<br>{{TooltipSimple|''Phases: 1, 3''|Samples: 70, 12}} |
|Airfield Princess/VI | |Airfield Princess/VI | ||
|Airfield Princess/V | |Airfield Princess/V | ||
| Line 1,199: | Line 1,213: | ||
|D | |D | ||
|Defense | |Defense | ||
| − | |{{TooltipSimple|Diamond| | + | |{{TooltipSimple|Diamond|25% (181/722, HQ: 82-120)}}<br>{{TooltipSimple|''Phases: 1, 2, 3''|Samples: 61, 1, 5}} |
|Airfield Princess/VI | |Airfield Princess/VI | ||
|Airfield Princess/VI | |Airfield Princess/VI | ||
| Line 1,206: | Line 1,220: | ||
|E | |E | ||
|Normal | |Normal | ||
| − | |{{TooltipSimple|Line Ahead| | + | |{{TooltipSimple|Line Ahead|37% (14/38, HQ: 106-113)}}<br>{{TooltipSimple|Double Line|32% (12/38, HQ: 107-114)}}<br>{{TooltipSimple|Echelon|32% (12/38, HQ: 99-109)}}<br>{{TooltipSimple|''Phases: 1''|Samples: 1}} |
|Light Cruiser Ho-Class/Elite | |Light Cruiser Ho-Class/Elite | ||
|Torpedo Cruiser Chi-Class/Elite | |Torpedo Cruiser Chi-Class/Elite | ||
| Line 1,217: | Line 1,231: | ||
|F | |F | ||
|Normal | |Normal | ||
| − | |{{TooltipSimple|Line Ahead|52% ( | + | |{{TooltipSimple|Line Ahead|52% (1306/2507, HQ: 58-120)}}<br>{{TooltipSimple|Double Line|19% (488/2507, HQ: 72-120)}}<br>{{TooltipSimple|Vanguard|28% (713/2507, HQ: 61-120)}}<br>{{TooltipSimple|''Phases: 1, 3''|Samples: 947, 29}} |
|Heavy Cruiser Ri-Class/Elite | |Heavy Cruiser Ri-Class/Elite | ||
|Heavy Cruiser Ri-Class/Elite | |Heavy Cruiser Ri-Class/Elite | ||
| Line 1,228: | Line 1,242: | ||
|G | |G | ||
|Normal | |Normal | ||
| − | |{{TooltipSimple|Echelon| | + | |{{TooltipSimple|Echelon|8% (36/434, HQ: 57-120)}}<br>{{TooltipSimple|Line Abreast|9% (37/434, HQ: 82-120)}}<br>{{TooltipSimple|''Phases: 1, 2, 3''|Samples: 3, 3, 2}} |
|Submarine Ka-Class | |Submarine Ka-Class | ||
|Submarine Ka-Class | |Submarine Ka-Class | ||
| Line 1,235: | Line 1,249: | ||
|G | |G | ||
|Normal | |Normal | ||
| − | |{{TooltipSimple|Echelon|24% ( | + | |{{TooltipSimple|Echelon|24% (102/434, HQ: 49-120)}}<br>{{TooltipSimple|Line Abreast|23% (100/434, HQ: 49-120)}}<br>{{TooltipSimple|''Phases: 1, 2, 3''|Samples: 19, 6, 15}} |
|Submarine Ka-Class/Elite | |Submarine Ka-Class/Elite | ||
|Submarine Ka-Class | |Submarine Ka-Class | ||
| Line 1,242: | Line 1,256: | ||
|G | |G | ||
|Normal | |Normal | ||
| − | |{{TooltipSimple|Echelon| | + | |{{TooltipSimple|Echelon|22% (94/434, HQ: 50-120)}}<br>{{TooltipSimple|Line Abreast|15% (65/434, HQ: 49-120)}}<br>{{TooltipSimple|''Phases: 1, 2, 3''|Samples: 25, 5, 4}} |
|Submarine Ka-Class/Elite | |Submarine Ka-Class/Elite | ||
|Submarine Ka-Class/Elite | |Submarine Ka-Class/Elite | ||
| Line 1,250: | Line 1,264: | ||
|H | |H | ||
|Defense | |Defense | ||
| − | |{{TooltipSimple|Diamond|5% ( | + | |{{TooltipSimple|Diamond|5% (6/118, HQ: 81-120)}}<br>{{TooltipSimple|''Phases: 1, 3''|Samples: 3, 2}} |
|Airfield Princess/V | |Airfield Princess/V | ||
|- | |- | ||
|H | |H | ||
|Defense | |Defense | ||
| − | |{{TooltipSimple|Diamond| | + | |{{TooltipSimple|Diamond|30% (35/118, HQ: 81-120)}}<br>{{TooltipSimple|''Phases: 1, 3''|Samples: 4, 3}} |
|Airfield Princess/VI | |Airfield Princess/VI | ||
|- | |- | ||
|H | |H | ||
|Defense | |Defense | ||
| − | |{{TooltipSimple|Diamond| | + | |{{TooltipSimple|Diamond|31% (37/118, HQ: 81-120)}}<br>{{TooltipSimple|''Phases: 1, 2, 3''|Samples: 5, 1, 6}} |
|Airfield Princess/V | |Airfield Princess/V | ||
|Airfield Princess/V | |Airfield Princess/V | ||
| Line 1,266: | Line 1,280: | ||
|H | |H | ||
|Defense | |Defense | ||
| − | |{{TooltipSimple|Diamond| | + | |{{TooltipSimple|Diamond|25% (29/118, HQ: 81-120)}}<br>{{TooltipSimple|''Phases: 1, 2, 3''|Samples: 7, 1, 1}} |
|Airfield Princess/VI | |Airfield Princess/VI | ||
|Airfield Princess/V | |Airfield Princess/V | ||
| Line 1,272: | Line 1,286: | ||
|H | |H | ||
|Defense | |Defense | ||
| − | |{{TooltipSimple|Diamond|9% ( | + | |{{TooltipSimple|Diamond|9% (11/118, HQ: 82-120)}}<br>{{TooltipSimple|''Phases: 1, 3''|Samples: 2, 2}} |
|Airfield Princess/VI | |Airfield Princess/VI | ||
|Airfield Princess/VI | |Airfield Princess/VI | ||
| Line 1,287: | Line 1,301: | ||
|J | |J | ||
|Normal | |Normal | ||
| − | |{{TooltipSimple|Line Ahead|60% ( | + | |{{TooltipSimple|Line Ahead|60% (215/356, HQ: 49-120)}}<br>{{TooltipSimple|Double Line|20% (70/356, HQ: 50-120)}}<br>{{TooltipSimple|Echelon|20% (71/356, HQ: 50-120)}}<br>{{TooltipSimple|''Phases: 1, 2, 3''|Samples: 46, 7, 15}} |
|Heavy Cruiser Ri-Class/Elite | |Heavy Cruiser Ri-Class/Elite | ||
|Light Cruiser Ho-Class/Elite | |Light Cruiser Ho-Class/Elite | ||
| Line 1,298: | Line 1,312: | ||
|K | |K | ||
|Defense | |Defense | ||
| − | |{{TooltipSimple|Diamond| | + | |{{TooltipSimple|Diamond|24% (7/29, HQ: 81-109)}}<br>{{TooltipSimple|''Phases: 3''|Samples: 1}} |
|Airfield Princess/V | |Airfield Princess/V | ||
|- | |- | ||
|K | |K | ||
|Defense | |Defense | ||
| − | |{{TooltipSimple|Diamond| | + | |{{TooltipSimple|Diamond|10% (3/29, HQ: 89-106)}}<br>{{TooltipSimple|''Phases: 3''|Samples: 1}} |
|Airfield Princess/VI | |Airfield Princess/VI | ||
|- | |- | ||
|K | |K | ||
|Defense | |Defense | ||
| − | |{{TooltipSimple|Diamond| | + | |{{TooltipSimple|Diamond|28% (8/29, HQ: 82-109)}}<br>{{TooltipSimple|''Phases: 3''|Samples: 3}} |
|Airfield Princess/V | |Airfield Princess/V | ||
|Airfield Princess/V | |Airfield Princess/V | ||
| Line 1,314: | Line 1,328: | ||
|K | |K | ||
|Defense | |Defense | ||
| − | |{{TooltipSimple|Diamond| | + | |{{TooltipSimple|Diamond|21% (6/29, HQ: 83-120)}}<br>{{TooltipSimple|''Phases: 3''|Samples: 3}} |
|Airfield Princess/VI | |Airfield Princess/VI | ||
|Airfield Princess/V | |Airfield Princess/V | ||
| Line 1,320: | Line 1,334: | ||
|K | |K | ||
|Defense | |Defense | ||
| − | |{{TooltipSimple|Diamond| | + | |{{TooltipSimple|Diamond|17% (5/29, HQ: 103-108)}}<br>{{TooltipSimple|''Phases: 1''|Samples: 1}} |
|Airfield Princess/VI | |Airfield Princess/VI | ||
|Airfield Princess/VI | |Airfield Princess/VI | ||
| Line 1,327: | Line 1,341: | ||
|L | |L | ||
|Normal | |Normal | ||
| − | |{{TooltipSimple|Line Ahead| | + | |{{TooltipSimple|Line Ahead|51% (161/314, HQ: 49-120)}}<br>{{TooltipSimple|Double Line|25% (79/314, HQ: 56-120)}}<br>{{TooltipSimple|''Phases: 1, 2, 3''|Samples: 33, 4, 8}} |
|Battleship Ru-Class/Elite | |Battleship Ru-Class/Elite | ||
|Heavy Cruiser Ri-Class/Elite | |Heavy Cruiser Ri-Class/Elite | ||
| Line 1,337: | Line 1,351: | ||
|L | |L | ||
|Normal | |Normal | ||
| − | |{{TooltipSimple|Line Ahead| | + | |{{TooltipSimple|Line Ahead|24% (74/314, HQ: 50-120)}}<br>{{TooltipSimple|''Phases: 1, 2, 3''|Samples: 9, 1, 1}} |
|Battleship Ru-Class/Elite | |Battleship Ru-Class/Elite | ||
|Heavy Cruiser Ri-Class/Elite | |Heavy Cruiser Ri-Class/Elite | ||
| Line 1,350: | Line 1,364: | ||
|O | |O | ||
|Boss | |Boss | ||
| − | |{{TooltipSimple|Line Ahead|49% ( | + | |{{TooltipSimple|Line Ahead|49% (1110/2255, HQ: 50-120)}}<br>{{TooltipSimple|Double Line|26% (590/2255, HQ: 50-120)}}<br>{{TooltipSimple|''Phases: 1, 2, 3''|Samples: 583, 3, 21}} |
|Anti-Air Cruiser Princess | |Anti-Air Cruiser Princess | ||
|Heavy Cruiser Ri-Class/Elite | |Heavy Cruiser Ri-Class/Elite | ||
| Line 1,360: | Line 1,374: | ||
|O | |O | ||
|Boss/Final | |Boss/Final | ||
| − | |{{TooltipSimple|Line Ahead|25% ( | + | |{{TooltipSimple|Line Ahead|25% (555/2255, HQ: 50-120)}}<br>{{TooltipSimple|''Phases: 1''|Samples: 158}} |
|Anti-Air Cruiser Princess/Damaged | |Anti-Air Cruiser Princess/Damaged | ||
|Heavy Cruiser Ri-Class/Elite | |Heavy Cruiser Ri-Class/Elite | ||
| Line 1,371: | Line 1,385: | ||
|P | |P | ||
|Normal | |Normal | ||
| − | |{{TooltipSimple|Echelon|8% ( | + | |{{TooltipSimple|Echelon|8% (860/10378, HQ: 51-120)}}<br>{{TooltipSimple|Line Abreast|17% (1752/10378, HQ: 51-120)}}<br>{{TooltipSimple|''Phases: 2, 3''|Samples: 280, 544}} |
|Submarine Ka-Class/Elite | |Submarine Ka-Class/Elite | ||
|Submarine Ka-Class | |Submarine Ka-Class | ||
| Line 1,378: | Line 1,392: | ||
|P | |P | ||
|Normal | |Normal | ||
| − | |{{TooltipSimple|Echelon|24% ( | + | |{{TooltipSimple|Echelon|24% (2500/10378, HQ: 51-120)}}<br>{{TooltipSimple|Line Abreast|24% (2486/10378, HQ: 51-120)}}<br>{{TooltipSimple|''Phases: 2, 3''|Samples: 389, 1084}} |
|Submarine Ka-Class/Elite | |Submarine Ka-Class/Elite | ||
|Submarine Ka-Class/Elite | |Submarine Ka-Class/Elite | ||
| Line 1,385: | Line 1,399: | ||
|P | |P | ||
|Normal | |Normal | ||
| − | |{{TooltipSimple|Echelon|14% ( | + | |{{TooltipSimple|Echelon|14% (1402/10378, HQ: 51-120)}}<br>{{TooltipSimple|Line Abreast|13% (1378/10378, HQ: 53-120)}}<br>{{TooltipSimple|''Phases: 2, 3''|Samples: 150, 714}} |
|Submarine Ka-Class/Elite | |Submarine Ka-Class/Elite | ||
|Submarine Ka-Class/Elite | |Submarine Ka-Class/Elite | ||
| Line 1,394: | Line 1,408: | ||
|R | |R | ||
|Normal | |Normal | ||
| − | |{{TooltipSimple|Line Ahead|59% ( | + | |{{TooltipSimple|Line Ahead|59% (4359/7407, HQ: 51-120)}}<br>{{TooltipSimple|Double Line|23% (1715/7407, HQ: 51-120)}}<br>{{TooltipSimple|Vanguard|18% (1333/7407, HQ: 59-120)}}<br>{{TooltipSimple|''Phases: 2, 3''|Samples: 4, 1988}} |
|Destroyer Ro-Class/Late Model | |Destroyer Ro-Class/Late Model | ||
|Destroyer Ro-Class/Late Model | |Destroyer Ro-Class/Late Model | ||
| Line 1,405: | Line 1,419: | ||
|S | |S | ||
|Normal | |Normal | ||
| − | |{{TooltipSimple|Line Ahead|60% ( | + | |{{TooltipSimple|Line Ahead|60% (1616/2712, HQ: 51-120)}}<br>{{TooltipSimple|Double Line|24% (641/2712, HQ: 76-120)}}<br>{{TooltipSimple|Vanguard|17% (455/2712, HQ: 51-120)}}<br>{{TooltipSimple|''Phases: 2, 3''|Samples: 793, 310}} |
|Destroyer Ro-Class/Late Model | |Destroyer Ro-Class/Late Model | ||
|Destroyer Ro-Class/Late Model | |Destroyer Ro-Class/Late Model | ||
| Line 1,416: | Line 1,430: | ||
|S1 | |S1 | ||
|Normal | |Normal | ||
| − | |{{TooltipSimple|Line Ahead| | + | |{{TooltipSimple|Line Ahead|59% (1559/2639, HQ: 51-120)}}<br>{{TooltipSimple|Double Line|23% (595/2639, HQ: 51-120)}}<br>{{TooltipSimple|''Phases: 2, 3''|Samples: 635, 284}} |
|Light Cruiser He-Class/Elite | |Light Cruiser He-Class/Elite | ||
|Heavy Cruiser Ne-Class | |Heavy Cruiser Ne-Class | ||
| Line 1,426: | Line 1,440: | ||
|S1 | |S1 | ||
|Normal | |Normal | ||
| − | |{{TooltipSimple|Line Ahead| | + | |{{TooltipSimple|Line Ahead|18% (485/2639, HQ: 51-120)}}<br>{{TooltipSimple|''Phases: 2, 3''|Samples: 143, 24}} |
|Light Cruiser He-Class/Elite | |Light Cruiser He-Class/Elite | ||
|Heavy Cruiser Ne-Class | |Heavy Cruiser Ne-Class | ||
| Line 1,437: | Line 1,451: | ||
|S2 | |S2 | ||
|Normal | |Normal | ||
| − | |{{TooltipSimple|Echelon| | + | |{{TooltipSimple|Echelon|11% (4/35, HQ: 82-103)}}<br>{{TooltipSimple|Line Abreast|14% (5/35, HQ: 82-103)}}<br>{{TooltipSimple|''Phases: 2''|Samples: 3}} |
|Submarine Ka-Class/Elite | |Submarine Ka-Class/Elite | ||
|Submarine Ka-Class | |Submarine Ka-Class | ||
| Line 1,444: | Line 1,458: | ||
|S2 | |S2 | ||
|Normal | |Normal | ||
| − | |{{TooltipSimple|Echelon| | + | |{{TooltipSimple|Echelon|20% (7/35, HQ: 82-100)}}<br>{{TooltipSimple|Line Abreast|29% (10/35, HQ: 81-103)}}<br>{{TooltipSimple|''Phases: 2''|Samples: 8}} |
|Submarine Ka-Class/Elite | |Submarine Ka-Class/Elite | ||
|Submarine Ka-Class/Elite | |Submarine Ka-Class/Elite | ||
| Line 1,451: | Line 1,465: | ||
|S2 | |S2 | ||
|Normal | |Normal | ||
| − | |{{TooltipSimple|Echelon| | + | |{{TooltipSimple|Echelon|20% (7/35, HQ: 81-105)}}<br>{{TooltipSimple|Line Abreast|6% (2/35, HQ: 82-97)}}<br>{{TooltipSimple|''Phases: 2''|Samples: 2}} |
|Submarine Ka-Class/Elite | |Submarine Ka-Class/Elite | ||
|Submarine Ka-Class/Elite | |Submarine Ka-Class/Elite | ||
| Line 1,459: | Line 1,473: | ||
|S3 | |S3 | ||
|Defense | |Defense | ||
| − | |{{TooltipSimple|Diamond|31% ( | + | |{{TooltipSimple|Diamond|31% (152/483, HQ: 82-120)}}<br>{{TooltipSimple|''Phases: 2, 3''|Samples: 43, 9}} |
|Seaplane Tender Princess | |Seaplane Tender Princess | ||
|Light Carrier Nu-Class/Elite | |Light Carrier Nu-Class/Elite | ||
| Line 1,469: | Line 1,483: | ||
|S3 | |S3 | ||
|Defense | |Defense | ||
| − | |{{TooltipSimple|Diamond| | + | |{{TooltipSimple|Diamond|43% (209/483, HQ: 81-120)}}<br>{{TooltipSimple|''Phases: 2, 3''|Samples: 63, 9}} |
|Seaplane Tender Princess | |Seaplane Tender Princess | ||
|Light Carrier Nu-Class/Elite III | |Light Carrier Nu-Class/Elite III | ||
| Line 1,479: | Line 1,493: | ||
|S3 | |S3 | ||
|Defense | |Defense | ||
| − | |{{TooltipSimple|Diamond|25% ( | + | |{{TooltipSimple|Diamond|25% (122/483, HQ: 81-120)}}<br>{{TooltipSimple|''Phases: 2, 3''|Samples: 42, 1}} |
|Seaplane Tender Princess | |Seaplane Tender Princess | ||
|Light Carrier Nu-Class/Elite III | |Light Carrier Nu-Class/Elite III | ||
| Line 1,492: | Line 1,506: | ||
|T2 | |T2 | ||
|Boss | |Boss | ||
| − | |{{TooltipSimple|Diamond| | + | |{{TooltipSimple|Diamond|29% (645/2257, HQ: 51-120)}}<br>{{TooltipSimple|''Phases: 2, 3''|Samples: 162, 85}} |
|Seaplane Tender Princess | |Seaplane Tender Princess | ||
|Light Carrier Nu-Class/Elite | |Light Carrier Nu-Class/Elite | ||
| Line 1,502: | Line 1,516: | ||
|T2 | |T2 | ||
|Boss | |Boss | ||
| − | |{{TooltipSimple|Diamond| | + | |{{TooltipSimple|Diamond|50% (1139/2257, HQ: 51-120)}}<br>{{TooltipSimple|''Phases: 2, 3''|Samples: 306, 138}} |
|Seaplane Tender Princess | |Seaplane Tender Princess | ||
|Light Carrier Nu-Class/Elite III | |Light Carrier Nu-Class/Elite III | ||
| Line 1,512: | Line 1,526: | ||
|T2 | |T2 | ||
|Boss/Final | |Boss/Final | ||
| − | |{{TooltipSimple|Diamond|21% ( | + | |{{TooltipSimple|Diamond|21% (473/2257, HQ: 51-120)}}<br>{{TooltipSimple|''Phases: 2, 3''|Samples: 123, 50}} |
|Seaplane Tender Princess | |Seaplane Tender Princess | ||
|Light Carrier Nu-Class/Elite III | |Light Carrier Nu-Class/Elite III | ||
| Line 1,523: | Line 1,537: | ||
|U | |U | ||
|Defense | |Defense | ||
| − | |{{TooltipSimple|Diamond| | + | |{{TooltipSimple|Diamond|50% (3462/6956, HQ: 52-120)}}<br>{{TooltipSimple|''Phases: 3''|Samples: 880}} |
|Airfield Princess/Patrol Aircraft Deployment | |Airfield Princess/Patrol Aircraft Deployment | ||
|Airfield Princess/Patrol Aircraft Deployment | |Airfield Princess/Patrol Aircraft Deployment | ||
| Line 1,529: | Line 1,543: | ||
|U | |U | ||
|Defense | |Defense | ||
| − | |{{TooltipSimple|Diamond|42% ( | + | |{{TooltipSimple|Diamond|42% (2915/6956, HQ: 51-120)}}<br>{{TooltipSimple|''Phases: 3''|Samples: 786}} |
|Airfield Princess/V | |Airfield Princess/V | ||
|Airfield Princess/Patrol Aircraft Deployment | |Airfield Princess/Patrol Aircraft Deployment | ||
| Line 1,536: | Line 1,550: | ||
|U | |U | ||
|Defense | |Defense | ||
| − | |{{TooltipSimple|Diamond| | + | |{{TooltipSimple|Diamond|8% (579/6956, HQ: 59-120)}}<br>{{TooltipSimple|''Phases: 3''|Samples: 196}} |
|Airfield Princess/V | |Airfield Princess/V | ||
|Airfield Princess/Patrol Aircraft Deployment II | |Airfield Princess/Patrol Aircraft Deployment II | ||
| Line 1,544: | Line 1,558: | ||
|V | |V | ||
|Normal | |Normal | ||
| − | |{{TooltipSimple|Line Ahead| | + | |{{TooltipSimple|Line Ahead|63% (371/587, HQ: 79-120)}}<br>{{TooltipSimple|Double Line|14% (84/587, HQ: 98-120)}}<br>{{TooltipSimple|Echelon|22% (132/587, HQ: 87-120)}}<br>{{TooltipSimple|''Phases: 3''|Samples: 118}} |
|PT Imp Pack/III | |PT Imp Pack/III | ||
|PT Imp Pack/II | |PT Imp Pack/II | ||
| Line 1,555: | Line 1,569: | ||
|W | |W | ||
|Normal | |Normal | ||
| − | |{{TooltipSimple|Line Ahead|37% ( | + | |{{TooltipSimple|Line Ahead|37% (2512/6713, HQ: 52-120)}}<br>{{TooltipSimple|Double Line|28% (1876/6713, HQ: 51-120)}}<br>{{TooltipSimple|Vanguard|35% (2325/6713, HQ: 52-120)}}<br>{{TooltipSimple|''Phases: 3''|Samples: 1804}} |
|Light Cruiser He-Class/Flagship | |Light Cruiser He-Class/Flagship | ||
|Torpedo Cruiser Chi-Class/Elite | |Torpedo Cruiser Chi-Class/Elite | ||
| Line 1,567: | Line 1,581: | ||
|W2 | |W2 | ||
|Boss | |Boss | ||
| − | |{{TooltipSimple|Line Ahead| | + | |{{TooltipSimple|Line Ahead|39% (2502/6495, HQ: 52-120)}}<br>{{TooltipSimple|''Phases: 3''|Samples: 576}} |
|New Battleship Princess | |New Battleship Princess | ||
|Battleship Ta-Class | |Battleship Ta-Class | ||
| Line 1,577: | Line 1,591: | ||
|W2 | |W2 | ||
|Boss | |Boss | ||
| − | |{{TooltipSimple|Line Ahead| | + | |{{TooltipSimple|Line Ahead|39% (2522/6495, HQ: 52-120)}}<br>{{TooltipSimple|''Phases: 3''|Samples: 555}} |
|New Battleship Princess | |New Battleship Princess | ||
|Battleship Ta-Class | |Battleship Ta-Class | ||
| Line 1,587: | Line 1,601: | ||
|W2 | |W2 | ||
|Boss/Final | |Boss/Final | ||
| − | |{{TooltipSimple|Line Ahead|23% ( | + | |{{TooltipSimple|Line Ahead|23% (1471/6495, HQ: 59-120)}}<br>{{TooltipSimple|''Phases: 3''|Samples: 431}} |
|New Battleship Princess/Damaged | |New Battleship Princess/Damaged | ||
|Battleship Ta-Class | |Battleship Ta-Class | ||
| Line 1,602: | Line 1,616: | ||
|AB | |AB | ||
|Raid | |Raid | ||
| − | |{{TooltipSimple|Diamond| | + | |{{TooltipSimple|Diamond|29% (436/1504)}} |
|Airfield Princess/V | |Airfield Princess/V | ||
|- | |- | ||
|AB | |AB | ||
|Raid | |Raid | ||
| − | |{{TooltipSimple|Diamond| | + | |{{TooltipSimple|Diamond|41% (618/1504)}} |
|Airfield Princess/VI | |Airfield Princess/VI | ||
|- | |- | ||
|AB | |AB | ||
|Raid | |Raid | ||
| − | |{{TooltipSimple|Diamond|30% ( | + | |{{TooltipSimple|Diamond|30% (450/1504)}} |
|Airfield Princess/V | |Airfield Princess/V | ||
|Airfield Princess/V | |Airfield Princess/V | ||
| Line 1,620: | Line 1,634: | ||
|B | |B | ||
|Defense | |Defense | ||
| − | |{{TooltipSimple|Diamond|28% ( | + | |{{TooltipSimple|Diamond|28% (449/1590, HQ: 34-120)}}<br>{{TooltipSimple|''Phases: 1, 2, 3''|Samples: 149, 9, 21}} |
|Airfield Princess/V | |Airfield Princess/V | ||
|- | |- | ||
|B | |B | ||
|Defense | |Defense | ||
| − | |{{TooltipSimple|Diamond| | + | |{{TooltipSimple|Diamond|46% (724/1590, HQ: 34-120)}}<br>{{TooltipSimple|''Phases: 1, 2, 3''|Samples: 270, 9, 21}} |
|Airfield Princess/VI | |Airfield Princess/VI | ||
|- | |- | ||
|B | |B | ||
|Defense | |Defense | ||
| − | |{{TooltipSimple|Diamond|26% ( | + | |{{TooltipSimple|Diamond|26% (417/1590, HQ: 34-120)}}<br>{{TooltipSimple|''Phases: 1, 2, 3''|Samples: 154, 4, 6}} |
|Airfield Princess/V | |Airfield Princess/V | ||
|Airfield Princess/V | |Airfield Princess/V | ||
| Line 1,637: | Line 1,651: | ||
|C | |C | ||
|Normal | |Normal | ||
| − | |{{TooltipSimple|Echelon|28% ( | + | |{{TooltipSimple|Echelon|28% (397/1396, HQ: 35-120)}}<br>{{TooltipSimple|Line Abreast|28% (392/1396, HQ: 34-120)}}<br>{{TooltipSimple|''Phases: 1, 2, 3''|Samples: 301, 8, 20}} |
|Submarine Ka-Class | |Submarine Ka-Class | ||
|Submarine Ka-Class | |Submarine Ka-Class | ||
| Line 1,644: | Line 1,658: | ||
|C | |C | ||
|Normal | |Normal | ||
| − | |{{TooltipSimple|Echelon|23% ( | + | |{{TooltipSimple|Echelon|23% (322/1396, HQ: 35-120)}}<br>{{TooltipSimple|Line Abreast|20% (285/1396, HQ: 35-120)}}<br>{{TooltipSimple|''Phases: 1, 2, 3''|Samples: 216, 5, 9}} |
|Submarine Ka-Class/Elite | |Submarine Ka-Class/Elite | ||
|Submarine Ka-Class | |Submarine Ka-Class | ||
| Line 1,652: | Line 1,666: | ||
|D | |D | ||
|Defense | |Defense | ||
| − | |{{TooltipSimple|Diamond|22% ( | + | |{{TooltipSimple|Diamond|22% (75/336, HQ: 59-120)}}<br>{{TooltipSimple|''Phases: 1, 2, 3''|Samples: 29, 1, 3}} |
|Airfield Princess/V | |Airfield Princess/V | ||
|- | |- | ||
|D | |D | ||
|Defense | |Defense | ||
| − | |{{TooltipSimple|Diamond|40% ( | + | |{{TooltipSimple|Diamond|40% (133/336, HQ: 60-120)}}<br>{{TooltipSimple|''Phases: 1, 2, 3''|Samples: 32, 6, 6}} |
|Airfield Princess/VI | |Airfield Princess/VI | ||
|- | |- | ||
|D | |D | ||
|Defense | |Defense | ||
| − | |{{TooltipSimple|Diamond|38% ( | + | |{{TooltipSimple|Diamond|38% (128/336, HQ: 59-120)}}<br>{{TooltipSimple|''Phases: 1, 2, 3''|Samples: 17, 1, 2}} |
|Airfield Princess/V | |Airfield Princess/V | ||
|Airfield Princess/V | |Airfield Princess/V | ||
| Line 1,669: | Line 1,683: | ||
|E | |E | ||
|Normal | |Normal | ||
| − | |{{TooltipSimple|Line Ahead|23% (3/13, HQ: 105-111)}}<br>{{TooltipSimple|Double Line|23% (3/13, HQ: 90-115)}}<br>{{TooltipSimple|Echelon|54% (7/13, HQ: 90-120)}}<br>{{TooltipSimple|''Phases: 1''|Samples: 1}} | + | |{{TooltipSimple|Line Ahead|23% (3/13, HQ: 105-111)}}<br>{{TooltipSimple|Double Line|23% (3/13, HQ: 90-115)}}<br>{{TooltipSimple|Echelon|54% (7/13, HQ: 90-120)}}<br>{{TooltipSimple|''Phases: 1, 2''|Samples: 1, 1}} |
|Light Cruiser Ho-Class/Elite | |Light Cruiser Ho-Class/Elite | ||
|Torpedo Cruiser Chi-Class | |Torpedo Cruiser Chi-Class | ||
| Line 1,680: | Line 1,694: | ||
|F | |F | ||
|Normal | |Normal | ||
| − | |{{TooltipSimple|Line Ahead| | + | |{{TooltipSimple|Line Ahead|49% (651/1324, HQ: 35-120)}}<br>{{TooltipSimple|Double Line|20% (267/1324, HQ: 35-120)}}<br>{{TooltipSimple|Vanguard|31% (406/1324, HQ: 34-120)}}<br>{{TooltipSimple|''Phases: 1, 2, 3''|Samples: 500, 5, 23}} |
|Heavy Cruiser Ri-Class/Elite | |Heavy Cruiser Ri-Class/Elite | ||
|Heavy Cruiser Ri-Class | |Heavy Cruiser Ri-Class | ||
| Line 1,690: | Line 1,704: | ||
|G | |G | ||
|Normal | |Normal | ||
| − | |{{TooltipSimple|Echelon|26% ( | + | |{{TooltipSimple|Echelon|26% (60/231, HQ: 56-120)}}<br>{{TooltipSimple|Line Abreast|37% (85/231, HQ: 56-120)}}<br>{{TooltipSimple|''Phases: 1, 2, 3''|Samples: 12, 15, 9}} |
|Submarine Ka-Class | |Submarine Ka-Class | ||
|Submarine Ka-Class | |Submarine Ka-Class | ||
| Line 1,697: | Line 1,711: | ||
|G | |G | ||
|Normal | |Normal | ||
| − | |{{TooltipSimple|Echelon| | + | |{{TooltipSimple|Echelon|17% (40/231, HQ: 56-120)}}<br>{{TooltipSimple|Line Abreast|20% (46/231, HQ: 58-120)}}<br>{{TooltipSimple|''Phases: 1, 2, 3''|Samples: 7, 5, 5}} |
|Submarine Ka-Class/Elite | |Submarine Ka-Class/Elite | ||
|Submarine Ka-Class | |Submarine Ka-Class | ||
| Line 1,705: | Line 1,719: | ||
|H | |H | ||
|Defense | |Defense | ||
| − | |{{TooltipSimple|Diamond|37% ( | + | |{{TooltipSimple|Diamond|37% (25/68, HQ: 56-113)}}<br>{{TooltipSimple|''Phases: 1, 2, 3''|Samples: 4, 8, 8}} |
|Airfield Princess/V | |Airfield Princess/V | ||
|- | |- | ||
|H | |H | ||
|Defense | |Defense | ||
| − | |{{TooltipSimple|Diamond| | + | |{{TooltipSimple|Diamond|35% (24/68, HQ: 56-120)}}<br>{{TooltipSimple|''Phases: 1, 2, 3''|Samples: 5, 3, 2}} |
|Airfield Princess/VI | |Airfield Princess/VI | ||
|- | |- | ||
|H | |H | ||
|Defense | |Defense | ||
| − | |{{TooltipSimple|Diamond| | + | |{{TooltipSimple|Diamond|28% (19/68, HQ: 56-112)}}<br>{{TooltipSimple|''Phases: 1, 2, 3''|Samples: 7, 4, 2}} |
|Airfield Princess/V | |Airfield Princess/V | ||
|Airfield Princess/V | |Airfield Princess/V | ||
| Line 1,730: | Line 1,744: | ||
|J | |J | ||
|Normal | |Normal | ||
| − | |{{TooltipSimple|Line Ahead| | + | |{{TooltipSimple|Line Ahead|64% (120/188, HQ: 56-120)}}<br>{{TooltipSimple|Double Line|17% (32/188, HQ: 56-120)}}<br>{{TooltipSimple|Echelon|19% (36/188, HQ: 69-120)}}<br>{{TooltipSimple|''Phases: 1, 2, 3''|Samples: 19, 13, 11}} |
|Heavy Cruiser Ri-Class/Elite | |Heavy Cruiser Ri-Class/Elite | ||
|Light Cruiser Ho-Class | |Light Cruiser Ho-Class | ||
| Line 1,740: | Line 1,754: | ||
|K | |K | ||
|Defense | |Defense | ||
| − | |{{TooltipSimple|Diamond| | + | |{{TooltipSimple|Diamond|36% (5/14, HQ: 72-112)}}<br>{{TooltipSimple|''Phases: 2, 3''|Samples: 1, 2}} |
|Airfield Princess/V | |Airfield Princess/V | ||
|- | |- | ||
|K | |K | ||
|Defense | |Defense | ||
| − | |{{TooltipSimple|Diamond| | + | |{{TooltipSimple|Diamond|43% (6/14, HQ: 72-120)}}<br>{{TooltipSimple|''Phases: 1, 2, 3''|Samples: 5, 1, 4}} |
|Airfield Princess/VI | |Airfield Princess/VI | ||
|- | |- | ||
|K | |K | ||
|Defense | |Defense | ||
| − | |{{TooltipSimple|Diamond| | + | |{{TooltipSimple|Diamond|21% (3/14, HQ: 96-113)}}<br>{{TooltipSimple|''Phases: 1, 3''|Samples: 3, 2}} |
|Airfield Princess/V | |Airfield Princess/V | ||
|Airfield Princess/V | |Airfield Princess/V | ||
| Line 1,757: | Line 1,771: | ||
|L | |L | ||
|Normal | |Normal | ||
| − | |{{TooltipSimple|Line Ahead| | + | |{{TooltipSimple|Line Ahead|52% (90/172, HQ: 65-120)}}<br>{{TooltipSimple|Double Line|29% (50/172, HQ: 56-120)}}<br>{{TooltipSimple|''Phases: 1, 2, 3''|Samples: 17, 3, 4}} |
|Battleship Ru-Class/Elite | |Battleship Ru-Class/Elite | ||
|Heavy Cruiser Ri-Class | |Heavy Cruiser Ri-Class | ||
| Line 1,766: | Line 1,780: | ||
|L | |L | ||
|Normal | |Normal | ||
| − | |{{TooltipSimple|Line Ahead| | + | |{{TooltipSimple|Line Ahead|19% (32/172, HQ: 69-120)}}<br>{{TooltipSimple|''Phases: 1, 2, 3''|Samples: 2, 1, 2}} |
|Battleship Ru-Class/Elite | |Battleship Ru-Class/Elite | ||
|Heavy Cruiser Ri-Class/Elite | |Heavy Cruiser Ri-Class/Elite | ||
| Line 1,779: | Line 1,793: | ||
|O | |O | ||
|Boss | |Boss | ||
| − | |{{TooltipSimple|Line Ahead| | + | |{{TooltipSimple|Line Ahead|55% (697/1261, HQ: 35-120)}}<br>{{TooltipSimple|Double Line|33% (410/1261, HQ: 34-120)}}<br>{{TooltipSimple|''Phases: 1, 2, 3''|Samples: 362, 6, 20}} |
|Anti-Air Cruiser Princess | |Anti-Air Cruiser Princess | ||
|Heavy Cruiser Ri-Class | |Heavy Cruiser Ri-Class | ||
| Line 1,788: | Line 1,802: | ||
|O | |O | ||
|Boss/Final | |Boss/Final | ||
| − | |{{TooltipSimple|Line Ahead| | + | |{{TooltipSimple|Line Ahead|12% (154/1261, HQ: 36-120)}}<br>{{TooltipSimple|''Phases: 1''|Samples: 42}} |
|Anti-Air Cruiser Princess/Damaged | |Anti-Air Cruiser Princess/Damaged | ||
|Heavy Cruiser Ri-Class | |Heavy Cruiser Ri-Class | ||
| Line 1,799: | Line 1,813: | ||
|P | |P | ||
|Normal | |Normal | ||
| − | |{{TooltipSimple|Echelon|40% ( | + | |{{TooltipSimple|Echelon|40% (2797/6965, HQ: 37-120)}}<br>{{TooltipSimple|Line Abreast|40% (2784/6965, HQ: 37-120)}}<br>{{TooltipSimple|''Phases: 2, 3''|Samples: 372, 1130}} |
|Submarine Ka-Class/Elite | |Submarine Ka-Class/Elite | ||
|Submarine Ka-Class | |Submarine Ka-Class | ||
| Line 1,806: | Line 1,820: | ||
|P | |P | ||
|Normal | |Normal | ||
| − | |{{TooltipSimple|Echelon|10% ( | + | |{{TooltipSimple|Echelon|10% (683/6965, HQ: 44-120)}}<br>{{TooltipSimple|Line Abreast|10% (701/6965, HQ: 51-120)}}<br>{{TooltipSimple|''Phases: 2, 3''|Samples: 92, 278}} |
|Submarine Ka-Class/Elite | |Submarine Ka-Class/Elite | ||
|Submarine Ka-Class/Elite | |Submarine Ka-Class/Elite | ||
| Line 1,815: | Line 1,829: | ||
|R | |R | ||
|Normal | |Normal | ||
| − | |{{TooltipSimple|Line Ahead|58% ( | + | |{{TooltipSimple|Line Ahead|58% (2587/4498, HQ: 39-120)}}<br>{{TooltipSimple|Double Line|23% (1030/4498, HQ: 39-120)}}<br>{{TooltipSimple|Vanguard|20% (881/4498, HQ: 42-120)}}<br>{{TooltipSimple|''Phases: 2, 3''|Samples: 2, 1140}} |
|Destroyer Ro-Class/Late Model | |Destroyer Ro-Class/Late Model | ||
|Destroyer Ro-Class/Late Model | |Destroyer Ro-Class/Late Model | ||
| Line 1,826: | Line 1,840: | ||
|S | |S | ||
|Normal | |Normal | ||
| − | |{{TooltipSimple|Line Ahead|59% ( | + | |{{TooltipSimple|Line Ahead|59% (1354/2307, HQ: 37-120)}}<br>{{TooltipSimple|Double Line|27% (624/2307, HQ: 37-120)}}<br>{{TooltipSimple|Vanguard|14% (329/2307, HQ: 37-120)}}<br>{{TooltipSimple|''Phases: 2, 3''|Samples: 452, 248}} |
|Destroyer Ro-Class/Late Model | |Destroyer Ro-Class/Late Model | ||
|Destroyer Ro-Class/Late Model | |Destroyer Ro-Class/Late Model | ||
| Line 1,836: | Line 1,850: | ||
|S1 | |S1 | ||
|Normal | |Normal | ||
| − | |{{TooltipSimple|Line Ahead|59% ( | + | |{{TooltipSimple|Line Ahead|59% (1336/2246, HQ: 37-120)}}<br>{{TooltipSimple|Double Line|27% (599/2246, HQ: 37-120)}}<br>{{TooltipSimple|''Phases: 2, 3''|Samples: 346, 206}} |
|Light Cruiser He-Class/Elite | |Light Cruiser He-Class/Elite | ||
|Heavy Cruiser Ne-Class | |Heavy Cruiser Ne-Class | ||
| Line 1,845: | Line 1,859: | ||
|S1 | |S1 | ||
|Normal | |Normal | ||
| − | |{{TooltipSimple|Line Ahead|14% ( | + | |{{TooltipSimple|Line Ahead|14% (311/2246, HQ: 37-120)}}<br>{{TooltipSimple|''Phases: 2, 3''|Samples: 61, 37}} |
|Light Cruiser He-Class/Elite | |Light Cruiser He-Class/Elite | ||
|Heavy Cruiser Ne-Class | |Heavy Cruiser Ne-Class | ||
| Line 1,856: | Line 1,870: | ||
|S2 | |S2 | ||
|Normal | |Normal | ||
| − | |{{TooltipSimple|Echelon|50% (6/12, HQ: 96-106)}}<br>{{TooltipSimple|Line Abreast|33% (4/12, HQ: 96-106)}} | + | |{{TooltipSimple|Echelon|50% (6/12, HQ: 96-106)}}<br>{{TooltipSimple|Line Abreast|33% (4/12, HQ: 96-106)}}<br>{{TooltipSimple|''Phases: 2''|Samples: 2}} |
|Submarine Ka-Class/Elite | |Submarine Ka-Class/Elite | ||
|Submarine Ka-Class | |Submarine Ka-Class | ||
| Line 1,871: | Line 1,885: | ||
|S3 | |S3 | ||
|Defense | |Defense | ||
| − | |{{TooltipSimple|Diamond| | + | |{{TooltipSimple|Diamond|36% (183/512, HQ: 67-120)}}<br>{{TooltipSimple|''Phases: 2, 3''|Samples: 22, 1}} |
|Seaplane Tender Princess | |Seaplane Tender Princess | ||
|Light Carrier Nu-Class/Elite | |Light Carrier Nu-Class/Elite | ||
| Line 1,880: | Line 1,894: | ||
|S3 | |S3 | ||
|Defense | |Defense | ||
| − | |{{TooltipSimple|Diamond| | + | |{{TooltipSimple|Diamond|41% (209/512, HQ: 67-120)}}<br>{{TooltipSimple|''Phases: 2, 3''|Samples: 20, 3}} |
|Seaplane Tender Princess | |Seaplane Tender Princess | ||
|Light Carrier Nu-Class/Elite III | |Light Carrier Nu-Class/Elite III | ||
| Line 1,890: | Line 1,904: | ||
|S3 | |S3 | ||
|Defense | |Defense | ||
| − | |{{TooltipSimple|Diamond| | + | |{{TooltipSimple|Diamond|23% (120/512, HQ: 70-120)}}<br>{{TooltipSimple|''Phases: 2, 3''|Samples: 13, 2}} |
|Seaplane Tender Princess | |Seaplane Tender Princess | ||
|Light Carrier Nu-Class/Elite III | |Light Carrier Nu-Class/Elite III | ||
| Line 1,903: | Line 1,917: | ||
|T2 | |T2 | ||
|Boss | |Boss | ||
| − | |{{TooltipSimple|Diamond|31% ( | + | |{{TooltipSimple|Diamond|31% (649/2092, HQ: 37-120)}}<br>{{TooltipSimple|''Phases: 2, 3''|Samples: 108, 64}} |
|Seaplane Tender Princess | |Seaplane Tender Princess | ||
|Light Carrier Nu-Class/Elite | |Light Carrier Nu-Class/Elite | ||
| Line 1,912: | Line 1,926: | ||
|T2 | |T2 | ||
|Boss | |Boss | ||
| − | |{{TooltipSimple|Diamond|49% ( | + | |{{TooltipSimple|Diamond|49% (1030/2092, HQ: 38-120)}}<br>{{TooltipSimple|''Phases: 2, 3''|Samples: 161, 113}} |
|Seaplane Tender Princess | |Seaplane Tender Princess | ||
|Light Carrier Nu-Class/Elite | |Light Carrier Nu-Class/Elite | ||
| Line 1,922: | Line 1,936: | ||
|T2 | |T2 | ||
|Boss/Final | |Boss/Final | ||
| − | |{{TooltipSimple|Diamond| | + | |{{TooltipSimple|Diamond|20% (413/2092, HQ: 37-120)}}<br>{{TooltipSimple|''Phases: 2, 3''|Samples: 63, 46}} |
|Seaplane Tender Princess | |Seaplane Tender Princess | ||
|Light Carrier Nu-Class/Elite III | |Light Carrier Nu-Class/Elite III | ||
| Line 1,933: | Line 1,947: | ||
|U | |U | ||
|Defense | |Defense | ||
| − | |{{TooltipSimple|Diamond| | + | |{{TooltipSimple|Diamond|50% (2106/4239, HQ: 39-120)}}<br>{{TooltipSimple|''Phases: 3''|Samples: 417}} |
|Airfield Princess/Patrol Aircraft Deployment | |Airfield Princess/Patrol Aircraft Deployment | ||
|- | |- | ||
|U | |U | ||
|Defense | |Defense | ||
| − | |{{TooltipSimple|Diamond|43% ( | + | |{{TooltipSimple|Diamond|43% (1805/4239, HQ: 39-120)}}<br>{{TooltipSimple|''Phases: 3''|Samples: 514}} |
|Airfield Princess/V | |Airfield Princess/V | ||
|Airfield Princess/Patrol Aircraft Deployment | |Airfield Princess/Patrol Aircraft Deployment | ||
| Line 1,944: | Line 1,958: | ||
|U | |U | ||
|Defense | |Defense | ||
| − | |{{TooltipSimple|Diamond|8% ( | + | |{{TooltipSimple|Diamond|8% (328/4239, HQ: 42-120)}}<br>{{TooltipSimple|''Phases: 3''|Samples: 143}} |
|Airfield Princess/V | |Airfield Princess/V | ||
|Airfield Princess/Patrol Aircraft Deployment II | |Airfield Princess/Patrol Aircraft Deployment II | ||
| Line 1,951: | Line 1,965: | ||
|V | |V | ||
|Normal | |Normal | ||
| − | |{{TooltipSimple|Line Ahead| | + | |{{TooltipSimple|Line Ahead|64% (190/296, HQ: 60-120)}}<br>{{TooltipSimple|Double Line|16% (47/296, HQ: 72-120)}}<br>{{TooltipSimple|Echelon|20% (59/296, HQ: 74-119)}}<br>{{TooltipSimple|''Phases: 3''|Samples: 30}} |
|PT Imp Pack/III | |PT Imp Pack/III | ||
|PT Imp Pack/II | |PT Imp Pack/II | ||
| Line 1,962: | Line 1,976: | ||
|W | |W | ||
|Normal | |Normal | ||
| − | |{{TooltipSimple|Line Ahead|38% ( | + | |{{TooltipSimple|Line Ahead|38% (1579/4108, HQ: 39-120)}}<br>{{TooltipSimple|Double Line|27% (1106/4108, HQ: 39-120)}}<br>{{TooltipSimple|Vanguard|35% (1423/4108, HQ: 39-120)}}<br>{{TooltipSimple|''Phases: 3''|Samples: 1045}} |
|Light Cruiser He-Class/Elite | |Light Cruiser He-Class/Elite | ||
|Torpedo Cruiser Chi-Class | |Torpedo Cruiser Chi-Class | ||
| Line 1,974: | Line 1,988: | ||
|W2 | |W2 | ||
|Boss | |Boss | ||
| − | |{{TooltipSimple|Line Ahead| | + | |{{TooltipSimple|Line Ahead|39% (1592/4051, HQ: 39-120)}}<br>{{TooltipSimple|''Phases: 3''|Samples: 300}} |
|New Battleship Princess | |New Battleship Princess | ||
|Heavy Cruiser Ne-Class | |Heavy Cruiser Ne-Class | ||
| Line 1,984: | Line 1,998: | ||
|W2 | |W2 | ||
|Boss | |Boss | ||
| − | |{{TooltipSimple|Line Ahead|38% ( | + | |{{TooltipSimple|Line Ahead|38% (1546/4051, HQ: 39-120)}}<br>{{TooltipSimple|''Phases: 3''|Samples: 293}} |
|New Battleship Princess | |New Battleship Princess | ||
|Heavy Cruiser Ne-Class | |Heavy Cruiser Ne-Class | ||
| Line 1,994: | Line 2,008: | ||
|W2 | |W2 | ||
|Boss/Final | |Boss/Final | ||
| − | |{{TooltipSimple|Line Ahead|23% ( | + | |{{TooltipSimple|Line Ahead|23% (913/4051, HQ: 42-120)}}<br>{{TooltipSimple|''Phases: 3''|Samples: 363}} |
|New Battleship Princess/Damaged | |New Battleship Princess/Damaged | ||
|Battleship Ta-Class | |Battleship Ta-Class | ||
Latest revision as of 13:37, 8 July 2022
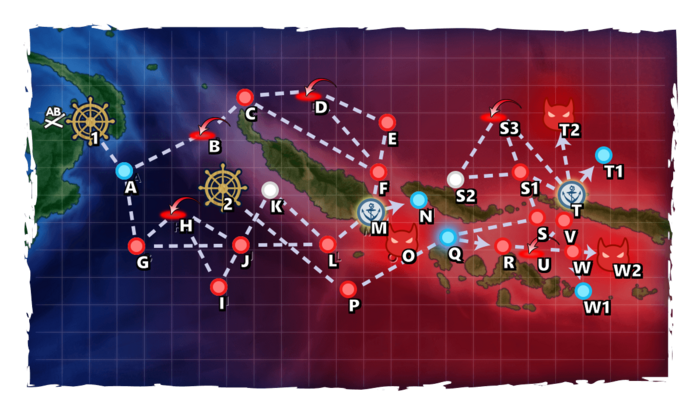
| Type | Ships |
|---|---|
| DE | |
| DD |
| Type | Ships |
|---|---|
| DE | |
| DD |
| Type | Ships |
|---|---|
| DE | |
| DD | |
| SSV | |
| AV | |
| AS |
| Type | Ships |
|---|---|
| DE | |
| DD |
| Type | Ships |
|---|---|
| DE | |
| DD |
| Type | Ships |
|---|---|
| DE | |
| DD |
| Type | Ships |
|---|---|
| DE | |
| DD | |
| CV | |
| SSV | |
| AV | |
| AS |
| Type | Ships |
|---|---|
| DE | |
| DD | |
| SS | |
| AV | |
| AS |
| Type | Ships |
|---|---|
| DE | |
| DD | |
| CV | |
| SSV | |
| AV | |
| AS |
E-2 Hard AB
| # | Formation | Air Raids | AD/AP AS/AS+ |
|---|---|---|---|
| AB | Diamond | 39/78 174/348 | |
| Diamond | 51/101 225/450 | ||
| Diamond | 57/114 255/510 | ||
| Diamond | 62/123 276/552 | ||
| Diamond | 69/137 306/612 | ||
| # | Formation | Air Raids | AD/AP AS/AS+ |
E-2 Hard A
| # | Empty Node | ||
|---|---|---|---|
| A | 気のせいだった。 R方面部隊、増援輸送部隊、発進! Must be my imagination. R-Area Unit, reinforcement transport unit, launch! | ||
| # | Empty Node | ||
E-2 Hard B: 深海基地航空隊 (PoiDB)
| # | Formation | Air Defense Node | AD/AP AS/AS+ |
|---|---|---|---|
| B | Diamond Phases: 1, 2, 3 |
39/78 174/348 | |
| Diamond Phases: 1, 2, 3 |
44/87 195/390 | ||
| Diamond Phases: 1, 2, 3 |
51/101 225/450 | ||
| Diamond Phases: 1, 2, 3 |
57/114 255/510 | ||
| Diamond Phases: 1 |
62/123 276/552 | ||
| Diamond Phases: 1 |
69/137 306/612 | ||
| # | Formation | Air Defense Node | AD/AP AS/AS+ |
E-2 Hard C: 深海潜水艦隊 前衛哨戒 III群 (PoiDB)
| # | Formation | Normal Battle Node | AD/AP AS/AS+ |
|---|---|---|---|
| C | Echelon Line Abreast Phases: 1, 2, 3 |
0/0 0/0 | |
| Echelon Line Abreast Phases: 1, 2, 3 |
0/0 0/0 | ||
| Echelon Line Abreast Phases: 1, 2, 3 |
0/0 0/0 | ||
| # | Formation | Normal Battle Node | AD/AP AS/AS+ |
E-2 Hard D: 深海基地航空隊 (PoiDB)
| # | Formation | Air Defense Node | AD/AP AS/AS+ |
|---|---|---|---|
| D | Diamond Phases: 1, 3 |
39/78 174/348 | |
| Diamond Phases: 1, 3 |
44/87 195/390 | ||
| Diamond Phases: 1, 3 |
51/101 225/450 | ||
| Diamond Phases: 1, 2, 3 |
57/114 255/510 | ||
| Diamond Phases: 1, 3 |
62/123 276/552 | ||
| Diamond Phases: 1, 3 |
69/137 306/612 | ||
| # | Formation | Air Defense Node | AD/AP AS/AS+ |
E-2 Hard E: 深海任務部隊 警戒水雷戦隊 (PoiDB)
| # | Formation | Normal Battle Node | AD/AP AS/AS+ |
|---|---|---|---|
| E | Line Ahead Double Line Echelon Phases: 1, 3 |
0/0 0/0 | |
| # | Formation | Normal Battle Node | AD/AP AS/AS+ |
E-2 Hard F: 深海任務部隊 巡洋艦戦隊 (PoiDB)
| # | Formation | Normal Battle Node | AD/AP AS/AS+ |
|---|---|---|---|
| F | Line Ahead Double Line Vanguard Phases: 1, 3 |
0/0 0/0 | |
| # | Formation | Normal Battle Node | AD/AP AS/AS+ |
E-2 Hard G: 深海潜水艦隊 前衛哨戒 II群 (PoiDB)
| # | Formation | Normal Battle Node | AD/AP AS/AS+ |
|---|---|---|---|
| G | Echelon Line Abreast Phases: 1, 2, 3 |
0/0 0/0 | |
| Echelon Line Abreast Phases: 1, 3 |
0/0 0/0 | ||
| Echelon Line Abreast Phases: 1, 2, 3 |
0/0 0/0 | ||
| # | Formation | Normal Battle Node | AD/AP AS/AS+ |
E-2 Hard H: 深海基地航空隊 (PoiDB)
| # | Formation | Air Defense Node | AD/AP AS/AS+ |
|---|---|---|---|
| H | Diamond Phases: 1, 3 |
39/78 174/348 | |
| Diamond Phases: 1, 2, 3 |
44/87 195/390 | ||
| Diamond Phases: 1, 3 |
51/101 225/450 | ||
| Diamond Phases: 1, 3 |
57/114 255/510 | ||
| Diamond | 62/123 276/552 | ||
| Diamond | 69/137 306/612 | ||
| # | Formation | Air Defense Node | AD/AP AS/AS+ |
E-2 Hard I: 深海潜水艦隊 前衛哨戒 I群 (PoiDB)
| # | Formation | Normal Battle Node | AD/AP AS/AS+ |
|---|---|---|---|
| I | Echelon Line Abreast Phases: 3 |
0/0 0/0 | |
| Line Abreast Phases: 1, 2 |
0/0 0/0 | ||
| Echelon | 0/0 0/0 | ||
| # | Formation | Normal Battle Node | AD/AP AS/AS+ |
E-2 Hard J: 深海任務部隊 水上打撃集団前衛 (PoiDB)
| # | Formation | Normal Battle Node | AD/AP AS/AS+ |
|---|---|---|---|
| J | Line Ahead Double Line Echelon Phases: 1, 2, 3 |
0/0 0/0 | |
| # | Formation | Normal Battle Node | AD/AP AS/AS+ |
E-2 Hard K: 深海基地航空隊 (PoiDB)
| # | Formation | Air Defense Node | AD/AP AS/AS+ |
|---|---|---|---|
| K | Diamond Phases: 1, 3 |
39/78 174/348 | |
| Diamond Phases: 1, 3 |
44/87 195/390 | ||
| Diamond Phases: 1, 3 |
51/101 225/450 | ||
| Diamond Phases: 1, 3 |
57/114 255/510 | ||
| Diamond Phases: 1, 3 |
62/123 276/552 | ||
| Diamond Phases: 3 |
69/137 306/612 | ||
| # | Formation | Air Defense Node | AD/AP AS/AS+ |
E-2 Hard L: 深海任務部隊 水上打撃集団 (PoiDB)
| # | Formation | Normal Battle Node | AD/AP AS/AS+ |
|---|---|---|---|
| L | Line Ahead Double Line Phases: 1, 2, 3 |
0/0 0/0 | |
| Line Ahead Phases: 1, 3 |
36/72 161/321 | ||
| # | Formation | Normal Battle Node | AD/AP AS/AS+ |
E-2 Hard M
| # | Landing Node | ||
|---|---|---|---|
| M | ショートランドに到着しました。 We've arrived at Shortland. | ||
| # | Landing Node | ||
E-2 Hard N
| # | Empty Node | ||
|---|---|---|---|
| N | 敵影を見ず。 R方面部隊、増援輸送部隊、発進! No enemy spotted. R-Area Unit, reinforcement transport unit, launch! | ||
| # | Empty Node | ||
E-2 Hard O: 深海任務部隊 前衛群主力戦隊 (PoiDB)
| # | Formation | Boss Battle Node | AD/AP AS/AS+ |
|---|---|---|---|
| O | Line Ahead Double Line Phases: 1, 2, 3 |
0/0 0/0 | |
| Line Ahead Phases: 1 (Final)
|
0/0 0/0 | ||
| # | Formation | Boss Battle Node | AD/AP AS/AS+ |
E-2 Hard P: 深海潜水艦隊 南方哨戒警戒群 (PoiDB)
| # | Formation | Normal Battle Node | AD/AP AS/AS+ |
|---|---|---|---|
| P | Echelon Line Abreast Phases: 2, 3 |
0/0 0/0 | |
| Echelon Line Abreast Phases: 2, 3 |
0/0 0/0 | ||
| Echelon Line Abreast Phases: 2, 3 |
0/0 0/0 | ||
| # | Formation | Normal Battle Node | AD/AP AS/AS+ |
E-2 Hard Q
| # | Selection Node | ||
|---|---|---|---|
| Q | 艦隊の針路を選択できます。提督、どちらの針路をとられますか? You can decide the fleet's course. Admiral, which heading should we take? | ||
| # | Selection Node | ||
E-2 Hard R: 深海任務部隊 哨戒駆逐隊 I群 (PoiDB)
| # | Formation | Normal Battle Node | AD/AP AS/AS+ |
|---|---|---|---|
| R | Line Ahead Double Line Vanguard Phases: 2, 3 |
0/0 0/0 | |
| # | Formation | Normal Battle Node | AD/AP AS/AS+ |
E-2 Hard S: 深海任務部隊 哨戒駆逐隊 II群 (PoiDB)
| # | Formation | Normal Battle Node | AD/AP AS/AS+ |
|---|---|---|---|
| S | Line Ahead Double Line Vanguard Phases: 2, 3 |
0/0 0/0 | |
| # | Formation | Normal Battle Node | AD/AP AS/AS+ |
E-2 Hard S1: 深海任務部隊 増援部隊前衛集団 (PoiDB)
| # | Formation | Normal Battle Node | AD/AP AS/AS+ |
|---|---|---|---|
| S1 | Line Ahead Double Line Phases: 2, 3 |
0/0 0/0 | |
| Line Ahead Phases: 2, 3 |
0/0 0/0 | ||
| # | Formation | Normal Battle Node | AD/AP AS/AS+ |
E-2 Hard S2: 深海潜水艦隊 北方哨戒警戒群 (PoiDB)
| # | Formation | Normal Battle Node | AD/AP AS/AS+ |
|---|---|---|---|
| S2 | Echelon Line Abreast Phases: 2, 3 |
0/0 0/0 | |
| Echelon Line Abreast Phases: 2 |
0/0 0/0 | ||
| Echelon Line Abreast Phases: 2 |
0/0 0/0 | ||
| # | Formation | Normal Battle Node | AD/AP AS/AS+ |
E-2 Hard S3: 深海任務部隊 戦闘哨戒艦載機群 (PoiDB)
| # | Formation | Air Defense Node | AD/AP AS/AS+ |
|---|---|---|---|
| S3 | Diamond Phases: 2, 3 |
67/133 297/594 | |
| Diamond Phases: 2, 3 |
111/221 495/990 | ||
| Diamond Phases: 2, 3 |
109/217 486/972 | ||
| # | Formation | Air Defense Node | AD/AP AS/AS+ |
E-2 Hard T
| # | Landing Node | ||
|---|---|---|---|
| T | レカタに到着しました。 We've arrived at Lekata. | ||
| # | Landing Node | ||
E-2 Hard T1
| # | Empty Node | ||
|---|---|---|---|
| T1 | 敵影を見ず。 No enemy spotted. | ||
| # | Empty Node | ||
E-2 Hard T2: 深海任務部隊 増援部隊本隊 (PoiDB)
| # | Formation | Boss Battle Node | AD/AP AS/AS+ |
|---|---|---|---|
| T2 | Diamond Phases: 2, 3 |
69/137 306/612 | |
| Diamond Phases: 2, 3 |
67/133 297/594 | ||
| Diamond Phases: 2, 3 (Final)
|
69/137 306/612 | ||
| # | Formation | Boss Battle Node | AD/AP AS/AS+ |
E-2 Hard U: 深海基地航空隊 戦爆連合部隊 (PoiDB)
| # | Formation | Air Defense Node | AD/AP AS/AS+ |
|---|---|---|---|
| U | Diamond Phases: 3 |
109/217 486/972 | |
| Diamond Phases: 3 |
121/242 543/1086 | ||
| Diamond Phases: 3 |
131/261 585/1170 | ||
| # | Formation | Air Defense Node | AD/AP AS/AS+ |
E-2 Hard V: 深海任務部隊 南方戦域防備隊 (PoiDB)
| # | Formation | Normal Battle Node | AD/AP AS/AS+ |
|---|---|---|---|
| V | Line Ahead Double Line Echelon Phases: 3 |
0/0 0/0 | |
| # | Formation | Normal Battle Node | AD/AP AS/AS+ |
E-2 Hard W: 深海任務部隊 突撃重水雷戦隊 (PoiDB)
| # | Formation | Normal Battle Node | AD/AP AS/AS+ |
|---|---|---|---|
| W | Line Ahead Double Line Vanguard Phases: 3 |
0/0 0/0 | |
| # | Formation | Normal Battle Node | AD/AP AS/AS+ |
E-2 Hard W1
| # | Empty Node | ||
|---|---|---|---|
| W1 | 敵影を見ず。 No enemy spotted. | ||
| # | Empty Node | ||
E-2 Hard W2: 深海任務部隊 南方旗艦艦隊 (PoiDB)
| # | Formation | Boss Battle Node | AD/AP AS/AS+ |
|---|---|---|---|
| W2 | Line Ahead Phases: 3 |
0/0 0/0 | |
| Line Ahead Phases: 3 |
36/71 159/318 | ||
| Line Ahead Phases: 3 (Final)
|
36/71 159/318 | ||
| # | Formation | Boss Battle Node | AD/AP AS/AS+ |
| Type | Ships |
|---|---|
| DE | |
| DD |
| Type | Ships |
|---|---|
| DD |
| Type | Ships |
|---|---|
| DE | |
| DD | |
| SSV | |
| AV |
| Type | Ships |
|---|---|
| DE | |
| DD |
| Type | Ships |
|---|---|
| DE | |
| DD |
| Type | Ships |
|---|---|
| DD |
| Type | Ships |
|---|---|
| DE | |
| DD | |
| CV | |
| SSV | |
| AV | |
| AS |
| Type | Ships |
|---|---|
| DE | |
| DD | |
| SS | |
| AV | |
| AS |
| Type | Ships |
|---|---|
| DE | |
| DD | |
| SSV | |
| AV | |
| AS |
E-2 Medium AB
| # | Formation | Air Raids | AD/AP AS/AS+ |
|---|---|---|---|
| AB | Diamond | 28/55 123/246 | |
| Diamond | 33/65 144/288 | ||
| Diamond | 39/78 174/348 | ||
| Diamond | 44/87 195/390 | ||
| # | Formation | Air Raids | AD/AP AS/AS+ |
E-2 Medium A
| # | Empty Node | ||
|---|---|---|---|
| A | 気のせいだった。 R方面部隊、増援輸送部隊、発進! Must be my imagination. R-Area Unit, reinforcement transport unit, launch! | ||
| # | Empty Node | ||
E-2 Medium B: 深海基地航空隊 (PoiDB)
| # | Formation | Air Defense Node | AD/AP AS/AS+ |
|---|---|---|---|
| B | Diamond Phases: 1, 2, 3 |
28/55 123/246 | |
| Diamond Phases: 1, 2, 3 |
33/65 144/288 | ||
| Diamond Phases: 1 |
39/78 174/348 | ||
| Diamond Phases: 1, 2, 3 |
39/78 174/348 | ||
| Diamond Phases: 1, 3 |
44/87 195/390 | ||
| # | Formation | Air Defense Node | AD/AP AS/AS+ |
E-2 Medium C: 深海潜水艦隊 前衛哨戒 III群 (PoiDB)
| # | Formation | Normal Battle Node | AD/AP AS/AS+ |
|---|---|---|---|
| C | Echelon Line Abreast Phases: 1, 3 |
0/0 0/0 | |
| Echelon Line Abreast Phases: 1, 2, 3 |
0/0 0/0 | ||
| Echelon Line Abreast Phases: 1, 2, 3 |
0/0 0/0 | ||
| # | Formation | Normal Battle Node | AD/AP AS/AS+ |
E-2 Medium D: 深海基地航空隊 (PoiDB)
| # | Formation | Air Defense Node | AD/AP AS/AS+ |
|---|---|---|---|
| D | Diamond Phases: 1, 3 |
28/55 123/246 | |
| Diamond Phases: 1, 3 |
33/65 144/288 | ||
| Diamond Phases: 1, 3 |
39/78 174/348 | ||
| Diamond Phases: 1, 3 |
39/78 174/348 | ||
| Diamond Phases: 1, 3 |
44/87 195/390 | ||
| # | Formation | Air Defense Node | AD/AP AS/AS+ |
E-2 Medium E: 深海任務部隊 警戒水雷戦隊 (PoiDB)
| # | Formation | Normal Battle Node | AD/AP AS/AS+ |
|---|---|---|---|
| E | Line Ahead Double Line Echelon Phases: 1 |
0/0 0/0 | |
| # | Formation | Normal Battle Node | AD/AP AS/AS+ |
E-2 Medium F: 深海任務部隊 巡洋艦戦隊 (PoiDB)
| # | Formation | Normal Battle Node | AD/AP AS/AS+ |
|---|---|---|---|
| F | Line Ahead Double Line Vanguard Phases: 1, 2, 3 |
0/0 0/0 | |
| # | Formation | Normal Battle Node | AD/AP AS/AS+ |
E-2 Medium G: 深海潜水艦隊 前衛哨戒 II群 (PoiDB)
| # | Formation | Normal Battle Node | AD/AP AS/AS+ |
|---|---|---|---|
| G | Echelon Line Abreast Phases: 1, 2, 3 |
0/0 0/0 | |
| Echelon Line Abreast Phases: 1, 2, 3 |
0/0 0/0 | ||
| Echelon Line Abreast Phases: 1, 2, 3 |
0/0 0/0 | ||
| # | Formation | Normal Battle Node | AD/AP AS/AS+ |
E-2 Medium H: 深海基地航空隊 (PoiDB)
| # | Formation | Air Defense Node | AD/AP AS/AS+ |
|---|---|---|---|
| H | Diamond Phases: 1, 3 |
28/55 123/246 | |
| Diamond Phases: 1, 3 |
33/65 144/288 | ||
| Diamond Phases: 1, 3 |
39/78 174/348 | ||
| Diamond Phases: 1, 3 |
44/87 195/390 | ||
| # | Formation | Air Defense Node | AD/AP AS/AS+ |
E-2 Medium I (PoiDB)
| # | Formation | Normal Battle Node | AD/AP AS/AS+ |
|---|---|---|---|
| I | Echelon Phases: 1 |
0/0 0/0 | |
| # | Formation | Normal Battle Node | AD/AP AS/AS+ |
E-2 Medium J: 深海任務部隊 水上打撃集団前衛 (PoiDB)
| # | Formation | Normal Battle Node | AD/AP AS/AS+ |
|---|---|---|---|
| J | Line Ahead Double Line Echelon Phases: 1, 2, 3 |
0/0 0/0 | |
| # | Formation | Normal Battle Node | AD/AP AS/AS+ |
E-2 Medium K: 深海基地航空隊 (PoiDB)
| # | Formation | Air Defense Node | AD/AP AS/AS+ |
|---|---|---|---|
| K | Diamond Phases: 1, 3 |
28/55 123/246 | |
| Diamond Phases: 1, 3 |
33/65 144/288 | ||
| Diamond Phases: 1 |
39/78 174/348 | ||
| Diamond Phases: 1, 3 |
39/78 174/348 | ||
| Diamond Phases: 1, 3 |
44/87 195/390 | ||
| # | Formation | Air Defense Node | AD/AP AS/AS+ |
E-2 Medium L: 深海任務部隊 水上打撃集団 (PoiDB)
| # | Formation | Normal Battle Node | AD/AP AS/AS+ |
|---|---|---|---|
| L | Line Ahead Double Line Phases: 1, 2, 3 |
0/0 0/0 | |
| Line Ahead Phases: 1, 3 |
24/47 104/207 | ||
| # | Formation | Normal Battle Node | AD/AP AS/AS+ |
E-2 Medium M
| # | Landing Node | ||
|---|---|---|---|
| M | ショートランドに到着しました。 We've arrived at Shortland. | ||
| # | Landing Node | ||
E-2 Medium N
| # | Empty Node | ||
|---|---|---|---|
| N | 敵影を見ず。 R方面部隊、増援輸送部隊、発進! No enemy spotted. R-Area Unit, reinforcement transport unit, launch! | ||
| # | Empty Node | ||
E-2 Medium O: 深海任務部隊 前衛群主力戦隊 (PoiDB)
| # | Formation | Boss Battle Node | AD/AP AS/AS+ |
|---|---|---|---|
| O | Line Ahead Double Line Phases: 1, 2, 3 |
0/0 0/0 | |
| Line Ahead Phases: 1 (Final)
|
0/0 0/0 | ||
| # | Formation | Boss Battle Node | AD/AP AS/AS+ |
E-2 Medium P: 深海潜水艦隊 南方哨戒警戒群 (PoiDB)
| # | Formation | Normal Battle Node | AD/AP AS/AS+ |
|---|---|---|---|
| P | Echelon Line Abreast Phases: 2, 3 |
0/0 0/0 | |
| Echelon Line Abreast Phases: 2, 3 |
0/0 0/0 | ||
| Echelon Line Abreast Phases: 2, 3 |
0/0 0/0 | ||
| # | Formation | Normal Battle Node | AD/AP AS/AS+ |
E-2 Medium Q
| # | Selection Node | ||
|---|---|---|---|
| Q | 艦隊の針路を選択できます。提督、どちらの針路をとられますか? You can decide the fleet's course. Admiral, which heading should we take? | ||
| # | Selection Node | ||
E-2 Medium R: 深海任務部隊 哨戒駆逐隊 I群 (PoiDB)
| # | Formation | Normal Battle Node | AD/AP AS/AS+ |
|---|---|---|---|
| R | Line Ahead Double Line Vanguard Phases: 2, 3 |
0/0 0/0 | |
| # | Formation | Normal Battle Node | AD/AP AS/AS+ |
E-2 Medium S: 深海任務部隊 哨戒駆逐隊 II群 (PoiDB)
| # | Formation | Normal Battle Node | AD/AP AS/AS+ |
|---|---|---|---|
| S | Line Ahead Double Line Vanguard Phases: 2, 3 |
0/0 0/0 | |
| # | Formation | Normal Battle Node | AD/AP AS/AS+ |
E-2 Medium S1: 深海任務部隊 増援部隊前衛集団 (PoiDB)
| # | Formation | Normal Battle Node | AD/AP AS/AS+ |
|---|---|---|---|
| S1 | Line Ahead Double Line Phases: 2, 3 |
0/0 0/0 | |
| Line Ahead Phases: 2, 3 |
0/0 0/0 | ||
| # | Formation | Normal Battle Node | AD/AP AS/AS+ |
E-2 Medium S2: 深海潜水艦隊 北方哨戒警戒群 (PoiDB)
| # | Formation | Normal Battle Node | AD/AP AS/AS+ |
|---|---|---|---|
| S2 | Echelon Line Abreast Phases: 2 |
0/0 0/0 | |
| Echelon Line Abreast Phases: 2, 3 |
0/0 0/0 | ||
| Echelon Line Abreast Phases: 2 |
0/0 0/0 | ||
| # | Formation | Normal Battle Node | AD/AP AS/AS+ |
E-2 Medium S3: 深海任務部隊 戦闘哨戒艦載機群 (PoiDB)
| # | Formation | Air Defense Node | AD/AP AS/AS+ |
|---|---|---|---|
| S3 | Diamond Phases: 2, 3 |
50/99 222/444 | |
| Diamond Phases: 2, 3 |
60/119 267/534 | ||
| Diamond Phases: 2, 3 |
58/115 258/516 | ||
| # | Formation | Air Defense Node | AD/AP AS/AS+ |
E-2 Medium T
| # | Landing Node | ||
|---|---|---|---|
| T | レカタに到着しました。 We've arrived at Lekata. | ||
| # | Landing Node | ||
E-2 Medium T1
| # | Empty Node | ||
|---|---|---|---|
| T1 | 敵影を見ず。 No enemy spotted. | ||
| # | Empty Node | ||
E-2 Medium T2: 深海任務部隊 増援部隊本隊 (PoiDB)
| # | Formation | Boss Battle Node | AD/AP AS/AS+ |
|---|---|---|---|
| T2 | Diamond Phases: 2, 3 |
52/103 231/462 | |
| Diamond Phases: 2, 3 |
50/99 222/444 | ||
| Diamond Phases: 2, 3 (Final)
|
50/99 222/444 | ||
| # | Formation | Boss Battle Node | AD/AP AS/AS+ |
E-2 Medium U: 深海基地航空隊 戦爆連合部隊 (PoiDB)
| # | Formation | Air Defense Node | AD/AP AS/AS+ |
|---|---|---|---|
| U | Diamond Phases: 3 |
82/163 366/732 | |
| Diamond Phases: 3 |
95/189 423/846 | ||
| Diamond Phases: 3 |
107/214 480/960 | ||
| # | Formation | Air Defense Node | AD/AP AS/AS+ |
E-2 Medium V: 深海任務部隊 南方戦域防備隊 (PoiDB)
| # | Formation | Normal Battle Node | AD/AP AS/AS+ |
|---|---|---|---|
| V | Line Ahead Double Line Echelon Phases: 3 |
0/0 0/0 | |
| # | Formation | Normal Battle Node | AD/AP AS/AS+ |
E-2 Medium W: 深海任務部隊 突撃重水雷戦隊 (PoiDB)
| # | Formation | Normal Battle Node | AD/AP AS/AS+ |
|---|---|---|---|
| W | Line Ahead Double Line Vanguard Phases: 3 |
0/0 0/0 | |
| # | Formation | Normal Battle Node | AD/AP AS/AS+ |
E-2 Medium W1
| # | Empty Node | ||
|---|---|---|---|
| W1 | 敵影を見ず。 No enemy spotted. | ||
| # | Empty Node | ||
E-2 Medium W2: 深海任務部隊 南方旗艦艦隊 (PoiDB)
| # | Formation | Boss Battle Node | AD/AP AS/AS+ |
|---|---|---|---|
| W2 | Line Ahead Phases: 3 |
0/0 0/0 | |
| Line Ahead Phases: 3 |
43/85 189/378 | ||
| Line Ahead Phases: 3 (Final)
|
43/85 189/378 | ||
| # | Formation | Boss Battle Node | AD/AP AS/AS+ |
| Type | Ships |
|---|---|
| DE | |
| DD |
| Type | Ships |
|---|---|
| DE | |
| DD |
| Type | Ships |
|---|---|
| DE | |
| DD | |
| SSV | |
| AV | |
| AS |
| Type | Ships |
|---|---|
| DE | |
| DD |
| Type | Ships |
|---|---|
| DE | |
| DD |
| Type | Ships |
|---|---|
| DD |
| Type | Ships |
|---|---|
| DE | |
| DD | |
| CV | |
| SSV | |
| AV | |
| AS |
| Type | Ships |
|---|---|
| DE | |
| DD | |
| SS | |
| AV | |
| AS |
| Type | Ships |
|---|---|
| DE | |
| DD | |
| SSV | |
| AV | |
| AS |
E-2 Easy AB
| # | Formation | Air Raids | AD/AP AS/AS+ |
|---|---|---|---|
| AB | Diamond | 17/33 72/144 | |
| Diamond | 23/46 102/204 | ||
| Diamond | 28/55 123/246 | ||
| # | Formation | Air Raids | AD/AP AS/AS+ |
E-2 Easy A
| # | Empty Node | ||
|---|---|---|---|
| A | 気のせいだった。 R方面部隊、増援輸送部隊、発進! Must be my imagination. R-Area Unit, reinforcement transport unit, launch! | ||
| # | Empty Node | ||
E-2 Easy B: 深海基地航空隊 (PoiDB)
| # | Formation | Air Defense Node | AD/AP AS/AS+ |
|---|---|---|---|
| B | Diamond Phases: 1, 3 |
12/23 51/102 | |
| Diamond Phases: 1, 2, 3 |
17/33 72/144 | ||
| Diamond Phases: 1, 2, 3 |
23/46 102/204 | ||
| Diamond Phases: 1, 2, 3 |
28/55 123/246 | ||
| Diamond Phases: 1, 2, 3 |
33/65 144/288 | ||
| # | Formation | Air Defense Node | AD/AP AS/AS+ |
E-2 Easy C: 深海潜水艦隊 前衛哨戒 III群 (PoiDB)
| # | Formation | Normal Battle Node | AD/AP AS/AS+ |
|---|---|---|---|
| C | Echelon Line Abreast Phases: 1, 3 |
0/0 0/0 | |
| Echelon Line Abreast Phases: 1, 2, 3 |
0/0 0/0 | ||
| Echelon Line Abreast Phases: 1, 2, 3 |
0/0 0/0 | ||
| # | Formation | Normal Battle Node | AD/AP AS/AS+ |
E-2 Easy D: 深海基地航空隊 (PoiDB)
| # | Formation | Air Defense Node | AD/AP AS/AS+ |
|---|---|---|---|
| D | Diamond Phases: 1, 3 |
12/23 51/102 | |
| Diamond Phases: 1, 3 |
17/33 72/144 | ||
| Diamond Phases: 1, 3 |
23/46 102/204 | ||
| Diamond Phases: 1, 3 |
28/55 123/246 | ||
| Diamond Phases: 1, 2, 3 |
33/65 144/288 | ||
| # | Formation | Air Defense Node | AD/AP AS/AS+ |
E-2 Easy E: 深海任務部隊 警戒水雷戦隊 (PoiDB)
| # | Formation | Normal Battle Node | AD/AP AS/AS+ |
|---|---|---|---|
| E | Line Ahead Double Line Echelon Phases: 1 |
0/0 0/0 | |
| # | Formation | Normal Battle Node | AD/AP AS/AS+ |
E-2 Easy F: 深海任務部隊 巡洋艦戦隊 (PoiDB)
| # | Formation | Normal Battle Node | AD/AP AS/AS+ |
|---|---|---|---|
| F | Line Ahead Double Line Vanguard Phases: 1, 3 |
0/0 0/0 | |
| # | Formation | Normal Battle Node | AD/AP AS/AS+ |
E-2 Easy G: 深海潜水艦隊 前衛哨戒 II群 (PoiDB)
| # | Formation | Normal Battle Node | AD/AP AS/AS+ |
|---|---|---|---|
| G | Echelon Line Abreast Phases: 1, 2, 3 |
0/0 0/0 | |
| Echelon Line Abreast Phases: 1, 2, 3 |
0/0 0/0 | ||
| Echelon Line Abreast Phases: 1, 2, 3 |
0/0 0/0 | ||
| # | Formation | Normal Battle Node | AD/AP AS/AS+ |
E-2 Easy H: 深海基地航空隊 (PoiDB)
| # | Formation | Air Defense Node | AD/AP AS/AS+ |
|---|---|---|---|
| H | Diamond Phases: 1, 3 |
12/23 51/102 | |
| Diamond Phases: 1, 3 |
17/33 72/144 | ||
| Diamond Phases: 1, 2, 3 |
23/46 102/204 | ||
| Diamond Phases: 1, 2, 3 |
28/55 123/246 | ||
| Diamond Phases: 1, 3 |
33/65 144/288 | ||
| # | Formation | Air Defense Node | AD/AP AS/AS+ |
E-2 Easy I: 深海潜水艦隊 前衛哨戒 I群 (PoiDB)
| # | Formation | Normal Battle Node | AD/AP AS/AS+ |
|---|---|---|---|
| I | Echelon | 0/0 0/0 | |
| # | Formation | Normal Battle Node | AD/AP AS/AS+ |
E-2 Easy J: 深海任務部隊 水上打撃集団前衛 (PoiDB)
| # | Formation | Normal Battle Node | AD/AP AS/AS+ |
|---|---|---|---|
| J | Line Ahead Double Line Echelon Phases: 1, 2, 3 |
0/0 0/0 | |
| # | Formation | Normal Battle Node | AD/AP AS/AS+ |
E-2 Easy K: 深海基地航空隊 (PoiDB)
| # | Formation | Air Defense Node | AD/AP AS/AS+ |
|---|---|---|---|
| K | Diamond Phases: 3 |
12/23 51/102 | |
| Diamond Phases: 3 |
17/33 72/144 | ||
| Diamond Phases: 3 |
23/46 102/204 | ||
| Diamond Phases: 3 |
28/55 123/246 | ||
| Diamond Phases: 1 |
33/65 144/288 | ||
| # | Formation | Air Defense Node | AD/AP AS/AS+ |
E-2 Easy L: 深海任務部隊 水上打撃集団 (PoiDB)
| # | Formation | Normal Battle Node | AD/AP AS/AS+ |
|---|---|---|---|
| L | Line Ahead Double Line Phases: 1, 2, 3 |
0/0 0/0 | |
| Line Ahead Phases: 1, 2, 3 |
9/17 36/72 | ||
| # | Formation | Normal Battle Node | AD/AP AS/AS+ |
E-2 Easy M
| # | Landing Node | ||
|---|---|---|---|
| M | ショートランドに到着しました。 We've arrived at Shortland. | ||
| # | Landing Node | ||
E-2 Easy N
| # | Empty Node | ||
|---|---|---|---|
| N | 敵影を見ず。 R方面部隊、増援輸送部隊、発進! No enemy spotted. R-Area Unit, reinforcement transport unit, launch! | ||
| # | Empty Node | ||
E-2 Easy O: 深海任務部隊 前衛群主力戦隊 (PoiDB)
| # | Formation | Boss Battle Node | AD/AP AS/AS+ |
|---|---|---|---|
| O | Line Ahead Double Line Phases: 1, 2, 3 |
0/0 0/0 | |
| Line Ahead Phases: 1 (Final)
|
0/0 0/0 | ||
| # | Formation | Boss Battle Node | AD/AP AS/AS+ |
E-2 Easy P: 深海潜水艦隊 南方哨戒警戒群 (PoiDB)
| # | Formation | Normal Battle Node | AD/AP AS/AS+ |
|---|---|---|---|
| P | Echelon Line Abreast Phases: 2, 3 |
0/0 0/0 | |
| Echelon Line Abreast Phases: 2, 3 |
0/0 0/0 | ||
| Echelon Line Abreast Phases: 2, 3 |
0/0 0/0 | ||
| # | Formation | Normal Battle Node | AD/AP AS/AS+ |
E-2 Easy Q
| # | Selection Node | ||
|---|---|---|---|
| Q | 艦隊の針路を選択できます。提督、どちらの針路をとられますか? You can decide the fleet's course. Admiral, which heading should we take? | ||
| # | Selection Node | ||
E-2 Easy R: 深海任務部隊 哨戒駆逐隊 I群 (PoiDB)
| # | Formation | Normal Battle Node | AD/AP AS/AS+ |
|---|---|---|---|
| R | Line Ahead Double Line Vanguard Phases: 2, 3 |
0/0 0/0 | |
| # | Formation | Normal Battle Node | AD/AP AS/AS+ |
E-2 Easy S: 深海任務部隊 哨戒駆逐隊 II群 (PoiDB)
| # | Formation | Normal Battle Node | AD/AP AS/AS+ |
|---|---|---|---|
| S | Line Ahead Double Line Vanguard Phases: 2, 3 |
0/0 0/0 | |
| # | Formation | Normal Battle Node | AD/AP AS/AS+ |
E-2 Easy S1: 深海任務部隊 増援部隊前衛集団 (PoiDB)
| # | Formation | Normal Battle Node | AD/AP AS/AS+ |
|---|---|---|---|
| S1 | Line Ahead Double Line Phases: 2, 3 |
0/0 0/0 | |
| Line Ahead Phases: 2, 3 |
0/0 0/0 | ||
| # | Formation | Normal Battle Node | AD/AP AS/AS+ |
E-2 Easy S2: 深海潜水艦隊 北方哨戒警戒群 (PoiDB)
| # | Formation | Normal Battle Node | AD/AP AS/AS+ |
|---|---|---|---|
| S2 | Echelon Line Abreast Phases: 2 |
0/0 0/0 | |
| Echelon Line Abreast Phases: 2 |
0/0 0/0 | ||
| Echelon Line Abreast Phases: 2 |
0/0 0/0 | ||
| # | Formation | Normal Battle Node | AD/AP AS/AS+ |
E-2 Easy S3: 深海任務部隊 戦闘哨戒艦載機群 (PoiDB)
| # | Formation | Air Defense Node | AD/AP AS/AS+ |
|---|---|---|---|
| S3 | Diamond Phases: 2, 3 |
16/31 69/138 | |
| Diamond Phases: 2, 3 |
50/99 222/444 | ||
| Diamond Phases: 2, 3 |
58/115 258/516 | ||
| # | Formation | Air Defense Node | AD/AP AS/AS+ |
E-2 Easy T
| # | Landing Node | ||
|---|---|---|---|
| T | レカタに到着しました。 We've arrived at Lekata. | ||
| # | Landing Node | ||
E-2 Easy T1
| # | Empty Node | ||
|---|---|---|---|
| T1 | 敵影を見ず。 No enemy spotted. | ||
| # | Empty Node | ||
E-2 Easy T2: 深海任務部隊 増援部隊本隊 (PoiDB)
| # | Formation | Boss Battle Node | AD/AP AS/AS+ |
|---|---|---|---|
| T2 | Diamond Phases: 2, 3 |
16/31 69/138 | |
| Diamond Phases: 2, 3 |
50/99 222/444 | ||
| Diamond Phases: 2, 3 (Final)
|
50/99 222/444 | ||
| # | Formation | Boss Battle Node | AD/AP AS/AS+ |
E-2 Easy U: 深海基地航空隊 戦爆連合部隊 (PoiDB)
| # | Formation | Air Defense Node | AD/AP AS/AS+ |
|---|---|---|---|
| U | Diamond Phases: 3 |
47/94 210/420 | |
| Diamond Phases: 3 |
59/117 261/522 | ||
| Diamond Phases: 3 |
71/142 318/636 | ||
| # | Formation | Air Defense Node | AD/AP AS/AS+ |
E-2 Easy V: 深海任務部隊 南方戦域防備隊 (PoiDB)
| # | Formation | Normal Battle Node | AD/AP AS/AS+ |
|---|---|---|---|
| V | Line Ahead Double Line Echelon Phases: 3 |
0/0 0/0 | |
| # | Formation | Normal Battle Node | AD/AP AS/AS+ |
E-2 Easy W: 深海任務部隊 突撃重水雷戦隊 (PoiDB)
| # | Formation | Normal Battle Node | AD/AP AS/AS+ |
|---|---|---|---|
| W | Line Ahead Double Line Vanguard Phases: 3 |
0/0 0/0 | |
| # | Formation | Normal Battle Node | AD/AP AS/AS+ |
E-2 Easy W1
| # | Empty Node | ||
|---|---|---|---|
| W1 | 敵影を見ず。 No enemy spotted. | ||
| # | Empty Node | ||
E-2 Easy W2: 深海任務部隊 南方旗艦艦隊 (PoiDB)
| # | Formation | Boss Battle Node | AD/AP AS/AS+ |
|---|---|---|---|
| W2 | Line Ahead Phases: 3 |
0/0 0/0 | |
| Line Ahead Phases: 3 |
43/85 189/378 | ||
| Line Ahead Phases: 3 (Final)
|
43/85 189/378 | ||
| # | Formation | Boss Battle Node | AD/AP AS/AS+ |
| Type | Ships |
|---|---|
| DE | |
| DD |
| Type | Ships |
|---|---|
| DD |
| Type | Ships |
|---|---|
| DE | |
| DD | |
| SSV | |
| AS |
| Type | Ships |
|---|---|
| DD |
| Type | Ships |
|---|---|
| DE | |
| DD |
| Type | Ships |
|---|---|
| DE | |
| DD | |
| CV | |
| SSV | |
| AV | |
| AS |
| Type | Ships |
|---|---|
| DE | |
| DD | |
| SS | |
| AV | |
| AS |
| Type | Ships |
|---|---|
| DE | |
| DD | |
| SSV | |
| AV | |
| AS |
E-2 Casual AB
| # | Formation | Air Raids | AD/AP AS/AS+ |
|---|---|---|---|
| AB | Diamond | 12/23 51/102 | |
| Diamond | 17/33 72/144 | ||
| Diamond | 23/46 102/204 | ||
| # | Formation | Air Raids | AD/AP AS/AS+ |
E-2 Casual A
| # | Empty Node | ||
|---|---|---|---|
| A | 気のせいだった。 R方面部隊、増援輸送部隊、発進! Must be my imagination. R-Area Unit, reinforcement transport unit, launch! | ||
| # | Empty Node | ||
E-2 Casual B: 深海基地航空隊 (PoiDB)
| # | Formation | Air Defense Node | AD/AP AS/AS+ |
|---|---|---|---|
| B | Diamond Phases: 1, 2, 3 |
12/23 51/102 | |
| Diamond Phases: 1, 2, 3 |
17/33 72/144 | ||
| Diamond Phases: 1, 2, 3 |
23/46 102/204 | ||
| # | Formation | Air Defense Node | AD/AP AS/AS+ |
E-2 Casual C: 深海潜水艦隊 前衛哨戒 III群 (PoiDB)
| # | Formation | Normal Battle Node | AD/AP AS/AS+ |
|---|---|---|---|
| C | Echelon Line Abreast Phases: 1, 2, 3 |
0/0 0/0 | |
| Echelon Line Abreast Phases: 1, 2, 3 |
0/0 0/0 | ||
| # | Formation | Normal Battle Node | AD/AP AS/AS+ |
E-2 Casual D: 深海基地航空隊 (PoiDB)
| # | Formation | Air Defense Node | AD/AP AS/AS+ |
|---|---|---|---|
| D | Diamond Phases: 1, 2, 3 |
12/23 51/102 | |
| Diamond Phases: 1, 2, 3 |
17/33 72/144 | ||
| Diamond Phases: 1, 2, 3 |
23/46 102/204 | ||
| # | Formation | Air Defense Node | AD/AP AS/AS+ |
E-2 Casual E: 深海任務部隊 警戒水雷戦隊 (PoiDB)
| # | Formation | Normal Battle Node | AD/AP AS/AS+ |
|---|---|---|---|
| E | Line Ahead Double Line Echelon Phases: 1, 2 |
0/0 0/0 | |
| # | Formation | Normal Battle Node | AD/AP AS/AS+ |
E-2 Casual F: 深海任務部隊 巡洋艦戦隊 (PoiDB)
| # | Formation | Normal Battle Node | AD/AP AS/AS+ |
|---|---|---|---|
| F | Line Ahead Double Line Vanguard Phases: 1, 2, 3 |
0/0 0/0 | |
| # | Formation | Normal Battle Node | AD/AP AS/AS+ |
E-2 Casual G: 深海潜水艦隊 前衛哨戒 II群 (PoiDB)
| # | Formation | Normal Battle Node | AD/AP AS/AS+ |
|---|---|---|---|
| G | Echelon Line Abreast Phases: 1, 2, 3 |
0/0 0/0 | |
| Echelon Line Abreast Phases: 1, 2, 3 |
0/0 0/0 | ||
| # | Formation | Normal Battle Node | AD/AP AS/AS+ |
E-2 Casual H: 深海基地航空隊 (PoiDB)
| # | Formation | Air Defense Node | AD/AP AS/AS+ |
|---|---|---|---|
| H | Diamond Phases: 1, 2, 3 |
12/23 51/102 | |
| Diamond Phases: 1, 2, 3 |
17/33 72/144 | ||
| Diamond Phases: 1, 2, 3 |
23/46 102/204 | ||
| # | Formation | Air Defense Node | AD/AP AS/AS+ |
E-2 Casual I: 深海潜水艦隊 前衛哨戒 I群 (PoiDB)
| # | Formation | Normal Battle Node | AD/AP AS/AS+ |
|---|---|---|---|
| I | Echelon Phases: 3 |
0/0 0/0 | |
| # | Formation | Normal Battle Node | AD/AP AS/AS+ |
E-2 Casual J: 深海任務部隊 水上打撃集団前衛 (PoiDB)
| # | Formation | Normal Battle Node | AD/AP AS/AS+ |
|---|---|---|---|
| J | Line Ahead Double Line Echelon Phases: 1, 2, 3 |
0/0 0/0 | |
| # | Formation | Normal Battle Node | AD/AP AS/AS+ |
E-2 Casual K: 深海基地航空隊 (PoiDB)
| # | Formation | Air Defense Node | AD/AP AS/AS+ |
|---|---|---|---|
| K | Diamond Phases: 2, 3 |
12/23 51/102 | |
| Diamond Phases: 1, 2, 3 |
17/33 72/144 | ||
| Diamond Phases: 1, 3 |
23/46 102/204 | ||
| # | Formation | Air Defense Node | AD/AP AS/AS+ |
E-2 Casual L: 深海任務部隊 水上打撃集団 (PoiDB)
| # | Formation | Normal Battle Node | AD/AP AS/AS+ |
|---|---|---|---|
| L | Line Ahead Double Line Phases: 1, 2, 3 |
0/0 0/0 | |
| Line Ahead Phases: 1, 2, 3 |
0/0 0/0 | ||
| # | Formation | Normal Battle Node | AD/AP AS/AS+ |
E-2 Casual M
| # | Landing Node | ||
|---|---|---|---|
| M | ショートランドに到着しました。 We've arrived at Shortland. | ||
| # | Landing Node | ||
E-2 Casual N
| # | Empty Node | ||
|---|---|---|---|
| N | 敵影を見ず。 R方面部隊、増援輸送部隊、発進! No enemy spotted. R-Area Unit, reinforcement transport unit, launch! | ||
| # | Empty Node | ||
E-2 Casual O: 深海任務部隊 前衛群主力戦隊 (PoiDB)
| # | Formation | Boss Battle Node | AD/AP AS/AS+ |
|---|---|---|---|
| O | Line Ahead Double Line Phases: 1, 2, 3 |
0/0 0/0 | |
| Line Ahead Phases: 1 (Final)
|
0/0 0/0 | ||
| # | Formation | Boss Battle Node | AD/AP AS/AS+ |
E-2 Casual P: 深海潜水艦隊 南方哨戒警戒群 (PoiDB)
| # | Formation | Normal Battle Node | AD/AP AS/AS+ |
|---|---|---|---|
| P | Echelon Line Abreast Phases: 2, 3 |
0/0 0/0 | |
| Echelon Line Abreast Phases: 2, 3 |
0/0 0/0 | ||
| # | Formation | Normal Battle Node | AD/AP AS/AS+ |
E-2 Casual Q
| # | Selection Node | ||
|---|---|---|---|
| Q | 艦隊の針路を選択できます。提督、どちらの針路をとられますか? You can decide the fleet's course. Admiral, which heading should we take? | ||
| # | Selection Node | ||
E-2 Casual R: 深海任務部隊 哨戒駆逐隊 I群 (PoiDB)
| # | Formation | Normal Battle Node | AD/AP AS/AS+ |
|---|---|---|---|
| R | Line Ahead Double Line Vanguard Phases: 2, 3 |
0/0 0/0 | |
| # | Formation | Normal Battle Node | AD/AP AS/AS+ |
E-2 Casual S: 深海任務部隊 哨戒駆逐隊 II群 (PoiDB)
| # | Formation | Normal Battle Node | AD/AP AS/AS+ |
|---|---|---|---|
| S | Line Ahead Double Line Vanguard Phases: 2, 3 |
0/0 0/0 | |
| # | Formation | Normal Battle Node | AD/AP AS/AS+ |
E-2 Casual S1: 深海任務部隊 増援部隊前衛集団 (PoiDB)
| # | Formation | Normal Battle Node | AD/AP AS/AS+ |
|---|---|---|---|
| S1 | Line Ahead Double Line Phases: 2, 3 |
0/0 0/0 | |
| Line Ahead Phases: 2, 3 |
0/0 0/0 | ||
| # | Formation | Normal Battle Node | AD/AP AS/AS+ |
E-2 Casual S2: 深海潜水艦隊 北方哨戒警戒群 (PoiDB)
| # | Formation | Normal Battle Node | AD/AP AS/AS+ |
|---|---|---|---|
| S2 | Echelon Line Abreast Phases: 2 |
0/0 0/0 | |
| Line Abreast | 0/0 0/0 | ||
| # | Formation | Normal Battle Node | AD/AP AS/AS+ |
E-2 Casual S3: 深海任務部隊 戦闘哨戒艦載機群 (PoiDB)
| # | Formation | Air Defense Node | AD/AP AS/AS+ |
|---|---|---|---|
| S3 | Diamond Phases: 2, 3 |
16/31 69/138 | |
| Diamond Phases: 2, 3 |
50/99 222/444 | ||
| Diamond Phases: 2, 3 |
53/105 234/468 | ||
| # | Formation | Air Defense Node | AD/AP AS/AS+ |
E-2 Casual T
| # | Landing Node | ||
|---|---|---|---|
| T | レカタに到着しました。 We've arrived at Lekata. | ||
| # | Landing Node | ||
E-2 Casual T1
| # | Empty Node | ||
|---|---|---|---|
| T1 | 敵影を見ず。 No enemy spotted. | ||
| # | Empty Node | ||
E-2 Casual T2: 深海任務部隊 増援部隊本隊 (PoiDB)
| # | Formation | Boss Battle Node | AD/AP AS/AS+ |
|---|---|---|---|
| T2 | Diamond Phases: 2, 3 |
16/31 69/138 | |
| Diamond Phases: 2, 3 |
16/31 69/138 | ||
| Diamond Phases: 2, 3 (Final)
|
50/99 222/444 | ||
| # | Formation | Boss Battle Node | AD/AP AS/AS+ |
E-2 Casual U: 深海基地航空隊 戦爆連合部隊 (PoiDB)
| # | Formation | Air Defense Node | AD/AP AS/AS+ |
|---|---|---|---|
| U | Diamond Phases: 3 |
24/47 105/210 | |
| Diamond Phases: 3 |
35/70 156/312 | ||
| Diamond Phases: 3 |
48/95 213/426 | ||
| # | Formation | Air Defense Node | AD/AP AS/AS+ |
E-2 Casual V: 深海任務部隊 南方戦域防備隊 (PoiDB)
| # | Formation | Normal Battle Node | AD/AP AS/AS+ |
|---|---|---|---|
| V | Line Ahead Double Line Echelon Phases: 3 |
0/0 0/0 | |
| # | Formation | Normal Battle Node | AD/AP AS/AS+ |
E-2 Casual W: 深海任務部隊 突撃重水雷戦隊 (PoiDB)
| # | Formation | Normal Battle Node | AD/AP AS/AS+ |
|---|---|---|---|
| W | Line Ahead Double Line Vanguard Phases: 3 |
0/0 0/0 | |
| # | Formation | Normal Battle Node | AD/AP AS/AS+ |
E-2 Casual W1
| # | Empty Node | ||
|---|---|---|---|
| W1 | 敵影を見ず。 No enemy spotted. | ||
| # | Empty Node | ||
E-2 Casual W2: 深海任務部隊 南方旗艦艦隊 (PoiDB)
| # | Formation | Boss Battle Node | AD/AP AS/AS+ |
|---|---|---|---|
| W2 | Line Ahead Phases: 3 |
0/0 0/0 | |
| Line Ahead Phases: 3 |
9/17 36/72 | ||
| Line Ahead Phases: 3 (Final)
|
9/17 36/72 | ||
| # | Formation | Boss Battle Node | AD/AP AS/AS+ |