- Welcome to the Kancolle Wiki!
- If you have any questions regarding site content, account registration, etc., please visit the KanColle Wiki Discord
Difference between revisions of "Spring 2022 Event/E-4/Enemy comps"
< Spring 2022 Event | E-4
Jump to navigation
Jump to search
(Created page with "<tabber> |-|Hard= {{Map/Image|page=Spring 2022 Event/E-4| {{Map/ImageNode|1|Hard|E-4|x=573|y=102}} {{Map/ImageNode|AB|Hard|E-4|x=622|y=156}} {{Map/ImageNode|A|Hard|E-4|x=563|y...") |
|||
| Line 18: | Line 18: | ||
{{Map/ImageNode|K|Hard|E-4|x=300|y=183}} | {{Map/ImageNode|K|Hard|E-4|x=300|y=183}} | ||
{{Map/ImageNode|L|Hard|E-4|x=237|y=242}} | {{Map/ImageNode|L|Hard|E-4|x=237|y=242}} | ||
| − | {{Map/ImageNode|M|Hard|E-4|x=235|y=200|drops=<table class="wikitable"><tr><th>Type</th><th>Ships</th></tr><tr><th>DE</th><td>{{Ship/Banner|small=true|Fukae}}{{Ship/Banner|small=true|Ishigaki}}{{Ship/Banner|small=true|Mikura}}<br></td></tr><tr><th>DD</th><td>{{Ship/Banner|small=true|Amagiri}}{{Ship/Banner|small=true|Asashimo}}{{Ship/Banner|small=true|Sagiri}}<br>{{Ship/Banner|small=true|Samuel B. Roberts}}{{Ship/Banner|small=true|Uranami}}{{Ship/Banner|small=true|Usugumo}}<br></td></tr><tr><th>CL</th><td>{{Ship/Banner|small=true|Yahagi}}</td></tr><tr><th>LHA</th><td>{{Ship/Banner|small=true|Akitsu Maru}}</td></tr><tr><th>AO</th><td>{{Ship/Banner|small=true|Hayasui}}</td></tr></table>}} | + | {{Map/ImageNode|M|Hard|E-4|x=235|y=200|drops=<table class="wikitable"><tr><th>Type</th><th>Ships</th></tr><tr><th>DE</th><td>{{Ship/Banner|small=true|Fukae}}{{Ship/Banner|small=true|Ishigaki}}{{Ship/Banner|small=true|Mikura}}<br></td></tr><tr><th>DD</th><td>{{Ship/Banner|small=true|Amagiri}}{{Ship/Banner|small=true|Asashimo}}{{Ship/Banner|small=true|Sagiri}}<br>{{Ship/Banner|small=true|Samuel B. Roberts}}{{Ship/Banner|small=true|Uranami}}{{Ship/Banner|small=true|Usugumo}}<br></td></tr><tr><th>CL</th><td>{{Ship/Banner|small=true|Perth}}{{Ship/Banner|small=true|Yahagi}}</td></tr><tr><th>LHA</th><td>{{Ship/Banner|small=true|Akitsu Maru}}</td></tr><tr><th>AO</th><td>{{Ship/Banner|small=true|Hayasui}}</td></tr></table>}} |
{{Map/ImageNode|N|Hard|E-4|x=366|y=116}} | {{Map/ImageNode|N|Hard|E-4|x=366|y=116}} | ||
{{Map/ImageNode|O|Hard|E-4|x=330|y=152}} | {{Map/ImageNode|O|Hard|E-4|x=330|y=152}} | ||
| Line 29: | Line 29: | ||
{{Map/ImageNode|U|Hard|E-4|x=186|y=186}} | {{Map/ImageNode|U|Hard|E-4|x=186|y=186}} | ||
{{Map/ImageNode|V|Hard|E-4|x=131|y=132}} | {{Map/ImageNode|V|Hard|E-4|x=131|y=132}} | ||
| − | {{Map/ImageNode|W|Hard|E-4|x=122|y=185|drops=<table class="wikitable"><tr><th>Type</th><th>Ships</th></tr><tr><th>DE</th><td>{{Ship/Banner|small=true|Fukae}}{{Ship/Banner|small=true|Ishigaki}}{{Ship/Banner|small=true|Mikura}}<br></td></tr><tr><th>DD</th><td>{{Ship/Banner|small=true|Amagiri}}{{Ship/Banner|small=true|Asashimo}}{{Ship/Banner|small=true|Sagiri}}<br>{{Ship/Banner|small=true|Samuel B. Roberts}}{{Ship/Banner|small=true|Uranami}}{{Ship/Banner|small=true|Usugumo}}<br></td></tr><tr><th>CL</th><td>{{Ship/Banner|small=true|Yahagi}}</td></tr><tr><th>LHA</th><td>{{Ship/Banner|small=true|Akitsu Maru}}</td></tr><tr><th>AO</th><td>{{Ship/Banner|small=true|Hayasui}}</td></tr></table>}} | + | {{Map/ImageNode|W|Hard|E-4|x=122|y=185|drops=<table class="wikitable"><tr><th>Type</th><th>Ships</th></tr><tr><th>DE</th><td>{{Ship/Banner|small=true|Fukae}}{{Ship/Banner|small=true|Ishigaki}}{{Ship/Banner|small=true|Mikura}}<br></td></tr><tr><th>DD</th><td>{{Ship/Banner|small=true|Amagiri}}{{Ship/Banner|small=true|Asashimo}}{{Ship/Banner|small=true|Sagiri}}<br>{{Ship/Banner|small=true|Samuel B. Roberts}}{{Ship/Banner|small=true|Uranami}}{{Ship/Banner|small=true|Usugumo}}<br></td></tr><tr><th>CL</th><td>{{Ship/Banner|small=true|Perth}}{{Ship/Banner|small=true|Yahagi}}</td></tr><tr><th>CV</th><td>{{Ship/Banner|small=true|Hornet}}</td></tr><tr><th>LHA</th><td>{{Ship/Banner|small=true|Akitsu Maru}}</td></tr><tr><th>AO</th><td>{{Ship/Banner|small=true|Hayasui}}</td></tr></table>}} |
{{Map/ImageNode|X|Hard|E-4|x=261|y=273}} | {{Map/ImageNode|X|Hard|E-4|x=261|y=273}} | ||
{{Map/ImageNode|Y1|Hard|E-4|x=213|y=291}} | {{Map/ImageNode|Y1|Hard|E-4|x=213|y=291}} | ||
{{Map/ImageNode|Y2|Hard|E-4|x=182|y=215}} | {{Map/ImageNode|Y2|Hard|E-4|x=182|y=215}} | ||
{{Map/ImageNode|Y3|Hard|E-4|x=179|y=297}} | {{Map/ImageNode|Y3|Hard|E-4|x=179|y=297}} | ||
| − | {{Map/ImageNode|Y|Hard|E-4|x=197|y=252|drops=<table class="wikitable"><tr><th>Type</th><th>Ships</th></tr><tr><th>DE</th><td>{{Ship/Banner|small=true|Fukae}}{{Ship/Banner|small=true|Mikura}}</td></tr><tr><th>DD</th><td>{{Ship/Banner|small=true|Amagiri}}{{Ship/Banner|small=true|Asashimo}}{{Ship/Banner|small=true|Sagiri}}<br>{{Ship/Banner|small=true|Uranami}}{{Ship/Banner|small=true|Usugumo}}</td></tr><tr><th>CL</th><td>{{Ship/Banner|small=true|Yahagi}}</td></tr><tr><th>LHA</th><td>{{Ship/Banner|small=true|Akitsu Maru}}</td></tr></table>}} | + | {{Map/ImageNode|Y|Hard|E-4|x=197|y=252|drops=<table class="wikitable"><tr><th>Type</th><th>Ships</th></tr><tr><th>DE</th><td>{{Ship/Banner|small=true|Fukae}}{{Ship/Banner|small=true|Mikura}}</td></tr><tr><th>DD</th><td>{{Ship/Banner|small=true|Amagiri}}{{Ship/Banner|small=true|Asashimo}}{{Ship/Banner|small=true|Sagiri}}<br>{{Ship/Banner|small=true|Uranami}}{{Ship/Banner|small=true|Usugumo}}</td></tr><tr><th>CL</th><td>{{Ship/Banner|small=true|Yahagi}}</td></tr><tr><th>LHA</th><td>{{Ship/Banner|small=true|Akitsu Maru}}</td></tr><tr><th>AO</th><td>{{Ship/Banner|small=true|Hayasui}}</td></tr></table>}} |
| − | {{Map/ImageNode|Z|Hard|E-4|x=137|y=263|drops=<table class="wikitable"><tr><th>Type</th><th>Ships</th></tr><tr><th>DE</th><td>{{Ship/Banner|small=true|Etorofu}}{{Ship/Banner|small=true|Kurahashi}}</td></tr><tr><th>DD</th><td>{{Ship/Banner|small=true|Akishimo}}{{Ship/Banner|small=true|Amatsukaze}}{{Ship/Banner|small=true|Kishinami}}<br>{{Ship/Banner|small=true|Suzutsuki}}</td></tr><tr><th>CL</th><td>{{Ship/Banner|small=true|Ooyodo}}{{Ship/Banner|small=true|Yahagi}}</td></tr><tr><th>CA</th><td>{{Ship/Banner|small=true|Mikuma}}</td></tr><tr><th>CVL</th><td>{{Ship/Banner|small=true|Shinyou}}</td></tr><tr><th>BB</th><td>{{Ship/Banner|small=true|Yamato}}</td></tr><tr><th>CV</th><td>{{Ship/Banner|small=true|Hornet}}{{Ship/Banner|small=true|Intrepid}}</td></tr><tr><th>AR</th><td>{{Ship/Banner|small=true|Akashi}}</td></tr></table>}} | + | {{Map/ImageNode|Z|Hard|E-4|x=137|y=263|drops=<table class="wikitable"><tr><th>Type</th><th>Ships</th></tr><tr><th>DE</th><td>{{Ship/Banner|small=true|Etorofu}}{{Ship/Banner|small=true|Kurahashi}}</td></tr><tr><th>DD</th><td>{{Ship/Banner|small=true|Akishimo}}{{Ship/Banner|small=true|Amatsukaze}}{{Ship/Banner|small=true|Kishinami}}<br>{{Ship/Banner|small=true|Suzutsuki}}</td></tr><tr><th>CL</th><td>{{Ship/Banner|small=true|Ooyodo}}{{Ship/Banner|small=true|Yahagi}}</td></tr><tr><th>CA</th><td>{{Ship/Banner|small=true|Mikuma}}</td></tr><tr><th>CVL</th><td>{{Ship/Banner|small=true|Shinyou}}</td></tr><tr><th>BB</th><td>{{Ship/Banner|small=true|Yamato}}</td></tr><tr><th>CV</th><td>{{Ship/Banner|small=true|Hornet}}{{Ship/Banner|small=true|Intrepid}}</td></tr><tr><th>AR</th><td>{{Ship/Banner|small=true|Akashi}}</td></tr><tr><th>AS</th><td>{{Ship/Banner|small=true|Taigei}}</td></tr></table>}} |
}} | }} | ||
<div class="map-nodes"> | <div class="map-nodes"> | ||
| Line 41: | Line 41: | ||
|AB | |AB | ||
|Raid | |Raid | ||
| − | |{{TooltipSimple|Diamond| | + | |{{TooltipSimple|Diamond|25% (767/3072)}} |
|Light Carrier Nu-Class/B Elite III | |Light Carrier Nu-Class/B Elite III | ||
|Light Carrier Nu-Class/B Elite III | |Light Carrier Nu-Class/B Elite III | ||
| Line 51: | Line 51: | ||
|AB | |AB | ||
|Raid | |Raid | ||
| − | |{{TooltipSimple|Diamond| | + | |{{TooltipSimple|Diamond|48% (1485/3072)}} |
|Light Carrier Nu-Class/B Flagship | |Light Carrier Nu-Class/B Flagship | ||
|Light Carrier Nu-Class/B Flagship | |Light Carrier Nu-Class/B Flagship | ||
| Line 61: | Line 61: | ||
|AB | |AB | ||
|Raid | |Raid | ||
| − | |{{TooltipSimple|Diamond| | + | |{{TooltipSimple|Diamond|14% (423/3072)}} |
|Aircraft Carrier Princess/B IV | |Aircraft Carrier Princess/B IV | ||
|Light Carrier Nu-Class/B Elite III | |Light Carrier Nu-Class/B Elite III | ||
| Line 71: | Line 71: | ||
|AB | |AB | ||
|Raid | |Raid | ||
| − | |{{TooltipSimple|Diamond| | + | |{{TooltipSimple|Diamond|13% (397/3072)}} |
|Aircraft Carrier Princess/B IV | |Aircraft Carrier Princess/B IV | ||
|Light Carrier Nu-Class/B Elite III | |Light Carrier Nu-Class/B Elite III | ||
| Line 84: | Line 84: | ||
|C | |C | ||
|Normal | |Normal | ||
| − | |{{TooltipSimple|Echelon| | + | |{{TooltipSimple|Echelon|15% (1414/9662, HQ: 108-120)}}<br>{{TooltipSimple|Line Abreast|8% (814/9662, HQ: 108-120)}}<br>{{TooltipSimple|''Phases: 1, 2, 3''|Samples: 503, 85, 49}} |
|Submarine So-Class/Flagship | |Submarine So-Class/Flagship | ||
|Submarine So-Class/Elite | |Submarine So-Class/Elite | ||
| Line 92: | Line 92: | ||
|C | |C | ||
|Normal | |Normal | ||
| − | |{{TooltipSimple|Echelon| | + | |{{TooltipSimple|Echelon|40% (3823/9662, HQ: 109-120)}}<br>{{TooltipSimple|Line Abreast|23% (2265/9662, HQ: 108-120)}}<br>{{TooltipSimple|''Phases: 1, 2, 3''|Samples: 1110, 156, 501}} |
|Submarine So-Class/Flagship | |Submarine So-Class/Flagship | ||
|Submarine So-Class/Flagship | |Submarine So-Class/Flagship | ||
| Line 100: | Line 100: | ||
|C | |C | ||
|Normal | |Normal | ||
| − | |{{TooltipSimple|Echelon| | + | |{{TooltipSimple|Echelon|9% (860/9662, HQ: 110-120)}}<br>{{TooltipSimple|Line Abreast|5% (486/9662, HQ: 110-120)}}<br>{{TooltipSimple|''Phases: 3''|Samples: 375}} |
|Submarine So-Class/Flagship | |Submarine So-Class/Flagship | ||
|Submarine So-Class/Flagship | |Submarine So-Class/Flagship | ||
| Line 110: | Line 110: | ||
|D1 | |D1 | ||
|Defense | |Defense | ||
| − | |{{TooltipSimple|Diamond| | + | |{{TooltipSimple|Diamond|19% (251/1311, HQ: 111-120)}}<br>{{TooltipSimple|''Phases: 1, 2, 3''|Samples: 79, 21, 16}} |
|Light Carrier Nu-Class/B Flagship | |Light Carrier Nu-Class/B Flagship | ||
|Light Carrier Nu-Class/B Elite II | |Light Carrier Nu-Class/B Elite II | ||
| Line 120: | Line 120: | ||
|D1 | |D1 | ||
|Defense | |Defense | ||
| − | |{{TooltipSimple|Diamond| | + | |{{TooltipSimple|Diamond|57% (742/1311, HQ: 110-120)}}<br>{{TooltipSimple|''Phases: 1, 2, 3''|Samples: 197, 76, 51}} |
|Light Carrier Nu-Class/B Flagship | |Light Carrier Nu-Class/B Flagship | ||
|Light Carrier Nu-Class/B Elite III | |Light Carrier Nu-Class/B Elite III | ||
| Line 130: | Line 130: | ||
|D1 | |D1 | ||
|Defense | |Defense | ||
| − | |{{TooltipSimple|Diamond| | + | |{{TooltipSimple|Diamond|24% (318/1311, HQ: 112-120)}}<br>{{TooltipSimple|''Phases: 1, 2, 3''|Samples: 182, 37, 14}} |
|Light Carrier Nu-Class/B Flagship | |Light Carrier Nu-Class/B Flagship | ||
|Light Carrier Nu-Class/B Flagship | |Light Carrier Nu-Class/B Flagship | ||
| Line 141: | Line 141: | ||
|D2 | |D2 | ||
|Normal | |Normal | ||
| − | |{{TooltipSimple|Echelon| | + | |{{TooltipSimple|Echelon|26% (248/956, HQ: 112-120)}}<br>{{TooltipSimple|Line Abreast|18% (168/956, HQ: 113-120)}}<br>{{TooltipSimple|''Phases: 1, 2''|Samples: 162, 47}} |
|Submarine So-Class/Flagship | |Submarine So-Class/Flagship | ||
|Submarine So-Class/Elite | |Submarine So-Class/Elite | ||
| Line 149: | Line 149: | ||
|D2 | |D2 | ||
|Normal | |Normal | ||
| − | |{{TooltipSimple|Echelon| | + | |{{TooltipSimple|Echelon|32% (305/956, HQ: 111-120)}}<br>{{TooltipSimple|Line Abreast|22% (212/956, HQ: 113-120)}}<br>{{TooltipSimple|''Phases: 1, 2, 3''|Samples: 219, 43, 27}} |
|Submarine So-Class/Flagship | |Submarine So-Class/Flagship | ||
|Submarine So-Class/Flagship | |Submarine So-Class/Flagship | ||
| Line 157: | Line 157: | ||
|D2 | |D2 | ||
|Normal | |Normal | ||
| − | |{{TooltipSimple|Echelon|1% ( | + | |{{TooltipSimple|Echelon|1% (13/956, HQ: 117-120)}}<br>{{TooltipSimple|Line Abreast|1% (10/956, HQ: 120)}}<br>{{TooltipSimple|''Phases: 3''|Samples: 13}} |
|Submarine So-Class/Flagship | |Submarine So-Class/Flagship | ||
|Submarine So-Class/Flagship | |Submarine So-Class/Flagship | ||
| Line 166: | Line 166: | ||
|E | |E | ||
|Defense | |Defense | ||
| − | |{{TooltipSimple|Diamond| | + | |{{TooltipSimple|Diamond|17% (954/5698, HQ: 108-120)}}<br>{{TooltipSimple|''Phases: 1, 2, 3''|Samples: 179, 29, 29}} |
|Light Carrier Nu-Class/B Flagship | |Light Carrier Nu-Class/B Flagship | ||
|Light Carrier Nu-Class/B Elite II | |Light Carrier Nu-Class/B Elite II | ||
| Line 176: | Line 176: | ||
|E | |E | ||
|Defense | |Defense | ||
| − | |{{TooltipSimple|Diamond| | + | |{{TooltipSimple|Diamond|50% (2847/5698, HQ: 108-120)}}<br>{{TooltipSimple|''Phases: 1, 2, 3''|Samples: 593, 76, 76}} |
|Light Carrier Nu-Class/B Flagship | |Light Carrier Nu-Class/B Flagship | ||
|Light Carrier Nu-Class/B Elite III | |Light Carrier Nu-Class/B Elite III | ||
| Line 186: | Line 186: | ||
|E | |E | ||
|Defense | |Defense | ||
| − | |{{TooltipSimple|Diamond| | + | |{{TooltipSimple|Diamond|33% (1897/5698, HQ: 108-120)}}<br>{{TooltipSimple|''Phases: 1, 2, 3''|Samples: 587, 49, 32}} |
|Light Carrier Nu-Class/B Flagship | |Light Carrier Nu-Class/B Flagship | ||
|Light Carrier Nu-Class/B Flagship | |Light Carrier Nu-Class/B Flagship | ||
| Line 197: | Line 197: | ||
|F | |F | ||
|Normal | |Normal | ||
| − | |{{TooltipSimple|Line Ahead| | + | |{{TooltipSimple|Line Ahead|23% (1672/7422, HQ: 108-120)}}<br>{{TooltipSimple|''Phases: 1, 2, 3''|Samples: 430, 31, 32}} |
|Light Cruiser Ho-Class/Flagship | |Light Cruiser Ho-Class/Flagship | ||
|Light Cruiser Tsu-Class | |Light Cruiser Tsu-Class | ||
| Line 207: | Line 207: | ||
|F | |F | ||
|Normal | |Normal | ||
| − | |{{TooltipSimple|Line Ahead| | + | |{{TooltipSimple|Line Ahead|59% (4369/7422, HQ: 108-120)}}<br>{{TooltipSimple|''Phases: 1, 2, 3''|Samples: 929, 86, 239}} |
|Heavy Cruiser Ri-Class/Flagship | |Heavy Cruiser Ri-Class/Flagship | ||
|Light Cruiser Ho-Class/Flagship | |Light Cruiser Ho-Class/Flagship | ||
| Line 217: | Line 217: | ||
|F | |F | ||
|Normal | |Normal | ||
| − | |{{TooltipSimple|Line Ahead| | + | |{{TooltipSimple|Line Ahead|19% (1381/7422, HQ: 112-120)}}<br>{{TooltipSimple|''Phases: 3''|Samples: 389}} |
|Battleship Ta-Class/Flagship | |Battleship Ta-Class/Flagship | ||
|Heavy Cruiser Ri-Class/Flagship | |Heavy Cruiser Ri-Class/Flagship | ||
| Line 231: | Line 231: | ||
|J | |J | ||
|Normal | |Normal | ||
| − | |{{TooltipSimple|Diamond| | + | |{{TooltipSimple|Diamond|15% (570/3832, HQ: 112-120)}}<br>{{TooltipSimple|''Phases: 1, 2, 3''|Samples: 142, 13, 19}} |
|Light Carrier Nu-Class/B Flagship | |Light Carrier Nu-Class/B Flagship | ||
|Light Carrier Nu-Class/B Elite II | |Light Carrier Nu-Class/B Elite II | ||
| Line 241: | Line 241: | ||
|J | |J | ||
|Normal | |Normal | ||
| − | |{{TooltipSimple|Diamond|48% ( | + | |{{TooltipSimple|Diamond|48% (1828/3832, HQ: 108-120)}}<br>{{TooltipSimple|''Phases: 1, 2, 3''|Samples: 366, 66, 87}} |
|Light Carrier Nu-Class/B Flagship | |Light Carrier Nu-Class/B Flagship | ||
|Light Carrier Nu-Class/B Elite III | |Light Carrier Nu-Class/B Elite III | ||
| Line 251: | Line 251: | ||
|J | |J | ||
|Normal | |Normal | ||
| − | |{{TooltipSimple|Diamond| | + | |{{TooltipSimple|Diamond|37% (1434/3832, HQ: 110-120)}}<br>{{TooltipSimple|''Phases: 1, 2, 3''|Samples: 393, 18, 26}} |
|Light Carrier Nu-Class/B Flagship | |Light Carrier Nu-Class/B Flagship | ||
|Light Carrier Nu-Class/B Flagship | |Light Carrier Nu-Class/B Flagship | ||
| Line 262: | Line 262: | ||
|K | |K | ||
|Normal | |Normal | ||
| − | |{{TooltipSimple|Diamond| | + | |{{TooltipSimple|Diamond|15% (6/40, HQ: 120)}}<br>{{TooltipSimple|''Phases: 1, 2, 3''|Samples: 4, 1, 1}} |
|Light Carrier Nu-Class/B Flagship | |Light Carrier Nu-Class/B Flagship | ||
|Light Carrier Nu-Class/B Elite II | |Light Carrier Nu-Class/B Elite II | ||
| Line 272: | Line 272: | ||
|K | |K | ||
|Normal | |Normal | ||
| − | |{{TooltipSimple|Diamond| | + | |{{TooltipSimple|Diamond|50% (20/40, HQ: 120)}}<br>{{TooltipSimple|''Phases: 1, 2''|Samples: 14, 1}} |
|Light Carrier Nu-Class/B Flagship | |Light Carrier Nu-Class/B Flagship | ||
|Light Carrier Nu-Class/B Elite III | |Light Carrier Nu-Class/B Elite III | ||
| Line 282: | Line 282: | ||
|K | |K | ||
|Normal | |Normal | ||
| − | |{{TooltipSimple|Diamond| | + | |{{TooltipSimple|Diamond|35% (14/40, HQ: 119-120)}}<br>{{TooltipSimple|''Phases: 1, 3''|Samples: 12, 1}} |
|Light Carrier Nu-Class/B Flagship | |Light Carrier Nu-Class/B Flagship | ||
|Light Carrier Nu-Class/B Flagship | |Light Carrier Nu-Class/B Flagship | ||
| Line 294: | Line 294: | ||
|M | |M | ||
|Boss | |Boss | ||
| − | |{{TooltipSimple|Cruising Formation 4| | + | |{{TooltipSimple|Cruising Formation 4|76% (2083/2735, HQ: 108-120)}}<br>{{TooltipSimple|''Phases: 1, 2, 3''|Samples: 488, 16, 69}} |
|Battleship Princess | |Battleship Princess | ||
|Heavy Cruiser Ne-Class/Elite | |Heavy Cruiser Ne-Class/Elite | ||
| Line 310: | Line 310: | ||
|M | |M | ||
|Boss/Final | |Boss/Final | ||
| − | |{{TooltipSimple|Cruising Formation 4| | + | |{{TooltipSimple|Cruising Formation 4|24% (652/2735, HQ: 111-120)}}<br>{{TooltipSimple|''Phases: 1''|Samples: 168}} |
|Battleship Princess | |Battleship Princess | ||
|Battleship Princess | |Battleship Princess | ||
| Line 327: | Line 327: | ||
|N | |N | ||
|Normal | |Normal | ||
| − | |{{TooltipSimple|Echelon| | + | |{{TooltipSimple|Echelon|15% (641/4370, HQ: 112-120)}}<br>{{TooltipSimple|Line Abreast|5% (239/4370, HQ: 110-120)}}<br>{{TooltipSimple|''Phases: 2, 3''|Samples: 187, 52}} |
|Submarine So-Class/Flagship | |Submarine So-Class/Flagship | ||
|Submarine So-Class/Elite | |Submarine So-Class/Elite | ||
| Line 334: | Line 334: | ||
|N | |N | ||
|Normal | |Normal | ||
| − | |{{TooltipSimple|Echelon| | + | |{{TooltipSimple|Echelon|19% (813/4370, HQ: 110-120)}}<br>{{TooltipSimple|Line Abreast|11% (481/4370, HQ: 110-120)}}<br>{{TooltipSimple|''Phases: 2, 3''|Samples: 269, 79}} |
|Submarine So-Class/Flagship | |Submarine So-Class/Flagship | ||
|Submarine So-Class/Elite | |Submarine So-Class/Elite | ||
| Line 342: | Line 342: | ||
|N | |N | ||
|Normal | |Normal | ||
| − | |{{TooltipSimple|Echelon| | + | |{{TooltipSimple|Echelon|14% (621/4370, HQ: 110-120)}}<br>{{TooltipSimple|Line Abreast|9% (385/4370, HQ: 110-120)}}<br>{{TooltipSimple|''Phases: 2, 3''|Samples: 224, 50}} |
|Submarine So-Class/Flagship | |Submarine So-Class/Flagship | ||
|Submarine So-Class/Flagship | |Submarine So-Class/Flagship | ||
| Line 350: | Line 350: | ||
|N | |N | ||
|Normal | |Normal | ||
| − | |{{TooltipSimple|Echelon| | + | |{{TooltipSimple|Echelon|16% (691/4370, HQ: 110-120)}}<br>{{TooltipSimple|Line Abreast|11% (499/4370, HQ: 110-120)}}<br>{{TooltipSimple|''Phases: 2''|Samples: 335}} |
|Submarine So-Class/Flagship | |Submarine So-Class/Flagship | ||
|Submarine So-Class/Flagship | |Submarine So-Class/Flagship | ||
| Line 359: | Line 359: | ||
|O | |O | ||
|Defense | |Defense | ||
| − | |{{TooltipSimple|Diamond| | + | |{{TooltipSimple|Diamond|13% (108/823, HQ: 110-120)}}<br>{{TooltipSimple|''Phases: 2, 3''|Samples: 14, 14}} |
|Light Carrier Nu-Class/B Flagship | |Light Carrier Nu-Class/B Flagship | ||
|Light Carrier Nu-Class/B Elite II | |Light Carrier Nu-Class/B Elite II | ||
| Line 369: | Line 369: | ||
|O | |O | ||
|Defense | |Defense | ||
| − | |{{TooltipSimple|Diamond| | + | |{{TooltipSimple|Diamond|33% (268/823, HQ: 110-120)}}<br>{{TooltipSimple|''Phases: 2, 3''|Samples: 32, 31}} |
|Light Carrier Nu-Class/B Flagship | |Light Carrier Nu-Class/B Flagship | ||
|Light Carrier Nu-Class/B Elite III | |Light Carrier Nu-Class/B Elite III | ||
| Line 379: | Line 379: | ||
|O | |O | ||
|Defense | |Defense | ||
| − | |{{TooltipSimple|Diamond| | + | |{{TooltipSimple|Diamond|54% (447/823, HQ: 110-120)}}<br>{{TooltipSimple|''Phases: 2, 3''|Samples: 56, 46}} |
|Light Carrier Nu-Class/B Flagship | |Light Carrier Nu-Class/B Flagship | ||
|Light Carrier Nu-Class/B Flagship | |Light Carrier Nu-Class/B Flagship | ||
| Line 390: | Line 390: | ||
|P | |P | ||
|Defense | |Defense | ||
| − | |{{TooltipSimple|Diamond| | + | |{{TooltipSimple|Diamond|17% (541/3113, HQ: 112-120)}}<br>{{TooltipSimple|''Phases: 2, 3''|Samples: 139, 20}} |
|Light Carrier Nu-Class/B Flagship | |Light Carrier Nu-Class/B Flagship | ||
|Light Carrier Nu-Class/B Elite III | |Light Carrier Nu-Class/B Elite III | ||
| Line 400: | Line 400: | ||
|P | |P | ||
|Defense | |Defense | ||
| − | |{{TooltipSimple|Diamond| | + | |{{TooltipSimple|Diamond|34% (1050/3113, HQ: 112-120)}}<br>{{TooltipSimple|''Phases: 2, 3''|Samples: 251, 30}} |
|Light Carrier Nu-Class/B Flagship | |Light Carrier Nu-Class/B Flagship | ||
|Light Carrier Nu-Class/B Flagship | |Light Carrier Nu-Class/B Flagship | ||
| Line 410: | Line 410: | ||
|P | |P | ||
|Defense | |Defense | ||
| − | |{{TooltipSimple|Diamond| | + | |{{TooltipSimple|Diamond|49% (1522/3113, HQ: 112-120)}}<br>{{TooltipSimple|''Phases: 2, 3''|Samples: 403, 27}} |
|Light Carrier Nu-Class/B Flagship | |Light Carrier Nu-Class/B Flagship | ||
|Light Carrier Nu-Class/B Flagship | |Light Carrier Nu-Class/B Flagship | ||
| Line 421: | Line 421: | ||
|Q | |Q | ||
|Defense | |Defense | ||
| − | |{{TooltipSimple|Diamond| | + | |{{TooltipSimple|Diamond|12% (85/718, HQ: 113-120)}}<br>{{TooltipSimple|''Phases: 2, 3''|Samples: 10, 8}} |
|Light Carrier Nu-Class/B Flagship | |Light Carrier Nu-Class/B Flagship | ||
|Light Carrier Nu-Class/B Elite III | |Light Carrier Nu-Class/B Elite III | ||
| Line 431: | Line 431: | ||
|Q | |Q | ||
|Defense | |Defense | ||
| − | |{{TooltipSimple|Diamond| | + | |{{TooltipSimple|Diamond|50% (362/718, HQ: 110-120)}}<br>{{TooltipSimple|''Phases: 2, 3''|Samples: 71, 33}} |
|Light Carrier Nu-Class/B Flagship | |Light Carrier Nu-Class/B Flagship | ||
|Light Carrier Nu-Class/B Flagship | |Light Carrier Nu-Class/B Flagship | ||
| Line 441: | Line 441: | ||
|Q | |Q | ||
|Defense | |Defense | ||
| − | |{{TooltipSimple|Diamond| | + | |{{TooltipSimple|Diamond|38% (271/718, HQ: 110-120)}}<br>{{TooltipSimple|''Phases: 2, 3''|Samples: 37, 19}} |
|Light Carrier Nu-Class/B Flagship | |Light Carrier Nu-Class/B Flagship | ||
|Light Carrier Nu-Class/B Flagship | |Light Carrier Nu-Class/B Flagship | ||
| Line 452: | Line 452: | ||
|R | |R | ||
|Normal | |Normal | ||
| − | |{{TooltipSimple|Line Ahead| | + | |{{TooltipSimple|Line Ahead|35% (1188/3375, HQ: 110-120)}}<br>{{TooltipSimple|Double Line|29% (976/3375, HQ: 110-120)}}<br>{{TooltipSimple|Vanguard|36% (1211/3375, HQ: 110-120)}}<br>{{TooltipSimple|''Phases: 2, 3''|Samples: 812, 105}} |
|Heavy Cruiser Ri-Class/Flagship | |Heavy Cruiser Ri-Class/Flagship | ||
|Heavy Cruiser Ri-Class/Flagship | |Heavy Cruiser Ri-Class/Flagship | ||
| Line 463: | Line 463: | ||
|S | |S | ||
|Normal | |Normal | ||
| − | |{{TooltipSimple|Echelon| | + | |{{TooltipSimple|Echelon|15% (22/144, HQ: 113-120)}}<br>{{TooltipSimple|Line Abreast|5% (7/144, HQ: 118-120)}}<br>{{TooltipSimple|''Phases: 2, 3''|Samples: 5, 2}} |
|Submarine So-Class/Flagship | |Submarine So-Class/Flagship | ||
|Submarine So-Class/Elite | |Submarine So-Class/Elite | ||
| Line 470: | Line 470: | ||
|S | |S | ||
|Normal | |Normal | ||
| − | |{{TooltipSimple|Echelon| | + | |{{TooltipSimple|Echelon|22% (32/144, HQ: 116-120)}}<br>{{TooltipSimple|Line Abreast|13% (18/144, HQ: 117-120)}}<br>{{TooltipSimple|''Phases: 2, 3''|Samples: 18, 1}} |
|Submarine So-Class/Flagship | |Submarine So-Class/Flagship | ||
|Submarine So-Class/Elite | |Submarine So-Class/Elite | ||
| Line 478: | Line 478: | ||
|S | |S | ||
|Normal | |Normal | ||
| − | |{{TooltipSimple|Echelon| | + | |{{TooltipSimple|Echelon|20% (29/144, HQ: 113-120)}}<br>{{TooltipSimple|Line Abreast|14% (20/144, HQ: 118-120)}}<br>{{TooltipSimple|''Phases: 2, 3''|Samples: 16, 1}} |
|Submarine So-Class/Flagship | |Submarine So-Class/Flagship | ||
|Submarine So-Class/Flagship | |Submarine So-Class/Flagship | ||
| Line 486: | Line 486: | ||
|S | |S | ||
|Normal | |Normal | ||
| − | |{{TooltipSimple|Line Abreast| | + | |{{TooltipSimple|Echelon|6% (8/144, HQ: 117-120)}}<br>{{TooltipSimple|Line Abreast|6% (8/144, HQ: 120)}}<br>{{TooltipSimple|''Phases: 2''|Samples: 3}} |
|Submarine So-Class/Flagship | |Submarine So-Class/Flagship | ||
|Submarine So-Class/Flagship | |Submarine So-Class/Flagship | ||
| Line 495: | Line 495: | ||
|T | |T | ||
|Normal | |Normal | ||
| − | |{{TooltipSimple|Diamond|8% ( | + | |{{TooltipSimple|Diamond|8% (217/2837, HQ: 112-120)}}<br>{{TooltipSimple|''Phases: 2, 3''|Samples: 57, 7}} |
|Light Carrier Nu-Class/B Flagship | |Light Carrier Nu-Class/B Flagship | ||
|Light Carrier Nu-Class/B Elite II | |Light Carrier Nu-Class/B Elite II | ||
| Line 505: | Line 505: | ||
|T | |T | ||
|Normal | |Normal | ||
| − | |{{TooltipSimple|Diamond|22% ( | + | |{{TooltipSimple|Diamond|22% (634/2837, HQ: 110-120)}}<br>{{TooltipSimple|''Phases: 2, 3''|Samples: 136, 29}} |
|Light Carrier Nu-Class/B Flagship | |Light Carrier Nu-Class/B Flagship | ||
|Light Carrier Nu-Class/B Elite III | |Light Carrier Nu-Class/B Elite III | ||
| Line 515: | Line 515: | ||
|T | |T | ||
|Normal | |Normal | ||
| − | |{{TooltipSimple|Diamond| | + | |{{TooltipSimple|Diamond|70% (1986/2837, HQ: 110-120)}}<br>{{TooltipSimple|''Phases: 2, 3''|Samples: 638, 53}} |
|Light Carrier Nu-Class/B Flagship | |Light Carrier Nu-Class/B Flagship | ||
|Light Carrier Nu-Class/B Flagship | |Light Carrier Nu-Class/B Flagship | ||
| Line 526: | Line 526: | ||
|U | |U | ||
|Defense | |Defense | ||
| − | |{{TooltipSimple|Diamond| | + | |{{TooltipSimple|Diamond|39% (13/33, HQ: 120)}}<br>{{TooltipSimple|''Phases: 2, 3''|Samples: 1, 3}} |
|Aircraft Carrier Princess/Kai III | |Aircraft Carrier Princess/Kai III | ||
|Light Carrier Nu-Class/B Elite III | |Light Carrier Nu-Class/B Elite III | ||
| Line 536: | Line 536: | ||
|U | |U | ||
|Defense | |Defense | ||
| − | |{{TooltipSimple|Diamond| | + | |{{TooltipSimple|Diamond|45% (15/33, HQ: 120)}}<br>{{TooltipSimple|''Phases: 2, 3''|Samples: 3, 3}} |
|Aircraft Carrier Princess/Kai III | |Aircraft Carrier Princess/Kai III | ||
|Light Carrier Nu-Class/B Elite III | |Light Carrier Nu-Class/B Elite III | ||
| Line 543: | Line 543: | ||
|Battleship Ta-Class/Flagship | |Battleship Ta-Class/Flagship | ||
|Transport Ship Wa-Class/Elite | |Transport Ship Wa-Class/Elite | ||
| + | |- | ||
| + | |U | ||
| + | |Defense | ||
| + | |{{TooltipSimple|Diamond|15% (5/33, HQ: 120)}}<br>{{TooltipSimple|''Phases: 2''|Samples: 1}} | ||
| + | |Aircraft Carrier Princess/Kai III | ||
| + | |Light Carrier Nu-Class/B Flagship | ||
| + | |Light Carrier Nu-Class/B Flagship | ||
| + | |Battleship Ta-Class/Flagship | ||
| + | |Battleship Ta-Class/Flagship | ||
| + | |Transport Ship Wa-Class/Flagship | ||
}} | }} | ||
{{Map/Nodes|diff=Hard|V|Empty|kind=1}} | {{Map/Nodes|diff=Hard|V|Empty|kind=1}} | ||
| Line 548: | Line 558: | ||
|W | |W | ||
|Boss | |Boss | ||
| − | |{{TooltipSimple|Cruising Formation 4| | + | |{{TooltipSimple|Cruising Formation 4|75% (1724/2305, HQ: 110-120)}}<br>{{TooltipSimple|''Phases: 2, 3''|Samples: 402, 75}} |
|Aircraft Carrier Princess/Kai III | |Aircraft Carrier Princess/Kai III | ||
|Light Carrier Nu-Class/B Elite III | |Light Carrier Nu-Class/B Elite III | ||
| Line 564: | Line 574: | ||
|W | |W | ||
|Boss/Final | |Boss/Final | ||
| − | |{{TooltipSimple|Cruising Formation 4| | + | |{{TooltipSimple|Cruising Formation 4|25% (581/2305, HQ: 110-120)}}<br>{{TooltipSimple|''Phases: 2''|Samples: 159}} |
|Aircraft Carrier Princess/Kai III | |Aircraft Carrier Princess/Kai III | ||
|Light Carrier Nu-Class/B Flagship | |Light Carrier Nu-Class/B Flagship | ||
| Line 581: | Line 591: | ||
|X | |X | ||
|Defense | |Defense | ||
| − | |{{TooltipSimple|Diamond|36% ( | + | |{{TooltipSimple|Diamond|36% (664/1820, HQ: 112-120)}}<br>{{TooltipSimple|''Phases: 3''|Samples: 174}} |
|Aircraft Carrier Princess/B IV | |Aircraft Carrier Princess/B IV | ||
|Battleship Princess | |Battleship Princess | ||
| Line 591: | Line 601: | ||
|X | |X | ||
|Defense | |Defense | ||
| − | |{{TooltipSimple|Diamond| | + | |{{TooltipSimple|Diamond|56% (1013/1820, HQ: 110-120)}}<br>{{TooltipSimple|''Phases: 3''|Samples: 295}} |
|Aircraft Carrier Princess/B IV | |Aircraft Carrier Princess/B IV | ||
|Light Carrier Nu-Class/B Elite II | |Light Carrier Nu-Class/B Elite II | ||
| Line 601: | Line 611: | ||
|X | |X | ||
|Defense | |Defense | ||
| − | |{{TooltipSimple|Diamond| | + | |{{TooltipSimple|Diamond|8% (143/1820, HQ: 115-120)}}<br>{{TooltipSimple|''Phases: 3''|Samples: 36}} |
|Aircraft Carrier Princess/B IV | |Aircraft Carrier Princess/B IV | ||
|Light Carrier Nu-Class/B Elite III | |Light Carrier Nu-Class/B Elite III | ||
| Line 612: | Line 622: | ||
|Y | |Y | ||
|Normal | |Normal | ||
| − | |{{TooltipSimple|Line Ahead| | + | |{{TooltipSimple|Line Ahead|53% (905/1705, HQ: 110-120)}}<br>{{TooltipSimple|Double Line|29% (493/1705, HQ: 112-120)}}<br>{{TooltipSimple|Echelon|18% (307/1705, HQ: 112-120)}}<br>{{TooltipSimple|''Phases: 3''|Samples: 492}} |
|Battleship Ru-Class/Flagship | |Battleship Ru-Class/Flagship | ||
|Battleship Ru-Class/Flagship | |Battleship Ru-Class/Flagship | ||
| Line 623: | Line 633: | ||
|Y1 | |Y1 | ||
|Normal | |Normal | ||
| − | |{{TooltipSimple|Echelon| | + | |{{TooltipSimple|Echelon|35% (18/52, HQ: 112-120)}}<br>{{TooltipSimple|Line Abreast|10% (5/52, HQ: 120)}}<br>{{TooltipSimple|''Phases: 3''|Samples: 8}} |
|New Submarine Princess/Flagship | |New Submarine Princess/Flagship | ||
|Submarine So-Class/Elite | |Submarine So-Class/Elite | ||
| Line 631: | Line 641: | ||
|Y1 | |Y1 | ||
|Normal | |Normal | ||
| − | |{{TooltipSimple|Echelon| | + | |{{TooltipSimple|Echelon|33% (17/52, HQ: 120)}}<br>{{TooltipSimple|Line Abreast|23% (12/52, HQ: 120)}}<br>{{TooltipSimple|''Phases: 3''|Samples: 10}} |
|New Submarine Princess/Flagship II | |New Submarine Princess/Flagship II | ||
|Submarine So-Class/Flagship | |Submarine So-Class/Flagship | ||
| Line 648: | Line 658: | ||
|Destroyer Ni-Class/Late Model Elite | |Destroyer Ni-Class/Late Model Elite | ||
}} | }} | ||
| + | {{Map/Nodes|diff=Hard|Y3|Empty|kind=1}} | ||
{{Map/Nodes|diff=Hard|name=深海任務部隊 前衛艦隊総旗艦|margin=true | {{Map/Nodes|diff=Hard|name=深海任務部隊 前衛艦隊総旗艦|margin=true | ||
|Z | |Z | ||
|Boss | |Boss | ||
| − | |{{TooltipSimple|Cruising Formation 4| | + | |{{TooltipSimple|Cruising Formation 4|85% (1284/1517, HQ: 110-120)}}<br>{{TooltipSimple|''Phases: 3''|Samples: 364}} |
|Aircraft Carrier Princess/B IV | |Aircraft Carrier Princess/B IV | ||
|Battleship Princess | |Battleship Princess | ||
| Line 667: | Line 678: | ||
|Z | |Z | ||
|Boss/Final | |Boss/Final | ||
| − | |{{TooltipSimple|Cruising Formation 4| | + | |{{TooltipSimple|Cruising Formation 4|15% (233/1517, HQ: 112-120)}}<br>{{TooltipSimple|''Phases: 3''|Samples: 58}} |
|Aircraft Carrier Princess/B IV | |Aircraft Carrier Princess/B IV | ||
|Battleship Princess | |Battleship Princess | ||
| Line 693: | Line 704: | ||
{{Map/ImageNode|D|Medium|E-4|x=537|y=247}} | {{Map/ImageNode|D|Medium|E-4|x=537|y=247}} | ||
{{Map/ImageNode|E|Medium|E-4|x=500|y=245}} | {{Map/ImageNode|E|Medium|E-4|x=500|y=245}} | ||
| − | {{Map/ImageNode|F|Medium|E-4|x=436|y=263}} | + | {{Map/ImageNode|F|Medium|E-4|x=436|y=263|drops=<table class="wikitable"><tr><th>Type</th><th>Ships</th></tr><tr><th>DD</th><td>{{Ship/Banner|small=true|Asashimo}}</td></tr></table>}} |
{{Map/ImageNode|G|Medium|E-4|x=383|y=259}} | {{Map/ImageNode|G|Medium|E-4|x=383|y=259}} | ||
{{Map/ImageNode|H|Medium|E-4|x=342|y=261}} | {{Map/ImageNode|H|Medium|E-4|x=342|y=261}} | ||
{{Map/ImageNode|I|Medium|E-4|x=358|y=222}} | {{Map/ImageNode|I|Medium|E-4|x=358|y=222}} | ||
| − | {{Map/ImageNode|J|Medium|E-4|x=292|y=232|drops=<table class="wikitable"><tr><th>Type</th><th>Ships</th></tr><tr><th>DD</th><td>{{Ship/Banner|small=true|Asashimo}}{{Ship/Banner|small=true|Sagiri}}{{Ship/Banner|small=true|Uranami}} | + | {{Map/ImageNode|J|Medium|E-4|x=292|y=232|drops=<table class="wikitable"><tr><th>Type</th><th>Ships</th></tr><tr><th>DD</th><td>{{Ship/Banner|small=true|Amagiri}}{{Ship/Banner|small=true|Asashimo}}{{Ship/Banner|small=true|Sagiri}}<br>{{Ship/Banner|small=true|Uranami}}</td></tr></table>}} |
{{Map/ImageNode|K|Medium|E-4|x=300|y=183}} | {{Map/ImageNode|K|Medium|E-4|x=300|y=183}} | ||
{{Map/ImageNode|L|Medium|E-4|x=237|y=242}} | {{Map/ImageNode|L|Medium|E-4|x=237|y=242}} | ||
| − | {{Map/ImageNode|M|Medium|E-4|x=235|y=200|drops=<table class="wikitable"><tr><th>Type</th><th>Ships</th></tr><tr><th>DE</th><td>{{Ship/Banner|small=true|Fukae}}{{Ship/Banner|small=true|Mikura}}</td></tr><tr><th>DD</th><td>{{Ship/Banner|small=true|Asashimo}}{{Ship/Banner|small=true|Uranami}}</td></tr><tr><th>CL</th><td>{{Ship/Banner|small=true|Yahagi}}</td></tr></table>}} | + | {{Map/ImageNode|M|Medium|E-4|x=235|y=200|drops=<table class="wikitable"><tr><th>Type</th><th>Ships</th></tr><tr><th>DE</th><td>{{Ship/Banner|small=true|Fukae}}{{Ship/Banner|small=true|Ishigaki}}{{Ship/Banner|small=true|Mikura}}<br></td></tr><tr><th>DD</th><td>{{Ship/Banner|small=true|Amagiri}}{{Ship/Banner|small=true|Asashimo}}{{Ship/Banner|small=true|Sagiri}}<br>{{Ship/Banner|small=true|Uranami}}</td></tr><tr><th>CL</th><td>{{Ship/Banner|small=true|Perth}}{{Ship/Banner|small=true|Yahagi}}</td></tr><tr><th>LHA</th><td>{{Ship/Banner|small=true|Akitsu Maru}}</td></tr></table>}} |
{{Map/ImageNode|N|Medium|E-4|x=366|y=116}} | {{Map/ImageNode|N|Medium|E-4|x=366|y=116}} | ||
{{Map/ImageNode|O|Medium|E-4|x=330|y=152}} | {{Map/ImageNode|O|Medium|E-4|x=330|y=152}} | ||
{{Map/ImageNode|P|Medium|E-4|x=308|y=127}} | {{Map/ImageNode|P|Medium|E-4|x=308|y=127}} | ||
{{Map/ImageNode|Q|Medium|E-4|x=282|y=148}} | {{Map/ImageNode|Q|Medium|E-4|x=282|y=148}} | ||
| − | {{Map/ImageNode|R|Medium|E-4|x=234|y=142}} | + | {{Map/ImageNode|R|Medium|E-4|x=234|y=142|drops=<table class="wikitable"><tr><th>Type</th><th>Ships</th></tr><tr><th>DD</th><td>{{Ship/Banner|small=true|Amagiri}}{{Ship/Banner|small=true|Asashimo}}{{Ship/Banner|small=true|Uranami}}<br></td></tr></table>}} |
{{Map/ImageNode|Start 2|Medium|E-4|x=401|y=82}} | {{Map/ImageNode|Start 2|Medium|E-4|x=401|y=82}} | ||
{{Map/ImageNode|S|Medium|E-4|x=198|y=100}} | {{Map/ImageNode|S|Medium|E-4|x=198|y=100}} | ||
| − | {{Map/ImageNode|T|Medium|E-4|x=193|y=138|drops=<table class="wikitable"><tr><th>Type</th><th>Ships</th></tr><tr><th>DD</th><td>{{Ship/Banner|small=true|Asashimo}}{{Ship/Banner|small=true|Sagiri}}</td></tr></table>}} | + | {{Map/ImageNode|T|Medium|E-4|x=193|y=138|drops=<table class="wikitable"><tr><th>Type</th><th>Ships</th></tr><tr><th>DD</th><td>{{Ship/Banner|small=true|Amagiri}}{{Ship/Banner|small=true|Asashimo}}{{Ship/Banner|small=true|Sagiri}}<br>{{Ship/Banner|small=true|Uranami}}</td></tr></table>}} |
{{Map/ImageNode|U|Medium|E-4|x=186|y=186}} | {{Map/ImageNode|U|Medium|E-4|x=186|y=186}} | ||
{{Map/ImageNode|V|Medium|E-4|x=131|y=132}} | {{Map/ImageNode|V|Medium|E-4|x=131|y=132}} | ||
| − | {{Map/ImageNode|W|Medium|E-4|x=122|y=185|drops=<table class="wikitable"><tr><th>Type</th><th>Ships</th></tr><tr><th>DE</th><td>{{Ship/Banner|small=true|Fukae}}{{Ship/Banner|small=true|Mikura}}</td></tr></table>}} | + | {{Map/ImageNode|W|Medium|E-4|x=122|y=185|drops=<table class="wikitable"><tr><th>Type</th><th>Ships</th></tr><tr><th>DE</th><td>{{Ship/Banner|small=true|Fukae}}{{Ship/Banner|small=true|Mikura}}</td></tr><tr><th>DD</th><td>{{Ship/Banner|small=true|Amagiri}}{{Ship/Banner|small=true|Asashimo}}{{Ship/Banner|small=true|Sagiri}}<br>{{Ship/Banner|small=true|Samuel B. Roberts}}{{Ship/Banner|small=true|Uranami}}{{Ship/Banner|small=true|Usugumo}}<br></td></tr><tr><th>CL</th><td>{{Ship/Banner|small=true|Yahagi}}</td></tr><tr><th>LHA</th><td>{{Ship/Banner|small=true|Akitsu Maru}}</td></tr></table>}} |
{{Map/ImageNode|X|Medium|E-4|x=261|y=273}} | {{Map/ImageNode|X|Medium|E-4|x=261|y=273}} | ||
{{Map/ImageNode|Y1|Medium|E-4|x=213|y=291}} | {{Map/ImageNode|Y1|Medium|E-4|x=213|y=291}} | ||
{{Map/ImageNode|Y2|Medium|E-4|x=182|y=215}} | {{Map/ImageNode|Y2|Medium|E-4|x=182|y=215}} | ||
{{Map/ImageNode|Y3|Medium|E-4|x=179|y=297}} | {{Map/ImageNode|Y3|Medium|E-4|x=179|y=297}} | ||
| − | {{Map/ImageNode|Y|Medium|E-4|x=197|y=252}} | + | {{Map/ImageNode|Y|Medium|E-4|x=197|y=252|drops=<table class="wikitable"><tr><th>Type</th><th>Ships</th></tr><tr><th>DE</th><td>{{Ship/Banner|small=true|Mikura}}</td></tr><tr><th>DD</th><td>{{Ship/Banner|small=true|Asashimo}}{{Ship/Banner|small=true|Usugumo}}</td></tr><tr><th>LHA</th><td>{{Ship/Banner|small=true|Akitsu Maru}}</td></tr><tr><th>AO</th><td>{{Ship/Banner|small=true|Hayasui}}</td></tr></table>}} |
| − | {{Map/ImageNode|Z|Medium|E-4|x=137|y=263}} | + | {{Map/ImageNode|Z|Medium|E-4|x=137|y=263|drops=<table class="wikitable"><tr><th>Type</th><th>Ships</th></tr><tr><th>DE</th><td>{{Ship/Banner|small=true|Etorofu}}{{Ship/Banner|small=true|Kurahashi}}</td></tr><tr><th>DD</th><td>{{Ship/Banner|small=true|Akishimo}}{{Ship/Banner|small=true|Amatsukaze}}{{Ship/Banner|small=true|Kishinami}}<br>{{Ship/Banner|small=true|Suzutsuki}}</td></tr><tr><th>CL</th><td>{{Ship/Banner|small=true|Ooyodo}}{{Ship/Banner|small=true|Yahagi}}</td></tr><tr><th>CA</th><td>{{Ship/Banner|small=true|Mikuma}}</td></tr><tr><th>CVL</th><td>{{Ship/Banner|small=true|Shinyou}}</td></tr><tr><th>BB</th><td>{{Ship/Banner|small=true|Yamato}}</td></tr><tr><th>CV</th><td>{{Ship/Banner|small=true|Hornet}}</td></tr><tr><th>AR</th><td>{{Ship/Banner|small=true|Akashi}}</td></tr></table>}} |
}} | }} | ||
<div class="map-nodes"> | <div class="map-nodes"> | ||
| Line 723: | Line 734: | ||
|AB | |AB | ||
|Raid | |Raid | ||
| − | |{{TooltipSimple|Diamond| | + | |{{TooltipSimple|Diamond|25% (32/126)}} |
|Light Carrier Nu-Class/B Elite II | |Light Carrier Nu-Class/B Elite II | ||
|Light Carrier Nu-Class/B Elite II | |Light Carrier Nu-Class/B Elite II | ||
| Line 733: | Line 744: | ||
|AB | |AB | ||
|Raid | |Raid | ||
| − | |{{TooltipSimple|Diamond| | + | |{{TooltipSimple|Diamond|48% (60/126)}} |
|Light Carrier Nu-Class/B Elite III | |Light Carrier Nu-Class/B Elite III | ||
|Light Carrier Nu-Class/B Elite III | |Light Carrier Nu-Class/B Elite III | ||
| Line 743: | Line 754: | ||
|AB | |AB | ||
|Raid | |Raid | ||
| − | |{{TooltipSimple|Diamond| | + | |{{TooltipSimple|Diamond|10% (12/126)}} |
|Aircraft Carrier Princess/B III | |Aircraft Carrier Princess/B III | ||
|Light Carrier Nu-Class/B Elite II | |Light Carrier Nu-Class/B Elite II | ||
| Line 753: | Line 764: | ||
|AB | |AB | ||
|Raid | |Raid | ||
| − | |{{TooltipSimple|Diamond| | + | |{{TooltipSimple|Diamond|17% (22/126)}} |
|Aircraft Carrier Princess/B III | |Aircraft Carrier Princess/B III | ||
|Light Carrier Nu-Class/B Elite II | |Light Carrier Nu-Class/B Elite II | ||
| Line 766: | Line 777: | ||
|C | |C | ||
|Normal | |Normal | ||
| − | |{{TooltipSimple|Echelon| | + | |{{TooltipSimple|Echelon|40% (277/691, HQ: 102-120)}}<br>{{TooltipSimple|Line Abreast|20% (140/691, HQ: 102-120)}}<br>{{TooltipSimple|''Phases: 1, 3''|Samples: 51, 23}} |
|Submarine So-Class/Flagship | |Submarine So-Class/Flagship | ||
|Submarine So-Class/Elite | |Submarine So-Class/Elite | ||
| Line 773: | Line 784: | ||
|C | |C | ||
|Normal | |Normal | ||
| − | |{{TooltipSimple|Echelon| | + | |{{TooltipSimple|Echelon|24% (169/691, HQ: 105-120)}}<br>{{TooltipSimple|Line Abreast|15% (105/691, HQ: 108-120)}}<br>{{TooltipSimple|''Phases: 1, 2, 3''|Samples: 37, 1, 12}} |
|Submarine So-Class/Flagship | |Submarine So-Class/Flagship | ||
|Submarine So-Class/Elite | |Submarine So-Class/Elite | ||
| Line 783: | Line 794: | ||
|D1 | |D1 | ||
|Defense | |Defense | ||
| − | |{{TooltipSimple|Diamond| | + | |{{TooltipSimple|Diamond|26% (28/108, HQ: 108-120)}}<br>{{TooltipSimple|''Phases: 1''|Samples: 5}} |
|Light Carrier Nu-Class/B Elite III | |Light Carrier Nu-Class/B Elite III | ||
|Light Carrier Nu-Class/B Elite | |Light Carrier Nu-Class/B Elite | ||
| Line 793: | Line 804: | ||
|D1 | |D1 | ||
|Defense | |Defense | ||
| − | |{{TooltipSimple|Diamond| | + | |{{TooltipSimple|Diamond|46% (50/108, HQ: 108-120)}}<br>{{TooltipSimple|''Phases: 1, 2, 3''|Samples: 7, 1, 2}} |
|Light Carrier Nu-Class/B Elite III | |Light Carrier Nu-Class/B Elite III | ||
|Light Carrier Nu-Class/B Elite II | |Light Carrier Nu-Class/B Elite II | ||
| Line 803: | Line 814: | ||
|D1 | |D1 | ||
|Defense | |Defense | ||
| − | |{{TooltipSimple|Diamond| | + | |{{TooltipSimple|Diamond|28% (30/108, HQ: 105-120)}}<br>{{TooltipSimple|''Phases: 1, 2, 3''|Samples: 13, 1, 1}} |
|Light Carrier Nu-Class/B Elite III | |Light Carrier Nu-Class/B Elite III | ||
|Light Carrier Nu-Class/B Elite III | |Light Carrier Nu-Class/B Elite III | ||
| Line 814: | Line 825: | ||
|D2 | |D2 | ||
|Normal | |Normal | ||
| − | |{{TooltipSimple|Echelon| | + | |{{TooltipSimple|Echelon|36% (31/85, HQ: 108-120)}}<br>{{TooltipSimple|Line Abreast|21% (18/85, HQ: 108-120)}}<br>{{TooltipSimple|''Phases: 1''|Samples: 11}} |
|Submarine So-Class/Flagship | |Submarine So-Class/Flagship | ||
|Submarine So-Class/Elite | |Submarine So-Class/Elite | ||
| Line 821: | Line 832: | ||
|D2 | |D2 | ||
|Normal | |Normal | ||
| − | |{{TooltipSimple|Echelon| | + | |{{TooltipSimple|Echelon|25% (21/85, HQ: 108-120)}}<br>{{TooltipSimple|Line Abreast|18% (15/85, HQ: 111-120)}}<br>{{TooltipSimple|''Phases: 1, 2, 3''|Samples: 9, 1, 1}} |
|Submarine So-Class/Flagship | |Submarine So-Class/Flagship | ||
|Submarine So-Class/Elite | |Submarine So-Class/Elite | ||
| Line 830: | Line 841: | ||
|E | |E | ||
|Defense | |Defense | ||
| − | |{{TooltipSimple|Diamond| | + | |{{TooltipSimple|Diamond|18% (72/408, HQ: 105-120)}}<br>{{TooltipSimple|''Phases: 1, 3''|Samples: 9, 3}} |
|Light Carrier Nu-Class/B Elite III | |Light Carrier Nu-Class/B Elite III | ||
|Light Carrier Nu-Class/B Elite | |Light Carrier Nu-Class/B Elite | ||
| Line 840: | Line 851: | ||
|E | |E | ||
|Defense | |Defense | ||
| − | |{{TooltipSimple|Diamond| | + | |{{TooltipSimple|Diamond|50% (204/408, HQ: 102-120)}}<br>{{TooltipSimple|''Phases: 1, 2, 3''|Samples: 30, 1, 12}} |
|Light Carrier Nu-Class/B Elite III | |Light Carrier Nu-Class/B Elite III | ||
|Light Carrier Nu-Class/B Elite II | |Light Carrier Nu-Class/B Elite II | ||
| Line 850: | Line 861: | ||
|E | |E | ||
|Defense | |Defense | ||
| − | |{{TooltipSimple|Diamond| | + | |{{TooltipSimple|Diamond|32% (132/408, HQ: 105-120)}}<br>{{TooltipSimple|''Phases: 1, 3''|Samples: 34, 7}} |
|Light Carrier Nu-Class/B Elite III | |Light Carrier Nu-Class/B Elite III | ||
|Light Carrier Nu-Class/B Elite III | |Light Carrier Nu-Class/B Elite III | ||
| Line 861: | Line 872: | ||
|F | |F | ||
|Normal | |Normal | ||
| − | |{{TooltipSimple|Line Ahead| | + | |{{TooltipSimple|Line Ahead|26% (134/508, HQ: 105-120)}}<br>{{TooltipSimple|''Phases: 1''|Samples: 22}} |
|Light Cruiser Ho-Class/Elite | |Light Cruiser Ho-Class/Elite | ||
|Light Cruiser Tsu-Class | |Light Cruiser Tsu-Class | ||
| Line 871: | Line 882: | ||
|F | |F | ||
|Normal | |Normal | ||
| − | |{{TooltipSimple|Line Ahead| | + | |{{TooltipSimple|Line Ahead|57% (288/508, HQ: 102-120)}}<br>{{TooltipSimple|''Phases: 1, 2, 3''|Samples: 31, 1, 14}} |
|Heavy Cruiser Ri-Class/Elite | |Heavy Cruiser Ri-Class/Elite | ||
|Light Cruiser Ho-Class/Elite | |Light Cruiser Ho-Class/Elite | ||
| Line 881: | Line 892: | ||
|F | |F | ||
|Normal | |Normal | ||
| − | |{{TooltipSimple|Line Ahead| | + | |{{TooltipSimple|Line Ahead|17% (86/508, HQ: 111-120)}}<br>{{TooltipSimple|''Phases: 3''|Samples: 14}} |
|Battleship Ta-Class/Elite | |Battleship Ta-Class/Elite | ||
|Heavy Cruiser Ri-Class/Elite | |Heavy Cruiser Ri-Class/Elite | ||
| Line 895: | Line 906: | ||
|J | |J | ||
|Normal | |Normal | ||
| − | |{{TooltipSimple|Diamond| | + | |{{TooltipSimple|Diamond|13% (35/265, HQ: 105-120)}}<br>{{TooltipSimple|''Phases: 1, 2, 3''|Samples: 3, 1, 4}} |
|Light Carrier Nu-Class/B Elite III | |Light Carrier Nu-Class/B Elite III | ||
|Light Carrier Nu-Class/B Elite | |Light Carrier Nu-Class/B Elite | ||
| Line 905: | Line 916: | ||
|J | |J | ||
|Normal | |Normal | ||
| − | |{{TooltipSimple|Diamond| | + | |{{TooltipSimple|Diamond|49% (131/265, HQ: 102-120)}}<br>{{TooltipSimple|''Phases: 1, 3''|Samples: 18, 12}} |
|Light Carrier Nu-Class/B Elite III | |Light Carrier Nu-Class/B Elite III | ||
|Light Carrier Nu-Class/B Elite II | |Light Carrier Nu-Class/B Elite II | ||
| Line 915: | Line 926: | ||
|J | |J | ||
|Normal | |Normal | ||
| − | |{{TooltipSimple|Diamond| | + | |{{TooltipSimple|Diamond|37% (99/265, HQ: 105-120)}}<br>{{TooltipSimple|''Phases: 1, 3''|Samples: 14, 3}} |
|Light Carrier Nu-Class/B Elite III | |Light Carrier Nu-Class/B Elite III | ||
|Light Carrier Nu-Class/B Elite III | |Light Carrier Nu-Class/B Elite III | ||
| Line 926: | Line 937: | ||
|K | |K | ||
|Normal | |Normal | ||
| − | |{{TooltipSimple|Diamond| | + | |{{TooltipSimple|Diamond|70% (7/10, HQ: 108-120)}} |
|Light Carrier Nu-Class/B Elite III | |Light Carrier Nu-Class/B Elite III | ||
|Light Carrier Nu-Class/B Elite II | |Light Carrier Nu-Class/B Elite II | ||
| + | |Heavy Cruiser Ri-Class/Flagship | ||
| + | |Light Cruiser He-Class/Elite | ||
| + | |Destroyer Ni-Class/Late Model | ||
| + | |Destroyer Ni-Class/Late Model | ||
| + | |- | ||
| + | |K | ||
| + | |Normal | ||
| + | |{{TooltipSimple|Diamond|30% (3/10, HQ: 111)}} | ||
| + | |Light Carrier Nu-Class/B Elite III | ||
| + | |Light Carrier Nu-Class/B Elite III | ||
|Heavy Cruiser Ri-Class/Flagship | |Heavy Cruiser Ri-Class/Flagship | ||
|Light Cruiser He-Class/Elite | |Light Cruiser He-Class/Elite | ||
| Line 938: | Line 959: | ||
|M | |M | ||
|Boss | |Boss | ||
| − | |{{TooltipSimple|Cruising Formation 4| | + | |{{TooltipSimple|Cruising Formation 4|75% (121/162, HQ: 102-120)}}<br>{{TooltipSimple|''Phases: 1, 3''|Samples: 18, 2}} |
|Battleship Princess | |Battleship Princess | ||
|Heavy Cruiser Ne-Class | |Heavy Cruiser Ne-Class | ||
| Line 954: | Line 975: | ||
|M | |M | ||
|Boss/Final | |Boss/Final | ||
| − | |{{TooltipSimple|Cruising Formation 4| | + | |{{TooltipSimple|Cruising Formation 4|25% (41/162, HQ: 105-120)}}<br>{{TooltipSimple|''Phases: 1''|Samples: 3}} |
|Battleship Princess | |Battleship Princess | ||
|Heavy Cruiser Ne-Class/Elite | |Heavy Cruiser Ne-Class/Elite | ||
| Line 971: | Line 992: | ||
|N | |N | ||
|Normal | |Normal | ||
| − | |{{TooltipSimple|Echelon| | + | |{{TooltipSimple|Echelon|17% (43/259, HQ: 105-120)}}<br>{{TooltipSimple|Line Abreast|12% (30/259, HQ: 105-120)}}<br>{{TooltipSimple|''Phases: 2''|Samples: 9}} |
|Submarine So-Class/Elite | |Submarine So-Class/Elite | ||
|Submarine So-Class | |Submarine So-Class | ||
| Line 978: | Line 999: | ||
|N | |N | ||
|Normal | |Normal | ||
| − | |{{TooltipSimple|Echelon| | + | |{{TooltipSimple|Echelon|23% (59/259, HQ: 105-120)}}<br>{{TooltipSimple|Line Abreast|15% (40/259, HQ: 105-120)}}<br>{{TooltipSimple|''Phases: 2, 3''|Samples: 10, 4}} |
|Submarine So-Class/Flagship | |Submarine So-Class/Flagship | ||
|Submarine So-Class/Elite | |Submarine So-Class/Elite | ||
| Line 985: | Line 1,006: | ||
|N | |N | ||
|Normal | |Normal | ||
| − | |{{TooltipSimple|Echelon| | + | |{{TooltipSimple|Echelon|19% (50/259, HQ: 112-120)}}<br>{{TooltipSimple|Line Abreast|14% (37/259, HQ: 105-120)}}<br>{{TooltipSimple|''Phases: 2''|Samples: 3}} |
|Submarine So-Class/Flagship | |Submarine So-Class/Flagship | ||
|Submarine So-Class/Elite | |Submarine So-Class/Elite | ||
| Line 994: | Line 1,015: | ||
|O | |O | ||
|Defense | |Defense | ||
| − | |{{TooltipSimple|Diamond| | + | |{{TooltipSimple|Diamond|9% (5/57, HQ: 116-120)}} |
| + | |Light Carrier Nu-Class/B Elite III | ||
| + | |Light Carrier Nu-Class/B Elite | ||
| + | |Heavy Cruiser Ri-Class/Flagship | ||
| + | |Light Cruiser He-Class/Elite | ||
| + | |Destroyer Ni-Class/Late Model | ||
| + | |Destroyer Ni-Class/Late Model | ||
| + | |- | ||
| + | |O | ||
| + | |Defense | ||
| + | |{{TooltipSimple|Diamond|44% (25/57, HQ: 105-120)}} | ||
|Light Carrier Nu-Class/B Elite III | |Light Carrier Nu-Class/B Elite III | ||
|Light Carrier Nu-Class/B Elite II | |Light Carrier Nu-Class/B Elite II | ||
| Line 1,004: | Line 1,035: | ||
|O | |O | ||
|Defense | |Defense | ||
| − | |{{TooltipSimple|Diamond| | + | |{{TooltipSimple|Diamond|47% (27/57, HQ: 105-120)}}<br>{{TooltipSimple|''Phases: 3''|Samples: 2}} |
|Light Carrier Nu-Class/B Elite III | |Light Carrier Nu-Class/B Elite III | ||
|Light Carrier Nu-Class/B Elite III | |Light Carrier Nu-Class/B Elite III | ||
| Line 1,015: | Line 1,046: | ||
|P | |P | ||
|Defense | |Defense | ||
| − | |{{TooltipSimple|Diamond| | + | |{{TooltipSimple|Diamond|13% (23/178, HQ: 105-120)}}<br>{{TooltipSimple|''Phases: 2, 3''|Samples: 3, 1}} |
|Light Carrier Nu-Class/B Elite III | |Light Carrier Nu-Class/B Elite III | ||
|Light Carrier Nu-Class/B Elite II | |Light Carrier Nu-Class/B Elite II | ||
| Line 1,025: | Line 1,056: | ||
|P | |P | ||
|Defense | |Defense | ||
| − | |{{TooltipSimple|Diamond| | + | |{{TooltipSimple|Diamond|35% (62/178, HQ: 105-120)}}<br>{{TooltipSimple|''Phases: 2, 3''|Samples: 5, 1}} |
|Light Carrier Nu-Class/B Elite III | |Light Carrier Nu-Class/B Elite III | ||
|Light Carrier Nu-Class/B Elite III | |Light Carrier Nu-Class/B Elite III | ||
| Line 1,035: | Line 1,066: | ||
|P | |P | ||
|Defense | |Defense | ||
| − | |{{TooltipSimple|Diamond| | + | |{{TooltipSimple|Diamond|52% (93/178, HQ: 105-120)}}<br>{{TooltipSimple|''Phases: 2''|Samples: 11}} |
|Light Carrier Nu-Class/B Elite III | |Light Carrier Nu-Class/B Elite III | ||
|Light Carrier Nu-Class/B Elite III | |Light Carrier Nu-Class/B Elite III | ||
| Line 1,046: | Line 1,077: | ||
|Q | |Q | ||
|Defense | |Defense | ||
| − | |{{TooltipSimple|Diamond| | + | |{{TooltipSimple|Diamond|11% (6/54, HQ: 111-120)}} |
|Light Carrier Nu-Class/B Elite III | |Light Carrier Nu-Class/B Elite III | ||
|Light Carrier Nu-Class/B Elite II | |Light Carrier Nu-Class/B Elite II | ||
| Line 1,056: | Line 1,087: | ||
|Q | |Q | ||
|Defense | |Defense | ||
| − | |{{TooltipSimple|Diamond| | + | |{{TooltipSimple|Diamond|57% (31/54, HQ: 105-120)}}<br>{{TooltipSimple|''Phases: 3''|Samples: 2}} |
|Light Carrier Nu-Class/B Elite III | |Light Carrier Nu-Class/B Elite III | ||
|Light Carrier Nu-Class/B Elite III | |Light Carrier Nu-Class/B Elite III | ||
| Line 1,063: | Line 1,094: | ||
|Destroyer Ni-Class/Late Model | |Destroyer Ni-Class/Late Model | ||
|Destroyer Ni-Class/Late Model | |Destroyer Ni-Class/Late Model | ||
| − | }} | + | |- |
| − | {{Map/Nodes|diff=Medium|name=深海任務部隊 前衛警戒艦隊 | + | |Q |
| + | |Defense | ||
| + | |{{TooltipSimple|Diamond|31% (17/54, HQ: 105-120)}} | ||
| + | |Light Carrier Nu-Class/B Elite III | ||
| + | |Light Carrier Nu-Class/B Elite III | ||
| + | |Light Carrier Nu-Class/B Elite | ||
| + | |Light Cruiser He-Class/Elite | ||
| + | |Destroyer Ni-Class/Late Model | ||
| + | |Destroyer Ni-Class/Late Model | ||
| + | }} | ||
| + | {{Map/Nodes|diff=Medium|name=深海任務部隊 前衛警戒艦隊 | ||
|R | |R | ||
|Normal | |Normal | ||
| − | |{{TooltipSimple|Line Ahead| | + | |{{TooltipSimple|Line Ahead|37% (81/218, HQ: 105-120)}}<br>{{TooltipSimple|Double Line|28% (62/218, HQ: 105-120)}}<br>{{TooltipSimple|Vanguard|34% (75/218, HQ: 105-120)}}<br>{{TooltipSimple|''Phases: 2, 3''|Samples: 19, 3}} |
|Heavy Cruiser Ri-Class/Flagship | |Heavy Cruiser Ri-Class/Flagship | ||
|Heavy Cruiser Ri-Class/Elite | |Heavy Cruiser Ri-Class/Elite | ||
| Line 1,078: | Line 1,119: | ||
|S | |S | ||
|Normal | |Normal | ||
| − | |{{TooltipSimple|Echelon| | + | |{{TooltipSimple|Echelon|20% (4/20, HQ: 105-120)}}<br>{{TooltipSimple|Line Abreast|20% (4/20, HQ: 105-120)}}<br>{{TooltipSimple|''Phases: 2''|Samples: 3}} |
|Submarine So-Class/Elite | |Submarine So-Class/Elite | ||
|Submarine So-Class | |Submarine So-Class | ||
|Submarine So-Class | |Submarine So-Class | ||
| + | |- | ||
| + | |S | ||
| + | |Normal | ||
| + | |{{TooltipSimple|Echelon|15% (3/20, HQ: 105-111)}}<br>{{TooltipSimple|Line Abreast|10% (2/20, HQ: 105-120)}} | ||
| + | |Submarine So-Class/Flagship | ||
| + | |Submarine So-Class/Elite | ||
| + | |Submarine So-Class/Elite | ||
| + | |- | ||
| + | |S | ||
| + | |Normal | ||
| + | |{{TooltipSimple|Echelon|20% (4/20, HQ: 119)}}<br>{{TooltipSimple|Line Abreast|15% (3/20, HQ: 105-119)}} | ||
| + | |Submarine So-Class/Flagship | ||
| + | |Submarine So-Class/Elite | ||
| + | |Submarine So-Class/Elite | ||
| + | |Submarine So-Class/Elite | ||
}} | }} | ||
{{Map/Nodes|diff=Medium|name=深海任務部隊 前衛空母集団 III群 | {{Map/Nodes|diff=Medium|name=深海任務部隊 前衛空母集団 III群 | ||
|T | |T | ||
|Normal | |Normal | ||
| − | |{{TooltipSimple|Diamond| | + | |{{TooltipSimple|Diamond|6% (11/179, HQ: 111-120)}}<br>{{TooltipSimple|''Phases: 2, 3''|Samples: 1, 1}} |
|Light Carrier Nu-Class/B Elite III | |Light Carrier Nu-Class/B Elite III | ||
|Light Carrier Nu-Class/B Elite | |Light Carrier Nu-Class/B Elite | ||
| Line 1,096: | Line 1,152: | ||
|T | |T | ||
|Normal | |Normal | ||
| − | |{{TooltipSimple|Diamond| | + | |{{TooltipSimple|Diamond|22% (39/179, HQ: 105-120)}}<br>{{TooltipSimple|''Phases: 2, 3''|Samples: 3, 2}} |
|Light Carrier Nu-Class/B Elite III | |Light Carrier Nu-Class/B Elite III | ||
|Light Carrier Nu-Class/B Elite II | |Light Carrier Nu-Class/B Elite II | ||
| Line 1,106: | Line 1,162: | ||
|T | |T | ||
|Normal | |Normal | ||
| − | |{{TooltipSimple|Diamond| | + | |{{TooltipSimple|Diamond|72% (129/179, HQ: 105-120)}}<br>{{TooltipSimple|''Phases: 2''|Samples: 15}} |
|Light Carrier Nu-Class/B Elite III | |Light Carrier Nu-Class/B Elite III | ||
|Light Carrier Nu-Class/B Elite III | |Light Carrier Nu-Class/B Elite III | ||
| Line 1,129: | Line 1,185: | ||
|W | |W | ||
|Boss | |Boss | ||
| − | |{{TooltipSimple|Cruising Formation 4| | + | |{{TooltipSimple|Cruising Formation 4|71% (109/153, HQ: 105-120)}}<br>{{TooltipSimple|''Phases: 2, 3''|Samples: 14, 2}} |
|Aircraft Carrier Princess/Kai II | |Aircraft Carrier Princess/Kai II | ||
|Light Carrier Nu-Class/B Elite II | |Light Carrier Nu-Class/B Elite II | ||
| Line 1,145: | Line 1,201: | ||
|W | |W | ||
|Boss/Final | |Boss/Final | ||
| − | |{{TooltipSimple|Cruising Formation 4| | + | |{{TooltipSimple|Cruising Formation 4|29% (44/153, HQ: 105-120)}}<br>{{TooltipSimple|''Phases: 2''|Samples: 3}} |
|Aircraft Carrier Princess/Kai II | |Aircraft Carrier Princess/Kai II | ||
|Light Carrier Nu-Class/B Elite III | |Light Carrier Nu-Class/B Elite III | ||
| Line 1,162: | Line 1,218: | ||
|X | |X | ||
|Defense | |Defense | ||
| − | |{{TooltipSimple|Diamond| | + | |{{TooltipSimple|Diamond|34% (48/141, HQ: 111-120)}}<br>{{TooltipSimple|''Phases: 3''|Samples: 5}} |
|Aircraft Carrier Princess/B III | |Aircraft Carrier Princess/B III | ||
|Battleship Princess | |Battleship Princess | ||
| Line 1,172: | Line 1,228: | ||
|X | |X | ||
|Defense | |Defense | ||
| − | |{{TooltipSimple|Diamond| | + | |{{TooltipSimple|Diamond|57% (81/141, HQ: 111-120)}}<br>{{TooltipSimple|''Phases: 3''|Samples: 15}} |
|Aircraft Carrier Princess/B III | |Aircraft Carrier Princess/B III | ||
|Light Carrier Nu-Class/B Elite II | |Light Carrier Nu-Class/B Elite II | ||
| Line 1,178: | Line 1,234: | ||
|Heavy Cruiser Ne-Class | |Heavy Cruiser Ne-Class | ||
|Heavy Cruiser Ne-Class | |Heavy Cruiser Ne-Class | ||
| + | |Light Cruiser Tsu-Class | ||
| + | |- | ||
| + | |X | ||
| + | |Defense | ||
| + | |{{TooltipSimple|Diamond|9% (12/141, HQ: 111-120)}}<br>{{TooltipSimple|''Phases: 3''|Samples: 1}} | ||
| + | |Aircraft Carrier Princess/B III | ||
| + | |Light Carrier Nu-Class/B Elite II | ||
| + | |Light Carrier Nu-Class/B Elite | ||
| + | |Battleship Princess | ||
| + | |Heavy Cruiser Ne-Class/Elite | ||
|Light Cruiser Tsu-Class | |Light Cruiser Tsu-Class | ||
}} | }} | ||
| Line 1,183: | Line 1,249: | ||
|Y | |Y | ||
|Normal | |Normal | ||
| − | |{{TooltipSimple|Line Ahead| | + | |{{TooltipSimple|Line Ahead|57% (73/127, HQ: 111-120)}}<br>{{TooltipSimple|Double Line|28% (35/127, HQ: 114-120)}}<br>{{TooltipSimple|Echelon|15% (19/127, HQ: 111-120)}}<br>{{TooltipSimple|''Phases: 3''|Samples: 17}} |
|Battleship Ru-Class/Elite | |Battleship Ru-Class/Elite | ||
|Battleship Ru-Class/Elite | |Battleship Ru-Class/Elite | ||
| Line 1,194: | Line 1,260: | ||
|Y1 | |Y1 | ||
|Normal | |Normal | ||
| − | |{{TooltipSimple|Line Abreast| | + | |{{TooltipSimple|Echelon|33% (1/3, HQ: 117)}}<br>{{TooltipSimple|Line Abreast|33% (1/3, HQ: 120)}}<br>{{TooltipSimple|''Phases: 3''|Samples: 1}} |
|New Submarine Princess/Flagship V | |New Submarine Princess/Flagship V | ||
|Submarine So-Class/Elite | |Submarine So-Class/Elite | ||
|Submarine So-Class | |Submarine So-Class | ||
|Submarine So-Class | |Submarine So-Class | ||
| − | }} | + | |- |
| − | {{Map/Nodes|diff=Medium|Y2|Defense}} | + | |Y1 |
| + | |Normal | ||
| + | |{{TooltipSimple|Line Abreast|33% (1/3, HQ: 120)}}<br>{{TooltipSimple|''Phases: 3''|Samples: 1}} | ||
| + | |New Submarine Princess/Flagship | ||
| + | |Submarine So-Class/Elite | ||
| + | |Submarine So-Class/Elite | ||
| + | |Submarine So-Class | ||
| + | }} | ||
| + | {{Map/Nodes|diff=Medium|name=深海任務部隊 艦載機群 | ||
| + | |Y2 | ||
| + | |Defense | ||
| + | |{{TooltipSimple|Diamond|100% (1/1, HQ: 120)}} | ||
| + | |Aircraft Carrier Princess/B III | ||
| + | |Battleship Princess | ||
| + | |Heavy Cruiser Ne-Class | ||
| + | |Heavy Cruiser Ne-Class | ||
| + | |Light Cruiser Tsu-Class | ||
| + | |Destroyer Ni-Class/Late Model | ||
| + | }} | ||
| + | {{Map/Nodes|diff=Medium|Y3|Empty|kind=1}} | ||
{{Map/Nodes|diff=Medium|name=深海任務部隊 前衛艦隊総旗艦|margin=true | {{Map/Nodes|diff=Medium|name=深海任務部隊 前衛艦隊総旗艦|margin=true | ||
|Z | |Z | ||
|Boss | |Boss | ||
| − | |{{TooltipSimple|Cruising Formation 4| | + | |{{TooltipSimple|Cruising Formation 4|83% (86/103, HQ: 111-120)}}<br>{{TooltipSimple|''Phases: 3''|Samples: 13}} |
|Aircraft Carrier Princess/B III | |Aircraft Carrier Princess/B III | ||
|Battleship Princess | |Battleship Princess | ||
| Line 1,217: | Line 1,302: | ||
|Destroyer I-Class | |Destroyer I-Class | ||
|Destroyer I-Class | |Destroyer I-Class | ||
| − | }} | + | |- |
| − | </div> | + | |Z |
| − | |-|Easy= | + | |Boss/Final |
| − | {{Map/Image|page=Spring 2022 Event/E-4| | + | |{{TooltipSimple|Cruising Formation 4|17% (17/103, HQ: 111-120)}}<br>{{TooltipSimple|''Phases: 3''|Samples: 2}} |
| − | {{Map/ImageNode|1|Easy|E-4|x=573|y=102}} | + | |Aircraft Carrier Princess/B III |
| − | {{Map/ImageNode|AB|Easy|E-4|x=622|y=156}} | + | |Battleship Princess |
| − | {{Map/ImageNode|A|Easy|E-4|x=563|y=145}} | + | |Light Carrier Nu-Class/B Elite II |
| + | |Heavy Cruiser Ne-Class/Elite | ||
| + | |Light Cruiser Tsu-Class | ||
| + | |Destroyer Ni-Class/Late Model | ||
| + | |Light Cruiser He-Class/Flagship | ||
| + | |Destroyer Ni-Class/Late Model | ||
| + | |Destroyer Ni-Class/Late Model | ||
| + | |Destroyer Ni-Class/Late Model | ||
| + | |Destroyer I-Class | ||
| + | |Destroyer I-Class | ||
| + | }} | ||
| + | </div> | ||
| + | |-|Easy= | ||
| + | {{Map/Image|page=Spring 2022 Event/E-4| | ||
| + | {{Map/ImageNode|1|Easy|E-4|x=573|y=102}} | ||
| + | {{Map/ImageNode|AB|Easy|E-4|x=622|y=156}} | ||
| + | {{Map/ImageNode|A|Easy|E-4|x=563|y=145}} | ||
{{Map/ImageNode|B|Easy|E-4|x=553|y=174}} | {{Map/ImageNode|B|Easy|E-4|x=553|y=174}} | ||
{{Map/ImageNode|C|Easy|E-4|x=531|y=206}} | {{Map/ImageNode|C|Easy|E-4|x=531|y=206}} | ||
| Line 1,237: | Line 1,338: | ||
{{Map/ImageNode|K|Easy|E-4|x=300|y=183|drops=<table class="wikitable"><tr><th>Type</th><th>Ships</th></tr><tr><th>DD</th><td>{{Ship/Banner|small=true|Uranami}}</td></tr></table>}} | {{Map/ImageNode|K|Easy|E-4|x=300|y=183|drops=<table class="wikitable"><tr><th>Type</th><th>Ships</th></tr><tr><th>DD</th><td>{{Ship/Banner|small=true|Uranami}}</td></tr></table>}} | ||
{{Map/ImageNode|L|Easy|E-4|x=237|y=242}} | {{Map/ImageNode|L|Easy|E-4|x=237|y=242}} | ||
| − | {{Map/ImageNode|M|Easy|E-4|x=235|y=200|drops=<table class="wikitable"><tr><th>Type</th><th>Ships</th></tr><tr><th>DE</th><td>{{Ship/Banner|small=true|Fukae}}{{Ship/Banner|small=true|Ishigaki}}{{Ship/Banner|small=true|Mikura}}<br></td></tr><tr><th>DD</th><td>{{Ship/Banner|small=true|Amagiri}}{{Ship/Banner|small=true|Asashimo}}{{Ship/Banner|small=true|Sagiri}}<br>{{Ship/Banner|small=true|Uranami}}{{Ship/Banner|small=true|Usugumo}}</td></tr><tr><th>CL</th><td>{{Ship/Banner|small=true|Yahagi}}</td></tr><tr><th>AO</th><td>{{Ship/Banner|small=true|Hayasui}}</td></tr></table>}} | + | {{Map/ImageNode|M|Easy|E-4|x=235|y=200|drops=<table class="wikitable"><tr><th>Type</th><th>Ships</th></tr><tr><th>DE</th><td>{{Ship/Banner|small=true|Fukae}}{{Ship/Banner|small=true|Ishigaki}}{{Ship/Banner|small=true|Mikura}}<br></td></tr><tr><th>DD</th><td>{{Ship/Banner|small=true|Amagiri}}{{Ship/Banner|small=true|Asashimo}}{{Ship/Banner|small=true|Sagiri}}<br>{{Ship/Banner|small=true|Uranami}}{{Ship/Banner|small=true|Usugumo}}</td></tr><tr><th>CL</th><td>{{Ship/Banner|small=true|Perth}}{{Ship/Banner|small=true|Yahagi}}</td></tr><tr><th>LHA</th><td>{{Ship/Banner|small=true|Akitsu Maru}}</td></tr><tr><th>AO</th><td>{{Ship/Banner|small=true|Hayasui}}</td></tr></table>}} |
{{Map/ImageNode|N|Easy|E-4|x=366|y=116}} | {{Map/ImageNode|N|Easy|E-4|x=366|y=116}} | ||
{{Map/ImageNode|O|Easy|E-4|x=330|y=152}} | {{Map/ImageNode|O|Easy|E-4|x=330|y=152}} | ||
| Line 1,248: | Line 1,349: | ||
{{Map/ImageNode|U|Easy|E-4|x=186|y=186}} | {{Map/ImageNode|U|Easy|E-4|x=186|y=186}} | ||
{{Map/ImageNode|V|Easy|E-4|x=131|y=132}} | {{Map/ImageNode|V|Easy|E-4|x=131|y=132}} | ||
| − | {{Map/ImageNode|W|Easy|E-4|x=122|y=185|drops=<table class="wikitable"><tr><th>Type</th><th>Ships</th></tr><tr><th>DE</th><td>{{Ship/Banner|small=true|Fukae}}{{Ship/Banner|small=true|Ishigaki}}{{Ship/Banner|small=true|Mikura}}<br></td></tr><tr><th>DD</th><td>{{Ship/Banner|small=true|Amagiri}}{{Ship/Banner|small=true|Asashimo}}{{Ship/Banner|small=true|Sagiri}}<br>{{Ship/Banner|small=true|Samuel B. Roberts}}{{Ship/Banner|small=true|Uranami}}{{Ship/Banner|small=true|Usugumo}}<br></td></tr><tr><th>CL</th><td>{{Ship/Banner|small=true|Perth}}{{Ship/Banner|small=true|Yahagi}}</td></tr><tr><th>LHA</th><td>{{Ship/Banner|small=true|Akitsu Maru}}</td></tr><tr><th>AS</th><td>{{Ship/Banner|small=true|Taigei}}</td></tr></table>}} | + | {{Map/ImageNode|W|Easy|E-4|x=122|y=185|drops=<table class="wikitable"><tr><th>Type</th><th>Ships</th></tr><tr><th>DE</th><td>{{Ship/Banner|small=true|Fukae}}{{Ship/Banner|small=true|Ishigaki}}{{Ship/Banner|small=true|Mikura}}<br></td></tr><tr><th>DD</th><td>{{Ship/Banner|small=true|Amagiri}}{{Ship/Banner|small=true|Asashimo}}{{Ship/Banner|small=true|Sagiri}}<br>{{Ship/Banner|small=true|Samuel B. Roberts}}{{Ship/Banner|small=true|Uranami}}{{Ship/Banner|small=true|Usugumo}}<br></td></tr><tr><th>CL</th><td>{{Ship/Banner|small=true|Perth}}{{Ship/Banner|small=true|Yahagi}}</td></tr><tr><th>LHA</th><td>{{Ship/Banner|small=true|Akitsu Maru}}</td></tr><tr><th>AS</th><td>{{Ship/Banner|small=true|Taigei}}</td></tr><tr><th>AO</th><td>{{Ship/Banner|small=true|Hayasui}}</td></tr></table>}} |
{{Map/ImageNode|X|Easy|E-4|x=261|y=273}} | {{Map/ImageNode|X|Easy|E-4|x=261|y=273}} | ||
{{Map/ImageNode|Y1|Easy|E-4|x=213|y=291}} | {{Map/ImageNode|Y1|Easy|E-4|x=213|y=291}} | ||
{{Map/ImageNode|Y2|Easy|E-4|x=182|y=215}} | {{Map/ImageNode|Y2|Easy|E-4|x=182|y=215}} | ||
{{Map/ImageNode|Y3|Easy|E-4|x=179|y=297}} | {{Map/ImageNode|Y3|Easy|E-4|x=179|y=297}} | ||
| − | {{Map/ImageNode|Y|Easy|E-4|x=197|y=252|drops=<table class="wikitable"><tr><th>Type</th><th>Ships</th></tr><tr><th>DE</th><td>{{Ship/Banner|small=true|Mikura}}</td></tr><tr><th>DD</th><td>{{Ship/Banner|small=true|Amagiri}}{{Ship/Banner|small=true|Asashimo}}{{Ship/Banner|small=true| | + | {{Map/ImageNode|Y|Easy|E-4|x=197|y=252|drops=<table class="wikitable"><tr><th>Type</th><th>Ships</th></tr><tr><th>DE</th><td>{{Ship/Banner|small=true|Mikura}}</td></tr><tr><th>DD</th><td>{{Ship/Banner|small=true|Amagiri}}{{Ship/Banner|small=true|Asashimo}}{{Ship/Banner|small=true|Sagiri}}<br>{{Ship/Banner|small=true|Uranami}}{{Ship/Banner|small=true|Usugumo}}</td></tr><tr><th>CL</th><td>{{Ship/Banner|small=true|Yahagi}}</td></tr></table>}} |
| − | {{Map/ImageNode|Z|Easy|E-4|x=137|y=263|drops=<table class="wikitable"><tr><th>Type</th><th>Ships</th></tr><tr><th>DE</th><td>{{Ship/Banner|small=true|Etorofu}}{{Ship/Banner|small=true|Kurahashi}}</td></tr><tr><th>DD</th><td>{{Ship/Banner|small=true|Akishimo}}{{Ship/Banner|small=true|Kishinami}}</td></tr><tr><th>CL</th><td>{{Ship/Banner|small=true|Ooyodo}}{{Ship/Banner|small=true|Yahagi}}</td></tr><tr><th>CVL</th><td>{{Ship/Banner|small=true|Shinyou}}</td></tr><tr><th>AR</th><td>{{Ship/Banner|small=true|Akashi}}</td></tr><tr><th>AS</th><td>{{Ship/Banner|small=true|Taigei}}</td></tr></table>}} | + | {{Map/ImageNode|Z|Easy|E-4|x=137|y=263|drops=<table class="wikitable"><tr><th>Type</th><th>Ships</th></tr><tr><th>DE</th><td>{{Ship/Banner|small=true|Etorofu}}{{Ship/Banner|small=true|Kurahashi}}</td></tr><tr><th>DD</th><td>{{Ship/Banner|small=true|Akishimo}}{{Ship/Banner|small=true|Amatsukaze}}{{Ship/Banner|small=true|Kishinami}}<br>{{Ship/Banner|small=true|Suzutsuki}}</td></tr><tr><th>CL</th><td>{{Ship/Banner|small=true|Ooyodo}}{{Ship/Banner|small=true|Yahagi}}</td></tr><tr><th>CA</th><td>{{Ship/Banner|small=true|Mikuma}}</td></tr><tr><th>CVL</th><td>{{Ship/Banner|small=true|Shinyou}}</td></tr><tr><th>BB</th><td>{{Ship/Banner|small=true|Yamato}}</td></tr><tr><th>CV</th><td>{{Ship/Banner|small=true|Hornet}}{{Ship/Banner|small=true|Intrepid}}</td></tr><tr><th>AR</th><td>{{Ship/Banner|small=true|Akashi}}</td></tr><tr><th>AS</th><td>{{Ship/Banner|small=true|Taigei}}</td></tr></table>}} |
}} | }} | ||
<div class="map-nodes"> | <div class="map-nodes"> | ||
| Line 1,260: | Line 1,361: | ||
|AB | |AB | ||
|Raid | |Raid | ||
| − | |{{TooltipSimple|Diamond| | + | |{{TooltipSimple|Diamond|28% (194/686)}} |
|Light Carrier Nu-Class/B Elite | |Light Carrier Nu-Class/B Elite | ||
|Light Carrier Nu-Class/B Elite | |Light Carrier Nu-Class/B Elite | ||
| Line 1,270: | Line 1,371: | ||
|AB | |AB | ||
|Raid | |Raid | ||
| − | |{{TooltipSimple|Diamond| | + | |{{TooltipSimple|Diamond|36% (246/686)}} |
|Light Carrier Nu-Class/B Elite II | |Light Carrier Nu-Class/B Elite II | ||
|Light Carrier Nu-Class/B Elite II | |Light Carrier Nu-Class/B Elite II | ||
| Line 1,280: | Line 1,381: | ||
|AB | |AB | ||
|Raid | |Raid | ||
| − | |{{TooltipSimple|Diamond| | + | |{{TooltipSimple|Diamond|17% (118/686)}} |
|Aircraft Carrier Princess/B II | |Aircraft Carrier Princess/B II | ||
|Light Carrier Nu-Class/B Elite | |Light Carrier Nu-Class/B Elite | ||
| Line 1,290: | Line 1,391: | ||
|AB | |AB | ||
|Raid | |Raid | ||
| − | |{{TooltipSimple|Diamond| | + | |{{TooltipSimple|Diamond|19% (128/686)}} |
|Aircraft Carrier Princess/B II | |Aircraft Carrier Princess/B II | ||
|Light Carrier Nu-Class/B Elite | |Light Carrier Nu-Class/B Elite | ||
| Line 1,303: | Line 1,404: | ||
|C | |C | ||
|Normal | |Normal | ||
| − | |{{TooltipSimple|Echelon| | + | |{{TooltipSimple|Echelon|11% (265/2332, HQ: 97-120)}}<br>{{TooltipSimple|Line Abreast|7% (174/2332, HQ: 97-120)}}<br>{{TooltipSimple|''Phases: 1, 2, 3''|Samples: 70, 11, 49}} |
|Submarine So-Class | |Submarine So-Class | ||
|Submarine So-Class | |Submarine So-Class | ||
| Line 1,310: | Line 1,411: | ||
|C | |C | ||
|Normal | |Normal | ||
| − | |{{TooltipSimple|Echelon| | + | |{{TooltipSimple|Echelon|30% (693/2332, HQ: 97-120)}}<br>{{TooltipSimple|Line Abreast|20% (470/2332, HQ: 98-120)}}<br>{{TooltipSimple|''Phases: 1, 2, 3''|Samples: 156, 26, 158}} |
|Submarine So-Class/Elite | |Submarine So-Class/Elite | ||
|Submarine So-Class | |Submarine So-Class | ||
| Line 1,317: | Line 1,418: | ||
|C | |C | ||
|Normal | |Normal | ||
| − | |{{TooltipSimple|Echelon|21% ( | + | |{{TooltipSimple|Echelon|21% (497/2332, HQ: 97-120)}}<br>{{TooltipSimple|Line Abreast|10% (233/2332, HQ: 98-120)}}<br>{{TooltipSimple|''Phases: 1, 2, 3''|Samples: 93, 20, 89}} |
|Submarine So-Class/Flagship | |Submarine So-Class/Flagship | ||
|Submarine So-Class/Elite | |Submarine So-Class/Elite | ||
| Line 1,326: | Line 1,427: | ||
|D1 | |D1 | ||
|Defense | |Defense | ||
| − | |{{TooltipSimple|Diamond| | + | |{{TooltipSimple|Diamond|20% (60/305, HQ: 98-120)}}<br>{{TooltipSimple|''Phases: 1, 2, 3''|Samples: 5, 6, 8}} |
|Light Carrier Nu-Class/B Elite II | |Light Carrier Nu-Class/B Elite II | ||
|Light Carrier Nu-Class/Elite | |Light Carrier Nu-Class/Elite | ||
| Line 1,336: | Line 1,437: | ||
|D1 | |D1 | ||
|Defense | |Defense | ||
| − | |{{TooltipSimple|Diamond| | + | |{{TooltipSimple|Diamond|56% (171/305, HQ: 98-120)}}<br>{{TooltipSimple|''Phases: 1, 2, 3''|Samples: 11, 8, 25}} |
|Light Carrier Nu-Class/B Elite II | |Light Carrier Nu-Class/B Elite II | ||
|Light Carrier Nu-Class/B Elite | |Light Carrier Nu-Class/B Elite | ||
| Line 1,346: | Line 1,447: | ||
|D1 | |D1 | ||
|Defense | |Defense | ||
| − | |{{TooltipSimple|Diamond| | + | |{{TooltipSimple|Diamond|24% (74/305, HQ: 98-120)}}<br>{{TooltipSimple|''Phases: 1, 2, 3''|Samples: 17, 9, 3}} |
|Light Carrier Nu-Class/B Elite II | |Light Carrier Nu-Class/B Elite II | ||
|Light Carrier Nu-Class/B Elite II | |Light Carrier Nu-Class/B Elite II | ||
| Line 1,357: | Line 1,458: | ||
|D2 | |D2 | ||
|Normal | |Normal | ||
| − | |{{TooltipSimple|Echelon| | + | |{{TooltipSimple|Echelon|11% (22/196, HQ: 98-120)}}<br>{{TooltipSimple|Line Abreast|9% (18/196, HQ: 102-120)}}<br>{{TooltipSimple|''Phases: 1, 2, 3''|Samples: 9, 4, 2}} |
|Submarine So-Class | |Submarine So-Class | ||
|Submarine So-Class | |Submarine So-Class | ||
| Line 1,364: | Line 1,465: | ||
|D2 | |D2 | ||
|Normal | |Normal | ||
| − | |{{TooltipSimple|Echelon| | + | |{{TooltipSimple|Echelon|29% (57/196, HQ: 100-120)}}<br>{{TooltipSimple|Line Abreast|14% (27/196, HQ: 98-120)}}<br>{{TooltipSimple|''Phases: 1, 2, 3''|Samples: 5, 5, 10}} |
|Submarine So-Class/Elite | |Submarine So-Class/Elite | ||
|Submarine So-Class | |Submarine So-Class | ||
| Line 1,371: | Line 1,472: | ||
|D2 | |D2 | ||
|Normal | |Normal | ||
| − | |{{TooltipSimple|Echelon| | + | |{{TooltipSimple|Echelon|21% (42/196, HQ: 98-120)}}<br>{{TooltipSimple|Line Abreast|15% (30/196, HQ: 98-120)}}<br>{{TooltipSimple|''Phases: 1, 2, 3''|Samples: 9, 5, 10}} |
|Submarine So-Class/Flagship | |Submarine So-Class/Flagship | ||
|Submarine So-Class/Elite | |Submarine So-Class/Elite | ||
| Line 1,379: | Line 1,480: | ||
|E | |E | ||
|Defense | |Defense | ||
| − | |{{TooltipSimple|Diamond| | + | |{{TooltipSimple|Diamond|17% (237/1392, HQ: 97-120)}}<br>{{TooltipSimple|''Phases: 1, 2, 3''|Samples: 51, 9, 13}} |
|Light Carrier Nu-Class/B Elite II | |Light Carrier Nu-Class/B Elite II | ||
|Light Carrier Nu-Class/Elite | |Light Carrier Nu-Class/Elite | ||
| Line 1,389: | Line 1,490: | ||
|E | |E | ||
|Defense | |Defense | ||
| − | |{{TooltipSimple|Diamond| | + | |{{TooltipSimple|Diamond|51% (712/1392, HQ: 97-120)}}<br>{{TooltipSimple|''Phases: 1, 2, 3''|Samples: 124, 10, 44}} |
|Light Carrier Nu-Class/B Elite II | |Light Carrier Nu-Class/B Elite II | ||
|Light Carrier Nu-Class/B Elite | |Light Carrier Nu-Class/B Elite | ||
| Line 1,399: | Line 1,500: | ||
|E | |E | ||
|Defense | |Defense | ||
| − | |{{TooltipSimple|Diamond|32% ( | + | |{{TooltipSimple|Diamond|32% (443/1392, HQ: 97-120)}}<br>{{TooltipSimple|''Phases: 1, 2, 3''|Samples: 142, 4, 17}} |
|Light Carrier Nu-Class/B Elite II | |Light Carrier Nu-Class/B Elite II | ||
|Light Carrier Nu-Class/B Elite II | |Light Carrier Nu-Class/B Elite II | ||
| Line 1,410: | Line 1,511: | ||
|F | |F | ||
|Normal | |Normal | ||
| − | |{{TooltipSimple|Line Ahead| | + | |{{TooltipSimple|Line Ahead|31% (607/1933, HQ: 97-120)}}<br>{{TooltipSimple|''Phases: 1, 2, 3''|Samples: 152, 11, 16}} |
|Light Cruiser Ho-Class/Elite | |Light Cruiser Ho-Class/Elite | ||
|Destroyer Ha-Class/Late Model | |Destroyer Ha-Class/Late Model | ||
| Line 1,420: | Line 1,521: | ||
|F | |F | ||
|Normal | |Normal | ||
| − | |{{TooltipSimple|Line Ahead| | + | |{{TooltipSimple|Line Ahead|51% (982/1933, HQ: 97-120)}}<br>{{TooltipSimple|''Phases: 1, 2, 3''|Samples: 131, 8, 121}} |
|Heavy Cruiser Ri-Class/Elite | |Heavy Cruiser Ri-Class/Elite | ||
|Light Cruiser Ho-Class/Elite | |Light Cruiser Ho-Class/Elite | ||
| Line 1,430: | Line 1,531: | ||
|F | |F | ||
|Normal | |Normal | ||
| − | |{{TooltipSimple|Line Ahead| | + | |{{TooltipSimple|Line Ahead|18% (344/1933, HQ: 98-120)}}<br>{{TooltipSimple|''Phases: 3''|Samples: 110}} |
|Battleship Ta-Class | |Battleship Ta-Class | ||
|Heavy Cruiser Ri-Class/Elite | |Heavy Cruiser Ri-Class/Elite | ||
| Line 1,444: | Line 1,545: | ||
|J | |J | ||
|Normal | |Normal | ||
| − | |{{TooltipSimple|Diamond| | + | |{{TooltipSimple|Diamond|17% (190/1145, HQ: 97-120)}}<br>{{TooltipSimple|''Phases: 1, 2, 3''|Samples: 23, 2, 22}} |
|Light Carrier Nu-Class/B Elite II | |Light Carrier Nu-Class/B Elite II | ||
|Light Carrier Nu-Class/Elite | |Light Carrier Nu-Class/Elite | ||
| Line 1,454: | Line 1,555: | ||
|J | |J | ||
|Normal | |Normal | ||
| − | |{{TooltipSimple|Diamond| | + | |{{TooltipSimple|Diamond|53% (603/1145, HQ: 97-120)}}<br>{{TooltipSimple|''Phases: 1, 2, 3''|Samples: 85, 9, 61}} |
|Light Carrier Nu-Class/B Elite II | |Light Carrier Nu-Class/B Elite II | ||
|Light Carrier Nu-Class/B Elite | |Light Carrier Nu-Class/B Elite | ||
| Line 1,464: | Line 1,565: | ||
|J | |J | ||
|Normal | |Normal | ||
| − | |{{TooltipSimple|Diamond| | + | |{{TooltipSimple|Diamond|31% (352/1145, HQ: 97-120)}}<br>{{TooltipSimple|''Phases: 1, 2, 3''|Samples: 91, 6, 8}} |
|Light Carrier Nu-Class/B Elite II | |Light Carrier Nu-Class/B Elite II | ||
|Light Carrier Nu-Class/B Elite II | |Light Carrier Nu-Class/B Elite II | ||
| Line 1,475: | Line 1,576: | ||
|K | |K | ||
|Normal | |Normal | ||
| − | |{{TooltipSimple|Diamond| | + | |{{TooltipSimple|Diamond|11% (2/19, HQ: 105-115)}} |
| + | |Light Carrier Nu-Class/B Elite II | ||
| + | |Light Carrier Nu-Class/Elite | ||
| + | |Heavy Cruiser Ri-Class/Elite | ||
| + | |Light Cruiser He-Class/Elite | ||
| + | |Destroyer Ni-Class/Late Model | ||
| + | |Destroyer Ni-Class/Late Model | ||
| + | |- | ||
| + | |K | ||
| + | |Normal | ||
| + | |{{TooltipSimple|Diamond|58% (11/19, HQ: 98-120)}} | ||
|Light Carrier Nu-Class/B Elite II | |Light Carrier Nu-Class/B Elite II | ||
|Light Carrier Nu-Class/B Elite | |Light Carrier Nu-Class/B Elite | ||
| Line 1,485: | Line 1,596: | ||
|K | |K | ||
|Normal | |Normal | ||
| − | |{{TooltipSimple|Diamond| | + | |{{TooltipSimple|Diamond|32% (6/19, HQ: 102-120)}} |
|Light Carrier Nu-Class/B Elite II | |Light Carrier Nu-Class/B Elite II | ||
|Light Carrier Nu-Class/B Elite II | |Light Carrier Nu-Class/B Elite II | ||
| Line 1,497: | Line 1,608: | ||
|M | |M | ||
|Boss | |Boss | ||
| − | |{{TooltipSimple|Cruising Formation 4|78% ( | + | |{{TooltipSimple|Cruising Formation 4|78% (519/663, HQ: 97-120)}}<br>{{TooltipSimple|''Phases: 1, 2, 3''|Samples: 108, 3, 22}} |
|Battleship Princess | |Battleship Princess | ||
|Heavy Cruiser Ne-Class | |Heavy Cruiser Ne-Class | ||
| Line 1,513: | Line 1,624: | ||
|M | |M | ||
|Boss/Final | |Boss/Final | ||
| − | |{{TooltipSimple|Cruising Formation 4|22% ( | + | |{{TooltipSimple|Cruising Formation 4|22% (144/663, HQ: 98-120)}}<br>{{TooltipSimple|''Phases: 1''|Samples: 39}} |
|Battleship Princess | |Battleship Princess | ||
|Heavy Cruiser Ne-Class | |Heavy Cruiser Ne-Class | ||
| Line 1,530: | Line 1,641: | ||
|N | |N | ||
|Normal | |Normal | ||
| − | |{{TooltipSimple|Echelon| | + | |{{TooltipSimple|Echelon|15% (173/1149, HQ: 98-120)}}<br>{{TooltipSimple|Line Abreast|10% (114/1149, HQ: 98-120)}}<br>{{TooltipSimple|''Phases: 2, 3''|Samples: 78, 25}} |
|Submarine So-Class | |Submarine So-Class | ||
|Submarine So-Class | |Submarine So-Class | ||
| Line 1,537: | Line 1,648: | ||
|N | |N | ||
|Normal | |Normal | ||
| − | |{{TooltipSimple|Echelon| | + | |{{TooltipSimple|Echelon|48% (551/1149, HQ: 98-120)}}<br>{{TooltipSimple|Line Abreast|27% (311/1149, HQ: 98-120)}}<br>{{TooltipSimple|''Phases: 2, 3''|Samples: 490, 20}} |
|Submarine So-Class/Elite | |Submarine So-Class/Elite | ||
|Submarine So-Class | |Submarine So-Class | ||
| Line 1,545: | Line 1,656: | ||
|O | |O | ||
|Defense | |Defense | ||
| − | |{{TooltipSimple|Diamond| | + | |{{TooltipSimple|Diamond|13% (27/212, HQ: 102-120)}}<br>{{TooltipSimple|''Phases: 2, 3''|Samples: 4, 2}} |
|Light Carrier Nu-Class/B Elite II | |Light Carrier Nu-Class/B Elite II | ||
|Light Carrier Nu-Class/Elite | |Light Carrier Nu-Class/Elite | ||
| Line 1,555: | Line 1,666: | ||
|O | |O | ||
|Defense | |Defense | ||
| − | |{{TooltipSimple|Diamond| | + | |{{TooltipSimple|Diamond|28% (59/212, HQ: 100-120)}}<br>{{TooltipSimple|''Phases: 2, 3''|Samples: 4, 10}} |
|Light Carrier Nu-Class/B Elite II | |Light Carrier Nu-Class/B Elite II | ||
|Light Carrier Nu-Class/B Elite | |Light Carrier Nu-Class/B Elite | ||
| Line 1,565: | Line 1,676: | ||
|O | |O | ||
|Defense | |Defense | ||
| − | |{{TooltipSimple|Diamond| | + | |{{TooltipSimple|Diamond|59% (126/212, HQ: 100-120)}}<br>{{TooltipSimple|''Phases: 2, 3''|Samples: 13, 11}} |
|Light Carrier Nu-Class/B Elite II | |Light Carrier Nu-Class/B Elite II | ||
|Light Carrier Nu-Class/B Elite II | |Light Carrier Nu-Class/B Elite II | ||
| Line 1,576: | Line 1,687: | ||
|P | |P | ||
|Defense | |Defense | ||
| − | |{{TooltipSimple|Diamond| | + | |{{TooltipSimple|Diamond|23% (131/569, HQ: 98-120)}}<br>{{TooltipSimple|''Phases: 2, 3''|Samples: 41, 6}} |
|Light Carrier Nu-Class/B Elite II | |Light Carrier Nu-Class/B Elite II | ||
|Light Carrier Nu-Class/B Elite | |Light Carrier Nu-Class/B Elite | ||
| Line 1,586: | Line 1,697: | ||
|P | |P | ||
|Defense | |Defense | ||
| − | |{{TooltipSimple|Diamond|38% ( | + | |{{TooltipSimple|Diamond|38% (216/569, HQ: 98-120)}}<br>{{TooltipSimple|''Phases: 2, 3''|Samples: 72, 6}} |
|Light Carrier Nu-Class/B Elite II | |Light Carrier Nu-Class/B Elite II | ||
|Light Carrier Nu-Class/B Elite II | |Light Carrier Nu-Class/B Elite II | ||
| Line 1,596: | Line 1,707: | ||
|P | |P | ||
|Defense | |Defense | ||
| − | |{{TooltipSimple|Diamond| | + | |{{TooltipSimple|Diamond|39% (222/569, HQ: 98-120)}}<br>{{TooltipSimple|''Phases: 2, 3''|Samples: 74, 10}} |
|Light Carrier Nu-Class/B Elite II | |Light Carrier Nu-Class/B Elite II | ||
|Light Carrier Nu-Class/B Elite II | |Light Carrier Nu-Class/B Elite II | ||
| Line 1,607: | Line 1,718: | ||
|Q | |Q | ||
|Defense | |Defense | ||
| − | |{{TooltipSimple|Diamond| | + | |{{TooltipSimple|Diamond|11% (21/189, HQ: 100-118)}}<br>{{TooltipSimple|''Phases: 2, 3''|Samples: 2, 1}} |
|Light Carrier Nu-Class/B Elite II | |Light Carrier Nu-Class/B Elite II | ||
|Light Carrier Nu-Class/B Elite | |Light Carrier Nu-Class/B Elite | ||
| Line 1,617: | Line 1,728: | ||
|Q | |Q | ||
|Defense | |Defense | ||
| − | |{{TooltipSimple|Diamond| | + | |{{TooltipSimple|Diamond|51% (96/189, HQ: 100-120)}}<br>{{TooltipSimple|''Phases: 2, 3''|Samples: 10, 9}} |
|Light Carrier Nu-Class/B Elite II | |Light Carrier Nu-Class/B Elite II | ||
|Light Carrier Nu-Class/B Elite II | |Light Carrier Nu-Class/B Elite II | ||
| Line 1,627: | Line 1,738: | ||
|Q | |Q | ||
|Defense | |Defense | ||
| − | |{{TooltipSimple|Diamond| | + | |{{TooltipSimple|Diamond|38% (72/189, HQ: 100-120)}}<br>{{TooltipSimple|''Phases: 2, 3''|Samples: 10, 6}} |
|Light Carrier Nu-Class/B Elite II | |Light Carrier Nu-Class/B Elite II | ||
|Light Carrier Nu-Class/B Elite II | |Light Carrier Nu-Class/B Elite II | ||
| Line 1,638: | Line 1,749: | ||
|R | |R | ||
|Normal | |Normal | ||
| − | |{{TooltipSimple|Line Ahead| | + | |{{TooltipSimple|Line Ahead|34% (240/712, HQ: 98-120)}}<br>{{TooltipSimple|Double Line|31% (219/712, HQ: 98-120)}}<br>{{TooltipSimple|Vanguard|36% (253/712, HQ: 98-120)}}<br>{{TooltipSimple|''Phases: 2, 3''|Samples: 195, 31}} |
|Heavy Cruiser Ri-Class/Elite | |Heavy Cruiser Ri-Class/Elite | ||
|Heavy Cruiser Ri-Class/Elite | |Heavy Cruiser Ri-Class/Elite | ||
| Line 1,649: | Line 1,760: | ||
|S | |S | ||
|Normal | |Normal | ||
| − | |{{TooltipSimple|Echelon| | + | |{{TooltipSimple|Echelon|33% (14/43, HQ: 102-120)}}<br>{{TooltipSimple|Line Abreast|16% (7/43, HQ: 111-120)}}<br>{{TooltipSimple|''Phases: 2''|Samples: 4}} |
|Submarine So-Class | |Submarine So-Class | ||
|Submarine So-Class | |Submarine So-Class | ||
| Line 1,656: | Line 1,767: | ||
|S | |S | ||
|Normal | |Normal | ||
| − | |{{TooltipSimple|Echelon| | + | |{{TooltipSimple|Echelon|26% (11/43, HQ: 102-120)}}<br>{{TooltipSimple|Line Abreast|26% (11/43, HQ: 102-115)}}<br>{{TooltipSimple|''Phases: 2, 3''|Samples: 5, 2}} |
|Submarine So-Class/Elite | |Submarine So-Class/Elite | ||
|Submarine So-Class | |Submarine So-Class | ||
| Line 1,664: | Line 1,775: | ||
|T | |T | ||
|Normal | |Normal | ||
| − | |{{TooltipSimple|Diamond| | + | |{{TooltipSimple|Diamond|7% (47/641, HQ: 98-120)}}<br>{{TooltipSimple|''Phases: 2, 3''|Samples: 11, 4}} |
|Light Carrier Nu-Class/B Elite II | |Light Carrier Nu-Class/B Elite II | ||
|Light Carrier Nu-Class/Elite | |Light Carrier Nu-Class/Elite | ||
| Line 1,674: | Line 1,785: | ||
|T | |T | ||
|Normal | |Normal | ||
| − | |{{TooltipSimple|Diamond| | + | |{{TooltipSimple|Diamond|24% (155/641, HQ: 100-120)}}<br>{{TooltipSimple|''Phases: 2, 3''|Samples: 38, 8}} |
|Light Carrier Nu-Class/B Elite II | |Light Carrier Nu-Class/B Elite II | ||
|Light Carrier Nu-Class/B Elite | |Light Carrier Nu-Class/B Elite | ||
| Line 1,684: | Line 1,795: | ||
|T | |T | ||
|Normal | |Normal | ||
| − | |{{TooltipSimple|Diamond| | + | |{{TooltipSimple|Diamond|68% (439/641, HQ: 98-120)}}<br>{{TooltipSimple|''Phases: 2, 3''|Samples: 159, 14}} |
|Light Carrier Nu-Class/B Elite II | |Light Carrier Nu-Class/B Elite II | ||
|Light Carrier Nu-Class/B Elite II | |Light Carrier Nu-Class/B Elite II | ||
| Line 1,695: | Line 1,806: | ||
|U | |U | ||
|Defense | |Defense | ||
| − | |{{TooltipSimple|Diamond| | + | |{{TooltipSimple|Diamond|48% (13/27, HQ: 100-120)}}<br>{{TooltipSimple|''Phases: 2''|Samples: 3}} |
|Aircraft Carrier Princess/Kai | |Aircraft Carrier Princess/Kai | ||
|Light Carrier Nu-Class/B Elite | |Light Carrier Nu-Class/B Elite | ||
| Line 1,705: | Line 1,816: | ||
|U | |U | ||
|Defense | |Defense | ||
| − | |{{TooltipSimple|Diamond| | + | |{{TooltipSimple|Diamond|44% (12/27, HQ: 102-120)}}<br>{{TooltipSimple|''Phases: 2, 3''|Samples: 3, 1}} |
|Aircraft Carrier Princess/Kai | |Aircraft Carrier Princess/Kai | ||
|Light Carrier Nu-Class/B Elite II | |Light Carrier Nu-Class/B Elite II | ||
| Line 1,711: | Line 1,822: | ||
|Battleship Ta-Class | |Battleship Ta-Class | ||
|Light Cruiser Tsu-Class | |Light Cruiser Tsu-Class | ||
| + | |Transport Ship Wa-Class | ||
| + | |- | ||
| + | |U | ||
| + | |Defense | ||
| + | |{{TooltipSimple|Diamond|7% (2/27, HQ: 102-107)}} | ||
| + | |Aircraft Carrier Princess/Kai | ||
| + | |Light Carrier Nu-Class/B Elite II | ||
| + | |Light Carrier Nu-Class/B Elite II | ||
| + | |Battleship Ta-Class | ||
| + | |Battleship Ta-Class | ||
|Transport Ship Wa-Class | |Transport Ship Wa-Class | ||
}} | }} | ||
| Line 1,717: | Line 1,838: | ||
|W | |W | ||
|Boss | |Boss | ||
| − | |{{TooltipSimple|Cruising Formation 4|82% ( | + | |{{TooltipSimple|Cruising Formation 4|82% (490/596, HQ: 98-120)}}<br>{{TooltipSimple|''Phases: 2, 3''|Samples: 129, 21}} |
|Aircraft Carrier Princess/Kai | |Aircraft Carrier Princess/Kai | ||
|Light Carrier Nu-Class/B Elite II | |Light Carrier Nu-Class/B Elite II | ||
| Line 1,733: | Line 1,854: | ||
|W | |W | ||
|Boss/Final | |Boss/Final | ||
| − | |{{TooltipSimple|Cruising Formation 4|18% ( | + | |{{TooltipSimple|Cruising Formation 4|18% (106/596, HQ: 98-120)}}<br>{{TooltipSimple|''Phases: 2''|Samples: 31}} |
|Aircraft Carrier Princess/Kai | |Aircraft Carrier Princess/Kai | ||
|Light Carrier Nu-Class/B Elite II | |Light Carrier Nu-Class/B Elite II | ||
| Line 1,750: | Line 1,871: | ||
|X | |X | ||
|Defense | |Defense | ||
| − | |{{TooltipSimple|Diamond| | + | |{{TooltipSimple|Diamond|34% (203/605, HQ: 98-120)}}<br>{{TooltipSimple|''Phases: 3''|Samples: 71}} |
|Aircraft Carrier Princess/B II | |Aircraft Carrier Princess/B II | ||
|Battleship Princess | |Battleship Princess | ||
| Line 1,760: | Line 1,881: | ||
|X | |X | ||
|Defense | |Defense | ||
| − | |{{TooltipSimple|Diamond| | + | |{{TooltipSimple|Diamond|55% (334/605, HQ: 98-120)}}<br>{{TooltipSimple|''Phases: 3''|Samples: 109}} |
|Aircraft Carrier Princess/B II | |Aircraft Carrier Princess/B II | ||
|Light Carrier Nu-Class/B Elite | |Light Carrier Nu-Class/B Elite | ||
| Line 1,770: | Line 1,891: | ||
|X | |X | ||
|Defense | |Defense | ||
| − | |{{TooltipSimple|Diamond| | + | |{{TooltipSimple|Diamond|11% (68/605, HQ: 100-120)}}<br>{{TooltipSimple|''Phases: 3''|Samples: 20}} |
|Aircraft Carrier Princess/B II | |Aircraft Carrier Princess/B II | ||
|Light Carrier Nu-Class/B Elite | |Light Carrier Nu-Class/B Elite | ||
| Line 1,781: | Line 1,902: | ||
|Y | |Y | ||
|Normal | |Normal | ||
| − | |{{TooltipSimple|Line Ahead| | + | |{{TooltipSimple|Line Ahead|54% (300/552, HQ: 98-120)}}<br>{{TooltipSimple|Double Line|30% (164/552, HQ: 100-120)}}<br>{{TooltipSimple|Echelon|16% (88/552, HQ: 100-120)}}<br>{{TooltipSimple|''Phases: 3''|Samples: 181}} |
|Battleship Ru-Class/Elite | |Battleship Ru-Class/Elite | ||
|Battleship Ru-Class/Elite | |Battleship Ru-Class/Elite | ||
| Line 1,792: | Line 1,913: | ||
|Y1 | |Y1 | ||
|Normal | |Normal | ||
| − | |{{TooltipSimple|Echelon| | + | |{{TooltipSimple|Echelon|20% (17/85, HQ: 100-120)}}<br>{{TooltipSimple|Line Abreast|20% (17/85, HQ: 101-120)}}<br>{{TooltipSimple|''Phases: 3''|Samples: 12}} |
|New Submarine Princess/Flagship V | |New Submarine Princess/Flagship V | ||
|Submarine So-Class | |Submarine So-Class | ||
| Line 1,799: | Line 1,920: | ||
|Y1 | |Y1 | ||
|Normal | |Normal | ||
| − | |{{TooltipSimple|Echelon| | + | |{{TooltipSimple|Echelon|12% (10/85, HQ: 102-120)}}<br>{{TooltipSimple|Line Abreast|12% (10/85, HQ: 100-112)}}<br>{{TooltipSimple|''Phases: 3''|Samples: 5}} |
|New Submarine Princess/Flagship V | |New Submarine Princess/Flagship V | ||
|Submarine So-Class | |Submarine So-Class | ||
| Line 1,807: | Line 1,928: | ||
|Y1 | |Y1 | ||
|Normal | |Normal | ||
| − | |{{TooltipSimple|Echelon| | + | |{{TooltipSimple|Echelon|24% (20/85, HQ: 102-120)}}<br>{{TooltipSimple|Line Abreast|13% (11/85, HQ: 102-120)}}<br>{{TooltipSimple|''Phases: 3''|Samples: 10}} |
|New Submarine Princess/Flagship V | |New Submarine Princess/Flagship V | ||
|Submarine So-Class/Elite | |Submarine So-Class/Elite | ||
| Line 1,816: | Line 1,937: | ||
|Y2 | |Y2 | ||
|Defense | |Defense | ||
| − | |{{TooltipSimple|Diamond| | + | |{{TooltipSimple|Diamond|32% (7/22, HQ: 102-120)}}<br>{{TooltipSimple|''Phases: 3''|Samples: 3}} |
|Aircraft Carrier Princess/B II | |Aircraft Carrier Princess/B II | ||
|Battleship Princess | |Battleship Princess | ||
| Line 1,826: | Line 1,947: | ||
|Y2 | |Y2 | ||
|Defense | |Defense | ||
| − | |{{TooltipSimple|Diamond| | + | |{{TooltipSimple|Diamond|59% (13/22, HQ: 100-117)}}<br>{{TooltipSimple|''Phases: 3''|Samples: 4}} |
|Aircraft Carrier Princess/B II | |Aircraft Carrier Princess/B II | ||
|Light Carrier Nu-Class/B Elite | |Light Carrier Nu-Class/B Elite | ||
| Line 1,836: | Line 1,957: | ||
|Y2 | |Y2 | ||
|Defense | |Defense | ||
| − | |{{TooltipSimple|Diamond| | + | |{{TooltipSimple|Diamond|9% (2/22, HQ: 102)}} |
|Aircraft Carrier Princess/B II | |Aircraft Carrier Princess/B II | ||
|Light Carrier Nu-Class/B Elite | |Light Carrier Nu-Class/B Elite | ||
| Line 1,844: | Line 1,965: | ||
|Light Cruiser Tsu-Class | |Light Cruiser Tsu-Class | ||
}} | }} | ||
| + | {{Map/Nodes|diff=Easy|Y3|Empty|kind=1}} | ||
{{Map/Nodes|diff=Easy|name=深海任務部隊 前衛艦隊総旗艦|margin=true | {{Map/Nodes|diff=Easy|name=深海任務部隊 前衛艦隊総旗艦|margin=true | ||
|Z | |Z | ||
|Boss | |Boss | ||
| − | |{{TooltipSimple|Cruising Formation 4| | + | |{{TooltipSimple|Cruising Formation 4|82% (367/449, HQ: 100-120)}}<br>{{TooltipSimple|''Phases: 3''|Samples: 124}} |
|Aircraft Carrier Princess/B II | |Aircraft Carrier Princess/B II | ||
|Battleship Princess | |Battleship Princess | ||
| Line 1,863: | Line 1,985: | ||
|Z | |Z | ||
|Boss/Final | |Boss/Final | ||
| − | |{{TooltipSimple|Cruising Formation 4| | + | |{{TooltipSimple|Cruising Formation 4|18% (82/449, HQ: 100-120)}}<br>{{TooltipSimple|''Phases: 3''|Samples: 24}} |
|Aircraft Carrier Princess/B II | |Aircraft Carrier Princess/B II | ||
|Battleship Princess | |Battleship Princess | ||
| Line 1,893: | Line 2,015: | ||
{{Map/ImageNode|H|Casual|E-4|x=342|y=261}} | {{Map/ImageNode|H|Casual|E-4|x=342|y=261}} | ||
{{Map/ImageNode|I|Casual|E-4|x=358|y=222}} | {{Map/ImageNode|I|Casual|E-4|x=358|y=222}} | ||
| − | {{Map/ImageNode|J|Casual|E-4|x=292|y=232|drops=<table class="wikitable"><tr><th>Type</th><th>Ships</th></tr><tr><th>DD</th><td>{{Ship/Banner|small=true|Amagiri}}{{Ship/Banner|small=true|Asashimo}}{{Ship/Banner|small=true| | + | {{Map/ImageNode|J|Casual|E-4|x=292|y=232|drops=<table class="wikitable"><tr><th>Type</th><th>Ships</th></tr><tr><th>DD</th><td>{{Ship/Banner|small=true|Amagiri}}{{Ship/Banner|small=true|Asashimo}}{{Ship/Banner|small=true|Sagiri}}<br>{{Ship/Banner|small=true|Uranami}}</td></tr></table>}} |
| − | {{Map/ImageNode|K|Casual|E-4|x=300|y=183|drops=<table class="wikitable"><tr><th>Type</th><th>Ships</th></tr><tr><th>DD</th><td>{{Ship/Banner|small=true|Sagiri}}</td></tr></table>}} | + | {{Map/ImageNode|K|Casual|E-4|x=300|y=183|drops=<table class="wikitable"><tr><th>Type</th><th>Ships</th></tr><tr><th>DD</th><td>{{Ship/Banner|small=true|Amagiri}}{{Ship/Banner|small=true|Sagiri}}</td></tr></table>}} |
{{Map/ImageNode|L|Casual|E-4|x=237|y=242}} | {{Map/ImageNode|L|Casual|E-4|x=237|y=242}} | ||
| − | {{Map/ImageNode|M|Casual|E-4|x=235|y=200|drops=<table class="wikitable"><tr><th>Type</th><th>Ships</th></tr><tr><th>DE</th><td>{{Ship/Banner|small=true|Fukae}}{{Ship/Banner|small=true|Mikura}}</td></tr><tr><th>DD</th><td>{{Ship/Banner|small=true|Amagiri}}{{Ship/Banner|small=true|Asashimo}}{{Ship/Banner|small=true|Usugumo}}<br></td></tr><tr><th>CL</th><td>{{Ship/Banner|small=true|Yahagi}}</td></tr><tr><th>LHA</th><td>{{Ship/Banner|small=true|Akitsu Maru}}</td></tr></table>}} | + | {{Map/ImageNode|M|Casual|E-4|x=235|y=200|drops=<table class="wikitable"><tr><th>Type</th><th>Ships</th></tr><tr><th>DE</th><td>{{Ship/Banner|small=true|Fukae}}{{Ship/Banner|small=true|Ishigaki}}{{Ship/Banner|small=true|Mikura}}<br></td></tr><tr><th>DD</th><td>{{Ship/Banner|small=true|Amagiri}}{{Ship/Banner|small=true|Asashimo}}{{Ship/Banner|small=true|Usugumo}}<br></td></tr><tr><th>CL</th><td>{{Ship/Banner|small=true|Yahagi}}</td></tr><tr><th>LHA</th><td>{{Ship/Banner|small=true|Akitsu Maru}}</td></tr><tr><th>AO</th><td>{{Ship/Banner|small=true|Hayasui}}</td></tr></table>}} |
{{Map/ImageNode|N|Casual|E-4|x=366|y=116}} | {{Map/ImageNode|N|Casual|E-4|x=366|y=116}} | ||
{{Map/ImageNode|O|Casual|E-4|x=330|y=152}} | {{Map/ImageNode|O|Casual|E-4|x=330|y=152}} | ||
| Line 1,907: | Line 2,029: | ||
{{Map/ImageNode|U|Casual|E-4|x=186|y=186}} | {{Map/ImageNode|U|Casual|E-4|x=186|y=186}} | ||
{{Map/ImageNode|V|Casual|E-4|x=131|y=132}} | {{Map/ImageNode|V|Casual|E-4|x=131|y=132}} | ||
| − | {{Map/ImageNode|W|Casual|E-4|x=122|y=185|drops=<table class="wikitable"><tr><th>Type</th><th>Ships</th></tr><tr><th>DE</th><td>{{Ship/Banner|small=true|Ishigaki}}{{Ship/Banner|small=true|Mikura}}</td></tr><tr><th>DD</th><td>{{Ship/Banner|small=true|Amagiri}}{{Ship/Banner|small=true|Asashimo}}{{Ship/Banner|small=true|Samuel B. Roberts}} | + | {{Map/ImageNode|W|Casual|E-4|x=122|y=185|drops=<table class="wikitable"><tr><th>Type</th><th>Ships</th></tr><tr><th>DE</th><td>{{Ship/Banner|small=true|Ishigaki}}{{Ship/Banner|small=true|Mikura}}</td></tr><tr><th>DD</th><td>{{Ship/Banner|small=true|Amagiri}}{{Ship/Banner|small=true|Asashimo}}{{Ship/Banner|small=true|Sagiri}}<br>{{Ship/Banner|small=true|Samuel B. Roberts}}{{Ship/Banner|small=true|Uranami}}{{Ship/Banner|small=true|Usugumo}}<br></td></tr><tr><th>CL</th><td>{{Ship/Banner|small=true|Perth}}{{Ship/Banner|small=true|Yahagi}}</td></tr><tr><th>AO</th><td>{{Ship/Banner|small=true|Hayasui}}</td></tr></table>}} |
{{Map/ImageNode|X|Casual|E-4|x=261|y=273}} | {{Map/ImageNode|X|Casual|E-4|x=261|y=273}} | ||
{{Map/ImageNode|Y1|Casual|E-4|x=213|y=291}} | {{Map/ImageNode|Y1|Casual|E-4|x=213|y=291}} | ||
{{Map/ImageNode|Y2|Casual|E-4|x=182|y=215}} | {{Map/ImageNode|Y2|Casual|E-4|x=182|y=215}} | ||
{{Map/ImageNode|Y3|Casual|E-4|x=179|y=297}} | {{Map/ImageNode|Y3|Casual|E-4|x=179|y=297}} | ||
| − | {{Map/ImageNode|Y|Casual|E-4|x=197|y=252|drops=<table class="wikitable"><tr><th>Type</th><th>Ships</th></tr><tr><th>DE</th><td>{{Ship/Banner|small=true|Mikura}}</td></tr><tr><th>DD</th><td>{{Ship/Banner|small=true|Amagiri}}{{Ship/Banner|small=true|Asashimo}}{{Ship/Banner|small=true| | + | {{Map/ImageNode|Y|Casual|E-4|x=197|y=252|drops=<table class="wikitable"><tr><th>Type</th><th>Ships</th></tr><tr><th>DE</th><td>{{Ship/Banner|small=true|Mikura}}</td></tr><tr><th>DD</th><td>{{Ship/Banner|small=true|Amagiri}}{{Ship/Banner|small=true|Asashimo}}{{Ship/Banner|small=true|Sagiri}}<br>{{Ship/Banner|small=true|Uranami}}{{Ship/Banner|small=true|Usugumo}}</td></tr><tr><th>CL</th><td>{{Ship/Banner|small=true|Yahagi}}</td></tr></table>}} |
| − | {{Map/ImageNode|Z|Casual|E-4|x=137|y=263|drops=<table class="wikitable"><tr><th>Type</th><th>Ships</th></tr><tr><th>DE</th><td>{{Ship/Banner|small=true|Etorofu}}{{Ship/Banner|small=true|Kurahashi}}</td></tr><tr><th>DD</th><td>{{Ship/Banner|small=true|Akishimo}}{{Ship/Banner|small=true|Amatsukaze}}{{Ship/Banner|small=true| | + | {{Map/ImageNode|Z|Casual|E-4|x=137|y=263|drops=<table class="wikitable"><tr><th>Type</th><th>Ships</th></tr><tr><th>DE</th><td>{{Ship/Banner|small=true|Etorofu}}{{Ship/Banner|small=true|Kurahashi}}</td></tr><tr><th>DD</th><td>{{Ship/Banner|small=true|Akishimo}}{{Ship/Banner|small=true|Amatsukaze}}{{Ship/Banner|small=true|Kishinami}}<br>{{Ship/Banner|small=true|Suzutsuki}}</td></tr><tr><th>CL</th><td>{{Ship/Banner|small=true|Ooyodo}}{{Ship/Banner|small=true|Yahagi}}</td></tr><tr><th>CA</th><td>{{Ship/Banner|small=true|Mikuma}}</td></tr><tr><th>CVL</th><td>{{Ship/Banner|small=true|Shinyou}}</td></tr><tr><th>BB</th><td>{{Ship/Banner|small=true|Yamato}}</td></tr><tr><th>CV</th><td>{{Ship/Banner|small=true|Hornet}}{{Ship/Banner|small=true|Intrepid}}</td></tr><tr><th>AR</th><td>{{Ship/Banner|small=true|Akashi}}</td></tr><tr><th>AS</th><td>{{Ship/Banner|small=true|Taigei}}</td></tr></table>}} |
}} | }} | ||
<div class="map-nodes"> | <div class="map-nodes"> | ||
| Line 1,919: | Line 2,041: | ||
|AB | |AB | ||
|Raid | |Raid | ||
| − | |{{TooltipSimple|Diamond| | + | |{{TooltipSimple|Diamond|76% (117/154)}} |
|Light Carrier Nu-Class/B Elite | |Light Carrier Nu-Class/B Elite | ||
|Light Carrier Nu-Class/B Elite | |Light Carrier Nu-Class/B Elite | ||
| Line 1,929: | Line 2,051: | ||
|AB | |AB | ||
|Raid | |Raid | ||
| − | |{{TooltipSimple|Diamond| | + | |{{TooltipSimple|Diamond|14% (21/154)}} |
|Aircraft Carrier Princess/B | |Aircraft Carrier Princess/B | ||
|Light Carrier Nu-Class/B Elite | |Light Carrier Nu-Class/B Elite | ||
| Line 1,939: | Line 2,061: | ||
|AB | |AB | ||
|Raid | |Raid | ||
| − | |{{TooltipSimple|Diamond| | + | |{{TooltipSimple|Diamond|10% (16/154)}} |
|Aircraft Carrier Princess/B | |Aircraft Carrier Princess/B | ||
|Light Carrier Nu-Class/B Elite | |Light Carrier Nu-Class/B Elite | ||
| Line 1,952: | Line 2,074: | ||
|C | |C | ||
|Normal | |Normal | ||
| − | |{{TooltipSimple|Echelon| | + | |{{TooltipSimple|Echelon|41% (275/672, HQ: 90-120)}}<br>{{TooltipSimple|Line Abreast|19% (130/672, HQ: 90-120)}}<br>{{TooltipSimple|''Phases: 1, 2, 3''|Samples: 39, 6, 78}} |
|Submarine So-Class | |Submarine So-Class | ||
|Submarine So-Class | |Submarine So-Class | ||
| Line 1,959: | Line 2,081: | ||
|C | |C | ||
|Normal | |Normal | ||
| − | |{{TooltipSimple|Echelon| | + | |{{TooltipSimple|Echelon|25% (166/672, HQ: 90-120)}}<br>{{TooltipSimple|Line Abreast|15% (101/672, HQ: 90-120)}}<br>{{TooltipSimple|''Phases: 1, 2, 3''|Samples: 40, 3, 48}} |
|Submarine So-Class/Elite | |Submarine So-Class/Elite | ||
|Submarine So-Class | |Submarine So-Class | ||
| Line 1,968: | Line 2,090: | ||
|D1 | |D1 | ||
|Defense | |Defense | ||
| − | |{{TooltipSimple|Diamond| | + | |{{TooltipSimple|Diamond|22% (21/95, HQ: 90-116)}}<br>{{TooltipSimple|''Phases: 1, 2, 3''|Samples: 5, 2, 1}} |
|Light Carrier Nu-Class/B Elite | |Light Carrier Nu-Class/B Elite | ||
|Heavy Cruiser Ri-Class/Elite | |Heavy Cruiser Ri-Class/Elite | ||
| Line 1,978: | Line 2,100: | ||
|D1 | |D1 | ||
|Defense | |Defense | ||
| − | |{{TooltipSimple|Diamond| | + | |{{TooltipSimple|Diamond|53% (50/95, HQ: 93-120)}}<br>{{TooltipSimple|''Phases: 1, 2, 3''|Samples: 10, 3, 6}} |
|Light Carrier Nu-Class/B Elite | |Light Carrier Nu-Class/B Elite | ||
|Light Carrier Nu-Class/Elite | |Light Carrier Nu-Class/Elite | ||
| Line 1,988: | Line 2,110: | ||
|D1 | |D1 | ||
|Defense | |Defense | ||
| − | |{{TooltipSimple|Diamond| | + | |{{TooltipSimple|Diamond|25% (24/95, HQ: 90-120)}}<br>{{TooltipSimple|''Phases: 1, 2''|Samples: 11, 2}} |
|Light Carrier Nu-Class/B Elite | |Light Carrier Nu-Class/B Elite | ||
|Light Carrier Nu-Class/B Elite | |Light Carrier Nu-Class/B Elite | ||
| Line 1,999: | Line 2,121: | ||
|D2 | |D2 | ||
|Normal | |Normal | ||
| − | |{{TooltipSimple|Echelon| | + | |{{TooltipSimple|Echelon|35% (28/81, HQ: 90-120)}}<br>{{TooltipSimple|Line Abreast|25% (20/81, HQ: 90-120)}}<br>{{TooltipSimple|''Phases: 1, 2, 3''|Samples: 9, 3, 2}} |
|Submarine So-Class | |Submarine So-Class | ||
|Submarine So-Class | |Submarine So-Class | ||
| Line 2,006: | Line 2,128: | ||
|D2 | |D2 | ||
|Normal | |Normal | ||
| − | |{{TooltipSimple|Echelon| | + | |{{TooltipSimple|Echelon|22% (18/81, HQ: 102-120)}}<br>{{TooltipSimple|Line Abreast|19% (15/81, HQ: 90-120)}}<br>{{TooltipSimple|''Phases: 1, 2, 3''|Samples: 8, 2, 4}} |
|Submarine So-Class/Elite | |Submarine So-Class/Elite | ||
|Submarine So-Class | |Submarine So-Class | ||
| Line 2,014: | Line 2,136: | ||
|E | |E | ||
|Defense | |Defense | ||
| − | |{{TooltipSimple|Diamond| | + | |{{TooltipSimple|Diamond|17% (59/352, HQ: 97-120)}}<br>{{TooltipSimple|''Phases: 1, 2, 3''|Samples: 14, 1, 6}} |
|Light Carrier Nu-Class/B Elite | |Light Carrier Nu-Class/B Elite | ||
|Heavy Cruiser Ri-Class/Elite | |Heavy Cruiser Ri-Class/Elite | ||
| Line 2,024: | Line 2,146: | ||
|E | |E | ||
|Defense | |Defense | ||
| − | |{{TooltipSimple|Diamond| | + | |{{TooltipSimple|Diamond|56% (197/352, HQ: 92-120)}}<br>{{TooltipSimple|''Phases: 1, 2, 3''|Samples: 28, 3, 14}} |
|Light Carrier Nu-Class/B Elite | |Light Carrier Nu-Class/B Elite | ||
|Light Carrier Nu-Class/Elite | |Light Carrier Nu-Class/Elite | ||
| Line 2,034: | Line 2,156: | ||
|E | |E | ||
|Defense | |Defense | ||
| − | |{{TooltipSimple|Diamond| | + | |{{TooltipSimple|Diamond|27% (96/352, HQ: 90-120)}}<br>{{TooltipSimple|''Phases: 1, 2, 3''|Samples: 31, 3, 7}} |
|Light Carrier Nu-Class/B Elite | |Light Carrier Nu-Class/B Elite | ||
|Light Carrier Nu-Class/B Elite | |Light Carrier Nu-Class/B Elite | ||
| Line 2,045: | Line 2,167: | ||
|F | |F | ||
|Normal | |Normal | ||
| − | |{{TooltipSimple|Line Ahead| | + | |{{TooltipSimple|Line Ahead|32% (186/590, HQ: 90-120)}}<br>{{TooltipSimple|''Phases: 1, 2, 3''|Samples: 42, 2, 4}} |
|Light Cruiser Ho-Class/Elite | |Light Cruiser Ho-Class/Elite | ||
|Destroyer Ha-Class/Late Model | |Destroyer Ha-Class/Late Model | ||
| Line 2,054: | Line 2,176: | ||
|F | |F | ||
|Normal | |Normal | ||
| − | |{{TooltipSimple|Line Ahead| | + | |{{TooltipSimple|Line Ahead|47% (276/590, HQ: 90-120)}}<br>{{TooltipSimple|''Phases: 1, 2, 3''|Samples: 26, 2, 66}} |
|Heavy Cruiser Ri-Class/Elite | |Heavy Cruiser Ri-Class/Elite | ||
|Destroyer Ha-Class/Late Model | |Destroyer Ha-Class/Late Model | ||
| Line 2,064: | Line 2,186: | ||
|F | |F | ||
|Normal | |Normal | ||
| − | |{{TooltipSimple|Line Ahead| | + | |{{TooltipSimple|Line Ahead|22% (128/590, HQ: 93-120)}}<br>{{TooltipSimple|''Phases: 3''|Samples: 51}} |
|Heavy Cruiser Ri-Class/Elite | |Heavy Cruiser Ri-Class/Elite | ||
|Heavy Cruiser Ri-Class | |Heavy Cruiser Ri-Class | ||
| Line 2,078: | Line 2,200: | ||
|J | |J | ||
|Normal | |Normal | ||
| − | |{{TooltipSimple|Diamond| | + | |{{TooltipSimple|Diamond|16% (65/394, HQ: 93-120)}}<br>{{TooltipSimple|''Phases: 1, 2, 3''|Samples: 9, 1, 10}} |
|Light Carrier Nu-Class/B Elite | |Light Carrier Nu-Class/B Elite | ||
|Heavy Cruiser Ri-Class/Elite | |Heavy Cruiser Ri-Class/Elite | ||
| Line 2,088: | Line 2,210: | ||
|J | |J | ||
|Normal | |Normal | ||
| − | |{{TooltipSimple|Diamond|58% ( | + | |{{TooltipSimple|Diamond|58% (228/394, HQ: 90-120)}}<br>{{TooltipSimple|''Phases: 1, 3''|Samples: 34, 24}} |
|Light Carrier Nu-Class/B Elite | |Light Carrier Nu-Class/B Elite | ||
|Light Carrier Nu-Class/Elite | |Light Carrier Nu-Class/Elite | ||
| Line 2,098: | Line 2,220: | ||
|J | |J | ||
|Normal | |Normal | ||
| − | |{{TooltipSimple|Diamond| | + | |{{TooltipSimple|Diamond|26% (101/394, HQ: 90-120)}}<br>{{TooltipSimple|''Phases: 1, 2, 3''|Samples: 14, 3, 3}} |
|Light Carrier Nu-Class/B Elite | |Light Carrier Nu-Class/B Elite | ||
|Light Carrier Nu-Class/B Elite | |Light Carrier Nu-Class/B Elite | ||
| Line 2,109: | Line 2,231: | ||
|K | |K | ||
|Normal | |Normal | ||
| − | |{{TooltipSimple|Diamond| | + | |{{TooltipSimple|Diamond|35% (6/17, HQ: 104-120)}}<br>{{TooltipSimple|''Phases: 1''|Samples: 2}} |
|Light Carrier Nu-Class/B Elite | |Light Carrier Nu-Class/B Elite | ||
|Heavy Cruiser Ri-Class/Elite | |Heavy Cruiser Ri-Class/Elite | ||
| Line 2,119: | Line 2,241: | ||
|K | |K | ||
|Normal | |Normal | ||
| − | |{{TooltipSimple|Diamond| | + | |{{TooltipSimple|Diamond|29% (5/17, HQ: 104-110)}} |
| + | |Light Carrier Nu-Class/B Elite | ||
| + | |Light Carrier Nu-Class/Elite | ||
| + | |Heavy Cruiser Ri-Class/Elite | ||
| + | |Destroyer Ni-Class/Late Model | ||
| + | |Destroyer Ni-Class/Late Model | ||
| + | |Destroyer I-Class | ||
| + | |- | ||
| + | |K | ||
| + | |Normal | ||
| + | |{{TooltipSimple|Diamond|35% (6/17, HQ: 109-120)}}<br>{{TooltipSimple|''Phases: 1''|Samples: 1}} | ||
|Light Carrier Nu-Class/B Elite | |Light Carrier Nu-Class/B Elite | ||
|Light Carrier Nu-Class/B Elite | |Light Carrier Nu-Class/B Elite | ||
| Line 2,131: | Line 2,263: | ||
|M | |M | ||
|Boss | |Boss | ||
| − | |{{TooltipSimple|Cruising Formation 4| | + | |{{TooltipSimple|Cruising Formation 4|78% (160/206, HQ: 90-120)}}<br>{{TooltipSimple|''Phases: 1, 3''|Samples: 33, 4}} |
|Battleship Princess | |Battleship Princess | ||
|Heavy Cruiser Ne-Class | |Heavy Cruiser Ne-Class | ||
| Line 2,147: | Line 2,279: | ||
|M | |M | ||
|Boss/Final | |Boss/Final | ||
| − | |{{TooltipSimple|Cruising Formation 4| | + | |{{TooltipSimple|Cruising Formation 4|22% (46/206, HQ: 93-120)}}<br>{{TooltipSimple|''Phases: 1''|Samples: 8}} |
|Battleship Princess | |Battleship Princess | ||
|Heavy Cruiser Ne-Class | |Heavy Cruiser Ne-Class | ||
| Line 2,164: | Line 2,296: | ||
|N | |N | ||
|Normal | |Normal | ||
| − | |{{TooltipSimple|Echelon| | + | |{{TooltipSimple|Echelon|36% (75/208, HQ: 93-120)}}<br>{{TooltipSimple|Line Abreast|22% (46/208, HQ: 93-120)}}<br>{{TooltipSimple|''Phases: 2, 3''|Samples: 22, 8}} |
|Submarine So-Class | |Submarine So-Class | ||
|Submarine So-Class | |Submarine So-Class | ||
| Line 2,171: | Line 2,303: | ||
|N | |N | ||
|Normal | |Normal | ||
| − | |{{TooltipSimple|Echelon| | + | |{{TooltipSimple|Echelon|32% (66/208, HQ: 93-120)}}<br>{{TooltipSimple|Line Abreast|10% (21/208, HQ: 100-120)}}<br>{{TooltipSimple|''Phases: 2, 3''|Samples: 21, 1}} |
|Submarine So-Class/Elite | |Submarine So-Class/Elite | ||
|Submarine So-Class | |Submarine So-Class | ||
| Line 2,179: | Line 2,311: | ||
|O | |O | ||
|Defense | |Defense | ||
| − | |{{TooltipSimple|Diamond| | + | |{{TooltipSimple|Diamond|10% (5/50, HQ: 102-108)}} |
|Light Carrier Nu-Class/B Elite | |Light Carrier Nu-Class/B Elite | ||
|Light Carrier Nu-Class | |Light Carrier Nu-Class | ||
| Line 2,189: | Line 2,321: | ||
|O | |O | ||
|Defense | |Defense | ||
| − | |{{TooltipSimple|Diamond| | + | |{{TooltipSimple|Diamond|40% (20/50, HQ: 93-120)}}<br>{{TooltipSimple|''Phases: 2, 3''|Samples: 4, 3}} |
|Light Carrier Nu-Class/B Elite | |Light Carrier Nu-Class/B Elite | ||
|Light Carrier Nu-Class/Elite | |Light Carrier Nu-Class/Elite | ||
| Line 2,199: | Line 2,331: | ||
|O | |O | ||
|Defense | |Defense | ||
| − | |{{TooltipSimple|Diamond| | + | |{{TooltipSimple|Diamond|50% (25/50, HQ: 97-116)}}<br>{{TooltipSimple|''Phases: 2, 3''|Samples: 1, 3}} |
|Light Carrier Nu-Class/B Elite | |Light Carrier Nu-Class/B Elite | ||
|Light Carrier Nu-Class/B Elite | |Light Carrier Nu-Class/B Elite | ||
| Line 2,210: | Line 2,342: | ||
|P | |P | ||
|Defense | |Defense | ||
| − | |{{TooltipSimple|Diamond| | + | |{{TooltipSimple|Diamond|22% (35/156, HQ: 93-120)}}<br>{{TooltipSimple|''Phases: 2, 3''|Samples: 8, 1}} |
|Light Carrier Nu-Class/B Elite | |Light Carrier Nu-Class/B Elite | ||
|Light Carrier Nu-Class/Elite | |Light Carrier Nu-Class/Elite | ||
| Line 2,220: | Line 2,352: | ||
|P | |P | ||
|Defense | |Defense | ||
| − | |{{TooltipSimple|Diamond| | + | |{{TooltipSimple|Diamond|58% (90/156, HQ: 93-120)}}<br>{{TooltipSimple|''Phases: 2, 3''|Samples: 21, 2}} |
|Light Carrier Nu-Class/B Elite | |Light Carrier Nu-Class/B Elite | ||
|Light Carrier Nu-Class/B Elite | |Light Carrier Nu-Class/B Elite | ||
| Line 2,230: | Line 2,362: | ||
|P | |P | ||
|Defense | |Defense | ||
| − | |{{TooltipSimple|Diamond| | + | |{{TooltipSimple|Diamond|20% (31/156, HQ: 93-120)}}<br>{{TooltipSimple|''Phases: 2''|Samples: 9}} |
|Light Carrier Nu-Class/B Elite | |Light Carrier Nu-Class/B Elite | ||
|Light Carrier Nu-Class/B Elite | |Light Carrier Nu-Class/B Elite | ||
| Line 2,241: | Line 2,373: | ||
|Q | |Q | ||
|Defense | |Defense | ||
| − | |{{TooltipSimple|Diamond| | + | |{{TooltipSimple|Diamond|21% (10/48, HQ: 93-104)}}<br>{{TooltipSimple|''Phases: 2''|Samples: 1}} |
|Light Carrier Nu-Class/B Elite | |Light Carrier Nu-Class/B Elite | ||
|Light Carrier Nu-Class/Elite | |Light Carrier Nu-Class/Elite | ||
| Line 2,251: | Line 2,383: | ||
|Q | |Q | ||
|Defense | |Defense | ||
| − | |{{TooltipSimple|Diamond|56% ( | + | |{{TooltipSimple|Diamond|56% (27/48, HQ: 97-120)}}<br>{{TooltipSimple|''Phases: 2, 3''|Samples: 5, 2}} |
|Light Carrier Nu-Class/B Elite | |Light Carrier Nu-Class/B Elite | ||
|Light Carrier Nu-Class/B Elite | |Light Carrier Nu-Class/B Elite | ||
| Line 2,261: | Line 2,393: | ||
|Q | |Q | ||
|Defense | |Defense | ||
| − | |{{TooltipSimple|Diamond| | + | |{{TooltipSimple|Diamond|23% (11/48, HQ: 97-114)}}<br>{{TooltipSimple|''Phases: 3''|Samples: 3}} |
|Light Carrier Nu-Class/B Elite | |Light Carrier Nu-Class/B Elite | ||
|Light Carrier Nu-Class/B Elite | |Light Carrier Nu-Class/B Elite | ||
| Line 2,272: | Line 2,404: | ||
|R | |R | ||
|Normal | |Normal | ||
| − | |{{TooltipSimple|Line Ahead| | + | |{{TooltipSimple|Line Ahead|32% (64/199, HQ: 93-120)}}<br>{{TooltipSimple|Double Line|31% (62/199, HQ: 93-120)}}<br>{{TooltipSimple|Vanguard|37% (73/199, HQ: 93-120)}}<br>{{TooltipSimple|''Phases: 2, 3''|Samples: 41, 7}} |
|Heavy Cruiser Ri-Class/Elite | |Heavy Cruiser Ri-Class/Elite | ||
|Heavy Cruiser Ri-Class | |Heavy Cruiser Ri-Class | ||
| Line 2,283: | Line 2,415: | ||
|S | |S | ||
|Normal | |Normal | ||
| − | |{{TooltipSimple|Echelon| | + | |{{TooltipSimple|Echelon|14% (2/14, HQ: 93-116)}}<br>{{TooltipSimple|Line Abreast|43% (6/14, HQ: 97-116)}} |
|Submarine So-Class | |Submarine So-Class | ||
|Submarine So-Class | |Submarine So-Class | ||
| Line 2,290: | Line 2,422: | ||
|S | |S | ||
|Normal | |Normal | ||
| − | |{{TooltipSimple|Echelon| | + | |{{TooltipSimple|Echelon|21% (3/14, HQ: 97-120)}}<br>{{TooltipSimple|Line Abreast|21% (3/14, HQ: 97-120)}} |
|Submarine So-Class/Elite | |Submarine So-Class/Elite | ||
|Submarine So-Class | |Submarine So-Class | ||
| Line 2,298: | Line 2,430: | ||
|T | |T | ||
|Normal | |Normal | ||
| − | |{{TooltipSimple|Diamond|20% ( | + | |{{TooltipSimple|Diamond|20% (38/191, HQ: 93-120)}}<br>{{TooltipSimple|''Phases: 2, 3''|Samples: 5, 1}} |
|Light Carrier Nu-Class/B Elite | |Light Carrier Nu-Class/B Elite | ||
|Heavy Cruiser Ri-Class/Elite | |Heavy Cruiser Ri-Class/Elite | ||
| Line 2,308: | Line 2,440: | ||
|T | |T | ||
|Normal | |Normal | ||
| − | |{{TooltipSimple|Diamond| | + | |{{TooltipSimple|Diamond|29% (56/191, HQ: 93-120)}}<br>{{TooltipSimple|''Phases: 2, 3''|Samples: 15, 1}} |
|Light Carrier Nu-Class/B Elite | |Light Carrier Nu-Class/B Elite | ||
|Light Carrier Nu-Class/Elite | |Light Carrier Nu-Class/Elite | ||
| Line 2,318: | Line 2,450: | ||
|T | |T | ||
|Normal | |Normal | ||
| − | |{{TooltipSimple|Diamond| | + | |{{TooltipSimple|Diamond|51% (97/191, HQ: 93-120)}}<br>{{TooltipSimple|''Phases: 2, 3''|Samples: 24, 4}} |
|Light Carrier Nu-Class/B Elite | |Light Carrier Nu-Class/B Elite | ||
|Light Carrier Nu-Class/B Elite | |Light Carrier Nu-Class/B Elite | ||
| Line 2,329: | Line 2,461: | ||
|U | |U | ||
|Defense | |Defense | ||
| − | |{{TooltipSimple|Diamond| | + | |{{TooltipSimple|Diamond|61% (11/18, HQ: 93-120)}}<br>{{TooltipSimple|''Phases: 2, 3''|Samples: 4, 1}} |
| + | |Aircraft Carrier Princess/Kai IV | ||
| + | |Battleship Ta-Class | ||
| + | |Light Cruiser Tsu-Class | ||
| + | |Destroyer I-Class | ||
| + | |Destroyer I-Class | ||
| + | |Transport Ship Wa-Class | ||
| + | |- | ||
| + | |U | ||
| + | |Defense | ||
| + | |{{TooltipSimple|Diamond|33% (6/18, HQ: 103-107)}}<br>{{TooltipSimple|''Phases: 3''|Samples: 1}} | ||
|Aircraft Carrier Princess/Kai IV | |Aircraft Carrier Princess/Kai IV | ||
| + | |Light Carrier Nu-Class | ||
|Battleship Ta-Class | |Battleship Ta-Class | ||
|Light Cruiser Tsu-Class | |Light Cruiser Tsu-Class | ||
|Destroyer I-Class | |Destroyer I-Class | ||
| + | |Transport Ship Wa-Class | ||
| + | |- | ||
| + | |U | ||
| + | |Defense | ||
| + | |{{TooltipSimple|Diamond|6% (1/18, HQ: 103)}} | ||
| + | |Aircraft Carrier Princess/Kai IV | ||
| + | |Light Carrier Nu-Class/B Elite | ||
| + | |Battleship Ta-Class | ||
| + | |Light Cruiser Tsu-Class | ||
|Destroyer I-Class | |Destroyer I-Class | ||
|Transport Ship Wa-Class | |Transport Ship Wa-Class | ||
| Line 2,341: | Line 2,493: | ||
|W | |W | ||
|Boss | |Boss | ||
| − | |{{TooltipSimple|Cruising Formation 4|83% ( | + | |{{TooltipSimple|Cruising Formation 4|83% (149/179, HQ: 93-120)}}<br>{{TooltipSimple|''Phases: 2, 3''|Samples: 27, 4}} |
|Aircraft Carrier Princess/Kai IV | |Aircraft Carrier Princess/Kai IV | ||
|Battleship Ta-Class | |Battleship Ta-Class | ||
| Line 2,357: | Line 2,509: | ||
|W | |W | ||
|Boss/Final | |Boss/Final | ||
| − | |{{TooltipSimple|Cruising Formation 4|17% ( | + | |{{TooltipSimple|Cruising Formation 4|17% (30/179, HQ: 93-120)}}<br>{{TooltipSimple|''Phases: 2''|Samples: 8}} |
|Aircraft Carrier Princess/Kai IV | |Aircraft Carrier Princess/Kai IV | ||
|Light Carrier Nu-Class/B Elite | |Light Carrier Nu-Class/B Elite | ||
| Line 2,374: | Line 2,526: | ||
|X | |X | ||
|Defense | |Defense | ||
| − | |{{TooltipSimple|Diamond| | + | |{{TooltipSimple|Diamond|38% (93/243, HQ: 93-120)}}<br>{{TooltipSimple|''Phases: 3''|Samples: 46}} |
|Aircraft Carrier Princess/B | |Aircraft Carrier Princess/B | ||
|Battleship Ta-Class | |Battleship Ta-Class | ||
| Line 2,384: | Line 2,536: | ||
|X | |X | ||
|Defense | |Defense | ||
| − | |{{TooltipSimple|Diamond| | + | |{{TooltipSimple|Diamond|53% (129/243, HQ: 93-120)}}<br>{{TooltipSimple|''Phases: 3''|Samples: 58}} |
|Aircraft Carrier Princess/B | |Aircraft Carrier Princess/B | ||
|Light Carrier Nu-Class/B Elite | |Light Carrier Nu-Class/B Elite | ||
| Line 2,394: | Line 2,546: | ||
|X | |X | ||
|Defense | |Defense | ||
| − | |{{TooltipSimple|Diamond| | + | |{{TooltipSimple|Diamond|9% (21/243, HQ: 93-120)}}<br>{{TooltipSimple|''Phases: 3''|Samples: 4}} |
|Aircraft Carrier Princess/B | |Aircraft Carrier Princess/B | ||
|Light Carrier Nu-Class/B Elite | |Light Carrier Nu-Class/B Elite | ||
| Line 2,405: | Line 2,557: | ||
|Y | |Y | ||
|Normal | |Normal | ||
| − | |{{TooltipSimple|Line Ahead| | + | |{{TooltipSimple|Line Ahead|47% (106/227, HQ: 93-120)}}<br>{{TooltipSimple|Double Line|32% (73/227, HQ: 93-120)}}<br>{{TooltipSimple|Echelon|21% (48/227, HQ: 93-120)}}<br>{{TooltipSimple|''Phases: 3''|Samples: 103}} |
|Battleship Ru-Class/Elite | |Battleship Ru-Class/Elite | ||
|Battleship Ru-Class | |Battleship Ru-Class | ||
| Line 2,416: | Line 2,568: | ||
|Y1 | |Y1 | ||
|Normal | |Normal | ||
| − | |{{TooltipSimple|Echelon| | + | |{{TooltipSimple|Echelon|44% (12/27, HQ: 98-120)}}<br>{{TooltipSimple|Line Abreast|26% (7/27, HQ: 98-120)}}<br>{{TooltipSimple|''Phases: 3''|Samples: 6}} |
|New Submarine Princess/Flagship V | |New Submarine Princess/Flagship V | ||
|Submarine So-Class | |Submarine So-Class | ||
| Line 2,423: | Line 2,575: | ||
|Y1 | |Y1 | ||
|Normal | |Normal | ||
| − | |{{TooltipSimple|Echelon| | + | |{{TooltipSimple|Echelon|26% (7/27, HQ: 108-120)}}<br>{{TooltipSimple|Line Abreast|4% (1/27, HQ: 116)}}<br>{{TooltipSimple|''Phases: 3''|Samples: 2}} |
|New Submarine Princess/Flagship V | |New Submarine Princess/Flagship V | ||
|Submarine So-Class | |Submarine So-Class | ||
| Line 2,432: | Line 2,584: | ||
|Y2 | |Y2 | ||
|Defense | |Defense | ||
| − | |{{TooltipSimple|Diamond| | + | |{{TooltipSimple|Diamond|56% (5/9, HQ: 103-120)}} |
|Aircraft Carrier Princess/B | |Aircraft Carrier Princess/B | ||
|Battleship Ta-Class | |Battleship Ta-Class | ||
| Line 2,442: | Line 2,594: | ||
|Y2 | |Y2 | ||
|Defense | |Defense | ||
| − | |{{TooltipSimple|Diamond| | + | |{{TooltipSimple|Diamond|44% (4/9, HQ: 103-120)}} |
|Aircraft Carrier Princess/B | |Aircraft Carrier Princess/B | ||
|Light Carrier Nu-Class/B Elite | |Light Carrier Nu-Class/B Elite | ||
| Line 2,450: | Line 2,602: | ||
|Destroyer I-Class | |Destroyer I-Class | ||
}} | }} | ||
| + | {{Map/Nodes|diff=Casual|Y3|Empty|kind=1}} | ||
{{Map/Nodes|diff=Casual|name=深海任務部隊 前衛艦隊総旗艦|margin=true | {{Map/Nodes|diff=Casual|name=深海任務部隊 前衛艦隊総旗艦|margin=true | ||
|Z | |Z | ||
|Boss | |Boss | ||
| − | |{{TooltipSimple|Cruising Formation 4| | + | |{{TooltipSimple|Cruising Formation 4|87% (177/203, HQ: 93-120)}}<br>{{TooltipSimple|''Phases: 3''|Samples: 80}} |
|Aircraft Carrier Princess/B | |Aircraft Carrier Princess/B | ||
|Battleship Ta-Class | |Battleship Ta-Class | ||
| Line 2,469: | Line 2,622: | ||
|Z | |Z | ||
|Boss/Final | |Boss/Final | ||
| − | |{{TooltipSimple|Cruising Formation 4| | + | |{{TooltipSimple|Cruising Formation 4|13% (26/203, HQ: 93-120)}}<br>{{TooltipSimple|''Phases: 3''|Samples: 6}} |
|Aircraft Carrier Princess/B | |Aircraft Carrier Princess/B | ||
|Light Carrier Nu-Class/B Elite | |Light Carrier Nu-Class/B Elite | ||
Revision as of 18:02, 20 June 2022
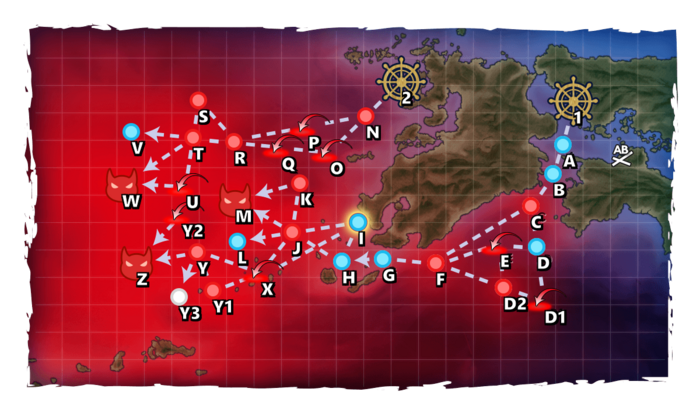
| Type | Ships |
|---|---|
| DD |
| Type | Ships |
|---|---|
| DD |
| Type | Ships |
|---|---|
| DE | |
| DD | |
| CL | |
| LHA | |
| AO |
| Type | Ships |
|---|---|
| DD |
| Type | Ships |
|---|---|
| DD |
| Type | Ships |
|---|---|
| DE | |
| DD | |
| CL | |
| CV | |
| LHA | |
| AO |
| Type | Ships |
|---|---|
| DE | |
| DD | |
| CL | |
| LHA | |
| AO |
| Type | Ships |
|---|---|
| DE | |
| DD | |
| CL | |
| CA | |
| CVL | |
| BB | |
| CV | |
| AR | |
| AS |
E-4 Hard AB
| # | Formation | Air Raids | AD/AP AS/AS+ |
|---|---|---|---|
| AB | Diamond | 101/201 452/903 | |
| Diamond | 114/227 509/1017 | ||
| Diamond | 167/334 750/1500 | ||
| Diamond | 177/353 794/1587 | ||
| # | Formation | Air Raids | AD/AP AS/AS+ |
E-4 Hard A
| # | Empty Node | ||
|---|---|---|---|
| A | 気のせいだった。 艦隊、徳山沖より出撃す! Must be my imagination. The fleet is sailing from Tokuyama! | ||
| # | Empty Node | ||
E-4 Hard B
| # | Empty Node | ||
|---|---|---|---|
| B | 気のせいだった。 これより豊後水道。対潜警戒を厳に! Must be my imagination. From here on, this is the Bungo Channel. Maintain strict anti-submarine alert! | ||
| # | Empty Node | ||
E-4 Hard C: 深海潜水艦隊 豊後水道警戒線 (PoiDB)
| # | Formation | Normal Battle Node | AD/AP AS/AS+ |
|---|---|---|---|
| C | Echelon Line Abreast Phases: 1, 2, 3 |
0/0 0/0 | |
| Echelon Line Abreast Phases: 1, 2, 3 |
0/0 0/0 | ||
| Echelon Line Abreast Phases: 3 |
0/0 0/0 | ||
| # | Formation | Normal Battle Node | AD/AP AS/AS+ |
E-4 Hard D
| # | Empty Node | ||
|---|---|---|---|
| D | 気のせいだった。 敵機に気をつけろ!対空警戒も厳とせよ! Must be my imagination. Watch out for enemy aircraft! Stay on anti-aircraft alert! | ||
| # | Empty Node | ||
E-4 Hard D1: 深海任務部隊 艦載機群 (PoiDB)
| # | Formation | Air Defense Node | AD/AP AS/AS+ |
|---|---|---|---|
| D1 | Diamond Phases: 1, 2, 3 |
102/203 456/912 | |
| Diamond Phases: 1, 2, 3 |
106/212 476/951 | ||
| Diamond Phases: 1, 2, 3 |
113/225 504/1008 | ||
| # | Formation | Air Defense Node | AD/AP AS/AS+ |
E-4 Hard D2: 深海潜水艦隊 大隅海峡警戒線 (PoiDB)
| # | Formation | Normal Battle Node | AD/AP AS/AS+ |
|---|---|---|---|
| D2 | Echelon Line Abreast Phases: 1, 2 |
0/0 0/0 | |
| Echelon Line Abreast Phases: 1, 2, 3 |
0/0 0/0 | ||
| Echelon Line Abreast Phases: 3 |
0/0 0/0 | ||
| # | Formation | Normal Battle Node | AD/AP AS/AS+ |
E-4 Hard E: 深海任務部隊 艦載機群 (PoiDB)
| # | Formation | Air Defense Node | AD/AP AS/AS+ |
|---|---|---|---|
| E | Diamond Phases: 1, 2, 3 |
102/203 456/912 | |
| Diamond Phases: 1, 2, 3 |
106/212 476/951 | ||
| Diamond Phases: 1, 2, 3 |
113/225 504/1008 | ||
| # | Formation | Air Defense Node | AD/AP AS/AS+ |
E-4 Hard F: 深海任務部隊 ピケット艦隊 (PoiDB)
| # | Formation | Normal Battle Node | AD/AP AS/AS+ |
|---|---|---|---|
| F | Line Ahead Phases: 1, 2, 3 |
0/0 0/0 | |
| Line Ahead Phases: 1, 2, 3 |
0/0 0/0 | ||
| Line Ahead Phases: 3 |
0/0 0/0 | ||
| # | Formation | Normal Battle Node | AD/AP AS/AS+ |
E-4 Hard G
| # | Empty Node | ||
|---|---|---|---|
| G | 気のせいだった。 艦隊、大隅海峡を抜ける!これより南西諸島方面へ向かう! Must be my imagination. The fleet is now exiting the Osumi Strait! We are now heading to the Nansei Islands! | ||
| # | Empty Node | ||
E-4 Hard H
| # | Empty Node | ||
|---|---|---|---|
| H | 気のせいだった。 作戦予定航路、前路掃蕩を完了せり! Must be my imagination. Planned route of operations, forward sweep complete! | ||
| # | Empty Node | ||
E-4 Hard I
| # | Repair Node | ||
|---|---|---|---|
| # | Repair Node | ||
E-4 Hard J: 深海任務部隊 前衛空母集団 I群 (PoiDB)
| # | Formation | Normal Battle Node | AD/AP AS/AS+ |
|---|---|---|---|
| J | Diamond Phases: 1, 2, 3 |
102/203 456/912 | |
| Diamond Phases: 1, 2, 3 |
106/212 476/951 | ||
| Diamond Phases: 1, 2, 3 |
113/225 504/1008 | ||
| # | Formation | Normal Battle Node | AD/AP AS/AS+ |
E-4 Hard K: 深海任務部隊 前衛空母集団 II群 (PoiDB)
| # | Formation | Normal Battle Node | AD/AP AS/AS+ |
|---|---|---|---|
| K | Diamond Phases: 1, 2, 3 |
102/203 456/912 | |
| Diamond Phases: 1, 2 |
106/212 476/951 | ||
| Diamond Phases: 1, 3 |
113/225 504/1008 | ||
| # | Formation | Normal Battle Node | AD/AP AS/AS+ |
E-4 Hard L
| # | Empty Node | ||
|---|---|---|---|
| L | 敵影を見ず。 作戦予定航路、前路掃蕩を完了せり! No enemy spotted. Planned route of operations, forward sweep complete! | ||
| # | Empty Node | ||
E-4 Hard M: 深海任務部隊 前衛水上打撃群 (PoiDB)
| # | Formation | Boss Battle Node | AD/AP AS/AS+ |
|---|---|---|---|
| M | Cruising Formation 4 Phases: 1, 2, 3 |
0/0 0/0 | |
| Cruising Formation 4 Phases: 1 (Final)
|
50/100 224/447 | ||
| # | Formation | Boss Battle Node | AD/AP AS/AS+ |
E-4 Hard N: 深海潜水艦隊 五島列島沖警戒線 (PoiDB)
| # | Formation | Normal Battle Node | AD/AP AS/AS+ |
|---|---|---|---|
| N | Echelon Line Abreast Phases: 2, 3 |
0/0 0/0 | |
| Echelon Line Abreast Phases: 2, 3 |
0/0 0/0 | ||
| Echelon Line Abreast Phases: 2, 3 |
0/0 0/0 | ||
| Echelon Line Abreast Phases: 2 |
0/0 0/0 | ||
| # | Formation | Normal Battle Node | AD/AP AS/AS+ |
E-4 Hard O: 深海任務部隊 艦載機群 (PoiDB)
| # | Formation | Air Defense Node | AD/AP AS/AS+ |
|---|---|---|---|
| O | Diamond Phases: 2, 3 |
102/203 456/912 | |
| Diamond Phases: 2, 3 |
106/212 476/951 | ||
| Diamond Phases: 2, 3 |
113/225 504/1008 | ||
| # | Formation | Air Defense Node | AD/AP AS/AS+ |
E-4 Hard P: 深海任務部隊 艦載機群 (PoiDB)
| # | Formation | Air Defense Node | AD/AP AS/AS+ |
|---|---|---|---|
| P | Diamond Phases: 2, 3 |
106/212 476/951 | |
| Diamond Phases: 2, 3 |
113/225 504/1008 | ||
| Diamond Phases: 2, 3 |
162/324 728/1455 | ||
| # | Formation | Air Defense Node | AD/AP AS/AS+ |
E-4 Hard Q: 深海任務部隊 艦載機群 (PoiDB)
| # | Formation | Air Defense Node | AD/AP AS/AS+ |
|---|---|---|---|
| Q | Diamond Phases: 2, 3 |
106/212 476/951 | |
| Diamond Phases: 2, 3 |
113/225 504/1008 | ||
| Diamond Phases: 2, 3 |
162/324 728/1455 | ||
| # | Formation | Air Defense Node | AD/AP AS/AS+ |
E-4 Hard R: 深海任務部隊 前衛警戒艦隊 (PoiDB)
| # | Formation | Normal Battle Node | AD/AP AS/AS+ |
|---|---|---|---|
| R | Line Ahead Double Line Vanguard Phases: 2, 3 |
0/0 0/0 | |
| # | Formation | Normal Battle Node | AD/AP AS/AS+ |
E-4 Hard S: 深海潜水艦隊 群狼攻撃集団 (PoiDB)
| # | Formation | Normal Battle Node | AD/AP AS/AS+ |
|---|---|---|---|
| S | Echelon Line Abreast Phases: 2, 3 |
0/0 0/0 | |
| Echelon Line Abreast Phases: 2, 3 |
0/0 0/0 | ||
| Echelon Line Abreast Phases: 2, 3 |
0/0 0/0 | ||
| Echelon Line Abreast Phases: 2 |
0/0 0/0 | ||
| # | Formation | Normal Battle Node | AD/AP AS/AS+ |
E-4 Hard T: 深海任務部隊 前衛空母集団 III群 (PoiDB)
| # | Formation | Normal Battle Node | AD/AP AS/AS+ |
|---|---|---|---|
| T | Diamond Phases: 2, 3 |
102/203 456/912 | |
| Diamond Phases: 2, 3 |
106/212 476/951 | ||
| Diamond Phases: 2, 3 |
113/225 504/1008 | ||
| # | Formation | Normal Battle Node | AD/AP AS/AS+ |
E-4 Hard U: 深海任務部隊 艦載機群 (PoiDB)
| # | Formation | Air Defense Node | AD/AP AS/AS+ |
|---|---|---|---|
| U | Diamond Phases: 2, 3 |
156/311 699/1398 | |
| Diamond Phases: 2, 3 |
166/331 743/1485 | ||
| Diamond Phases: 2 |
178/356 800/1599 | ||
| # | Formation | Air Defense Node | AD/AP AS/AS+ |
E-4 Hard V
| # | Empty Node | ||
|---|---|---|---|
| V | 敵影を見ず。 No enemy spotted. | ||
| # | Empty Node | ||
E-4 Hard W: 深海任務部隊 前衛空母主力集団 (PoiDB)
| # | Formation | Boss Battle Node | AD/AP AS/AS+ |
|---|---|---|---|
| W | Cruising Formation 4 Phases: 2, 3 |
166/331 743/1485 | |
| Cruising Formation 4 Phases: 2 (Final)
|
178/356 800/1599 | ||
| # | Formation | Boss Battle Node | AD/AP AS/AS+ |
E-4 Hard X: 深海任務部隊 艦載機群 (PoiDB)
| # | Formation | Air Defense Node | AD/AP AS/AS+ |
|---|---|---|---|
| X | Diamond Phases: 3 |
77/154 345/690 | |
| Diamond Phases: 3 |
123/245 549/1098 | ||
| Diamond Phases: 3 |
167/333 749/1497 | ||
| # | Formation | Air Defense Node | AD/AP AS/AS+ |
E-4 Hard Y: 深海任務部隊 低速戦艦戦隊 (PoiDB)
| # | Formation | Normal Battle Node | AD/AP AS/AS+ |
|---|---|---|---|
| Y | Line Ahead Double Line Echelon Phases: 3 |
0/0 0/0 | |
| # | Formation | Normal Battle Node | AD/AP AS/AS+ |
E-4 Hard Y1: 深海潜水艦隊 警戒線指揮潜水艦 (PoiDB)
| # | Formation | Normal Battle Node | AD/AP AS/AS+ |
|---|---|---|---|
| Y1 | Echelon Line Abreast Phases: 3 |
0/0 0/0 | |
| Echelon Line Abreast Phases: 3 |
0/0 0/0 | ||
| # | Formation | Normal Battle Node | AD/AP AS/AS+ |
E-4 Hard Y2: 深海任務部隊 艦載機群 (PoiDB)
| # | Formation | Air Defense Node | AD/AP AS/AS+ |
|---|---|---|---|
| Y2 | Diamond | 77/154 345/690 | |
| # | Formation | Air Defense Node | AD/AP AS/AS+ |
E-4 Hard Y3
| # | Empty Node | ||
|---|---|---|---|
| Y3 | 敵影を見ず。 作戦予定航路、前路掃蕩を完了せり! No enemy spotted. Planned route of operations, forward sweep complete! | ||
| # | Empty Node | ||
E-4 Hard Z: 深海任務部隊 前衛艦隊総旗艦 (PoiDB)
| # | Formation | Boss Battle Node | AD/AP AS/AS+ |
|---|---|---|---|
| Z | Cruising Formation 4 Phases: 3 |
77/154 345/690 | |
| Cruising Formation 4 Phases: 3 (Final)
|
127/253 569/1137 | ||
| # | Formation | Boss Battle Node | AD/AP AS/AS+ |
| Type | Ships |
|---|---|
| DD |
| Type | Ships |
|---|---|
| DD |
| Type | Ships |
|---|---|
| DE | |
| DD | |
| CL | |
| LHA |
| Type | Ships |
|---|---|
| DD |
| Type | Ships |
|---|---|
| DD |
| Type | Ships |
|---|---|
| DE | |
| DD | |
| CL | |
| LHA |
| Type | Ships |
|---|---|
| DE | |
| DD | |
| LHA | |
| AO |
| Type | Ships |
|---|---|
| DE | |
| DD | |
| CL | |
| CA | |
| CVL | |
| BB | |
| CV | |
| AR |
E-4 Medium AB
| # | Formation | Air Raids | AD/AP AS/AS+ |
|---|---|---|---|
| AB | Diamond | 92/184 413/825 | |
| Diamond | 101/201 452/903 | ||
| Diamond | 156/311 698/1395 | ||
| Diamond | 161/321 722/1443 | ||
| # | Formation | Air Raids | AD/AP AS/AS+ |
E-4 Medium A
| # | Empty Node | ||
|---|---|---|---|
| A | 気のせいだった。 艦隊、徳山沖より出撃す! Must be my imagination. The fleet is sailing from Tokuyama! | ||
| # | Empty Node | ||
E-4 Medium B
| # | Empty Node | ||
|---|---|---|---|
| B | 気のせいだった。 これより豊後水道。対潜警戒を厳に! Must be my imagination. From here on, this is the Bungo Channel. Maintain strict anti-submarine alert! | ||
| # | Empty Node | ||
E-4 Medium C: 深海潜水艦隊 豊後水道警戒線 (PoiDB)
| # | Formation | Normal Battle Node | AD/AP AS/AS+ |
|---|---|---|---|
| C | Echelon Line Abreast Phases: 1, 3 |
0/0 0/0 | |
| Echelon Line Abreast Phases: 1, 2, 3 |
0/0 0/0 | ||
| # | Formation | Normal Battle Node | AD/AP AS/AS+ |
E-4 Medium D
| # | Empty Node | ||
|---|---|---|---|
| D | 気のせいだった。 敵機に気をつけろ!対空警戒も厳とせよ! Must be my imagination. Watch out for enemy aircraft! Stay on anti-aircraft alert! | ||
| # | Empty Node | ||
E-4 Medium D1: 深海任務部隊 艦載機群 (PoiDB)
| # | Formation | Air Defense Node | AD/AP AS/AS+ |
|---|---|---|---|
| D1 | Diamond Phases: 1 |
90/180 404/807 | |
| Diamond Phases: 1, 2, 3 |
96/191 428/855 | ||
| Diamond Phases: 1, 2, 3 |
100/199 447/894 | ||
| # | Formation | Air Defense Node | AD/AP AS/AS+ |
E-4 Medium D2: 深海潜水艦隊 大隅海峡警戒線 (PoiDB)
| # | Formation | Normal Battle Node | AD/AP AS/AS+ |
|---|---|---|---|
| D2 | Echelon Line Abreast Phases: 1 |
0/0 0/0 | |
| Echelon Line Abreast Phases: 1, 2, 3 |
0/0 0/0 | ||
| # | Formation | Normal Battle Node | AD/AP AS/AS+ |
E-4 Medium E: 深海任務部隊 艦載機群 (PoiDB)
| # | Formation | Air Defense Node | AD/AP AS/AS+ |
|---|---|---|---|
| E | Diamond Phases: 1, 3 |
90/180 404/807 | |
| Diamond Phases: 1, 2, 3 |
96/191 428/855 | ||
| Diamond Phases: 1, 3 |
100/199 447/894 | ||
| # | Formation | Air Defense Node | AD/AP AS/AS+ |
E-4 Medium F: 深海任務部隊 ピケット艦隊 (PoiDB)
| # | Formation | Normal Battle Node | AD/AP AS/AS+ |
|---|---|---|---|
| F | Line Ahead Phases: 1 |
0/0 0/0 | |
| Line Ahead Phases: 1, 2, 3 |
0/0 0/0 | ||
| Line Ahead Phases: 3 |
0/0 0/0 | ||
| # | Formation | Normal Battle Node | AD/AP AS/AS+ |
E-4 Medium G
| # | Empty Node | ||
|---|---|---|---|
| G | 気のせいだった。 艦隊、大隅海峡を抜ける!これより南西諸島方面へ向かう! Must be my imagination. The fleet is now exiting the Osumi Strait! We are now heading to the Nansei Islands! | ||
| # | Empty Node | ||
E-4 Medium H
| # | Empty Node | ||
|---|---|---|---|
| H | 気のせいだった。 作戦予定航路、前路掃蕩を完了せり! Must be my imagination. Planned route of operations, forward sweep complete! | ||
| # | Empty Node | ||
E-4 Medium I
| # | Repair Node | ||
|---|---|---|---|
| # | Repair Node | ||
E-4 Medium J: 深海任務部隊 前衛空母集団 I群 (PoiDB)
| # | Formation | Normal Battle Node | AD/AP AS/AS+ |
|---|---|---|---|
| J | Diamond Phases: 1, 2, 3 |
90/180 404/807 | |
| Diamond Phases: 1, 3 |
96/191 428/855 | ||
| Diamond Phases: 1, 3 |
100/199 447/894 | ||
| # | Formation | Normal Battle Node | AD/AP AS/AS+ |
E-4 Medium K: 深海任務部隊 前衛空母集団 II群 (PoiDB)
| # | Formation | Normal Battle Node | AD/AP AS/AS+ |
|---|---|---|---|
| K | Diamond | 96/191 428/855 | |
| Diamond | 100/199 447/894 | ||
| # | Formation | Normal Battle Node | AD/AP AS/AS+ |
E-4 Medium L
| # | Empty Node | ||
|---|---|---|---|
| L | 敵影を見ず。 作戦予定航路、前路掃蕩を完了せり! No enemy spotted. Planned route of operations, forward sweep complete! | ||
| # | Empty Node | ||
E-4 Medium M: 深海任務部隊 前衛水上打撃群 (PoiDB)
| # | Formation | Boss Battle Node | AD/AP AS/AS+ |
|---|---|---|---|
| M | Cruising Formation 4 Phases: 1, 3 |
0/0 0/0 | |
| Cruising Formation 4 Phases: 1 (Final)
|
46/91 204/408 | ||
| # | Formation | Boss Battle Node | AD/AP AS/AS+ |
E-4 Medium N: 深海潜水艦隊 五島列島沖警戒線 (PoiDB)
| # | Formation | Normal Battle Node | AD/AP AS/AS+ |
|---|---|---|---|
| N | Echelon Line Abreast Phases: 2 |
0/0 0/0 | |
| Echelon Line Abreast Phases: 2, 3 |
0/0 0/0 | ||
| Echelon Line Abreast Phases: 2 |
0/0 0/0 | ||
| # | Formation | Normal Battle Node | AD/AP AS/AS+ |
E-4 Medium O: 深海任務部隊 艦載機群 (PoiDB)
| # | Formation | Air Defense Node | AD/AP AS/AS+ |
|---|---|---|---|
| O | Diamond | 90/180 404/807 | |
| Diamond | 96/191 428/855 | ||
| Diamond Phases: 3 |
100/199 447/894 | ||
| # | Formation | Air Defense Node | AD/AP AS/AS+ |
E-4 Medium P: 深海任務部隊 艦載機群 (PoiDB)
| # | Formation | Air Defense Node | AD/AP AS/AS+ |
|---|---|---|---|
| P | Diamond Phases: 2, 3 |
96/191 428/855 | |
| Diamond Phases: 2, 3 |
100/199 447/894 | ||
| Diamond Phases: 2 |
140/279 627/1254 | ||
| # | Formation | Air Defense Node | AD/AP AS/AS+ |
E-4 Medium Q: 深海任務部隊 艦載機群 (PoiDB)
| # | Formation | Air Defense Node | AD/AP AS/AS+ |
|---|---|---|---|
| Q | Diamond | 96/191 428/855 | |
| Diamond Phases: 3 |
100/199 447/894 | ||
| Diamond | 140/279 627/1254 | ||
| # | Formation | Air Defense Node | AD/AP AS/AS+ |
E-4 Medium R: 深海任務部隊 前衛警戒艦隊 (PoiDB)
| # | Formation | Normal Battle Node | AD/AP AS/AS+ |
|---|---|---|---|
| R | Line Ahead Double Line Vanguard Phases: 2, 3 |
0/0 0/0 | |
| # | Formation | Normal Battle Node | AD/AP AS/AS+ |
E-4 Medium S: 深海潜水艦隊 群狼攻撃集団 (PoiDB)
| # | Formation | Normal Battle Node | AD/AP AS/AS+ |
|---|---|---|---|
| S | Echelon Line Abreast Phases: 2 |
0/0 0/0 | |
| Echelon Line Abreast |
0/0 0/0 | ||
| Echelon Line Abreast |
0/0 0/0 | ||
| # | Formation | Normal Battle Node | AD/AP AS/AS+ |
E-4 Medium T: 深海任務部隊 前衛空母集団 III群 (PoiDB)
| # | Formation | Normal Battle Node | AD/AP AS/AS+ |
|---|---|---|---|
| T | Diamond Phases: 2, 3 |
90/180 404/807 | |
| Diamond Phases: 2, 3 |
96/191 428/855 | ||
| Diamond Phases: 2 |
100/199 447/894 | ||
| # | Formation | Normal Battle Node | AD/AP AS/AS+ |
E-4 Medium U: 深海任務部隊 艦載機群 (PoiDB)
| # | Formation | Air Defense Node | AD/AP AS/AS+ |
|---|---|---|---|
| U | Diamond | 153/306 687/1374 | |
| # | Formation | Air Defense Node | AD/AP AS/AS+ |
E-4 Medium V
| # | Empty Node | ||
|---|---|---|---|
| V | 敵影を見ず。 No enemy spotted. | ||
| # | Empty Node | ||
E-4 Medium W: 深海任務部隊 前衛空母主力集団 (PoiDB)
| # | Formation | Boss Battle Node | AD/AP AS/AS+ |
|---|---|---|---|
| W | Cruising Formation 4 Phases: 2, 3 |
153/306 687/1374 | |
| Cruising Formation 4 Phases: 2 (Final)
|
162/323 726/1452 | ||
| # | Formation | Boss Battle Node | AD/AP AS/AS+ |
E-4 Medium X: 深海任務部隊 艦載機群 (PoiDB)
| # | Formation | Air Defense Node | AD/AP AS/AS+ |
|---|---|---|---|
| X | Diamond Phases: 3 |
69/138 309/618 | |
| Diamond Phases: 3 |
115/229 513/1026 | ||
| Diamond Phases: 3 |
155/309 693/1386 | ||
| # | Formation | Air Defense Node | AD/AP AS/AS+ |
E-4 Medium Y: 深海任務部隊 低速戦艦戦隊 (PoiDB)
| # | Formation | Normal Battle Node | AD/AP AS/AS+ |
|---|---|---|---|
| Y | Line Ahead Double Line Echelon Phases: 3 |
0/0 0/0 | |
| # | Formation | Normal Battle Node | AD/AP AS/AS+ |
E-4 Medium Y1: 深海潜水艦隊 警戒線指揮潜水艦 (PoiDB)
| # | Formation | Normal Battle Node | AD/AP AS/AS+ |
|---|---|---|---|
| Y1 | Echelon Line Abreast Phases: 3 |
0/0 0/0 | |
| Line Abreast Phases: 3 |
0/0 0/0 | ||
| # | Formation | Normal Battle Node | AD/AP AS/AS+ |
E-4 Medium Y2: 深海任務部隊 艦載機群 (PoiDB)
| # | Formation | Air Defense Node | AD/AP AS/AS+ |
|---|---|---|---|
| Y2 | Diamond | 69/138 309/618 | |
| # | Formation | Air Defense Node | AD/AP AS/AS+ |
E-4 Medium Y3
| # | Empty Node | ||
|---|---|---|---|
| Y3 | 敵影を見ず。 作戦予定航路、前路掃蕩を完了せり! No enemy spotted. Planned route of operations, forward sweep complete! | ||
| # | Empty Node | ||
E-4 Medium Z: 深海任務部隊 前衛艦隊総旗艦 (PoiDB)
| # | Formation | Boss Battle Node | AD/AP AS/AS+ |
|---|---|---|---|
| Z | Cruising Formation 4 Phases: 3 |
69/138 309/618 | |
| Cruising Formation 4 Phases: 3 (Final)
|
115/229 513/1026 | ||
| # | Formation | Boss Battle Node | AD/AP AS/AS+ |
| Type | Ships |
|---|---|
| DD |
| Type | Ships |
|---|---|
| DD |
| Type | Ships |
|---|---|
| DD |
| Type | Ships |
|---|---|
| DE | |
| DD | |
| CL | |
| LHA | |
| AO |
| Type | Ships |
|---|---|
| DD |
| Type | Ships |
|---|---|
| DD |
| Type | Ships |
|---|---|
| DE | |
| DD | |
| CL | |
| LHA | |
| AS | |
| AO |
| Type | Ships |
|---|---|
| DE | |
| DD | |
| CL |
| Type | Ships |
|---|---|
| DE | |
| DD | |
| CL | |
| CA | |
| CVL | |
| BB | |
| CV | |
| AR | |
| AS |
E-4 Easy AB
| # | Formation | Air Raids | AD/AP AS/AS+ |
|---|---|---|---|
| AB | Diamond | 81/162 363/726 | |
| Diamond | 92/184 413/825 | ||
| Diamond | 114/228 512/1023 | ||
| Diamond | 146/292 656/1311 | ||
| # | Formation | Air Raids | AD/AP AS/AS+ |
E-4 Easy A
| # | Empty Node | ||
|---|---|---|---|
| A | 気のせいだった。 艦隊、徳山沖より出撃す! Must be my imagination. The fleet is sailing from Tokuyama! | ||
| # | Empty Node | ||
E-4 Easy B
| # | Empty Node | ||
|---|---|---|---|
| B | 気のせいだった。 これより豊後水道。対潜警戒を厳に! Must be my imagination. From here on, this is the Bungo Channel. Maintain strict anti-submarine alert! | ||
| # | Empty Node | ||
E-4 Easy C: 深海潜水艦隊 豊後水道警戒線 (PoiDB)
| # | Formation | Normal Battle Node | AD/AP AS/AS+ |
|---|---|---|---|
| C | Echelon Line Abreast Phases: 1, 2, 3 |
0/0 0/0 | |
| Echelon Line Abreast Phases: 1, 2, 3 |
0/0 0/0 | ||
| Echelon Line Abreast Phases: 1, 2, 3 |
0/0 0/0 | ||
| # | Formation | Normal Battle Node | AD/AP AS/AS+ |
E-4 Easy D
| # | Empty Node | ||
|---|---|---|---|
| D | 気のせいだった。 敵機に気をつけろ!対空警戒も厳とせよ! Must be my imagination. Watch out for enemy aircraft! Stay on anti-aircraft alert! | ||
| # | Empty Node | ||
E-4 Easy D1: 深海任務部隊 艦載機群 (PoiDB)
| # | Formation | Air Defense Node | AD/AP AS/AS+ |
|---|---|---|---|
| D1 | Diamond Phases: 1, 2, 3 |
54/107 240/480 | |
| Diamond Phases: 1, 2, 3 |
86/171 384/768 | ||
| Diamond Phases: 1, 2, 3 |
91/182 408/816 | ||
| # | Formation | Air Defense Node | AD/AP AS/AS+ |
E-4 Easy D2: 深海潜水艦隊 大隅海峡警戒線 (PoiDB)
| # | Formation | Normal Battle Node | AD/AP AS/AS+ |
|---|---|---|---|
| D2 | Echelon Line Abreast Phases: 1, 2, 3 |
0/0 0/0 | |
| Echelon Line Abreast Phases: 1, 2, 3 |
0/0 0/0 | ||
| Echelon Line Abreast Phases: 1, 2, 3 |
0/0 0/0 | ||
| # | Formation | Normal Battle Node | AD/AP AS/AS+ |
E-4 Easy E: 深海任務部隊 艦載機群 (PoiDB)
| # | Formation | Air Defense Node | AD/AP AS/AS+ |
|---|---|---|---|
| E | Diamond Phases: 1, 2, 3 |
54/107 240/480 | |
| Diamond Phases: 1, 2, 3 |
86/171 384/768 | ||
| Diamond Phases: 1, 2, 3 |
91/182 408/816 | ||
| # | Formation | Air Defense Node | AD/AP AS/AS+ |
E-4 Easy F: 深海任務部隊 ピケット艦隊 (PoiDB)
| # | Formation | Normal Battle Node | AD/AP AS/AS+ |
|---|---|---|---|
| F | Line Ahead Phases: 1, 2, 3 |
0/0 0/0 | |
| Line Ahead Phases: 1, 2, 3 |
0/0 0/0 | ||
| Line Ahead Phases: 3 |
0/0 0/0 | ||
| # | Formation | Normal Battle Node | AD/AP AS/AS+ |
E-4 Easy G
| # | Empty Node | ||
|---|---|---|---|
| G | 気のせいだった。 艦隊、大隅海峡を抜ける!これより南西諸島方面へ向かう! Must be my imagination. The fleet is now exiting the Osumi Strait! We are now heading to the Nansei Islands! | ||
| # | Empty Node | ||
E-4 Easy H
| # | Empty Node | ||
|---|---|---|---|
| H | 気のせいだった。 作戦予定航路、前路掃蕩を完了せり! Must be my imagination. Planned route of operations, forward sweep complete! | ||
| # | Empty Node | ||
E-4 Easy I
| # | Repair Node | ||
|---|---|---|---|
| # | Repair Node | ||
E-4 Easy J: 深海任務部隊 前衛空母集団 I群 (PoiDB)
| # | Formation | Normal Battle Node | AD/AP AS/AS+ |
|---|---|---|---|
| J | Diamond Phases: 1, 2, 3 |
54/107 240/480 | |
| Diamond Phases: 1, 2, 3 |
86/171 384/768 | ||
| Diamond Phases: 1, 2, 3 |
91/182 408/816 | ||
| # | Formation | Normal Battle Node | AD/AP AS/AS+ |
E-4 Easy K: 深海任務部隊 前衛空母集団 II群 (PoiDB)
| # | Formation | Normal Battle Node | AD/AP AS/AS+ |
|---|---|---|---|
| K | Diamond | 54/107 240/480 | |
| Diamond | 86/171 384/768 | ||
| Diamond | 91/182 408/816 | ||
| # | Formation | Normal Battle Node | AD/AP AS/AS+ |
E-4 Easy L
| # | Empty Node | ||
|---|---|---|---|
| L | 敵影を見ず。 作戦予定航路、前路掃蕩を完了せり! No enemy spotted. Planned route of operations, forward sweep complete! | ||
| # | Empty Node | ||
E-4 Easy M: 深海任務部隊 前衛水上打撃群 (PoiDB)
| # | Formation | Boss Battle Node | AD/AP AS/AS+ |
|---|---|---|---|
| M | Cruising Formation 4 Phases: 1, 2, 3 |
0/0 0/0 | |
| Cruising Formation 4 Phases: 1 (Final)
|
46/91 204/408 | ||
| # | Formation | Boss Battle Node | AD/AP AS/AS+ |
E-4 Easy N: 深海潜水艦隊 五島列島沖警戒線 (PoiDB)
| # | Formation | Normal Battle Node | AD/AP AS/AS+ |
|---|---|---|---|
| N | Echelon Line Abreast Phases: 2, 3 |
0/0 0/0 | |
| Echelon Line Abreast Phases: 2, 3 |
0/0 0/0 | ||
| # | Formation | Normal Battle Node | AD/AP AS/AS+ |
E-4 Easy O: 深海任務部隊 艦載機群 (PoiDB)
| # | Formation | Air Defense Node | AD/AP AS/AS+ |
|---|---|---|---|
| O | Diamond Phases: 2, 3 |
54/107 240/480 | |
| Diamond Phases: 2, 3 |
86/171 384/768 | ||
| Diamond Phases: 2, 3 |
91/182 408/816 | ||
| # | Formation | Air Defense Node | AD/AP AS/AS+ |
E-4 Easy P: 深海任務部隊 艦載機群 (PoiDB)
| # | Formation | Air Defense Node | AD/AP AS/AS+ |
|---|---|---|---|
| P | Diamond Phases: 2, 3 |
86/171 384/768 | |
| Diamond Phases: 2, 3 |
91/182 408/816 | ||
| Diamond Phases: 2, 3 |
131/262 588/1176 | ||
| # | Formation | Air Defense Node | AD/AP AS/AS+ |
E-4 Easy Q: 深海任務部隊 艦載機群 (PoiDB)
| # | Formation | Air Defense Node | AD/AP AS/AS+ |
|---|---|---|---|
| Q | Diamond Phases: 2, 3 |
86/171 384/768 | |
| Diamond Phases: 2, 3 |
91/182 408/816 | ||
| Diamond Phases: 2, 3 |
131/262 588/1176 | ||
| # | Formation | Air Defense Node | AD/AP AS/AS+ |
E-4 Easy R: 深海任務部隊 前衛警戒艦隊 (PoiDB)
| # | Formation | Normal Battle Node | AD/AP AS/AS+ |
|---|---|---|---|
| R | Line Ahead Double Line Vanguard Phases: 2, 3 |
0/0 0/0 | |
| # | Formation | Normal Battle Node | AD/AP AS/AS+ |
E-4 Easy S: 深海潜水艦隊 群狼攻撃集団 (PoiDB)
| # | Formation | Normal Battle Node | AD/AP AS/AS+ |
|---|---|---|---|
| S | Echelon Line Abreast Phases: 2 |
0/0 0/0 | |
| Echelon Line Abreast Phases: 2, 3 |
0/0 0/0 | ||
| # | Formation | Normal Battle Node | AD/AP AS/AS+ |
E-4 Easy T: 深海任務部隊 前衛空母集団 III群 (PoiDB)
| # | Formation | Normal Battle Node | AD/AP AS/AS+ |
|---|---|---|---|
| T | Diamond Phases: 2, 3 |
54/107 240/480 | |
| Diamond Phases: 2, 3 |
86/171 384/768 | ||
| Diamond Phases: 2, 3 |
91/182 408/816 | ||
| # | Formation | Normal Battle Node | AD/AP AS/AS+ |
E-4 Easy U: 深海任務部隊 艦載機群 (PoiDB)
| # | Formation | Air Defense Node | AD/AP AS/AS+ |
|---|---|---|---|
| U | Diamond Phases: 2 |
93/185 414/828 | |
| Diamond Phases: 2, 3 |
135/270 606/1212 | ||
| Diamond | 141/281 630/1260 | ||
| # | Formation | Air Defense Node | AD/AP AS/AS+ |
E-4 Easy V
| # | Empty Node | ||
|---|---|---|---|
| V | 敵影を見ず。 No enemy spotted. | ||
| # | Empty Node | ||
E-4 Easy W: 深海任務部隊 前衛空母主力集団 (PoiDB)
| # | Formation | Boss Battle Node | AD/AP AS/AS+ |
|---|---|---|---|
| W | Cruising Formation 4 Phases: 2, 3 |
135/270 606/1212 | |
| Cruising Formation 4 Phases: 2 (Final)
|
141/281 630/1260 | ||
| # | Formation | Boss Battle Node | AD/AP AS/AS+ |
E-4 Easy X: 深海任務部隊 艦載機群 (PoiDB)
| # | Formation | Air Defense Node | AD/AP AS/AS+ |
|---|---|---|---|
| X | Diamond Phases: 3 |
65/130 291/582 | |
| Diamond Phases: 3 |
105/210 471/942 | ||
| Diamond Phases: 3 |
113/226 507/1014 | ||
| # | Formation | Air Defense Node | AD/AP AS/AS+ |
E-4 Easy Y: 深海任務部隊 低速戦艦戦隊 (PoiDB)
| # | Formation | Normal Battle Node | AD/AP AS/AS+ |
|---|---|---|---|
| Y | Line Ahead Double Line Echelon Phases: 3 |
0/0 0/0 | |
| # | Formation | Normal Battle Node | AD/AP AS/AS+ |
E-4 Easy Y1: 深海潜水艦隊 警戒線指揮潜水艦 (PoiDB)
| # | Formation | Normal Battle Node | AD/AP AS/AS+ |
|---|---|---|---|
| Y1 | Echelon Line Abreast Phases: 3 |
0/0 0/0 | |
| Echelon Line Abreast Phases: 3 |
0/0 0/0 | ||
| Echelon Line Abreast Phases: 3 |
0/0 0/0 | ||
| # | Formation | Normal Battle Node | AD/AP AS/AS+ |
E-4 Easy Y2: 深海任務部隊 艦載機群 (PoiDB)
| # | Formation | Air Defense Node | AD/AP AS/AS+ |
|---|---|---|---|
| Y2 | Diamond Phases: 3 |
65/130 291/582 | |
| Diamond Phases: 3 |
105/210 471/942 | ||
| Diamond | 113/226 507/1014 | ||
| # | Formation | Air Defense Node | AD/AP AS/AS+ |
E-4 Easy Y3
| # | Empty Node | ||
|---|---|---|---|
| Y3 | 敵影を見ず。 作戦予定航路、前路掃蕩を完了せり! No enemy spotted. Planned route of operations, forward sweep complete! | ||
| # | Empty Node | ||
E-4 Easy Z: 深海任務部隊 前衛艦隊総旗艦 (PoiDB)
| # | Formation | Boss Battle Node | AD/AP AS/AS+ |
|---|---|---|---|
| Z | Cruising Formation 4 Phases: 3 |
65/130 291/582 | |
| Cruising Formation 4 Phases: 3 (Final)
|
105/210 471/942 | ||
| # | Formation | Boss Battle Node | AD/AP AS/AS+ |
| Type | Ships |
|---|---|
| DD |
| Type | Ships |
|---|---|
| DD |
| Type | Ships |
|---|---|
| DE | |
| DD | |
| CL | |
| LHA | |
| AO |
| Type | Ships |
|---|---|
| DD |
| Type | Ships |
|---|---|
| DD |
| Type | Ships |
|---|---|
| DE | |
| DD | |
| CL | |
| AO |
| Type | Ships |
|---|---|
| DE | |
| DD | |
| CL |
| Type | Ships |
|---|---|
| DE | |
| DD | |
| CL | |
| CA | |
| CVL | |
| BB | |
| CV | |
| AR | |
| AS |
E-4 Casual AB
| # | Formation | Air Raids | AD/AP AS/AS+ |
|---|---|---|---|
| AB | Diamond | 81/162 363/726 | |
| Diamond | 98/196 440/879 | ||
| Diamond | 101/201 452/903 | ||
| # | Formation | Air Raids | AD/AP AS/AS+ |
E-4 Casual A
| # | Empty Node | ||
|---|---|---|---|
| A | 気のせいだった。 艦隊、徳山沖より出撃す! Must be my imagination. The fleet is sailing from Tokuyama! | ||
| # | Empty Node | ||
E-4 Casual B
| # | Empty Node | ||
|---|---|---|---|
| B | 気のせいだった。 これより豊後水道。対潜警戒を厳に! Must be my imagination. From here on, this is the Bungo Channel. Maintain strict anti-submarine alert! | ||
| # | Empty Node | ||
E-4 Casual C: 深海潜水艦隊 豊後水道警戒線 (PoiDB)
| # | Formation | Normal Battle Node | AD/AP AS/AS+ |
|---|---|---|---|
| C | Echelon Line Abreast Phases: 1, 2, 3 |
0/0 0/0 | |
| Echelon Line Abreast Phases: 1, 2, 3 |
0/0 0/0 | ||
| # | Formation | Normal Battle Node | AD/AP AS/AS+ |
E-4 Casual D
| # | Empty Node | ||
|---|---|---|---|
| D | 気のせいだった。 敵機に気をつけろ!対空警戒も厳とせよ! Must be my imagination. Watch out for enemy aircraft! Stay on anti-aircraft alert! | ||
| # | Empty Node | ||
E-4 Casual D1: 深海任務部隊 艦載機群 (PoiDB)
| # | Formation | Air Defense Node | AD/AP AS/AS+ |
|---|---|---|---|
| D1 | Diamond Phases: 1, 2, 3 |
41/81 180/360 | |
| Diamond Phases: 1, 2, 3 |
49/97 216/432 | ||
| Diamond Phases: 1, 2 |
81/161 360/720 | ||
| # | Formation | Air Defense Node | AD/AP AS/AS+ |
E-4 Casual D2: 深海潜水艦隊 大隅海峡警戒線 (PoiDB)
| # | Formation | Normal Battle Node | AD/AP AS/AS+ |
|---|---|---|---|
| D2 | Echelon Line Abreast Phases: 1, 2, 3 |
0/0 0/0 | |
| Echelon Line Abreast Phases: 1, 2, 3 |
0/0 0/0 | ||
| # | Formation | Normal Battle Node | AD/AP AS/AS+ |
E-4 Casual E: 深海任務部隊 艦載機群 (PoiDB)
| # | Formation | Air Defense Node | AD/AP AS/AS+ |
|---|---|---|---|
| E | Diamond Phases: 1, 2, 3 |
41/81 180/360 | |
| Diamond Phases: 1, 2, 3 |
49/97 216/432 | ||
| Diamond Phases: 1, 2, 3 |
81/161 360/720 | ||
| # | Formation | Air Defense Node | AD/AP AS/AS+ |
E-4 Casual F: 深海任務部隊 ピケット艦隊 (PoiDB)
| # | Formation | Normal Battle Node | AD/AP AS/AS+ |
|---|---|---|---|
| F | Line Ahead Phases: 1, 2, 3 |
0/0 0/0 | |
| Line Ahead Phases: 1, 2, 3 |
0/0 0/0 | ||
| Line Ahead Phases: 3 |
0/0 0/0 | ||
| # | Formation | Normal Battle Node | AD/AP AS/AS+ |
E-4 Casual G
| # | Empty Node | ||
|---|---|---|---|
| G | 気のせいだった。 艦隊、大隅海峡を抜ける!これより南西諸島方面へ向かう! Must be my imagination. The fleet is now exiting the Osumi Strait! We are now heading to the Nansei Islands! | ||
| # | Empty Node | ||
E-4 Casual H
| # | Empty Node | ||
|---|---|---|---|
| H | 気のせいだった。 作戦予定航路、前路掃蕩を完了せり! Must be my imagination. Planned route of operations, forward sweep complete! | ||
| # | Empty Node | ||
E-4 Casual I
| # | Repair Node | ||
|---|---|---|---|
| # | Repair Node | ||
E-4 Casual J: 深海任務部隊 前衛空母集団 I群 (PoiDB)
| # | Formation | Normal Battle Node | AD/AP AS/AS+ |
|---|---|---|---|
| J | Diamond Phases: 1, 2, 3 |
41/81 180/360 | |
| Diamond Phases: 1, 3 |
49/97 216/432 | ||
| Diamond Phases: 1, 2, 3 |
81/161 360/720 | ||
| # | Formation | Normal Battle Node | AD/AP AS/AS+ |
E-4 Casual K: 深海任務部隊 前衛空母集団 II群 (PoiDB)
| # | Formation | Normal Battle Node | AD/AP AS/AS+ |
|---|---|---|---|
| K | Diamond Phases: 1 |
41/81 180/360 | |
| Diamond | 49/97 216/432 | ||
| Diamond Phases: 1 |
81/161 360/720 | ||
| # | Formation | Normal Battle Node | AD/AP AS/AS+ |
E-4 Casual L
| # | Empty Node | ||
|---|---|---|---|
| L | 敵影を見ず。 作戦予定航路、前路掃蕩を完了せり! No enemy spotted. Planned route of operations, forward sweep complete! | ||
| # | Empty Node | ||
E-4 Casual M: 深海任務部隊 前衛水上打撃群 (PoiDB)
| # | Formation | Boss Battle Node | AD/AP AS/AS+ |
|---|---|---|---|
| M | Cruising Formation 4 Phases: 1, 3 |
0/0 0/0 | |
| Cruising Formation 4 Phases: 1 (Final)
|
41/81 180/360 | ||
| # | Formation | Boss Battle Node | AD/AP AS/AS+ |
E-4 Casual N: 深海潜水艦隊 五島列島沖警戒線 (PoiDB)
| # | Formation | Normal Battle Node | AD/AP AS/AS+ |
|---|---|---|---|
| N | Echelon Line Abreast Phases: 2, 3 |
0/0 0/0 | |
| Echelon Line Abreast Phases: 2, 3 |
0/0 0/0 | ||
| # | Formation | Normal Battle Node | AD/AP AS/AS+ |
E-4 Casual O: 深海任務部隊 艦載機群 (PoiDB)
| # | Formation | Air Defense Node | AD/AP AS/AS+ |
|---|---|---|---|
| O | Diamond | 43/86 192/384 | |
| Diamond Phases: 2, 3 |
49/97 216/432 | ||
| Diamond Phases: 2, 3 |
81/161 360/720 | ||
| # | Formation | Air Defense Node | AD/AP AS/AS+ |
E-4 Casual P: 深海任務部隊 艦載機群 (PoiDB)
| # | Formation | Air Defense Node | AD/AP AS/AS+ |
|---|---|---|---|
| P | Diamond Phases: 2, 3 |
49/97 216/432 | |
| Diamond Phases: 2, 3 |
81/161 360/720 | ||
| Diamond Phases: 2 |
83/166 372/744 | ||
| # | Formation | Air Defense Node | AD/AP AS/AS+ |
E-4 Casual Q: 深海任務部隊 艦載機群 (PoiDB)
| # | Formation | Air Defense Node | AD/AP AS/AS+ |
|---|---|---|---|
| Q | Diamond Phases: 2 |
49/97 216/432 | |
| Diamond Phases: 2, 3 |
81/161 360/720 | ||
| Diamond Phases: 3 |
83/166 372/744 | ||
| # | Formation | Air Defense Node | AD/AP AS/AS+ |
E-4 Casual R: 深海任務部隊 前衛警戒艦隊 (PoiDB)
| # | Formation | Normal Battle Node | AD/AP AS/AS+ |
|---|---|---|---|
| R | Line Ahead Double Line Vanguard Phases: 2, 3 |
0/0 0/0 | |
| # | Formation | Normal Battle Node | AD/AP AS/AS+ |
E-4 Casual S: 深海潜水艦隊 群狼攻撃集団 (PoiDB)
| # | Formation | Normal Battle Node | AD/AP AS/AS+ |
|---|---|---|---|
| S | Echelon Line Abreast |
0/0 0/0 | |
| Echelon Line Abreast |
0/0 0/0 | ||
| # | Formation | Normal Battle Node | AD/AP AS/AS+ |
E-4 Casual T: 深海任務部隊 前衛空母集団 III群 (PoiDB)
| # | Formation | Normal Battle Node | AD/AP AS/AS+ |
|---|---|---|---|
| T | Diamond Phases: 2, 3 |
41/81 180/360 | |
| Diamond Phases: 2, 3 |
49/97 216/432 | ||
| Diamond Phases: 2, 3 |
81/161 360/720 | ||
| # | Formation | Normal Battle Node | AD/AP AS/AS+ |
E-4 Casual U: 深海任務部隊 艦載機群 (PoiDB)
| # | Formation | Air Defense Node | AD/AP AS/AS+ |
|---|---|---|---|
| U | Diamond Phases: 2, 3 |
47/94 210/420 | |
| Diamond Phases: 3 |
50/99 222/444 | ||
| Diamond | 87/174 390/780 | ||
| # | Formation | Air Defense Node | AD/AP AS/AS+ |
E-4 Casual V
| # | Empty Node | ||
|---|---|---|---|
| V | 敵影を見ず。 No enemy spotted. | ||
| # | Empty Node | ||
E-4 Casual W: 深海任務部隊 前衛空母主力集団 (PoiDB)
| # | Formation | Boss Battle Node | AD/AP AS/AS+ |
|---|---|---|---|
| W | Cruising Formation 4 Phases: 2, 3 |
47/94 210/420 | |
| Cruising Formation 4 Phases: 2 (Final)
|
87/174 390/780 | ||
| # | Formation | Boss Battle Node | AD/AP AS/AS+ |
E-4 Casual X: 深海任務部隊 艦載機群 (PoiDB)
| # | Formation | Air Defense Node | AD/AP AS/AS+ |
|---|---|---|---|
| X | Diamond Phases: 3 |
57/113 252/504 | |
| Diamond Phases: 3 |
97/193 432/864 | ||
| Diamond Phases: 3 |
99/198 444/888 | ||
| # | Formation | Air Defense Node | AD/AP AS/AS+ |
E-4 Casual Y: 深海任務部隊 低速戦艦戦隊 (PoiDB)
| # | Formation | Normal Battle Node | AD/AP AS/AS+ |
|---|---|---|---|
| Y | Line Ahead Double Line Echelon Phases: 3 |
0/0 0/0 | |
| # | Formation | Normal Battle Node | AD/AP AS/AS+ |
E-4 Casual Y1: 深海潜水艦隊 警戒線指揮潜水艦 (PoiDB)
| # | Formation | Normal Battle Node | AD/AP AS/AS+ |
|---|---|---|---|
| Y1 | Echelon Line Abreast Phases: 3 |
0/0 0/0 | |
| Echelon Line Abreast Phases: 3 |
0/0 0/0 | ||
| # | Formation | Normal Battle Node | AD/AP AS/AS+ |
E-4 Casual Y2: 深海任務部隊 艦載機群 (PoiDB)
| # | Formation | Air Defense Node | AD/AP AS/AS+ |
|---|---|---|---|
| Y2 | Diamond | 57/113 252/504 | |
| Diamond | 97/193 432/864 | ||
| # | Formation | Air Defense Node | AD/AP AS/AS+ |
E-4 Casual Y3
| # | Empty Node | ||
|---|---|---|---|
| Y3 | 敵影を見ず。 作戦予定航路、前路掃蕩を完了せり! No enemy spotted. Planned route of operations, forward sweep complete! | ||
| # | Empty Node | ||
E-4 Casual Z: 深海任務部隊 前衛艦隊総旗艦 (PoiDB)
| # | Formation | Boss Battle Node | AD/AP AS/AS+ |
|---|---|---|---|
| Z | Cruising Formation 4 Phases: 3 |
57/113 252/504 | |
| Cruising Formation 4 Phases: 3 (Final)
|
97/193 432/864 | ||
| # | Formation | Boss Battle Node | AD/AP AS/AS+ |