- Welcome to the Kancolle Wiki!
- If you have any questions regarding site content, account registration, etc., please visit the KanColle Wiki Discord
Difference between revisions of "User:Reikyu"
m (taihou!) |
|||
| Line 145: | Line 145: | ||
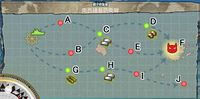
Fleet: 2 CLT, 2 CAV, 1 CV, 1 CVL<br /> | Fleet: 2 CLT, 2 CAV, 1 CV, 1 CVL<br /> | ||
CAV equipped with Zuiun to help with AS. Add one radar for maelstroms<br /> | CAV equipped with Zuiun to help with AS. Add one radar for maelstroms<br /> | ||
| − | Testing E->F pathing. 1 CV + 1 CVL (6/ | + | Testing E->F pathing. 1 CV + 1 CVL (6/10 success so far...). 2 CV (0/3? success). 2 CVL (1/2? success)<br /> |
|- | |- | ||
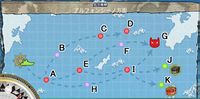
|[[File:3-5 Map.jpg|200px|link=http://kancolle.wikia.com/wiki/World_3:_%E5%8C%97%E6%96%B9%E6%B5%B7%E5%9F%9F#3-5]]<b>World 3-5</b> | |[[File:3-5 Map.jpg|200px|link=http://kancolle.wikia.com/wiki/World_3:_%E5%8C%97%E6%96%B9%E6%B5%B7%E5%9F%9F#3-5]]<b>World 3-5</b> | ||
Revision as of 15:48, 18 November 2014
| Started Playing: Early July, 2014
Server: Hitokappu Current HQ: 100 |
.png) |
Standard Carriers
|
|
 |
Battleships
|
|
 |
Light Carriers
|
|
 |
Heavy Cruisers
|
|
 |
Light Cruisers
|
|
 |
Destroyers
|
|
 |
Submarines
|
|
 |
Sortie Notes
Very much under construction!
| Map | Applicable | Notes |
|---|---|---|
 World 1-4 World 1-4
|
Bm3 - Deploy a Torpedo Squadron | [2 / 2] attempts using 3 CL + 3 DD. All attempts were sent south B-H-I to dead end J. [3 / 3] attempts using 1 CL + 5 DD. All attempts took one of the two northern routes so far. |
 World 1-5 World 1-5
|
Monthly Medal Bw10 - A-rank at the boss node 3x |
Recommended fleet order: CVL - Flag, BBV, DD/CL, DD/CL This setup will allow your weaker ASW ships to focus on trash, saving the enemy flag for your CL/DD attacking last. |
 World 3-3 World 3-3
|
Bw7 - Defeat 5 bosses in the Northern Sea | My currently preferred map for this weekly, but still bad. Recommended: AS+ 243 (includes 6 buffer) |
 World 3-5 World 3-5
|
Monthly Medal Bw7 - Defeat 5 bosses in the Northern Sea |
South Route: CL + 5 DD (SPARKLE ALL) Ooyodo: 2 x 15.5 (red or yellow?) + 2 x type 0 observation = no LoS problems |
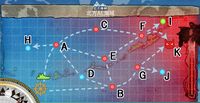
World 2-5 Battle plans for next month: (untested)
2 CAV + 2 DD + CLT + CVL for B-E-H-L path
Advantages: resource cheap, buckets cheap, supposedly no B-F dead ends, 2 pre boss nodes, avoids BWS and BRS
Disadvantages: light fleet, Ru node E, will need to pack saiun as light fleet will be weak against boss node.
Best CVL to bring is Ryuujou Kai Ni as she has the largest 2 slots that isn't Jun'you slow speed.
Recommend: 35 AS for first node. Ignoring AS+ as it's only one node
Construction
| Ship | LSC Attempts | Completed | |||||
|---|---|---|---|---|---|---|---|
| Taihou | 29 | 115,500 | 59,500 | 146,000 | 202,000 | 660 | 11/16/14 |
| LSC Results | Count |
|---|---|
| 3 | |
| 3 | |
| 1 | |
| 4 | |
| 2 | |
| 1 | |
| 3 | |
| 5 | |
| 2 | |
| 3 | |
| 1 |
Expeditions for 
Expeditions can be divided up into a few categories based on their duration.
Short: Under 1 hour. These are good for working towards the 3 + 10 expeditions daily. The 10 expedition daily is worth 150 ![]() , 300
, 300 ![]() , 300
, 300 ![]() , 150
, 150 ![]() , and 600 furniture coins. These are usually not worth sparkling for but still have decent efficiency.
, and 600 furniture coins. These are usually not worth sparkling for but still have decent efficiency.
Medium: 1.5 - 3 hours. These expeditions are bulkier in that you might only be able to run them a few times a night depending on how long you play. You should sparkle for these as they tends to have the best efficiency when sparkled.
Long: 4 - 9 hours. These are usually reserved for overnight or when you are at school/work. Their returns/hour aren't as good as shorter expeditions, but they require less visits to 1-1 for sparkling and you aren't playing the game during this time anyways. Always be sparkling.
When it comes to sparkling and expeditions, you can't just sparkle the minimum number of required ships. To guarantee great success you will need to send a full fleet of sparkled ships.
Feel free to mix and match expeditions based on your needs, time, and what you have available. This is just a list of the expeditions that I regularly run.
Expeditions with good returns are marked with: ![]()
![]()
![]()
![]()
![]()
Short Expeditions
Expedition 2: 30 minutes![]()
![]()
Short and a great source of ammo and buckets. If you have spare lv 1 DDs from 1-1 sparkling, you can put a SS as flag, and add in 3 DDs to run the expedition once, then scrap/modernize the DDs and rotate in fresh ones. Not worth the trouble to sparkle for as it doesn't increase bucket chance.
Expedition 6: 40 minutes![]()
Short and a great source of bauxite. Although it is a lot of work to sparkle for this expedition, if you are really desperate for bauxite then you gotta do what you gotta do. I run this with 6 sparkled DDs (usually Mutsuki class)
Medium Expeditions
Expedition 5: 90 minutes![]()
![]()
In terms of efficiency, this is one of the best expeditions out there. It's also short enough that you could run it a few times a night if you are on a lot.
Expedition 21: 140 minutes![]()
![]()
A good return on fuel and ammo, but not as efficient as expedition 5. If you are against sparkling your ships, you can run this unsparkled with a roughly 50% chance of still getting a great success since it's a drum canister expedition.
Expedition 37: 165 minutes![]()
![]()
Ammo and steel, although there's expedition 2 for that. Expedition 37 and 38 are used in the D9 and D11 weeklies for additional fuel, bauxite, and 1 screw. Another drum canister expedition.
Expedition 38: 175 minutes![]()
![]()
Fuel and steel, but a whole lot of fuel. Unfortunately expedition 37 and 38 have long durations which limits how much they can be used. I usually run these on the weekends to get the weekly quests out of the way. Drum canister expedition.
Long Expeditions
Expedition 36: 9 hours![]()
![]()
![]()
You probably don't sleep 9 hours, so run this an hour or so before you sleep. It gives a lot of fuel, steel, and bauxite, and if you have Daihatsus then you can use them on the AVs as well. One of my favorites to run overnight and during the day.
Expedition 35: 7 hours![]()
![]()
For bauxite this can't be beat, and a good amount of steel as well. You could use AVs for this expedition as well if you have extras or if you decide not to run expedition 36.
Expedition 11: 5 hours![]()
The second best long expedition for bauxite but with a simpler fleet setup.
Expedition 16: 15 hours (SUPER LONG)![]()
![]()
![]()
![]()
This expedition is long enough that you will only be able to run it once a day but it returns a lot of resources of all types.
Sparkling
Unfortunately it's boring, but the great returns from a sparkled expedition cannot be denied.
The table below includes the cost of one run of sparkling in 1-1 which is worth about 4 expeditions. The right columns are the equivalent additional resource cost of sparkling said ship for one expedition. ex. 6 sparkled DDs would cost an additional 9 fuel and 9 ammo for one expedition vs. fielding 6 non sparkled DDs. If you were looking at efficiency, you'd then have to consider the cost of fielding 6 DD instead of maybe 4 DD when comparing sparkled vs non-sparkled expeditions, but to put it simply it's just about always better to sparkle if you have time and energy to do so. Most of the numbers below are for unremodeled and/or efficient ships.
| Ship Type | 1-1 |
1-1 |
Sparkle |
Sparkle |
|---|---|---|---|---|
| DD | 6 | 6 | 1.5 | 1.5 |
| CL | 10 | 8 | 2.5 | 2 |
| SS | 4 | 8 | 1 | 2 |
| AV | 14 | 14 | 3.5 | 3.5 |
| CA | 14 | 14 | 3.5 | 3.5 |
| CVL | 12 | 12 | 3 | 3 |
How to Prepare for Events

Development
I'm placing this first as it can't be emphasized enough: develop, develop, develop. You can begin developing good stuff at a low HQ of 20-30. A lot of events have Line of Sight (LoS) checks which are highly equipment based. Your carrier's default planes are also pretty crappy and can receive a massive upgrade with developed planes. Developing equipment will help you succeed in events and sorties so there's no reason why you shouldn't start now. The last thing you need to happen during an event is realizing that you are short X item and are burning resources trying to develop an item that only has a 2% success chance. Following is a list of items that you should have developed before going into an event. You can research recipes here.
| Notes | |||
|---|---|---|---|
 Type 3 Shell Type 3 Shell
|
The Type 3 Shell or Sanshiki is a required staple now that there are installation type bosses. Installation type enemies are immune to torpedoes (but not torpedo bombers) and will take mostly scratch damage from all your ships. The Type 3 Shell can be equipped on your BB/CA to allow those ships to do increased damage on these types of bosses. | ||
 Saiun Saiun
|
The Saiun (Iridescent Cloud) is used to prevent Red-T engagements which make it harder to S rank a boss. They also provide 9 LoS which is then doubled in LoS calculations. Event maps are almost guaranteed to have LoS checks along the way and these will help you to meet those checks. | ||
 Reppu Reppu
|
The Reppuu (Strong Gale) is the best craftable +AA plane in the game and are incredibly valuable for securing air superiority. The Shiden Kai 2 is a close substitute if you aren't able to develop enough Reppuu (Strong Gale). | ||
| 100px46cm Triple Gun Mount | Now moving on to not required but good to have equipment, the 46cm Triple Gun Mount will help get your BB up to firepower cap while also providing additional AA cover. These can be hard to make so you might want to only start with a few. | ||
 Type 0 Obs. Seaplane Type 0 Obs. Seaplane
|
Not to be confused with the Type 0 Recon Seaplane which you have a million of, the Type 0 Observation Seaplane has better stats and is cheap to make, but is pretty rare. The +1 additional LoS is doubled in LoS calculations. The more LoS the better when it comes to meeting LoS requirements during events. | ||
 Type 33 Surface Radar Type 33 Surface Radar
|
The Type 33 Surface RADAR is the highest LoS radar that can fit on a DD. As DD cannot equip seaplanes to help with LoS checks, all they can do is equip small radars. These fit in nicely in their third slot should you need additional LoS. |
Fleet
The general rule of thumb is take 2 ships of each type and level them up. It pays to be versatile though. Focus on getting your ships to Kai status first and modernized, then gradually work your way to Kai Ni or higher levels. Leveling up your ships is important, but so is having the appropriate ships for branching rules which you won't know until the event has started. Don't neglect developing your equipment!
"Two ships good, four ships better!"
These are a few ships which I recommend leveling either for their unique abilities or for their equipment. Feel free to love/level whichever ships you want though.
| Ship | Notes |
|---|---|
| With a cut-in setup and her 60 luck Yukikaze can one shot just about anything at the boss node during night battles. And since events tend to make you use DDs in branching rules... | |
| Similar to Yukikaze with even more power but less luck, Kitakami is your ace in the hole for dishing out incredible amounts of damage through her torpedos during the day and her powerful double attacks or cut-ins at night. | |
| A great CL with unique equipment. The only source of the Type 98 Recon Seaplane (Night Scout), along with one of the two Star Shell in the game. Sendai's equipment will help make your night battle life just a little more bearable. | |
| Good stats and the owner of the other Star Shell if you wanted to carry a second to reduce the number of times that these tend to fail. Unfortunately Ayanami has her Kai Ni level at 70. | |
|
You probably won't have Souryuu and Hiryuu if you are a newer TTK, but if you do get one it would be a good idea to level them up for their unique planes. The Tenzan Model 12 (Tomonaga Squadron) and Suisei (Comet) (Egusa Squadron) are the best blue and red bombers in the game. It does take quite a bit of work to both find them, level them to Kai Ni, and unlock the upgraded versions of their planes. |
| With her massive 46 plane slot, Kaga is considered one of the best CV in the game. |
Event Record

|
Summer 2014 Event August 8th to August 29th E-5 Cleared |
| Fall 2014 Event November 14th to November 28th E-4 Cleared! |
Useful Kancolle Links
Kancolle AS Calculator - Air Superiority Calculator. Very useful!
JP Kancolle LoS Calculator - A LoS calculator including red/blue plane LoS
KC Player - Play your favorite voice clips!
http://zh.moegirl.org - Lots of good stuff, but all in JP
Random Kancolle Videos
Taigei - Because Hnnnngggg
Kancolle MMD - 1, 2, 3, 4
【手書き】 艦これ絵日記〜第六駆逐隊〜 - Because sad video is sad
第13回MMD杯本選 イーノックが艦娘たちと踊ってみたようです - My favorite from the 13th MMD cup
第12回MMD杯Ex イーノックが艦娘たちと踊ってみたようです - The above guy's previous video
【第13回MMD杯本選】海の日なのです! - Because I happen to like Nichijou
Is the order a kanmusu? (niconico) 1, 2, 3, 4, 5, 6, 7, 8, 9
【最新版】艦これ 戦闘BGMまとめ【2014.8.8】 - BGM Music Collection
【艦これBGM】 艦これオーケストラアレンジメドレー 【完成版】 - Short collection of some instrumental BGM Music
艦娘とティータイム出来る様に艦これBGMを色々喫茶店風にアレンジ - Coffee house music