Fall 2021 Event/E-1
E-1
off Hokkaido
【北海道沖秋刀魚漁支援】


| Information | ||||
|---|---|---|---|---|
| Event Tag | None | |||
| Boss Gauges | Hard (甲): 480 HP + 2800 HP | |||
| Medium (乙): 420 HP + 2300 HP | ||||
| Easy (丙): 420 HP + 2300 HP | ||||
| Casual (丁): 420 HP + 2300 HP | ||||
| Map Bosses | Battleship Ru-Class
| |||
German Escort Princess
| ||||
| Rewards | ||||
|---|---|---|---|---|
| Equipment/Item | 丁 Casual |
丙 Easy |
乙 Medium |
甲 Hard |
Medal |
1 | 1 | 1 | 1 |
Improvement Material |
2 | 4 | 6 | |
 Emergency Repair Goddess |
1 | 1 | 2 | 2 |
 Arctic Camouflage (+ Arctic Equipment) |
1 | 1 (★3) | 1 (★6) | |
 Toku Daihatsu Landing Craft + 11th Tank Regiment |
1 (★2) | |||
 Type 3 Depth Charge Projector |
1 (★4) | |||
 Type 3 Depth Charge Projector (Concentrated Deployment) |
1 | |||
 Hedgehog (Initial Model) |
1 | 1 (★2) | ||

Branching Table
| E-1 Branching Rules | ||
|---|---|---|
| Nodes | Rules | |
A |
B |
Choose your own adventure! |
D | ||
C |
E |
|
F |
| |
E |
F |
|
G |
| |
F |
H |
|
I |
| |
G |
J |
Choose your own adventure! |
L | ||
I |
K |
|
N |
| |
L |
O |
Meet ANY of the following conditions
|
P |
Doesn't meet the requirements for O | |
P |
Q |
|
R |
| |
Branching compositions were reported over the course of the event. (NGA and KCNav)
The event guides are to be constructed through the respective Event map page guide and reviewed by editor staff / collaboration committee before being approved here. Do not under any circumstance update the guides through this page or attempt to fix them through this page. Please only update guides through their respective sandbox pages.
Ship Bonuses (Tentative)
DISCLAIMER: This information is based on user submitted data and is subject to revisions as more data is gathered. Any version of the ship receives the bonus regardless of remodel.
Ship Bonuses
| Ships | Map-wide | Node N | Nodes J, M, P, R | ||
|---|---|---|---|---|---|
| 1.1x | 1.26x | 1.26x | |||
| - | - | ||||
| 1.1x | |||||
| Other Coastal Defense Ships (DE) | |||||
| - | 1.48x(?) | ||||
| - | - | 1.35x | |||
| - | - | 1.26x | |||
| Historical ships also receive a 1.1x bonus to accuracy and evasion on this map | |||||
| German Escort Princess Modifiers
| |
|---|---|
Kongou-class   
|
1.15x |
| 1.2x | |
|
1.38x |
| 1.3x | |
| 1.45x | |
| 1.4x | |
| 2.25x | |
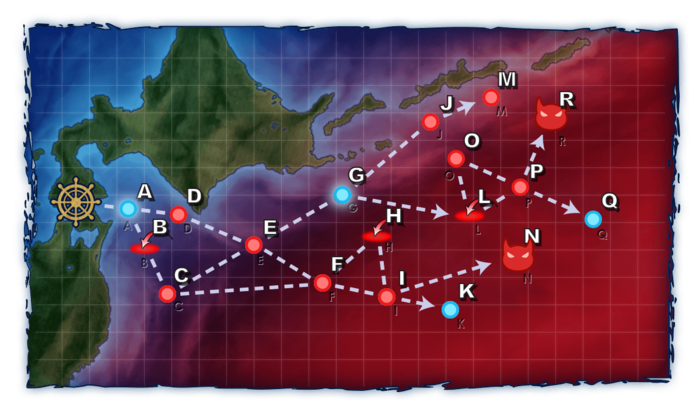
Map Overview
This map is relatively easy and can be done with a decently trained fleet and a good variety of equipment. Below is the key information you need to know about the map:
- There are no ship locks and LBAS for this map
- All fleet used in this map are Single Fleet
- Node M requirement for unlocking for Phase 2 can be done at any time within Phase 1.
- Saury fish can be dropped on nodes: I, J, M, N, P, and R
Phase 1: Defeat the Ru-Class Battleship at N
You fleet will mainly be traveling to the bottom boss node N to fight off against Ru-class BBs. Most fights will have you go through subs, small surface fights and some carriers.
Since this section allows for many different working compositions below will be listed some of the key ones that can bring out the best impact for your fleet for this phase.
- Note: North Composition: A -> D and South Composition: A -> B
- Both the North and South Composition allows you to pack fishing equipment and enough firepower to deal with the Boss Node.
- Composition: 0-1 FBB, 1-2 CVL, 0-1 CA(V), 0-1 AV, 2-3 DD (FAST)
- Route: 1 A B C F I N
- Note:Default Slow Fleet will take you to an extra node: E
- Speed modding will not avoid E
- Composition: 0-1 BB(V), 1-2 CVL, 0-1 CV, 1-2 CA/CL(T), 0-2 DD (FAST)
- Route: 1 A D E F I N
- If you use a heavy fleet, use this route.
- Avoid using a combination of 1 CL + 2 DD in your fleet to prevent routing to Node G unless you intend to visit Node M.
- Alternative route if you want to avoid the air raid node.
- Composition: 6 (F)BB(V) + CV(L)(B) (FAST+)
- Route: 1 A D E F I N
- Will ignore all branching rules that would cause you to travel through extra nodes.
- Highly expensive fleet that will allow you to bring a very heavy fleet to the boss node.
- With certain gear you can consider fishing, but be aware of equipment limitations due to your turbine + Boiler set ups.
- Composition: 6 SS (FAST+)
- Route: 1 A D E F I N
- Will ignore all branching rules that would cause you to travel through extra nodes.
- Cheapest composition but very hard to fish due to lack of fishing equipment brought for the fleet.
- Not recommended as it runs into a high risk of getting severely damage from depth charge attacks lacks proper damage.
Phase 0.5/1.5: Unlock Node R
- Note: This phase can be done at any point in Phase 1.
- A+ Rank is needed for ALL DIFFICULTIES for node M
- Composition: 0-1 FBB, 1-2 CVL, 0-1 CA(V), 0-1 CL, 2-3 DD
- Route: A D E G J M
- 1 CL + 2 DD is required to route this path
- Composition: 1 (F)BB, 1-2 CV(L), 0-1 CA(V),2 CLT 1 CL
- Fleet must be fast to route this path.
Once you complete these conditions, the next route leading to the final boss will be unlocked.
Phase 2: Eliminate German Escort Princess at R
In this phase, you will be up against the German Escort Princess who will come with a sizable amount of air power. While her fleet may be difficult to AS, it is still very possible to beat her even under AP as long as you bring equipment that can exploit her weakness. Below is some methods that can be used to effectively do this.
- Boss Note: The boss is weak against dive-bombers. Having 2 or more Dive-bombers on CV(L/B) setups will be able to one-shot the boss.
- Type 3 Shell on BB can also be used to help kill the Escort Princess more quickly.
- Ise-class Kai Ni can use both dive bombers and type 3 shells allowing for her to do heavy damage that can potentially kill the princess.
- This method can be effective for farming on post clear as there will be less air power to deal with.
- While not entirely necessary, boss support can be considered if your fleet needs an edge in the battle.
| Boss Air-Power | AP | AS | AS+ |
|---|---|---|---|
| Hard | 248 | 557 | 1113 |
| Medium | 170 | 383 | 765 |
| Easy | 154 | 347 | 693 |
| Casual | 154 | 347 | 693 |
- 1-2FBB, 0-1 CV(L), 0-1 CA(V), 1 CL, 2-3 DD
- Route: 1 A D E G L P R
- A minimum of 1 CL + 2 DD in the fleet is required for taking this route.
- Focuses on Night Battle attack
- CV(L) should be focused on trying to meet the air-power requirement at the boss.
- 1-2 CV(B), 1-2(F)BB(V), 1 CL, 2 DD
- Route: 1 A D E G L P R
- A minimum of 1 CL + 2 DD in the fleet is required for taking this route.
- A BBV can be used here to provide extra firepower
- A maximum of 2 CV(L/B) and 1 (F)BB(V) can be used in the fleet.
Fishing on the Event map
Since there are key fishing points in nodes I, J, M, N, P, and R. You can use this opportunity to catch fish while you play the event map.
This map has a very high yield of fish so bring a decent amount of fishing gear while maintaining your combat strength to maximize your overall fishing and combat performance (earning up to 2 fish per run).
For more tips on how to do this please review the Naval District Saury Festival page.
Enemy Compositions
| # | Selection Node | ||
|---|---|---|---|
| A | 艦隊の針路を選択できます。提督、どちらの針路をとられますか? You can decide the fleet's course. Admiral, which heading should we take? | ||
| # | Selection Node | ||
| # | Formation | Air Defense Node | AD/AP AS/AS+ |
|---|---|---|---|
| B | Diamond Phases: 1, 2 |
24/47 104/207 | |
| Diamond Phases: 1, 2 |
26/52 116/231 | ||
| Diamond Phases: 1 |
52/103 231/462 | ||
| # | Formation | Air Defense Node | AD/AP AS/AS+ |
| # | Formation | Normal Battle Node | AD/AP AS/AS+ |
|---|---|---|---|
| C | Line Ahead Double Line Phases: 1, 2 |
0/0 0/0 | |
| Line Ahead Phases: 1 |
0/0 0/0 | ||
| # | Formation | Normal Battle Node | AD/AP AS/AS+ |
| # | Formation | Normal Battle Node | AD/AP AS/AS+ |
|---|---|---|---|
| D | Echelon Line Abreast Phases: 1, 2 |
0/0 0/0 | |
| Echelon Line Abreast Phases: 1, 2 |
0/0 0/0 | ||
| Echelon Line Abreast Phases: 1, 2 |
0/0 0/0 | ||
| # | Formation | Normal Battle Node | AD/AP AS/AS+ |
| # | Formation | Normal Battle Node | AD/AP AS/AS+ |
|---|---|---|---|
| E | Line Ahead Echelon Phases: 1, 2 |
0/0 0/0 | |
| Line Ahead Phases: 2 |
0/0 0/0 | ||
| # | Formation | Normal Battle Node | AD/AP AS/AS+ |
| # | Formation | Normal Battle Node | AD/AP AS/AS+ |
|---|---|---|---|
| F | Echelon Line Abreast Phases: 1, 2 |
0/0 0/0 | |
| Echelon Line Abreast Phases: 1, 2 |
0/0 0/0 | ||
| Echelon Line Abreast Phases: 1, 2 |
0/0 0/0 | ||
| # | Formation | Normal Battle Node | AD/AP AS/AS+ |
| # | Selection Node | ||
|---|---|---|---|
| G | 艦隊の針路を選択できます。提督、どちらの針路をとられますか? You can decide the fleet's course. Admiral, which heading should we take? | ||
| # | Selection Node | ||
| # | Formation | Air Defense Node | AD/AP AS/AS+ |
|---|---|---|---|
| H | Diamond Phases: 1, 2 |
24/47 104/207 | |
| Diamond Phases: 1, 2 |
26/52 116/231 | ||
| Diamond Phases: 1 |
52/103 231/462 | ||
| # | Formation | Air Defense Node | AD/AP AS/AS+ |
| # | Formation | Normal Battle Node | AD/AP AS/AS+ |
|---|---|---|---|
| I | Diamond Phases: 1, 2 |
24/47 104/207 | |
| Diamond Phases: 1, 2 |
26/52 116/231 | ||
| Diamond Phases: 1 |
52/103 231/462 | ||
| # | Formation | Normal Battle Node | AD/AP AS/AS+ |
| # | Formation | Normal Battle Node | AD/AP AS/AS+ |
|---|---|---|---|
| J | Line Ahead Echelon Vanguard Phases: 1, 2 |
0/0 0/0 | |
| # | Formation | Normal Battle Node | AD/AP AS/AS+ |
| # | Empty Node | ||
|---|---|---|---|
| K | 敵影を見ず。 No enemy spotted. | ||
| # | Empty Node | ||
| # | Formation | Air Defense Node | AD/AP AS/AS+ |
|---|---|---|---|
| L | Diamond Phases: 1, 2 |
124/248 557/1113 | |
| Diamond Phases: 2 |
87/173 387/774 | ||
| Diamond Phases: 2 |
115/230 516/1032 | ||
| # | Formation | Air Defense Node | AD/AP AS/AS+ |
| # | Formation | Normal Battle Node | AD/AP AS/AS+ |
|---|---|---|---|
| M | Line Ahead Phases: 1, 2 |
25/49 108/216 | |
| Line Ahead Phases: 1, 2 |
25/49 108/216 | ||
| Line Ahead Phases: 1, 2 |
25/49 108/216 | ||
| # | Formation | Normal Battle Node | AD/AP AS/AS+ |
| # | Formation | Boss Battle Node | AD/AP AS/AS+ |
|---|---|---|---|
| N | Line Ahead Double Line Phases: 1, 2 |
0/0 0/0 | |
| Line Ahead Phases: 1 (Final)
|
0/0 0/0 | ||
| # | Formation | Boss Battle Node | AD/AP AS/AS+ |
| # | Formation | Normal Battle Node | AD/AP AS/AS+ |
|---|---|---|---|
| O | Echelon Line Abreast Phases: 2 |
0/0 0/0 | |
| Echelon Line Abreast Phases: 2 |
0/0 0/0 | ||
| Echelon Line Abreast Phases: 2 |
0/0 0/0 | ||
| # | Formation | Normal Battle Node | AD/AP AS/AS+ |
| # | Formation | Normal Battle Node | AD/AP AS/AS+ |
|---|---|---|---|
| P | Line Ahead Double Line Vanguard Phases: 2 |
0/0 0/0 | |
| # | Formation | Normal Battle Node | AD/AP AS/AS+ |
| # | Empty Node | ||
|---|---|---|---|
| Q | 敵影を見ず。 No enemy spotted. | ||
| # | Empty Node | ||
| # | Formation | Boss Battle Node | AD/AP AS/AS+ |
|---|---|---|---|
| R | Diamond Phases: 2 |
124/248 557/1113 | |
| Diamond Phases: 2 |
87/173 387/774 | ||
| Diamond Phases: 2 (Final)
|
115/230 516/1032 | ||
| # | Formation | Boss Battle Node | AD/AP AS/AS+ |
| # | Selection Node | ||
|---|---|---|---|
| A | 艦隊の針路を選択できます。提督、どちらの針路をとられますか? You can decide the fleet's course. Admiral, which heading should we take? | ||
| # | Selection Node | ||
| # | Formation | Air Defense Node | AD/AP AS/AS+ |
|---|---|---|---|
| B | Diamond Phases: 1, 2 |
24/47 104/207 | |
| Diamond Phases: 1, 2 |
24/47 104/207 | ||
| Diamond Phases: 1 |
47/93 207/414 | ||
| # | Formation | Air Defense Node | AD/AP AS/AS+ |
| # | Formation | Normal Battle Node | AD/AP AS/AS+ |
|---|---|---|---|
| C | Line Ahead Double Line Phases: 1, 2 |
0/0 0/0 | |
| Line Ahead Phases: 1 |
0/0 0/0 | ||
| # | Formation | Normal Battle Node | AD/AP AS/AS+ |
| # | Formation | Normal Battle Node | AD/AP AS/AS+ |
|---|---|---|---|
| D | Echelon Line Abreast Phases: 1, 2 |
0/0 0/0 | |
| Echelon Line Abreast Phases: 1, 2 |
0/0 0/0 | ||
| Echelon Line Abreast Phases: 1, 2 |
0/0 0/0 | ||
| # | Formation | Normal Battle Node | AD/AP AS/AS+ |
| # | Formation | Normal Battle Node | AD/AP AS/AS+ |
|---|---|---|---|
| E | Line Ahead Echelon Phases: 1, 2 |
0/0 0/0 | |
| Line Ahead Phases: 2 |
0/0 0/0 | ||
| # | Formation | Normal Battle Node | AD/AP AS/AS+ |
| # | Formation | Normal Battle Node | AD/AP AS/AS+ |
|---|---|---|---|
| F | Echelon Line Abreast Phases: 1, 2 |
0/0 0/0 | |
| Echelon Line Abreast Phases: 1, 2 |
0/0 0/0 | ||
| Echelon Line Abreast Phases: 1, 2 |
0/0 0/0 | ||
| # | Formation | Normal Battle Node | AD/AP AS/AS+ |
| # | Selection Node | ||
|---|---|---|---|
| G | 艦隊の針路を選択できます。提督、どちらの針路をとられますか? You can decide the fleet's course. Admiral, which heading should we take? | ||
| # | Selection Node | ||
| # | Formation | Air Defense Node | AD/AP AS/AS+ |
|---|---|---|---|
| H | Diamond Phases: 1, 2 |
24/47 104/207 | |
| Diamond Phases: 1, 2 |
24/47 104/207 | ||
| Diamond Phases: 1 |
47/93 207/414 | ||
| # | Formation | Air Defense Node | AD/AP AS/AS+ |
| # | Formation | Normal Battle Node | AD/AP AS/AS+ |
|---|---|---|---|
| I | Diamond Phases: 1, 2 |
24/47 104/207 | |
| Diamond Phases: 1, 2 |
24/47 104/207 | ||
| Diamond Phases: 1 |
47/93 207/414 | ||
| # | Formation | Normal Battle Node | AD/AP AS/AS+ |
| # | Formation | Normal Battle Node | AD/AP AS/AS+ |
|---|---|---|---|
| J | Line Ahead Echelon Vanguard Phases: 1, 2 |
0/0 0/0 | |
| # | Formation | Normal Battle Node | AD/AP AS/AS+ |
| # | Empty Node | ||
|---|---|---|---|
| K | 敵影を見ず。 No enemy spotted. | ||
| # | Empty Node | ||
| # | Formation | Air Defense Node | AD/AP AS/AS+ |
|---|---|---|---|
| L | Diamond Phases: 1, 2 |
86/171 383/765 | |
| Diamond Phases: 2 |
82/164 368/735 | ||
| Diamond Phases: 2 |
124/248 557/1113 | ||
| # | Formation | Air Defense Node | AD/AP AS/AS+ |
| # | Formation | Normal Battle Node | AD/AP AS/AS+ |
|---|---|---|---|
| M | Line Ahead Phases: 1, 2 |
8/15 33/66 | |
| Line Ahead Phases: 1, 2 |
8/15 33/66 | ||
| Line Ahead Phases: 1, 2 |
8/15 33/66 | ||
| # | Formation | Normal Battle Node | AD/AP AS/AS+ |
| # | Formation | Boss Battle Node | AD/AP AS/AS+ |
|---|---|---|---|
| N | Line Ahead Double Line Phases: 1, 2 |
0/0 0/0 | |
| Line Ahead Phases: 1 (Final)
|
0/0 0/0 | ||
| # | Formation | Boss Battle Node | AD/AP AS/AS+ |
| # | Formation | Normal Battle Node | AD/AP AS/AS+ |
|---|---|---|---|
| O | Echelon Line Abreast Phases: 2 |
0/0 0/0 | |
| Echelon Line Abreast |
0/0 0/0 | ||
| Echelon Line Abreast Phases: 2 |
0/0 0/0 | ||
| # | Formation | Normal Battle Node | AD/AP AS/AS+ |
| # | Formation | Normal Battle Node | AD/AP AS/AS+ |
|---|---|---|---|
| P | Line Ahead Double Line Vanguard Phases: 2 |
0/0 0/0 | |
| # | Formation | Normal Battle Node | AD/AP AS/AS+ |
| # | Empty Node | ||
|---|---|---|---|
| Q | 敵影を見ず。 No enemy spotted. | ||
| # | Empty Node | ||
| # | Formation | Boss Battle Node | AD/AP AS/AS+ |
|---|---|---|---|
| R | Diamond Phases: 2 |
86/171 383/765 | |
| Diamond Phases: 2 |
82/164 368/735 | ||
| Diamond Phases: 2 (Final)
|
124/248 557/1113 | ||
| # | Formation | Boss Battle Node | AD/AP AS/AS+ |
| # | Selection Node | ||
|---|---|---|---|
| A | 艦隊の針路を選択できます。提督、どちらの針路をとられますか? You can decide the fleet's course. Admiral, which heading should we take? | ||
| # | Selection Node | ||
| # | Formation | Air Defense Node | AD/AP AS/AS+ |
|---|---|---|---|
| B | Diamond Phases: 1, 2 |
9/17 36/72 | |
| Diamond Phases: 1, 2 |
24/47 104/207 | ||
| Diamond Phases: 1 |
32/63 140/279 | ||
| # | Formation | Air Defense Node | AD/AP AS/AS+ |
| # | Formation | Normal Battle Node | AD/AP AS/AS+ |
|---|---|---|---|
| C | Line Ahead Double Line Phases: 1, 2 |
0/0 0/0 | |
| Line Ahead Phases: 1 |
0/0 0/0 | ||
| # | Formation | Normal Battle Node | AD/AP AS/AS+ |
| # | Formation | Normal Battle Node | AD/AP AS/AS+ |
|---|---|---|---|
| D | Echelon Line Abreast Phases: 1, 2 |
0/0 0/0 | |
| Echelon Line Abreast Phases: 1, 2 |
0/0 0/0 | ||
| Echelon Line Abreast Phases: 1, 2 |
0/0 0/0 | ||
| # | Formation | Normal Battle Node | AD/AP AS/AS+ |
| # | Formation | Normal Battle Node | AD/AP AS/AS+ |
|---|---|---|---|
| E | Line Ahead Echelon Phases: 1, 2 |
0/0 0/0 | |
| Line Ahead Phases: 2 |
0/0 0/0 | ||
| # | Formation | Normal Battle Node | AD/AP AS/AS+ |
| # | Formation | Normal Battle Node | AD/AP AS/AS+ |
|---|---|---|---|
| F | Echelon Line Abreast Phases: 1, 2 |
0/0 0/0 | |
| Echelon Line Abreast Phases: 1, 2 |
0/0 0/0 | ||
| Echelon Line Abreast Phases: 1, 2 |
0/0 0/0 | ||
| # | Formation | Normal Battle Node | AD/AP AS/AS+ |
| # | Selection Node | ||
|---|---|---|---|
| G | 艦隊の針路を選択できます。提督、どちらの針路をとられますか? You can decide the fleet's course. Admiral, which heading should we take? | ||
| # | Selection Node | ||
| # | Formation | Air Defense Node | AD/AP AS/AS+ |
|---|---|---|---|
| H | Diamond Phases: 1, 2 |
9/17 36/72 | |
| Diamond Phases: 1, 2 |
24/47 104/207 | ||
| Diamond Phases: 1 |
32/63 140/279 | ||
| # | Formation | Air Defense Node | AD/AP AS/AS+ |
| # | Formation | Normal Battle Node | AD/AP AS/AS+ |
|---|---|---|---|
| I | Diamond Phases: 1, 2 |
9/17 36/72 | |
| Diamond Phases: 1, 2 |
24/47 104/207 | ||
| Diamond Phases: 1 |
32/63 140/279 | ||
| # | Formation | Normal Battle Node | AD/AP AS/AS+ |
| # | Formation | Normal Battle Node | AD/AP AS/AS+ |
|---|---|---|---|
| J | Line Ahead Echelon Vanguard Phases: 1, 2 |
0/0 0/0 | |
| # | Formation | Normal Battle Node | AD/AP AS/AS+ |
| # | Empty Node | ||
|---|---|---|---|
| K | 敵影を見ず。 No enemy spotted. | ||
| # | Empty Node | ||
| # | Formation | Air Defense Node | AD/AP AS/AS+ |
|---|---|---|---|
| L | Diamond Phases: 1, 2 |
78/155 347/693 | |
| Diamond Phases: 2 |
48/96 215/429 | ||
| Diamond Phases: 2 |
90/180 404/807 | ||
| # | Formation | Air Defense Node | AD/AP AS/AS+ |
| # | Formation | Normal Battle Node | AD/AP AS/AS+ |
|---|---|---|---|
| M | Line Ahead Phases: 1, 2 |
8/15 33/66 | |
| Line Ahead Phases: 1, 2 |
8/15 33/66 | ||
| Line Ahead Phases: 1, 2 |
8/15 33/66 | ||
| # | Formation | Normal Battle Node | AD/AP AS/AS+ |
| # | Formation | Boss Battle Node | AD/AP AS/AS+ |
|---|---|---|---|
| N | Line Ahead Double Line Phases: 1, 2 |
0/0 0/0 | |
| Line Ahead Phases: 1 (Final)
|
0/0 0/0 | ||
| # | Formation | Boss Battle Node | AD/AP AS/AS+ |
| # | Formation | Normal Battle Node | AD/AP AS/AS+ |
|---|---|---|---|
| O | Echelon Line Abreast Phases: 2 |
0/0 0/0 | |
| Echelon Line Abreast Phases: 2 |
0/0 0/0 | ||
| Echelon Line Abreast Phases: 2 |
0/0 0/0 | ||
| # | Formation | Normal Battle Node | AD/AP AS/AS+ |
| # | Formation | Normal Battle Node | AD/AP AS/AS+ |
|---|---|---|---|
| P | Line Ahead Double Line Vanguard Phases: 2 |
0/0 0/0 | |
| # | Formation | Normal Battle Node | AD/AP AS/AS+ |
| # | Empty Node | ||
|---|---|---|---|
| Q | 敵影を見ず。 No enemy spotted. | ||
| # | Empty Node | ||
| # | Formation | Boss Battle Node | AD/AP AS/AS+ |
|---|---|---|---|
| R | Diamond Phases: 2 |
78/155 347/693 | |
| Diamond Phases: 2 |
48/96 215/429 | ||
| Diamond Phases: 2 (Final)
|
90/180 404/807 | ||
| # | Formation | Boss Battle Node | AD/AP AS/AS+ |
| # | Selection Node | ||
|---|---|---|---|
| A | 艦隊の針路を選択できます。提督、どちらの針路をとられますか? You can decide the fleet's course. Admiral, which heading should we take? | ||
| # | Selection Node | ||
| # | Formation | Air Defense Node | AD/AP AS/AS+ |
|---|---|---|---|
| B | Diamond Phases: 1, 2 |
9/17 36/72 | |
| Diamond Phases: 1, 2 |
9/17 36/72 | ||
| Diamond Phases: 1 |
24/47 104/207 | ||
| # | Formation | Air Defense Node | AD/AP AS/AS+ |
| # | Formation | Normal Battle Node | AD/AP AS/AS+ |
|---|---|---|---|
| C | Line Ahead Double Line Phases: 1, 2 |
0/0 0/0 | |
| Line Ahead Phases: 1 |
0/0 0/0 | ||
| # | Formation | Normal Battle Node | AD/AP AS/AS+ |
| # | Formation | Normal Battle Node | AD/AP AS/AS+ |
|---|---|---|---|
| D | Echelon Line Abreast Phases: 1, 2 |
0/0 0/0 | |
| Echelon Line Abreast Phases: 1, 2 |
0/0 0/0 | ||
| # | Formation | Normal Battle Node | AD/AP AS/AS+ |
| # | Formation | Normal Battle Node | AD/AP AS/AS+ |
|---|---|---|---|
| E | Line Ahead Echelon Phases: 1, 2 |
0/0 0/0 | |
| Line Ahead Phases: 2 |
0/0 0/0 | ||
| # | Formation | Normal Battle Node | AD/AP AS/AS+ |
| # | Formation | Normal Battle Node | AD/AP AS/AS+ |
|---|---|---|---|
| F | Echelon Line Abreast Phases: 1, 2 |
0/0 0/0 | |
| Echelon Line Abreast Phases: 1, 2 |
0/0 0/0 | ||
| # | Formation | Normal Battle Node | AD/AP AS/AS+ |
| # | Selection Node | ||
|---|---|---|---|
| G | 艦隊の針路を選択できます。提督、どちらの針路をとられますか? You can decide the fleet's course. Admiral, which heading should we take? | ||
| # | Selection Node | ||
| # | Formation | Air Defense Node | AD/AP AS/AS+ |
|---|---|---|---|
| H | Diamond Phases: 1, 2 |
9/17 36/72 | |
| Diamond Phases: 1, 2 |
9/17 36/72 | ||
| Diamond | 24/47 104/207 | ||
| # | Formation | Air Defense Node | AD/AP AS/AS+ |
| # | Formation | Normal Battle Node | AD/AP AS/AS+ |
|---|---|---|---|
| I | Diamond Phases: 1, 2 |
9/17 36/72 | |
| Diamond Phases: 1, 2 |
9/17 36/72 | ||
| Diamond Phases: 1 |
24/47 104/207 | ||
| # | Formation | Normal Battle Node | AD/AP AS/AS+ |
| # | Formation | Normal Battle Node | AD/AP AS/AS+ |
|---|---|---|---|
| J | Line Ahead Echelon Vanguard Phases: 1, 2 |
0/0 0/0 | |
| # | Formation | Normal Battle Node | AD/AP AS/AS+ |
| # | Empty Node | ||
|---|---|---|---|
| K | 敵影を見ず。 No enemy spotted. | ||
| # | Empty Node | ||
| # | Formation | Air Defense Node | AD/AP AS/AS+ |
|---|---|---|---|
| L | Diamond Phases: 1, 2 |
44/87 194/387 | |
| Diamond Phases: 2 |
40/80 179/357 | ||
| Diamond Phases: 2 |
82/164 368/735 | ||
| # | Formation | Air Defense Node | AD/AP AS/AS+ |
| # | Formation | Normal Battle Node | AD/AP AS/AS+ |
|---|---|---|---|
| M | Line Ahead Phases: 1, 2 |
8/15 33/66 | |
| Line Ahead Phases: 1, 2 |
8/15 33/66 | ||
| Line Ahead Phases: 1, 2 |
8/15 33/66 | ||
| # | Formation | Normal Battle Node | AD/AP AS/AS+ |
| # | Formation | Boss Battle Node | AD/AP AS/AS+ |
|---|---|---|---|
| N | Line Ahead Double Line Phases: 1, 2 |
0/0 0/0 | |
| Line Ahead Phases: 1 (Final)
|
0/0 0/0 | ||
| # | Formation | Boss Battle Node | AD/AP AS/AS+ |
| # | Formation | Normal Battle Node | AD/AP AS/AS+ |
|---|---|---|---|
| O | Echelon Line Abreast Phases: 2 |
0/0 0/0 | |
| Echelon Line Abreast Phases: 2 |
0/0 0/0 | ||
| # | Formation | Normal Battle Node | AD/AP AS/AS+ |
| # | Formation | Normal Battle Node | AD/AP AS/AS+ |
|---|---|---|---|
| P | Line Ahead Double Line Vanguard Phases: 2 |
0/0 0/0 | |
| # | Formation | Normal Battle Node | AD/AP AS/AS+ |
| # | Empty Node | ||
|---|---|---|---|
| Q | 敵影を見ず。 No enemy spotted. | ||
| # | Empty Node | ||
| # | Formation | Boss Battle Node | AD/AP AS/AS+ |
|---|---|---|---|
| R | Diamond Phases: 2 |
44/87 194/387 | |
| Diamond Phases: 2 |
40/80 179/357 | ||
| Diamond Phases: 2 (Final)
|
82/164 368/735 | ||
| # | Formation | Boss Battle Node | AD/AP AS/AS+ |
Ship Drops
| Ship drops | |||||||||||||||||||||||||||||||||||||||||||||||||||||||||||||||||||||||||||||||||||||||||||||||||||
|---|---|---|---|---|---|---|---|---|---|---|---|---|---|---|---|---|---|---|---|---|---|---|---|---|---|---|---|---|---|---|---|---|---|---|---|---|---|---|---|---|---|---|---|---|---|---|---|---|---|---|---|---|---|---|---|---|---|---|---|---|---|---|---|---|---|---|---|---|---|---|---|---|---|---|---|---|---|---|---|---|---|---|---|---|---|---|---|---|---|---|---|---|---|---|---|---|---|---|---|
| Type | Ship? | I | J | M | N | P | R | ||||||||||||||||||||||||||||||||||||||||||||||||||||||||||||||||||||||||||||||||||||||||||||
| DE | Shimushu | Casual+ | |||||||||||||||||||||||||||||||||||||||||||||||||||||||||||||||||||||||||||||||||||||||||||||||||
| DE | Kunashiri | Casual+ | |||||||||||||||||||||||||||||||||||||||||||||||||||||||||||||||||||||||||||||||||||||||||||||||||
| DE | Hachijou | Easy+ | |||||||||||||||||||||||||||||||||||||||||||||||||||||||||||||||||||||||||||||||||||||||||||||||||
| DE | Etorofu | Casual+ | |||||||||||||||||||||||||||||||||||||||||||||||||||||||||||||||||||||||||||||||||||||||||||||||||
| DE | Fukae | Easy+ | |||||||||||||||||||||||||||||||||||||||||||||||||||||||||||||||||||||||||||||||||||||||||||||||||
| DD | Uzuki | Easy+ | Casual+ | Casual+ | Casual+ | Casual+ | |||||||||||||||||||||||||||||||||||||||||||||||||||||||||||||||||||||||||||||||||||||||||||||
| DD | Usugumo | Casual+ | |||||||||||||||||||||||||||||||||||||||||||||||||||||||||||||||||||||||||||||||||||||||||||||||||
| DD | Uranami | Easy+ | Casual+ | Casual+ | Casual+ | ||||||||||||||||||||||||||||||||||||||||||||||||||||||||||||||||||||||||||||||||||||||||||||||
| DD | Amagiri | Hard+ | Casual+ | Casual+ | Casual+ | Casual+ | |||||||||||||||||||||||||||||||||||||||||||||||||||||||||||||||||||||||||||||||||||||||||||||
| DD | Sagiri | Medium+ | Casual+ | Casual+ | Casual+ | Casual+ | |||||||||||||||||||||||||||||||||||||||||||||||||||||||||||||||||||||||||||||||||||||||||||||
| DD | Oyashio | Casual+ | |||||||||||||||||||||||||||||||||||||||||||||||||||||||||||||||||||||||||||||||||||||||||||||||||
| CVL | Kasuga Maru | Casual+ | |||||||||||||||||||||||||||||||||||||||||||||||||||||||||||||||||||||||||||||||||||||||||||||||||
| CVL | Shinyou | Casual+ | |||||||||||||||||||||||||||||||||||||||||||||||||||||||||||||||||||||||||||||||||||||||||||||||||
| SS | Maruyu | Casual+ | |||||||||||||||||||||||||||||||||||||||||||||||||||||||||||||||||||||||||||||||||||||||||||||||||
| AV | Mizuho | Casual+ | Medium+ | Medium+ | |||||||||||||||||||||||||||||||||||||||||||||||||||||||||||||||||||||||||||||||||||||||||||||||
| AV | Commandant Teste | Casual+ | |||||||||||||||||||||||||||||||||||||||||||||||||||||||||||||||||||||||||||||||||||||||||||||||||
| AS | Chougei | Casual+ | |||||||||||||||||||||||||||||||||||||||||||||||||||||||||||||||||||||||||||||||||||||||||||||||||
| AO | Kamoi | Casual+ | Hard+ | Hard+ | |||||||||||||||||||||||||||||||||||||||||||||||||||||||||||||||||||||||||||||||||||||||||||||||
| AO | Souya | Medium+ | Casual+ | ||||||||||||||||||||||||||||||||||||||||||||||||||||||||||||||||||||||||||||||||||||||||||||||||
| DD | Yukikaze | Casual+ | |||||||||||||||||||||||||||||||||||||||||||||||||||||||||||||||||||||||||||||||||||||||||||||||||
| CL | Kitakami | Casual+ | |||||||||||||||||||||||||||||||||||||||||||||||||||||||||||||||||||||||||||||||||||||||||||||||||
| CL | Ooi | Casual+ | |||||||||||||||||||||||||||||||||||||||||||||||||||||||||||||||||||||||||||||||||||||||||||||||||
| CL | Nagara | Casual+ | |||||||||||||||||||||||||||||||||||||||||||||||||||||||||||||||||||||||||||||||||||||||||||||||||
| CL | Kinu | Medium+ | Casual+ | Casual+ | Casual+ | ||||||||||||||||||||||||||||||||||||||||||||||||||||||||||||||||||||||||||||||||||||||||||||||
| CL | Abukuma | Hard+ | Casual+ | Casual+ | Easy+ | ||||||||||||||||||||||||||||||||||||||||||||||||||||||||||||||||||||||||||||||||||||||||||||||
| CL | Sendai | Casual+ | Casual+ | Casual+ | Casual+ | Casual+ | Casual+ | ||||||||||||||||||||||||||||||||||||||||||||||||||||||||||||||||||||||||||||||||||||||||||||
| CA | Myoukou | Casual+ | |||||||||||||||||||||||||||||||||||||||||||||||||||||||||||||||||||||||||||||||||||||||||||||||||
| CA | Atago | Casual+ | |||||||||||||||||||||||||||||||||||||||||||||||||||||||||||||||||||||||||||||||||||||||||||||||||
| CA | Suzuya | Casual+ | |||||||||||||||||||||||||||||||||||||||||||||||||||||||||||||||||||||||||||||||||||||||||||||||||
| CA | Kumano | Casual+ | |||||||||||||||||||||||||||||||||||||||||||||||||||||||||||||||||||||||||||||||||||||||||||||||||
| FBB | Kongou | Easy+ | Hard+ | Hard+ | Casual+ | ||||||||||||||||||||||||||||||||||||||||||||||||||||||||||||||||||||||||||||||||||||||||||||||
| FBB | Hiei | Casual+ | Hard+ | Medium+ | Casual+ | ||||||||||||||||||||||||||||||||||||||||||||||||||||||||||||||||||||||||||||||||||||||||||||||
| FBB | Haruna | Casual+ | Casual+ | ||||||||||||||||||||||||||||||||||||||||||||||||||||||||||||||||||||||||||||||||||||||||||||||||
| FBB | Kirishima | Medium+ | Casual+ | ||||||||||||||||||||||||||||||||||||||||||||||||||||||||||||||||||||||||||||||||||||||||||||||||
| BB | Fusou | Casual+ | |||||||||||||||||||||||||||||||||||||||||||||||||||||||||||||||||||||||||||||||||||||||||||||||||
| BB | Yamashiro | Casual+ | |||||||||||||||||||||||||||||||||||||||||||||||||||||||||||||||||||||||||||||||||||||||||||||||||
| BB | Ise | Casual+ | |||||||||||||||||||||||||||||||||||||||||||||||||||||||||||||||||||||||||||||||||||||||||||||||||
| BB | Hyuuga | Casual+ | |||||||||||||||||||||||||||||||||||||||||||||||||||||||||||||||||||||||||||||||||||||||||||||||||
| BB | Nagato | Casual+ | Easy+ | Easy+ | Casual+ | ||||||||||||||||||||||||||||||||||||||||||||||||||||||||||||||||||||||||||||||||||||||||||||||
| BB | Mutsu | Casual+ | |||||||||||||||||||||||||||||||||||||||||||||||||||||||||||||||||||||||||||||||||||||||||||||||||
| CV | Shoukaku | Easy+ | |||||||||||||||||||||||||||||||||||||||||||||||||||||||||||||||||||||||||||||||||||||||||||||||||
| CV | Zuikaku | Casual+ | |||||||||||||||||||||||||||||||||||||||||||||||||||||||||||||||||||||||||||||||||||||||||||||||||