- Welcome to the Kancolle Wiki!
- If you have any questions regarding site content, account registration, etc., please visit the KanColle Wiki Discord
Difference between revisions of "Summer 2022 Event/E-2/Enemy comps"
< Summer 2022 Event | E-2
Jump to navigation
Jump to search
(Created page with "<tabber> |-|Hard= {{Map/Image|page=Summer 2022 Event/E-2|{{Map/ImageNode|1|Hard|E-2|x=635|y=249}}{{Map/ImageNode|A|Hard|E-2|x=551|y=274}}{{Map/ImageNode|B|Hard|E-2|x=465|y=299...") |
|||
| Line 1: | Line 1: | ||
<tabber> | <tabber> | ||
|-|Hard= | |-|Hard= | ||
| − | {{Map/Image|page=Summer 2022 Event/E-2|{{Map/ImageNode|1|Hard|E-2|x=635|y=249}}{{Map/ImageNode|A|Hard|E-2|x=551|y=274}}{{Map/ImageNode|B|Hard|E-2|x=465|y=299}}{{Map/ImageNode|C|Hard|E-2|x=398|y=169}}{{Map/ImageNode|D|Hard|E-2|x=369|y=260|drops=<table class="wikitable"><tr><th>Type</th><th>Ships</th></tr><tr><th>DD</th><td>{{Ship/Banner|small=true|Fujinami}}{{Ship/Banner|small=true|Harusame}}{{Ship/Banner|small=true|Kawakaze}}<br> | + | {{Map/Image|page=Summer 2022 Event/E-2|{{Map/ImageNode|1|Hard|E-2|x=635|y=249}}{{Map/ImageNode|A|Hard|E-2|x=551|y=274}}{{Map/ImageNode|B|Hard|E-2|x=465|y=299}}{{Map/ImageNode|C|Hard|E-2|x=398|y=169}}{{Map/ImageNode|D|Hard|E-2|x=369|y=260|drops=<table class="wikitable"><tr><th>Type</th><th>Ships</th></tr><tr><th>DD</th><td>{{Ship/Banner|small=true|Fujinami}}{{Ship/Banner|small=true|Harusame}}{{Ship/Banner|small=true|Kawakaze}}<br>{{Ship/Banner|small=true|Kishinami}}{{Ship/Banner|small=true|Libeccio}}{{Ship/Banner|small=true|Umikaze}}<br>{{Ship/Banner|small=true|Yamakaze}}</td></tr></table>}}{{Map/ImageNode|E|Hard|E-2|x=337|y=180}}{{Map/ImageNode|F|Hard|E-2|x=332|y=136}}{{Map/ImageNode|G|Hard|E-2|x=295|y=129}}{{Map/ImageNode|H|Hard|E-2|x=273|y=191}}{{Map/ImageNode|I1|Hard|E-2|x=209|y=201}}{{Map/ImageNode|I|Hard|E-2|x=240|y=195|drops=<table class="wikitable"><tr><th>Type</th><th>Ships</th></tr><tr><th>DE</th><td>{{Ship/Banner|small=true|Kunashiri}}</td></tr><tr><th>DD</th><td>{{Ship/Banner|small=true|Amagiri}}{{Ship/Banner|small=true|Fujinami}}{{Ship/Banner|small=true|Harusame}}<br>{{Ship/Banner|small=true|Kawakaze}}{{Ship/Banner|small=true|Kishinami}}{{Ship/Banner|small=true|Libeccio}}<br>{{Ship/Banner|small=true|Sagiri}}{{Ship/Banner|small=true|Tanikaze}}{{Ship/Banner|small=true|Umikaze}}<br>{{Ship/Banner|small=true|Uranami}}{{Ship/Banner|small=true|Usugumo}}{{Ship/Banner|small=true|Yamakaze}}<br></td></tr></table>}}{{Map/ImageNode|J|Hard|E-2|x=206|y=229|drops=<table class="wikitable"><tr><th>Type</th><th>Ships</th></tr><tr><th>DE</th><td>{{Ship/Banner|small=true|Kunashiri}}</td></tr><tr><th>DD</th><td>{{Ship/Banner|small=true|Amagiri}}{{Ship/Banner|small=true|Fujinami}}{{Ship/Banner|small=true|Harusame}}<br>{{Ship/Banner|small=true|Kawakaze}}{{Ship/Banner|small=true|Kishinami}}{{Ship/Banner|small=true|Libeccio}}<br>{{Ship/Banner|small=true|Sagiri}}{{Ship/Banner|small=true|Tanikaze}}{{Ship/Banner|small=true|Umikaze}}<br>{{Ship/Banner|small=true|Uranami}}{{Ship/Banner|small=true|Usugumo}}{{Ship/Banner|small=true|Yamakaze}}<br></td></tr></table>}}{{Map/ImageNode|K|Hard|E-2|x=240|y=172|drops=<table class="wikitable"><tr><th>Type</th><th>Ships</th></tr><tr><th>DE</th><td>{{Ship/Banner|small=true|Kunashiri}}{{Ship/Banner|small=true|Shimushu}}</td></tr><tr><th>DD</th><td>{{Ship/Banner|small=true|Amagiri}}{{Ship/Banner|small=true|Fujinami}}{{Ship/Banner|small=true|Harusame}}<br>{{Ship/Banner|small=true|Kawakaze}}{{Ship/Banner|small=true|Kishinami}}{{Ship/Banner|small=true|Libeccio}}<br>{{Ship/Banner|small=true|Sagiri}}{{Ship/Banner|small=true|Tanikaze}}{{Ship/Banner|small=true|Umikaze}}<br>{{Ship/Banner|small=true|Uranami}}{{Ship/Banner|small=true|Usugumo}}{{Ship/Banner|small=true|Yamakaze}}<br></td></tr><tr><th>SSV</th><td>{{Ship/Banner|small=true|I-400}}</td></tr><tr><th>AS</th><td>{{Ship/Banner|small=true|Jingei}}{{Ship/Banner|small=true|Taigei}}</td></tr></table>}}{{Map/ImageNode|L|Hard|E-2|x=415|y=296}}{{Map/ImageNode|M|Hard|E-2|x=353|y=310}}{{Map/ImageNode|N|Hard|E-2|x=325|y=227}}{{Map/ImageNode|O|Hard|E-2|x=265|y=287|drops=<table class="wikitable"><tr><th>Type</th><th>Ships</th></tr><tr><th>DE</th><td>{{Ship/Banner|small=true|Kunashiri}}{{Ship/Banner|small=true|Shimushu}}</td></tr><tr><th>DD</th><td>{{Ship/Banner|small=true|Amagiri}}{{Ship/Banner|small=true|Fujinami}}{{Ship/Banner|small=true|Harusame}}<br>{{Ship/Banner|small=true|Kawakaze}}{{Ship/Banner|small=true|Kishinami}}{{Ship/Banner|small=true|Libeccio}}<br>{{Ship/Banner|small=true|Sagiri}}{{Ship/Banner|small=true|Tanikaze}}{{Ship/Banner|small=true|Umikaze}}<br>{{Ship/Banner|small=true|Uranami}}{{Ship/Banner|small=true|Usugumo}}{{Ship/Banner|small=true|Yamakaze}}<br></td></tr><tr><th>SSV</th><td>{{Ship/Banner|small=true|I-400}}</td></tr><tr><th>AS</th><td>{{Ship/Banner|small=true|Jingei}}{{Ship/Banner|small=true|Taigei}}</td></tr></table>}}{{Map/ImageNode|P1|Hard|E-2|x=516|y=109}}{{Map/ImageNode|P2|Hard|E-2|x=454|y=97}}{{Map/ImageNode|P|Hard|E-2|x=525|y=168}}{{Map/ImageNode|Q|Hard|E-2|x=411|y=119|drops=<table class="wikitable"><tr><th>Type</th><th>Ships</th></tr><tr><th>DD</th><td>{{Ship/Banner|small=true|Fujinami}}{{Ship/Banner|small=true|Harusame}}{{Ship/Banner|small=true|Kawakaze}}<br>{{Ship/Banner|small=true|Kishinami}}{{Ship/Banner|small=true|Libeccio}}{{Ship/Banner|small=true|Yamakaze}}<br></td></tr></table>}}{{Map/ImageNode|R|Hard|E-2|x=172|y=242}}{{Map/ImageNode|Start 2|Hard|E-2|x=580|y=222}}{{Map/ImageNode|S|Hard|E-2|x=143|y=188|drops=<table class="wikitable"><tr><th>Type</th><th>Ships</th></tr><tr><th>DE</th><td>{{Ship/Banner|small=true|Kunashiri}}{{Ship/Banner|small=true|Shimushu}}</td></tr><tr><th>DD</th><td>{{Ship/Banner|small=true|Amagiri}}{{Ship/Banner|small=true|Fujinami}}{{Ship/Banner|small=true|Harusame}}<br>{{Ship/Banner|small=true|Kawakaze}}{{Ship/Banner|small=true|Kishinami}}{{Ship/Banner|small=true|Libeccio}}<br>{{Ship/Banner|small=true|Sagiri}}{{Ship/Banner|small=true|Tanikaze}}{{Ship/Banner|small=true|Umikaze}}<br>{{Ship/Banner|small=true|Uranami}}{{Ship/Banner|small=true|Usugumo}}{{Ship/Banner|small=true|Yamakaze}}<br></td></tr></table>}}{{Map/ImageNode|T|Hard|E-2|x=127|y=159}}{{Map/ImageNode|U|Hard|E-2|x=121|y=206}}{{Map/ImageNode|V|Hard|E-2|x=93|y=160|drops=<table class="wikitable"><tr><th>Type</th><th>Ships</th></tr><tr><th>DE</th><td>{{Ship/Banner|small=true|Fukae}}{{Ship/Banner|small=true|Hirato}}</td></tr><tr><th>DD</th><td>{{Ship/Banner|small=true|Akishimo}}{{Ship/Banner|small=true|Hayanami}}{{Ship/Banner|small=true|Natsugumo}}<br></td></tr><tr><th>CA</th><td>{{Ship/Banner|small=true|Pola}}</td></tr><tr><th>SS</th><td>{{Ship/Banner|small=true|I-47}}</td></tr><tr><th>AV</th><td>{{Ship/Banner|small=true|Commandant Teste}}{{Ship/Banner|small=true|Mizuho}}</td></tr><tr><th>AO</th><td>{{Ship/Banner|small=true|Kamoi}}</td></tr></table>}}}} |
<div class="map-nodes"> | <div class="map-nodes"> | ||
{{Map/Nodes|diff=Hard|name=深海潜水艦隊 アラビア海哨戒線 | {{Map/Nodes|diff=Hard|name=深海潜水艦隊 アラビア海哨戒線 | ||
|A | |A | ||
|Normal | |Normal | ||
| − | |{{TooltipSimple|Echelon|19% ( | + | |{{TooltipSimple|Echelon|19% (17381/92485, HQ: 99-120)}}<br>{{TooltipSimple|Line Abreast|19% (17742/92485, HQ: 100-120)}}<br>{{TooltipSimple|''Phases: 1, 2''|Samples: 5138, 2696}} |
|Submarine Ka-Class/Flagship | |Submarine Ka-Class/Flagship | ||
|Submarine Ka-Class/Elite | |Submarine Ka-Class/Elite | ||
| Line 13: | Line 13: | ||
|A | |A | ||
|Normal | |Normal | ||
| − | |{{TooltipSimple|Echelon|17% ( | + | |{{TooltipSimple|Echelon|17% (15634/92485, HQ: 98-120)}}<br>{{TooltipSimple|Line Abreast|17% (15714/92485, HQ: 99-120)}}<br>{{TooltipSimple|''Phases: 1, 2''|Samples: 4648, 2315}} |
|Submarine Ka-Class/Flagship | |Submarine Ka-Class/Flagship | ||
|Submarine Ka-Class/Elite | |Submarine Ka-Class/Elite | ||
| Line 21: | Line 21: | ||
|A | |A | ||
|Normal | |Normal | ||
| − | |{{TooltipSimple|Echelon| | + | |{{TooltipSimple|Echelon|14% (12794/92485, HQ: 100-120)}}<br>{{TooltipSimple|Line Abreast|14% (13220/92485, HQ: 99-120)}}<br>{{TooltipSimple|''Phases: 1, 2''|Samples: 4111, 1637}} |
|Submarine Ka-Class/Flagship | |Submarine Ka-Class/Flagship | ||
|Submarine Ka-Class/Flagship | |Submarine Ka-Class/Flagship | ||
| Line 30: | Line 30: | ||
|B | |B | ||
|Normal | |Normal | ||
| − | |{{TooltipSimple|Line Ahead| | + | |{{TooltipSimple|Line Ahead|40% (357/902, HQ: 103-120)}}<br>{{TooltipSimple|Echelon|32% (286/902, HQ: 106-120)}}<br>{{TooltipSimple|Vanguard|29% (259/902, HQ: 104-120)}}<br>{{TooltipSimple|''Phases: 1, 2''|Samples: 409, 206}} |
|Light Cruiser He-Class/Flagship | |Light Cruiser He-Class/Flagship | ||
|Light Cruiser Ho-Class/Flagship | |Light Cruiser Ho-Class/Flagship | ||
| Line 42: | Line 42: | ||
|D | |D | ||
|Normal | |Normal | ||
| − | |{{TooltipSimple|Diamond| | + | |{{TooltipSimple|Diamond|31% (3941/12656, HQ: 100-120)}}<br>{{TooltipSimple|''Phases: 1, 2''|Samples: 2, 928}} |
|Light Carrier Nu-Class/Flagship II | |Light Carrier Nu-Class/Flagship II | ||
|Heavy Cruiser Ri-Class/Flagship | |Heavy Cruiser Ri-Class/Flagship | ||
| Line 52: | Line 52: | ||
|D | |D | ||
|Normal | |Normal | ||
| − | |{{TooltipSimple|Diamond| | + | |{{TooltipSimple|Diamond|34% (4323/12656, HQ: 100-120)}}<br>{{TooltipSimple|''Phases: 2''|Samples: 1016}} |
|Light Carrier Nu-Class/Flagship III | |Light Carrier Nu-Class/Flagship III | ||
|Heavy Cruiser Ri-Class/Flagship | |Heavy Cruiser Ri-Class/Flagship | ||
| Line 62: | Line 62: | ||
|D | |D | ||
|Normal | |Normal | ||
| − | |{{TooltipSimple|Diamond| | + | |{{TooltipSimple|Diamond|35% (4392/12656, HQ: 100-120)}}<br>{{TooltipSimple|''Phases: 2''|Samples: 1084}} |
|Light Carrier Nu-Class/Kai Flagship III | |Light Carrier Nu-Class/Kai Flagship III | ||
|Heavy Cruiser Ri-Class/Flagship | |Heavy Cruiser Ri-Class/Flagship | ||
| Line 74: | Line 74: | ||
|F | |F | ||
|Normal | |Normal | ||
| − | |{{TooltipSimple|Double Line| | + | |{{TooltipSimple|Double Line|29% (1088/3693, HQ: 102-120)}}<br>{{TooltipSimple|Diamond|51% (1880/3693, HQ: 100-120)}}<br>{{TooltipSimple|Vanguard|20% (725/3693, HQ: 102-120)}}<br>{{TooltipSimple|''Phases: 1, 2''|Samples: 53, 878}} |
|Transport Ship Wa-Class/Elite | |Transport Ship Wa-Class/Elite | ||
|Transport Ship Wa-Class/Elite | |Transport Ship Wa-Class/Elite | ||
| Line 87: | Line 87: | ||
|I | |I | ||
|Normal | |Normal | ||
| − | |{{TooltipSimple|Line Ahead|50% ( | + | |{{TooltipSimple|Line Ahead|50% (29442/58389, HQ: 98-120)}}<br>{{TooltipSimple|Echelon|32% (18922/58389, HQ: 99-120)}}<br>{{TooltipSimple|''Phases: 1, 2''|Samples: 10667, 69}} |
|Light Cruiser He-Class/Flagship | |Light Cruiser He-Class/Flagship | ||
|Light Cruiser Tsu-Class | |Light Cruiser Tsu-Class | ||
| Line 97: | Line 97: | ||
|I | |I | ||
|Normal | |Normal | ||
| − | |{{TooltipSimple|Line Ahead|17% ( | + | |{{TooltipSimple|Line Ahead|17% (10025/58389, HQ: 100-120)}}<br>{{TooltipSimple|''Phases: 1, 2''|Samples: 2098, 5}} |
|Light Cruiser He-Class/Flagship | |Light Cruiser He-Class/Flagship | ||
|Light Cruiser Tsu-Class/Elite | |Light Cruiser Tsu-Class/Elite | ||
| Line 109: | Line 109: | ||
|J | |J | ||
|Normal | |Normal | ||
| − | |{{TooltipSimple|Line Ahead| | + | |{{TooltipSimple|Line Ahead|53% (16549/31093, HQ: 100-120)}}<br>{{TooltipSimple|Double Line|29% (8898/31093, HQ: 101-120)}}<br>{{TooltipSimple|''Phases: 1, 2''|Samples: 3, 5963}} |
|Battleship Ta-Class/Flagship | |Battleship Ta-Class/Flagship | ||
|Heavy Cruiser Ne-Class/Elite | |Heavy Cruiser Ne-Class/Elite | ||
| Line 119: | Line 119: | ||
|J | |J | ||
|Normal | |Normal | ||
| − | |{{TooltipSimple|Line Ahead| | + | |{{TooltipSimple|Line Ahead|18% (5646/31093, HQ: 101-120)}}<br>{{TooltipSimple|''Phases: 2''|Samples: 1379}} |
|Battleship Ta-Class/Flagship | |Battleship Ta-Class/Flagship | ||
|Battleship Ta-Class/Flagship | |Battleship Ta-Class/Flagship | ||
| Line 130: | Line 130: | ||
|K | |K | ||
|Boss | |Boss | ||
| − | |{{TooltipSimple|Line Ahead| | + | |{{TooltipSimple|Line Ahead|31% (15400/50351, HQ: 99-120)}}<br>{{TooltipSimple|''Phases: 1, 2''|Samples: 3451, 6}} |
|Heavy Cruiser Summer Princess/III | |Heavy Cruiser Summer Princess/III | ||
|Light Cruiser Tsu-Class/Elite | |Light Cruiser Tsu-Class/Elite | ||
| Line 140: | Line 140: | ||
|K | |K | ||
|Boss | |Boss | ||
| − | |{{TooltipSimple|Line Ahead|20% ( | + | |{{TooltipSimple|Line Ahead|20% (10061/50351, HQ: 100-120)}}<br>{{TooltipSimple|''Phases: 1, 2''|Samples: 2259, 3}} |
|Heavy Cruiser Summer Princess/III | |Heavy Cruiser Summer Princess/III | ||
|Heavy Cruiser Ne-Class/Elite | |Heavy Cruiser Ne-Class/Elite | ||
| Line 150: | Line 150: | ||
|K | |K | ||
|Boss/Final | |Boss/Final | ||
| − | |{{TooltipSimple|Line Ahead| | + | |{{TooltipSimple|Line Ahead|49% (24890/50351, HQ: 99-120)}}<br>{{TooltipSimple|''Phases: 1, 2''|Samples: 5583, 21}} |
|Heavy Cruiser Summer Princess/III | |Heavy Cruiser Summer Princess/III | ||
|Light Carrier Nu-Class/Kai Flagship III | |Light Carrier Nu-Class/Kai Flagship III | ||
| Line 158: | Line 158: | ||
|PT Imp Pack/III | |PT Imp Pack/III | ||
}} | }} | ||
| − | {{Map/Nodes|diff=Hard|L|Normal}} | + | {{Map/Nodes|diff=Hard|name=深海潜水艦隊 アラビア海遊撃隊 |
| + | |L | ||
| + | |Normal | ||
| + | |{{TooltipSimple|Echelon|50% (2/4, HQ: 118)}}<br>{{TooltipSimple|Line Abreast|25% (1/4, HQ: 118)}}<br>{{TooltipSimple|''Phases: 2''|Samples: 1}} | ||
| + | |Submarine Ka-Class/Flagship | ||
| + | |Submarine Ka-Class/Elite | ||
| + | |Submarine Ka-Class/Elite | ||
| + | |- | ||
| + | |L | ||
| + | |Normal | ||
| + | |{{TooltipSimple|Echelon|25% (1/4, HQ: 120)}}<br>{{TooltipSimple|''Phases: 2''|Samples: 4}} | ||
| + | |Submarine Ka-Class/Flagship | ||
| + | |Submarine Ka-Class/Flagship | ||
| + | |Submarine Ka-Class/Flagship | ||
| + | |Submarine Ka-Class/Elite | ||
| + | }} | ||
{{Map/Nodes|diff=Hard|name=深海攻勢拠点 航空部隊 | {{Map/Nodes|diff=Hard|name=深海攻勢拠点 航空部隊 | ||
|M | |M | ||
|Defense | |Defense | ||
| − | |{{TooltipSimple|Diamond| | + | |{{TooltipSimple|Diamond|58% (83/144, HQ: 101-120)}}<br>{{TooltipSimple|''Phases: 2''|Samples: 52}} |
|Supply Depot Princess B/Vacation Mode IV | |Supply Depot Princess B/Vacation Mode IV | ||
|Airfield Princess/Patrol Aircraft Deployment III | |Airfield Princess/Patrol Aircraft Deployment III | ||
| Line 172: | Line 187: | ||
|M | |M | ||
|Defense | |Defense | ||
| − | |{{TooltipSimple|Diamond| | + | |{{TooltipSimple|Diamond|42% (61/144, HQ: 101-120)}}<br>{{TooltipSimple|''Phases: 2''|Samples: 41}} |
|Supply Depot Princess B/Vacation Mode IV | |Supply Depot Princess B/Vacation Mode IV | ||
|Airfield Princess/Patrol Aircraft Deployment II | |Airfield Princess/Patrol Aircraft Deployment II | ||
| Line 184: | Line 199: | ||
|O | |O | ||
|Normal | |Normal | ||
| − | |{{TooltipSimple|Diamond| | + | |{{TooltipSimple|Diamond|59% (4992/8403, HQ: 100-120)}}<br>{{TooltipSimple|''Phases: 2''|Samples: 1144}} |
|Supply Depot Princess B/Vacation Mode IV | |Supply Depot Princess B/Vacation Mode IV | ||
|Airfield Princess/Patrol Aircraft Deployment III | |Airfield Princess/Patrol Aircraft Deployment III | ||
| Line 194: | Line 209: | ||
|O | |O | ||
|Normal | |Normal | ||
| − | |{{TooltipSimple|Diamond| | + | |{{TooltipSimple|Diamond|41% (3408/8403, HQ: 100-120)}}<br>{{TooltipSimple|''Phases: 2''|Samples: 815}} |
|Supply Depot Princess B/Vacation Mode IV | |Supply Depot Princess B/Vacation Mode IV | ||
|Airfield Princess/Patrol Aircraft Deployment II | |Airfield Princess/Patrol Aircraft Deployment II | ||
| Line 200: | Line 215: | ||
|Light Carrier Nu-Class/B Elite II | |Light Carrier Nu-Class/B Elite II | ||
|Transport Ship Wa-Class/Elite | |Transport Ship Wa-Class/Elite | ||
| + | |PT Imp Pack/III | ||
| + | |- | ||
| + | |O | ||
| + | |Normal | ||
| + | |{{TooltipSimple|Diamond|0% (3/8403, HQ: 120)}} | ||
| + | |Supply Depot Princess B/Vacation Mode Damaged IV | ||
| + | |Airfield Princess/Patrol Aircraft Deployment III | ||
| + | |Artillery Imp | ||
| + | |Transport Ship Wa-Class/Elite | ||
| + | |Destroyer I-Class/Late Model | ||
|PT Imp Pack/III | |PT Imp Pack/III | ||
}} | }} | ||
| Line 206: | Line 231: | ||
|P1 | |P1 | ||
|Defense | |Defense | ||
| − | |{{TooltipSimple|Diamond| | + | |{{TooltipSimple|Diamond|25% (2/8, HQ: 115-120)}}<br>{{TooltipSimple|''Phases: 2''|Samples: 3}} |
| + | |Light Carrier Nu-Class/B Elite II | ||
| + | |Light Carrier Nu-Class/B Elite II | ||
| + | |Heavy Cruiser Ri-Class/Flagship | ||
| + | |Light Cruiser Tsu-Class | ||
| + | |Destroyer I-Class/Late Model | ||
| + | |Destroyer I-Class/Late Model | ||
| + | |- | ||
| + | |P1 | ||
| + | |Defense | ||
| + | |{{TooltipSimple|Diamond|38% (3/8, HQ: 106-120)}}<br>{{TooltipSimple|''Phases: 2''|Samples: 10}} | ||
|Light Carrier Nu-Class/B Flagship | |Light Carrier Nu-Class/B Flagship | ||
|Light Carrier Nu-Class/B Elite III | |Light Carrier Nu-Class/B Elite III | ||
| + | |Heavy Cruiser Ri-Class/Flagship | ||
| + | |Light Cruiser Tsu-Class | ||
| + | |Destroyer I-Class/Late Model | ||
| + | |Destroyer I-Class/Late Model | ||
| + | |- | ||
| + | |P1 | ||
| + | |Defense | ||
| + | |{{TooltipSimple|Diamond|38% (3/8, HQ: 106)}}<br>{{TooltipSimple|''Phases: 2''|Samples: 3}} | ||
| + | |Light Carrier Nu-Class/B Flagship | ||
| + | |Light Carrier Nu-Class/B Flagship | ||
|Heavy Cruiser Ri-Class/Flagship | |Heavy Cruiser Ri-Class/Flagship | ||
|Light Cruiser Tsu-Class | |Light Cruiser Tsu-Class | ||
| Line 217: | Line 262: | ||
|P2 | |P2 | ||
|Normal | |Normal | ||
| − | |{{TooltipSimple|Echelon| | + | |{{TooltipSimple|Echelon|8% (11/136, HQ: 114-120)}}<br>{{TooltipSimple|Line Abreast|20% (27/136, HQ: 114-120)}}<br>{{TooltipSimple|''Phases: 2''|Samples: 30}} |
|Submarine Yo-Class/Flagship | |Submarine Yo-Class/Flagship | ||
|Submarine Ka-Class/Elite | |Submarine Ka-Class/Elite | ||
| Line 225: | Line 270: | ||
|P2 | |P2 | ||
|Normal | |Normal | ||
| − | |{{TooltipSimple|Echelon| | + | |{{TooltipSimple|Echelon|15% (21/136, HQ: 106-120)}}<br>{{TooltipSimple|Line Abreast|11% (15/136, HQ: 117-120)}}<br>{{TooltipSimple|''Phases: 2''|Samples: 19}} |
|Submarine Yo-Class/Flagship | |Submarine Yo-Class/Flagship | ||
|Submarine Ka-Class/Elite | |Submarine Ka-Class/Elite | ||
| Line 234: | Line 279: | ||
|P2 | |P2 | ||
|Normal | |Normal | ||
| − | |{{TooltipSimple|Echelon| | + | |{{TooltipSimple|Echelon|21% (29/136, HQ: 106-120)}}<br>{{TooltipSimple|Line Abreast|24% (33/136, HQ: 105-120)}}<br>{{TooltipSimple|''Phases: 2''|Samples: 48}} |
|Submarine Yo-Class/Flagship | |Submarine Yo-Class/Flagship | ||
|Submarine Yo-Class/Flagship | |Submarine Yo-Class/Flagship | ||
| Line 244: | Line 289: | ||
|Q | |Q | ||
|Normal | |Normal | ||
| − | |{{TooltipSimple|Diamond| | + | |{{TooltipSimple|Diamond|32% (10150/31757, HQ: 101-120)}}<br>{{TooltipSimple|''Phases: 2''|Samples: 2400}} |
|Light Carrier Nu-Class/B Elite II | |Light Carrier Nu-Class/B Elite II | ||
|Light Carrier Nu-Class/B Elite II | |Light Carrier Nu-Class/B Elite II | ||
| Line 254: | Line 299: | ||
|Q | |Q | ||
|Normal | |Normal | ||
| − | |{{TooltipSimple|Diamond| | + | |{{TooltipSimple|Diamond|55% (17561/31757, HQ: 101-120)}}<br>{{TooltipSimple|''Phases: 2''|Samples: 4010}} |
|Light Carrier Nu-Class/B Flagship | |Light Carrier Nu-Class/B Flagship | ||
|Light Carrier Nu-Class/B Elite III | |Light Carrier Nu-Class/B Elite III | ||
| Line 264: | Line 309: | ||
|Q | |Q | ||
|Normal | |Normal | ||
| − | |{{TooltipSimple|Diamond| | + | |{{TooltipSimple|Diamond|13% (4046/31757, HQ: 101-120)}}<br>{{TooltipSimple|''Phases: 2''|Samples: 998}} |
|Light Carrier Nu-Class/B Flagship | |Light Carrier Nu-Class/B Flagship | ||
|Light Carrier Nu-Class/B Flagship | |Light Carrier Nu-Class/B Flagship | ||
| Line 276: | Line 321: | ||
|S | |S | ||
|Normal | |Normal | ||
| − | |{{TooltipSimple|Line Ahead| | + | |{{TooltipSimple|Line Ahead|56% (13479/24106, HQ: 101-120)}}<br>{{TooltipSimple|Double Line|24% (5726/24106, HQ: 101-120)}}<br>{{TooltipSimple|Diamond|20% (4901/24106, HQ: 101-120)}}<br>{{TooltipSimple|''Phases: 2''|Samples: 5851}} |
|Light Carrier Nu-Class/B Flagship | |Light Carrier Nu-Class/B Flagship | ||
|Battleship Ta-Class/Flagship | |Battleship Ta-Class/Flagship | ||
| Line 288: | Line 333: | ||
|U | |U | ||
|Normal | |Normal | ||
| − | |{{TooltipSimple|Line Ahead| | + | |{{TooltipSimple|Line Ahead|57% (276/487, HQ: 107-120)}}<br>{{TooltipSimple|Echelon|30% (144/487, HQ: 108-120)}}<br>{{TooltipSimple|''Phases: 2''|Samples: 155}} |
|PT Imp Pack/IV | |PT Imp Pack/IV | ||
|PT Imp Pack/IV | |PT Imp Pack/IV | ||
| Line 297: | Line 342: | ||
|U | |U | ||
|Normal | |Normal | ||
| − | |{{TooltipSimple|Line Ahead| | + | |{{TooltipSimple|Line Ahead|14% (67/487, HQ: 105-120)}}<br>{{TooltipSimple|''Phases: 2''|Samples: 20}} |
|PT Imp Pack/IV | |PT Imp Pack/IV | ||
|PT Imp Pack/IV | |PT Imp Pack/IV | ||
| Line 308: | Line 353: | ||
|V | |V | ||
|Boss | |Boss | ||
| − | |{{TooltipSimple|Cruising Formation 4| | + | |{{TooltipSimple|Cruising Formation 4|81% (14947/18390, HQ: 101-120)}}<br>{{TooltipSimple|''Phases: 2''|Samples: 3357}} |
|Battleship Summer Princess/III | |Battleship Summer Princess/III | ||
|Light Carrier Nu-Class/B Flagship | |Light Carrier Nu-Class/B Flagship | ||
| Line 324: | Line 369: | ||
|V | |V | ||
|Boss/Final | |Boss/Final | ||
| − | |{{TooltipSimple|Cruising Formation 4| | + | |{{TooltipSimple|Cruising Formation 4|19% (3443/18390, HQ: 101-120)}}<br>{{TooltipSimple|''Phases: 2''|Samples: 682}} |
|Battleship Summer Princess/III | |Battleship Summer Princess/III | ||
|Light Carrier Nu-Class/B Flagship | |Light Carrier Nu-Class/B Flagship | ||
| Line 340: | Line 385: | ||
</div> | </div> | ||
|-|Medium= | |-|Medium= | ||
| − | {{Map/Image|page=Summer 2022 Event/E-2|{{Map/ImageNode|1|Medium|E-2|x=635|y=249}}{{Map/ImageNode|A|Medium|E-2|x=551|y=274}}{{Map/ImageNode|B|Medium|E-2|x=465|y=299}}{{Map/ImageNode|C|Medium|E-2|x=398|y=169}}{{Map/ImageNode|D|Medium|E-2|x=369|y=260 | + | {{Map/Image|page=Summer 2022 Event/E-2|{{Map/ImageNode|1|Medium|E-2|x=635|y=249}}{{Map/ImageNode|A|Medium|E-2|x=551|y=274}}{{Map/ImageNode|B|Medium|E-2|x=465|y=299}}{{Map/ImageNode|C|Medium|E-2|x=398|y=169}}{{Map/ImageNode|D|Medium|E-2|x=369|y=260|drops=<table class="wikitable"><tr><th>Type</th><th>Ships</th></tr><tr><th>DD</th><td>{{Ship/Banner|small=true|Fujinami}}{{Ship/Banner|small=true|Harusame}}{{Ship/Banner|small=true|Kawakaze}}<br>{{Ship/Banner|small=true|Kishinami}}{{Ship/Banner|small=true|Libeccio}}</td></tr></table>}}{{Map/ImageNode|E|Medium|E-2|x=337|y=180}}{{Map/ImageNode|F|Medium|E-2|x=332|y=136}}{{Map/ImageNode|G|Medium|E-2|x=295|y=129}}{{Map/ImageNode|H|Medium|E-2|x=273|y=191}}{{Map/ImageNode|I1|Medium|E-2|x=209|y=201}}{{Map/ImageNode|I|Medium|E-2|x=240|y=195|drops=<table class="wikitable"><tr><th>Type</th><th>Ships</th></tr><tr><th>DD</th><td>{{Ship/Banner|small=true|Amagiri}}{{Ship/Banner|small=true|Fujinami}}{{Ship/Banner|small=true|Harusame}}<br>{{Ship/Banner|small=true|Kawakaze}}{{Ship/Banner|small=true|Kishinami}}{{Ship/Banner|small=true|Libeccio}}<br>{{Ship/Banner|small=true|Sagiri}}{{Ship/Banner|small=true|Tanikaze}}{{Ship/Banner|small=true|Umikaze}}<br>{{Ship/Banner|small=true|Uranami}}{{Ship/Banner|small=true|Usugumo}}{{Ship/Banner|small=true|Yamakaze}}<br></td></tr></table>}}{{Map/ImageNode|J|Medium|E-2|x=206|y=229|drops=<table class="wikitable"><tr><th>Type</th><th>Ships</th></tr><tr><th>DD</th><td>{{Ship/Banner|small=true|Amagiri}}{{Ship/Banner|small=true|Fujinami}}{{Ship/Banner|small=true|Harusame}}<br>{{Ship/Banner|small=true|Kawakaze}}{{Ship/Banner|small=true|Kishinami}}{{Ship/Banner|small=true|Libeccio}}<br>{{Ship/Banner|small=true|Sagiri}}{{Ship/Banner|small=true|Tanikaze}}{{Ship/Banner|small=true|Umikaze}}<br>{{Ship/Banner|small=true|Uranami}}{{Ship/Banner|small=true|Usugumo}}{{Ship/Banner|small=true|Yamakaze}}<br></td></tr></table>}}{{Map/ImageNode|K|Medium|E-2|x=240|y=172|drops=<table class="wikitable"><tr><th>Type</th><th>Ships</th></tr><tr><th>DE</th><td>{{Ship/Banner|small=true|Kunashiri}}</td></tr><tr><th>DD</th><td>{{Ship/Banner|small=true|Amagiri}}{{Ship/Banner|small=true|Fujinami}}{{Ship/Banner|small=true|Harusame}}<br>{{Ship/Banner|small=true|Kawakaze}}{{Ship/Banner|small=true|Kishinami}}{{Ship/Banner|small=true|Libeccio}}<br>{{Ship/Banner|small=true|Sagiri}}{{Ship/Banner|small=true|Tanikaze}}{{Ship/Banner|small=true|Umikaze}}<br>{{Ship/Banner|small=true|Uranami}}</td></tr><tr><th>SSV</th><td>{{Ship/Banner|small=true|I-400}}</td></tr><tr><th>AS</th><td>{{Ship/Banner|small=true|Jingei}}</td></tr></table>}}{{Map/ImageNode|L|Medium|E-2|x=415|y=296}}{{Map/ImageNode|M|Medium|E-2|x=353|y=310}}{{Map/ImageNode|N|Medium|E-2|x=325|y=227}}{{Map/ImageNode|O|Medium|E-2|x=265|y=287|drops=<table class="wikitable"><tr><th>Type</th><th>Ships</th></tr><tr><th>DE</th><td>{{Ship/Banner|small=true|Kunashiri}}{{Ship/Banner|small=true|Shimushu}}</td></tr><tr><th>DD</th><td>{{Ship/Banner|small=true|Amagiri}}{{Ship/Banner|small=true|Fujinami}}{{Ship/Banner|small=true|Harusame}}<br>{{Ship/Banner|small=true|Kawakaze}}{{Ship/Banner|small=true|Kishinami}}{{Ship/Banner|small=true|Libeccio}}<br>{{Ship/Banner|small=true|Sagiri}}{{Ship/Banner|small=true|Tanikaze}}{{Ship/Banner|small=true|Umikaze}}<br>{{Ship/Banner|small=true|Uranami}}{{Ship/Banner|small=true|Usugumo}}{{Ship/Banner|small=true|Yamakaze}}<br></td></tr><tr><th>SSV</th><td>{{Ship/Banner|small=true|I-400}}</td></tr><tr><th>AS</th><td>{{Ship/Banner|small=true|Jingei}}{{Ship/Banner|small=true|Taigei}}</td></tr></table>}}{{Map/ImageNode|P1|Medium|E-2|x=516|y=109}}{{Map/ImageNode|P2|Medium|E-2|x=454|y=97}}{{Map/ImageNode|P|Medium|E-2|x=525|y=168}}{{Map/ImageNode|Q|Medium|E-2|x=411|y=119|drops=<table class="wikitable"><tr><th>Type</th><th>Ships</th></tr><tr><th>DD</th><td>{{Ship/Banner|small=true|Fujinami}}{{Ship/Banner|small=true|Harusame}}{{Ship/Banner|small=true|Kawakaze}}<br>{{Ship/Banner|small=true|Kishinami}}{{Ship/Banner|small=true|Libeccio}}</td></tr></table>}}{{Map/ImageNode|R|Medium|E-2|x=172|y=242}}{{Map/ImageNode|Start 2|Medium|E-2|x=580|y=222}}{{Map/ImageNode|S|Medium|E-2|x=143|y=188|drops=<table class="wikitable"><tr><th>Type</th><th>Ships</th></tr><tr><th>DE</th><td>{{Ship/Banner|small=true|Kunashiri}}{{Ship/Banner|small=true|Shimushu}}</td></tr><tr><th>DD</th><td>{{Ship/Banner|small=true|Amagiri}}{{Ship/Banner|small=true|Fujinami}}{{Ship/Banner|small=true|Harusame}}<br>{{Ship/Banner|small=true|Kawakaze}}{{Ship/Banner|small=true|Kishinami}}{{Ship/Banner|small=true|Libeccio}}<br>{{Ship/Banner|small=true|Sagiri}}{{Ship/Banner|small=true|Tanikaze}}{{Ship/Banner|small=true|Umikaze}}<br>{{Ship/Banner|small=true|Uranami}}{{Ship/Banner|small=true|Usugumo}}{{Ship/Banner|small=true|Yamakaze}}<br></td></tr></table>}}{{Map/ImageNode|T|Medium|E-2|x=127|y=159}}{{Map/ImageNode|U|Medium|E-2|x=121|y=206}}{{Map/ImageNode|V|Medium|E-2|x=93|y=160|drops=<table class="wikitable"><tr><th>Type</th><th>Ships</th></tr><tr><th>DE</th><td>{{Ship/Banner|small=true|Fukae}}{{Ship/Banner|small=true|Hirato}}</td></tr><tr><th>DD</th><td>{{Ship/Banner|small=true|Akishimo}}{{Ship/Banner|small=true|Hayanami}}{{Ship/Banner|small=true|Natsugumo}}<br></td></tr><tr><th>CA</th><td>{{Ship/Banner|small=true|Pola}}</td></tr><tr><th>SS</th><td>{{Ship/Banner|small=true|I-47}}</td></tr><tr><th>AV</th><td>{{Ship/Banner|small=true|Commandant Teste}}{{Ship/Banner|small=true|Mizuho}}</td></tr><tr><th>AO</th><td>{{Ship/Banner|small=true|Kamoi}}</td></tr></table>}}}} |
<div class="map-nodes"> | <div class="map-nodes"> | ||
{{Map/Nodes|diff=Medium|name=深海潜水艦隊 アラビア海哨戒線 | {{Map/Nodes|diff=Medium|name=深海潜水艦隊 アラビア海哨戒線 | ||
|A | |A | ||
|Normal | |Normal | ||
| − | |{{TooltipSimple|Echelon|17% ( | + | |{{TooltipSimple|Echelon|17% (2553/15179, HQ: 87-120)}}<br>{{TooltipSimple|Line Abreast|16% (2467/15179, HQ: 87-120)}}<br>{{TooltipSimple|''Phases: 1, 2''|Samples: 1145, 373}} |
|Submarine Ka-Class/Elite | |Submarine Ka-Class/Elite | ||
|Submarine Ka-Class | |Submarine Ka-Class | ||
| Line 352: | Line 397: | ||
|A | |A | ||
|Normal | |Normal | ||
| − | |{{TooltipSimple|Echelon|19% ( | + | |{{TooltipSimple|Echelon|19% (2878/15179, HQ: 87-120)}}<br>{{TooltipSimple|Line Abreast|19% (2827/15179, HQ: 88-120)}}<br>{{TooltipSimple|''Phases: 1, 2''|Samples: 1305, 431}} |
|Submarine Ka-Class/Elite | |Submarine Ka-Class/Elite | ||
|Submarine Ka-Class/Elite | |Submarine Ka-Class/Elite | ||
| Line 359: | Line 404: | ||
|A | |A | ||
|Normal | |Normal | ||
| − | |{{TooltipSimple|Echelon|15% ( | + | |{{TooltipSimple|Echelon|15% (2209/15179, HQ: 90-120)}}<br>{{TooltipSimple|Line Abreast|15% (2245/15179, HQ: 87-120)}}<br>{{TooltipSimple|''Phases: 1, 2''|Samples: 1084, 250}} |
|Submarine Ka-Class/Flagship | |Submarine Ka-Class/Flagship | ||
|Submarine Ka-Class/Elite | |Submarine Ka-Class/Elite | ||
| Line 367: | Line 412: | ||
|B | |B | ||
|Normal | |Normal | ||
| − | |{{TooltipSimple|Line Ahead| | + | |{{TooltipSimple|Line Ahead|46% (275/600, HQ: 90-120)}}<br>{{TooltipSimple|Echelon|27% (161/600, HQ: 98-120)}}<br>{{TooltipSimple|Vanguard|27% (164/600, HQ: 90-120)}}<br>{{TooltipSimple|''Phases: 1, 2''|Samples: 322, 75}} |
|Light Cruiser He-Class/Flagship | |Light Cruiser He-Class/Flagship | ||
|Light Cruiser Ho-Class/Elite | |Light Cruiser Ho-Class/Elite | ||
| Line 379: | Line 424: | ||
|D | |D | ||
|Normal | |Normal | ||
| − | |{{TooltipSimple|Diamond| | + | |{{TooltipSimple|Diamond|29% (485/1657, HQ: 98-120)}}<br>{{TooltipSimple|''Phases: 2''|Samples: 146}} |
|Light Carrier Nu-Class/Elite II | |Light Carrier Nu-Class/Elite II | ||
|Heavy Cruiser Ri-Class/Elite | |Heavy Cruiser Ri-Class/Elite | ||
| Line 389: | Line 434: | ||
|D | |D | ||
|Normal | |Normal | ||
| − | |{{TooltipSimple|Diamond| | + | |{{TooltipSimple|Diamond|36% (592/1657, HQ: 91-120)}}<br>{{TooltipSimple|''Phases: 2''|Samples: 183}} |
|Light Carrier Nu-Class/Elite II | |Light Carrier Nu-Class/Elite II | ||
|Heavy Cruiser Ri-Class/Elite | |Heavy Cruiser Ri-Class/Elite | ||
| Line 399: | Line 444: | ||
|D | |D | ||
|Normal | |Normal | ||
| − | |{{TooltipSimple|Diamond| | + | |{{TooltipSimple|Diamond|35% (580/1657, HQ: 98-120)}}<br>{{TooltipSimple|''Phases: 2''|Samples: 175}} |
|Light Carrier Nu-Class/Elite II | |Light Carrier Nu-Class/Elite II | ||
|Heavy Cruiser Ri-Class/Elite | |Heavy Cruiser Ri-Class/Elite | ||
| Line 411: | Line 456: | ||
|F | |F | ||
|Normal | |Normal | ||
| − | |{{TooltipSimple|Double Line| | + | |{{TooltipSimple|Double Line|31% (196/630, HQ: 90-120)}}<br>{{TooltipSimple|Diamond|48% (302/630, HQ: 98-120)}}<br>{{TooltipSimple|Vanguard|21% (132/630, HQ: 99-120)}}<br>{{TooltipSimple|''Phases: 1, 2''|Samples: 14, 137}} |
|Transport Ship Wa-Class/Elite | |Transport Ship Wa-Class/Elite | ||
|Transport Ship Wa-Class/Elite | |Transport Ship Wa-Class/Elite | ||
| Line 424: | Line 469: | ||
|I | |I | ||
|Normal | |Normal | ||
| − | |{{TooltipSimple|Line Ahead| | + | |{{TooltipSimple|Line Ahead|49% (5385/10973, HQ: 88-120)}}<br>{{TooltipSimple|Echelon|32% (3543/10973, HQ: 87-120)}}<br>{{TooltipSimple|''Phases: 1, 2''|Samples: 2747, 32}} |
|Light Cruiser He-Class/Flagship | |Light Cruiser He-Class/Flagship | ||
|Light Cruiser Tsu-Class | |Light Cruiser Tsu-Class | ||
| Line 434: | Line 479: | ||
|I | |I | ||
|Normal | |Normal | ||
| − | |{{TooltipSimple|Line Ahead| | + | |{{TooltipSimple|Line Ahead|19% (2045/10973, HQ: 87-120)}}<br>{{TooltipSimple|''Phases: 1, 2''|Samples: 596, 7}} |
|Light Cruiser He-Class/Flagship | |Light Cruiser He-Class/Flagship | ||
|Light Cruiser Tsu-Class | |Light Cruiser Tsu-Class | ||
| Line 446: | Line 491: | ||
|J | |J | ||
|Normal | |Normal | ||
| − | |{{TooltipSimple|Line Ahead| | + | |{{TooltipSimple|Line Ahead|49% (2936/5992, HQ: 91-120)}}<br>{{TooltipSimple|Double Line|33% (1984/5992, HQ: 91-120)}}<br>{{TooltipSimple|''Phases: 1, 2''|Samples: 1, 1554}} |
|Battleship Ta-Class/Elite | |Battleship Ta-Class/Elite | ||
|Heavy Cruiser Ne-Class/Elite | |Heavy Cruiser Ne-Class/Elite | ||
| Line 456: | Line 501: | ||
|J | |J | ||
|Normal | |Normal | ||
| − | |{{TooltipSimple|Line Ahead| | + | |{{TooltipSimple|Line Ahead|18% (1072/5992, HQ: 93-120)}}<br>{{TooltipSimple|''Phases: 2''|Samples: 353}} |
|Battleship Ta-Class/Elite | |Battleship Ta-Class/Elite | ||
|Battleship Ta-Class/Elite | |Battleship Ta-Class/Elite | ||
| Line 467: | Line 512: | ||
|K | |K | ||
|Boss | |Boss | ||
| − | |{{TooltipSimple|Line Ahead|30% ( | + | |{{TooltipSimple|Line Ahead|30% (2821/9390, HQ: 87-120)}}<br>{{TooltipSimple|''Phases: 1, 2''|Samples: 895, 3}} |
|Heavy Cruiser Summer Princess/II | |Heavy Cruiser Summer Princess/II | ||
|Light Cruiser Tsu-Class | |Light Cruiser Tsu-Class | ||
| Line 477: | Line 522: | ||
|K | |K | ||
|Boss | |Boss | ||
| − | |{{TooltipSimple|Line Ahead| | + | |{{TooltipSimple|Line Ahead|21% (1978/9390, HQ: 88-120)}}<br>{{TooltipSimple|''Phases: 1, 2''|Samples: 634, 1}} |
|Heavy Cruiser Summer Princess/II | |Heavy Cruiser Summer Princess/II | ||
|Heavy Cruiser Ne-Class | |Heavy Cruiser Ne-Class | ||
| Line 487: | Line 532: | ||
|K | |K | ||
|Boss/Final | |Boss/Final | ||
| − | |{{TooltipSimple|Line Ahead| | + | |{{TooltipSimple|Line Ahead|49% (4591/9390, HQ: 87-120)}}<br>{{TooltipSimple|''Phases: 1, 2''|Samples: 1400, 9}} |
|Heavy Cruiser Summer Princess/II | |Heavy Cruiser Summer Princess/II | ||
|Light Carrier Nu-Class/Flagship III | |Light Carrier Nu-Class/Flagship III | ||
| Line 498: | Line 543: | ||
|L | |L | ||
|Normal | |Normal | ||
| − | |{{TooltipSimple|Line Abreast| | + | |{{TooltipSimple|Line Abreast|25% (1/4, HQ: 107)}}<br>{{TooltipSimple|''Phases: 2''|Samples: 3}} |
|Submarine Ka-Class/Elite | |Submarine Ka-Class/Elite | ||
|Submarine Ka-Class | |Submarine Ka-Class | ||
|Submarine Ka-Class | |Submarine Ka-Class | ||
| + | |- | ||
| + | |L | ||
| + | |Normal | ||
| + | |{{TooltipSimple|Echelon|25% (1/4, HQ: 111)}}<br>{{TooltipSimple|Line Abreast|25% (1/4, HQ: 111)}} | ||
| + | |Submarine Ka-Class/Elite | ||
| + | |Submarine Ka-Class/Elite | ||
| + | |Submarine Ka-Class | ||
| + | |- | ||
| + | |L | ||
| + | |Normal | ||
| + | |{{TooltipSimple|Line Abreast|25% (1/4, HQ: 111)}} | ||
| + | |Submarine Ka-Class/Flagship | ||
| + | |Submarine Ka-Class/Elite | ||
| + | |Submarine Ka-Class/Elite | ||
}} | }} | ||
{{Map/Nodes|diff=Medium|name=深海攻勢拠点 航空部隊 | {{Map/Nodes|diff=Medium|name=深海攻勢拠点 航空部隊 | ||
|M | |M | ||
|Defense | |Defense | ||
| − | |{{TooltipSimple|Diamond| | + | |{{TooltipSimple|Diamond|53% (18/34, HQ: 106-120)}}<br>{{TooltipSimple|''Phases: 2''|Samples: 15}} |
|Supply Depot Princess B/Vacation Mode III | |Supply Depot Princess B/Vacation Mode III | ||
|Airfield Princess/Patrol Aircraft Deployment | |Airfield Princess/Patrol Aircraft Deployment | ||
| Line 516: | Line 575: | ||
|M | |M | ||
|Defense | |Defense | ||
| − | |{{TooltipSimple|Diamond| | + | |{{TooltipSimple|Diamond|47% (16/34, HQ: 106-120)}}<br>{{TooltipSimple|''Phases: 2''|Samples: 14}} |
|Supply Depot Princess B/Vacation Mode III | |Supply Depot Princess B/Vacation Mode III | ||
|Airfield Princess/Patrol Aircraft Deployment II | |Airfield Princess/Patrol Aircraft Deployment II | ||
| Line 528: | Line 587: | ||
|O | |O | ||
|Normal | |Normal | ||
| − | |{{TooltipSimple|Diamond| | + | |{{TooltipSimple|Diamond|48% (528/1094, HQ: 91-120)}}<br>{{TooltipSimple|''Phases: 2''|Samples: 172}} |
|Supply Depot Princess B/Vacation Mode III | |Supply Depot Princess B/Vacation Mode III | ||
|Airfield Princess/Patrol Aircraft Deployment | |Airfield Princess/Patrol Aircraft Deployment | ||
| Line 538: | Line 597: | ||
|O | |O | ||
|Normal | |Normal | ||
| − | |{{TooltipSimple|Diamond| | + | |{{TooltipSimple|Diamond|52% (565/1094, HQ: 91-120)}}<br>{{TooltipSimple|''Phases: 2''|Samples: 158}} |
|Supply Depot Princess B/Vacation Mode III | |Supply Depot Princess B/Vacation Mode III | ||
|Airfield Princess/Patrol Aircraft Deployment II | |Airfield Princess/Patrol Aircraft Deployment II | ||
|Light Carrier Nu-Class/Elite III | |Light Carrier Nu-Class/Elite III | ||
|Light Carrier Nu-Class/Elite | |Light Carrier Nu-Class/Elite | ||
| + | |Destroyer I-Class/Late Model | ||
| + | |PT Imp Pack/II | ||
| + | |- | ||
| + | |O | ||
| + | |Normal | ||
| + | |{{TooltipSimple|Diamond|0% (1/1094, HQ: 109)}} | ||
| + | |Supply Depot Princess B/Vacation Mode Damaged III | ||
| + | |Airfield Princess/Patrol Aircraft Deployment II | ||
| + | |Transport Ship Wa-Class/Elite | ||
| + | |Destroyer I-Class/Late Model | ||
|Destroyer I-Class/Late Model | |Destroyer I-Class/Late Model | ||
|PT Imp Pack/II | |PT Imp Pack/II | ||
}} | }} | ||
{{Map/Nodes|diff=Medium|P|Empty|kind=0}} | {{Map/Nodes|diff=Medium|P|Empty|kind=0}} | ||
| − | {{Map/Nodes|diff=Medium|P1|Defense}} | + | {{Map/Nodes|diff=Medium|name=深海空母機動部隊 艦載機群 |
| + | |P1 | ||
| + | |Defense | ||
| + | |{{TooltipSimple|Diamond|12% (2/17, HQ: 100)}} | ||
| + | |Light Carrier Nu-Class/B Elite II | ||
| + | |Light Carrier Nu-Class/B Elite II | ||
| + | |Heavy Cruiser Ri-Class/Elite | ||
| + | |Light Cruiser Tsu-Class | ||
| + | |Destroyer I-Class/Late Model | ||
| + | |Destroyer I-Class/Late Model | ||
| + | |- | ||
| + | |P1 | ||
| + | |Defense | ||
| + | |{{TooltipSimple|Diamond|65% (11/17, HQ: 100)}} | ||
| + | |Light Carrier Nu-Class/B Elite III | ||
| + | |Light Carrier Nu-Class/B Elite II | ||
| + | |Heavy Cruiser Ri-Class/Elite | ||
| + | |Light Cruiser Tsu-Class | ||
| + | |Destroyer I-Class/Late Model | ||
| + | |Destroyer I-Class/Late Model | ||
| + | |- | ||
| + | |P1 | ||
| + | |Defense | ||
| + | |{{TooltipSimple|Diamond|24% (4/17, HQ: 100)}} | ||
| + | |Light Carrier Nu-Class/B Elite III | ||
| + | |Light Carrier Nu-Class/B Elite III | ||
| + | |Heavy Cruiser Ri-Class/Elite | ||
| + | |Light Cruiser Tsu-Class | ||
| + | |Destroyer I-Class/Late Model | ||
| + | |Destroyer I-Class/Late Model | ||
| + | }} | ||
{{Map/Nodes|diff=Medium|name=深海潜水艦隊 アラビア海阻止線 | {{Map/Nodes|diff=Medium|name=深海潜水艦隊 アラビア海阻止線 | ||
|P2 | |P2 | ||
|Normal | |Normal | ||
| − | |{{TooltipSimple|Echelon| | + | |{{TooltipSimple|Echelon|10% (12/124, HQ: 100-120)}}<br>{{TooltipSimple|Line Abreast|10% (13/124, HQ: 100-119)}}<br>{{TooltipSimple|''Phases: 2''|Samples: 18}} |
|Submarine Yo-Class/Elite | |Submarine Yo-Class/Elite | ||
|Submarine Ka-Class | |Submarine Ka-Class | ||
| Line 559: | Line 658: | ||
|P2 | |P2 | ||
|Normal | |Normal | ||
| − | |{{TooltipSimple|Echelon| | + | |{{TooltipSimple|Echelon|17% (21/124, HQ: 100-119)}}<br>{{TooltipSimple|Line Abreast|19% (23/124, HQ: 100-120)}}<br>{{TooltipSimple|''Phases: 2''|Samples: 14}} |
|Submarine Yo-Class/Elite | |Submarine Yo-Class/Elite | ||
|Submarine Yo-Class/Elite | |Submarine Yo-Class/Elite | ||
| Line 567: | Line 666: | ||
|P2 | |P2 | ||
|Normal | |Normal | ||
| − | |{{TooltipSimple|Echelon| | + | |{{TooltipSimple|Echelon|23% (29/124, HQ: 100-119)}}<br>{{TooltipSimple|Line Abreast|21% (26/124, HQ: 100-119)}}<br>{{TooltipSimple|''Phases: 2''|Samples: 29}} |
|Submarine Yo-Class/Flagship | |Submarine Yo-Class/Flagship | ||
|Submarine Ka-Class/Elite | |Submarine Ka-Class/Elite | ||
| Line 576: | Line 675: | ||
|Q | |Q | ||
|Normal | |Normal | ||
| − | |{{TooltipSimple|Diamond| | + | |{{TooltipSimple|Diamond|36% (2259/6331, HQ: 91-120)}}<br>{{TooltipSimple|''Phases: 2''|Samples: 680}} |
|Light Carrier Nu-Class/B Elite II | |Light Carrier Nu-Class/B Elite II | ||
|Light Carrier Nu-Class/B Elite II | |Light Carrier Nu-Class/B Elite II | ||
| Line 586: | Line 685: | ||
|Q | |Q | ||
|Normal | |Normal | ||
| − | |{{TooltipSimple|Diamond| | + | |{{TooltipSimple|Diamond|53% (3350/6331, HQ: 91-120)}}<br>{{TooltipSimple|''Phases: 2''|Samples: 1037}} |
|Light Carrier Nu-Class/B Elite III | |Light Carrier Nu-Class/B Elite III | ||
|Light Carrier Nu-Class/B Elite II | |Light Carrier Nu-Class/B Elite II | ||
| Line 596: | Line 695: | ||
|Q | |Q | ||
|Normal | |Normal | ||
| − | |{{TooltipSimple|Diamond| | + | |{{TooltipSimple|Diamond|11% (722/6331, HQ: 93-120)}}<br>{{TooltipSimple|''Phases: 2''|Samples: 243}} |
|Light Carrier Nu-Class/B Elite III | |Light Carrier Nu-Class/B Elite III | ||
|Light Carrier Nu-Class/B Elite III | |Light Carrier Nu-Class/B Elite III | ||
| Line 608: | Line 707: | ||
|S | |S | ||
|Normal | |Normal | ||
| − | |{{TooltipSimple|Line Ahead| | + | |{{TooltipSimple|Line Ahead|56% (2561/4598, HQ: 93-120)}}<br>{{TooltipSimple|Double Line|24% (1122/4598, HQ: 91-120)}}<br>{{TooltipSimple|Diamond|20% (915/4598, HQ: 91-120)}}<br>{{TooltipSimple|''Phases: 2''|Samples: 1481}} |
|Light Carrier Nu-Class/B Elite III | |Light Carrier Nu-Class/B Elite III | ||
|Battleship Ta-Class/Elite | |Battleship Ta-Class/Elite | ||
| Line 620: | Line 719: | ||
|U | |U | ||
|Normal | |Normal | ||
| − | |{{TooltipSimple|Line Ahead|65% ( | + | |{{TooltipSimple|Line Ahead|65% (85/130, HQ: 99-120)}}<br>{{TooltipSimple|Echelon|21% (27/130, HQ: 100-120)}}<br>{{TooltipSimple|''Phases: 2''|Samples: 84}} |
|PT Imp Pack/III | |PT Imp Pack/III | ||
|PT Imp Pack/III | |PT Imp Pack/III | ||
| Line 629: | Line 728: | ||
|U | |U | ||
|Normal | |Normal | ||
| − | |{{TooltipSimple|Line Ahead| | + | |{{TooltipSimple|Line Ahead|14% (18/130, HQ: 103-120)}}<br>{{TooltipSimple|''Phases: 2''|Samples: 5}} |
|PT Imp Pack/III | |PT Imp Pack/III | ||
|PT Imp Pack/III | |PT Imp Pack/III | ||
| Line 640: | Line 739: | ||
|V | |V | ||
|Boss | |Boss | ||
| − | |{{TooltipSimple|Cruising Formation 4| | + | |{{TooltipSimple|Cruising Formation 4|82% (2769/3365, HQ: 91-120)}}<br>{{TooltipSimple|''Phases: 2''|Samples: 793}} |
|Battleship Summer Princess/II | |Battleship Summer Princess/II | ||
|Light Carrier Nu-Class/B Elite III | |Light Carrier Nu-Class/B Elite III | ||
| Line 656: | Line 755: | ||
|V | |V | ||
|Boss/Final | |Boss/Final | ||
| − | |{{TooltipSimple|Cruising Formation 4| | + | |{{TooltipSimple|Cruising Formation 4|18% (596/3365, HQ: 93-120)}}<br>{{TooltipSimple|''Phases: 2''|Samples: 136}} |
|Battleship Summer Princess/II | |Battleship Summer Princess/II | ||
|Light Carrier Nu-Class/B Elite III | |Light Carrier Nu-Class/B Elite III | ||
| Line 672: | Line 771: | ||
</div> | </div> | ||
|-|Easy= | |-|Easy= | ||
| − | {{Map/Image|page=Summer 2022 Event/E-2|{{Map/ImageNode|1|Easy|E-2|x=635|y=249}}{{Map/ImageNode|A|Easy|E-2|x=551|y=274}}{{Map/ImageNode|B|Easy|E-2|x=465|y=299}}{{Map/ImageNode|C|Easy|E-2|x=398|y=169}}{{Map/ImageNode|D|Easy|E-2|x=369|y=260|drops=<table class="wikitable"><tr><th>Type</th><th>Ships</th></tr><tr><th>DD</th><td>{{Ship/Banner|small=true|Kawakaze}}{{Ship/Banner|small=true|Libeccio}}</td></tr></table>}}{{Map/ImageNode|E|Easy|E-2|x=337|y=180}}{{Map/ImageNode|F|Easy|E-2|x=332|y=136}}{{Map/ImageNode|G|Easy|E-2|x=295|y=129}}{{Map/ImageNode|H|Easy|E-2|x=273|y=191}}{{Map/ImageNode|I1|Easy|E-2|x=209|y=201}}{{Map/ImageNode|I|Easy|E-2|x=240|y=195|drops=<table class="wikitable"><tr><th>Type</th><th>Ships</th></tr><tr><th>DD</th><td>{{Ship/Banner|small=true|Fujinami}}{{Ship/Banner|small=true|Harusame}}{{Ship/Banner|small=true|Kawakaze}}<br>{{Ship/Banner|small=true|Kishinami}}{{Ship/Banner|small=true|Libeccio}}{{Ship/Banner|small=true|Sagiri}}<br>{{Ship/Banner|small=true|Tanikaze}}{{Ship/Banner|small=true|Umikaze}}{{Ship/Banner|small=true|Uranami}}<br>{{Ship/Banner|small=true|Usugumo}}{{Ship/Banner|small=true|Yamakaze}}</td></tr></table>}}{{Map/ImageNode|J|Easy|E-2|x=206|y=229|drops=<table class="wikitable"><tr><th>Type</th><th>Ships</th></tr><tr><th>DD</th><td>{{Ship/Banner|small=true|Fujinami}}{{Ship/Banner|small=true|Harusame}}{{Ship/Banner|small=true|Kawakaze}}<br>{{Ship/Banner|small=true|Kishinami}}{{Ship/Banner|small=true|Libeccio}}{{Ship/Banner|small=true|Sagiri}}<br>{{Ship/Banner|small=true|Tanikaze}}{{Ship/Banner|small=true|Umikaze}}{{Ship/Banner|small=true|Uranami}}<br>{{Ship/Banner|small=true|Usugumo}}{{Ship/Banner|small=true|Yamakaze}}</td></tr></table>}}{{Map/ImageNode|K|Easy|E-2|x=240|y=172|drops=<table class="wikitable"><tr><th>Type</th><th>Ships</th></tr><tr><th>DE</th><td>{{Ship/Banner|small=true|Kunashiri}}{{Ship/Banner|small=true|Shimushu}}</td></tr><tr><th>DD</th><td>{{Ship/Banner|small=true|Amagiri}}{{Ship/Banner|small=true|Fujinami}}{{Ship/Banner|small=true|Harusame}}<br>{{Ship/Banner|small=true|Kawakaze}}{{Ship/Banner|small=true| | + | {{Map/Image|page=Summer 2022 Event/E-2|{{Map/ImageNode|1|Easy|E-2|x=635|y=249}}{{Map/ImageNode|A|Easy|E-2|x=551|y=274}}{{Map/ImageNode|B|Easy|E-2|x=465|y=299}}{{Map/ImageNode|C|Easy|E-2|x=398|y=169}}{{Map/ImageNode|D|Easy|E-2|x=369|y=260|drops=<table class="wikitable"><tr><th>Type</th><th>Ships</th></tr><tr><th>DD</th><td>{{Ship/Banner|small=true|Harusame}}{{Ship/Banner|small=true|Kawakaze}}{{Ship/Banner|small=true|Libeccio}}<br></td></tr></table>}}{{Map/ImageNode|E|Easy|E-2|x=337|y=180}}{{Map/ImageNode|F|Easy|E-2|x=332|y=136}}{{Map/ImageNode|G|Easy|E-2|x=295|y=129}}{{Map/ImageNode|H|Easy|E-2|x=273|y=191}}{{Map/ImageNode|I1|Easy|E-2|x=209|y=201}}{{Map/ImageNode|I|Easy|E-2|x=240|y=195|drops=<table class="wikitable"><tr><th>Type</th><th>Ships</th></tr><tr><th>DD</th><td>{{Ship/Banner|small=true|Fujinami}}{{Ship/Banner|small=true|Harusame}}{{Ship/Banner|small=true|Kawakaze}}<br>{{Ship/Banner|small=true|Kishinami}}{{Ship/Banner|small=true|Libeccio}}{{Ship/Banner|small=true|Sagiri}}<br>{{Ship/Banner|small=true|Tanikaze}}{{Ship/Banner|small=true|Umikaze}}{{Ship/Banner|small=true|Uranami}}<br>{{Ship/Banner|small=true|Usugumo}}{{Ship/Banner|small=true|Yamakaze}}</td></tr></table>}}{{Map/ImageNode|J|Easy|E-2|x=206|y=229|drops=<table class="wikitable"><tr><th>Type</th><th>Ships</th></tr><tr><th>DD</th><td>{{Ship/Banner|small=true|Fujinami}}{{Ship/Banner|small=true|Harusame}}{{Ship/Banner|small=true|Kawakaze}}<br>{{Ship/Banner|small=true|Kishinami}}{{Ship/Banner|small=true|Libeccio}}{{Ship/Banner|small=true|Sagiri}}<br>{{Ship/Banner|small=true|Tanikaze}}{{Ship/Banner|small=true|Umikaze}}{{Ship/Banner|small=true|Uranami}}<br>{{Ship/Banner|small=true|Usugumo}}{{Ship/Banner|small=true|Yamakaze}}</td></tr></table>}}{{Map/ImageNode|K|Easy|E-2|x=240|y=172|drops=<table class="wikitable"><tr><th>Type</th><th>Ships</th></tr><tr><th>DE</th><td>{{Ship/Banner|small=true|Kunashiri}}{{Ship/Banner|small=true|Shimushu}}</td></tr><tr><th>DD</th><td>{{Ship/Banner|small=true|Amagiri}}{{Ship/Banner|small=true|Fujinami}}{{Ship/Banner|small=true|Harusame}}<br>{{Ship/Banner|small=true|Kawakaze}}{{Ship/Banner|small=true|Kishinami}}{{Ship/Banner|small=true|Libeccio}}<br>{{Ship/Banner|small=true|Sagiri}}{{Ship/Banner|small=true|Tanikaze}}{{Ship/Banner|small=true|Umikaze}}<br>{{Ship/Banner|small=true|Uranami}}{{Ship/Banner|small=true|Usugumo}}{{Ship/Banner|small=true|Yamakaze}}<br></td></tr><tr><th>SSV</th><td>{{Ship/Banner|small=true|I-400}}</td></tr><tr><th>AS</th><td>{{Ship/Banner|small=true|Jingei}}{{Ship/Banner|small=true|Taigei}}</td></tr></table>}}{{Map/ImageNode|L|Easy|E-2|x=415|y=296}}{{Map/ImageNode|M|Easy|E-2|x=353|y=310}}{{Map/ImageNode|N|Easy|E-2|x=325|y=227}}{{Map/ImageNode|O|Easy|E-2|x=265|y=287|drops=<table class="wikitable"><tr><th>Type</th><th>Ships</th></tr><tr><th>DE</th><td>{{Ship/Banner|small=true|Kunashiri}}{{Ship/Banner|small=true|Shimushu}}</td></tr><tr><th>DD</th><td>{{Ship/Banner|small=true|Amagiri}}{{Ship/Banner|small=true|Fujinami}}{{Ship/Banner|small=true|Harusame}}<br>{{Ship/Banner|small=true|Kawakaze}}{{Ship/Banner|small=true|Kishinami}}{{Ship/Banner|small=true|Libeccio}}<br>{{Ship/Banner|small=true|Sagiri}}{{Ship/Banner|small=true|Tanikaze}}{{Ship/Banner|small=true|Umikaze}}<br>{{Ship/Banner|small=true|Uranami}}{{Ship/Banner|small=true|Usugumo}}{{Ship/Banner|small=true|Yamakaze}}<br></td></tr><tr><th>SSV</th><td>{{Ship/Banner|small=true|I-400}}</td></tr><tr><th>AS</th><td>{{Ship/Banner|small=true|Jingei}}{{Ship/Banner|small=true|Taigei}}</td></tr></table>}}{{Map/ImageNode|P1|Easy|E-2|x=516|y=109}}{{Map/ImageNode|P2|Easy|E-2|x=454|y=97}}{{Map/ImageNode|P|Easy|E-2|x=525|y=168}}{{Map/ImageNode|Q|Easy|E-2|x=411|y=119|drops=<table class="wikitable"><tr><th>Type</th><th>Ships</th></tr><tr><th>DD</th><td>{{Ship/Banner|small=true|Fujinami}}{{Ship/Banner|small=true|Harusame}}{{Ship/Banner|small=true|Kawakaze}}<br>{{Ship/Banner|small=true|Kishinami}}{{Ship/Banner|small=true|Libeccio}}</td></tr></table>}}{{Map/ImageNode|R|Easy|E-2|x=172|y=242}}{{Map/ImageNode|Start 2|Easy|E-2|x=580|y=222}}{{Map/ImageNode|S|Easy|E-2|x=143|y=188|drops=<table class="wikitable"><tr><th>Type</th><th>Ships</th></tr><tr><th>DE</th><td>{{Ship/Banner|small=true|Kunashiri}}</td></tr><tr><th>DD</th><td>{{Ship/Banner|small=true|Amagiri}}{{Ship/Banner|small=true|Fujinami}}{{Ship/Banner|small=true|Harusame}}<br>{{Ship/Banner|small=true|Kawakaze}}{{Ship/Banner|small=true|Kishinami}}{{Ship/Banner|small=true|Libeccio}}<br>{{Ship/Banner|small=true|Sagiri}}{{Ship/Banner|small=true|Tanikaze}}{{Ship/Banner|small=true|Umikaze}}<br>{{Ship/Banner|small=true|Uranami}}{{Ship/Banner|small=true|Usugumo}}{{Ship/Banner|small=true|Yamakaze}}<br></td></tr></table>}}{{Map/ImageNode|T|Easy|E-2|x=127|y=159}}{{Map/ImageNode|U|Easy|E-2|x=121|y=206}}{{Map/ImageNode|V|Easy|E-2|x=93|y=160|drops=<table class="wikitable"><tr><th>Type</th><th>Ships</th></tr><tr><th>DE</th><td>{{Ship/Banner|small=true|Fukae}}{{Ship/Banner|small=true|Hirato}}</td></tr><tr><th>DD</th><td>{{Ship/Banner|small=true|Akishimo}}{{Ship/Banner|small=true|Hayanami}}{{Ship/Banner|small=true|Natsugumo}}<br></td></tr><tr><th>CA</th><td>{{Ship/Banner|small=true|Pola}}</td></tr><tr><th>SS</th><td>{{Ship/Banner|small=true|I-47}}</td></tr><tr><th>AV</th><td>{{Ship/Banner|small=true|Commandant Teste}}{{Ship/Banner|small=true|Mizuho}}</td></tr><tr><th>AO</th><td>{{Ship/Banner|small=true|Kamoi}}</td></tr></table>}}}} |
<div class="map-nodes"> | <div class="map-nodes"> | ||
{{Map/Nodes|diff=Easy|name=深海潜水艦隊 アラビア海哨戒線 | {{Map/Nodes|diff=Easy|name=深海潜水艦隊 アラビア海哨戒線 | ||
|A | |A | ||
|Normal | |Normal | ||
| − | |{{TooltipSimple|Echelon|9% ( | + | |{{TooltipSimple|Echelon|9% (874/9765, HQ: 28-120)}}<br>{{TooltipSimple|Line Abreast|9% (903/9765, HQ: 66-120)}}<br>{{TooltipSimple|''Phases: 1, 2''|Samples: 354, 99}} |
|Submarine Ka-Class | |Submarine Ka-Class | ||
|Submarine Ka-Class | |Submarine Ka-Class | ||
| Line 684: | Line 783: | ||
|A | |A | ||
|Normal | |Normal | ||
| − | |{{TooltipSimple|Echelon| | + | |{{TooltipSimple|Echelon|27% (2652/9765, HQ: 29-120)}}<br>{{TooltipSimple|Line Abreast|28% (2711/9765, HQ: 28-120)}}<br>{{TooltipSimple|''Phases: 1, 2''|Samples: 1061, 289}} |
|Submarine Ka-Class/Elite | |Submarine Ka-Class/Elite | ||
|Submarine Ka-Class | |Submarine Ka-Class | ||
| Line 691: | Line 790: | ||
|A | |A | ||
|Normal | |Normal | ||
| − | |{{TooltipSimple|Echelon| | + | |{{TooltipSimple|Echelon|14% (1338/9765, HQ: 76-120)}}<br>{{TooltipSimple|Line Abreast|13% (1287/9765, HQ: 28-120)}}<br>{{TooltipSimple|''Phases: 1, 2''|Samples: 525, 134}} |
|Submarine Ka-Class/Elite | |Submarine Ka-Class/Elite | ||
|Submarine Ka-Class/Elite | |Submarine Ka-Class/Elite | ||
| Line 699: | Line 798: | ||
|B | |B | ||
|Normal | |Normal | ||
| − | |{{TooltipSimple|Line Ahead| | + | |{{TooltipSimple|Line Ahead|43% (253/592, HQ: 28-120)}}<br>{{TooltipSimple|Echelon|28% (168/592, HQ: 29-120)}}<br>{{TooltipSimple|Vanguard|29% (171/592, HQ: 28-120)}}<br>{{TooltipSimple|''Phases: 1, 2''|Samples: 165, 55}} |
|Light Cruiser He-Class/Flagship | |Light Cruiser He-Class/Flagship | ||
|Light Cruiser Ho-Class/Elite | |Light Cruiser Ho-Class/Elite | ||
| Line 711: | Line 810: | ||
|D | |D | ||
|Normal | |Normal | ||
| − | |{{TooltipSimple|Diamond| | + | |{{TooltipSimple|Diamond|29% (314/1078, HQ: 84-120)}}<br>{{TooltipSimple|''Phases: 2''|Samples: 67}} |
|Light Carrier Nu-Class/Elite | |Light Carrier Nu-Class/Elite | ||
|Heavy Cruiser Ri-Class/Elite | |Heavy Cruiser Ri-Class/Elite | ||
| Line 721: | Line 820: | ||
|D | |D | ||
|Normal | |Normal | ||
| − | |{{TooltipSimple|Diamond| | + | |{{TooltipSimple|Diamond|36% (390/1078, HQ: 80-120)}}<br>{{TooltipSimple|''Phases: 1, 2''|Samples: 1, 98}} |
|Light Carrier Nu-Class/Elite | |Light Carrier Nu-Class/Elite | ||
|Heavy Cruiser Ri-Class/Elite | |Heavy Cruiser Ri-Class/Elite | ||
| Line 731: | Line 830: | ||
|D | |D | ||
|Normal | |Normal | ||
| − | |{{TooltipSimple|Diamond| | + | |{{TooltipSimple|Diamond|35% (374/1078, HQ: 80-120)}}<br>{{TooltipSimple|''Phases: 2''|Samples: 95}} |
|Light Carrier Nu-Class/Elite | |Light Carrier Nu-Class/Elite | ||
|Heavy Cruiser Ri-Class/Elite | |Heavy Cruiser Ri-Class/Elite | ||
| Line 743: | Line 842: | ||
|F | |F | ||
|Normal | |Normal | ||
| − | |{{TooltipSimple|Double Line|29% ( | + | |{{TooltipSimple|Double Line|29% (228/800, HQ: 74-120)}}<br>{{TooltipSimple|Diamond|50% (400/800, HQ: 80-120)}}<br>{{TooltipSimple|Vanguard|22% (172/800, HQ: 82-120)}}<br>{{TooltipSimple|''Phases: 1, 2''|Samples: 4, 99}} |
|Transport Ship Wa-Class/Elite | |Transport Ship Wa-Class/Elite | ||
|Transport Ship Wa-Class | |Transport Ship Wa-Class | ||
| Line 756: | Line 855: | ||
|I | |I | ||
|Normal | |Normal | ||
| − | |{{TooltipSimple|Line Ahead| | + | |{{TooltipSimple|Line Ahead|44% (3074/6919, HQ: 28-120)}}<br>{{TooltipSimple|Echelon|36% (2518/6919, HQ: 28-120)}}<br>{{TooltipSimple|''Phases: 1, 2''|Samples: 1526, 9}} |
|Light Cruiser He-Class/Flagship | |Light Cruiser He-Class/Flagship | ||
|Light Cruiser Tsu-Class | |Light Cruiser Tsu-Class | ||
| Line 766: | Line 865: | ||
|I | |I | ||
|Normal | |Normal | ||
| − | |{{TooltipSimple|Line Ahead|19% ( | + | |{{TooltipSimple|Line Ahead|19% (1327/6919, HQ: 76-120)}}<br>{{TooltipSimple|''Phases: 1, 2''|Samples: 367, 1}} |
|Light Cruiser He-Class/Flagship | |Light Cruiser He-Class/Flagship | ||
|Light Cruiser Tsu-Class | |Light Cruiser Tsu-Class | ||
| Line 778: | Line 877: | ||
|J | |J | ||
|Normal | |Normal | ||
| − | |{{TooltipSimple|Line Ahead| | + | |{{TooltipSimple|Line Ahead|55% (2230/4069, HQ: 66-120)}}<br>{{TooltipSimple|Double Line|31% (1250/4069, HQ: 80-120)}}<br>{{TooltipSimple|''Phases: 1, 2''|Samples: 2, 1026}} |
|Battleship Ta-Class/Elite | |Battleship Ta-Class/Elite | ||
|Heavy Cruiser Ne-Class | |Heavy Cruiser Ne-Class | ||
| Line 788: | Line 887: | ||
|J | |J | ||
|Normal | |Normal | ||
| − | |{{TooltipSimple|Line Ahead| | + | |{{TooltipSimple|Line Ahead|14% (589/4069, HQ: 81-120)}}<br>{{TooltipSimple|''Phases: 2''|Samples: 176}} |
|Battleship Ta-Class/Elite | |Battleship Ta-Class/Elite | ||
|Battleship Ta-Class | |Battleship Ta-Class | ||
| Line 799: | Line 898: | ||
|K | |K | ||
|Boss | |Boss | ||
| − | |{{TooltipSimple|Line Ahead|30% ( | + | |{{TooltipSimple|Line Ahead|30% (1823/6091, HQ: 28-120)}}<br>{{TooltipSimple|''Phases: 1, 2''|Samples: 486, 3}} |
|Heavy Cruiser Summer Princess | |Heavy Cruiser Summer Princess | ||
|Light Cruiser Tsu-Class | |Light Cruiser Tsu-Class | ||
| Line 809: | Line 908: | ||
|K | |K | ||
|Boss | |Boss | ||
| − | |{{TooltipSimple|Line Ahead|20% ( | + | |{{TooltipSimple|Line Ahead|20% (1231/6091, HQ: 28-120)}}<br>{{TooltipSimple|''Phases: 1, 2''|Samples: 335, 1}} |
|Heavy Cruiser Summer Princess | |Heavy Cruiser Summer Princess | ||
|Heavy Cruiser Ne-Class | |Heavy Cruiser Ne-Class | ||
| Line 819: | Line 918: | ||
|K | |K | ||
|Boss/Final | |Boss/Final | ||
| − | |{{TooltipSimple|Line Ahead| | + | |{{TooltipSimple|Line Ahead|50% (3037/6091, HQ: 66-120)}}<br>{{TooltipSimple|''Phases: 1, 2''|Samples: 854, 1}} |
|Heavy Cruiser Summer Princess | |Heavy Cruiser Summer Princess | ||
|Light Carrier Nu-Class/Elite II | |Light Carrier Nu-Class/Elite II | ||
| Line 830: | Line 929: | ||
|L | |L | ||
|Normal | |Normal | ||
| − | |{{TooltipSimple|Line Abreast| | + | |{{TooltipSimple|Echelon|7% (1/14, HQ: 98)}}<br>{{TooltipSimple|Line Abreast|29% (4/14, HQ: 98-112)}}<br>{{TooltipSimple|''Phases: 2''|Samples: 4}} |
|Submarine Ka-Class | |Submarine Ka-Class | ||
|Submarine Ka-Class | |Submarine Ka-Class | ||
| Line 837: | Line 936: | ||
|L | |L | ||
|Normal | |Normal | ||
| − | |{{TooltipSimple|Echelon| | + | |{{TooltipSimple|Echelon|36% (5/14, HQ: 98-111)}}<br>{{TooltipSimple|Line Abreast|14% (2/14, HQ: 98-99)}}<br>{{TooltipSimple|''Phases: 2''|Samples: 4}} |
|Submarine Ka-Class/Elite | |Submarine Ka-Class/Elite | ||
|Submarine Ka-Class | |Submarine Ka-Class | ||
| Line 844: | Line 943: | ||
|L | |L | ||
|Normal | |Normal | ||
| − | |{{TooltipSimple|Echelon| | + | |{{TooltipSimple|Echelon|14% (2/14, HQ: 111-112)}}<br>{{TooltipSimple|''Phases: 2''|Samples: 2}} |
|Submarine Ka-Class/Elite | |Submarine Ka-Class/Elite | ||
|Submarine Ka-Class/Elite | |Submarine Ka-Class/Elite | ||
| Line 852: | Line 951: | ||
|M | |M | ||
|Defense | |Defense | ||
| − | |{{TooltipSimple|Diamond| | + | |{{TooltipSimple|Diamond|46% (22/48, HQ: 97-118)}}<br>{{TooltipSimple|''Phases: 2''|Samples: 18}} |
|Supply Depot Princess B/Vacation Mode II | |Supply Depot Princess B/Vacation Mode II | ||
|Airfield Princess/Patrol Aircraft Deployment | |Airfield Princess/Patrol Aircraft Deployment | ||
| Line 862: | Line 961: | ||
|M | |M | ||
|Defense | |Defense | ||
| − | |{{TooltipSimple|Diamond| | + | |{{TooltipSimple|Diamond|54% (26/48, HQ: 97-120)}}<br>{{TooltipSimple|''Phases: 2''|Samples: 14}} |
|Supply Depot Princess B/Vacation Mode II | |Supply Depot Princess B/Vacation Mode II | ||
|Airfield Princess/Patrol Aircraft Deployment | |Airfield Princess/Patrol Aircraft Deployment | ||
| Line 874: | Line 973: | ||
|O | |O | ||
|Normal | |Normal | ||
| − | |{{TooltipSimple|Diamond| | + | |{{TooltipSimple|Diamond|45% (371/826, HQ: 80-120)}}<br>{{TooltipSimple|''Phases: 2''|Samples: 110}} |
|Supply Depot Princess B/Vacation Mode II | |Supply Depot Princess B/Vacation Mode II | ||
|Airfield Princess/Patrol Aircraft Deployment | |Airfield Princess/Patrol Aircraft Deployment | ||
| Line 884: | Line 983: | ||
|O | |O | ||
|Normal | |Normal | ||
| − | |{{TooltipSimple|Diamond| | + | |{{TooltipSimple|Diamond|44% (361/826, HQ: 82-120)}}<br>{{TooltipSimple|''Phases: 2''|Samples: 102}} |
|Supply Depot Princess B/Vacation Mode II | |Supply Depot Princess B/Vacation Mode II | ||
|Airfield Princess/Patrol Aircraft Deployment | |Airfield Princess/Patrol Aircraft Deployment | ||
| Line 894: | Line 993: | ||
|O | |O | ||
|Normal | |Normal | ||
| − | |{{TooltipSimple|Diamond| | + | |{{TooltipSimple|Diamond|11% (94/826, HQ: 105-120)}}<br>{{TooltipSimple|''Phases: 2''|Samples: 1}} |
|Supply Depot Princess B/Vacation Mode Damaged II | |Supply Depot Princess B/Vacation Mode Damaged II | ||
|Airfield Princess/Patrol Aircraft Deployment | |Airfield Princess/Patrol Aircraft Deployment | ||
| Line 903: | Line 1,002: | ||
}} | }} | ||
{{Map/Nodes|diff=Easy|P|Empty|kind=0}} | {{Map/Nodes|diff=Easy|P|Empty|kind=0}} | ||
| − | {{Map/Nodes|diff=Easy|P1|Defense}} | + | {{Map/Nodes|diff=Easy|name=深海空母機動部隊 艦載機群 |
| + | |P1 | ||
| + | |Defense | ||
| + | |{{TooltipSimple|Diamond|24% (9/37, HQ: 102-117)}} | ||
| + | |Light Carrier Nu-Class/Elite III | ||
| + | |Light Carrier Nu-Class/Elite | ||
| + | |Heavy Cruiser Ri-Class/Elite | ||
| + | |Light Cruiser Tsu-Class | ||
| + | |Destroyer I-Class/Late Model | ||
| + | |Destroyer I-Class/Late Model | ||
| + | |- | ||
| + | |P1 | ||
| + | |Defense | ||
| + | |{{TooltipSimple|Diamond|57% (21/37, HQ: 98-117)}}<br>{{TooltipSimple|''Phases: 2''|Samples: 2}} | ||
| + | |Light Carrier Nu-Class/Elite III | ||
| + | |Light Carrier Nu-Class/Elite III | ||
| + | |Heavy Cruiser Ri-Class/Elite | ||
| + | |Light Cruiser Tsu-Class | ||
| + | |Destroyer I-Class/Late Model | ||
| + | |Destroyer I-Class/Late Model | ||
| + | |- | ||
| + | |P1 | ||
| + | |Defense | ||
| + | |{{TooltipSimple|Diamond|19% (7/37, HQ: 102-117)}} | ||
| + | |Light Carrier Nu-Class/B Elite II | ||
| + | |Light Carrier Nu-Class/Elite III | ||
| + | |Heavy Cruiser Ri-Class/Elite | ||
| + | |Light Cruiser Tsu-Class | ||
| + | |Destroyer I-Class/Late Model | ||
| + | |Destroyer I-Class/Late Model | ||
| + | }} | ||
{{Map/Nodes|diff=Easy|name=深海潜水艦隊 アラビア海阻止線 | {{Map/Nodes|diff=Easy|name=深海潜水艦隊 アラビア海阻止線 | ||
|P2 | |P2 | ||
|Normal | |Normal | ||
| − | |{{TooltipSimple|Echelon| | + | |{{TooltipSimple|Echelon|15% (32/218, HQ: 82-120)}}<br>{{TooltipSimple|Line Abreast|13% (29/218, HQ: 85-119)}}<br>{{TooltipSimple|''Phases: 2''|Samples: 11}} |
|Submarine Yo-Class/Elite | |Submarine Yo-Class/Elite | ||
|Submarine Ka-Class | |Submarine Ka-Class | ||
| Line 914: | Line 1,043: | ||
|P2 | |P2 | ||
|Normal | |Normal | ||
| − | |{{TooltipSimple|Echelon|13% ( | + | |{{TooltipSimple|Echelon|13% (29/218, HQ: 84-120)}}<br>{{TooltipSimple|Line Abreast|13% (29/218, HQ: 84-119)}}<br>{{TooltipSimple|''Phases: 2''|Samples: 14}} |
|Submarine Yo-Class/Elite | |Submarine Yo-Class/Elite | ||
|Submarine Ka-Class | |Submarine Ka-Class | ||
| Line 922: | Line 1,051: | ||
|P2 | |P2 | ||
|Normal | |Normal | ||
| − | |{{TooltipSimple|Echelon| | + | |{{TooltipSimple|Echelon|19% (41/218, HQ: 84-120)}}<br>{{TooltipSimple|Line Abreast|27% (58/218, HQ: 84-120)}}<br>{{TooltipSimple|''Phases: 2''|Samples: 18}} |
|Submarine Yo-Class/Elite | |Submarine Yo-Class/Elite | ||
|Submarine Yo-Class/Elite | |Submarine Yo-Class/Elite | ||
| Line 931: | Line 1,060: | ||
|Q | |Q | ||
|Normal | |Normal | ||
| − | |{{TooltipSimple|Diamond| | + | |{{TooltipSimple|Diamond|42% (1614/3835, HQ: 80-120)}}<br>{{TooltipSimple|''Phases: 2''|Samples: 491}} |
|Light Carrier Nu-Class/Elite III | |Light Carrier Nu-Class/Elite III | ||
|Light Carrier Nu-Class/Elite | |Light Carrier Nu-Class/Elite | ||
| Line 941: | Line 1,070: | ||
|Q | |Q | ||
|Normal | |Normal | ||
| − | |{{TooltipSimple|Diamond| | + | |{{TooltipSimple|Diamond|50% (1910/3835, HQ: 80-120)}}<br>{{TooltipSimple|''Phases: 2''|Samples: 578}} |
|Light Carrier Nu-Class/Elite III | |Light Carrier Nu-Class/Elite III | ||
|Light Carrier Nu-Class/Elite III | |Light Carrier Nu-Class/Elite III | ||
| Line 951: | Line 1,080: | ||
|Q | |Q | ||
|Normal | |Normal | ||
| − | |{{TooltipSimple|Diamond| | + | |{{TooltipSimple|Diamond|8% (311/3835, HQ: 81-120)}}<br>{{TooltipSimple|''Phases: 2''|Samples: 89}} |
|Light Carrier Nu-Class/B Elite II | |Light Carrier Nu-Class/B Elite II | ||
|Light Carrier Nu-Class/Elite III | |Light Carrier Nu-Class/Elite III | ||
| Line 963: | Line 1,092: | ||
|S | |S | ||
|Normal | |Normal | ||
| − | |{{TooltipSimple|Line Ahead| | + | |{{TooltipSimple|Line Ahead|53% (1661/3143, HQ: 80-120)}}<br>{{TooltipSimple|Double Line|25% (800/3143, HQ: 80-120)}}<br>{{TooltipSimple|Diamond|22% (682/3143, HQ: 80-120)}}<br>{{TooltipSimple|''Phases: 2''|Samples: 941}} |
|Light Carrier Nu-Class/B Elite II | |Light Carrier Nu-Class/B Elite II | ||
|Battleship Ta-Class | |Battleship Ta-Class | ||
| Line 975: | Line 1,104: | ||
|U | |U | ||
|Normal | |Normal | ||
| − | |{{TooltipSimple|Line Ahead| | + | |{{TooltipSimple|Line Ahead|59% (85/144, HQ: 80-120)}}<br>{{TooltipSimple|Echelon|26% (37/144, HQ: 84-117)}}<br>{{TooltipSimple|''Phases: 2''|Samples: 45}} |
|PT Imp Pack/III | |PT Imp Pack/III | ||
|PT Imp Pack/II | |PT Imp Pack/II | ||
| Line 984: | Line 1,113: | ||
|U | |U | ||
|Normal | |Normal | ||
| − | |{{TooltipSimple|Line Ahead| | + | |{{TooltipSimple|Line Ahead|15% (22/144, HQ: 85-117)}}<br>{{TooltipSimple|''Phases: 2''|Samples: 5}} |
|PT Imp Pack/III | |PT Imp Pack/III | ||
|PT Imp Pack/II | |PT Imp Pack/II | ||
| Line 994: | Line 1,123: | ||
|V | |V | ||
|Boss | |Boss | ||
| − | |{{TooltipSimple|Cruising Formation 4|86% ( | + | |{{TooltipSimple|Cruising Formation 4|86% (2199/2563, HQ: 80-120)}}<br>{{TooltipSimple|''Phases: 2''|Samples: 605}} |
|Battleship Summer Princess | |Battleship Summer Princess | ||
|Light Carrier Nu-Class/B Elite II | |Light Carrier Nu-Class/B Elite II | ||
| Line 1,010: | Line 1,139: | ||
|V | |V | ||
|Boss/Final | |Boss/Final | ||
| − | |{{TooltipSimple|Cruising Formation 4|14% ( | + | |{{TooltipSimple|Cruising Formation 4|14% (364/2563, HQ: 81-120)}}<br>{{TooltipSimple|''Phases: 2''|Samples: 81}} |
|Battleship Summer Princess | |Battleship Summer Princess | ||
|Light Carrier Nu-Class/B Elite II | |Light Carrier Nu-Class/B Elite II | ||
| Line 1,026: | Line 1,155: | ||
</div> | </div> | ||
|-|Casual= | |-|Casual= | ||
| − | {{Map/Image|page=Summer 2022 Event/E-2|{{Map/ImageNode|1|Casual|E-2|x=635|y=249}}{{Map/ImageNode|A|Casual|E-2|x=551|y=274}}{{Map/ImageNode|B|Casual|E-2|x=465|y=299}}{{Map/ImageNode|C|Casual|E-2|x=398|y=169}}{{Map/ImageNode|D|Casual|E-2|x=369|y=260 | + | {{Map/Image|page=Summer 2022 Event/E-2|{{Map/ImageNode|1|Casual|E-2|x=635|y=249}}{{Map/ImageNode|A|Casual|E-2|x=551|y=274}}{{Map/ImageNode|B|Casual|E-2|x=465|y=299}}{{Map/ImageNode|C|Casual|E-2|x=398|y=169}}{{Map/ImageNode|D|Casual|E-2|x=369|y=260|drops=<table class="wikitable"><tr><th>Type</th><th>Ships</th></tr><tr><th>DD</th><td>{{Ship/Banner|small=true|Harusame}}</td></tr></table>}}{{Map/ImageNode|E|Casual|E-2|x=337|y=180}}{{Map/ImageNode|F|Casual|E-2|x=332|y=136}}{{Map/ImageNode|G|Casual|E-2|x=295|y=129}}{{Map/ImageNode|H|Casual|E-2|x=273|y=191}}{{Map/ImageNode|I1|Casual|E-2|x=209|y=201}}{{Map/ImageNode|I|Casual|E-2|x=240|y=195|drops=<table class="wikitable"><tr><th>Type</th><th>Ships</th></tr><tr><th>DD</th><td>{{Ship/Banner|small=true|Fujinami}}{{Ship/Banner|small=true|Harusame}}{{Ship/Banner|small=true|Kawakaze}}<br>{{Ship/Banner|small=true|Kishinami}}{{Ship/Banner|small=true|Libeccio}}{{Ship/Banner|small=true|Sagiri}}<br>{{Ship/Banner|small=true|Tanikaze}}{{Ship/Banner|small=true|Umikaze}}{{Ship/Banner|small=true|Uranami}}<br>{{Ship/Banner|small=true|Usugumo}}{{Ship/Banner|small=true|Yamakaze}}</td></tr></table>}}{{Map/ImageNode|J|Casual|E-2|x=206|y=229|drops=<table class="wikitable"><tr><th>Type</th><th>Ships</th></tr><tr><th>DD</th><td>{{Ship/Banner|small=true|Fujinami}}{{Ship/Banner|small=true|Harusame}}{{Ship/Banner|small=true|Kawakaze}}<br>{{Ship/Banner|small=true|Kishinami}}{{Ship/Banner|small=true|Libeccio}}{{Ship/Banner|small=true|Sagiri}}<br>{{Ship/Banner|small=true|Tanikaze}}{{Ship/Banner|small=true|Umikaze}}{{Ship/Banner|small=true|Uranami}}<br>{{Ship/Banner|small=true|Yamakaze}}</td></tr></table>}}{{Map/ImageNode|K|Casual|E-2|x=240|y=172|drops=<table class="wikitable"><tr><th>Type</th><th>Ships</th></tr><tr><th>DE</th><td>{{Ship/Banner|small=true|Kunashiri}}{{Ship/Banner|small=true|Shimushu}}</td></tr><tr><th>DD</th><td>{{Ship/Banner|small=true|Amagiri}}{{Ship/Banner|small=true|Fujinami}}{{Ship/Banner|small=true|Harusame}}<br>{{Ship/Banner|small=true|Kawakaze}}{{Ship/Banner|small=true|Kishinami}}{{Ship/Banner|small=true|Libeccio}}<br>{{Ship/Banner|small=true|Sagiri}}{{Ship/Banner|small=true|Tanikaze}}{{Ship/Banner|small=true|Umikaze}}<br>{{Ship/Banner|small=true|Uranami}}{{Ship/Banner|small=true|Usugumo}}{{Ship/Banner|small=true|Yamakaze}}<br></td></tr><tr><th>SSV</th><td>{{Ship/Banner|small=true|I-400}}</td></tr></table>}}{{Map/ImageNode|L|Casual|E-2|x=415|y=296}}{{Map/ImageNode|M|Casual|E-2|x=353|y=310}}{{Map/ImageNode|N|Casual|E-2|x=325|y=227}}{{Map/ImageNode|O|Casual|E-2|x=265|y=287|drops=<table class="wikitable"><tr><th>Type</th><th>Ships</th></tr><tr><th>DE</th><td>{{Ship/Banner|small=true|Kunashiri}}{{Ship/Banner|small=true|Shimushu}}</td></tr><tr><th>DD</th><td>{{Ship/Banner|small=true|Amagiri}}{{Ship/Banner|small=true|Fujinami}}{{Ship/Banner|small=true|Harusame}}<br>{{Ship/Banner|small=true|Kawakaze}}{{Ship/Banner|small=true|Kishinami}}{{Ship/Banner|small=true|Libeccio}}<br>{{Ship/Banner|small=true|Sagiri}}{{Ship/Banner|small=true|Tanikaze}}{{Ship/Banner|small=true|Umikaze}}<br>{{Ship/Banner|small=true|Usugumo}}{{Ship/Banner|small=true|Yamakaze}}</td></tr><tr><th>SSV</th><td>{{Ship/Banner|small=true|I-400}}</td></tr><tr><th>AS</th><td>{{Ship/Banner|small=true|Jingei}}{{Ship/Banner|small=true|Taigei}}</td></tr></table>}}{{Map/ImageNode|P1|Casual|E-2|x=516|y=109}}{{Map/ImageNode|P2|Casual|E-2|x=454|y=97}}{{Map/ImageNode|P|Casual|E-2|x=525|y=168}}{{Map/ImageNode|Q|Casual|E-2|x=411|y=119|drops=<table class="wikitable"><tr><th>Type</th><th>Ships</th></tr><tr><th>DD</th><td>{{Ship/Banner|small=true|Harusame}}{{Ship/Banner|small=true|Kawakaze}}{{Ship/Banner|small=true|Libeccio}}<br></td></tr></table>}}{{Map/ImageNode|R|Casual|E-2|x=172|y=242}}{{Map/ImageNode|Start 2|Casual|E-2|x=580|y=222}}{{Map/ImageNode|S|Casual|E-2|x=143|y=188|drops=<table class="wikitable"><tr><th>Type</th><th>Ships</th></tr><tr><th>DD</th><td>{{Ship/Banner|small=true|Amagiri}}{{Ship/Banner|small=true|Fujinami}}{{Ship/Banner|small=true|Harusame}}<br>{{Ship/Banner|small=true|Kawakaze}}{{Ship/Banner|small=true|Kishinami}}{{Ship/Banner|small=true|Libeccio}}<br>{{Ship/Banner|small=true|Sagiri}}{{Ship/Banner|small=true|Tanikaze}}{{Ship/Banner|small=true|Umikaze}}<br>{{Ship/Banner|small=true|Uranami}}{{Ship/Banner|small=true|Usugumo}}{{Ship/Banner|small=true|Yamakaze}}<br></td></tr></table>}}{{Map/ImageNode|T|Casual|E-2|x=127|y=159}}{{Map/ImageNode|U|Casual|E-2|x=121|y=206}}{{Map/ImageNode|V|Casual|E-2|x=93|y=160|drops=<table class="wikitable"><tr><th>Type</th><th>Ships</th></tr><tr><th>DE</th><td>{{Ship/Banner|small=true|Fukae}}{{Ship/Banner|small=true|Hirato}}</td></tr><tr><th>DD</th><td>{{Ship/Banner|small=true|Akishimo}}{{Ship/Banner|small=true|Hayanami}}{{Ship/Banner|small=true|Natsugumo}}<br></td></tr><tr><th>CA</th><td>{{Ship/Banner|small=true|Pola}}</td></tr><tr><th>SS</th><td>{{Ship/Banner|small=true|I-47}}</td></tr><tr><th>AV</th><td>{{Ship/Banner|small=true|Commandant Teste}}{{Ship/Banner|small=true|Mizuho}}</td></tr><tr><th>AO</th><td>{{Ship/Banner|small=true|Kamoi}}</td></tr></table>}}}} |
<div class="map-nodes"> | <div class="map-nodes"> | ||
{{Map/Nodes|diff=Casual|name=深海潜水艦隊 アラビア海哨戒線 | {{Map/Nodes|diff=Casual|name=深海潜水艦隊 アラビア海哨戒線 | ||
|A | |A | ||
|Normal | |Normal | ||
| − | |{{TooltipSimple|Echelon| | + | |{{TooltipSimple|Echelon|32% (12494/38981, HQ: 36-120)}}<br>{{TooltipSimple|Line Abreast|34% (13345/38981, HQ: 35-120)}}<br>{{TooltipSimple|''Phases: 1, 2''|Samples: 928, 136}} |
|Submarine Ka-Class | |Submarine Ka-Class | ||
|Submarine Ka-Class | |Submarine Ka-Class | ||
| Line 1,038: | Line 1,167: | ||
|A | |A | ||
|Normal | |Normal | ||
| − | |{{TooltipSimple|Echelon| | + | |{{TooltipSimple|Echelon|16% (6184/38981, HQ: 35-120)}}<br>{{TooltipSimple|Line Abreast|18% (6958/38981, HQ: 35-120)}}<br>{{TooltipSimple|''Phases: 1, 2''|Samples: 432, 92}} |
|Submarine Ka-Class/Elite | |Submarine Ka-Class/Elite | ||
|Submarine Ka-Class | |Submarine Ka-Class | ||
| Line 1,046: | Line 1,175: | ||
|B | |B | ||
|Normal | |Normal | ||
| − | |{{TooltipSimple|Line Ahead| | + | |{{TooltipSimple|Line Ahead|47% (274/584, HQ: 36-120)}}<br>{{TooltipSimple|Echelon|26% (151/584, HQ: 35-120)}}<br>{{TooltipSimple|Vanguard|27% (159/584, HQ: 35-120)}}<br>{{TooltipSimple|''Phases: 1, 2''|Samples: 98, 54}} |
|Light Cruiser Ho-Class/Elite | |Light Cruiser Ho-Class/Elite | ||
|Torpedo Cruiser Chi-Class | |Torpedo Cruiser Chi-Class | ||
| Line 1,058: | Line 1,187: | ||
|D | |D | ||
|Normal | |Normal | ||
| − | |{{TooltipSimple|Diamond| | + | |{{TooltipSimple|Diamond|31% (128/407, HQ: 38-120)}}<br>{{TooltipSimple|''Phases: 1, 2''|Samples: 1, 24}} |
|Light Carrier Nu-Class | |Light Carrier Nu-Class | ||
|Heavy Cruiser Ri-Class | |Heavy Cruiser Ri-Class | ||
| Line 1,068: | Line 1,197: | ||
|D | |D | ||
|Normal | |Normal | ||
| − | |{{TooltipSimple|Diamond| | + | |{{TooltipSimple|Diamond|33% (134/407, HQ: 39-120)}}<br>{{TooltipSimple|''Phases: 1, 2''|Samples: 4, 18}} |
|Light Carrier Nu-Class/Elite | |Light Carrier Nu-Class/Elite | ||
|Heavy Cruiser Ri-Class | |Heavy Cruiser Ri-Class | ||
| Line 1,078: | Line 1,207: | ||
|D | |D | ||
|Normal | |Normal | ||
| − | |{{TooltipSimple|Diamond| | + | |{{TooltipSimple|Diamond|36% (145/407, HQ: 38-120)}}<br>{{TooltipSimple|''Phases: 1, 2''|Samples: 1, 29}} |
|Light Carrier Nu-Class/Elite | |Light Carrier Nu-Class/Elite | ||
|Heavy Cruiser Ri-Class/Elite | |Heavy Cruiser Ri-Class/Elite | ||
| Line 1,090: | Line 1,219: | ||
|F | |F | ||
|Normal | |Normal | ||
| − | |{{TooltipSimple|Double Line|30% ( | + | |{{TooltipSimple|Double Line|30% (10595/35486, HQ: 38-120)}}<br>{{TooltipSimple|Diamond|50% (17709/35486, HQ: 38-120)}}<br>{{TooltipSimple|Vanguard|20% (7182/35486, HQ: 39-120)}}<br>{{TooltipSimple|''Phases: 1, 2''|Samples: 887, 45}} |
|Transport Ship Wa-Class/Elite | |Transport Ship Wa-Class/Elite | ||
|Transport Ship Wa-Class | |Transport Ship Wa-Class | ||
| Line 1,103: | Line 1,232: | ||
|I | |I | ||
|Normal | |Normal | ||
| − | |{{TooltipSimple|Line Ahead| | + | |{{TooltipSimple|Line Ahead|37% (601/1646, HQ: 35-120)}}<br>{{TooltipSimple|Echelon|34% (561/1646, HQ: 35-120)}}<br>{{TooltipSimple|''Phases: 1, 2''|Samples: 312, 3}} |
|Light Cruiser He-Class/Elite | |Light Cruiser He-Class/Elite | ||
|Destroyer I-Class/Late Model | |Destroyer I-Class/Late Model | ||
| Line 1,113: | Line 1,242: | ||
|I | |I | ||
|Normal | |Normal | ||
| − | |{{TooltipSimple|Line Ahead| | + | |{{TooltipSimple|Line Ahead|29% (484/1646, HQ: 36-120)}}<br>{{TooltipSimple|''Phases: 1, 2''|Samples: 122, 1}} |
|Light Cruiser He-Class/Elite | |Light Cruiser He-Class/Elite | ||
|Light Cruiser Tsu-Class | |Light Cruiser Tsu-Class | ||
| Line 1,125: | Line 1,254: | ||
|J | |J | ||
|Normal | |Normal | ||
| − | |{{TooltipSimple|Line Ahead| | + | |{{TooltipSimple|Line Ahead|61% (1517/2503, HQ: 38-120)}}<br>{{TooltipSimple|Double Line|32% (791/2503, HQ: 39-120)}}<br>{{TooltipSimple|''Phases: 1, 2''|Samples: 5, 485}} |
|Battleship Ta-Class | |Battleship Ta-Class | ||
|Heavy Cruiser Ne-Class | |Heavy Cruiser Ne-Class | ||
| Line 1,135: | Line 1,264: | ||
|J | |J | ||
|Normal | |Normal | ||
| − | |{{TooltipSimple|Line Ahead|8% ( | + | |{{TooltipSimple|Line Ahead|8% (195/2503, HQ: 42-120)}}<br>{{TooltipSimple|''Phases: 2''|Samples: 44}} |
|Battleship Ta-Class | |Battleship Ta-Class | ||
|Heavy Cruiser Ne-Class | |Heavy Cruiser Ne-Class | ||
| Line 1,146: | Line 1,275: | ||
|K | |K | ||
|Boss | |Boss | ||
| − | |{{TooltipSimple|Line Ahead| | + | |{{TooltipSimple|Line Ahead|29% (452/1558, HQ: 35-120)}}<br>{{TooltipSimple|''Phases: 1, 2''|Samples: 117, 2}} |
|Heavy Cruiser Summer Princess | |Heavy Cruiser Summer Princess | ||
|Light Cruiser Tsu-Class | |Light Cruiser Tsu-Class | ||
| Line 1,155: | Line 1,284: | ||
|K | |K | ||
|Boss | |Boss | ||
| − | |{{TooltipSimple|Line Ahead| | + | |{{TooltipSimple|Line Ahead|19% (296/1558, HQ: 35-120)}}<br>{{TooltipSimple|''Phases: 1, 2''|Samples: 96, 2}} |
|Heavy Cruiser Summer Princess | |Heavy Cruiser Summer Princess | ||
|Heavy Cruiser Ne-Class | |Heavy Cruiser Ne-Class | ||
| Line 1,164: | Line 1,293: | ||
|K | |K | ||
|Boss/Final | |Boss/Final | ||
| − | |{{TooltipSimple|Line Ahead|52% ( | + | |{{TooltipSimple|Line Ahead|52% (810/1558, HQ: 35-120)}}<br>{{TooltipSimple|''Phases: 1''|Samples: 198}} |
|Heavy Cruiser Summer Princess | |Heavy Cruiser Summer Princess | ||
|Light Carrier Nu-Class/Elite | |Light Carrier Nu-Class/Elite | ||
| Line 1,174: | Line 1,303: | ||
|L | |L | ||
|Normal | |Normal | ||
| − | |{{TooltipSimple|Echelon| | + | |{{TooltipSimple|Echelon|25% (6/24, HQ: 41-111)}}<br>{{TooltipSimple|Line Abreast|17% (4/24, HQ: 38-98)}}<br>{{TooltipSimple|''Phases: 2''|Samples: 6}} |
|Submarine Ka-Class | |Submarine Ka-Class | ||
|Submarine Ka-Class | |Submarine Ka-Class | ||
| Line 1,181: | Line 1,310: | ||
|L | |L | ||
|Normal | |Normal | ||
| − | |{{TooltipSimple|Echelon| | + | |{{TooltipSimple|Echelon|38% (9/24, HQ: 38-104)}}<br>{{TooltipSimple|Line Abreast|21% (5/24, HQ: 57-99)}}<br>{{TooltipSimple|''Phases: 2''|Samples: 2}} |
|Submarine Ka-Class/Elite | |Submarine Ka-Class/Elite | ||
|Submarine Ka-Class | |Submarine Ka-Class | ||
| Line 1,189: | Line 1,318: | ||
|M | |M | ||
|Defense | |Defense | ||
| − | |{{TooltipSimple|Diamond| | + | |{{TooltipSimple|Diamond|55% (21/38, HQ: 38-120)}}<br>{{TooltipSimple|''Phases: 2''|Samples: 8}} |
|Supply Depot Princess B/Vacation Mode | |Supply Depot Princess B/Vacation Mode | ||
|Airfield Princess/Patrol Aircraft Deployment | |Airfield Princess/Patrol Aircraft Deployment | ||
| Line 1,198: | Line 1,327: | ||
|M | |M | ||
|Defense | |Defense | ||
| − | |{{TooltipSimple|Diamond| | + | |{{TooltipSimple|Diamond|45% (17/38, HQ: 38-113)}}<br>{{TooltipSimple|''Phases: 2''|Samples: 7}} |
|Supply Depot Princess B/Vacation Mode | |Supply Depot Princess B/Vacation Mode | ||
|Airfield Princess/Patrol Aircraft Deployment | |Airfield Princess/Patrol Aircraft Deployment | ||
| Line 1,209: | Line 1,338: | ||
|O | |O | ||
|Normal | |Normal | ||
| − | |{{TooltipSimple|Diamond| | + | |{{TooltipSimple|Diamond|42% (133/313, HQ: 41-120)}}<br>{{TooltipSimple|''Phases: 2''|Samples: 29}} |
|Supply Depot Princess B/Vacation Mode | |Supply Depot Princess B/Vacation Mode | ||
|Airfield Princess/Patrol Aircraft Deployment | |Airfield Princess/Patrol Aircraft Deployment | ||
| Line 1,218: | Line 1,347: | ||
|O | |O | ||
|Normal | |Normal | ||
| − | |{{TooltipSimple|Diamond| | + | |{{TooltipSimple|Diamond|35% (109/313, HQ: 38-120)}}<br>{{TooltipSimple|''Phases: 2''|Samples: 23}} |
|Supply Depot Princess B/Vacation Mode | |Supply Depot Princess B/Vacation Mode | ||
|Airfield Princess/Patrol Aircraft Deployment | |Airfield Princess/Patrol Aircraft Deployment | ||
|Light Carrier Nu-Class | |Light Carrier Nu-Class | ||
| + | |Destroyer I-Class | ||
| + | |Destroyer I-Class | ||
| + | |- | ||
| + | |O | ||
| + | |Normal | ||
| + | |{{TooltipSimple|Diamond|23% (71/313, HQ: 96-120)}} | ||
| + | |Supply Depot Princess B/Vacation Mode Damaged | ||
| + | |Airfield Princess/Patrol Aircraft Deployment | ||
| + | |Transport Ship Wa-Class | ||
|Destroyer I-Class | |Destroyer I-Class | ||
|Destroyer I-Class | |Destroyer I-Class | ||
| Line 1,229: | Line 1,367: | ||
|P1 | |P1 | ||
|Defense | |Defense | ||
| − | |{{TooltipSimple|Diamond| | + | |{{TooltipSimple|Diamond|36% (4/11, HQ: 88-112)}} |
|Light Carrier Nu-Class/Elite III | |Light Carrier Nu-Class/Elite III | ||
|Heavy Cruiser Ri-Class | |Heavy Cruiser Ri-Class | ||
| Line 1,239: | Line 1,377: | ||
|P1 | |P1 | ||
|Defense | |Defense | ||
| − | |{{TooltipSimple|Diamond| | + | |{{TooltipSimple|Diamond|55% (6/11, HQ: 82-103)}} |
|Light Carrier Nu-Class/Elite III | |Light Carrier Nu-Class/Elite III | ||
|Light Carrier Nu-Class | |Light Carrier Nu-Class | ||
| Line 1,249: | Line 1,387: | ||
|P1 | |P1 | ||
|Defense | |Defense | ||
| − | |{{TooltipSimple|Diamond| | + | |{{TooltipSimple|Diamond|9% (1/11, HQ: 103)}} |
|Light Carrier Nu-Class/Elite III | |Light Carrier Nu-Class/Elite III | ||
|Light Carrier Nu-Class/Elite | |Light Carrier Nu-Class/Elite | ||
| Line 1,260: | Line 1,398: | ||
|P2 | |P2 | ||
|Normal | |Normal | ||
| − | |{{TooltipSimple|Echelon|29% ( | + | |{{TooltipSimple|Echelon|29% (53/184, HQ: 40-120)}}<br>{{TooltipSimple|Line Abreast|29% (54/184, HQ: 40-120)}}<br>{{TooltipSimple|''Phases: 2''|Samples: 36}} |
|Submarine Yo-Class/Elite | |Submarine Yo-Class/Elite | ||
|Submarine Ka-Class | |Submarine Ka-Class | ||
| Line 1,267: | Line 1,405: | ||
|P2 | |P2 | ||
|Normal | |Normal | ||
| − | |{{TooltipSimple|Echelon|17% ( | + | |{{TooltipSimple|Echelon|17% (32/184, HQ: 40-120)}}<br>{{TooltipSimple|Line Abreast|24% (45/184, HQ: 40-120)}}<br>{{TooltipSimple|''Phases: 2''|Samples: 17}} |
|Submarine Yo-Class/Elite | |Submarine Yo-Class/Elite | ||
|Submarine Ka-Class | |Submarine Ka-Class | ||
| Line 1,276: | Line 1,414: | ||
|Q | |Q | ||
|Normal | |Normal | ||
| − | |{{TooltipSimple|Diamond| | + | |{{TooltipSimple|Diamond|48% (1004/2076, HQ: 40-120)}}<br>{{TooltipSimple|''Phases: 2''|Samples: 218}} |
|Light Carrier Nu-Class/Elite III | |Light Carrier Nu-Class/Elite III | ||
|Heavy Cruiser Ri-Class | |Heavy Cruiser Ri-Class | ||
| Line 1,286: | Line 1,424: | ||
|Q | |Q | ||
|Normal | |Normal | ||
| − | |{{TooltipSimple|Diamond| | + | |{{TooltipSimple|Diamond|46% (952/2076, HQ: 39-120)}}<br>{{TooltipSimple|''Phases: 2''|Samples: 236}} |
|Light Carrier Nu-Class/Elite III | |Light Carrier Nu-Class/Elite III | ||
|Light Carrier Nu-Class | |Light Carrier Nu-Class | ||
| Line 1,296: | Line 1,434: | ||
|Q | |Q | ||
|Normal | |Normal | ||
| − | |{{TooltipSimple|Diamond| | + | |{{TooltipSimple|Diamond|6% (120/2076, HQ: 42-120)}}<br>{{TooltipSimple|''Phases: 2''|Samples: 23}} |
|Light Carrier Nu-Class/Elite III | |Light Carrier Nu-Class/Elite III | ||
|Light Carrier Nu-Class/Elite | |Light Carrier Nu-Class/Elite | ||
| Line 1,308: | Line 1,446: | ||
|S | |S | ||
|Normal | |Normal | ||
| − | |{{TooltipSimple|Line Ahead| | + | |{{TooltipSimple|Line Ahead|51% (1051/2075, HQ: 40-120)}}<br>{{TooltipSimple|Double Line|27% (550/2075, HQ: 39-120)}}<br>{{TooltipSimple|Diamond|23% (474/2075, HQ: 40-120)}}<br>{{TooltipSimple|''Phases: 2''|Samples: 438}} |
|Light Carrier Nu-Class/B Elite | |Light Carrier Nu-Class/B Elite | ||
|Heavy Cruiser Ne-Class | |Heavy Cruiser Ne-Class | ||
| Line 1,320: | Line 1,458: | ||
|U | |U | ||
|Normal | |Normal | ||
| − | |{{TooltipSimple|Line Ahead| | + | |{{TooltipSimple|Line Ahead|60% (58/97, HQ: 41-120)}}<br>{{TooltipSimple|Echelon|23% (22/97, HQ: 43-120)}}<br>{{TooltipSimple|''Phases: 2''|Samples: 15}} |
|PT Imp Pack/II | |PT Imp Pack/II | ||
|PT Imp Pack | |PT Imp Pack | ||
| Line 1,328: | Line 1,466: | ||
|U | |U | ||
|Normal | |Normal | ||
| − | |{{TooltipSimple|Line Ahead| | + | |{{TooltipSimple|Line Ahead|18% (17/97, HQ: 43-120)}}<br>{{TooltipSimple|''Phases: 2''|Samples: 6}} |
|PT Imp Pack/II | |PT Imp Pack/II | ||
|PT Imp Pack/II | |PT Imp Pack/II | ||
| Line 1,338: | Line 1,476: | ||
|V | |V | ||
|Boss | |Boss | ||
| − | |{{TooltipSimple|Cruising Formation 4| | + | |{{TooltipSimple|Cruising Formation 4|88% (1495/1702, HQ: 39-120)}}<br>{{TooltipSimple|''Phases: 2''|Samples: 261}} |
|Battleship Summer Princess | |Battleship Summer Princess | ||
|Light Carrier Nu-Class/Elite | |Light Carrier Nu-Class/Elite | ||
| Line 1,354: | Line 1,492: | ||
|V | |V | ||
|Boss/Final | |Boss/Final | ||
| − | |{{TooltipSimple|Cruising Formation 4| | + | |{{TooltipSimple|Cruising Formation 4|12% (207/1702, HQ: 42-120)}}<br>{{TooltipSimple|''Phases: 2''|Samples: 42}} |
|Battleship Summer Princess | |Battleship Summer Princess | ||
|Light Carrier Nu-Class/B Elite | |Light Carrier Nu-Class/B Elite | ||
Latest revision as of 19:47, 19 September 2022
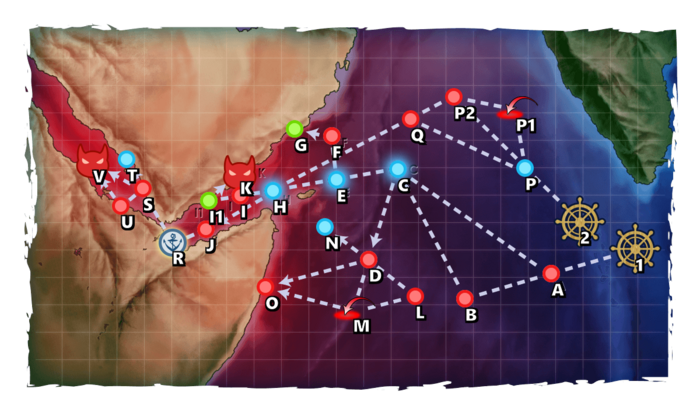
| Type | Ships |
|---|---|
| DD |
| Type | Ships |
|---|---|
| DE | |
| DD |
| Type | Ships |
|---|---|
| DE | |
| DD |
| Type | Ships |
|---|---|
| DE | |
| DD | |
| SSV | |
| AS |
| Type | Ships |
|---|---|
| DE | |
| DD | |
| SSV | |
| AS |
| Type | Ships |
|---|---|
| DD |
| Type | Ships |
|---|---|
| DE | |
| DD |
| Type | Ships |
|---|---|
| DE | |
| DD | |
| CA | |
| SS | |
| AV | |
| AO |
E-2 Hard A: 深海潜水艦隊 アラビア海哨戒線 (PoiDB)
| # | Formation | Normal Battle Node | AD/AP AS/AS+ |
|---|---|---|---|
| A | Echelon Line Abreast Phases: 1, 2 |
0/0 0/0 | |
| Echelon Line Abreast Phases: 1, 2 |
0/0 0/0 | ||
| Echelon Line Abreast Phases: 1, 2 |
0/0 0/0 | ||
| # | Formation | Normal Battle Node | AD/AP AS/AS+ |
E-2 Hard B: 深海任務部隊 偵察哨戒艦隊 (PoiDB)
| # | Formation | Normal Battle Node | AD/AP AS/AS+ |
|---|---|---|---|
| B | Line Ahead Echelon Vanguard Phases: 1, 2 |
0/0 0/0 | |
| # | Formation | Normal Battle Node | AD/AP AS/AS+ |
E-2 Hard C
| # | Selection Node | ||
|---|---|---|---|
| C | 艦隊の針路を選択できます。提督、どちらの針路をとられますか? You can decide the fleet's course. Admiral, which heading should we take? | ||
| # | Selection Node | ||
E-2 Hard D: 深海任務部隊 増援軽空母戦隊 (PoiDB)
| # | Formation | Normal Battle Node | AD/AP AS/AS+ |
|---|---|---|---|
| D | Diamond Phases: 1, 2 |
26/52 116/231 | |
| Diamond Phases: 2 |
32/63 140/279 | ||
| Diamond Phases: 2 |
36/72 161/321 | ||
| # | Formation | Normal Battle Node | AD/AP AS/AS+ |
E-2 Hard E
| # | Selection Node | ||
|---|---|---|---|
| E | 艦隊の針路を選択できます。提督、どちらの針路をとられますか? You can decide the fleet's course. Admiral, which heading should we take? | ||
| # | Selection Node | ||
E-2 Hard F: 深海任務部隊 油槽船団 (PoiDB)
| # | Formation | Normal Battle Node | AD/AP AS/AS+ |
|---|---|---|---|
| F | Double Line Diamond Vanguard Phases: 1, 2 |
0/0 0/0 | |
| # | Formation | Normal Battle Node | AD/AP AS/AS+ |
E-2 Hard G
| # | Resource Node | ||
|---|---|---|---|
| # | Resource Node | ||
E-2 Hard H
| # | Selection Node | ||
|---|---|---|---|
| H | 遠征艦隊、アデン湾方面へ進出せよ! Expeditionary fleet, advance towards the Gulf of Aden! | ||
| # | Selection Node | ||
E-2 Hard I: 深海任務部隊 揚陸阻止線 (PoiDB)
| # | Formation | Normal Battle Node | AD/AP AS/AS+ |
|---|---|---|---|
| I | Line Ahead Echelon Phases: 1, 2 |
0/0 0/0 | |
| Line Ahead Phases: 1, 2 |
0/0 0/0 | ||
| # | Formation | Normal Battle Node | AD/AP AS/AS+ |
E-2 Hard I1
| # | Landing Node | ||
|---|---|---|---|
| I1 | 輸送物資の揚陸地点に到達しました。本海域の輸送作戦は無事完了しています。 The landing point of the convoy has been reached. The transport operation here has already been completed successfully. | ||
| # | Landing Node | ||
E-2 Hard J: 深海任務部隊 アデン湾阻止線 (PoiDB)
| # | Formation | Normal Battle Node | AD/AP AS/AS+ |
|---|---|---|---|
| J | Line Ahead Double Line Phases: 1, 2 |
0/0 0/0 | |
| Line Ahead Phases: 2 |
0/0 0/0 | ||
| # | Formation | Normal Battle Node | AD/AP AS/AS+ |
E-2 Hard K: 深海任務部隊 揚陸地点強襲部隊 (PoiDB)
| # | Formation | Boss Battle Node | AD/AP AS/AS+ |
|---|---|---|---|
| K | Line Ahead Phases: 1, 2 |
0/0 0/0 | |
| Line Ahead Phases: 1, 2 |
0/0 0/0 | ||
| Line Ahead Phases: 1, 2 (Final)
|
36/72 161/321 | ||
| # | Formation | Boss Battle Node | AD/AP AS/AS+ |
E-2 Hard L: 深海潜水艦隊 アラビア海遊撃隊 (PoiDB)
| # | Formation | Normal Battle Node | AD/AP AS/AS+ |
|---|---|---|---|
| L | Echelon Line Abreast Phases: 2 |
0/0 0/0 | |
| Echelon Phases: 2 |
0/0 0/0 | ||
| # | Formation | Normal Battle Node | AD/AP AS/AS+ |
E-2 Hard M: 深海攻勢拠点 航空部隊 (PoiDB)
| # | Formation | Air Defense Node | AD/AP AS/AS+ |
|---|---|---|---|
| M | Diamond Phases: 2 |
112/223 501/1002 | |
| Diamond Phases: 2 |
98/196 440/879 | ||
| # | Formation | Air Defense Node | AD/AP AS/AS+ |
E-2 Hard N
| # | Empty Node | ||
|---|---|---|---|
| N | 敵影を見ず。 No enemy spotted. | ||
| # | Empty Node | ||
E-2 Hard O: 深海攻勢拠点 物資集積地 (PoiDB)
| # | Formation | Normal Battle Node | AD/AP AS/AS+ |
|---|---|---|---|
| O | Diamond Phases: 2 |
112/223 501/1002 | |
| Diamond Phases: 2 |
98/196 440/879 | ||
| Diamond | 46/91 204/408 | ||
| # | Formation | Normal Battle Node | AD/AP AS/AS+ |
E-2 Hard P
| # | Empty Node | ||
|---|---|---|---|
| P | 気のせいだった。 遠征艦隊、アデン湾方面へ進出せよ! Must be my imagination. Expeditionary fleet, advance towards the Gulf of Aden! | ||
| # | Empty Node | ||
E-2 Hard P1: 深海空母機動部隊 艦載機群 (PoiDB)
| # | Formation | Air Defense Node | AD/AP AS/AS+ |
|---|---|---|---|
| P1 | Diamond Phases: 2 |
91/182 408/816 | |
| Diamond Phases: 2 |
106/212 476/951 | ||
| Diamond Phases: 2 |
113/225 504/1008 | ||
| # | Formation | Air Defense Node | AD/AP AS/AS+ |
E-2 Hard P2: 深海潜水艦隊 アラビア海阻止線 (PoiDB)
| # | Formation | Normal Battle Node | AD/AP AS/AS+ |
|---|---|---|---|
| P2 | Echelon Line Abreast Phases: 2 |
0/0 0/0 | |
| Echelon Line Abreast Phases: 2 |
0/0 0/0 | ||
| Echelon Line Abreast Phases: 2 |
0/0 0/0 | ||
| # | Formation | Normal Battle Node | AD/AP AS/AS+ |
E-2 Hard Q: 深海任務部隊 警戒軽空母集団 (PoiDB)
| # | Formation | Normal Battle Node | AD/AP AS/AS+ |
|---|---|---|---|
| Q | Diamond Phases: 2 |
91/182 408/816 | |
| Diamond Phases: 2 |
106/212 476/951 | ||
| Diamond Phases: 2 |
113/225 504/1008 | ||
| # | Formation | Normal Battle Node | AD/AP AS/AS+ |
E-2 Hard R
| # | Repair Node | ||
|---|---|---|---|
| # | Repair Node | ||
E-2 Hard S: 深海任務部隊 紅海阻止線前縁部 (PoiDB)
| # | Formation | Normal Battle Node | AD/AP AS/AS+ |
|---|---|---|---|
| S | Line Ahead Double Line Diamond Phases: 2 |
57/113 252/504 | |
| # | Formation | Normal Battle Node | AD/AP AS/AS+ |
E-2 Hard T
| # | Empty Node | ||
|---|---|---|---|
| T | 敵影を見ず。 遠征艦隊、アデン湾方面へ進出せよ! No enemy spotted. Expeditionary fleet, advance towards the Gulf of Aden! | ||
| # | Empty Node | ||
E-2 Hard U: 紅海配備 深海魚雷艇部隊 (PoiDB)
| # | Formation | Normal Battle Node | AD/AP AS/AS+ |
|---|---|---|---|
| U | Line Ahead Echelon Phases: 2 |
0/0 0/0 | |
| Line Ahead Phases: 2 |
0/0 0/0 | ||
| # | Formation | Normal Battle Node | AD/AP AS/AS+ |
E-2 Hard V: 深海任務部隊 紅海絶対阻止線 (PoiDB)
| # | Formation | Boss Battle Node | AD/AP AS/AS+ |
|---|---|---|---|
| V | Cruising Formation 4 Phases: 2 |
57/113 252/504 | |
| Cruising Formation 4 Phases: 2 (Final)
|
113/225 504/1008 | ||
| # | Formation | Boss Battle Node | AD/AP AS/AS+ |
| Type | Ships |
|---|---|
| DD |
| Type | Ships |
|---|---|
| DD |
| Type | Ships |
|---|---|
| DD |
| Type | Ships |
|---|---|
| DE | |
| DD | |
| SSV | |
| AS |
| Type | Ships |
|---|---|
| DE | |
| DD | |
| SSV | |
| AS |
| Type | Ships |
|---|---|
| DD |
| Type | Ships |
|---|---|
| DE | |
| DD |
| Type | Ships |
|---|---|
| DE | |
| DD | |
| CA | |
| SS | |
| AV | |
| AO |
E-2 Medium A: 深海潜水艦隊 アラビア海哨戒線 (PoiDB)
| # | Formation | Normal Battle Node | AD/AP AS/AS+ |
|---|---|---|---|
| A | Echelon Line Abreast Phases: 1, 2 |
0/0 0/0 | |
| Echelon Line Abreast Phases: 1, 2 |
0/0 0/0 | ||
| Echelon Line Abreast Phases: 1, 2 |
0/0 0/0 | ||
| # | Formation | Normal Battle Node | AD/AP AS/AS+ |
E-2 Medium B: 深海任務部隊 偵察哨戒艦隊 (PoiDB)
| # | Formation | Normal Battle Node | AD/AP AS/AS+ |
|---|---|---|---|
| B | Line Ahead Echelon Vanguard Phases: 1, 2 |
0/0 0/0 | |
| # | Formation | Normal Battle Node | AD/AP AS/AS+ |
E-2 Medium C
| # | Selection Node | ||
|---|---|---|---|
| C | 艦隊の針路を選択できます。提督、どちらの針路をとられますか? You can decide the fleet's course. Admiral, which heading should we take? | ||
| # | Selection Node | ||
E-2 Medium D: 深海任務部隊 増援軽空母戦隊 (PoiDB)
| # | Formation | Normal Battle Node | AD/AP AS/AS+ |
|---|---|---|---|
| D | Diamond Phases: 2 |
24/47 104/207 | |
| Diamond Phases: 2 |
24/47 104/207 | ||
| Diamond Phases: 2 |
24/47 104/207 | ||
| # | Formation | Normal Battle Node | AD/AP AS/AS+ |
E-2 Medium E
| # | Selection Node | ||
|---|---|---|---|
| E | 艦隊の針路を選択できます。提督、どちらの針路をとられますか? You can decide the fleet's course. Admiral, which heading should we take? | ||
| # | Selection Node | ||
E-2 Medium F: 深海任務部隊 油槽船団 (PoiDB)
| # | Formation | Normal Battle Node | AD/AP AS/AS+ |
|---|---|---|---|
| F | Double Line Diamond Vanguard Phases: 1, 2 |
0/0 0/0 | |
| # | Formation | Normal Battle Node | AD/AP AS/AS+ |
E-2 Medium G
| # | Resource Node | ||
|---|---|---|---|
| # | Resource Node | ||
E-2 Medium H
| # | Selection Node | ||
|---|---|---|---|
| H | 遠征艦隊、アデン湾方面へ進出せよ! Expeditionary fleet, advance towards the Gulf of Aden! | ||
| # | Selection Node | ||
E-2 Medium I: 深海任務部隊 揚陸阻止線 (PoiDB)
| # | Formation | Normal Battle Node | AD/AP AS/AS+ |
|---|---|---|---|
| I | Line Ahead Echelon Phases: 1, 2 |
0/0 0/0 | |
| Line Ahead Phases: 1, 2 |
0/0 0/0 | ||
| # | Formation | Normal Battle Node | AD/AP AS/AS+ |
E-2 Medium I1
| # | Landing Node | ||
|---|---|---|---|
| I1 | 輸送物資の揚陸地点に到達しました。本海域の輸送作戦は無事完了しています。 The landing point of the convoy has been reached. The transport operation here has already been completed successfully. | ||
| # | Landing Node | ||
E-2 Medium J: 深海任務部隊 アデン湾阻止線 (PoiDB)
| # | Formation | Normal Battle Node | AD/AP AS/AS+ |
|---|---|---|---|
| J | Line Ahead Double Line Phases: 1, 2 |
0/0 0/0 | |
| Line Ahead Phases: 2 |
0/0 0/0 | ||
| # | Formation | Normal Battle Node | AD/AP AS/AS+ |
E-2 Medium K: 深海任務部隊 揚陸地点強襲部隊 (PoiDB)
| # | Formation | Boss Battle Node | AD/AP AS/AS+ |
|---|---|---|---|
| K | Line Ahead Phases: 1, 2 |
0/0 0/0 | |
| Line Ahead Phases: 1, 2 |
0/0 0/0 | ||
| Line Ahead Phases: 1, 2 (Final)
|
32/63 140/279 | ||
| # | Formation | Boss Battle Node | AD/AP AS/AS+ |
E-2 Medium L: 深海潜水艦隊 アラビア海遊撃隊 (PoiDB)
| # | Formation | Normal Battle Node | AD/AP AS/AS+ |
|---|---|---|---|
| L | Line Abreast Phases: 2 |
0/0 0/0 | |
| Echelon Line Abreast |
0/0 0/0 | ||
| Line Abreast | 0/0 0/0 | ||
| # | Formation | Normal Battle Node | AD/AP AS/AS+ |
E-2 Medium M: 深海攻勢拠点 航空部隊 (PoiDB)
| # | Formation | Air Defense Node | AD/AP AS/AS+ |
|---|---|---|---|
| M | Diamond Phases: 2 |
81/162 363/726 | |
| Diamond Phases: 2 |
102/203 456/912 | ||
| # | Formation | Air Defense Node | AD/AP AS/AS+ |
E-2 Medium N
| # | Empty Node | ||
|---|---|---|---|
| N | 敵影を見ず。 No enemy spotted. | ||
| # | Empty Node | ||
E-2 Medium O: 深海攻勢拠点 物資集積地 (PoiDB)
| # | Formation | Normal Battle Node | AD/AP AS/AS+ |
|---|---|---|---|
| O | Diamond Phases: 2 |
81/162 363/726 | |
| Diamond Phases: 2 |
102/203 456/912 | ||
| Diamond | 37/73 162/324 | ||
| # | Formation | Normal Battle Node | AD/AP AS/AS+ |
E-2 Medium P
| # | Empty Node | ||
|---|---|---|---|
| P | 気のせいだった。 遠征艦隊、アデン湾方面へ進出せよ! Must be my imagination. Expeditionary fleet, advance towards the Gulf of Aden! | ||
| # | Empty Node | ||
E-2 Medium P1: 深海空母機動部隊 艦載機群 (PoiDB)
| # | Formation | Air Defense Node | AD/AP AS/AS+ |
|---|---|---|---|
| P1 | Diamond | 91/182 408/816 | |
| Diamond | 96/191 428/855 | ||
| Diamond | 100/199 447/894 | ||
| # | Formation | Air Defense Node | AD/AP AS/AS+ |
E-2 Medium P2: 深海潜水艦隊 アラビア海阻止線 (PoiDB)
| # | Formation | Normal Battle Node | AD/AP AS/AS+ |
|---|---|---|---|
| P2 | Echelon Line Abreast Phases: 2 |
0/0 0/0 | |
| Echelon Line Abreast Phases: 2 |
0/0 0/0 | ||
| Echelon Line Abreast Phases: 2 |
0/0 0/0 | ||
| # | Formation | Normal Battle Node | AD/AP AS/AS+ |
E-2 Medium Q: 深海任務部隊 警戒軽空母集団 (PoiDB)
| # | Formation | Normal Battle Node | AD/AP AS/AS+ |
|---|---|---|---|
| Q | Diamond Phases: 2 |
91/182 408/816 | |
| Diamond Phases: 2 |
96/191 428/855 | ||
| Diamond Phases: 2 |
100/199 447/894 | ||
| # | Formation | Normal Battle Node | AD/AP AS/AS+ |
E-2 Medium R
| # | Repair Node | ||
|---|---|---|---|
| # | Repair Node | ||
E-2 Medium S: 深海任務部隊 紅海阻止線前縁部 (PoiDB)
| # | Formation | Normal Battle Node | AD/AP AS/AS+ |
|---|---|---|---|
| S | Line Ahead Double Line Diamond Phases: 2 |
50/100 224/447 | |
| # | Formation | Normal Battle Node | AD/AP AS/AS+ |
E-2 Medium T
| # | Empty Node | ||
|---|---|---|---|
| T | 敵影を見ず。 遠征艦隊、アデン湾方面へ進出せよ! No enemy spotted. Expeditionary fleet, advance towards the Gulf of Aden! | ||
| # | Empty Node | ||
E-2 Medium U: 紅海配備 深海魚雷艇部隊 (PoiDB)
| # | Formation | Normal Battle Node | AD/AP AS/AS+ |
|---|---|---|---|
| U | Line Ahead Echelon Phases: 2 |
0/0 0/0 | |
| Line Ahead Phases: 2 |
0/0 0/0 | ||
| # | Formation | Normal Battle Node | AD/AP AS/AS+ |
E-2 Medium V: 深海任務部隊 紅海絶対阻止線 (PoiDB)
| # | Formation | Boss Battle Node | AD/AP AS/AS+ |
|---|---|---|---|
| V | Cruising Formation 4 Phases: 2 |
50/100 224/447 | |
| Cruising Formation 4 Phases: 2 (Final)
|
100/199 447/894 | ||
| # | Formation | Boss Battle Node | AD/AP AS/AS+ |
| Type | Ships |
|---|---|
| DD |
| Type | Ships |
|---|---|
| DD |
| Type | Ships |
|---|---|
| DD |
| Type | Ships |
|---|---|
| DE | |
| DD | |
| SSV | |
| AS |
| Type | Ships |
|---|---|
| DE | |
| DD | |
| SSV | |
| AS |
| Type | Ships |
|---|---|
| DD |
| Type | Ships |
|---|---|
| DE | |
| DD |
| Type | Ships |
|---|---|
| DE | |
| DD | |
| CA | |
| SS | |
| AV | |
| AO |
E-2 Easy A: 深海潜水艦隊 アラビア海哨戒線 (PoiDB)
| # | Formation | Normal Battle Node | AD/AP AS/AS+ |
|---|---|---|---|
| A | Echelon Line Abreast Phases: 1, 2 |
0/0 0/0 | |
| Echelon Line Abreast Phases: 1, 2 |
0/0 0/0 | ||
| Echelon Line Abreast Phases: 1, 2 |
0/0 0/0 | ||
| # | Formation | Normal Battle Node | AD/AP AS/AS+ |
E-2 Easy B: 深海任務部隊 偵察哨戒艦隊 (PoiDB)
| # | Formation | Normal Battle Node | AD/AP AS/AS+ |
|---|---|---|---|
| B | Line Ahead Echelon Vanguard Phases: 1, 2 |
0/0 0/0 | |
| # | Formation | Normal Battle Node | AD/AP AS/AS+ |
E-2 Easy C
| # | Selection Node | ||
|---|---|---|---|
| C | 艦隊の針路を選択できます。提督、どちらの針路をとられますか? You can decide the fleet's course. Admiral, which heading should we take? | ||
| # | Selection Node | ||
E-2 Easy D: 深海任務部隊 増援軽空母戦隊 (PoiDB)
| # | Formation | Normal Battle Node | AD/AP AS/AS+ |
|---|---|---|---|
| D | Diamond Phases: 2 |
9/17 36/72 | |
| Diamond Phases: 1, 2 |
9/17 36/72 | ||
| Diamond Phases: 2 |
9/17 36/72 | ||
| # | Formation | Normal Battle Node | AD/AP AS/AS+ |
E-2 Easy E
| # | Selection Node | ||
|---|---|---|---|
| E | 艦隊の針路を選択できます。提督、どちらの針路をとられますか? You can decide the fleet's course. Admiral, which heading should we take? | ||
| # | Selection Node | ||
E-2 Easy F: 深海任務部隊 油槽船団 (PoiDB)
| # | Formation | Normal Battle Node | AD/AP AS/AS+ |
|---|---|---|---|
| F | Double Line Diamond Vanguard Phases: 1, 2 |
0/0 0/0 | |
| # | Formation | Normal Battle Node | AD/AP AS/AS+ |
E-2 Easy G
| # | Resource Node | ||
|---|---|---|---|
| # | Resource Node | ||
E-2 Easy H
| # | Selection Node | ||
|---|---|---|---|
| H | 遠征艦隊、アデン湾方面へ進出せよ! Expeditionary fleet, advance towards the Gulf of Aden! | ||
| # | Selection Node | ||
E-2 Easy I: 深海任務部隊 揚陸阻止線 (PoiDB)
| # | Formation | Normal Battle Node | AD/AP AS/AS+ |
|---|---|---|---|
| I | Line Ahead Echelon Phases: 1, 2 |
0/0 0/0 | |
| Line Ahead Phases: 1, 2 |
0/0 0/0 | ||
| # | Formation | Normal Battle Node | AD/AP AS/AS+ |
E-2 Easy I1
| # | Landing Node | ||
|---|---|---|---|
| I1 | 輸送物資の揚陸地点に到達しました。本海域の輸送作戦は無事完了しています。 The landing point of the convoy has been reached. The transport operation here has already been completed successfully. | ||
| # | Landing Node | ||
E-2 Easy J: 深海任務部隊 アデン湾阻止線 (PoiDB)
| # | Formation | Normal Battle Node | AD/AP AS/AS+ |
|---|---|---|---|
| J | Line Ahead Double Line Phases: 1, 2 |
0/0 0/0 | |
| Line Ahead Phases: 2 |
0/0 0/0 | ||
| # | Formation | Normal Battle Node | AD/AP AS/AS+ |
E-2 Easy K: 深海任務部隊 揚陸地点強襲部隊 (PoiDB)
| # | Formation | Boss Battle Node | AD/AP AS/AS+ |
|---|---|---|---|
| K | Line Ahead Phases: 1, 2 |
0/0 0/0 | |
| Line Ahead Phases: 1, 2 |
0/0 0/0 | ||
| Line Ahead Phases: 1, 2 (Final)
|
24/47 104/207 | ||
| # | Formation | Boss Battle Node | AD/AP AS/AS+ |
E-2 Easy L: 深海潜水艦隊 アラビア海遊撃隊 (PoiDB)
| # | Formation | Normal Battle Node | AD/AP AS/AS+ |
|---|---|---|---|
| L | Echelon Line Abreast Phases: 2 |
0/0 0/0 | |
| Echelon Line Abreast Phases: 2 |
0/0 0/0 | ||
| Echelon Phases: 2 |
0/0 0/0 | ||
| # | Formation | Normal Battle Node | AD/AP AS/AS+ |
E-2 Easy M: 深海攻勢拠点 航空部隊 (PoiDB)
| # | Formation | Air Defense Node | AD/AP AS/AS+ |
|---|---|---|---|
| M | Diamond Phases: 2 |
40/79 177/354 | |
| Diamond Phases: 2 |
45/90 201/402 | ||
| # | Formation | Air Defense Node | AD/AP AS/AS+ |
E-2 Easy N
| # | Empty Node | ||
|---|---|---|---|
| N | 敵影を見ず。 No enemy spotted. | ||
| # | Empty Node | ||
E-2 Easy O: 深海攻勢拠点 物資集積地 (PoiDB)
| # | Formation | Normal Battle Node | AD/AP AS/AS+ |
|---|---|---|---|
| O | Diamond Phases: 2 |
40/79 177/354 | |
| Diamond Phases: 2 |
45/90 201/402 | ||
| Diamond Phases: 2 |
24/47 105/210 | ||
| # | Formation | Normal Battle Node | AD/AP AS/AS+ |
E-2 Easy P
| # | Empty Node | ||
|---|---|---|---|
| P | 気のせいだった。 遠征艦隊、アデン湾方面へ進出せよ! Must be my imagination. Expeditionary fleet, advance towards the Gulf of Aden! | ||
| # | Empty Node | ||
E-2 Easy P1: 深海空母機動部隊 艦載機群 (PoiDB)
| # | Formation | Air Defense Node | AD/AP AS/AS+ |
|---|---|---|---|
| P1 | Diamond | 51/101 225/450 | |
| Diamond Phases: 2 |
85/169 378/756 | ||
| Diamond | 88/175 393/786 | ||
| # | Formation | Air Defense Node | AD/AP AS/AS+ |
E-2 Easy P2: 深海潜水艦隊 アラビア海阻止線 (PoiDB)
| # | Formation | Normal Battle Node | AD/AP AS/AS+ |
|---|---|---|---|
| P2 | Echelon Line Abreast Phases: 2 |
0/0 0/0 | |
| Echelon Line Abreast Phases: 2 |
0/0 0/0 | ||
| Echelon Line Abreast Phases: 2 |
0/0 0/0 | ||
| # | Formation | Normal Battle Node | AD/AP AS/AS+ |
E-2 Easy Q: 深海任務部隊 警戒軽空母集団 (PoiDB)
| # | Formation | Normal Battle Node | AD/AP AS/AS+ |
|---|---|---|---|
| Q | Diamond Phases: 2 |
51/101 225/450 | |
| Diamond Phases: 2 |
85/169 378/756 | ||
| Diamond Phases: 2 |
88/175 393/786 | ||
| # | Formation | Normal Battle Node | AD/AP AS/AS+ |
E-2 Easy R
| # | Repair Node | ||
|---|---|---|---|
| # | Repair Node | ||
E-2 Easy S: 深海任務部隊 紅海阻止線前縁部 (PoiDB)
| # | Formation | Normal Battle Node | AD/AP AS/AS+ |
|---|---|---|---|
| S | Line Ahead Double Line Diamond Phases: 2 |
46/91 204/408 | |
| # | Formation | Normal Battle Node | AD/AP AS/AS+ |
E-2 Easy T
| # | Empty Node | ||
|---|---|---|---|
| T | 敵影を見ず。 遠征艦隊、アデン湾方面へ進出せよ! No enemy spotted. Expeditionary fleet, advance towards the Gulf of Aden! | ||
| # | Empty Node | ||
E-2 Easy U: 紅海配備 深海魚雷艇部隊 (PoiDB)
| # | Formation | Normal Battle Node | AD/AP AS/AS+ |
|---|---|---|---|
| U | Line Ahead Echelon Phases: 2 |
0/0 0/0 | |
| Line Ahead Phases: 2 |
0/0 0/0 | ||
| # | Formation | Normal Battle Node | AD/AP AS/AS+ |
E-2 Easy V: 深海任務部隊 紅海絶対阻止線 (PoiDB)
| # | Formation | Boss Battle Node | AD/AP AS/AS+ |
|---|---|---|---|
| V | Cruising Formation 4 Phases: 2 |
46/91 204/408 | |
| Cruising Formation 4 Phases: 2 (Final)
|
91/182 408/816 | ||
| # | Formation | Boss Battle Node | AD/AP AS/AS+ |
| Type | Ships |
|---|---|
| DD |
| Type | Ships |
|---|---|
| DD |
| Type | Ships |
|---|---|
| DD |
| Type | Ships |
|---|---|
| DE | |
| DD | |
| SSV |
| Type | Ships |
|---|---|
| DE | |
| DD | |
| SSV | |
| AS |
| Type | Ships |
|---|---|
| DD |
| Type | Ships |
|---|---|
| DD |
| Type | Ships |
|---|---|
| DE | |
| DD | |
| CA | |
| SS | |
| AV | |
| AO |
E-2 Casual A: 深海潜水艦隊 アラビア海哨戒線 (PoiDB)
| # | Formation | Normal Battle Node | AD/AP AS/AS+ |
|---|---|---|---|
| A | Echelon Line Abreast Phases: 1, 2 |
0/0 0/0 | |
| Echelon Line Abreast Phases: 1, 2 |
0/0 0/0 | ||
| # | Formation | Normal Battle Node | AD/AP AS/AS+ |
E-2 Casual B: 深海任務部隊 偵察哨戒艦隊 (PoiDB)
| # | Formation | Normal Battle Node | AD/AP AS/AS+ |
|---|---|---|---|
| B | Line Ahead Echelon Vanguard Phases: 1, 2 |
0/0 0/0 | |
| # | Formation | Normal Battle Node | AD/AP AS/AS+ |
E-2 Casual C
| # | Selection Node | ||
|---|---|---|---|
| C | 艦隊の針路を選択できます。提督、どちらの針路をとられますか? You can decide the fleet's course. Admiral, which heading should we take? | ||
| # | Selection Node | ||
E-2 Casual D: 深海任務部隊 増援軽空母戦隊 (PoiDB)
| # | Formation | Normal Battle Node | AD/AP AS/AS+ |
|---|---|---|---|
| D | Diamond Phases: 1, 2 |
3/6 12/24 | |
| Diamond Phases: 1, 2 |
9/17 36/72 | ||
| Diamond Phases: 1, 2 |
9/17 36/72 | ||
| # | Formation | Normal Battle Node | AD/AP AS/AS+ |
E-2 Casual E
| # | Selection Node | ||
|---|---|---|---|
| E | 艦隊の針路を選択できます。提督、どちらの針路をとられますか? You can decide the fleet's course. Admiral, which heading should we take? | ||
| # | Selection Node | ||
E-2 Casual F: 深海任務部隊 油槽船団 (PoiDB)
| # | Formation | Normal Battle Node | AD/AP AS/AS+ |
|---|---|---|---|
| F | Double Line Diamond Vanguard Phases: 1, 2 |
0/0 0/0 | |
| # | Formation | Normal Battle Node | AD/AP AS/AS+ |
E-2 Casual G
| # | Resource Node | ||
|---|---|---|---|
| # | Resource Node | ||
E-2 Casual H
| # | Selection Node | ||
|---|---|---|---|
| H | 遠征艦隊、アデン湾方面へ進出せよ! Expeditionary fleet, advance towards the Gulf of Aden! | ||
| # | Selection Node | ||
E-2 Casual I: 深海任務部隊 揚陸阻止線 (PoiDB)
| # | Formation | Normal Battle Node | AD/AP AS/AS+ |
|---|---|---|---|
| I | Line Ahead Echelon Phases: 1, 2 |
0/0 0/0 | |
| Line Ahead Phases: 1, 2 |
0/0 0/0 | ||
| # | Formation | Normal Battle Node | AD/AP AS/AS+ |
E-2 Casual I1
| # | Landing Node | ||
|---|---|---|---|
| I1 | 輸送物資の揚陸地点に到達しました。本海域の輸送作戦は無事完了しています。 The landing point of the convoy has been reached. The transport operation here has already been completed successfully. | ||
| # | Landing Node | ||
E-2 Casual J: 深海任務部隊 アデン湾阻止線 (PoiDB)
| # | Formation | Normal Battle Node | AD/AP AS/AS+ |
|---|---|---|---|
| J | Line Ahead Double Line Phases: 1, 2 |
0/0 0/0 | |
| Line Ahead Phases: 2 |
0/0 0/0 | ||
| # | Formation | Normal Battle Node | AD/AP AS/AS+ |
E-2 Casual K: 深海任務部隊 揚陸地点強襲部隊 (PoiDB)
| # | Formation | Boss Battle Node | AD/AP AS/AS+ |
|---|---|---|---|
| K | Line Ahead Phases: 1, 2 |
0/0 0/0 | |
| Line Ahead Phases: 1, 2 |
0/0 0/0 | ||
| Line Ahead Phases: 1 (Final)
|
9/17 36/72 | ||
| # | Formation | Boss Battle Node | AD/AP AS/AS+ |
E-2 Casual L: 深海潜水艦隊 アラビア海遊撃隊 (PoiDB)
| # | Formation | Normal Battle Node | AD/AP AS/AS+ |
|---|---|---|---|
| L | Echelon Line Abreast Phases: 2 |
0/0 0/0 | |
| Echelon Line Abreast Phases: 2 |
0/0 0/0 | ||
| # | Formation | Normal Battle Node | AD/AP AS/AS+ |
E-2 Casual M: 深海攻勢拠点 航空部隊 (PoiDB)
| # | Formation | Air Defense Node | AD/AP AS/AS+ |
|---|---|---|---|
| M | Diamond Phases: 2 |
29/58 129/258 | |
| Diamond Phases: 2 |
32/63 141/282 | ||
| # | Formation | Air Defense Node | AD/AP AS/AS+ |
E-2 Casual N
| # | Empty Node | ||
|---|---|---|---|
| N | 敵影を見ず。 No enemy spotted. | ||
| # | Empty Node | ||
E-2 Casual O: 深海攻勢拠点 物資集積地 (PoiDB)
| # | Formation | Normal Battle Node | AD/AP AS/AS+ |
|---|---|---|---|
| O | Diamond Phases: 2 |
29/58 129/258 | |
| Diamond Phases: 2 |
32/63 141/282 | ||
| Diamond | 24/47 105/210 | ||
| # | Formation | Normal Battle Node | AD/AP AS/AS+ |
E-2 Casual P
| # | Empty Node | ||
|---|---|---|---|
| P | 気のせいだった。 遠征艦隊、アデン湾方面へ進出せよ! Must be my imagination. Expeditionary fleet, advance towards the Gulf of Aden! | ||
| # | Empty Node | ||
E-2 Casual P1: 深海空母機動部隊 艦載機群 (PoiDB)
| # | Formation | Air Defense Node | AD/AP AS/AS+ |
|---|---|---|---|
| P1 | Diamond | 43/85 189/378 | |
| Diamond | 45/90 201/402 | ||
| Diamond | 51/101 225/450 | ||
| # | Formation | Air Defense Node | AD/AP AS/AS+ |
E-2 Casual P2: 深海潜水艦隊 アラビア海阻止線 (PoiDB)
| # | Formation | Normal Battle Node | AD/AP AS/AS+ |
|---|---|---|---|
| P2 | Echelon Line Abreast Phases: 2 |
0/0 0/0 | |
| Echelon Line Abreast Phases: 2 |
0/0 0/0 | ||
| # | Formation | Normal Battle Node | AD/AP AS/AS+ |
E-2 Casual Q: 深海任務部隊 警戒軽空母集団 (PoiDB)
| # | Formation | Normal Battle Node | AD/AP AS/AS+ |
|---|---|---|---|
| Q | Diamond Phases: 2 |
43/85 189/378 | |
| Diamond Phases: 2 |
45/90 201/402 | ||
| Diamond Phases: 2 |
51/101 225/450 | ||
| # | Formation | Normal Battle Node | AD/AP AS/AS+ |
E-2 Casual R
| # | Repair Node | ||
|---|---|---|---|
| # | Repair Node | ||
E-2 Casual S: 深海任務部隊 紅海阻止線前縁部 (PoiDB)
| # | Formation | Normal Battle Node | AD/AP AS/AS+ |
|---|---|---|---|
| S | Line Ahead Double Line Diamond Phases: 2 |
41/81 180/360 | |
| # | Formation | Normal Battle Node | AD/AP AS/AS+ |
E-2 Casual T
| # | Empty Node | ||
|---|---|---|---|
| T | 敵影を見ず。 遠征艦隊、アデン湾方面へ進出せよ! No enemy spotted. Expeditionary fleet, advance towards the Gulf of Aden! | ||
| # | Empty Node | ||
E-2 Casual U: 紅海配備 深海魚雷艇部隊 (PoiDB)
| # | Formation | Normal Battle Node | AD/AP AS/AS+ |
|---|---|---|---|
| U | Line Ahead Echelon Phases: 2 |
0/0 0/0 | |
| Line Ahead Phases: 2 |
0/0 0/0 | ||
| # | Formation | Normal Battle Node | AD/AP AS/AS+ |
E-2 Casual V: 深海任務部隊 紅海絶対阻止線 (PoiDB)
| # | Formation | Boss Battle Node | AD/AP AS/AS+ |
|---|---|---|---|
| V | Cruising Formation 4 Phases: 2 |
9/17 36/72 | |
| Cruising Formation 4 Phases: 2 (Final)
|
41/81 180/360 | ||
| # | Formation | Boss Battle Node | AD/AP AS/AS+ |