- Welcome to the Kancolle Wiki!
- If you have any questions regarding site content, account registration, etc., please visit the KanColle Wiki Discord
Difference between revisions of "Summer 2022 Event/E-1/Enemy comps"
< Summer 2022 Event | E-1
Jump to navigation
Jump to search
(Created page with "<tabber> |-|Hard= {{Map/Image|page=Summer 2022 Event/E-1|{{Map/ImageNode|1|Hard|E-1|x=640|y=228}}{{Map/ImageNode|A|Hard|E-1|x=594|y=183}}{{Map/ImageNode|B|Hard|E-1|x=579|y=106...") |
|||
| Line 1: | Line 1: | ||
<tabber> | <tabber> | ||
|-|Hard= | |-|Hard= | ||
| − | {{Map/Image|page=Summer 2022 Event/E-1|{{Map/ImageNode|1|Hard|E-1|x=640|y=228}}{{Map/ImageNode|A|Hard|E-1|x=594|y=183}}{{Map/ImageNode|B|Hard|E-1|x=579|y=106}}{{Map/ImageNode|C|Hard|E-1|x=506|y=80}}{{Map/ImageNode|D|Hard|E-1|x=446|y=126}}{{Map/ImageNode|E|Hard|E-1|x=473|y=151}}{{Map/ImageNode|F|Hard|E-1|x=547|y=240}}{{Map/ImageNode|G|Hard|E-1|x=500|y=296}}{{Map/ImageNode|H|Hard|E-1|x=435|y=231}}{{Map/ImageNode|I|Hard|E-1|x=417|y=144}}{{Map/ImageNode|J|Hard|E-1|x=368|y=158|drops=<table class="wikitable"><tr><th>Type</th><th>Ships</th></tr><tr><th>DE</th><td>{{Ship/Banner|small=true|Sado}}{{Ship/Banner|small=true|Tsushima}}</td></tr><tr><th>DD</th><td>{{Ship/Banner|small=true|Makinami}}</td></tr><tr><th>SS</th><td>{{Ship/Banner|small=true|I-26}}</td></tr><tr><th>SSV</th><td>{{Ship/Banner|small=true|I-401}}</td></tr></table>}}{{Map/ImageNode|K1|Hard|E-1|x=239|y=240}}{{Map/ImageNode|K2|Hard|E-1|x=261|y=285}}{{Map/ImageNode|K|Hard|E-1|x=311|y=270}}{{Map/ImageNode|L|Hard|E-1|x=221|y=205}}{{Map/ImageNode|M|Hard|E-1|x=199|y=157}}{{Map/ImageNode|N|Hard|E-1|x=200|y=304}}{{Map/ImageNode|O|Hard|E-1|x=146|y=144}}{{Map/ImageNode|P|Hard|E-1|x=170|y=212|drops=<table class="wikitable"><tr><th>Type</th><th>Ships</th></tr><tr><th>DE</th><td>{{Ship/Banner|small=true|Sado}}{{Ship/Banner|small=true|Tsushima}}</td></tr><tr><th>SS</th><td>{{Ship/Banner|small=true|I-26}}</td></tr></table>}}{{Map/ImageNode|Q|Hard|E-1|x=140|y=265}}{{Map/ImageNode|R|Hard|E-1|x=103|y=186|drops=<table class="wikitable"><tr><th>Type</th><th>Ships</th></tr><tr><th>CL</th><td>{{Ship/Banner|small=true|Helena}}{{Ship/Banner|small=true|Perth}}</td></tr><tr><th>CV</th><td>{{Ship/Banner|small=true|Aquila}}</td></tr><tr><th>SS</th><td>{{Ship/Banner|small=true|Luigi Torelli}}</td></tr></table>}}}} | + | {{Map/Image|page=Summer 2022 Event/E-1|{{Map/ImageNode|1|Hard|E-1|x=640|y=228}}{{Map/ImageNode|A|Hard|E-1|x=594|y=183}}{{Map/ImageNode|B|Hard|E-1|x=579|y=106}}{{Map/ImageNode|C|Hard|E-1|x=506|y=80}}{{Map/ImageNode|D|Hard|E-1|x=446|y=126}}{{Map/ImageNode|E|Hard|E-1|x=473|y=151}}{{Map/ImageNode|F|Hard|E-1|x=547|y=240}}{{Map/ImageNode|G|Hard|E-1|x=500|y=296}}{{Map/ImageNode|H|Hard|E-1|x=435|y=231}}{{Map/ImageNode|I|Hard|E-1|x=417|y=144}}{{Map/ImageNode|J|Hard|E-1|x=368|y=158|drops=<table class="wikitable"><tr><th>Type</th><th>Ships</th></tr><tr><th>DE</th><td>{{Ship/Banner|small=true|Sado}}{{Ship/Banner|small=true|Tsushima}}</td></tr><tr><th>DD</th><td>{{Ship/Banner|small=true|Makinami}}</td></tr><tr><th>SS</th><td>{{Ship/Banner|small=true|I-26}}</td></tr><tr><th>SSV</th><td>{{Ship/Banner|small=true|I-401}}</td></tr></table>}}{{Map/ImageNode|K1|Hard|E-1|x=239|y=240}}{{Map/ImageNode|K2|Hard|E-1|x=261|y=285}}{{Map/ImageNode|K|Hard|E-1|x=311|y=270}}{{Map/ImageNode|L|Hard|E-1|x=221|y=205}}{{Map/ImageNode|M|Hard|E-1|x=199|y=157}}{{Map/ImageNode|N|Hard|E-1|x=200|y=304}}{{Map/ImageNode|O|Hard|E-1|x=146|y=144}}{{Map/ImageNode|P|Hard|E-1|x=170|y=212|drops=<table class="wikitable"><tr><th>Type</th><th>Ships</th></tr><tr><th>DE</th><td>{{Ship/Banner|small=true|Sado}}{{Ship/Banner|small=true|Tsushima}}</td></tr><tr><th>SS</th><td>{{Ship/Banner|small=true|I-26}}</td></tr></table>}}{{Map/ImageNode|Q|Hard|E-1|x=140|y=265}}{{Map/ImageNode|R|Hard|E-1|x=103|y=186|drops=<table class="wikitable"><tr><th>Type</th><th>Ships</th></tr><tr><th>DE</th><td>{{Ship/Banner|small=true|Ukuru}}</td></tr><tr><th>CL</th><td>{{Ship/Banner|small=true|Helena}}{{Ship/Banner|small=true|Perth}}</td></tr><tr><th>CV</th><td>{{Ship/Banner|small=true|Aquila}}</td></tr><tr><th>SS</th><td>{{Ship/Banner|small=true|Luigi Torelli}}</td></tr></table>}}}} |
<div class="map-nodes"> | <div class="map-nodes"> | ||
{{Map/Nodes|diff=Hard|A|Empty|kind=0}} | {{Map/Nodes|diff=Hard|A|Empty|kind=0}} | ||
| Line 7: | Line 7: | ||
|B | |B | ||
|Normal | |Normal | ||
| − | |{{TooltipSimple|Line Ahead| | + | |{{TooltipSimple|Line Ahead|49% (132/268, HQ: 88-120)}}<br>{{TooltipSimple|Double Line|28% (74/268, HQ: 88-120)}}<br>{{TooltipSimple|Echelon|23% (62/268, HQ: 88-120)}}<br>{{TooltipSimple|''Phases: 1''|Samples: 115}} |
|Destroyer I-Class/Late Model Elite | |Destroyer I-Class/Late Model Elite | ||
|Destroyer I-Class/Late Model | |Destroyer I-Class/Late Model | ||
| Line 18: | Line 18: | ||
|C | |C | ||
|Normal | |Normal | ||
| − | |{{TooltipSimple|Echelon| | + | |{{TooltipSimple|Echelon|17% (35/203, HQ: 88-120)}}<br>{{TooltipSimple|Line Abreast|16% (32/203, HQ: 99-120)}}<br>{{TooltipSimple|''Phases: 1''|Samples: 33}} |
|Submarine Ka-Class/Flagship | |Submarine Ka-Class/Flagship | ||
|Submarine Ka-Class/Elite | |Submarine Ka-Class/Elite | ||
| Line 25: | Line 25: | ||
|C | |C | ||
|Normal | |Normal | ||
| − | |{{TooltipSimple|Echelon|22% ( | + | |{{TooltipSimple|Echelon|22% (45/203, HQ: 88-120)}}<br>{{TooltipSimple|Line Abreast|18% (37/203, HQ: 89-120)}}<br>{{TooltipSimple|''Phases: 1''|Samples: 35}} |
|Submarine Ka-Class/Flagship | |Submarine Ka-Class/Flagship | ||
|Submarine Ka-Class/Elite | |Submarine Ka-Class/Elite | ||
| Line 33: | Line 33: | ||
|C | |C | ||
|Normal | |Normal | ||
| − | |{{TooltipSimple|Echelon| | + | |{{TooltipSimple|Echelon|12% (25/203, HQ: 88-120)}}<br>{{TooltipSimple|Line Abreast|14% (29/203, HQ: 88-120)}}<br>{{TooltipSimple|''Phases: 1''|Samples: 24}} |
|Submarine Ka-Class/Flagship | |Submarine Ka-Class/Flagship | ||
|Submarine Ka-Class/Flagship | |Submarine Ka-Class/Flagship | ||
| Line 42: | Line 42: | ||
|D | |D | ||
|Defense | |Defense | ||
| − | |{{TooltipSimple|Double Line| | + | |{{TooltipSimple|Double Line|33% (7/21, HQ: 88-120)}}<br>{{TooltipSimple|''Phases: 1''|Samples: 1}} |
|Harbour Summer Princess B/III | |Harbour Summer Princess B/III | ||
|Airfield Princess/Patrol Aircraft Deployment II | |Airfield Princess/Patrol Aircraft Deployment II | ||
| Line 51: | Line 51: | ||
|D | |D | ||
|Defense | |Defense | ||
| − | |{{TooltipSimple|Double Line| | + | |{{TooltipSimple|Double Line|29% (6/21, HQ: 103-120)}}<br>{{TooltipSimple|''Phases: 1''|Samples: 1}} |
|Harbour Summer Princess B/III | |Harbour Summer Princess B/III | ||
|Airfield Princess/Patrol Aircraft Deployment III | |Airfield Princess/Patrol Aircraft Deployment III | ||
| Line 61: | Line 61: | ||
|D | |D | ||
|Defense | |Defense | ||
| − | |{{TooltipSimple|Double Line| | + | |{{TooltipSimple|Double Line|38% (8/21, HQ: 88-120)}}<br>{{TooltipSimple|''Phases: 1''|Samples: 4}} |
|Harbour Summer Princess B/III | |Harbour Summer Princess B/III | ||
|Airfield Princess/Patrol Aircraft Deployment III | |Airfield Princess/Patrol Aircraft Deployment III | ||
| Line 72: | Line 72: | ||
|E | |E | ||
|Normal | |Normal | ||
| − | |{{TooltipSimple|Line Ahead| | + | |{{TooltipSimple|Line Ahead|54% (99/182, HQ: 88-120)}}<br>{{TooltipSimple|Double Line|26% (48/182, HQ: 102-120)}}<br>{{TooltipSimple|Echelon|19% (35/182, HQ: 88-120)}}<br>{{TooltipSimple|''Phases: 1''|Samples: 83}} |
|Heavy Cruiser Ri-Class/Flagship | |Heavy Cruiser Ri-Class/Flagship | ||
|Heavy Cruiser Ri-Class/Flagship | |Heavy Cruiser Ri-Class/Flagship | ||
| Line 83: | Line 83: | ||
|F | |F | ||
|Normal | |Normal | ||
| − | |{{TooltipSimple|Line Ahead|30% ( | + | |{{TooltipSimple|Line Ahead|30% (22775/75463, HQ: 88-120)}}<br>{{TooltipSimple|Vanguard|36% (26870/75463, HQ: 88-120)}}<br>{{TooltipSimple|''Phases: 1''|Samples: 11116}} |
|Light Cruiser Ho-Class/Flagship | |Light Cruiser Ho-Class/Flagship | ||
|Torpedo Cruiser Chi-Class/Flagship | |Torpedo Cruiser Chi-Class/Flagship | ||
| Line 93: | Line 93: | ||
|F | |F | ||
|Normal | |Normal | ||
| − | |{{TooltipSimple|Line Ahead|34% ( | + | |{{TooltipSimple|Line Ahead|34% (25818/75463, HQ: 88-120)}}<br>{{TooltipSimple|''Phases: 1''|Samples: 5972}} |
|Light Cruiser Ho-Class/Flagship | |Light Cruiser Ho-Class/Flagship | ||
|Torpedo Cruiser Chi-Class/Flagship | |Torpedo Cruiser Chi-Class/Flagship | ||
| Line 104: | Line 104: | ||
|G | |G | ||
|Normal | |Normal | ||
| − | |{{TooltipSimple|Echelon| | + | |{{TooltipSimple|Echelon|20% (3470/17167, HQ: 97-120)}}<br>{{TooltipSimple|Line Abreast|20% (3442/17167, HQ: 97-120)}}<br>{{TooltipSimple|''Phases: 1''|Samples: 744}} |
|Submarine Ka-Class/Flagship | |Submarine Ka-Class/Flagship | ||
|Submarine Ka-Class/Elite | |Submarine Ka-Class/Elite | ||
| Line 111: | Line 111: | ||
|G | |G | ||
|Normal | |Normal | ||
| − | |{{TooltipSimple|Echelon| | + | |{{TooltipSimple|Echelon|18% (3064/17167, HQ: 97-120)}}<br>{{TooltipSimple|Line Abreast|18% (3041/17167, HQ: 99-120)}}<br>{{TooltipSimple|''Phases: 1''|Samples: 625}} |
|Submarine Ka-Class/Flagship | |Submarine Ka-Class/Flagship | ||
|Submarine Ka-Class/Elite | |Submarine Ka-Class/Elite | ||
| Line 119: | Line 119: | ||
|G | |G | ||
|Normal | |Normal | ||
| − | |{{TooltipSimple|Echelon|12% ( | + | |{{TooltipSimple|Echelon|12% (2102/17167, HQ: 100-120)}}<br>{{TooltipSimple|Line Abreast|12% (2048/17167, HQ: 97-120)}}<br>{{TooltipSimple|''Phases: 1''|Samples: 441}} |
|Submarine Ka-Class/Flagship | |Submarine Ka-Class/Flagship | ||
|Submarine Ka-Class/Flagship | |Submarine Ka-Class/Flagship | ||
| Line 129: | Line 129: | ||
|I | |I | ||
|Normal | |Normal | ||
| − | |{{TooltipSimple|Diamond|31% ( | + | |{{TooltipSimple|Diamond|31% (8097/26477, HQ: 88-120)}}<br>{{TooltipSimple|''Phases: 1''|Samples: 2045}} |
|Light Carrier Nu-Class/Flagship II | |Light Carrier Nu-Class/Flagship II | ||
|Heavy Cruiser Ri-Class/Flagship | |Heavy Cruiser Ri-Class/Flagship | ||
| Line 139: | Line 139: | ||
|I | |I | ||
|Normal | |Normal | ||
| − | |{{TooltipSimple|Diamond| | + | |{{TooltipSimple|Diamond|35% (9157/26477, HQ: 88-120)}}<br>{{TooltipSimple|''Phases: 1''|Samples: 2387}} |
|Light Carrier Nu-Class/Flagship III | |Light Carrier Nu-Class/Flagship III | ||
|Heavy Cruiser Ri-Class/Flagship | |Heavy Cruiser Ri-Class/Flagship | ||
| Line 149: | Line 149: | ||
|I | |I | ||
|Normal | |Normal | ||
| − | |{{TooltipSimple|Diamond|35% ( | + | |{{TooltipSimple|Diamond|35% (9223/26477, HQ: 88-120)}}<br>{{TooltipSimple|''Phases: 1''|Samples: 2404}} |
|Light Carrier Nu-Class/Kai Flagship III | |Light Carrier Nu-Class/Kai Flagship III | ||
|Heavy Cruiser Ri-Class/Flagship | |Heavy Cruiser Ri-Class/Flagship | ||
| Line 160: | Line 160: | ||
|J | |J | ||
|Normal | |Normal | ||
| − | |{{TooltipSimple|Double Line| | + | |{{TooltipSimple|Double Line|30% (6308/20945, HQ: 97-120)}}<br>{{TooltipSimple|''Phases: 1''|Samples: 1671}} |
|Harbour Summer Princess B/III | |Harbour Summer Princess B/III | ||
|Airfield Princess/Patrol Aircraft Deployment III | |Airfield Princess/Patrol Aircraft Deployment III | ||
| Line 169: | Line 169: | ||
|J | |J | ||
|Normal | |Normal | ||
| − | |{{TooltipSimple|Double Line|36% ( | + | |{{TooltipSimple|Double Line|36% (7489/20945, HQ: 88-120)}}<br>{{TooltipSimple|''Phases: 1''|Samples: 1993}} |
|Harbour Summer Princess B/III | |Harbour Summer Princess B/III | ||
|Airfield Princess/Patrol Aircraft Deployment III | |Airfield Princess/Patrol Aircraft Deployment III | ||
| Line 179: | Line 179: | ||
|J | |J | ||
|Normal | |Normal | ||
| − | |{{TooltipSimple|Double Line| | + | |{{TooltipSimple|Double Line|34% (7148/20945, HQ: 88-120)}}<br>{{TooltipSimple|''Phases: 1''|Samples: 1888}} |
|Harbour Summer Princess B/III | |Harbour Summer Princess B/III | ||
|Airfield Princess/Patrol Aircraft Deployment III | |Airfield Princess/Patrol Aircraft Deployment III | ||
| Line 193: | Line 193: | ||
|L | |L | ||
|Normal | |Normal | ||
| − | |{{TooltipSimple|Echelon|15% ( | + | |{{TooltipSimple|Echelon|15% (146/980, HQ: 108-120)}}<br>{{TooltipSimple|Line Abreast|16% (159/980, HQ: 107-120)}}<br>{{TooltipSimple|''Phases: 1''|Samples: 78}} |
|Submarine Ka-Class/Flagship | |Submarine Ka-Class/Flagship | ||
|Submarine Ka-Class/Elite | |Submarine Ka-Class/Elite | ||
| Line 201: | Line 201: | ||
|L | |L | ||
|Normal | |Normal | ||
| − | |{{TooltipSimple|Echelon| | + | |{{TooltipSimple|Echelon|14% (133/980, HQ: 107-120)}}<br>{{TooltipSimple|Line Abreast|12% (122/980, HQ: 106-120)}}<br>{{TooltipSimple|''Phases: 1''|Samples: 66}} |
|Submarine Ka-Class/Flagship | |Submarine Ka-Class/Flagship | ||
|Submarine Ka-Class/Flagship | |Submarine Ka-Class/Flagship | ||
| Line 209: | Line 209: | ||
|L | |L | ||
|Normal | |Normal | ||
| − | |{{TooltipSimple|Echelon| | + | |{{TooltipSimple|Echelon|21% (204/980, HQ: 107-120)}}<br>{{TooltipSimple|Line Abreast|22% (216/980, HQ: 107-120)}}<br>{{TooltipSimple|''Phases: 1''|Samples: 93}} |
|Submarine Ka-Class/Flagship | |Submarine Ka-Class/Flagship | ||
|Submarine Ka-Class/Flagship | |Submarine Ka-Class/Flagship | ||
| Line 218: | Line 218: | ||
|M | |M | ||
|Defense | |Defense | ||
| − | |{{TooltipSimple|Diamond|42% ( | + | |{{TooltipSimple|Diamond|42% (359/863, HQ: 106-120)}}<br>{{TooltipSimple|''Phases: 1''|Samples: 87}} |
|Standard Carrier Wo-Class/Kai B Flagship II | |Standard Carrier Wo-Class/Kai B Flagship II | ||
|Light Carrier Nu-Class/B Elite II | |Light Carrier Nu-Class/B Elite II | ||
| Line 228: | Line 228: | ||
|M | |M | ||
|Defense | |Defense | ||
| − | |{{TooltipSimple|Diamond| | + | |{{TooltipSimple|Diamond|41% (350/863, HQ: 107-120)}}<br>{{TooltipSimple|''Phases: 1''|Samples: 99}} |
|Standard Carrier Wo-Class/Kai B Flagship II | |Standard Carrier Wo-Class/Kai B Flagship II | ||
|Light Carrier Nu-Class/B Elite III | |Light Carrier Nu-Class/B Elite III | ||
| Line 238: | Line 238: | ||
|M | |M | ||
|Defense | |Defense | ||
| − | |{{TooltipSimple|Diamond| | + | |{{TooltipSimple|Diamond|18% (154/863, HQ: 107-120)}}<br>{{TooltipSimple|''Phases: 1''|Samples: 31}} |
|Standard Carrier Wo-Class/Kai B Flagship II | |Standard Carrier Wo-Class/Kai B Flagship II | ||
|Light Carrier Nu-Class/B Flagship | |Light Carrier Nu-Class/B Flagship | ||
| Line 249: | Line 249: | ||
|N | |N | ||
|Defense | |Defense | ||
| − | |{{TooltipSimple|Diamond|40% ( | + | |{{TooltipSimple|Diamond|40% (9688/24202, HQ: 104-120)}}<br>{{TooltipSimple|''Phases: 1''|Samples: 2752}} |
|Standard Carrier Wo-Class/Kai B Flagship II | |Standard Carrier Wo-Class/Kai B Flagship II | ||
|Light Carrier Nu-Class/B Elite II | |Light Carrier Nu-Class/B Elite II | ||
| Line 259: | Line 259: | ||
|N | |N | ||
|Defense | |Defense | ||
| − | |{{TooltipSimple|Diamond| | + | |{{TooltipSimple|Diamond|40% (9729/24202, HQ: 104-120)}}<br>{{TooltipSimple|''Phases: 1''|Samples: 2712}} |
|Standard Carrier Wo-Class/Kai B Flagship II | |Standard Carrier Wo-Class/Kai B Flagship II | ||
|Light Carrier Nu-Class/B Elite III | |Light Carrier Nu-Class/B Elite III | ||
| Line 269: | Line 269: | ||
|N | |N | ||
|Defense | |Defense | ||
| − | |{{TooltipSimple|Diamond| | + | |{{TooltipSimple|Diamond|20% (4785/24202, HQ: 104-120)}}<br>{{TooltipSimple|''Phases: 1''|Samples: 1488}} |
|Standard Carrier Wo-Class/Kai B Flagship II | |Standard Carrier Wo-Class/Kai B Flagship II | ||
|Light Carrier Nu-Class/B Flagship | |Light Carrier Nu-Class/B Flagship | ||
| Line 280: | Line 280: | ||
|O | |O | ||
|Normal | |Normal | ||
| − | |{{TooltipSimple|Echelon| | + | |{{TooltipSimple|Echelon|19% (20/104, HQ: 111-120)}}<br>{{TooltipSimple|Line Abreast|19% (20/104, HQ: 112-120)}}<br>{{TooltipSimple|''Phases: 1''|Samples: 22}} |
|Submarine Ka-Class/Flagship | |Submarine Ka-Class/Flagship | ||
|Submarine Ka-Class/Elite | |Submarine Ka-Class/Elite | ||
| Line 288: | Line 288: | ||
|O | |O | ||
|Normal | |Normal | ||
| − | |{{TooltipSimple|Echelon| | + | |{{TooltipSimple|Echelon|14% (15/104, HQ: 118-120)}}<br>{{TooltipSimple|Line Abreast|14% (15/104, HQ: 112-120)}}<br>{{TooltipSimple|''Phases: 1''|Samples: 14}} |
|Submarine Ka-Class/Flagship | |Submarine Ka-Class/Flagship | ||
|Submarine Ka-Class/Flagship | |Submarine Ka-Class/Flagship | ||
| Line 296: | Line 296: | ||
|O | |O | ||
|Normal | |Normal | ||
| − | |{{TooltipSimple|Echelon| | + | |{{TooltipSimple|Echelon|20% (21/104, HQ: 112-120)}}<br>{{TooltipSimple|Line Abreast|13% (13/104, HQ: 112-120)}}<br>{{TooltipSimple|''Phases: 1''|Samples: 16}} |
|Submarine Ka-Class/Flagship | |Submarine Ka-Class/Flagship | ||
|Submarine Ka-Class/Flagship | |Submarine Ka-Class/Flagship | ||
| Line 305: | Line 305: | ||
|P | |P | ||
|Normal | |Normal | ||
| − | |{{TooltipSimple|Line Ahead|42% ( | + | |{{TooltipSimple|Line Ahead|42% (14592/34578, HQ: 104-120)}}<br>{{TooltipSimple|Double Line|34% (11608/34578, HQ: 104-120)}}<br>{{TooltipSimple|Echelon|24% (8378/34578, HQ: 104-120)}}<br>{{TooltipSimple|''Phases: 1''|Samples: 7548}} |
|Battleship Ru-Class/Flagship | |Battleship Ru-Class/Flagship | ||
|Battleship Ru-Class/Flagship | |Battleship Ru-Class/Flagship | ||
| Line 317: | Line 317: | ||
|R | |R | ||
|Boss | |Boss | ||
| − | |{{TooltipSimple|Diamond| | + | |{{TooltipSimple|Diamond|37% (9959/27048, HQ: 104-120)}}<br>{{TooltipSimple|''Phases: 1''|Samples: 2088}} |
|Standard Carrier Wo-Class/Kai B Flagship II | |Standard Carrier Wo-Class/Kai B Flagship II | ||
|Light Carrier Nu-Class/B Elite III | |Light Carrier Nu-Class/B Elite III | ||
| Line 327: | Line 327: | ||
|R | |R | ||
|Boss | |Boss | ||
| − | |{{TooltipSimple|Diamond| | + | |{{TooltipSimple|Diamond|44% (11997/27048, HQ: 104-120)}}<br>{{TooltipSimple|''Phases: 1''|Samples: 2572}} |
|Standard Carrier Wo-Class/Kai B Flagship II | |Standard Carrier Wo-Class/Kai B Flagship II | ||
|Light Carrier Nu-Class/B Flagship | |Light Carrier Nu-Class/B Flagship | ||
| Line 337: | Line 337: | ||
|R | |R | ||
|Boss/Final | |Boss/Final | ||
| − | |{{TooltipSimple|Diamond|19% ( | + | |{{TooltipSimple|Diamond|19% (5092/27048, HQ: 104-120)}}<br>{{TooltipSimple|''Phases: 1''|Samples: 1199}} |
|Standard Carrier Wo-Class/Kai B Flagship II | |Standard Carrier Wo-Class/Kai B Flagship II | ||
|Light Carrier Nu-Class/B Flagship | |Light Carrier Nu-Class/B Flagship | ||
| Line 347: | Line 347: | ||
</div> | </div> | ||
|-|Medium= | |-|Medium= | ||
| − | {{Map/Image|page=Summer 2022 Event/E-1|{{Map/ImageNode|1|Medium|E-1|x=640|y=228}}{{Map/ImageNode|A|Medium|E-1|x=594|y=183}}{{Map/ImageNode|B|Medium|E-1|x=579|y=106}}{{Map/ImageNode|C|Medium|E-1|x=506|y=80}}{{Map/ImageNode|D|Medium|E-1|x=446|y=126}}{{Map/ImageNode|E|Medium|E-1|x=473|y=151}}{{Map/ImageNode|F|Medium|E-1|x=547|y=240}}{{Map/ImageNode|G|Medium|E-1|x=500|y=296}}{{Map/ImageNode|H|Medium|E-1|x=435|y=231}}{{Map/ImageNode|I|Medium|E-1|x=417|y=144}}{{Map/ImageNode|J|Medium|E-1|x=368|y=158|drops=<table class="wikitable"><tr><th>Type</th><th>Ships</th></tr><tr><th>DE</th><td>{{Ship/Banner|small=true|Sado}}{{Ship/Banner|small=true|Tsushima}}</td></tr><tr><th>DD</th><td>{{Ship/Banner|small=true|Makinami}}</td></tr><tr><th>SS</th><td>{{Ship/Banner|small=true|I-26}}</td></tr><tr><th>SSV</th><td>{{Ship/Banner|small=true|I-401}}</td></tr></table>}}{{Map/ImageNode|K1|Medium|E-1|x=239|y=240}}{{Map/ImageNode|K2|Medium|E-1|x=261|y=285}}{{Map/ImageNode|K|Medium|E-1|x=311|y=270}}{{Map/ImageNode|L|Medium|E-1|x=221|y=205}}{{Map/ImageNode|M|Medium|E-1|x=199|y=157}}{{Map/ImageNode|N|Medium|E-1|x=200|y=304}}{{Map/ImageNode|O|Medium|E-1|x=146|y=144}}{{Map/ImageNode|P|Medium|E-1|x=170|y=212|drops=<table class="wikitable"><tr><th>Type</th><th>Ships</th></tr><tr><th>DE</th><td>{{Ship/Banner|small=true|Tsushima}}</td></tr></table>}}{{Map/ImageNode|Q|Medium|E-1|x=140|y=265}}{{Map/ImageNode|R|Medium|E-1|x=103|y=186|drops=<table class="wikitable"><tr><th>Type</th><th>Ships</th></tr><tr><th>CL</th><td>{{Ship/Banner|small=true|Helena}}{{Ship/Banner|small=true|Perth}}</td></tr><tr><th>CV</th><td>{{Ship/Banner|small=true|Aquila}}</td></tr><tr><th>SS</th><td>{{Ship/Banner|small=true|Luigi Torelli}}</td></tr></table>}}}} | + | {{Map/Image|page=Summer 2022 Event/E-1|{{Map/ImageNode|1|Medium|E-1|x=640|y=228}}{{Map/ImageNode|A|Medium|E-1|x=594|y=183}}{{Map/ImageNode|B|Medium|E-1|x=579|y=106}}{{Map/ImageNode|C|Medium|E-1|x=506|y=80}}{{Map/ImageNode|D|Medium|E-1|x=446|y=126}}{{Map/ImageNode|E|Medium|E-1|x=473|y=151}}{{Map/ImageNode|F|Medium|E-1|x=547|y=240}}{{Map/ImageNode|G|Medium|E-1|x=500|y=296}}{{Map/ImageNode|H|Medium|E-1|x=435|y=231}}{{Map/ImageNode|I|Medium|E-1|x=417|y=144}}{{Map/ImageNode|J|Medium|E-1|x=368|y=158|drops=<table class="wikitable"><tr><th>Type</th><th>Ships</th></tr><tr><th>DE</th><td>{{Ship/Banner|small=true|Sado}}{{Ship/Banner|small=true|Tsushima}}</td></tr><tr><th>DD</th><td>{{Ship/Banner|small=true|Makinami}}</td></tr><tr><th>SS</th><td>{{Ship/Banner|small=true|I-26}}</td></tr><tr><th>SSV</th><td>{{Ship/Banner|small=true|I-401}}</td></tr></table>}}{{Map/ImageNode|K1|Medium|E-1|x=239|y=240}}{{Map/ImageNode|K2|Medium|E-1|x=261|y=285}}{{Map/ImageNode|K|Medium|E-1|x=311|y=270}}{{Map/ImageNode|L|Medium|E-1|x=221|y=205}}{{Map/ImageNode|M|Medium|E-1|x=199|y=157}}{{Map/ImageNode|N|Medium|E-1|x=200|y=304}}{{Map/ImageNode|O|Medium|E-1|x=146|y=144}}{{Map/ImageNode|P|Medium|E-1|x=170|y=212|drops=<table class="wikitable"><tr><th>Type</th><th>Ships</th></tr><tr><th>DE</th><td>{{Ship/Banner|small=true|Tsushima}}</td></tr></table>}}{{Map/ImageNode|Q|Medium|E-1|x=140|y=265}}{{Map/ImageNode|R|Medium|E-1|x=103|y=186|drops=<table class="wikitable"><tr><th>Type</th><th>Ships</th></tr><tr><th>DE</th><td>{{Ship/Banner|small=true|Ukuru}}</td></tr><tr><th>CL</th><td>{{Ship/Banner|small=true|Helena}}{{Ship/Banner|small=true|Perth}}</td></tr><tr><th>CV</th><td>{{Ship/Banner|small=true|Aquila}}</td></tr><tr><th>SS</th><td>{{Ship/Banner|small=true|Luigi Torelli}}</td></tr></table>}}}} |
<div class="map-nodes"> | <div class="map-nodes"> | ||
{{Map/Nodes|diff=Medium|A|Empty|kind=0}} | {{Map/Nodes|diff=Medium|A|Empty|kind=0}} | ||
| Line 353: | Line 353: | ||
|B | |B | ||
|Normal | |Normal | ||
| − | |{{TooltipSimple|Line Ahead| | + | |{{TooltipSimple|Line Ahead|57% (55/96, HQ: 41-120)}}<br>{{TooltipSimple|Double Line|25% (24/96, HQ: 41-120)}}<br>{{TooltipSimple|Echelon|18% (17/96, HQ: 41-120)}}<br>{{TooltipSimple|''Phases: 1''|Samples: 46}} |
|Destroyer I-Class/Late Model Elite | |Destroyer I-Class/Late Model Elite | ||
|Destroyer I-Class/Late Model | |Destroyer I-Class/Late Model | ||
| Line 364: | Line 364: | ||
|C | |C | ||
|Normal | |Normal | ||
| − | |{{TooltipSimple|Echelon| | + | |{{TooltipSimple|Echelon|13% (10/75, HQ: 43-99)}}<br>{{TooltipSimple|Line Abreast|15% (11/75, HQ: 41-115)}}<br>{{TooltipSimple|''Phases: 1''|Samples: 10}} |
|Submarine Ka-Class/Elite | |Submarine Ka-Class/Elite | ||
|Submarine Ka-Class | |Submarine Ka-Class | ||
| Line 371: | Line 371: | ||
|C | |C | ||
|Normal | |Normal | ||
| − | |{{TooltipSimple|Echelon| | + | |{{TooltipSimple|Echelon|17% (13/75, HQ: 41-120)}}<br>{{TooltipSimple|Line Abreast|21% (16/75, HQ: 41-120)}}<br>{{TooltipSimple|''Phases: 1''|Samples: 17}} |
|Submarine Ka-Class/Elite | |Submarine Ka-Class/Elite | ||
|Submarine Ka-Class/Elite | |Submarine Ka-Class/Elite | ||
| Line 378: | Line 378: | ||
|C | |C | ||
|Normal | |Normal | ||
| − | |{{TooltipSimple|Echelon| | + | |{{TooltipSimple|Echelon|15% (11/75, HQ: 43-105)}}<br>{{TooltipSimple|Line Abreast|19% (14/75, HQ: 43-120)}}<br>{{TooltipSimple|''Phases: 1''|Samples: 11}} |
|Submarine Ka-Class/Flagship | |Submarine Ka-Class/Flagship | ||
|Submarine Ka-Class/Elite | |Submarine Ka-Class/Elite | ||
| Line 386: | Line 386: | ||
|D | |D | ||
|Defense | |Defense | ||
| − | |{{TooltipSimple|Double Line| | + | |{{TooltipSimple|Double Line|42% (8/19, HQ: 41-103)}}<br>{{TooltipSimple|''Phases: 1''|Samples: 2}} |
|Harbour Summer Princess B/II | |Harbour Summer Princess B/II | ||
|Airfield Princess/Patrol Aircraft Deployment | |Airfield Princess/Patrol Aircraft Deployment | ||
| Line 395: | Line 395: | ||
|D | |D | ||
|Defense | |Defense | ||
| − | |{{TooltipSimple|Double Line| | + | |{{TooltipSimple|Double Line|26% (5/19, HQ: 51-101)}}<br>{{TooltipSimple|''Phases: 1''|Samples: 1}} |
|Harbour Summer Princess B/II | |Harbour Summer Princess B/II | ||
|Airfield Princess/Patrol Aircraft Deployment II | |Airfield Princess/Patrol Aircraft Deployment II | ||
| Line 404: | Line 404: | ||
|D | |D | ||
|Defense | |Defense | ||
| − | |{{TooltipSimple|Double Line| | + | |{{TooltipSimple|Double Line|32% (6/19, HQ: 41-105)}}<br>{{TooltipSimple|''Phases: 1''|Samples: 4}} |
|Harbour Summer Princess B/II | |Harbour Summer Princess B/II | ||
|Airfield Princess/Patrol Aircraft Deployment II | |Airfield Princess/Patrol Aircraft Deployment II | ||
| Line 415: | Line 415: | ||
|E | |E | ||
|Normal | |Normal | ||
| − | |{{TooltipSimple|Line Ahead| | + | |{{TooltipSimple|Line Ahead|56% (34/61, HQ: 41-120)}}<br>{{TooltipSimple|Double Line|23% (14/61, HQ: 42-102)}}<br>{{TooltipSimple|Echelon|21% (13/61, HQ: 51-115)}}<br>{{TooltipSimple|''Phases: 1''|Samples: 28}} |
|Heavy Cruiser Ri-Class/Elite | |Heavy Cruiser Ri-Class/Elite | ||
|Heavy Cruiser Ri-Class/Elite | |Heavy Cruiser Ri-Class/Elite | ||
| Line 426: | Line 426: | ||
|F | |F | ||
|Normal | |Normal | ||
| − | |{{TooltipSimple|Line Ahead|30% ( | + | |{{TooltipSimple|Line Ahead|30% (4301/14212, HQ: 53-120)}}<br>{{TooltipSimple|Vanguard|35% (4948/14212, HQ: 55-120)}}<br>{{TooltipSimple|''Phases: 1''|Samples: 2597}} |
|Light Cruiser Ho-Class/Flagship | |Light Cruiser Ho-Class/Flagship | ||
|Torpedo Cruiser Chi-Class/Elite | |Torpedo Cruiser Chi-Class/Elite | ||
| Line 436: | Line 436: | ||
|F | |F | ||
|Normal | |Normal | ||
| − | |{{TooltipSimple|Line Ahead| | + | |{{TooltipSimple|Line Ahead|35% (4963/14212, HQ: 53-120)}}<br>{{TooltipSimple|''Phases: 1''|Samples: 1415}} |
|Light Cruiser Ho-Class/Flagship | |Light Cruiser Ho-Class/Flagship | ||
|Torpedo Cruiser Chi-Class/Elite | |Torpedo Cruiser Chi-Class/Elite | ||
| Line 447: | Line 447: | ||
|G | |G | ||
|Normal | |Normal | ||
| − | |{{TooltipSimple|Echelon| | + | |{{TooltipSimple|Echelon|18% (277/1578, HQ: 54-120)}}<br>{{TooltipSimple|Line Abreast|17% (265/1578, HQ: 53-120)}}<br>{{TooltipSimple|''Phases: 1''|Samples: 70}} |
|Submarine Ka-Class/Elite | |Submarine Ka-Class/Elite | ||
|Submarine Ka-Class | |Submarine Ka-Class | ||
| Line 454: | Line 454: | ||
|G | |G | ||
|Normal | |Normal | ||
| − | |{{TooltipSimple|Echelon|20% ( | + | |{{TooltipSimple|Echelon|20% (318/1578, HQ: 54-120)}}<br>{{TooltipSimple|Line Abreast|20% (321/1578, HQ: 54-120)}}<br>{{TooltipSimple|''Phases: 1''|Samples: 74}} |
|Submarine Ka-Class/Elite | |Submarine Ka-Class/Elite | ||
|Submarine Ka-Class/Elite | |Submarine Ka-Class/Elite | ||
| Line 461: | Line 461: | ||
|G | |G | ||
|Normal | |Normal | ||
| − | |{{TooltipSimple|Echelon| | + | |{{TooltipSimple|Echelon|12% (191/1578, HQ: 95-120)}}<br>{{TooltipSimple|Line Abreast|13% (206/1578, HQ: 53-120)}}<br>{{TooltipSimple|''Phases: 1''|Samples: 45}} |
|Submarine Ka-Class/Flagship | |Submarine Ka-Class/Flagship | ||
|Submarine Ka-Class/Elite | |Submarine Ka-Class/Elite | ||
| Line 470: | Line 470: | ||
|I | |I | ||
|Normal | |Normal | ||
| − | |{{TooltipSimple|Diamond|29% ( | + | |{{TooltipSimple|Diamond|29% (660/2304, HQ: 59-120)}}<br>{{TooltipSimple|''Phases: 1''|Samples: 196}} |
|Light Carrier Nu-Class/Elite II | |Light Carrier Nu-Class/Elite II | ||
|Heavy Cruiser Ri-Class/Elite | |Heavy Cruiser Ri-Class/Elite | ||
| Line 480: | Line 480: | ||
|I | |I | ||
|Normal | |Normal | ||
| − | |{{TooltipSimple|Diamond|35% ( | + | |{{TooltipSimple|Diamond|35% (804/2304, HQ: 43-120)}}<br>{{TooltipSimple|''Phases: 1''|Samples: 225}} |
|Light Carrier Nu-Class/Elite II | |Light Carrier Nu-Class/Elite II | ||
|Heavy Cruiser Ri-Class/Elite | |Heavy Cruiser Ri-Class/Elite | ||
| Line 490: | Line 490: | ||
|I | |I | ||
|Normal | |Normal | ||
| − | |{{TooltipSimple|Diamond| | + | |{{TooltipSimple|Diamond|36% (840/2304, HQ: 44-120)}}<br>{{TooltipSimple|''Phases: 1''|Samples: 260}} |
|Light Carrier Nu-Class/Elite II | |Light Carrier Nu-Class/Elite II | ||
|Heavy Cruiser Ri-Class/Elite | |Heavy Cruiser Ri-Class/Elite | ||
| Line 501: | Line 501: | ||
|J | |J | ||
|Normal | |Normal | ||
| − | |{{TooltipSimple|Double Line| | + | |{{TooltipSimple|Double Line|30% (603/2035, HQ: 44-120)}}<br>{{TooltipSimple|''Phases: 1''|Samples: 166}} |
|Harbour Summer Princess B/II | |Harbour Summer Princess B/II | ||
|Airfield Princess/Patrol Aircraft Deployment II | |Airfield Princess/Patrol Aircraft Deployment II | ||
| Line 510: | Line 510: | ||
|J | |J | ||
|Normal | |Normal | ||
| − | |{{TooltipSimple|Double Line|36% ( | + | |{{TooltipSimple|Double Line|36% (725/2035, HQ: 53-120)}}<br>{{TooltipSimple|''Phases: 1''|Samples: 205}} |
|Harbour Summer Princess B/II | |Harbour Summer Princess B/II | ||
|Airfield Princess/Patrol Aircraft Deployment II | |Airfield Princess/Patrol Aircraft Deployment II | ||
| Line 519: | Line 519: | ||
|J | |J | ||
|Normal | |Normal | ||
| − | |{{TooltipSimple|Double Line| | + | |{{TooltipSimple|Double Line|35% (707/2035, HQ: 51-120)}}<br>{{TooltipSimple|''Phases: 1''|Samples: 218}} |
|Harbour Summer Princess B/II | |Harbour Summer Princess B/II | ||
|Airfield Princess/Patrol Aircraft Deployment II | |Airfield Princess/Patrol Aircraft Deployment II | ||
| Line 533: | Line 533: | ||
|L | |L | ||
|Normal | |Normal | ||
| − | |{{TooltipSimple|Echelon| | + | |{{TooltipSimple|Echelon|13% (57/448, HQ: 55-120)}}<br>{{TooltipSimple|Line Abreast|15% (65/448, HQ: 56-120)}}<br>{{TooltipSimple|''Phases: 1''|Samples: 38}} |
|Submarine Ka-Class/Elite | |Submarine Ka-Class/Elite | ||
|Submarine Ka-Class/Elite | |Submarine Ka-Class/Elite | ||
| Line 540: | Line 540: | ||
|L | |L | ||
|Normal | |Normal | ||
| − | |{{TooltipSimple|Echelon|15% ( | + | |{{TooltipSimple|Echelon|15% (67/448, HQ: 56-120)}}<br>{{TooltipSimple|Line Abreast|15% (66/448, HQ: 55-120)}}<br>{{TooltipSimple|''Phases: 1''|Samples: 43}} |
|Submarine Ka-Class/Elite | |Submarine Ka-Class/Elite | ||
|Submarine Ka-Class/Elite | |Submarine Ka-Class/Elite | ||
| Line 547: | Line 547: | ||
|L | |L | ||
|Normal | |Normal | ||
| − | |{{TooltipSimple|Echelon|25% ( | + | |{{TooltipSimple|Echelon|25% (110/448, HQ: 55-120)}}<br>{{TooltipSimple|Line Abreast|19% (83/448, HQ: 98-120)}}<br>{{TooltipSimple|''Phases: 1''|Samples: 55}} |
|Submarine Ka-Class/Flagship | |Submarine Ka-Class/Flagship | ||
|Submarine Ka-Class/Elite | |Submarine Ka-Class/Elite | ||
| Line 556: | Line 556: | ||
|M | |M | ||
|Defense | |Defense | ||
| − | |{{TooltipSimple|Diamond|37% ( | + | |{{TooltipSimple|Diamond|37% (146/399, HQ: 55-120)}}<br>{{TooltipSimple|''Phases: 1''|Samples: 42}} |
|Standard Carrier Wo-Class/Kai B Flagship | |Standard Carrier Wo-Class/Kai B Flagship | ||
|Light Carrier Nu-Class/Elite III | |Light Carrier Nu-Class/Elite III | ||
| Line 566: | Line 566: | ||
|M | |M | ||
|Defense | |Defense | ||
| − | |{{TooltipSimple|Diamond| | + | |{{TooltipSimple|Diamond|47% (189/399, HQ: 55-120)}}<br>{{TooltipSimple|''Phases: 1''|Samples: 59}} |
|Standard Carrier Wo-Class/Kai B Flagship | |Standard Carrier Wo-Class/Kai B Flagship | ||
|Light Carrier Nu-Class/B Elite II | |Light Carrier Nu-Class/B Elite II | ||
| Line 576: | Line 576: | ||
|M | |M | ||
|Defense | |Defense | ||
| − | |{{TooltipSimple|Diamond| | + | |{{TooltipSimple|Diamond|16% (64/399, HQ: 98-120)}}<br>{{TooltipSimple|''Phases: 1''|Samples: 18}} |
|Standard Carrier Wo-Class/Kai B Flagship | |Standard Carrier Wo-Class/Kai B Flagship | ||
|Light Carrier Nu-Class/B Elite III | |Light Carrier Nu-Class/B Elite III | ||
| Line 587: | Line 587: | ||
|N | |N | ||
|Defense | |Defense | ||
| − | |{{TooltipSimple|Diamond|40% ( | + | |{{TooltipSimple|Diamond|40% (2838/7156, HQ: 83-120)}}<br>{{TooltipSimple|''Phases: 1''|Samples: 865}} |
|Standard Carrier Wo-Class/Kai B Flagship | |Standard Carrier Wo-Class/Kai B Flagship | ||
|Light Carrier Nu-Class/Elite III | |Light Carrier Nu-Class/Elite III | ||
| Line 597: | Line 597: | ||
|N | |N | ||
|Defense | |Defense | ||
| − | |{{TooltipSimple|Diamond| | + | |{{TooltipSimple|Diamond|41% (2903/7156, HQ: 83-120)}}<br>{{TooltipSimple|''Phases: 1''|Samples: 873}} |
|Standard Carrier Wo-Class/Kai B Flagship | |Standard Carrier Wo-Class/Kai B Flagship | ||
|Light Carrier Nu-Class/B Elite II | |Light Carrier Nu-Class/B Elite II | ||
| Line 607: | Line 607: | ||
|N | |N | ||
|Defense | |Defense | ||
| − | |{{TooltipSimple|Diamond| | + | |{{TooltipSimple|Diamond|20% (1415/7156, HQ: 89-120)}}<br>{{TooltipSimple|''Phases: 1''|Samples: 510}} |
|Standard Carrier Wo-Class/Kai B Flagship | |Standard Carrier Wo-Class/Kai B Flagship | ||
|Light Carrier Nu-Class/B Elite III | |Light Carrier Nu-Class/B Elite III | ||
| Line 618: | Line 618: | ||
|O | |O | ||
|Normal | |Normal | ||
| − | |{{TooltipSimple|Echelon| | + | |{{TooltipSimple|Echelon|6% (3/47, HQ: 98-106)}}<br>{{TooltipSimple|Line Abreast|9% (4/47, HQ: 95-119)}} |
|Submarine Ka-Class/Elite | |Submarine Ka-Class/Elite | ||
|Submarine Ka-Class/Elite | |Submarine Ka-Class/Elite | ||
| Line 625: | Line 625: | ||
|O | |O | ||
|Normal | |Normal | ||
| − | |{{TooltipSimple|Line Abreast| | + | |{{TooltipSimple|Echelon|11% (5/47, HQ: 56-119)}}<br>{{TooltipSimple|Line Abreast|21% (10/47, HQ: 55-120)}}<br>{{TooltipSimple|''Phases: 1''|Samples: 4}} |
|Submarine Ka-Class/Elite | |Submarine Ka-Class/Elite | ||
|Submarine Ka-Class/Elite | |Submarine Ka-Class/Elite | ||
| Line 632: | Line 632: | ||
|O | |O | ||
|Normal | |Normal | ||
| − | |{{TooltipSimple|Echelon| | + | |{{TooltipSimple|Echelon|23% (11/47, HQ: 98-120)}}<br>{{TooltipSimple|Line Abreast|30% (14/47, HQ: 98-120)}}<br>{{TooltipSimple|''Phases: 1''|Samples: 5}} |
|Submarine Ka-Class/Flagship | |Submarine Ka-Class/Flagship | ||
|Submarine Ka-Class/Elite | |Submarine Ka-Class/Elite | ||
| Line 641: | Line 641: | ||
|P | |P | ||
|Normal | |Normal | ||
| − | |{{TooltipSimple|Line Ahead| | + | |{{TooltipSimple|Line Ahead|41% (3765/9140, HQ: 56-120)}}<br>{{TooltipSimple|Double Line|35% (3178/9140, HQ: 56-120)}}<br>{{TooltipSimple|Echelon|24% (2197/9140, HQ: 55-120)}}<br>{{TooltipSimple|''Phases: 1''|Samples: 2559}} |
|Battleship Ru-Class/Elite | |Battleship Ru-Class/Elite | ||
|Battleship Ru-Class/Elite | |Battleship Ru-Class/Elite | ||
| Line 653: | Line 653: | ||
|R | |R | ||
|Boss | |Boss | ||
| − | |{{TooltipSimple|Diamond| | + | |{{TooltipSimple|Diamond|41% (2913/7110, HQ: 56-120)}}<br>{{TooltipSimple|''Phases: 1''|Samples: 836}} |
|Standard Carrier Wo-Class/Kai B Flagship | |Standard Carrier Wo-Class/Kai B Flagship | ||
|Light Carrier Nu-Class/Elite III | |Light Carrier Nu-Class/Elite III | ||
| Line 663: | Line 663: | ||
|R | |R | ||
|Boss | |Boss | ||
| − | |{{TooltipSimple|Diamond| | + | |{{TooltipSimple|Diamond|41% (2886/7110, HQ: 57-120)}}<br>{{TooltipSimple|''Phases: 1''|Samples: 730}} |
|Standard Carrier Wo-Class/Kai B Flagship | |Standard Carrier Wo-Class/Kai B Flagship | ||
|Light Carrier Nu-Class/B Elite II | |Light Carrier Nu-Class/B Elite II | ||
| Line 673: | Line 673: | ||
|R | |R | ||
|Boss/Final | |Boss/Final | ||
| − | |{{TooltipSimple|Diamond| | + | |{{TooltipSimple|Diamond|18% (1311/7110, HQ: 58-120)}}<br>{{TooltipSimple|''Phases: 1''|Samples: 410}} |
|Standard Carrier Wo-Class/Kai B Flagship | |Standard Carrier Wo-Class/Kai B Flagship | ||
|Light Carrier Nu-Class/B Elite II | |Light Carrier Nu-Class/B Elite II | ||
| Line 683: | Line 683: | ||
</div> | </div> | ||
|-|Easy= | |-|Easy= | ||
| − | {{Map/Image|page=Summer 2022 Event/E-1|{{Map/ImageNode|1|Easy|E-1|x=640|y=228}}{{Map/ImageNode|A|Easy|E-1|x=594|y=183}}{{Map/ImageNode|B|Easy|E-1|x=579|y=106}}{{Map/ImageNode|C|Easy|E-1|x=506|y=80}}{{Map/ImageNode|D|Easy|E-1|x=446|y=126}}{{Map/ImageNode|E|Easy|E-1|x=473|y=151}}{{Map/ImageNode|F|Easy|E-1|x=547|y=240}}{{Map/ImageNode|G|Easy|E-1|x=500|y=296}}{{Map/ImageNode|H|Easy|E-1|x=435|y=231}}{{Map/ImageNode|I|Easy|E-1|x=417|y=144}}{{Map/ImageNode|J|Easy|E-1|x=368|y=158|drops=<table class="wikitable"><tr><th>Type</th><th>Ships</th></tr><tr><th>DE</th><td>{{Ship/Banner|small=true|Sado}}{{Ship/Banner|small=true|Tsushima}}</td></tr><tr><th>DD</th><td>{{Ship/Banner|small=true|Makinami}}</td></tr><tr><th>SS</th><td>{{Ship/Banner|small=true|I-26}}</td></tr><tr><th>SSV</th><td>{{Ship/Banner|small=true|I-401}}</td></tr></table>}}{{Map/ImageNode|K1|Easy|E-1|x=239|y=240}}{{Map/ImageNode|K2|Easy|E-1|x=261|y=285}}{{Map/ImageNode|K|Easy|E-1|x=311|y=270}}{{Map/ImageNode|L|Easy|E-1|x=221|y=205}}{{Map/ImageNode|M|Easy|E-1|x=199|y=157}}{{Map/ImageNode|N|Easy|E-1|x=200|y=304}}{{Map/ImageNode|O|Easy|E-1|x=146|y=144}}{{Map/ImageNode|P|Easy|E-1|x=170|y=212}}{{Map/ImageNode|Q|Easy|E-1|x=140|y=265}}{{Map/ImageNode|R|Easy|E-1|x=103|y=186|drops=<table class="wikitable"><tr><th>Type</th><th>Ships</th></tr><tr><th>CL</th><td>{{Ship/Banner|small=true|Helena}}{{Ship/Banner|small=true|Perth}}</td></tr><tr><th>CV</th><td>{{Ship/Banner|small=true|Aquila}}</td></tr><tr><th>SS</th><td>{{Ship/Banner|small=true|Luigi Torelli}}</td></tr></table>}}}} | + | {{Map/Image|page=Summer 2022 Event/E-1|{{Map/ImageNode|1|Easy|E-1|x=640|y=228}}{{Map/ImageNode|A|Easy|E-1|x=594|y=183}}{{Map/ImageNode|B|Easy|E-1|x=579|y=106}}{{Map/ImageNode|C|Easy|E-1|x=506|y=80}}{{Map/ImageNode|D|Easy|E-1|x=446|y=126}}{{Map/ImageNode|E|Easy|E-1|x=473|y=151}}{{Map/ImageNode|F|Easy|E-1|x=547|y=240}}{{Map/ImageNode|G|Easy|E-1|x=500|y=296}}{{Map/ImageNode|H|Easy|E-1|x=435|y=231}}{{Map/ImageNode|I|Easy|E-1|x=417|y=144}}{{Map/ImageNode|J|Easy|E-1|x=368|y=158|drops=<table class="wikitable"><tr><th>Type</th><th>Ships</th></tr><tr><th>DE</th><td>{{Ship/Banner|small=true|Sado}}{{Ship/Banner|small=true|Tsushima}}</td></tr><tr><th>DD</th><td>{{Ship/Banner|small=true|Makinami}}</td></tr><tr><th>SS</th><td>{{Ship/Banner|small=true|I-26}}</td></tr><tr><th>SSV</th><td>{{Ship/Banner|small=true|I-401}}</td></tr></table>}}{{Map/ImageNode|K1|Easy|E-1|x=239|y=240}}{{Map/ImageNode|K2|Easy|E-1|x=261|y=285}}{{Map/ImageNode|K|Easy|E-1|x=311|y=270}}{{Map/ImageNode|L|Easy|E-1|x=221|y=205}}{{Map/ImageNode|M|Easy|E-1|x=199|y=157}}{{Map/ImageNode|N|Easy|E-1|x=200|y=304}}{{Map/ImageNode|O|Easy|E-1|x=146|y=144}}{{Map/ImageNode|P|Easy|E-1|x=170|y=212}}{{Map/ImageNode|Q|Easy|E-1|x=140|y=265}}{{Map/ImageNode|R|Easy|E-1|x=103|y=186|drops=<table class="wikitable"><tr><th>Type</th><th>Ships</th></tr><tr><th>DE</th><td>{{Ship/Banner|small=true|Ukuru}}</td></tr><tr><th>CL</th><td>{{Ship/Banner|small=true|Helena}}{{Ship/Banner|small=true|Perth}}</td></tr><tr><th>CV</th><td>{{Ship/Banner|small=true|Aquila}}</td></tr><tr><th>SS</th><td>{{Ship/Banner|small=true|Luigi Torelli}}</td></tr></table>}}}} |
<div class="map-nodes"> | <div class="map-nodes"> | ||
{{Map/Nodes|diff=Easy|A|Empty|kind=0}} | {{Map/Nodes|diff=Easy|A|Empty|kind=0}} | ||
| Line 689: | Line 689: | ||
|B | |B | ||
|Normal | |Normal | ||
| − | |{{TooltipSimple|Line Ahead| | + | |{{TooltipSimple|Line Ahead|52% (76/145, HQ: 19-120)}}<br>{{TooltipSimple|Double Line|23% (34/145, HQ: 15-113)}}<br>{{TooltipSimple|Echelon|24% (35/145, HQ: 16-112)}}<br>{{TooltipSimple|''Phases: 1''|Samples: 90}} |
|Destroyer I-Class/Late Model Elite | |Destroyer I-Class/Late Model Elite | ||
|Destroyer I-Class/Late Model | |Destroyer I-Class/Late Model | ||
| Line 699: | Line 699: | ||
|C | |C | ||
|Normal | |Normal | ||
| − | |{{TooltipSimple|Echelon| | + | |{{TooltipSimple|Echelon|14% (17/121, HQ: 18-100)}}<br>{{TooltipSimple|Line Abreast|7% (9/121, HQ: 29-100)}}<br>{{TooltipSimple|''Phases: 1''|Samples: 15}} |
|Submarine Ka-Class | |Submarine Ka-Class | ||
|Submarine Ka-Class | |Submarine Ka-Class | ||
| Line 706: | Line 706: | ||
|C | |C | ||
|Normal | |Normal | ||
| − | |{{TooltipSimple|Echelon| | + | |{{TooltipSimple|Echelon|23% (28/121, HQ: 16-106)}}<br>{{TooltipSimple|Line Abreast|30% (36/121, HQ: 19-111)}}<br>{{TooltipSimple|''Phases: 1''|Samples: 42}} |
|Submarine Ka-Class/Elite | |Submarine Ka-Class/Elite | ||
|Submarine Ka-Class | |Submarine Ka-Class | ||
| Line 713: | Line 713: | ||
|C | |C | ||
|Normal | |Normal | ||
| − | |{{TooltipSimple|Echelon| | + | |{{TooltipSimple|Echelon|15% (18/121, HQ: 22-90)}}<br>{{TooltipSimple|Line Abreast|11% (13/121, HQ: 15-100)}}<br>{{TooltipSimple|''Phases: 1''|Samples: 21}} |
|Submarine Ka-Class/Elite | |Submarine Ka-Class/Elite | ||
|Submarine Ka-Class/Elite | |Submarine Ka-Class/Elite | ||
| Line 721: | Line 721: | ||
|D | |D | ||
|Defense | |Defense | ||
| − | |{{TooltipSimple|Double Line| | + | |{{TooltipSimple|Double Line|39% (16/41, HQ: 15-100)}}<br>{{TooltipSimple|''Phases: 1''|Samples: 14}} |
|Airfield Princess/Patrol Aircraft Deployment | |Airfield Princess/Patrol Aircraft Deployment | ||
|Destroyer I-Class | |Destroyer I-Class | ||
| Line 728: | Line 728: | ||
|D | |D | ||
|Defense | |Defense | ||
| − | |{{TooltipSimple|Double Line| | + | |{{TooltipSimple|Double Line|32% (13/41, HQ: 25-99)}}<br>{{TooltipSimple|''Phases: 1''|Samples: 12}} |
|Harbour Summer Princess B | |Harbour Summer Princess B | ||
|Airfield Princess/Patrol Aircraft Deployment | |Airfield Princess/Patrol Aircraft Deployment | ||
| Line 737: | Line 737: | ||
|D | |D | ||
|Defense | |Defense | ||
| − | |{{TooltipSimple|Double Line| | + | |{{TooltipSimple|Double Line|29% (12/41, HQ: 18-99)}}<br>{{TooltipSimple|''Phases: 1''|Samples: 9}} |
|Harbour Summer Princess B | |Harbour Summer Princess B | ||
|Airfield Princess/Patrol Aircraft Deployment | |Airfield Princess/Patrol Aircraft Deployment | ||
| Line 748: | Line 748: | ||
|E | |E | ||
|Normal | |Normal | ||
| − | |{{TooltipSimple|Line Ahead| | + | |{{TooltipSimple|Line Ahead|53% (53/100, HQ: 18-111)}}<br>{{TooltipSimple|Double Line|28% (28/100, HQ: 21-100)}}<br>{{TooltipSimple|Echelon|19% (19/100, HQ: 15-111)}}<br>{{TooltipSimple|''Phases: 1''|Samples: 63}} |
|Heavy Cruiser Ri-Class/Elite | |Heavy Cruiser Ri-Class/Elite | ||
|Heavy Cruiser Ri-Class/Elite | |Heavy Cruiser Ri-Class/Elite | ||
| Line 759: | Line 759: | ||
|F | |F | ||
|Normal | |Normal | ||
| − | |{{TooltipSimple|Line Ahead| | + | |{{TooltipSimple|Line Ahead|34% (3665/10752, HQ: 29-120)}}<br>{{TooltipSimple|''Phases: 1''|Samples: 1026}} |
|Torpedo Cruiser Chi-Class/Elite | |Torpedo Cruiser Chi-Class/Elite | ||
|Torpedo Cruiser Chi-Class/Elite | |Torpedo Cruiser Chi-Class/Elite | ||
| Line 769: | Line 769: | ||
|F | |F | ||
|Normal | |Normal | ||
| − | |{{TooltipSimple|Line Ahead|31% ( | + | |{{TooltipSimple|Line Ahead|31% (3351/10752, HQ: 31-120)}}<br>{{TooltipSimple|Vanguard|35% (3736/10752, HQ: 29-120)}}<br>{{TooltipSimple|''Phases: 1''|Samples: 2018}} |
|Light Cruiser Ho-Class/Elite | |Light Cruiser Ho-Class/Elite | ||
|Torpedo Cruiser Chi-Class/Elite | |Torpedo Cruiser Chi-Class/Elite | ||
| Line 780: | Line 780: | ||
|G | |G | ||
|Normal | |Normal | ||
| − | |{{TooltipSimple|Echelon| | + | |{{TooltipSimple|Echelon|9% (98/1110, HQ: 50-120)}}<br>{{TooltipSimple|Line Abreast|9% (105/1110, HQ: 45-120)}}<br>{{TooltipSimple|''Phases: 1''|Samples: 34}} |
|Submarine Ka-Class | |Submarine Ka-Class | ||
|Submarine Ka-Class | |Submarine Ka-Class | ||
| Line 787: | Line 787: | ||
|G | |G | ||
|Normal | |Normal | ||
| − | |{{TooltipSimple|Echelon| | + | |{{TooltipSimple|Echelon|29% (327/1110, HQ: 31-120)}}<br>{{TooltipSimple|Line Abreast|25% (277/1110, HQ: 29-120)}}<br>{{TooltipSimple|''Phases: 1''|Samples: 117}} |
|Submarine Ka-Class/Elite | |Submarine Ka-Class/Elite | ||
|Submarine Ka-Class | |Submarine Ka-Class | ||
| Line 794: | Line 794: | ||
|G | |G | ||
|Normal | |Normal | ||
| − | |{{TooltipSimple|Echelon| | + | |{{TooltipSimple|Echelon|13% (148/1110, HQ: 29-120)}}<br>{{TooltipSimple|Line Abreast|14% (155/1110, HQ: 31-120)}}<br>{{TooltipSimple|''Phases: 1''|Samples: 59}} |
|Submarine Ka-Class/Elite | |Submarine Ka-Class/Elite | ||
|Submarine Ka-Class/Elite | |Submarine Ka-Class/Elite | ||
| Line 803: | Line 803: | ||
|I | |I | ||
|Normal | |Normal | ||
| − | |{{TooltipSimple|Diamond| | + | |{{TooltipSimple|Diamond|32% (414/1309, HQ: 22-120)}}<br>{{TooltipSimple|''Phases: 1''|Samples: 151}} |
|Light Carrier Nu-Class/Elite | |Light Carrier Nu-Class/Elite | ||
|Heavy Cruiser Ri-Class/Elite | |Heavy Cruiser Ri-Class/Elite | ||
| Line 813: | Line 813: | ||
|I | |I | ||
|Normal | |Normal | ||
| − | |{{TooltipSimple|Diamond|35% ( | + | |{{TooltipSimple|Diamond|35% (452/1309, HQ: 21-120)}}<br>{{TooltipSimple|''Phases: 1''|Samples: 189}} |
|Light Carrier Nu-Class/Elite | |Light Carrier Nu-Class/Elite | ||
|Heavy Cruiser Ri-Class/Elite | |Heavy Cruiser Ri-Class/Elite | ||
| Line 823: | Line 823: | ||
|I | |I | ||
|Normal | |Normal | ||
| − | |{{TooltipSimple|Diamond| | + | |{{TooltipSimple|Diamond|34% (443/1309, HQ: 24-120)}}<br>{{TooltipSimple|''Phases: 1''|Samples: 169}} |
|Light Carrier Nu-Class/Elite | |Light Carrier Nu-Class/Elite | ||
|Heavy Cruiser Ri-Class/Elite | |Heavy Cruiser Ri-Class/Elite | ||
| Line 834: | Line 834: | ||
|J | |J | ||
|Normal | |Normal | ||
| − | |{{TooltipSimple|Double Line| | + | |{{TooltipSimple|Double Line|32% (395/1252, HQ: 28-120)}}<br>{{TooltipSimple|''Phases: 1''|Samples: 163}} |
|Harbour Summer Princess B | |Harbour Summer Princess B | ||
|Airfield Princess/Patrol Aircraft Deployment | |Airfield Princess/Patrol Aircraft Deployment | ||
| Line 842: | Line 842: | ||
|J | |J | ||
|Normal | |Normal | ||
| − | |{{TooltipSimple|Double Line| | + | |{{TooltipSimple|Double Line|34% (426/1252, HQ: 21-120)}}<br>{{TooltipSimple|''Phases: 1''|Samples: 161}} |
|Harbour Summer Princess B | |Harbour Summer Princess B | ||
|Airfield Princess/Patrol Aircraft Deployment | |Airfield Princess/Patrol Aircraft Deployment | ||
| Line 851: | Line 851: | ||
|J | |J | ||
|Normal | |Normal | ||
| − | |{{TooltipSimple|Double Line|34% ( | + | |{{TooltipSimple|Double Line|34% (431/1252, HQ: 24-120)}}<br>{{TooltipSimple|''Phases: 1''|Samples: 161}} |
|Harbour Summer Princess B | |Harbour Summer Princess B | ||
|Airfield Princess/Patrol Aircraft Deployment | |Airfield Princess/Patrol Aircraft Deployment | ||
| Line 865: | Line 865: | ||
|L | |L | ||
|Normal | |Normal | ||
| − | |{{TooltipSimple|Echelon| | + | |{{TooltipSimple|Echelon|10% (73/762, HQ: 32-120)}}<br>{{TooltipSimple|Line Abreast|10% (77/762, HQ: 38-120)}}<br>{{TooltipSimple|''Phases: 1''|Samples: 26}} |
|Submarine Ka-Class/Elite | |Submarine Ka-Class/Elite | ||
|Submarine Ka-Class | |Submarine Ka-Class | ||
| Line 872: | Line 872: | ||
|L | |L | ||
|Normal | |Normal | ||
| − | |{{TooltipSimple|Echelon| | + | |{{TooltipSimple|Echelon|23% (176/762, HQ: 22-120)}}<br>{{TooltipSimple|Line Abreast|24% (180/762, HQ: 29-120)}}<br>{{TooltipSimple|''Phases: 1''|Samples: 78}} |
|Submarine Ka-Class/Elite | |Submarine Ka-Class/Elite | ||
|Submarine Ka-Class/Elite | |Submarine Ka-Class/Elite | ||
| Line 879: | Line 879: | ||
|L | |L | ||
|Normal | |Normal | ||
| − | |{{TooltipSimple|Echelon|18% ( | + | |{{TooltipSimple|Echelon|18% (136/762, HQ: 29-120)}}<br>{{TooltipSimple|Line Abreast|16% (120/762, HQ: 29-120)}}<br>{{TooltipSimple|''Phases: 1''|Samples: 61}} |
|Submarine Ka-Class/Elite | |Submarine Ka-Class/Elite | ||
|Submarine Ka-Class/Elite | |Submarine Ka-Class/Elite | ||
| Line 887: | Line 887: | ||
|M | |M | ||
|Defense | |Defense | ||
| − | |{{TooltipSimple|Diamond| | + | |{{TooltipSimple|Diamond|47% (330/700, HQ: 31-120)}}<br>{{TooltipSimple|''Phases: 1''|Samples: 64}} |
|Standard Carrier Wo-Class/Kai B Flagship | |Standard Carrier Wo-Class/Kai B Flagship | ||
|Light Carrier Nu-Class/Elite | |Light Carrier Nu-Class/Elite | ||
| Line 897: | Line 897: | ||
|M | |M | ||
|Defense | |Defense | ||
| − | |{{TooltipSimple|Diamond| | + | |{{TooltipSimple|Diamond|40% (279/700, HQ: 22-120)}}<br>{{TooltipSimple|''Phases: 1''|Samples: 73}} |
|Standard Carrier Wo-Class/Kai B Flagship | |Standard Carrier Wo-Class/Kai B Flagship | ||
|Light Carrier Nu-Class/Elite III | |Light Carrier Nu-Class/Elite III | ||
| Line 907: | Line 907: | ||
|M | |M | ||
|Defense | |Defense | ||
| − | |{{TooltipSimple|Diamond|13% ( | + | |{{TooltipSimple|Diamond|13% (91/700, HQ: 76-120)}}<br>{{TooltipSimple|''Phases: 1''|Samples: 9}} |
|Standard Carrier Wo-Class/Kai B Flagship | |Standard Carrier Wo-Class/Kai B Flagship | ||
|Light Carrier Nu-Class/B Elite II | |Light Carrier Nu-Class/B Elite II | ||
| Line 918: | Line 918: | ||
|N | |N | ||
|Defense | |Defense | ||
| − | |{{TooltipSimple|Diamond| | + | |{{TooltipSimple|Diamond|42% (1992/4722, HQ: 33-120)}}<br>{{TooltipSimple|''Phases: 1''|Samples: 616}} |
|Standard Carrier Wo-Class/Kai B Flagship | |Standard Carrier Wo-Class/Kai B Flagship | ||
|Light Carrier Nu-Class/Elite | |Light Carrier Nu-Class/Elite | ||
| Line 928: | Line 928: | ||
|N | |N | ||
|Defense | |Defense | ||
| − | |{{TooltipSimple|Diamond|41% ( | + | |{{TooltipSimple|Diamond|41% (1925/4722, HQ: 34-120)}}<br>{{TooltipSimple|''Phases: 1''|Samples: 591}} |
|Standard Carrier Wo-Class/Kai B Flagship | |Standard Carrier Wo-Class/Kai B Flagship | ||
|Light Carrier Nu-Class/Elite III | |Light Carrier Nu-Class/Elite III | ||
| Line 938: | Line 938: | ||
|N | |N | ||
|Defense | |Defense | ||
| − | |{{TooltipSimple|Diamond| | + | |{{TooltipSimple|Diamond|17% (805/4722, HQ: 47-120)}}<br>{{TooltipSimple|''Phases: 1''|Samples: 248}} |
|Standard Carrier Wo-Class/Kai B Flagship | |Standard Carrier Wo-Class/Kai B Flagship | ||
|Light Carrier Nu-Class/B Elite II | |Light Carrier Nu-Class/B Elite II | ||
| Line 949: | Line 949: | ||
|O | |O | ||
|Normal | |Normal | ||
| − | |{{TooltipSimple|Echelon| | + | |{{TooltipSimple|Echelon|7% (9/132, HQ: 71-115)}}<br>{{TooltipSimple|Line Abreast|11% (15/132, HQ: 77-115)}}<br>{{TooltipSimple|''Phases: 1''|Samples: 4}} |
|Submarine Ka-Class/Elite | |Submarine Ka-Class/Elite | ||
|Submarine Ka-Class | |Submarine Ka-Class | ||
| Line 956: | Line 956: | ||
|O | |O | ||
|Normal | |Normal | ||
| − | |{{TooltipSimple|Echelon| | + | |{{TooltipSimple|Echelon|22% (29/132, HQ: 38-118)}}<br>{{TooltipSimple|Line Abreast|27% (36/132, HQ: 31-119)}}<br>{{TooltipSimple|''Phases: 1''|Samples: 16}} |
|Submarine Ka-Class/Elite | |Submarine Ka-Class/Elite | ||
|Submarine Ka-Class/Elite | |Submarine Ka-Class/Elite | ||
| Line 963: | Line 963: | ||
|O | |O | ||
|Normal | |Normal | ||
| − | |{{TooltipSimple|Echelon| | + | |{{TooltipSimple|Echelon|19% (25/132, HQ: 62-115)}}<br>{{TooltipSimple|Line Abreast|14% (18/132, HQ: 40-115)}}<br>{{TooltipSimple|''Phases: 1''|Samples: 7}} |
|Submarine Ka-Class/Elite | |Submarine Ka-Class/Elite | ||
|Submarine Ka-Class/Elite | |Submarine Ka-Class/Elite | ||
| Line 971: | Line 971: | ||
|P | |P | ||
|Normal | |Normal | ||
| − | |{{TooltipSimple|Line Ahead|40% ( | + | |{{TooltipSimple|Line Ahead|40% (2949/7309, HQ: 31-120)}}<br>{{TooltipSimple|Double Line|35% (2536/7309, HQ: 31-120)}}<br>{{TooltipSimple|Echelon|25% (1824/7309, HQ: 31-120)}}<br>{{TooltipSimple|''Phases: 1''|Samples: 1921}} |
|Battleship Ru-Class/Elite | |Battleship Ru-Class/Elite | ||
|Battleship Ru-Class | |Battleship Ru-Class | ||
| Line 983: | Line 983: | ||
|R | |R | ||
|Boss | |Boss | ||
| − | |{{TooltipSimple|Diamond| | + | |{{TooltipSimple|Diamond|47% (2792/5885, HQ: 31-120)}}<br>{{TooltipSimple|''Phases: 1''|Samples: 668}} |
|Standard Carrier Wo-Class/Kai B Flagship | |Standard Carrier Wo-Class/Kai B Flagship | ||
|Light Carrier Nu-Class/Elite III | |Light Carrier Nu-Class/Elite III | ||
| Line 993: | Line 993: | ||
|R | |R | ||
|Boss | |Boss | ||
| − | |{{TooltipSimple|Diamond|15% ( | + | |{{TooltipSimple|Diamond|15% (880/5885, HQ: 47-120)}}<br>{{TooltipSimple|''Phases: 1''|Samples: 234}} |
|Standard Carrier Wo-Class/Kai B Flagship | |Standard Carrier Wo-Class/Kai B Flagship | ||
|Light Carrier Nu-Class/Elite III | |Light Carrier Nu-Class/Elite III | ||
| Line 1,003: | Line 1,003: | ||
|R | |R | ||
|Boss/Final | |Boss/Final | ||
| − | |{{TooltipSimple|Diamond| | + | |{{TooltipSimple|Diamond|38% (2213/5885, HQ: 34-120)}}<br>{{TooltipSimple|''Phases: 1''|Samples: 522}} |
|Standard Carrier Wo-Class/Kai B Flagship | |Standard Carrier Wo-Class/Kai B Flagship | ||
|Light Carrier Nu-Class/Elite III | |Light Carrier Nu-Class/Elite III | ||
| Line 1,013: | Line 1,013: | ||
</div> | </div> | ||
|-|Casual= | |-|Casual= | ||
| − | {{Map/Image|page=Summer 2022 Event/E-1|{{Map/ImageNode|1|Casual|E-1|x=640|y=228}}{{Map/ImageNode|A|Casual|E-1|x=594|y=183}}{{Map/ImageNode|B|Casual|E-1|x=579|y=106}}{{Map/ImageNode|C|Casual|E-1|x=506|y=80}}{{Map/ImageNode|D|Casual|E-1|x=446|y=126}}{{Map/ImageNode|E|Casual|E-1|x=473|y=151}}{{Map/ImageNode|F|Casual|E-1|x=547|y=240}}{{Map/ImageNode|G|Casual|E-1|x=500|y=296}}{{Map/ImageNode|H|Casual|E-1|x=435|y=231}}{{Map/ImageNode|I|Casual|E-1|x=417|y=144}}{{Map/ImageNode|J|Casual|E-1|x=368|y=158|drops=<table class="wikitable"><tr><th>Type</th><th>Ships</th></tr><tr><th>DE</th><td>{{Ship/Banner|small=true|Sado}}</td></tr><tr><th>DD</th><td>{{Ship/Banner|small=true|Makinami}}</td></tr></table>}}{{Map/ImageNode|K1|Casual|E-1|x=239|y=240}}{{Map/ImageNode|K2|Casual|E-1|x=261|y=285}}{{Map/ImageNode|K|Casual|E-1|x=311|y=270}}{{Map/ImageNode|L|Casual|E-1|x=221|y=205}}{{Map/ImageNode|M|Casual|E-1|x=199|y=157}}{{Map/ImageNode|N|Casual|E-1|x=200|y=304}}{{Map/ImageNode|O|Casual|E-1|x=146|y=144}}{{Map/ImageNode|P|Casual|E-1|x=170|y=212}}{{Map/ImageNode|Q|Casual|E-1|x=140|y=265}}{{Map/ImageNode|R|Casual|E-1|x=103|y=186|drops=<table class="wikitable"><tr><th>Type</th><th>Ships</th></tr><tr><th>CL</th><td>{{Ship/Banner|small=true|Helena}}{{Ship/Banner|small=true|Perth}}</td></tr><tr><th>CV</th><td>{{Ship/Banner|small=true|Aquila}}</td></tr><tr><th>SS</th><td>{{Ship/Banner|small=true|Luigi Torelli}}</td></tr></table>}}}} | + | {{Map/Image|page=Summer 2022 Event/E-1|{{Map/ImageNode|1|Casual|E-1|x=640|y=228}}{{Map/ImageNode|A|Casual|E-1|x=594|y=183}}{{Map/ImageNode|B|Casual|E-1|x=579|y=106}}{{Map/ImageNode|C|Casual|E-1|x=506|y=80}}{{Map/ImageNode|D|Casual|E-1|x=446|y=126}}{{Map/ImageNode|E|Casual|E-1|x=473|y=151}}{{Map/ImageNode|F|Casual|E-1|x=547|y=240}}{{Map/ImageNode|G|Casual|E-1|x=500|y=296}}{{Map/ImageNode|H|Casual|E-1|x=435|y=231}}{{Map/ImageNode|I|Casual|E-1|x=417|y=144}}{{Map/ImageNode|J|Casual|E-1|x=368|y=158|drops=<table class="wikitable"><tr><th>Type</th><th>Ships</th></tr><tr><th>DE</th><td>{{Ship/Banner|small=true|Sado}}</td></tr><tr><th>DD</th><td>{{Ship/Banner|small=true|Makinami}}</td></tr><tr><th>SS</th><td>{{Ship/Banner|small=true|I-26}}</td></tr></table>}}{{Map/ImageNode|K1|Casual|E-1|x=239|y=240}}{{Map/ImageNode|K2|Casual|E-1|x=261|y=285}}{{Map/ImageNode|K|Casual|E-1|x=311|y=270}}{{Map/ImageNode|L|Casual|E-1|x=221|y=205}}{{Map/ImageNode|M|Casual|E-1|x=199|y=157}}{{Map/ImageNode|N|Casual|E-1|x=200|y=304}}{{Map/ImageNode|O|Casual|E-1|x=146|y=144}}{{Map/ImageNode|P|Casual|E-1|x=170|y=212}}{{Map/ImageNode|Q|Casual|E-1|x=140|y=265}}{{Map/ImageNode|R|Casual|E-1|x=103|y=186|drops=<table class="wikitable"><tr><th>Type</th><th>Ships</th></tr><tr><th>DE</th><td>{{Ship/Banner|small=true|Ukuru}}</td></tr><tr><th>CL</th><td>{{Ship/Banner|small=true|Helena}}{{Ship/Banner|small=true|Perth}}</td></tr><tr><th>CV</th><td>{{Ship/Banner|small=true|Aquila}}</td></tr><tr><th>SS</th><td>{{Ship/Banner|small=true|Luigi Torelli}}</td></tr></table>}}}} |
<div class="map-nodes"> | <div class="map-nodes"> | ||
{{Map/Nodes|diff=Casual|A|Empty|kind=0}} | {{Map/Nodes|diff=Casual|A|Empty|kind=0}} | ||
| Line 1,019: | Line 1,019: | ||
|B | |B | ||
|Normal | |Normal | ||
| − | |{{TooltipSimple|Line Ahead| | + | |{{TooltipSimple|Line Ahead|59% (169/287, HQ: 11-120)}}<br>{{TooltipSimple|Double Line|23% (66/287, HQ: 9-120)}}<br>{{TooltipSimple|Echelon|18% (52/287, HQ: 17-120)}}<br>{{TooltipSimple|''Phases: 1''|Samples: 99}} |
|Destroyer I-Class/Late Model | |Destroyer I-Class/Late Model | ||
|Destroyer I-Class | |Destroyer I-Class | ||
| Line 1,029: | Line 1,029: | ||
|C | |C | ||
|Normal | |Normal | ||
| − | |{{TooltipSimple|Echelon|35% ( | + | |{{TooltipSimple|Echelon|35% (89/255, HQ: 11-120)}}<br>{{TooltipSimple|Line Abreast|28% (72/255, HQ: 9-120)}}<br>{{TooltipSimple|''Phases: 1''|Samples: 52}} |
|Submarine Ka-Class | |Submarine Ka-Class | ||
|Submarine Ka-Class | |Submarine Ka-Class | ||
| Line 1,036: | Line 1,036: | ||
|C | |C | ||
|Normal | |Normal | ||
| − | |{{TooltipSimple|Echelon| | + | |{{TooltipSimple|Echelon|17% (44/255, HQ: 11-120)}}<br>{{TooltipSimple|Line Abreast|20% (50/255, HQ: 21-120)}}<br>{{TooltipSimple|''Phases: 1''|Samples: 28}} |
|Submarine Ka-Class/Elite | |Submarine Ka-Class/Elite | ||
|Submarine Ka-Class | |Submarine Ka-Class | ||
| Line 1,044: | Line 1,044: | ||
|D | |D | ||
|Defense | |Defense | ||
| − | |{{TooltipSimple|Double Line| | + | |{{TooltipSimple|Double Line|36% (47/132, HQ: 16-97)}}<br>{{TooltipSimple|''Phases: 1''|Samples: 13}} |
|Airfield Princess/Patrol Aircraft Deployment | |Airfield Princess/Patrol Aircraft Deployment | ||
|Destroyer I-Class | |Destroyer I-Class | ||
| Line 1,051: | Line 1,051: | ||
|D | |D | ||
|Defense | |Defense | ||
| − | |{{TooltipSimple|Double Line| | + | |{{TooltipSimple|Double Line|33% (44/132, HQ: 13-120)}}<br>{{TooltipSimple|''Phases: 1''|Samples: 12}} |
|Harbour Summer Princess | |Harbour Summer Princess | ||
|Airfield Princess/Patrol Aircraft Deployment | |Airfield Princess/Patrol Aircraft Deployment | ||
| Line 1,059: | Line 1,059: | ||
|D | |D | ||
|Defense | |Defense | ||
| − | |{{TooltipSimple|Double Line| | + | |{{TooltipSimple|Double Line|31% (41/132, HQ: 16-101)}}<br>{{TooltipSimple|''Phases: 1''|Samples: 16}} |
|Airfield Princess/Patrol Aircraft Deployment | |Airfield Princess/Patrol Aircraft Deployment | ||
|Airfield Princess/Patrol Aircraft Deployment | |Airfield Princess/Patrol Aircraft Deployment | ||
| Line 1,069: | Line 1,069: | ||
|E | |E | ||
|Normal | |Normal | ||
| − | |{{TooltipSimple|Line Ahead| | + | |{{TooltipSimple|Line Ahead|51% (114/222, HQ: 9-106)}}<br>{{TooltipSimple|Double Line|27% (59/222, HQ: 16-120)}}<br>{{TooltipSimple|Echelon|22% (49/222, HQ: 11-101)}}<br>{{TooltipSimple|''Phases: 1''|Samples: 68}} |
|Heavy Cruiser Ri-Class/Elite | |Heavy Cruiser Ri-Class/Elite | ||
|Heavy Cruiser Ri-Class | |Heavy Cruiser Ri-Class | ||
| Line 1,079: | Line 1,079: | ||
|F | |F | ||
|Normal | |Normal | ||
| − | |{{TooltipSimple|Line Ahead| | + | |{{TooltipSimple|Line Ahead|33% (1014/3057, HQ: 4-120)}}<br>{{TooltipSimple|Vanguard|34% (1037/3057, HQ: 8-120)}}<br>{{TooltipSimple|''Phases: 1''|Samples: 490}} |
|Light Cruiser Ho-Class/Elite | |Light Cruiser Ho-Class/Elite | ||
|Torpedo Cruiser Chi-Class | |Torpedo Cruiser Chi-Class | ||
| Line 1,088: | Line 1,088: | ||
|F | |F | ||
|Normal | |Normal | ||
| − | |{{TooltipSimple|Line Ahead| | + | |{{TooltipSimple|Line Ahead|33% (1006/3057, HQ: 5-120)}}<br>{{TooltipSimple|''Phases: 1''|Samples: 243}} |
|Light Cruiser Ho-Class/Elite | |Light Cruiser Ho-Class/Elite | ||
|Torpedo Cruiser Chi-Class | |Torpedo Cruiser Chi-Class | ||
| Line 1,099: | Line 1,099: | ||
|G | |G | ||
|Normal | |Normal | ||
| − | |{{TooltipSimple|Echelon| | + | |{{TooltipSimple|Echelon|28% (121/434, HQ: 13-120)}}<br>{{TooltipSimple|Line Abreast|37% (160/434, HQ: 18-120)}}<br>{{TooltipSimple|''Phases: 1''|Samples: 53}} |
|Submarine Ka-Class | |Submarine Ka-Class | ||
|Submarine Ka-Class | |Submarine Ka-Class | ||
| Line 1,106: | Line 1,106: | ||
|G | |G | ||
|Normal | |Normal | ||
| − | |{{TooltipSimple|Echelon| | + | |{{TooltipSimple|Echelon|14% (61/434, HQ: 35-120)}}<br>{{TooltipSimple|Line Abreast|21% (92/434, HQ: 16-120)}}<br>{{TooltipSimple|''Phases: 1''|Samples: 24}} |
|Submarine Ka-Class/Elite | |Submarine Ka-Class/Elite | ||
|Submarine Ka-Class | |Submarine Ka-Class | ||
| Line 1,115: | Line 1,115: | ||
|I | |I | ||
|Normal | |Normal | ||
| − | |{{TooltipSimple|Diamond| | + | |{{TooltipSimple|Diamond|31% (129/422, HQ: 10-120)}}<br>{{TooltipSimple|''Phases: 1''|Samples: 29}} |
|Light Carrier Nu-Class | |Light Carrier Nu-Class | ||
|Heavy Cruiser Ri-Class | |Heavy Cruiser Ri-Class | ||
| Line 1,125: | Line 1,125: | ||
|I | |I | ||
|Normal | |Normal | ||
| − | |{{TooltipSimple|Diamond|34% ( | + | |{{TooltipSimple|Diamond|34% (144/422, HQ: 11-120)}}<br>{{TooltipSimple|''Phases: 1''|Samples: 36}} |
|Light Carrier Nu-Class/Elite | |Light Carrier Nu-Class/Elite | ||
|Heavy Cruiser Ri-Class | |Heavy Cruiser Ri-Class | ||
| Line 1,135: | Line 1,135: | ||
|I | |I | ||
|Normal | |Normal | ||
| − | |{{TooltipSimple|Diamond| | + | |{{TooltipSimple|Diamond|35% (149/422, HQ: 9-120)}}<br>{{TooltipSimple|''Phases: 1''|Samples: 38}} |
|Light Carrier Nu-Class/Elite | |Light Carrier Nu-Class/Elite | ||
|Heavy Cruiser Ri-Class/Elite | |Heavy Cruiser Ri-Class/Elite | ||
| Line 1,146: | Line 1,146: | ||
|J | |J | ||
|Normal | |Normal | ||
| − | |{{TooltipSimple|Double Line| | + | |{{TooltipSimple|Double Line|32% (127/403, HQ: 10-120)}}<br>{{TooltipSimple|''Phases: 1''|Samples: 32}} |
|Harbour Summer Princess | |Harbour Summer Princess | ||
|Destroyer I-Class | |Destroyer I-Class | ||
| Line 1,153: | Line 1,153: | ||
|J | |J | ||
|Normal | |Normal | ||
| − | |{{TooltipSimple|Double Line| | + | |{{TooltipSimple|Double Line|34% (136/403, HQ: 23-120)}}<br>{{TooltipSimple|''Phases: 1''|Samples: 27}} |
|Harbour Summer Princess | |Harbour Summer Princess | ||
|Destroyer I-Class | |Destroyer I-Class | ||
| Line 1,161: | Line 1,161: | ||
|J | |J | ||
|Normal | |Normal | ||
| − | |{{TooltipSimple|Double Line| | + | |{{TooltipSimple|Double Line|35% (140/403, HQ: 22-120)}}<br>{{TooltipSimple|''Phases: 1''|Samples: 31}} |
|Harbour Summer Princess | |Harbour Summer Princess | ||
|Airfield Princess/Patrol Aircraft Deployment | |Airfield Princess/Patrol Aircraft Deployment | ||
| Line 1,174: | Line 1,174: | ||
|L | |L | ||
|Normal | |Normal | ||
| − | |{{TooltipSimple|Echelon| | + | |{{TooltipSimple|Echelon|33% (164/490, HQ: 18-120)}}<br>{{TooltipSimple|Line Abreast|28% (137/490, HQ: 16-120)}}<br>{{TooltipSimple|''Phases: 1''|Samples: 68}} |
|Submarine Ka-Class/Elite | |Submarine Ka-Class/Elite | ||
|Submarine Ka-Class | |Submarine Ka-Class | ||
| Line 1,181: | Line 1,181: | ||
|L | |L | ||
|Normal | |Normal | ||
| − | |{{TooltipSimple|Echelon| | + | |{{TooltipSimple|Echelon|18% (88/490, HQ: 18-120)}}<br>{{TooltipSimple|Line Abreast|21% (101/490, HQ: 17-120)}}<br>{{TooltipSimple|''Phases: 1''|Samples: 56}} |
|Submarine Ka-Class/Elite | |Submarine Ka-Class/Elite | ||
|Submarine Ka-Class/Elite | |Submarine Ka-Class/Elite | ||
| Line 1,189: | Line 1,189: | ||
|M | |M | ||
|Defense | |Defense | ||
| − | |{{TooltipSimple|Diamond|39% ( | + | |{{TooltipSimple|Diamond|39% (179/462, HQ: 17-120)}}<br>{{TooltipSimple|''Phases: 1''|Samples: 43}} |
|Light Carrier Nu-Class/Elite III | |Light Carrier Nu-Class/Elite III | ||
|Destroyer I-Class | |Destroyer I-Class | ||
| Line 1,197: | Line 1,197: | ||
|M | |M | ||
|Defense | |Defense | ||
| − | |{{TooltipSimple|Diamond| | + | |{{TooltipSimple|Diamond|39% (182/462, HQ: 16-120)}}<br>{{TooltipSimple|''Phases: 1''|Samples: 45}} |
|Light Carrier Nu-Class/Elite III | |Light Carrier Nu-Class/Elite III | ||
|Light Carrier Nu-Class/Elite | |Light Carrier Nu-Class/Elite | ||
| Line 1,206: | Line 1,206: | ||
|M | |M | ||
|Defense | |Defense | ||
| − | |{{TooltipSimple|Diamond| | + | |{{TooltipSimple|Diamond|22% (101/462, HQ: 28-120)}}<br>{{TooltipSimple|''Phases: 1''|Samples: 26}} |
|Standard Carrier Wo-Class/Kai Flagship II | |Standard Carrier Wo-Class/Kai Flagship II | ||
|Light Carrier Nu-Class/Elite III | |Light Carrier Nu-Class/Elite III | ||
| Line 1,216: | Line 1,216: | ||
|N | |N | ||
|Defense | |Defense | ||
| − | |{{TooltipSimple|Diamond| | + | |{{TooltipSimple|Diamond|43% (523/1218, HQ: 31-120)}}<br>{{TooltipSimple|''Phases: 1''|Samples: 115}} |
|Light Carrier Nu-Class/Elite III | |Light Carrier Nu-Class/Elite III | ||
|Destroyer I-Class | |Destroyer I-Class | ||
| Line 1,224: | Line 1,224: | ||
|N | |N | ||
|Defense | |Defense | ||
| − | |{{TooltipSimple|Diamond| | + | |{{TooltipSimple|Diamond|41% (503/1218, HQ: 32-120)}}<br>{{TooltipSimple|''Phases: 1''|Samples: 86}} |
|Light Carrier Nu-Class/Elite III | |Light Carrier Nu-Class/Elite III | ||
|Light Carrier Nu-Class/Elite | |Light Carrier Nu-Class/Elite | ||
| Line 1,233: | Line 1,233: | ||
|N | |N | ||
|Defense | |Defense | ||
| − | |{{TooltipSimple|Diamond|16% ( | + | |{{TooltipSimple|Diamond|16% (192/1218, HQ: 34-120)}}<br>{{TooltipSimple|''Phases: 1''|Samples: 61}} |
|Standard Carrier Wo-Class/Kai Flagship II | |Standard Carrier Wo-Class/Kai Flagship II | ||
|Light Carrier Nu-Class/Elite III | |Light Carrier Nu-Class/Elite III | ||
| Line 1,243: | Line 1,243: | ||
|O | |O | ||
|Normal | |Normal | ||
| − | |{{TooltipSimple|Echelon| | + | |{{TooltipSimple|Echelon|31% (57/182, HQ: 19-120)}}<br>{{TooltipSimple|Line Abreast|31% (56/182, HQ: 16-118)}}<br>{{TooltipSimple|''Phases: 1''|Samples: 39}} |
|Submarine Ka-Class/Elite | |Submarine Ka-Class/Elite | ||
|Submarine Ka-Class | |Submarine Ka-Class | ||
| Line 1,250: | Line 1,250: | ||
|O | |O | ||
|Normal | |Normal | ||
| − | |{{TooltipSimple|Echelon| | + | |{{TooltipSimple|Echelon|19% (34/182, HQ: 26-105)}}<br>{{TooltipSimple|Line Abreast|19% (35/182, HQ: 32-120)}}<br>{{TooltipSimple|''Phases: 1''|Samples: 20}} |
|Submarine Ka-Class/Elite | |Submarine Ka-Class/Elite | ||
|Submarine Ka-Class/Elite | |Submarine Ka-Class/Elite | ||
| Line 1,258: | Line 1,258: | ||
|P | |P | ||
|Normal | |Normal | ||
| − | |{{TooltipSimple|Line Ahead| | + | |{{TooltipSimple|Line Ahead|34% (809/2391, HQ: 18-120)}}<br>{{TooltipSimple|Double Line|37% (875/2391, HQ: 16-120)}}<br>{{TooltipSimple|Echelon|30% (707/2391, HQ: 19-120)}}<br>{{TooltipSimple|''Phases: 1''|Samples: 564}} |
|Battleship Ru-Class | |Battleship Ru-Class | ||
|Battleship Ru-Class | |Battleship Ru-Class | ||
| Line 1,270: | Line 1,270: | ||
|R | |R | ||
|Boss | |Boss | ||
| − | |{{TooltipSimple|Diamond| | + | |{{TooltipSimple|Diamond|53% (1097/2077, HQ: 23-120)}}<br>{{TooltipSimple|''Phases: 1''|Samples: 241}} |
|Standard Carrier Wo-Class/Kai Flagship II | |Standard Carrier Wo-Class/Kai Flagship II | ||
|Light Carrier Nu-Class/Elite III | |Light Carrier Nu-Class/Elite III | ||
| Line 1,278: | Line 1,278: | ||
|R | |R | ||
|Boss | |Boss | ||
| − | |{{TooltipSimple|Diamond|35% ( | + | |{{TooltipSimple|Diamond|35% (727/2077, HQ: 27-120)}}<br>{{TooltipSimple|''Phases: 1''|Samples: 146}} |
|Standard Carrier Wo-Class/Kai Flagship II | |Standard Carrier Wo-Class/Kai Flagship II | ||
|Light Carrier Nu-Class/Elite III | |Light Carrier Nu-Class/Elite III | ||
| Line 1,287: | Line 1,287: | ||
|R | |R | ||
|Boss/Final | |Boss/Final | ||
| − | |{{TooltipSimple|Diamond| | + | |{{TooltipSimple|Diamond|12% (253/2077, HQ: 28-120)}}<br>{{TooltipSimple|''Phases: 1''|Samples: 72}} |
|Standard Carrier Wo-Class/Kai Flagship II | |Standard Carrier Wo-Class/Kai Flagship II | ||
|Light Carrier Nu-Class/Elite III | |Light Carrier Nu-Class/Elite III | ||
Latest revision as of 19:47, 19 September 2022
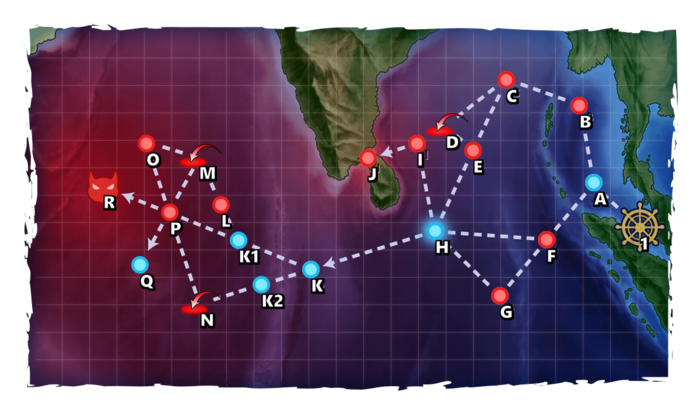
E-1 Hard A
| # | Empty Node | ||
|---|---|---|---|
| A | 気のせいだった。 遠征艦隊の前路掃討を実施する!抜錨! Must be my imagination. Conduct frontline sweeping for the expeditionary fleet! Weigh anchor! | ||
| # | Empty Node | ||
E-1 Hard B: 深海任務部隊 極東哨戒駆逐隊 (PoiDB)
| # | Formation | Normal Battle Node | AD/AP AS/AS+ |
|---|---|---|---|
| B | Line Ahead Double Line Echelon Phases: 1 |
0/0 0/0 | |
| # | Formation | Normal Battle Node | AD/AP AS/AS+ |
E-1 Hard C: 深海潜水艦隊 インド洋北哨戒線 (PoiDB)
| # | Formation | Normal Battle Node | AD/AP AS/AS+ |
|---|---|---|---|
| C | Echelon Line Abreast Phases: 1 |
0/0 0/0 | |
| Echelon Line Abreast Phases: 1 |
0/0 0/0 | ||
| Echelon Line Abreast Phases: 1 |
0/0 0/0 | ||
| # | Formation | Normal Battle Node | AD/AP AS/AS+ |
E-1 Hard D: 深海インド洋方面 港湾泊地 (PoiDB)
| # | Formation | Air Defense Node | AD/AP AS/AS+ |
|---|---|---|---|
| D | Double Line Phases: 1 |
69/137 306/612 | |
| Double Line Phases: 1 |
78/155 348/696 | ||
| Double Line Phases: 1 |
101/202 453/906 | ||
| # | Formation | Air Defense Node | AD/AP AS/AS+ |
E-1 Hard E: 深海任務部隊 極東巡洋艦戦隊 (PoiDB)
| # | Formation | Normal Battle Node | AD/AP AS/AS+ |
|---|---|---|---|
| E | Line Ahead Double Line Echelon Phases: 1 |
0/0 0/0 | |
| # | Formation | Normal Battle Node | AD/AP AS/AS+ |
E-1 Hard F: 深海任務部隊 極東偵察水雷戦隊 (PoiDB)
| # | Formation | Normal Battle Node | AD/AP AS/AS+ |
|---|---|---|---|
| F | Line Ahead Vanguard Phases: 1 |
0/0 0/0 | |
| Line Ahead Phases: 1 |
0/0 0/0 | ||
| # | Formation | Normal Battle Node | AD/AP AS/AS+ |
E-1 Hard G: 深海潜水艦隊 インド洋南哨戒線 (PoiDB)
| # | Formation | Normal Battle Node | AD/AP AS/AS+ |
|---|---|---|---|
| G | Echelon Line Abreast Phases: 1 |
0/0 0/0 | |
| Echelon Line Abreast Phases: 1 |
0/0 0/0 | ||
| Echelon Line Abreast Phases: 1 |
0/0 0/0 | ||
| # | Formation | Normal Battle Node | AD/AP AS/AS+ |
E-1 Hard H
| # | Selection Node | ||
|---|---|---|---|
| H | 遠征艦隊の前路掃討を実施する!抜錨! Conduct frontline sweeping for the expeditionary fleet! Weigh anchor! | ||
| # | Selection Node | ||
E-1 Hard I: 深海任務部隊 極東軽空母戦隊 (PoiDB)
| # | Formation | Normal Battle Node | AD/AP AS/AS+ |
|---|---|---|---|
| I | Diamond Phases: 1 |
26/52 116/231 | |
| Diamond Phases: 1 |
32/63 140/279 | ||
| Diamond Phases: 1 |
36/72 161/321 | ||
| # | Formation | Normal Battle Node | AD/AP AS/AS+ |
E-1 Hard J: 深海インド洋方面 港湾泊地 (PoiDB)
| # | Formation | Normal Battle Node | AD/AP AS/AS+ |
|---|---|---|---|
| J | Double Line Phases: 1 |
78/155 348/696 | |
| Double Line Phases: 1 |
78/155 348/696 | ||
| Double Line Phases: 1 |
78/155 348/696 | ||
| # | Formation | Normal Battle Node | AD/AP AS/AS+ |
E-1 Hard K
| # | Empty Node | ||
|---|---|---|---|
| K | 気のせいだった。 アラビア海方面に進出す! Must be my imagination. Advancing towards the Arabian Sea! | ||
| # | Empty Node | ||
E-1 Hard K1
| # | Empty Node | ||
|---|---|---|---|
| K1 | 気のせいだった。 対空、対潜警戒を厳にせよ! Must be my imagination. Maintain strict anti-aircraft and anti-submarine precautions! | ||
| # | Empty Node | ||
E-1 Hard K2
| # | Empty Node | ||
|---|---|---|---|
| K2 | 気のせいだった。 対空、対潜警戒を厳にせよ! Must be my imagination. Maintain strict anti-aircraft and anti-submarine precautions! | ||
| # | Empty Node | ||
E-1 Hard L: 深海潜水艦隊 アラビア海哨戒線 (PoiDB)
| # | Formation | Normal Battle Node | AD/AP AS/AS+ |
|---|---|---|---|
| L | Echelon Line Abreast Phases: 1 |
0/0 0/0 | |
| Echelon Line Abreast Phases: 1 |
0/0 0/0 | ||
| Echelon Line Abreast Phases: 1 |
0/0 0/0 | ||
| # | Formation | Normal Battle Node | AD/AP AS/AS+ |
E-1 Hard M: 深海空母機動部隊 艦載機群 (PoiDB)
| # | Formation | Air Defense Node | AD/AP AS/AS+ |
|---|---|---|---|
| M | Diamond Phases: 1 |
112/223 500/999 | |
| Diamond Phases: 1 |
116/231 519/1038 | ||
| Diamond Phases: 1 |
122/244 548/1095 | ||
| # | Formation | Air Defense Node | AD/AP AS/AS+ |
E-1 Hard N: 深海空母機動部隊 艦載機群 (PoiDB)
| # | Formation | Air Defense Node | AD/AP AS/AS+ |
|---|---|---|---|
| N | Diamond Phases: 1 |
112/223 500/999 | |
| Diamond Phases: 1 |
116/231 519/1038 | ||
| Diamond Phases: 1 |
122/244 548/1095 | ||
| # | Formation | Air Defense Node | AD/AP AS/AS+ |
E-1 Hard O: 深海潜水艦隊 機動部隊随伴戦隊 (PoiDB)
| # | Formation | Normal Battle Node | AD/AP AS/AS+ |
|---|---|---|---|
| O | Echelon Line Abreast Phases: 1 |
0/0 0/0 | |
| Echelon Line Abreast Phases: 1 |
0/0 0/0 | ||
| Echelon Line Abreast Phases: 1 |
0/0 0/0 | ||
| # | Formation | Normal Battle Node | AD/AP AS/AS+ |
E-1 Hard P: 深海アラビア海方面 戦艦戦隊 (PoiDB)
| # | Formation | Normal Battle Node | AD/AP AS/AS+ |
|---|---|---|---|
| P | Line Ahead Double Line Echelon Phases: 1 |
0/0 0/0 | |
| # | Formation | Normal Battle Node | AD/AP AS/AS+ |
E-1 Hard Q
| # | Empty Node | ||
|---|---|---|---|
| Q | 敵影を見ず。 対空、対潜警戒を厳にせよ! No enemy spotted. Maintain strict anti-aircraft and anti-submarine precautions! | ||
| # | Empty Node | ||
E-1 Hard R: 深海アラビア海方面 空母機動部隊 (PoiDB)
| # | Formation | Boss Battle Node | AD/AP AS/AS+ |
|---|---|---|---|
| R | Diamond Phases: 1 |
116/231 519/1038 | |
| Diamond Phases: 1 |
122/244 548/1095 | ||
| Diamond Phases: 1 (Final)
|
122/244 548/1095 | ||
| # | Formation | Boss Battle Node | AD/AP AS/AS+ |
E-1 Medium A
| # | Empty Node | ||
|---|---|---|---|
| A | 気のせいだった。 遠征艦隊の前路掃討を実施する!抜錨! Must be my imagination. Conduct frontline sweeping for the expeditionary fleet! Weigh anchor! | ||
| # | Empty Node | ||
E-1 Medium B: 深海任務部隊 極東哨戒駆逐隊 (PoiDB)
| # | Formation | Normal Battle Node | AD/AP AS/AS+ |
|---|---|---|---|
| B | Line Ahead Double Line Echelon Phases: 1 |
0/0 0/0 | |
| # | Formation | Normal Battle Node | AD/AP AS/AS+ |
E-1 Medium C: 深海潜水艦隊 インド洋北哨戒線 (PoiDB)
| # | Formation | Normal Battle Node | AD/AP AS/AS+ |
|---|---|---|---|
| C | Echelon Line Abreast Phases: 1 |
0/0 0/0 | |
| Echelon Line Abreast Phases: 1 |
0/0 0/0 | ||
| Echelon Line Abreast Phases: 1 |
0/0 0/0 | ||
| # | Formation | Normal Battle Node | AD/AP AS/AS+ |
E-1 Medium D: 深海インド洋方面 港湾泊地 (PoiDB)
| # | Formation | Air Defense Node | AD/AP AS/AS+ |
|---|---|---|---|
| D | Double Line Phases: 1 |
49/97 218/435 | |
| Double Line Phases: 1 |
62/123 275/549 | ||
| Double Line Phases: 1 |
85/169 380/759 | ||
| # | Formation | Air Defense Node | AD/AP AS/AS+ |
E-1 Medium E: 深海任務部隊 極東巡洋艦戦隊 (PoiDB)
| # | Formation | Normal Battle Node | AD/AP AS/AS+ |
|---|---|---|---|
| E | Line Ahead Double Line Echelon Phases: 1 |
0/0 0/0 | |
| # | Formation | Normal Battle Node | AD/AP AS/AS+ |
E-1 Medium F: 深海任務部隊 極東偵察水雷戦隊 (PoiDB)
| # | Formation | Normal Battle Node | AD/AP AS/AS+ |
|---|---|---|---|
| F | Line Ahead Vanguard Phases: 1 |
0/0 0/0 | |
| Line Ahead Phases: 1 |
0/0 0/0 | ||
| # | Formation | Normal Battle Node | AD/AP AS/AS+ |
E-1 Medium G: 深海潜水艦隊 インド洋南哨戒線 (PoiDB)
| # | Formation | Normal Battle Node | AD/AP AS/AS+ |
|---|---|---|---|
| G | Echelon Line Abreast Phases: 1 |
0/0 0/0 | |
| Echelon Line Abreast Phases: 1 |
0/0 0/0 | ||
| Echelon Line Abreast Phases: 1 |
0/0 0/0 | ||
| # | Formation | Normal Battle Node | AD/AP AS/AS+ |
E-1 Medium H
| # | Selection Node | ||
|---|---|---|---|
| H | 遠征艦隊の前路掃討を実施する!抜錨! Conduct frontline sweeping for the expeditionary fleet! Weigh anchor! | ||
| # | Selection Node | ||
E-1 Medium I: 深海任務部隊 極東軽空母戦隊 (PoiDB)
| # | Formation | Normal Battle Node | AD/AP AS/AS+ |
|---|---|---|---|
| I | Diamond Phases: 1 |
24/47 104/207 | |
| Diamond Phases: 1 |
24/47 104/207 | ||
| Diamond Phases: 1 |
24/47 104/207 | ||
| # | Formation | Normal Battle Node | AD/AP AS/AS+ |
E-1 Medium J: 深海インド洋方面 港湾泊地 (PoiDB)
| # | Formation | Normal Battle Node | AD/AP AS/AS+ |
|---|---|---|---|
| J | Double Line Phases: 1 |
62/123 275/549 | |
| Double Line Phases: 1 |
62/123 275/549 | ||
| Double Line Phases: 1 |
62/123 275/549 | ||
| # | Formation | Normal Battle Node | AD/AP AS/AS+ |
E-1 Medium K
| # | Empty Node | ||
|---|---|---|---|
| K | 気のせいだった。 アラビア海方面に進出す! Must be my imagination. Advancing towards the Arabian Sea! | ||
| # | Empty Node | ||
E-1 Medium K1
| # | Empty Node | ||
|---|---|---|---|
| K1 | 気のせいだった。 対空、対潜警戒を厳にせよ! Must be my imagination. Maintain strict anti-aircraft and anti-submarine precautions! | ||
| # | Empty Node | ||
E-1 Medium K2
| # | Empty Node | ||
|---|---|---|---|
| K2 | 気のせいだった。 対空、対潜警戒を厳にせよ! Must be my imagination. Maintain strict anti-aircraft and anti-submarine precautions! | ||
| # | Empty Node | ||
E-1 Medium L: 深海潜水艦隊 アラビア海哨戒線 (PoiDB)
| # | Formation | Normal Battle Node | AD/AP AS/AS+ |
|---|---|---|---|
| L | Echelon Line Abreast Phases: 1 |
0/0 0/0 | |
| Echelon Line Abreast Phases: 1 |
0/0 0/0 | ||
| Echelon Line Abreast Phases: 1 |
0/0 0/0 | ||
| # | Formation | Normal Battle Node | AD/AP AS/AS+ |
E-1 Medium M: 深海空母機動部隊 艦載機群 (PoiDB)
| # | Formation | Air Defense Node | AD/AP AS/AS+ |
|---|---|---|---|
| M | Diamond Phases: 1 |
103/205 459/918 | |
| Diamond Phases: 1 |
106/211 474/948 | ||
| Diamond Phases: 1 |
110/220 494/987 | ||
| # | Formation | Air Defense Node | AD/AP AS/AS+ |
E-1 Medium N: 深海空母機動部隊 艦載機群 (PoiDB)
| # | Formation | Air Defense Node | AD/AP AS/AS+ |
|---|---|---|---|
| N | Diamond Phases: 1 |
103/205 459/918 | |
| Diamond Phases: 1 |
106/211 474/948 | ||
| Diamond Phases: 1 |
110/220 494/987 | ||
| # | Formation | Air Defense Node | AD/AP AS/AS+ |
E-1 Medium O: 深海潜水艦隊 機動部隊随伴戦隊 (PoiDB)
| # | Formation | Normal Battle Node | AD/AP AS/AS+ |
|---|---|---|---|
| O | Echelon Line Abreast |
0/0 0/0 | |
| Echelon Line Abreast Phases: 1 |
0/0 0/0 | ||
| Echelon Line Abreast Phases: 1 |
0/0 0/0 | ||
| # | Formation | Normal Battle Node | AD/AP AS/AS+ |
E-1 Medium P: 深海アラビア海方面 戦艦戦隊 (PoiDB)
| # | Formation | Normal Battle Node | AD/AP AS/AS+ |
|---|---|---|---|
| P | Line Ahead Double Line Echelon Phases: 1 |
0/0 0/0 | |
| # | Formation | Normal Battle Node | AD/AP AS/AS+ |
E-1 Medium Q
| # | Empty Node | ||
|---|---|---|---|
| Q | 敵影を見ず。 対空、対潜警戒を厳にせよ! No enemy spotted. Maintain strict anti-aircraft and anti-submarine precautions! | ||
| # | Empty Node | ||
E-1 Medium R: 深海アラビア海方面 空母機動部隊 (PoiDB)
| # | Formation | Boss Battle Node | AD/AP AS/AS+ |
|---|---|---|---|
| R | Diamond Phases: 1 |
103/205 459/918 | |
| Diamond Phases: 1 |
106/211 474/948 | ||
| Diamond Phases: 1 (Final)
|
106/211 474/948 | ||
| # | Formation | Boss Battle Node | AD/AP AS/AS+ |
E-1 Easy A
| # | Empty Node | ||
|---|---|---|---|
| A | 気のせいだった。 遠征艦隊の前路掃討を実施する!抜錨! Must be my imagination. Conduct frontline sweeping for the expeditionary fleet! Weigh anchor! | ||
| # | Empty Node | ||
E-1 Easy B: 深海任務部隊 極東哨戒駆逐隊 (PoiDB)
| # | Formation | Normal Battle Node | AD/AP AS/AS+ |
|---|---|---|---|
| B | Line Ahead Double Line Echelon Phases: 1 |
0/0 0/0 | |
| # | Formation | Normal Battle Node | AD/AP AS/AS+ |
E-1 Easy C: 深海潜水艦隊 インド洋北哨戒線 (PoiDB)
| # | Formation | Normal Battle Node | AD/AP AS/AS+ |
|---|---|---|---|
| C | Echelon Line Abreast Phases: 1 |
0/0 0/0 | |
| Echelon Line Abreast Phases: 1 |
0/0 0/0 | ||
| Echelon Line Abreast Phases: 1 |
0/0 0/0 | ||
| # | Formation | Normal Battle Node | AD/AP AS/AS+ |
E-1 Easy D: 深海インド洋方面 港湾泊地 (PoiDB)
| # | Formation | Air Defense Node | AD/AP AS/AS+ |
|---|---|---|---|
| D | Double Line Phases: 1 |
24/47 105/210 | |
| Double Line Phases: 1 |
42/83 186/372 | ||
| Double Line Phases: 1 |
65/130 291/582 | ||
| # | Formation | Air Defense Node | AD/AP AS/AS+ |
E-1 Easy E: 深海任務部隊 極東巡洋艦戦隊 (PoiDB)
| # | Formation | Normal Battle Node | AD/AP AS/AS+ |
|---|---|---|---|
| E | Line Ahead Double Line Echelon Phases: 1 |
0/0 0/0 | |
| # | Formation | Normal Battle Node | AD/AP AS/AS+ |
E-1 Easy F: 深海任務部隊 極東偵察水雷戦隊 (PoiDB)
| # | Formation | Normal Battle Node | AD/AP AS/AS+ |
|---|---|---|---|
| F | Line Ahead Phases: 1 |
0/0 0/0 | |
| Line Ahead Vanguard Phases: 1 |
0/0 0/0 | ||
| # | Formation | Normal Battle Node | AD/AP AS/AS+ |
E-1 Easy G: 深海潜水艦隊 インド洋南哨戒線 (PoiDB)
| # | Formation | Normal Battle Node | AD/AP AS/AS+ |
|---|---|---|---|
| G | Echelon Line Abreast Phases: 1 |
0/0 0/0 | |
| Echelon Line Abreast Phases: 1 |
0/0 0/0 | ||
| Echelon Line Abreast Phases: 1 |
0/0 0/0 | ||
| # | Formation | Normal Battle Node | AD/AP AS/AS+ |
E-1 Easy H
| # | Selection Node | ||
|---|---|---|---|
| H | 遠征艦隊の前路掃討を実施する!抜錨! Conduct frontline sweeping for the expeditionary fleet! Weigh anchor! | ||
| # | Selection Node | ||
E-1 Easy I: 深海任務部隊 極東軽空母戦隊 (PoiDB)
| # | Formation | Normal Battle Node | AD/AP AS/AS+ |
|---|---|---|---|
| I | Diamond Phases: 1 |
9/17 36/72 | |
| Diamond Phases: 1 |
9/17 36/72 | ||
| Diamond Phases: 1 |
9/17 36/72 | ||
| # | Formation | Normal Battle Node | AD/AP AS/AS+ |
E-1 Easy J: 深海インド洋方面 港湾泊地 (PoiDB)
| # | Formation | Normal Battle Node | AD/AP AS/AS+ |
|---|---|---|---|
| J | Double Line Phases: 1 |
42/83 186/372 | |
| Double Line Phases: 1 |
42/83 186/372 | ||
| Double Line Phases: 1 |
42/83 186/372 | ||
| # | Formation | Normal Battle Node | AD/AP AS/AS+ |
E-1 Easy K
| # | Empty Node | ||
|---|---|---|---|
| K | 気のせいだった。 アラビア海方面に進出す! Must be my imagination. Advancing towards the Arabian Sea! | ||
| # | Empty Node | ||
E-1 Easy K1
| # | Empty Node | ||
|---|---|---|---|
| K1 | 気のせいだった。 対空、対潜警戒を厳にせよ! Must be my imagination. Maintain strict anti-aircraft and anti-submarine precautions! | ||
| # | Empty Node | ||
E-1 Easy K2
| # | Empty Node | ||
|---|---|---|---|
| K2 | 気のせいだった。 対空、対潜警戒を厳にせよ! Must be my imagination. Maintain strict anti-aircraft and anti-submarine precautions! | ||
| # | Empty Node | ||
E-1 Easy L: 深海潜水艦隊 アラビア海哨戒線 (PoiDB)
| # | Formation | Normal Battle Node | AD/AP AS/AS+ |
|---|---|---|---|
| L | Echelon Line Abreast Phases: 1 |
0/0 0/0 | |
| Echelon Line Abreast Phases: 1 |
0/0 0/0 | ||
| Echelon Line Abreast Phases: 1 |
0/0 0/0 | ||
| # | Formation | Normal Battle Node | AD/AP AS/AS+ |
E-1 Easy M: 深海空母機動部隊 艦載機群 (PoiDB)
| # | Formation | Air Defense Node | AD/AP AS/AS+ |
|---|---|---|---|
| M | Diamond Phases: 1 |
69/137 306/612 | |
| Diamond Phases: 1 |
103/205 459/918 | ||
| Diamond Phases: 1 |
106/211 474/948 | ||
| # | Formation | Air Defense Node | AD/AP AS/AS+ |
E-1 Easy N: 深海空母機動部隊 艦載機群 (PoiDB)
| # | Formation | Air Defense Node | AD/AP AS/AS+ |
|---|---|---|---|
| N | Diamond Phases: 1 |
69/137 306/612 | |
| Diamond Phases: 1 |
103/205 459/918 | ||
| Diamond Phases: 1 |
106/211 474/948 | ||
| # | Formation | Air Defense Node | AD/AP AS/AS+ |
E-1 Easy O: 深海潜水艦隊 機動部隊随伴戦隊 (PoiDB)
| # | Formation | Normal Battle Node | AD/AP AS/AS+ |
|---|---|---|---|
| O | Echelon Line Abreast Phases: 1 |
0/0 0/0 | |
| Echelon Line Abreast Phases: 1 |
0/0 0/0 | ||
| Echelon Line Abreast Phases: 1 |
0/0 0/0 | ||
| # | Formation | Normal Battle Node | AD/AP AS/AS+ |
E-1 Easy P: 深海アラビア海方面 戦艦戦隊 (PoiDB)
| # | Formation | Normal Battle Node | AD/AP AS/AS+ |
|---|---|---|---|
| P | Line Ahead Double Line Echelon Phases: 1 |
0/0 0/0 | |
| # | Formation | Normal Battle Node | AD/AP AS/AS+ |
E-1 Easy Q
| # | Empty Node | ||
|---|---|---|---|
| Q | 敵影を見ず。 対空、対潜警戒を厳にせよ! No enemy spotted. Maintain strict anti-aircraft and anti-submarine precautions! | ||
| # | Empty Node | ||
E-1 Easy R: 深海アラビア海方面 空母機動部隊 (PoiDB)
| # | Formation | Boss Battle Node | AD/AP AS/AS+ |
|---|---|---|---|
| R | Diamond Phases: 1 |
103/205 459/918 | |
| Diamond Phases: 1 |
103/205 459/918 | ||
| Diamond Phases: 1 (Final)
|
111/221 495/990 | ||
| # | Formation | Boss Battle Node | AD/AP AS/AS+ |
E-1 Casual A
| # | Empty Node | ||
|---|---|---|---|
| A | 気のせいだった。 遠征艦隊の前路掃討を実施する!抜錨! Must be my imagination. Conduct frontline sweeping for the expeditionary fleet! Weigh anchor! | ||
| # | Empty Node | ||
E-1 Casual B: 深海任務部隊 極東哨戒駆逐隊 (PoiDB)
| # | Formation | Normal Battle Node | AD/AP AS/AS+ |
|---|---|---|---|
| B | Line Ahead Double Line Echelon Phases: 1 |
0/0 0/0 | |
| # | Formation | Normal Battle Node | AD/AP AS/AS+ |
E-1 Casual C: 深海潜水艦隊 インド洋北哨戒線 (PoiDB)
| # | Formation | Normal Battle Node | AD/AP AS/AS+ |
|---|---|---|---|
| C | Echelon Line Abreast Phases: 1 |
0/0 0/0 | |
| Echelon Line Abreast Phases: 1 |
0/0 0/0 | ||
| # | Formation | Normal Battle Node | AD/AP AS/AS+ |
E-1 Casual D: 深海インド洋方面 港湾泊地 (PoiDB)
| # | Formation | Air Defense Node | AD/AP AS/AS+ |
|---|---|---|---|
| D | Double Line Phases: 1 |
24/47 105/210 | |
| Double Line Phases: 1 |
42/83 186/372 | ||
| Double Line Phases: 1 |
47/94 210/420 | ||
| # | Formation | Air Defense Node | AD/AP AS/AS+ |
E-1 Casual E: 深海任務部隊 極東巡洋艦戦隊 (PoiDB)
| # | Formation | Normal Battle Node | AD/AP AS/AS+ |
|---|---|---|---|
| E | Line Ahead Double Line Echelon Phases: 1 |
0/0 0/0 | |
| # | Formation | Normal Battle Node | AD/AP AS/AS+ |
E-1 Casual F: 深海任務部隊 極東偵察水雷戦隊 (PoiDB)
| # | Formation | Normal Battle Node | AD/AP AS/AS+ |
|---|---|---|---|
| F | Line Ahead Vanguard Phases: 1 |
0/0 0/0 | |
| Line Ahead Phases: 1 |
0/0 0/0 | ||
| # | Formation | Normal Battle Node | AD/AP AS/AS+ |
E-1 Casual G: 深海潜水艦隊 インド洋南哨戒線 (PoiDB)
| # | Formation | Normal Battle Node | AD/AP AS/AS+ |
|---|---|---|---|
| G | Echelon Line Abreast Phases: 1 |
0/0 0/0 | |
| Echelon Line Abreast Phases: 1 |
0/0 0/0 | ||
| # | Formation | Normal Battle Node | AD/AP AS/AS+ |
E-1 Casual H
| # | Selection Node | ||
|---|---|---|---|
| H | 遠征艦隊の前路掃討を実施する!抜錨! Conduct frontline sweeping for the expeditionary fleet! Weigh anchor! | ||
| # | Selection Node | ||
E-1 Casual I: 深海任務部隊 極東軽空母戦隊 (PoiDB)
| # | Formation | Normal Battle Node | AD/AP AS/AS+ |
|---|---|---|---|
| I | Diamond Phases: 1 |
3/6 12/24 | |
| Diamond Phases: 1 |
9/17 36/72 | ||
| Diamond Phases: 1 |
9/17 36/72 | ||
| # | Formation | Normal Battle Node | AD/AP AS/AS+ |
E-1 Casual J: 深海インド洋方面 港湾泊地 (PoiDB)
| # | Formation | Normal Battle Node | AD/AP AS/AS+ |
|---|---|---|---|
| J | Double Line Phases: 1 |
19/37 81/162 | |
| Double Line Phases: 1 |
19/37 81/162 | ||
| Double Line Phases: 1 |
42/83 186/372 | ||
| # | Formation | Normal Battle Node | AD/AP AS/AS+ |
E-1 Casual K
| # | Empty Node | ||
|---|---|---|---|
| K | 気のせいだった。 アラビア海方面に進出す! Must be my imagination. Advancing towards the Arabian Sea! | ||
| # | Empty Node | ||
E-1 Casual K1
| # | Empty Node | ||
|---|---|---|---|
| K1 | 気のせいだった。 対空、対潜警戒を厳にせよ! Must be my imagination. Maintain strict anti-aircraft and anti-submarine precautions! | ||
| # | Empty Node | ||
E-1 Casual K2
| # | Empty Node | ||
|---|---|---|---|
| K2 | 気のせいだった。 対空、対潜警戒を厳にせよ! Must be my imagination. Maintain strict anti-aircraft and anti-submarine precautions! | ||
| # | Empty Node | ||
E-1 Casual L: 深海潜水艦隊 アラビア海哨戒線 (PoiDB)
| # | Formation | Normal Battle Node | AD/AP AS/AS+ |
|---|---|---|---|
| L | Echelon Line Abreast Phases: 1 |
0/0 0/0 | |
| Echelon Line Abreast Phases: 1 |
0/0 0/0 | ||
| # | Formation | Normal Battle Node | AD/AP AS/AS+ |
E-1 Casual M: 深海空母機動部隊 艦載機群 (PoiDB)
| # | Formation | Air Defense Node | AD/AP AS/AS+ |
|---|---|---|---|
| M | Diamond Phases: 1 |
43/85 189/378 | |
| Diamond Phases: 1 |
51/101 225/450 | ||
| Diamond Phases: 1 |
79/157 351/702 | ||
| # | Formation | Air Defense Node | AD/AP AS/AS+ |
E-1 Casual N: 深海空母機動部隊 艦載機群 (PoiDB)
| # | Formation | Air Defense Node | AD/AP AS/AS+ |
|---|---|---|---|
| N | Diamond Phases: 1 |
43/85 189/378 | |
| Diamond Phases: 1 |
51/101 225/450 | ||
| Diamond Phases: 1 |
79/157 351/702 | ||
| # | Formation | Air Defense Node | AD/AP AS/AS+ |
E-1 Casual O: 深海潜水艦隊 機動部隊随伴戦隊 (PoiDB)
| # | Formation | Normal Battle Node | AD/AP AS/AS+ |
|---|---|---|---|
| O | Echelon Line Abreast Phases: 1 |
0/0 0/0 | |
| Echelon Line Abreast Phases: 1 |
0/0 0/0 | ||
| # | Formation | Normal Battle Node | AD/AP AS/AS+ |
E-1 Casual P: 深海アラビア海方面 戦艦戦隊 (PoiDB)
| # | Formation | Normal Battle Node | AD/AP AS/AS+ |
|---|---|---|---|
| P | Line Ahead Double Line Echelon Phases: 1 |
0/0 0/0 | |
| # | Formation | Normal Battle Node | AD/AP AS/AS+ |
E-1 Casual Q
| # | Empty Node | ||
|---|---|---|---|
| Q | 敵影を見ず。 対空、対潜警戒を厳にせよ! No enemy spotted. Maintain strict anti-aircraft and anti-submarine precautions! | ||
| # | Empty Node | ||
E-1 Casual R: 深海アラビア海方面 空母機動部隊 (PoiDB)
| # | Formation | Boss Battle Node | AD/AP AS/AS+ |
|---|---|---|---|
| R | Diamond Phases: 1 |
79/157 351/702 | |
| Diamond Phases: 1 |
79/157 351/702 | ||
| Diamond Phases: 1 (Final)
|
79/157 351/702 | ||
| # | Formation | Boss Battle Node | AD/AP AS/AS+ |