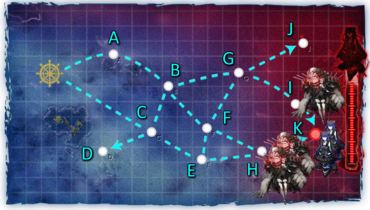
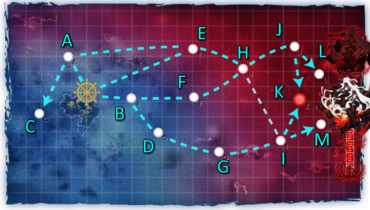
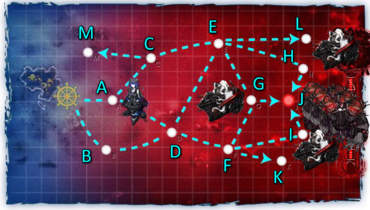
- Welcome to the Kancolle Wiki!
- If you have any questions regarding site content, account registration, etc., please visit the KanColle Wiki Discord
Difference between revisions of "Winter 2015 Event"
Jump to navigation
Jump to search
>Nicky008 (→E-4: High luck cut-in attack and boss node support expedition.) |
>SlashZero (→E-5) |
||
| Line 232: | Line 232: | ||
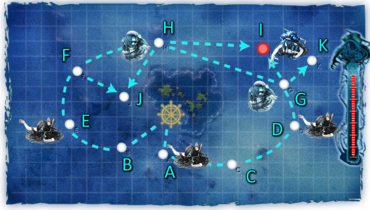
* Node '''C''' is an empty node, Node '''D''' is a fuel maelstrom. | * Node '''C''' is an empty node, Node '''D''' is a fuel maelstrom. | ||
|branching = | |branching = | ||
| − | *Having Akashi in your first fleet brings you from A - C, otherwise it seems to be random whether you get sent C or D. | + | *Naka or Agano plus 1 or fewer CLT will guarantee B node from start. |
| − | * | + | *Having Akashi or Katori in your first fleet brings you from A - C, otherwise it seems to be random whether you get sent C or D. |
| − | * | + | *Surface Combined Fleets are sent from D north to E, while Fast Response Combined Fleets are sent east to F. |
| + | *G and H/I are random. | ||
| + | *More than 2 CLT will deadend. | ||
|tips = | |tips = | ||
* There is a chance of meeting [[Light Cruiser Dwelling Demon|Light Cruiser Demon]] in the first node. | * There is a chance of meeting [[Light Cruiser Dwelling Demon|Light Cruiser Demon]] in the first node. | ||
* [[Aircraft Carrier Demon]] awaits you at the pre-boss node. | * [[Aircraft Carrier Demon]] awaits you at the pre-boss node. | ||
* On the final boss kill for hard difficulty, [[Battleship Water Demon]] awaits you with an escort of 2 [[Battleship Princess|Battleship Princesses]], [[Standard Carrier Wo-Class|Standard Carrier Wo-Class Flagship II]], and 2 [[Heavy Cruiser Ne-Class|Heavy Cruiser Ne-class elites]]. | * On the final boss kill for hard difficulty, [[Battleship Water Demon]] awaits you with an escort of 2 [[Battleship Princess|Battleship Princesses]], [[Standard Carrier Wo-Class|Standard Carrier Wo-Class Flagship II]], and 2 [[Heavy Cruiser Ne-Class|Heavy Cruiser Ne-class elites]]. | ||
| + | * Surface Combined Fleet is highly preferred since it is better able to defend the second fleet until the boss battle. | ||
| + | * Cut-in setups and night battle equipment are highly recommended for the boss's final form. | ||
| + | * Fighter power of 252 is needed for hard mode pre-final kill air superiority at the boss. | ||
| + | ** This is achievable with 2CVL + 1BBV or 1CV + Akitsumaru + 2BBV | ||
| + | * Fighter power of 126 is needed for hard mode final boss formation air superiority. | ||
| + | ** This is achievable with 1CV | ||
| + | * [[Katori]] Kai is recommended as flagship to avoid the fuel maelstrom while holding the [[Fleet Command Facility]]. | ||
|dropsA = [[Kikuzuki]] | |dropsA = [[Kikuzuki]] | ||
|dropsB = ? | |dropsB = ? | ||
Revision as of 15:37, 8 February 2015
Introduction
The Winter 2015 Event, 【Counter-attack! Assault on Truk Anchorage】 will begin February 6th, ending two weeks later on February 23rd.
It is based around Operation Hailstone
Patch Notes
See Recent Updates for more info.
- New Ships
- New Enemy Vessels
- Light Cruiser Demon (軽巡棲鬼)
- Battleship Water Demon (戦艦水鬼)
- New Equipment
- Prototype 51cm Twin Cannon (E-2 Hard only clear reward)
- WG42 (Wurfgerät 42) (E-3 Hard and Normal only clear reward and U-511 stock equipment)
- Prototype FaT Type 95 Oxygen Torpedo Kai (Ro-500 (aka U-511 Kai Ni) stock equipment)
- Voice and other Updates
Mechanics
Participation requirements
- Must have a 75% sortie win ratio
- Must have 5 empty ship slots for new ships
- Must have 20 free equipment slots
Special Mechanics
- Combined Fleet (E-3 and E-5)
- Line of Sight requirements on some (all?) maps.
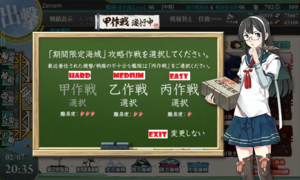
- Selectable and Changeable difficulty
- This event has 3 ranks: easy (丙), medium (乙), hard (甲).
- You can choose the difficulty in each map separately.
- Different difficulties give different medals, equipment and materials when clearing the maps.
- Ships rewards (U-511, Katori and Amagi) will appear regardless of the difficulty.
- Difficulties probably affect drop rates, but ships still drop in any difficulty.
- When the difficulty is changed, the boss's health bar will be reset.
- Once the map is cleared (boss HP bar is depleted and killed), you CANNOT go back and change the difficulty.
- There is no ship locking for this event.
- The boss HP gauges does not regenerate over time in any map in any difficulty.
- Support Expeditions are available. Expedition 141 Focuses on Support for Normal Nodes, Whereas Expedition 142 Focuses Support on Boss Nodes. The Expeditions DO REQUIRE that you have 2 DDs in your fleet. Do take note that their expeditions will end early after you finish one sortie, so try to make the most use out of them.
Event Maps
E-1
Information
|
|||
|
Branching rules
| |||
|
Tips
| |||
E-2
Information
|
|||
|
Branching rules
| |||
|
Tips
| |||
E-3
Information
|
|||
|
Branching rules
| |||
|
Tips
| |||
E-4
Information
|
|||
|
Branching rules
| |||
|
Tips
| |||
E-5
Information
|
|||
|
Branching rules
| |||
|
Tips
| |||
See Also
References
Tools
- Air Superiority Calculator (Japanese version. English version in works)
- KanColle Calculator and tools by no1244 (in Japanese)
- Air Superiority Calculator (in Japanese)
- Effective LoS Calculator (in Japanese)
Discussions
- Before and After Resource Checks
- Reports and Results: E-1
- Reports and Results: E-2
- Reports and Results: E-3
- Reports and Results: E-4
- Reports and Results: E-5
Player Live Streams
- KanColle U.S.A. Streamers
- Zak提督's stream: twitch.tv/bl2w (will be playing every day from 8:00 PM - 10:00 PM EST / 10:00 AM - 12:00 PM JST)
- Ok1n´s stream : http://www.twitch.tv/ok1n
- Yamato_kai2000's stream: http://www.twitch.tv/yamato_kai2000 (schedule 7:30 PM - 9:20PM PST (Mondays, Wednesdays, Fridays, and Saturdays) / 12:30 PM - 2:20 PM JST Tuesdays, Thursdays, Saturdays, and Sundays)
- Totaku's stream: Totaku's Livestream (will be playing on weekends from 1:30 AM - 6:00 AM CST / 4:30 PM - 9:00 PM JST)
- DS4's stream 1: twitch.tv/deltasierra4 (will be playing on weekends from 9:00 PM - 3:00 AM CST / 12:00 PM - 6:00 PM JST. More stream announcements will be made on the wiki chat)
- DS4's stream 2: DS4 on Livestream
- Remi_Scarlet's stream: twitch.tv/remi_scarlet
- NikaidoAkiBro's stream: twitch.tv/nikaidorumibro
- HandgunOtonashi's stream : twitch.tv/handgunotonashi EST 1200 onwards.
- SlashZero's stream: hitbox.tv/JenXIII (main) twitch.tv/jenxiii (mirror)
- Kevadu's stream: http://www.twitch.tv/kevadu/ (will be frontlining, staying up all night to try and clear the event as quickly as possible after maintenance finishes)
- Sekronashi's stream: http://www.twitch.tv/sekronashi
- Crescentia's stream: http://www.hitbox.tv/crescentia (main) twitch.tv/crescentia (backup)
Gensui Hime's Stream: http://www.twitch.tv/gensuihime (All day Friday after 5PM, based on CST)c0mpl3x1ty & DeepDFantasy: http://twitch.tv/c0mpl3x1ty (Friday at 9:00PM EST)finished- keemeef~'s stream http://www.twitch.tv/keemeef/ (6:00pm PST onwards; usually late hours)
Blizzie's stream: twitch.tv/blizzietv (Speedrun attempt -- Sat, Feb 7 @ 1 PM PST)
- Kancolle E.U Streamers
- jeftai's stream: http://www.twitch.tv/jefferytai (will be playing randomly)
- ArcticaFrost http://www.twitch.tv/SaberFrost
- Naikon http://www.twitch.tv/naikon86
- Kancolle S.E.A. Streamers
- dragonjet's Twitch (be one of the first to see, watch event maps, new ships and seasonal CGs get ripped first-hand)
- Lolibunny's twitch (GMT +8 2100- 0100) (Not available on feb 7 and 8) I need resources
- TempestaMkII's Twitch (Watch me fail horribly at this event) (GMT+8 2100 - 0000(On weekdays and weekends) / 1000 - 1200 (On weekends))
- Kancolle E.A. Streamers
- pcp8p67's Stream: http://www.twitch.tv/pcp8p67 (W.G. Forum mainstream, Korean base.)
- Xie's stream: http://twitch.tv/xiei (Live from Japan, random times)

