• Welcome to the Kancolle Wiki!
  • If you have any questions regarding site content, account registration, etc., please visit the KanColle Wiki Discord

World 6/6-1

From Kancolle Wiki
Jump to navigation Jump to search

World 6-1: 潜水艦作戦 Submarine Operation

Strategy Name 潜水艦作戦 (Submarine Operation)
Difficulty ☆ ☆ ☆ ☆ ☆ ☆ ☆ ☆
Item -
Strategy Content 有力な潜水艦隊を編成し、中部海域哨戒線に進出せよ。敵艦隊を発見、これを漸減撃滅せよ!
Organize a strong submarine fleet and advance a patrol line into the Middle Sea region. Locate enemy fleets and gradually destroy them!
6-1 CV Fleet
Fleet 1CV, 1CL, 1CLT, 3SS(V)
Route C F G H K
Other Notes Has a 15% chance to off-route to Node I
AP AS AS+
56 126 252
6-1 AS Fleet
Fleet 1AS, 1CL, 4SS(V)
Route A F G H K
Other Notes
AP AS AS+
56 126 252

Stage Guide

6-1 Branching Rules
Nodes Rules
Start
A
  • Meet ANY of the following to FORCE B
    • CA(V)+(F)BB(V)+CV(L/B) ≥ 3
    • (F)BB(V) ≥ 2
  • Meet ANY of the following to go to A
    • Fleet contains SS(V) only
    • Fleet contains AS and meets one of the following
      • SS(V) ≥ 3, no other ship types allowed
      • SS(V) = 3 and DD = 2
      • SS(V) = 4 and CL+DD = 1
  • Go to B if fleet contains no CL and DDs
  • Otherwise, C
B
C
A
D
  • Fleet does not contains AS
F
  • AS Is in the fleet
G
H
  • Meet ALL of the following requirements:
    • Amount of SS(V) ≥ 3
    • Amount of BB(V) + CV(L/B) + CA(V) ≤ 1
    • Pass the LoS check: ≥ 16 (Cn4)
      • Routing becomes random if 12 ≤ LoS ≤ 15.9 (Cn4)
I
  • Meet ANY of the following requirements:
    • Fail the LoS check
    • Amount of SS(V) ≤ 2
    • Amount of BB(V) + CV(L) + CA(V) ≥ 2
  • If the fleet does not contain AS:
    • 15% chance of off-routing to I regardless of LoS check result
H
E
  • Always node E if LoS ≤ 20 (Cn4)
  • If the fleet contains AS:
    • Always node K if LoS ≥ 25 (Cn4)
    • Random between E and K if 20 ≤ LoS ≤ 24.9 (Cn4)
  • If the fleet does not contain AS:
    • Always node K if LoS ≥ 36 (Cn4)
    • Random between J and K if 25 ≤ LoS ≤ 35.9 (Cn4)
    • Random between E, J and K if 20 ≤ LoS ≤ 24.9 (Cn4)
J
K

Tips

  • At least 3 SS(V) are required to reach the boss.
  • There are LoS checks at G H and H K. They do not have high LoS requirements, but an all-submarine fleet without recons/radar can be sent to I.
  • You may also need to use a "New Submarine Torpedo Cut-In" :

Template:Equipment/New Submarine Torpedo Cut-In


Recommended Fleets

  • 1CV, 1CL, 1CLT, 3SS(V)
  • Route = C F G H K
    • Has a 15% chance to off-route to Node I
    • Most effective fleet for taking out the boss but it will have to go through node C where there's a Ru-class Flagship.
  • Using a Midget SubmarineType A Kouhyouteki
    Type C Kouhyouteki
    Type D Kouhyouteki Kai (Kouryuu Kai)
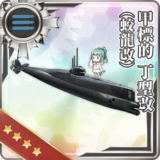
    on both your CL & CLT gives you a powerful Opening Torpedo Salvo (Otorp).
  • For your CV, either:
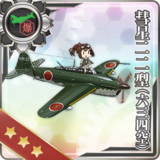
  • Try to use a CVB so that it can attack even in Chuuha.


Node I has so good drops like I-401 .

  • If you want to farm there, you can use:
    • 1BB, 3CLT, 1CL, 1CV
    • 1CL, 3CLT, 2CV
    • Route = C F G I

Nodes And Enemy Encounters

Show/Hide Nodes and Enemy Encounters
Nodes and Enemy Encounters
NodePatternXpNode InfoFormAir
A
Battle Avoided
Pattern 1"Must be my imagination" (battle avoided)
B
Battle Avoided
Pattern 1"Must be my imagination" (battle avoided)
C
中部海域 敵遊撃部隊
Pattern 1 Battleship Ru-Class flagshipLight Carrier Nu-Class flagshipHeavy Cruiser Ri-Class flagshipLight Cruiser Tsu-ClassDestroyer Ro-Class Late ModelDestroyer Ro-Class Late Model
Formation 1: Line Ahead
Formation 2: Double Line
AP:16
AS:35
AS+:69
Pattern 2 Battleship Ru-Class flagshipLight Carrier Nu-Class flagshipHeavy Cruiser Ri-Class eliteLight Cruiser Tsu-ClassDestroyer I-Class Late ModelDestroyer I-Class Late Model
Formation 2: Double Line
AP:16
AS:35
AS+:69
D
中部海域哨戒戦 D地点
Pattern 1 Light Cruiser Ho-Class flagshipDestroyer Ha-Class eliteDestroyer Ha-Class eliteDestroyer I-Class Late ModelDestroyer I-Class Late Model
Formation 4: Echelon
Formation 3: Diamond
Formation 1: Line Ahead
E
Battle Avoided
Pattern 1"Must be my imagination" (battle avoided)
F
中部海域哨戒戦 F地点
Pattern 1 Light Cruiser He-Class flagshipDestroyer Ni-Class eliteDestroyer Ni-Class eliteDestroyer I-Class Late ModelDestroyer I-Class Late Model
Formation 2: Double Line
Pattern 2 Light Cruiser He-Class flagshipDestroyer Ha-Class eliteDestroyer Ha-Class eliteDestroyer I-Class Late ModelDestroyer I-Class Late Model
Formation 2: Double Line
Pattern 3 Light Cruiser He-Class flagshipTransport Ship Wa-Class eliteTransport Ship Wa-Class eliteDestroyer I-Class Late ModelDestroyer I-Class Late Model
Formation 3: Diamond
Pattern 4 Light Cruiser He-Class flagshipLight Cruiser To-Class eliteDestroyer Ni-Class eliteDestroyer Ni-Class eliteDestroyer I-Class Late ModelDestroyer I-Class Late Model
Formation 2: Double Line
G
Battle Avoided
Pattern 1"Must be my imagination" (battle avoided)
H
中部海域哨戒戦 H地点
Pattern 1 Heavy Cruiser Ri-Class flagshipDestroyer Ha-Class eliteDestroyer Ha-Class eliteLight Cruiser Tsu-ClassDestroyer Ro-Class Late ModelDestroyer Ro-Class Late Model
Formation 3: Diamond
Pattern 2 Heavy Cruiser Ri-Class flagshipLight Cruiser He-Class flagshipDestroyer Ha-Class eliteDestroyer Ha-Class eliteDestroyer Ro-Class Late ModelDestroyer Ro-Class Late Model
Formation 4: Echelon
Pattern 3 Heavy Cruiser Ri-Class flagshipHeavy Cruiser Ri-Class eliteTorpedo Cruiser Chi-Class eliteLight Cruiser Tsu-ClassDestroyer I-Class Late ModelDestroyer I-Class Late Model
Formation 2: Double Line
I
敵機動部隊
Pattern 1 Standard Carrier Wo-Class flagshipStandard Carrier Wo-Class flagshipHeavy Cruiser Ri-Class flagshipLight Cruiser Tsu-ClassDestroyer Ro-Class Late ModelDestroyer Ro-Class Late Model
Formation 3: Diamond
AP:112
AS:252
AS+:504
Pattern 2 Aircraft Carrier DemonStandard Carrier Wo-Class flagshipHeavy Cruiser Ri-Class flagshipLight Cruiser Tsu-ClassDestroyer Ro-Class Late ModelDestroyer Ro-Class Late Model
Formation 3: Diamond
AP:120
AS:270
AS+:540
Pattern 3 Aircraft Carrier DemonHeavy Cruiser Ri-Class flagshipHeavy Cruiser Ri-Class flagshipLight Cruiser Tsu-ClassDestroyer Ro-Class Late ModelDestroyer Ro-Class Late Model
Formation 3: Diamond
AP:64
AS:144
AS+:288
J
中部海域 敵輸送船団
Pattern 1 Transport Ship Wa-Class flagshipTransport Ship Wa-Class flagshipLight Cruiser He-Class flagshipLight Cruiser He-Class flagshipDestroyer Ha-Class Late ModelDestroyer Ha-Class Late Model
Formation 2: Double Line
Formation 3: Diamond
Formation 1: Line Ahead
Pattern 2 Transport Ship Wa-Class flagshipTransport Ship Wa-Class flagshipLight Cruiser He-Class flagshipLight Cruiser Tsu-Class eliteDestroyer Ha-Class Late ModelDestroyer Ha-Class Late Model
Formation 3: Diamond
Formation 1: Line Ahead
K
敵回航中空母
Pattern 1 Standard Carrier Wo-Class flagshipHeavy Cruiser Ri-Class flagshipLight Cruiser Tsu-Class eliteLight Cruiser Tsu-Class eliteDestroyer Ni-Class Late ModelDestroyer Ni-Class Late Model
Formation 2: Double Line
Formation 3: Diamond
AP:56
AS:126
AS+:252
Pattern 2 Standard Carrier Wo-Class flagshipHeavy Cruiser Ri-Class flagshipLight Cruiser He-Class flagshipLight Cruiser Tsu-Class eliteDestroyer Ha-Class Late ModelDestroyer Ha-Class Late Model
Formation 3: Diamond
AP:56
AS:126
AS+:252

World 6/6-1/Drop list