- Welcome to the Kancolle Wiki!
- If you have any questions regarding site content, account registration, etc., please visit the KanColle Wiki Discord
Difference between revisions of "Fall 2014 Event"
Jump to navigation
Jump to search
| Line 157: | Line 157: | ||
* To go start->B (and avoid the first maelstrom) you cannot have more than 1 CLT and your first fleet must contain either a CL, DD, or Akitsumaru and have 2 BB + 2 CA (other combinations may work, still needs testing) | * To go start->B (and avoid the first maelstrom) you cannot have more than 1 CLT and your first fleet must contain either a CL, DD, or Akitsumaru and have 2 BB + 2 CA (other combinations may work, still needs testing) | ||
* Akitsumaru can guarantee F->H, plus she can carry Reppuus so Akitsumaru + a CV can get you air superiority at all nodes. Combined with the previous rule this makes easy B->F->H->I routing. | * Akitsumaru can guarantee F->H, plus she can carry Reppuus so Akitsumaru + a CV can get you air superiority at all nodes. Combined with the previous rule this makes easy B->F->H->I routing. | ||
| − | * Going C-E-G-I is possible with a fleet of Akitsumaru, 2 Slow BB, 2 CAV, 1 CL + 3 DD, 1 CL, 1 BB, 1 CLT | + | * Going C-E-G-I is possible with a fleet of Akitsumaru, 2 Slow BB, 2 CAV, 1 CL + 3 DD, 1 CL, 1 BB, 1 CLT. E is a maelstrom so this means you only fight 2 battles before the boss. |
|dropsA = | |dropsA = | ||
|dropsI = [[Akitsumaru]] [[Amatsukaze]] [[Asagumo]] [[Fusou]] [[Harusame]] [[Hiei]] [[Hyuuga]] [[I-8]] [[Ise]] [[Kinugasa]] [[Kiyoshimo]] [[Kongou]] [[Maruyu]] [[Mikuma]] [[Shimakaze]] [[Tokitsukaze]] [[Noshiro]]|dropsJ = [[Asagumo]]|dropsH = [[Maruyu]] [[Harusame]] [[Shimakaze]] [[Yuubari]] [[Kinu]] [[Ooi]]|dropsF = [[Shimakaze]] [[Kinu]]|dropsB = [[Shigure]]|dropsG = [[Aoba]]}} | |dropsI = [[Akitsumaru]] [[Amatsukaze]] [[Asagumo]] [[Fusou]] [[Harusame]] [[Hiei]] [[Hyuuga]] [[I-8]] [[Ise]] [[Kinugasa]] [[Kiyoshimo]] [[Kongou]] [[Maruyu]] [[Mikuma]] [[Shimakaze]] [[Tokitsukaze]] [[Noshiro]]|dropsJ = [[Asagumo]]|dropsH = [[Maruyu]] [[Harusame]] [[Shimakaze]] [[Yuubari]] [[Kinu]] [[Ooi]]|dropsF = [[Shimakaze]] [[Kinu]]|dropsB = [[Shigure]]|dropsG = [[Aoba]]}} | ||
Revision as of 05:49, 16 November 2014
Introduction
The Fall 2014 Event will start on 14 November 2014, and will last until 28 November 2014. It is based on Western New Guinea campaign
Participation requirements
- Must have a 75% sortie win ratio
- Must have 5 empty ship slots for new ships
- Must have 20 free equipment slots
- Must use combined fleet for maps that require it (refer to Special mechanics section).
- Ships that are used in E-1 and E-2 can not be used in E-3 (and vice versa).
Patch Notes
- New Ships
- Prinz Eugen, Admiral Hipper-class Heavy Cruiser (Kai Level 45,
 600
600  700)
700) - Asagumo, Asashio-class Destroyer (Kai Level 35,
 140
140  110)
110) - Nowaki, Kagerou-class Destroyer (Kai Level 35,
 140
140  110)
110) - Akizuki, Akizuki-class Destroyer (Kai Level 40,
 270
270  170)
170)
- Prinz Eugen, Admiral Hipper-class Heavy Cruiser (Kai Level 45,
- New Remodels
- Ushio Kai2 (Level 60,
 30
30  170)
170)
- Ushio Kai2 (Level 60,
- New Enemy Vessels
- Heavy Cruiser Ne-Class (重巡ネ級)
- Heavy Cruiser Ne-Class Elite (重巡ネ級 elite)
- Destroyer Princess (駆逐棲姫) - 2 types
- Aircraft Carrier Water Demon (空母水鬼) - 2 types
- New Equipment
- New Equipment Type: Anti-Aircraft Fire Director (高射装置)
- Can be equipped on all except: 海防艦, 超弩級戦艦, 潜水艦, 潜水空母, 補給艦 (Coastal defence boats, super dreadnoughts, submarines, submarine carriers, supply ships)
- Type 91 Anti-Aircraft Fire Director
- Type 94 Anti-Aircraft Fire Director
- 10cm Twin High-angle Mount + Anti-Aircraft Fire Director
- SKC34 20.3cm Twin Cannon
- FuMO25 Radar
- New Equipment Type: Anti-Aircraft Fire Director (高射装置)
- Voice and other Updates
- Akebono Kai voice
- Hatsuharu Kai/Kai2 voice
- Nenohi Kai voice
- Home Port Expansion maximum 220 ships / 980 equipment
Special Mechanics
- Combined Fleet - Surface Fleet combined fleet added and required for E-1 and E-3. E-4 may use either the original MI style Carrier-Escort combined fleet or a Surface Fleet.
- Surface Fleet combined fleet has different ship requirements. First Fleet now only allows maximum of 1 CV(B) or 2 CVLs, 4 BBs and 1 Wild card that is not BB, CV or CVL. Second Fleet requires 1 CL 2 DD.
- Form a combined fleet by dragging the fleet number 2 over fleet number 1.
- Change in combat nodes - Surface Fleet Combined Fleet will now have to go through shelling phrase rather that only having aerial phrase. However, First Fleet will begin shelling first before Second Fleet does.
- Ships that are used in E1 and E2 cannot be used in E-3 (as well as ships used in E3 cannot be used in E1 and E2). However, you can use all your ships (even those used in E1, E2 and E3) in E4. No one is locked out of E4.
- After you unlock E-4 you will be given the option to form Carrier-Escort Combined fleet when attempting to form a combined fleet (Left option). Right option allows you to form a Surface Fleet for E-1 and E-3.
Event Maps
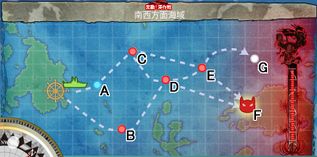
E-1 第一次渾作戦
Information
Rewards
|
|||
|
Branching rules
| |||
|
Tips | |||
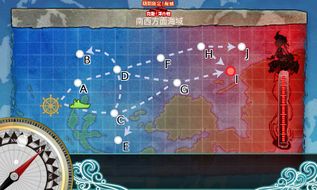
E-2: 第二次渾作戦
Information
Rewards
|
|||
|
Branching rules
| |||
|
Tips
| |||
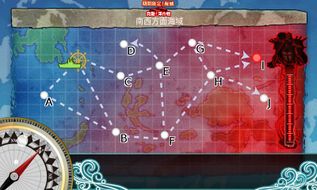
E-3: 第三次渾作戦
Information
Rewards
|
|||
|
Branching rules | |||
|
Tips
| |||
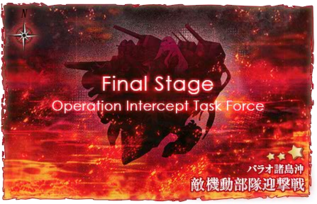
E-4: 敵機動部隊迎撃戦
Information
Rewards
|
|||
|
Branching rules
| |||
|
Tips
| |||
See Also
References
Tools
Discussions
- Resource Checks - post your before and after resource screenshots
Player Live Streams
- @Kevadu http://www.twitch.tv/kevadu/
- http://live.nicovideo.jp/watch/lv199964043
- http://live.nicovideo.jp/watch/lv200070426
- http://www.twitch.tv/Elinasama (lolibunny)
- @HandgunOtonashi http://www.twitch.tv/handgunotonashi
- http://www.twitch.tv/bl2w (plays 8:30-10:00 PM EST every day)

