- Welcome to the Kancolle Wiki!
- If you have any questions regarding site content, account registration, etc., please visit the KanColle Wiki Discord
Difference between revisions of "Spring 2022 Event/E-1/Enemy comps"
< Spring 2022 Event | E-1
Jump to navigation
Jump to search
m |
m |
||
| (One intermediate revision by the same user not shown) | |||
| Line 1: | Line 1: | ||
<tabber> | <tabber> | ||
|-|Hard= | |-|Hard= | ||
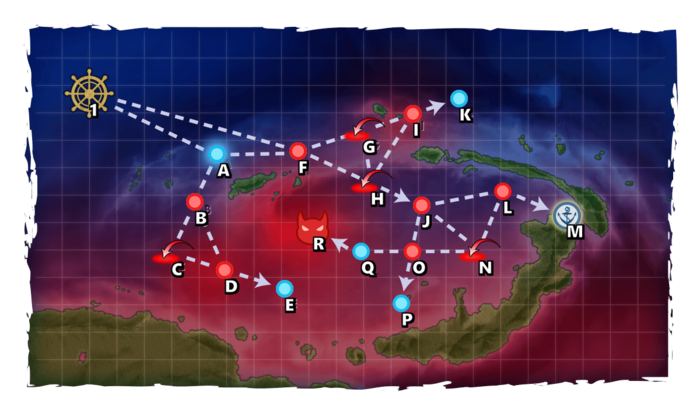
| − | {{Map/Image|page=Spring 2022 Event/E-1| | + | {{Map/Image|page=Spring 2022 Event/E-1|{{Map/ImageNode|1|Hard|E-1|x=89|y=94}}{{Map/ImageNode|A|Hard|E-1|x=217|y=154}}{{Map/ImageNode|B|Hard|E-1|x=195|y=202}}{{Map/ImageNode|C|Hard|E-1|x=172|y=253}}{{Map/ImageNode|D|Hard|E-1|x=225|y=270|drops=<table class="wikitable"><tr><th>Type</th><th>Ships</th></tr><tr><th>DD</th><td>{{Ship/Banner|small=true|Akizuki}}{{Ship/Banner|small=true|Asagumo}}{{Ship/Banner|small=true|Hatsukaze}}<br>{{Ship/Banner|small=true|Maikaze}}{{Ship/Banner|small=true|Matsukaze}}{{Ship/Banner|small=true|Minazuki}}<br>{{Ship/Banner|small=true|Minegumo}}{{Ship/Banner|small=true|Uranami}}{{Ship/Banner|small=true|Uzuki}}<br></td></tr></table>}}{{Map/ImageNode|E|Hard|E-1|x=285|y=289}}{{Map/ImageNode|F|Hard|E-1|x=298|y=151}}{{Map/ImageNode|G|Hard|E-1|x=363|y=131}}{{Map/ImageNode|H|Hard|E-1|x=370|y=183}}{{Map/ImageNode|I|Hard|E-1|x=413|y=114|drops=<table class="wikitable"><tr><th>Type</th><th>Ships</th></tr><tr><th>DD</th><td>{{Ship/Banner|small=true|Akizuki}}{{Ship/Banner|small=true|Asagumo}}{{Ship/Banner|small=true|Asakaze}}<br>{{Ship/Banner|small=true|Hatsukaze}}{{Ship/Banner|small=true|Maikaze}}{{Ship/Banner|small=true|Matsukaze}}<br>{{Ship/Banner|small=true|Minazuki}}{{Ship/Banner|small=true|Minegumo}}{{Ship/Banner|small=true|Uranami}}<br>{{Ship/Banner|small=true|Uzuki}}</td></tr><tr><th>SS</th><td>{{Ship/Banner|small=true|I-47}}</td></tr><tr><th>CVB</th><td>{{Ship/Banner|small=true|Taihou}}</td></tr><tr><th>AO</th><td>{{Ship/Banner|small=true|Kamoi}}</td></tr></table>}}{{Map/ImageNode|J|Hard|E-1|x=422|y=205|drops=<table class="wikitable"><tr><th>Type</th><th>Ships</th></tr><tr><th>DD</th><td>{{Ship/Banner|small=true|Minazuki}}{{Ship/Banner|small=true|Uranami}}{{Ship/Banner|small=true|Uzuki}}<br></td></tr></table>}}{{Map/ImageNode|K|Hard|E-1|x=459|y=99}}{{Map/ImageNode|L|Hard|E-1|x=503|y=191}}{{Map/ImageNode|M|Hard|E-1|x=566|y=215}}{{Map/ImageNode|N|Hard|E-1|x=478|y=251}}{{Map/ImageNode|O|Hard|E-1|x=412|y=251|drops=<table class="wikitable"><tr><th>Type</th><th>Ships</th></tr><tr><th>DD</th><td>{{Ship/Banner|small=true|Akizuki}}{{Ship/Banner|small=true|Asagumo}}{{Ship/Banner|small=true|Asakaze}}<br>{{Ship/Banner|small=true|Hatsukaze}}{{Ship/Banner|small=true|Maikaze}}{{Ship/Banner|small=true|Matsukaze}}<br>{{Ship/Banner|small=true|Minazuki}}{{Ship/Banner|small=true|Minegumo}}{{Ship/Banner|small=true|Uranami}}<br>{{Ship/Banner|small=true|Uzuki}}</td></tr><tr><th>SS</th><td>{{Ship/Banner|small=true|I-47}}</td></tr></table>}}{{Map/ImageNode|P|Hard|E-1|x=401|y=303}}{{Map/ImageNode|Q|Hard|E-1|x=361|y=251}}{{Map/ImageNode|R|Hard|E-1|x=313|y=228|drops=<table class="wikitable"><tr><th>Type</th><th>Ships</th></tr><tr><th>DE</th><td>{{Ship/Banner|small=true|Hachijou}}{{Ship/Banner|small=true|Sado}}</td></tr><tr><th>DD</th><td>{{Ship/Banner|small=true|Arashi}}{{Ship/Banner|small=true|Hagikaze}}{{Ship/Banner|small=true|Harukaze}}<br>{{Ship/Banner|small=true|Hatakaze}}{{Ship/Banner|small=true|Hatsukaze}}{{Ship/Banner|small=true|Kamikaze}}<br>{{Ship/Banner|small=true|Suzunami}}</td></tr><tr><th>CL</th><td>{{Ship/Banner|small=true|Agano}}{{Ship/Banner|small=true|Noshiro}}</td></tr><tr><th>CV</th><td>{{Ship/Banner|small=true|Saratoga}}</td></tr><tr><th>SS</th><td>{{Ship/Banner|small=true|I-201}}{{Ship/Banner|small=true|I-203}}</td></tr></table>}}}} |
| − | {{Map/ImageNode|1|Hard|E-1|x=89|y=94}} | ||
| − | {{Map/ImageNode|A|Hard|E-1|x=217|y=154}} | ||
| − | {{Map/ImageNode|B|Hard|E-1|x=195|y=202}} | ||
| − | {{Map/ImageNode|C|Hard|E-1|x=172|y=253}} | ||
| − | {{Map/ImageNode|D|Hard|E-1|x=225|y=270|drops=<table class="wikitable"><tr><th>Type</th><th>Ships</th></tr><tr><th>DD</th><td>{{Ship/Banner|small=true|Akizuki}}{{Ship/Banner|small=true|Asagumo}}{{Ship/Banner|small=true|Hatsukaze}}<br>{{Ship/Banner|small=true|Maikaze}}{{Ship/Banner|small=true| | ||
| − | {{Map/ImageNode|E|Hard|E-1|x=285|y=289}} | ||
| − | {{Map/ImageNode|F|Hard|E-1|x=298|y=151}} | ||
| − | {{Map/ImageNode|G|Hard|E-1|x=363|y=131}} | ||
| − | {{Map/ImageNode|H|Hard|E-1|x=370|y=183}} | ||
| − | {{Map/ImageNode|I|Hard|E-1|x=413|y=114|drops=<table class="wikitable"><tr><th>Type</th><th>Ships</th></tr><tr><th>DD</th><td>{{Ship/Banner|small=true|Akizuki}}{{Ship/Banner|small=true|Asagumo}}{{Ship/Banner|small=true|Asakaze}}<br>{{Ship/Banner|small=true|Hatsukaze}}{{Ship/Banner|small=true|Maikaze}}{{Ship/Banner|small=true|Matsukaze}}<br>{{Ship/Banner|small=true|Minazuki}}{{Ship/Banner|small=true|Minegumo}}{{Ship/Banner|small=true|Uranami}}<br>{{Ship/Banner|small=true|Uzuki}}</td></tr><tr><th>SS</th><td>{{Ship/Banner|small=true|I-47}}</td></tr><tr><th>CVB</th><td>{{Ship/Banner|small=true|Taihou}}</td></tr><tr><th>AO</th><td>{{Ship/Banner|small=true|Kamoi}}</td></tr></table>}} | ||
| − | {{Map/ImageNode|J|Hard|E-1|x=422|y=205|drops=<table class="wikitable"><tr><th>Type</th><th>Ships</th></tr><tr><th>DD</th><td>{{Ship/Banner|small=true|Minazuki}}{{Ship/Banner|small=true|Uranami}}{{Ship/Banner|small=true|Uzuki}}<br></td></tr></table>}} | ||
| − | {{Map/ImageNode|K|Hard|E-1|x=459|y=99}} | ||
| − | {{Map/ImageNode|L|Hard|E-1|x=503|y=191}} | ||
| − | {{Map/ImageNode|M|Hard|E-1|x=566|y=215}} | ||
| − | {{Map/ImageNode|N|Hard|E-1|x=478|y=251}} | ||
| − | {{Map/ImageNode|O|Hard|E-1|x=412|y=251|drops=<table class="wikitable"><tr><th>Type</th><th>Ships</th></tr><tr><th>DD</th><td>{{Ship/Banner|small=true|Akizuki}}{{Ship/Banner|small=true|Asagumo}}{{Ship/Banner|small=true|Asakaze}}<br>{{Ship/Banner|small=true|Hatsukaze}}{{Ship/Banner|small=true|Maikaze}}{{Ship/Banner|small=true|Matsukaze}}<br>{{Ship/Banner|small=true|Minazuki}}{{Ship/Banner|small=true|Minegumo}}{{Ship/Banner|small=true|Uranami}}<br>{{Ship/Banner|small=true|Uzuki}}</td></tr><tr><th>SS</th><td>{{Ship/Banner|small=true|I-47}}</td></tr></table>}} | ||
| − | {{Map/ImageNode|P|Hard|E-1|x=401|y=303}} | ||
| − | {{Map/ImageNode|Q|Hard|E-1|x=361|y=251}} | ||
| − | {{Map/ImageNode|R|Hard|E-1|x=313|y=228|drops=<table class="wikitable"><tr><th>Type</th><th>Ships</th></tr><tr><th>DE</th><td>{{Ship/Banner|small=true|Hachijou}}{{Ship/Banner|small=true|Sado}}</td></tr><tr><th>DD</th><td>{{Ship/Banner|small=true|Arashi}}{{Ship/Banner|small=true|Hagikaze}}{{Ship/Banner|small=true|Harukaze}}<br>{{Ship/Banner|small=true|Hatakaze}}{{Ship/Banner|small=true|Hatsukaze}}{{Ship/Banner|small=true|Kamikaze}}<br>{{Ship/Banner|small=true|Suzunami}}</td></tr><tr><th>CL</th><td>{{Ship/Banner|small=true|Agano}}{{Ship/Banner|small=true|Noshiro}}</td></tr><tr><th>CV</th><td>{{Ship/Banner|small=true|Saratoga}}</td></tr><tr><th>SS</th><td>{{Ship/Banner|small=true|I-201}}{{Ship/Banner|small=true|I-203}}</td></tr></table>}} | ||
| − | }} | ||
<div class="map-nodes"> | <div class="map-nodes"> | ||
{{Map/Nodes|diff=Hard|A|Select}} | {{Map/Nodes|diff=Hard|A|Select}} | ||
| Line 27: | Line 7: | ||
|B | |B | ||
|Normal | |Normal | ||
| − | |{{TooltipSimple|Echelon| | + | |{{TooltipSimple|Echelon|21% (579/2781, HQ: 100-120)}}<br>{{TooltipSimple|Line Abreast|25% (683/2781, HQ: 91-120)}}<br>{{TooltipSimple|''Phases: 1''|Samples: 467}} |
|Submarine Ka-Class/Flagship | |Submarine Ka-Class/Flagship | ||
|Submarine Ka-Class/Elite | |Submarine Ka-Class/Elite | ||
| Line 34: | Line 14: | ||
|B | |B | ||
|Normal | |Normal | ||
| − | |{{TooltipSimple|Echelon|16% ( | + | |{{TooltipSimple|Echelon|16% (443/2781, HQ: 100-120)}}<br>{{TooltipSimple|Line Abreast|15% (428/2781, HQ: 99-120)}}<br>{{TooltipSimple|''Phases: 1''|Samples: 331}} |
|Submarine Ka-Class/Flagship | |Submarine Ka-Class/Flagship | ||
|Submarine Ka-Class/Elite | |Submarine Ka-Class/Elite | ||
| Line 42: | Line 22: | ||
|B | |B | ||
|Normal | |Normal | ||
| − | |{{TooltipSimple|Echelon|11% ( | + | |{{TooltipSimple|Echelon|11% (315/2781, HQ: 97-120)}}<br>{{TooltipSimple|Line Abreast|12% (333/2781, HQ: 100-120)}}<br>{{TooltipSimple|''Phases: 1''|Samples: 297}} |
|Submarine Ka-Class/Flagship | |Submarine Ka-Class/Flagship | ||
|Submarine Ka-Class/Flagship | |Submarine Ka-Class/Flagship | ||
| Line 51: | Line 31: | ||
|C | |C | ||
|Defense | |Defense | ||
| − | |{{TooltipSimple|Diamond|41% ( | + | |{{TooltipSimple|Diamond|41% (1069/2600, HQ: 91-120)}}<br>{{TooltipSimple|''Phases: 1''|Samples: 413}} |
|Airfield Princess/VII | |Airfield Princess/VII | ||
|Airfield Princess/VI | |Airfield Princess/VI | ||
| Line 57: | Line 37: | ||
|C | |C | ||
|Defense | |Defense | ||
| − | |{{TooltipSimple|Diamond| | + | |{{TooltipSimple|Diamond|40% (1033/2600, HQ: 94-120)}}<br>{{TooltipSimple|''Phases: 1''|Samples: 396}} |
|Airfield Princess/VI | |Airfield Princess/VI | ||
|Airfield Princess/VI | |Airfield Princess/VI | ||
| Line 64: | Line 44: | ||
|C | |C | ||
|Defense | |Defense | ||
| − | |{{TooltipSimple|Diamond|10% ( | + | |{{TooltipSimple|Diamond|10% (257/2600, HQ: 94-120)}}<br>{{TooltipSimple|''Phases: 1''|Samples: 112}} |
|Airfield Princess/VII | |Airfield Princess/VII | ||
|Airfield Princess/VI | |Airfield Princess/VI | ||
| Line 71: | Line 51: | ||
|C | |C | ||
|Defense | |Defense | ||
| − | |{{TooltipSimple|Diamond|9% ( | + | |{{TooltipSimple|Diamond|9% (241/2600, HQ: 102-120)}}<br>{{TooltipSimple|''Phases: 1''|Samples: 96}} |
|Airfield Princess/VII | |Airfield Princess/VII | ||
|Airfield Princess/VII | |Airfield Princess/VII | ||
| Line 79: | Line 59: | ||
|D | |D | ||
|Normal | |Normal | ||
| − | |{{TooltipSimple|Line Ahead|51% ( | + | |{{TooltipSimple|Line Ahead|51% (1346/2657, HQ: 91-120)}}<br>{{TooltipSimple|Double Line|29% (759/2657, HQ: 92-120)}}<br>{{TooltipSimple|Echelon|21% (552/2657, HQ: 94-120)}}<br>{{TooltipSimple|''Phases: 1''|Samples: 1065}} |
|Heavy Cruiser Ri-Class/Flagship | |Heavy Cruiser Ri-Class/Flagship | ||
|Heavy Cruiser Ri-Class/Flagship | |Heavy Cruiser Ri-Class/Flagship | ||
| Line 91: | Line 71: | ||
|F | |F | ||
|Normal | |Normal | ||
| − | |{{TooltipSimple|Echelon| | + | |{{TooltipSimple|Echelon|17% (10697/64200, HQ: 90-120)}}<br>{{TooltipSimple|Line Abreast|17% (10763/64200, HQ: 84-120)}}<br>{{TooltipSimple|''Phases: 1''|Samples: 7442}} |
|Submarine Ka-Class/Flagship | |Submarine Ka-Class/Flagship | ||
|Submarine Ka-Class/Elite | |Submarine Ka-Class/Elite | ||
| Line 98: | Line 78: | ||
|F | |F | ||
|Normal | |Normal | ||
| − | |{{TooltipSimple|Echelon|11% ( | + | |{{TooltipSimple|Echelon|11% (6999/64200, HQ: 84-120)}}<br>{{TooltipSimple|Line Abreast|11% (6864/64200, HQ: 91-120)}}<br>{{TooltipSimple|''Phases: 1''|Samples: 4997}} |
|Submarine Ka-Class/Flagship | |Submarine Ka-Class/Flagship | ||
|Submarine Ka-Class/Elite | |Submarine Ka-Class/Elite | ||
| Line 106: | Line 86: | ||
|F | |F | ||
|Normal | |Normal | ||
| − | |{{TooltipSimple|Echelon|23% ( | + | |{{TooltipSimple|Echelon|23% (14466/64200, HQ: 90-120)}}<br>{{TooltipSimple|Line Abreast|22% (14411/64200, HQ: 84-120)}}<br>{{TooltipSimple|''Phases: 1''|Samples: 11082}} |
|Submarine Ka-Class/Flagship | |Submarine Ka-Class/Flagship | ||
|Submarine Ka-Class/Flagship | |Submarine Ka-Class/Flagship | ||
| Line 115: | Line 95: | ||
|G | |G | ||
|Defense | |Defense | ||
| − | |{{TooltipSimple|Diamond| | + | |{{TooltipSimple|Diamond|44% (1932/4424, HQ: 91-120)}}<br>{{TooltipSimple|''Phases: 1''|Samples: 642}} |
|Light Carrier Nu-Class/Elite II | |Light Carrier Nu-Class/Elite II | ||
|Light Carrier Nu-Class/Elite II | |Light Carrier Nu-Class/Elite II | ||
| Line 125: | Line 105: | ||
|G | |G | ||
|Defense | |Defense | ||
| − | |{{TooltipSimple|Diamond|31% ( | + | |{{TooltipSimple|Diamond|31% (1352/4424, HQ: 91-120)}}<br>{{TooltipSimple|''Phases: 1''|Samples: 496}} |
|Light Carrier Nu-Class/Flagship II | |Light Carrier Nu-Class/Flagship II | ||
|Light Carrier Nu-Class/Elite II | |Light Carrier Nu-Class/Elite II | ||
| Line 135: | Line 115: | ||
|G | |G | ||
|Defense | |Defense | ||
| − | |{{TooltipSimple|Diamond|26% ( | + | |{{TooltipSimple|Diamond|26% (1140/4424, HQ: 91-120)}}<br>{{TooltipSimple|''Phases: 1''|Samples: 381}} |
|Light Carrier Nu-Class/Flagship II | |Light Carrier Nu-Class/Flagship II | ||
|Light Carrier Nu-Class/Flagship II | |Light Carrier Nu-Class/Flagship II | ||
| Line 146: | Line 126: | ||
|H | |H | ||
|Defense | |Defense | ||
| − | |{{TooltipSimple|Diamond| | + | |{{TooltipSimple|Diamond|22% (13202/60455, HQ: 84-120)}}<br>{{TooltipSimple|''Phases: 1''|Samples: 4452}} |
|Light Carrier Nu-Class/Elite II | |Light Carrier Nu-Class/Elite II | ||
|Light Carrier Nu-Class/Elite II | |Light Carrier Nu-Class/Elite II | ||
| Line 156: | Line 136: | ||
|H | |H | ||
|Defense | |Defense | ||
| − | |{{TooltipSimple|Diamond|36% ( | + | |{{TooltipSimple|Diamond|36% (21467/60455, HQ: 84-120)}}<br>{{TooltipSimple|''Phases: 1''|Samples: 8041}} |
|Light Carrier Nu-Class/Flagship II | |Light Carrier Nu-Class/Flagship II | ||
|Light Carrier Nu-Class/Elite II | |Light Carrier Nu-Class/Elite II | ||
| Line 166: | Line 146: | ||
|H | |H | ||
|Defense | |Defense | ||
| − | |{{TooltipSimple|Diamond|43% ( | + | |{{TooltipSimple|Diamond|43% (25786/60455, HQ: 84-120)}}<br>{{TooltipSimple|''Phases: 1''|Samples: 10086}} |
|Light Carrier Nu-Class/Flagship II | |Light Carrier Nu-Class/Flagship II | ||
|Light Carrier Nu-Class/Flagship II | |Light Carrier Nu-Class/Flagship II | ||
| Line 177: | Line 157: | ||
|I | |I | ||
|Normal | |Normal | ||
| − | |{{TooltipSimple|Diamond|20% ( | + | |{{TooltipSimple|Diamond|20% (819/4108, HQ: 91-120)}}<br>{{TooltipSimple|''Phases: 1''|Samples: 256}} |
|Light Carrier Nu-Class/Elite II | |Light Carrier Nu-Class/Elite II | ||
|Light Carrier Nu-Class/Elite II | |Light Carrier Nu-Class/Elite II | ||
| Line 187: | Line 167: | ||
|I | |I | ||
|Normal | |Normal | ||
| − | |{{TooltipSimple|Diamond|30% ( | + | |{{TooltipSimple|Diamond|30% (1225/4108, HQ: 91-120)}}<br>{{TooltipSimple|''Phases: 1''|Samples: 414}} |
|Light Carrier Nu-Class/Flagship II | |Light Carrier Nu-Class/Flagship II | ||
|Light Carrier Nu-Class/Elite II | |Light Carrier Nu-Class/Elite II | ||
| Line 197: | Line 177: | ||
|I | |I | ||
|Normal | |Normal | ||
| − | |{{TooltipSimple|Diamond| | + | |{{TooltipSimple|Diamond|50% (2064/4108, HQ: 91-120)}}<br>{{TooltipSimple|''Phases: 1''|Samples: 642}} |
|Light Carrier Nu-Class/Flagship II | |Light Carrier Nu-Class/Flagship II | ||
|Light Carrier Nu-Class/Flagship II | |Light Carrier Nu-Class/Flagship II | ||
| Line 208: | Line 188: | ||
|J | |J | ||
|Normal | |Normal | ||
| − | |{{TooltipSimple|Line Ahead| | + | |{{TooltipSimple|Line Ahead|64% (34246/53294, HQ: 84-120)}}<br>{{TooltipSimple|Double Line|21% (11352/53294, HQ: 84-120)}}<br>{{TooltipSimple|Echelon|14% (7696/53294, HQ: 90-120)}}<br>{{TooltipSimple|''Phases: 1''|Samples: 19797}} |
|Destroyer I-Class/Late Model Elite | |Destroyer I-Class/Late Model Elite | ||
|Destroyer I-Class/Late Model | |Destroyer I-Class/Late Model | ||
| Line 220: | Line 200: | ||
|L | |L | ||
|Normal | |Normal | ||
| − | |{{TooltipSimple|Echelon|15% ( | + | |{{TooltipSimple|Echelon|15% (4265/28461, HQ: 91-120)}}<br>{{TooltipSimple|Line Abreast|15% (4385/28461, HQ: 92-120)}}<br>{{TooltipSimple|''Phases: 1''|Samples: 3111}} |
|Submarine Ka-Class/Flagship | |Submarine Ka-Class/Flagship | ||
|Submarine Ka-Class/Elite | |Submarine Ka-Class/Elite | ||
| Line 228: | Line 208: | ||
|L | |L | ||
|Normal | |Normal | ||
| − | |{{TooltipSimple|Echelon|11% ( | + | |{{TooltipSimple|Echelon|11% (3235/28461, HQ: 90-120)}}<br>{{TooltipSimple|Line Abreast|11% (3241/28461, HQ: 91-120)}}<br>{{TooltipSimple|''Phases: 1''|Samples: 2273}} |
|Submarine Ka-Class/Flagship | |Submarine Ka-Class/Flagship | ||
|Submarine Ka-Class/Flagship | |Submarine Ka-Class/Flagship | ||
| Line 236: | Line 216: | ||
|L | |L | ||
|Normal | |Normal | ||
| − | |{{TooltipSimple|Echelon| | + | |{{TooltipSimple|Echelon|23% (6684/28461, HQ: 84-120)}}<br>{{TooltipSimple|Line Abreast|23% (6651/28461, HQ: 90-120)}}<br>{{TooltipSimple|''Phases: 1''|Samples: 5329}} |
|Submarine Ka-Class/Flagship | |Submarine Ka-Class/Flagship | ||
|Submarine Ka-Class/Flagship | |Submarine Ka-Class/Flagship | ||
| Line 246: | Line 226: | ||
|N | |N | ||
|Defense | |Defense | ||
| − | |{{TooltipSimple|Diamond|13% ( | + | |{{TooltipSimple|Diamond|13% (5082/39430, HQ: 91-120)}}<br>{{TooltipSimple|''Phases: 1''|Samples: 1729}} |
|Airfield Princess/VII | |Airfield Princess/VII | ||
|Airfield Princess/VI | |Airfield Princess/VI | ||
| Line 252: | Line 232: | ||
|N | |N | ||
|Defense | |Defense | ||
| − | |{{TooltipSimple|Diamond| | + | |{{TooltipSimple|Diamond|20% (7695/39430, HQ: 91-120)}}<br>{{TooltipSimple|''Phases: 1''|Samples: 2654}} |
|Airfield Princess/VI | |Airfield Princess/VI | ||
|Airfield Princess/VI | |Airfield Princess/VI | ||
| Line 259: | Line 239: | ||
|N | |N | ||
|Defense | |Defense | ||
| − | |{{TooltipSimple|Diamond|27% ( | + | |{{TooltipSimple|Diamond|27% (10689/39430, HQ: 91-120)}}<br>{{TooltipSimple|''Phases: 1''|Samples: 3843}} |
|Airfield Princess/VII | |Airfield Princess/VII | ||
|Airfield Princess/VI | |Airfield Princess/VI | ||
| Line 266: | Line 246: | ||
|N | |N | ||
|Defense | |Defense | ||
| − | |{{TooltipSimple|Diamond|24% ( | + | |{{TooltipSimple|Diamond|24% (9281/39430, HQ: 92-120)}}<br>{{TooltipSimple|''Phases: 1''|Samples: 3300}} |
|Airfield Princess/VII | |Airfield Princess/VII | ||
|Airfield Princess/VII | |Airfield Princess/VII | ||
| Line 273: | Line 253: | ||
|N | |N | ||
|Defense | |Defense | ||
| − | |{{TooltipSimple|Diamond| | + | |{{TooltipSimple|Diamond|13% (5294/39430, HQ: 91-120)}}<br>{{TooltipSimple|''Phases: 1''|Samples: 1977}} |
|Airfield Princess/VII | |Airfield Princess/VII | ||
|Airfield Princess/VII | |Airfield Princess/VII | ||
| Line 280: | Line 260: | ||
|N | |N | ||
|Defense | |Defense | ||
| − | |{{TooltipSimple|Diamond|4% ( | + | |{{TooltipSimple|Diamond|4% (1389/39430, HQ: 93-120)}}<br>{{TooltipSimple|''Phases: 1''|Samples: 528}} |
|Airfield Princess/VII | |Airfield Princess/VII | ||
|Airfield Princess/VII | |Airfield Princess/VII | ||
| Line 288: | Line 268: | ||
|O | |O | ||
|Normal | |Normal | ||
| − | |{{TooltipSimple|Line Ahead|37% ( | + | |{{TooltipSimple|Line Ahead|37% (12708/34593, HQ: 92-120)}}<br>{{TooltipSimple|Vanguard|27% (9293/34593, HQ: 92-120)}}<br>{{TooltipSimple|''Phases: 1''|Samples: 7962}} |
|Light Cruiser Ho-Class/Flagship | |Light Cruiser Ho-Class/Flagship | ||
|Torpedo Cruiser Chi-Class/Flagship | |Torpedo Cruiser Chi-Class/Flagship | ||
| Line 298: | Line 278: | ||
|O | |O | ||
|Normal | |Normal | ||
| − | |{{TooltipSimple|Line Ahead| | + | |{{TooltipSimple|Line Ahead|36% (12592/34593, HQ: 92-120)}}<br>{{TooltipSimple|''Phases: 1''|Samples: 4753}} |
|Light Cruiser Ho-Class/Flagship | |Light Cruiser Ho-Class/Flagship | ||
|Torpedo Cruiser Chi-Class/Flagship | |Torpedo Cruiser Chi-Class/Flagship | ||
| Line 311: | Line 291: | ||
|R | |R | ||
|Boss | |Boss | ||
| − | |{{TooltipSimple|Line Ahead| | + | |{{TooltipSimple|Line Ahead|37% (10645/28818, HQ: 92-120)}}<br>{{TooltipSimple|''Phases: 1''|Samples: 3616}} |
|Heavy Cruiser Princess/III | |Heavy Cruiser Princess/III | ||
|Light Cruiser Tsu-Class | |Light Cruiser Tsu-Class | ||
| Line 321: | Line 301: | ||
|R | |R | ||
|Boss | |Boss | ||
| − | |{{TooltipSimple|Line Ahead| | + | |{{TooltipSimple|Line Ahead|30% (8717/28818, HQ: 92-120)}}<br>{{TooltipSimple|''Phases: 1''|Samples: 3076}} |
|Heavy Cruiser Princess/III | |Heavy Cruiser Princess/III | ||
|Light Carrier Nu-Class/Flagship II | |Light Carrier Nu-Class/Flagship II | ||
| Line 331: | Line 311: | ||
|R | |R | ||
|Boss/Final | |Boss/Final | ||
| − | |{{TooltipSimple|Line Ahead| | + | |{{TooltipSimple|Line Ahead|33% (9456/28818, HQ: 92-120)}}<br>{{TooltipSimple|''Phases: 1''|Samples: 3820}} |
|Heavy Cruiser Princess/VI | |Heavy Cruiser Princess/VI | ||
|Light Carrier Nu-Class/Kai Flagship III | |Light Carrier Nu-Class/Kai Flagship III | ||
| Line 341: | Line 321: | ||
</div> | </div> | ||
|-|Medium= | |-|Medium= | ||
| − | {{Map/Image|page=Spring 2022 Event/E-1| | + | {{Map/Image|page=Spring 2022 Event/E-1|{{Map/ImageNode|1|Medium|E-1|x=89|y=94}}{{Map/ImageNode|A|Medium|E-1|x=217|y=154}}{{Map/ImageNode|B|Medium|E-1|x=195|y=202}}{{Map/ImageNode|C|Medium|E-1|x=172|y=253}}{{Map/ImageNode|D|Medium|E-1|x=225|y=270|drops=<table class="wikitable"><tr><th>Type</th><th>Ships</th></tr><tr><th>DD</th><td>{{Ship/Banner|small=true|Asagumo}}{{Ship/Banner|small=true|Matsukaze}}{{Ship/Banner|small=true|Minazuki}}<br></td></tr></table>}}{{Map/ImageNode|E|Medium|E-1|x=285|y=289}}{{Map/ImageNode|F|Medium|E-1|x=298|y=151}}{{Map/ImageNode|G|Medium|E-1|x=363|y=131}}{{Map/ImageNode|H|Medium|E-1|x=370|y=183}}{{Map/ImageNode|I|Medium|E-1|x=413|y=114|drops=<table class="wikitable"><tr><th>Type</th><th>Ships</th></tr><tr><th>DD</th><td>{{Ship/Banner|small=true|Akizuki}}{{Ship/Banner|small=true|Asagumo}}{{Ship/Banner|small=true|Asakaze}}<br>{{Ship/Banner|small=true|Hatsukaze}}{{Ship/Banner|small=true|Maikaze}}{{Ship/Banner|small=true|Matsukaze}}<br>{{Ship/Banner|small=true|Minazuki}}{{Ship/Banner|small=true|Minegumo}}{{Ship/Banner|small=true|Uranami}}<br>{{Ship/Banner|small=true|Uzuki}}</td></tr><tr><th>SS</th><td>{{Ship/Banner|small=true|I-47}}</td></tr><tr><th>CVB</th><td>{{Ship/Banner|small=true|Taihou}}</td></tr><tr><th>AO</th><td>{{Ship/Banner|small=true|Kamoi}}</td></tr></table>}}{{Map/ImageNode|J|Medium|E-1|x=422|y=205|drops=<table class="wikitable"><tr><th>Type</th><th>Ships</th></tr><tr><th>DD</th><td>{{Ship/Banner|small=true|Minazuki}}{{Ship/Banner|small=true|Uranami}}{{Ship/Banner|small=true|Uzuki}}<br></td></tr></table>}}{{Map/ImageNode|K|Medium|E-1|x=459|y=99}}{{Map/ImageNode|L|Medium|E-1|x=503|y=191}}{{Map/ImageNode|M|Medium|E-1|x=566|y=215}}{{Map/ImageNode|N|Medium|E-1|x=478|y=251}}{{Map/ImageNode|O|Medium|E-1|x=412|y=251|drops=<table class="wikitable"><tr><th>Type</th><th>Ships</th></tr><tr><th>DD</th><td>{{Ship/Banner|small=true|Akizuki}}{{Ship/Banner|small=true|Asagumo}}{{Ship/Banner|small=true|Asakaze}}<br>{{Ship/Banner|small=true|Hatsukaze}}{{Ship/Banner|small=true|Maikaze}}{{Ship/Banner|small=true|Matsukaze}}<br>{{Ship/Banner|small=true|Minazuki}}{{Ship/Banner|small=true|Minegumo}}{{Ship/Banner|small=true|Uranami}}<br>{{Ship/Banner|small=true|Uzuki}}</td></tr></table>}}{{Map/ImageNode|P|Medium|E-1|x=401|y=303}}{{Map/ImageNode|Q|Medium|E-1|x=361|y=251}}{{Map/ImageNode|R|Medium|E-1|x=313|y=228|drops=<table class="wikitable"><tr><th>Type</th><th>Ships</th></tr><tr><th>DE</th><td>{{Ship/Banner|small=true|Hachijou}}{{Ship/Banner|small=true|Sado}}</td></tr><tr><th>DD</th><td>{{Ship/Banner|small=true|Arashi}}{{Ship/Banner|small=true|Hagikaze}}{{Ship/Banner|small=true|Harukaze}}<br>{{Ship/Banner|small=true|Hatakaze}}{{Ship/Banner|small=true|Hatsukaze}}{{Ship/Banner|small=true|Kamikaze}}<br>{{Ship/Banner|small=true|Suzunami}}</td></tr><tr><th>CL</th><td>{{Ship/Banner|small=true|Agano}}{{Ship/Banner|small=true|Noshiro}}</td></tr><tr><th>CV</th><td>{{Ship/Banner|small=true|Saratoga}}</td></tr><tr><th>SS</th><td>{{Ship/Banner|small=true|I-201}}{{Ship/Banner|small=true|I-203}}</td></tr></table>}}}} |
| − | {{Map/ImageNode|1|Medium|E-1|x=89|y=94}} | ||
| − | {{Map/ImageNode|A|Medium|E-1|x=217|y=154}} | ||
| − | {{Map/ImageNode|B|Medium|E-1|x=195|y=202}} | ||
| − | {{Map/ImageNode|C|Medium|E-1|x=172|y=253}} | ||
| − | {{Map/ImageNode|D|Medium|E-1|x=225|y=270|drops=<table class="wikitable"><tr><th>Type</th><th>Ships</th></tr><tr><th>DD</th><td>{{Ship/Banner|small=true|Asagumo}}{{Ship/Banner|small=true|Matsukaze}}{{Ship/Banner|small=true|Minazuki}}<br></td></tr></table>}} | ||
| − | {{Map/ImageNode|E|Medium|E-1|x=285|y=289}} | ||
| − | {{Map/ImageNode|F|Medium|E-1|x=298|y=151}} | ||
| − | {{Map/ImageNode|G|Medium|E-1|x=363|y=131}} | ||
| − | {{Map/ImageNode|H|Medium|E-1|x=370|y=183}} | ||
| − | {{Map/ImageNode|I|Medium|E-1|x=413|y=114|drops=<table class="wikitable"><tr><th>Type</th><th>Ships</th></tr><tr><th>DD</th><td>{{Ship/Banner|small=true|Akizuki}}{{Ship/Banner|small=true|Asagumo}}{{Ship/Banner|small=true|Asakaze}}<br>{{Ship/Banner|small=true|Hatsukaze}}{{Ship/Banner|small=true|Maikaze}}{{Ship/Banner|small=true|Matsukaze}}<br>{{Ship/Banner|small=true|Minazuki}}{{Ship/Banner|small=true|Minegumo}}{{Ship/Banner|small=true|Uranami}}<br>{{Ship/Banner|small=true|Uzuki}}</td></tr><tr><th>SS</th><td>{{Ship/Banner|small=true|I-47}}</td></tr><tr><th>CVB</th><td>{{Ship/Banner|small=true|Taihou}}</td></tr><tr><th>AO</th><td>{{Ship/Banner|small=true|Kamoi}}</td></tr></table>}} | ||
| − | {{Map/ImageNode|J|Medium|E-1|x=422|y=205|drops=<table class="wikitable"><tr><th>Type</th><th>Ships</th></tr><tr><th>DD</th><td>{{Ship/Banner|small=true|Minazuki}}{{Ship/Banner|small=true|Uranami}}{{Ship/Banner|small=true|Uzuki}}<br></td></tr></table>}} | ||
| − | {{Map/ImageNode|K|Medium|E-1|x=459|y=99}} | ||
| − | {{Map/ImageNode|L|Medium|E-1|x=503|y=191}} | ||
| − | {{Map/ImageNode|M|Medium|E-1|x=566|y=215}} | ||
| − | {{Map/ImageNode|N|Medium|E-1|x=478|y=251}} | ||
| − | {{Map/ImageNode|O|Medium|E-1|x=412|y=251|drops=<table class="wikitable"><tr><th>Type</th><th>Ships</th></tr><tr><th>DD</th><td>{{Ship/Banner|small=true|Akizuki}}{{Ship/Banner|small=true|Asagumo}}{{Ship/Banner|small=true|Asakaze}}<br>{{Ship/Banner|small=true|Hatsukaze}}{{Ship/Banner|small=true|Maikaze}}{{Ship/Banner|small=true|Matsukaze}}<br>{{Ship/Banner|small=true|Minazuki}}{{Ship/Banner|small=true|Minegumo}}{{Ship/Banner|small=true|Uranami}}<br>{{Ship/Banner|small=true|Uzuki}}</td></tr></table>}} | ||
| − | {{Map/ImageNode|P|Medium|E-1|x=401|y=303}} | ||
| − | {{Map/ImageNode|Q|Medium|E-1|x=361|y=251}} | ||
| − | {{Map/ImageNode|R|Medium|E-1|x=313|y=228|drops=<table class="wikitable"><tr><th>Type</th><th>Ships</th></tr><tr><th>DE</th><td>{{Ship/Banner|small=true|Hachijou}}{{Ship/Banner|small=true|Sado}}</td></tr><tr><th>DD</th><td>{{Ship/Banner|small=true|Arashi}}{{Ship/Banner|small=true|Hagikaze}}{{Ship/Banner|small=true|Harukaze}}<br>{{Ship/Banner|small=true|Hatakaze}}{{Ship/Banner|small=true|Hatsukaze}}{{Ship/Banner|small=true|Kamikaze}}<br>{{Ship/Banner|small=true|Suzunami}}</td></tr><tr><th>CL</th><td>{{Ship/Banner|small=true|Agano}}{{Ship/Banner|small=true|Noshiro}}</td></tr><tr><th>CV</th><td>{{Ship/Banner|small=true|Saratoga}}</td></tr><tr><th>SS</th><td>{{Ship/Banner|small=true|I-201}}{{Ship/Banner|small=true|I-203}}</td></tr></table>}} | ||
| − | }} | ||
<div class="map-nodes"> | <div class="map-nodes"> | ||
{{Map/Nodes|diff=Medium|A|Select}} | {{Map/Nodes|diff=Medium|A|Select}} | ||
| Line 367: | Line 327: | ||
|B | |B | ||
|Normal | |Normal | ||
| − | |{{TooltipSimple|Echelon|15% ( | + | |{{TooltipSimple|Echelon|15% (50/330, HQ: 55-120)}}<br>{{TooltipSimple|Line Abreast|23% (76/330, HQ: 63-120)}}<br>{{TooltipSimple|''Phases: 1''|Samples: 42}} |
|Submarine Ka-Class/Elite | |Submarine Ka-Class/Elite | ||
|Submarine Ka-Class | |Submarine Ka-Class | ||
| Line 374: | Line 334: | ||
|B | |B | ||
|Normal | |Normal | ||
| − | |{{TooltipSimple|Echelon| | + | |{{TooltipSimple|Echelon|20% (66/330, HQ: 70-120)}}<br>{{TooltipSimple|Line Abreast|20% (67/330, HQ: 89-120)}}<br>{{TooltipSimple|''Phases: 1''|Samples: 51}} |
|Submarine Ka-Class/Elite | |Submarine Ka-Class/Elite | ||
|Submarine Ka-Class/Elite | |Submarine Ka-Class/Elite | ||
| Line 381: | Line 341: | ||
|B | |B | ||
|Normal | |Normal | ||
| − | |{{TooltipSimple|Echelon| | + | |{{TooltipSimple|Echelon|11% (35/330, HQ: 70-120)}}<br>{{TooltipSimple|Line Abreast|11% (36/330, HQ: 73-120)}}<br>{{TooltipSimple|''Phases: 1''|Samples: 27}} |
|Submarine Ka-Class/Flagship | |Submarine Ka-Class/Flagship | ||
|Submarine Ka-Class/Elite | |Submarine Ka-Class/Elite | ||
| Line 389: | Line 349: | ||
|C | |C | ||
|Defense | |Defense | ||
| − | |{{TooltipSimple|Diamond| | + | |{{TooltipSimple|Diamond|28% (85/302, HQ: 63-120)}}<br>{{TooltipSimple|''Phases: 1''|Samples: 22}} |
|Airfield Princess/VI | |Airfield Princess/VI | ||
|Airfield Princess/V | |Airfield Princess/V | ||
| Line 395: | Line 355: | ||
|C | |C | ||
|Defense | |Defense | ||
| − | |{{TooltipSimple|Diamond| | + | |{{TooltipSimple|Diamond|30% (90/302, HQ: 55-120)}}<br>{{TooltipSimple|''Phases: 1''|Samples: 27}} |
|Airfield Princess/VI | |Airfield Princess/VI | ||
|Airfield Princess/VI | |Airfield Princess/VI | ||
| Line 401: | Line 361: | ||
|C | |C | ||
|Defense | |Defense | ||
| − | |{{TooltipSimple|Diamond|17% ( | + | |{{TooltipSimple|Diamond|17% (51/302, HQ: 70-120)}}<br>{{TooltipSimple|''Phases: 1''|Samples: 23}} |
|Airfield Princess/VI | |Airfield Princess/VI | ||
|Airfield Princess/V | |Airfield Princess/V | ||
| Line 408: | Line 368: | ||
|C | |C | ||
|Defense | |Defense | ||
| − | |{{TooltipSimple|Diamond|25% ( | + | |{{TooltipSimple|Diamond|25% (76/302, HQ: 70-120)}}<br>{{TooltipSimple|''Phases: 1''|Samples: 32}} |
|Airfield Princess/VI | |Airfield Princess/VI | ||
|Airfield Princess/VI | |Airfield Princess/VI | ||
| Line 416: | Line 376: | ||
|D | |D | ||
|Normal | |Normal | ||
| − | |{{TooltipSimple|Line Ahead| | + | |{{TooltipSimple|Line Ahead|50% (159/320, HQ: 70-120)}}<br>{{TooltipSimple|Double Line|30% (97/320, HQ: 63-120)}}<br>{{TooltipSimple|Echelon|20% (64/320, HQ: 55-120)}}<br>{{TooltipSimple|''Phases: 1''|Samples: 115}} |
|Heavy Cruiser Ri-Class/Elite | |Heavy Cruiser Ri-Class/Elite | ||
|Heavy Cruiser Ri-Class/Elite | |Heavy Cruiser Ri-Class/Elite | ||
| Line 428: | Line 388: | ||
|F | |F | ||
|Normal | |Normal | ||
| − | |{{TooltipSimple|Echelon|15% ( | + | |{{TooltipSimple|Echelon|15% (1646/10954, HQ: 48-120)}}<br>{{TooltipSimple|Line Abreast|15% (1649/10954, HQ: 48-120)}}<br>{{TooltipSimple|''Phases: 1''|Samples: 1021}} |
|Submarine Ka-Class/Elite | |Submarine Ka-Class/Elite | ||
|Submarine Ka-Class | |Submarine Ka-Class | ||
| Line 435: | Line 395: | ||
|F | |F | ||
|Normal | |Normal | ||
| − | |{{TooltipSimple|Echelon| | + | |{{TooltipSimple|Echelon|17% (1835/10954, HQ: 48-120)}}<br>{{TooltipSimple|Line Abreast|16% (1777/10954, HQ: 55-120)}}<br>{{TooltipSimple|''Phases: 1''|Samples: 1173}} |
|Submarine Ka-Class/Elite | |Submarine Ka-Class/Elite | ||
|Submarine Ka-Class/Elite | |Submarine Ka-Class/Elite | ||
| Line 442: | Line 402: | ||
|F | |F | ||
|Normal | |Normal | ||
| − | |{{TooltipSimple|Echelon| | + | |{{TooltipSimple|Echelon|18% (2017/10954, HQ: 48-120)}}<br>{{TooltipSimple|Line Abreast|19% (2030/10954, HQ: 48-120)}}<br>{{TooltipSimple|''Phases: 1''|Samples: 1507}} |
|Submarine Ka-Class/Flagship | |Submarine Ka-Class/Flagship | ||
|Submarine Ka-Class/Elite | |Submarine Ka-Class/Elite | ||
| Line 450: | Line 410: | ||
|G | |G | ||
|Defense | |Defense | ||
| − | |{{TooltipSimple|Diamond| | + | |{{TooltipSimple|Diamond|42% (484/1150, HQ: 48-120)}}<br>{{TooltipSimple|''Phases: 1''|Samples: 127}} |
|Light Carrier Nu-Class/Elite II | |Light Carrier Nu-Class/Elite II | ||
|Light Carrier Nu-Class | |Light Carrier Nu-Class | ||
| Line 460: | Line 420: | ||
|G | |G | ||
|Defense | |Defense | ||
| − | |{{TooltipSimple|Diamond| | + | |{{TooltipSimple|Diamond|31% (362/1150, HQ: 48-120)}}<br>{{TooltipSimple|''Phases: 1''|Samples: 83}} |
|Light Carrier Nu-Class/Elite II | |Light Carrier Nu-Class/Elite II | ||
|Light Carrier Nu-Class/Elite | |Light Carrier Nu-Class/Elite | ||
| Line 470: | Line 430: | ||
|G | |G | ||
|Defense | |Defense | ||
| − | |{{TooltipSimple|Diamond| | + | |{{TooltipSimple|Diamond|26% (304/1150, HQ: 48-120)}}<br>{{TooltipSimple|''Phases: 1''|Samples: 71}} |
|Light Carrier Nu-Class/Elite II | |Light Carrier Nu-Class/Elite II | ||
|Light Carrier Nu-Class/Elite II | |Light Carrier Nu-Class/Elite II | ||
| Line 481: | Line 441: | ||
|H | |H | ||
|Defense | |Defense | ||
| − | |{{TooltipSimple|Diamond| | + | |{{TooltipSimple|Diamond|25% (2442/9916, HQ: 48-120)}}<br>{{TooltipSimple|''Phases: 1''|Samples: 759}} |
|Light Carrier Nu-Class/Elite II | |Light Carrier Nu-Class/Elite II | ||
|Light Carrier Nu-Class | |Light Carrier Nu-Class | ||
| Line 491: | Line 451: | ||
|H | |H | ||
|Defense | |Defense | ||
| − | |{{TooltipSimple|Diamond|34% ( | + | |{{TooltipSimple|Diamond|34% (3326/9916, HQ: 48-120)}}<br>{{TooltipSimple|''Phases: 1''|Samples: 1184}} |
|Light Carrier Nu-Class/Elite II | |Light Carrier Nu-Class/Elite II | ||
|Light Carrier Nu-Class/Elite | |Light Carrier Nu-Class/Elite | ||
| Line 501: | Line 461: | ||
|H | |H | ||
|Defense | |Defense | ||
| − | |{{TooltipSimple|Diamond|42% ( | + | |{{TooltipSimple|Diamond|42% (4148/9916, HQ: 48-120)}}<br>{{TooltipSimple|''Phases: 1''|Samples: 1500}} |
|Light Carrier Nu-Class/Elite II | |Light Carrier Nu-Class/Elite II | ||
|Light Carrier Nu-Class/Elite II | |Light Carrier Nu-Class/Elite II | ||
| Line 512: | Line 472: | ||
|I | |I | ||
|Normal | |Normal | ||
| − | |{{TooltipSimple|Diamond|20% ( | + | |{{TooltipSimple|Diamond|20% (231/1161, HQ: 49-120)}}<br>{{TooltipSimple|''Phases: 1''|Samples: 48}} |
|Light Carrier Nu-Class/Elite II | |Light Carrier Nu-Class/Elite II | ||
|Light Carrier Nu-Class | |Light Carrier Nu-Class | ||
| Line 522: | Line 482: | ||
|I | |I | ||
|Normal | |Normal | ||
| − | |{{TooltipSimple|Diamond| | + | |{{TooltipSimple|Diamond|29% (335/1161, HQ: 49-120)}}<br>{{TooltipSimple|''Phases: 1''|Samples: 69}} |
|Light Carrier Nu-Class/Elite II | |Light Carrier Nu-Class/Elite II | ||
|Light Carrier Nu-Class/Elite | |Light Carrier Nu-Class/Elite | ||
| Line 532: | Line 492: | ||
|I | |I | ||
|Normal | |Normal | ||
| − | |{{TooltipSimple|Diamond|51% ( | + | |{{TooltipSimple|Diamond|51% (595/1161, HQ: 48-120)}}<br>{{TooltipSimple|''Phases: 1''|Samples: 157}} |
|Light Carrier Nu-Class/Elite II | |Light Carrier Nu-Class/Elite II | ||
|Light Carrier Nu-Class/Elite II | |Light Carrier Nu-Class/Elite II | ||
| Line 543: | Line 503: | ||
|J | |J | ||
|Normal | |Normal | ||
| − | |{{TooltipSimple|Line Ahead| | + | |{{TooltipSimple|Line Ahead|58% (5253/8984, HQ: 55-120)}}<br>{{TooltipSimple|Double Line|26% (2298/8984, HQ: 64-120)}}<br>{{TooltipSimple|Echelon|16% (1433/8984, HQ: 65-120)}}<br>{{TooltipSimple|''Phases: 1''|Samples: 3144}} |
|Destroyer I-Class/Late Model Elite | |Destroyer I-Class/Late Model Elite | ||
|Destroyer I-Class/Late Model | |Destroyer I-Class/Late Model | ||
| Line 555: | Line 515: | ||
|L | |L | ||
|Normal | |Normal | ||
| − | |{{TooltipSimple|Echelon|12% ( | + | |{{TooltipSimple|Echelon|12% (509/4335, HQ: 64-120)}}<br>{{TooltipSimple|Line Abreast|12% (520/4335, HQ: 55-120)}}<br>{{TooltipSimple|''Phases: 1''|Samples: 395}} |
|Submarine Ka-Class/Elite | |Submarine Ka-Class/Elite | ||
|Submarine Ka-Class/Elite | |Submarine Ka-Class/Elite | ||
| Line 562: | Line 522: | ||
|L | |L | ||
|Normal | |Normal | ||
| − | |{{TooltipSimple|Echelon|17% ( | + | |{{TooltipSimple|Echelon|17% (739/4335, HQ: 64-120)}}<br>{{TooltipSimple|Line Abreast|17% (716/4335, HQ: 64-120)}}<br>{{TooltipSimple|''Phases: 1''|Samples: 617}} |
|Submarine Ka-Class/Elite | |Submarine Ka-Class/Elite | ||
|Submarine Ka-Class/Elite | |Submarine Ka-Class/Elite | ||
| Line 569: | Line 529: | ||
|L | |L | ||
|Normal | |Normal | ||
| − | |{{TooltipSimple|Echelon|21% ( | + | |{{TooltipSimple|Echelon|21% (917/4335, HQ: 65-120)}}<br>{{TooltipSimple|Line Abreast|22% (934/4335, HQ: 56-120)}}<br>{{TooltipSimple|''Phases: 1''|Samples: 817}} |
|Submarine Ka-Class/Flagship | |Submarine Ka-Class/Flagship | ||
|Submarine Ka-Class/Elite | |Submarine Ka-Class/Elite | ||
| Line 579: | Line 539: | ||
|N | |N | ||
|Defense | |Defense | ||
| − | |{{TooltipSimple|Diamond| | + | |{{TooltipSimple|Diamond|16% (1134/7290, HQ: 65-120)}}<br>{{TooltipSimple|''Phases: 1''|Samples: 370}} |
|Airfield Princess/VI | |Airfield Princess/VI | ||
|Airfield Princess/V | |Airfield Princess/V | ||
| Line 585: | Line 545: | ||
|N | |N | ||
|Defense | |Defense | ||
| − | |{{TooltipSimple|Diamond|15% ( | + | |{{TooltipSimple|Diamond|15% (1121/7290, HQ: 66-120)}}<br>{{TooltipSimple|''Phases: 1''|Samples: 373}} |
|Airfield Princess/VI | |Airfield Princess/VI | ||
|Airfield Princess/VI | |Airfield Princess/VI | ||
| Line 591: | Line 551: | ||
|N | |N | ||
|Defense | |Defense | ||
| − | |{{TooltipSimple|Diamond|23% ( | + | |{{TooltipSimple|Diamond|23% (1664/7290, HQ: 64-120)}}<br>{{TooltipSimple|''Phases: 1''|Samples: 568}} |
|Airfield Princess/VII | |Airfield Princess/VII | ||
|Airfield Princess/VI | |Airfield Princess/VI | ||
| Line 597: | Line 557: | ||
|N | |N | ||
|Defense | |Defense | ||
| − | |{{TooltipSimple|Diamond|22% ( | + | |{{TooltipSimple|Diamond|22% (1580/7290, HQ: 64-120)}}<br>{{TooltipSimple|''Phases: 1''|Samples: 532}} |
|Airfield Princess/VI | |Airfield Princess/VI | ||
|Airfield Princess/V | |Airfield Princess/V | ||
| Line 604: | Line 564: | ||
|N | |N | ||
|Defense | |Defense | ||
| − | |{{TooltipSimple|Diamond|25% ( | + | |{{TooltipSimple|Diamond|25% (1791/7290, HQ: 73-120)}}<br>{{TooltipSimple|''Phases: 1''|Samples: 692}} |
|Airfield Princess/VI | |Airfield Princess/VI | ||
|Airfield Princess/VI | |Airfield Princess/VI | ||
| Line 612: | Line 572: | ||
|O | |O | ||
|Normal | |Normal | ||
| − | |{{TooltipSimple|Line Ahead|35% ( | + | |{{TooltipSimple|Line Ahead|35% (2391/6921, HQ: 75-120)}}<br>{{TooltipSimple|Vanguard|32% (2215/6921, HQ: 64-120)}}<br>{{TooltipSimple|''Phases: 1''|Samples: 1516}} |
|Light Cruiser Ho-Class/Flagship | |Light Cruiser Ho-Class/Flagship | ||
|Torpedo Cruiser Chi-Class/Elite | |Torpedo Cruiser Chi-Class/Elite | ||
| Line 622: | Line 582: | ||
|O | |O | ||
|Normal | |Normal | ||
| − | |{{TooltipSimple|Line Ahead| | + | |{{TooltipSimple|Line Ahead|33% (2315/6921, HQ: 65-120)}}<br>{{TooltipSimple|''Phases: 1''|Samples: 860}} |
|Light Cruiser Ho-Class/Flagship | |Light Cruiser Ho-Class/Flagship | ||
|Torpedo Cruiser Chi-Class/Elite | |Torpedo Cruiser Chi-Class/Elite | ||
| Line 635: | Line 595: | ||
|R | |R | ||
|Boss | |Boss | ||
| − | |{{TooltipSimple|Line Ahead| | + | |{{TooltipSimple|Line Ahead|44% (2856/6558, HQ: 64-120)}}<br>{{TooltipSimple|''Phases: 1''|Samples: 919}} |
|Heavy Cruiser Princess/II | |Heavy Cruiser Princess/II | ||
|Light Cruiser Tsu-Class | |Light Cruiser Tsu-Class | ||
| Line 645: | Line 605: | ||
|R | |R | ||
|Boss | |Boss | ||
| − | |{{TooltipSimple|Line Ahead|36% ( | + | |{{TooltipSimple|Line Ahead|36% (2377/6558, HQ: 75-120)}}<br>{{TooltipSimple|''Phases: 1''|Samples: 789}} |
|Heavy Cruiser Princess/II | |Heavy Cruiser Princess/II | ||
|Light Carrier Nu-Class/Elite II | |Light Carrier Nu-Class/Elite II | ||
| Line 655: | Line 615: | ||
|R | |R | ||
|Boss/Final | |Boss/Final | ||
| − | |{{TooltipSimple|Line Ahead| | + | |{{TooltipSimple|Line Ahead|20% (1325/6558, HQ: 81-120)}}<br>{{TooltipSimple|''Phases: 1''|Samples: 511}} |
|Heavy Cruiser Princess/V | |Heavy Cruiser Princess/V | ||
|Light Carrier Nu-Class/Elite II | |Light Carrier Nu-Class/Elite II | ||
| Line 665: | Line 625: | ||
</div> | </div> | ||
|-|Easy= | |-|Easy= | ||
| − | {{Map/Image|page=Spring 2022 Event/E-1| | + | {{Map/Image|page=Spring 2022 Event/E-1|{{Map/ImageNode|1|Easy|E-1|x=89|y=94}}{{Map/ImageNode|A|Easy|E-1|x=217|y=154}}{{Map/ImageNode|B|Easy|E-1|x=195|y=202}}{{Map/ImageNode|C|Easy|E-1|x=172|y=253}}{{Map/ImageNode|D|Easy|E-1|x=225|y=270|drops=<table class="wikitable"><tr><th>Type</th><th>Ships</th></tr><tr><th>DD</th><td>{{Ship/Banner|small=true|Hatsukaze}}{{Ship/Banner|small=true|Maikaze}}{{Ship/Banner|small=true|Minazuki}}<br>{{Ship/Banner|small=true|Minegumo}}{{Ship/Banner|small=true|Uzuki}}</td></tr></table>}}{{Map/ImageNode|E|Easy|E-1|x=285|y=289}}{{Map/ImageNode|F|Easy|E-1|x=298|y=151}}{{Map/ImageNode|G|Easy|E-1|x=363|y=131}}{{Map/ImageNode|H|Easy|E-1|x=370|y=183}}{{Map/ImageNode|I|Easy|E-1|x=413|y=114|drops=<table class="wikitable"><tr><th>Type</th><th>Ships</th></tr><tr><th>DD</th><td>{{Ship/Banner|small=true|Akizuki}}{{Ship/Banner|small=true|Asagumo}}{{Ship/Banner|small=true|Asakaze}}<br>{{Ship/Banner|small=true|Hatsukaze}}{{Ship/Banner|small=true|Maikaze}}{{Ship/Banner|small=true|Matsukaze}}<br>{{Ship/Banner|small=true|Minazuki}}{{Ship/Banner|small=true|Minegumo}}{{Ship/Banner|small=true|Uranami}}<br>{{Ship/Banner|small=true|Uzuki}}</td></tr><tr><th>SS</th><td>{{Ship/Banner|small=true|I-47}}</td></tr><tr><th>CVB</th><td>{{Ship/Banner|small=true|Taihou}}</td></tr><tr><th>AO</th><td>{{Ship/Banner|small=true|Kamoi}}</td></tr></table>}}{{Map/ImageNode|J|Easy|E-1|x=422|y=205|drops=<table class="wikitable"><tr><th>Type</th><th>Ships</th></tr><tr><th>DD</th><td>{{Ship/Banner|small=true|Minazuki}}{{Ship/Banner|small=true|Uranami}}{{Ship/Banner|small=true|Uzuki}}<br></td></tr></table>}}{{Map/ImageNode|K|Easy|E-1|x=459|y=99}}{{Map/ImageNode|L|Easy|E-1|x=503|y=191}}{{Map/ImageNode|M|Easy|E-1|x=566|y=215}}{{Map/ImageNode|N|Easy|E-1|x=478|y=251}}{{Map/ImageNode|O|Easy|E-1|x=412|y=251|drops=<table class="wikitable"><tr><th>Type</th><th>Ships</th></tr><tr><th>DD</th><td>{{Ship/Banner|small=true|Asagumo}}{{Ship/Banner|small=true|Hatsukaze}}{{Ship/Banner|small=true|Maikaze}}<br>{{Ship/Banner|small=true|Matsukaze}}{{Ship/Banner|small=true|Minazuki}}{{Ship/Banner|small=true|Minegumo}}<br>{{Ship/Banner|small=true|Uranami}}{{Ship/Banner|small=true|Uzuki}}</td></tr></table>}}{{Map/ImageNode|P|Easy|E-1|x=401|y=303}}{{Map/ImageNode|Q|Easy|E-1|x=361|y=251}}{{Map/ImageNode|R|Easy|E-1|x=313|y=228|drops=<table class="wikitable"><tr><th>Type</th><th>Ships</th></tr><tr><th>DE</th><td>{{Ship/Banner|small=true|Hachijou}}{{Ship/Banner|small=true|Sado}}</td></tr><tr><th>DD</th><td>{{Ship/Banner|small=true|Arashi}}{{Ship/Banner|small=true|Hagikaze}}{{Ship/Banner|small=true|Harukaze}}<br>{{Ship/Banner|small=true|Hatakaze}}{{Ship/Banner|small=true|Hatsukaze}}{{Ship/Banner|small=true|Kamikaze}}<br>{{Ship/Banner|small=true|Suzunami}}</td></tr><tr><th>CL</th><td>{{Ship/Banner|small=true|Agano}}{{Ship/Banner|small=true|Noshiro}}</td></tr><tr><th>CV</th><td>{{Ship/Banner|small=true|Saratoga}}</td></tr><tr><th>SS</th><td>{{Ship/Banner|small=true|I-201}}{{Ship/Banner|small=true|I-203}}</td></tr></table>}}}} |
| − | {{Map/ImageNode|1|Easy|E-1|x=89|y=94}} | ||
| − | {{Map/ImageNode|A|Easy|E-1|x=217|y=154}} | ||
| − | {{Map/ImageNode|B|Easy|E-1|x=195|y=202}} | ||
| − | {{Map/ImageNode|C|Easy|E-1|x=172|y=253}} | ||
| − | {{Map/ImageNode|D|Easy|E-1|x=225|y=270|drops=<table class="wikitable"><tr><th>Type</th><th>Ships</th></tr><tr><th>DD</th><td>{{Ship/Banner|small=true|Hatsukaze}}{{Ship/Banner|small=true|Maikaze}}{{Ship/Banner|small=true|Minazuki}}<br>{{Ship/Banner|small=true|Minegumo}}{{Ship/Banner|small=true|Uzuki}}</td></tr></table>}} | ||
| − | {{Map/ImageNode|E|Easy|E-1|x=285|y=289}} | ||
| − | {{Map/ImageNode|F|Easy|E-1|x=298|y=151}} | ||
| − | {{Map/ImageNode|G|Easy|E-1|x=363|y=131}} | ||
| − | {{Map/ImageNode|H|Easy|E-1|x=370|y=183}} | ||
| − | {{Map/ImageNode|I|Easy|E-1|x=413|y=114|drops=<table class="wikitable"><tr><th>Type</th><th>Ships</th></tr><tr><th>DD</th><td>{{Ship/Banner|small=true|Akizuki}}{{Ship/Banner|small=true|Asagumo}}{{Ship/Banner|small=true|Asakaze}}<br>{{Ship/Banner|small=true|Hatsukaze}}{{Ship/Banner|small=true|Maikaze}}{{Ship/Banner|small=true|Matsukaze}}<br>{{Ship/Banner|small=true|Minazuki}}{{Ship/Banner|small=true|Minegumo}}{{Ship/Banner|small=true|Uranami}}<br>{{Ship/Banner|small=true|Uzuki}}</td></tr><tr><th>SS</th><td>{{Ship/Banner|small=true|I-47}}</td></tr><tr><th>CVB</th><td>{{Ship/Banner|small=true|Taihou}}</td></tr><tr><th>AO</th><td>{{Ship/Banner|small=true|Kamoi}}</td></tr></table>}} | ||
| − | {{Map/ImageNode|J|Easy|E-1|x=422|y=205|drops=<table class="wikitable"><tr><th>Type</th><th>Ships</th></tr><tr><th>DD</th><td>{{Ship/Banner|small=true|Minazuki}}{{Ship/Banner|small=true|Uranami}}{{Ship/Banner|small=true|Uzuki}}<br></td></tr></table>}} | ||
| − | {{Map/ImageNode|K|Easy|E-1|x=459|y=99}} | ||
| − | {{Map/ImageNode|L|Easy|E-1|x=503|y=191}} | ||
| − | {{Map/ImageNode|M|Easy|E-1|x=566|y=215}} | ||
| − | {{Map/ImageNode|N|Easy|E-1|x=478|y=251}} | ||
| − | {{Map/ImageNode|O|Easy|E-1|x=412|y=251|drops=<table class="wikitable"><tr><th>Type</th><th>Ships</th></tr><tr><th>DD</th><td>{{Ship/Banner|small=true|Asagumo}}{{Ship/Banner|small=true|Hatsukaze}}{{Ship/Banner|small=true|Maikaze}}<br>{{Ship/Banner|small=true|Matsukaze}}{{Ship/Banner|small=true|Minazuki}}{{Ship/Banner|small=true|Minegumo}}<br>{{Ship/Banner|small=true|Uranami}}{{Ship/Banner|small=true|Uzuki}}</td></tr></table>}} | ||
| − | {{Map/ImageNode|P|Easy|E-1|x=401|y=303}} | ||
| − | {{Map/ImageNode|Q|Easy|E-1|x=361|y=251}} | ||
| − | {{Map/ImageNode|R|Easy|E-1|x=313|y=228|drops=<table class="wikitable"><tr><th>Type</th><th>Ships</th></tr><tr><th>DE</th><td>{{Ship/Banner|small=true|Hachijou}}{{Ship/Banner|small=true|Sado}}</td></tr><tr><th>DD</th><td>{{Ship/Banner|small=true|Arashi}}{{Ship/Banner|small=true|Hagikaze}}{{Ship/Banner|small=true|Harukaze}}<br>{{Ship/Banner|small=true|Hatakaze}}{{Ship/Banner|small=true|Hatsukaze}}{{Ship/Banner|small=true|Kamikaze}}<br>{{Ship/Banner|small=true|Suzunami}}</td></tr><tr><th>CL</th><td>{{Ship/Banner|small=true|Agano}}{{Ship/Banner|small=true|Noshiro}}</td></tr><tr><th>CV</th><td>{{Ship/Banner|small=true|Saratoga}}</td></tr><tr><th>SS</th><td>{{Ship/Banner|small=true|I-201}}{{Ship/Banner|small=true|I-203}}</td></tr></table>}} | ||
| − | }} | ||
<div class="map-nodes"> | <div class="map-nodes"> | ||
{{Map/Nodes|diff=Easy|A|Select}} | {{Map/Nodes|diff=Easy|A|Select}} | ||
| Line 691: | Line 631: | ||
|B | |B | ||
|Normal | |Normal | ||
| − | |{{TooltipSimple|Echelon| | + | |{{TooltipSimple|Echelon|13% (62/477, HQ: 16-120)}}<br>{{TooltipSimple|Line Abreast|15% (72/477, HQ: 49-120)}}<br>{{TooltipSimple|''Phases: 1''|Samples: 48}} |
|Submarine Ka-Class | |Submarine Ka-Class | ||
|Submarine Ka-Class | |Submarine Ka-Class | ||
| Line 698: | Line 638: | ||
|B | |B | ||
|Normal | |Normal | ||
| − | |{{TooltipSimple|Echelon| | + | |{{TooltipSimple|Echelon|27% (129/477, HQ: 16-120)}}<br>{{TooltipSimple|Line Abreast|25% (118/477, HQ: 14-120)}}<br>{{TooltipSimple|''Phases: 1''|Samples: 109}} |
|Submarine Ka-Class/Elite | |Submarine Ka-Class/Elite | ||
|Submarine Ka-Class | |Submarine Ka-Class | ||
| Line 705: | Line 645: | ||
|B | |B | ||
|Normal | |Normal | ||
| − | |{{TooltipSimple|Echelon|9% ( | + | |{{TooltipSimple|Echelon|9% (42/477, HQ: 60-120)}}<br>{{TooltipSimple|Line Abreast|11% (54/477, HQ: 15-120)}}<br>{{TooltipSimple|''Phases: 1''|Samples: 44}} |
|Submarine Ka-Class/Elite | |Submarine Ka-Class/Elite | ||
|Submarine Ka-Class/Elite | |Submarine Ka-Class/Elite | ||
| Line 713: | Line 653: | ||
|C | |C | ||
|Defense | |Defense | ||
| − | |{{TooltipSimple|Diamond| | + | |{{TooltipSimple|Diamond|10% (40/382, HQ: 14-120)}}<br>{{TooltipSimple|''Phases: 1''|Samples: 20}} |
|Airfield Princess/V | |Airfield Princess/V | ||
|- | |- | ||
|C | |C | ||
|Defense | |Defense | ||
| − | |{{TooltipSimple|Diamond| | + | |{{TooltipSimple|Diamond|27% (103/382, HQ: 16-120)}}<br>{{TooltipSimple|''Phases: 1''|Samples: 51}} |
|Airfield Princess/VI | |Airfield Princess/VI | ||
|- | |- | ||
|C | |C | ||
|Defense | |Defense | ||
| − | |{{TooltipSimple|Diamond|31% ( | + | |{{TooltipSimple|Diamond|31% (119/382, HQ: 25-120)}}<br>{{TooltipSimple|''Phases: 1''|Samples: 57}} |
|Airfield Princess/V | |Airfield Princess/V | ||
|Airfield Princess/V | |Airfield Princess/V | ||
| Line 729: | Line 669: | ||
|C | |C | ||
|Defense | |Defense | ||
| − | |{{TooltipSimple|Diamond| | + | |{{TooltipSimple|Diamond|22% (84/382, HQ: 54-120)}}<br>{{TooltipSimple|''Phases: 1''|Samples: 35}} |
|Airfield Princess/VI | |Airfield Princess/VI | ||
|Airfield Princess/V | |Airfield Princess/V | ||
| Line 735: | Line 675: | ||
|C | |C | ||
|Defense | |Defense | ||
| − | |{{TooltipSimple|Diamond|9% ( | + | |{{TooltipSimple|Diamond|9% (36/382, HQ: 24-120)}}<br>{{TooltipSimple|''Phases: 1''|Samples: 18}} |
|Airfield Princess/VI | |Airfield Princess/VI | ||
|Airfield Princess/VI | |Airfield Princess/VI | ||
| Line 742: | Line 682: | ||
|D | |D | ||
|Normal | |Normal | ||
| − | |{{TooltipSimple|Line Ahead| | + | |{{TooltipSimple|Line Ahead|51% (232/459, HQ: 16-120)}}<br>{{TooltipSimple|Double Line|30% (138/459, HQ: 25-120)}}<br>{{TooltipSimple|Echelon|19% (89/459, HQ: 60-120)}}<br>{{TooltipSimple|''Phases: 1''|Samples: 194}} |
|Heavy Cruiser Ri-Class/Elite | |Heavy Cruiser Ri-Class/Elite | ||
|Heavy Cruiser Ri-Class/Elite | |Heavy Cruiser Ri-Class/Elite | ||
| Line 754: | Line 694: | ||
|F | |F | ||
|Normal | |Normal | ||
| − | |{{TooltipSimple|Echelon|9% ( | + | |{{TooltipSimple|Echelon|9% (1650/18609, HQ: 26-120)}}<br>{{TooltipSimple|Line Abreast|15% (2701/18609, HQ: 24-120)}}<br>{{TooltipSimple|''Phases: 1''|Samples: 1161}} |
|Submarine Ka-Class | |Submarine Ka-Class | ||
|Submarine Ka-Class | |Submarine Ka-Class | ||
| Line 761: | Line 701: | ||
|F | |F | ||
|Normal | |Normal | ||
| − | |{{TooltipSimple|Echelon|24% ( | + | |{{TooltipSimple|Echelon|24% (4526/18609, HQ: 14-120)}}<br>{{TooltipSimple|Line Abreast|25% (4629/18609, HQ: 20-120)}}<br>{{TooltipSimple|''Phases: 1''|Samples: 2771}} |
|Submarine Ka-Class/Elite | |Submarine Ka-Class/Elite | ||
|Submarine Ka-Class | |Submarine Ka-Class | ||
| Line 768: | Line 708: | ||
|F | |F | ||
|Normal | |Normal | ||
| − | |{{TooltipSimple|Echelon|14% ( | + | |{{TooltipSimple|Echelon|14% (2570/18609, HQ: 14-120)}}<br>{{TooltipSimple|Line Abreast|14% (2533/18609, HQ: 3-120)}}<br>{{TooltipSimple|''Phases: 1''|Samples: 1602}} |
|Submarine Ka-Class/Elite | |Submarine Ka-Class/Elite | ||
|Submarine Ka-Class/Elite | |Submarine Ka-Class/Elite | ||
| Line 776: | Line 716: | ||
|G | |G | ||
|Defense | |Defense | ||
| − | |{{TooltipSimple|Diamond|44% ( | + | |{{TooltipSimple|Diamond|44% (1691/3859, HQ: 24-120)}}<br>{{TooltipSimple|''Phases: 1''|Samples: 578}} |
|Light Carrier Nu-Class/Elite II | |Light Carrier Nu-Class/Elite II | ||
|Light Cruiser Tsu-Class | |Light Cruiser Tsu-Class | ||
| Line 786: | Line 726: | ||
|G | |G | ||
|Defense | |Defense | ||
| − | |{{TooltipSimple|Diamond|31% ( | + | |{{TooltipSimple|Diamond|31% (1195/3859, HQ: 24-120)}}<br>{{TooltipSimple|''Phases: 1''|Samples: 450}} |
|Light Carrier Nu-Class/Elite II | |Light Carrier Nu-Class/Elite II | ||
|Light Carrier Nu-Class | |Light Carrier Nu-Class | ||
| Line 796: | Line 736: | ||
|G | |G | ||
|Defense | |Defense | ||
| − | |{{TooltipSimple|Diamond|25% ( | + | |{{TooltipSimple|Diamond|25% (973/3859, HQ: 20-120)}}<br>{{TooltipSimple|''Phases: 1''|Samples: 376}} |
|Light Carrier Nu-Class/Elite II | |Light Carrier Nu-Class/Elite II | ||
|Light Carrier Nu-Class/Elite | |Light Carrier Nu-Class/Elite | ||
| Line 807: | Line 747: | ||
|H | |H | ||
|Defense | |Defense | ||
| − | |{{TooltipSimple|Diamond|27% ( | + | |{{TooltipSimple|Diamond|27% (4147/15332, HQ: 20-120)}}<br>{{TooltipSimple|''Phases: 1''|Samples: 1006}} |
|Light Carrier Nu-Class/Elite II | |Light Carrier Nu-Class/Elite II | ||
|Light Cruiser Tsu-Class | |Light Cruiser Tsu-Class | ||
| Line 817: | Line 757: | ||
|H | |H | ||
|Defense | |Defense | ||
| − | |{{TooltipSimple|Diamond| | + | |{{TooltipSimple|Diamond|33% (4984/15332, HQ: 24-120)}}<br>{{TooltipSimple|''Phases: 1''|Samples: 1446}} |
|Light Carrier Nu-Class/Elite II | |Light Carrier Nu-Class/Elite II | ||
|Light Carrier Nu-Class | |Light Carrier Nu-Class | ||
| Line 827: | Line 767: | ||
|H | |H | ||
|Defense | |Defense | ||
| − | |{{TooltipSimple|Diamond| | + | |{{TooltipSimple|Diamond|40% (6201/15332, HQ: 14-120)}}<br>{{TooltipSimple|''Phases: 1''|Samples: 1819}} |
|Light Carrier Nu-Class/Elite II | |Light Carrier Nu-Class/Elite II | ||
|Light Carrier Nu-Class/Elite | |Light Carrier Nu-Class/Elite | ||
| Line 838: | Line 778: | ||
|I | |I | ||
|Normal | |Normal | ||
| − | |{{TooltipSimple|Diamond|20% ( | + | |{{TooltipSimple|Diamond|20% (862/4277, HQ: 25-120)}}<br>{{TooltipSimple|''Phases: 1''|Samples: 232}} |
|Light Carrier Nu-Class/Elite II | |Light Carrier Nu-Class/Elite II | ||
|Light Cruiser Tsu-Class | |Light Cruiser Tsu-Class | ||
| Line 848: | Line 788: | ||
|I | |I | ||
|Normal | |Normal | ||
| − | |{{TooltipSimple|Diamond|30% ( | + | |{{TooltipSimple|Diamond|30% (1264/4277, HQ: 24-120)}}<br>{{TooltipSimple|''Phases: 1''|Samples: 440}} |
|Light Carrier Nu-Class/Elite II | |Light Carrier Nu-Class/Elite II | ||
|Light Carrier Nu-Class | |Light Carrier Nu-Class | ||
| Line 858: | Line 798: | ||
|I | |I | ||
|Normal | |Normal | ||
| − | |{{TooltipSimple|Diamond|50% ( | + | |{{TooltipSimple|Diamond|50% (2151/4277, HQ: 20-120)}}<br>{{TooltipSimple|''Phases: 1''|Samples: 681}} |
|Light Carrier Nu-Class/Elite II | |Light Carrier Nu-Class/Elite II | ||
|Light Carrier Nu-Class/Elite | |Light Carrier Nu-Class/Elite | ||
| Line 869: | Line 809: | ||
|J | |J | ||
|Normal | |Normal | ||
| − | |{{TooltipSimple|Line Ahead|56% ( | + | |{{TooltipSimple|Line Ahead|56% (7298/13099, HQ: 14-120)}}<br>{{TooltipSimple|Double Line|27% (3513/13099, HQ: 25-120)}}<br>{{TooltipSimple|Echelon|17% (2288/13099, HQ: 26-120)}}<br>{{TooltipSimple|''Phases: 1''|Samples: 3791}} |
|Destroyer I-Class/Late Model Elite | |Destroyer I-Class/Late Model Elite | ||
|Destroyer I-Class/Late Model | |Destroyer I-Class/Late Model | ||
| Line 881: | Line 821: | ||
|L | |L | ||
|Normal | |Normal | ||
| − | |{{TooltipSimple|Echelon| | + | |{{TooltipSimple|Echelon|8% (545/6446, HQ: 26-120)}}<br>{{TooltipSimple|Line Abreast|9% (581/6446, HQ: 45-120)}}<br>{{TooltipSimple|''Phases: 1''|Samples: 418}} |
|Submarine Ka-Class/Elite | |Submarine Ka-Class/Elite | ||
|Submarine Ka-Class | |Submarine Ka-Class | ||
| Line 888: | Line 828: | ||
|L | |L | ||
|Normal | |Normal | ||
| − | |{{TooltipSimple|Echelon|25% ( | + | |{{TooltipSimple|Echelon|25% (1607/6446, HQ: 26-120)}}<br>{{TooltipSimple|Line Abreast|24% (1553/6446, HQ: 25-120)}}<br>{{TooltipSimple|''Phases: 1''|Samples: 1188}} |
|Submarine Ka-Class/Elite | |Submarine Ka-Class/Elite | ||
|Submarine Ka-Class/Elite | |Submarine Ka-Class/Elite | ||
| Line 895: | Line 835: | ||
|L | |L | ||
|Normal | |Normal | ||
| − | |{{TooltipSimple|Echelon|17% ( | + | |{{TooltipSimple|Echelon|17% (1115/6446, HQ: 30-120)}}<br>{{TooltipSimple|Line Abreast|16% (1045/6446, HQ: 27-120)}}<br>{{TooltipSimple|''Phases: 1''|Samples: 900}} |
|Submarine Ka-Class/Elite | |Submarine Ka-Class/Elite | ||
|Submarine Ka-Class/Elite | |Submarine Ka-Class/Elite | ||
| Line 904: | Line 844: | ||
|N | |N | ||
|Defense | |Defense | ||
| − | |{{TooltipSimple|Diamond|17% ( | + | |{{TooltipSimple|Diamond|17% (1763/10276, HQ: 29-120)}}<br>{{TooltipSimple|''Phases: 1''|Samples: 498}} |
|Airfield Princess/V | |Airfield Princess/V | ||
|- | |- | ||
|N | |N | ||
|Defense | |Defense | ||
| − | |{{TooltipSimple|Diamond|17% ( | + | |{{TooltipSimple|Diamond|17% (1795/10276, HQ: 27-120)}}<br>{{TooltipSimple|''Phases: 1''|Samples: 498}} |
|Airfield Princess/VI | |Airfield Princess/VI | ||
|- | |- | ||
|N | |N | ||
|Defense | |Defense | ||
| − | |{{TooltipSimple|Diamond| | + | |{{TooltipSimple|Diamond|18% (1800/10276, HQ: 27-120)}}<br>{{TooltipSimple|''Phases: 1''|Samples: 454}} |
|Airfield Princess/V | |Airfield Princess/V | ||
|Airfield Princess/V | |Airfield Princess/V | ||
| Line 920: | Line 860: | ||
|N | |N | ||
|Defense | |Defense | ||
| − | |{{TooltipSimple|Diamond|24% ( | + | |{{TooltipSimple|Diamond|24% (2451/10276, HQ: 30-120)}}<br>{{TooltipSimple|''Phases: 1''|Samples: 713}} |
|Airfield Princess/VI | |Airfield Princess/VI | ||
|Airfield Princess/V | |Airfield Princess/V | ||
| Line 926: | Line 866: | ||
|N | |N | ||
|Defense | |Defense | ||
| − | |{{TooltipSimple|Diamond|24% ( | + | |{{TooltipSimple|Diamond|24% (2467/10276, HQ: 31-120)}}<br>{{TooltipSimple|''Phases: 1''|Samples: 673}} |
|Airfield Princess/VI | |Airfield Princess/VI | ||
|Airfield Princess/VI | |Airfield Princess/VI | ||
| Line 933: | Line 873: | ||
|O | |O | ||
|Normal | |Normal | ||
| − | |{{TooltipSimple|Line Ahead|32% ( | + | |{{TooltipSimple|Line Ahead|32% (3402/10561, HQ: 29-120)}}<br>{{TooltipSimple|Vanguard|35% (3715/10561, HQ: 27-120)}}<br>{{TooltipSimple|''Phases: 1''|Samples: 1963}} |
|Light Cruiser Ho-Class/Elite | |Light Cruiser Ho-Class/Elite | ||
|Torpedo Cruiser Chi-Class/Elite | |Torpedo Cruiser Chi-Class/Elite | ||
| Line 943: | Line 883: | ||
|O | |O | ||
|Normal | |Normal | ||
| − | |{{TooltipSimple|Line Ahead|33% ( | + | |{{TooltipSimple|Line Ahead|33% (3444/10561, HQ: 27-120)}}<br>{{TooltipSimple|''Phases: 1''|Samples: 905}} |
|Light Cruiser Ho-Class/Elite | |Light Cruiser Ho-Class/Elite | ||
|Torpedo Cruiser Chi-Class/Elite | |Torpedo Cruiser Chi-Class/Elite | ||
| Line 956: | Line 896: | ||
|R | |R | ||
|Boss | |Boss | ||
| − | |{{TooltipSimple|Line Ahead|47% ( | + | |{{TooltipSimple|Line Ahead|47% (4690/9981, HQ: 27-120)}}<br>{{TooltipSimple|''Phases: 1''|Samples: 1224}} |
|Heavy Cruiser Princess | |Heavy Cruiser Princess | ||
|Light Cruiser Tsu-Class | |Light Cruiser Tsu-Class | ||
| Line 966: | Line 906: | ||
|R | |R | ||
|Boss | |Boss | ||
| − | |{{TooltipSimple|Line Ahead|40% ( | + | |{{TooltipSimple|Line Ahead|40% (4006/9981, HQ: 27-120)}}<br>{{TooltipSimple|''Phases: 1''|Samples: 994}} |
|Heavy Cruiser Princess | |Heavy Cruiser Princess | ||
|Light Carrier Nu-Class/Elite II | |Light Carrier Nu-Class/Elite II | ||
| Line 976: | Line 916: | ||
|R | |R | ||
|Boss/Final | |Boss/Final | ||
| − | |{{TooltipSimple|Line Ahead|13% ( | + | |{{TooltipSimple|Line Ahead|13% (1285/9981, HQ: 50-120)}}<br>{{TooltipSimple|''Phases: 1''|Samples: 458}} |
|Heavy Cruiser Princess/IV | |Heavy Cruiser Princess/IV | ||
|Light Carrier Nu-Class/Elite II | |Light Carrier Nu-Class/Elite II | ||
| Line 986: | Line 926: | ||
</div> | </div> | ||
|-|Casual= | |-|Casual= | ||
| − | {{Map/Image|page=Spring 2022 Event/E-1| | + | {{Map/Image|page=Spring 2022 Event/E-1|{{Map/ImageNode|1|Casual|E-1|x=89|y=94}}{{Map/ImageNode|A|Casual|E-1|x=217|y=154}}{{Map/ImageNode|B|Casual|E-1|x=195|y=202}}{{Map/ImageNode|C|Casual|E-1|x=172|y=253}}{{Map/ImageNode|D|Casual|E-1|x=225|y=270|drops=<table class="wikitable"><tr><th>Type</th><th>Ships</th></tr><tr><th>DD</th><td>{{Ship/Banner|small=true|Maikaze}}{{Ship/Banner|small=true|Minazuki}}{{Ship/Banner|small=true|Minegumo}}<br>{{Ship/Banner|small=true|Uranami}}</td></tr></table>}}{{Map/ImageNode|E|Casual|E-1|x=285|y=289}}{{Map/ImageNode|F|Casual|E-1|x=298|y=151}}{{Map/ImageNode|G|Casual|E-1|x=363|y=131}}{{Map/ImageNode|H|Casual|E-1|x=370|y=183}}{{Map/ImageNode|I|Casual|E-1|x=413|y=114|drops=<table class="wikitable"><tr><th>Type</th><th>Ships</th></tr><tr><th>DD</th><td>{{Ship/Banner|small=true|Akizuki}}{{Ship/Banner|small=true|Asagumo}}{{Ship/Banner|small=true|Asakaze}}<br>{{Ship/Banner|small=true|Hatsukaze}}{{Ship/Banner|small=true|Maikaze}}{{Ship/Banner|small=true|Matsukaze}}<br>{{Ship/Banner|small=true|Minazuki}}{{Ship/Banner|small=true|Minegumo}}{{Ship/Banner|small=true|Uranami}}<br>{{Ship/Banner|small=true|Uzuki}}</td></tr><tr><th>SS</th><td>{{Ship/Banner|small=true|I-47}}</td></tr></table>}}{{Map/ImageNode|J|Casual|E-1|x=422|y=205|drops=<table class="wikitable"><tr><th>Type</th><th>Ships</th></tr><tr><th>DD</th><td>{{Ship/Banner|small=true|Minazuki}}{{Ship/Banner|small=true|Uzuki}}</td></tr></table>}}{{Map/ImageNode|K|Casual|E-1|x=459|y=99}}{{Map/ImageNode|L|Casual|E-1|x=503|y=191}}{{Map/ImageNode|M|Casual|E-1|x=566|y=215}}{{Map/ImageNode|N|Casual|E-1|x=478|y=251}}{{Map/ImageNode|O|Casual|E-1|x=412|y=251|drops=<table class="wikitable"><tr><th>Type</th><th>Ships</th></tr><tr><th>DD</th><td>{{Ship/Banner|small=true|Asagumo}}{{Ship/Banner|small=true|Maikaze}}{{Ship/Banner|small=true|Minazuki}}<br>{{Ship/Banner|small=true|Minegumo}}{{Ship/Banner|small=true|Uranami}}{{Ship/Banner|small=true|Uzuki}}<br></td></tr></table>}}{{Map/ImageNode|P|Casual|E-1|x=401|y=303}}{{Map/ImageNode|Q|Casual|E-1|x=361|y=251}}{{Map/ImageNode|R|Casual|E-1|x=313|y=228|drops=<table class="wikitable"><tr><th>Type</th><th>Ships</th></tr><tr><th>DE</th><td>{{Ship/Banner|small=true|Hachijou}}{{Ship/Banner|small=true|Sado}}</td></tr><tr><th>DD</th><td>{{Ship/Banner|small=true|Arashi}}{{Ship/Banner|small=true|Hagikaze}}{{Ship/Banner|small=true|Harukaze}}<br>{{Ship/Banner|small=true|Hatakaze}}{{Ship/Banner|small=true|Hatsukaze}}{{Ship/Banner|small=true|Kamikaze}}<br>{{Ship/Banner|small=true|Suzunami}}</td></tr><tr><th>CL</th><td>{{Ship/Banner|small=true|Agano}}{{Ship/Banner|small=true|Noshiro}}</td></tr><tr><th>SS</th><td>{{Ship/Banner|small=true|I-201}}{{Ship/Banner|small=true|I-203}}</td></tr></table>}}}} |
| − | {{Map/ImageNode|1|Casual|E-1|x=89|y=94}} | ||
| − | {{Map/ImageNode|A|Casual|E-1|x=217|y=154}} | ||
| − | {{Map/ImageNode|B|Casual|E-1|x=195|y=202}} | ||
| − | {{Map/ImageNode|C|Casual|E-1|x=172|y=253}} | ||
| − | {{Map/ImageNode|D|Casual|E-1|x=225|y=270|drops=<table class="wikitable"><tr><th>Type</th><th>Ships</th></tr><tr><th>DD</th><td>{{Ship/Banner|small=true|Maikaze}}{{Ship/Banner|small=true|Minazuki}}{{Ship/Banner|small=true|Minegumo}}<br>{{Ship/Banner|small=true|Uranami}}</td></tr></table>}} | ||
| − | {{Map/ImageNode|E|Casual|E-1|x=285|y=289}} | ||
| − | {{Map/ImageNode|F|Casual|E-1|x=298|y=151}} | ||
| − | {{Map/ImageNode|G|Casual|E-1|x=363|y=131}} | ||
| − | {{Map/ImageNode|H|Casual|E-1|x=370|y=183}} | ||
| − | {{Map/ImageNode|I|Casual|E-1|x=413|y=114|drops=<table class="wikitable"><tr><th>Type</th><th>Ships</th></tr><tr><th>DD</th><td>{{Ship/Banner|small=true|Akizuki}}{{Ship/Banner|small=true|Asagumo}}{{Ship/Banner|small=true|Asakaze}}<br>{{Ship/Banner|small=true|Hatsukaze}}{{Ship/Banner|small=true| | ||
| − | {{Map/ImageNode|J|Casual|E-1|x=422|y=205|drops=<table class="wikitable"><tr><th>Type</th><th>Ships</th></tr><tr><th>DD</th><td>{{Ship/Banner|small=true|Minazuki}}{{Ship/Banner|small=true|Uzuki}}</td></tr></table>}} | ||
| − | {{Map/ImageNode|K|Casual|E-1|x=459|y=99}} | ||
| − | {{Map/ImageNode|L|Casual|E-1|x=503|y=191}} | ||
| − | {{Map/ImageNode|M|Casual|E-1|x=566|y=215}} | ||
| − | {{Map/ImageNode|N|Casual|E-1|x=478|y=251}} | ||
| − | {{Map/ImageNode|O|Casual|E-1|x=412|y=251|drops=<table class="wikitable"><tr><th>Type</th><th>Ships</th></tr><tr><th>DD</th><td>{{Ship/Banner|small=true|Asagumo}}{{Ship/Banner|small=true|Maikaze}}{{Ship/Banner|small=true|Minazuki}}<br>{{Ship/Banner|small=true|Minegumo}}{{Ship/Banner|small=true|Uranami}}{{Ship/Banner|small=true|Uzuki}}<br></td></tr></table>}} | ||
| − | {{Map/ImageNode|P|Casual|E-1|x=401|y=303}} | ||
| − | {{Map/ImageNode|Q|Casual|E-1|x=361|y=251}} | ||
| − | {{Map/ImageNode|R|Casual|E-1|x=313|y=228|drops=<table class="wikitable"><tr><th>Type</th><th>Ships</th></tr><tr><th>DE</th><td>{{Ship/Banner|small=true|Hachijou}}{{Ship/Banner|small=true|Sado}}</td></tr><tr><th>DD</th><td>{{Ship/Banner|small=true|Arashi}}{{Ship/Banner|small=true|Hagikaze}}{{Ship/Banner|small=true|Harukaze}}<br>{{Ship/Banner|small=true|Hatakaze}}{{Ship/Banner|small=true|Hatsukaze}}{{Ship/Banner|small=true|Kamikaze}}<br>{{Ship/Banner|small=true|Suzunami}}</td></tr><tr><th>CL</th><td>{{Ship/Banner|small=true|Agano}}{{Ship/Banner|small=true|Noshiro}}</td></tr><tr><th>SS</th><td>{{Ship/Banner|small=true|I-201}}{{Ship/Banner|small=true|I-203}}</td></tr></table>}} | ||
| − | }} | ||
<div class="map-nodes"> | <div class="map-nodes"> | ||
{{Map/Nodes|diff=Casual|A|Select}} | {{Map/Nodes|diff=Casual|A|Select}} | ||
| Line 1,012: | Line 932: | ||
|B | |B | ||
|Normal | |Normal | ||
| − | |{{TooltipSimple|Echelon| | + | |{{TooltipSimple|Echelon|29% (69/239, HQ: 15-120)}}<br>{{TooltipSimple|Line Abreast|33% (79/239, HQ: 3-120)}}<br>{{TooltipSimple|''Phases: 1''|Samples: 55}} |
|Submarine Ka-Class | |Submarine Ka-Class | ||
|Submarine Ka-Class | |Submarine Ka-Class | ||
| Line 1,019: | Line 939: | ||
|B | |B | ||
|Normal | |Normal | ||
| − | |{{TooltipSimple|Echelon| | + | |{{TooltipSimple|Echelon|19% (45/239, HQ: 23-120)}}<br>{{TooltipSimple|Line Abreast|19% (46/239, HQ: 8-120)}}<br>{{TooltipSimple|''Phases: 1''|Samples: 39}} |
|Submarine Ka-Class/Elite | |Submarine Ka-Class/Elite | ||
|Submarine Ka-Class | |Submarine Ka-Class | ||
| Line 1,027: | Line 947: | ||
|C | |C | ||
|Defense | |Defense | ||
| − | |{{TooltipSimple|Diamond| | + | |{{TooltipSimple|Diamond|38% (62/163, HQ: 9-120)}}<br>{{TooltipSimple|''Phases: 1''|Samples: 27}} |
|Airfield Princess/V | |Airfield Princess/V | ||
|- | |- | ||
|C | |C | ||
|Defense | |Defense | ||
| − | |{{TooltipSimple|Diamond| | + | |{{TooltipSimple|Diamond|35% (57/163, HQ: 15-120)}}<br>{{TooltipSimple|''Phases: 1''|Samples: 27}} |
|Airfield Princess/VI | |Airfield Princess/VI | ||
|- | |- | ||
|C | |C | ||
|Defense | |Defense | ||
| − | |{{TooltipSimple|Diamond| | + | |{{TooltipSimple|Diamond|27% (44/163, HQ: 16-120)}}<br>{{TooltipSimple|''Phases: 1''|Samples: 12}} |
|Airfield Princess/V | |Airfield Princess/V | ||
|Airfield Princess/V | |Airfield Princess/V | ||
| Line 1,044: | Line 964: | ||
|D | |D | ||
|Normal | |Normal | ||
| − | |{{TooltipSimple|Line Ahead| | + | |{{TooltipSimple|Line Ahead|48% (100/209, HQ: 3-120)}}<br>{{TooltipSimple|Double Line|27% (56/209, HQ: 23-120)}}<br>{{TooltipSimple|Echelon|25% (53/209, HQ: 8-120)}}<br>{{TooltipSimple|''Phases: 1''|Samples: 84}} |
|Heavy Cruiser Ri-Class/Elite | |Heavy Cruiser Ri-Class/Elite | ||
|Heavy Cruiser Ri-Class | |Heavy Cruiser Ri-Class | ||
| Line 1,055: | Line 975: | ||
|F | |F | ||
|Normal | |Normal | ||
| − | |{{TooltipSimple|Echelon|29% ( | + | |{{TooltipSimple|Echelon|29% (1398/4743, HQ: 12-120)}}<br>{{TooltipSimple|Line Abreast|31% (1455/4743, HQ: 8-120)}}<br>{{TooltipSimple|''Phases: 1''|Samples: 805}} |
|Submarine Ka-Class | |Submarine Ka-Class | ||
|Submarine Ka-Class | |Submarine Ka-Class | ||
| Line 1,062: | Line 982: | ||
|F | |F | ||
|Normal | |Normal | ||
| − | |{{TooltipSimple|Echelon|20% ( | + | |{{TooltipSimple|Echelon|20% (949/4743, HQ: 17-120)}}<br>{{TooltipSimple|Line Abreast|20% (941/4743, HQ: 7-120)}}<br>{{TooltipSimple|''Phases: 1''|Samples: 531}} |
|Submarine Ka-Class/Elite | |Submarine Ka-Class/Elite | ||
|Submarine Ka-Class | |Submarine Ka-Class | ||
| Line 1,070: | Line 990: | ||
|G | |G | ||
|Defense | |Defense | ||
| − | |{{TooltipSimple|Diamond| | + | |{{TooltipSimple|Diamond|41% (251/609, HQ: 19-120)}}<br>{{TooltipSimple|''Phases: 1''|Samples: 79}} |
|Light Carrier Nu-Class/Elite | |Light Carrier Nu-Class/Elite | ||
|Destroyer I-Class/Late Model | |Destroyer I-Class/Late Model | ||
| Line 1,079: | Line 999: | ||
|G | |G | ||
|Defense | |Defense | ||
| − | |{{TooltipSimple|Diamond| | + | |{{TooltipSimple|Diamond|32% (196/609, HQ: 10-120)}}<br>{{TooltipSimple|''Phases: 1''|Samples: 81}} |
|Light Carrier Nu-Class/Elite | |Light Carrier Nu-Class/Elite | ||
|Light Carrier Nu-Class | |Light Carrier Nu-Class | ||
| Line 1,088: | Line 1,008: | ||
|G | |G | ||
|Defense | |Defense | ||
| − | |{{TooltipSimple|Diamond| | + | |{{TooltipSimple|Diamond|27% (162/609, HQ: 12-120)}}<br>{{TooltipSimple|''Phases: 1''|Samples: 60}} |
|Light Carrier Nu-Class/Elite II | |Light Carrier Nu-Class/Elite II | ||
|Light Carrier Nu-Class | |Light Carrier Nu-Class | ||
| Line 1,098: | Line 1,018: | ||
|H | |H | ||
|Defense | |Defense | ||
| − | |{{TooltipSimple|Diamond| | + | |{{TooltipSimple|Diamond|27% (1193/4438, HQ: 12-120)}}<br>{{TooltipSimple|''Phases: 1''|Samples: 281}} |
|Light Carrier Nu-Class/Elite | |Light Carrier Nu-Class/Elite | ||
|Destroyer I-Class/Late Model | |Destroyer I-Class/Late Model | ||
| Line 1,107: | Line 1,027: | ||
|H | |H | ||
|Defense | |Defense | ||
| − | |{{TooltipSimple|Diamond|31% ( | + | |{{TooltipSimple|Diamond|31% (1371/4438, HQ: 17-120)}}<br>{{TooltipSimple|''Phases: 1''|Samples: 378}} |
|Light Carrier Nu-Class/Elite | |Light Carrier Nu-Class/Elite | ||
|Light Carrier Nu-Class | |Light Carrier Nu-Class | ||
| Line 1,116: | Line 1,036: | ||
|H | |H | ||
|Defense | |Defense | ||
| − | |{{TooltipSimple|Diamond| | + | |{{TooltipSimple|Diamond|42% (1874/4438, HQ: 8-120)}}<br>{{TooltipSimple|''Phases: 1''|Samples: 544}} |
|Light Carrier Nu-Class/Elite II | |Light Carrier Nu-Class/Elite II | ||
|Light Carrier Nu-Class | |Light Carrier Nu-Class | ||
| Line 1,126: | Line 1,046: | ||
|I | |I | ||
|Normal | |Normal | ||
| − | |{{TooltipSimple|Diamond|17% ( | + | |{{TooltipSimple|Diamond|17% (91/543, HQ: 20-120)}}<br>{{TooltipSimple|''Phases: 1''|Samples: 29}} |
|Light Carrier Nu-Class/Elite | |Light Carrier Nu-Class/Elite | ||
|Destroyer I-Class/Late Model | |Destroyer I-Class/Late Model | ||
| Line 1,135: | Line 1,055: | ||
|I | |I | ||
|Normal | |Normal | ||
| − | |{{TooltipSimple|Diamond| | + | |{{TooltipSimple|Diamond|35% (188/543, HQ: 10-120)}}<br>{{TooltipSimple|''Phases: 1''|Samples: 44}} |
|Light Carrier Nu-Class/Elite | |Light Carrier Nu-Class/Elite | ||
|Light Carrier Nu-Class | |Light Carrier Nu-Class | ||
| Line 1,144: | Line 1,064: | ||
|I | |I | ||
|Normal | |Normal | ||
| − | |{{TooltipSimple|Diamond|49% ( | + | |{{TooltipSimple|Diamond|49% (264/543, HQ: 10-120)}}<br>{{TooltipSimple|''Phases: 1''|Samples: 96}} |
|Light Carrier Nu-Class/Elite II | |Light Carrier Nu-Class/Elite II | ||
|Light Carrier Nu-Class | |Light Carrier Nu-Class | ||
| Line 1,154: | Line 1,074: | ||
|J | |J | ||
|Normal | |Normal | ||
| − | |{{TooltipSimple|Line Ahead| | + | |{{TooltipSimple|Line Ahead|57% (2192/3873, HQ: 17-120)}}<br>{{TooltipSimple|Double Line|26% (1002/3873, HQ: 8-120)}}<br>{{TooltipSimple|Echelon|18% (679/3873, HQ: 12-120)}}<br>{{TooltipSimple|''Phases: 1''|Samples: 1041}} |
|Destroyer I-Class/Late Model | |Destroyer I-Class/Late Model | ||
|Destroyer I-Class/Late Model | |Destroyer I-Class/Late Model | ||
| Line 1,165: | Line 1,085: | ||
|L | |L | ||
|Normal | |Normal | ||
| − | |{{TooltipSimple|Echelon| | + | |{{TooltipSimple|Echelon|28% (583/2055, HQ: 19-120)}}<br>{{TooltipSimple|Line Abreast|32% (657/2055, HQ: 18-120)}}<br>{{TooltipSimple|''Phases: 1''|Samples: 327}} |
|Submarine Ka-Class/Elite | |Submarine Ka-Class/Elite | ||
|Submarine Ka-Class | |Submarine Ka-Class | ||
| Line 1,172: | Line 1,092: | ||
|L | |L | ||
|Normal | |Normal | ||
| − | |{{TooltipSimple|Echelon| | + | |{{TooltipSimple|Echelon|19% (397/2055, HQ: 37-120)}}<br>{{TooltipSimple|Line Abreast|20% (418/2055, HQ: 18-120)}}<br>{{TooltipSimple|''Phases: 1''|Samples: 224}} |
|Submarine Ka-Class/Elite | |Submarine Ka-Class/Elite | ||
|Submarine Ka-Class/Elite | |Submarine Ka-Class/Elite | ||
| Line 1,181: | Line 1,101: | ||
|N | |N | ||
|Defense | |Defense | ||
| − | |{{TooltipSimple|Diamond|25% ( | + | |{{TooltipSimple|Diamond|25% (679/2723, HQ: 19-120)}}<br>{{TooltipSimple|''Phases: 1''|Samples: 119}} |
|Airfield Princess/V | |Airfield Princess/V | ||
|- | |- | ||
|N | |N | ||
|Defense | |Defense | ||
| − | |{{TooltipSimple|Diamond| | + | |{{TooltipSimple|Diamond|41% (1121/2723, HQ: 31-120)}}<br>{{TooltipSimple|''Phases: 1''|Samples: 228}} |
|Airfield Princess/VI | |Airfield Princess/VI | ||
|- | |- | ||
|N | |N | ||
|Defense | |Defense | ||
| − | |{{TooltipSimple|Diamond|34% ( | + | |{{TooltipSimple|Diamond|34% (923/2723, HQ: 26-120)}}<br>{{TooltipSimple|''Phases: 1''|Samples: 175}} |
|Airfield Princess/V | |Airfield Princess/V | ||
|Airfield Princess/V | |Airfield Princess/V | ||
| Line 1,198: | Line 1,118: | ||
|O | |O | ||
|Normal | |Normal | ||
| − | |{{TooltipSimple|Line Ahead| | + | |{{TooltipSimple|Line Ahead|32% (939/2896, HQ: 32-120)}}<br>{{TooltipSimple|Vanguard|35% (1017/2896, HQ: 33-120)}}<br>{{TooltipSimple|''Phases: 1''|Samples: 499}} |
|Light Cruiser Ho-Class/Elite | |Light Cruiser Ho-Class/Elite | ||
|Torpedo Cruiser Chi-Class | |Torpedo Cruiser Chi-Class | ||
| Line 1,207: | Line 1,127: | ||
|O | |O | ||
|Normal | |Normal | ||
| − | |{{TooltipSimple|Line Ahead| | + | |{{TooltipSimple|Line Ahead|32% (940/2896, HQ: 33-120)}}<br>{{TooltipSimple|''Phases: 1''|Samples: 238}} |
|Light Cruiser Ho-Class/Elite | |Light Cruiser Ho-Class/Elite | ||
|Torpedo Cruiser Chi-Class | |Torpedo Cruiser Chi-Class | ||
| Line 1,220: | Line 1,140: | ||
|R | |R | ||
|Boss | |Boss | ||
| − | |{{TooltipSimple|Line Ahead| | + | |{{TooltipSimple|Line Ahead|49% (1380/2831, HQ: 33-120)}}<br>{{TooltipSimple|''Phases: 1''|Samples: 330}} |
|Heavy Cruiser Princess | |Heavy Cruiser Princess | ||
|Destroyer I-Class/Late Model | |Destroyer I-Class/Late Model | ||
| Line 1,229: | Line 1,149: | ||
|R | |R | ||
|Boss | |Boss | ||
| − | |{{TooltipSimple|Line Ahead|37% ( | + | |{{TooltipSimple|Line Ahead|37% (1057/2831, HQ: 33-120)}}<br>{{TooltipSimple|''Phases: 1''|Samples: 234}} |
|Heavy Cruiser Princess | |Heavy Cruiser Princess | ||
|Light Carrier Nu-Class/Elite | |Light Carrier Nu-Class/Elite | ||
| Line 1,238: | Line 1,158: | ||
|R | |R | ||
|Boss/Final | |Boss/Final | ||
| − | |{{TooltipSimple|Line Ahead| | + | |{{TooltipSimple|Line Ahead|14% (394/2831, HQ: 32-120)}}<br>{{TooltipSimple|''Phases: 1''|Samples: 145}} |
|Heavy Cruiser Princess/IV | |Heavy Cruiser Princess/IV | ||
|Light Carrier Nu-Class/Elite | |Light Carrier Nu-Class/Elite | ||
Latest revision as of 13:37, 8 July 2022
E-1 Hard A
| # | Selection Node | ||
|---|---|---|---|
| A | 艦隊の針路を選択できます。提督、どちらの針路をとられますか? You can decide the fleet's course. Admiral, which heading should we take? | ||
| # | Selection Node | ||
E-1 Hard B: 深海潜水艦隊 偵察哨戒B線 (PoiDB)
| # | Formation | Normal Battle Node | AD/AP AS/AS+ |
|---|---|---|---|
| B | Echelon Line Abreast Phases: 1 |
0/0 0/0 | |
| Echelon Line Abreast Phases: 1 |
0/0 0/0 | ||
| Echelon Line Abreast Phases: 1 |
0/0 0/0 | ||
| # | Formation | Normal Battle Node | AD/AP AS/AS+ |
E-1 Hard C: 深海基地航空隊 (PoiDB)
| # | Formation | Air Defense Node | AD/AP AS/AS+ |
|---|---|---|---|
| C | Diamond Phases: 1 |
39/78 174/348 | |
| Diamond Phases: 1 |
44/87 195/390 | ||
| Diamond Phases: 1 |
51/101 225/450 | ||
| Diamond Phases: 1 |
57/114 255/510 | ||
| # | Formation | Air Defense Node | AD/AP AS/AS+ |
E-1 Hard D: 深海任務部隊 巡洋艦戦隊 (PoiDB)
| # | Formation | Normal Battle Node | AD/AP AS/AS+ |
|---|---|---|---|
| D | Line Ahead Double Line Echelon Phases: 1 |
0/0 0/0 | |
| # | Formation | Normal Battle Node | AD/AP AS/AS+ |
E-1 Hard E
| # | Empty Node | ||
|---|---|---|---|
| E | 気のせいだった。 ラバウル外郭西部、哨戒完了! Must be my imagination. Western part of outer Rabaul, patrol complete! | ||
| # | Empty Node | ||
E-1 Hard F: 深海潜水艦隊 偵察哨戒A線 (PoiDB)
| # | Formation | Normal Battle Node | AD/AP AS/AS+ |
|---|---|---|---|
| F | Echelon Line Abreast Phases: 1 |
0/0 0/0 | |
| Echelon Line Abreast Phases: 1 |
0/0 0/0 | ||
| Echelon Line Abreast Phases: 1 |
0/0 0/0 | ||
| # | Formation | Normal Battle Node | AD/AP AS/AS+ |
E-1 Hard G: 深海任務部隊 空母艦載機群 (PoiDB)
| # | Formation | Air Defense Node | AD/AP AS/AS+ |
|---|---|---|---|
| G | Diamond Phases: 1 |
47/93 207/414 | |
| Diamond Phases: 1 |
49/98 219/438 | ||
| Diamond Phases: 1 |
52/103 231/462 | ||
| # | Formation | Air Defense Node | AD/AP AS/AS+ |
E-1 Hard H: 深海任務部隊 空母艦載機群 (PoiDB)
| # | Formation | Air Defense Node | AD/AP AS/AS+ |
|---|---|---|---|
| H | Diamond Phases: 1 |
47/93 207/414 | |
| Diamond Phases: 1 |
49/98 219/438 | ||
| Diamond Phases: 1 |
52/103 231/462 | ||
| # | Formation | Air Defense Node | AD/AP AS/AS+ |
E-1 Hard I: 深海任務部隊 先遣機動部隊 (PoiDB)
| # | Formation | Normal Battle Node | AD/AP AS/AS+ |
|---|---|---|---|
| I | Diamond Phases: 1 |
47/93 207/414 | |
| Diamond Phases: 1 |
49/98 219/438 | ||
| Diamond Phases: 1 |
52/103 231/462 | ||
| # | Formation | Normal Battle Node | AD/AP AS/AS+ |
E-1 Hard J: 深海任務部隊 哨戒駆逐隊 (PoiDB)
| # | Formation | Normal Battle Node | AD/AP AS/AS+ |
|---|---|---|---|
| J | Line Ahead Double Line Echelon Phases: 1 |
0/0 0/0 | |
| # | Formation | Normal Battle Node | AD/AP AS/AS+ |
E-1 Hard K
| # | Empty Node | ||
|---|---|---|---|
| K | 気のせいだった。 ラバウル外郭北部、哨戒完了! Must be my imagination. Northern part of outer Rabaul, patrol complete! | ||
| # | Empty Node | ||
E-1 Hard L: 深海潜水艦隊 増援阻止哨戒線 (PoiDB)
| # | Formation | Normal Battle Node | AD/AP AS/AS+ |
|---|---|---|---|
| L | Echelon Line Abreast Phases: 1 |
0/0 0/0 | |
| Echelon Line Abreast Phases: 1 |
0/0 0/0 | ||
| Echelon Line Abreast Phases: 1 |
0/0 0/0 | ||
| # | Formation | Normal Battle Node | AD/AP AS/AS+ |
E-1 Hard M
| # | Resource Node | ||
|---|---|---|---|
| # | Resource Node | ||
E-1 Hard N: 深海基地航空隊 (PoiDB)
| # | Formation | Air Defense Node | AD/AP AS/AS+ |
|---|---|---|---|
| N | Diamond Phases: 1 |
39/78 174/348 | |
| Diamond Phases: 1 |
44/87 195/390 | ||
| Diamond Phases: 1 |
51/101 225/450 | ||
| Diamond Phases: 1 |
57/114 255/510 | ||
| Diamond Phases: 1 |
62/123 276/552 | ||
| Diamond Phases: 1 |
69/137 306/612 | ||
| # | Formation | Air Defense Node | AD/AP AS/AS+ |
E-1 Hard O: 深海任務部隊 突撃水雷戦隊 (PoiDB)
| # | Formation | Normal Battle Node | AD/AP AS/AS+ |
|---|---|---|---|
| O | Line Ahead Vanguard Phases: 1 |
0/0 0/0 | |
| Line Ahead Phases: 1 |
0/0 0/0 | ||
| # | Formation | Normal Battle Node | AD/AP AS/AS+ |
E-1 Hard P
| # | Empty Node | ||
|---|---|---|---|
| P | 敵影を見ず。 No enemy spotted. | ||
| # | Empty Node | ||
E-1 Hard Q
| # | Empty Node | ||
|---|---|---|---|
| Q | 気のせいだった。 R方面防備部隊、敵艦隊を発見せり!合戦用意!全艦、突撃せよッ! Must be my imagination. R-Area Defence Force, enemy fleet in sight! Prepare for battle! All ships, charge! | ||
| # | Empty Node | ||
E-1 Hard R: 深海任務部隊 増援阻止群旗艦 (PoiDB)
| # | Formation | Boss Battle Node | AD/AP AS/AS+ |
|---|---|---|---|
| R | Line Ahead Phases: 1 |
0/0 0/0 | |
| Line Ahead Phases: 1 |
26/52 116/231 | ||
| Line Ahead Phases: 1 (Final)
|
36/72 161/321 | ||
| # | Formation | Boss Battle Node | AD/AP AS/AS+ |
E-1 Medium A
| # | Selection Node | ||
|---|---|---|---|
| A | 艦隊の針路を選択できます。提督、どちらの針路をとられますか? You can decide the fleet's course. Admiral, which heading should we take? | ||
| # | Selection Node | ||
E-1 Medium B: 深海潜水艦隊 偵察哨戒B線 (PoiDB)
| # | Formation | Normal Battle Node | AD/AP AS/AS+ |
|---|---|---|---|
| B | Echelon Line Abreast Phases: 1 |
0/0 0/0 | |
| Echelon Line Abreast Phases: 1 |
0/0 0/0 | ||
| Echelon Line Abreast Phases: 1 |
0/0 0/0 | ||
| # | Formation | Normal Battle Node | AD/AP AS/AS+ |
E-1 Medium C: 深海基地航空隊 (PoiDB)
| # | Formation | Air Defense Node | AD/AP AS/AS+ |
|---|---|---|---|
| C | Diamond Phases: 1 |
28/55 123/246 | |
| Diamond Phases: 1 |
33/65 144/288 | ||
| Diamond Phases: 1 |
39/78 174/348 | ||
| Diamond Phases: 1 |
44/87 195/390 | ||
| # | Formation | Air Defense Node | AD/AP AS/AS+ |
E-1 Medium D: 深海任務部隊 巡洋艦戦隊 (PoiDB)
| # | Formation | Normal Battle Node | AD/AP AS/AS+ |
|---|---|---|---|
| D | Line Ahead Double Line Echelon Phases: 1 |
0/0 0/0 | |
| # | Formation | Normal Battle Node | AD/AP AS/AS+ |
E-1 Medium E
| # | Empty Node | ||
|---|---|---|---|
| E | 気のせいだった。 ラバウル外郭西部、哨戒完了! Must be my imagination. Western part of outer Rabaul, patrol complete! | ||
| # | Empty Node | ||
E-1 Medium F: 深海潜水艦隊 偵察哨戒A線 (PoiDB)
| # | Formation | Normal Battle Node | AD/AP AS/AS+ |
|---|---|---|---|
| F | Echelon Line Abreast Phases: 1 |
0/0 0/0 | |
| Echelon Line Abreast Phases: 1 |
0/0 0/0 | ||
| Echelon Line Abreast Phases: 1 |
0/0 0/0 | ||
| # | Formation | Normal Battle Node | AD/AP AS/AS+ |
E-1 Medium G: 深海任務部隊 空母艦載機群 (PoiDB)
| # | Formation | Air Defense Node | AD/AP AS/AS+ |
|---|---|---|---|
| G | Diamond Phases: 1 |
26/52 116/231 | |
| Diamond Phases: 1 |
32/63 140/279 | ||
| Diamond Phases: 1 |
47/93 207/414 | ||
| # | Formation | Air Defense Node | AD/AP AS/AS+ |
E-1 Medium H: 深海任務部隊 空母艦載機群 (PoiDB)
| # | Formation | Air Defense Node | AD/AP AS/AS+ |
|---|---|---|---|
| H | Diamond Phases: 1 |
26/52 116/231 | |
| Diamond Phases: 1 |
32/63 140/279 | ||
| Diamond Phases: 1 |
47/93 207/414 | ||
| # | Formation | Air Defense Node | AD/AP AS/AS+ |
E-1 Medium I: 深海任務部隊 先遣機動部隊 (PoiDB)
| # | Formation | Normal Battle Node | AD/AP AS/AS+ |
|---|---|---|---|
| I | Diamond Phases: 1 |
26/52 116/231 | |
| Diamond Phases: 1 |
32/63 140/279 | ||
| Diamond Phases: 1 |
47/93 207/414 | ||
| # | Formation | Normal Battle Node | AD/AP AS/AS+ |
E-1 Medium J: 深海任務部隊 哨戒駆逐隊 (PoiDB)
| # | Formation | Normal Battle Node | AD/AP AS/AS+ |
|---|---|---|---|
| J | Line Ahead Double Line Echelon Phases: 1 |
0/0 0/0 | |
| # | Formation | Normal Battle Node | AD/AP AS/AS+ |
E-1 Medium K
| # | Empty Node | ||
|---|---|---|---|
| K | 気のせいだった。 ラバウル外郭北部、哨戒完了! Must be my imagination. Northern part of outer Rabaul, patrol complete! | ||
| # | Empty Node | ||
E-1 Medium L: 深海潜水艦隊 増援阻止哨戒線 (PoiDB)
| # | Formation | Normal Battle Node | AD/AP AS/AS+ |
|---|---|---|---|
| L | Echelon Line Abreast Phases: 1 |
0/0 0/0 | |
| Echelon Line Abreast Phases: 1 |
0/0 0/0 | ||
| Echelon Line Abreast Phases: 1 |
0/0 0/0 | ||
| # | Formation | Normal Battle Node | AD/AP AS/AS+ |
E-1 Medium M
| # | Resource Node | ||
|---|---|---|---|
| # | Resource Node | ||
E-1 Medium N: 深海基地航空隊 (PoiDB)
| # | Formation | Air Defense Node | AD/AP AS/AS+ |
|---|---|---|---|
| N | Diamond Phases: 1 |
28/55 123/246 | |
| Diamond Phases: 1 |
33/65 144/288 | ||
| Diamond Phases: 1 |
39/78 174/348 | ||
| Diamond Phases: 1 |
39/78 174/348 | ||
| Diamond Phases: 1 |
44/87 195/390 | ||
| # | Formation | Air Defense Node | AD/AP AS/AS+ |
E-1 Medium O: 深海任務部隊 突撃水雷戦隊 (PoiDB)
| # | Formation | Normal Battle Node | AD/AP AS/AS+ |
|---|---|---|---|
| O | Line Ahead Vanguard Phases: 1 |
0/0 0/0 | |
| Line Ahead Phases: 1 |
0/0 0/0 | ||
| # | Formation | Normal Battle Node | AD/AP AS/AS+ |
E-1 Medium P
| # | Empty Node | ||
|---|---|---|---|
| P | 敵影を見ず。 No enemy spotted. | ||
| # | Empty Node | ||
E-1 Medium Q
| # | Empty Node | ||
|---|---|---|---|
| Q | 気のせいだった。 R方面防備部隊、敵艦隊を発見せり!合戦用意!全艦、突撃せよッ! Must be my imagination. R-Area Defence Force, enemy fleet in sight! Prepare for battle! All ships, charge! | ||
| # | Empty Node | ||
E-1 Medium R: 深海任務部隊 増援阻止群旗艦 (PoiDB)
| # | Formation | Boss Battle Node | AD/AP AS/AS+ |
|---|---|---|---|
| R | Line Ahead Phases: 1 |
0/0 0/0 | |
| Line Ahead Phases: 1 |
24/47 104/207 | ||
| Line Ahead Phases: 1 (Final)
|
24/47 104/207 | ||
| # | Formation | Boss Battle Node | AD/AP AS/AS+ |
E-1 Easy A
| # | Selection Node | ||
|---|---|---|---|
| A | 艦隊の針路を選択できます。提督、どちらの針路をとられますか? You can decide the fleet's course. Admiral, which heading should we take? | ||
| # | Selection Node | ||
E-1 Easy B: 深海潜水艦隊 偵察哨戒B線 (PoiDB)
| # | Formation | Normal Battle Node | AD/AP AS/AS+ |
|---|---|---|---|
| B | Echelon Line Abreast Phases: 1 |
0/0 0/0 | |
| Echelon Line Abreast Phases: 1 |
0/0 0/0 | ||
| Echelon Line Abreast Phases: 1 |
0/0 0/0 | ||
| # | Formation | Normal Battle Node | AD/AP AS/AS+ |
E-1 Easy C: 深海基地航空隊 (PoiDB)
| # | Formation | Air Defense Node | AD/AP AS/AS+ |
|---|---|---|---|
| C | Diamond Phases: 1 |
12/23 51/102 | |
| Diamond Phases: 1 |
17/33 72/144 | ||
| Diamond Phases: 1 |
23/46 102/204 | ||
| Diamond Phases: 1 |
28/55 123/246 | ||
| Diamond Phases: 1 |
33/65 144/288 | ||
| # | Formation | Air Defense Node | AD/AP AS/AS+ |
E-1 Easy D: 深海任務部隊 巡洋艦戦隊 (PoiDB)
| # | Formation | Normal Battle Node | AD/AP AS/AS+ |
|---|---|---|---|
| D | Line Ahead Double Line Echelon Phases: 1 |
0/0 0/0 | |
| # | Formation | Normal Battle Node | AD/AP AS/AS+ |
E-1 Easy E
| # | Empty Node | ||
|---|---|---|---|
| E | 気のせいだった。 ラバウル外郭西部、哨戒完了! Must be my imagination. Western part of outer Rabaul, patrol complete! | ||
| # | Empty Node | ||
E-1 Easy F: 深海潜水艦隊 偵察哨戒A線 (PoiDB)
| # | Formation | Normal Battle Node | AD/AP AS/AS+ |
|---|---|---|---|
| F | Echelon Line Abreast Phases: 1 |
0/0 0/0 | |
| Echelon Line Abreast Phases: 1 |
0/0 0/0 | ||
| Echelon Line Abreast Phases: 1 |
0/0 0/0 | ||
| # | Formation | Normal Battle Node | AD/AP AS/AS+ |
E-1 Easy G: 深海任務部隊 空母艦載機群 (PoiDB)
| # | Formation | Air Defense Node | AD/AP AS/AS+ |
|---|---|---|---|
| G | Diamond Phases: 1 |
24/47 104/207 | |
| Diamond Phases: 1 |
26/52 116/231 | ||
| Diamond Phases: 1 |
32/63 140/279 | ||
| # | Formation | Air Defense Node | AD/AP AS/AS+ |
E-1 Easy H: 深海任務部隊 空母艦載機群 (PoiDB)
| # | Formation | Air Defense Node | AD/AP AS/AS+ |
|---|---|---|---|
| H | Diamond Phases: 1 |
24/47 104/207 | |
| Diamond Phases: 1 |
26/52 116/231 | ||
| Diamond Phases: 1 |
32/63 140/279 | ||
| # | Formation | Air Defense Node | AD/AP AS/AS+ |
E-1 Easy I: 深海任務部隊 先遣機動部隊 (PoiDB)
| # | Formation | Normal Battle Node | AD/AP AS/AS+ |
|---|---|---|---|
| I | Diamond Phases: 1 |
24/47 104/207 | |
| Diamond Phases: 1 |
26/52 116/231 | ||
| Diamond Phases: 1 |
32/63 140/279 | ||
| # | Formation | Normal Battle Node | AD/AP AS/AS+ |
E-1 Easy J: 深海任務部隊 哨戒駆逐隊 (PoiDB)
| # | Formation | Normal Battle Node | AD/AP AS/AS+ |
|---|---|---|---|
| J | Line Ahead Double Line Echelon Phases: 1 |
0/0 0/0 | |
| # | Formation | Normal Battle Node | AD/AP AS/AS+ |
E-1 Easy K
| # | Empty Node | ||
|---|---|---|---|
| K | 気のせいだった。 ラバウル外郭北部、哨戒完了! Must be my imagination. Northern part of outer Rabaul, patrol complete! | ||
| # | Empty Node | ||
E-1 Easy L: 深海潜水艦隊 増援阻止哨戒線 (PoiDB)
| # | Formation | Normal Battle Node | AD/AP AS/AS+ |
|---|---|---|---|
| L | Echelon Line Abreast Phases: 1 |
0/0 0/0 | |
| Echelon Line Abreast Phases: 1 |
0/0 0/0 | ||
| Echelon Line Abreast Phases: 1 |
0/0 0/0 | ||
| # | Formation | Normal Battle Node | AD/AP AS/AS+ |
E-1 Easy M
| # | Resource Node | ||
|---|---|---|---|
| # | Resource Node | ||
E-1 Easy N: 深海基地航空隊 (PoiDB)
| # | Formation | Air Defense Node | AD/AP AS/AS+ |
|---|---|---|---|
| N | Diamond Phases: 1 |
12/23 51/102 | |
| Diamond Phases: 1 |
17/33 72/144 | ||
| Diamond Phases: 1 |
23/46 102/204 | ||
| Diamond Phases: 1 |
28/55 123/246 | ||
| Diamond Phases: 1 |
33/65 144/288 | ||
| # | Formation | Air Defense Node | AD/AP AS/AS+ |
E-1 Easy O: 深海任務部隊 突撃水雷戦隊 (PoiDB)
| # | Formation | Normal Battle Node | AD/AP AS/AS+ |
|---|---|---|---|
| O | Line Ahead Vanguard Phases: 1 |
0/0 0/0 | |
| Line Ahead Phases: 1 |
0/0 0/0 | ||
| # | Formation | Normal Battle Node | AD/AP AS/AS+ |
E-1 Easy P
| # | Empty Node | ||
|---|---|---|---|
| P | 敵影を見ず。 No enemy spotted. | ||
| # | Empty Node | ||
E-1 Easy Q
| # | Empty Node | ||
|---|---|---|---|
| Q | 気のせいだった。 R方面防備部隊、敵艦隊を発見せり!合戦用意!全艦、突撃せよッ! Must be my imagination. R-Area Defence Force, enemy fleet in sight! Prepare for battle! All ships, charge! | ||
| # | Empty Node | ||
E-1 Easy R: 深海任務部隊 増援阻止群旗艦 (PoiDB)
| # | Formation | Boss Battle Node | AD/AP AS/AS+ |
|---|---|---|---|
| R | Line Ahead Phases: 1 |
0/0 0/0 | |
| Line Ahead Phases: 1 |
24/47 104/207 | ||
| Line Ahead Phases: 1 (Final)
|
24/47 104/207 | ||
| # | Formation | Boss Battle Node | AD/AP AS/AS+ |
E-1 Casual A
| # | Selection Node | ||
|---|---|---|---|
| A | 艦隊の針路を選択できます。提督、どちらの針路をとられますか? You can decide the fleet's course. Admiral, which heading should we take? | ||
| # | Selection Node | ||
E-1 Casual B: 深海潜水艦隊 偵察哨戒B線 (PoiDB)
| # | Formation | Normal Battle Node | AD/AP AS/AS+ |
|---|---|---|---|
| B | Echelon Line Abreast Phases: 1 |
0/0 0/0 | |
| Echelon Line Abreast Phases: 1 |
0/0 0/0 | ||
| # | Formation | Normal Battle Node | AD/AP AS/AS+ |
E-1 Casual C: 深海基地航空隊 (PoiDB)
| # | Formation | Air Defense Node | AD/AP AS/AS+ |
|---|---|---|---|
| C | Diamond Phases: 1 |
12/23 51/102 | |
| Diamond Phases: 1 |
17/33 72/144 | ||
| Diamond Phases: 1 |
23/46 102/204 | ||
| # | Formation | Air Defense Node | AD/AP AS/AS+ |
E-1 Casual D: 深海任務部隊 巡洋艦戦隊 (PoiDB)
| # | Formation | Normal Battle Node | AD/AP AS/AS+ |
|---|---|---|---|
| D | Line Ahead Double Line Echelon Phases: 1 |
0/0 0/0 | |
| # | Formation | Normal Battle Node | AD/AP AS/AS+ |
E-1 Casual E
| # | Empty Node | ||
|---|---|---|---|
| E | 気のせいだった。 ラバウル外郭西部、哨戒完了! Must be my imagination. Western part of outer Rabaul, patrol complete! | ||
| # | Empty Node | ||
E-1 Casual F: 深海潜水艦隊 偵察哨戒A線 (PoiDB)
| # | Formation | Normal Battle Node | AD/AP AS/AS+ |
|---|---|---|---|
| F | Echelon Line Abreast Phases: 1 |
0/0 0/0 | |
| Echelon Line Abreast Phases: 1 |
0/0 0/0 | ||
| # | Formation | Normal Battle Node | AD/AP AS/AS+ |
E-1 Casual G: 深海任務部隊 空母艦載機群 (PoiDB)
| # | Formation | Air Defense Node | AD/AP AS/AS+ |
|---|---|---|---|
| G | Diamond Phases: 1 |
9/17 36/72 | |
| Diamond Phases: 1 |
11/22 48/96 | ||
| Diamond Phases: 1 |
26/52 116/231 | ||
| # | Formation | Air Defense Node | AD/AP AS/AS+ |
E-1 Casual H: 深海任務部隊 空母艦載機群 (PoiDB)
| # | Formation | Air Defense Node | AD/AP AS/AS+ |
|---|---|---|---|
| H | Diamond Phases: 1 |
9/17 36/72 | |
| Diamond Phases: 1 |
11/22 48/96 | ||
| Diamond Phases: 1 |
26/52 116/231 | ||
| # | Formation | Air Defense Node | AD/AP AS/AS+ |
E-1 Casual I: 深海任務部隊 先遣機動部隊 (PoiDB)
| # | Formation | Normal Battle Node | AD/AP AS/AS+ |
|---|---|---|---|
| I | Diamond Phases: 1 |
9/17 36/72 | |
| Diamond Phases: 1 |
11/22 48/96 | ||
| Diamond Phases: 1 |
26/52 116/231 | ||
| # | Formation | Normal Battle Node | AD/AP AS/AS+ |
E-1 Casual J: 深海任務部隊 哨戒駆逐隊 (PoiDB)
| # | Formation | Normal Battle Node | AD/AP AS/AS+ |
|---|---|---|---|
| J | Line Ahead Double Line Echelon Phases: 1 |
0/0 0/0 | |
| # | Formation | Normal Battle Node | AD/AP AS/AS+ |
E-1 Casual K
| # | Empty Node | ||
|---|---|---|---|
| K | 気のせいだった。 ラバウル外郭北部、哨戒完了! Must be my imagination. Northern part of outer Rabaul, patrol complete! | ||
| # | Empty Node | ||
E-1 Casual L: 深海潜水艦隊 増援阻止哨戒線 (PoiDB)
| # | Formation | Normal Battle Node | AD/AP AS/AS+ |
|---|---|---|---|
| L | Echelon Line Abreast Phases: 1 |
0/0 0/0 | |
| Echelon Line Abreast Phases: 1 |
0/0 0/0 | ||
| # | Formation | Normal Battle Node | AD/AP AS/AS+ |
E-1 Casual M
| # | Resource Node | ||
|---|---|---|---|
| # | Resource Node | ||
E-1 Casual N: 深海基地航空隊 (PoiDB)
| # | Formation | Air Defense Node | AD/AP AS/AS+ |
|---|---|---|---|
| N | Diamond Phases: 1 |
12/23 51/102 | |
| Diamond Phases: 1 |
17/33 72/144 | ||
| Diamond Phases: 1 |
23/46 102/204 | ||
| # | Formation | Air Defense Node | AD/AP AS/AS+ |
E-1 Casual O: 深海任務部隊 突撃水雷戦隊 (PoiDB)
| # | Formation | Normal Battle Node | AD/AP AS/AS+ |
|---|---|---|---|
| O | Line Ahead Vanguard Phases: 1 |
0/0 0/0 | |
| Line Ahead Phases: 1 |
0/0 0/0 | ||
| # | Formation | Normal Battle Node | AD/AP AS/AS+ |
E-1 Casual P
| # | Empty Node | ||
|---|---|---|---|
| P | 敵影を見ず。 No enemy spotted. | ||
| # | Empty Node | ||
E-1 Casual Q
| # | Empty Node | ||
|---|---|---|---|
| Q | 気のせいだった。 R方面防備部隊、敵艦隊を発見せり!合戦用意!全艦、突撃せよッ! Must be my imagination. R-Area Defence Force, enemy fleet in sight! Prepare for battle! All ships, charge! | ||
| # | Empty Node | ||
E-1 Casual R: 深海任務部隊 増援阻止群旗艦 (PoiDB)
| # | Formation | Boss Battle Node | AD/AP AS/AS+ |
|---|---|---|---|
| R | Line Ahead Phases: 1 |
0/0 0/0 | |
| Line Ahead Phases: 1 |
9/17 36/72 | ||
| Line Ahead Phases: 1 (Final)
|
9/17 36/72 | ||
| # | Formation | Boss Battle Node | AD/AP AS/AS+ |