- Welcome to the Kancolle Wiki!
- If you have any questions regarding site content, account registration, etc., please visit the KanColle Wiki Discord
Difference between revisions of "Summer 2022 Event/E-5/Enemy comps"
< Summer 2022 Event | E-5
Jump to navigation
Jump to search
(Created page with "<tabber> |-|Hard= {{Map/Image|page=Summer 2022 Event/E-5|{{Map/ImageNode|1|Hard|E-5|x=118|y=223}}{{Map/ImageNode|A|Hard|E-5|x=189|y=241}}{{Map/ImageNode|B|Hard|E-5|x=219|y=274...") |
(fix Prototype Carrier Princess) |
||
| (2 intermediate revisions by one other user not shown) | |||
| Line 1: | Line 1: | ||
<tabber> | <tabber> | ||
|-|Hard= | |-|Hard= | ||
| − | {{Map/Image|page=Summer 2022 Event/E-5|{{Map/ImageNode|1|Hard|E-5|x=118|y=223}}{{Map/ImageNode|A|Hard|E-5|x=189|y=241}}{{Map/ImageNode|B|Hard|E-5|x=219|y=274}}{{Map/ImageNode|C|Hard|E-5|x=235|y=233}}{{Map/ImageNode|D|Hard|E-5|x=281|y=225}}{{Map/ImageNode|E|Hard|E-5|x=295|y=257}}{{Map/ImageNode|F|Hard|E-5|x=327|y=218}}{{Map/ImageNode|G1|Hard|E-5|x=329|y=248|drops=<table class="wikitable"><tr><th>Type</th><th>Ships</th></tr><tr><th>DE</th><td>{{Ship/Banner|small=true|Hachijou}}{{Ship/Banner|small=true|Ishigaki}}</td></tr><tr><th>DD</th><td>{{Ship/Banner|small=true|Harusame}}{{Ship/Banner|small=true|Kawakaze}}</td></tr></table>}}{{Map/ImageNode|G2|Hard|E-5|x=261|y=265}}{{Map/ImageNode|G|Hard|E-5|x=311|y=292}}{{Map/ImageNode|H|Hard|E-5|x=269|y=304|drops=<table class="wikitable"><tr><th>Type</th><th>Ships</th></tr><tr><th>DE</th><td>{{Ship/Banner|small=true|Hachijou}}{{Ship/Banner|small=true|Ishigaki}}</td></tr><tr><th>DD</th><td>{{Ship/Banner|small=true|Amagiri}}{{Ship/Banner|small=true|Grecale}}{{Ship/Banner|small=true|Harusame}}<br>{{Ship/Banner|small=true|Kawakaze}}{{Ship/Banner|small=true|Oyashio}}{{Ship/Banner|small=true|Tanikaze}}<br>{{Ship/Banner|small=true|Uranami}}</td></tr><tr><th>CL</th><td>{{Ship/Banner|small=true|Giuseppe Garibaldi}}</td></tr><tr><th>CA</th><td>{{Ship/Banner|small=true|Pola}}</td></tr></table>}}{{Map/ImageNode|I|Hard|E-5|x=344|y=287}}{{Map/ImageNode|J|Hard|E-5|x=356|y=201}}{{Map/ImageNode|K|Hard|E-5|x=455|y=201}}{{Map/ImageNode|L|Hard|E-5|x=438|y=233}}{{Map/ImageNode|M|Hard|E-5|x=474|y=230|drops=<table class="wikitable"><tr><th>Type</th><th>Ships</th></tr><tr><th>DE</th><td>{{Ship/Banner|small=true|Hachijou}}{{Ship/Banner|small=true|Ishigaki}}</td></tr><tr><th>DD</th><td>{{Ship/Banner|small=true|Harusame}}{{Ship/Banner|small=true|Kawakaze}}{{Ship/Banner|small=true|Tanikaze}}<br>{{Ship/Banner|small=true|Uranami}}{{Ship/Banner|small=true|Usugumo}}</td></tr></table>}}{{Map/ImageNode|N1|Hard|E-5|x=420|y=257}}{{Map/ImageNode|N2|Hard|E-5|x=403|y=219}}{{Map/ImageNode|N|Hard|E-5|x=455|y=263}}{{Map/ImageNode|O|Hard|E-5|x=374|y=250|drops=<table class="wikitable"><tr><th>Type</th><th>Ships</th></tr><tr><th>DE</th><td>{{Ship/Banner|small=true|Hachijou}}{{Ship/Banner|small=true|Ishigaki}}</td></tr><tr><th>DD</th><td>{{Ship/Banner|small=true|Amagiri}}{{Ship/Banner|small=true|Grecale}}{{Ship/Banner|small=true|Harusame}}<br>{{Ship/Banner|small=true|Johnston}}{{Ship/Banner|small=true|Kawakaze}}{{Ship/Banner|small=true|Oyashio}}<br>{{Ship/Banner|small=true|Tanikaze}}{{Ship/Banner|small=true|Uranami}}{{Ship/Banner|small=true|Usugumo}}<br></td></tr><tr><th>CL</th><td>{{Ship/Banner|small=true|Giuseppe Garibaldi}}</td></tr></table>}}{{Map/ImageNode|P|Hard|E-5|x=496|y=268|drops=<table class="wikitable"><tr><th>Type</th><th>Ships</th></tr><tr><th>DE</th><td>{{Ship/Banner|small=true|Hachijou}}{{Ship/Banner|small=true|Ishigaki}}</td></tr><tr><th>DD</th><td>{{Ship/Banner|small=true|Amagiri}}{{Ship/Banner|small=true|Grecale}}{{Ship/Banner|small=true|Harusame}}<br>{{Ship/Banner|small=true|Johnston}}{{Ship/Banner|small=true|Kawakaze}}{{Ship/Banner|small=true|Oyashio}}<br>{{Ship/Banner|small=true|Tanikaze}}{{Ship/Banner|small=true|Uranami}}{{Ship/Banner|small=true|Usugumo}}<br></td></tr><tr><th>CL</th><td>{{Ship/Banner|small=true|Giuseppe Garibaldi}}</td></tr><tr><th>CA</th><td>{{Ship/Banner|small=true|Pola}}</td></tr></table>}}{{Map/ImageNode|Q|Hard|E-5|x=457|y=142}}{{Map/ImageNode|R|Hard|E-5|x=507|y=160}}{{Map/ImageNode|S|Hard|E-5|x=501|y=116}}{{Map/ImageNode|T|Hard|E-5|x=552|y=123|drops=<table class="wikitable"><tr><th>Type</th><th>Ships</th></tr><tr><th>DE</th><td>{{Ship/Banner|small=true|Hachijou}}{{Ship/Banner|small=true|Ishigaki}}</td></tr><tr><th>DD</th><td>{{Ship/Banner|small=true|Amagiri}}{{Ship/Banner|small=true|Harusame}}{{Ship/Banner|small=true|Kawakaze}}<br>{{Ship/Banner|small=true|Tanikaze}}{{Ship/Banner|small=true|Uranami}}{{Ship/Banner|small=true|Usugumo}}<br></td></tr><tr><th>CA</th><td>{{Ship/Banner|small=true|Pola}}</td></tr></table>}}{{Map/ImageNode|U|Hard|E-5|x=589|y=129}}{{Map/ImageNode|V|Hard|E-5|x=462|y=84}}{{Map/ImageNode|W|Hard|E-5|x=540|y=230}}{{Map/ImageNode|X|Hard|E-5|x=583|y=188|drops=<table class="wikitable"><tr><th>Type</th><th>Ships</th></tr><tr><th>DD</th><td>{{Ship/Banner|small=true|Hamanami}}{{Ship/Banner|small=true|Scirocco}}{{Ship/Banner|small=true|Suzunami}}<br></td></tr><tr><th>CL</th><td>{{Ship/Banner|small=true|Duca degli Abruzzi}}{{Ship/Banner|small=true|Ooyodo}}</td></tr><tr><th>CA</th><td>{{Ship/Banner|small=true|Zara}}</td></tr><tr><th>CVL</th><td>{{Ship/Banner|small=true|Gambier Bay}}</td></tr><tr><th>FBB</th><td>{{Ship/Banner|small=true|Washington}}</td></tr><tr><th>BB</th><td>{{Ship/Banner|small=true|Colorado}}</td></tr><tr><th>LHA</th><td>{{Ship/Banner|small=true|Akitsu Maru}}</td></tr></table>}}}} | + | {{Map/Image|page=Summer 2022 Event/E-5|{{Map/ImageNode|1|Hard|E-5|x=118|y=223}}{{Map/ImageNode|A|Hard|E-5|x=189|y=241}}{{Map/ImageNode|B|Hard|E-5|x=219|y=274}}{{Map/ImageNode|C|Hard|E-5|x=235|y=233}}{{Map/ImageNode|D|Hard|E-5|x=281|y=225}}{{Map/ImageNode|E|Hard|E-5|x=295|y=257}}{{Map/ImageNode|F|Hard|E-5|x=327|y=218}}{{Map/ImageNode|G1|Hard|E-5|x=329|y=248|drops=<table class="wikitable"><tr><th>Type</th><th>Ships</th></tr><tr><th>DE</th><td>{{Ship/Banner|small=true|Hachijou}}{{Ship/Banner|small=true|Ishigaki}}</td></tr><tr><th>DD</th><td>{{Ship/Banner|small=true|Harusame}}{{Ship/Banner|small=true|Kawakaze}}</td></tr></table>}}{{Map/ImageNode|G2|Hard|E-5|x=261|y=265}}{{Map/ImageNode|G|Hard|E-5|x=311|y=292}}{{Map/ImageNode|H|Hard|E-5|x=269|y=304|drops=<table class="wikitable"><tr><th>Type</th><th>Ships</th></tr><tr><th>DE</th><td>{{Ship/Banner|small=true|Hachijou}}{{Ship/Banner|small=true|Ishigaki}}</td></tr><tr><th>DD</th><td>{{Ship/Banner|small=true|Amagiri}}{{Ship/Banner|small=true|Grecale}}{{Ship/Banner|small=true|Harusame}}<br>{{Ship/Banner|small=true|Kawakaze}}{{Ship/Banner|small=true|Oyashio}}{{Ship/Banner|small=true|Tanikaze}}<br>{{Ship/Banner|small=true|Uranami}}</td></tr><tr><th>CL</th><td>{{Ship/Banner|small=true|Brooklyn}}{{Ship/Banner|small=true|Giuseppe Garibaldi}}</td></tr><tr><th>CA</th><td>{{Ship/Banner|small=true|Pola}}</td></tr></table>}}{{Map/ImageNode|I|Hard|E-5|x=344|y=287}}{{Map/ImageNode|J|Hard|E-5|x=356|y=201}}{{Map/ImageNode|K|Hard|E-5|x=455|y=201}}{{Map/ImageNode|L|Hard|E-5|x=438|y=233}}{{Map/ImageNode|M|Hard|E-5|x=474|y=230|drops=<table class="wikitable"><tr><th>Type</th><th>Ships</th></tr><tr><th>DE</th><td>{{Ship/Banner|small=true|Hachijou}}{{Ship/Banner|small=true|Ishigaki}}</td></tr><tr><th>DD</th><td>{{Ship/Banner|small=true|Harusame}}{{Ship/Banner|small=true|Kawakaze}}{{Ship/Banner|small=true|Tanikaze}}<br>{{Ship/Banner|small=true|Uranami}}{{Ship/Banner|small=true|Usugumo}}</td></tr></table>}}{{Map/ImageNode|N1|Hard|E-5|x=420|y=257}}{{Map/ImageNode|N2|Hard|E-5|x=403|y=219}}{{Map/ImageNode|N|Hard|E-5|x=455|y=263}}{{Map/ImageNode|O|Hard|E-5|x=374|y=250|drops=<table class="wikitable"><tr><th>Type</th><th>Ships</th></tr><tr><th>DE</th><td>{{Ship/Banner|small=true|Hachijou}}{{Ship/Banner|small=true|Ishigaki}}</td></tr><tr><th>DD</th><td>{{Ship/Banner|small=true|Amagiri}}{{Ship/Banner|small=true|Grecale}}{{Ship/Banner|small=true|Harusame}}<br>{{Ship/Banner|small=true|Johnston}}{{Ship/Banner|small=true|Kawakaze}}{{Ship/Banner|small=true|Oyashio}}<br>{{Ship/Banner|small=true|Tanikaze}}{{Ship/Banner|small=true|Uranami}}{{Ship/Banner|small=true|Usugumo}}<br></td></tr><tr><th>CL</th><td>{{Ship/Banner|small=true|Brooklyn}}{{Ship/Banner|small=true|Giuseppe Garibaldi}}</td></tr></table>}}{{Map/ImageNode|P|Hard|E-5|x=496|y=268|drops=<table class="wikitable"><tr><th>Type</th><th>Ships</th></tr><tr><th>DE</th><td>{{Ship/Banner|small=true|Hachijou}}{{Ship/Banner|small=true|Ishigaki}}</td></tr><tr><th>DD</th><td>{{Ship/Banner|small=true|Amagiri}}{{Ship/Banner|small=true|Grecale}}{{Ship/Banner|small=true|Harusame}}<br>{{Ship/Banner|small=true|Johnston}}{{Ship/Banner|small=true|Kawakaze}}{{Ship/Banner|small=true|Oyashio}}<br>{{Ship/Banner|small=true|Tanikaze}}{{Ship/Banner|small=true|Uranami}}{{Ship/Banner|small=true|Usugumo}}<br></td></tr><tr><th>CL</th><td>{{Ship/Banner|small=true|Brooklyn}}{{Ship/Banner|small=true|Giuseppe Garibaldi}}</td></tr><tr><th>CA</th><td>{{Ship/Banner|small=true|Pola}}</td></tr></table>}}{{Map/ImageNode|Q|Hard|E-5|x=457|y=142}}{{Map/ImageNode|R|Hard|E-5|x=507|y=160}}{{Map/ImageNode|S|Hard|E-5|x=501|y=116}}{{Map/ImageNode|T|Hard|E-5|x=552|y=123|drops=<table class="wikitable"><tr><th>Type</th><th>Ships</th></tr><tr><th>DE</th><td>{{Ship/Banner|small=true|Hachijou}}{{Ship/Banner|small=true|Ishigaki}}</td></tr><tr><th>DD</th><td>{{Ship/Banner|small=true|Amagiri}}{{Ship/Banner|small=true|Harusame}}{{Ship/Banner|small=true|Kawakaze}}<br>{{Ship/Banner|small=true|Tanikaze}}{{Ship/Banner|small=true|Uranami}}{{Ship/Banner|small=true|Usugumo}}<br></td></tr><tr><th>CA</th><td>{{Ship/Banner|small=true|Pola}}</td></tr></table>}}{{Map/ImageNode|U|Hard|E-5|x=589|y=129}}{{Map/ImageNode|V|Hard|E-5|x=462|y=84}}{{Map/ImageNode|W|Hard|E-5|x=540|y=230}}{{Map/ImageNode|X|Hard|E-5|x=583|y=188|drops=<table class="wikitable"><tr><th>Type</th><th>Ships</th></tr><tr><th>DD</th><td>{{Ship/Banner|small=true|Hamanami}}{{Ship/Banner|small=true|Scirocco}}{{Ship/Banner|small=true|Suzunami}}<br></td></tr><tr><th>CL</th><td>{{Ship/Banner|small=true|Duca degli Abruzzi}}{{Ship/Banner|small=true|Ooyodo}}</td></tr><tr><th>CA</th><td>{{Ship/Banner|small=true|Zara}}</td></tr><tr><th>CVL</th><td>{{Ship/Banner|small=true|Gambier Bay}}</td></tr><tr><th>FBB</th><td>{{Ship/Banner|small=true|Massachusetts}}{{Ship/Banner|small=true|Washington}}</td></tr><tr><th>BB</th><td>{{Ship/Banner|small=true|Colorado}}</td></tr><tr><th>LHA</th><td>{{Ship/Banner|small=true|Akitsu Maru}}</td></tr></table>}}}} |
<div class="map-nodes"> | <div class="map-nodes"> | ||
| + | {{Map/Nodes|diff=Hard|name= | ||
| + | |AB | ||
| + | |Raid | ||
| + | |{{TooltipSimple|Diamond|17% (838/4871)}} | ||
| + | |Airfield Princess/VII | ||
| + | |Airfield Princess/VI | ||
| + | |- | ||
| + | |AB | ||
| + | |Raid | ||
| + | |{{TooltipSimple|Diamond|31% (1513/4871)}} | ||
| + | |Airfield Princess/VII | ||
| + | |Airfield Princess/VI | ||
| + | |Airfield Princess/V | ||
| + | |- | ||
| + | |AB | ||
| + | |Raid | ||
| + | |{{TooltipSimple|Diamond|33% (1618/4871)}} | ||
| + | |Airfield Princess/VII | ||
| + | |Airfield Princess/VII | ||
| + | |Airfield Princess/V | ||
| + | |- | ||
| + | |AB | ||
| + | |Raid | ||
| + | |{{TooltipSimple|Diamond|10% (485/4871)}} | ||
| + | |Airfield Princess/VII | ||
| + | |Airfield Princess/VII | ||
| + | |Airfield Princess/VI | ||
| + | |- | ||
| + | |AB | ||
| + | |Raid | ||
| + | |{{TooltipSimple|Diamond|9% (417/4871)}} | ||
| + | |Airfield Princess/VII | ||
| + | |Airfield Princess/VII | ||
| + | |Airfield Princess/VII | ||
| + | }} | ||
{{Map/Nodes|diff=Hard|name=深海潜水艦隊 ジブラルタル警戒線 | {{Map/Nodes|diff=Hard|name=深海潜水艦隊 ジブラルタル警戒線 | ||
|A | |A | ||
| Line 376: | Line 411: | ||
|Defense | |Defense | ||
|{{TooltipSimple|Diamond|15% (285/1943, HQ: 114-120)}}<br>{{TooltipSimple|''Phases: 4''|Samples: 94}} | |{{TooltipSimple|Diamond|15% (285/1943, HQ: 114-120)}}<br>{{TooltipSimple|''Phases: 4''|Samples: 94}} | ||
| − | |Prototype Carrier Princess/III | + | |Prototype Carrier Princess/Vacation Mode III |
|Aircraft Carrier Summer Princess/B IV | |Aircraft Carrier Summer Princess/B IV | ||
|Heavy Cruiser Ne-Class/Kai B Summer Mode | |Heavy Cruiser Ne-Class/Kai B Summer Mode | ||
| Line 386: | Line 421: | ||
|Defense | |Defense | ||
|{{TooltipSimple|Diamond|23% (455/1943, HQ: 114-120)}}<br>{{TooltipSimple|''Phases: 4''|Samples: 133}} | |{{TooltipSimple|Diamond|23% (455/1943, HQ: 114-120)}}<br>{{TooltipSimple|''Phases: 4''|Samples: 133}} | ||
| − | |Prototype Carrier Princess/III | + | |Prototype Carrier Princess/Vacation Mode III |
|Aircraft Carrier Summer Princess/B IV | |Aircraft Carrier Summer Princess/B IV | ||
|Light Carrier Nu-Class/B Flagship | |Light Carrier Nu-Class/B Flagship | ||
| Line 396: | Line 431: | ||
|Defense | |Defense | ||
|{{TooltipSimple|Diamond|62% (1203/1943, HQ: 114-120)}}<br>{{TooltipSimple|''Phases: 4''|Samples: 372}} | |{{TooltipSimple|Diamond|62% (1203/1943, HQ: 114-120)}}<br>{{TooltipSimple|''Phases: 4''|Samples: 372}} | ||
| − | |Prototype Carrier Princess/Damaged III | + | |Prototype Carrier Princess/Vacation Mode Damaged III |
|Aircraft Carrier Summer Princess/B IV | |Aircraft Carrier Summer Princess/B IV | ||
|Aircraft Carrier Summer Princess/B IV | |Aircraft Carrier Summer Princess/B IV | ||
| Line 458: | Line 493: | ||
|Boss | |Boss | ||
|{{TooltipSimple|Cruising Formation 4|81% (3440/4226, HQ: 114-120)}}<br>{{TooltipSimple|''Phases: 4''|Samples: 1061}} | |{{TooltipSimple|Cruising Formation 4|81% (3440/4226, HQ: 114-120)}}<br>{{TooltipSimple|''Phases: 4''|Samples: 1061}} | ||
| − | |Prototype Carrier Princess/III | + | |Prototype Carrier Princess/Vacation Mode III |
|Aircraft Carrier Summer Princess/B IV | |Aircraft Carrier Summer Princess/B IV | ||
|Light Carrier Nu-Class/B Flagship | |Light Carrier Nu-Class/B Flagship | ||
| Line 474: | Line 509: | ||
|Boss/Final | |Boss/Final | ||
|{{TooltipSimple|Cruising Formation 4|19% (786/4226, HQ: 115-120)}}<br>{{TooltipSimple|''Phases: 4''|Samples: 540}} | |{{TooltipSimple|Cruising Formation 4|19% (786/4226, HQ: 115-120)}}<br>{{TooltipSimple|''Phases: 4''|Samples: 540}} | ||
| − | |Prototype Carrier Princess/Damaged III | + | |Prototype Carrier Princess/Vacation Mode Damaged III |
|Aircraft Carrier Summer Princess/B IV | |Aircraft Carrier Summer Princess/B IV | ||
|Aircraft Carrier Summer Princess/B IV | |Aircraft Carrier Summer Princess/B IV | ||
| Line 489: | Line 524: | ||
</div> | </div> | ||
|-|Medium= | |-|Medium= | ||
| − | {{Map/Image|page=Summer 2022 Event/E-5|{{Map/ImageNode|1|Medium|E-5|x=118|y=223}}{{Map/ImageNode|A|Medium|E-5|x=189|y=241}}{{Map/ImageNode|B|Medium|E-5|x=219|y=274}}{{Map/ImageNode|C|Medium|E-5|x=235|y=233}}{{Map/ImageNode|D|Medium|E-5|x=281|y=225}}{{Map/ImageNode|E|Medium|E-5|x=295|y=257}}{{Map/ImageNode|F|Medium|E-5|x=327|y=218}}{{Map/ImageNode|G1|Medium|E-5|x=329|y=248|drops=<table class="wikitable"><tr><th>Type</th><th>Ships</th></tr><tr><th>DE</th><td>{{Ship/Banner|small=true|Hachijou}}{{Ship/Banner|small=true|Ishigaki}}</td></tr><tr><th>DD</th><td>{{Ship/Banner|small=true|Harusame}}</td></tr></table>}}{{Map/ImageNode|G2|Medium|E-5|x=261|y=265}}{{Map/ImageNode|G|Medium|E-5|x=311|y=292}}{{Map/ImageNode|H|Medium|E-5|x=269|y=304|drops=<table class="wikitable"><tr><th>Type</th><th>Ships</th></tr><tr><th>DE</th><td>{{Ship/Banner|small=true|Ishigaki}}</td></tr><tr><th>DD</th><td>{{Ship/Banner|small=true|Amagiri}}{{Ship/Banner|small=true|Grecale}}{{Ship/Banner|small=true|Kawakaze}}<br>{{Ship/Banner|small=true|Tanikaze}}{{Ship/Banner|small=true|Uranami}}</td></tr><tr><th>CL</th><td>{{Ship/Banner|small=true|Giuseppe Garibaldi}}</td></tr></table>}}{{Map/ImageNode|I|Medium|E-5|x=344|y=287}}{{Map/ImageNode|J|Medium|E-5|x=356|y=201}}{{Map/ImageNode|K|Medium|E-5|x=455|y=201}}{{Map/ImageNode|L|Medium|E-5|x=438|y=233}}{{Map/ImageNode|M|Medium|E-5|x=474|y=230|drops=<table class="wikitable"><tr><th>Type</th><th>Ships</th></tr><tr><th>DE</th><td>{{Ship/Banner|small=true|Hachijou}}{{Ship/Banner|small=true|Ishigaki}}</td></tr><tr><th>DD</th><td>{{Ship/Banner|small=true|Harusame}}{{Ship/Banner|small=true|Kawakaze}}{{Ship/Banner|small=true|Tanikaze}}<br>{{Ship/Banner|small=true|Uranami}}{{Ship/Banner|small=true|Usugumo}}</td></tr></table>}}{{Map/ImageNode|N1|Medium|E-5|x=420|y=257}}{{Map/ImageNode|N2|Medium|E-5|x=403|y=219}}{{Map/ImageNode|N|Medium|E-5|x=455|y=263}}{{Map/ImageNode|O|Medium|E-5|x=374|y=250|drops=<table class="wikitable"><tr><th>Type</th><th>Ships</th></tr><tr><th>DE</th><td>{{Ship/Banner|small=true|Hachijou}}{{Ship/Banner|small=true|Ishigaki}}</td></tr><tr><th>DD</th><td>{{Ship/Banner|small=true|Amagiri}}{{Ship/Banner|small=true|Harusame}}{{Ship/Banner|small=true|Kawakaze}}<br>{{Ship/Banner|small=true|Tanikaze}}{{Ship/Banner|small=true|Uranami}}</td></tr></table>}}{{Map/ImageNode|P|Medium|E-5|x=496|y=268|drops=<table class="wikitable"><tr><th>Type</th><th>Ships</th></tr><tr><th>DE</th><td>{{Ship/Banner|small=true|Hachijou}}{{Ship/Banner|small=true|Ishigaki}}</td></tr><tr><th>DD</th><td>{{Ship/Banner|small=true|Amagiri}}{{Ship/Banner|small=true|Grecale}}{{Ship/Banner|small=true|Harusame}}<br>{{Ship/Banner|small=true|Johnston}}{{Ship/Banner|small=true|Kawakaze}}{{Ship/Banner|small=true|Oyashio}}<br>{{Ship/Banner|small=true|Tanikaze}}{{Ship/Banner|small=true|Uranami}}{{Ship/Banner|small=true|Usugumo}}<br></td></tr><tr><th>CL</th><td>{{Ship/Banner|small=true|Giuseppe Garibaldi}}</td></tr><tr><th>CA</th><td>{{Ship/Banner|small=true|Pola}}</td></tr></table>}}{{Map/ImageNode|Q|Medium|E-5|x=457|y=142}}{{Map/ImageNode|R|Medium|E-5|x=507|y=160}}{{Map/ImageNode|S|Medium|E-5|x=501|y=116}}{{Map/ImageNode|T|Medium|E-5|x=552|y=123|drops=<table class="wikitable"><tr><th>Type</th><th>Ships</th></tr><tr><th>DE</th><td>{{Ship/Banner|small=true|Hachijou}}{{Ship/Banner|small=true|Ishigaki}}</td></tr><tr><th>DD</th><td>{{Ship/Banner|small=true|Tanikaze}}{{Ship/Banner|small=true|Usugumo}}</td></tr><tr><th>CA</th><td>{{Ship/Banner|small=true|Pola}}</td></tr></table>}}{{Map/ImageNode|U|Medium|E-5|x=589|y=129}}{{Map/ImageNode|V|Medium|E-5|x=462|y=84}}{{Map/ImageNode|W|Medium|E-5|x=540|y=230}}{{Map/ImageNode|X|Medium|E-5|x=583|y=188|drops=<table class="wikitable"><tr><th>Type</th><th>Ships</th></tr><tr><th>DD</th><td>{{Ship/Banner|small=true|Hamanami}}{{Ship/Banner|small=true|Scirocco}}{{Ship/Banner|small=true|Suzunami}}<br></td></tr><tr><th>CL</th><td>{{Ship/Banner|small=true|Duca degli Abruzzi}}{{Ship/Banner|small=true|Ooyodo}}</td></tr><tr><th>CA</th><td>{{Ship/Banner|small=true|Zara}}</td></tr><tr><th>CVL</th><td>{{Ship/Banner|small=true|Gambier Bay}}</td></tr><tr><th>FBB</th><td>{{Ship/Banner|small=true|Washington}}</td></tr><tr><th>BB</th><td>{{Ship/Banner|small=true|Colorado}}</td></tr><tr><th>LHA</th><td>{{Ship/Banner|small=true|Akitsu Maru}}</td></tr></table>}}}} | + | {{Map/Image|page=Summer 2022 Event/E-5|{{Map/ImageNode|1|Medium|E-5|x=118|y=223}}{{Map/ImageNode|A|Medium|E-5|x=189|y=241}}{{Map/ImageNode|B|Medium|E-5|x=219|y=274}}{{Map/ImageNode|C|Medium|E-5|x=235|y=233}}{{Map/ImageNode|D|Medium|E-5|x=281|y=225}}{{Map/ImageNode|E|Medium|E-5|x=295|y=257}}{{Map/ImageNode|F|Medium|E-5|x=327|y=218}}{{Map/ImageNode|G1|Medium|E-5|x=329|y=248|drops=<table class="wikitable"><tr><th>Type</th><th>Ships</th></tr><tr><th>DE</th><td>{{Ship/Banner|small=true|Hachijou}}{{Ship/Banner|small=true|Ishigaki}}</td></tr><tr><th>DD</th><td>{{Ship/Banner|small=true|Harusame}}</td></tr></table>}}{{Map/ImageNode|G2|Medium|E-5|x=261|y=265}}{{Map/ImageNode|G|Medium|E-5|x=311|y=292}}{{Map/ImageNode|H|Medium|E-5|x=269|y=304|drops=<table class="wikitable"><tr><th>Type</th><th>Ships</th></tr><tr><th>DE</th><td>{{Ship/Banner|small=true|Ishigaki}}</td></tr><tr><th>DD</th><td>{{Ship/Banner|small=true|Amagiri}}{{Ship/Banner|small=true|Grecale}}{{Ship/Banner|small=true|Kawakaze}}<br>{{Ship/Banner|small=true|Tanikaze}}{{Ship/Banner|small=true|Uranami}}</td></tr><tr><th>CL</th><td>{{Ship/Banner|small=true|Giuseppe Garibaldi}}</td></tr></table>}}{{Map/ImageNode|I|Medium|E-5|x=344|y=287}}{{Map/ImageNode|J|Medium|E-5|x=356|y=201}}{{Map/ImageNode|K|Medium|E-5|x=455|y=201}}{{Map/ImageNode|L|Medium|E-5|x=438|y=233}}{{Map/ImageNode|M|Medium|E-5|x=474|y=230|drops=<table class="wikitable"><tr><th>Type</th><th>Ships</th></tr><tr><th>DE</th><td>{{Ship/Banner|small=true|Hachijou}}{{Ship/Banner|small=true|Ishigaki}}</td></tr><tr><th>DD</th><td>{{Ship/Banner|small=true|Harusame}}{{Ship/Banner|small=true|Kawakaze}}{{Ship/Banner|small=true|Tanikaze}}<br>{{Ship/Banner|small=true|Uranami}}{{Ship/Banner|small=true|Usugumo}}</td></tr></table>}}{{Map/ImageNode|N1|Medium|E-5|x=420|y=257}}{{Map/ImageNode|N2|Medium|E-5|x=403|y=219}}{{Map/ImageNode|N|Medium|E-5|x=455|y=263}}{{Map/ImageNode|O|Medium|E-5|x=374|y=250|drops=<table class="wikitable"><tr><th>Type</th><th>Ships</th></tr><tr><th>DE</th><td>{{Ship/Banner|small=true|Hachijou}}{{Ship/Banner|small=true|Ishigaki}}</td></tr><tr><th>DD</th><td>{{Ship/Banner|small=true|Amagiri}}{{Ship/Banner|small=true|Harusame}}{{Ship/Banner|small=true|Kawakaze}}<br>{{Ship/Banner|small=true|Tanikaze}}{{Ship/Banner|small=true|Uranami}}</td></tr><tr><th>CL</th><td>{{Ship/Banner|small=true|Brooklyn}}</td></tr></table>}}{{Map/ImageNode|P|Medium|E-5|x=496|y=268|drops=<table class="wikitable"><tr><th>Type</th><th>Ships</th></tr><tr><th>DE</th><td>{{Ship/Banner|small=true|Hachijou}}{{Ship/Banner|small=true|Ishigaki}}</td></tr><tr><th>DD</th><td>{{Ship/Banner|small=true|Amagiri}}{{Ship/Banner|small=true|Grecale}}{{Ship/Banner|small=true|Harusame}}<br>{{Ship/Banner|small=true|Johnston}}{{Ship/Banner|small=true|Kawakaze}}{{Ship/Banner|small=true|Oyashio}}<br>{{Ship/Banner|small=true|Tanikaze}}{{Ship/Banner|small=true|Uranami}}{{Ship/Banner|small=true|Usugumo}}<br></td></tr><tr><th>CL</th><td>{{Ship/Banner|small=true|Brooklyn}}{{Ship/Banner|small=true|Giuseppe Garibaldi}}</td></tr><tr><th>CA</th><td>{{Ship/Banner|small=true|Pola}}</td></tr></table>}}{{Map/ImageNode|Q|Medium|E-5|x=457|y=142}}{{Map/ImageNode|R|Medium|E-5|x=507|y=160}}{{Map/ImageNode|S|Medium|E-5|x=501|y=116}}{{Map/ImageNode|T|Medium|E-5|x=552|y=123|drops=<table class="wikitable"><tr><th>Type</th><th>Ships</th></tr><tr><th>DE</th><td>{{Ship/Banner|small=true|Hachijou}}{{Ship/Banner|small=true|Ishigaki}}</td></tr><tr><th>DD</th><td>{{Ship/Banner|small=true|Tanikaze}}{{Ship/Banner|small=true|Usugumo}}</td></tr><tr><th>CA</th><td>{{Ship/Banner|small=true|Pola}}</td></tr></table>}}{{Map/ImageNode|U|Medium|E-5|x=589|y=129}}{{Map/ImageNode|V|Medium|E-5|x=462|y=84}}{{Map/ImageNode|W|Medium|E-5|x=540|y=230}}{{Map/ImageNode|X|Medium|E-5|x=583|y=188|drops=<table class="wikitable"><tr><th>Type</th><th>Ships</th></tr><tr><th>DD</th><td>{{Ship/Banner|small=true|Hamanami}}{{Ship/Banner|small=true|Scirocco}}{{Ship/Banner|small=true|Suzunami}}<br></td></tr><tr><th>CL</th><td>{{Ship/Banner|small=true|Duca degli Abruzzi}}{{Ship/Banner|small=true|Ooyodo}}</td></tr><tr><th>CA</th><td>{{Ship/Banner|small=true|Zara}}</td></tr><tr><th>CVL</th><td>{{Ship/Banner|small=true|Gambier Bay}}</td></tr><tr><th>FBB</th><td>{{Ship/Banner|small=true|Massachusetts}}{{Ship/Banner|small=true|Washington}}</td></tr><tr><th>BB</th><td>{{Ship/Banner|small=true|Colorado}}</td></tr><tr><th>LHA</th><td>{{Ship/Banner|small=true|Akitsu Maru}}</td></tr></table>}}}} |
<div class="map-nodes"> | <div class="map-nodes"> | ||
| + | {{Map/Nodes|diff=Medium|name= | ||
| + | |AB | ||
| + | |Raid | ||
| + | |{{TooltipSimple|Diamond|19% (100/533)}} | ||
| + | |Airfield Princess/VI | ||
| + | |Airfield Princess/V | ||
| + | |- | ||
| + | |AB | ||
| + | |Raid | ||
| + | |{{TooltipSimple|Diamond|37% (198/533)}} | ||
| + | |Airfield Princess/VI | ||
| + | |Airfield Princess/VI | ||
| + | |- | ||
| + | |AB | ||
| + | |Raid | ||
| + | |{{TooltipSimple|Diamond|36% (192/533)}} | ||
| + | |Airfield Princess/VI | ||
| + | |Airfield Princess/V | ||
| + | |Airfield Princess/V | ||
| + | |- | ||
| + | |AB | ||
| + | |Raid | ||
| + | |{{TooltipSimple|Diamond|8% (43/533)}} | ||
| + | |Airfield Princess/VI | ||
| + | |Airfield Princess/VI | ||
| + | |Airfield Princess/V | ||
| + | }} | ||
{{Map/Nodes|diff=Medium|name=深海潜水艦隊 ジブラルタル警戒線 | {{Map/Nodes|diff=Medium|name=深海潜水艦隊 ジブラルタル警戒線 | ||
|A | |A | ||
| Line 862: | Line 924: | ||
|Defense | |Defense | ||
|{{TooltipSimple|Diamond|29% (98/337, HQ: 109-120)}}<br>{{TooltipSimple|''Phases: 4''|Samples: 6}} | |{{TooltipSimple|Diamond|29% (98/337, HQ: 109-120)}}<br>{{TooltipSimple|''Phases: 4''|Samples: 6}} | ||
| − | |Prototype Carrier Princess/II | + | |Prototype Carrier Princess/Vacation Mode II |
|Aircraft Carrier Summer Princess/B III | |Aircraft Carrier Summer Princess/B III | ||
|Heavy Cruiser Ne-Class/Kai Summer Mode III | |Heavy Cruiser Ne-Class/Kai Summer Mode III | ||
| Line 872: | Line 934: | ||
|Defense | |Defense | ||
|{{TooltipSimple|Diamond|43% (144/337, HQ: 108-120)}}<br>{{TooltipSimple|''Phases: 4''|Samples: 10}} | |{{TooltipSimple|Diamond|43% (144/337, HQ: 108-120)}}<br>{{TooltipSimple|''Phases: 4''|Samples: 10}} | ||
| − | |Prototype Carrier Princess/II | + | |Prototype Carrier Princess/Vacation Mode II |
|Aircraft Carrier Summer Princess/B III | |Aircraft Carrier Summer Princess/B III | ||
|Light Carrier Nu-Class/B Elite II | |Light Carrier Nu-Class/B Elite II | ||
| Line 882: | Line 944: | ||
|Defense | |Defense | ||
|{{TooltipSimple|Diamond|28% (95/337, HQ: 107-120)}}<br>{{TooltipSimple|''Phases: 4''|Samples: 14}} | |{{TooltipSimple|Diamond|28% (95/337, HQ: 107-120)}}<br>{{TooltipSimple|''Phases: 4''|Samples: 14}} | ||
| − | |Prototype Carrier Princess/Damaged II | + | |Prototype Carrier Princess/Vacation Mode Damaged II |
|Aircraft Carrier Summer Princess/B III | |Aircraft Carrier Summer Princess/B III | ||
|Light Carrier Nu-Class/B Elite III | |Light Carrier Nu-Class/B Elite III | ||
| Line 944: | Line 1,006: | ||
|Boss | |Boss | ||
|{{TooltipSimple|Cruising Formation 4|86% (894/1034, HQ: 107-120)}}<br>{{TooltipSimple|''Phases: 4''|Samples: 77}} | |{{TooltipSimple|Cruising Formation 4|86% (894/1034, HQ: 107-120)}}<br>{{TooltipSimple|''Phases: 4''|Samples: 77}} | ||
| − | |Prototype Carrier Princess/II | + | |Prototype Carrier Princess/Vacation Mode II |
|Aircraft Carrier Summer Princess/B III | |Aircraft Carrier Summer Princess/B III | ||
|Light Carrier Nu-Class/B Elite II | |Light Carrier Nu-Class/B Elite II | ||
| Line 960: | Line 1,022: | ||
|Boss/Final | |Boss/Final | ||
|{{TooltipSimple|Cruising Formation 4|14% (140/1034, HQ: 107-120)}}<br>{{TooltipSimple|''Phases: 4''|Samples: 32}} | |{{TooltipSimple|Cruising Formation 4|14% (140/1034, HQ: 107-120)}}<br>{{TooltipSimple|''Phases: 4''|Samples: 32}} | ||
| − | |Prototype Carrier Princess/Damaged II | + | |Prototype Carrier Princess/Vacation Mode Damaged II |
|Aircraft Carrier Summer Princess/B III | |Aircraft Carrier Summer Princess/B III | ||
|Light Carrier Nu-Class/B Elite III | |Light Carrier Nu-Class/B Elite III | ||
| Line 975: | Line 1,037: | ||
</div> | </div> | ||
|-|Easy= | |-|Easy= | ||
| − | {{Map/Image|page=Summer 2022 Event/E-5|{{Map/ImageNode|1|Easy|E-5|x=118|y=223}}{{Map/ImageNode|A|Easy|E-5|x=189|y=241}}{{Map/ImageNode|B|Easy|E-5|x=219|y=274}}{{Map/ImageNode|C|Easy|E-5|x=235|y=233}}{{Map/ImageNode|D|Easy|E-5|x=281|y=225}}{{Map/ImageNode|E|Easy|E-5|x=295|y=257}}{{Map/ImageNode|F|Easy|E-5|x=327|y=218}}{{Map/ImageNode|G1|Easy|E-5|x=329|y=248|drops=<table class="wikitable"><tr><th>Type</th><th>Ships</th></tr><tr><th>DE</th><td>{{Ship/Banner|small=true|Hachijou}}{{Ship/Banner|small=true|Ishigaki}}</td></tr><tr><th>DD</th><td>{{Ship/Banner|small=true|Harusame}}{{Ship/Banner|small=true|Kawakaze}}</td></tr></table>}}{{Map/ImageNode|G2|Easy|E-5|x=261|y=265}}{{Map/ImageNode|G|Easy|E-5|x=311|y=292}}{{Map/ImageNode|H|Easy|E-5|x=269|y=304|drops=<table class="wikitable"><tr><th>Type</th><th>Ships</th></tr><tr><th>DE</th><td>{{Ship/Banner|small=true|Hachijou}}{{Ship/Banner|small=true|Ishigaki}}</td></tr><tr><th>DD</th><td>{{Ship/Banner|small=true|Grecale}}{{Ship/Banner|small=true|Harusame}}{{Ship/Banner|small=true|Kawakaze}}<br>{{Ship/Banner|small=true|Tanikaze}}{{Ship/Banner|small=true|Uranami}}{{Ship/Banner|small=true|Usugumo}}<br></td></tr><tr><th>CA</th><td>{{Ship/Banner|small=true|Pola}}</td></tr></table>}}{{Map/ImageNode|I|Easy|E-5|x=344|y=287}}{{Map/ImageNode|J|Easy|E-5|x=356|y=201}}{{Map/ImageNode|K|Easy|E-5|x=455|y=201}}{{Map/ImageNode|L|Easy|E-5|x=438|y=233}}{{Map/ImageNode|M|Easy|E-5|x=474|y=230|drops=<table class="wikitable"><tr><th>Type</th><th>Ships</th></tr><tr><th>DE</th><td>{{Ship/Banner|small=true|Hachijou}}{{Ship/Banner|small=true|Ishigaki}}</td></tr><tr><th>DD</th><td>{{Ship/Banner|small=true|Harusame}}{{Ship/Banner|small=true|Kawakaze}}{{Ship/Banner|small=true|Tanikaze}}<br>{{Ship/Banner|small=true|Uranami}}</td></tr></table>}}{{Map/ImageNode|N1|Easy|E-5|x=420|y=257}}{{Map/ImageNode|N2|Easy|E-5|x=403|y=219}}{{Map/ImageNode|N|Easy|E-5|x=455|y=263}}{{Map/ImageNode|O|Easy|E-5|x=374|y=250|drops=<table class="wikitable"><tr><th>Type</th><th>Ships</th></tr><tr><th>DE</th><td>{{Ship/Banner|small=true|Hachijou}}{{Ship/Banner|small=true|Ishigaki}}</td></tr><tr><th>DD</th><td>{{Ship/Banner|small=true|Amagiri}}{{Ship/Banner|small=true|Grecale}}{{Ship/Banner|small=true|Harusame}}<br>{{Ship/Banner|small=true|Kawakaze}}{{Ship/Banner|small=true|Tanikaze}}{{Ship/Banner|small=true|Uranami}}<br>{{Ship/Banner|small=true|Usugumo}}</td></tr><tr><th>CL</th><td>{{Ship/Banner|small=true|Giuseppe Garibaldi}}</td></tr><tr><th>CA</th><td>{{Ship/Banner|small=true|Pola}}</td></tr></table>}}{{Map/ImageNode|P|Easy|E-5|x=496|y=268|drops=<table class="wikitable"><tr><th>Type</th><th>Ships</th></tr><tr><th>DE</th><td>{{Ship/Banner|small=true|Hachijou}}{{Ship/Banner|small=true|Ishigaki}}</td></tr><tr><th>DD</th><td>{{Ship/Banner|small=true|Amagiri}}{{Ship/Banner|small=true|Grecale}}{{Ship/Banner|small=true|Harusame}}<br>{{Ship/Banner|small=true|Johnston}}{{Ship/Banner|small=true|Kawakaze}}{{Ship/Banner|small=true|Oyashio}}<br>{{Ship/Banner|small=true|Tanikaze}}{{Ship/Banner|small=true|Uranami}}{{Ship/Banner|small=true|Usugumo}}<br></td></tr><tr><th>CL</th><td>{{Ship/Banner|small=true|Giuseppe Garibaldi}}</td></tr><tr><th>CA</th><td>{{Ship/Banner|small=true|Pola}}</td></tr></table>}}{{Map/ImageNode|Q|Easy|E-5|x=457|y=142}}{{Map/ImageNode|R|Easy|E-5|x=507|y=160}}{{Map/ImageNode|S|Easy|E-5|x=501|y=116}}{{Map/ImageNode|T|Easy|E-5|x=552|y=123|drops=<table class="wikitable"><tr><th>Type</th><th>Ships</th></tr><tr><th>DE</th><td>{{Ship/Banner|small=true|Ishigaki}}</td></tr><tr><th>DD</th><td>{{Ship/Banner|small=true|Kawakaze}}</td></tr></table>}}{{Map/ImageNode|U|Easy|E-5|x=589|y=129}}{{Map/ImageNode|V|Easy|E-5|x=462|y=84}}{{Map/ImageNode|W|Easy|E-5|x=540|y=230}}{{Map/ImageNode|X|Easy|E-5|x=583|y=188|drops=<table class="wikitable"><tr><th>Type</th><th>Ships</th></tr><tr><th>DD</th><td>{{Ship/Banner|small=true|Hamanami}}{{Ship/Banner|small=true|Scirocco}}{{Ship/Banner|small=true|Suzunami}}<br></td></tr><tr><th>CL</th><td>{{Ship/Banner|small=true|Duca degli Abruzzi}}{{Ship/Banner|small=true|Ooyodo}}</td></tr><tr><th>CA</th><td>{{Ship/Banner|small=true|Zara}}</td></tr><tr><th>CVL</th><td>{{Ship/Banner|small=true|Gambier Bay}}</td></tr><tr><th>FBB</th><td>{{Ship/Banner|small=true|Washington}}</td></tr><tr><th>BB</th><td>{{Ship/Banner|small=true|Colorado}}</td></tr><tr><th>LHA</th><td>{{Ship/Banner|small=true|Akitsu Maru}}</td></tr></table>}}}} | + | {{Map/Image|page=Summer 2022 Event/E-5|{{Map/ImageNode|1|Easy|E-5|x=118|y=223}}{{Map/ImageNode|A|Easy|E-5|x=189|y=241}}{{Map/ImageNode|B|Easy|E-5|x=219|y=274}}{{Map/ImageNode|C|Easy|E-5|x=235|y=233}}{{Map/ImageNode|D|Easy|E-5|x=281|y=225}}{{Map/ImageNode|E|Easy|E-5|x=295|y=257}}{{Map/ImageNode|F|Easy|E-5|x=327|y=218}}{{Map/ImageNode|G1|Easy|E-5|x=329|y=248|drops=<table class="wikitable"><tr><th>Type</th><th>Ships</th></tr><tr><th>DE</th><td>{{Ship/Banner|small=true|Hachijou}}{{Ship/Banner|small=true|Ishigaki}}</td></tr><tr><th>DD</th><td>{{Ship/Banner|small=true|Harusame}}{{Ship/Banner|small=true|Kawakaze}}</td></tr></table>}}{{Map/ImageNode|G2|Easy|E-5|x=261|y=265}}{{Map/ImageNode|G|Easy|E-5|x=311|y=292}}{{Map/ImageNode|H|Easy|E-5|x=269|y=304|drops=<table class="wikitable"><tr><th>Type</th><th>Ships</th></tr><tr><th>DE</th><td>{{Ship/Banner|small=true|Hachijou}}{{Ship/Banner|small=true|Ishigaki}}</td></tr><tr><th>DD</th><td>{{Ship/Banner|small=true|Grecale}}{{Ship/Banner|small=true|Harusame}}{{Ship/Banner|small=true|Kawakaze}}<br>{{Ship/Banner|small=true|Tanikaze}}{{Ship/Banner|small=true|Uranami}}{{Ship/Banner|small=true|Usugumo}}<br></td></tr><tr><th>CA</th><td>{{Ship/Banner|small=true|Pola}}</td></tr></table>}}{{Map/ImageNode|I|Easy|E-5|x=344|y=287}}{{Map/ImageNode|J|Easy|E-5|x=356|y=201}}{{Map/ImageNode|K|Easy|E-5|x=455|y=201}}{{Map/ImageNode|L|Easy|E-5|x=438|y=233}}{{Map/ImageNode|M|Easy|E-5|x=474|y=230|drops=<table class="wikitable"><tr><th>Type</th><th>Ships</th></tr><tr><th>DE</th><td>{{Ship/Banner|small=true|Hachijou}}{{Ship/Banner|small=true|Ishigaki}}</td></tr><tr><th>DD</th><td>{{Ship/Banner|small=true|Harusame}}{{Ship/Banner|small=true|Kawakaze}}{{Ship/Banner|small=true|Tanikaze}}<br>{{Ship/Banner|small=true|Uranami}}</td></tr></table>}}{{Map/ImageNode|N1|Easy|E-5|x=420|y=257}}{{Map/ImageNode|N2|Easy|E-5|x=403|y=219}}{{Map/ImageNode|N|Easy|E-5|x=455|y=263}}{{Map/ImageNode|O|Easy|E-5|x=374|y=250|drops=<table class="wikitable"><tr><th>Type</th><th>Ships</th></tr><tr><th>DE</th><td>{{Ship/Banner|small=true|Hachijou}}{{Ship/Banner|small=true|Ishigaki}}</td></tr><tr><th>DD</th><td>{{Ship/Banner|small=true|Amagiri}}{{Ship/Banner|small=true|Grecale}}{{Ship/Banner|small=true|Harusame}}<br>{{Ship/Banner|small=true|Kawakaze}}{{Ship/Banner|small=true|Tanikaze}}{{Ship/Banner|small=true|Uranami}}<br>{{Ship/Banner|small=true|Usugumo}}</td></tr><tr><th>CL</th><td>{{Ship/Banner|small=true|Brooklyn}}{{Ship/Banner|small=true|Giuseppe Garibaldi}}</td></tr><tr><th>CA</th><td>{{Ship/Banner|small=true|Pola}}</td></tr></table>}}{{Map/ImageNode|P|Easy|E-5|x=496|y=268|drops=<table class="wikitable"><tr><th>Type</th><th>Ships</th></tr><tr><th>DE</th><td>{{Ship/Banner|small=true|Hachijou}}{{Ship/Banner|small=true|Ishigaki}}</td></tr><tr><th>DD</th><td>{{Ship/Banner|small=true|Amagiri}}{{Ship/Banner|small=true|Grecale}}{{Ship/Banner|small=true|Harusame}}<br>{{Ship/Banner|small=true|Johnston}}{{Ship/Banner|small=true|Kawakaze}}{{Ship/Banner|small=true|Oyashio}}<br>{{Ship/Banner|small=true|Tanikaze}}{{Ship/Banner|small=true|Uranami}}{{Ship/Banner|small=true|Usugumo}}<br></td></tr><tr><th>CL</th><td>{{Ship/Banner|small=true|Brooklyn}}{{Ship/Banner|small=true|Giuseppe Garibaldi}}</td></tr><tr><th>CA</th><td>{{Ship/Banner|small=true|Pola}}</td></tr></table>}}{{Map/ImageNode|Q|Easy|E-5|x=457|y=142}}{{Map/ImageNode|R|Easy|E-5|x=507|y=160}}{{Map/ImageNode|S|Easy|E-5|x=501|y=116}}{{Map/ImageNode|T|Easy|E-5|x=552|y=123|drops=<table class="wikitable"><tr><th>Type</th><th>Ships</th></tr><tr><th>DE</th><td>{{Ship/Banner|small=true|Ishigaki}}</td></tr><tr><th>DD</th><td>{{Ship/Banner|small=true|Kawakaze}}</td></tr></table>}}{{Map/ImageNode|U|Easy|E-5|x=589|y=129}}{{Map/ImageNode|V|Easy|E-5|x=462|y=84}}{{Map/ImageNode|W|Easy|E-5|x=540|y=230}}{{Map/ImageNode|X|Easy|E-5|x=583|y=188|drops=<table class="wikitable"><tr><th>Type</th><th>Ships</th></tr><tr><th>DD</th><td>{{Ship/Banner|small=true|Hamanami}}{{Ship/Banner|small=true|Scirocco}}{{Ship/Banner|small=true|Suzunami}}<br></td></tr><tr><th>CL</th><td>{{Ship/Banner|small=true|Duca degli Abruzzi}}{{Ship/Banner|small=true|Ooyodo}}</td></tr><tr><th>CA</th><td>{{Ship/Banner|small=true|Zara}}</td></tr><tr><th>CVL</th><td>{{Ship/Banner|small=true|Gambier Bay}}</td></tr><tr><th>FBB</th><td>{{Ship/Banner|small=true|Massachusetts}}{{Ship/Banner|small=true|Washington}}</td></tr><tr><th>BB</th><td>{{Ship/Banner|small=true|Colorado}}</td></tr><tr><th>LHA</th><td>{{Ship/Banner|small=true|Akitsu Maru}}</td></tr></table>}}}} |
<div class="map-nodes"> | <div class="map-nodes"> | ||
| + | {{Map/Nodes|diff=Easy|name= | ||
| + | |AB | ||
| + | |Raid | ||
| + | |{{TooltipSimple|Diamond|12% (87/743)}} | ||
| + | |Airfield Princess/VI | ||
| + | |- | ||
| + | |AB | ||
| + | |Raid | ||
| + | |{{TooltipSimple|Diamond|45% (332/743)}} | ||
| + | |Airfield Princess/V | ||
| + | |Airfield Princess/V | ||
| + | |- | ||
| + | |AB | ||
| + | |Raid | ||
| + | |{{TooltipSimple|Diamond|44% (324/743)}} | ||
| + | |Airfield Princess/VI | ||
| + | |Airfield Princess/V | ||
| + | }} | ||
{{Map/Nodes|diff=Easy|name=深海潜水艦隊 ジブラルタル警戒線 | {{Map/Nodes|diff=Easy|name=深海潜水艦隊 ジブラルタル警戒線 | ||
|A | |A | ||
| Line 1,329: | Line 1,409: | ||
|Defense | |Defense | ||
|{{TooltipSimple|Diamond|30% (125/410, HQ: 105-120)}}<br>{{TooltipSimple|''Phases: 4''|Samples: 43}} | |{{TooltipSimple|Diamond|30% (125/410, HQ: 105-120)}}<br>{{TooltipSimple|''Phases: 4''|Samples: 43}} | ||
| − | |Prototype Carrier Princess | + | |Prototype Carrier Princess/Vacation Mode |
|Aircraft Carrier Summer Princess/B II | |Aircraft Carrier Summer Princess/B II | ||
|Heavy Cruiser Ne-Class/Kai Summer Mode II | |Heavy Cruiser Ne-Class/Kai Summer Mode II | ||
| Line 1,339: | Line 1,419: | ||
|Defense | |Defense | ||
|{{TooltipSimple|Diamond|46% (187/410, HQ: 104-120)}}<br>{{TooltipSimple|''Phases: 4''|Samples: 56}} | |{{TooltipSimple|Diamond|46% (187/410, HQ: 104-120)}}<br>{{TooltipSimple|''Phases: 4''|Samples: 56}} | ||
| − | |Prototype Carrier Princess | + | |Prototype Carrier Princess/Vacation Mode |
|Aircraft Carrier Summer Princess/B II | |Aircraft Carrier Summer Princess/B II | ||
|Light Carrier Nu-Class/B Elite | |Light Carrier Nu-Class/B Elite | ||
| Line 1,349: | Line 1,429: | ||
|Defense | |Defense | ||
|{{TooltipSimple|Diamond|24% (98/410, HQ: 105-120)}}<br>{{TooltipSimple|''Phases: 4''|Samples: 27}} | |{{TooltipSimple|Diamond|24% (98/410, HQ: 105-120)}}<br>{{TooltipSimple|''Phases: 4''|Samples: 27}} | ||
| − | |Prototype Carrier Princess/Damaged | + | |Prototype Carrier Princess/Vacation Mode Damaged |
|Aircraft Carrier Summer Princess/B II | |Aircraft Carrier Summer Princess/B II | ||
|Light Carrier Nu-Class/B Elite II | |Light Carrier Nu-Class/B Elite II | ||
| Line 1,417: | Line 1,497: | ||
|Boss | |Boss | ||
|{{TooltipSimple|Cruising Formation 4|82% (660/806, HQ: 101-120)}}<br>{{TooltipSimple|''Phases: 4''|Samples: 139}} | |{{TooltipSimple|Cruising Formation 4|82% (660/806, HQ: 101-120)}}<br>{{TooltipSimple|''Phases: 4''|Samples: 139}} | ||
| − | |Prototype Carrier Princess | + | |Prototype Carrier Princess/Vacation Mode |
|Aircraft Carrier Summer Princess/B II | |Aircraft Carrier Summer Princess/B II | ||
|Light Carrier Nu-Class/B Elite | |Light Carrier Nu-Class/B Elite | ||
| Line 1,433: | Line 1,513: | ||
|Boss/Final | |Boss/Final | ||
|{{TooltipSimple|Cruising Formation 4|18% (146/806, HQ: 104-120)}}<br>{{TooltipSimple|''Phases: 4''|Samples: 31}} | |{{TooltipSimple|Cruising Formation 4|18% (146/806, HQ: 104-120)}}<br>{{TooltipSimple|''Phases: 4''|Samples: 31}} | ||
| − | |Prototype Carrier Princess/Damaged | + | |Prototype Carrier Princess/Vacation Mode Damaged |
|Aircraft Carrier Summer Princess/B II | |Aircraft Carrier Summer Princess/B II | ||
|Light Carrier Nu-Class/B Elite II | |Light Carrier Nu-Class/B Elite II | ||
| Line 1,448: | Line 1,528: | ||
</div> | </div> | ||
|-|Casual= | |-|Casual= | ||
| − | {{Map/Image|page=Summer 2022 Event/E-5|{{Map/ImageNode|1|Casual|E-5|x=118|y=223}}{{Map/ImageNode|A|Casual|E-5|x=189|y=241}}{{Map/ImageNode|B|Casual|E-5|x=219|y=274}}{{Map/ImageNode|C|Casual|E-5|x=235|y=233}}{{Map/ImageNode|D|Casual|E-5|x=281|y=225}}{{Map/ImageNode|E|Casual|E-5|x=295|y=257}}{{Map/ImageNode|F|Casual|E-5|x=327|y=218}}{{Map/ImageNode|G1|Casual|E-5|x=329|y=248|drops=<table class="wikitable"><tr><th>Type</th><th>Ships</th></tr><tr><th>DE</th><td>{{Ship/Banner|small=true|Ishigaki}}</td></tr><tr><th>DD</th><td>{{Ship/Banner|small=true|Harusame}}{{Ship/Banner|small=true|Kawakaze}}</td></tr></table>}}{{Map/ImageNode|G2|Casual|E-5|x=261|y=265}}{{Map/ImageNode|G|Casual|E-5|x=311|y=292}}{{Map/ImageNode|H|Casual|E-5|x=269|y=304|drops=<table class="wikitable"><tr><th>Type</th><th>Ships</th></tr><tr><th>DE</th><td>{{Ship/Banner|small=true|Hachijou}}{{Ship/Banner|small=true|Ishigaki}}</td></tr><tr><th>DD</th><td>{{Ship/Banner|small=true|Amagiri}}{{Ship/Banner|small=true|Harusame}}{{Ship/Banner|small=true|Kawakaze}}<br>{{Ship/Banner|small=true|Tanikaze}}{{Ship/Banner|small=true|Uranami}}{{Ship/Banner|small=true|Usugumo}}<br></td></tr></table>}}{{Map/ImageNode|I|Casual|E-5|x=344|y=287}}{{Map/ImageNode|J|Casual|E-5|x=356|y=201}}{{Map/ImageNode|K|Casual|E-5|x=455|y=201}}{{Map/ImageNode|L|Casual|E-5|x=438|y=233}}{{Map/ImageNode|M|Casual|E-5|x=474|y=230|drops=<table class="wikitable"><tr><th>Type</th><th>Ships</th></tr><tr><th>DE</th><td>{{Ship/Banner|small=true|Hachijou}}{{Ship/Banner|small=true|Ishigaki}}</td></tr><tr><th>DD</th><td>{{Ship/Banner|small=true|Harusame}}{{Ship/Banner|small=true|Kawakaze}}{{Ship/Banner|small=true|Tanikaze}}<br></td></tr></table>}}{{Map/ImageNode|N1|Casual|E-5|x=420|y=257}}{{Map/ImageNode|N2|Casual|E-5|x=403|y=219}}{{Map/ImageNode|N|Casual|E-5|x=455|y=263}}{{Map/ImageNode|O|Casual|E-5|x=374|y=250|drops=<table class="wikitable"><tr><th>Type</th><th>Ships</th></tr><tr><th>DE</th><td>{{Ship/Banner|small=true|Hachijou}}{{Ship/Banner|small=true|Ishigaki}}</td></tr><tr><th>DD</th><td>{{Ship/Banner|small=true|Amagiri}}{{Ship/Banner|small=true|Grecale}}{{Ship/Banner|small=true|Harusame}}<br>{{Ship/Banner|small=true|Kawakaze}}{{Ship/Banner|small=true|Tanikaze}}{{Ship/Banner|small=true|Uranami}}<br>{{Ship/Banner|small=true|Usugumo}}</td></tr><tr><th>CA</th><td>{{Ship/Banner|small=true|Pola}}</td></tr></table>}}{{Map/ImageNode|P|Casual|E-5|x=496|y=268|drops=<table class="wikitable"><tr><th>Type</th><th>Ships</th></tr><tr><th>DE</th><td>{{Ship/Banner|small=true|Hachijou}}{{Ship/Banner|small=true|Ishigaki}}</td></tr><tr><th>DD</th><td>{{Ship/Banner|small=true|Amagiri}}{{Ship/Banner|small=true|Grecale}}{{Ship/Banner|small=true|Harusame}}<br>{{Ship/Banner|small=true|Johnston}}{{Ship/Banner|small=true|Kawakaze}}{{Ship/Banner|small=true|Oyashio}}<br>{{Ship/Banner|small=true|Tanikaze}}{{Ship/Banner|small=true|Uranami}}{{Ship/Banner|small=true|Usugumo}}<br></td></tr><tr><th>CL</th><td>{{Ship/Banner|small=true|Giuseppe Garibaldi}}</td></tr><tr><th>CA</th><td>{{Ship/Banner|small=true|Pola}}</td></tr></table>}}{{Map/ImageNode|Q|Casual|E-5|x=457|y=142}}{{Map/ImageNode|R|Casual|E-5|x=507|y=160}}{{Map/ImageNode|S|Casual|E-5|x=501|y=116}}{{Map/ImageNode|T|Casual|E-5|x=552|y=123|drops=<table class="wikitable"><tr><th>Type</th><th>Ships</th></tr><tr><th>DE</th><td>{{Ship/Banner|small=true|Hachijou}}{{Ship/Banner|small=true|Ishigaki}}</td></tr><tr><th>DD</th><td>{{Ship/Banner|small=true|Harusame}}{{Ship/Banner|small=true|Kawakaze}}{{Ship/Banner|small=true|Uranami}}<br>{{Ship/Banner|small=true|Usugumo}}</td></tr></table>}}{{Map/ImageNode|U|Casual|E-5|x=589|y=129}}{{Map/ImageNode|V|Casual|E-5|x=462|y=84}}{{Map/ImageNode|W|Casual|E-5|x=540|y=230}}{{Map/ImageNode|X|Casual|E-5|x=583|y=188|drops=<table class="wikitable"><tr><th>Type</th><th>Ships</th></tr><tr><th>DD</th><td>{{Ship/Banner|small=true|Hamanami}}{{Ship/Banner|small=true|Scirocco}}{{Ship/Banner|small=true|Suzunami}}<br></td></tr><tr><th>CL</th><td>{{Ship/Banner|small=true|Duca degli Abruzzi}}{{Ship/Banner|small=true|Ooyodo}}</td></tr><tr><th>CA</th><td>{{Ship/Banner|small=true|Zara}}</td></tr><tr><th>CVL</th><td>{{Ship/Banner|small=true|Gambier Bay}}</td></tr><tr><th>FBB</th><td>{{Ship/Banner|small=true|Washington}}</td></tr><tr><th>BB</th><td>{{Ship/Banner|small=true|Colorado}}</td></tr><tr><th>LHA</th><td>{{Ship/Banner|small=true|Akitsu Maru}}</td></tr></table>}}}} | + | {{Map/Image|page=Summer 2022 Event/E-5|{{Map/ImageNode|1|Casual|E-5|x=118|y=223}}{{Map/ImageNode|A|Casual|E-5|x=189|y=241}}{{Map/ImageNode|B|Casual|E-5|x=219|y=274}}{{Map/ImageNode|C|Casual|E-5|x=235|y=233}}{{Map/ImageNode|D|Casual|E-5|x=281|y=225}}{{Map/ImageNode|E|Casual|E-5|x=295|y=257}}{{Map/ImageNode|F|Casual|E-5|x=327|y=218}}{{Map/ImageNode|G1|Casual|E-5|x=329|y=248|drops=<table class="wikitable"><tr><th>Type</th><th>Ships</th></tr><tr><th>DE</th><td>{{Ship/Banner|small=true|Ishigaki}}</td></tr><tr><th>DD</th><td>{{Ship/Banner|small=true|Harusame}}{{Ship/Banner|small=true|Kawakaze}}</td></tr></table>}}{{Map/ImageNode|G2|Casual|E-5|x=261|y=265}}{{Map/ImageNode|G|Casual|E-5|x=311|y=292}}{{Map/ImageNode|H|Casual|E-5|x=269|y=304|drops=<table class="wikitable"><tr><th>Type</th><th>Ships</th></tr><tr><th>DE</th><td>{{Ship/Banner|small=true|Hachijou}}{{Ship/Banner|small=true|Ishigaki}}</td></tr><tr><th>DD</th><td>{{Ship/Banner|small=true|Amagiri}}{{Ship/Banner|small=true|Harusame}}{{Ship/Banner|small=true|Kawakaze}}<br>{{Ship/Banner|small=true|Tanikaze}}{{Ship/Banner|small=true|Uranami}}{{Ship/Banner|small=true|Usugumo}}<br></td></tr></table>}}{{Map/ImageNode|I|Casual|E-5|x=344|y=287}}{{Map/ImageNode|J|Casual|E-5|x=356|y=201}}{{Map/ImageNode|K|Casual|E-5|x=455|y=201}}{{Map/ImageNode|L|Casual|E-5|x=438|y=233}}{{Map/ImageNode|M|Casual|E-5|x=474|y=230|drops=<table class="wikitable"><tr><th>Type</th><th>Ships</th></tr><tr><th>DE</th><td>{{Ship/Banner|small=true|Hachijou}}{{Ship/Banner|small=true|Ishigaki}}</td></tr><tr><th>DD</th><td>{{Ship/Banner|small=true|Harusame}}{{Ship/Banner|small=true|Kawakaze}}{{Ship/Banner|small=true|Tanikaze}}<br></td></tr></table>}}{{Map/ImageNode|N1|Casual|E-5|x=420|y=257}}{{Map/ImageNode|N2|Casual|E-5|x=403|y=219}}{{Map/ImageNode|N|Casual|E-5|x=455|y=263}}{{Map/ImageNode|O|Casual|E-5|x=374|y=250|drops=<table class="wikitable"><tr><th>Type</th><th>Ships</th></tr><tr><th>DE</th><td>{{Ship/Banner|small=true|Hachijou}}{{Ship/Banner|small=true|Ishigaki}}</td></tr><tr><th>DD</th><td>{{Ship/Banner|small=true|Amagiri}}{{Ship/Banner|small=true|Grecale}}{{Ship/Banner|small=true|Harusame}}<br>{{Ship/Banner|small=true|Kawakaze}}{{Ship/Banner|small=true|Tanikaze}}{{Ship/Banner|small=true|Uranami}}<br>{{Ship/Banner|small=true|Usugumo}}</td></tr><tr><th>CA</th><td>{{Ship/Banner|small=true|Pola}}</td></tr></table>}}{{Map/ImageNode|P|Casual|E-5|x=496|y=268|drops=<table class="wikitable"><tr><th>Type</th><th>Ships</th></tr><tr><th>DE</th><td>{{Ship/Banner|small=true|Hachijou}}{{Ship/Banner|small=true|Ishigaki}}</td></tr><tr><th>DD</th><td>{{Ship/Banner|small=true|Amagiri}}{{Ship/Banner|small=true|Grecale}}{{Ship/Banner|small=true|Harusame}}<br>{{Ship/Banner|small=true|Johnston}}{{Ship/Banner|small=true|Kawakaze}}{{Ship/Banner|small=true|Oyashio}}<br>{{Ship/Banner|small=true|Tanikaze}}{{Ship/Banner|small=true|Uranami}}{{Ship/Banner|small=true|Usugumo}}<br></td></tr><tr><th>CL</th><td>{{Ship/Banner|small=true|Brooklyn}}{{Ship/Banner|small=true|Giuseppe Garibaldi}}</td></tr><tr><th>CA</th><td>{{Ship/Banner|small=true|Pola}}</td></tr></table>}}{{Map/ImageNode|Q|Casual|E-5|x=457|y=142}}{{Map/ImageNode|R|Casual|E-5|x=507|y=160}}{{Map/ImageNode|S|Casual|E-5|x=501|y=116}}{{Map/ImageNode|T|Casual|E-5|x=552|y=123|drops=<table class="wikitable"><tr><th>Type</th><th>Ships</th></tr><tr><th>DE</th><td>{{Ship/Banner|small=true|Hachijou}}{{Ship/Banner|small=true|Ishigaki}}</td></tr><tr><th>DD</th><td>{{Ship/Banner|small=true|Harusame}}{{Ship/Banner|small=true|Kawakaze}}{{Ship/Banner|small=true|Uranami}}<br>{{Ship/Banner|small=true|Usugumo}}</td></tr></table>}}{{Map/ImageNode|U|Casual|E-5|x=589|y=129}}{{Map/ImageNode|V|Casual|E-5|x=462|y=84}}{{Map/ImageNode|W|Casual|E-5|x=540|y=230}}{{Map/ImageNode|X|Casual|E-5|x=583|y=188|drops=<table class="wikitable"><tr><th>Type</th><th>Ships</th></tr><tr><th>DD</th><td>{{Ship/Banner|small=true|Hamanami}}{{Ship/Banner|small=true|Scirocco}}{{Ship/Banner|small=true|Suzunami}}<br></td></tr><tr><th>CL</th><td>{{Ship/Banner|small=true|Duca degli Abruzzi}}{{Ship/Banner|small=true|Ooyodo}}</td></tr><tr><th>CA</th><td>{{Ship/Banner|small=true|Zara}}</td></tr><tr><th>CVL</th><td>{{Ship/Banner|small=true|Gambier Bay}}</td></tr><tr><th>FBB</th><td>{{Ship/Banner|small=true|Massachusetts}}{{Ship/Banner|small=true|Washington}}</td></tr><tr><th>BB</th><td>{{Ship/Banner|small=true|Colorado}}</td></tr><tr><th>LHA</th><td>{{Ship/Banner|small=true|Akitsu Maru}}</td></tr></table>}}}} |
<div class="map-nodes"> | <div class="map-nodes"> | ||
| + | {{Map/Nodes|diff=Casual|name= | ||
| + | |AB | ||
| + | |Raid | ||
| + | |{{TooltipSimple|Diamond|33% (113/339)}} | ||
| + | |Airfield Princess/V | ||
| + | |- | ||
| + | |AB | ||
| + | |Raid | ||
| + | |{{TooltipSimple|Diamond|34% (115/339)}} | ||
| + | |Airfield Princess/VI | ||
| + | |- | ||
| + | |AB | ||
| + | |Raid | ||
| + | |{{TooltipSimple|Diamond|33% (111/339)}} | ||
| + | |Airfield Princess/V | ||
| + | |Airfield Princess/V | ||
| + | }} | ||
{{Map/Nodes|diff=Casual|name=深海潜水艦隊 ジブラルタル警戒線 | {{Map/Nodes|diff=Casual|name=深海潜水艦隊 ジブラルタル警戒線 | ||
|A | |A | ||
| Line 1,769: | Line 1,866: | ||
|Defense | |Defense | ||
|{{TooltipSimple|Diamond|33% (196/598, HQ: 99-120)}}<br>{{TooltipSimple|''Phases: 4''|Samples: 44}} | |{{TooltipSimple|Diamond|33% (196/598, HQ: 99-120)}}<br>{{TooltipSimple|''Phases: 4''|Samples: 44}} | ||
| − | |Prototype Carrier Princess | + | |Prototype Carrier Princess/Vacation Mode |
|Heavy Cruiser Ne-Class | |Heavy Cruiser Ne-Class | ||
|Light Cruiser Tsu-Class | |Light Cruiser Tsu-Class | ||
| Line 1,779: | Line 1,876: | ||
|Defense | |Defense | ||
|{{TooltipSimple|Diamond|58% (346/598, HQ: 99-120)}}<br>{{TooltipSimple|''Phases: 4''|Samples: 75}} | |{{TooltipSimple|Diamond|58% (346/598, HQ: 99-120)}}<br>{{TooltipSimple|''Phases: 4''|Samples: 75}} | ||
| − | |Prototype Carrier Princess | + | |Prototype Carrier Princess/Vacation Mode |
|Standard Carrier Wo-Class/Elite | |Standard Carrier Wo-Class/Elite | ||
|Heavy Cruiser Ne-Class | |Heavy Cruiser Ne-Class | ||
| Line 1,789: | Line 1,886: | ||
|Defense | |Defense | ||
|{{TooltipSimple|Diamond|9% (56/598, HQ: 99-120)}}<br>{{TooltipSimple|''Phases: 4''|Samples: 19}} | |{{TooltipSimple|Diamond|9% (56/598, HQ: 99-120)}}<br>{{TooltipSimple|''Phases: 4''|Samples: 19}} | ||
| − | |Prototype Carrier Princess/Damaged | + | |Prototype Carrier Princess/Vacation Mode Damaged |
|Light Carrier Nu-Class/Elite III | |Light Carrier Nu-Class/Elite III | ||
|Heavy Cruiser Ne-Class/Kai Summer Mode | |Heavy Cruiser Ne-Class/Kai Summer Mode | ||
| Line 1,849: | Line 1,946: | ||
|Boss | |Boss | ||
|{{TooltipSimple|Cruising Formation 4|93% (1275/1375, HQ: 99-120)}}<br>{{TooltipSimple|''Phases: 4''|Samples: 153}} | |{{TooltipSimple|Cruising Formation 4|93% (1275/1375, HQ: 99-120)}}<br>{{TooltipSimple|''Phases: 4''|Samples: 153}} | ||
| − | |Prototype Carrier Princess | + | |Prototype Carrier Princess/Vacation Mode |
|Heavy Cruiser Ne-Class | |Heavy Cruiser Ne-Class | ||
|Light Cruiser Tsu-Class | |Light Cruiser Tsu-Class | ||
| Line 1,865: | Line 1,962: | ||
|Boss/Final | |Boss/Final | ||
|{{TooltipSimple|Cruising Formation 4|7% (100/1375, HQ: 99-120)}}<br>{{TooltipSimple|''Phases: 4''|Samples: 22}} | |{{TooltipSimple|Cruising Formation 4|7% (100/1375, HQ: 99-120)}}<br>{{TooltipSimple|''Phases: 4''|Samples: 22}} | ||
| − | |Prototype Carrier Princess/Damaged | + | |Prototype Carrier Princess/Vacation Mode Damaged |
|Light Carrier Nu-Class/Elite III | |Light Carrier Nu-Class/Elite III | ||
|Heavy Cruiser Ne-Class/Kai Summer Mode | |Heavy Cruiser Ne-Class/Kai Summer Mode | ||
Latest revision as of 05:40, 21 September 2022
| Type | Ships |
|---|---|
| DE | |
| DD |
| Type | Ships |
|---|---|
| DE | |
| DD | |
| CL | |
| CA |
| Type | Ships |
|---|---|
| DE | |
| DD |
| Type | Ships |
|---|---|
| DE | |
| DD | |
| CL |
| Type | Ships |
|---|---|
| DE | |
| DD | |
| CL | |
| CA |
| Type | Ships |
|---|---|
| DE | |
| DD | |
| CA |
| Type | Ships |
|---|---|
| DD | |
| CL | |
| CA | |
| CVL | |
| FBB | |
| BB | |
| LHA |
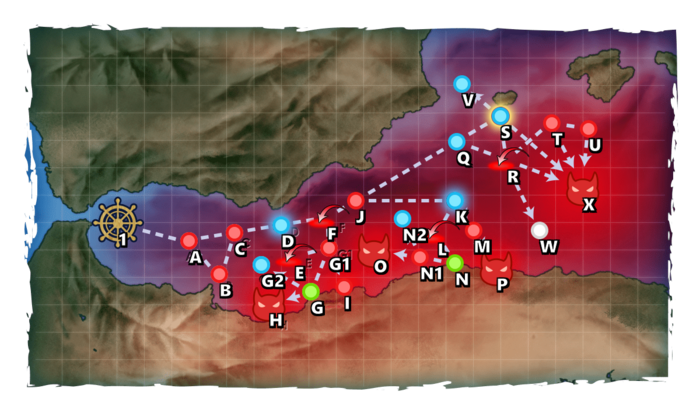
E-5 Hard AB
| # | Formation | Air Raids | AD/AP AS/AS+ |
|---|---|---|---|
| AB | Diamond | 39/78 174/348 | |
| Diamond | 51/101 225/450 | ||
| Diamond | 57/114 255/510 | ||
| Diamond | 62/123 276/552 | ||
| Diamond | 69/137 306/612 | ||
| # | Formation | Air Raids | AD/AP AS/AS+ |
E-5 Hard A: 深海潜水艦隊 ジブラルタル警戒線 (PoiDB)
| # | Formation | Normal Battle Node | AD/AP AS/AS+ |
|---|---|---|---|
| A | Echelon Line Abreast Phases: 1, 2, 3, 4 |
0/0 0/0 | |
| Echelon Line Abreast Phases: 1, 2, 3, 4 |
0/0 0/0 | ||
| Echelon Line Abreast Phases: 1, 2, 3, 4 |
0/0 0/0 | ||
| # | Formation | Normal Battle Node | AD/AP AS/AS+ |
E-5 Hard B: 深海地中海艦隊 東部管区駆逐隊 (PoiDB)
| # | Formation | Normal Battle Node | AD/AP AS/AS+ |
|---|---|---|---|
| B | Echelon Phases: 2, 3, 4 |
0/0 0/0 | |
| Vanguard Phases: 1, 2, 3, 4 |
0/0 0/0 | ||
| Vanguard Phases: 4 |
0/0 0/0 | ||
| # | Formation | Normal Battle Node | AD/AP AS/AS+ |
E-5 Hard C: 深海地中海艦隊 東部管区警戒隊 (PoiDB)
| # | Formation | Normal Battle Node | AD/AP AS/AS+ |
|---|---|---|---|
| C | Echelon Vanguard Phases: 1, 2, 3, 4 |
0/0 0/0 | |
| Vanguard Phases: 3, 4 |
0/0 0/0 | ||
| # | Formation | Normal Battle Node | AD/AP AS/AS+ |
E-5 Hard D
| # | Selection Node | ||
|---|---|---|---|
| D | 艦隊の針路を選択できます。提督、どちらの針路をとられますか? You can decide the fleet's course. Admiral, which heading should we take? | ||
| # | Selection Node | ||
E-5 Hard E: 深海地中海方面 基地航空隊 (PoiDB)
| # | Formation | Air Defense Node | AD/AP AS/AS+ |
|---|---|---|---|
| E | Diamond Phases: 1, 2, 4 |
81/161 360/720 | |
| Diamond Phases: 1, 4 |
90/179 402/804 | ||
| Diamond Phases: 1, 2, 4 |
99/198 444/888 | ||
| Diamond Phases: 1 |
105/209 468/936 | ||
| # | Formation | Air Defense Node | AD/AP AS/AS+ |
E-5 Hard F: 深海地中海方面 基地航空隊 (PoiDB)
| # | Formation | Air Defense Node | AD/AP AS/AS+ |
|---|---|---|---|
| F | Diamond Phases: 2, 3, 4 |
81/161 360/720 | |
| Diamond Phases: 2, 3, 4 |
90/179 402/804 | ||
| Diamond Phases: 2, 3, 4 |
99/198 444/888 | ||
| Diamond Phases: 2, 3 |
105/209 468/936 | ||
| # | Formation | Air Defense Node | AD/AP AS/AS+ |
E-5 Hard G
| # | Landing Node | ||
|---|---|---|---|
| G | 輸送物資の揚陸地点に到達しました。本海域の輸送作戦は無事完了しています。 The landing point of the convoy has been reached. The transport operation here has already been completed successfully. | ||
| # | Landing Node | ||
E-5 Hard G1: 深海地中海艦隊 東部管区防備隊 (PoiDB)
| # | Formation | Normal Battle Node | AD/AP AS/AS+ |
|---|---|---|---|
| G1 | Line Ahead Double Line Phases: 1, 2, 4 |
50/100 224/447 | |
| Diamond Phases: 1, 2, 4 |
50/100 224/447 | ||
| # | Formation | Normal Battle Node | AD/AP AS/AS+ |
E-5 Hard G2
| # | Empty Node | ||
|---|---|---|---|
| G2 | 敵影を見ず。 No enemy spotted. | ||
| # | Empty Node | ||
E-5 Hard H: 深海地中海方面 沿岸警備集団 (PoiDB)
| # | Formation | Boss Battle Node | AD/AP AS/AS+ |
|---|---|---|---|
| H | Line Ahead Double Line Diamond Phases: 1, 4 |
50/100 224/447 | |
| # | Formation | Boss Battle Node | AD/AP AS/AS+ |
E-5 Hard I: 深海北アフリカ 沿岸物資集積地 (PoiDB)
| # | Formation | Normal Battle Node | AD/AP AS/AS+ |
|---|---|---|---|
| I | Double Line Phases: 2 |
62/124 278/555 | |
| Double Line Phases: 2 |
62/124 278/555 | ||
| Double Line Phases: 4 |
46/91 204/408 | ||
| # | Formation | Normal Battle Node | AD/AP AS/AS+ |
E-5 Hard J: 深海潜水艦隊 地中海阻止哨戒線 (PoiDB)
| # | Formation | Normal Battle Node | AD/AP AS/AS+ |
|---|---|---|---|
| J | Echelon Line Abreast Phases: 2, 3, 4 |
0/0 0/0 | |
| Echelon Line Abreast Phases: 2, 3, 4 |
0/0 0/0 | ||
| Echelon Line Abreast Phases: 2, 3, 4 |
0/0 0/0 | ||
| # | Formation | Normal Battle Node | AD/AP AS/AS+ |
E-5 Hard K
| # | Selection Node | ||
|---|---|---|---|
| K | 艦隊の針路を選択できます。提督、どちらの針路をとられますか? You can decide the fleet's course. Admiral, which heading should we take? | ||
| # | Selection Node | ||
E-5 Hard L: 深海地中海方面 基地航空隊 (PoiDB)
| # | Formation | Air Defense Node | AD/AP AS/AS+ |
|---|---|---|---|
| L | Diamond Phases: 2 |
81/161 360/720 | |
| Diamond Phases: 2, 4 |
90/179 402/804 | ||
| Diamond Phases: 2, 3, 4 |
99/198 444/888 | ||
| Diamond Phases: 2 |
105/209 468/936 | ||
| # | Formation | Air Defense Node | AD/AP AS/AS+ |
E-5 Hard M: 深海地中海艦隊 水上打撃部隊 (PoiDB)
| # | Formation | Normal Battle Node | AD/AP AS/AS+ |
|---|---|---|---|
| M | Line Ahead Double Line Phases: 2, 3, 4 |
0/0 0/0 | |
| Line Ahead Phases: 3 |
0/0 0/0 | ||
| # | Formation | Normal Battle Node | AD/AP AS/AS+ |
E-5 Hard N
| # | Landing Node | ||
|---|---|---|---|
| N | 輸送物資の揚陸地点に到達しました。本海域の輸送作戦は無事完了しています。 The landing point of the convoy has been reached. The transport operation here has already been completed successfully. | ||
| # | Landing Node | ||
E-5 Hard N1: 北アフリカ配備 深海魚雷艇集団 (PoiDB)
| # | Formation | Normal Battle Node | AD/AP AS/AS+ |
|---|---|---|---|
| N1 | Line Ahead Echelon Phases: 2 |
0/0 0/0 | |
| # | Formation | Normal Battle Node | AD/AP AS/AS+ |
E-5 Hard N2
| # | Empty Node | ||
|---|---|---|---|
| N2 | 敵影を見ず。 No enemy spotted. | ||
| # | Empty Node | ||
E-5 Hard O: 深海地中海艦隊 中央機動反撃群 (PoiDB)
| # | Formation | Boss Battle Node | AD/AP AS/AS+ |
|---|---|---|---|
| O | Cruising Formation 4 Phases: 2 |
113/225 504/1008 | |
| Cruising Formation 4 (Final)
|
57/113 252/504 | ||
| # | Formation | Boss Battle Node | AD/AP AS/AS+ |
E-5 Hard P: 深海北アフリカ方面 重要戦力拠点 (PoiDB)
| # | Formation | Boss Battle Node | AD/AP AS/AS+ |
|---|---|---|---|
| P | Double Line Phases: 3 |
90/179 401/801 | |
| Double Line Phases: 4 |
0/0 0/0 | ||
| Double Line Phases: 3 (Final)
|
82/163 365/729 | ||
| # | Formation | Boss Battle Node | AD/AP AS/AS+ |
E-5 Hard Q
| # | Empty Node | ||
|---|---|---|---|
| Q | 気のせいだった。 地中海連合艦隊、これより敵主力艦隊を捜索、発見次第、これを撃滅する! Must be my imagination. The Mediterranean Combined Fleet will now search for the main enemy fleet and destroy it on sight! | ||
| # | Empty Node | ||
E-5 Hard R: 深海地中海艦隊 艦載機群 (PoiDB)
| # | Formation | Air Defense Node | AD/AP AS/AS+ |
|---|---|---|---|
| R | Diamond Phases: 4 |
143/286 642/1284 | |
| Diamond Phases: 4 |
199/398 894/1788 | ||
| Diamond Phases: 4 |
276/552 1241/2481 | ||
| # | Formation | Air Defense Node | AD/AP AS/AS+ |
E-5 Hard S
| # | Repair Node | ||
|---|---|---|---|
| # | Repair Node | ||
E-5 Hard T: 深海地中海艦隊 空母随伴集団 (PoiDB)
| # | Formation | Normal Battle Node | AD/AP AS/AS+ |
|---|---|---|---|
| T | Line Ahead Phases: 4 |
0/0 0/0 | |
| Line Ahead Phases: 4 |
0/0 0/0 | ||
| Line Ahead Phases: 4 |
0/0 0/0 | ||
| # | Formation | Normal Battle Node | AD/AP AS/AS+ |
E-5 Hard U: 深海潜水艦隊 地中海旗艦集団 (PoiDB)
| # | Formation | Normal Battle Node | AD/AP AS/AS+ |
|---|---|---|---|
| U | Line Abreast | 0/0 0/0 | |
| Echelon Line Abreast Phases: 4 |
0/0 0/0 | ||
| # | Formation | Normal Battle Node | AD/AP AS/AS+ |
E-5 Hard V
| # | Empty Node | ||
|---|---|---|---|
| V | 敵影を見ず。 地中海連合艦隊、これより敵主力艦隊を捜索、発見次第、これを撃滅する! No enemy spotted. The Mediterranean Combined Fleet will now search for the main enemy fleet and destroy it on sight! | ||
| # | Empty Node | ||
E-5 Hard W
| # | Empty Node | ||
|---|---|---|---|
| W | 敵影を見ず。 地中海連合艦隊、これより敵主力艦隊を捜索、発見次第、これを撃滅する! No enemy spotted. The Mediterranean Combined Fleet will now search for the main enemy fleet and destroy it on sight! | ||
| # | Empty Node | ||
E-5 Hard X: 深海地中海艦隊 主力機動部隊 (PoiDB)
| # | Formation | Boss Battle Node | AD/AP AS/AS+ |
|---|---|---|---|
| X | Cruising Formation 4 Phases: 4 |
199/398 894/1788 | |
| Cruising Formation 4 Phases: 4 (Final)
|
276/552 1241/2481 | ||
| # | Formation | Boss Battle Node | AD/AP AS/AS+ |
| Type | Ships |
|---|---|
| DE | |
| DD |
| Type | Ships |
|---|---|
| DE | |
| DD | |
| CL |
| Type | Ships |
|---|---|
| DE | |
| DD |
| Type | Ships |
|---|---|
| DE | |
| DD | |
| CL |
| Type | Ships |
|---|---|
| DE | |
| DD | |
| CL | |
| CA |
| Type | Ships |
|---|---|
| DE | |
| DD | |
| CA |
| Type | Ships |
|---|---|
| DD | |
| CL | |
| CA | |
| CVL | |
| FBB | |
| BB | |
| LHA |
E-5 Medium AB
| # | Formation | Air Raids | AD/AP AS/AS+ |
|---|---|---|---|
| AB | Diamond | 28/55 123/246 | |
| Diamond | 33/65 144/288 | ||
| Diamond | 39/78 174/348 | ||
| Diamond | 44/87 195/390 | ||
| # | Formation | Air Raids | AD/AP AS/AS+ |
E-5 Medium A: 深海潜水艦隊 ジブラルタル警戒線 (PoiDB)
| # | Formation | Normal Battle Node | AD/AP AS/AS+ |
|---|---|---|---|
| A | Echelon Line Abreast Phases: 1, 2, 3, 4 |
0/0 0/0 | |
| Echelon Line Abreast Phases: 1, 2, 3, 4 |
0/0 0/0 | ||
| Echelon Line Abreast Phases: 1, 2, 3, 4 |
0/0 0/0 | ||
| # | Formation | Normal Battle Node | AD/AP AS/AS+ |
E-5 Medium B: 深海地中海艦隊 東部管区駆逐隊 (PoiDB)
| # | Formation | Normal Battle Node | AD/AP AS/AS+ |
|---|---|---|---|
| B | Echelon Phases: 1 |
0/0 0/0 | |
| Vanguard | 0/0 0/0 | ||
| Vanguard Phases: 4 |
0/0 0/0 | ||
| # | Formation | Normal Battle Node | AD/AP AS/AS+ |
E-5 Medium C: 深海地中海艦隊 東部管区警戒隊 (PoiDB)
| # | Formation | Normal Battle Node | AD/AP AS/AS+ |
|---|---|---|---|
| C | Echelon Vanguard Phases: 1, 2, 3, 4 |
0/0 0/0 | |
| Vanguard Phases: 3, 4 |
0/0 0/0 | ||
| # | Formation | Normal Battle Node | AD/AP AS/AS+ |
E-5 Medium D
| # | Selection Node | ||
|---|---|---|---|
| D | 艦隊の針路を選択できます。提督、どちらの針路をとられますか? You can decide the fleet's course. Admiral, which heading should we take? | ||
| # | Selection Node | ||
E-5 Medium E: 深海地中海方面 基地航空隊 (PoiDB)
| # | Formation | Air Defense Node | AD/AP AS/AS+ |
|---|---|---|---|
| E | Diamond Phases: 1, 4 |
55/110 246/492 | |
| Diamond Phases: 1, 4 |
60/119 267/534 | ||
| Diamond Phases: 1, 4 |
74/147 330/660 | ||
| Diamond Phases: 1 |
61/122 273/546 | ||
| Diamond Phases: 1 |
81/161 360/720 | ||
| # | Formation | Air Defense Node | AD/AP AS/AS+ |
E-5 Medium F: 深海地中海方面 基地航空隊 (PoiDB)
| # | Formation | Air Defense Node | AD/AP AS/AS+ |
|---|---|---|---|
| F | Diamond Phases: 2, 3, 4 |
55/110 246/492 | |
| Diamond Phases: 2, 3, 4 |
60/119 267/534 | ||
| Diamond Phases: 2, 3, 4 |
74/147 330/660 | ||
| Diamond Phases: 2, 3, 4 |
61/122 273/546 | ||
| Diamond Phases: 3 |
81/161 360/720 | ||
| # | Formation | Air Defense Node | AD/AP AS/AS+ |
E-5 Medium G
| # | Landing Node | ||
|---|---|---|---|
| G | 輸送物資の揚陸地点に到達しました。本海域の輸送作戦は無事完了しています。 The landing point of the convoy has been reached. The transport operation here has already been completed successfully. | ||
| # | Landing Node | ||
E-5 Medium G1: 深海地中海艦隊 東部管区防備隊 (PoiDB)
| # | Formation | Normal Battle Node | AD/AP AS/AS+ |
|---|---|---|---|
| G1 | Line Ahead Double Line Phases: 2, 4 |
46/91 204/408 | |
| Diamond Phases: 2, 4 |
46/91 204/408 | ||
| # | Formation | Normal Battle Node | AD/AP AS/AS+ |
E-5 Medium G2
| # | Empty Node | ||
|---|---|---|---|
| G2 | 敵影を見ず。 No enemy spotted. | ||
| # | Empty Node | ||
E-5 Medium H: 深海地中海方面 沿岸警備集団 (PoiDB)
| # | Formation | Boss Battle Node | AD/AP AS/AS+ |
|---|---|---|---|
| H | Line Ahead Double Line Diamond Phases: 1, 2 |
41/81 180/360 | |
| # | Formation | Boss Battle Node | AD/AP AS/AS+ |
E-5 Medium I: 深海北アフリカ 沿岸物資集積地 (PoiDB)
| # | Formation | Normal Battle Node | AD/AP AS/AS+ |
|---|---|---|---|
| I | Double Line Phases: 2 |
52/103 231/462 | |
| Double Line Phases: 2 |
52/103 231/462 | ||
| Double Line Phases: 4 |
37/73 162/324 | ||
| # | Formation | Normal Battle Node | AD/AP AS/AS+ |
E-5 Medium J: 深海潜水艦隊 地中海阻止哨戒線 (PoiDB)
| # | Formation | Normal Battle Node | AD/AP AS/AS+ |
|---|---|---|---|
| J | Echelon Line Abreast Phases: 2, 3, 4 |
0/0 0/0 | |
| Echelon Line Abreast Phases: 2, 3, 4 |
0/0 0/0 | ||
| Echelon Line Abreast Phases: 2, 3, 4 |
0/0 0/0 | ||
| # | Formation | Normal Battle Node | AD/AP AS/AS+ |
E-5 Medium K
| # | Selection Node | ||
|---|---|---|---|
| K | 艦隊の針路を選択できます。提督、どちらの針路をとられますか? You can decide the fleet's course. Admiral, which heading should we take? | ||
| # | Selection Node | ||
E-5 Medium L: 深海地中海方面 基地航空隊 (PoiDB)
| # | Formation | Air Defense Node | AD/AP AS/AS+ |
|---|---|---|---|
| L | Diamond Phases: 2 |
55/110 246/492 | |
| Diamond Phases: 2 |
60/119 267/534 | ||
| Diamond Phases: 2 |
74/147 330/660 | ||
| Diamond Phases: 2, 3 |
61/122 273/546 | ||
| Diamond Phases: 2 |
81/161 360/720 | ||
| # | Formation | Air Defense Node | AD/AP AS/AS+ |
E-5 Medium M: 深海地中海艦隊 水上打撃部隊 (PoiDB)
| # | Formation | Normal Battle Node | AD/AP AS/AS+ |
|---|---|---|---|
| M | Line Ahead Double Line Phases: 3, 4 |
0/0 0/0 | |
| Line Ahead Phases: 3 |
0/0 0/0 | ||
| # | Formation | Normal Battle Node | AD/AP AS/AS+ |
E-5 Medium N
| # | Landing Node | ||
|---|---|---|---|
| N | 輸送物資の揚陸地点に到達しました。本海域の輸送作戦は無事完了しています。 The landing point of the convoy has been reached. The transport operation here has already been completed successfully. | ||
| # | Landing Node | ||
E-5 Medium N1: 北アフリカ配備 深海魚雷艇集団 (PoiDB)
| # | Formation | Normal Battle Node | AD/AP AS/AS+ |
|---|---|---|---|
| N1 | Line Ahead Echelon Phases: 2, 3 |
0/0 0/0 | |
| # | Formation | Normal Battle Node | AD/AP AS/AS+ |
E-5 Medium N2
| # | Empty Node | ||
|---|---|---|---|
| N2 | 敵影を見ず。 No enemy spotted. | ||
| # | Empty Node | ||
E-5 Medium O: 深海地中海艦隊 中央機動反撃群 (PoiDB)
| # | Formation | Boss Battle Node | AD/AP AS/AS+ |
|---|---|---|---|
| O | Cruising Formation 4 Phases: 2 |
46/91 204/408 | |
| # | Formation | Boss Battle Node | AD/AP AS/AS+ |
E-5 Medium P: 深海北アフリカ方面 重要戦力拠点 (PoiDB)
| # | Formation | Boss Battle Node | AD/AP AS/AS+ |
|---|---|---|---|
| P | Double Line Phases: 3 |
76/151 339/678 | |
| Double Line Phases: 4 |
0/0 0/0 | ||
| Double Line Phases: 3 (Final)
|
68/135 303/606 | ||
| # | Formation | Boss Battle Node | AD/AP AS/AS+ |
E-5 Medium Q
| # | Empty Node | ||
|---|---|---|---|
| Q | 気のせいだった。 地中海連合艦隊、これより敵主力艦隊を捜索、発見次第、これを撃滅する! Must be my imagination. The Mediterranean Combined Fleet will now search for the main enemy fleet and destroy it on sight! | ||
| # | Empty Node | ||
E-5 Medium R: 深海地中海艦隊 艦載機群 (PoiDB)
| # | Formation | Air Defense Node | AD/AP AS/AS+ |
|---|---|---|---|
| R | Diamond Phases: 4 |
136/271 608/1215 | |
| Diamond Phases: 4 |
181/361 812/1623 | ||
| Diamond Phases: 4 |
191/382 858/1716 | ||
| # | Formation | Air Defense Node | AD/AP AS/AS+ |
E-5 Medium S
| # | Repair Node | ||
|---|---|---|---|
| # | Repair Node | ||
E-5 Medium T: 深海地中海艦隊 空母随伴集団 (PoiDB)
| # | Formation | Normal Battle Node | AD/AP AS/AS+ |
|---|---|---|---|
| T | Line Ahead | 0/0 0/0 | |
| Line Ahead Phases: 4 |
0/0 0/0 | ||
| Line Ahead Phases: 4 |
0/0 0/0 | ||
| # | Formation | Normal Battle Node | AD/AP AS/AS+ |
E-5 Medium U: 深海潜水艦隊 地中海旗艦集団 (PoiDB)
| # | Formation | Normal Battle Node | AD/AP AS/AS+ |
|---|---|---|---|
| U | Line Abreast Phases: 4 |
0/0 0/0 | |
| Echelon Phases: 4 |
0/0 0/0 | ||
| # | Formation | Normal Battle Node | AD/AP AS/AS+ |
E-5 Medium V
| # | Empty Node | ||
|---|---|---|---|
| V | 敵影を見ず。 地中海連合艦隊、これより敵主力艦隊を捜索、発見次第、これを撃滅する! No enemy spotted. The Mediterranean Combined Fleet will now search for the main enemy fleet and destroy it on sight! | ||
| # | Empty Node | ||
E-5 Medium W
| # | Empty Node | ||
|---|---|---|---|
| W | 敵影を見ず。 地中海連合艦隊、これより敵主力艦隊を捜索、発見次第、これを撃滅する! No enemy spotted. The Mediterranean Combined Fleet will now search for the main enemy fleet and destroy it on sight! | ||
| # | Empty Node | ||
E-5 Medium X: 深海地中海艦隊 主力機動部隊 (PoiDB)
| # | Formation | Boss Battle Node | AD/AP AS/AS+ |
|---|---|---|---|
| X | Cruising Formation 4 Phases: 4 |
181/361 812/1623 | |
| Cruising Formation 4 Phases: 4 (Final)
|
191/382 858/1716 | ||
| # | Formation | Boss Battle Node | AD/AP AS/AS+ |
| Type | Ships |
|---|---|
| DE | |
| DD |
| Type | Ships |
|---|---|
| DE | |
| DD | |
| CA |
| Type | Ships |
|---|---|
| DE | |
| DD |
| Type | Ships |
|---|---|
| DE | |
| DD | |
| CL | |
| CA |
| Type | Ships |
|---|---|
| DE | |
| DD | |
| CL | |
| CA |
| Type | Ships |
|---|---|
| DE | |
| DD |
| Type | Ships |
|---|---|
| DD | |
| CL | |
| CA | |
| CVL | |
| FBB | |
| BB | |
| LHA |
E-5 Easy AB
| # | Formation | Air Raids | AD/AP AS/AS+ |
|---|---|---|---|
| AB | Diamond | 17/33 72/144 | |
| Diamond | 23/46 102/204 | ||
| Diamond | 28/55 123/246 | ||
| # | Formation | Air Raids | AD/AP AS/AS+ |
E-5 Easy A: 深海潜水艦隊 ジブラルタル警戒線 (PoiDB)
| # | Formation | Normal Battle Node | AD/AP AS/AS+ |
|---|---|---|---|
| A | Echelon Line Abreast Phases: 1, 2, 3, 4 |
0/0 0/0 | |
| Echelon Line Abreast Phases: 1, 2, 3, 4 |
0/0 0/0 | ||
| Echelon Line Abreast Phases: 1, 2, 3, 4 |
0/0 0/0 | ||
| # | Formation | Normal Battle Node | AD/AP AS/AS+ |
E-5 Easy B: 深海地中海艦隊 東部管区駆逐隊 (PoiDB)
| # | Formation | Normal Battle Node | AD/AP AS/AS+ |
|---|---|---|---|
| B | Echelon Phases: 3, 4 |
0/0 0/0 | |
| Vanguard Phases: 2, 4 |
0/0 0/0 | ||
| Vanguard Phases: 3, 4 |
0/0 0/0 | ||
| # | Formation | Normal Battle Node | AD/AP AS/AS+ |
E-5 Easy C: 深海地中海艦隊 東部管区警戒隊 (PoiDB)
| # | Formation | Normal Battle Node | AD/AP AS/AS+ |
|---|---|---|---|
| C | Echelon Vanguard Phases: 1, 2, 3, 4 |
0/0 0/0 | |
| Vanguard Phases: 3, 4 |
0/0 0/0 | ||
| # | Formation | Normal Battle Node | AD/AP AS/AS+ |
E-5 Easy D
| # | Selection Node | ||
|---|---|---|---|
| D | 艦隊の針路を選択できます。提督、どちらの針路をとられますか? You can decide the fleet's course. Admiral, which heading should we take? | ||
| # | Selection Node | ||
E-5 Easy E: 深海地中海方面 基地航空隊 (PoiDB)
| # | Formation | Air Defense Node | AD/AP AS/AS+ |
|---|---|---|---|
| E | Diamond Phases: 1, 2 |
35/69 153/306 | |
| Diamond Phases: 1, 2 |
44/87 195/390 | ||
| Diamond Phases: 1, 2 |
46/91 204/408 | ||
| Diamond Phases: 1, 2, 4 |
55/110 246/492 | ||
| Diamond Phases: 1 |
60/119 267/534 | ||
| # | Formation | Air Defense Node | AD/AP AS/AS+ |
E-5 Easy F: 深海地中海方面 基地航空隊 (PoiDB)
| # | Formation | Air Defense Node | AD/AP AS/AS+ |
|---|---|---|---|
| F | Diamond Phases: 2, 3, 4 |
35/69 153/306 | |
| Diamond Phases: 2, 3, 4 |
44/87 195/390 | ||
| Diamond Phases: 2, 3, 4 |
46/91 204/408 | ||
| Diamond Phases: 2, 3, 4 |
55/110 246/492 | ||
| Diamond Phases: 2, 3 |
60/119 267/534 | ||
| # | Formation | Air Defense Node | AD/AP AS/AS+ |
E-5 Easy G
| # | Landing Node | ||
|---|---|---|---|
| G | 輸送物資の揚陸地点に到達しました。本海域の輸送作戦は無事完了しています。 The landing point of the convoy has been reached. The transport operation here has already been completed successfully. | ||
| # | Landing Node | ||
E-5 Easy G1: 深海地中海艦隊 東部管区防備隊 (PoiDB)
| # | Formation | Normal Battle Node | AD/AP AS/AS+ |
|---|---|---|---|
| G1 | Line Ahead Double Line Phases: 1, 2, 4 |
41/81 180/360 | |
| Diamond Phases: 1, 2, 4 |
41/81 180/360 | ||
| # | Formation | Normal Battle Node | AD/AP AS/AS+ |
E-5 Easy G2
| # | Empty Node | ||
|---|---|---|---|
| G2 | 敵影を見ず。 No enemy spotted. | ||
| # | Empty Node | ||
E-5 Easy H: 深海地中海方面 沿岸警備集団 (PoiDB)
| # | Formation | Boss Battle Node | AD/AP AS/AS+ |
|---|---|---|---|
| H | Line Ahead Double Line Diamond Phases: 1, 2 |
43/85 189/378 | |
| # | Formation | Boss Battle Node | AD/AP AS/AS+ |
E-5 Easy I: 深海北アフリカ 沿岸物資集積地 (PoiDB)
| # | Formation | Normal Battle Node | AD/AP AS/AS+ |
|---|---|---|---|
| I | Double Line Phases: 2 |
37/74 165/330 | |
| Double Line Phases: 2 |
37/74 165/330 | ||
| Double Line Phases: 4 |
24/47 105/210 | ||
| # | Formation | Normal Battle Node | AD/AP AS/AS+ |
E-5 Easy J: 深海潜水艦隊 地中海阻止哨戒線 (PoiDB)
| # | Formation | Normal Battle Node | AD/AP AS/AS+ |
|---|---|---|---|
| J | Echelon Line Abreast Phases: 2, 3, 4 |
0/0 0/0 | |
| Echelon Line Abreast Phases: 2, 3, 4 |
0/0 0/0 | ||
| Echelon Line Abreast Phases: 2, 3, 4 |
0/0 0/0 | ||
| # | Formation | Normal Battle Node | AD/AP AS/AS+ |
E-5 Easy K
| # | Selection Node | ||
|---|---|---|---|
| K | 艦隊の針路を選択できます。提督、どちらの針路をとられますか? You can decide the fleet's course. Admiral, which heading should we take? | ||
| # | Selection Node | ||
E-5 Easy L: 深海地中海方面 基地航空隊 (PoiDB)
| # | Formation | Air Defense Node | AD/AP AS/AS+ |
|---|---|---|---|
| L | Diamond Phases: 2 |
35/69 153/306 | |
| Diamond Phases: 2, 3, 4 |
44/87 195/390 | ||
| Diamond Phases: 2, 4 |
46/91 204/408 | ||
| Diamond Phases: 2 |
55/110 246/492 | ||
| Diamond Phases: 2 |
60/119 267/534 | ||
| # | Formation | Air Defense Node | AD/AP AS/AS+ |
E-5 Easy M: 深海地中海艦隊 水上打撃部隊 (PoiDB)
| # | Formation | Normal Battle Node | AD/AP AS/AS+ |
|---|---|---|---|
| M | Line Ahead Double Line Phases: 3, 4 |
0/0 0/0 | |
| Line Ahead Phases: 3 |
0/0 0/0 | ||
| # | Formation | Normal Battle Node | AD/AP AS/AS+ |
E-5 Easy N
| # | Landing Node | ||
|---|---|---|---|
| N | 輸送物資の揚陸地点に到達しました。本海域の輸送作戦は無事完了しています。 The landing point of the convoy has been reached. The transport operation here has already been completed successfully. | ||
| # | Landing Node | ||
E-5 Easy N1: 北アフリカ配備 深海魚雷艇集団 (PoiDB)
| # | Formation | Normal Battle Node | AD/AP AS/AS+ |
|---|---|---|---|
| N1 | Line Ahead Echelon Phases: 2, 4 |
0/0 0/0 | |
| # | Formation | Normal Battle Node | AD/AP AS/AS+ |
E-5 Easy N2
| # | Empty Node | ||
|---|---|---|---|
| N2 | 敵影を見ず。 No enemy spotted. | ||
| # | Empty Node | ||
E-5 Easy O: 深海地中海艦隊 中央機動反撃群 (PoiDB)
| # | Formation | Boss Battle Node | AD/AP AS/AS+ |
|---|---|---|---|
| O | Cruising Formation 4 Phases: 2 |
43/85 189/378 | |
| # | Formation | Boss Battle Node | AD/AP AS/AS+ |
E-5 Easy P: 深海北アフリカ方面 重要戦力拠点 (PoiDB)
| # | Formation | Boss Battle Node | AD/AP AS/AS+ |
|---|---|---|---|
| P | Double Line Phases: 3 |
37/74 165/330 | |
| Double Line Phases: 4 |
0/0 0/0 | ||
| Double Line Phases: 3 (Final)
|
55/110 246/492 | ||
| # | Formation | Boss Battle Node | AD/AP AS/AS+ |
E-5 Easy Q
| # | Empty Node | ||
|---|---|---|---|
| Q | 気のせいだった。 地中海連合艦隊、これより敵主力艦隊を捜索、発見次第、これを撃滅する! Must be my imagination. The Mediterranean Combined Fleet will now search for the main enemy fleet and destroy it on sight! | ||
| # | Empty Node | ||
E-5 Easy R: 深海地中海艦隊 艦載機群 (PoiDB)
| # | Formation | Air Defense Node | AD/AP AS/AS+ |
|---|---|---|---|
| R | Diamond Phases: 4 |
127/254 570/1140 | |
| Diamond Phases: 4 |
167/334 750/1500 | ||
| Diamond Phases: 4 |
179/358 804/1608 | ||
| # | Formation | Air Defense Node | AD/AP AS/AS+ |
E-5 Easy S
| # | Repair Node | ||
|---|---|---|---|
| # | Repair Node | ||
E-5 Easy T: 深海地中海艦隊 空母随伴集団 (PoiDB)
| # | Formation | Normal Battle Node | AD/AP AS/AS+ |
|---|---|---|---|
| T | Line Ahead Phases: 4 |
0/0 0/0 | |
| Line Ahead Phases: 4 |
0/0 0/0 | ||
| Line Ahead Phases: 4 |
0/0 0/0 | ||
| # | Formation | Normal Battle Node | AD/AP AS/AS+ |
E-5 Easy U: 深海潜水艦隊 地中海旗艦集団 (PoiDB)
| # | Formation | Normal Battle Node | AD/AP AS/AS+ |
|---|---|---|---|
| U | Echelon Line Abreast |
0/0 0/0 | |
| Echelon Line Abreast Phases: 4 |
0/0 0/0 | ||
| Echelon Line Abreast Phases: 4 |
0/0 0/0 | ||
| # | Formation | Normal Battle Node | AD/AP AS/AS+ |
E-5 Easy V
| # | Empty Node | ||
|---|---|---|---|
| V | 敵影を見ず。 地中海連合艦隊、これより敵主力艦隊を捜索、発見次第、これを撃滅する! No enemy spotted. The Mediterranean Combined Fleet will now search for the main enemy fleet and destroy it on sight! | ||
| # | Empty Node | ||
E-5 Easy W
| # | Empty Node | ||
|---|---|---|---|
| W | 敵影を見ず。 地中海連合艦隊、これより敵主力艦隊を捜索、発見次第、これを撃滅する! No enemy spotted. The Mediterranean Combined Fleet will now search for the main enemy fleet and destroy it on sight! | ||
| # | Empty Node | ||
E-5 Easy X: 深海地中海艦隊 主力機動部隊 (PoiDB)
| # | Formation | Boss Battle Node | AD/AP AS/AS+ |
|---|---|---|---|
| X | Cruising Formation 4 Phases: 4 |
167/334 750/1500 | |
| Cruising Formation 4 Phases: 4 (Final)
|
179/358 804/1608 | ||
| # | Formation | Boss Battle Node | AD/AP AS/AS+ |
| Type | Ships |
|---|---|
| DE | |
| DD |
| Type | Ships |
|---|---|
| DE | |
| DD |
| Type | Ships |
|---|---|
| DE | |
| DD |
| Type | Ships |
|---|---|
| DE | |
| DD | |
| CA |
| Type | Ships |
|---|---|
| DE | |
| DD | |
| CL | |
| CA |
| Type | Ships |
|---|---|
| DE | |
| DD |
| Type | Ships |
|---|---|
| DD | |
| CL | |
| CA | |
| CVL | |
| FBB | |
| BB | |
| LHA |
E-5 Casual AB
| # | Formation | Air Raids | AD/AP AS/AS+ |
|---|---|---|---|
| AB | Diamond | 12/23 51/102 | |
| Diamond | 17/33 72/144 | ||
| Diamond | 23/46 102/204 | ||
| # | Formation | Air Raids | AD/AP AS/AS+ |
E-5 Casual A: 深海潜水艦隊 ジブラルタル警戒線 (PoiDB)
| # | Formation | Normal Battle Node | AD/AP AS/AS+ |
|---|---|---|---|
| A | Echelon Line Abreast Phases: 1, 2, 3, 4 |
0/0 0/0 | |
| Echelon Line Abreast Phases: 1, 2, 3, 4 |
0/0 0/0 | ||
| # | Formation | Normal Battle Node | AD/AP AS/AS+ |
E-5 Casual B: 深海地中海艦隊 東部管区駆逐隊 (PoiDB)
| # | Formation | Normal Battle Node | AD/AP AS/AS+ |
|---|---|---|---|
| B | Echelon Phases: 2, 3, 4 |
0/0 0/0 | |
| Vanguard Phases: 1, 4 |
0/0 0/0 | ||
| Vanguard Phases: 4 |
0/0 0/0 | ||
| # | Formation | Normal Battle Node | AD/AP AS/AS+ |
E-5 Casual C: 深海地中海艦隊 東部管区警戒隊 (PoiDB)
| # | Formation | Normal Battle Node | AD/AP AS/AS+ |
|---|---|---|---|
| C | Echelon Vanguard Phases: 1, 2, 3, 4 |
0/0 0/0 | |
| Vanguard Phases: 3, 4 |
0/0 0/0 | ||
| # | Formation | Normal Battle Node | AD/AP AS/AS+ |
E-5 Casual D
| # | Selection Node | ||
|---|---|---|---|
| D | 艦隊の針路を選択できます。提督、どちらの針路をとられますか? You can decide the fleet's course. Admiral, which heading should we take? | ||
| # | Selection Node | ||
E-5 Casual E: 深海地中海方面 基地航空隊 (PoiDB)
| # | Formation | Air Defense Node | AD/AP AS/AS+ |
|---|---|---|---|
| E | Diamond Phases: 1, 4 |
24/47 105/210 | |
| Diamond Phases: 1 |
35/69 153/306 | ||
| Diamond Phases: 1, 2, 4 |
44/87 195/390 | ||
| Diamond Phases: 1 |
46/91 204/408 | ||
| # | Formation | Air Defense Node | AD/AP AS/AS+ |
E-5 Casual F: 深海地中海方面 基地航空隊 (PoiDB)
| # | Formation | Air Defense Node | AD/AP AS/AS+ |
|---|---|---|---|
| F | Diamond Phases: 1, 2, 3, 4 |
24/47 105/210 | |
| Diamond Phases: 2, 3, 4 |
35/69 153/306 | ||
| Diamond Phases: 2, 3, 4 |
44/87 195/390 | ||
| Diamond Phases: 2, 3 |
46/91 204/408 | ||
| # | Formation | Air Defense Node | AD/AP AS/AS+ |
E-5 Casual G
| # | Landing Node | ||
|---|---|---|---|
| G | 輸送物資の揚陸地点に到達しました。本海域の輸送作戦は無事完了しています。 The landing point of the convoy has been reached. The transport operation here has already been completed successfully. | ||
| # | Landing Node | ||
E-5 Casual G1: 深海地中海艦隊 東部管区防備隊 (PoiDB)
| # | Formation | Normal Battle Node | AD/AP AS/AS+ |
|---|---|---|---|
| G1 | Line Ahead Double Line Phases: 1, 2, 4 |
43/85 189/378 | |
| Diamond Phases: 1, 2, 4 |
43/85 189/378 | ||
| # | Formation | Normal Battle Node | AD/AP AS/AS+ |
E-5 Casual G2
| # | Empty Node | ||
|---|---|---|---|
| G2 | 敵影を見ず。 No enemy spotted. | ||
| # | Empty Node | ||
E-5 Casual H: 深海地中海方面 沿岸警備集団 (PoiDB)
| # | Formation | Boss Battle Node | AD/AP AS/AS+ |
|---|---|---|---|
| H | Line Ahead Double Line Diamond Phases: 1, 2, 4 |
9/17 36/72 | |
| # | Formation | Boss Battle Node | AD/AP AS/AS+ |
E-5 Casual I: 深海北アフリカ 沿岸物資集積地 (PoiDB)
| # | Formation | Normal Battle Node | AD/AP AS/AS+ |
|---|---|---|---|
| I | Double Line Phases: 2 |
29/58 129/258 | |
| Double Line Phases: 2 |
29/58 129/258 | ||
| Double Line Phases: 4 |
24/47 105/210 | ||
| # | Formation | Normal Battle Node | AD/AP AS/AS+ |
E-5 Casual J: 深海潜水艦隊 地中海阻止哨戒線 (PoiDB)
| # | Formation | Normal Battle Node | AD/AP AS/AS+ |
|---|---|---|---|
| J | Echelon Line Abreast Phases: 2, 3, 4 |
0/0 0/0 | |
| Echelon Line Abreast Phases: 2, 3, 4 |
0/0 0/0 | ||
| # | Formation | Normal Battle Node | AD/AP AS/AS+ |
E-5 Casual K
| # | Selection Node | ||
|---|---|---|---|
| K | 艦隊の針路を選択できます。提督、どちらの針路をとられますか? You can decide the fleet's course. Admiral, which heading should we take? | ||
| # | Selection Node | ||
E-5 Casual L: 深海地中海方面 基地航空隊 (PoiDB)
| # | Formation | Air Defense Node | AD/AP AS/AS+ |
|---|---|---|---|
| L | Diamond Phases: 2, 4 |
24/47 105/210 | |
| Diamond Phases: 2, 4 |
35/69 153/306 | ||
| Diamond Phases: 2, 4 |
44/87 195/390 | ||
| Diamond Phases: 2 |
46/91 204/408 | ||
| # | Formation | Air Defense Node | AD/AP AS/AS+ |
E-5 Casual M: 深海地中海艦隊 水上打撃部隊 (PoiDB)
| # | Formation | Normal Battle Node | AD/AP AS/AS+ |
|---|---|---|---|
| M | Line Ahead Double Line Phases: 3, 4 |
0/0 0/0 | |
| Line Ahead Phases: 3 |
0/0 0/0 | ||
| # | Formation | Normal Battle Node | AD/AP AS/AS+ |
E-5 Casual N
| # | Landing Node | ||
|---|---|---|---|
| N | 輸送物資の揚陸地点に到達しました。本海域の輸送作戦は無事完了しています。 The landing point of the convoy has been reached. The transport operation here has already been completed successfully. | ||
| # | Landing Node | ||
E-5 Casual N1: 北アフリカ配備 深海魚雷艇集団 (PoiDB)
| # | Formation | Normal Battle Node | AD/AP AS/AS+ |
|---|---|---|---|
| N1 | Line Ahead Echelon Phases: 2, 4 |
0/0 0/0 | |
| # | Formation | Normal Battle Node | AD/AP AS/AS+ |
E-5 Casual N2
| # | Empty Node | ||
|---|---|---|---|
| N2 | 敵影を見ず。 No enemy spotted. | ||
| # | Empty Node | ||
E-5 Casual O: 深海地中海艦隊 中央機動反撃群 (PoiDB)
| # | Formation | Boss Battle Node | AD/AP AS/AS+ |
|---|---|---|---|
| O | Cruising Formation 4 Phases: 2 |
0/0 0/0 | |
| Cruising Formation 4 Phases: 4 (Final)
|
0/0 0/0 | ||
| # | Formation | Boss Battle Node | AD/AP AS/AS+ |
E-5 Casual P: 深海北アフリカ方面 重要戦力拠点 (PoiDB)
| # | Formation | Boss Battle Node | AD/AP AS/AS+ |
|---|---|---|---|
| P | Double Line Phases: 3 |
29/58 129/258 | |
| Double Line Phases: 4 |
0/0 0/0 | ||
| Double Line Phases: 3 (Final)
|
0/0 0/0 | ||
| # | Formation | Boss Battle Node | AD/AP AS/AS+ |
E-5 Casual Q
| # | Empty Node | ||
|---|---|---|---|
| Q | 気のせいだった。 地中海連合艦隊、これより敵主力艦隊を捜索、発見次第、これを撃滅する! Must be my imagination. The Mediterranean Combined Fleet will now search for the main enemy fleet and destroy it on sight! | ||
| # | Empty Node | ||
E-5 Casual R: 深海地中海艦隊 艦載機群 (PoiDB)
| # | Formation | Air Defense Node | AD/AP AS/AS+ |
|---|---|---|---|
| R | Diamond Phases: 4 |
61/121 270/540 | |
| Diamond Phases: 4 |
70/139 311/621 | ||
| Diamond Phases: 4 |
109/218 489/978 | ||
| # | Formation | Air Defense Node | AD/AP AS/AS+ |
E-5 Casual S
| # | Repair Node | ||
|---|---|---|---|
| # | Repair Node | ||
E-5 Casual T: 深海地中海艦隊 空母随伴集団 (PoiDB)
| # | Formation | Normal Battle Node | AD/AP AS/AS+ |
|---|---|---|---|
| T | Line Ahead Phases: 4 |
0/0 0/0 | |
| Line Ahead Phases: 4 |
0/0 0/0 | ||
| Line Ahead Phases: 4 |
0/0 0/0 | ||
| # | Formation | Normal Battle Node | AD/AP AS/AS+ |
E-5 Casual U: 深海潜水艦隊 地中海旗艦集団 (PoiDB)
| # | Formation | Normal Battle Node | AD/AP AS/AS+ |
|---|---|---|---|
| U | Echelon Line Abreast Phases: 4 |
0/0 0/0 | |
| Echelon Line Abreast Phases: 4 |
0/0 0/0 | ||
| # | Formation | Normal Battle Node | AD/AP AS/AS+ |
E-5 Casual V
| # | Empty Node | ||
|---|---|---|---|
| V | 敵影を見ず。 地中海連合艦隊、これより敵主力艦隊を捜索、発見次第、これを撃滅する! No enemy spotted. The Mediterranean Combined Fleet will now search for the main enemy fleet and destroy it on sight! | ||
| # | Empty Node | ||
E-5 Casual W
| # | Empty Node | ||
|---|---|---|---|
| W | 敵影を見ず。 地中海連合艦隊、これより敵主力艦隊を捜索、発見次第、これを撃滅する! No enemy spotted. The Mediterranean Combined Fleet will now search for the main enemy fleet and destroy it on sight! | ||
| # | Empty Node | ||
E-5 Casual X: 深海地中海艦隊 主力機動部隊 (PoiDB)
| # | Formation | Boss Battle Node | AD/AP AS/AS+ |
|---|---|---|---|
| X | Cruising Formation 4 Phases: 4 |
61/121 270/540 | |
| Cruising Formation 4 Phases: 4 (Final)
|
109/218 489/978 | ||
| # | Formation | Boss Battle Node | AD/AP AS/AS+ |