- Welcome to the Kancolle Wiki!
- If you have any questions regarding site content, account registration, etc., please visit the KanColle Wiki Discord
Difference between revisions of "Spring 2022 Event/E-5/Enemy comps"
< Spring 2022 Event | E-5
Jump to navigation
Jump to search
m |
|||
| Line 1: | Line 1: | ||
<tabber> | <tabber> | ||
|-|Hard= | |-|Hard= | ||
| − | {{Map/Image|page=Spring 2022 Event/E-5| | + | {{Map/Image|page=Spring 2022 Event/E-5|{{Map/ImageNode|1|Hard|E-5|x=604|y=116}}{{Map/ImageNode|A1|Hard|E-5|x=494|y=76}}{{Map/ImageNode|A2|Hard|E-5|x=428|y=78}}{{Map/ImageNode|A3|Hard|E-5|x=434|y=127}}{{Map/ImageNode|A4|Hard|E-5|x=475|y=110}}{{Map/ImageNode|AB|Hard|E-5|x=626|y=198}}{{Map/ImageNode|A|Hard|E-5|x=562|y=130}}{{Map/ImageNode|B1|Hard|E-5|x=616|y=285}}{{Map/ImageNode|B2|Hard|E-5|x=555|y=308}}{{Map/ImageNode|B3|Hard|E-5|x=512|y=291|drops=<table class="wikitable"><tr><th>Type</th><th>Ships</th></tr><tr><th>DD</th><td>{{Ship/Banner|small=true|Amatsukaze}}{{Ship/Banner|small=true|Asashimo}}{{Ship/Banner|small=true|Hayashimo}}<br>{{Ship/Banner|small=true|Kiyoshimo}}{{Ship/Banner|small=true|Tanikaze}}</td></tr></table>}}{{Map/ImageNode|B|Hard|E-5|x=551|y=258}}{{Map/ImageNode|C1|Hard|E-5|x=376|y=79|drops=<table class="wikitable"><tr><th>Type</th><th>Ships</th></tr><tr><th>DD</th><td>{{Ship/Banner|small=true|Asashimo}}</td></tr></table>}}{{Map/ImageNode|C2|Hard|E-5|x=309|y=80}}{{Map/ImageNode|C|Hard|E-5|x=365|y=118}}{{Map/ImageNode|D1|Hard|E-5|x=286|y=185}}{{Map/ImageNode|D2|Hard|E-5|x=236|y=123}}{{Map/ImageNode|D|Hard|E-5|x=261|y=89}}{{Map/ImageNode|E|Hard|E-5|x=247|y=212|drops=<table class="wikitable"><tr><th>Type</th><th>Ships</th></tr><tr><th>DD</th><td>{{Ship/Banner|small=true|Asashimo}}</td></tr></table>}}{{Map/ImageNode|F|Hard|E-5|x=268|y=271}}{{Map/ImageNode|G|Hard|E-5|x=230|y=253|drops=<table class="wikitable"><tr><th>Type</th><th>Ships</th></tr><tr><th>DE</th><td>{{Ship/Banner|small=true|Kaiboukan No.30}}{{Ship/Banner|small=true|Kaiboukan No.4}}</td></tr><tr><th>DD</th><td>{{Ship/Banner|small=true|Amatsukaze}}{{Ship/Banner|small=true|Asashimo}}{{Ship/Banner|small=true|Fletcher}}<br>{{Ship/Banner|small=true|Fujinami}}{{Ship/Banner|small=true|Hamanami}}{{Ship/Banner|small=true|Hayanami}}<br>{{Ship/Banner|small=true|Hayashimo}}{{Ship/Banner|small=true|Isokaze}}{{Ship/Banner|small=true|Kiyoshimo}}<br>{{Ship/Banner|small=true|Minegumo}}{{Ship/Banner|small=true|Tanikaze}}{{Ship/Banner|small=true|Tokitsukaze}}<br></td></tr><tr><th>CL</th><td>{{Ship/Banner|small=true|Gotland}}</td></tr><tr><th>CVL</th><td>{{Ship/Banner|small=true|Yawata Maru}}</td></tr><tr><th>BB</th><td>{{Ship/Banner|small=true|Colorado}}</td></tr><tr><th>CV</th><td>{{Ship/Banner|small=true|Amagi}}</td></tr><tr><th>SS</th><td>{{Ship/Banner|small=true|Maruyu}}</td></tr></table>}}{{Map/ImageNode|H1|Hard|E-5|x=236|y=181}}{{Map/ImageNode|H2|Hard|E-5|x=204|y=206}}{{Map/ImageNode|H3|Hard|E-5|x=201|y=244|drops=<table class="wikitable"><tr><th>Type</th><th>Ships</th></tr><tr><th>DD</th><td>{{Ship/Banner|small=true|Amatsukaze}}{{Ship/Banner|small=true|Tanikaze}}</td></tr><tr><th>CVL</th><td>{{Ship/Banner|small=true|Yawata Maru}}</td></tr></table>}}{{Map/ImageNode|H|Hard|E-5|x=173|y=162}}{{Map/ImageNode|I1|Hard|E-5|x=101|y=240}}{{Map/ImageNode|I2|Hard|E-5|x=141|y=276|drops=<table class="wikitable"><tr><th>Type</th><th>Ships</th></tr><tr><th>DE</th><td>{{Ship/Banner|small=true|Kaiboukan No.4}}</td></tr><tr><th>DD</th><td>{{Ship/Banner|small=true|Amatsukaze}}{{Ship/Banner|small=true|Asashimo}}{{Ship/Banner|small=true|Hamanami}}<br>{{Ship/Banner|small=true|Hayanami}}{{Ship/Banner|small=true|Hayashimo}}{{Ship/Banner|small=true|Isokaze}}<br>{{Ship/Banner|small=true|Kiyoshimo}}{{Ship/Banner|small=true|Minegumo}}{{Ship/Banner|small=true|Tanikaze}}<br>{{Ship/Banner|small=true|Tokitsukaze}}</td></tr><tr><th>CVL</th><td>{{Ship/Banner|small=true|Yawata Maru}}</td></tr><tr><th>CV</th><td>{{Ship/Banner|small=true|Amagi}}</td></tr><tr><th>SS</th><td>{{Ship/Banner|small=true|Maruyu}}</td></tr></table>}}{{Map/ImageNode|I|Hard|E-5|x=172|y=240}}{{Map/ImageNode|J|Hard|E-5|x=197|y=296}}{{Map/ImageNode|K|Hard|E-5|x=251|y=316|drops=<table class="wikitable"><tr><th>Type</th><th>Ships</th></tr><tr><th>DD</th><td>{{Ship/Banner|small=true|Asashimo}}</td></tr></table>}}{{Map/ImageNode|L1|Hard|E-5|x=327|y=118}}{{Map/ImageNode|L2|Hard|E-5|x=328|y=169}}{{Map/ImageNode|L|Hard|E-5|x=267|y=152}}{{Map/ImageNode|M|Hard|E-5|x=276|y=235}}{{Map/ImageNode|N|Hard|E-5|x=329|y=210|drops=<table class="wikitable"><tr><th>Type</th><th>Ships</th></tr><tr><th>DD</th><td>{{Ship/Banner|small=true|Amatsukaze}}{{Ship/Banner|small=true|Asashimo}}{{Ship/Banner|small=true|Hayanami}}<br>{{Ship/Banner|small=true|Hayashimo}}{{Ship/Banner|small=true|Kiyoshimo}}{{Ship/Banner|small=true|Minegumo}}<br>{{Ship/Banner|small=true|Tanikaze}}</td></tr></table>}}{{Map/ImageNode|O|Hard|E-5|x=330|y=265}}{{Map/ImageNode|P|Hard|E-5|x=296|y=307|drops=<table class="wikitable"><tr><th>Type</th><th>Ships</th></tr><tr><th>DE</th><td>{{Ship/Banner|small=true|Kunashiri}}{{Ship/Banner|small=true|Kurahashi}}{{Ship/Banner|small=true|Shounan}}<br></td></tr><tr><th>DD</th><td>{{Ship/Banner|small=true|Asashimo}}{{Ship/Banner|small=true|Uzuki}}</td></tr><tr><th>FBB</th><td>{{Ship/Banner|small=true|South Dakota}}</td></tr><tr><th>BB</th><td>{{Ship/Banner|small=true|Yamato}}</td></tr><tr><th>CV</th><td>{{Ship/Banner|small=true|Intrepid}}</td></tr><tr><th>AS</th><td>{{Ship/Banner|small=true|Jingei}}</td></tr></table>}}{{Map/ImageNode|Q1|Hard|E-5|x=537|y=169}}{{Map/ImageNode|Q2|Hard|E-5|x=519|y=207}}{{Map/ImageNode|Q|Hard|E-5|x=584|y=214}}{{Map/ImageNode|R1|Hard|E-5|x=466|y=190}}{{Map/ImageNode|R2|Hard|E-5|x=433|y=198}}{{Map/ImageNode|R3|Hard|E-5|x=403|y=206|drops=<table class="wikitable"><tr><th>Type</th><th>Ships</th></tr><tr><th>DD</th><td>{{Ship/Banner|small=true|Minegumo}}</td></tr></table>}}{{Map/ImageNode|R|Hard|E-5|x=501|y=180}}{{Map/ImageNode|S1|Hard|E-5|x=476|y=151}}{{Map/ImageNode|S2|Hard|E-5|x=445|y=160}}{{Map/ImageNode|S3|Hard|E-5|x=413|y=171}}{{Map/ImageNode|Start 2|Hard|E-5|x=140|y=114}}{{Map/ImageNode|Start 3|Hard|E-5|x=641|y=238}}{{Map/ImageNode|S|Hard|E-5|x=508|y=141}}{{Map/ImageNode|T|Hard|E-5|x=382|y=149}}{{Map/ImageNode|U|Hard|E-5|x=376|y=183}}{{Map/ImageNode|V1|Hard|E-5|x=370|y=214|drops=<table class="wikitable"><tr><th>Type</th><th>Ships</th></tr><tr><th>DE</th><td>{{Ship/Banner|small=true|Kaiboukan No.30}}{{Ship/Banner|small=true|Kaiboukan No.4}}</td></tr><tr><th>DD</th><td>{{Ship/Banner|small=true|Amatsukaze}}{{Ship/Banner|small=true|Asashimo}}{{Ship/Banner|small=true|Fujinami}}<br>{{Ship/Banner|small=true|Hamanami}}{{Ship/Banner|small=true|Hayanami}}{{Ship/Banner|small=true|Hayashimo}}<br>{{Ship/Banner|small=true|Kiyoshimo}}{{Ship/Banner|small=true|Minegumo}}{{Ship/Banner|small=true|Tanikaze}}<br>{{Ship/Banner|small=true|Tokitsukaze}}</td></tr><tr><th>CL</th><td>{{Ship/Banner|small=true|Gotland}}</td></tr><tr><th>CVL</th><td>{{Ship/Banner|small=true|Yawata Maru}}</td></tr><tr><th>SS</th><td>{{Ship/Banner|small=true|Maruyu}}</td></tr></table>}}{{Map/ImageNode|V2|Hard|E-5|x=404|y=244}}{{Map/ImageNode|V|Hard|E-5|x=368|y=260|drops=<table class="wikitable"><tr><th>Type</th><th>Ships</th></tr><tr><th>DE</th><td>{{Ship/Banner|small=true|Kaiboukan No.30}}{{Ship/Banner|small=true|Kaiboukan No.4}}</td></tr><tr><th>DD</th><td>{{Ship/Banner|small=true|Amatsukaze}}{{Ship/Banner|small=true|Asashimo}}{{Ship/Banner|small=true|Fujinami}}<br>{{Ship/Banner|small=true|Hamanami}}{{Ship/Banner|small=true|Hayanami}}{{Ship/Banner|small=true|Hayashimo}}<br>{{Ship/Banner|small=true|Isokaze}}{{Ship/Banner|small=true|Kiyoshimo}}{{Ship/Banner|small=true|Minegumo}}<br>{{Ship/Banner|small=true|Tanikaze}}{{Ship/Banner|small=true|Tokitsukaze}}</td></tr><tr><th>CL</th><td>{{Ship/Banner|small=true|Gotland}}</td></tr><tr><th>CVL</th><td>{{Ship/Banner|small=true|Yawata Maru}}</td></tr><tr><th>BB</th><td>{{Ship/Banner|small=true|Colorado}}</td></tr><tr><th>CV</th><td>{{Ship/Banner|small=true|Amagi}}</td></tr><tr><th>SS</th><td>{{Ship/Banner|small=true|Maruyu}}</td></tr></table>}}{{Map/ImageNode|W|Hard|E-5|x=484|y=221}}{{Map/ImageNode|X|Hard|E-5|x=445|y=236|drops=<table class="wikitable"><tr><th>Type</th><th>Ships</th></tr><tr><th>DE</th><td>{{Ship/Banner|small=true|Kaiboukan No.30}}</td></tr><tr><th>DD</th><td>{{Ship/Banner|small=true|Amatsukaze}}{{Ship/Banner|small=true|Hamanami}}{{Ship/Banner|small=true|Hayanami}}<br>{{Ship/Banner|small=true|Hayashimo}}{{Ship/Banner|small=true|Kiyoshimo}}{{Ship/Banner|small=true|Minegumo}}<br>{{Ship/Banner|small=true|Tanikaze}}</td></tr></table>}}{{Map/ImageNode|Y1|Hard|E-5|x=498|y=254}}{{Map/ImageNode|Y2|Hard|E-5|x=443|y=310}}{{Map/ImageNode|Y|Hard|E-5|x=480|y=314|drops=<table class="wikitable"><tr><th>Type</th><th>Ships</th></tr><tr><th>DE</th><td>{{Ship/Banner|small=true|Kaiboukan No.30}}{{Ship/Banner|small=true|Kaiboukan No.4}}</td></tr><tr><th>DD</th><td>{{Ship/Banner|small=true|Amatsukaze}}{{Ship/Banner|small=true|Asashimo}}{{Ship/Banner|small=true|Fujinami}}<br>{{Ship/Banner|small=true|Hamanami}}{{Ship/Banner|small=true|Hayanami}}{{Ship/Banner|small=true|Hayashimo}}<br>{{Ship/Banner|small=true|Kiyoshimo}}{{Ship/Banner|small=true|Minegumo}}{{Ship/Banner|small=true|Tanikaze}}<br>{{Ship/Banner|small=true|Tokitsukaze}}</td></tr><tr><th>CL</th><td>{{Ship/Banner|small=true|Gotland}}</td></tr><tr><th>CVL</th><td>{{Ship/Banner|small=true|Yawata Maru}}</td></tr><tr><th>BB</th><td>{{Ship/Banner|small=true|Colorado}}</td></tr><tr><th>SS</th><td>{{Ship/Banner|small=true|Maruyu}}</td></tr></table>}}{{Map/ImageNode|Z1|Hard|E-5|x=410|y=308|drops=<table class="wikitable"><tr><th>Type</th><th>Ships</th></tr><tr><th>DE</th><td>{{Ship/Banner|small=true|Kaiboukan No.30}}{{Ship/Banner|small=true|Kaiboukan No.4}}</td></tr><tr><th>DD</th><td>{{Ship/Banner|small=true|Amatsukaze}}{{Ship/Banner|small=true|Asashimo}}{{Ship/Banner|small=true|Fletcher}}<br>{{Ship/Banner|small=true|Fujinami}}{{Ship/Banner|small=true|Hamanami}}{{Ship/Banner|small=true|Hayanami}}<br>{{Ship/Banner|small=true|Hayashimo}}{{Ship/Banner|small=true|Isokaze}}{{Ship/Banner|small=true|Kiyoshimo}}<br>{{Ship/Banner|small=true|Minegumo}}{{Ship/Banner|small=true|Tanikaze}}{{Ship/Banner|small=true|Tokitsukaze}}<br></td></tr><tr><th>CL</th><td>{{Ship/Banner|small=true|Gotland}}</td></tr><tr><th>CVL</th><td>{{Ship/Banner|small=true|Yawata Maru}}</td></tr><tr><th>BB</th><td>{{Ship/Banner|small=true|Colorado}}</td></tr><tr><th>CV</th><td>{{Ship/Banner|small=true|Amagi}}</td></tr><tr><th>SS</th><td>{{Ship/Banner|small=true|Maruyu}}</td></tr></table>}}{{Map/ImageNode|Z2|Hard|E-5|x=392|y=276}}{{Map/ImageNode|Z|Hard|E-5|x=363|y=305|drops=<table class="wikitable"><tr><th>Type</th><th>Ships</th></tr><tr><th>DE</th><td>{{Ship/Banner|small=true|Kunashiri}}{{Ship/Banner|small=true|Kurahashi}}{{Ship/Banner|small=true|Shounan}}<br></td></tr><tr><th>DD</th><td>{{Ship/Banner|small=true|Asashimo}}{{Ship/Banner|small=true|Johnston}}{{Ship/Banner|small=true|Uzuki}}<br></td></tr><tr><th>CL</th><td>{{Ship/Banner|small=true|Yahagi}}</td></tr><tr><th>FBB</th><td>{{Ship/Banner|small=true|South Dakota}}</td></tr><tr><th>BB</th><td>{{Ship/Banner|small=true|Yamato}}</td></tr><tr><th>CV</th><td>{{Ship/Banner|small=true|Intrepid}}</td></tr><tr><th>SS</th><td>{{Ship/Banner|small=true|Scamp}}</td></tr><tr><th>AS</th><td>{{Ship/Banner|small=true|Jingei}}</td></tr></table>}}}} |
| − | {{Map/ImageNode|1|Hard|E-5|x=604|y=116}} | ||
| − | {{Map/ImageNode|A1|Hard|E-5|x=494|y=76}} | ||
| − | {{Map/ImageNode|A2|Hard|E-5|x=428|y=78}} | ||
| − | {{Map/ImageNode|A3|Hard|E-5|x=434|y=127}} | ||
| − | {{Map/ImageNode|A4|Hard|E-5|x=475|y=110}} | ||
| − | {{Map/ImageNode|AB|Hard|E-5|x=626|y=198}} | ||
| − | {{Map/ImageNode|A|Hard|E-5|x=562|y=130}} | ||
| − | {{Map/ImageNode|B1|Hard|E-5|x=616|y=285}} | ||
| − | {{Map/ImageNode|B2|Hard|E-5|x=555|y=308}} | ||
| − | {{Map/ImageNode|B3|Hard|E-5|x=512|y=291|drops=<table class="wikitable"><tr><th>Type</th><th>Ships</th></tr><tr><th>DD</th><td>{{Ship/Banner|small=true|Amatsukaze}}{{Ship/Banner|small=true|Asashimo}}{{Ship/Banner|small=true|Hayashimo}}<br>{{Ship/Banner|small=true|Kiyoshimo}}{{Ship/Banner|small=true|Tanikaze}}</td></tr></table>}} | ||
| − | {{Map/ImageNode|B|Hard|E-5|x=551|y=258}} | ||
| − | {{Map/ImageNode|C1|Hard|E-5|x=376|y=79|drops=<table class="wikitable"><tr><th>Type</th><th>Ships</th></tr><tr><th>DD</th><td>{{Ship/Banner|small=true|Asashimo}}</td></tr></table>}} | ||
| − | {{Map/ImageNode|C2|Hard|E-5|x=309|y=80}} | ||
| − | {{Map/ImageNode|C|Hard|E-5|x=365|y=118}} | ||
| − | {{Map/ImageNode|D1|Hard|E-5|x=286|y=185}} | ||
| − | {{Map/ImageNode|D2|Hard|E-5|x=236|y=123}} | ||
| − | {{Map/ImageNode|D|Hard|E-5|x=261|y=89}} | ||
| − | {{Map/ImageNode|E|Hard|E-5|x=247|y=212|drops=<table class="wikitable"><tr><th>Type</th><th>Ships</th></tr><tr><th>DD</th><td>{{Ship/Banner|small=true|Asashimo}}</td></tr></table>}} | ||
| − | {{Map/ImageNode|F|Hard|E-5|x=268|y=271}} | ||
| − | {{Map/ImageNode|G|Hard|E-5|x=230|y=253|drops=<table class="wikitable"><tr><th>Type</th><th>Ships</th></tr><tr><th>DE</th><td>{{Ship/Banner|small=true|Kaiboukan No.30}}{{Ship/Banner|small=true|Kaiboukan No.4}}</td></tr><tr><th>DD</th><td>{{Ship/Banner|small=true|Amatsukaze}}{{Ship/Banner|small=true|Asashimo}}{{Ship/Banner|small=true|Fletcher}}<br>{{Ship/Banner|small=true|Fujinami}}{{Ship/Banner|small=true|Hamanami}}{{Ship/Banner|small=true|Hayanami}}<br>{{Ship/Banner|small=true|Hayashimo}}{{Ship/Banner|small=true|Isokaze}}{{Ship/Banner|small=true|Kiyoshimo}}<br>{{Ship/Banner|small=true|Minegumo}}{{Ship/Banner|small=true|Tanikaze}}{{Ship/Banner|small=true|Tokitsukaze}}<br></td></tr><tr><th>CL</th><td>{{Ship/Banner|small=true|Gotland}}</td></tr><tr><th>CVL</th><td>{{Ship/Banner|small=true|Yawata Maru}}</td></tr><tr><th>BB</th><td>{{Ship/Banner|small=true|Colorado}}</td></tr><tr><th>CV</th><td>{{Ship/Banner|small=true|Amagi}}</td></tr><tr><th>SS</th><td>{{Ship/Banner|small=true|Maruyu}}</td></tr></table>}} | ||
| − | {{Map/ImageNode|H1|Hard|E-5|x=236|y=181}} | ||
| − | {{Map/ImageNode|H2|Hard|E-5|x=204|y=206}} | ||
| − | {{Map/ImageNode|H3|Hard|E-5|x=201|y=244|drops=<table class="wikitable"><tr><th>Type</th><th>Ships</th></tr><tr><th>DD</th><td>{{Ship/Banner|small=true|Amatsukaze}}{{Ship/Banner|small=true|Tanikaze}}</td></tr><tr><th>CVL</th><td>{{Ship/Banner|small=true|Yawata Maru}}</td></tr></table>}} | ||
| − | {{Map/ImageNode|H|Hard|E-5|x=173|y=162}} | ||
| − | {{Map/ImageNode|I1|Hard|E-5|x=101|y=240}} | ||
| − | {{Map/ImageNode|I2|Hard|E-5|x=141|y=276|drops=<table class="wikitable"><tr><th>Type</th><th>Ships</th></tr><tr><th>DE</th><td>{{Ship/Banner|small=true|Kaiboukan No.4}}</td></tr><tr><th>DD</th><td>{{Ship/Banner|small=true|Amatsukaze}}{{Ship/Banner|small=true|Asashimo}}{{Ship/Banner|small=true|Hamanami}}<br>{{Ship/Banner|small=true|Hayanami}}{{Ship/Banner|small=true|Hayashimo}}{{Ship/Banner|small=true|Isokaze}}<br>{{Ship/Banner|small=true|Kiyoshimo}}{{Ship/Banner|small=true|Minegumo}}{{Ship/Banner|small=true|Tanikaze}}<br>{{Ship/Banner|small=true|Tokitsukaze}}</td></tr><tr><th>CVL</th><td>{{Ship/Banner|small=true|Yawata Maru}}</td></tr><tr><th>CV</th><td>{{Ship/Banner|small=true|Amagi}}</td></tr><tr><th>SS</th><td>{{Ship/Banner|small=true|Maruyu}}</td></tr></table>}} | ||
| − | {{Map/ImageNode|I|Hard|E-5|x=172|y=240}} | ||
| − | {{Map/ImageNode|J|Hard|E-5|x=197|y=296}} | ||
| − | {{Map/ImageNode|K|Hard|E-5|x=251|y=316|drops=<table class="wikitable"><tr><th>Type</th><th>Ships</th></tr><tr><th>DD</th><td>{{Ship/Banner|small=true|Asashimo}}</td></tr></table>}} | ||
| − | {{Map/ImageNode|L1|Hard|E-5|x=327|y=118}} | ||
| − | {{Map/ImageNode|L2|Hard|E-5|x=328|y=169}} | ||
| − | {{Map/ImageNode|L|Hard|E-5|x=267|y=152}} | ||
| − | {{Map/ImageNode|M|Hard|E-5|x=276|y=235}} | ||
| − | {{Map/ImageNode|N|Hard|E-5|x=329|y=210|drops=<table class="wikitable"><tr><th>Type</th><th>Ships</th></tr><tr><th>DD</th><td>{{Ship/Banner|small=true|Amatsukaze}}{{Ship/Banner|small=true|Asashimo}}{{Ship/Banner|small=true|Hayanami}}<br>{{Ship/Banner|small=true|Hayashimo}}{{Ship/Banner|small=true|Kiyoshimo}}{{Ship/Banner|small=true|Minegumo}}<br>{{Ship/Banner|small=true|Tanikaze}}</td></tr></table>}} | ||
| − | {{Map/ImageNode|O|Hard|E-5|x=330|y=265}} | ||
| − | {{Map/ImageNode|P|Hard|E-5|x=296|y=307|drops=<table class="wikitable"><tr><th>Type</th><th>Ships</th></tr><tr><th>DE</th><td>{{Ship/Banner|small=true|Kunashiri}}{{Ship/Banner|small=true|Kurahashi}}{{Ship/Banner|small=true|Shounan}}<br></td></tr><tr><th>DD</th><td>{{Ship/Banner|small=true|Asashimo}}{{Ship/Banner|small=true|Uzuki}}</td></tr><tr><th>FBB</th><td>{{Ship/Banner|small=true|South Dakota}}</td></tr><tr><th>BB</th><td>{{Ship/Banner|small=true|Yamato}}</td></tr><tr><th>CV</th><td>{{Ship/Banner|small=true|Intrepid}}</td></tr><tr><th>AS</th><td>{{Ship/Banner|small=true|Jingei}}</td></tr></table>}} | ||
| − | {{Map/ImageNode|Q1|Hard|E-5|x=537|y=169}} | ||
| − | {{Map/ImageNode|Q2|Hard|E-5|x=519|y=207}} | ||
| − | {{Map/ImageNode|Q|Hard|E-5|x=584|y=214}} | ||
| − | {{Map/ImageNode|R1|Hard|E-5|x=466|y=190}} | ||
| − | {{Map/ImageNode|R2|Hard|E-5|x=433|y=198}} | ||
| − | {{Map/ImageNode|R3|Hard|E-5|x=403|y=206|drops=<table class="wikitable"><tr><th>Type</th><th>Ships</th></tr><tr><th>DD</th><td>{{Ship/Banner|small=true|Minegumo}}</td></tr></table>}} | ||
| − | {{Map/ImageNode|R|Hard|E-5|x=501|y=180}} | ||
| − | {{Map/ImageNode|S1|Hard|E-5|x=476|y=151}} | ||
| − | {{Map/ImageNode|S2|Hard|E-5|x=445|y=160}} | ||
| − | {{Map/ImageNode|S3|Hard|E-5|x=413|y=171}} | ||
| − | {{Map/ImageNode|Start 2|Hard|E-5|x=140|y=114}} | ||
| − | {{Map/ImageNode|Start 3|Hard|E-5|x=641|y=238}} | ||
| − | {{Map/ImageNode|S|Hard|E-5|x=508|y=141}} | ||
| − | {{Map/ImageNode|T|Hard|E-5|x=382|y=149}} | ||
| − | {{Map/ImageNode|U|Hard|E-5|x=376|y=183}} | ||
| − | {{Map/ImageNode|V1|Hard|E-5|x=370|y=214|drops=<table class="wikitable"><tr><th>Type</th><th>Ships</th></tr><tr><th>DE</th><td>{{Ship/Banner|small=true|Kaiboukan No.30}}{{Ship/Banner|small=true|Kaiboukan No.4}}</td></tr><tr><th>DD</th><td>{{Ship/Banner|small=true|Amatsukaze}}{{Ship/Banner|small=true|Asashimo}}{{Ship/Banner|small=true|Fujinami}}<br>{{Ship/Banner|small=true|Hamanami}}{{Ship/Banner|small=true|Hayanami}}{{Ship/Banner|small=true|Hayashimo}}<br>{{Ship/Banner|small=true|Kiyoshimo}}{{Ship/Banner|small=true|Minegumo}}{{Ship/Banner|small=true|Tanikaze}}<br>{{Ship/Banner|small=true|Tokitsukaze}}</td></tr><tr><th>CL</th><td>{{Ship/Banner|small=true|Gotland}}</td></tr><tr><th>CVL</th><td>{{Ship/Banner|small=true|Yawata Maru}}</td></tr><tr><th>SS</th><td>{{Ship/Banner|small=true|Maruyu}}</td></tr></table>}} | ||
| − | {{Map/ImageNode|V2|Hard|E-5|x=404|y=244}} | ||
| − | {{Map/ImageNode|V|Hard|E-5|x=368|y=260|drops=<table class="wikitable"><tr><th>Type</th><th>Ships</th></tr><tr><th>DE</th><td>{{Ship/Banner|small=true|Kaiboukan No.30}}{{Ship/Banner|small=true|Kaiboukan No.4}}</td></tr><tr><th>DD</th><td>{{Ship/Banner|small=true|Amatsukaze}}{{Ship/Banner|small=true|Asashimo}}{{Ship/Banner|small=true|Fujinami}}<br>{{Ship/Banner|small=true|Hamanami}}{{Ship/Banner|small=true|Hayanami}}{{Ship/Banner|small=true|Hayashimo}}<br>{{Ship/Banner|small=true|Isokaze}}{{Ship/Banner|small=true|Kiyoshimo}}{{Ship/Banner|small=true|Minegumo}}<br>{{Ship/Banner|small=true|Tanikaze}}{{Ship/Banner|small=true|Tokitsukaze}}</td></tr><tr><th>CL</th><td>{{Ship/Banner|small=true|Gotland}}</td></tr><tr><th>CVL</th><td>{{Ship/Banner|small=true|Yawata Maru}}</td></tr><tr><th>BB</th><td>{{Ship/Banner|small=true|Colorado}}</td></tr><tr><th>CV</th><td>{{Ship/Banner|small=true|Amagi}}</td></tr><tr><th>SS</th><td>{{Ship/Banner|small=true|Maruyu}}</td></tr></table>}} | ||
| − | {{Map/ImageNode|W|Hard|E-5|x=484|y=221}} | ||
| − | {{Map/ImageNode|X|Hard|E-5|x=445|y=236|drops=<table class="wikitable"><tr><th>Type</th><th>Ships</th></tr><tr><th>DE</th><td>{{Ship/Banner|small=true|Kaiboukan No.30}}</td></tr><tr><th>DD</th><td>{{Ship/Banner|small=true|Amatsukaze}}{{Ship/Banner|small=true|Hamanami}}{{Ship/Banner|small=true|Hayanami}}<br>{{Ship/Banner|small=true|Hayashimo}}{{Ship/Banner|small=true|Kiyoshimo}}{{Ship/Banner|small=true|Minegumo}}<br>{{Ship/Banner|small=true|Tanikaze}}</td></tr></table>}} | ||
| − | {{Map/ImageNode|Y1|Hard|E-5|x=498|y=254}} | ||
| − | {{Map/ImageNode|Y2|Hard|E-5|x=443|y=310}} | ||
| − | {{Map/ImageNode|Y|Hard|E-5|x=480|y=314|drops=<table class="wikitable"><tr><th>Type</th><th>Ships</th></tr><tr><th>DE</th><td>{{Ship/Banner|small=true|Kaiboukan No.30}}{{Ship/Banner|small=true|Kaiboukan No.4}}</td></tr><tr><th>DD</th><td>{{Ship/Banner|small=true|Amatsukaze}}{{Ship/Banner|small=true|Asashimo}}{{Ship/Banner|small=true|Fujinami}}<br>{{Ship/Banner|small=true|Hamanami}}{{Ship/Banner|small=true|Hayanami}}{{Ship/Banner|small=true|Hayashimo}}<br>{{Ship/Banner|small=true|Kiyoshimo}}{{Ship/Banner|small=true|Minegumo}}{{Ship/Banner|small=true|Tanikaze}}<br>{{Ship/Banner|small=true|Tokitsukaze}}</td></tr><tr><th>CL</th><td>{{Ship/Banner|small=true|Gotland}}</td></tr><tr><th>CVL</th><td>{{Ship/Banner|small=true|Yawata Maru}}</td></tr><tr><th>BB</th><td>{{Ship/Banner|small=true|Colorado}}</td></tr><tr><th>SS</th><td>{{Ship/Banner|small=true|Maruyu}}</td></tr></table>}} | ||
| − | {{Map/ImageNode|Z1|Hard|E-5|x=410|y=308|drops=<table class="wikitable"><tr><th>Type</th><th>Ships</th></tr><tr><th>DE</th><td>{{Ship/Banner|small=true|Kaiboukan No.30}}{{Ship/Banner|small=true|Kaiboukan No.4}}</td></tr><tr><th>DD</th><td>{{Ship/Banner|small=true|Amatsukaze}}{{Ship/Banner|small=true|Asashimo}}{{Ship/Banner|small=true|Fletcher}}<br>{{Ship/Banner|small=true|Fujinami}}{{Ship/Banner|small=true|Hamanami}}{{Ship/Banner|small=true|Hayanami}}<br>{{Ship/Banner|small=true|Hayashimo}}{{Ship/Banner|small=true|Isokaze}}{{Ship/Banner|small=true|Kiyoshimo}}<br>{{Ship/Banner|small=true|Minegumo}}{{Ship/Banner|small=true|Tanikaze}}{{Ship/Banner|small=true|Tokitsukaze}}<br></td></tr><tr><th>CL</th><td>{{Ship/Banner|small=true|Gotland}}</td></tr><tr><th>CVL</th><td>{{Ship/Banner|small=true|Yawata Maru}}</td></tr><tr><th>BB</th><td>{{Ship/Banner|small=true|Colorado}}</td></tr><tr><th>CV</th><td>{{Ship/Banner|small=true|Amagi}}</td></tr><tr><th>SS</th><td>{{Ship/Banner|small=true|Maruyu}}</td></tr></table>}} | ||
| − | {{Map/ImageNode|Z2|Hard|E-5|x=392|y=276}} | ||
| − | {{Map/ImageNode|Z|Hard|E-5|x=363|y=305|drops=<table class="wikitable"><tr><th>Type</th><th>Ships</th></tr><tr><th>DE</th><td>{{Ship/Banner|small=true|Kunashiri}}{{Ship/Banner|small=true|Kurahashi}}{{Ship/Banner|small=true|Shounan}}<br></td></tr><tr><th>DD</th><td>{{Ship/Banner|small=true|Asashimo}}{{Ship/Banner|small=true|Johnston}}{{Ship/Banner|small=true|Uzuki}}<br></td></tr><tr><th>CL</th><td>{{Ship/Banner|small=true|Yahagi}}</td></tr><tr><th>FBB</th><td>{{Ship/Banner|small=true|South Dakota}}</td></tr><tr><th>BB</th><td>{{Ship/Banner|small=true|Yamato}}</td></tr><tr><th>CV</th><td>{{Ship/Banner|small=true|Intrepid}}</td></tr><tr><th>SS</th><td>{{Ship/Banner|small=true|Scamp}}</td></tr><tr><th>AS</th><td>{{Ship/Banner|small=true|Jingei}}</td></tr></table>}} | ||
| − | }} | ||
<div class="map-nodes"> | <div class="map-nodes"> | ||
{{Map/Nodes|diff=Hard|name= | {{Map/Nodes|diff=Hard|name= | ||
| Line 1,303: | Line 1,240: | ||
</div> | </div> | ||
|-|Medium= | |-|Medium= | ||
| − | {{Map/Image|page=Spring 2022 Event/E-5| | + | {{Map/Image|page=Spring 2022 Event/E-5|{{Map/ImageNode|1|Medium|E-5|x=604|y=116}}{{Map/ImageNode|A1|Medium|E-5|x=494|y=76}}{{Map/ImageNode|A2|Medium|E-5|x=428|y=78}}{{Map/ImageNode|A3|Medium|E-5|x=434|y=127}}{{Map/ImageNode|A4|Medium|E-5|x=475|y=110}}{{Map/ImageNode|AB|Medium|E-5|x=626|y=198}}{{Map/ImageNode|A|Medium|E-5|x=562|y=130}}{{Map/ImageNode|B1|Medium|E-5|x=616|y=285}}{{Map/ImageNode|B2|Medium|E-5|x=555|y=308}}{{Map/ImageNode|B3|Medium|E-5|x=512|y=291|drops=<table class="wikitable"><tr><th>Type</th><th>Ships</th></tr><tr><th>DD</th><td>{{Ship/Banner|small=true|Tanikaze}}</td></tr></table>}}{{Map/ImageNode|B|Medium|E-5|x=551|y=258}}{{Map/ImageNode|C1|Medium|E-5|x=376|y=79}}{{Map/ImageNode|C2|Medium|E-5|x=309|y=80}}{{Map/ImageNode|C|Medium|E-5|x=365|y=118}}{{Map/ImageNode|D1|Medium|E-5|x=286|y=185}}{{Map/ImageNode|D2|Medium|E-5|x=236|y=123}}{{Map/ImageNode|D|Medium|E-5|x=261|y=89}}{{Map/ImageNode|E|Medium|E-5|x=247|y=212}}{{Map/ImageNode|F|Medium|E-5|x=268|y=271}}{{Map/ImageNode|G|Medium|E-5|x=230|y=253|drops=<table class="wikitable"><tr><th>Type</th><th>Ships</th></tr><tr><th>DE</th><td>{{Ship/Banner|small=true|Kaiboukan No.4}}</td></tr><tr><th>DD</th><td>{{Ship/Banner|small=true|Asashimo}}{{Ship/Banner|small=true|Fujinami}}{{Ship/Banner|small=true|Hamanami}}<br>{{Ship/Banner|small=true|Hayanami}}{{Ship/Banner|small=true|Tanikaze}}</td></tr><tr><th>CVL</th><td>{{Ship/Banner|small=true|Yawata Maru}}</td></tr><tr><th>CV</th><td>{{Ship/Banner|small=true|Amagi}}</td></tr></table>}}{{Map/ImageNode|H1|Medium|E-5|x=236|y=181}}{{Map/ImageNode|H2|Medium|E-5|x=204|y=206}}{{Map/ImageNode|H3|Medium|E-5|x=201|y=244}}{{Map/ImageNode|H|Medium|E-5|x=173|y=162}}{{Map/ImageNode|I1|Medium|E-5|x=101|y=240}}{{Map/ImageNode|I2|Medium|E-5|x=141|y=276|drops=<table class="wikitable"><tr><th>Type</th><th>Ships</th></tr><tr><th>DD</th><td>{{Ship/Banner|small=true|Asashimo}}{{Ship/Banner|small=true|Fletcher}}{{Ship/Banner|small=true|Minegumo}}<br>{{Ship/Banner|small=true|Tanikaze}}</td></tr><tr><th>CVL</th><td>{{Ship/Banner|small=true|Yawata Maru}}</td></tr></table>}}{{Map/ImageNode|I|Medium|E-5|x=172|y=240}}{{Map/ImageNode|J|Medium|E-5|x=197|y=296}}{{Map/ImageNode|K|Medium|E-5|x=251|y=316}}{{Map/ImageNode|L1|Medium|E-5|x=327|y=118}}{{Map/ImageNode|L2|Medium|E-5|x=328|y=169}}{{Map/ImageNode|L|Medium|E-5|x=267|y=152}}{{Map/ImageNode|M|Medium|E-5|x=276|y=235}}{{Map/ImageNode|N|Medium|E-5|x=329|y=210|drops=<table class="wikitable"><tr><th>Type</th><th>Ships</th></tr><tr><th>DD</th><td>{{Ship/Banner|small=true|Hayashimo}}{{Ship/Banner|small=true|Minegumo}}{{Ship/Banner|small=true|Tanikaze}}<br></td></tr></table>}}{{Map/ImageNode|O|Medium|E-5|x=330|y=265}}{{Map/ImageNode|P|Medium|E-5|x=296|y=307|drops=<table class="wikitable"><tr><th>Type</th><th>Ships</th></tr><tr><th>DD</th><td>{{Ship/Banner|small=true|Johnston}}</td></tr></table>}}{{Map/ImageNode|Q1|Medium|E-5|x=537|y=169}}{{Map/ImageNode|Q2|Medium|E-5|x=519|y=207}}{{Map/ImageNode|Q|Medium|E-5|x=584|y=214}}{{Map/ImageNode|R1|Medium|E-5|x=466|y=190}}{{Map/ImageNode|R2|Medium|E-5|x=433|y=198}}{{Map/ImageNode|R3|Medium|E-5|x=403|y=206}}{{Map/ImageNode|R|Medium|E-5|x=501|y=180}}{{Map/ImageNode|S1|Medium|E-5|x=476|y=151}}{{Map/ImageNode|S2|Medium|E-5|x=445|y=160}}{{Map/ImageNode|S3|Medium|E-5|x=413|y=171}}{{Map/ImageNode|Start 2|Medium|E-5|x=140|y=114}}{{Map/ImageNode|Start 3|Medium|E-5|x=641|y=238}}{{Map/ImageNode|S|Medium|E-5|x=508|y=141}}{{Map/ImageNode|T|Medium|E-5|x=382|y=149}}{{Map/ImageNode|U|Medium|E-5|x=376|y=183}}{{Map/ImageNode|V1|Medium|E-5|x=370|y=214|drops=<table class="wikitable"><tr><th>Type</th><th>Ships</th></tr><tr><th>DE</th><td>{{Ship/Banner|small=true|Kaiboukan No.30}}</td></tr><tr><th>DD</th><td>{{Ship/Banner|small=true|Amatsukaze}}{{Ship/Banner|small=true|Asashimo}}{{Ship/Banner|small=true|Fujinami}}<br>{{Ship/Banner|small=true|Kiyoshimo}}{{Ship/Banner|small=true|Tanikaze}}{{Ship/Banner|small=true|Tokitsukaze}}<br></td></tr><tr><th>CL</th><td>{{Ship/Banner|small=true|Gotland}}</td></tr></table>}}{{Map/ImageNode|V2|Medium|E-5|x=404|y=244}}{{Map/ImageNode|V|Medium|E-5|x=368|y=260|drops=<table class="wikitable"><tr><th>Type</th><th>Ships</th></tr><tr><th>DE</th><td>{{Ship/Banner|small=true|Kaiboukan No.4}}</td></tr><tr><th>DD</th><td>{{Ship/Banner|small=true|Amatsukaze}}{{Ship/Banner|small=true|Asashimo}}{{Ship/Banner|small=true|Fujinami}}<br>{{Ship/Banner|small=true|Hamanami}}{{Ship/Banner|small=true|Kiyoshimo}}{{Ship/Banner|small=true|Minegumo}}<br></td></tr><tr><th>CVL</th><td>{{Ship/Banner|small=true|Yawata Maru}}</td></tr><tr><th>BB</th><td>{{Ship/Banner|small=true|Colorado}}</td></tr></table>}}{{Map/ImageNode|W|Medium|E-5|x=484|y=221}}{{Map/ImageNode|X|Medium|E-5|x=445|y=236|drops=<table class="wikitable"><tr><th>Type</th><th>Ships</th></tr><tr><th>DE</th><td>{{Ship/Banner|small=true|Kaiboukan No.30}}</td></tr></table>}}{{Map/ImageNode|Y1|Medium|E-5|x=498|y=254}}{{Map/ImageNode|Y2|Medium|E-5|x=443|y=310}}{{Map/ImageNode|Y|Medium|E-5|x=480|y=314|drops=<table class="wikitable"><tr><th>Type</th><th>Ships</th></tr><tr><th>DD</th><td>{{Ship/Banner|small=true|Hamanami}}{{Ship/Banner|small=true|Kiyoshimo}}{{Ship/Banner|small=true|Tanikaze}}<br>{{Ship/Banner|small=true|Tokitsukaze}}</td></tr></table>}}{{Map/ImageNode|Z1|Medium|E-5|x=410|y=308|drops=<table class="wikitable"><tr><th>Type</th><th>Ships</th></tr><tr><th>DD</th><td>{{Ship/Banner|small=true|Amatsukaze}}{{Ship/Banner|small=true|Fujinami}}{{Ship/Banner|small=true|Hamanami}}<br>{{Ship/Banner|small=true|Hayanami}}{{Ship/Banner|small=true|Hayashimo}}{{Ship/Banner|small=true|Minegumo}}<br>{{Ship/Banner|small=true|Tokitsukaze}}</td></tr><tr><th>CVL</th><td>{{Ship/Banner|small=true|Yawata Maru}}</td></tr></table>}}{{Map/ImageNode|Z2|Medium|E-5|x=392|y=276}}{{Map/ImageNode|Z|Medium|E-5|x=363|y=305|drops=<table class="wikitable"><tr><th>Type</th><th>Ships</th></tr><tr><th>DE</th><td>{{Ship/Banner|small=true|Kunashiri}}{{Ship/Banner|small=true|Kurahashi}}</td></tr><tr><th>DD</th><td>{{Ship/Banner|small=true|Asashimo}}{{Ship/Banner|small=true|Johnston}}</td></tr><tr><th>CL</th><td>{{Ship/Banner|small=true|Yahagi}}</td></tr><tr><th>BB</th><td>{{Ship/Banner|small=true|Yamato}}</td></tr><tr><th>SS</th><td>{{Ship/Banner|small=true|Scamp}}</td></tr></table>}}}} |
| − | {{Map/ImageNode|1|Medium|E-5|x=604|y=116}} | ||
| − | {{Map/ImageNode|A1|Medium|E-5|x=494|y=76}} | ||
| − | {{Map/ImageNode|A2|Medium|E-5|x=428|y=78}} | ||
| − | {{Map/ImageNode|A3|Medium|E-5|x=434|y=127}} | ||
| − | {{Map/ImageNode|A4|Medium|E-5|x=475|y=110}} | ||
| − | {{Map/ImageNode|AB|Medium|E-5|x=626|y=198}} | ||
| − | {{Map/ImageNode|A|Medium|E-5|x=562|y=130}} | ||
| − | {{Map/ImageNode|B1|Medium|E-5|x=616|y=285}} | ||
| − | {{Map/ImageNode|B2|Medium|E-5|x=555|y=308}} | ||
| − | {{Map/ImageNode|B3|Medium|E-5|x=512|y=291|drops=<table class="wikitable"><tr><th>Type</th><th>Ships</th></tr><tr><th>DD</th><td>{{Ship/Banner|small=true|Tanikaze}}</td></tr></table>}} | ||
| − | {{Map/ImageNode|B|Medium|E-5|x=551|y=258}} | ||
| − | {{Map/ImageNode|C1|Medium|E-5|x=376|y=79}} | ||
| − | {{Map/ImageNode|C2|Medium|E-5|x=309|y=80}} | ||
| − | {{Map/ImageNode|C|Medium|E-5|x=365|y=118}} | ||
| − | {{Map/ImageNode|D1|Medium|E-5|x=286|y=185}} | ||
| − | {{Map/ImageNode|D2|Medium|E-5|x=236|y=123}} | ||
| − | {{Map/ImageNode|D|Medium|E-5|x=261|y=89}} | ||
| − | {{Map/ImageNode|E|Medium|E-5|x=247|y=212}} | ||
| − | {{Map/ImageNode|F|Medium|E-5|x=268|y=271}} | ||
| − | {{Map/ImageNode|G|Medium|E-5|x=230|y=253|drops=<table class="wikitable"><tr><th>Type</th><th>Ships</th></tr><tr><th>DE</th><td>{{Ship/Banner|small=true|Kaiboukan No.4}}</td></tr><tr><th>DD</th><td>{{Ship/Banner|small=true|Asashimo}}{{Ship/Banner|small=true|Fujinami}}{{Ship/Banner|small=true|Hamanami}}<br>{{Ship/Banner|small=true|Hayanami}}{{Ship/Banner|small=true|Tanikaze}}</td></tr><tr><th>CVL</th><td>{{Ship/Banner|small=true|Yawata Maru}}</td></tr><tr><th>CV</th><td>{{Ship/Banner|small=true|Amagi}}</td></tr></table>}} | ||
| − | {{Map/ImageNode|H1|Medium|E-5|x=236|y=181}} | ||
| − | {{Map/ImageNode|H2|Medium|E-5|x=204|y=206}} | ||
| − | {{Map/ImageNode|H3|Medium|E-5|x=201|y=244}} | ||
| − | {{Map/ImageNode|H|Medium|E-5|x=173|y=162}} | ||
| − | {{Map/ImageNode|I1|Medium|E-5|x=101|y=240}} | ||
| − | {{Map/ImageNode|I2|Medium|E-5|x=141|y=276|drops=<table class="wikitable"><tr><th>Type</th><th>Ships</th></tr><tr><th>DD</th><td>{{Ship/Banner|small=true|Asashimo}}{{Ship/Banner|small=true|Fletcher}}{{Ship/Banner|small=true|Minegumo}}<br>{{Ship/Banner|small=true|Tanikaze}}</td></tr><tr><th>CVL</th><td>{{Ship/Banner|small=true|Yawata Maru}}</td></tr></table>}} | ||
| − | {{Map/ImageNode|I|Medium|E-5|x=172|y=240}} | ||
| − | {{Map/ImageNode|J|Medium|E-5|x=197|y=296}} | ||
| − | {{Map/ImageNode|K|Medium|E-5|x=251|y=316}} | ||
| − | {{Map/ImageNode|L1|Medium|E-5|x=327|y=118}} | ||
| − | {{Map/ImageNode|L2|Medium|E-5|x=328|y=169}} | ||
| − | {{Map/ImageNode|L|Medium|E-5|x=267|y=152}} | ||
| − | {{Map/ImageNode|M|Medium|E-5|x=276|y=235}} | ||
| − | {{Map/ImageNode|N|Medium|E-5|x=329|y=210|drops=<table class="wikitable"><tr><th>Type</th><th>Ships</th></tr><tr><th>DD</th><td>{{Ship/Banner|small=true|Hayashimo}}{{Ship/Banner|small=true|Minegumo}}{{Ship/Banner|small=true|Tanikaze}}<br></td></tr></table>}} | ||
| − | {{Map/ImageNode|O|Medium|E-5|x=330|y=265}} | ||
| − | {{Map/ImageNode|P|Medium|E-5|x=296|y=307|drops=<table class="wikitable"><tr><th>Type</th><th>Ships</th></tr><tr><th>DD</th><td>{{Ship/Banner|small=true|Johnston}}</td></tr></table>}} | ||
| − | {{Map/ImageNode|Q1|Medium|E-5|x=537|y=169}} | ||
| − | {{Map/ImageNode|Q2|Medium|E-5|x=519|y=207}} | ||
| − | {{Map/ImageNode|Q|Medium|E-5|x=584|y=214}} | ||
| − | {{Map/ImageNode|R1|Medium|E-5|x=466|y=190}} | ||
| − | {{Map/ImageNode|R2|Medium|E-5|x=433|y=198}} | ||
| − | {{Map/ImageNode|R3|Medium|E-5|x=403|y=206}} | ||
| − | {{Map/ImageNode|R|Medium|E-5|x=501|y=180}} | ||
| − | {{Map/ImageNode|S1|Medium|E-5|x=476|y=151}} | ||
| − | {{Map/ImageNode|S2|Medium|E-5|x=445|y=160}} | ||
| − | {{Map/ImageNode|S3|Medium|E-5|x=413|y=171}} | ||
| − | {{Map/ImageNode|Start 2|Medium|E-5|x=140|y=114}} | ||
| − | {{Map/ImageNode|Start 3|Medium|E-5|x=641|y=238}} | ||
| − | {{Map/ImageNode|S|Medium|E-5|x=508|y=141}} | ||
| − | {{Map/ImageNode|T|Medium|E-5|x=382|y=149}} | ||
| − | {{Map/ImageNode|U|Medium|E-5|x=376|y=183}} | ||
| − | {{Map/ImageNode|V1|Medium|E-5|x=370|y=214|drops=<table class="wikitable"><tr><th>Type</th><th>Ships</th></tr><tr><th>DE</th><td>{{Ship/Banner|small=true|Kaiboukan No.30}}</td></tr><tr><th>DD</th><td>{{Ship/Banner|small=true|Amatsukaze}}{{Ship/Banner|small=true|Asashimo}}{{Ship/Banner|small=true|Fujinami}}<br>{{Ship/Banner|small=true|Kiyoshimo}}{{Ship/Banner|small=true|Tanikaze}}{{Ship/Banner|small=true|Tokitsukaze}}<br></td></tr><tr><th>CL</th><td>{{Ship/Banner|small=true|Gotland}}</td></tr></table>}} | ||
| − | {{Map/ImageNode|V2|Medium|E-5|x=404|y=244}} | ||
| − | {{Map/ImageNode|V|Medium|E-5|x=368|y=260|drops=<table class="wikitable"><tr><th>Type</th><th>Ships</th></tr><tr><th>DE</th><td>{{Ship/Banner|small=true|Kaiboukan No.4}}</td></tr><tr><th>DD</th><td>{{Ship/Banner|small=true|Amatsukaze}}{{Ship/Banner|small=true|Asashimo}}{{Ship/Banner|small=true|Fujinami}}<br>{{Ship/Banner|small=true|Hamanami}}{{Ship/Banner|small=true|Kiyoshimo}}{{Ship/Banner|small=true|Minegumo}}<br></td></tr><tr><th>CVL</th><td>{{Ship/Banner|small=true|Yawata Maru}}</td></tr><tr><th>BB</th><td>{{Ship/Banner|small=true|Colorado}}</td></tr></table>}} | ||
| − | {{Map/ImageNode|W|Medium|E-5|x=484|y=221}} | ||
| − | {{Map/ImageNode|X|Medium|E-5|x=445|y=236|drops=<table class="wikitable"><tr><th>Type</th><th>Ships</th></tr><tr><th>DE</th><td>{{Ship/Banner|small=true|Kaiboukan No.30}}</td></tr></table>}} | ||
| − | {{Map/ImageNode|Y1|Medium|E-5|x=498|y=254}} | ||
| − | {{Map/ImageNode|Y2|Medium|E-5|x=443|y=310}} | ||
| − | {{Map/ImageNode|Y|Medium|E-5|x=480|y=314|drops=<table class="wikitable"><tr><th>Type</th><th>Ships</th></tr><tr><th>DD</th><td>{{Ship/Banner|small=true|Hamanami}}{{Ship/Banner|small=true|Kiyoshimo}}{{Ship/Banner|small=true|Tanikaze}}<br>{{Ship/Banner|small=true|Tokitsukaze}}</td></tr></table>}} | ||
| − | {{Map/ImageNode|Z1|Medium|E-5|x=410|y=308|drops=<table class="wikitable"><tr><th>Type</th><th>Ships</th></tr><tr><th>DD</th><td>{{Ship/Banner|small=true|Amatsukaze}}{{Ship/Banner|small=true|Fujinami}}{{Ship/Banner|small=true|Hamanami}}<br>{{Ship/Banner|small=true|Hayanami}}{{Ship/Banner|small=true|Hayashimo}}{{Ship/Banner|small=true|Minegumo}}<br>{{Ship/Banner|small=true|Tokitsukaze}}</td></tr><tr><th>CVL</th><td>{{Ship/Banner|small=true|Yawata Maru}}</td></tr></table>}} | ||
| − | {{Map/ImageNode|Z2|Medium|E-5|x=392|y=276}} | ||
| − | {{Map/ImageNode|Z|Medium|E-5|x=363|y=305|drops=<table class="wikitable"><tr><th>Type</th><th>Ships</th></tr><tr><th>DE</th><td>{{Ship/Banner|small=true|Kunashiri}}{{Ship/Banner|small=true|Kurahashi}}</td></tr><tr><th>DD</th><td>{{Ship/Banner|small=true|Asashimo}}{{Ship/Banner|small=true|Johnston}}</td></tr><tr><th>CL</th><td>{{Ship/Banner|small=true|Yahagi}}</td></tr><tr><th>BB</th><td>{{Ship/Banner|small=true|Yamato}}</td></tr><tr><th>SS</th><td>{{Ship/Banner|small=true|Scamp}}</td></tr></table>}} | ||
| − | }} | ||
<div class="map-nodes"> | <div class="map-nodes"> | ||
{{Map/Nodes|diff=Medium|name= | {{Map/Nodes|diff=Medium|name= | ||
| Line 2,455: | Line 2,329: | ||
</div> | </div> | ||
|-|Easy= | |-|Easy= | ||
| − | {{Map/Image|page=Spring 2022 Event/E-5| | + | {{Map/Image|page=Spring 2022 Event/E-5|{{Map/ImageNode|1|Easy|E-5|x=604|y=116}}{{Map/ImageNode|A1|Easy|E-5|x=494|y=76}}{{Map/ImageNode|A2|Easy|E-5|x=428|y=78}}{{Map/ImageNode|A3|Easy|E-5|x=434|y=127}}{{Map/ImageNode|A4|Easy|E-5|x=475|y=110}}{{Map/ImageNode|AB|Easy|E-5|x=626|y=198}}{{Map/ImageNode|A|Easy|E-5|x=562|y=130}}{{Map/ImageNode|B1|Easy|E-5|x=616|y=285}}{{Map/ImageNode|B2|Easy|E-5|x=555|y=308}}{{Map/ImageNode|B3|Easy|E-5|x=512|y=291|drops=<table class="wikitable"><tr><th>Type</th><th>Ships</th></tr><tr><th>DD</th><td>{{Ship/Banner|small=true|Amatsukaze}}{{Ship/Banner|small=true|Tanikaze}}</td></tr></table>}}{{Map/ImageNode|B|Easy|E-5|x=551|y=258}}{{Map/ImageNode|C1|Easy|E-5|x=376|y=79}}{{Map/ImageNode|C2|Easy|E-5|x=309|y=80}}{{Map/ImageNode|C|Easy|E-5|x=365|y=118}}{{Map/ImageNode|D1|Easy|E-5|x=286|y=185}}{{Map/ImageNode|D2|Easy|E-5|x=236|y=123}}{{Map/ImageNode|D|Easy|E-5|x=261|y=89}}{{Map/ImageNode|E|Easy|E-5|x=247|y=212}}{{Map/ImageNode|F|Easy|E-5|x=268|y=271}}{{Map/ImageNode|G|Easy|E-5|x=230|y=253|drops=<table class="wikitable"><tr><th>Type</th><th>Ships</th></tr><tr><th>DE</th><td>{{Ship/Banner|small=true|Kaiboukan No.30}}{{Ship/Banner|small=true|Kaiboukan No.4}}</td></tr><tr><th>DD</th><td>{{Ship/Banner|small=true|Asashimo}}{{Ship/Banner|small=true|Fujinami}}{{Ship/Banner|small=true|Hamanami}}<br>{{Ship/Banner|small=true|Hayanami}}{{Ship/Banner|small=true|Hayashimo}}{{Ship/Banner|small=true|Isokaze}}<br>{{Ship/Banner|small=true|Kiyoshimo}}{{Ship/Banner|small=true|Minegumo}}{{Ship/Banner|small=true|Tanikaze}}<br>{{Ship/Banner|small=true|Tokitsukaze}}</td></tr><tr><th>CL</th><td>{{Ship/Banner|small=true|Gotland}}</td></tr><tr><th>CVL</th><td>{{Ship/Banner|small=true|Yawata Maru}}</td></tr><tr><th>BB</th><td>{{Ship/Banner|small=true|Colorado}}</td></tr><tr><th>CV</th><td>{{Ship/Banner|small=true|Amagi}}</td></tr><tr><th>SS</th><td>{{Ship/Banner|small=true|Maruyu}}</td></tr></table>}}{{Map/ImageNode|H1|Easy|E-5|x=236|y=181}}{{Map/ImageNode|H2|Easy|E-5|x=204|y=206}}{{Map/ImageNode|H3|Easy|E-5|x=201|y=244}}{{Map/ImageNode|H|Easy|E-5|x=173|y=162}}{{Map/ImageNode|I1|Easy|E-5|x=101|y=240}}{{Map/ImageNode|I2|Easy|E-5|x=141|y=276|drops=<table class="wikitable"><tr><th>Type</th><th>Ships</th></tr><tr><th>DE</th><td>{{Ship/Banner|small=true|Kaiboukan No.30}}{{Ship/Banner|small=true|Kaiboukan No.4}}</td></tr><tr><th>DD</th><td>{{Ship/Banner|small=true|Amatsukaze}}{{Ship/Banner|small=true|Asashimo}}{{Ship/Banner|small=true|Fujinami}}<br>{{Ship/Banner|small=true|Hayanami}}{{Ship/Banner|small=true|Tokitsukaze}}</td></tr><tr><th>CVL</th><td>{{Ship/Banner|small=true|Yawata Maru}}</td></tr></table>}}{{Map/ImageNode|I|Easy|E-5|x=172|y=240}}{{Map/ImageNode|J|Easy|E-5|x=197|y=296}}{{Map/ImageNode|K|Easy|E-5|x=251|y=316}}{{Map/ImageNode|L1|Easy|E-5|x=327|y=118}}{{Map/ImageNode|L2|Easy|E-5|x=328|y=169}}{{Map/ImageNode|L|Easy|E-5|x=267|y=152}}{{Map/ImageNode|M|Easy|E-5|x=276|y=235}}{{Map/ImageNode|N|Easy|E-5|x=329|y=210|drops=<table class="wikitable"><tr><th>Type</th><th>Ships</th></tr><tr><th>DD</th><td>{{Ship/Banner|small=true|Amatsukaze}}{{Ship/Banner|small=true|Asashimo}}{{Ship/Banner|small=true|Hayashimo}}<br>{{Ship/Banner|small=true|Kiyoshimo}}</td></tr></table>}}{{Map/ImageNode|O|Easy|E-5|x=330|y=265}}{{Map/ImageNode|P|Easy|E-5|x=296|y=307|drops=<table class="wikitable"><tr><th>Type</th><th>Ships</th></tr><tr><th>DD</th><td>{{Ship/Banner|small=true|Asashimo}}</td></tr><tr><th>AS</th><td>{{Ship/Banner|small=true|Jingei}}</td></tr></table>}}{{Map/ImageNode|Q1|Easy|E-5|x=537|y=169}}{{Map/ImageNode|Q2|Easy|E-5|x=519|y=207}}{{Map/ImageNode|Q|Easy|E-5|x=584|y=214}}{{Map/ImageNode|R1|Easy|E-5|x=466|y=190}}{{Map/ImageNode|R2|Easy|E-5|x=433|y=198}}{{Map/ImageNode|R3|Easy|E-5|x=403|y=206}}{{Map/ImageNode|R|Easy|E-5|x=501|y=180}}{{Map/ImageNode|S1|Easy|E-5|x=476|y=151}}{{Map/ImageNode|S2|Easy|E-5|x=445|y=160}}{{Map/ImageNode|S3|Easy|E-5|x=413|y=171}}{{Map/ImageNode|Start 2|Easy|E-5|x=140|y=114}}{{Map/ImageNode|Start 3|Easy|E-5|x=641|y=238}}{{Map/ImageNode|S|Easy|E-5|x=508|y=141}}{{Map/ImageNode|T|Easy|E-5|x=382|y=149}}{{Map/ImageNode|U|Easy|E-5|x=376|y=183}}{{Map/ImageNode|V1|Easy|E-5|x=370|y=214|drops=<table class="wikitable"><tr><th>Type</th><th>Ships</th></tr><tr><th>DE</th><td>{{Ship/Banner|small=true|Kaiboukan No.4}}</td></tr><tr><th>DD</th><td>{{Ship/Banner|small=true|Amatsukaze}}{{Ship/Banner|small=true|Asashimo}}{{Ship/Banner|small=true|Fujinami}}<br>{{Ship/Banner|small=true|Hamanami}}{{Ship/Banner|small=true|Hayanami}}{{Ship/Banner|small=true|Hayashimo}}<br>{{Ship/Banner|small=true|Kiyoshimo}}{{Ship/Banner|small=true|Minegumo}}{{Ship/Banner|small=true|Tanikaze}}<br></td></tr></table>}}{{Map/ImageNode|V2|Easy|E-5|x=404|y=244}}{{Map/ImageNode|V|Easy|E-5|x=368|y=260|drops=<table class="wikitable"><tr><th>Type</th><th>Ships</th></tr><tr><th>DE</th><td>{{Ship/Banner|small=true|Kaiboukan No.4}}</td></tr><tr><th>DD</th><td>{{Ship/Banner|small=true|Amatsukaze}}{{Ship/Banner|small=true|Asashimo}}{{Ship/Banner|small=true|Hamanami}}<br>{{Ship/Banner|small=true|Hayanami}}{{Ship/Banner|small=true|Hayashimo}}{{Ship/Banner|small=true|Kiyoshimo}}<br>{{Ship/Banner|small=true|Minegumo}}{{Ship/Banner|small=true|Tanikaze}}{{Ship/Banner|small=true|Tokitsukaze}}<br></td></tr><tr><th>CL</th><td>{{Ship/Banner|small=true|Gotland}}</td></tr><tr><th>CVL</th><td>{{Ship/Banner|small=true|Yawata Maru}}</td></tr><tr><th>BB</th><td>{{Ship/Banner|small=true|Colorado}}</td></tr><tr><th>SS</th><td>{{Ship/Banner|small=true|Maruyu}}</td></tr></table>}}{{Map/ImageNode|W|Easy|E-5|x=484|y=221}}{{Map/ImageNode|X|Easy|E-5|x=445|y=236|drops=<table class="wikitable"><tr><th>Type</th><th>Ships</th></tr><tr><th>DE</th><td>{{Ship/Banner|small=true|Kaiboukan No.30}}</td></tr><tr><th>DD</th><td>{{Ship/Banner|small=true|Hayanami}}{{Ship/Banner|small=true|Tanikaze}}</td></tr></table>}}{{Map/ImageNode|Y1|Easy|E-5|x=498|y=254}}{{Map/ImageNode|Y2|Easy|E-5|x=443|y=310}}{{Map/ImageNode|Y|Easy|E-5|x=480|y=314|drops=<table class="wikitable"><tr><th>Type</th><th>Ships</th></tr><tr><th>DE</th><td>{{Ship/Banner|small=true|Kaiboukan No.30}}</td></tr><tr><th>DD</th><td>{{Ship/Banner|small=true|Amatsukaze}}{{Ship/Banner|small=true|Asashimo}}{{Ship/Banner|small=true|Fujinami}}<br>{{Ship/Banner|small=true|Hamanami}}{{Ship/Banner|small=true|Hayanami}}{{Ship/Banner|small=true|Hayashimo}}<br>{{Ship/Banner|small=true|Kiyoshimo}}{{Ship/Banner|small=true|Minegumo}}{{Ship/Banner|small=true|Tokitsukaze}}<br></td></tr></table>}}{{Map/ImageNode|Z1|Easy|E-5|x=410|y=308|drops=<table class="wikitable"><tr><th>Type</th><th>Ships</th></tr><tr><th>DD</th><td>{{Ship/Banner|small=true|Amatsukaze}}{{Ship/Banner|small=true|Asashimo}}{{Ship/Banner|small=true|Fujinami}}<br>{{Ship/Banner|small=true|Hamanami}}{{Ship/Banner|small=true|Hayashimo}}{{Ship/Banner|small=true|Kiyoshimo}}<br>{{Ship/Banner|small=true|Tanikaze}}{{Ship/Banner|small=true|Tokitsukaze}}</td></tr><tr><th>CL</th><td>{{Ship/Banner|small=true|Gotland}}</td></tr><tr><th>BB</th><td>{{Ship/Banner|small=true|Colorado}}</td></tr><tr><th>SS</th><td>{{Ship/Banner|small=true|Maruyu}}</td></tr></table>}}{{Map/ImageNode|Z2|Easy|E-5|x=392|y=276}}{{Map/ImageNode|Z|Easy|E-5|x=363|y=305|drops=<table class="wikitable"><tr><th>Type</th><th>Ships</th></tr><tr><th>DE</th><td>{{Ship/Banner|small=true|Kunashiri}}{{Ship/Banner|small=true|Kurahashi}}{{Ship/Banner|small=true|Shounan}}<br></td></tr><tr><th>DD</th><td>{{Ship/Banner|small=true|Asashimo}}{{Ship/Banner|small=true|Johnston}}{{Ship/Banner|small=true|Uzuki}}<br></td></tr><tr><th>CL</th><td>{{Ship/Banner|small=true|Yahagi}}</td></tr><tr><th>FBB</th><td>{{Ship/Banner|small=true|South Dakota}}</td></tr><tr><th>BB</th><td>{{Ship/Banner|small=true|Colorado}}{{Ship/Banner|small=true|Yamato}}</td></tr><tr><th>AS</th><td>{{Ship/Banner|small=true|Jingei}}</td></tr></table>}}}} |
| − | {{Map/ImageNode|1|Easy|E-5|x=604|y=116}} | ||
| − | {{Map/ImageNode|A1|Easy|E-5|x=494|y=76}} | ||
| − | {{Map/ImageNode|A2|Easy|E-5|x=428|y=78}} | ||
| − | {{Map/ImageNode|A3|Easy|E-5|x=434|y=127}} | ||
| − | {{Map/ImageNode|A4|Easy|E-5|x=475|y=110}} | ||
| − | {{Map/ImageNode|AB|Easy|E-5|x=626|y=198}} | ||
| − | {{Map/ImageNode|A|Easy|E-5|x=562|y=130}} | ||
| − | {{Map/ImageNode|B1|Easy|E-5|x=616|y=285}} | ||
| − | {{Map/ImageNode|B2|Easy|E-5|x=555|y=308}} | ||
| − | {{Map/ImageNode|B3|Easy|E-5|x=512|y=291|drops=<table class="wikitable"><tr><th>Type</th><th>Ships</th></tr><tr><th>DD</th><td>{{Ship/Banner|small=true|Amatsukaze}}{{Ship/Banner|small=true|Tanikaze}}</td></tr></table>}} | ||
| − | {{Map/ImageNode|B|Easy|E-5|x=551|y=258}} | ||
| − | {{Map/ImageNode|C1|Easy|E-5|x=376|y=79}} | ||
| − | {{Map/ImageNode|C2|Easy|E-5|x=309|y=80}} | ||
| − | {{Map/ImageNode|C|Easy|E-5|x=365|y=118}} | ||
| − | {{Map/ImageNode|D1|Easy|E-5|x=286|y=185}} | ||
| − | {{Map/ImageNode|D2|Easy|E-5|x=236|y=123}} | ||
| − | {{Map/ImageNode|D|Easy|E-5|x=261|y=89}} | ||
| − | {{Map/ImageNode|E|Easy|E-5|x=247|y=212}} | ||
| − | {{Map/ImageNode|F|Easy|E-5|x=268|y=271}} | ||
| − | {{Map/ImageNode|G|Easy|E-5|x=230|y=253|drops=<table class="wikitable"><tr><th>Type</th><th>Ships</th></tr><tr><th>DE</th><td>{{Ship/Banner|small=true|Kaiboukan No.30}}{{Ship/Banner|small=true|Kaiboukan No.4}}</td></tr><tr><th>DD</th><td>{{Ship/Banner|small=true|Asashimo}}{{Ship/Banner|small=true|Fujinami}}{{Ship/Banner|small=true|Hamanami}}<br>{{Ship/Banner|small=true|Hayanami}}{{Ship/Banner|small=true|Hayashimo}}{{Ship/Banner|small=true|Isokaze}}<br>{{Ship/Banner|small=true|Kiyoshimo}}{{Ship/Banner|small=true|Minegumo}}{{Ship/Banner|small=true|Tanikaze}}<br>{{Ship/Banner|small=true|Tokitsukaze}}</td></tr><tr><th>CL</th><td>{{Ship/Banner|small=true|Gotland}}</td></tr><tr><th>CVL</th><td>{{Ship/Banner|small=true|Yawata Maru}}</td></tr><tr><th>BB</th><td>{{Ship/Banner|small=true|Colorado}}</td></tr><tr><th>CV</th><td>{{Ship/Banner|small=true|Amagi}}</td></tr><tr><th>SS</th><td>{{Ship/Banner|small=true|Maruyu}}</td></tr></table>}} | ||
| − | {{Map/ImageNode|H1|Easy|E-5|x=236|y=181}} | ||
| − | {{Map/ImageNode|H2|Easy|E-5|x=204|y=206}} | ||
| − | {{Map/ImageNode|H3|Easy|E-5|x=201|y=244}} | ||
| − | {{Map/ImageNode|H|Easy|E-5|x=173|y=162}} | ||
| − | {{Map/ImageNode|I1|Easy|E-5|x=101|y=240}} | ||
| − | {{Map/ImageNode|I2|Easy|E-5|x=141|y=276|drops=<table class="wikitable"><tr><th>Type</th><th>Ships</th></tr><tr><th>DE</th><td>{{Ship/Banner|small=true|Kaiboukan No.30}}{{Ship/Banner|small=true|Kaiboukan No.4}}</td></tr><tr><th>DD</th><td>{{Ship/Banner|small=true|Amatsukaze}}{{Ship/Banner|small=true|Asashimo}}{{Ship/Banner|small=true|Fujinami}}<br>{{Ship/Banner|small=true|Hayanami}}{{Ship/Banner|small=true|Tokitsukaze}}</td></tr><tr><th>CVL</th><td>{{Ship/Banner|small=true|Yawata Maru}}</td></tr></table>}} | ||
| − | {{Map/ImageNode|I|Easy|E-5|x=172|y=240}} | ||
| − | {{Map/ImageNode|J|Easy|E-5|x=197|y=296}} | ||
| − | {{Map/ImageNode|K|Easy|E-5|x=251|y=316}} | ||
| − | {{Map/ImageNode|L1|Easy|E-5|x=327|y=118}} | ||
| − | {{Map/ImageNode|L2|Easy|E-5|x=328|y=169}} | ||
| − | {{Map/ImageNode|L|Easy|E-5|x=267|y=152}} | ||
| − | {{Map/ImageNode|M|Easy|E-5|x=276|y=235}} | ||
| − | {{Map/ImageNode|N|Easy|E-5|x=329|y=210|drops=<table class="wikitable"><tr><th>Type</th><th>Ships</th></tr><tr><th>DD</th><td>{{Ship/Banner|small=true|Amatsukaze}}{{Ship/Banner|small=true|Asashimo}}{{Ship/Banner|small=true|Hayashimo}}<br>{{Ship/Banner|small=true|Kiyoshimo}}</td></tr></table>}} | ||
| − | {{Map/ImageNode|O|Easy|E-5|x=330|y=265}} | ||
| − | {{Map/ImageNode|P|Easy|E-5|x=296|y=307|drops=<table class="wikitable"><tr><th>Type</th><th>Ships</th></tr><tr><th>DD</th><td>{{Ship/Banner|small=true|Asashimo}}</td></tr><tr><th>AS</th><td>{{Ship/Banner|small=true|Jingei}}</td></tr></table>}} | ||
| − | {{Map/ImageNode|Q1|Easy|E-5|x=537|y=169}} | ||
| − | {{Map/ImageNode|Q2|Easy|E-5|x=519|y=207}} | ||
| − | {{Map/ImageNode|Q|Easy|E-5|x=584|y=214}} | ||
| − | {{Map/ImageNode|R1|Easy|E-5|x=466|y=190}} | ||
| − | {{Map/ImageNode|R2|Easy|E-5|x=433|y=198}} | ||
| − | {{Map/ImageNode|R3|Easy|E-5|x=403|y=206}} | ||
| − | {{Map/ImageNode|R|Easy|E-5|x=501|y=180}} | ||
| − | {{Map/ImageNode|S1|Easy|E-5|x=476|y=151}} | ||
| − | {{Map/ImageNode|S2|Easy|E-5|x=445|y=160}} | ||
| − | {{Map/ImageNode|S3|Easy|E-5|x=413|y=171}} | ||
| − | {{Map/ImageNode|Start 2|Easy|E-5|x=140|y=114}} | ||
| − | {{Map/ImageNode|Start 3|Easy|E-5|x=641|y=238}} | ||
| − | {{Map/ImageNode|S|Easy|E-5|x=508|y=141}} | ||
| − | {{Map/ImageNode|T|Easy|E-5|x=382|y=149}} | ||
| − | {{Map/ImageNode|U|Easy|E-5|x=376|y=183}} | ||
| − | {{Map/ImageNode|V1|Easy|E-5|x=370|y=214|drops=<table class="wikitable"><tr><th>Type</th><th>Ships</th></tr><tr><th>DE</th><td>{{Ship/Banner|small=true|Kaiboukan No.4}}</td></tr><tr><th>DD</th><td>{{Ship/Banner|small=true|Amatsukaze}}{{Ship/Banner|small=true|Asashimo}}{{Ship/Banner|small=true|Fujinami}}<br>{{Ship/Banner|small=true|Hamanami}}{{Ship/Banner|small=true|Hayanami}}{{Ship/Banner|small=true|Hayashimo}}<br>{{Ship/Banner|small=true|Kiyoshimo}}{{Ship/Banner|small=true|Minegumo}}{{Ship/Banner|small=true|Tanikaze}}<br></td></tr></table>}} | ||
| − | {{Map/ImageNode|V2|Easy|E-5|x=404|y=244}} | ||
| − | {{Map/ImageNode|V|Easy|E-5|x=368|y=260|drops=<table class="wikitable"><tr><th>Type</th><th>Ships</th></tr><tr><th>DE</th><td>{{Ship/Banner|small=true|Kaiboukan No.4}}</td></tr><tr><th>DD</th><td>{{Ship/Banner|small=true|Amatsukaze}}{{Ship/Banner|small=true|Asashimo}}{{Ship/Banner|small=true|Hamanami}}<br>{{Ship/Banner|small=true|Hayanami}}{{Ship/Banner|small=true|Hayashimo}}{{Ship/Banner|small=true|Kiyoshimo}}<br>{{Ship/Banner|small=true|Minegumo}}{{Ship/Banner|small=true|Tanikaze}}{{Ship/Banner|small=true|Tokitsukaze}}<br></td></tr><tr><th>CL</th><td>{{Ship/Banner|small=true|Gotland}}</td></tr><tr><th>CVL</th><td>{{Ship/Banner|small=true|Yawata Maru}}</td></tr><tr><th>BB</th><td>{{Ship/Banner|small=true|Colorado}}</td></tr><tr><th>SS</th><td>{{Ship/Banner|small=true|Maruyu}}</td></tr></table>}} | ||
| − | {{Map/ImageNode|W|Easy|E-5|x=484|y=221}} | ||
| − | {{Map/ImageNode|X|Easy|E-5|x=445|y=236|drops=<table class="wikitable"><tr><th>Type</th><th>Ships</th></tr><tr><th>DE</th><td>{{Ship/Banner|small=true|Kaiboukan No.30}}</td></tr><tr><th>DD</th><td>{{Ship/Banner|small=true|Hayanami}}{{Ship/Banner|small=true|Tanikaze}}</td></tr></table>}} | ||
| − | {{Map/ImageNode|Y1|Easy|E-5|x=498|y=254}} | ||
| − | {{Map/ImageNode|Y2|Easy|E-5|x=443|y=310}} | ||
| − | {{Map/ImageNode|Y|Easy|E-5|x=480|y=314|drops=<table class="wikitable"><tr><th>Type</th><th>Ships</th></tr><tr><th>DE</th><td>{{Ship/Banner|small=true|Kaiboukan No.30}}</td></tr><tr><th>DD</th><td>{{Ship/Banner|small=true|Amatsukaze}}{{Ship/Banner|small=true|Asashimo}}{{Ship/Banner|small=true|Fujinami}}<br>{{Ship/Banner|small=true|Hamanami}}{{Ship/Banner|small=true|Hayanami}}{{Ship/Banner|small=true|Hayashimo}}<br>{{Ship/Banner|small=true|Kiyoshimo}}{{Ship/Banner|small=true|Minegumo}}{{Ship/Banner|small=true|Tokitsukaze}}<br></td></tr></table>}} | ||
| − | {{Map/ImageNode|Z1|Easy|E-5|x=410|y=308|drops=<table class="wikitable"><tr><th>Type</th><th>Ships</th></tr><tr><th>DD</th><td>{{Ship/Banner|small=true|Amatsukaze}}{{Ship/Banner|small=true|Asashimo}}{{Ship/Banner|small=true|Fujinami}}<br>{{Ship/Banner|small=true|Hamanami}}{{Ship/Banner|small=true|Hayashimo}}{{Ship/Banner|small=true|Kiyoshimo}}<br>{{Ship/Banner|small=true|Tanikaze}}{{Ship/Banner|small=true|Tokitsukaze}}</td></tr><tr><th>CL</th><td>{{Ship/Banner|small=true|Gotland}}</td></tr><tr><th>BB</th><td>{{Ship/Banner|small=true|Colorado}}</td></tr><tr><th>SS</th><td>{{Ship/Banner|small=true|Maruyu}}</td></tr></table>}} | ||
| − | {{Map/ImageNode|Z2|Easy|E-5|x=392|y=276}} | ||
| − | {{Map/ImageNode|Z|Easy|E-5|x=363|y=305|drops=<table class="wikitable"><tr><th>Type</th><th>Ships</th></tr><tr><th>DE</th><td>{{Ship/Banner|small=true|Kunashiri}}{{Ship/Banner|small=true|Kurahashi}}{{Ship/Banner|small=true|Shounan}}<br></td></tr><tr><th>DD</th><td>{{Ship/Banner|small=true|Asashimo}}{{Ship/Banner|small=true|Johnston}}{{Ship/Banner|small=true|Uzuki}}<br></td></tr><tr><th>CL</th><td>{{Ship/Banner|small=true|Yahagi}}</td></tr><tr><th>FBB</th><td>{{Ship/Banner|small=true|South Dakota}}</td></tr><tr><th>BB</th><td>{{Ship/Banner|small=true|Colorado}}{{Ship/Banner|small=true|Yamato}}</td></tr><tr><th>AS</th><td>{{Ship/Banner|small=true|Jingei}}</td></tr></table>}} | ||
| − | }} | ||
<div class="map-nodes"> | <div class="map-nodes"> | ||
{{Map/Nodes|diff=Easy|name= | {{Map/Nodes|diff=Easy|name= | ||
| Line 3,721: | Line 3,532: | ||
</div> | </div> | ||
|-|Casual= | |-|Casual= | ||
| − | {{Map/Image|page=Spring 2022 Event/E-5| | + | {{Map/Image|page=Spring 2022 Event/E-5|{{Map/ImageNode|1|Casual|E-5|x=604|y=116}}{{Map/ImageNode|A1|Casual|E-5|x=494|y=76}}{{Map/ImageNode|A2|Casual|E-5|x=428|y=78}}{{Map/ImageNode|A3|Casual|E-5|x=434|y=127}}{{Map/ImageNode|A4|Casual|E-5|x=475|y=110}}{{Map/ImageNode|AB|Casual|E-5|x=626|y=198}}{{Map/ImageNode|A|Casual|E-5|x=562|y=130}}{{Map/ImageNode|B1|Casual|E-5|x=616|y=285}}{{Map/ImageNode|B2|Casual|E-5|x=555|y=308}}{{Map/ImageNode|B3|Casual|E-5|x=512|y=291|drops=<table class="wikitable"><tr><th>Type</th><th>Ships</th></tr><tr><th>DD</th><td>{{Ship/Banner|small=true|Amatsukaze}}{{Ship/Banner|small=true|Asashimo}}</td></tr></table>}}{{Map/ImageNode|B|Casual|E-5|x=551|y=258}}{{Map/ImageNode|C1|Casual|E-5|x=376|y=79}}{{Map/ImageNode|C2|Casual|E-5|x=309|y=80}}{{Map/ImageNode|C|Casual|E-5|x=365|y=118}}{{Map/ImageNode|D1|Casual|E-5|x=286|y=185}}{{Map/ImageNode|D2|Casual|E-5|x=236|y=123}}{{Map/ImageNode|D|Casual|E-5|x=261|y=89}}{{Map/ImageNode|E|Casual|E-5|x=247|y=212}}{{Map/ImageNode|F|Casual|E-5|x=268|y=271}}{{Map/ImageNode|G|Casual|E-5|x=230|y=253|drops=<table class="wikitable"><tr><th>Type</th><th>Ships</th></tr><tr><th>DE</th><td>{{Ship/Banner|small=true|Kaiboukan No.4}}</td></tr><tr><th>DD</th><td>{{Ship/Banner|small=true|Fujinami}}{{Ship/Banner|small=true|Hamanami}}{{Ship/Banner|small=true|Hayanami}}<br>{{Ship/Banner|small=true|Hayashimo}}{{Ship/Banner|small=true|Minegumo}}{{Ship/Banner|small=true|Tokitsukaze}}<br></td></tr><tr><th>CVL</th><td>{{Ship/Banner|small=true|Yawata Maru}}</td></tr><tr><th>BB</th><td>{{Ship/Banner|small=true|Colorado}}</td></tr></table>}}{{Map/ImageNode|H1|Casual|E-5|x=236|y=181}}{{Map/ImageNode|H2|Casual|E-5|x=204|y=206}}{{Map/ImageNode|H3|Casual|E-5|x=201|y=244}}{{Map/ImageNode|H|Casual|E-5|x=173|y=162}}{{Map/ImageNode|I1|Casual|E-5|x=101|y=240}}{{Map/ImageNode|I2|Casual|E-5|x=141|y=276|drops=<table class="wikitable"><tr><th>Type</th><th>Ships</th></tr><tr><th>DE</th><td>{{Ship/Banner|small=true|Kaiboukan No.30}}</td></tr><tr><th>DD</th><td>{{Ship/Banner|small=true|Asashimo}}{{Ship/Banner|small=true|Fujinami}}</td></tr></table>}}{{Map/ImageNode|I|Casual|E-5|x=172|y=240}}{{Map/ImageNode|J|Casual|E-5|x=197|y=296}}{{Map/ImageNode|K|Casual|E-5|x=251|y=316}}{{Map/ImageNode|L1|Casual|E-5|x=327|y=118}}{{Map/ImageNode|L2|Casual|E-5|x=328|y=169}}{{Map/ImageNode|L|Casual|E-5|x=267|y=152}}{{Map/ImageNode|M|Casual|E-5|x=276|y=235|drops=<table class="wikitable"><tr><th>Type</th><th>Ships</th></tr><tr><th>DD</th><td>{{Ship/Banner|small=true|Amatsukaze}}{{Ship/Banner|small=true|Tanikaze}}</td></tr></table>}}{{Map/ImageNode|N|Casual|E-5|x=329|y=210|drops=<table class="wikitable"><tr><th>Type</th><th>Ships</th></tr><tr><th>DD</th><td>{{Ship/Banner|small=true|Asashimo}}{{Ship/Banner|small=true|Tanikaze}}</td></tr></table>}}{{Map/ImageNode|O|Casual|E-5|x=330|y=265}}{{Map/ImageNode|P|Casual|E-5|x=296|y=307|drops=<table class="wikitable"><tr><th>Type</th><th>Ships</th></tr><tr><th>DE</th><td>{{Ship/Banner|small=true|Kunashiri}}{{Ship/Banner|small=true|Shounan}}</td></tr><tr><th>DD</th><td>{{Ship/Banner|small=true|Johnston}}</td></tr><tr><th>CL</th><td>{{Ship/Banner|small=true|Yahagi}}</td></tr><tr><th>BB</th><td>{{Ship/Banner|small=true|Yamato}}</td></tr><tr><th>AS</th><td>{{Ship/Banner|small=true|Jingei}}</td></tr></table>}}{{Map/ImageNode|Q1|Casual|E-5|x=537|y=169}}{{Map/ImageNode|Q2|Casual|E-5|x=519|y=207}}{{Map/ImageNode|Q|Casual|E-5|x=584|y=214}}{{Map/ImageNode|R1|Casual|E-5|x=466|y=190}}{{Map/ImageNode|R2|Casual|E-5|x=433|y=198}}{{Map/ImageNode|R3|Casual|E-5|x=403|y=206}}{{Map/ImageNode|R|Casual|E-5|x=501|y=180}}{{Map/ImageNode|S1|Casual|E-5|x=476|y=151}}{{Map/ImageNode|S2|Casual|E-5|x=445|y=160}}{{Map/ImageNode|S3|Casual|E-5|x=413|y=171}}{{Map/ImageNode|Start 2|Casual|E-5|x=140|y=114}}{{Map/ImageNode|Start 3|Casual|E-5|x=641|y=238}}{{Map/ImageNode|S|Casual|E-5|x=508|y=141}}{{Map/ImageNode|T|Casual|E-5|x=382|y=149}}{{Map/ImageNode|U|Casual|E-5|x=376|y=183}}{{Map/ImageNode|V1|Casual|E-5|x=370|y=214|drops=<table class="wikitable"><tr><th>Type</th><th>Ships</th></tr><tr><th>DE</th><td>{{Ship/Banner|small=true|Kaiboukan No.4}}</td></tr><tr><th>DD</th><td>{{Ship/Banner|small=true|Asashimo}}{{Ship/Banner|small=true|Fujinami}}{{Ship/Banner|small=true|Hamanami}}<br>{{Ship/Banner|small=true|Hayanami}}{{Ship/Banner|small=true|Hayashimo}}{{Ship/Banner|small=true|Kiyoshimo}}<br>{{Ship/Banner|small=true|Tanikaze}}{{Ship/Banner|small=true|Tokitsukaze}}</td></tr></table>}}{{Map/ImageNode|V2|Casual|E-5|x=404|y=244}}{{Map/ImageNode|V|Casual|E-5|x=368|y=260|drops=<table class="wikitable"><tr><th>Type</th><th>Ships</th></tr><tr><th>DE</th><td>{{Ship/Banner|small=true|Kaiboukan No.30}}{{Ship/Banner|small=true|Kaiboukan No.4}}</td></tr><tr><th>DD</th><td>{{Ship/Banner|small=true|Asashimo}}{{Ship/Banner|small=true|Fletcher}}{{Ship/Banner|small=true|Fujinami}}<br>{{Ship/Banner|small=true|Hamanami}}{{Ship/Banner|small=true|Hayanami}}{{Ship/Banner|small=true|Hayashimo}}<br>{{Ship/Banner|small=true|Isokaze}}{{Ship/Banner|small=true|Minegumo}}{{Ship/Banner|small=true|Tanikaze}}<br></td></tr><tr><th>CL</th><td>{{Ship/Banner|small=true|Gotland}}</td></tr><tr><th>CVL</th><td>{{Ship/Banner|small=true|Yawata Maru}}</td></tr><tr><th>BB</th><td>{{Ship/Banner|small=true|Colorado}}</td></tr><tr><th>CV</th><td>{{Ship/Banner|small=true|Amagi}}</td></tr></table>}}{{Map/ImageNode|W|Casual|E-5|x=484|y=221}}{{Map/ImageNode|X|Casual|E-5|x=445|y=236|drops=<table class="wikitable"><tr><th>Type</th><th>Ships</th></tr><tr><th>DD</th><td>{{Ship/Banner|small=true|Amatsukaze}}{{Ship/Banner|small=true|Hayanami}}{{Ship/Banner|small=true|Hayashimo}}<br>{{Ship/Banner|small=true|Kiyoshimo}}{{Ship/Banner|small=true|Tokitsukaze}}</td></tr></table>}}{{Map/ImageNode|Y1|Casual|E-5|x=498|y=254}}{{Map/ImageNode|Y2|Casual|E-5|x=443|y=310}}{{Map/ImageNode|Y|Casual|E-5|x=480|y=314|drops=<table class="wikitable"><tr><th>Type</th><th>Ships</th></tr><tr><th>DD</th><td>{{Ship/Banner|small=true|Asashimo}}{{Ship/Banner|small=true|Fujinami}}{{Ship/Banner|small=true|Hayanami}}<br>{{Ship/Banner|small=true|Kiyoshimo}}{{Ship/Banner|small=true|Minegumo}}{{Ship/Banner|small=true|Tokitsukaze}}<br></td></tr></table>}}{{Map/ImageNode|Z1|Casual|E-5|x=410|y=308|drops=<table class="wikitable"><tr><th>Type</th><th>Ships</th></tr><tr><th>DE</th><td>{{Ship/Banner|small=true|Kaiboukan No.30}}{{Ship/Banner|small=true|Kaiboukan No.4}}</td></tr><tr><th>DD</th><td>{{Ship/Banner|small=true|Amatsukaze}}{{Ship/Banner|small=true|Asashimo}}{{Ship/Banner|small=true|Fujinami}}<br>{{Ship/Banner|small=true|Hamanami}}{{Ship/Banner|small=true|Hayanami}}{{Ship/Banner|small=true|Hayashimo}}<br>{{Ship/Banner|small=true|Kiyoshimo}}{{Ship/Banner|small=true|Tanikaze}}{{Ship/Banner|small=true|Tokitsukaze}}<br></td></tr><tr><th>SS</th><td>{{Ship/Banner|small=true|Maruyu}}</td></tr></table>}}{{Map/ImageNode|Z2|Casual|E-5|x=392|y=276}}{{Map/ImageNode|Z|Casual|E-5|x=363|y=305|drops=<table class="wikitable"><tr><th>Type</th><th>Ships</th></tr><tr><th>DE</th><td>{{Ship/Banner|small=true|Kunashiri}}{{Ship/Banner|small=true|Kurahashi}}{{Ship/Banner|small=true|Shounan}}<br></td></tr><tr><th>DD</th><td>{{Ship/Banner|small=true|Johnston}}{{Ship/Banner|small=true|Uzuki}}</td></tr><tr><th>CL</th><td>{{Ship/Banner|small=true|Sakawa}}{{Ship/Banner|small=true|Yahagi}}</td></tr><tr><th>FBB</th><td>{{Ship/Banner|small=true|South Dakota}}</td></tr><tr><th>BB</th><td>{{Ship/Banner|small=true|Yamato}}</td></tr><tr><th>SS</th><td>{{Ship/Banner|small=true|Scamp}}</td></tr><tr><th>AS</th><td>{{Ship/Banner|small=true|Jingei}}</td></tr></table>}}}} |
| − | {{Map/ImageNode|1|Casual|E-5|x=604|y=116}} | ||
| − | {{Map/ImageNode|A1|Casual|E-5|x=494|y=76}} | ||
| − | {{Map/ImageNode|A2|Casual|E-5|x=428|y=78}} | ||
| − | {{Map/ImageNode|A3|Casual|E-5|x=434|y=127}} | ||
| − | {{Map/ImageNode|A4|Casual|E-5|x=475|y=110}} | ||
| − | {{Map/ImageNode|AB|Casual|E-5|x=626|y=198}} | ||
| − | {{Map/ImageNode|A|Casual|E-5|x=562|y=130}} | ||
| − | {{Map/ImageNode|B1|Casual|E-5|x=616|y=285}} | ||
| − | {{Map/ImageNode|B2|Casual|E-5|x=555|y=308}} | ||
| − | {{Map/ImageNode|B3|Casual|E-5|x=512|y=291|drops=<table class="wikitable"><tr><th>Type</th><th>Ships</th></tr><tr><th>DD</th><td>{{Ship/Banner|small=true|Amatsukaze}}{{Ship/Banner|small=true|Asashimo}}</td></tr></table>}} | ||
| − | {{Map/ImageNode|B|Casual|E-5|x=551|y=258}} | ||
| − | {{Map/ImageNode|C1|Casual|E-5|x=376|y=79}} | ||
| − | {{Map/ImageNode|C2|Casual|E-5|x=309|y=80}} | ||
| − | {{Map/ImageNode|C|Casual|E-5|x=365|y=118}} | ||
| − | {{Map/ImageNode|D1|Casual|E-5|x=286|y=185}} | ||
| − | {{Map/ImageNode|D2|Casual|E-5|x=236|y=123}} | ||
| − | {{Map/ImageNode|D|Casual|E-5|x=261|y=89}} | ||
| − | {{Map/ImageNode|E|Casual|E-5|x=247|y=212}} | ||
| − | {{Map/ImageNode|F|Casual|E-5|x=268|y=271}} | ||
| − | {{Map/ImageNode|G|Casual|E-5|x=230|y=253|drops=<table class="wikitable"><tr><th>Type</th><th>Ships</th></tr><tr><th>DE</th><td>{{Ship/Banner|small=true|Kaiboukan No.4}}</td></tr><tr><th>DD</th><td>{{Ship/Banner|small=true|Fujinami}}{{Ship/Banner|small=true|Hamanami}}{{Ship/Banner|small=true|Hayanami}}<br>{{Ship/Banner|small=true|Hayashimo}}{{Ship/Banner|small=true|Minegumo}}{{Ship/Banner|small=true|Tokitsukaze}}<br></td></tr><tr><th>CVL</th><td>{{Ship/Banner|small=true|Yawata Maru}}</td></tr><tr><th>BB</th><td>{{Ship/Banner|small=true|Colorado}}</td></tr></table>}} | ||
| − | {{Map/ImageNode|H1|Casual|E-5|x=236|y=181}} | ||
| − | {{Map/ImageNode|H2|Casual|E-5|x=204|y=206}} | ||
| − | {{Map/ImageNode|H3|Casual|E-5|x=201|y=244}} | ||
| − | {{Map/ImageNode|H|Casual|E-5|x=173|y=162}} | ||
| − | {{Map/ImageNode|I1|Casual|E-5|x=101|y=240}} | ||
| − | {{Map/ImageNode|I2|Casual|E-5|x=141|y=276|drops=<table class="wikitable"><tr><th>Type</th><th>Ships</th></tr><tr><th>DE</th><td>{{Ship/Banner|small=true|Kaiboukan No.30}}</td></tr><tr><th>DD</th><td>{{Ship/Banner|small=true|Asashimo}}{{Ship/Banner|small=true|Fujinami}}</td></tr></table>}} | ||
| − | {{Map/ImageNode|I|Casual|E-5|x=172|y=240}} | ||
| − | {{Map/ImageNode|J|Casual|E-5|x=197|y=296}} | ||
| − | {{Map/ImageNode|K|Casual|E-5|x=251|y=316}} | ||
| − | {{Map/ImageNode|L1|Casual|E-5|x=327|y=118}} | ||
| − | {{Map/ImageNode|L2|Casual|E-5|x=328|y=169}} | ||
| − | {{Map/ImageNode|L|Casual|E-5|x=267|y=152}} | ||
| − | {{Map/ImageNode|M|Casual|E-5|x=276|y=235|drops=<table class="wikitable"><tr><th>Type</th><th>Ships</th></tr><tr><th>DD</th><td>{{Ship/Banner|small=true|Amatsukaze}}{{Ship/Banner|small=true|Tanikaze}}</td></tr></table>}} | ||
| − | {{Map/ImageNode|N|Casual|E-5|x=329|y=210|drops=<table class="wikitable"><tr><th>Type</th><th>Ships</th></tr><tr><th>DD</th><td>{{Ship/Banner|small=true|Asashimo}}{{Ship/Banner|small=true|Tanikaze}}</td></tr></table>}} | ||
| − | {{Map/ImageNode|O|Casual|E-5|x=330|y=265}} | ||
| − | {{Map/ImageNode|P|Casual|E-5|x=296|y=307|drops=<table class="wikitable"><tr><th>Type</th><th>Ships</th></tr><tr><th>DE</th><td>{{Ship/Banner|small=true|Kunashiri}}{{Ship/Banner|small=true|Shounan}}</td></tr><tr><th>DD</th><td>{{Ship/Banner|small=true|Johnston}}</td></tr><tr><th>CL</th><td>{{Ship/Banner|small=true|Yahagi}}</td></tr><tr><th>BB</th><td>{{Ship/Banner|small=true|Yamato}}</td></tr><tr><th>AS</th><td>{{Ship/Banner|small=true|Jingei}}</td></tr></table>}} | ||
| − | {{Map/ImageNode|Q1|Casual|E-5|x=537|y=169}} | ||
| − | {{Map/ImageNode|Q2|Casual|E-5|x=519|y=207}} | ||
| − | {{Map/ImageNode|Q|Casual|E-5|x=584|y=214}} | ||
| − | {{Map/ImageNode|R1|Casual|E-5|x=466|y=190}} | ||
| − | {{Map/ImageNode|R2|Casual|E-5|x=433|y=198}} | ||
| − | {{Map/ImageNode|R3|Casual|E-5|x=403|y=206}} | ||
| − | {{Map/ImageNode|R|Casual|E-5|x=501|y=180}} | ||
| − | {{Map/ImageNode|S1|Casual|E-5|x=476|y=151}} | ||
| − | {{Map/ImageNode|S2|Casual|E-5|x=445|y=160}} | ||
| − | {{Map/ImageNode|S3|Casual|E-5|x=413|y=171}} | ||
| − | {{Map/ImageNode|Start 2|Casual|E-5|x=140|y=114}} | ||
| − | {{Map/ImageNode|Start 3|Casual|E-5|x=641|y=238}} | ||
| − | {{Map/ImageNode|S|Casual|E-5|x=508|y=141}} | ||
| − | {{Map/ImageNode|T|Casual|E-5|x=382|y=149}} | ||
| − | {{Map/ImageNode|U|Casual|E-5|x=376|y=183}} | ||
| − | {{Map/ImageNode|V1|Casual|E-5|x=370|y=214|drops=<table class="wikitable"><tr><th>Type</th><th>Ships</th></tr><tr><th>DE</th><td>{{Ship/Banner|small=true|Kaiboukan No.4}}</td></tr><tr><th>DD</th><td>{{Ship/Banner|small=true|Asashimo}}{{Ship/Banner|small=true|Fujinami}}{{Ship/Banner|small=true|Hamanami}}<br>{{Ship/Banner|small=true|Hayanami}}{{Ship/Banner|small=true|Hayashimo}}{{Ship/Banner|small=true|Kiyoshimo}}<br>{{Ship/Banner|small=true|Tanikaze}}{{Ship/Banner|small=true|Tokitsukaze}}</td></tr></table>}} | ||
| − | {{Map/ImageNode|V2|Casual|E-5|x=404|y=244}} | ||
| − | {{Map/ImageNode|V|Casual|E-5|x=368|y=260|drops=<table class="wikitable"><tr><th>Type</th><th>Ships</th></tr><tr><th>DE</th><td>{{Ship/Banner|small=true|Kaiboukan No.30}}{{Ship/Banner|small=true|Kaiboukan No.4}}</td></tr><tr><th>DD</th><td>{{Ship/Banner|small=true|Asashimo}}{{Ship/Banner|small=true|Fletcher}}{{Ship/Banner|small=true|Fujinami}}<br>{{Ship/Banner|small=true|Hamanami}}{{Ship/Banner|small=true|Hayanami}}{{Ship/Banner|small=true|Hayashimo}}<br>{{Ship/Banner|small=true|Isokaze}}{{Ship/Banner|small=true|Minegumo}}{{Ship/Banner|small=true|Tanikaze}}<br></td></tr><tr><th>CL</th><td>{{Ship/Banner|small=true|Gotland}}</td></tr><tr><th>CVL</th><td>{{Ship/Banner|small=true|Yawata Maru}}</td></tr><tr><th>BB</th><td>{{Ship/Banner|small=true|Colorado}}</td></tr><tr><th>CV</th><td>{{Ship/Banner|small=true|Amagi}}</td></tr></table>}} | ||
| − | {{Map/ImageNode|W|Casual|E-5|x=484|y=221}} | ||
| − | {{Map/ImageNode|X|Casual|E-5|x=445|y=236|drops=<table class="wikitable"><tr><th>Type</th><th>Ships</th></tr><tr><th>DD</th><td>{{Ship/Banner|small=true|Amatsukaze}}{{Ship/Banner|small=true|Hayanami}}{{Ship/Banner|small=true|Hayashimo}}<br>{{Ship/Banner|small=true|Kiyoshimo}}{{Ship/Banner|small=true|Tokitsukaze}}</td></tr></table>}} | ||
| − | {{Map/ImageNode|Y1|Casual|E-5|x=498|y=254}} | ||
| − | {{Map/ImageNode|Y2|Casual|E-5|x=443|y=310}} | ||
| − | {{Map/ImageNode|Y|Casual|E-5|x=480|y=314|drops=<table class="wikitable"><tr><th>Type</th><th>Ships</th></tr><tr><th>DD</th><td>{{Ship/Banner|small=true|Asashimo}}{{Ship/Banner|small=true|Fujinami}}{{Ship/Banner|small=true|Hayanami}}<br>{{Ship/Banner|small=true|Kiyoshimo}}{{Ship/Banner|small=true|Minegumo}}{{Ship/Banner|small=true|Tokitsukaze}}<br></td></tr></table>}} | ||
| − | {{Map/ImageNode|Z1|Casual|E-5|x=410|y=308|drops=<table class="wikitable"><tr><th>Type</th><th>Ships</th></tr><tr><th>DE</th><td>{{Ship/Banner|small=true|Kaiboukan No.30}}{{Ship/Banner|small=true|Kaiboukan No.4}}</td></tr><tr><th>DD</th><td>{{Ship/Banner|small=true|Amatsukaze}}{{Ship/Banner|small=true|Asashimo}}{{Ship/Banner|small=true|Fujinami}}<br>{{Ship/Banner|small=true|Hamanami}}{{Ship/Banner|small=true|Hayanami}}{{Ship/Banner|small=true|Hayashimo}}<br>{{Ship/Banner|small=true|Kiyoshimo}}{{Ship/Banner|small=true|Tanikaze}}{{Ship/Banner|small=true|Tokitsukaze}}<br></td></tr><tr><th>SS</th><td>{{Ship/Banner|small=true|Maruyu}}</td></tr></table>}} | ||
| − | {{Map/ImageNode|Z2|Casual|E-5|x=392|y=276}} | ||
| − | {{Map/ImageNode|Z|Casual|E-5|x=363|y=305|drops=<table class="wikitable"><tr><th>Type</th><th>Ships</th></tr><tr><th>DE</th><td>{{Ship/Banner|small=true|Kunashiri}}{{Ship/Banner|small=true|Kurahashi}}{{Ship/Banner|small=true|Shounan}}<br></td></tr><tr><th>DD</th><td>{{Ship/Banner|small=true|Johnston}}{{Ship/Banner|small=true|Uzuki}}</td></tr><tr><th>CL</th><td>{{Ship/Banner|small=true|Sakawa}}{{Ship/Banner|small=true|Yahagi}}</td></tr><tr><th>FBB</th><td>{{Ship/Banner|small=true|South Dakota}}</td></tr><tr><th>BB</th><td>{{Ship/Banner|small=true|Yamato}}</td></tr><tr><th>SS</th><td>{{Ship/Banner|small=true|Scamp}}</td></tr><tr><th>AS</th><td>{{Ship/Banner|small=true|Jingei}}</td></tr></table>}} | ||
| − | }} | ||
<div class="map-nodes"> | <div class="map-nodes"> | ||
{{Map/Nodes|diff=Casual|name= | {{Map/Nodes|diff=Casual|name= | ||
Revision as of 19:16, 20 June 2022
| Type | Ships |
|---|---|
| DD |
| Type | Ships |
|---|---|
| DD |
| Type | Ships |
|---|---|
| DD |
| Type | Ships |
|---|---|
| DE | |
| DD | |
| CL | |
| CVL | |
| BB | |
| CV | |
| SS |
| Type | Ships |
|---|---|
| DD | |
| CVL |
| Type | Ships |
|---|---|
| DE | |
| DD | |
| CVL | |
| CV | |
| SS |
| Type | Ships |
|---|---|
| DD |
| Type | Ships |
|---|---|
| DD |
| Type | Ships |
|---|---|
| DE | |
| DD | |
| FBB | |
| BB | |
| CV | |
| AS |
| Type | Ships |
|---|---|
| DD |
| Type | Ships |
|---|---|
| DE | |
| DD | |
| CL | |
| CVL | |
| SS |
| Type | Ships |
|---|---|
| DE | |
| DD | |
| CL | |
| CVL | |
| BB | |
| CV | |
| SS |
| Type | Ships |
|---|---|
| DE | |
| DD |
| Type | Ships |
|---|---|
| DE | |
| DD | |
| CL | |
| CVL | |
| BB | |
| SS |
| Type | Ships |
|---|---|
| DE | |
| DD | |
| CL | |
| CVL | |
| BB | |
| CV | |
| SS |
| Type | Ships |
|---|---|
| DE | |
| DD | |
| CL | |
| FBB | |
| BB | |
| CV | |
| SS | |
| AS |
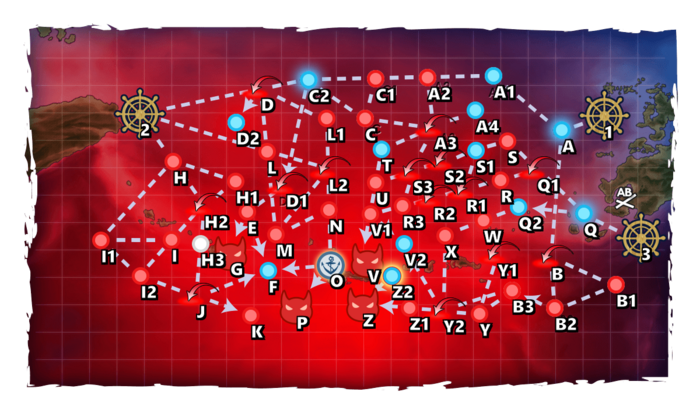
E-5 Hard AB
| # | Formation | Air Raids | AD/AP AS/AS+ |
|---|---|---|---|
| AB | Diamond | 163/325 731/1461 | |
| Diamond | 179/357 803/1605 | ||
| Diamond | 190/379 851/1701 | ||
| # | Formation | Air Raids | AD/AP AS/AS+ |
E-5 Hard A
| # | Selection Node | ||
|---|---|---|---|
| A | 艦隊の針路を選択できます。提督、どちらの針路をとられますか? You can decide the fleet's course. Admiral, which heading should we take? | ||
| # | Selection Node | ||
E-5 Hard A1
| # | Empty Node | ||
|---|---|---|---|
| A1 | 気のせいだった。 台湾方面の友軍との連絡を試みる!対潜対空、対水上警戒を厳とせよ! Must be my imagination. Attempting to contact friendly forces in the Taiwan area! Maintain strict anti-submarine, anti-air and anti-water vigilance! | ||
| # | Empty Node | ||
E-5 Hard A2: 深海潜水艦隊 前方警戒線C群 (PoiDB)
| # | Formation | Normal Battle Node | AD/AP AS/AS+ |
|---|---|---|---|
| A2 | Echelon Line Abreast Phases: 1, 2, 4 |
0/0 0/0 | |
| Echelon Line Abreast Phases: 1, 2, 4 |
0/0 0/0 | ||
| Echelon Line Abreast Phases: 1, 2, 4 |
0/0 0/0 | ||
| # | Formation | Normal Battle Node | AD/AP AS/AS+ |
E-5 Hard A3: 深海任務部隊 艦載機群 (PoiDB)
| # | Formation | Air Defense Node | AD/AP AS/AS+ |
|---|---|---|---|
| A3 | Diamond Phases: 1, 3, 4 |
141/281 630/1260 | |
| Diamond Phases: 1, 2, 3, 4 |
150/300 674/1347 | ||
| Diamond Phases: 1, 3, 4 |
157/313 702/1404 | ||
| # | Formation | Air Defense Node | AD/AP AS/AS+ |
E-5 Hard A4
| # | Empty Node | ||
|---|---|---|---|
| A4 | 気のせいだった。 偽装航路、終了。これより変針、第二艦隊1YBは、沖縄を目指す! Must be my imagination. Deceptive route over. Now changing course! The Second Fleet, 1YB, is now heading towards Okinawa! | ||
| # | Empty Node | ||
E-5 Hard B: 深海任務部隊 艦載機群 (PoiDB)
| # | Formation | Air Defense Node | AD/AP AS/AS+ |
|---|---|---|---|
| B | Diamond Phases: 1, 4 |
141/281 630/1260 | |
| Diamond Phases: 1 |
150/300 674/1347 | ||
| Diamond Phases: 1, 4 |
157/313 702/1404 | ||
| # | Formation | Air Defense Node | AD/AP AS/AS+ |
E-5 Hard B1: 深海潜水艦隊 前方警戒線A群 (PoiDB)
| # | Formation | Normal Battle Node | AD/AP AS/AS+ |
|---|---|---|---|
| B1 | Echelon Line Abreast Phases: 1 |
0/0 0/0 | |
| Echelon Line Abreast Phases: 1 |
0/0 0/0 | ||
| Echelon Line Abreast Phases: 1, 4 |
0/0 0/0 | ||
| # | Formation | Normal Battle Node | AD/AP AS/AS+ |
E-5 Hard B2: 深海潜水艦隊 前方警戒線B群 (PoiDB)
| # | Formation | Normal Battle Node | AD/AP AS/AS+ |
|---|---|---|---|
| B2 | Echelon Line Abreast Phases: 1 |
0/0 0/0 | |
| Echelon Line Abreast Phases: 1 |
0/0 0/0 | ||
| Echelon Line Abreast Phases: 1, 4 |
0/0 0/0 | ||
| # | Formation | Normal Battle Node | AD/AP AS/AS+ |
E-5 Hard B3: 深海任務部隊 南部ピケットライン (PoiDB)
| # | Formation | Normal Battle Node | AD/AP AS/AS+ |
|---|---|---|---|
| B3 | Line Ahead Phases: 1, 4 |
0/0 0/0 | |
| Line Ahead Phases: 1, 4 |
0/0 0/0 | ||
| Line Ahead Phases: 4 |
0/0 0/0 | ||
| # | Formation | Normal Battle Node | AD/AP AS/AS+ |
E-5 Hard C: 深海任務部隊 護衛空母集団 II群 (PoiDB)
| # | Formation | Normal Battle Node | AD/AP AS/AS+ |
|---|---|---|---|
| C | Diamond Phases: 1 |
102/203 456/912 | |
| Diamond Phases: 1, 4 |
106/212 476/951 | ||
| Diamond Phases: 1, 4 |
113/225 504/1008 | ||
| # | Formation | Normal Battle Node | AD/AP AS/AS+ |
E-5 Hard C1: 深海任務部隊 北部ピケットライン (PoiDB)
| # | Formation | Normal Battle Node | AD/AP AS/AS+ |
|---|---|---|---|
| C1 | Line Ahead Double Line Echelon Phases: 1, 4 |
0/0 0/0 | |
| # | Formation | Normal Battle Node | AD/AP AS/AS+ |
E-5 Hard C2
| # | Selection Node | ||
|---|---|---|---|
| C2 | 台湾方面の友軍との連絡を試みる!対潜対空、対水上警戒を厳とせよ! Attempting to contact friendly forces in the Taiwan area! Maintain strict anti-submarine, anti-air and anti-water vigilance! | ||
| # | Selection Node | ||
E-5 Hard D: 深海任務部隊 艦載機群 (PoiDB)
| # | Formation | Air Defense Node | AD/AP AS/AS+ |
|---|---|---|---|
| D | Diamond Phases: 1, 2 |
106/212 476/951 | |
| Diamond Phases: 1, 2, 4 |
113/225 504/1008 | ||
| Diamond Phases: 1, 2, 4 |
153/305 684/1368 | ||
| # | Formation | Air Defense Node | AD/AP AS/AS+ |
E-5 Hard D1: 深海任務部隊 艦載機群 (PoiDB)
| # | Formation | Air Defense Node | AD/AP AS/AS+ |
|---|---|---|---|
| D1 | Diamond Phases: 1, 4 |
106/212 476/951 | |
| Diamond Phases: 1, 4 |
113/225 504/1008 | ||
| Diamond Phases: 1, 4 |
153/305 684/1368 | ||
| # | Formation | Air Defense Node | AD/AP AS/AS+ |
E-5 Hard D2
| # | Empty Node | ||
|---|---|---|---|
| D2 | 気のせいだった。 艦隊は台北沖に到達。台湾方面に集結中の友軍艦隊との連絡、作戦連携に成功せり! Must be my imagination. Our fleet has reached the coast of Taipei. We've successfully established coordination with the friendly fleet in the Taiwan area! | ||
| # | Empty Node | ||
E-5 Hard E: 深海任務部隊 後方警戒ライン I群 (PoiDB)
| # | Formation | Normal Battle Node | AD/AP AS/AS+ |
|---|---|---|---|
| E | Line Ahead Double Line Vanguard Phases: 1, 4 |
0/0 0/0 | |
| # | Formation | Normal Battle Node | AD/AP AS/AS+ |
E-5 Hard F
| # | Empty Node | ||
|---|---|---|---|
| F | 敵影を見ず。 台湾方面の友軍との連絡を試みる!対潜対空、対水上警戒を厳とせよ! No enemy spotted. Attempting to contact friendly forces in the Taiwan area! Maintain strict anti-submarine, anti-air and anti-water vigilance! | ||
| # | Empty Node | ||
E-5 Hard G: 深海任務部隊 輸送護衛空母群 (PoiDB)
| # | Formation | Boss Battle Node | AD/AP AS/AS+ |
|---|---|---|---|
| G | Line Ahead Diamond Phases: 1, 4 (HA) |
33/65 146/291 | |
| Line Ahead Phases: 1 (Final) (HA) |
53/105 236/471 | ||
| # | Formation | Boss Battle Node | AD/AP AS/AS+ |
E-5 Hard H: 深海潜水艦隊 後方哨戒線A群 (PoiDB)
| # | Formation | Normal Battle Node | AD/AP AS/AS+ |
|---|---|---|---|
| H | Echelon Line Abreast Phases: 2, 4 |
0/0 0/0 | |
| Echelon Line Abreast Phases: 2, 4 |
0/0 0/0 | ||
| Echelon Line Abreast Phases: 2, 4 |
0/0 0/0 | ||
| # | Formation | Normal Battle Node | AD/AP AS/AS+ |
E-5 Hard H1: 深海潜水艦隊 後方哨戒線B群 (PoiDB)
| # | Formation | Normal Battle Node | AD/AP AS/AS+ |
|---|---|---|---|
| H1 | Echelon Line Abreast Phases: 2, 4 |
0/0 0/0 | |
| Echelon Line Abreast Phases: 2, 4 |
0/0 0/0 | ||
| Echelon Line Abreast Phases: 2, 4 |
0/0 0/0 | ||
| # | Formation | Normal Battle Node | AD/AP AS/AS+ |
E-5 Hard H2: 深海任務部隊 艦載機群 (PoiDB)
| # | Formation | Air Defense Node | AD/AP AS/AS+ |
|---|---|---|---|
| H2 | Diamond Phases: 2 |
141/281 630/1260 | |
| Diamond Phases: 2, 4 |
150/300 674/1347 | ||
| Diamond Phases: 2, 4 |
157/313 702/1404 | ||
| # | Formation | Air Defense Node | AD/AP AS/AS+ |
E-5 Hard H3: 深海任務部隊 空母打撃集団 B群 (PoiDB)
| # | Formation | Normal Battle Node | AD/AP AS/AS+ |
|---|---|---|---|
| H3 | Diamond Phases: 2 |
141/281 630/1260 | |
| Diamond Phases: 2 |
150/300 674/1347 | ||
| Diamond Phases: 2, 4 |
157/313 702/1404 | ||
| # | Formation | Normal Battle Node | AD/AP AS/AS+ |
E-5 Hard I: 深海任務部隊 後方警戒ライン II群 (PoiDB)
| # | Formation | Normal Battle Node | AD/AP AS/AS+ |
|---|---|---|---|
| I | Line Ahead Double Line Vanguard Phases: 2, 4 |
0/0 0/0 | |
| # | Formation | Normal Battle Node | AD/AP AS/AS+ |
E-5 Hard I1: 深海任務部隊 予備護衛空母集団 (PoiDB)
| # | Formation | Normal Battle Node | AD/AP AS/AS+ |
|---|---|---|---|
| I1 | Diamond Phases: 2 |
102/203 456/912 | |
| Diamond Phases: 2 |
106/212 476/951 | ||
| Diamond Phases: 2, 4 |
113/225 504/1008 | ||
| # | Formation | Normal Battle Node | AD/AP AS/AS+ |
E-5 Hard I2: 深海任務部隊 空母打撃集団 C群 (PoiDB)
| # | Formation | Normal Battle Node | AD/AP AS/AS+ |
|---|---|---|---|
| I2 | Diamond Phases: 2 |
141/281 630/1260 | |
| Diamond Phases: 2 |
150/300 674/1347 | ||
| Diamond Phases: 2, 4 |
157/313 702/1404 | ||
| # | Formation | Normal Battle Node | AD/AP AS/AS+ |
E-5 Hard J: 深海任務部隊 艦載機群 (PoiDB)
| # | Formation | Air Defense Node | AD/AP AS/AS+ |
|---|---|---|---|
| J | Diamond Phases: 2 |
168/335 753/1506 | |
| Diamond Phases: 2, 4 |
172/344 773/1545 | ||
| Diamond Phases: 2, 4 |
177/353 792/1584 | ||
| # | Formation | Air Defense Node | AD/AP AS/AS+ |
E-5 Hard K: 深海任務部隊 兵站補給船団 (PoiDB)
| # | Formation | Normal Battle Node | AD/AP AS/AS+ |
|---|---|---|---|
| K | Double Line Diamond Vanguard Phases: 2, 4 |
0/0 0/0 | |
| # | Formation | Normal Battle Node | AD/AP AS/AS+ |
E-5 Hard L: 深海潜水艦隊 後方哨戒線C群 (PoiDB)
| # | Formation | Normal Battle Node | AD/AP AS/AS+ |
|---|---|---|---|
| L | Echelon Line Abreast Phases: 2, 4 |
0/0 0/0 | |
| Echelon Line Abreast Phases: 2 |
0/0 0/0 | ||
| Echelon Line Abreast Phases: 2 |
0/0 0/0 | ||
| # | Formation | Normal Battle Node | AD/AP AS/AS+ |
E-5 Hard L1: 深海潜水艦隊 後方哨戒線D群 (PoiDB)
| # | Formation | Normal Battle Node | AD/AP AS/AS+ |
|---|---|---|---|
| L1 | Echelon Line Abreast Phases: 2, 4 |
0/0 0/0 | |
| Echelon Line Abreast Phases: 2 |
0/0 0/0 | ||
| Echelon Line Abreast Phases: 2 |
0/0 0/0 | ||
| # | Formation | Normal Battle Node | AD/AP AS/AS+ |
E-5 Hard L2: 深海任務部隊 艦載機群 (PoiDB)
| # | Formation | Air Defense Node | AD/AP AS/AS+ |
|---|---|---|---|
| L2 | Diamond Phases: 2, 4 |
106/212 476/951 | |
| Diamond Phases: 2 |
113/225 504/1008 | ||
| Diamond Phases: 2 |
153/305 684/1368 | ||
| # | Formation | Air Defense Node | AD/AP AS/AS+ |
E-5 Hard M: 深海任務部隊 護衛空母集団 IV群 (PoiDB)
| # | Formation | Normal Battle Node | AD/AP AS/AS+ |
|---|---|---|---|
| M | Diamond Phases: 2, 4 |
102/203 456/912 | |
| Diamond Phases: 2 |
106/212 476/951 | ||
| Diamond Phases: 2 |
113/225 504/1008 | ||
| # | Formation | Normal Battle Node | AD/AP AS/AS+ |
E-5 Hard N: 深海任務部隊 護衛空母集団 I群 (PoiDB)
| # | Formation | Normal Battle Node | AD/AP AS/AS+ |
|---|---|---|---|
| N | Diamond Phases: 2, 4 |
102/203 456/912 | |
| Diamond Phases: 2 |
106/212 476/951 | ||
| Diamond Phases: 2 |
113/225 504/1008 | ||
| # | Formation | Normal Battle Node | AD/AP AS/AS+ |
E-5 Hard O
| # | Landing Node | ||
|---|---|---|---|
| O | 連合救援艦隊、那覇への逆上陸に成功、増援及び救援物資の揚陸に成功せり! The Combined Rescue Fleet has made a successful counter-landing at Naha, and has successfully landed reinforcement supplies. | ||
| # | Landing Node | ||
E-5 Hard P: 深海任務部隊 増援空母打撃集団 (PoiDB)
| # | Formation | Boss Battle Node | AD/AP AS/AS+ |
|---|---|---|---|
| P | Diamond Phases: 2, 4 |
123/245 549/1098 | |
| Diamond Phases: 2 (Final)
|
127/253 569/1137 | ||
| # | Formation | Boss Battle Node | AD/AP AS/AS+ |
E-5 Hard Q
| # | Selection Node | ||
|---|---|---|---|
| Q | 艦隊の針路を選択できます。提督、どちらの針路をとられますか? You can decide the fleet's course. Admiral, which heading should we take? | ||
| # | Selection Node | ||
E-5 Hard Q1: 深海任務部隊 艦載機群 (PoiDB)
| # | Formation | Air Defense Node | AD/AP AS/AS+ |
|---|---|---|---|
| Q1 | Diamond Phases: 3, 4 |
141/281 630/1260 | |
| Diamond Phases: 3, 4 |
150/300 674/1347 | ||
| Diamond Phases: 3, 4 |
157/313 702/1404 | ||
| # | Formation | Air Defense Node | AD/AP AS/AS+ |
E-5 Hard Q2
| # | Empty Node | ||
|---|---|---|---|
| Q2 | 敵影を見ず。 No enemy spotted. | ||
| # | Empty Node | ||
E-5 Hard R: 深海潜水艦隊 水上艦隊阻止A線 (PoiDB)
| # | Formation | Normal Battle Node | AD/AP AS/AS+ |
|---|---|---|---|
| R | Echelon Line Abreast Phases: 3, 4 |
0/0 0/0 | |
| Echelon Line Abreast Phases: 3, 4 |
0/0 0/0 | ||
| # | Formation | Normal Battle Node | AD/AP AS/AS+ |
E-5 Hard R1: 深海任務部隊 艦載機群 (PoiDB)
| # | Formation | Air Defense Node | AD/AP AS/AS+ |
|---|---|---|---|
| R1 | Diamond Phases: 3, 4 |
141/281 630/1260 | |
| Diamond Phases: 3, 4 |
150/300 674/1347 | ||
| Diamond Phases: 3, 4 |
157/313 702/1404 | ||
| # | Formation | Air Defense Node | AD/AP AS/AS+ |
E-5 Hard R2: 深海任務部隊 艦載機群 (PoiDB)
| # | Formation | Air Defense Node | AD/AP AS/AS+ |
|---|---|---|---|
| R2 | Diamond Phases: 3 |
141/281 630/1260 | |
| Diamond Phases: 3, 4 |
150/300 674/1347 | ||
| Diamond Phases: 3 |
157/313 702/1404 | ||
| # | Formation | Air Defense Node | AD/AP AS/AS+ |
E-5 Hard R3: 深海任務部隊 護衛空母集団 III群 (PoiDB)
| # | Formation | Normal Battle Node | AD/AP AS/AS+ |
|---|---|---|---|
| R3 | Diamond Phases: 3 |
102/203 456/912 | |
| Diamond Phases: 3, 4 |
106/212 476/951 | ||
| Diamond Phases: 3, 4 |
113/225 504/1008 | ||
| # | Formation | Normal Battle Node | AD/AP AS/AS+ |
E-5 Hard S: 深海潜水艦隊 前方警戒線D群 (PoiDB)
| # | Formation | Normal Battle Node | AD/AP AS/AS+ |
|---|---|---|---|
| S | Echelon Line Abreast Phases: 3, 4 |
0/0 0/0 | |
| Echelon Line Abreast Phases: 3, 4 |
0/0 0/0 | ||
| Echelon Line Abreast Phases: 3, 4 |
0/0 0/0 | ||
| # | Formation | Normal Battle Node | AD/AP AS/AS+ |
E-5 Hard S1
| # | Empty Node | ||
|---|---|---|---|
| S1 | 気のせいだった。 敵編隊を発見!対空戦闘、用意ッ! Must be my imagination. Enemy formation detected! Prepare for anti-air combat! | ||
| # | Empty Node | ||
E-5 Hard S2: 深海任務部隊 艦載機群 (PoiDB)
| # | Formation | Air Defense Node | AD/AP AS/AS+ |
|---|---|---|---|
| S2 | Diamond Phases: 3 |
141/281 630/1260 | |
| Diamond Phases: 3, 4 |
150/300 674/1347 | ||
| Diamond Phases: 3 |
157/313 702/1404 | ||
| # | Formation | Air Defense Node | AD/AP AS/AS+ |
E-5 Hard S3: 深海任務部隊 艦載機群 (PoiDB)
| # | Formation | Air Defense Node | AD/AP AS/AS+ |
|---|---|---|---|
| S3 | Diamond Phases: 3 |
141/281 630/1260 | |
| Diamond Phases: 3 |
150/300 674/1347 | ||
| Diamond Phases: 3, 4 |
157/313 702/1404 | ||
| # | Formation | Air Defense Node | AD/AP AS/AS+ |
E-5 Hard T
| # | Empty Node | ||
|---|---|---|---|
| T | 気のせいだった。 第二艦隊1YBは、これより沖縄に突入す!各艦、対潜警戒も厳とせよ! Must be my imagination. The Second Fleet, 1YB, will now enter Okinawa! All ships, maintain strict anti-submarine alert! | ||
| # | Empty Node | ||
E-5 Hard U: 深海潜水艦隊 水上艦隊阻止B線 (PoiDB)
| # | Formation | Normal Battle Node | AD/AP AS/AS+ |
|---|---|---|---|
| U | Echelon Line Abreast Phases: 3, 4 |
0/0 0/0 | |
| Echelon Line Abreast Phases: 3, 4 |
0/0 0/0 | ||
| # | Formation | Normal Battle Node | AD/AP AS/AS+ |
E-5 Hard V: 深海侵攻部隊 浸透上陸拠点 (PoiDB)
| # | Formation | Boss Battle Node | AD/AP AS/AS+ |
|---|---|---|---|
| V | Cruising Formation 4 Phases: 3, 4 |
45/89 198/396 | |
| Cruising Formation 4 Phases: 3 (Final)
|
26/51 114/228 | ||
| # | Formation | Boss Battle Node | AD/AP AS/AS+ |
E-5 Hard V1: 深海任務部隊 上陸支援砲撃戦隊 (PoiDB)
| # | Formation | Normal Battle Node | AD/AP AS/AS+ |
|---|---|---|---|
| V1 | Line Ahead Double Line Echelon Phases: 3, 4 |
0/0 0/0 | |
| # | Formation | Normal Battle Node | AD/AP AS/AS+ |
E-5 Hard V2
| # | Empty Node | ||
|---|---|---|---|
| V2 | 敵影を見ず。 第二艦隊1YBは、これより沖縄に突入す!各艦、対潜警戒も厳とせよ! No enemy spotted. The Second Fleet, 1YB, will now enter Okinawa! All ships, maintain strict anti-submarine alert! | ||
| # | Empty Node | ||
E-5 Hard W: 深海潜水艦隊 水上艦隊阻止C線 (PoiDB)
| # | Formation | Normal Battle Node | AD/AP AS/AS+ |
|---|---|---|---|
| W | Echelon Line Abreast Phases: 4 |
0/0 0/0 | |
| Echelon Line Abreast Phases: 4 |
0/0 0/0 | ||
| # | Formation | Normal Battle Node | AD/AP AS/AS+ |
E-5 Hard X: 深海任務部隊 空母打撃集団 D群 (PoiDB)
| # | Formation | Normal Battle Node | AD/AP AS/AS+ |
|---|---|---|---|
| X | Diamond Phases: 4 |
141/281 630/1260 | |
| Diamond Phases: 4 |
150/300 674/1347 | ||
| Diamond Phases: 4 |
157/313 702/1404 | ||
| # | Formation | Normal Battle Node | AD/AP AS/AS+ |
E-5 Hard Y: 深海任務部隊 空母打撃集団 E群 (PoiDB)
| # | Formation | Normal Battle Node | AD/AP AS/AS+ |
|---|---|---|---|
| Y | Diamond Phases: 4 |
141/281 630/1260 | |
| Diamond Phases: 4 |
150/300 674/1347 | ||
| Diamond Phases: 4 |
157/313 702/1404 | ||
| # | Formation | Normal Battle Node | AD/AP AS/AS+ |
E-5 Hard Y1: 深海任務部隊 艦載機群 (PoiDB)
| # | Formation | Air Defense Node | AD/AP AS/AS+ |
|---|---|---|---|
| Y1 | Diamond Phases: 4 |
141/281 630/1260 | |
| Diamond Phases: 4 |
150/300 674/1347 | ||
| Diamond Phases: 4 |
157/313 702/1404 | ||
| # | Formation | Air Defense Node | AD/AP AS/AS+ |
E-5 Hard Y2: 深海任務部隊 艦載機群 (PoiDB)
| # | Formation | Air Defense Node | AD/AP AS/AS+ |
|---|---|---|---|
| Y2 | Diamond Phases: 4 |
141/281 630/1260 | |
| Diamond Phases: 4 |
150/300 674/1347 | ||
| Diamond Phases: 4 |
157/313 702/1404 | ||
| # | Formation | Air Defense Node | AD/AP AS/AS+ |
E-5 Hard Z: 深海任務部隊 水上打撃部隊旗艦 (PoiDB)
| # | Formation | Boss Battle Node | AD/AP AS/AS+ |
|---|---|---|---|
| Z | Cruising Formation 4 Phases: 4 |
133/266 597/1194 | |
| Cruising Formation 4 Phases: 4 (Final)
|
154/307 690/1380 | ||
| # | Formation | Boss Battle Node | AD/AP AS/AS+ |
E-5 Hard Z1: 深海任務部隊 空母打撃集団 A群 (PoiDB)
| # | Formation | Normal Battle Node | AD/AP AS/AS+ |
|---|---|---|---|
| Z1 | Diamond Phases: 4 |
141/281 630/1260 | |
| Diamond Phases: 4 |
150/300 674/1347 | ||
| Diamond Phases: 4 |
157/313 702/1404 | ||
| # | Formation | Normal Battle Node | AD/AP AS/AS+ |
E-5 Hard Z2
| # | Repair Node | ||
|---|---|---|---|
| # | Repair Node | ||
| Type | Ships |
|---|---|
| DD |
| Type | Ships |
|---|---|
| DE | |
| DD | |
| CVL | |
| CV |
| Type | Ships |
|---|---|
| DD | |
| CVL |
| Type | Ships |
|---|---|
| DD |
| Type | Ships |
|---|---|
| DD |
| Type | Ships |
|---|---|
| DE | |
| DD | |
| CL |
| Type | Ships |
|---|---|
| DE | |
| DD | |
| CVL | |
| BB |
| Type | Ships |
|---|---|
| DE |
| Type | Ships |
|---|---|
| DD |
| Type | Ships |
|---|---|
| DD | |
| CVL |
| Type | Ships |
|---|---|
| DE | |
| DD | |
| CL | |
| BB | |
| SS |
E-5 Medium AB
| # | Formation | Air Raids | AD/AP AS/AS+ |
|---|---|---|---|
| AB | Diamond | 150/299 671/1341 | |
| Diamond | 160/320 719/1437 | ||
| Diamond | 165/329 738/1476 | ||
| # | Formation | Air Raids | AD/AP AS/AS+ |
E-5 Medium A
| # | Selection Node | ||
|---|---|---|---|
| A | 艦隊の針路を選択できます。提督、どちらの針路をとられますか? You can decide the fleet's course. Admiral, which heading should we take? | ||
| # | Selection Node | ||
E-5 Medium A1
| # | Empty Node | ||
|---|---|---|---|
| A1 | 気のせいだった。 台湾方面の友軍との連絡を試みる!対潜対空、対水上警戒を厳とせよ! Must be my imagination. Attempting to contact friendly forces in the Taiwan area! Maintain strict anti-submarine, anti-air and anti-water vigilance! | ||
| # | Empty Node | ||
E-5 Medium A2: 深海潜水艦隊 前方警戒線C群 (PoiDB)
| # | Formation | Normal Battle Node | AD/AP AS/AS+ |
|---|---|---|---|
| A2 | Echelon Line Abreast Phases: 1, 4 |
0/0 0/0 | |
| Echelon Line Abreast Phases: 1 |
0/0 0/0 | ||
| # | Formation | Normal Battle Node | AD/AP AS/AS+ |
E-5 Medium A3: 深海任務部隊 艦載機群 (PoiDB)
| # | Formation | Air Defense Node | AD/AP AS/AS+ |
|---|---|---|---|
| A3 | Diamond Phases: 1, 3 |
120/240 539/1077 | |
| Diamond Phases: 1, 3 |
126/251 563/1125 | ||
| Diamond Phases: 3, 4 |
134/268 602/1203 | ||
| # | Formation | Air Defense Node | AD/AP AS/AS+ |
E-5 Medium A4
| # | Empty Node | ||
|---|---|---|---|
| A4 | 気のせいだった。 偽装航路、終了。これより変針、第二艦隊1YBは、沖縄を目指す! Must be my imagination. Deceptive route over. Now changing course! The Second Fleet, 1YB, is now heading towards Okinawa! | ||
| # | Empty Node | ||
E-5 Medium B: 深海任務部隊 艦載機群 (PoiDB)
| # | Formation | Air Defense Node | AD/AP AS/AS+ |
|---|---|---|---|
| B | Diamond Phases: 1 |
120/240 539/1077 | |
| Diamond Phases: 1 |
126/251 563/1125 | ||
| Diamond Phases: 1 |
134/268 602/1203 | ||
| # | Formation | Air Defense Node | AD/AP AS/AS+ |
E-5 Medium B1: 深海潜水艦隊 前方警戒線A群 (PoiDB)
| # | Formation | Normal Battle Node | AD/AP AS/AS+ |
|---|---|---|---|
| B1 | Echelon Line Abreast Phases: 1 |
0/0 0/0 | |
| Line Abreast | 0/0 0/0 | ||
| # | Formation | Normal Battle Node | AD/AP AS/AS+ |
E-5 Medium B2: 深海潜水艦隊 前方警戒線B群 (PoiDB)
| # | Formation | Normal Battle Node | AD/AP AS/AS+ |
|---|---|---|---|
| B2 | Echelon Line Abreast Phases: 1 |
0/0 0/0 | |
| Echelon Line Abreast Phases: 1 |
0/0 0/0 | ||
| # | Formation | Normal Battle Node | AD/AP AS/AS+ |
E-5 Medium B3: 深海任務部隊 南部ピケットライン (PoiDB)
| # | Formation | Normal Battle Node | AD/AP AS/AS+ |
|---|---|---|---|
| B3 | Line Ahead Phases: 1 |
0/0 0/0 | |
| Line Ahead Phases: 1 |
0/0 0/0 | ||
| # | Formation | Normal Battle Node | AD/AP AS/AS+ |
E-5 Medium C: 深海任務部隊 護衛空母集団 II群 (PoiDB)
| # | Formation | Normal Battle Node | AD/AP AS/AS+ |
|---|---|---|---|
| C | Diamond | 90/180 404/807 | |
| Diamond Phases: 1 |
96/191 428/855 | ||
| Diamond Phases: 1 |
100/199 447/894 | ||
| # | Formation | Normal Battle Node | AD/AP AS/AS+ |
E-5 Medium C1: 深海任務部隊 北部ピケットライン (PoiDB)
| # | Formation | Normal Battle Node | AD/AP AS/AS+ |
|---|---|---|---|
| C1 | Line Ahead Double Line Echelon Phases: 1, 4 |
0/0 0/0 | |
| # | Formation | Normal Battle Node | AD/AP AS/AS+ |
E-5 Medium C2
| # | Selection Node | ||
|---|---|---|---|
| C2 | 台湾方面の友軍との連絡を試みる!対潜対空、対水上警戒を厳とせよ! Attempting to contact friendly forces in the Taiwan area! Maintain strict anti-submarine, anti-air and anti-water vigilance! | ||
| # | Selection Node | ||
E-5 Medium D: 深海任務部隊 艦載機群 (PoiDB)
| # | Formation | Air Defense Node | AD/AP AS/AS+ |
|---|---|---|---|
| D | Diamond Phases: 1 |
96/191 428/855 | |
| Diamond Phases: 1 |
100/199 447/894 | ||
| Diamond Phases: 1 |
140/279 627/1254 | ||
| # | Formation | Air Defense Node | AD/AP AS/AS+ |
E-5 Medium D1: 深海任務部隊 艦載機群 (PoiDB)
| # | Formation | Air Defense Node | AD/AP AS/AS+ |
|---|---|---|---|
| D1 | Diamond Phases: 1 |
96/191 428/855 | |
| Diamond Phases: 1, 4 |
100/199 447/894 | ||
| Diamond Phases: 1 |
140/279 627/1254 | ||
| # | Formation | Air Defense Node | AD/AP AS/AS+ |
E-5 Medium D2
| # | Empty Node | ||
|---|---|---|---|
| D2 | 気のせいだった。 艦隊は台北沖に到達。台湾方面に集結中の友軍艦隊との連絡、作戦連携に成功せり! Must be my imagination. Our fleet has reached the coast of Taipei. We've successfully established coordination with the friendly fleet in the Taiwan area! | ||
| # | Empty Node | ||
E-5 Medium E: 深海任務部隊 後方警戒ライン I群 (PoiDB)
| # | Formation | Normal Battle Node | AD/AP AS/AS+ |
|---|---|---|---|
| E | Line Ahead Double Line Vanguard Phases: 1, 4 |
0/0 0/0 | |
| # | Formation | Normal Battle Node | AD/AP AS/AS+ |
E-5 Medium F
| # | Empty Node | ||
|---|---|---|---|
| F | 敵影を見ず。 台湾方面の友軍との連絡を試みる!対潜対空、対水上警戒を厳とせよ! No enemy spotted. Attempting to contact friendly forces in the Taiwan area! Maintain strict anti-submarine, anti-air and anti-water vigilance! | ||
| # | Empty Node | ||
E-5 Medium G: 深海任務部隊 輸送護衛空母群 (PoiDB)
| # | Formation | Boss Battle Node | AD/AP AS/AS+ |
|---|---|---|---|
| G | Line Ahead Diamond Phases: 1, 4 (HA) |
32/63 140/279 | |
| Line Ahead Phases: 1 (Final) (HA) |
54/107 240/480 | ||
| # | Formation | Boss Battle Node | AD/AP AS/AS+ |
E-5 Medium H: 深海潜水艦隊 後方哨戒線A群 (PoiDB)
| # | Formation | Normal Battle Node | AD/AP AS/AS+ |
|---|---|---|---|
| H | Echelon Line Abreast Phases: 2 |
0/0 0/0 | |
| Echelon Line Abreast Phases: 2 |
0/0 0/0 | ||
| # | Formation | Normal Battle Node | AD/AP AS/AS+ |
E-5 Medium H1: 深海潜水艦隊 後方哨戒線B群 (PoiDB)
| # | Formation | Normal Battle Node | AD/AP AS/AS+ |
|---|---|---|---|
| H1 | Line Abreast | 0/0 0/0 | |
| # | Formation | Normal Battle Node | AD/AP AS/AS+ |
E-5 Medium H2 (PoiDB)
| # | Formation | Air Defense Node | AD/AP AS/AS+ |
|---|---|---|---|
| # | Formation | Air Defense Node | AD/AP AS/AS+ |
E-5 Medium H3 (PoiDB)
| # | Formation | Normal Battle Node | AD/AP AS/AS+ |
|---|---|---|---|
| # | Formation | Normal Battle Node | AD/AP AS/AS+ |
E-5 Medium I (PoiDB)
| # | Formation | Normal Battle Node | AD/AP AS/AS+ |
|---|---|---|---|
| # | Formation | Normal Battle Node | AD/AP AS/AS+ |
E-5 Medium I1: 深海任務部隊 予備護衛空母集団 (PoiDB)
| # | Formation | Normal Battle Node | AD/AP AS/AS+ |
|---|---|---|---|
| I1 | Diamond Phases: 2 |
90/180 404/807 | |
| Diamond Phases: 2 |
96/191 428/855 | ||
| Diamond Phases: 2 |
100/199 447/894 | ||
| # | Formation | Normal Battle Node | AD/AP AS/AS+ |
E-5 Medium I2: 深海任務部隊 空母打撃集団 C群 (PoiDB)
| # | Formation | Normal Battle Node | AD/AP AS/AS+ |
|---|---|---|---|
| I2 | Diamond Phases: 2 |
120/240 539/1077 | |
| Diamond Phases: 2 |
126/251 563/1125 | ||
| Diamond Phases: 2 |
134/268 602/1203 | ||
| # | Formation | Normal Battle Node | AD/AP AS/AS+ |
E-5 Medium J: 深海任務部隊 艦載機群 (PoiDB)
| # | Formation | Air Defense Node | AD/AP AS/AS+ |
|---|---|---|---|
| J | Diamond Phases: 2 |
149/298 669/1338 | |
| Diamond Phases: 2 |
155/309 693/1386 | ||
| Diamond Phases: 2 |
160/319 717/1434 | ||
| # | Formation | Air Defense Node | AD/AP AS/AS+ |
E-5 Medium K: 深海任務部隊 兵站補給船団 (PoiDB)
| # | Formation | Normal Battle Node | AD/AP AS/AS+ |
|---|---|---|---|
| K | Double Line Diamond Vanguard Phases: 2 |
0/0 0/0 | |
| # | Formation | Normal Battle Node | AD/AP AS/AS+ |
E-5 Medium L: 深海潜水艦隊 後方哨戒線C群 (PoiDB)
| # | Formation | Normal Battle Node | AD/AP AS/AS+ |
|---|---|---|---|
| L | Echelon Line Abreast Phases: 2 |
0/0 0/0 | |
| Echelon Line Abreast Phases: 2 |
0/0 0/0 | ||
| # | Formation | Normal Battle Node | AD/AP AS/AS+ |
E-5 Medium L1: 深海潜水艦隊 後方哨戒線D群 (PoiDB)
| # | Formation | Normal Battle Node | AD/AP AS/AS+ |
|---|---|---|---|
| L1 | Line Abreast | 0/0 0/0 | |
| Echelon Line Abreast |
0/0 0/0 | ||
| # | Formation | Normal Battle Node | AD/AP AS/AS+ |
E-5 Medium L2: 深海任務部隊 艦載機群 (PoiDB)
| # | Formation | Air Defense Node | AD/AP AS/AS+ |
|---|---|---|---|
| L2 | Diamond Phases: 2 |
96/191 428/855 | |
| Diamond Phases: 2 |
100/199 447/894 | ||
| Diamond Phases: 2 |
140/279 627/1254 | ||
| # | Formation | Air Defense Node | AD/AP AS/AS+ |
E-5 Medium M: 深海任務部隊 護衛空母集団 IV群 (PoiDB)
| # | Formation | Normal Battle Node | AD/AP AS/AS+ |
|---|---|---|---|
| M | Diamond Phases: 2 |
90/180 404/807 | |
| Diamond Phases: 2 |
96/191 428/855 | ||
| Diamond Phases: 2 |
100/199 447/894 | ||
| # | Formation | Normal Battle Node | AD/AP AS/AS+ |
E-5 Medium N: 深海任務部隊 護衛空母集団 I群 (PoiDB)
| # | Formation | Normal Battle Node | AD/AP AS/AS+ |
|---|---|---|---|
| N | Diamond Phases: 2 |
90/180 404/807 | |
| Diamond Phases: 2 |
96/191 428/855 | ||
| Diamond Phases: 2 |
100/199 447/894 | ||
| # | Formation | Normal Battle Node | AD/AP AS/AS+ |
E-5 Medium O
| # | Landing Node | ||
|---|---|---|---|
| O | 連合救援艦隊、那覇への逆上陸に成功、増援及び救援物資の揚陸に成功せり! The Combined Rescue Fleet has made a successful counter-landing at Naha, and has successfully landed reinforcement supplies. | ||
| # | Landing Node | ||
E-5 Medium P: 深海任務部隊 増援空母打撃集団 (PoiDB)
| # | Formation | Boss Battle Node | AD/AP AS/AS+ |
|---|---|---|---|
| P | Diamond Phases: 2 |
77/154 345/690 | |
| Diamond Phases: 2 |
109/218 489/978 | ||
| Diamond Phases: 2 (Final)
|
115/229 513/1026 | ||
| # | Formation | Boss Battle Node | AD/AP AS/AS+ |
E-5 Medium Q
| # | Selection Node | ||
|---|---|---|---|
| Q | 艦隊の針路を選択できます。提督、どちらの針路をとられますか? You can decide the fleet's course. Admiral, which heading should we take? | ||
| # | Selection Node | ||
E-5 Medium Q1: 深海任務部隊 艦載機群 (PoiDB)
| # | Formation | Air Defense Node | AD/AP AS/AS+ |
|---|---|---|---|
| Q1 | Diamond Phases: 3 |
120/240 539/1077 | |
| Diamond Phases: 3 |
126/251 563/1125 | ||
| Diamond Phases: 3, 4 |
134/268 602/1203 | ||
| # | Formation | Air Defense Node | AD/AP AS/AS+ |
E-5 Medium Q2
| # | Empty Node | ||
|---|---|---|---|
| Q2 | 敵影を見ず。 No enemy spotted. | ||
| # | Empty Node | ||
E-5 Medium R: 深海潜水艦隊 水上艦隊阻止A線 (PoiDB)
| # | Formation | Normal Battle Node | AD/AP AS/AS+ |
|---|---|---|---|
| R | Echelon | 0/0 0/0 | |
| Echelon Line Abreast |
0/0 0/0 | ||
| # | Formation | Normal Battle Node | AD/AP AS/AS+ |
E-5 Medium R1: 深海任務部隊 艦載機群 (PoiDB)
| # | Formation | Air Defense Node | AD/AP AS/AS+ |
|---|---|---|---|
| R1 | Diamond | 120/240 539/1077 | |
| Diamond | 126/251 563/1125 | ||
| Diamond | 134/268 602/1203 | ||
| # | Formation | Air Defense Node | AD/AP AS/AS+ |
E-5 Medium R2: 深海任務部隊 艦載機群 (PoiDB)
| # | Formation | Air Defense Node | AD/AP AS/AS+ |
|---|---|---|---|
| R2 | Diamond | 120/240 539/1077 | |
| Diamond | 126/251 563/1125 | ||
| Diamond | 134/268 602/1203 | ||
| # | Formation | Air Defense Node | AD/AP AS/AS+ |
E-5 Medium R3: 深海任務部隊 護衛空母集団 III群 (PoiDB)
| # | Formation | Normal Battle Node | AD/AP AS/AS+ |
|---|---|---|---|
| R3 | Diamond | 90/180 404/807 | |
| Diamond | 96/191 428/855 | ||
| Diamond | 100/199 447/894 | ||
| # | Formation | Normal Battle Node | AD/AP AS/AS+ |
E-5 Medium S: 深海潜水艦隊 前方警戒線D群 (PoiDB)
| # | Formation | Normal Battle Node | AD/AP AS/AS+ |
|---|---|---|---|
| S | Echelon Line Abreast Phases: 3, 4 |
0/0 0/0 | |
| Echelon Line Abreast Phases: 3 |
0/0 0/0 | ||
| # | Formation | Normal Battle Node | AD/AP AS/AS+ |
E-5 Medium S1
| # | Empty Node | ||
|---|---|---|---|
| S1 | 気のせいだった。 敵編隊を発見!対空戦闘、用意ッ! Must be my imagination. Enemy formation detected! Prepare for anti-air combat! | ||
| # | Empty Node | ||
E-5 Medium S2: 深海任務部隊 艦載機群 (PoiDB)
| # | Formation | Air Defense Node | AD/AP AS/AS+ |
|---|---|---|---|
| S2 | Diamond Phases: 3 |
120/240 539/1077 | |
| Diamond Phases: 3 |
126/251 563/1125 | ||
| Diamond Phases: 3 |
134/268 602/1203 | ||
| # | Formation | Air Defense Node | AD/AP AS/AS+ |
E-5 Medium S3: 深海任務部隊 艦載機群 (PoiDB)
| # | Formation | Air Defense Node | AD/AP AS/AS+ |
|---|---|---|---|
| S3 | Diamond Phases: 3 |
120/240 539/1077 | |
| Diamond Phases: 3 |
126/251 563/1125 | ||
| Diamond Phases: 3 |
134/268 602/1203 | ||
| # | Formation | Air Defense Node | AD/AP AS/AS+ |
E-5 Medium T
| # | Empty Node | ||
|---|---|---|---|
| T | 気のせいだった。 第二艦隊1YBは、これより沖縄に突入す!各艦、対潜警戒も厳とせよ! Must be my imagination. The Second Fleet, 1YB, will now enter Okinawa! All ships, maintain strict anti-submarine alert! | ||
| # | Empty Node | ||
E-5 Medium U: 深海潜水艦隊 水上艦隊阻止B線 (PoiDB)
| # | Formation | Normal Battle Node | AD/AP AS/AS+ |
|---|---|---|---|
| U | Echelon Line Abreast Phases: 3, 4 |
0/0 0/0 | |
| Echelon Line Abreast Phases: 3 |
0/0 0/0 | ||
| # | Formation | Normal Battle Node | AD/AP AS/AS+ |
E-5 Medium V: 深海侵攻部隊 浸透上陸拠点 (PoiDB)
| # | Formation | Boss Battle Node | AD/AP AS/AS+ |
|---|---|---|---|
| V | Cruising Formation 4 Phases: 3, 4 |
30/59 132/264 | |
| Cruising Formation 4 Phases: 3 (Final)
|
21/41 90/180 | ||
| # | Formation | Boss Battle Node | AD/AP AS/AS+ |
E-5 Medium V1: 深海任務部隊 上陸支援砲撃戦隊 (PoiDB)
| # | Formation | Normal Battle Node | AD/AP AS/AS+ |
|---|---|---|---|
| V1 | Line Ahead Double Line Echelon Phases: 3, 4 |
0/0 0/0 | |
| # | Formation | Normal Battle Node | AD/AP AS/AS+ |
E-5 Medium V2
| # | Empty Node | ||
|---|---|---|---|
| V2 | 敵影を見ず。 第二艦隊1YBは、これより沖縄に突入す!各艦、対潜警戒も厳とせよ! No enemy spotted. The Second Fleet, 1YB, will now enter Okinawa! All ships, maintain strict anti-submarine alert! | ||
| # | Empty Node | ||
E-5 Medium W: 深海潜水艦隊 水上艦隊阻止C線 (PoiDB)
| # | Formation | Normal Battle Node | AD/AP AS/AS+ |
|---|---|---|---|
| W | Echelon Line Abreast Phases: 4 |
0/0 0/0 | |
| Echelon Line Abreast Phases: 4 |
0/0 0/0 | ||
| # | Formation | Normal Battle Node | AD/AP AS/AS+ |
E-5 Medium X: 深海任務部隊 空母打撃集団 D群 (PoiDB)
| # | Formation | Normal Battle Node | AD/AP AS/AS+ |
|---|---|---|---|
| X | Diamond | 120/240 539/1077 | |
| Diamond | 126/251 563/1125 | ||
| Diamond | 134/268 602/1203 | ||
| # | Formation | Normal Battle Node | AD/AP AS/AS+ |
E-5 Medium Y: 深海任務部隊 空母打撃集団 E群 (PoiDB)
| # | Formation | Normal Battle Node | AD/AP AS/AS+ |
|---|---|---|---|
| Y | Diamond Phases: 4 |
120/240 539/1077 | |
| Diamond Phases: 4 |
126/251 563/1125 | ||
| Diamond Phases: 4 |
134/268 602/1203 | ||
| # | Formation | Normal Battle Node | AD/AP AS/AS+ |
E-5 Medium Y1: 深海任務部隊 艦載機群 (PoiDB)
| # | Formation | Air Defense Node | AD/AP AS/AS+ |
|---|---|---|---|
| Y1 | Diamond Phases: 4 |
120/240 539/1077 | |
| Diamond Phases: 4 |
126/251 563/1125 | ||
| Diamond Phases: 4 |
134/268 602/1203 | ||
| # | Formation | Air Defense Node | AD/AP AS/AS+ |
E-5 Medium Y2: 深海任務部隊 艦載機群 (PoiDB)
| # | Formation | Air Defense Node | AD/AP AS/AS+ |
|---|---|---|---|
| Y2 | Diamond Phases: 4 |
120/240 539/1077 | |
| Diamond Phases: 4 |
126/251 563/1125 | ||
| Diamond Phases: 4 |
134/268 602/1203 | ||
| # | Formation | Air Defense Node | AD/AP AS/AS+ |
E-5 Medium Z: 深海任務部隊 水上打撃部隊旗艦 (PoiDB)
| # | Formation | Boss Battle Node | AD/AP AS/AS+ |
|---|---|---|---|
| Z | Cruising Formation 4 Phases: 4 |
100/199 447/894 | |
| Cruising Formation 4 Phases: 4 (Final)
|
119/237 533/1065 | ||
| # | Formation | Boss Battle Node | AD/AP AS/AS+ |
E-5 Medium Z1: 深海任務部隊 空母打撃集団 A群 (PoiDB)
| # | Formation | Normal Battle Node | AD/AP AS/AS+ |
|---|---|---|---|
| Z1 | Diamond Phases: 4 |
120/240 539/1077 | |
| Diamond Phases: 4 |
126/251 563/1125 | ||
| Diamond Phases: 4 |
134/268 602/1203 | ||
| # | Formation | Normal Battle Node | AD/AP AS/AS+ |
E-5 Medium Z2
| # | Repair Node | ||
|---|---|---|---|
| # | Repair Node | ||
| Type | Ships |
|---|---|
| DD |
| Type | Ships |
|---|---|
| DE | |
| DD | |
| CL | |
| CVL | |
| BB | |
| CV | |
| SS |
| Type | Ships |
|---|---|
| DE | |
| DD | |
| CVL |
| Type | Ships |
|---|---|
| DD |
| Type | Ships |
|---|---|
| DD | |
| AS |
| Type | Ships |
|---|---|
| DE | |
| DD |
| Type | Ships |
|---|---|
| DE | |
| DD | |
| CL | |
| CVL | |
| BB | |
| SS |
| Type | Ships |
|---|---|
| DE | |
| DD |
| Type | Ships |
|---|---|
| DE | |
| DD |
| Type | Ships |
|---|---|
| DD | |
| CL | |
| BB | |
| SS |
| Type | Ships |
|---|---|
| DE | |
| DD | |
| CL | |
| FBB | |
| BB | |
| AS |
E-5 Easy AB
| # | Formation | Air Raids | AD/AP AS/AS+ |
|---|---|---|---|
| AB | Diamond | 114/227 509/1017 | |
| Diamond | 146/291 653/1305 | ||
| Diamond | 151/301 677/1353 | ||
| # | Formation | Air Raids | AD/AP AS/AS+ |
E-5 Easy A
| # | Selection Node | ||
|---|---|---|---|
| A | 艦隊の針路を選択できます。提督、どちらの針路をとられますか? You can decide the fleet's course. Admiral, which heading should we take? | ||
| # | Selection Node | ||
E-5 Easy A1
| # | Empty Node | ||
|---|---|---|---|
| A1 | 気のせいだった。 台湾方面の友軍との連絡を試みる!対潜対空、対水上警戒を厳とせよ! Must be my imagination. Attempting to contact friendly forces in the Taiwan area! Maintain strict anti-submarine, anti-air and anti-water vigilance! | ||
| # | Empty Node | ||
E-5 Easy A2: 深海潜水艦隊 前方警戒線C群 (PoiDB)
| # | Formation | Normal Battle Node | AD/AP AS/AS+ |
|---|---|---|---|
| A2 | Echelon Line Abreast Phases: 1 |
0/0 0/0 | |
| Echelon Line Abreast Phases: 1, 4 |
0/0 0/0 | ||
| Echelon Line Abreast Phases: 1 |
0/0 0/0 | ||
| # | Formation | Normal Battle Node | AD/AP AS/AS+ |
E-5 Easy A3: 深海任務部隊 艦載機群 (PoiDB)
| # | Formation | Air Defense Node | AD/AP AS/AS+ |
|---|---|---|---|
| A3 | Diamond Phases: 1, 3, 4 |
87/174 390/780 | |
| Diamond Phases: 1, 3, 4 |
119/238 534/1068 | ||
| Diamond Phases: 1, 3 |
125/249 558/1116 | ||
| # | Formation | Air Defense Node | AD/AP AS/AS+ |
E-5 Easy A4
| # | Empty Node | ||
|---|---|---|---|
| A4 | 気のせいだった。 偽装航路、終了。これより変針、第二艦隊1YBは、沖縄を目指す! Must be my imagination. Deceptive route over. Now changing course! The Second Fleet, 1YB, is now heading towards Okinawa! | ||
| # | Empty Node | ||
E-5 Easy B: 深海任務部隊 艦載機群 (PoiDB)
| # | Formation | Air Defense Node | AD/AP AS/AS+ |
|---|---|---|---|
| B | Diamond Phases: 1 |
87/174 390/780 | |
| Diamond Phases: 1 |
119/238 534/1068 | ||
| Diamond Phases: 1, 4 |
125/249 558/1116 | ||
| # | Formation | Air Defense Node | AD/AP AS/AS+ |
E-5 Easy B1: 深海潜水艦隊 前方警戒線A群 (PoiDB)
| # | Formation | Normal Battle Node | AD/AP AS/AS+ |
|---|---|---|---|
| B1 | Line Abreast Phases: 1 |
0/0 0/0 | |
| Echelon Phases: 1 |
0/0 0/0 | ||
| # | Formation | Normal Battle Node | AD/AP AS/AS+ |
E-5 Easy B2: 深海潜水艦隊 前方警戒線B群 (PoiDB)
| # | Formation | Normal Battle Node | AD/AP AS/AS+ |
|---|---|---|---|
| B2 | Echelon Line Abreast Phases: 1 |
0/0 0/0 | |
| Echelon Line Abreast Phases: 1 |
0/0 0/0 | ||
| Echelon Line Abreast Phases: 1, 4 |
0/0 0/0 | ||
| # | Formation | Normal Battle Node | AD/AP AS/AS+ |
E-5 Easy B3: 深海任務部隊 南部ピケットライン (PoiDB)
| # | Formation | Normal Battle Node | AD/AP AS/AS+ |
|---|---|---|---|
| B3 | Line Ahead Phases: 1, 4 |
0/0 0/0 | |
| Line Ahead Phases: 1 |
0/0 0/0 | ||
| Line Ahead | 0/0 0/0 | ||
| # | Formation | Normal Battle Node | AD/AP AS/AS+ |
E-5 Easy C: 深海任務部隊 護衛空母集団 II群 (PoiDB)
| # | Formation | Normal Battle Node | AD/AP AS/AS+ |
|---|---|---|---|
| C | Diamond Phases: 1 |
54/107 240/480 | |
| Diamond Phases: 1 |
86/171 384/768 | ||
| Diamond Phases: 1 |
91/182 408/816 | ||
| # | Formation | Normal Battle Node | AD/AP AS/AS+ |
E-5 Easy C1: 深海任務部隊 北部ピケットライン (PoiDB)
| # | Formation | Normal Battle Node | AD/AP AS/AS+ |
|---|---|---|---|
| C1 | Line Ahead Double Line Echelon Phases: 1, 4 |
0/0 0/0 | |
| # | Formation | Normal Battle Node | AD/AP AS/AS+ |
E-5 Easy C2
| # | Selection Node | ||
|---|---|---|---|
| C2 | 台湾方面の友軍との連絡を試みる!対潜対空、対水上警戒を厳とせよ! Attempting to contact friendly forces in the Taiwan area! Maintain strict anti-submarine, anti-air and anti-water vigilance! | ||
| # | Selection Node | ||
E-5 Easy D: 深海任務部隊 艦載機群 (PoiDB)
| # | Formation | Air Defense Node | AD/AP AS/AS+ |
|---|---|---|---|
| D | Diamond Phases: 1 |
86/171 384/768 | |
| Diamond Phases: 1 |
91/182 408/816 | ||
| Diamond Phases: 1 |
131/262 588/1176 | ||
| # | Formation | Air Defense Node | AD/AP AS/AS+ |
E-5 Easy D1: 深海任務部隊 艦載機群 (PoiDB)
| # | Formation | Air Defense Node | AD/AP AS/AS+ |
|---|---|---|---|
| D1 | Diamond Phases: 1 |
86/171 384/768 | |
| Diamond Phases: 1 |
91/182 408/816 | ||
| Diamond Phases: 1, 4 |
131/262 588/1176 | ||
| # | Formation | Air Defense Node | AD/AP AS/AS+ |
E-5 Easy D2
| # | Empty Node | ||
|---|---|---|---|
| D2 | 気のせいだった。 艦隊は台北沖に到達。台湾方面に集結中の友軍艦隊との連絡、作戦連携に成功せり! Must be my imagination. Our fleet has reached the coast of Taipei. We've successfully established coordination with the friendly fleet in the Taiwan area! | ||
| # | Empty Node | ||
E-5 Easy E: 深海任務部隊 後方警戒ライン I群 (PoiDB)
| # | Formation | Normal Battle Node | AD/AP AS/AS+ |
|---|---|---|---|
| E | Line Ahead Double Line Vanguard Phases: 1, 4 |
0/0 0/0 | |
| # | Formation | Normal Battle Node | AD/AP AS/AS+ |
E-5 Easy F
| # | Empty Node | ||
|---|---|---|---|
| F | 敵影を見ず。 台湾方面の友軍との連絡を試みる!対潜対空、対水上警戒を厳とせよ! No enemy spotted. Attempting to contact friendly forces in the Taiwan area! Maintain strict anti-submarine, anti-air and anti-water vigilance! | ||
| # | Empty Node | ||
E-5 Easy G: 深海任務部隊 輸送護衛空母群 (PoiDB)
| # | Formation | Boss Battle Node | AD/AP AS/AS+ |
|---|---|---|---|
| G | Line Ahead Diamond Phases: 1, 4 (HA) |
32/63 140/279 | |
| Line Ahead Phases: 1 (Final) (HA) |
54/107 240/480 | ||
| # | Formation | Boss Battle Node | AD/AP AS/AS+ |
E-5 Easy H: 深海潜水艦隊 後方哨戒線A群 (PoiDB)
| # | Formation | Normal Battle Node | AD/AP AS/AS+ |
|---|---|---|---|
| H | Echelon Line Abreast Phases: 2 |
0/0 0/0 | |
| Echelon Line Abreast Phases: 2 |
0/0 0/0 | ||
| Echelon Line Abreast Phases: 2 |
0/0 0/0 | ||
| # | Formation | Normal Battle Node | AD/AP AS/AS+ |
E-5 Easy H1: 深海潜水艦隊 後方哨戒線B群 (PoiDB)
| # | Formation | Normal Battle Node | AD/AP AS/AS+ |
|---|---|---|---|
| H1 | Echelon Phases: 2 |
0/0 0/0 | |
| Echelon Line Abreast Phases: 2 |
0/0 0/0 | ||
| # | Formation | Normal Battle Node | AD/AP AS/AS+ |
E-5 Easy H2: 深海任務部隊 艦載機群 (PoiDB)
| # | Formation | Air Defense Node | AD/AP AS/AS+ |
|---|---|---|---|
| H2 | Diamond Phases: 2 |
87/174 390/780 | |
| Diamond | 119/238 534/1068 | ||
| Diamond | 125/249 558/1116 | ||
| # | Formation | Air Defense Node | AD/AP AS/AS+ |
E-5 Easy H3: 深海任務部隊 空母打撃集団 B群 (PoiDB)
| # | Formation | Normal Battle Node | AD/AP AS/AS+ |
|---|---|---|---|
| H3 | Diamond | 87/174 390/780 | |
| Diamond | 119/238 534/1068 | ||
| # | Formation | Normal Battle Node | AD/AP AS/AS+ |
E-5 Easy I: 深海任務部隊 後方警戒ライン II群 (PoiDB)
| # | Formation | Normal Battle Node | AD/AP AS/AS+ |
|---|---|---|---|
| I | Line Ahead Double Line Vanguard Phases: 2 |
0/0 0/0 | |
| # | Formation | Normal Battle Node | AD/AP AS/AS+ |
E-5 Easy I1: 深海任務部隊 予備護衛空母集団 (PoiDB)
| # | Formation | Normal Battle Node | AD/AP AS/AS+ |
|---|---|---|---|
| I1 | Diamond Phases: 2 |
54/107 240/480 | |
| Diamond Phases: 2 |
86/171 384/768 | ||
| Diamond Phases: 2 |
91/182 408/816 | ||
| # | Formation | Normal Battle Node | AD/AP AS/AS+ |
E-5 Easy I2: 深海任務部隊 空母打撃集団 C群 (PoiDB)
| # | Formation | Normal Battle Node | AD/AP AS/AS+ |
|---|---|---|---|
| I2 | Diamond Phases: 2 |
87/174 390/780 | |
| Diamond Phases: 2 |
119/238 534/1068 | ||
| Diamond | 125/249 558/1116 | ||
| # | Formation | Normal Battle Node | AD/AP AS/AS+ |
E-5 Easy J: 深海任務部隊 艦載機群 (PoiDB)
| # | Formation | Air Defense Node | AD/AP AS/AS+ |
|---|---|---|---|
| J | Diamond Phases: 2 |
113/226 507/1014 | |
| Diamond Phases: 2 |
145/290 651/1302 | ||
| Diamond Phases: 2 |
109/217 486/972 | ||
| # | Formation | Air Defense Node | AD/AP AS/AS+ |
E-5 Easy K: 深海任務部隊 兵站補給船団 (PoiDB)
| # | Formation | Normal Battle Node | AD/AP AS/AS+ |
|---|---|---|---|
| K | Double Line Diamond Vanguard Phases: 2 |
0/0 0/0 | |
| # | Formation | Normal Battle Node | AD/AP AS/AS+ |
E-5 Easy L: 深海潜水艦隊 後方哨戒線C群 (PoiDB)
| # | Formation | Normal Battle Node | AD/AP AS/AS+ |
|---|---|---|---|
| L | Echelon Line Abreast Phases: 2 |
0/0 0/0 | |
| Echelon Line Abreast Phases: 2 |
0/0 0/0 | ||
| Echelon Line Abreast Phases: 2 |
0/0 0/0 | ||
| # | Formation | Normal Battle Node | AD/AP AS/AS+ |
E-5 Easy L1 (PoiDB)
| # | Formation | Normal Battle Node | AD/AP AS/AS+ |
|---|---|---|---|
| # | Formation | Normal Battle Node | AD/AP AS/AS+ |
E-5 Easy L2: 深海任務部隊 艦載機群 (PoiDB)
| # | Formation | Air Defense Node | AD/AP AS/AS+ |
|---|---|---|---|
| L2 | Diamond Phases: 2 |
86/171 384/768 | |
| Diamond Phases: 2 |
91/182 408/816 | ||
| Diamond Phases: 2 |
131/262 588/1176 | ||
| # | Formation | Air Defense Node | AD/AP AS/AS+ |
E-5 Easy M: 深海任務部隊 護衛空母集団 IV群 (PoiDB)
| # | Formation | Normal Battle Node | AD/AP AS/AS+ |
|---|---|---|---|
| M | Diamond Phases: 2 |
54/107 240/480 | |
| Diamond Phases: 2 |
86/171 384/768 | ||
| Diamond Phases: 2 |
91/182 408/816 | ||
| # | Formation | Normal Battle Node | AD/AP AS/AS+ |
E-5 Easy N: 深海任務部隊 護衛空母集団 I群 (PoiDB)
| # | Formation | Normal Battle Node | AD/AP AS/AS+ |
|---|---|---|---|
| N | Diamond Phases: 2 |
54/107 240/480 | |
| Diamond Phases: 2 |
86/171 384/768 | ||
| Diamond Phases: 2 |
91/182 408/816 | ||
| # | Formation | Normal Battle Node | AD/AP AS/AS+ |
E-5 Easy O
| # | Landing Node | ||
|---|---|---|---|
| O | 連合救援艦隊、那覇への逆上陸に成功、増援及び救援物資の揚陸に成功せり! The Combined Rescue Fleet has made a successful counter-landing at Naha, and has successfully landed reinforcement supplies. | ||
| # | Landing Node | ||
E-5 Easy P: 深海任務部隊 増援空母打撃集団 (PoiDB)
| # | Formation | Boss Battle Node | AD/AP AS/AS+ |
|---|---|---|---|
| P | Diamond Phases: 2 |
68/135 303/606 | |
| Diamond Phases: 2 |
73/146 327/654 | ||
| Diamond Phases: 2 (Final)
|
105/210 471/942 | ||
| # | Formation | Boss Battle Node | AD/AP AS/AS+ |
E-5 Easy Q
| # | Selection Node | ||
|---|---|---|---|
| Q | 艦隊の針路を選択できます。提督、どちらの針路をとられますか? You can decide the fleet's course. Admiral, which heading should we take? | ||
| # | Selection Node | ||
E-5 Easy Q1: 深海任務部隊 艦載機群 (PoiDB)
| # | Formation | Air Defense Node | AD/AP AS/AS+ |
|---|---|---|---|
| Q1 | Diamond Phases: 3, 4 |
87/174 390/780 | |
| Diamond Phases: 3 |
119/238 534/1068 | ||
| Diamond Phases: 3 |
125/249 558/1116 | ||
| # | Formation | Air Defense Node | AD/AP AS/AS+ |
E-5 Easy Q2
| # | Empty Node | ||
|---|---|---|---|
| Q2 | 敵影を見ず。 No enemy spotted. | ||
| # | Empty Node | ||
E-5 Easy R: 深海潜水艦隊 水上艦隊阻止A線 (PoiDB)
| # | Formation | Normal Battle Node | AD/AP AS/AS+ |
|---|---|---|---|
| R | Echelon Line Abreast Phases: 3 |
0/0 0/0 | |
| Echelon Line Abreast Phases: 3 |
0/0 0/0 | ||
| Echelon Line Abreast Phases: 3 |
0/0 0/0 | ||
| # | Formation | Normal Battle Node | AD/AP AS/AS+ |
E-5 Easy R1: 深海任務部隊 艦載機群 (PoiDB)
| # | Formation | Air Defense Node | AD/AP AS/AS+ |
|---|---|---|---|
| R1 | Diamond | 87/174 390/780 | |
| Diamond Phases: 3 |
119/238 534/1068 | ||
| Diamond Phases: 3 |
125/249 558/1116 | ||
| # | Formation | Air Defense Node | AD/AP AS/AS+ |
E-5 Easy R2: 深海任務部隊 艦載機群 (PoiDB)
| # | Formation | Air Defense Node | AD/AP AS/AS+ |
|---|---|---|---|
| R2 | Diamond Phases: 3 |
87/174 390/780 | |
| Diamond Phases: 3 |
119/238 534/1068 | ||
| Diamond Phases: 3 |
125/249 558/1116 | ||
| # | Formation | Air Defense Node | AD/AP AS/AS+ |
E-5 Easy R3: 深海任務部隊 護衛空母集団 III群 (PoiDB)
| # | Formation | Normal Battle Node | AD/AP AS/AS+ |
|---|---|---|---|
| R3 | Diamond Phases: 3 |
54/107 240/480 | |
| Diamond Phases: 3 |
86/171 384/768 | ||
| Diamond Phases: 3 |
91/182 408/816 | ||
| # | Formation | Normal Battle Node | AD/AP AS/AS+ |
E-5 Easy S: 深海潜水艦隊 前方警戒線D群 (PoiDB)
| # | Formation | Normal Battle Node | AD/AP AS/AS+ |
|---|---|---|---|
| S | Echelon Line Abreast Phases: 3 |
0/0 0/0 | |
| Echelon Line Abreast Phases: 3, 4 |
0/0 0/0 | ||
| Echelon Line Abreast Phases: 3 |
0/0 0/0 | ||
| # | Formation | Normal Battle Node | AD/AP AS/AS+ |
E-5 Easy S1
| # | Empty Node | ||
|---|---|---|---|
| S1 | 気のせいだった。 敵編隊を発見!対空戦闘、用意ッ! Must be my imagination. Enemy formation detected! Prepare for anti-air combat! | ||
| # | Empty Node | ||
E-5 Easy S2: 深海任務部隊 艦載機群 (PoiDB)
| # | Formation | Air Defense Node | AD/AP AS/AS+ |
|---|---|---|---|
| S2 | Diamond | 87/174 390/780 | |
| Diamond | 119/238 534/1068 | ||
| Diamond | 125/249 558/1116 | ||
| # | Formation | Air Defense Node | AD/AP AS/AS+ |
E-5 Easy S3: 深海任務部隊 艦載機群 (PoiDB)
| # | Formation | Air Defense Node | AD/AP AS/AS+ |
|---|---|---|---|
| S3 | Diamond | 87/174 390/780 | |
| Diamond | 119/238 534/1068 | ||
| Diamond | 125/249 558/1116 | ||
| # | Formation | Air Defense Node | AD/AP AS/AS+ |
E-5 Easy T
| # | Empty Node | ||
|---|---|---|---|
| T | 気のせいだった。 第二艦隊1YBは、これより沖縄に突入す!各艦、対潜警戒も厳とせよ! Must be my imagination. The Second Fleet, 1YB, will now enter Okinawa! All ships, maintain strict anti-submarine alert! | ||
| # | Empty Node | ||
E-5 Easy U: 深海潜水艦隊 水上艦隊阻止B線 (PoiDB)
| # | Formation | Normal Battle Node | AD/AP AS/AS+ |
|---|---|---|---|
| U | Echelon Line Abreast Phases: 3, 4 |
0/0 0/0 | |
| Echelon Line Abreast Phases: 3 |
0/0 0/0 | ||
| Echelon Line Abreast Phases: 3 |
0/0 0/0 | ||
| # | Formation | Normal Battle Node | AD/AP AS/AS+ |
E-5 Easy V: 深海侵攻部隊 浸透上陸拠点 (PoiDB)
| # | Formation | Boss Battle Node | AD/AP AS/AS+ |
|---|---|---|---|
| V | Cruising Formation 4 Phases: 3, 4 |
21/41 90/180 | |
| Cruising Formation 4 Phases: 3 (Final)
|
11/22 48/96 | ||
| # | Formation | Boss Battle Node | AD/AP AS/AS+ |
E-5 Easy V1: 深海任務部隊 上陸支援砲撃戦隊 (PoiDB)
| # | Formation | Normal Battle Node | AD/AP AS/AS+ |
|---|---|---|---|
| V1 | Line Ahead Double Line Echelon Phases: 3, 4 |
0/0 0/0 | |
| # | Formation | Normal Battle Node | AD/AP AS/AS+ |
E-5 Easy V2
| # | Empty Node | ||
|---|---|---|---|
| V2 | 敵影を見ず。 第二艦隊1YBは、これより沖縄に突入す!各艦、対潜警戒も厳とせよ! No enemy spotted. The Second Fleet, 1YB, will now enter Okinawa! All ships, maintain strict anti-submarine alert! | ||
| # | Empty Node | ||
E-5 Easy W: 深海潜水艦隊 水上艦隊阻止C線 (PoiDB)
| # | Formation | Normal Battle Node | AD/AP AS/AS+ |
|---|---|---|---|
| W | Echelon Line Abreast Phases: 4 |
0/0 0/0 | |
| Echelon Line Abreast Phases: 4 |
0/0 0/0 | ||
| Echelon Line Abreast Phases: 4 |
0/0 0/0 | ||
| # | Formation | Normal Battle Node | AD/AP AS/AS+ |
E-5 Easy X: 深海任務部隊 空母打撃集団 D群 (PoiDB)
| # | Formation | Normal Battle Node | AD/AP AS/AS+ |
|---|---|---|---|
| X | Diamond Phases: 4 |
87/174 390/780 | |
| Diamond Phases: 4 |
119/238 534/1068 | ||
| Diamond Phases: 4 |
125/249 558/1116 | ||
| # | Formation | Normal Battle Node | AD/AP AS/AS+ |
E-5 Easy Y: 深海任務部隊 空母打撃集団 E群 (PoiDB)
| # | Formation | Normal Battle Node | AD/AP AS/AS+ |
|---|---|---|---|
| Y | Diamond | 87/174 390/780 | |
| Diamond | 119/238 534/1068 | ||
| Diamond | 125/249 558/1116 | ||
| # | Formation | Normal Battle Node | AD/AP AS/AS+ |
E-5 Easy Y1: 深海任務部隊 艦載機群 (PoiDB)
| # | Formation | Air Defense Node | AD/AP AS/AS+ |
|---|---|---|---|
| Y1 | Diamond | 87/174 390/780 | |
| Diamond | 119/238 534/1068 | ||
| Diamond | 125/249 558/1116 | ||
| # | Formation | Air Defense Node | AD/AP AS/AS+ |
E-5 Easy Y2: 深海任務部隊 艦載機群 (PoiDB)
| # | Formation | Air Defense Node | AD/AP AS/AS+ |
|---|---|---|---|
| Y2 | Diamond Phases: 4 |
87/174 390/780 | |
| Diamond Phases: 4 |
119/238 534/1068 | ||
| Diamond Phases: 4 |
125/249 558/1116 | ||
| # | Formation | Air Defense Node | AD/AP AS/AS+ |
E-5 Easy Z: 深海任務部隊 水上打撃部隊旗艦 (PoiDB)
| # | Formation | Boss Battle Node | AD/AP AS/AS+ |
|---|---|---|---|
| Z | Cruising Formation 4 Phases: 4 |
91/182 408/816 | |
| Cruising Formation 4 Phases: 4 (Final)
|
111/221 495/990 | ||
| # | Formation | Boss Battle Node | AD/AP AS/AS+ |
E-5 Easy Z1: 深海任務部隊 空母打撃集団 A群 (PoiDB)
| # | Formation | Normal Battle Node | AD/AP AS/AS+ |
|---|---|---|---|
| Z1 | Diamond Phases: 4 |
87/174 390/780 | |
| Diamond Phases: 4 |
119/238 534/1068 | ||
| Diamond Phases: 4 |
125/249 558/1116 | ||
| # | Formation | Normal Battle Node | AD/AP AS/AS+ |
E-5 Easy Z2
| # | Repair Node | ||
|---|---|---|---|
| # | Repair Node | ||
| Type | Ships |
|---|---|
| DD |
| Type | Ships |
|---|---|
| DE | |
| DD | |
| CVL | |
| BB |
| Type | Ships |
|---|---|
| DE | |
| DD |
| Type | Ships |
|---|---|
| DD |
| Type | Ships |
|---|---|
| DD |
| Type | Ships |
|---|---|
| DE | |
| DD | |
| CL | |
| BB | |
| AS |
| Type | Ships |
|---|---|
| DE | |
| DD |
| Type | Ships |
|---|---|
| DE | |
| DD | |
| CL | |
| CVL | |
| BB | |
| CV |
| Type | Ships |
|---|---|
| DD |
| Type | Ships |
|---|---|
| DD |
| Type | Ships |
|---|---|
| DE | |
| DD | |
| SS |
| Type | Ships |
|---|---|
| DE | |
| DD | |
| CL | |
| FBB | |
| BB | |
| SS | |
| AS |
E-5 Casual AB
| # | Formation | Air Raids | AD/AP AS/AS+ |
|---|---|---|---|
| AB | Diamond | 97/193 434/867 | |
| Diamond | 105/209 470/939 | ||
| Diamond | 137/273 614/1227 | ||
| # | Formation | Air Raids | AD/AP AS/AS+ |
E-5 Casual A
| # | Selection Node | ||
|---|---|---|---|
| A | 艦隊の針路を選択できます。提督、どちらの針路をとられますか? You can decide the fleet's course. Admiral, which heading should we take? | ||
| # | Selection Node | ||
E-5 Casual A1
| # | Empty Node | ||
|---|---|---|---|
| A1 | 気のせいだった。 台湾方面の友軍との連絡を試みる!対潜対空、対水上警戒を厳とせよ! Must be my imagination. Attempting to contact friendly forces in the Taiwan area! Maintain strict anti-submarine, anti-air and anti-water vigilance! | ||
| # | Empty Node | ||
E-5 Casual A2: 深海潜水艦隊 前方警戒線C群 (PoiDB)
| # | Formation | Normal Battle Node | AD/AP AS/AS+ |
|---|---|---|---|
| A2 | Echelon Line Abreast Phases: 1 |
0/0 0/0 | |
| Echelon Line Abreast Phases: 1, 4 |
0/0 0/0 | ||
| # | Formation | Normal Battle Node | AD/AP AS/AS+ |
E-5 Casual A3: 深海任務部隊 艦載機群 (PoiDB)
| # | Formation | Air Defense Node | AD/AP AS/AS+ |
|---|---|---|---|
| A3 | Diamond Phases: 1, 3 |
74/147 330/660 | |
| Diamond Phases: 3, 4 |
82/163 366/732 | ||
| Diamond Phases: 3, 4 |
114/227 510/1020 | ||
| # | Formation | Air Defense Node | AD/AP AS/AS+ |
E-5 Casual A4
| # | Empty Node | ||
|---|---|---|---|
| A4 | 気のせいだった。 偽装航路、終了。これより変針、第二艦隊1YBは、沖縄を目指す! Must be my imagination. Deceptive route over. Now changing course! The Second Fleet, 1YB, is now heading towards Okinawa! | ||
| # | Empty Node | ||
E-5 Casual B: 深海任務部隊 艦載機群 (PoiDB)
| # | Formation | Air Defense Node | AD/AP AS/AS+ |
|---|---|---|---|
| B | Diamond Phases: 1 |
74/147 330/660 | |
| Diamond Phases: 1 |
82/163 366/732 | ||
| Diamond Phases: 1 |
114/227 510/1020 | ||
| # | Formation | Air Defense Node | AD/AP AS/AS+ |
E-5 Casual B1: 深海潜水艦隊 前方警戒線A群 (PoiDB)
| # | Formation | Normal Battle Node | AD/AP AS/AS+ |
|---|---|---|---|
| B1 | Echelon Line Abreast Phases: 1 |
0/0 0/0 | |
| Echelon Line Abreast |
0/0 0/0 | ||
| # | Formation | Normal Battle Node | AD/AP AS/AS+ |
E-5 Casual B2: 深海潜水艦隊 前方警戒線B群 (PoiDB)
| # | Formation | Normal Battle Node | AD/AP AS/AS+ |
|---|---|---|---|
| B2 | Echelon Line Abreast Phases: 1 |
0/0 0/0 | |
| Echelon Line Abreast Phases: 1 |
0/0 0/0 | ||
| # | Formation | Normal Battle Node | AD/AP AS/AS+ |
E-5 Casual B3: 深海任務部隊 南部ピケットライン (PoiDB)
| # | Formation | Normal Battle Node | AD/AP AS/AS+ |
|---|---|---|---|
| B3 | Line Ahead Phases: 1 |
0/0 0/0 | |
| Line Ahead Phases: 1, 4 |
0/0 0/0 | ||
| Line Ahead Phases: 4 |
0/0 0/0 | ||
| # | Formation | Normal Battle Node | AD/AP AS/AS+ |
E-5 Casual C: 深海任務部隊 護衛空母集団 II群 (PoiDB)
| # | Formation | Normal Battle Node | AD/AP AS/AS+ |
|---|---|---|---|
| C | Diamond Phases: 1 |
41/81 180/360 | |
| Diamond Phases: 1 |
49/97 216/432 | ||
| Diamond | 81/161 360/720 | ||
| # | Formation | Normal Battle Node | AD/AP AS/AS+ |
E-5 Casual C1: 深海任務部隊 北部ピケットライン (PoiDB)
| # | Formation | Normal Battle Node | AD/AP AS/AS+ |
|---|---|---|---|
| C1 | Line Ahead Double Line Echelon Phases: 1, 4 |
0/0 0/0 | |
| # | Formation | Normal Battle Node | AD/AP AS/AS+ |
E-5 Casual C2
| # | Selection Node | ||
|---|---|---|---|
| C2 | 台湾方面の友軍との連絡を試みる!対潜対空、対水上警戒を厳とせよ! Attempting to contact friendly forces in the Taiwan area! Maintain strict anti-submarine, anti-air and anti-water vigilance! | ||
| # | Selection Node | ||
E-5 Casual D: 深海任務部隊 艦載機群 (PoiDB)
| # | Formation | Air Defense Node | AD/AP AS/AS+ |
|---|---|---|---|
| D | Diamond Phases: 1 |
49/97 216/432 | |
| Diamond Phases: 1 |
81/161 360/720 | ||
| Diamond Phases: 1 |
89/177 396/792 | ||
| # | Formation | Air Defense Node | AD/AP AS/AS+ |
E-5 Casual D1: 深海任務部隊 艦載機群 (PoiDB)
| # | Formation | Air Defense Node | AD/AP AS/AS+ |
|---|---|---|---|
| D1 | Diamond Phases: 1 |
49/97 216/432 | |
| Diamond Phases: 1 |
81/161 360/720 | ||
| Diamond Phases: 1, 4 |
89/177 396/792 | ||
| # | Formation | Air Defense Node | AD/AP AS/AS+ |
E-5 Casual D2
| # | Empty Node | ||
|---|---|---|---|
| D2 | 気のせいだった。 艦隊は台北沖に到達。台湾方面に集結中の友軍艦隊との連絡、作戦連携に成功せり! Must be my imagination. Our fleet has reached the coast of Taipei. We've successfully established coordination with the friendly fleet in the Taiwan area! | ||
| # | Empty Node | ||
E-5 Casual E: 深海任務部隊 後方警戒ライン I群 (PoiDB)
| # | Formation | Normal Battle Node | AD/AP AS/AS+ |
|---|---|---|---|
| E | Line Ahead Double Line Vanguard Phases: 1, 4 |
0/0 0/0 | |
| # | Formation | Normal Battle Node | AD/AP AS/AS+ |
E-5 Casual F
| # | Empty Node | ||
|---|---|---|---|
| F | 敵影を見ず。 台湾方面の友軍との連絡を試みる!対潜対空、対水上警戒を厳とせよ! No enemy spotted. Attempting to contact friendly forces in the Taiwan area! Maintain strict anti-submarine, anti-air and anti-water vigilance! | ||
| # | Empty Node | ||
E-5 Casual G: 深海任務部隊 輸送護衛空母群 (PoiDB)
| # | Formation | Boss Battle Node | AD/AP AS/AS+ |
|---|---|---|---|
| G | Line Ahead Diamond Phases: 1, 4 (HA) |
32/63 140/279 | |
| Line Ahead Phases: 1 (Final) (HA) |
54/107 240/480 | ||
| # | Formation | Boss Battle Node | AD/AP AS/AS+ |
E-5 Casual H: 深海潜水艦隊 後方哨戒線A群 (PoiDB)
| # | Formation | Normal Battle Node | AD/AP AS/AS+ |
|---|---|---|---|
| H | Echelon Line Abreast Phases: 2, 4 |
0/0 0/0 | |
| Echelon Line Abreast Phases: 2, 4 |
0/0 0/0 | ||
| # | Formation | Normal Battle Node | AD/AP AS/AS+ |
E-5 Casual H1: 深海潜水艦隊 後方哨戒線B群 (PoiDB)
| # | Formation | Normal Battle Node | AD/AP AS/AS+ |
|---|---|---|---|
| H1 | Echelon Line Abreast Phases: 4 |
0/0 0/0 | |
| Echelon Line Abreast Phases: 2, 4 |
0/0 0/0 | ||
| # | Formation | Normal Battle Node | AD/AP AS/AS+ |
E-5 Casual H2: 深海任務部隊 艦載機群 (PoiDB)
| # | Formation | Air Defense Node | AD/AP AS/AS+ |
|---|---|---|---|
| H2 | Diamond | 74/147 330/660 | |
| Diamond Phases: 2 |
82/163 366/732 | ||
| Diamond | 114/227 510/1020 | ||
| # | Formation | Air Defense Node | AD/AP AS/AS+ |
E-5 Casual H3 (PoiDB)
| # | Formation | Normal Battle Node | AD/AP AS/AS+ |
|---|---|---|---|
| # | Formation | Normal Battle Node | AD/AP AS/AS+ |
E-5 Casual I: 深海任務部隊 後方警戒ライン II群 (PoiDB)
| # | Formation | Normal Battle Node | AD/AP AS/AS+ |
|---|---|---|---|
| I | Line Ahead Double Line Phases: 2 |
0/0 0/0 | |
| # | Formation | Normal Battle Node | AD/AP AS/AS+ |
E-5 Casual I1: 深海任務部隊 予備護衛空母集団 (PoiDB)
| # | Formation | Normal Battle Node | AD/AP AS/AS+ |
|---|---|---|---|
| I1 | Diamond Phases: 2 |
41/81 180/360 | |
| Diamond Phases: 2 |
49/97 216/432 | ||
| Diamond | 81/161 360/720 | ||
| # | Formation | Normal Battle Node | AD/AP AS/AS+ |
E-5 Casual I2: 深海任務部隊 空母打撃集団 C群 (PoiDB)
| # | Formation | Normal Battle Node | AD/AP AS/AS+ |
|---|---|---|---|
| I2 | Diamond Phases: 2 |
74/147 330/660 | |
| Diamond Phases: 2 |
82/163 366/732 | ||
| Diamond Phases: 2 |
114/227 510/1020 | ||
| # | Formation | Normal Battle Node | AD/AP AS/AS+ |
E-5 Casual J: 深海任務部隊 艦載機群 (PoiDB)
| # | Formation | Air Defense Node | AD/AP AS/AS+ |
|---|---|---|---|
| J | Diamond Phases: 2 |
100/199 447/894 | |
| Diamond Phases: 2 |
105/209 468/936 | ||
| Diamond Phases: 2 |
100/199 447/894 | ||
| # | Formation | Air Defense Node | AD/AP AS/AS+ |
E-5 Casual K: 深海任務部隊 兵站補給船団 (PoiDB)
| # | Formation | Normal Battle Node | AD/AP AS/AS+ |
|---|---|---|---|
| K | Double Line Diamond Vanguard Phases: 2 |
0/0 0/0 | |
| # | Formation | Normal Battle Node | AD/AP AS/AS+ |
E-5 Casual L: 深海潜水艦隊 後方哨戒線C群 (PoiDB)
| # | Formation | Normal Battle Node | AD/AP AS/AS+ |
|---|---|---|---|
| L | Echelon Line Abreast Phases: 2, 4 |
0/0 0/0 | |
| Echelon Line Abreast Phases: 2 |
0/0 0/0 | ||
| # | Formation | Normal Battle Node | AD/AP AS/AS+ |
E-5 Casual L1 (PoiDB)
| # | Formation | Normal Battle Node | AD/AP AS/AS+ |
|---|---|---|---|
| # | Formation | Normal Battle Node | AD/AP AS/AS+ |
E-5 Casual L2: 深海任務部隊 艦載機群 (PoiDB)
| # | Formation | Air Defense Node | AD/AP AS/AS+ |
|---|---|---|---|
| L2 | Diamond Phases: 2 |
49/97 216/432 | |
| Diamond Phases: 2 |
81/161 360/720 | ||
| Diamond Phases: 2 |
89/177 396/792 | ||
| # | Formation | Air Defense Node | AD/AP AS/AS+ |
E-5 Casual M: 深海任務部隊 護衛空母集団 IV群 (PoiDB)
| # | Formation | Normal Battle Node | AD/AP AS/AS+ |
|---|---|---|---|
| M | Diamond Phases: 2 |
41/81 180/360 | |
| Diamond Phases: 2 |
49/97 216/432 | ||
| Diamond Phases: 2 |
81/161 360/720 | ||
| # | Formation | Normal Battle Node | AD/AP AS/AS+ |
E-5 Casual N: 深海任務部隊 護衛空母集団 I群 (PoiDB)
| # | Formation | Normal Battle Node | AD/AP AS/AS+ |
|---|---|---|---|
| N | Diamond Phases: 2 |
41/81 180/360 | |
| Diamond Phases: 2 |
49/97 216/432 | ||
| Diamond Phases: 2 |
81/161 360/720 | ||
| # | Formation | Normal Battle Node | AD/AP AS/AS+ |
E-5 Casual O
| # | Landing Node | ||
|---|---|---|---|
| O | 連合救援艦隊、那覇への逆上陸に成功、増援及び救援物資の揚陸に成功せり! The Combined Rescue Fleet has made a successful counter-landing at Naha, and has successfully landed reinforcement supplies. | ||
| # | Landing Node | ||
E-5 Casual P: 深海任務部隊 増援空母打撃集団 (PoiDB)
| # | Formation | Boss Battle Node | AD/AP AS/AS+ |
|---|---|---|---|
| P | Diamond Phases: 2 |
97/193 432/864 | |
| Diamond Phases: 2 |
97/193 432/864 | ||
| Diamond Phases: 2 (Final)
|
97/193 432/864 | ||
| # | Formation | Boss Battle Node | AD/AP AS/AS+ |
E-5 Casual Q
| # | Selection Node | ||
|---|---|---|---|
| Q | 艦隊の針路を選択できます。提督、どちらの針路をとられますか? You can decide the fleet's course. Admiral, which heading should we take? | ||
| # | Selection Node | ||
E-5 Casual Q1: 深海任務部隊 艦載機群 (PoiDB)
| # | Formation | Air Defense Node | AD/AP AS/AS+ |
|---|---|---|---|
| Q1 | Diamond Phases: 3, 4 |
74/147 330/660 | |
| Diamond Phases: 3, 4 |
82/163 366/732 | ||
| Diamond Phases: 3 |
114/227 510/1020 | ||
| # | Formation | Air Defense Node | AD/AP AS/AS+ |
E-5 Casual Q2
| # | Empty Node | ||
|---|---|---|---|
| Q2 | 敵影を見ず。 No enemy spotted. | ||
| # | Empty Node | ||
E-5 Casual R: 深海潜水艦隊 水上艦隊阻止A線 (PoiDB)
| # | Formation | Normal Battle Node | AD/AP AS/AS+ |
|---|---|---|---|
| R | Echelon Line Abreast Phases: 3 |
0/0 0/0 | |
| Echelon Line Abreast Phases: 3 |
0/0 0/0 | ||
| # | Formation | Normal Battle Node | AD/AP AS/AS+ |
E-5 Casual R1: 深海任務部隊 艦載機群 (PoiDB)
| # | Formation | Air Defense Node | AD/AP AS/AS+ |
|---|---|---|---|
| R1 | Diamond Phases: 3 |
74/147 330/660 | |
| Diamond Phases: 3 |
82/163 366/732 | ||
| Diamond Phases: 3 |
114/227 510/1020 | ||
| # | Formation | Air Defense Node | AD/AP AS/AS+ |
E-5 Casual R2: 深海任務部隊 艦載機群 (PoiDB)
| # | Formation | Air Defense Node | AD/AP AS/AS+ |
|---|---|---|---|
| R2 | Diamond Phases: 3 |
74/147 330/660 | |
| Diamond Phases: 3 |
82/163 366/732 | ||
| Diamond Phases: 3 |
114/227 510/1020 | ||
| # | Formation | Air Defense Node | AD/AP AS/AS+ |
E-5 Casual R3: 深海任務部隊 護衛空母集団 III群 (PoiDB)
| # | Formation | Normal Battle Node | AD/AP AS/AS+ |
|---|---|---|---|
| R3 | Diamond Phases: 3 |
41/81 180/360 | |
| Diamond Phases: 3 |
49/97 216/432 | ||
| Diamond Phases: 3 |
81/161 360/720 | ||
| # | Formation | Normal Battle Node | AD/AP AS/AS+ |
E-5 Casual S: 深海潜水艦隊 前方警戒線D群 (PoiDB)
| # | Formation | Normal Battle Node | AD/AP AS/AS+ |
|---|---|---|---|
| S | Echelon Line Abreast Phases: 3, 4 |
0/0 0/0 | |
| Echelon Line Abreast Phases: 3, 4 |
0/0 0/0 | ||
| # | Formation | Normal Battle Node | AD/AP AS/AS+ |
E-5 Casual S1
| # | Empty Node | ||
|---|---|---|---|
| S1 | 気のせいだった。 敵編隊を発見!対空戦闘、用意ッ! Must be my imagination. Enemy formation detected! Prepare for anti-air combat! | ||
| # | Empty Node | ||
E-5 Casual S2: 深海任務部隊 艦載機群 (PoiDB)
| # | Formation | Air Defense Node | AD/AP AS/AS+ |
|---|---|---|---|
| S2 | Diamond Phases: 3 |
74/147 330/660 | |
| Diamond Phases: 3 |
82/163 366/732 | ||
| Diamond | 114/227 510/1020 | ||
| # | Formation | Air Defense Node | AD/AP AS/AS+ |
E-5 Casual S3: 深海任務部隊 艦載機群 (PoiDB)
| # | Formation | Air Defense Node | AD/AP AS/AS+ |
|---|---|---|---|
| S3 | Diamond Phases: 3 |
74/147 330/660 | |
| Diamond Phases: 3 |
82/163 366/732 | ||
| Diamond Phases: 3 |
114/227 510/1020 | ||
| # | Formation | Air Defense Node | AD/AP AS/AS+ |
E-5 Casual T
| # | Empty Node | ||
|---|---|---|---|
| T | 気のせいだった。 第二艦隊1YBは、これより沖縄に突入す!各艦、対潜警戒も厳とせよ! Must be my imagination. The Second Fleet, 1YB, will now enter Okinawa! All ships, maintain strict anti-submarine alert! | ||
| # | Empty Node | ||
E-5 Casual U: 深海潜水艦隊 水上艦隊阻止B線 (PoiDB)
| # | Formation | Normal Battle Node | AD/AP AS/AS+ |
|---|---|---|---|
| U | Echelon Line Abreast Phases: 3, 4 |
0/0 0/0 | |
| Echelon Line Abreast Phases: 3 |
0/0 0/0 | ||
| # | Formation | Normal Battle Node | AD/AP AS/AS+ |
E-5 Casual V: 深海侵攻部隊 浸透上陸拠点 (PoiDB)
| # | Formation | Boss Battle Node | AD/AP AS/AS+ |
|---|---|---|---|
| V | Cruising Formation 4 Phases: 3, 4 |
10/19 42/84 | |
| Cruising Formation 4 Phases: 3 (Final)
|
11/22 48/96 | ||
| # | Formation | Boss Battle Node | AD/AP AS/AS+ |
E-5 Casual V1: 深海任務部隊 上陸支援砲撃戦隊 (PoiDB)
| # | Formation | Normal Battle Node | AD/AP AS/AS+ |
|---|---|---|---|
| V1 | Line Ahead Double Line Echelon Phases: 3, 4 |
0/0 0/0 | |
| # | Formation | Normal Battle Node | AD/AP AS/AS+ |
E-5 Casual V2
| # | Empty Node | ||
|---|---|---|---|
| V2 | 敵影を見ず。 第二艦隊1YBは、これより沖縄に突入す!各艦、対潜警戒も厳とせよ! No enemy spotted. The Second Fleet, 1YB, will now enter Okinawa! All ships, maintain strict anti-submarine alert! | ||
| # | Empty Node | ||
E-5 Casual W: 深海潜水艦隊 水上艦隊阻止C線 (PoiDB)
| # | Formation | Normal Battle Node | AD/AP AS/AS+ |
|---|---|---|---|
| W | Echelon Line Abreast Phases: 4 |
0/0 0/0 | |
| Echelon Line Abreast Phases: 4 |
0/0 0/0 | ||
| # | Formation | Normal Battle Node | AD/AP AS/AS+ |
E-5 Casual X: 深海任務部隊 空母打撃集団 D群 (PoiDB)
| # | Formation | Normal Battle Node | AD/AP AS/AS+ |
|---|---|---|---|
| X | Diamond Phases: 4 |
74/147 330/660 | |
| Diamond Phases: 4 |
82/163 366/732 | ||
| Diamond Phases: 4 |
114/227 510/1020 | ||
| # | Formation | Normal Battle Node | AD/AP AS/AS+ |
E-5 Casual Y: 深海任務部隊 空母打撃集団 E群 (PoiDB)
| # | Formation | Normal Battle Node | AD/AP AS/AS+ |
|---|---|---|---|
| Y | Diamond Phases: 4 |
74/147 330/660 | |
| Diamond Phases: 4 |
82/163 366/732 | ||
| Diamond Phases: 4 |
114/227 510/1020 | ||
| # | Formation | Normal Battle Node | AD/AP AS/AS+ |
E-5 Casual Y1: 深海任務部隊 艦載機群 (PoiDB)
| # | Formation | Air Defense Node | AD/AP AS/AS+ |
|---|---|---|---|
| Y1 | Diamond Phases: 4 |
74/147 330/660 | |
| Diamond Phases: 4 |
82/163 366/732 | ||
| Diamond Phases: 4 |
114/227 510/1020 | ||
| # | Formation | Air Defense Node | AD/AP AS/AS+ |
E-5 Casual Y2: 深海任務部隊 艦載機群 (PoiDB)
| # | Formation | Air Defense Node | AD/AP AS/AS+ |
|---|---|---|---|
| Y2 | Diamond Phases: 4 |
74/147 330/660 | |
| Diamond Phases: 4 |
82/163 366/732 | ||
| Diamond Phases: 4 |
114/227 510/1020 | ||
| # | Formation | Air Defense Node | AD/AP AS/AS+ |
E-5 Casual Z: 深海任務部隊 水上打撃部隊旗艦 (PoiDB)
| # | Formation | Boss Battle Node | AD/AP AS/AS+ |
|---|---|---|---|
| Z | Cruising Formation 4 Phases: 4 |
81/161 360/720 | |
| Cruising Formation 4 Phases: 4 (Final)
|
97/193 432/864 | ||
| # | Formation | Boss Battle Node | AD/AP AS/AS+ |
E-5 Casual Z1: 深海任務部隊 空母打撃集団 A群 (PoiDB)
| # | Formation | Normal Battle Node | AD/AP AS/AS+ |
|---|---|---|---|
| Z1 | Diamond Phases: 4 |
74/147 330/660 | |
| Diamond Phases: 4 |
82/163 366/732 | ||
| Diamond Phases: 4 |
114/227 510/1020 | ||
| # | Formation | Normal Battle Node | AD/AP AS/AS+ |
E-5 Casual Z2
| # | Repair Node | ||
|---|---|---|---|
| # | Repair Node | ||