- Welcome to the Kancolle Wiki!
- If you have any questions regarding site content, account registration, etc., please visit the KanColle Wiki Discord
User:Remi Scarlet/Blog/FurutakaKaiNiCosplay/Day10
Day 10
Date: 6/4/16 through 6/10/16
Time spent: ~8 hours
Show/Hide Day 10
Umf. What an update. I didn't feel like I'd worked on enough stuff to make an entire blog post for the past 5 days so I just kind of didn't... and now I suddenly have a lot going on. A lot of the waiting time was just from waiting for parts to ship to me or having a chance to buy more materials lol. Lots of electronics and various small tidbits like grommets, dowels and more screws. Never enough screws. Remember this.
Legging Armor

So I actually didn't make a ton of progress here, but I've figured out the general idea on how to do Furutaka's leg armor shit on her shin and thighs. Basically I'll be crafting "foam armor" with craft foam, styrene coating and some wood plates to hold the torpedo launcher and catapult in-place. So to start, I had to first make some craft foam strips that would act as... well, my armor. I cut these into strips that were approximately appropriate to my leg proportions and got to gluing them together since I could only find 8.5" x 11" sheets at my local craft store.

Gorilla gluing craft foam together with clamps

Clamped craft foam

Gluing the craft foam together
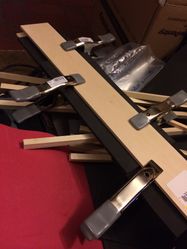
Longer pieces of craft foam being clamped


So now I had to wait for these to dry... and not be lazy because I really didn't want to work on this part. Anyway, aside from that we also have the components that go onto these.
Torpedo casing

Not exactly a whole lot going on here. I just cut out the casing base and top. I need to get the leg armor part working before I can figure out where and how to attach the connector piece to this whole thing so this part's on hiatus for now.
Seaplane Catapult
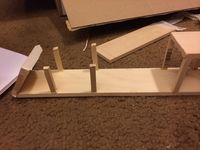
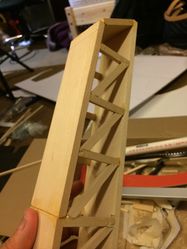
So this part was actually a bit fun, though tedious. This one was simple woodcraft and cutting dowels to the right size, shape and sanding them properly. I'll just attach a gallery here since it should be pretty self-explanatory.

Leg mounted seaplane launcher progress

Prototyping angled portion of seaplane catapult
Dowels being put up with wood glue. Make sure to have tacky glue.

Dowels being put up with wood glue. Make sure to have tacky glue.

Glue and supports applied

Different angle of mostly finished seaplane catapult.

Diagonal supports inserted on Furutaka's seaplane catapult
Closer shot of the front edge of the seaplane catapult
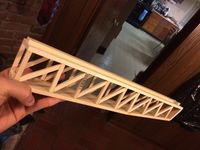
Final product minus paint and minor additions


Smokestack Backpack Top


So this one was interesting to think through, but I didn't actually manage to make too much progress. Basically, imagine a pot and a lid. Now imagine my smokestack thing being the pot and now I'm trying to make the lid. This component shouldn't be too complex, but I first needed to start with a sheet that would wrap around the current smokestack backpack so it'd fit snugly. This was accomplished simply by cutting some poster paper into 5 inch strips and layering them 4 times like I did with the backpack's wall lining. The rest I've managed to do was get the paint going and... well, that's about it. I let it sit for 24 hours but it hadn't quite dried so I let it sit again last night so I'll probably to work on that tonight.
Shoulder Cannon and Mechanized Turrets


This is where the majority of my time went with this one. Basically, I had to figure out the dimensions of the whole arm cannon base and turrets so that they made sense, weren't too bulky, had good proportions and could support the motors and wiring. This started out, like all things, with some diagrams. The thought and time that went into this portion was actually much larger than the other parts because I couldn't decide on the exact dimensions for the longest time since I was trying to figure out the optimal dimensions for both ease of making, managing and aesthetics. Eventually, I decided on the dimensions drawn on the board... or so I thought. More on this in a bit.
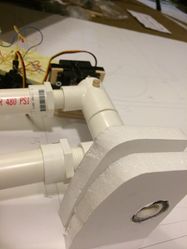
As soon as I was done with the planning for that portion, I went over to trying and attach a servo motor to the cross-section of a PVC. So this part was ridiculously annoying because as you might know, a PVC is kind of hollow and the cross-sectional component of a PVC is... well, let's just say there isn't a whole lot you can attach things onto. After pondering this for a few days, I finally decided to get some aluminum heavy-grade servo horns that could also take proper 3/32" screws, which were both small enough to drill into dowels but strong enough to withstand any kind of force the servo would apply. I decided that I would then screw through the servo horn and drill into a small 5/16" thick dowel which would be fit through the horizontal of the PVC via two holes I would drill in. This probably doesn't make much sense with just words so here's a quick gallery of the end-product.
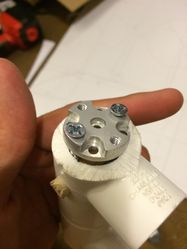
Different angled shot of servo horn on PVC
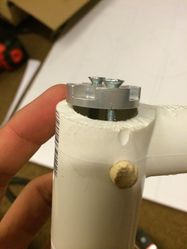
Another angle

Shot of how the servo horn attaches to the PVC's cross-section securely.


So with this, it's actually great because the PVC can now be extremely securely fastened to the servo horn. This is a much better upgrade from the janky shit I had a few days ago with square dowels and 1/4" screws lol.
So that's all good and done. Now time to try and figure out how it fits onto the base...

Uh oh... the barrels and servo motor don't fit into the base... Notice how the motor sticks out of the right side of the base. Realizing this, I had to redraw the base to give it an extra inch of leeway on the width to barely fit the motors in. I didn't like this decision since now the turrets are a bit disproportionate to what I had originally wanted, but alas I need to fit the motor in somehow.


That fixed and all good, the motor and barrels would now fit into the space allotted. Now I had to figure out how to actually mount the damn thing. After thinking for a little bit, I decided the best way to do this was use an intermediary PVC which would slot into the horizontal cross-section of the two barrels and have that held up via foam board slottings.
With that done, now it was time to mount the motors. I decided that since the servos already had some screw holes, I would utilize those with a 5/16" x 5/16" square dowel and drill it into there. Doing that with both sides, I simply built a platform from more wood that would act as a flat base and I ended up with something like this.
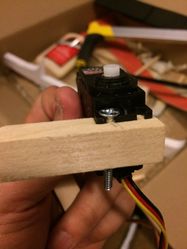
Showing how the servo motor is secured to the cannon
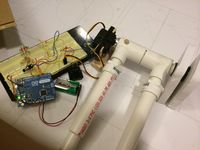
Shot of servo and turrets up and running with arduino
Different angle of electronics

Closeup of the servo motor in mounting position


Oh, and did I mention that I went ahead and did a mock wire-up while I was at it? This turret is technically fully functional in terms of y-level elevation :)
So overall, the past few days, while frustrating at times, was very productive. I'm actually picking up momentum once again so we'll see where I get tomorrow.
Also bonus image of something my friend and I wrote cuz kek
