- Welcome to the Kancolle Wiki!
- If you have any questions regarding site content, account registration, etc., please visit the KanColle Wiki Discord
Difference between revisions of "User:Chrno98/Sandbox"
Jump to navigation
Jump to search
| Line 1: | Line 1: | ||
| − | == | + | ==Phase 2: Defeat the European Princess== |
| − | * | + | [[File:Summer2021E-3MapP2.png|450px|right]] |
| − | ** | + | The boss is a combined fleet located at node {{MapRoute|O|red}} |
| − | ** | + | * This phase uses a '''Combined Fleet'''. |
| + | * The LBAS range to the boss at {{MapRoute|O|red}} is 5. | ||
| + | * Node {{MapRoute|J2|red}} features the highly dangerous '''New Submarine Princess'''. | ||
| + | ** Bringing 2 OASW capable ships and/or a LBAS full of ASW aircraft in order to neutralize her is recommended in order to minimize early retreats. | ||
| + | ** The LBAS range for node {{MapRoute|J2|red}} is 1. | ||
| + | * Node {{MapRoute|M|red}} features '''Heavy Cruiser Ne-Class''' that are capable of firing opening torpedoes on '''Hard'''. | ||
| + | ** The formation of this node will be locked at Line Ahead during Last Dance. | ||
| + | ** People are encouraged to either use [[Repair Team]] or [[Repair Goddess]] as part of the strategy. Implementing kuso strategies is also possible. There is simply no good method around this. | ||
| − | + | This phase uses the following tag: | |
| − | This phase | ||
| − | |||
| − | + | {{Shiplock|Summer2021EventTag4}} | |
| − | |||
| − | |||
| − | |||
| − | |||
| − | |||
| − | |||
| − | |||
| − | |||
| − | |||
| − | |||
| − | |||
| − | |||
| − | |||
| − | |||
| − | |||
| − | |||
| − | |||
| − | |||
| − | |||
| − | |||
| − | |||
| − | |||
| − | |||
| − | |||
| − | |||
| − | |||
| − | |||
| − | |||
| − | |||
| − | |||
| − | |||
| − | |||
| − | |||
| − | |||
| − | |||
| − | |||
| − | |||
| − | + | <span style="color:red";>'''Warning:'''</span> Any '''Combined Fleet''' containing a ship tagged with {{ToolTip|'''Force H'''|{{Shiplock|Summer2021EventTag4}}}} will be forced to start at point 2, <span style="color:red";>'''regardless of difficulty'''</span>. This effectively means that any ships tagged with {{ToolTip|'''Force H'''|{{Shiplock|Summer2021EventTag4}}}} cannot be used for phases that involves either {{ToolTip|'''Force Z'''|{{Shiplock|Summer2021EventTag6}}}} or {{ToolTip|'''Force X'''|{{Shiplock|Summer2021EventTag7}}}}. | |
| − | |||
| − | |||
| − | |||
| − | |||
| − | |||
| − | |||
| − | |||
| − | |||
<tabber> | <tabber> | ||
| − | |-| | + | |-|Carrier Task Force= |
| − | + | {|class="wikitable" | |
| − | + | !colspan="3"| Fleet Info | |
| − | + | |- | |
| − | + | !Tag | |
| − | + | !Fleet Type | |
| − | + | !Composition | |
| − | |-| | + | |- |
| − | + | |rowspan="3"| [[File:Summer2021EventTag4.png]]</br>'''Force H''' | |
| − | + | |CTF | |
| − | + | |'''4CV(B) 1CAV 1SS(V) + 1CL 2DD 1CA 1FBB 1XX''' | |
| − | + | |- | |
| − | + | !Speed | |
| − | + | !Route | |
| − | + | |- | |
| − | + | |Fast | |
| − | + | |{{MapRoute|2||J2|red|L|pink|M|red|O|red}} | |
| − | + | |} | |
| − | |||
| − | |||
| − | |||
| − | | | ||
| − | |||
| − | |||
| − | |||
| − | |||
| − | |||
| − | |||
| − | |||
| − | |||
| − | + | * '''XX''' should either be '''FBB''', '''CVL''', '''CAV''' or '''CLT'''. | |
| − | + | * Just like Phase 1, carriers can make use of historical bonuses provided by foreign aircraft in order to deal as much damage as possible during daytime. | |
| − | + | ** This is important because carriers with the necessary aircraft are capable of defeating the boss at daytime. There are not that many ships capable of dealing decent damage during the night, assuming that the escort fleet is still alive at that point. | |
| − | + | * The submarine can help tank some of the incoming shots and improve the survival of the main fleet. | |
| − | |||
| − | |||
| − | |||
| − | |||
| − | |||
| − | |||
| − | |||
| − | |||
| − | |||
| − | |||
| − | |||
| − | |||
| − | |||
| − | |||
| − | |||
| − | |||
| − | |||
| − | |||
| − | |||
| − | |||
| − | |||
| − | |||
| − | |||
| − | |||
| − | |||
| − | |||
| − | |||
| − | |||
| − | |||
| − | |||
| − | |||
| − | |||
| − | |||
| − | |||
| − | |||
| − | |||
| − | |||
| − | |||
| − | |||
| − | |||
| − | |||
| − | |||
| − | |||
| − | |||
| − | |||
| − | |||
| − | |||
| − | |||
| − | |||
| − | |||
| − | |||
| − | |||
| − | |||
| − | |||
| − | |||
| − | |||
| − | |||
| − | + | |-|Surface Task Force= | |
| − | |||
| − | |||
| − | |||
| − | |||
| − | |||
| − | |||
| − | + | * '''XX''' should either be '''SS(V)''' or '''CA(V)'''. | |
| + | * An alternative option that doesn't capitalize on the use of historical aircraft, but chooses to conserve bauxite instead. | ||
| + | * Due to the lack of air power, air sweeping the boss to get a favorable air state is recommended. | ||
| + | * Among the fast battleships, only {{ShipLink|Bismarck}} and {{ShipLink|Richelieu}} have a decent historical bonus. Using STF on Hard might not be desirable due to the lack of historical bonuses. | ||
| − | |||
| − | + | |-|Kuso strategy= | |
| − | + | <span style="color:red";>'''Warning:'''</span> Friendly ships will be sunk intentionally using this strategy. | |
| − | + | * This is done by putting fodder destroyers that were intended for modernization/scrapping in the '''escort''' in order to tank all the torpedo attacks. | |
| − | + | * This strategy is not meant for players who do not want to sink ships for whatever moral reasons. | |
| − | |||
| − | * | ||
| − | |||
| − | |||
| − | |||
| − | |||
| − | |||
| − | |||
| − | |||
| − | |||
| − | |||
| − | |||
| − | |||
| − | |||
| − | |||
| − | |||
| − | |||
| − | |||
| − | |||
| − | * This is | ||
| − | |||
| − | |||
| − | |||
| − | |||
| − | |||
| − | |||
| − | |||
| − | |||
| − | |||
| − | |||
| − | |||
| − | == | + | ===Option 1: Surface Task Force=== |
| − | + | Composition: '''3(F)BB(V) 1CV(B) 2XX + CL flagship with 5 fodder DDs''' | |
| + | * Route: {{MapRoute|2||J2|red|L|pink|M|red|O|red}} | ||
| + | * '''XX''' cannot be (F)BB(V) or CV(L/B). | ||
| + | * Damage output from the fleet is limited. Instead, the main source of damage comes boss support and LBAS. | ||
| + | * This option is purely intended for chipping, so it is very unlikely that a clear will occur on harder difficulties. | ||
| − | + | ===Option 2: Carrier Task Force=== | |
| − | + | Composition: '''4CV(B) 2XX + CL flagship with 5 fodder DDs''' | |
| − | + | * Route: {{MapRoute|2||J2|red|L|pink|M|red|O|red}} | |
| − | * Route: {{MapRoute| | + | * If '''XX''' is a (F)BB(V), then '''Fast Fleet''' becomes mandatory. |
| − | * | + | ** Otherwise, using SS(V) or any other planes that can contribute to air power is recommended. |
| − | + | * Similarly to option 1, but with the huge difference that this is actually capable of killing the boss. | |
| − | + | * The effectiveness of this strategy heavily depends on the amount of historical aircraft available. | |
| − | + | ** This also means that using carriers isn't feasible if the player lacks the historical aircraft. | |
| − | * | + | * This is the recommended strategy in order to defeat the boss if the player has the required aircraft. Using a traditional fleet is simply not as effective on '''Hard'''. |
| − | * | ||
| − | |||
| − | * | ||
| − | * | ||
| − | * | ||
| − | * | ||
| − | * | ||
| − | |||
</tabber> | </tabber> | ||
| − | |||
| − | |||
| − | |||
| − | |||
| − | |||
| − | |||
| − | |||
| − | |||
| − | |||
| − | |||
| − | |||
| − | |||
| − | |||
| − | |||
| − | |||
| − | |||
| − | |||
| − | |||
| − | |||
| − | |||
| − | |||
| − | |||
| − | |||
| − | |||
| − | |||
| − | |||
| − | |||
| − | |||
| − | |||
| − | |||
| − | |||
Revision as of 01:23, 18 September 2021
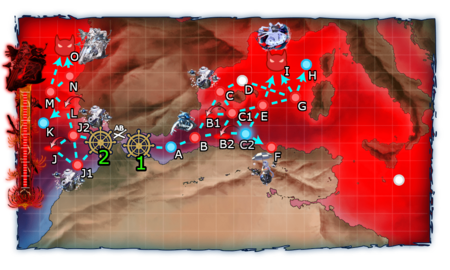
Phase 2: Defeat the European Princess

The boss is a combined fleet located at node O
- This phase uses a Combined Fleet.
- The LBAS range to the boss at O is 5.
- Node J2 features the highly dangerous New Submarine Princess.
- Bringing 2 OASW capable ships and/or a LBAS full of ASW aircraft in order to neutralize her is recommended in order to minimize early retreats.
- The LBAS range for node J2 is 1.
- Node M features Heavy Cruiser Ne-Class that are capable of firing opening torpedoes on Hard.
- The formation of this node will be locked at Line Ahead during Last Dance.
- People are encouraged to either use Repair Team or Repair Goddess as part of the strategy. Implementing kuso strategies is also possible. There is simply no good method around this.
This phase uses the following tag:
![]()
Warning: Any Combined Fleet containing a ship tagged with Force H![]() will be forced to start at point 2, regardless of difficulty. This effectively means that any ships tagged with Force H
will be forced to start at point 2, regardless of difficulty. This effectively means that any ships tagged with Force H![]() cannot be used for phases that involves either Force Z
cannot be used for phases that involves either Force Z![]() or Force X
or Force X![]() .
.
| Fleet Info | ||
|---|---|---|
| Tag | Fleet Type | Composition |
Force H |
CTF | 4CV(B) 1CAV 1SS(V) + 1CL 2DD 1CA 1FBB 1XX |
| Speed | Route | |
| Fast | 2 J2 L M O | |
- XX should either be FBB, CVL, CAV or CLT.
- Just like Phase 1, carriers can make use of historical bonuses provided by foreign aircraft in order to deal as much damage as possible during daytime.
- This is important because carriers with the necessary aircraft are capable of defeating the boss at daytime. There are not that many ships capable of dealing decent damage during the night, assuming that the escort fleet is still alive at that point.
- The submarine can help tank some of the incoming shots and improve the survival of the main fleet.
- XX should either be SS(V) or CA(V).
- An alternative option that doesn't capitalize on the use of historical aircraft, but chooses to conserve bauxite instead.
- Due to the lack of air power, air sweeping the boss to get a favorable air state is recommended.
- Among the fast battleships, only Bismarck
 and Richelieu
 have a decent historical bonus. Using STF on Hard might not be desirable due to the lack of historical bonuses.
Warning: Friendly ships will be sunk intentionally using this strategy.
- This is done by putting fodder destroyers that were intended for modernization/scrapping in the escort in order to tank all the torpedo attacks.
- This strategy is not meant for players who do not want to sink ships for whatever moral reasons.
Option 1: Surface Task Force
Composition: 3(F)BB(V) 1CV(B) 2XX + CL flagship with 5 fodder DDs
- Route: 2 J2 L M O
- XX cannot be (F)BB(V) or CV(L/B).
- Damage output from the fleet is limited. Instead, the main source of damage comes boss support and LBAS.
- This option is purely intended for chipping, so it is very unlikely that a clear will occur on harder difficulties.
Option 2: Carrier Task Force
Composition: 4CV(B) 2XX + CL flagship with 5 fodder DDs
- Route: 2 J2 L M O
- If XX is a (F)BB(V), then Fast Fleet becomes mandatory.
- Otherwise, using SS(V) or any other planes that can contribute to air power is recommended.
- Similarly to option 1, but with the huge difference that this is actually capable of killing the boss.
- The effectiveness of this strategy heavily depends on the amount of historical aircraft available.
- This also means that using carriers isn't feasible if the player lacks the historical aircraft.
- This is the recommended strategy in order to defeat the boss if the player has the required aircraft. Using a traditional fleet is simply not as effective on Hard.