• Welcome to the Kancolle Wiki!
  • If you have any questions regarding site content, account registration, etc., please visit the KanColle Wiki Discord

Sandbox

From Kancolle Wiki
Revision as of 12:23, 15 December 2013 by >CDRW
Jump to navigation Jump to search

Welcome to the Kancolle Wiki sandbox!
This page exists so that you can practice editing or formatting (see Help:Editing) without changing any serious content. Feel free to try wiki editing out here first.
Wiki allows for rather complicated formatting. It can look overwhelming when you begin, but don't let it worry you. Just start with the basics... enter some text, and learn the other pieces as you go. Your content contributions are welcome and important. The wiki is a collaborative effort and others can help with formatting and other improvements.
Best wishes!

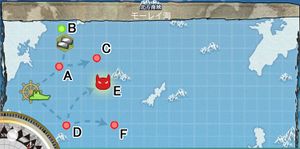
World 3-1: モーレイ海哨戒

Difficulty ☆ ☆ ☆ ☆ Map
EXP/node 310
3-1 Map.jpg
Items Steel
Fluff text モーレイ海哨戒
北方海域に艦隊を進出させ、モーレイ海を哨戒せよ!

Nodes And Enemy Encounters

Area Pattern Encountered Vessels Formation
A Pattern 1 CL Ho Class3.pngCL Ho Class2.pngCL He Class2.pngDD Ro Class2.pngDD I Class2.pngDD I Class2.png Formation 1: Line Ahead
Pattern 2 CL Ho Class3.pngCA Ri Class2.pngCL To Class2.pngCT Chi Class2.pngDD Ro Class2.pngDD Ro Class2.png
Pattern 3 CL Ho Class3.pngCL To Class2.pngCL To Class2.pngCL Ho Class2.pngDD Ro Class2.pngDD Ro Class2.png Formation 2: Double Line
B Steel +35 - 150
C Pattern 1 CVL Nu Class2.pngCVL Nu Class2.pngCVL Nu Class2.pngCL Ho Class3.pngDD Ha Class2.pngDD Ha Class2.png Formation 4: Echelon
Pattern 2 CVL Nu Class2.pngCVL Nu Class2.pngCVL Nu Class2.pngCA Ri Class3.pngDD Ni Class2.pngDD Ni Class2.png Formation 1: Line Ahead
D Pattern 1 CL Ho Class3.pngCL To Class2.pngCL Ho Class2.pngCL Ho Class2.pngDD Ro Class2.pngDD Ro Class2.png Formation 2: Double Line
Pattern 2 CL Ho Class3.pngCA Ri Class2.pngCL To Class2.pngCT Chi Class2.pngDD Ro Class2.pngDD Ro Class2.png Formation 1: Line Ahead

E

Boss Node Transport Fleet

Pattern 1 BB Ru Class3.pngBB Ru Class2.pngCL Ho Class3.pngDD Ro Class3.pngDD Ni Class2.pngAP Wa Class2.png Formation 2: Double Line
Pattern 2 CV O Class3.jpgBB Ru Class3.pngBB Ru Class2.pngDD Ha Class3.pngDD Ni Class2.pngAP Wa Class2.png Formation 1: Line Ahead
Pattern 3 BB Ru Class3.pngBB Ru Class2.pngCL Ho Class3.pngCT Chi Class2.pngDD Ni Class2.pngDD Ni Class2.png
F Pattern 1 CVL Nu Class2.pngCVL Nu Class2.pngCVL Nu Class2.pngCL Ho Class3.pngDD Ha Class2.pngDD Ha Class2.png Formation 4: Echelon
Pattern 2 CVL Nu Class2.pngCVL Nu Class2.pngCVL Nu Class2.pngCA Ri Class3.pngDD Ni Class2.pngDD Ni Class2.png Formation 1: Line Ahead
Show/Hide table

Drops

Destroyer Light Cruiser Heavy Cruiser Seaplane Mothership Aircraft carrier Battleship
A Fubuki, Kasumi, Arare Natori, Tenryuu Maya, Choukai, Nachi, Haguro Kongou, Kirishima
C Kiso Maya
D Kagerou Yura, Sendai, Tatsuta Haguro, Choukai, Tone, Chikuma, Nachi Shouhou Kaga, Hiyou

E

Haguro Souryuu, Kaga

Hiei, Kirishima, Hyuuga,Ise, Yamashiro

Tips

  • With decent luck, you can solo 3-1 with single submarines, just like 2-3 and 2-4 in previous world. Recommended lv25 with 5 stars. Turbine-equipped one is more preferable.

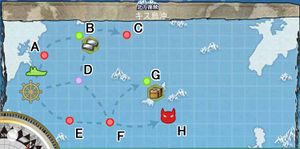
World 3-2: キス島沖

Difficulty ☆ ☆ ☆ ☆ ☆ Map
EXP/node 320
3-2 Map.jpg
Items Steel, Furniture box (small)
Fluff text キス島撤退作戦
駆逐艦のみの高速艦隊で、敵艦隊に包囲された北方海域キス島に突入! 島の守備隊を無事収容せよ!

Nodes And Enemy Encounters

Area Pattern Encountered Vessels Formation
A Pattern 1 CL Ho Class3.pngCT Chi Class2.pngDD Ha Class2.pngDD Ha Class.pngDD Ro Class.jpgDD Ro Class.jpg Formation 1: Line Ahead
Pattern 2 CT Chi Class2.pngCT Chi Class.pngCT Chi Class.pngDD Ro Class3.pngDD Ro Class.jpgDD Ro Class.jpg Formation 2: Double Line
Pattern 3 CL Ho Class3.pngDD Ha Class.pngDD Ha Class.pngDD Ro Class.jpgDD Ro Class.jpg Formation 1: Line Ahead
B Steel+50 - 150
C Pattern 1 CV O Class2.pngCV O Class2.pngBB Ru Class2.pngBB Ru Class2.pngDD Ro Class3.pngDD Ni Class2.png Formation 2: Double Line
Pattern 2 CV O Class2.pngCV O Class2.pngCVL Nu Class2.pngCA Ri Class2.pngDD Ro Class3.pngDD Ha Class2.png
Pattern 3 CV O Class2.pngCV O Class2.pngCA Ri Class2.pngCL To Class2.pngCA Ri Class2.pngDD Ha Class2.png
D Without Radar Maelstorm: Fuel -4 tick
With Radar Maelstorm: Fuel -2 tick
E Pattern 1 CL Ho Class3.pngCT Chi Class2.pngDD Ha Class2.pngDD Ha Class.pngDD Ro Class.jpgDD Ro Class.jpg Formation 1: Line Ahead
Pattern 2 CT Chi Class2.pngCT Chi Class.pngCT Chi Class.pngDD Ro Class3.pngDD Ro Class.jpgDD Ro Class.jpg Formation 2: Double Line
Pattern 3 CL Ho Class3.pngDD Ha Class.pngDD Ha Class.pngDD Ro Class.jpgDD Ro Class.jpg Formation 1: Line Ahead
F Pattern 1 BB Ru Class2.pngBB Ru Class2.pngCA Ri Class2.pngCA Ri Class2.pngDD Ha Class2.pngDD Ha Class2.png Formation 1: Line Ahead
Pattern 2 BB Ru Class2.pngCA Ri Class2.pngCA Ri Class2.pngCL To Class2.pngDD Ha Class2.pngDD Ha Class2.png Formation 1: Line Ahead
Pattern 3 BB Ru Class2.pngCA Ri Class2.pngCL To Class2.pngCL To Class2.pngDD Ha Class2.pngDD Ha Class2.png Formation 4: Echelon
G Furniture Box (small) +1

H

Boss Node Transport Fleet

Pattern 1 CL Ho Class3.pngCL To Class.pngDD Ni Class.pngDD Ni Class.pngAP Wa Class2.pngAP Wa Class2.png Formation 2: Double Line
Pattern 2 CL He Class3.pngCL He Class2.pngCL To Class.pngDD Ni Class.pngDD Ni Class.pngAP Wa Class2.png Formation 1: Line Ahead

Drops

Destroyer Light Cruiser Heavy Cruiser Seaplane Mothership Aircraft Carrier Battleship
A

Kuroshio, Ayanami, Kagerou, Asashio

Naka, Jintsu, Sendai, Tama, Yura, Kitakami, Kiso, Tenryuu, Tatsuta, Isuzu, Natori Nachi, Ashigara, Haguro, Maya, Choukai, Takao, Atago, Tone, Chikuma Chitose, Chiyoda Hiyou, Junyou, Souryuu, Shouhou. Kongou, Hiei, Haruna, Kirishima, Fusou, Yamashiro, Ise, Hyuuga
C Kuroshio, Ayanami Naka, Isuzu, Yura Choukai, Mogami Hiei
E
F
H

Tips

  • In order to get to the Boss Node H, you will need to use a fleet of destroyers only. Having other type of ship inside your fleet will make the Compass Girl directs you to Node A all the time
  • All destroyers should be remodeled, equipped with torpedoes (quarduple torpedo or oxygen torpedo for better damage), and have their stats maxed (at least Torpedo and Armor stats).
  • Sparkle your fleet before every try if you aren't already, it might make far more of an impact than turbines do.
  • Equip「Emergency Repair」(応急修理要員) if you don't feel confident.
  • Use line abreast formation (単横) to avoid damage on your way and do night battle to take out the boss if your firepower is not enough for the day battle.
  • You'll need to be patient, it might take 1 try or dozens of tries to clear 3-2.
  • 3-2-A is a great place to level up using the following fleet composition:
    • Flagship: whatever ship you want to level up.
    1. If you have submarine: 「CV/CVLx2 (Torpedo Bomber) CLTx1-2 (Type A Ko-hyoteki) SSx1」. Enemies will prioritize attacking your submarine whenever possible since all of them can attack a submarine. You will therefore incur minimum cost to resources, time (Submarines are cheap and quick to repair) and risk while gaining 558 EXP per battle for flagship and 744 EXP for MVP.
    2. If you have no submarine: 「CV/CVLx2 (Torpedo Bomber) CLTx1-2 (Type A Ko-hyoteki) BBx1」. CV will take out 4-5 ships while BB takes out the remaining ships. With that composition, you can level 2 DD at the same time. Not as resource efficient as the first one, but reasonable if you do not have a submarine that can evade.

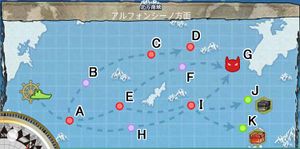
World 3-3: アルフォンシーノ方面

Difficulty ☆ ☆ ☆ ☆ ☆ ☆ ☆ Map
EXP/node 330
3-3 Map.jpg
Items Furniture box (medium), Furniture box (large)
Fluff text アルフォンシーノ方面進出
空母2隻以上を擁する空母機動部隊を持って北方海域へ進出。 敵情の強行偵察を敢行せよ!

Nodes And Enemy Encounters

Area Pattern Encountered Vessels Formation
A Pattern 1 CL He Class3.pngCA Ri Class2.pngCL To Class2.pngCT Chi Class2.pngDD Ro Class2.pngDD Ro Class2.png Formation 1: Line Ahead
Pattern 2 CL He Class3.pngCL To Class2.pngCL To Class2.pngCL Ho Class2.pngDD Ro Class2.pngDD Ro Class2.png Formation 2: Double Line
Pattern 3 CL He Class3.pngCL Ho Class2.pngCL Ho Class2.pngDD Ro Class2.pngDD I Class2.pngDD I Class2.png Formation 1: Line Ahead
B Without Radar Maelstorm: Fuel -4 tick
With Radar Maelstorm: Fuel -2 tick
C Pattern 1 CVL Nu Class2.pngCVL Nu Class2.pngCVL Nu Class2.pngCA Ri Class3.pngDD Ro Class3.pngDD Ha Class2.png Formation 1: Line Ahead
Pattern 2 CVL Nu Class2.pngCVL Nu Class2.pngCVL Nu Class2.pngCL Ho Class3.pngDD Ha Class2.pngDD Ha Class2.png Formation 1: Line Ahead
Pattern 3 CVL Nu Class2.pngCVL Nu Class2.pngCVL Nu Class2.pngCL Ho Class3.pngDD Ni Class2.pngDD Ni Class2.png Formation 4: Echelon
D Pattern 1 CV O Class3.jpgCV O Class2.pngCVL Nu Class2.pngBB Ru Class2.pngCL He Class2.pngDD Ha Class3.png Formation 2: Double Line
Pattern 2 CV O Class3.jpgCV O Class2.pngCVL Nu Class2.pngBB Ru Class2.pngCL To Class2.pngDD Ha Class3.png
Pattern 3 CV O Class3.jpgCV O Class2.pngCVL Nu Class2.pngBB Ru Class2.pngCL Ho Class3.pngDD Ni Class2.png
E Pattern 1 CVL Nu Class2.pngCVL Nu Class2.pngCVL Nu Class2.pngCA Ri Class3.pngDD Ro Class3.pngDD Ha Class2.png Formation 1: Line Ahead
Pattern 2 CVL Nu Class2.pngCVL Nu Class2.pngCVL Nu Class2.pngCL Ho Class3.pngDD Ha Class2.pngDD Ha Class2.png Formation 1: Line Ahead
Pattern 3 CVL Nu Class2.pngCVL Nu Class2.pngCVL Nu Class2.pngCL Ho Class3.pngDD Ni Class2.pngDD Ni Class2.png Formation 4: Echelon
F Without Radar Maelstorm: Ammunition -2 tick
With Radar Maelstorm: Ammunition -1 tick

G

Boss Node

Pattern 1 CV O Class2.pngCV O Class2.pngBB Ru Class3.pngCL He Class3.pngDD Ni Class2.pngDD Ni Class2.png Formation 2: Double Line
Pattern 2 CV O Class3.jpgCV O Class2.pngBB Ru Class3.pngCL He Class3.pngCL To Class2.pngDD Ni Class2.png Formation 1: Line Ahead
Pattern 3 CV O Class2.pngCV O Class2.pngBB Ru Class3.pngCL Ho Class3.pngDD Ha Class2.png, DD Ni Class.png Formation 1: Line Ahead
H Without Radar Maelstorm: Ammunition -3 tick
With Radar Maelstorm: Ammunition -2 tick
I Pattern 1 CV O Class3.jpgCV O Class2.pngCVL Nu Class2.pngBB Ru Class2.pngCL He Class2.pngDD Ha Class3.png Formation 2: Double Line
Pattern 2 CV O Class3.jpgCVL Nu Class2.pngCVL Nu Class2.pngBB Ru Class2.pngDD Ro Class3.pngDD Ni Class2.png Formation 2: Double Line
J Furniture Box (Medium) +1
K Furniture Box (Large) +1

Drops

Destroyer Light Cruiser Heavy Cruiser Seaplane Mothership Aircraft Carrier Submarine Battleship
A Maikaze Tenryuu Tone Chiyoda
C Shouhou
D
E

Shikinami, Shiranui, Maikaze

Ashigara, Tone Junyou I-168 Mutsu
G Maikaze Mogami, Sendai

Kaga, Souryuu, Akagi

Fusou, Hyuuga

I Isuzu Choukai, Haguro, Maya Mutsu

Tips

  • Fleet composition requires 2 CV/CVL to make it to the boss node.
  • One of the best way to farm furniture coins (node J : medium box ; node K : large box)

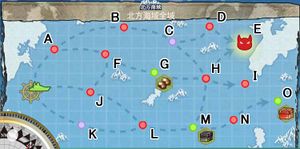
World 3-4: 北方海域全域

Difficulty ☆ ☆ ☆ ☆ ☆ ☆ ☆ ☆ ☆ Map
EXP/node 350
3-4 Map.jpg
Items Bauxite, Furniture box (medium), Furniture box (large)
Fluff text 北方海域艦隊決戦
北方海域奥地に敵艦隊の大規模泊地を発見!我が艦隊の総力を 挙げてこれを撃滅せよ!

Nodes And Enemy Encounters

Area Pattern Encountered Vessels Formation
A Pattern 1 CA Ri Class3.pngCA Ri Class2.pngCL To Class2.pngCL To Class2.pngDD Ni Class2.pngDD Ni Class2.png Formation 2: Double Line
Pattern 2 CL He Class3.pngCT Chi Class2.pngCT Chi Class2.pngCT Chi Class2.pngDD Ro Class2.pngDD Ro Class2.png Formation 1: Line Ahead
Pattern 3 CL Ho Class3.pngCL He Class2.pngCL He Class2.pngDD Ha Class2.pngDD Ha Class2.pngDD Ha Class2.png Formation 1: Line Ahead
B Pattern 1 BB Ru Class3.pngBB Ru Class2.pngCV O Class2.pngCL He Class3.pngDD Ro Class3.pngDD Ha Class2.png Formation 1: Line Ahead
Pattern 2 BB Ru Class3.pngCA Ri Class2.pngCA Ri Class2.pngCL Ho Class3.pngDD Ro Class3.pngDD Ha Class2.png Formation 1: Line Ahead
Pattern 3 BB Ru Class3.pngCL Ho Class3.pngCVL Nu Class2.pngCVL Nu Class2.pngDD Ro Class3.pngDD Ha Class2.png Formation 4: Echelon
C Without Radar Maelstorm: Ammunition -4 tick
With Radar Maelstorm: Ammunition -3 tick
D Pattern 1 CV O Class3.jpgCV O Class2.pngCV O Class2.pngBB Ru Class3.pngDD Ro Class3.pngDD Ro Class3.png Formation 1: Line Ahead
Pattern 2 CV O Class3.jpgCV O Class2.pngCV O Class2.pngBB Ru Class3.pngCL Ho Class3.pngDD Ro Class3.png

E

Boss Node

Pattern 1 CV O Class3.jpgCV O Class3.jpgBB Ru Class3.pngBB Ru Class2.pngCL Ho Class3.pngCT Chi Class2.png Formation 1: Line Ahead
Pattern 2 CV O Class3.jpgCV O Class3.jpgBB Ru Class3.pngCL He Class3.pngCT Chi Class2.pngCT Chi Class2.png
Pattern 3 CV O Class3.jpgCV O Class3.jpgCA Ri Class3.pngCL Ho Class3.pngCL To Class2.pngCL To Class2.png
F Pattern 1 BB Ru Class3.pngCA Ri Class2.pngCA Ri Class2.pngCL Ho Class3.pngDD Ro Class3.pngDD Ha Class2.png Formation 1: Line Ahead
Pattern 2 BB Ru Class3.pngCL Ho Class3.pngCVL Nu Class2.pngCVL Nu Class2.pngDD Ro Class3.pngDD Ha Class2.png Formation 4: Echelon
Pattern 3 BB Ru Class3.pngBB Ru Class2.pngCV O Class2.pngCL He Class3.pngDD Ro Class3.pngDD Ha Class2.png Formation 1: Line Ahead
G Bauxite + 50-150
H Pattern 1 BB Ru Class3.pngBB Ru Class3.pngBB Ru Class2.pngBB Ru Class2.pngCL Ho Class3.pngDD Ha Class3.png Formation 2: Double Line
Pattern 2 BB Ru Class3.pngBB Ru Class3.pngCA Ri Class2.pngCA Ri Class2.pngDD Ha Class3.pngDD Ha Class2.png
Pattern 3 BB Ru Class3.pngBB Ru Class2.pngCA Ri Class2.pngCL He Class3.pngDD Ha Class3.pngDD Ha Class2.png
I Pattern 1 CV O Class3.jpgCV O Class2.pngCV O Class2.pngBB Ru Class3.pngDD Ro Class3.pngDD Ro Class3.png Formation 1: Line Ahead
Pattern 2 CV O Class3.jpgCV O Class2.pngCV O Class2.pngBB Ru Class3.pngCL He Class3.pngDD Ni Class2.png
J Pattern 1 CA Ri Class3.pngCA Ri Class2.pngCL To Class2.pngCL To Class2.pngDD Ni Class2.pngDD Ni Class2.png Formation 2: Double Line
Pattern 2 CL He Class3.pngCT Chi Class2.pngCT Chi Class2.pngCT Chi Class2.pngDD Ro Class2.pngDD Ro Class2.png Formation 1: Line Ahead
Pattern 3 CL Ho Class3.pngCL He Class2.pngCL He Class2.pngDD Ha Class2.pngDD Ha Class2.pngDD Ha Class2.png Formation 1: Line Ahead
K Without Radar Maelstorm: Fuel -4 tick
With Radar Maelstorm: Fuel -3 tick
L Pattern 1 BB Ru Class3.pngCL Ho Class3.pngCVL Nu Class2.pngCVL Nu Class2.pngDD Ro Class3.pngDD Ha Class2.png Formation 4: Echelon
Pattern 2 BB Ru Class3.pngBB Ru Class2.pngCV O Class2.pngCL He Class3.pngDD Ro Class3.pngDD Ha Class2.png Formation 1: Line Ahead
Pattern 3 BB Ru Class3.pngCA Ri Class2.pngCA Ri Class2.pngCL Ho Class3.pngDD Ro Class3.pngDD Ha Class2.png Formation 1: Line Ahead
M Furniture Box (Medium) +1
N Pattern 1 CV O Class3.jpgCV O Class2.pngCV O Class2.pngBB Ru Class3.pngCL He Class3.pngDD Ni Class2.png Formation 1: Line Ahead
Pattern 2 CV O Class3.jpgCV O Class2.pngCV O Class2.pngBB Ru Class3.pngDD Ro Class3.pngDD Ro Class3.png
Pattern 3 CV O Class3.jpgCV O Class2.pngCV O Class2.pngBB Ru Class3.pngDD Ha Class3.pngDD Ni Class2.png
O Furniture Box (Large) +1

Drops

Destroyer Light Cruiser Heavy Cruiser Seaplane Mothership Aircraft Carrier Battleship
A
B
D
E
F
H
I
J Shimakaze
L Kagerou
N

Tips

  • 4BB 2CV Seems fairly reliable at getting to the Boss node (Unverified)