- Welcome to the Kancolle Wiki!
- If you have any questions regarding site content, account registration, etc., please visit the KanColle Wiki Discord
Difference between revisions of "Fall 2020 Event/E-3/Enemy comps"
< Fall 2020 Event | E-3
Jump to navigation
Jump to search
| Line 2: | Line 2: | ||
|-|Hard= | |-|Hard= | ||
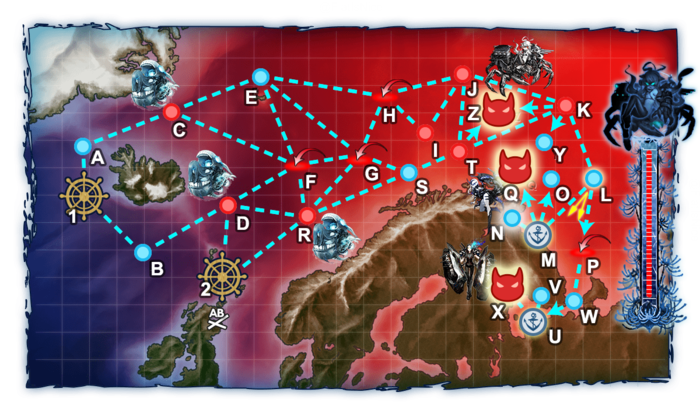
{{Map/Image|page=Fall 2020 Event/E-3| | {{Map/Image|page=Fall 2020 Event/E-3| | ||
| − | {{Map/ImageNode|1|Hard|x=84|y=197}} | + | {{Map/ImageNode|1|Hard|E-3|x=84|y=197}} |
| − | {{Map/ImageNode|2|Hard|x=222|y=277}} | + | {{Map/ImageNode|2|Hard|E-3|x=222|y=277}} |
| − | {{Map/ImageNode|AB|Hard|x=218|y=319}} | + | {{Map/ImageNode|AB|Hard|E-3|x=218|y=319}} |
| − | {{Map/ImageNode|A|Hard|x=83|y=146}} | + | {{Map/ImageNode|A|Hard|E-3|x=83|y=146}} |
| − | {{Map/ImageNode|B|Hard|x=143|y=253}} | + | {{Map/ImageNode|B|Hard|E-3|x=143|y=253}} |
| − | {{Map/ImageNode|C|Hard|x=172|y=112}} | + | {{Map/ImageNode|C|Hard|E-3|x=172|y=112}} |
| − | {{Map/ImageNode|D|Hard|x=228|y=205}} | + | {{Map/ImageNode|D|Hard|E-3|x=228|y=205}} |
| − | {{Map/ImageNode|E|Hard|x=261|y=77}} | + | {{Map/ImageNode|E|Hard|E-3|x=261|y=77}} |
| − | {{Map/ImageNode|F|Hard|x=298|y=166}} | + | {{Map/ImageNode|F|Hard|E-3|x=298|y=166}} |
| − | {{Map/ImageNode|G|Hard|x=361|y=155}} | + | {{Map/ImageNode|G|Hard|E-3|x=361|y=155}} |
| − | {{Map/ImageNode|H|Hard|x=386|y=96}} | + | {{Map/ImageNode|H|Hard|E-3|x=386|y=96}} |
| − | {{Map/ImageNode|I|Hard|x=425|y=133}} | + | {{Map/ImageNode|I|Hard|E-3|x=425|y=133}} |
| − | {{Map/ImageNode|J|Hard|x=463|y=74}} | + | {{Map/ImageNode|J|Hard|E-3|x=463|y=74}} |
| − | {{Map/ImageNode|K|Hard|x=566|y=106}} | + | {{Map/ImageNode|K|Hard|E-3|x=566|y=106}} |
| − | {{Map/ImageNode|L|Hard|x=594|y=179}} | + | {{Map/ImageNode|L|Hard|E-3|x=594|y=179}} |
| − | {{Map/ImageNode|M|Hard|x=538|y=235}} | + | {{Map/ImageNode|M|Hard|E-3|x=538|y=235}} |
| − | {{Map/ImageNode|N|Hard|x=512|y=218}} | + | {{Map/ImageNode|N|Hard|E-3|x=512|y=218}} |
| − | {{Map/ImageNode|O|Hard|x=551|y=179}} | + | {{Map/ImageNode|O|Hard|E-3|x=551|y=179}} |
| − | {{Map/ImageNode|P|Hard|x=583|y=250}} | + | {{Map/ImageNode|P|Hard|E-3|x=583|y=250}} |
| − | {{Map/ImageNode|Q|Hard|x=515|y=172}} | + | {{Map/ImageNode|Q|Hard|E-3|x=515|y=172}} |
| − | {{Map/ImageNode|R|Hard|x=307|y=216}} | + | {{Map/ImageNode|R|Hard|E-3|x=307|y=216}} |
| − | {{Map/ImageNode|S|Hard|x=409|y=173}} | + | {{Map/ImageNode|S|Hard|E-3|x=409|y=173}} |
| − | {{Map/ImageNode|T|Hard|x=459|y=152}} | + | {{Map/ImageNode|T|Hard|E-3|x=459|y=152}} |
| − | {{Map/ImageNode|U|Hard|x=534|y=321}} | + | {{Map/ImageNode|U|Hard|E-3|x=534|y=321}} |
| − | {{Map/ImageNode|V|Hard|x=541|y=296}} | + | {{Map/ImageNode|V|Hard|E-3|x=541|y=296}} |
| − | {{Map/ImageNode|W|Hard|x=574|y=301}} | + | {{Map/ImageNode|W|Hard|E-3|x=574|y=301}} |
| − | {{Map/ImageNode|X|Hard|x=511|y=291}} | + | {{Map/ImageNode|X|Hard|E-3|x=511|y=291}} |
| − | {{Map/ImageNode|Y|Hard|x=544|y=142}} | + | {{Map/ImageNode|Y|Hard|E-3|x=544|y=142}} |
| − | {{Map/ImageNode|Z|Hard|x=496|y=111}} | + | {{Map/ImageNode|Z|Hard|E-3|x=496|y=111}} |
}} | }} | ||
<div class="map-nodes"> | <div class="map-nodes"> | ||
| − | <div id="E-3 AB Hard" style="width:100%;text-align:center">E-3 AB</div> | + | <div id="E-3 AB Hard" style="width:100%;text-align:center">E-3 Hard AB</div> |
{|class="wikitable" style="width:100%" | {|class="wikitable" style="width:100%" | ||
!style="width:1px"|# | !style="width:1px"|# | ||
| Line 62: | Line 62: | ||
!style="width:1px"|AD/AP<br>AS/AS+ | !style="width:1px"|AD/AP<br>AS/AS+ | ||
|} | |} | ||
| − | <div id="E-3 A Hard" style="width:100%;text-align:center">E-3 A</div> | + | <div id="E-3 A Hard" style="width:100%;text-align:center">E-3 Hard A</div> |
{|class="wikitable" style="width:100%" | {|class="wikitable" style="width:100%" | ||
!style="width:1px"|# | !style="width:1px"|# | ||
| Line 73: | Line 73: | ||
!colspan="3"|Empty Node | !colspan="3"|Empty Node | ||
|} | |} | ||
| − | <div id="E-3 B Hard" style="width:100%;text-align:center">E-3 B</div> | + | <div id="E-3 B Hard" style="width:100%;text-align:center">E-3 Hard B</div> |
{|class="wikitable" style="width:100%" | {|class="wikitable" style="width:100%" | ||
!style="width:1px"|# | !style="width:1px"|# | ||
| Line 84: | Line 84: | ||
!colspan="3"|Empty Node | !colspan="3"|Empty Node | ||
|} | |} | ||
| − | <div id="E-3 C Hard" style="width:100%;text-align:center">E-3 C ([https://db.kcwiki.moe/drop/map/493/4/C-SAB.html PoiDB])</div> | + | <div id="E-3 C Hard" style="width:100%;text-align:center">E-3 Hard C ([https://db.kcwiki.moe/drop/map/493/4/C-SAB.html PoiDB])</div> |
{|class="wikitable" style="width:100%" | {|class="wikitable" style="width:100%" | ||
!style="width:1px"|# | !style="width:1px"|# | ||
| Line 105: | Line 105: | ||
!style="width:1px"|AD/AP<br>AS/AS+ | !style="width:1px"|AD/AP<br>AS/AS+ | ||
|} | |} | ||
| − | <div id="E-3 D Hard" style="width:100%;text-align:center">E-3 D ([https://db.kcwiki.moe/drop/map/493/4/D-SAB.html PoiDB])</div> | + | <div id="E-3 D Hard" style="width:100%;text-align:center">E-3 Hard D ([https://db.kcwiki.moe/drop/map/493/4/D-SAB.html PoiDB])</div> |
{|class="wikitable" style="width:100%" | {|class="wikitable" style="width:100%" | ||
!style="width:1px"|# | !style="width:1px"|# | ||
| Line 130: | Line 130: | ||
!style="width:1px"|AD/AP<br>AS/AS+ | !style="width:1px"|AD/AP<br>AS/AS+ | ||
|} | |} | ||
| − | <div id="E-3 E Hard" style="width:100%;text-align:center">E-3 E</div> | + | <div id="E-3 E Hard" style="width:100%;text-align:center">E-3 Hard E</div> |
{|class="wikitable" style="width:100%" | {|class="wikitable" style="width:100%" | ||
!style="width:1px"|# | !style="width:1px"|# | ||
| Line 141: | Line 141: | ||
!colspan="3"|Empty Node | !colspan="3"|Empty Node | ||
|} | |} | ||
| − | <div id="E-3 F Hard" style="width:100%;text-align:center">E-3 F ([https://db.kcwiki.moe/drop/map/493/4/F-SAB.html PoiDB])</div> | + | <div id="E-3 F Hard" style="width:100%;text-align:center">E-3 Hard F ([https://db.kcwiki.moe/drop/map/493/4/F-SAB.html PoiDB])</div> |
{|class="wikitable" style="width:100%" | {|class="wikitable" style="width:100%" | ||
!style="width:1px"|# | !style="width:1px"|# | ||
| Line 170: | Line 170: | ||
!style="width:1px"|AD/AP<br>AS/AS+ | !style="width:1px"|AD/AP<br>AS/AS+ | ||
|} | |} | ||
| − | <div id="E-3 G Hard" style="width:100%;text-align:center">E-3 G ([https://db.kcwiki.moe/drop/map/493/4/G-SAB.html PoiDB])</div> | + | <div id="E-3 G Hard" style="width:100%;text-align:center">E-3 Hard G ([https://db.kcwiki.moe/drop/map/493/4/G-SAB.html PoiDB])</div> |
{|class="wikitable" style="width:100%" | {|class="wikitable" style="width:100%" | ||
!style="width:1px"|# | !style="width:1px"|# | ||
| Line 199: | Line 199: | ||
!style="width:1px"|AD/AP<br>AS/AS+ | !style="width:1px"|AD/AP<br>AS/AS+ | ||
|} | |} | ||
| − | <div id="E-3 H Hard" style="width:100%;text-align:center">E-3 H ([https://db.kcwiki.moe/drop/map/493/4/H-SAB.html PoiDB])</div> | + | <div id="E-3 H Hard" style="width:100%;text-align:center">E-3 Hard H ([https://db.kcwiki.moe/drop/map/493/4/H-SAB.html PoiDB])</div> |
{|class="wikitable" style="width:100%" | {|class="wikitable" style="width:100%" | ||
!style="width:1px"|# | !style="width:1px"|# | ||
| Line 228: | Line 228: | ||
!style="width:1px"|AD/AP<br>AS/AS+ | !style="width:1px"|AD/AP<br>AS/AS+ | ||
|} | |} | ||
| − | <div id="E-3 I Hard" style="width:100%;text-align:center">E-3 I ([https://db.kcwiki.moe/drop/map/493/4/I-SAB.html PoiDB])</div> | + | <div id="E-3 I Hard" style="width:100%;text-align:center">E-3 Hard I ([https://db.kcwiki.moe/drop/map/493/4/I-SAB.html PoiDB])</div> |
{|class="wikitable" style="width:100%" | {|class="wikitable" style="width:100%" | ||
!style="width:1px"|# | !style="width:1px"|# | ||
| Line 245: | Line 245: | ||
!style="width:1px"|AD/AP<br>AS/AS+ | !style="width:1px"|AD/AP<br>AS/AS+ | ||
|} | |} | ||
| − | <div id="E-3 J Hard" style="width:100%;text-align:center">E-3 J ([https://db.kcwiki.moe/drop/map/493/4/J-SAB.html PoiDB])</div> | + | <div id="E-3 J Hard" style="width:100%;text-align:center">E-3 Hard J ([https://db.kcwiki.moe/drop/map/493/4/J-SAB.html PoiDB])</div> |
{|class="wikitable" style="width:100%" | {|class="wikitable" style="width:100%" | ||
!style="width:1px"|# | !style="width:1px"|# | ||
| Line 262: | Line 262: | ||
!style="width:1px"|AD/AP<br>AS/AS+ | !style="width:1px"|AD/AP<br>AS/AS+ | ||
|} | |} | ||
| − | <div id="E-3 K Hard" style="width:100%;text-align:center">E-3 K ([https://db.kcwiki.moe/drop/map/493/4/K-SAB.html PoiDB])</div> | + | <div id="E-3 K Hard" style="width:100%;text-align:center">E-3 Hard K ([https://db.kcwiki.moe/drop/map/493/4/K-SAB.html PoiDB])</div> |
{|class="wikitable" style="width:100%" | {|class="wikitable" style="width:100%" | ||
!style="width:1px"|# | !style="width:1px"|# | ||
| Line 283: | Line 283: | ||
!style="width:1px"|AD/AP<br>AS/AS+ | !style="width:1px"|AD/AP<br>AS/AS+ | ||
|} | |} | ||
| − | <div id="E-3 L Hard" style="width:100%;text-align:center">E-3 L</div> | + | <div id="E-3 L Hard" style="width:100%;text-align:center">E-3 Hard L</div> |
{|class="wikitable" style="width:100%" | {|class="wikitable" style="width:100%" | ||
!style="width:1px"|# | !style="width:1px"|# | ||
| Line 294: | Line 294: | ||
!colspan="3"|Selection Node | !colspan="3"|Selection Node | ||
|} | |} | ||
| − | <div id="E-3 M Hard" style="width:100%;text-align:center">E-3 M</div> | + | <div id="E-3 M Hard" style="width:100%;text-align:center">E-3 Hard M</div> |
{|class="wikitable" style="width:100%" | {|class="wikitable" style="width:100%" | ||
!style="width:1px"|# | !style="width:1px"|# | ||
| Line 302: | Line 302: | ||
!colspan="3"|Landing Node | !colspan="3"|Landing Node | ||
|} | |} | ||
| − | <div id="E-3 O Hard" style="width:100%;text-align:center">E-3 O</div> | + | <div id="E-3 O Hard" style="width:100%;text-align:center">E-3 Hard O</div> |
{|class="wikitable" style="width:100%" | {|class="wikitable" style="width:100%" | ||
!style="width:1px"|# | !style="width:1px"|# | ||
| Line 313: | Line 313: | ||
!colspan="3"|Empty Node | !colspan="3"|Empty Node | ||
|} | |} | ||
| − | <div id="E-3 P Hard" style="width:100%;text-align:center">E-3 P ([https://db.kcwiki.moe/drop/map/493/4/P-SAB.html PoiDB])</div> | + | <div id="E-3 P Hard" style="width:100%;text-align:center">E-3 Hard P ([https://db.kcwiki.moe/drop/map/493/4/P-SAB.html PoiDB])</div> |
{|class="wikitable" style="width:100%" | {|class="wikitable" style="width:100%" | ||
!style="width:1px"|# | !style="width:1px"|# | ||
| Line 342: | Line 342: | ||
!style="width:1px"|AD/AP<br>AS/AS+ | !style="width:1px"|AD/AP<br>AS/AS+ | ||
|} | |} | ||
| − | <div id="E-3 Q Hard" style="width:100%;text-align:center">E-3 Q ([https://db.kcwiki.moe/drop/map/493/4/Q-SAB.html PoiDB])</div> | + | <div id="E-3 Q Hard" style="width:100%;text-align:center">E-3 Hard Q ([https://db.kcwiki.moe/drop/map/493/4/Q-SAB.html PoiDB])</div> |
{|class="wikitable" style="width:100%" | {|class="wikitable" style="width:100%" | ||
!style="width:1px"|# | !style="width:1px"|# | ||
| Line 359: | Line 359: | ||
!style="width:1px"|AD/AP<br>AS/AS+ | !style="width:1px"|AD/AP<br>AS/AS+ | ||
|} | |} | ||
| − | <div id="E-3 R Hard" style="width:100%;text-align:center">E-3 R ([https://db.kcwiki.moe/drop/map/493/4/R-SAB.html PoiDB])</div> | + | <div id="E-3 R Hard" style="width:100%;text-align:center">E-3 Hard R ([https://db.kcwiki.moe/drop/map/493/4/R-SAB.html PoiDB])</div> |
{|class="wikitable" style="width:100%" | {|class="wikitable" style="width:100%" | ||
!style="width:1px"|# | !style="width:1px"|# | ||
| Line 384: | Line 384: | ||
!style="width:1px"|AD/AP<br>AS/AS+ | !style="width:1px"|AD/AP<br>AS/AS+ | ||
|} | |} | ||
| − | <div id="E-3 S Hard" style="width:100%;text-align:center">E-3 S</div> | + | <div id="E-3 S Hard" style="width:100%;text-align:center">E-3 Hard S</div> |
{|class="wikitable" style="width:100%" | {|class="wikitable" style="width:100%" | ||
!style="width:1px"|# | !style="width:1px"|# | ||
| Line 395: | Line 395: | ||
!colspan="3"|Empty Node | !colspan="3"|Empty Node | ||
|} | |} | ||
| − | <div id="E-3 T Hard" style="width:100%;text-align:center">E-3 T ([https://db.kcwiki.moe/drop/map/493/4/T-SAB.html PoiDB])</div> | + | <div id="E-3 T Hard" style="width:100%;text-align:center">E-3 Hard T ([https://db.kcwiki.moe/drop/map/493/4/T-SAB.html PoiDB])</div> |
{|class="wikitable" style="width:100%" | {|class="wikitable" style="width:100%" | ||
!style="width:1px"|# | !style="width:1px"|# | ||
| Line 412: | Line 412: | ||
!style="width:1px"|AD/AP<br>AS/AS+ | !style="width:1px"|AD/AP<br>AS/AS+ | ||
|} | |} | ||
| − | <div id="E-3 U Hard" style="width:100%;text-align:center">E-3 U</div> | + | <div id="E-3 U Hard" style="width:100%;text-align:center">E-3 Hard U</div> |
{|class="wikitable" style="width:100%" | {|class="wikitable" style="width:100%" | ||
!style="width:1px"|# | !style="width:1px"|# | ||
| Line 420: | Line 420: | ||
!colspan="3"|Landing Node | !colspan="3"|Landing Node | ||
|} | |} | ||
| − | <div id="E-3 W Hard" style="width:100%;text-align:center">E-3 W</div> | + | <div id="E-3 W Hard" style="width:100%;text-align:center">E-3 Hard W</div> |
{|class="wikitable" style="width:100%" | {|class="wikitable" style="width:100%" | ||
!style="width:1px"|# | !style="width:1px"|# | ||
| Line 431: | Line 431: | ||
!colspan="3"|Empty Node | !colspan="3"|Empty Node | ||
|} | |} | ||
| − | <div id="E-3 X Hard" style="width:100%;text-align:center">E-3 X ([https://db.kcwiki.moe/drop/map/493/4/X-SAB.html PoiDB])</div> | + | <div id="E-3 X Hard" style="width:100%;text-align:center">E-3 Hard X ([https://db.kcwiki.moe/drop/map/493/4/X-SAB.html PoiDB])</div> |
{|class="wikitable" style="width:100%" | {|class="wikitable" style="width:100%" | ||
!style="width:1px"|# | !style="width:1px"|# | ||
| Line 448: | Line 448: | ||
!style="width:1px"|AD/AP<br>AS/AS+ | !style="width:1px"|AD/AP<br>AS/AS+ | ||
|} | |} | ||
| − | <div id="E-3 Y Hard" style="width:100%;text-align:center">E-3 Y</div> | + | <div id="E-3 Y Hard" style="width:100%;text-align:center">E-3 Hard Y</div> |
{|class="wikitable" style="width:100%" | {|class="wikitable" style="width:100%" | ||
!style="width:1px"|# | !style="width:1px"|# | ||
| Line 459: | Line 459: | ||
!colspan="3"|Empty Node | !colspan="3"|Empty Node | ||
|} | |} | ||
| − | <div id="E-3 Z Hard" style="width:100%;text-align:center">E-3 Z ([https://db.kcwiki.moe/drop/map/493/4/Z-SAB.html PoiDB])</div> | + | <div id="E-3 Z Hard" style="width:100%;text-align:center">E-3 Hard Z ([https://db.kcwiki.moe/drop/map/493/4/Z-SAB.html PoiDB])</div> |
{|class="wikitable" style="width:100%" | {|class="wikitable" style="width:100%" | ||
!style="width:1px"|# | !style="width:1px"|# | ||
| Line 483: | Line 483: | ||
|-|Medium= | |-|Medium= | ||
{{Map/Image|page=Fall 2020 Event/E-3| | {{Map/Image|page=Fall 2020 Event/E-3| | ||
| − | {{Map/ImageNode|1|Medium|x=84|y=197}} | + | {{Map/ImageNode|1|Medium|E-3|x=84|y=197}} |
| − | {{Map/ImageNode|2|Medium|x=222|y=277}} | + | {{Map/ImageNode|2|Medium|E-3|x=222|y=277}} |
| − | {{Map/ImageNode|AB|Medium|x=218|y=319}} | + | {{Map/ImageNode|AB|Medium|E-3|x=218|y=319}} |
| − | {{Map/ImageNode|A|Medium|x=83|y=146}} | + | {{Map/ImageNode|A|Medium|E-3|x=83|y=146}} |
| − | {{Map/ImageNode|B|Medium|x=143|y=253}} | + | {{Map/ImageNode|B|Medium|E-3|x=143|y=253}} |
| − | {{Map/ImageNode|C|Medium|x=172|y=112}} | + | {{Map/ImageNode|C|Medium|E-3|x=172|y=112}} |
| − | {{Map/ImageNode|D|Medium|x=228|y=205}} | + | {{Map/ImageNode|D|Medium|E-3|x=228|y=205}} |
| − | {{Map/ImageNode|E|Medium|x=261|y=77}} | + | {{Map/ImageNode|E|Medium|E-3|x=261|y=77}} |
| − | {{Map/ImageNode|F|Medium|x=298|y=166}} | + | {{Map/ImageNode|F|Medium|E-3|x=298|y=166}} |
| − | {{Map/ImageNode|G|Medium|x=361|y=155}} | + | {{Map/ImageNode|G|Medium|E-3|x=361|y=155}} |
| − | {{Map/ImageNode|H|Medium|x=386|y=96}} | + | {{Map/ImageNode|H|Medium|E-3|x=386|y=96}} |
| − | {{Map/ImageNode|I|Medium|x=425|y=133}} | + | {{Map/ImageNode|I|Medium|E-3|x=425|y=133}} |
| − | {{Map/ImageNode|J|Medium|x=463|y=74}} | + | {{Map/ImageNode|J|Medium|E-3|x=463|y=74}} |
| − | {{Map/ImageNode|K|Medium|x=566|y=106}} | + | {{Map/ImageNode|K|Medium|E-3|x=566|y=106}} |
| − | {{Map/ImageNode|L|Medium|x=594|y=179}} | + | {{Map/ImageNode|L|Medium|E-3|x=594|y=179}} |
| − | {{Map/ImageNode|M|Medium|x=538|y=235}} | + | {{Map/ImageNode|M|Medium|E-3|x=538|y=235}} |
| − | {{Map/ImageNode|N|Medium|x=512|y=218}} | + | {{Map/ImageNode|N|Medium|E-3|x=512|y=218}} |
| − | {{Map/ImageNode|O|Medium|x=551|y=179}} | + | {{Map/ImageNode|O|Medium|E-3|x=551|y=179}} |
| − | {{Map/ImageNode|P|Medium|x=583|y=250}} | + | {{Map/ImageNode|P|Medium|E-3|x=583|y=250}} |
| − | {{Map/ImageNode|Q|Medium|x=515|y=172}} | + | {{Map/ImageNode|Q|Medium|E-3|x=515|y=172}} |
| − | {{Map/ImageNode|R|Medium|x=307|y=216}} | + | {{Map/ImageNode|R|Medium|E-3|x=307|y=216}} |
| − | {{Map/ImageNode|S|Medium|x=409|y=173}} | + | {{Map/ImageNode|S|Medium|E-3|x=409|y=173}} |
| − | {{Map/ImageNode|T|Medium|x=459|y=152}} | + | {{Map/ImageNode|T|Medium|E-3|x=459|y=152}} |
| − | {{Map/ImageNode|U|Medium|x=534|y=321}} | + | {{Map/ImageNode|U|Medium|E-3|x=534|y=321}} |
| − | {{Map/ImageNode|V|Medium|x=541|y=296}} | + | {{Map/ImageNode|V|Medium|E-3|x=541|y=296}} |
| − | {{Map/ImageNode|W|Medium|x=574|y=301}} | + | {{Map/ImageNode|W|Medium|E-3|x=574|y=301}} |
| − | {{Map/ImageNode|X|Medium|x=511|y=291}} | + | {{Map/ImageNode|X|Medium|E-3|x=511|y=291}} |
| − | {{Map/ImageNode|Y|Medium|x=544|y=142}} | + | {{Map/ImageNode|Y|Medium|E-3|x=544|y=142}} |
| − | {{Map/ImageNode|Z|Medium|x=496|y=111}} | + | {{Map/ImageNode|Z|Medium|E-3|x=496|y=111}} |
}} | }} | ||
<div class="map-nodes"> | <div class="map-nodes"> | ||
| − | <div id="E-3 AB Medium" style="width:100%;text-align:center">E-3 AB</div> | + | <div id="E-3 AB Medium" style="width:100%;text-align:center">E-3 Medium AB</div> |
{|class="wikitable" style="width:100%" | {|class="wikitable" style="width:100%" | ||
!style="width:1px"|# | !style="width:1px"|# | ||
| Line 539: | Line 539: | ||
!style="width:1px"|AD/AP<br>AS/AS+ | !style="width:1px"|AD/AP<br>AS/AS+ | ||
|} | |} | ||
| − | <div id="E-3 A Medium" style="width:100%;text-align:center">E-3 A</div> | + | <div id="E-3 A Medium" style="width:100%;text-align:center">E-3 Medium A</div> |
{|class="wikitable" style="width:100%" | {|class="wikitable" style="width:100%" | ||
!style="width:1px"|# | !style="width:1px"|# | ||
| Line 550: | Line 550: | ||
!colspan="3"|Empty Node | !colspan="3"|Empty Node | ||
|} | |} | ||
| − | <div id="E-3 B Medium" style="width:100%;text-align:center">E-3 B</div> | + | <div id="E-3 B Medium" style="width:100%;text-align:center">E-3 Medium B</div> |
{|class="wikitable" style="width:100%" | {|class="wikitable" style="width:100%" | ||
!style="width:1px"|# | !style="width:1px"|# | ||
| Line 561: | Line 561: | ||
!colspan="3"|Empty Node | !colspan="3"|Empty Node | ||
|} | |} | ||
| − | <div id="E-3 C Medium" style="width:100%;text-align:center">E-3 C ([https://db.kcwiki.moe/drop/map/493/3/C-SAB.html PoiDB])</div> | + | <div id="E-3 C Medium" style="width:100%;text-align:center">E-3 Medium C ([https://db.kcwiki.moe/drop/map/493/3/C-SAB.html PoiDB])</div> |
{|class="wikitable" style="width:100%" | {|class="wikitable" style="width:100%" | ||
!style="width:1px"|# | !style="width:1px"|# | ||
| Line 590: | Line 590: | ||
!style="width:1px"|AD/AP<br>AS/AS+ | !style="width:1px"|AD/AP<br>AS/AS+ | ||
|} | |} | ||
| − | <div id="E-3 D Medium" style="width:100%;text-align:center">E-3 D ([https://db.kcwiki.moe/drop/map/493/3/D-SAB.html PoiDB])</div> | + | <div id="E-3 D Medium" style="width:100%;text-align:center">E-3 Medium D ([https://db.kcwiki.moe/drop/map/493/3/D-SAB.html PoiDB])</div> |
{|class="wikitable" style="width:100%" | {|class="wikitable" style="width:100%" | ||
!style="width:1px"|# | !style="width:1px"|# | ||
| Line 611: | Line 611: | ||
!style="width:1px"|AD/AP<br>AS/AS+ | !style="width:1px"|AD/AP<br>AS/AS+ | ||
|} | |} | ||
| − | <div id="E-3 E Medium" style="width:100%;text-align:center">E-3 E</div> | + | <div id="E-3 E Medium" style="width:100%;text-align:center">E-3 Medium E</div> |
{|class="wikitable" style="width:100%" | {|class="wikitable" style="width:100%" | ||
!style="width:1px"|# | !style="width:1px"|# | ||
| Line 622: | Line 622: | ||
!colspan="3"|Empty Node | !colspan="3"|Empty Node | ||
|} | |} | ||
| − | <div id="E-3 F Medium" style="width:100%;text-align:center">E-3 F ([https://db.kcwiki.moe/drop/map/493/3/F-SAB.html PoiDB])</div> | + | <div id="E-3 F Medium" style="width:100%;text-align:center">E-3 Medium F ([https://db.kcwiki.moe/drop/map/493/3/F-SAB.html PoiDB])</div> |
{|class="wikitable" style="width:100%" | {|class="wikitable" style="width:100%" | ||
!style="width:1px"|# | !style="width:1px"|# | ||
| Line 634: | Line 634: | ||
!style="width:1px"|AD/AP<br>AS/AS+ | !style="width:1px"|AD/AP<br>AS/AS+ | ||
|} | |} | ||
| − | <div id="E-3 G Medium" style="width:100%;text-align:center">E-3 G ([https://db.kcwiki.moe/drop/map/493/3/G-SAB.html PoiDB])</div> | + | <div id="E-3 G Medium" style="width:100%;text-align:center">E-3 Medium G ([https://db.kcwiki.moe/drop/map/493/3/G-SAB.html PoiDB])</div> |
{|class="wikitable" style="width:100%" | {|class="wikitable" style="width:100%" | ||
!style="width:1px"|# | !style="width:1px"|# | ||
| Line 646: | Line 646: | ||
!style="width:1px"|AD/AP<br>AS/AS+ | !style="width:1px"|AD/AP<br>AS/AS+ | ||
|} | |} | ||
| − | <div id="E-3 H Medium" style="width:100%;text-align:center">E-3 H ([https://db.kcwiki.moe/drop/map/493/3/H-SAB.html PoiDB])</div> | + | <div id="E-3 H Medium" style="width:100%;text-align:center">E-3 Medium H ([https://db.kcwiki.moe/drop/map/493/3/H-SAB.html PoiDB])</div> |
{|class="wikitable" style="width:100%" | {|class="wikitable" style="width:100%" | ||
!style="width:1px"|# | !style="width:1px"|# | ||
| Line 675: | Line 675: | ||
!style="width:1px"|AD/AP<br>AS/AS+ | !style="width:1px"|AD/AP<br>AS/AS+ | ||
|} | |} | ||
| − | <div id="E-3 I Medium" style="width:100%;text-align:center">E-3 I ([https://db.kcwiki.moe/drop/map/493/3/I-SAB.html PoiDB])</div> | + | <div id="E-3 I Medium" style="width:100%;text-align:center">E-3 Medium I ([https://db.kcwiki.moe/drop/map/493/3/I-SAB.html PoiDB])</div> |
{|class="wikitable" style="width:100%" | {|class="wikitable" style="width:100%" | ||
!style="width:1px"|# | !style="width:1px"|# | ||
| Line 687: | Line 687: | ||
!style="width:1px"|AD/AP<br>AS/AS+ | !style="width:1px"|AD/AP<br>AS/AS+ | ||
|} | |} | ||
| − | <div id="E-3 J Medium" style="width:100%;text-align:center">E-3 J ([https://db.kcwiki.moe/drop/map/493/3/J-SAB.html PoiDB])</div> | + | <div id="E-3 J Medium" style="width:100%;text-align:center">E-3 Medium J ([https://db.kcwiki.moe/drop/map/493/3/J-SAB.html PoiDB])</div> |
{|class="wikitable" style="width:100%" | {|class="wikitable" style="width:100%" | ||
!style="width:1px"|# | !style="width:1px"|# | ||
| Line 704: | Line 704: | ||
!style="width:1px"|AD/AP<br>AS/AS+ | !style="width:1px"|AD/AP<br>AS/AS+ | ||
|} | |} | ||
| − | <div id="E-3 K Medium" style="width:100%;text-align:center">E-3 K ([https://db.kcwiki.moe/drop/map/493/3/K-SAB.html PoiDB])</div> | + | <div id="E-3 K Medium" style="width:100%;text-align:center">E-3 Medium K ([https://db.kcwiki.moe/drop/map/493/3/K-SAB.html PoiDB])</div> |
{|class="wikitable" style="width:100%" | {|class="wikitable" style="width:100%" | ||
!style="width:1px"|# | !style="width:1px"|# | ||
| Line 721: | Line 721: | ||
!style="width:1px"|AD/AP<br>AS/AS+ | !style="width:1px"|AD/AP<br>AS/AS+ | ||
|} | |} | ||
| − | <div id="E-3 L Medium" style="width:100%;text-align:center">E-3 L</div> | + | <div id="E-3 L Medium" style="width:100%;text-align:center">E-3 Medium L</div> |
{|class="wikitable" style="width:100%" | {|class="wikitable" style="width:100%" | ||
!style="width:1px"|# | !style="width:1px"|# | ||
| Line 732: | Line 732: | ||
!colspan="3"|Selection Node | !colspan="3"|Selection Node | ||
|} | |} | ||
| − | <div id="E-3 M Medium" style="width:100%;text-align:center">E-3 M</div> | + | <div id="E-3 M Medium" style="width:100%;text-align:center">E-3 Medium M</div> |
{|class="wikitable" style="width:100%" | {|class="wikitable" style="width:100%" | ||
!style="width:1px"|# | !style="width:1px"|# | ||
| Line 740: | Line 740: | ||
!colspan="3"|Landing Node | !colspan="3"|Landing Node | ||
|} | |} | ||
| − | <div id="E-3 O Medium" style="width:100%;text-align:center">E-3 O</div> | + | <div id="E-3 O Medium" style="width:100%;text-align:center">E-3 Medium O</div> |
{|class="wikitable" style="width:100%" | {|class="wikitable" style="width:100%" | ||
!style="width:1px"|# | !style="width:1px"|# | ||
| Line 751: | Line 751: | ||
!colspan="3"|Empty Node | !colspan="3"|Empty Node | ||
|} | |} | ||
| − | <div id="E-3 P Medium" style="width:100%;text-align:center">E-3 P ([https://db.kcwiki.moe/drop/map/493/3/P-SAB.html PoiDB])</div> | + | <div id="E-3 P Medium" style="width:100%;text-align:center">E-3 Medium P ([https://db.kcwiki.moe/drop/map/493/3/P-SAB.html PoiDB])</div> |
{|class="wikitable" style="width:100%" | {|class="wikitable" style="width:100%" | ||
!style="width:1px"|# | !style="width:1px"|# | ||
| Line 763: | Line 763: | ||
!style="width:1px"|AD/AP<br>AS/AS+ | !style="width:1px"|AD/AP<br>AS/AS+ | ||
|} | |} | ||
| − | <div id="E-3 Q Medium" style="width:100%;text-align:center">E-3 Q ([https://db.kcwiki.moe/drop/map/493/3/Q-SAB.html PoiDB])</div> | + | <div id="E-3 Q Medium" style="width:100%;text-align:center">E-3 Medium Q ([https://db.kcwiki.moe/drop/map/493/3/Q-SAB.html PoiDB])</div> |
{|class="wikitable" style="width:100%" | {|class="wikitable" style="width:100%" | ||
!style="width:1px"|# | !style="width:1px"|# | ||
| Line 780: | Line 780: | ||
!style="width:1px"|AD/AP<br>AS/AS+ | !style="width:1px"|AD/AP<br>AS/AS+ | ||
|} | |} | ||
| − | <div id="E-3 R Medium" style="width:100%;text-align:center">E-3 R ([https://db.kcwiki.moe/drop/map/493/3/R-SAB.html PoiDB])</div> | + | <div id="E-3 R Medium" style="width:100%;text-align:center">E-3 Medium R ([https://db.kcwiki.moe/drop/map/493/3/R-SAB.html PoiDB])</div> |
{|class="wikitable" style="width:100%" | {|class="wikitable" style="width:100%" | ||
!style="width:1px"|# | !style="width:1px"|# | ||
| Line 792: | Line 792: | ||
!style="width:1px"|AD/AP<br>AS/AS+ | !style="width:1px"|AD/AP<br>AS/AS+ | ||
|} | |} | ||
| − | <div id="E-3 S Medium" style="width:100%;text-align:center">E-3 S</div> | + | <div id="E-3 S Medium" style="width:100%;text-align:center">E-3 Medium S</div> |
{|class="wikitable" style="width:100%" | {|class="wikitable" style="width:100%" | ||
!style="width:1px"|# | !style="width:1px"|# | ||
| Line 803: | Line 803: | ||
!colspan="3"|Empty Node | !colspan="3"|Empty Node | ||
|} | |} | ||
| − | <div id="E-3 T Medium" style="width:100%;text-align:center">E-3 T ([https://db.kcwiki.moe/drop/map/493/3/T-SAB.html PoiDB])</div> | + | <div id="E-3 T Medium" style="width:100%;text-align:center">E-3 Medium T ([https://db.kcwiki.moe/drop/map/493/3/T-SAB.html PoiDB])</div> |
{|class="wikitable" style="width:100%" | {|class="wikitable" style="width:100%" | ||
!style="width:1px"|# | !style="width:1px"|# | ||
| Line 815: | Line 815: | ||
!style="width:1px"|AD/AP<br>AS/AS+ | !style="width:1px"|AD/AP<br>AS/AS+ | ||
|} | |} | ||
| − | <div id="E-3 U Medium" style="width:100%;text-align:center">E-3 U</div> | + | <div id="E-3 U Medium" style="width:100%;text-align:center">E-3 Medium U</div> |
{|class="wikitable" style="width:100%" | {|class="wikitable" style="width:100%" | ||
!style="width:1px"|# | !style="width:1px"|# | ||
| Line 823: | Line 823: | ||
!colspan="3"|Landing Node | !colspan="3"|Landing Node | ||
|} | |} | ||
| − | <div id="E-3 W Medium" style="width:100%;text-align:center">E-3 W</div> | + | <div id="E-3 W Medium" style="width:100%;text-align:center">E-3 Medium W</div> |
{|class="wikitable" style="width:100%" | {|class="wikitable" style="width:100%" | ||
!style="width:1px"|# | !style="width:1px"|# | ||
| Line 834: | Line 834: | ||
!colspan="3"|Empty Node | !colspan="3"|Empty Node | ||
|} | |} | ||
| − | <div id="E-3 X Medium" style="width:100%;text-align:center">E-3 X ([https://db.kcwiki.moe/drop/map/493/3/X-SAB.html PoiDB])</div> | + | <div id="E-3 X Medium" style="width:100%;text-align:center">E-3 Medium X ([https://db.kcwiki.moe/drop/map/493/3/X-SAB.html PoiDB])</div> |
{|class="wikitable" style="width:100%" | {|class="wikitable" style="width:100%" | ||
!style="width:1px"|# | !style="width:1px"|# | ||
| Line 846: | Line 846: | ||
!style="width:1px"|AD/AP<br>AS/AS+ | !style="width:1px"|AD/AP<br>AS/AS+ | ||
|} | |} | ||
| − | <div id="E-3 Y Medium" style="width:100%;text-align:center">E-3 Y</div> | + | <div id="E-3 Y Medium" style="width:100%;text-align:center">E-3 Medium Y</div> |
{|class="wikitable" style="width:100%" | {|class="wikitable" style="width:100%" | ||
!style="width:1px"|# | !style="width:1px"|# | ||
| Line 857: | Line 857: | ||
!colspan="3"|Empty Node | !colspan="3"|Empty Node | ||
|} | |} | ||
| − | <div id="E-3 Z Medium" style="width:100%;text-align:center">E-3 Z ([https://db.kcwiki.moe/drop/map/493/3/Z-SAB.html PoiDB])</div> | + | <div id="E-3 Z Medium" style="width:100%;text-align:center">E-3 Medium Z ([https://db.kcwiki.moe/drop/map/493/3/Z-SAB.html PoiDB])</div> |
{|class="wikitable" style="width:100%" | {|class="wikitable" style="width:100%" | ||
!style="width:1px"|# | !style="width:1px"|# | ||
| Line 872: | Line 872: | ||
|-|Easy= | |-|Easy= | ||
{{Map/Image|page=Fall 2020 Event/E-3| | {{Map/Image|page=Fall 2020 Event/E-3| | ||
| − | {{Map/ImageNode|1|Easy|x=84|y=197}} | + | {{Map/ImageNode|1|Easy|E-3|x=84|y=197}} |
| − | {{Map/ImageNode|2|Easy|x=222|y=277}} | + | {{Map/ImageNode|2|Easy|E-3|x=222|y=277}} |
| − | {{Map/ImageNode|AB|Easy|x=218|y=319}} | + | {{Map/ImageNode|AB|Easy|E-3|x=218|y=319}} |
| − | {{Map/ImageNode|A|Easy|x=83|y=146}} | + | {{Map/ImageNode|A|Easy|E-3|x=83|y=146}} |
| − | {{Map/ImageNode|B|Easy|x=143|y=253}} | + | {{Map/ImageNode|B|Easy|E-3|x=143|y=253}} |
| − | {{Map/ImageNode|C|Easy|x=172|y=112}} | + | {{Map/ImageNode|C|Easy|E-3|x=172|y=112}} |
| − | {{Map/ImageNode|D|Easy|x=228|y=205}} | + | {{Map/ImageNode|D|Easy|E-3|x=228|y=205}} |
| − | {{Map/ImageNode|E|Easy|x=261|y=77}} | + | {{Map/ImageNode|E|Easy|E-3|x=261|y=77}} |
| − | {{Map/ImageNode|F|Easy|x=298|y=166}} | + | {{Map/ImageNode|F|Easy|E-3|x=298|y=166}} |
| − | {{Map/ImageNode|G|Easy|x=361|y=155}} | + | {{Map/ImageNode|G|Easy|E-3|x=361|y=155}} |
| − | {{Map/ImageNode|H|Easy|x=386|y=96}} | + | {{Map/ImageNode|H|Easy|E-3|x=386|y=96}} |
| − | {{Map/ImageNode|I|Easy|x=425|y=133}} | + | {{Map/ImageNode|I|Easy|E-3|x=425|y=133}} |
| − | {{Map/ImageNode|J|Easy|x=463|y=74}} | + | {{Map/ImageNode|J|Easy|E-3|x=463|y=74}} |
| − | {{Map/ImageNode|K|Easy|x=566|y=106}} | + | {{Map/ImageNode|K|Easy|E-3|x=566|y=106}} |
| − | {{Map/ImageNode|L|Easy|x=594|y=179}} | + | {{Map/ImageNode|L|Easy|E-3|x=594|y=179}} |
| − | {{Map/ImageNode|M|Easy|x=538|y=235}} | + | {{Map/ImageNode|M|Easy|E-3|x=538|y=235}} |
| − | {{Map/ImageNode|N|Easy|x=512|y=218}} | + | {{Map/ImageNode|N|Easy|E-3|x=512|y=218}} |
| − | {{Map/ImageNode|O|Easy|x=551|y=179}} | + | {{Map/ImageNode|O|Easy|E-3|x=551|y=179}} |
| − | {{Map/ImageNode|P|Easy|x=583|y=250}} | + | {{Map/ImageNode|P|Easy|E-3|x=583|y=250}} |
| − | {{Map/ImageNode|Q|Easy|x=515|y=172}} | + | {{Map/ImageNode|Q|Easy|E-3|x=515|y=172}} |
| − | {{Map/ImageNode|R|Easy|x=307|y=216}} | + | {{Map/ImageNode|R|Easy|E-3|x=307|y=216}} |
| − | {{Map/ImageNode|S|Easy|x=409|y=173}} | + | {{Map/ImageNode|S|Easy|E-3|x=409|y=173}} |
| − | {{Map/ImageNode|T|Easy|x=459|y=152}} | + | {{Map/ImageNode|T|Easy|E-3|x=459|y=152}} |
| − | {{Map/ImageNode|U|Easy|x=534|y=321}} | + | {{Map/ImageNode|U|Easy|E-3|x=534|y=321}} |
| − | {{Map/ImageNode|V|Easy|x=541|y=296}} | + | {{Map/ImageNode|V|Easy|E-3|x=541|y=296}} |
| − | {{Map/ImageNode|W|Easy|x=574|y=301}} | + | {{Map/ImageNode|W|Easy|E-3|x=574|y=301}} |
| − | {{Map/ImageNode|X|Easy|x=511|y=291}} | + | {{Map/ImageNode|X|Easy|E-3|x=511|y=291}} |
| − | {{Map/ImageNode|Y|Easy|x=544|y=142}} | + | {{Map/ImageNode|Y|Easy|E-3|x=544|y=142}} |
| − | {{Map/ImageNode|Z|Easy|x=496|y=111}} | + | {{Map/ImageNode|Z|Easy|E-3|x=496|y=111}} |
}} | }} | ||
<div class="map-nodes"> | <div class="map-nodes"> | ||
| − | <div id="E-3 AB Easy" style="width:100%;text-align:center">E-3 AB</div> | + | <div id="E-3 AB Easy" style="width:100%;text-align:center">E-3 Easy AB</div> |
{|class="wikitable" style="width:100%" | {|class="wikitable" style="width:100%" | ||
!style="width:1px"|# | !style="width:1px"|# | ||
| Line 936: | Line 936: | ||
!style="width:1px"|AD/AP<br>AS/AS+ | !style="width:1px"|AD/AP<br>AS/AS+ | ||
|} | |} | ||
| − | <div id="E-3 A Easy" style="width:100%;text-align:center">E-3 A</div> | + | <div id="E-3 A Easy" style="width:100%;text-align:center">E-3 Easy A</div> |
{|class="wikitable" style="width:100%" | {|class="wikitable" style="width:100%" | ||
!style="width:1px"|# | !style="width:1px"|# | ||
| Line 947: | Line 947: | ||
!colspan="3"|Empty Node | !colspan="3"|Empty Node | ||
|} | |} | ||
| − | <div id="E-3 B Easy" style="width:100%;text-align:center">E-3 B</div> | + | <div id="E-3 B Easy" style="width:100%;text-align:center">E-3 Easy B</div> |
{|class="wikitable" style="width:100%" | {|class="wikitable" style="width:100%" | ||
!style="width:1px"|# | !style="width:1px"|# | ||
| Line 958: | Line 958: | ||
!colspan="3"|Empty Node | !colspan="3"|Empty Node | ||
|} | |} | ||
| − | <div id="E-3 C Easy" style="width:100%;text-align:center">E-3 C ([https://db.kcwiki.moe/drop/map/493/2/C-SAB.html PoiDB])</div> | + | <div id="E-3 C Easy" style="width:100%;text-align:center">E-3 Easy C ([https://db.kcwiki.moe/drop/map/493/2/C-SAB.html PoiDB])</div> |
{|class="wikitable" style="width:100%" | {|class="wikitable" style="width:100%" | ||
!style="width:1px"|# | !style="width:1px"|# | ||
| Line 987: | Line 987: | ||
!style="width:1px"|AD/AP<br>AS/AS+ | !style="width:1px"|AD/AP<br>AS/AS+ | ||
|} | |} | ||
| − | <div id="E-3 D Easy" style="width:100%;text-align:center">E-3 D ([https://db.kcwiki.moe/drop/map/493/2/D-SAB.html PoiDB])</div> | + | <div id="E-3 D Easy" style="width:100%;text-align:center">E-3 Easy D ([https://db.kcwiki.moe/drop/map/493/2/D-SAB.html PoiDB])</div> |
{|class="wikitable" style="width:100%" | {|class="wikitable" style="width:100%" | ||
!style="width:1px"|# | !style="width:1px"|# | ||
| Line 1,012: | Line 1,012: | ||
!style="width:1px"|AD/AP<br>AS/AS+ | !style="width:1px"|AD/AP<br>AS/AS+ | ||
|} | |} | ||
| − | <div id="E-3 E Easy" style="width:100%;text-align:center">E-3 E</div> | + | <div id="E-3 E Easy" style="width:100%;text-align:center">E-3 Easy E</div> |
{|class="wikitable" style="width:100%" | {|class="wikitable" style="width:100%" | ||
!style="width:1px"|# | !style="width:1px"|# | ||
| Line 1,023: | Line 1,023: | ||
!colspan="3"|Empty Node | !colspan="3"|Empty Node | ||
|} | |} | ||
| − | <div id="E-3 F Easy" style="width:100%;text-align:center">E-3 F ([https://db.kcwiki.moe/drop/map/493/2/F-SAB.html PoiDB])</div> | + | <div id="E-3 F Easy" style="width:100%;text-align:center">E-3 Easy F ([https://db.kcwiki.moe/drop/map/493/2/F-SAB.html PoiDB])</div> |
{|class="wikitable" style="width:100%" | {|class="wikitable" style="width:100%" | ||
!style="width:1px"|# | !style="width:1px"|# | ||
| Line 1,052: | Line 1,052: | ||
!style="width:1px"|AD/AP<br>AS/AS+ | !style="width:1px"|AD/AP<br>AS/AS+ | ||
|} | |} | ||
| − | <div id="E-3 G Easy" style="width:100%;text-align:center">E-3 G ([https://db.kcwiki.moe/drop/map/493/2/G-SAB.html PoiDB])</div> | + | <div id="E-3 G Easy" style="width:100%;text-align:center">E-3 Easy G ([https://db.kcwiki.moe/drop/map/493/2/G-SAB.html PoiDB])</div> |
{|class="wikitable" style="width:100%" | {|class="wikitable" style="width:100%" | ||
!style="width:1px"|# | !style="width:1px"|# | ||
| Line 1,081: | Line 1,081: | ||
!style="width:1px"|AD/AP<br>AS/AS+ | !style="width:1px"|AD/AP<br>AS/AS+ | ||
|} | |} | ||
| − | <div id="E-3 H Easy" style="width:100%;text-align:center">E-3 H ([https://db.kcwiki.moe/drop/map/493/2/H-SAB.html PoiDB])</div> | + | <div id="E-3 H Easy" style="width:100%;text-align:center">E-3 Easy H ([https://db.kcwiki.moe/drop/map/493/2/H-SAB.html PoiDB])</div> |
{|class="wikitable" style="width:100%" | {|class="wikitable" style="width:100%" | ||
!style="width:1px"|# | !style="width:1px"|# | ||
| Line 1,114: | Line 1,114: | ||
!style="width:1px"|AD/AP<br>AS/AS+ | !style="width:1px"|AD/AP<br>AS/AS+ | ||
|} | |} | ||
| − | <div id="E-3 I Easy" style="width:100%;text-align:center">E-3 I ([https://db.kcwiki.moe/drop/map/493/2/I-SAB.html PoiDB])</div> | + | <div id="E-3 I Easy" style="width:100%;text-align:center">E-3 Easy I ([https://db.kcwiki.moe/drop/map/493/2/I-SAB.html PoiDB])</div> |
{|class="wikitable" style="width:100%" | {|class="wikitable" style="width:100%" | ||
!style="width:1px"|# | !style="width:1px"|# | ||
| Line 1,131: | Line 1,131: | ||
!style="width:1px"|AD/AP<br>AS/AS+ | !style="width:1px"|AD/AP<br>AS/AS+ | ||
|} | |} | ||
| − | <div id="E-3 J Easy" style="width:100%;text-align:center">E-3 J ([https://db.kcwiki.moe/drop/map/493/2/J-SAB.html PoiDB])</div> | + | <div id="E-3 J Easy" style="width:100%;text-align:center">E-3 Easy J ([https://db.kcwiki.moe/drop/map/493/2/J-SAB.html PoiDB])</div> |
{|class="wikitable" style="width:100%" | {|class="wikitable" style="width:100%" | ||
!style="width:1px"|# | !style="width:1px"|# | ||
| Line 1,148: | Line 1,148: | ||
!style="width:1px"|AD/AP<br>AS/AS+ | !style="width:1px"|AD/AP<br>AS/AS+ | ||
|} | |} | ||
| − | <div id="E-3 K Easy" style="width:100%;text-align:center">E-3 K ([https://db.kcwiki.moe/drop/map/493/2/K-SAB.html PoiDB])</div> | + | <div id="E-3 K Easy" style="width:100%;text-align:center">E-3 Easy K ([https://db.kcwiki.moe/drop/map/493/2/K-SAB.html PoiDB])</div> |
{|class="wikitable" style="width:100%" | {|class="wikitable" style="width:100%" | ||
!style="width:1px"|# | !style="width:1px"|# | ||
| Line 1,169: | Line 1,169: | ||
!style="width:1px"|AD/AP<br>AS/AS+ | !style="width:1px"|AD/AP<br>AS/AS+ | ||
|} | |} | ||
| − | <div id="E-3 L Easy" style="width:100%;text-align:center">E-3 L</div> | + | <div id="E-3 L Easy" style="width:100%;text-align:center">E-3 Easy L</div> |
{|class="wikitable" style="width:100%" | {|class="wikitable" style="width:100%" | ||
!style="width:1px"|# | !style="width:1px"|# | ||
| Line 1,180: | Line 1,180: | ||
!colspan="3"|Selection Node | !colspan="3"|Selection Node | ||
|} | |} | ||
| − | <div id="E-3 M Easy" style="width:100%;text-align:center">E-3 M</div> | + | <div id="E-3 M Easy" style="width:100%;text-align:center">E-3 Easy M</div> |
{|class="wikitable" style="width:100%" | {|class="wikitable" style="width:100%" | ||
!style="width:1px"|# | !style="width:1px"|# | ||
| Line 1,188: | Line 1,188: | ||
!colspan="3"|Landing Node | !colspan="3"|Landing Node | ||
|} | |} | ||
| − | <div id="E-3 O Easy" style="width:100%;text-align:center">E-3 O</div> | + | <div id="E-3 O Easy" style="width:100%;text-align:center">E-3 Easy O</div> |
{|class="wikitable" style="width:100%" | {|class="wikitable" style="width:100%" | ||
!style="width:1px"|# | !style="width:1px"|# | ||
| Line 1,199: | Line 1,199: | ||
!colspan="3"|Empty Node | !colspan="3"|Empty Node | ||
|} | |} | ||
| − | <div id="E-3 P Easy" style="width:100%;text-align:center">E-3 P ([https://db.kcwiki.moe/drop/map/493/2/P-SAB.html PoiDB])</div> | + | <div id="E-3 P Easy" style="width:100%;text-align:center">E-3 Easy P ([https://db.kcwiki.moe/drop/map/493/2/P-SAB.html PoiDB])</div> |
{|class="wikitable" style="width:100%" | {|class="wikitable" style="width:100%" | ||
!style="width:1px"|# | !style="width:1px"|# | ||
| Line 1,232: | Line 1,232: | ||
!style="width:1px"|AD/AP<br>AS/AS+ | !style="width:1px"|AD/AP<br>AS/AS+ | ||
|} | |} | ||
| − | <div id="E-3 Q Easy" style="width:100%;text-align:center">E-3 Q ([https://db.kcwiki.moe/drop/map/493/2/Q-SAB.html PoiDB])</div> | + | <div id="E-3 Q Easy" style="width:100%;text-align:center">E-3 Easy Q ([https://db.kcwiki.moe/drop/map/493/2/Q-SAB.html PoiDB])</div> |
{|class="wikitable" style="width:100%" | {|class="wikitable" style="width:100%" | ||
!style="width:1px"|# | !style="width:1px"|# | ||
| Line 1,249: | Line 1,249: | ||
!style="width:1px"|AD/AP<br>AS/AS+ | !style="width:1px"|AD/AP<br>AS/AS+ | ||
|} | |} | ||
| − | <div id="E-3 R Easy" style="width:100%;text-align:center">E-3 R ([https://db.kcwiki.moe/drop/map/493/2/R-SAB.html PoiDB])</div> | + | <div id="E-3 R Easy" style="width:100%;text-align:center">E-3 Easy R ([https://db.kcwiki.moe/drop/map/493/2/R-SAB.html PoiDB])</div> |
{|class="wikitable" style="width:100%" | {|class="wikitable" style="width:100%" | ||
!style="width:1px"|# | !style="width:1px"|# | ||
| Line 1,274: | Line 1,274: | ||
!style="width:1px"|AD/AP<br>AS/AS+ | !style="width:1px"|AD/AP<br>AS/AS+ | ||
|} | |} | ||
| − | <div id="E-3 S Easy" style="width:100%;text-align:center">E-3 S</div> | + | <div id="E-3 S Easy" style="width:100%;text-align:center">E-3 Easy S</div> |
{|class="wikitable" style="width:100%" | {|class="wikitable" style="width:100%" | ||
!style="width:1px"|# | !style="width:1px"|# | ||
| Line 1,285: | Line 1,285: | ||
!colspan="3"|Empty Node | !colspan="3"|Empty Node | ||
|} | |} | ||
| − | <div id="E-3 T Easy" style="width:100%;text-align:center">E-3 T ([https://db.kcwiki.moe/drop/map/493/2/T-SAB.html PoiDB])</div> | + | <div id="E-3 T Easy" style="width:100%;text-align:center">E-3 Easy T ([https://db.kcwiki.moe/drop/map/493/2/T-SAB.html PoiDB])</div> |
{|class="wikitable" style="width:100%" | {|class="wikitable" style="width:100%" | ||
!style="width:1px"|# | !style="width:1px"|# | ||
| Line 1,302: | Line 1,302: | ||
!style="width:1px"|AD/AP<br>AS/AS+ | !style="width:1px"|AD/AP<br>AS/AS+ | ||
|} | |} | ||
| − | <div id="E-3 U Easy" style="width:100%;text-align:center">E-3 U</div> | + | <div id="E-3 U Easy" style="width:100%;text-align:center">E-3 Easy U</div> |
{|class="wikitable" style="width:100%" | {|class="wikitable" style="width:100%" | ||
!style="width:1px"|# | !style="width:1px"|# | ||
| Line 1,310: | Line 1,310: | ||
!colspan="3"|Landing Node | !colspan="3"|Landing Node | ||
|} | |} | ||
| − | <div id="E-3 W Easy" style="width:100%;text-align:center">E-3 W</div> | + | <div id="E-3 W Easy" style="width:100%;text-align:center">E-3 Easy W</div> |
{|class="wikitable" style="width:100%" | {|class="wikitable" style="width:100%" | ||
!style="width:1px"|# | !style="width:1px"|# | ||
| Line 1,321: | Line 1,321: | ||
!colspan="3"|Empty Node | !colspan="3"|Empty Node | ||
|} | |} | ||
| − | <div id="E-3 X Easy" style="width:100%;text-align:center">E-3 X ([https://db.kcwiki.moe/drop/map/493/2/X-SAB.html PoiDB])</div> | + | <div id="E-3 X Easy" style="width:100%;text-align:center">E-3 Easy X ([https://db.kcwiki.moe/drop/map/493/2/X-SAB.html PoiDB])</div> |
{|class="wikitable" style="width:100%" | {|class="wikitable" style="width:100%" | ||
!style="width:1px"|# | !style="width:1px"|# | ||
| Line 1,338: | Line 1,338: | ||
!style="width:1px"|AD/AP<br>AS/AS+ | !style="width:1px"|AD/AP<br>AS/AS+ | ||
|} | |} | ||
| − | <div id="E-3 Y Easy" style="width:100%;text-align:center">E-3 Y</div> | + | <div id="E-3 Y Easy" style="width:100%;text-align:center">E-3 Easy Y</div> |
{|class="wikitable" style="width:100%" | {|class="wikitable" style="width:100%" | ||
!style="width:1px"|# | !style="width:1px"|# | ||
| Line 1,349: | Line 1,349: | ||
!colspan="3"|Empty Node | !colspan="3"|Empty Node | ||
|} | |} | ||
| − | <div id="E-3 Z Easy" style="width:100%;text-align:center">E-3 Z ([https://db.kcwiki.moe/drop/map/493/2/Z-SAB.html PoiDB])</div> | + | <div id="E-3 Z Easy" style="width:100%;text-align:center">E-3 Easy Z ([https://db.kcwiki.moe/drop/map/493/2/Z-SAB.html PoiDB])</div> |
{|class="wikitable" style="width:100%" | {|class="wikitable" style="width:100%" | ||
!style="width:1px"|# | !style="width:1px"|# | ||
| Line 1,373: | Line 1,373: | ||
|-|Casual= | |-|Casual= | ||
{{Map/Image|page=Fall 2020 Event/E-3| | {{Map/Image|page=Fall 2020 Event/E-3| | ||
| − | {{Map/ImageNode|1|Casual|x=84|y=197}} | + | {{Map/ImageNode|1|Casual|E-3|x=84|y=197}} |
| − | {{Map/ImageNode|2|Casual|x=222|y=277}} | + | {{Map/ImageNode|2|Casual|E-3|x=222|y=277}} |
| − | {{Map/ImageNode|AB|Casual|x=218|y=319}} | + | {{Map/ImageNode|AB|Casual|E-3|x=218|y=319}} |
| − | {{Map/ImageNode|A|Casual|x=83|y=146}} | + | {{Map/ImageNode|A|Casual|E-3|x=83|y=146}} |
| − | {{Map/ImageNode|B|Casual|x=143|y=253}} | + | {{Map/ImageNode|B|Casual|E-3|x=143|y=253}} |
| − | {{Map/ImageNode|C|Casual|x=172|y=112}} | + | {{Map/ImageNode|C|Casual|E-3|x=172|y=112}} |
| − | {{Map/ImageNode|D|Casual|x=228|y=205}} | + | {{Map/ImageNode|D|Casual|E-3|x=228|y=205}} |
| − | {{Map/ImageNode|E|Casual|x=261|y=77}} | + | {{Map/ImageNode|E|Casual|E-3|x=261|y=77}} |
| − | {{Map/ImageNode|F|Casual|x=298|y=166}} | + | {{Map/ImageNode|F|Casual|E-3|x=298|y=166}} |
| − | {{Map/ImageNode|G|Casual|x=361|y=155}} | + | {{Map/ImageNode|G|Casual|E-3|x=361|y=155}} |
| − | {{Map/ImageNode|H|Casual|x=386|y=96}} | + | {{Map/ImageNode|H|Casual|E-3|x=386|y=96}} |
| − | {{Map/ImageNode|I|Casual|x=425|y=133}} | + | {{Map/ImageNode|I|Casual|E-3|x=425|y=133}} |
| − | {{Map/ImageNode|J|Casual|x=463|y=74}} | + | {{Map/ImageNode|J|Casual|E-3|x=463|y=74}} |
| − | {{Map/ImageNode|K|Casual|x=566|y=106}} | + | {{Map/ImageNode|K|Casual|E-3|x=566|y=106}} |
| − | {{Map/ImageNode|L|Casual|x=594|y=179}} | + | {{Map/ImageNode|L|Casual|E-3|x=594|y=179}} |
| − | {{Map/ImageNode|M|Casual|x=538|y=235}} | + | {{Map/ImageNode|M|Casual|E-3|x=538|y=235}} |
| − | {{Map/ImageNode|N|Casual|x=512|y=218}} | + | {{Map/ImageNode|N|Casual|E-3|x=512|y=218}} |
| − | {{Map/ImageNode|O|Casual|x=551|y=179}} | + | {{Map/ImageNode|O|Casual|E-3|x=551|y=179}} |
| − | {{Map/ImageNode|P|Casual|x=583|y=250}} | + | {{Map/ImageNode|P|Casual|E-3|x=583|y=250}} |
| − | {{Map/ImageNode|Q|Casual|x=515|y=172}} | + | {{Map/ImageNode|Q|Casual|E-3|x=515|y=172}} |
| − | {{Map/ImageNode|R|Casual|x=307|y=216}} | + | {{Map/ImageNode|R|Casual|E-3|x=307|y=216}} |
| − | {{Map/ImageNode|S|Casual|x=409|y=173}} | + | {{Map/ImageNode|S|Casual|E-3|x=409|y=173}} |
| − | {{Map/ImageNode|T|Casual|x=459|y=152}} | + | {{Map/ImageNode|T|Casual|E-3|x=459|y=152}} |
| − | {{Map/ImageNode|U|Casual|x=534|y=321}} | + | {{Map/ImageNode|U|Casual|E-3|x=534|y=321}} |
| − | {{Map/ImageNode|V|Casual|x=541|y=296}} | + | {{Map/ImageNode|V|Casual|E-3|x=541|y=296}} |
| − | {{Map/ImageNode|W|Casual|x=574|y=301}} | + | {{Map/ImageNode|W|Casual|E-3|x=574|y=301}} |
| − | {{Map/ImageNode|X|Casual|x=511|y=291}} | + | {{Map/ImageNode|X|Casual|E-3|x=511|y=291}} |
| − | {{Map/ImageNode|Y|Casual|x=544|y=142}} | + | {{Map/ImageNode|Y|Casual|E-3|x=544|y=142}} |
| − | {{Map/ImageNode|Z|Casual|x=496|y=111}} | + | {{Map/ImageNode|Z|Casual|E-3|x=496|y=111}} |
}} | }} | ||
<div class="map-nodes"> | <div class="map-nodes"> | ||
| − | <div id="E-3 AB Casual" style="width:100%;text-align:center">E-3 AB</div> | + | <div id="E-3 AB Casual" style="width:100%;text-align:center">E-3 Casual AB</div> |
{|class="wikitable" style="width:100%" | {|class="wikitable" style="width:100%" | ||
!style="width:1px"|# | !style="width:1px"|# | ||
| Line 1,429: | Line 1,429: | ||
!style="width:1px"|AD/AP<br>AS/AS+ | !style="width:1px"|AD/AP<br>AS/AS+ | ||
|} | |} | ||
| − | <div id="E-3 A Casual" style="width:100%;text-align:center">E-3 A</div> | + | <div id="E-3 A Casual" style="width:100%;text-align:center">E-3 Casual A</div> |
{|class="wikitable" style="width:100%" | {|class="wikitable" style="width:100%" | ||
!style="width:1px"|# | !style="width:1px"|# | ||
| Line 1,440: | Line 1,440: | ||
!colspan="3"|Empty Node | !colspan="3"|Empty Node | ||
|} | |} | ||
| − | <div id="E-3 B Casual" style="width:100%;text-align:center">E-3 B</div> | + | <div id="E-3 B Casual" style="width:100%;text-align:center">E-3 Casual B</div> |
{|class="wikitable" style="width:100%" | {|class="wikitable" style="width:100%" | ||
!style="width:1px"|# | !style="width:1px"|# | ||
| Line 1,451: | Line 1,451: | ||
!colspan="3"|Empty Node | !colspan="3"|Empty Node | ||
|} | |} | ||
| − | <div id="E-3 C Casual" style="width:100%;text-align:center">E-3 C ([https://db.kcwiki.moe/drop/map/493/1/C-SAB.html PoiDB])</div> | + | <div id="E-3 C Casual" style="width:100%;text-align:center">E-3 Casual C ([https://db.kcwiki.moe/drop/map/493/1/C-SAB.html PoiDB])</div> |
{|class="wikitable" style="width:100%" | {|class="wikitable" style="width:100%" | ||
!style="width:1px"|# | !style="width:1px"|# | ||
| Line 1,472: | Line 1,472: | ||
!style="width:1px"|AD/AP<br>AS/AS+ | !style="width:1px"|AD/AP<br>AS/AS+ | ||
|} | |} | ||
| − | <div id="E-3 D Casual" style="width:100%;text-align:center">E-3 D ([https://db.kcwiki.moe/drop/map/493/1/D-SAB.html PoiDB])</div> | + | <div id="E-3 D Casual" style="width:100%;text-align:center">E-3 Casual D ([https://db.kcwiki.moe/drop/map/493/1/D-SAB.html PoiDB])</div> |
{|class="wikitable" style="width:100%" | {|class="wikitable" style="width:100%" | ||
!style="width:1px"|# | !style="width:1px"|# | ||
| Line 1,489: | Line 1,489: | ||
!style="width:1px"|AD/AP<br>AS/AS+ | !style="width:1px"|AD/AP<br>AS/AS+ | ||
|} | |} | ||
| − | <div id="E-3 E Casual" style="width:100%;text-align:center">E-3 E</div> | + | <div id="E-3 E Casual" style="width:100%;text-align:center">E-3 Casual E</div> |
{|class="wikitable" style="width:100%" | {|class="wikitable" style="width:100%" | ||
!style="width:1px"|# | !style="width:1px"|# | ||
| Line 1,500: | Line 1,500: | ||
!colspan="3"|Empty Node | !colspan="3"|Empty Node | ||
|} | |} | ||
| − | <div id="E-3 F Casual" style="width:100%;text-align:center">E-3 F ([https://db.kcwiki.moe/drop/map/493/1/F-SAB.html PoiDB])</div> | + | <div id="E-3 F Casual" style="width:100%;text-align:center">E-3 Casual F ([https://db.kcwiki.moe/drop/map/493/1/F-SAB.html PoiDB])</div> |
{|class="wikitable" style="width:100%" | {|class="wikitable" style="width:100%" | ||
!style="width:1px"|# | !style="width:1px"|# | ||
| Line 1,525: | Line 1,525: | ||
!style="width:1px"|AD/AP<br>AS/AS+ | !style="width:1px"|AD/AP<br>AS/AS+ | ||
|} | |} | ||
| − | <div id="E-3 G Casual" style="width:100%;text-align:center">E-3 G ([https://db.kcwiki.moe/drop/map/493/1/G-SAB.html PoiDB])</div> | + | <div id="E-3 G Casual" style="width:100%;text-align:center">E-3 Casual G ([https://db.kcwiki.moe/drop/map/493/1/G-SAB.html PoiDB])</div> |
{|class="wikitable" style="width:100%" | {|class="wikitable" style="width:100%" | ||
!style="width:1px"|# | !style="width:1px"|# | ||
| Line 1,550: | Line 1,550: | ||
!style="width:1px"|AD/AP<br>AS/AS+ | !style="width:1px"|AD/AP<br>AS/AS+ | ||
|} | |} | ||
| − | <div id="E-3 H Casual" style="width:100%;text-align:center">E-3 H ([https://db.kcwiki.moe/drop/map/493/1/H-SAB.html PoiDB])</div> | + | <div id="E-3 H Casual" style="width:100%;text-align:center">E-3 Casual H ([https://db.kcwiki.moe/drop/map/493/1/H-SAB.html PoiDB])</div> |
{|class="wikitable" style="width:100%" | {|class="wikitable" style="width:100%" | ||
!style="width:1px"|# | !style="width:1px"|# | ||
| Line 1,575: | Line 1,575: | ||
!style="width:1px"|AD/AP<br>AS/AS+ | !style="width:1px"|AD/AP<br>AS/AS+ | ||
|} | |} | ||
| − | <div id="E-3 I Casual" style="width:100%;text-align:center">E-3 I ([https://db.kcwiki.moe/drop/map/493/1/I-SAB.html PoiDB])</div> | + | <div id="E-3 I Casual" style="width:100%;text-align:center">E-3 Casual I ([https://db.kcwiki.moe/drop/map/493/1/I-SAB.html PoiDB])</div> |
{|class="wikitable" style="width:100%" | {|class="wikitable" style="width:100%" | ||
!style="width:1px"|# | !style="width:1px"|# | ||
| Line 1,587: | Line 1,587: | ||
!style="width:1px"|AD/AP<br>AS/AS+ | !style="width:1px"|AD/AP<br>AS/AS+ | ||
|} | |} | ||
| − | <div id="E-3 J Casual" style="width:100%;text-align:center">E-3 J ([https://db.kcwiki.moe/drop/map/493/1/J-SAB.html PoiDB])</div> | + | <div id="E-3 J Casual" style="width:100%;text-align:center">E-3 Casual J ([https://db.kcwiki.moe/drop/map/493/1/J-SAB.html PoiDB])</div> |
{|class="wikitable" style="width:100%" | {|class="wikitable" style="width:100%" | ||
!style="width:1px"|# | !style="width:1px"|# | ||
| Line 1,604: | Line 1,604: | ||
!style="width:1px"|AD/AP<br>AS/AS+ | !style="width:1px"|AD/AP<br>AS/AS+ | ||
|} | |} | ||
| − | <div id="E-3 K Casual" style="width:100%;text-align:center">E-3 K ([https://db.kcwiki.moe/drop/map/493/1/K-SAB.html PoiDB])</div> | + | <div id="E-3 K Casual" style="width:100%;text-align:center">E-3 Casual K ([https://db.kcwiki.moe/drop/map/493/1/K-SAB.html PoiDB])</div> |
{|class="wikitable" style="width:100%" | {|class="wikitable" style="width:100%" | ||
!style="width:1px"|# | !style="width:1px"|# | ||
| Line 1,625: | Line 1,625: | ||
!style="width:1px"|AD/AP<br>AS/AS+ | !style="width:1px"|AD/AP<br>AS/AS+ | ||
|} | |} | ||
| − | <div id="E-3 L Casual" style="width:100%;text-align:center">E-3 L</div> | + | <div id="E-3 L Casual" style="width:100%;text-align:center">E-3 Casual L</div> |
{|class="wikitable" style="width:100%" | {|class="wikitable" style="width:100%" | ||
!style="width:1px"|# | !style="width:1px"|# | ||
| Line 1,636: | Line 1,636: | ||
!colspan="3"|Selection Node | !colspan="3"|Selection Node | ||
|} | |} | ||
| − | <div id="E-3 M Casual" style="width:100%;text-align:center">E-3 M</div> | + | <div id="E-3 M Casual" style="width:100%;text-align:center">E-3 Casual M</div> |
{|class="wikitable" style="width:100%" | {|class="wikitable" style="width:100%" | ||
!style="width:1px"|# | !style="width:1px"|# | ||
| Line 1,644: | Line 1,644: | ||
!colspan="3"|Landing Node | !colspan="3"|Landing Node | ||
|} | |} | ||
| − | <div id="E-3 O Casual" style="width:100%;text-align:center">E-3 O</div> | + | <div id="E-3 O Casual" style="width:100%;text-align:center">E-3 Casual O</div> |
{|class="wikitable" style="width:100%" | {|class="wikitable" style="width:100%" | ||
!style="width:1px"|# | !style="width:1px"|# | ||
| Line 1,655: | Line 1,655: | ||
!colspan="3"|Empty Node | !colspan="3"|Empty Node | ||
|} | |} | ||
| − | <div id="E-3 P Casual" style="width:100%;text-align:center">E-3 P ([https://db.kcwiki.moe/drop/map/493/1/P-SAB.html PoiDB])</div> | + | <div id="E-3 P Casual" style="width:100%;text-align:center">E-3 Casual P ([https://db.kcwiki.moe/drop/map/493/1/P-SAB.html PoiDB])</div> |
{|class="wikitable" style="width:100%" | {|class="wikitable" style="width:100%" | ||
!style="width:1px"|# | !style="width:1px"|# | ||
| Line 1,680: | Line 1,680: | ||
!style="width:1px"|AD/AP<br>AS/AS+ | !style="width:1px"|AD/AP<br>AS/AS+ | ||
|} | |} | ||
| − | <div id="E-3 Q Casual" style="width:100%;text-align:center">E-3 Q ([https://db.kcwiki.moe/drop/map/493/1/Q-SAB.html PoiDB])</div> | + | <div id="E-3 Q Casual" style="width:100%;text-align:center">E-3 Casual Q ([https://db.kcwiki.moe/drop/map/493/1/Q-SAB.html PoiDB])</div> |
{|class="wikitable" style="width:100%" | {|class="wikitable" style="width:100%" | ||
!style="width:1px"|# | !style="width:1px"|# | ||
| Line 1,697: | Line 1,697: | ||
!style="width:1px"|AD/AP<br>AS/AS+ | !style="width:1px"|AD/AP<br>AS/AS+ | ||
|} | |} | ||
| − | <div id="E-3 R Casual" style="width:100%;text-align:center">E-3 R ([https://db.kcwiki.moe/drop/map/493/1/R-SAB.html PoiDB])</div> | + | <div id="E-3 R Casual" style="width:100%;text-align:center">E-3 Casual R ([https://db.kcwiki.moe/drop/map/493/1/R-SAB.html PoiDB])</div> |
{|class="wikitable" style="width:100%" | {|class="wikitable" style="width:100%" | ||
!style="width:1px"|# | !style="width:1px"|# | ||
| Line 1,718: | Line 1,718: | ||
!style="width:1px"|AD/AP<br>AS/AS+ | !style="width:1px"|AD/AP<br>AS/AS+ | ||
|} | |} | ||
| − | <div id="E-3 S Casual" style="width:100%;text-align:center">E-3 S</div> | + | <div id="E-3 S Casual" style="width:100%;text-align:center">E-3 Casual S</div> |
{|class="wikitable" style="width:100%" | {|class="wikitable" style="width:100%" | ||
!style="width:1px"|# | !style="width:1px"|# | ||
| Line 1,729: | Line 1,729: | ||
!colspan="3"|Empty Node | !colspan="3"|Empty Node | ||
|} | |} | ||
| − | <div id="E-3 T Casual" style="width:100%;text-align:center">E-3 T ([https://db.kcwiki.moe/drop/map/493/1/T-SAB.html PoiDB])</div> | + | <div id="E-3 T Casual" style="width:100%;text-align:center">E-3 Casual T ([https://db.kcwiki.moe/drop/map/493/1/T-SAB.html PoiDB])</div> |
{|class="wikitable" style="width:100%" | {|class="wikitable" style="width:100%" | ||
!style="width:1px"|# | !style="width:1px"|# | ||
| Line 1,746: | Line 1,746: | ||
!style="width:1px"|AD/AP<br>AS/AS+ | !style="width:1px"|AD/AP<br>AS/AS+ | ||
|} | |} | ||
| − | <div id="E-3 U Casual" style="width:100%;text-align:center">E-3 U</div> | + | <div id="E-3 U Casual" style="width:100%;text-align:center">E-3 Casual U</div> |
{|class="wikitable" style="width:100%" | {|class="wikitable" style="width:100%" | ||
!style="width:1px"|# | !style="width:1px"|# | ||
| Line 1,754: | Line 1,754: | ||
!colspan="3"|Landing Node | !colspan="3"|Landing Node | ||
|} | |} | ||
| − | <div id="E-3 W Casual" style="width:100%;text-align:center">E-3 W</div> | + | <div id="E-3 W Casual" style="width:100%;text-align:center">E-3 Casual W</div> |
{|class="wikitable" style="width:100%" | {|class="wikitable" style="width:100%" | ||
!style="width:1px"|# | !style="width:1px"|# | ||
| Line 1,765: | Line 1,765: | ||
!colspan="3"|Empty Node | !colspan="3"|Empty Node | ||
|} | |} | ||
| − | <div id="E-3 X Casual" style="width:100%;text-align:center">E-3 X ([https://db.kcwiki.moe/drop/map/493/1/X-SAB.html PoiDB])</div> | + | <div id="E-3 X Casual" style="width:100%;text-align:center">E-3 Casual X ([https://db.kcwiki.moe/drop/map/493/1/X-SAB.html PoiDB])</div> |
{|class="wikitable" style="width:100%" | {|class="wikitable" style="width:100%" | ||
!style="width:1px"|# | !style="width:1px"|# | ||
| Line 1,782: | Line 1,782: | ||
!style="width:1px"|AD/AP<br>AS/AS+ | !style="width:1px"|AD/AP<br>AS/AS+ | ||
|} | |} | ||
| − | <div id="E-3 Y Casual" style="width:100%;text-align:center">E-3 Y</div> | + | <div id="E-3 Y Casual" style="width:100%;text-align:center">E-3 Casual Y</div> |
{|class="wikitable" style="width:100%" | {|class="wikitable" style="width:100%" | ||
!style="width:1px"|# | !style="width:1px"|# | ||
| Line 1,793: | Line 1,793: | ||
!colspan="3"|Empty Node | !colspan="3"|Empty Node | ||
|} | |} | ||
| − | <div id="E-3 Z Casual" style="width:100%;text-align:center">E-3 Z ([https://db.kcwiki.moe/drop/map/493/1/Z-SAB.html PoiDB])</div> | + | <div id="E-3 Z Casual" style="width:100%;text-align:center">E-3 Casual Z ([https://db.kcwiki.moe/drop/map/493/1/Z-SAB.html PoiDB])</div> |
{|class="wikitable" style="width:100%" | {|class="wikitable" style="width:100%" | ||
!style="width:1px"|# | !style="width:1px"|# | ||
Revision as of 01:58, 29 November 2020
E-3 Hard AB
| # | Formation | Air Raids | AD/AP AS/AS+ |
|---|---|---|---|
| AB | Diamond | 33/65 144/288 | |
| Diamond | 39/78 174/348 | ||
| Diamond | 44/87 195/390 | ||
| Diamond | 49/97 216/432 | ||
| # | Formation | Air Raids | AD/AP AS/AS+ |
E-3 Hard A
| # | Empty Node | ||
|---|---|---|---|
| A | 気のせいだった。 Must be my imagination. | ||
| # | Empty Node | ||
E-3 Hard B
| # | Empty Node | ||
|---|---|---|---|
| B | 気のせいだった。 Must be my imagination. | ||
| # | Empty Node | ||
E-3 Hard C (PoiDB)
| # | Formation | Normal Battle Node | AD/AP AS/AS+ |
|---|---|---|---|
| C | Echelon Line Abreast |
0/0 0/0 | |
| Echelon Line Abreast |
0/0 0/0 | ||
| # | Formation | Normal Battle Node | AD/AP AS/AS+ |
E-3 Hard D (PoiDB)
| # | Formation | Normal Battle Node | AD/AP AS/AS+ |
|---|---|---|---|
| D | Echelon Line Abreast |
0/0 0/0 | |
| Echelon Line Abreast |
0/0 0/0 | ||
| Echelon Line Abreast |
0/0 0/0 | ||
| # | Formation | Normal Battle Node | AD/AP AS/AS+ |
E-3 Hard E
| # | Empty Node | ||
|---|---|---|---|
| E | 気のせいだった。 Must be my imagination. | ||
| # | Empty Node | ||
E-3 Hard F (PoiDB)
| # | Formation | Air Defense Node | AD/AP AS/AS+ |
|---|---|---|---|
| F | Diamond | 33/65 144/288 | |
| Diamond | 39/78 174/348 | ||
| Diamond | 44/87 195/390 | ||
| Diamond | 49/97 216/432 | ||
| # | Formation | Air Defense Node | AD/AP AS/AS+ |
E-3 Hard G (PoiDB)
| # | Formation | Air Defense Node | AD/AP AS/AS+ |
|---|---|---|---|
| G | Diamond | 33/65 144/288 | |
| Diamond | 39/78 174/348 | ||
| Diamond | 44/87 195/390 | ||
| Diamond | 49/97 216/432 | ||
| # | Formation | Air Defense Node | AD/AP AS/AS+ |
E-3 Hard H (PoiDB)
| # | Formation | Air Defense Node | AD/AP AS/AS+ |
|---|---|---|---|
| H | Diamond | 33/65 144/288 | |
| Diamond | 39/78 174/348 | ||
| Diamond | 44/87 195/390 | ||
| Diamond | 49/97 216/432 | ||
| # | Formation | Air Defense Node | AD/AP AS/AS+ |
E-3 Hard I (PoiDB)
| # | Formation | Normal Battle Node | AD/AP AS/AS+ |
|---|---|---|---|
| I | Line Ahead | 0/0 0/0 | |
| # | Formation | Normal Battle Node | AD/AP AS/AS+ |
E-3 Hard J (PoiDB)
| # | Formation | Normal Battle Node | AD/AP AS/AS+ |
|---|---|---|---|
| J | Line Ahead Double Line Vanguard |
0/0 0/0 | |
| # | Formation | Normal Battle Node | AD/AP AS/AS+ |
E-3 Hard K (PoiDB)
| # | Formation | Normal Battle Node | AD/AP AS/AS+ |
|---|---|---|---|
| K | Line Ahead Double Line |
0/0 0/0 | |
| Line Ahead | 0/0 0/0 | ||
| # | Formation | Normal Battle Node | AD/AP AS/AS+ |
E-3 Hard L
| # | Selection Node | ||
|---|---|---|---|
| L | 艦隊の針路を選択できます。提督、どちらの針路をとられますか? You can decide the fleet's course. Admiral, which heading should we take? | ||
| # | Selection Node | ||
E-3 Hard M
| # | Landing Node | ||
|---|---|---|---|
| # | Landing Node | ||
E-3 Hard O
| # | Empty Node | ||
|---|---|---|---|
| O | 敵影を見ず。 No enemy spotted. | ||
| # | Empty Node | ||
E-3 Hard P (PoiDB)
| # | Formation | Air Defense Node | AD/AP AS/AS+ |
|---|---|---|---|
| P | Diamond | 33/65 144/288 | |
| Diamond | 39/78 174/348 | ||
| Diamond | 44/87 195/390 | ||
| Diamond | 49/97 216/432 | ||
| # | Formation | Air Defense Node | AD/AP AS/AS+ |
E-3 Hard Q (PoiDB)
| # | Formation | Boss Battle Node | AD/AP AS/AS+ |
|---|---|---|---|
| Q | Cruising Formation 4 (Final)
|
0/0 0/0 | |
| # | Formation | Boss Battle Node | AD/AP AS/AS+ |
E-3 Hard R (PoiDB)
| # | Formation | Normal Battle Node | AD/AP AS/AS+ |
|---|---|---|---|
| R | Echelon Line Abreast |
0/0 0/0 | |
| Echelon Line Abreast |
0/0 0/0 | ||
| Echelon Line Abreast |
0/0 0/0 | ||
| # | Formation | Normal Battle Node | AD/AP AS/AS+ |
E-3 Hard S
| # | Empty Node | ||
|---|---|---|---|
| S | 気のせいだった。 Must be my imagination. | ||
| # | Empty Node | ||
E-3 Hard T (PoiDB)
| # | Formation | Normal Battle Node | AD/AP AS/AS+ |
|---|---|---|---|
| T | Line Ahead Double Line Vanguard |
0/0 0/0 | |
| # | Formation | Normal Battle Node | AD/AP AS/AS+ |
E-3 Hard U
| # | Landing Node | ||
|---|---|---|---|
| # | Landing Node | ||
E-3 Hard W
| # | Empty Node | ||
|---|---|---|---|
| W | 気のせいだった。 Must be my imagination. | ||
| # | Empty Node | ||
E-3 Hard X (PoiDB)
| # | Formation | Boss Battle Node | AD/AP AS/AS+ |
|---|---|---|---|
| X | Cruising Formation 4 (Final)
|
0/0 0/0 | |
| # | Formation | Boss Battle Node | AD/AP AS/AS+ |
E-3 Hard Y
| # | Empty Node | ||
|---|---|---|---|
| Y | 敵影を見ず。 No enemy spotted. | ||
| # | Empty Node | ||
E-3 Hard Z (PoiDB)
| # | Formation | Boss Battle Node | AD/AP AS/AS+ |
|---|---|---|---|
| Z | Cruising Formation 4 | ?/? ?/? | |
| Cruising Formation 4 (Final)
|
?/? ?/? | ||
| # | Formation | Boss Battle Node | AD/AP AS/AS+ |
E-3 Medium AB
| # | Formation | Air Raids | AD/AP AS/AS+ |
|---|---|---|---|
| AB | Diamond | 28/55 123/246 | |
| Diamond | 35/69 153/306 | ||
| Diamond | 39/78 174/348 | ||
| # | Formation | Air Raids | AD/AP AS/AS+ |
E-3 Medium A
| # | Empty Node | ||
|---|---|---|---|
| A | 気のせいだった。 Must be my imagination. | ||
| # | Empty Node | ||
E-3 Medium B
| # | Empty Node | ||
|---|---|---|---|
| B | 気のせいだった。 Must be my imagination. | ||
| # | Empty Node | ||
E-3 Medium C (PoiDB)
| # | Formation | Normal Battle Node | AD/AP AS/AS+ |
|---|---|---|---|
| C | Echelon Line Abreast |
0/0 0/0 | |
| Echelon | 0/0 0/0 | ||
| Line Abreast | 0/0 0/0 | ||
| Echelon Line Abreast |
0/0 0/0 | ||
| # | Formation | Normal Battle Node | AD/AP AS/AS+ |
E-3 Medium D (PoiDB)
| # | Formation | Normal Battle Node | AD/AP AS/AS+ |
|---|---|---|---|
| D | Line Abreast | 0/0 0/0 | |
| Echelon | 0/0 0/0 | ||
| # | Formation | Normal Battle Node | AD/AP AS/AS+ |
E-3 Medium E
| # | Empty Node | ||
|---|---|---|---|
| E | 気のせいだった。 Must be my imagination. | ||
| # | Empty Node | ||
E-3 Medium F (PoiDB)
| # | Formation | Air Defense Node | AD/AP AS/AS+ |
|---|---|---|---|
| # | Formation | Air Defense Node | AD/AP AS/AS+ |
E-3 Medium G (PoiDB)
| # | Formation | Air Defense Node | AD/AP AS/AS+ |
|---|---|---|---|
| # | Formation | Air Defense Node | AD/AP AS/AS+ |
E-3 Medium H (PoiDB)
| # | Formation | Air Defense Node | AD/AP AS/AS+ |
|---|---|---|---|
| H | Diamond | 28/55 123/246 | |
| Diamond | 33/65 144/288 | ||
| Diamond | 35/69 153/306 | ||
| Diamond | 39/78 174/348 | ||
| # | Formation | Air Defense Node | AD/AP AS/AS+ |
E-3 Medium I (PoiDB)
| # | Formation | Normal Battle Node | AD/AP AS/AS+ |
|---|---|---|---|
| # | Formation | Normal Battle Node | AD/AP AS/AS+ |
E-3 Medium J (PoiDB)
| # | Formation | Normal Battle Node | AD/AP AS/AS+ |
|---|---|---|---|
| J | Line Ahead Double Line Vanguard |
0/0 0/0 | |
| # | Formation | Normal Battle Node | AD/AP AS/AS+ |
E-3 Medium K (PoiDB)
| # | Formation | Normal Battle Node | AD/AP AS/AS+ |
|---|---|---|---|
| K | Line Ahead Double Line |
0/0 0/0 | |
| # | Formation | Normal Battle Node | AD/AP AS/AS+ |
E-3 Medium L
| # | Selection Node | ||
|---|---|---|---|
| L | 艦隊の針路を選択できます。提督、どちらの針路をとられますか? You can decide the fleet's course. Admiral, which heading should we take? | ||
| # | Selection Node | ||
E-3 Medium M
| # | Landing Node | ||
|---|---|---|---|
| # | Landing Node | ||
E-3 Medium O
| # | Empty Node | ||
|---|---|---|---|
| O | 敵影を見ず。 No enemy spotted. | ||
| # | Empty Node | ||
E-3 Medium P (PoiDB)
| # | Formation | Air Defense Node | AD/AP AS/AS+ |
|---|---|---|---|
| # | Formation | Air Defense Node | AD/AP AS/AS+ |
E-3 Medium Q (PoiDB)
| # | Formation | Boss Battle Node | AD/AP AS/AS+ |
|---|---|---|---|
| Q | Cruising Formation 4 (Final)
|
0/0 0/0 | |
| # | Formation | Boss Battle Node | AD/AP AS/AS+ |
E-3 Medium R (PoiDB)
| # | Formation | Normal Battle Node | AD/AP AS/AS+ |
|---|---|---|---|
| # | Formation | Normal Battle Node | AD/AP AS/AS+ |
E-3 Medium S
| # | Empty Node | ||
|---|---|---|---|
| S | 気のせいだった。 Must be my imagination. | ||
| # | Empty Node | ||
E-3 Medium T (PoiDB)
| # | Formation | Normal Battle Node | AD/AP AS/AS+ |
|---|---|---|---|
| # | Formation | Normal Battle Node | AD/AP AS/AS+ |
E-3 Medium U
| # | Landing Node | ||
|---|---|---|---|
| # | Landing Node | ||
E-3 Medium W
| # | Empty Node | ||
|---|---|---|---|
| W | 気のせいだった。 Must be my imagination. | ||
| # | Empty Node | ||
E-3 Medium X (PoiDB)
| # | Formation | Boss Battle Node | AD/AP AS/AS+ |
|---|---|---|---|
| # | Formation | Boss Battle Node | AD/AP AS/AS+ |
E-3 Medium Y
| # | Empty Node | ||
|---|---|---|---|
| Y | 敵影を見ず。 No enemy spotted. | ||
| # | Empty Node | ||
E-3 Medium Z (PoiDB)
| # | Formation | Boss Battle Node | AD/AP AS/AS+ |
|---|---|---|---|
| # | Formation | Boss Battle Node | AD/AP AS/AS+ |
E-3 Easy AB
| # | Formation | Air Raids | AD/AP AS/AS+ |
|---|---|---|---|
| AB | Diamond | 12/23 51/102 | |
| Diamond | 17/33 72/144 | ||
| Diamond | 23/46 102/204 | ||
| Diamond | 28/55 123/246 | ||
| Diamond | 35/69 153/306 | ||
| # | Formation | Air Raids | AD/AP AS/AS+ |
E-3 Easy A
| # | Empty Node | ||
|---|---|---|---|
| A | 気のせいだった。 Must be my imagination. | ||
| # | Empty Node | ||
E-3 Easy B
| # | Empty Node | ||
|---|---|---|---|
| B | 気のせいだった。 Must be my imagination. | ||
| # | Empty Node | ||
E-3 Easy C (PoiDB)
| # | Formation | Normal Battle Node | AD/AP AS/AS+ |
|---|---|---|---|
| C | Echelon Line Abreast |
0/0 0/0 | |
| Echelon Line Abreast |
0/0 0/0 | ||
| Echelon Line Abreast |
0/0 0/0 | ||
| Echelon Line Abreast |
0/0 0/0 | ||
| # | Formation | Normal Battle Node | AD/AP AS/AS+ |
E-3 Easy D (PoiDB)
| # | Formation | Normal Battle Node | AD/AP AS/AS+ |
|---|---|---|---|
| D | Echelon Line Abreast |
0/0 0/0 | |
| Echelon Line Abreast |
0/0 0/0 | ||
| Echelon Line Abreast |
0/0 0/0 | ||
| # | Formation | Normal Battle Node | AD/AP AS/AS+ |
E-3 Easy E
| # | Empty Node | ||
|---|---|---|---|
| E | 気のせいだった。 Must be my imagination. | ||
| # | Empty Node | ||
E-3 Easy F (PoiDB)
| # | Formation | Air Defense Node | AD/AP AS/AS+ |
|---|---|---|---|
| F | Diamond | 12/23 51/102 | |
| Diamond | 17/33 72/144 | ||
| Diamond | 23/46 102/204 | ||
| Diamond | 28/55 123/246 | ||
| # | Formation | Air Defense Node | AD/AP AS/AS+ |
E-3 Easy G (PoiDB)
| # | Formation | Air Defense Node | AD/AP AS/AS+ |
|---|---|---|---|
| G | Diamond | 17/33 72/144 | |
| Diamond | 23/46 102/204 | ||
| Diamond | 28/55 123/246 | ||
| Diamond | 35/69 153/306 | ||
| # | Formation | Air Defense Node | AD/AP AS/AS+ |
E-3 Easy H (PoiDB)
| # | Formation | Air Defense Node | AD/AP AS/AS+ |
|---|---|---|---|
| H | Diamond | 12/23 51/102 | |
| Diamond | 17/33 72/144 | ||
| Diamond | 23/46 102/204 | ||
| Diamond | 28/55 123/246 | ||
| Diamond | 35/69 153/306 | ||
| # | Formation | Air Defense Node | AD/AP AS/AS+ |
E-3 Easy I (PoiDB)
| # | Formation | Normal Battle Node | AD/AP AS/AS+ |
|---|---|---|---|
| I | Line Ahead | 0/0 0/0 | |
| # | Formation | Normal Battle Node | AD/AP AS/AS+ |
E-3 Easy J (PoiDB)
| # | Formation | Normal Battle Node | AD/AP AS/AS+ |
|---|---|---|---|
| J | Line Ahead Double Line Vanguard |
0/0 0/0 | |
| # | Formation | Normal Battle Node | AD/AP AS/AS+ |
E-3 Easy K (PoiDB)
| # | Formation | Normal Battle Node | AD/AP AS/AS+ |
|---|---|---|---|
| K | Line Ahead Double Line |
0/0 0/0 | |
| Line Ahead | 0/0 0/0 | ||
| # | Formation | Normal Battle Node | AD/AP AS/AS+ |
E-3 Easy L
| # | Selection Node | ||
|---|---|---|---|
| L | 艦隊の針路を選択できます。提督、どちらの針路をとられますか? You can decide the fleet's course. Admiral, which heading should we take? | ||
| # | Selection Node | ||
E-3 Easy M
| # | Landing Node | ||
|---|---|---|---|
| # | Landing Node | ||
E-3 Easy O
| # | Empty Node | ||
|---|---|---|---|
| O | 敵影を見ず。 No enemy spotted. | ||
| # | Empty Node | ||
E-3 Easy P (PoiDB)
| # | Formation | Air Defense Node | AD/AP AS/AS+ |
|---|---|---|---|
| P | Diamond | 12/23 51/102 | |
| Diamond | 17/33 72/144 | ||
| Diamond | 23/46 102/204 | ||
| Diamond | 28/55 123/246 | ||
| Diamond | 35/69 153/306 | ||
| # | Formation | Air Defense Node | AD/AP AS/AS+ |
E-3 Easy Q (PoiDB)
| # | Formation | Boss Battle Node | AD/AP AS/AS+ |
|---|---|---|---|
| Q | Cruising Formation 4 (Final)
|
0/0 0/0 | |
| # | Formation | Boss Battle Node | AD/AP AS/AS+ |
E-3 Easy R (PoiDB)
| # | Formation | Normal Battle Node | AD/AP AS/AS+ |
|---|---|---|---|
| R | Echelon Line Abreast |
0/0 0/0 | |
| Echelon Line Abreast |
0/0 0/0 | ||
| Echelon Line Abreast |
0/0 0/0 | ||
| # | Formation | Normal Battle Node | AD/AP AS/AS+ |
E-3 Easy S
| # | Empty Node | ||
|---|---|---|---|
| S | 気のせいだった。 Must be my imagination. | ||
| # | Empty Node | ||
E-3 Easy T (PoiDB)
| # | Formation | Normal Battle Node | AD/AP AS/AS+ |
|---|---|---|---|
| T | Line Ahead Double Line Vanguard |
0/0 0/0 | |
| # | Formation | Normal Battle Node | AD/AP AS/AS+ |
E-3 Easy U
| # | Landing Node | ||
|---|---|---|---|
| # | Landing Node | ||
E-3 Easy W
| # | Empty Node | ||
|---|---|---|---|
| W | 気のせいだった。 Must be my imagination. | ||
| # | Empty Node | ||
E-3 Easy X (PoiDB)
| # | Formation | Boss Battle Node | AD/AP AS/AS+ |
|---|---|---|---|
| X | Cruising Formation 4 (Final)
|
0/0 0/0 | |
| # | Formation | Boss Battle Node | AD/AP AS/AS+ |
E-3 Easy Y
| # | Empty Node | ||
|---|---|---|---|
| Y | 敵影を見ず。 No enemy spotted. | ||
| # | Empty Node | ||
E-3 Easy Z (PoiDB)
| # | Formation | Boss Battle Node | AD/AP AS/AS+ |
|---|---|---|---|
| Z | Cruising Formation 4 | ?/? ?/? | |
| Cruising Formation 4 (Final)
|
?/? ?/? | ||
| # | Formation | Boss Battle Node | AD/AP AS/AS+ |
E-3 Casual AB
| # | Formation | Air Raids | AD/AP AS/AS+ |
|---|---|---|---|
| AB | Diamond | 12/23 51/102 | |
| Diamond | 17/33 72/144 | ||
| Diamond | 23/46 102/204 | ||
| # | Formation | Air Raids | AD/AP AS/AS+ |
E-3 Casual A
| # | Empty Node | ||
|---|---|---|---|
| A | 気のせいだった。 Must be my imagination. | ||
| # | Empty Node | ||
E-3 Casual B
| # | Empty Node | ||
|---|---|---|---|
| B | 気のせいだった。 Must be my imagination. | ||
| # | Empty Node | ||
E-3 Casual C (PoiDB)
| # | Formation | Normal Battle Node | AD/AP AS/AS+ |
|---|---|---|---|
| C | Echelon Line Abreast |
0/0 0/0 | |
| Echelon Line Abreast |
0/0 0/0 | ||
| # | Formation | Normal Battle Node | AD/AP AS/AS+ |
E-3 Casual D (PoiDB)
| # | Formation | Normal Battle Node | AD/AP AS/AS+ |
|---|---|---|---|
| D | Echelon Line Abreast |
0/0 0/0 | |
| # | Formation | Normal Battle Node | AD/AP AS/AS+ |
E-3 Casual E
| # | Empty Node | ||
|---|---|---|---|
| E | 気のせいだった。 Must be my imagination. | ||
| # | Empty Node | ||
E-3 Casual F (PoiDB)
| # | Formation | Air Defense Node | AD/AP AS/AS+ |
|---|---|---|---|
| F | Diamond | 12/23 51/102 | |
| Diamond | 17/33 72/144 | ||
| Diamond | 23/46 102/204 | ||
| # | Formation | Air Defense Node | AD/AP AS/AS+ |
E-3 Casual G (PoiDB)
| # | Formation | Air Defense Node | AD/AP AS/AS+ |
|---|---|---|---|
| G | Diamond | 12/23 51/102 | |
| Diamond | 17/33 72/144 | ||
| Diamond | 23/46 102/204 | ||
| # | Formation | Air Defense Node | AD/AP AS/AS+ |
E-3 Casual H (PoiDB)
| # | Formation | Air Defense Node | AD/AP AS/AS+ |
|---|---|---|---|
| H | Diamond | 12/23 51/102 | |
| Diamond | 17/33 72/144 | ||
| Diamond | 23/46 102/204 | ||
| # | Formation | Air Defense Node | AD/AP AS/AS+ |
E-3 Casual I (PoiDB)
| # | Formation | Normal Battle Node | AD/AP AS/AS+ |
|---|---|---|---|
| # | Formation | Normal Battle Node | AD/AP AS/AS+ |
E-3 Casual J (PoiDB)
| # | Formation | Normal Battle Node | AD/AP AS/AS+ |
|---|---|---|---|
| J | Line Ahead Double Line Vanguard |
0/0 0/0 | |
| # | Formation | Normal Battle Node | AD/AP AS/AS+ |
E-3 Casual K (PoiDB)
| # | Formation | Normal Battle Node | AD/AP AS/AS+ |
|---|---|---|---|
| K | Line Ahead Double Line |
0/0 0/0 | |
| Line Ahead | 0/0 0/0 | ||
| # | Formation | Normal Battle Node | AD/AP AS/AS+ |
E-3 Casual L
| # | Selection Node | ||
|---|---|---|---|
| L | 艦隊の針路を選択できます。提督、どちらの針路をとられますか? You can decide the fleet's course. Admiral, which heading should we take? | ||
| # | Selection Node | ||
E-3 Casual M
| # | Landing Node | ||
|---|---|---|---|
| # | Landing Node | ||
E-3 Casual O
| # | Empty Node | ||
|---|---|---|---|
| O | 敵影を見ず。 No enemy spotted. | ||
| # | Empty Node | ||
E-3 Casual P (PoiDB)
| # | Formation | Air Defense Node | AD/AP AS/AS+ |
|---|---|---|---|
| P | Diamond | 12/23 51/102 | |
| Diamond | 17/33 72/144 | ||
| Diamond | 23/46 102/204 | ||
| # | Formation | Air Defense Node | AD/AP AS/AS+ |
E-3 Casual Q (PoiDB)
| # | Formation | Boss Battle Node | AD/AP AS/AS+ |
|---|---|---|---|
| Q | Cruising Formation 4 (Final)
|
0/0 0/0 | |
| # | Formation | Boss Battle Node | AD/AP AS/AS+ |
E-3 Casual R (PoiDB)
| # | Formation | Normal Battle Node | AD/AP AS/AS+ |
|---|---|---|---|
| R | Echelon Line Abreast |
0/0 0/0 | |
| Echelon Line Abreast |
0/0 0/0 | ||
| # | Formation | Normal Battle Node | AD/AP AS/AS+ |
E-3 Casual S
| # | Empty Node | ||
|---|---|---|---|
| S | 気のせいだった。 Must be my imagination. | ||
| # | Empty Node | ||
E-3 Casual T (PoiDB)
| # | Formation | Normal Battle Node | AD/AP AS/AS+ |
|---|---|---|---|
| T | Line Ahead Double Line Vanguard |
0/0 0/0 | |
| # | Formation | Normal Battle Node | AD/AP AS/AS+ |
E-3 Casual U
| # | Landing Node | ||
|---|---|---|---|
| # | Landing Node | ||
E-3 Casual W
| # | Empty Node | ||
|---|---|---|---|
| W | 気のせいだった。 Must be my imagination. | ||
| # | Empty Node | ||
E-3 Casual X (PoiDB)
| # | Formation | Boss Battle Node | AD/AP AS/AS+ |
|---|---|---|---|
| X | Cruising Formation 4 (Final)
|
0/0 0/0 | |
| # | Formation | Boss Battle Node | AD/AP AS/AS+ |
E-3 Casual Y
| # | Empty Node | ||
|---|---|---|---|
| Y | 敵影を見ず。 No enemy spotted. | ||
| # | Empty Node | ||
E-3 Casual Z (PoiDB)
| # | Formation | Boss Battle Node | AD/AP AS/AS+ |
|---|---|---|---|
| Z | Cruising Formation 4 | ?/? ?/? | |
| Cruising Formation 4 (Final)
|
?/? ?/? | ||
| # | Formation | Boss Battle Node | AD/AP AS/AS+ |