- Welcome to the Kancolle Wiki!
- If you have any questions regarding site content, account registration, etc., please visit the KanColle Wiki Discord
Difference between revisions of "Fall 2020 Event/E-1/Enemy comps"
< Fall 2020 Event | E-1
Jump to navigation
Jump to search
| Line 2: | Line 2: | ||
|-|Hard= | |-|Hard= | ||
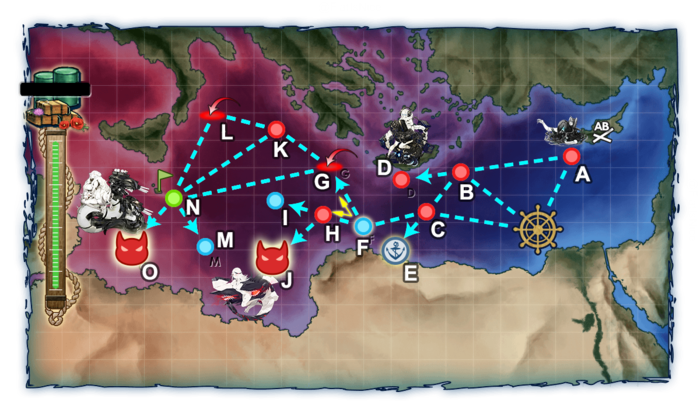
{{Map/Image|page=Fall 2020 Event/E-1| | {{Map/Image|page=Fall 2020 Event/E-1| | ||
| − | {{Map/ImageNode|1|Hard|x=538|y=230}} | + | {{Map/ImageNode|1|Hard|E-1|x=538|y=230}} |
| − | {{Map/ImageNode|AB|Hard|x=603|y=132}} | + | {{Map/ImageNode|AB|Hard|E-1|x=603|y=132}} |
| − | {{Map/ImageNode|A|Hard|x=572|y=156}} | + | {{Map/ImageNode|A|Hard|E-1|x=572|y=156}} |
| − | {{Map/ImageNode|B|Hard|x=461|y=172}} | + | {{Map/ImageNode|B|Hard|E-1|x=461|y=172}} |
| − | {{Map/ImageNode|C|Hard|x=426|y=212}} | + | {{Map/ImageNode|C|Hard|E-1|x=426|y=212}} |
| − | {{Map/ImageNode|D|Hard|x=401|y=180}} | + | {{Map/ImageNode|D|Hard|E-1|x=401|y=180}} |
| − | {{Map/ImageNode|E|Hard|x=395|y=249}} | + | {{Map/ImageNode|E|Hard|E-1|x=395|y=249}} |
| − | {{Map/ImageNode|F|Hard|x=363|y=226}} | + | {{Map/ImageNode|F|Hard|E-1|x=363|y=226}} |
| − | {{Map/ImageNode|G|Hard|x=330|y=166}} | + | {{Map/ImageNode|G|Hard|E-1|x=330|y=166}} |
| − | {{Map/ImageNode|H|Hard|x=323|y=215}} | + | {{Map/ImageNode|H|Hard|E-1|x=323|y=215}} |
| − | {{Map/ImageNode|I|Hard|x=275|y=201}} | + | {{Map/ImageNode|I|Hard|E-1|x=275|y=201}} |
| − | {{Map/ImageNode|J|Hard|x=275|y=263}} | + | {{Map/ImageNode|J|Hard|E-1|x=275|y=263}} |
| − | {{Map/ImageNode|K|Hard|x=277|y=130}} | + | {{Map/ImageNode|K|Hard|E-1|x=277|y=130}} |
| − | {{Map/ImageNode|L|Hard|x=215|y=113}} | + | {{Map/ImageNode|L|Hard|E-1|x=215|y=113}} |
| − | {{Map/ImageNode|M|Hard|x=205|y=247}} | + | {{Map/ImageNode|M|Hard|E-1|x=205|y=247}} |
| − | {{Map/ImageNode|N|Hard|x=174|y=198}} | + | {{Map/ImageNode|N|Hard|E-1|x=174|y=198}} |
| − | {{Map/ImageNode|O|Hard|x=129|y=248}} | + | {{Map/ImageNode|O|Hard|E-1|x=129|y=248}} |
}} | }} | ||
<div class="map-nodes"> | <div class="map-nodes"> | ||
| − | <div id="E-1 A Hard" style="width:100%;text-align:center">E-1 A ([https://db.kcwiki.moe/drop/map/491/4/A-SAB.html PoiDB])</div> | + | <div id="E-1 A Hard" style="width:100%;text-align:center">E-1 Hard A ([https://db.kcwiki.moe/drop/map/491/4/A-SAB.html PoiDB])</div> |
{|class="wikitable" style="width:100%" | {|class="wikitable" style="width:100%" | ||
!style="width:1px"|# | !style="width:1px"|# | ||
| Line 42: | Line 42: | ||
!style="width:1px"|AD/AP<br>AS/AS+ | !style="width:1px"|AD/AP<br>AS/AS+ | ||
|} | |} | ||
| − | <div id="E-1 B Hard" style="width:100%;text-align:center">E-1 B ([https://db.kcwiki.moe/drop/map/491/4/B-SAB.html PoiDB])</div> | + | <div id="E-1 B Hard" style="width:100%;text-align:center">E-1 Hard B ([https://db.kcwiki.moe/drop/map/491/4/B-SAB.html PoiDB])</div> |
{|class="wikitable" style="width:100%" | {|class="wikitable" style="width:100%" | ||
!style="width:1px"|# | !style="width:1px"|# | ||
| Line 67: | Line 67: | ||
!style="width:1px"|AD/AP<br>AS/AS+ | !style="width:1px"|AD/AP<br>AS/AS+ | ||
|} | |} | ||
| − | <div id="E-1 C Hard" style="width:100%;text-align:center">E-1 C ([https://db.kcwiki.moe/drop/map/491/4/C-SAB.html PoiDB])</div> | + | <div id="E-1 C Hard" style="width:100%;text-align:center">E-1 Hard C ([https://db.kcwiki.moe/drop/map/491/4/C-SAB.html PoiDB])</div> |
{|class="wikitable" style="width:100%" | {|class="wikitable" style="width:100%" | ||
!style="width:1px"|# | !style="width:1px"|# | ||
| Line 92: | Line 92: | ||
!style="width:1px"|AD/AP<br>AS/AS+ | !style="width:1px"|AD/AP<br>AS/AS+ | ||
|} | |} | ||
| − | <div id="E-1 D Hard" style="width:100%;text-align:center">E-1 D ([https://db.kcwiki.moe/drop/map/491/4/D-SAB.html PoiDB])</div> | + | <div id="E-1 D Hard" style="width:100%;text-align:center">E-1 Hard D ([https://db.kcwiki.moe/drop/map/491/4/D-SAB.html PoiDB])</div> |
{|class="wikitable" style="width:100%" | {|class="wikitable" style="width:100%" | ||
!style="width:1px"|# | !style="width:1px"|# | ||
| Line 117: | Line 117: | ||
!style="width:1px"|AD/AP<br>AS/AS+ | !style="width:1px"|AD/AP<br>AS/AS+ | ||
|} | |} | ||
| − | <div id="E-1 E Hard" style="width:100%;text-align:center">E-1 E</div> | + | <div id="E-1 E Hard" style="width:100%;text-align:center">E-1 Hard E</div> |
{|class="wikitable" style="width:100%" | {|class="wikitable" style="width:100%" | ||
!style="width:1px"|# | !style="width:1px"|# | ||
| Line 125: | Line 125: | ||
!colspan="3"|Resource Node | !colspan="3"|Resource Node | ||
|} | |} | ||
| − | <div id="E-1 F Hard" style="width:100%;text-align:center">E-1 F</div> | + | <div id="E-1 F Hard" style="width:100%;text-align:center">E-1 Hard F</div> |
{|class="wikitable" style="width:100%" | {|class="wikitable" style="width:100%" | ||
!style="width:1px"|# | !style="width:1px"|# | ||
| Line 136: | Line 136: | ||
!colspan="3"|Selection Node | !colspan="3"|Selection Node | ||
|} | |} | ||
| − | <div id="E-1 G Hard" style="width:100%;text-align:center">E-1 G ([https://db.kcwiki.moe/drop/map/491/4/G-SAB.html PoiDB])</div> | + | <div id="E-1 G Hard" style="width:100%;text-align:center">E-1 Hard G ([https://db.kcwiki.moe/drop/map/491/4/G-SAB.html PoiDB])</div> |
{|class="wikitable" style="width:100%" | {|class="wikitable" style="width:100%" | ||
!style="width:1px"|# | !style="width:1px"|# | ||
| Line 161: | Line 161: | ||
!style="width:1px"|AD/AP<br>AS/AS+ | !style="width:1px"|AD/AP<br>AS/AS+ | ||
|} | |} | ||
| − | <div id="E-1 H Hard" style="width:100%;text-align:center">E-1 H ([https://db.kcwiki.moe/drop/map/491/4/H-SAB.html PoiDB])</div> | + | <div id="E-1 H Hard" style="width:100%;text-align:center">E-1 Hard H ([https://db.kcwiki.moe/drop/map/491/4/H-SAB.html PoiDB])</div> |
{|class="wikitable" style="width:100%" | {|class="wikitable" style="width:100%" | ||
!style="width:1px"|# | !style="width:1px"|# | ||
| Line 186: | Line 186: | ||
!style="width:1px"|AD/AP<br>AS/AS+ | !style="width:1px"|AD/AP<br>AS/AS+ | ||
|} | |} | ||
| − | <div id="E-1 I Hard" style="width:100%;text-align:center">E-1 I</div> | + | <div id="E-1 I Hard" style="width:100%;text-align:center">E-1 Hard I</div> |
{|class="wikitable" style="width:100%" | {|class="wikitable" style="width:100%" | ||
!style="width:1px"|# | !style="width:1px"|# | ||
| Line 197: | Line 197: | ||
!colspan="3"|Empty Node | !colspan="3"|Empty Node | ||
|} | |} | ||
| − | <div id="E-1 J Hard" style="width:100%;text-align:center">E-1 J ([https://db.kcwiki.moe/drop/map/491/4/J-SAB.html PoiDB])</div> | + | <div id="E-1 J Hard" style="width:100%;text-align:center">E-1 Hard J ([https://db.kcwiki.moe/drop/map/491/4/J-SAB.html PoiDB])</div> |
{|class="wikitable" style="width:100%" | {|class="wikitable" style="width:100%" | ||
!style="width:1px"|# | !style="width:1px"|# | ||
| Line 222: | Line 222: | ||
!style="width:1px"|AD/AP<br>AS/AS+ | !style="width:1px"|AD/AP<br>AS/AS+ | ||
|} | |} | ||
| − | <div id="E-1 K Hard" style="width:100%;text-align:center">E-1 K ([https://db.kcwiki.moe/drop/map/491/4/K-SAB.html PoiDB])</div> | + | <div id="E-1 K Hard" style="width:100%;text-align:center">E-1 Hard K ([https://db.kcwiki.moe/drop/map/491/4/K-SAB.html PoiDB])</div> |
{|class="wikitable" style="width:100%" | {|class="wikitable" style="width:100%" | ||
!style="width:1px"|# | !style="width:1px"|# | ||
| Line 247: | Line 247: | ||
!style="width:1px"|AD/AP<br>AS/AS+ | !style="width:1px"|AD/AP<br>AS/AS+ | ||
|} | |} | ||
| − | <div id="E-1 M Hard" style="width:100%;text-align:center">E-1 M</div> | + | <div id="E-1 M Hard" style="width:100%;text-align:center">E-1 Hard M</div> |
{|class="wikitable" style="width:100%" | {|class="wikitable" style="width:100%" | ||
!style="width:1px"|# | !style="width:1px"|# | ||
| Line 258: | Line 258: | ||
!colspan="3"|Empty Node | !colspan="3"|Empty Node | ||
|} | |} | ||
| − | <div id="E-1 N Hard" style="width:100%;text-align:center">E-1 N</div> | + | <div id="E-1 N Hard" style="width:100%;text-align:center">E-1 Hard N</div> |
{|class="wikitable" style="width:100%" | {|class="wikitable" style="width:100%" | ||
!style="width:1px"|# | !style="width:1px"|# | ||
| Line 266: | Line 266: | ||
!colspan="3"|Landing Node | !colspan="3"|Landing Node | ||
|} | |} | ||
| − | <div id="E-1 O Hard" style="width:100%;text-align:center">E-1 O ([https://db.kcwiki.moe/drop/map/491/4/O-SAB.html PoiDB])</div> | + | <div id="E-1 O Hard" style="width:100%;text-align:center">E-1 Hard O ([https://db.kcwiki.moe/drop/map/491/4/O-SAB.html PoiDB])</div> |
{|class="wikitable" style="width:100%" | {|class="wikitable" style="width:100%" | ||
!style="width:1px"|# | !style="width:1px"|# | ||
| Line 294: | Line 294: | ||
|-|Medium= | |-|Medium= | ||
{{Map/Image|page=Fall 2020 Event/E-1| | {{Map/Image|page=Fall 2020 Event/E-1| | ||
| − | {{Map/ImageNode|1|Medium|x=538|y=230}} | + | {{Map/ImageNode|1|Medium|E-1|x=538|y=230}} |
| − | {{Map/ImageNode|AB|Medium|x=603|y=132}} | + | {{Map/ImageNode|AB|Medium|E-1|x=603|y=132}} |
| − | {{Map/ImageNode|A|Medium|x=572|y=156}} | + | {{Map/ImageNode|A|Medium|E-1|x=572|y=156}} |
| − | {{Map/ImageNode|B|Medium|x=461|y=172}} | + | {{Map/ImageNode|B|Medium|E-1|x=461|y=172}} |
| − | {{Map/ImageNode|C|Medium|x=426|y=212}} | + | {{Map/ImageNode|C|Medium|E-1|x=426|y=212}} |
| − | {{Map/ImageNode|D|Medium|x=401|y=180}} | + | {{Map/ImageNode|D|Medium|E-1|x=401|y=180}} |
| − | {{Map/ImageNode|E|Medium|x=395|y=249}} | + | {{Map/ImageNode|E|Medium|E-1|x=395|y=249}} |
| − | {{Map/ImageNode|F|Medium|x=363|y=226}} | + | {{Map/ImageNode|F|Medium|E-1|x=363|y=226}} |
| − | {{Map/ImageNode|G|Medium|x=330|y=166}} | + | {{Map/ImageNode|G|Medium|E-1|x=330|y=166}} |
| − | {{Map/ImageNode|H|Medium|x=323|y=215}} | + | {{Map/ImageNode|H|Medium|E-1|x=323|y=215}} |
| − | {{Map/ImageNode|I|Medium|x=275|y=201}} | + | {{Map/ImageNode|I|Medium|E-1|x=275|y=201}} |
| − | {{Map/ImageNode|J|Medium|x=275|y=263}} | + | {{Map/ImageNode|J|Medium|E-1|x=275|y=263}} |
| − | {{Map/ImageNode|K|Medium|x=277|y=130}} | + | {{Map/ImageNode|K|Medium|E-1|x=277|y=130}} |
| − | {{Map/ImageNode|L|Medium|x=215|y=113}} | + | {{Map/ImageNode|L|Medium|E-1|x=215|y=113}} |
| − | {{Map/ImageNode|M|Medium|x=205|y=247}} | + | {{Map/ImageNode|M|Medium|E-1|x=205|y=247}} |
| − | {{Map/ImageNode|N|Medium|x=174|y=198}} | + | {{Map/ImageNode|N|Medium|E-1|x=174|y=198}} |
| − | {{Map/ImageNode|O|Medium|x=129|y=248}} | + | {{Map/ImageNode|O|Medium|E-1|x=129|y=248}} |
}} | }} | ||
<div class="map-nodes"> | <div class="map-nodes"> | ||
| − | <div id="E-1 A Medium" style="width:100%;text-align:center">E-1 A ([https://db.kcwiki.moe/drop/map/491/3/A-SAB.html PoiDB])</div> | + | <div id="E-1 A Medium" style="width:100%;text-align:center">E-1 Medium A ([https://db.kcwiki.moe/drop/map/491/3/A-SAB.html PoiDB])</div> |
{|class="wikitable" style="width:100%" | {|class="wikitable" style="width:100%" | ||
!style="width:1px"|# | !style="width:1px"|# | ||
| Line 330: | Line 330: | ||
!style="width:1px"|AD/AP<br>AS/AS+ | !style="width:1px"|AD/AP<br>AS/AS+ | ||
|} | |} | ||
| − | <div id="E-1 B Medium" style="width:100%;text-align:center">E-1 B ([https://db.kcwiki.moe/drop/map/491/3/B-SAB.html PoiDB])</div> | + | <div id="E-1 B Medium" style="width:100%;text-align:center">E-1 Medium B ([https://db.kcwiki.moe/drop/map/491/3/B-SAB.html PoiDB])</div> |
{|class="wikitable" style="width:100%" | {|class="wikitable" style="width:100%" | ||
!style="width:1px"|# | !style="width:1px"|# | ||
| Line 355: | Line 355: | ||
!style="width:1px"|AD/AP<br>AS/AS+ | !style="width:1px"|AD/AP<br>AS/AS+ | ||
|} | |} | ||
| − | <div id="E-1 C Medium" style="width:100%;text-align:center">E-1 C ([https://db.kcwiki.moe/drop/map/491/3/C-SAB.html PoiDB])</div> | + | <div id="E-1 C Medium" style="width:100%;text-align:center">E-1 Medium C ([https://db.kcwiki.moe/drop/map/491/3/C-SAB.html PoiDB])</div> |
{|class="wikitable" style="width:100%" | {|class="wikitable" style="width:100%" | ||
!style="width:1px"|# | !style="width:1px"|# | ||
| Line 380: | Line 380: | ||
!style="width:1px"|AD/AP<br>AS/AS+ | !style="width:1px"|AD/AP<br>AS/AS+ | ||
|} | |} | ||
| − | <div id="E-1 D Medium" style="width:100%;text-align:center">E-1 D ([https://db.kcwiki.moe/drop/map/491/3/D-SAB.html PoiDB])</div> | + | <div id="E-1 D Medium" style="width:100%;text-align:center">E-1 Medium D ([https://db.kcwiki.moe/drop/map/491/3/D-SAB.html PoiDB])</div> |
{|class="wikitable" style="width:100%" | {|class="wikitable" style="width:100%" | ||
!style="width:1px"|# | !style="width:1px"|# | ||
| Line 401: | Line 401: | ||
!style="width:1px"|AD/AP<br>AS/AS+ | !style="width:1px"|AD/AP<br>AS/AS+ | ||
|} | |} | ||
| − | <div id="E-1 E Medium" style="width:100%;text-align:center">E-1 E</div> | + | <div id="E-1 E Medium" style="width:100%;text-align:center">E-1 Medium E</div> |
{|class="wikitable" style="width:100%" | {|class="wikitable" style="width:100%" | ||
!style="width:1px"|# | !style="width:1px"|# | ||
| Line 409: | Line 409: | ||
!colspan="3"|Resource Node | !colspan="3"|Resource Node | ||
|} | |} | ||
| − | <div id="E-1 F Medium" style="width:100%;text-align:center">E-1 F</div> | + | <div id="E-1 F Medium" style="width:100%;text-align:center">E-1 Medium F</div> |
{|class="wikitable" style="width:100%" | {|class="wikitable" style="width:100%" | ||
!style="width:1px"|# | !style="width:1px"|# | ||
| Line 420: | Line 420: | ||
!colspan="3"|Selection Node | !colspan="3"|Selection Node | ||
|} | |} | ||
| − | <div id="E-1 G Medium" style="width:100%;text-align:center">E-1 G ([https://db.kcwiki.moe/drop/map/491/3/G-SAB.html PoiDB])</div> | + | <div id="E-1 G Medium" style="width:100%;text-align:center">E-1 Medium G ([https://db.kcwiki.moe/drop/map/491/3/G-SAB.html PoiDB])</div> |
{|class="wikitable" style="width:100%" | {|class="wikitable" style="width:100%" | ||
!style="width:1px"|# | !style="width:1px"|# | ||
| Line 445: | Line 445: | ||
!style="width:1px"|AD/AP<br>AS/AS+ | !style="width:1px"|AD/AP<br>AS/AS+ | ||
|} | |} | ||
| − | <div id="E-1 H Medium" style="width:100%;text-align:center">E-1 H ([https://db.kcwiki.moe/drop/map/491/3/H-SAB.html PoiDB])</div> | + | <div id="E-1 H Medium" style="width:100%;text-align:center">E-1 Medium H ([https://db.kcwiki.moe/drop/map/491/3/H-SAB.html PoiDB])</div> |
{|class="wikitable" style="width:100%" | {|class="wikitable" style="width:100%" | ||
!style="width:1px"|# | !style="width:1px"|# | ||
| Line 470: | Line 470: | ||
!style="width:1px"|AD/AP<br>AS/AS+ | !style="width:1px"|AD/AP<br>AS/AS+ | ||
|} | |} | ||
| − | <div id="E-1 I Medium" style="width:100%;text-align:center">E-1 I</div> | + | <div id="E-1 I Medium" style="width:100%;text-align:center">E-1 Medium I</div> |
{|class="wikitable" style="width:100%" | {|class="wikitable" style="width:100%" | ||
!style="width:1px"|# | !style="width:1px"|# | ||
| Line 481: | Line 481: | ||
!colspan="3"|Empty Node | !colspan="3"|Empty Node | ||
|} | |} | ||
| − | <div id="E-1 J Medium" style="width:100%;text-align:center">E-1 J ([https://db.kcwiki.moe/drop/map/491/3/J-SAB.html PoiDB])</div> | + | <div id="E-1 J Medium" style="width:100%;text-align:center">E-1 Medium J ([https://db.kcwiki.moe/drop/map/491/3/J-SAB.html PoiDB])</div> |
{|class="wikitable" style="width:100%" | {|class="wikitable" style="width:100%" | ||
!style="width:1px"|# | !style="width:1px"|# | ||
| Line 506: | Line 506: | ||
!style="width:1px"|AD/AP<br>AS/AS+ | !style="width:1px"|AD/AP<br>AS/AS+ | ||
|} | |} | ||
| − | <div id="E-1 K Medium" style="width:100%;text-align:center">E-1 K ([https://db.kcwiki.moe/drop/map/491/3/K-SAB.html PoiDB])</div> | + | <div id="E-1 K Medium" style="width:100%;text-align:center">E-1 Medium K ([https://db.kcwiki.moe/drop/map/491/3/K-SAB.html PoiDB])</div> |
{|class="wikitable" style="width:100%" | {|class="wikitable" style="width:100%" | ||
!style="width:1px"|# | !style="width:1px"|# | ||
| Line 531: | Line 531: | ||
!style="width:1px"|AD/AP<br>AS/AS+ | !style="width:1px"|AD/AP<br>AS/AS+ | ||
|} | |} | ||
| − | <div id="E-1 M Medium" style="width:100%;text-align:center">E-1 M</div> | + | <div id="E-1 M Medium" style="width:100%;text-align:center">E-1 Medium M</div> |
{|class="wikitable" style="width:100%" | {|class="wikitable" style="width:100%" | ||
!style="width:1px"|# | !style="width:1px"|# | ||
| Line 542: | Line 542: | ||
!colspan="3"|Empty Node | !colspan="3"|Empty Node | ||
|} | |} | ||
| − | <div id="E-1 N Medium" style="width:100%;text-align:center">E-1 N</div> | + | <div id="E-1 N Medium" style="width:100%;text-align:center">E-1 Medium N</div> |
{|class="wikitable" style="width:100%" | {|class="wikitable" style="width:100%" | ||
!style="width:1px"|# | !style="width:1px"|# | ||
| Line 550: | Line 550: | ||
!colspan="3"|Landing Node | !colspan="3"|Landing Node | ||
|} | |} | ||
| − | <div id="E-1 O Medium" style="width:100%;text-align:center">E-1 O ([https://db.kcwiki.moe/drop/map/491/3/O-SAB.html PoiDB])</div> | + | <div id="E-1 O Medium" style="width:100%;text-align:center">E-1 Medium O ([https://db.kcwiki.moe/drop/map/491/3/O-SAB.html PoiDB])</div> |
{|class="wikitable" style="width:100%" | {|class="wikitable" style="width:100%" | ||
!style="width:1px"|# | !style="width:1px"|# | ||
| Line 578: | Line 578: | ||
|-|Easy= | |-|Easy= | ||
{{Map/Image|page=Fall 2020 Event/E-1| | {{Map/Image|page=Fall 2020 Event/E-1| | ||
| − | {{Map/ImageNode|1|Easy|x=538|y=230}} | + | {{Map/ImageNode|1|Easy|E-1|x=538|y=230}} |
| − | {{Map/ImageNode|AB|Easy|x=603|y=132}} | + | {{Map/ImageNode|AB|Easy|E-1|x=603|y=132}} |
| − | {{Map/ImageNode|A|Easy|x=572|y=156}} | + | {{Map/ImageNode|A|Easy|E-1|x=572|y=156}} |
| − | {{Map/ImageNode|B|Easy|x=461|y=172}} | + | {{Map/ImageNode|B|Easy|E-1|x=461|y=172}} |
| − | {{Map/ImageNode|C|Easy|x=426|y=212}} | + | {{Map/ImageNode|C|Easy|E-1|x=426|y=212}} |
| − | {{Map/ImageNode|D|Easy|x=401|y=180}} | + | {{Map/ImageNode|D|Easy|E-1|x=401|y=180}} |
| − | {{Map/ImageNode|E|Easy|x=395|y=249}} | + | {{Map/ImageNode|E|Easy|E-1|x=395|y=249}} |
| − | {{Map/ImageNode|F|Easy|x=363|y=226}} | + | {{Map/ImageNode|F|Easy|E-1|x=363|y=226}} |
| − | {{Map/ImageNode|G|Easy|x=330|y=166}} | + | {{Map/ImageNode|G|Easy|E-1|x=330|y=166}} |
| − | {{Map/ImageNode|H|Easy|x=323|y=215}} | + | {{Map/ImageNode|H|Easy|E-1|x=323|y=215}} |
| − | {{Map/ImageNode|I|Easy|x=275|y=201}} | + | {{Map/ImageNode|I|Easy|E-1|x=275|y=201}} |
| − | {{Map/ImageNode|J|Easy|x=275|y=263}} | + | {{Map/ImageNode|J|Easy|E-1|x=275|y=263}} |
| − | {{Map/ImageNode|K|Easy|x=277|y=130}} | + | {{Map/ImageNode|K|Easy|E-1|x=277|y=130}} |
| − | {{Map/ImageNode|L|Easy|x=215|y=113}} | + | {{Map/ImageNode|L|Easy|E-1|x=215|y=113}} |
| − | {{Map/ImageNode|M|Easy|x=205|y=247}} | + | {{Map/ImageNode|M|Easy|E-1|x=205|y=247}} |
| − | {{Map/ImageNode|N|Easy|x=174|y=198}} | + | {{Map/ImageNode|N|Easy|E-1|x=174|y=198}} |
| − | {{Map/ImageNode|O|Easy|x=129|y=248}} | + | {{Map/ImageNode|O|Easy|E-1|x=129|y=248}} |
}} | }} | ||
<div class="map-nodes"> | <div class="map-nodes"> | ||
| − | <div id="E-1 A Easy" style="width:100%;text-align:center">E-1 A ([https://db.kcwiki.moe/drop/map/491/2/A-SAB.html PoiDB])</div> | + | <div id="E-1 A Easy" style="width:100%;text-align:center">E-1 Easy A ([https://db.kcwiki.moe/drop/map/491/2/A-SAB.html PoiDB])</div> |
{|class="wikitable" style="width:100%" | {|class="wikitable" style="width:100%" | ||
!style="width:1px"|# | !style="width:1px"|# | ||
| Line 618: | Line 618: | ||
!style="width:1px"|AD/AP<br>AS/AS+ | !style="width:1px"|AD/AP<br>AS/AS+ | ||
|} | |} | ||
| − | <div id="E-1 B Easy" style="width:100%;text-align:center">E-1 B ([https://db.kcwiki.moe/drop/map/491/2/B-SAB.html PoiDB])</div> | + | <div id="E-1 B Easy" style="width:100%;text-align:center">E-1 Easy B ([https://db.kcwiki.moe/drop/map/491/2/B-SAB.html PoiDB])</div> |
{|class="wikitable" style="width:100%" | {|class="wikitable" style="width:100%" | ||
!style="width:1px"|# | !style="width:1px"|# | ||
| Line 643: | Line 643: | ||
!style="width:1px"|AD/AP<br>AS/AS+ | !style="width:1px"|AD/AP<br>AS/AS+ | ||
|} | |} | ||
| − | <div id="E-1 C Easy" style="width:100%;text-align:center">E-1 C ([https://db.kcwiki.moe/drop/map/491/2/C-SAB.html PoiDB])</div> | + | <div id="E-1 C Easy" style="width:100%;text-align:center">E-1 Easy C ([https://db.kcwiki.moe/drop/map/491/2/C-SAB.html PoiDB])</div> |
{|class="wikitable" style="width:100%" | {|class="wikitable" style="width:100%" | ||
!style="width:1px"|# | !style="width:1px"|# | ||
| Line 668: | Line 668: | ||
!style="width:1px"|AD/AP<br>AS/AS+ | !style="width:1px"|AD/AP<br>AS/AS+ | ||
|} | |} | ||
| − | <div id="E-1 D Easy" style="width:100%;text-align:center">E-1 D ([https://db.kcwiki.moe/drop/map/491/2/D-SAB.html PoiDB])</div> | + | <div id="E-1 D Easy" style="width:100%;text-align:center">E-1 Easy D ([https://db.kcwiki.moe/drop/map/491/2/D-SAB.html PoiDB])</div> |
{|class="wikitable" style="width:100%" | {|class="wikitable" style="width:100%" | ||
!style="width:1px"|# | !style="width:1px"|# | ||
| Line 693: | Line 693: | ||
!style="width:1px"|AD/AP<br>AS/AS+ | !style="width:1px"|AD/AP<br>AS/AS+ | ||
|} | |} | ||
| − | <div id="E-1 E Easy" style="width:100%;text-align:center">E-1 E</div> | + | <div id="E-1 E Easy" style="width:100%;text-align:center">E-1 Easy E</div> |
{|class="wikitable" style="width:100%" | {|class="wikitable" style="width:100%" | ||
!style="width:1px"|# | !style="width:1px"|# | ||
| Line 701: | Line 701: | ||
!colspan="3"|Resource Node | !colspan="3"|Resource Node | ||
|} | |} | ||
| − | <div id="E-1 F Easy" style="width:100%;text-align:center">E-1 F</div> | + | <div id="E-1 F Easy" style="width:100%;text-align:center">E-1 Easy F</div> |
{|class="wikitable" style="width:100%" | {|class="wikitable" style="width:100%" | ||
!style="width:1px"|# | !style="width:1px"|# | ||
| Line 712: | Line 712: | ||
!colspan="3"|Selection Node | !colspan="3"|Selection Node | ||
|} | |} | ||
| − | <div id="E-1 G Easy" style="width:100%;text-align:center">E-1 G ([https://db.kcwiki.moe/drop/map/491/2/G-SAB.html PoiDB])</div> | + | <div id="E-1 G Easy" style="width:100%;text-align:center">E-1 Easy G ([https://db.kcwiki.moe/drop/map/491/2/G-SAB.html PoiDB])</div> |
{|class="wikitable" style="width:100%" | {|class="wikitable" style="width:100%" | ||
!style="width:1px"|# | !style="width:1px"|# | ||
| Line 741: | Line 741: | ||
!style="width:1px"|AD/AP<br>AS/AS+ | !style="width:1px"|AD/AP<br>AS/AS+ | ||
|} | |} | ||
| − | <div id="E-1 H Easy" style="width:100%;text-align:center">E-1 H ([https://db.kcwiki.moe/drop/map/491/2/H-SAB.html PoiDB])</div> | + | <div id="E-1 H Easy" style="width:100%;text-align:center">E-1 Easy H ([https://db.kcwiki.moe/drop/map/491/2/H-SAB.html PoiDB])</div> |
{|class="wikitable" style="width:100%" | {|class="wikitable" style="width:100%" | ||
!style="width:1px"|# | !style="width:1px"|# | ||
| Line 766: | Line 766: | ||
!style="width:1px"|AD/AP<br>AS/AS+ | !style="width:1px"|AD/AP<br>AS/AS+ | ||
|} | |} | ||
| − | <div id="E-1 I Easy" style="width:100%;text-align:center">E-1 I</div> | + | <div id="E-1 I Easy" style="width:100%;text-align:center">E-1 Easy I</div> |
{|class="wikitable" style="width:100%" | {|class="wikitable" style="width:100%" | ||
!style="width:1px"|# | !style="width:1px"|# | ||
| Line 777: | Line 777: | ||
!colspan="3"|Empty Node | !colspan="3"|Empty Node | ||
|} | |} | ||
| − | <div id="E-1 J Easy" style="width:100%;text-align:center">E-1 J ([https://db.kcwiki.moe/drop/map/491/2/J-SAB.html PoiDB])</div> | + | <div id="E-1 J Easy" style="width:100%;text-align:center">E-1 Easy J ([https://db.kcwiki.moe/drop/map/491/2/J-SAB.html PoiDB])</div> |
{|class="wikitable" style="width:100%" | {|class="wikitable" style="width:100%" | ||
!style="width:1px"|# | !style="width:1px"|# | ||
| Line 802: | Line 802: | ||
!style="width:1px"|AD/AP<br>AS/AS+ | !style="width:1px"|AD/AP<br>AS/AS+ | ||
|} | |} | ||
| − | <div id="E-1 K Easy" style="width:100%;text-align:center">E-1 K ([https://db.kcwiki.moe/drop/map/491/2/K-SAB.html PoiDB])</div> | + | <div id="E-1 K Easy" style="width:100%;text-align:center">E-1 Easy K ([https://db.kcwiki.moe/drop/map/491/2/K-SAB.html PoiDB])</div> |
{|class="wikitable" style="width:100%" | {|class="wikitable" style="width:100%" | ||
!style="width:1px"|# | !style="width:1px"|# | ||
| Line 827: | Line 827: | ||
!style="width:1px"|AD/AP<br>AS/AS+ | !style="width:1px"|AD/AP<br>AS/AS+ | ||
|} | |} | ||
| − | <div id="E-1 M Easy" style="width:100%;text-align:center">E-1 M</div> | + | <div id="E-1 M Easy" style="width:100%;text-align:center">E-1 Easy M</div> |
{|class="wikitable" style="width:100%" | {|class="wikitable" style="width:100%" | ||
!style="width:1px"|# | !style="width:1px"|# | ||
| Line 838: | Line 838: | ||
!colspan="3"|Empty Node | !colspan="3"|Empty Node | ||
|} | |} | ||
| − | <div id="E-1 N Easy" style="width:100%;text-align:center">E-1 N</div> | + | <div id="E-1 N Easy" style="width:100%;text-align:center">E-1 Easy N</div> |
{|class="wikitable" style="width:100%" | {|class="wikitable" style="width:100%" | ||
!style="width:1px"|# | !style="width:1px"|# | ||
| Line 846: | Line 846: | ||
!colspan="3"|Landing Node | !colspan="3"|Landing Node | ||
|} | |} | ||
| − | <div id="E-1 O Easy" style="width:100%;text-align:center">E-1 O ([https://db.kcwiki.moe/drop/map/491/2/O-SAB.html PoiDB])</div> | + | <div id="E-1 O Easy" style="width:100%;text-align:center">E-1 Easy O ([https://db.kcwiki.moe/drop/map/491/2/O-SAB.html PoiDB])</div> |
{|class="wikitable" style="width:100%" | {|class="wikitable" style="width:100%" | ||
!style="width:1px"|# | !style="width:1px"|# | ||
| Line 874: | Line 874: | ||
|-|Casual= | |-|Casual= | ||
{{Map/Image|page=Fall 2020 Event/E-1| | {{Map/Image|page=Fall 2020 Event/E-1| | ||
| − | {{Map/ImageNode|1|Casual|x=538|y=230}} | + | {{Map/ImageNode|1|Casual|E-1|x=538|y=230}} |
| − | {{Map/ImageNode|AB|Casual|x=603|y=132}} | + | {{Map/ImageNode|AB|Casual|E-1|x=603|y=132}} |
| − | {{Map/ImageNode|A|Casual|x=572|y=156}} | + | {{Map/ImageNode|A|Casual|E-1|x=572|y=156}} |
| − | {{Map/ImageNode|B|Casual|x=461|y=172}} | + | {{Map/ImageNode|B|Casual|E-1|x=461|y=172}} |
| − | {{Map/ImageNode|C|Casual|x=426|y=212}} | + | {{Map/ImageNode|C|Casual|E-1|x=426|y=212}} |
| − | {{Map/ImageNode|D|Casual|x=401|y=180}} | + | {{Map/ImageNode|D|Casual|E-1|x=401|y=180}} |
| − | {{Map/ImageNode|E|Casual|x=395|y=249}} | + | {{Map/ImageNode|E|Casual|E-1|x=395|y=249}} |
| − | {{Map/ImageNode|F|Casual|x=363|y=226}} | + | {{Map/ImageNode|F|Casual|E-1|x=363|y=226}} |
| − | {{Map/ImageNode|G|Casual|x=330|y=166}} | + | {{Map/ImageNode|G|Casual|E-1|x=330|y=166}} |
| − | {{Map/ImageNode|H|Casual|x=323|y=215}} | + | {{Map/ImageNode|H|Casual|E-1|x=323|y=215}} |
| − | {{Map/ImageNode|I|Casual|x=275|y=201}} | + | {{Map/ImageNode|I|Casual|E-1|x=275|y=201}} |
| − | {{Map/ImageNode|J|Casual|x=275|y=263}} | + | {{Map/ImageNode|J|Casual|E-1|x=275|y=263}} |
| − | {{Map/ImageNode|K|Casual|x=277|y=130}} | + | {{Map/ImageNode|K|Casual|E-1|x=277|y=130}} |
| − | {{Map/ImageNode|L|Casual|x=215|y=113}} | + | {{Map/ImageNode|L|Casual|E-1|x=215|y=113}} |
| − | {{Map/ImageNode|M|Casual|x=205|y=247}} | + | {{Map/ImageNode|M|Casual|E-1|x=205|y=247}} |
| − | {{Map/ImageNode|N|Casual|x=174|y=198}} | + | {{Map/ImageNode|N|Casual|E-1|x=174|y=198}} |
| − | {{Map/ImageNode|O|Casual|x=129|y=248}} | + | {{Map/ImageNode|O|Casual|E-1|x=129|y=248}} |
}} | }} | ||
<div class="map-nodes"> | <div class="map-nodes"> | ||
| − | <div id="E-1 A Casual" style="width:100%;text-align:center">E-1 A ([https://db.kcwiki.moe/drop/map/491/1/A-SAB.html PoiDB])</div> | + | <div id="E-1 A Casual" style="width:100%;text-align:center">E-1 Casual A ([https://db.kcwiki.moe/drop/map/491/1/A-SAB.html PoiDB])</div> |
{|class="wikitable" style="width:100%" | {|class="wikitable" style="width:100%" | ||
!style="width:1px"|# | !style="width:1px"|# | ||
| Line 914: | Line 914: | ||
!style="width:1px"|AD/AP<br>AS/AS+ | !style="width:1px"|AD/AP<br>AS/AS+ | ||
|} | |} | ||
| − | <div id="E-1 B Casual" style="width:100%;text-align:center">E-1 B ([https://db.kcwiki.moe/drop/map/491/1/B-SAB.html PoiDB])</div> | + | <div id="E-1 B Casual" style="width:100%;text-align:center">E-1 Casual B ([https://db.kcwiki.moe/drop/map/491/1/B-SAB.html PoiDB])</div> |
{|class="wikitable" style="width:100%" | {|class="wikitable" style="width:100%" | ||
!style="width:1px"|# | !style="width:1px"|# | ||
| Line 935: | Line 935: | ||
!style="width:1px"|AD/AP<br>AS/AS+ | !style="width:1px"|AD/AP<br>AS/AS+ | ||
|} | |} | ||
| − | <div id="E-1 C Casual" style="width:100%;text-align:center">E-1 C ([https://db.kcwiki.moe/drop/map/491/1/C-SAB.html PoiDB])</div> | + | <div id="E-1 C Casual" style="width:100%;text-align:center">E-1 Casual C ([https://db.kcwiki.moe/drop/map/491/1/C-SAB.html PoiDB])</div> |
{|class="wikitable" style="width:100%" | {|class="wikitable" style="width:100%" | ||
!style="width:1px"|# | !style="width:1px"|# | ||
| Line 956: | Line 956: | ||
!style="width:1px"|AD/AP<br>AS/AS+ | !style="width:1px"|AD/AP<br>AS/AS+ | ||
|} | |} | ||
| − | <div id="E-1 D Casual" style="width:100%;text-align:center">E-1 D ([https://db.kcwiki.moe/drop/map/491/1/D-SAB.html PoiDB])</div> | + | <div id="E-1 D Casual" style="width:100%;text-align:center">E-1 Casual D ([https://db.kcwiki.moe/drop/map/491/1/D-SAB.html PoiDB])</div> |
{|class="wikitable" style="width:100%" | {|class="wikitable" style="width:100%" | ||
!style="width:1px"|# | !style="width:1px"|# | ||
| Line 981: | Line 981: | ||
!style="width:1px"|AD/AP<br>AS/AS+ | !style="width:1px"|AD/AP<br>AS/AS+ | ||
|} | |} | ||
| − | <div id="E-1 E Casual" style="width:100%;text-align:center">E-1 E</div> | + | <div id="E-1 E Casual" style="width:100%;text-align:center">E-1 Casual E</div> |
{|class="wikitable" style="width:100%" | {|class="wikitable" style="width:100%" | ||
!style="width:1px"|# | !style="width:1px"|# | ||
| Line 989: | Line 989: | ||
!colspan="3"|Resource Node | !colspan="3"|Resource Node | ||
|} | |} | ||
| − | <div id="E-1 F Casual" style="width:100%;text-align:center">E-1 F</div> | + | <div id="E-1 F Casual" style="width:100%;text-align:center">E-1 Casual F</div> |
{|class="wikitable" style="width:100%" | {|class="wikitable" style="width:100%" | ||
!style="width:1px"|# | !style="width:1px"|# | ||
| Line 1,000: | Line 1,000: | ||
!colspan="3"|Selection Node | !colspan="3"|Selection Node | ||
|} | |} | ||
| − | <div id="E-1 G Casual" style="width:100%;text-align:center">E-1 G ([https://db.kcwiki.moe/drop/map/491/1/G-SAB.html PoiDB])</div> | + | <div id="E-1 G Casual" style="width:100%;text-align:center">E-1 Casual G ([https://db.kcwiki.moe/drop/map/491/1/G-SAB.html PoiDB])</div> |
{|class="wikitable" style="width:100%" | {|class="wikitable" style="width:100%" | ||
!style="width:1px"|# | !style="width:1px"|# | ||
| Line 1,025: | Line 1,025: | ||
!style="width:1px"|AD/AP<br>AS/AS+ | !style="width:1px"|AD/AP<br>AS/AS+ | ||
|} | |} | ||
| − | <div id="E-1 H Casual" style="width:100%;text-align:center">E-1 H ([https://db.kcwiki.moe/drop/map/491/1/H-SAB.html PoiDB])</div> | + | <div id="E-1 H Casual" style="width:100%;text-align:center">E-1 Casual H ([https://db.kcwiki.moe/drop/map/491/1/H-SAB.html PoiDB])</div> |
{|class="wikitable" style="width:100%" | {|class="wikitable" style="width:100%" | ||
!style="width:1px"|# | !style="width:1px"|# | ||
| Line 1,046: | Line 1,046: | ||
!style="width:1px"|AD/AP<br>AS/AS+ | !style="width:1px"|AD/AP<br>AS/AS+ | ||
|} | |} | ||
| − | <div id="E-1 I Casual" style="width:100%;text-align:center">E-1 I</div> | + | <div id="E-1 I Casual" style="width:100%;text-align:center">E-1 Casual I</div> |
{|class="wikitable" style="width:100%" | {|class="wikitable" style="width:100%" | ||
!style="width:1px"|# | !style="width:1px"|# | ||
| Line 1,057: | Line 1,057: | ||
!colspan="3"|Empty Node | !colspan="3"|Empty Node | ||
|} | |} | ||
| − | <div id="E-1 J Casual" style="width:100%;text-align:center">E-1 J ([https://db.kcwiki.moe/drop/map/491/1/J-SAB.html PoiDB])</div> | + | <div id="E-1 J Casual" style="width:100%;text-align:center">E-1 Casual J ([https://db.kcwiki.moe/drop/map/491/1/J-SAB.html PoiDB])</div> |
{|class="wikitable" style="width:100%" | {|class="wikitable" style="width:100%" | ||
!style="width:1px"|# | !style="width:1px"|# | ||
| Line 1,082: | Line 1,082: | ||
!style="width:1px"|AD/AP<br>AS/AS+ | !style="width:1px"|AD/AP<br>AS/AS+ | ||
|} | |} | ||
| − | <div id="E-1 K Casual" style="width:100%;text-align:center">E-1 K ([https://db.kcwiki.moe/drop/map/491/1/K-SAB.html PoiDB])</div> | + | <div id="E-1 K Casual" style="width:100%;text-align:center">E-1 Casual K ([https://db.kcwiki.moe/drop/map/491/1/K-SAB.html PoiDB])</div> |
{|class="wikitable" style="width:100%" | {|class="wikitable" style="width:100%" | ||
!style="width:1px"|# | !style="width:1px"|# | ||
| Line 1,107: | Line 1,107: | ||
!style="width:1px"|AD/AP<br>AS/AS+ | !style="width:1px"|AD/AP<br>AS/AS+ | ||
|} | |} | ||
| − | <div id="E-1 M Casual" style="width:100%;text-align:center">E-1 M</div> | + | <div id="E-1 M Casual" style="width:100%;text-align:center">E-1 Casual M</div> |
{|class="wikitable" style="width:100%" | {|class="wikitable" style="width:100%" | ||
!style="width:1px"|# | !style="width:1px"|# | ||
| Line 1,118: | Line 1,118: | ||
!colspan="3"|Empty Node | !colspan="3"|Empty Node | ||
|} | |} | ||
| − | <div id="E-1 N Casual" style="width:100%;text-align:center">E-1 N</div> | + | <div id="E-1 N Casual" style="width:100%;text-align:center">E-1 Casual N</div> |
{|class="wikitable" style="width:100%" | {|class="wikitable" style="width:100%" | ||
!style="width:1px"|# | !style="width:1px"|# | ||
| Line 1,126: | Line 1,126: | ||
!colspan="3"|Landing Node | !colspan="3"|Landing Node | ||
|} | |} | ||
| − | <div id="E-1 O Casual" style="width:100%;text-align:center">E-1 O ([https://db.kcwiki.moe/drop/map/491/1/O-SAB.html PoiDB])</div> | + | <div id="E-1 O Casual" style="width:100%;text-align:center">E-1 Casual O ([https://db.kcwiki.moe/drop/map/491/1/O-SAB.html PoiDB])</div> |
{|class="wikitable" style="width:100%" | {|class="wikitable" style="width:100%" | ||
!style="width:1px"|# | !style="width:1px"|# | ||
Revision as of 01:57, 29 November 2020
E-1 Hard A (PoiDB)
| # | Formation | Normal Battle Node | AD/AP AS/AS+ |
|---|---|---|---|
| A | Echelon Line Abreast |
0/0 0/0 | |
| Echelon Line Abreast |
0/0 0/0 | ||
| # | Formation | Normal Battle Node | AD/AP AS/AS+ |
E-1 Hard B (PoiDB)
| # | Formation | Normal Battle Node | AD/AP AS/AS+ |
|---|---|---|---|
| B | Line Ahead Double Line |
0/0 0/0 | |
| Line Ahead Double Line |
0/0 0/0 | ||
| Line Ahead Double Line |
0/0 0/0 | ||
| # | Formation | Normal Battle Node | AD/AP AS/AS+ |
E-1 Hard C (PoiDB)
| # | Formation | Normal Battle Node | AD/AP AS/AS+ |
|---|---|---|---|
| C | Line Ahead Double Line |
0/0 0/0 | |
| Line Ahead Double Line |
0/0 0/0 | ||
| Line Ahead Double Line |
0/0 0/0 | ||
| # | Formation | Normal Battle Node | AD/AP AS/AS+ |
E-1 Hard D (PoiDB)
| # | Formation | Normal Battle Node | AD/AP AS/AS+ |
|---|---|---|---|
| D | Double Line | 46/91 204/408 | |
| Double Line | 46/91 204/408 | ||
| Double Line | 69/137 306/612 | ||
| # | Formation | Normal Battle Node | AD/AP AS/AS+ |
E-1 Hard E
| # | Resource Node | ||
|---|---|---|---|
| # | Resource Node | ||
E-1 Hard F
| # | Selection Node | ||
|---|---|---|---|
| F | 艦隊の針路を選択できます。提督、どちらの針路をとられますか? You can decide the fleet's course. Admiral, which heading should we take? | ||
| # | Selection Node | ||
E-1 Hard G (PoiDB)
| # | Formation | Air Defense Node | AD/AP AS/AS+ |
|---|---|---|---|
| G | Diamond | 33/65 144/288 | |
| Diamond | 44/87 195/390 | ||
| Diamond | 49/97 216/432 | ||
| # | Formation | Air Defense Node | AD/AP AS/AS+ |
E-1 Hard H (PoiDB)
| # | Formation | Normal Battle Node | AD/AP AS/AS+ |
|---|---|---|---|
| H | Line Ahead Echelon |
0/0 0/0 | |
| Line Ahead Echelon |
0/0 0/0 | ||
| Line Ahead Echelon |
0/0 0/0 | ||
| # | Formation | Normal Battle Node | AD/AP AS/AS+ |
E-1 Hard I
| # | Empty Node | ||
|---|---|---|---|
| I | 敵影を見ず。 No enemy spotted. | ||
| # | Empty Node | ||
E-1 Hard J (PoiDB)
| # | Formation | Boss Battle Node | AD/AP AS/AS+ |
|---|---|---|---|
| J | Line Ahead | 0/0 0/0 | |
| Line Ahead | 51/101 225/450 | ||
| Line Ahead (Final)
|
51/101 225/450 | ||
| # | Formation | Boss Battle Node | AD/AP AS/AS+ |
E-1 Hard K (PoiDB)
| # | Formation | Normal Battle Node | AD/AP AS/AS+ |
|---|---|---|---|
| K | Echelon | 0/0 0/0 | |
| Echelon | 0/0 0/0 | ||
| Echelon | 0/0 0/0 | ||
| # | Formation | Normal Battle Node | AD/AP AS/AS+ |
E-1 Hard M
| # | Empty Node | ||
|---|---|---|---|
| M | 敵影を見ず。 No enemy spotted. | ||
| # | Empty Node | ||
E-1 Hard N
| # | Landing Node | ||
|---|---|---|---|
| # | Landing Node | ||
E-1 Hard O (PoiDB)
| # | Formation | Boss Battle Node | AD/AP AS/AS+ |
|---|---|---|---|
| O | Line Ahead | 23/45 101/201 | |
| Line Ahead | 23/45 101/201 | ||
| Line Ahead (Final)
|
25/49 108/216 | ||
| # | Formation | Boss Battle Node | AD/AP AS/AS+ |
E-1 Medium A (PoiDB)
| # | Formation | Normal Battle Node | AD/AP AS/AS+ |
|---|---|---|---|
| A | Echelon | 0/0 0/0 | |
| # | Formation | Normal Battle Node | AD/AP AS/AS+ |
E-1 Medium B (PoiDB)
| # | Formation | Normal Battle Node | AD/AP AS/AS+ |
|---|---|---|---|
| B | Line Ahead Double Line |
0/0 0/0 | |
| Line Ahead Double Line |
0/0 0/0 | ||
| Line Ahead Double Line |
0/0 0/0 | ||
| # | Formation | Normal Battle Node | AD/AP AS/AS+ |
E-1 Medium C (PoiDB)
| # | Formation | Normal Battle Node | AD/AP AS/AS+ |
|---|---|---|---|
| C | Line Ahead Double Line |
0/0 0/0 | |
| Line Ahead Double Line |
0/0 0/0 | ||
| Line Ahead Double Line |
0/0 0/0 | ||
| # | Formation | Normal Battle Node | AD/AP AS/AS+ |
E-1 Medium D (PoiDB)
| # | Formation | Normal Battle Node | AD/AP AS/AS+ |
|---|---|---|---|
| D | Double Line | 33/65 144/288 | |
| Double Line | 49/97 216/432 | ||
| # | Formation | Normal Battle Node | AD/AP AS/AS+ |
E-1 Medium E
| # | Resource Node | ||
|---|---|---|---|
| # | Resource Node | ||
E-1 Medium F
| # | Selection Node | ||
|---|---|---|---|
| F | 艦隊の針路を選択できます。提督、どちらの針路をとられますか? You can decide the fleet's course. Admiral, which heading should we take? | ||
| # | Selection Node | ||
E-1 Medium G (PoiDB)
| # | Formation | Air Defense Node | AD/AP AS/AS+ |
|---|---|---|---|
| G | Diamond | 28/55 123/246 | |
| Diamond | 35/69 153/306 | ||
| Diamond | 39/78 174/348 | ||
| # | Formation | Air Defense Node | AD/AP AS/AS+ |
E-1 Medium H (PoiDB)
| # | Formation | Normal Battle Node | AD/AP AS/AS+ |
|---|---|---|---|
| H | Line Ahead Echelon |
0/0 0/0 | |
| Line Ahead Echelon |
0/0 0/0 | ||
| Line Ahead Echelon |
0/0 0/0 | ||
| # | Formation | Normal Battle Node | AD/AP AS/AS+ |
E-1 Medium I
| # | Empty Node | ||
|---|---|---|---|
| I | 敵影を見ず。 No enemy spotted. | ||
| # | Empty Node | ||
E-1 Medium J (PoiDB)
| # | Formation | Boss Battle Node | AD/AP AS/AS+ |
|---|---|---|---|
| J | Line Ahead | 0/0 0/0 | |
| Line Ahead | 36/72 161/321 | ||
| Line Ahead (Final)
|
45/89 198/396 | ||
| # | Formation | Boss Battle Node | AD/AP AS/AS+ |
E-1 Medium K (PoiDB)
| # | Formation | Normal Battle Node | AD/AP AS/AS+ |
|---|---|---|---|
| K | Echelon | 0/0 0/0 | |
| Echelon | 0/0 0/0 | ||
| Echelon | 0/0 0/0 | ||
| # | Formation | Normal Battle Node | AD/AP AS/AS+ |
E-1 Medium M
| # | Empty Node | ||
|---|---|---|---|
| M | 敵影を見ず。 No enemy spotted. | ||
| # | Empty Node | ||
E-1 Medium N
| # | Landing Node | ||
|---|---|---|---|
| # | Landing Node | ||
E-1 Medium O (PoiDB)
| # | Formation | Boss Battle Node | AD/AP AS/AS+ |
|---|---|---|---|
| O | Line Ahead | 22/43 96/192 | |
| Line Ahead | 22/43 96/192 | ||
| Line Ahead (Final)
|
23/45 101/201 | ||
| # | Formation | Boss Battle Node | AD/AP AS/AS+ |
E-1 Easy A (PoiDB)
| # | Formation | Normal Battle Node | AD/AP AS/AS+ |
|---|---|---|---|
| A | Echelon Line Abreast |
0/0 0/0 | |
| Echelon | 0/0 0/0 | ||
| # | Formation | Normal Battle Node | AD/AP AS/AS+ |
E-1 Easy B (PoiDB)
| # | Formation | Normal Battle Node | AD/AP AS/AS+ |
|---|---|---|---|
| B | Line Ahead Double Line |
0/0 0/0 | |
| Line Ahead Double Line |
0/0 0/0 | ||
| Line Ahead Double Line |
0/0 0/0 | ||
| # | Formation | Normal Battle Node | AD/AP AS/AS+ |
E-1 Easy C (PoiDB)
| # | Formation | Normal Battle Node | AD/AP AS/AS+ |
|---|---|---|---|
| C | Line Ahead Double Line |
0/0 0/0 | |
| Line Ahead Double Line |
0/0 0/0 | ||
| Line Ahead Double Line |
0/0 0/0 | ||
| # | Formation | Normal Battle Node | AD/AP AS/AS+ |
E-1 Easy D (PoiDB)
| # | Formation | Normal Battle Node | AD/AP AS/AS+ |
|---|---|---|---|
| D | Double Line | 23/46 102/204 | |
| Double Line | 23/46 102/204 | ||
| Double Line | 35/69 153/306 | ||
| # | Formation | Normal Battle Node | AD/AP AS/AS+ |
E-1 Easy E
| # | Resource Node | ||
|---|---|---|---|
| # | Resource Node | ||
E-1 Easy F
| # | Selection Node | ||
|---|---|---|---|
| F | 艦隊の針路を選択できます。提督、どちらの針路をとられますか? You can decide the fleet's course. Admiral, which heading should we take? | ||
| # | Selection Node | ||
E-1 Easy G (PoiDB)
| # | Formation | Air Defense Node | AD/AP AS/AS+ |
|---|---|---|---|
| G | Diamond | 12/23 51/102 | |
| Diamond | 17/33 72/144 | ||
| Diamond | 23/46 102/204 | ||
| Diamond | 28/55 123/246 | ||
| # | Formation | Air Defense Node | AD/AP AS/AS+ |
E-1 Easy H (PoiDB)
| # | Formation | Normal Battle Node | AD/AP AS/AS+ |
|---|---|---|---|
| H | Line Ahead Echelon |
0/0 0/0 | |
| Line Ahead Echelon |
0/0 0/0 | ||
| Line Ahead Echelon |
0/0 0/0 | ||
| # | Formation | Normal Battle Node | AD/AP AS/AS+ |
E-1 Easy I
| # | Empty Node | ||
|---|---|---|---|
| I | 敵影を見ず。 No enemy spotted. | ||
| # | Empty Node | ||
E-1 Easy J (PoiDB)
| # | Formation | Boss Battle Node | AD/AP AS/AS+ |
|---|---|---|---|
| J | Line Ahead | 0/0 0/0 | |
| Line Ahead | 9/17 36/72 | ||
| Line Ahead (Final)
|
45/89 198/396 | ||
| # | Formation | Boss Battle Node | AD/AP AS/AS+ |
E-1 Easy K (PoiDB)
| # | Formation | Normal Battle Node | AD/AP AS/AS+ |
|---|---|---|---|
| K | Echelon | 0/0 0/0 | |
| Echelon | 0/0 0/0 | ||
| Echelon | 0/0 0/0 | ||
| # | Formation | Normal Battle Node | AD/AP AS/AS+ |
E-1 Easy M
| # | Empty Node | ||
|---|---|---|---|
| M | 敵影を見ず。 No enemy spotted. | ||
| # | Empty Node | ||
E-1 Easy N
| # | Landing Node | ||
|---|---|---|---|
| # | Landing Node | ||
E-1 Easy O (PoiDB)
| # | Formation | Boss Battle Node | AD/AP AS/AS+ |
|---|---|---|---|
| O | Line Ahead | 19/37 83/165 | |
| Line Ahead | 19/37 83/165 | ||
| Line Ahead (Final)
|
22/43 96/192 | ||
| # | Formation | Boss Battle Node | AD/AP AS/AS+ |
E-1 Casual A (PoiDB)
| # | Formation | Normal Battle Node | AD/AP AS/AS+ |
|---|---|---|---|
| A | Echelon | 0/0 0/0 | |
| Echelon Line Abreast |
0/0 0/0 | ||
| # | Formation | Normal Battle Node | AD/AP AS/AS+ |
E-1 Casual B (PoiDB)
| # | Formation | Normal Battle Node | AD/AP AS/AS+ |
|---|---|---|---|
| B | Line Ahead Double Line |
0/0 0/0 | |
| Line Ahead Double Line |
0/0 0/0 | ||
| # | Formation | Normal Battle Node | AD/AP AS/AS+ |
E-1 Casual C (PoiDB)
| # | Formation | Normal Battle Node | AD/AP AS/AS+ |
|---|---|---|---|
| C | Line Ahead Double Line |
0/0 0/0 | |
| Line Ahead Double Line |
0/0 0/0 | ||
| # | Formation | Normal Battle Node | AD/AP AS/AS+ |
E-1 Casual D (PoiDB)
| # | Formation | Normal Battle Node | AD/AP AS/AS+ |
|---|---|---|---|
| D | Double Line | 12/23 51/102 | |
| Double Line | 12/23 51/102 | ||
| Double Line | 23/46 102/204 | ||
| # | Formation | Normal Battle Node | AD/AP AS/AS+ |
E-1 Casual E
| # | Resource Node | ||
|---|---|---|---|
| # | Resource Node | ||
E-1 Casual F
| # | Selection Node | ||
|---|---|---|---|
| F | 艦隊の針路を選択できます。提督、どちらの針路をとられますか? You can decide the fleet's course. Admiral, which heading should we take? | ||
| # | Selection Node | ||
E-1 Casual G (PoiDB)
| # | Formation | Air Defense Node | AD/AP AS/AS+ |
|---|---|---|---|
| G | Diamond | 12/23 51/102 | |
| Diamond | 17/33 72/144 | ||
| Diamond | 23/46 102/204 | ||
| # | Formation | Air Defense Node | AD/AP AS/AS+ |
E-1 Casual H (PoiDB)
| # | Formation | Normal Battle Node | AD/AP AS/AS+ |
|---|---|---|---|
| H | Line Ahead Echelon |
0/0 0/0 | |
| Line Ahead Echelon |
0/0 0/0 | ||
| # | Formation | Normal Battle Node | AD/AP AS/AS+ |
E-1 Casual I
| # | Empty Node | ||
|---|---|---|---|
| I | 敵影を見ず。 No enemy spotted. | ||
| # | Empty Node | ||
E-1 Casual J (PoiDB)
| # | Formation | Boss Battle Node | AD/AP AS/AS+ |
|---|---|---|---|
| J | Line Ahead | 0/0 0/0 | |
| Line Ahead | 0/0 0/0 | ||
| Line Ahead (Final)
|
0/0 0/0 | ||
| # | Formation | Boss Battle Node | AD/AP AS/AS+ |
E-1 Casual K (PoiDB)
| # | Formation | Normal Battle Node | AD/AP AS/AS+ |
|---|---|---|---|
| K | Echelon | 0/0 0/0 | |
| Echelon | 0/0 0/0 | ||
| Echelon | 0/0 0/0 | ||
| # | Formation | Normal Battle Node | AD/AP AS/AS+ |
E-1 Casual M
| # | Empty Node | ||
|---|---|---|---|
| M | 敵影を見ず。 No enemy spotted. | ||
| # | Empty Node | ||
E-1 Casual N
| # | Landing Node | ||
|---|---|---|---|
| # | Landing Node | ||
E-1 Casual O (PoiDB)
| # | Formation | Boss Battle Node | AD/AP AS/AS+ |
|---|---|---|---|
| O | Line Ahead | 19/37 83/165 | |
| Line Ahead | 19/37 83/165 | ||
| Line Ahead (Final)
|
22/43 96/192 | ||
| # | Formation | Boss Battle Node | AD/AP AS/AS+ |