- Welcome to the Kancolle Wiki!
- If you have any questions regarding site content, account registration, etc., please visit the KanColle Wiki Discord
User:Remi Scarlet/Blog/FurutakaKaiNiCosplay
Well, here goes nothing.
What The Fuck Is This
I'll be making these blog posts as I work on my Furutaka Kai Ni cosplay props and whatnot. The posts will be made with my progress, process, description/explanation and some random musings.
This series of "blog entries" will effectively be a That said...
Day 1
Date: 5/21/15
Time spent: ~3 hours
Show/Hide Day 1
So as with all good things, there are some boring parts that come with it as well. That's usually the beginning with making cosplay props :(

Paper Layering
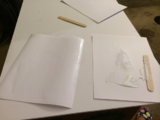
On the first day, there were two primary things I got accomplished. Well, to be specific I started on both of them. With my style of prop making, I utilize rigid foam boards (The kind you can buy from any art store, not the lionboard/EVA boards/more rare varieties) and paper.
"Whoa, whoa, whoa. Paper?", you might ask me. People who don't do cosplay props might not realize, but paper is actually not that uncommon a material to be used as one of the primary materials. Here's the trick. You have to get some of the thicker lines of paper, the kind you usually use for business cards or fancy letters and papers. These might go by the name of "cardstock" paper or just by paper weight classifications.

What I do with these papers is that depending on the required strength of the object I'm making out of this paper is, I'll layer it two to three times via spreading a thin layer of glue on one sheet, layering another clean sheet on and letting it sit under pressure for at least 24 hours. It's crucial that the layer of glue you apply is as thin as possible while making sure you don't leave any air holes, eg spots that don't have glue. If your glue is too thick, then it'll never dry and when it does, it'll be like a solid layer of glue. On the other hand, if your glue is too thin and you have pockets of no glue, then when you start cutting and using the layered sheets, you'll get areas where the sheet is... well, not combined into one layer. Also be sure to get the edges of the papers. These are important too!
Examples can be seen on the second and third images on the left as well as the second image on the right. Personally, I find using popsicle sticks that you can buy a bag for $0.99 at an arts and crafts store to be a great way to spread the glue very evenly. As for the glue, as shown in the picture, I just get a tub of Elmer's glue and it works like a freaking charm. Great stuff.
Now how many of you immature bastards thought "Ew, sticky white stuff, teehee!"? Don't worry, I thought that too. Anyway, make sure to get as thin as possible a layer on the sheet while making sure you don't make it invisibly thin.
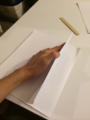
And once your glue is layered, make sure to get a clean sheet of paper and layer it on.
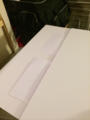
And here we lay the layered pieces of paper to rest under more foam board and an unpictured box of a lot of heavy textbooks. I guess that's one use for those $200 university textbooks I never used!


Planning and References
So now that's all good and done, what about actually planning the actual making of the props? Staring at paper dry is hardly anyone's definition of fun cosplay making. Well for starters, since I'm recreating a cosplay of a character, the logical thing to do is simply look up reference images. The key here is that you want to get a really good feel for the character's look from all possible angles. Unfortunately, this isn't always possible with just official sources. Kancolle is a great example of this due to the limited "official" art available for most characters. This is where you have to use some imagination in combination with fan art to fill in the gaps of what the official sources might be lacking in terms of angles.
Basically, before you start anything you should have a pretty good idea of the general location, size, look, feel and workings of all the major components of a character's propset. For me since I'm doing Furutaka kai ni, I needed to be able to visualize what her arm cannon, shoulder cannon, exhaust backpack thing, torpedo racks, boots, etc all looked like, how they aligned with each other and how it all worked cohesively as a unit.

Once I got an idea of that, I started sketching out some diagrams based on official art to get a reference for size and dimensions of all the major components I'd need. I haven't finished doing this step yet, but I've made some progress on the arm cannons for now. For the cannon, I did a combination of tracing as well as just visualizing test dimensions and seeing what seemed to "work" best. Eg, when I look at the official art I know that the front cannon should have a certain feel with its shape and size. That said, I guesstimate what kind of proportions/dimensions would look appropriate on me (my arm) and visualize these dimensions and shapes on my arm. I keep adjusting until I find a visualization I think works well and write them down. Another important point is that with anything you trace, assuming you trace well, the proportions of the trace will technically be the most "accurate" and "official", so just make them proportional to your own body as it is to the character. Eg, I measured my should to the first knuckle on my fist to be about 26 inches. Since I had a trace of the entire arm cannon which started at the first knuckle and ended at the shoulder, I just set that as my standard. The trace was almost exactly four inches long so I scaled it so that one inch on my scale trace was approximately 6 inches in real measurements. From here, everything else worked out via proportions to get a rough dimension estimate for the rest of the arm cannon.

And for Day 1, that was about the extent of how far I got. I expect to continue working on diagrams and dimensions for Day 2 and getting a rough estimate on the amount of materials I need as well as maybe even starting on actual material work.
Do keep in mind that everything I do here is simply a blog and the information and any tips provided are done so as-is. Don't blame me if you try doing anything I do and you blow up your house or anything. Though if you do somehow manage to blow your house up trying to reproduce my steps, do tell me because I'd be really curious as to how someone could fuck up that badly lol.
Cosplay props are fun.