- Welcome to the Kancolle Wiki!
- If you have any questions regarding site content, account registration, etc., please visit the KanColle Wiki Discord
Difference between revisions of "Spring 2021 Event/E-4/Enemy comps"
< Spring 2021 Event | E-4
Jump to navigation
Jump to search
| (2 intermediate revisions by the same user not shown) | |||
| Line 56: | Line 56: | ||
{|class="wikitable" style="width:100%" | {|class="wikitable" style="width:100%" | ||
!style="width:1px"|# | !style="width:1px"|# | ||
| − | !style="width: | + | !style="width:150px"|Formation |
!Air Raids | !Air Raids | ||
!style="width:1px"|AD/AP<br>AS/AS+ | !style="width:1px"|AD/AP<br>AS/AS+ | ||
| Line 82: | Line 82: | ||
|- | |- | ||
!style="width:1px"|# | !style="width:1px"|# | ||
| − | !style="width: | + | !style="width:150px"|Formation |
!Air Raids | !Air Raids | ||
!style="width:1px"|AD/AP<br>AS/AS+ | !style="width:1px"|AD/AP<br>AS/AS+ | ||
| Line 89: | Line 89: | ||
{|class="wikitable" style="width:100%" | {|class="wikitable" style="width:100%" | ||
!style="width:1px"|# | !style="width:1px"|# | ||
| − | !style="width: | + | !style="width:150px"|Formation |
!Air Defense Node | !Air Defense Node | ||
!style="width:1px"|AD/AP<br>AS/AS+ | !style="width:1px"|AD/AP<br>AS/AS+ | ||
| Line 107: | Line 107: | ||
|- | |- | ||
!style="width:1px"|# | !style="width:1px"|# | ||
| − | !style="width: | + | !style="width:150px"|Formation |
!Air Defense Node | !Air Defense Node | ||
!style="width:1px"|AD/AP<br>AS/AS+ | !style="width:1px"|AD/AP<br>AS/AS+ | ||
| Line 114: | Line 114: | ||
{|class="wikitable" style="width:100%" | {|class="wikitable" style="width:100%" | ||
!style="width:1px"|# | !style="width:1px"|# | ||
| − | !style="width: | + | !style="width:150px"|Formation |
!Normal Battle Node | !Normal Battle Node | ||
!style="width:1px"|AD/AP<br>AS/AS+ | !style="width:1px"|AD/AP<br>AS/AS+ | ||
| Line 132: | Line 132: | ||
|- | |- | ||
!style="width:1px"|# | !style="width:1px"|# | ||
| − | !style="width: | + | !style="width:150px"|Formation |
!Normal Battle Node | !Normal Battle Node | ||
!style="width:1px"|AD/AP<br>AS/AS+ | !style="width:1px"|AD/AP<br>AS/AS+ | ||
| Line 142: | Line 142: | ||
|- | |- | ||
|style="text-align:center"|C | |style="text-align:center"|C | ||
| − | |colspan="3" style="text-align:center"|<span lang="ja"> | + | |colspan="3" style="text-align:center"|<span lang="ja">艦隊の針路を選択できます。提督、どちらの針路をとられますか?</span><br>You can decide the fleet's course. Admiral, which heading should we take? |
|- | |- | ||
!style="width:1px"|# | !style="width:1px"|# | ||
| Line 150: | Line 150: | ||
{|class="wikitable" style="width:100%" | {|class="wikitable" style="width:100%" | ||
!style="width:1px"|# | !style="width:1px"|# | ||
| − | !style="width: | + | !style="width:150px"|Formation |
!Air Defense Node | !Air Defense Node | ||
!style="width:1px"|AD/AP<br>AS/AS+ | !style="width:1px"|AD/AP<br>AS/AS+ | ||
| Line 168: | Line 168: | ||
|- | |- | ||
!style="width:1px"|# | !style="width:1px"|# | ||
| − | !style="width: | + | !style="width:150px"|Formation |
!Air Defense Node | !Air Defense Node | ||
!style="width:1px"|AD/AP<br>AS/AS+ | !style="width:1px"|AD/AP<br>AS/AS+ | ||
| Line 175: | Line 175: | ||
{|class="wikitable" style="width:100%" | {|class="wikitable" style="width:100%" | ||
!style="width:1px"|# | !style="width:1px"|# | ||
| − | !style="width: | + | !style="width:150px"|Formation |
!Normal Battle Node | !Normal Battle Node | ||
!style="width:1px"|AD/AP<br>AS/AS+ | !style="width:1px"|AD/AP<br>AS/AS+ | ||
| Line 193: | Line 193: | ||
|- | |- | ||
!style="width:1px"|# | !style="width:1px"|# | ||
| − | !style="width: | + | !style="width:150px"|Formation |
!Normal Battle Node | !Normal Battle Node | ||
!style="width:1px"|AD/AP<br>AS/AS+ | !style="width:1px"|AD/AP<br>AS/AS+ | ||
| Line 200: | Line 200: | ||
{|class="wikitable" style="width:100%" | {|class="wikitable" style="width:100%" | ||
!style="width:1px"|# | !style="width:1px"|# | ||
| − | !style="width: | + | !style="width:150px"|Formation |
!Air Defense Node | !Air Defense Node | ||
!style="width:1px"|AD/AP<br>AS/AS+ | !style="width:1px"|AD/AP<br>AS/AS+ | ||
| Line 218: | Line 218: | ||
|- | |- | ||
!style="width:1px"|# | !style="width:1px"|# | ||
| − | !style="width: | + | !style="width:150px"|Formation |
!Air Defense Node | !Air Defense Node | ||
!style="width:1px"|AD/AP<br>AS/AS+ | !style="width:1px"|AD/AP<br>AS/AS+ | ||
| Line 225: | Line 225: | ||
{|class="wikitable" style="width:100%" | {|class="wikitable" style="width:100%" | ||
!style="width:1px"|# | !style="width:1px"|# | ||
| − | !style="width: | + | !style="width:150px"|Formation |
!Air Defense Node | !Air Defense Node | ||
!style="width:1px"|AD/AP<br>AS/AS+ | !style="width:1px"|AD/AP<br>AS/AS+ | ||
| Line 251: | Line 251: | ||
|- | |- | ||
!style="width:1px"|# | !style="width:1px"|# | ||
| − | !style="width: | + | !style="width:150px"|Formation |
!Air Defense Node | !Air Defense Node | ||
!style="width:1px"|AD/AP<br>AS/AS+ | !style="width:1px"|AD/AP<br>AS/AS+ | ||
| Line 258: | Line 258: | ||
{|class="wikitable" style="width:100%" | {|class="wikitable" style="width:100%" | ||
!style="width:1px"|# | !style="width:1px"|# | ||
| − | !style="width: | + | !style="width:150px"|Formation |
!Normal Battle Node | !Normal Battle Node | ||
!style="width:1px"|AD/AP<br>AS/AS+ | !style="width:1px"|AD/AP<br>AS/AS+ | ||
| Line 272: | Line 272: | ||
|- | |- | ||
!style="width:1px"|# | !style="width:1px"|# | ||
| − | !style="width: | + | !style="width:150px"|Formation |
!Normal Battle Node | !Normal Battle Node | ||
!style="width:1px"|AD/AP<br>AS/AS+ | !style="width:1px"|AD/AP<br>AS/AS+ | ||
| Line 279: | Line 279: | ||
{|class="wikitable" style="width:100%" | {|class="wikitable" style="width:100%" | ||
!style="width:1px"|# | !style="width:1px"|# | ||
| − | !style="width: | + | !style="width:150px"|Formation |
!Normal Battle Node | !Normal Battle Node | ||
!style="width:1px"|AD/AP<br>AS/AS+ | !style="width:1px"|AD/AP<br>AS/AS+ | ||
| Line 293: | Line 293: | ||
|- | |- | ||
!style="width:1px"|# | !style="width:1px"|# | ||
| − | !style="width: | + | !style="width:150px"|Formation |
!Normal Battle Node | !Normal Battle Node | ||
!style="width:1px"|AD/AP<br>AS/AS+ | !style="width:1px"|AD/AP<br>AS/AS+ | ||
| Line 303: | Line 303: | ||
|- | |- | ||
|style="text-align:center"|J | |style="text-align:center"|J | ||
| − | |colspan="3" style="text-align:center"|<span lang="ja">気のせいだった。</span><br>Must be my imagination. | + | |colspan="3" style="text-align:center"|<span lang="ja">気のせいだった。<br>大規模艦隊の……応急修理に適した泊地です。</span><br>Must be my imagination.<br>This is... a suitable anchorage<br>for emergency repairs on large fleets. |
|- | |- | ||
!style="width:1px"|# | !style="width:1px"|# | ||
| Line 311: | Line 311: | ||
{|class="wikitable" style="width:100%" | {|class="wikitable" style="width:100%" | ||
!style="width:1px"|# | !style="width:1px"|# | ||
| − | !style="width: | + | !style="width:150px"|Formation |
!Night Battle Node | !Night Battle Node | ||
!style="width:1px"|AD/AP<br>AS/AS+ | !style="width:1px"|AD/AP<br>AS/AS+ | ||
| Line 325: | Line 325: | ||
|- | |- | ||
!style="width:1px"|# | !style="width:1px"|# | ||
| − | !style="width: | + | !style="width:150px"|Formation |
!Night Battle Node | !Night Battle Node | ||
!style="width:1px"|AD/AP<br>AS/AS+ | !style="width:1px"|AD/AP<br>AS/AS+ | ||
| Line 332: | Line 332: | ||
{|class="wikitable" style="width:100%" | {|class="wikitable" style="width:100%" | ||
!style="width:1px"|# | !style="width:1px"|# | ||
| − | !style="width: | + | !style="width:150px"|Formation |
!Boss Battle Node | !Boss Battle Node | ||
!style="width:1px"|AD/AP<br>AS/AS+ | !style="width:1px"|AD/AP<br>AS/AS+ | ||
| Line 346: | Line 346: | ||
|- | |- | ||
!style="width:1px"|# | !style="width:1px"|# | ||
| − | !style="width: | + | !style="width:150px"|Formation |
!Boss Battle Node | !Boss Battle Node | ||
!style="width:1px"|AD/AP<br>AS/AS+ | !style="width:1px"|AD/AP<br>AS/AS+ | ||
| Line 353: | Line 353: | ||
{|class="wikitable" style="width:100%" | {|class="wikitable" style="width:100%" | ||
!style="width:1px"|# | !style="width:1px"|# | ||
| − | !style="width: | + | !style="width:150px"|Formation |
!Normal Battle Node | !Normal Battle Node | ||
!style="width:1px"|AD/AP<br>AS/AS+ | !style="width:1px"|AD/AP<br>AS/AS+ | ||
| Line 371: | Line 371: | ||
|- | |- | ||
!style="width:1px"|# | !style="width:1px"|# | ||
| − | !style="width: | + | !style="width:150px"|Formation |
!Normal Battle Node | !Normal Battle Node | ||
!style="width:1px"|AD/AP<br>AS/AS+ | !style="width:1px"|AD/AP<br>AS/AS+ | ||
| Line 378: | Line 378: | ||
{|class="wikitable" style="width:100%" | {|class="wikitable" style="width:100%" | ||
!style="width:1px"|# | !style="width:1px"|# | ||
| − | !style="width: | + | !style="width:150px"|Formation |
!Normal Battle Node | !Normal Battle Node | ||
!style="width:1px"|AD/AP<br>AS/AS+ | !style="width:1px"|AD/AP<br>AS/AS+ | ||
| Line 388: | Line 388: | ||
|- | |- | ||
!style="width:1px"|# | !style="width:1px"|# | ||
| − | !style="width: | + | !style="width:150px"|Formation |
!Normal Battle Node | !Normal Battle Node | ||
!style="width:1px"|AD/AP<br>AS/AS+ | !style="width:1px"|AD/AP<br>AS/AS+ | ||
| Line 395: | Line 395: | ||
{|class="wikitable" style="width:100%" | {|class="wikitable" style="width:100%" | ||
!style="width:1px"|# | !style="width:1px"|# | ||
| − | !style="width: | + | !style="width:150px"|Formation |
!Air Defense Node | !Air Defense Node | ||
!style="width:1px"|AD/AP<br>AS/AS+ | !style="width:1px"|AD/AP<br>AS/AS+ | ||
| Line 421: | Line 421: | ||
|- | |- | ||
!style="width:1px"|# | !style="width:1px"|# | ||
| − | !style="width: | + | !style="width:150px"|Formation |
!Air Defense Node | !Air Defense Node | ||
!style="width:1px"|AD/AP<br>AS/AS+ | !style="width:1px"|AD/AP<br>AS/AS+ | ||
| Line 428: | Line 428: | ||
{|class="wikitable" style="width:100%" | {|class="wikitable" style="width:100%" | ||
!style="width:1px"|# | !style="width:1px"|# | ||
| − | !style="width: | + | !style="width:150px"|Formation |
!Air Defense Node | !Air Defense Node | ||
!style="width:1px"|AD/AP<br>AS/AS+ | !style="width:1px"|AD/AP<br>AS/AS+ | ||
| Line 454: | Line 454: | ||
|- | |- | ||
!style="width:1px"|# | !style="width:1px"|# | ||
| − | !style="width: | + | !style="width:150px"|Formation |
!Air Defense Node | !Air Defense Node | ||
!style="width:1px"|AD/AP<br>AS/AS+ | !style="width:1px"|AD/AP<br>AS/AS+ | ||
| Line 461: | Line 461: | ||
{|class="wikitable" style="width:100%" | {|class="wikitable" style="width:100%" | ||
!style="width:1px"|# | !style="width:1px"|# | ||
| − | !style="width: | + | !style="width:150px"|Formation |
!Normal Battle Node | !Normal Battle Node | ||
!style="width:1px"|AD/AP<br>AS/AS+ | !style="width:1px"|AD/AP<br>AS/AS+ | ||
| Line 479: | Line 479: | ||
|- | |- | ||
!style="width:1px"|# | !style="width:1px"|# | ||
| − | !style="width: | + | !style="width:150px"|Formation |
!Normal Battle Node | !Normal Battle Node | ||
!style="width:1px"|AD/AP<br>AS/AS+ | !style="width:1px"|AD/AP<br>AS/AS+ | ||
| Line 486: | Line 486: | ||
{|class="wikitable" style="width:100%" | {|class="wikitable" style="width:100%" | ||
!style="width:1px"|# | !style="width:1px"|# | ||
| − | !style="width: | + | !style="width:150px"|Formation |
!Normal Battle Node | !Normal Battle Node | ||
!style="width:1px"|AD/AP<br>AS/AS+ | !style="width:1px"|AD/AP<br>AS/AS+ | ||
|- | |- | ||
!style="width:1px"|# | !style="width:1px"|# | ||
| − | !style="width: | + | !style="width:150px"|Formation |
!Normal Battle Node | !Normal Battle Node | ||
!style="width:1px"|AD/AP<br>AS/AS+ | !style="width:1px"|AD/AP<br>AS/AS+ | ||
| Line 498: | Line 498: | ||
{|class="wikitable" style="width:100%" | {|class="wikitable" style="width:100%" | ||
!style="width:1px"|# | !style="width:1px"|# | ||
| − | !style="width: | + | !style="width:150px"|Formation |
!Air Defense Node | !Air Defense Node | ||
!style="width:1px"|AD/AP<br>AS/AS+ | !style="width:1px"|AD/AP<br>AS/AS+ | ||
| Line 524: | Line 524: | ||
|- | |- | ||
!style="width:1px"|# | !style="width:1px"|# | ||
| − | !style="width: | + | !style="width:150px"|Formation |
!Air Defense Node | !Air Defense Node | ||
!style="width:1px"|AD/AP<br>AS/AS+ | !style="width:1px"|AD/AP<br>AS/AS+ | ||
| Line 531: | Line 531: | ||
{|class="wikitable" style="width:100%" | {|class="wikitable" style="width:100%" | ||
!style="width:1px"|# | !style="width:1px"|# | ||
| − | !style="width: | + | !style="width:150px"|Formation |
!Normal Battle Node | !Normal Battle Node | ||
!style="width:1px"|AD/AP<br>AS/AS+ | !style="width:1px"|AD/AP<br>AS/AS+ | ||
| Line 545: | Line 545: | ||
|- | |- | ||
!style="width:1px"|# | !style="width:1px"|# | ||
| − | !style="width: | + | !style="width:150px"|Formation |
!Normal Battle Node | !Normal Battle Node | ||
!style="width:1px"|AD/AP<br>AS/AS+ | !style="width:1px"|AD/AP<br>AS/AS+ | ||
| Line 552: | Line 552: | ||
{|class="wikitable" style="width:100%" | {|class="wikitable" style="width:100%" | ||
!style="width:1px"|# | !style="width:1px"|# | ||
| − | !style="width: | + | !style="width:150px"|Formation |
!Air Defense Node | !Air Defense Node | ||
!style="width:1px"|AD/AP<br>AS/AS+ | !style="width:1px"|AD/AP<br>AS/AS+ | ||
| Line 566: | Line 566: | ||
|- | |- | ||
!style="width:1px"|# | !style="width:1px"|# | ||
| − | !style="width: | + | !style="width:150px"|Formation |
!Air Defense Node | !Air Defense Node | ||
!style="width:1px"|AD/AP<br>AS/AS+ | !style="width:1px"|AD/AP<br>AS/AS+ | ||
| Line 573: | Line 573: | ||
{|class="wikitable" style="width:100%" | {|class="wikitable" style="width:100%" | ||
!style="width:1px"|# | !style="width:1px"|# | ||
| − | !style="width: | + | !style="width:150px"|Formation |
!Air Defense Node | !Air Defense Node | ||
!style="width:1px"|AD/AP<br>AS/AS+ | !style="width:1px"|AD/AP<br>AS/AS+ | ||
| Line 599: | Line 599: | ||
|- | |- | ||
!style="width:1px"|# | !style="width:1px"|# | ||
| − | !style="width: | + | !style="width:150px"|Formation |
!Air Defense Node | !Air Defense Node | ||
!style="width:1px"|AD/AP<br>AS/AS+ | !style="width:1px"|AD/AP<br>AS/AS+ | ||
| Line 617: | Line 617: | ||
{|class="wikitable" style="width:100%" | {|class="wikitable" style="width:100%" | ||
!style="width:1px"|# | !style="width:1px"|# | ||
| − | !style="width: | + | !style="width:150px"|Formation |
!Air Defense Node | !Air Defense Node | ||
!style="width:1px"|AD/AP<br>AS/AS+ | !style="width:1px"|AD/AP<br>AS/AS+ | ||
| Line 643: | Line 643: | ||
|- | |- | ||
!style="width:1px"|# | !style="width:1px"|# | ||
| − | !style="width: | + | !style="width:150px"|Formation |
!Air Defense Node | !Air Defense Node | ||
!style="width:1px"|AD/AP<br>AS/AS+ | !style="width:1px"|AD/AP<br>AS/AS+ | ||
| Line 650: | Line 650: | ||
{|class="wikitable" style="width:100%" | {|class="wikitable" style="width:100%" | ||
!style="width:1px"|# | !style="width:1px"|# | ||
| − | !style="width: | + | !style="width:150px"|Formation |
!Boss Battle Node | !Boss Battle Node | ||
!style="width:1px"|AD/AP<br>AS/AS+ | !style="width:1px"|AD/AP<br>AS/AS+ | ||
| Line 660: | Line 660: | ||
|- | |- | ||
!style="width:1px"|# | !style="width:1px"|# | ||
| − | !style="width: | + | !style="width:150px"|Formation |
!Boss Battle Node | !Boss Battle Node | ||
!style="width:1px"|AD/AP<br>AS/AS+ | !style="width:1px"|AD/AP<br>AS/AS+ | ||
| Line 686: | Line 686: | ||
{|class="wikitable" style="width:100%" | {|class="wikitable" style="width:100%" | ||
!style="width:1px"|# | !style="width:1px"|# | ||
| − | !style="width: | + | !style="width:150px"|Formation |
!Normal Battle Node | !Normal Battle Node | ||
!style="width:1px"|AD/AP<br>AS/AS+ | !style="width:1px"|AD/AP<br>AS/AS+ | ||
| Line 704: | Line 704: | ||
|- | |- | ||
!style="width:1px"|# | !style="width:1px"|# | ||
| − | !style="width: | + | !style="width:150px"|Formation |
!Normal Battle Node | !Normal Battle Node | ||
!style="width:1px"|AD/AP<br>AS/AS+ | !style="width:1px"|AD/AP<br>AS/AS+ | ||
| Line 711: | Line 711: | ||
{|class="wikitable" style="width:100%" | {|class="wikitable" style="width:100%" | ||
!style="width:1px"|# | !style="width:1px"|# | ||
| − | !style="width: | + | !style="width:150px"|Formation |
!Normal Battle Node | !Normal Battle Node | ||
!style="width:1px"|AD/AP<br>AS/AS+ | !style="width:1px"|AD/AP<br>AS/AS+ | ||
| Line 725: | Line 725: | ||
|- | |- | ||
!style="width:1px"|# | !style="width:1px"|# | ||
| − | !style="width: | + | !style="width:150px"|Formation |
!Normal Battle Node | !Normal Battle Node | ||
!style="width:1px"|AD/AP<br>AS/AS+ | !style="width:1px"|AD/AP<br>AS/AS+ | ||
| Line 743: | Line 743: | ||
{|class="wikitable" style="width:100%" | {|class="wikitable" style="width:100%" | ||
!style="width:1px"|# | !style="width:1px"|# | ||
| − | !style="width: | + | !style="width:150px"|Formation |
!Normal Battle Node | !Normal Battle Node | ||
!style="width:1px"|AD/AP<br>AS/AS+ | !style="width:1px"|AD/AP<br>AS/AS+ | ||
| Line 753: | Line 753: | ||
|- | |- | ||
!style="width:1px"|# | !style="width:1px"|# | ||
| − | !style="width: | + | !style="width:150px"|Formation |
!Normal Battle Node | !Normal Battle Node | ||
!style="width:1px"|AD/AP<br>AS/AS+ | !style="width:1px"|AD/AP<br>AS/AS+ | ||
| Line 763: | Line 763: | ||
|- | |- | ||
|style="text-align:center"|X1 | |style="text-align:center"|X1 | ||
| − | |colspan="3" style="text-align:center"|<span lang="ja">敵影を見ず。 | + | |colspan="3" style="text-align:center"|<span lang="ja">敵影を見ず。</span><br>No enemy spotted. |
|- | |- | ||
!style="width:1px"|# | !style="width:1px"|# | ||
| Line 771: | Line 771: | ||
{|class="wikitable" style="width:100%" | {|class="wikitable" style="width:100%" | ||
!style="width:1px"|# | !style="width:1px"|# | ||
| − | !style="width: | + | !style="width:150px"|Formation |
!Normal Battle Node | !Normal Battle Node | ||
!style="width:1px"|AD/AP<br>AS/AS+ | !style="width:1px"|AD/AP<br>AS/AS+ | ||
| Line 781: | Line 781: | ||
|- | |- | ||
!style="width:1px"|# | !style="width:1px"|# | ||
| − | !style="width: | + | !style="width:150px"|Formation |
!Normal Battle Node | !Normal Battle Node | ||
!style="width:1px"|AD/AP<br>AS/AS+ | !style="width:1px"|AD/AP<br>AS/AS+ | ||
| Line 788: | Line 788: | ||
{|class="wikitable" style="width:100%" | {|class="wikitable" style="width:100%" | ||
!style="width:1px"|# | !style="width:1px"|# | ||
| − | !style="width: | + | !style="width:150px"|Formation |
!Air Defense Node | !Air Defense Node | ||
!style="width:1px"|AD/AP<br>AS/AS+ | !style="width:1px"|AD/AP<br>AS/AS+ | ||
| Line 814: | Line 814: | ||
|- | |- | ||
!style="width:1px"|# | !style="width:1px"|# | ||
| − | !style="width: | + | !style="width:150px"|Formation |
!Air Defense Node | !Air Defense Node | ||
!style="width:1px"|AD/AP<br>AS/AS+ | !style="width:1px"|AD/AP<br>AS/AS+ | ||
| Line 821: | Line 821: | ||
{|class="wikitable" style="width:100%" | {|class="wikitable" style="width:100%" | ||
!style="width:1px"|# | !style="width:1px"|# | ||
| − | !style="width: | + | !style="width:150px"|Formation |
!Boss Battle Node | !Boss Battle Node | ||
!style="width:1px"|AD/AP<br>AS/AS+ | !style="width:1px"|AD/AP<br>AS/AS+ | ||
| Line 835: | Line 835: | ||
|- | |- | ||
!style="width:1px"|# | !style="width:1px"|# | ||
| − | !style="width: | + | !style="width:150px"|Formation |
!Boss Battle Node | !Boss Battle Node | ||
!style="width:1px"|AD/AP<br>AS/AS+ | !style="width:1px"|AD/AP<br>AS/AS+ | ||
| Line 842: | Line 842: | ||
{|class="wikitable" style="width:100%" | {|class="wikitable" style="width:100%" | ||
!style="width:1px"|# | !style="width:1px"|# | ||
| − | !style="width: | + | !style="width:150px"|Formation |
!Normal Battle Node | !Normal Battle Node | ||
!style="width:1px"|AD/AP<br>AS/AS+ | !style="width:1px"|AD/AP<br>AS/AS+ | ||
| Line 856: | Line 856: | ||
|- | |- | ||
!style="width:1px"|# | !style="width:1px"|# | ||
| − | !style="width: | + | !style="width:150px"|Formation |
!Normal Battle Node | !Normal Battle Node | ||
!style="width:1px"|AD/AP<br>AS/AS+ | !style="width:1px"|AD/AP<br>AS/AS+ | ||
| Line 863: | Line 863: | ||
{|class="wikitable" style="width:100%" | {|class="wikitable" style="width:100%" | ||
!style="width:1px"|# | !style="width:1px"|# | ||
| − | !style="width: | + | !style="width:150px"|Formation |
!Normal Battle Node | !Normal Battle Node | ||
!style="width:1px"|AD/AP<br>AS/AS+ | !style="width:1px"|AD/AP<br>AS/AS+ | ||
| Line 877: | Line 877: | ||
|- | |- | ||
!style="width:1px"|# | !style="width:1px"|# | ||
| − | !style="width: | + | !style="width:150px"|Formation |
!Normal Battle Node | !Normal Battle Node | ||
!style="width:1px"|AD/AP<br>AS/AS+ | !style="width:1px"|AD/AP<br>AS/AS+ | ||
| Line 898: | Line 898: | ||
|- | |- | ||
|style="text-align:center"|Y4 | |style="text-align:center"|Y4 | ||
| − | |colspan="3" style="text-align:center"|<span lang="ja">敵影を見ず。 | + | |colspan="3" style="text-align:center"|<span lang="ja">敵影を見ず。</span><br>No enemy spotted. |
|- | |- | ||
!style="width:1px"|# | !style="width:1px"|# | ||
| Line 906: | Line 906: | ||
{|class="wikitable" style="width:100%" | {|class="wikitable" style="width:100%" | ||
!style="width:1px"|# | !style="width:1px"|# | ||
| − | !style="width: | + | !style="width:150px"|Formation |
!Normal Battle Node | !Normal Battle Node | ||
!style="width:1px"|AD/AP<br>AS/AS+ | !style="width:1px"|AD/AP<br>AS/AS+ | ||
| Line 920: | Line 920: | ||
|- | |- | ||
!style="width:1px"|# | !style="width:1px"|# | ||
| − | !style="width: | + | !style="width:150px"|Formation |
!Normal Battle Node | !Normal Battle Node | ||
!style="width:1px"|AD/AP<br>AS/AS+ | !style="width:1px"|AD/AP<br>AS/AS+ | ||
| Line 927: | Line 927: | ||
{|class="wikitable" style="width:100%" | {|class="wikitable" style="width:100%" | ||
!style="width:1px"|# | !style="width:1px"|# | ||
| − | !style="width: | + | !style="width:150px"|Formation |
!Boss Battle Node | !Boss Battle Node | ||
!style="width:1px"|AD/AP<br>AS/AS+ | !style="width:1px"|AD/AP<br>AS/AS+ | ||
| Line 941: | Line 941: | ||
|- | |- | ||
!style="width:1px"|# | !style="width:1px"|# | ||
| − | !style="width: | + | !style="width:150px"|Formation |
!Boss Battle Node | !Boss Battle Node | ||
!style="width:1px"|AD/AP<br>AS/AS+ | !style="width:1px"|AD/AP<br>AS/AS+ | ||
| Line 948: | Line 948: | ||
{|class="wikitable" style="width:100%" | {|class="wikitable" style="width:100%" | ||
!style="width:1px"|# | !style="width:1px"|# | ||
| − | !style="width: | + | !style="width:150px"|Formation |
!Normal Battle Node | !Normal Battle Node | ||
!style="width:1px"|AD/AP<br>AS/AS+ | !style="width:1px"|AD/AP<br>AS/AS+ | ||
| Line 958: | Line 958: | ||
|- | |- | ||
!style="width:1px"|# | !style="width:1px"|# | ||
| − | !style="width: | + | !style="width:150px"|Formation |
!Normal Battle Node | !Normal Battle Node | ||
!style="width:1px"|AD/AP<br>AS/AS+ | !style="width:1px"|AD/AP<br>AS/AS+ | ||
| Line 965: | Line 965: | ||
{|class="wikitable" style="width:100%;margin-bottom:240px !important" | {|class="wikitable" style="width:100%;margin-bottom:240px !important" | ||
!style="width:1px"|# | !style="width:1px"|# | ||
| − | !style="width: | + | !style="width:150px"|Formation |
!Normal Battle Node | !Normal Battle Node | ||
!style="width:1px"|AD/AP<br>AS/AS+ | !style="width:1px"|AD/AP<br>AS/AS+ | ||
| Line 979: | Line 979: | ||
|- | |- | ||
!style="width:1px"|# | !style="width:1px"|# | ||
| − | !style="width: | + | !style="width:150px"|Formation |
!Normal Battle Node | !Normal Battle Node | ||
!style="width:1px"|AD/AP<br>AS/AS+ | !style="width:1px"|AD/AP<br>AS/AS+ | ||
| Line 1,040: | Line 1,040: | ||
{|class="wikitable" style="width:100%" | {|class="wikitable" style="width:100%" | ||
!style="width:1px"|# | !style="width:1px"|# | ||
| − | !style="width: | + | !style="width:150px"|Formation |
!Air Raids | !Air Raids | ||
!style="width:1px"|AD/AP<br>AS/AS+ | !style="width:1px"|AD/AP<br>AS/AS+ | ||
| Line 1,066: | Line 1,066: | ||
|- | |- | ||
!style="width:1px"|# | !style="width:1px"|# | ||
| − | !style="width: | + | !style="width:150px"|Formation |
!Air Raids | !Air Raids | ||
!style="width:1px"|AD/AP<br>AS/AS+ | !style="width:1px"|AD/AP<br>AS/AS+ | ||
| Line 1,073: | Line 1,073: | ||
{|class="wikitable" style="width:100%" | {|class="wikitable" style="width:100%" | ||
!style="width:1px"|# | !style="width:1px"|# | ||
| − | !style="width: | + | !style="width:150px"|Formation |
!Air Defense Node | !Air Defense Node | ||
!style="width:1px"|AD/AP<br>AS/AS+ | !style="width:1px"|AD/AP<br>AS/AS+ | ||
| Line 1,091: | Line 1,091: | ||
|- | |- | ||
!style="width:1px"|# | !style="width:1px"|# | ||
| − | !style="width: | + | !style="width:150px"|Formation |
!Air Defense Node | !Air Defense Node | ||
!style="width:1px"|AD/AP<br>AS/AS+ | !style="width:1px"|AD/AP<br>AS/AS+ | ||
| Line 1,098: | Line 1,098: | ||
{|class="wikitable" style="width:100%" | {|class="wikitable" style="width:100%" | ||
!style="width:1px"|# | !style="width:1px"|# | ||
| − | !style="width: | + | !style="width:150px"|Formation |
!Normal Battle Node | !Normal Battle Node | ||
!style="width:1px"|AD/AP<br>AS/AS+ | !style="width:1px"|AD/AP<br>AS/AS+ | ||
| Line 1,116: | Line 1,116: | ||
|- | |- | ||
!style="width:1px"|# | !style="width:1px"|# | ||
| − | !style="width: | + | !style="width:150px"|Formation |
!Normal Battle Node | !Normal Battle Node | ||
!style="width:1px"|AD/AP<br>AS/AS+ | !style="width:1px"|AD/AP<br>AS/AS+ | ||
| Line 1,126: | Line 1,126: | ||
|- | |- | ||
|style="text-align:center"|C | |style="text-align:center"|C | ||
| − | |colspan="3" style="text-align:center"|<span lang="ja"> | + | |colspan="3" style="text-align:center"|<span lang="ja">艦隊の針路を選択できます。提督、どちらの針路をとられますか?</span><br>You can decide the fleet's course. Admiral, which heading should we take? |
|- | |- | ||
!style="width:1px"|# | !style="width:1px"|# | ||
| Line 1,134: | Line 1,134: | ||
{|class="wikitable" style="width:100%" | {|class="wikitable" style="width:100%" | ||
!style="width:1px"|# | !style="width:1px"|# | ||
| − | !style="width: | + | !style="width:150px"|Formation |
!Air Defense Node | !Air Defense Node | ||
!style="width:1px"|AD/AP<br>AS/AS+ | !style="width:1px"|AD/AP<br>AS/AS+ | ||
| Line 1,152: | Line 1,152: | ||
|- | |- | ||
!style="width:1px"|# | !style="width:1px"|# | ||
| − | !style="width: | + | !style="width:150px"|Formation |
!Air Defense Node | !Air Defense Node | ||
!style="width:1px"|AD/AP<br>AS/AS+ | !style="width:1px"|AD/AP<br>AS/AS+ | ||
| Line 1,159: | Line 1,159: | ||
{|class="wikitable" style="width:100%" | {|class="wikitable" style="width:100%" | ||
!style="width:1px"|# | !style="width:1px"|# | ||
| − | !style="width: | + | !style="width:150px"|Formation |
!Normal Battle Node | !Normal Battle Node | ||
!style="width:1px"|AD/AP<br>AS/AS+ | !style="width:1px"|AD/AP<br>AS/AS+ | ||
| Line 1,177: | Line 1,177: | ||
|- | |- | ||
!style="width:1px"|# | !style="width:1px"|# | ||
| − | !style="width: | + | !style="width:150px"|Formation |
!Normal Battle Node | !Normal Battle Node | ||
!style="width:1px"|AD/AP<br>AS/AS+ | !style="width:1px"|AD/AP<br>AS/AS+ | ||
| Line 1,184: | Line 1,184: | ||
{|class="wikitable" style="width:100%" | {|class="wikitable" style="width:100%" | ||
!style="width:1px"|# | !style="width:1px"|# | ||
| − | !style="width: | + | !style="width:150px"|Formation |
!Air Defense Node | !Air Defense Node | ||
!style="width:1px"|AD/AP<br>AS/AS+ | !style="width:1px"|AD/AP<br>AS/AS+ | ||
| Line 1,202: | Line 1,202: | ||
|- | |- | ||
!style="width:1px"|# | !style="width:1px"|# | ||
| − | !style="width: | + | !style="width:150px"|Formation |
!Air Defense Node | !Air Defense Node | ||
!style="width:1px"|AD/AP<br>AS/AS+ | !style="width:1px"|AD/AP<br>AS/AS+ | ||
| Line 1,209: | Line 1,209: | ||
{|class="wikitable" style="width:100%" | {|class="wikitable" style="width:100%" | ||
!style="width:1px"|# | !style="width:1px"|# | ||
| − | !style="width: | + | !style="width:150px"|Formation |
!Air Defense Node | !Air Defense Node | ||
!style="width:1px"|AD/AP<br>AS/AS+ | !style="width:1px"|AD/AP<br>AS/AS+ | ||
| Line 1,231: | Line 1,231: | ||
|- | |- | ||
!style="width:1px"|# | !style="width:1px"|# | ||
| − | !style="width: | + | !style="width:150px"|Formation |
!Air Defense Node | !Air Defense Node | ||
!style="width:1px"|AD/AP<br>AS/AS+ | !style="width:1px"|AD/AP<br>AS/AS+ | ||
| Line 1,238: | Line 1,238: | ||
{|class="wikitable" style="width:100%" | {|class="wikitable" style="width:100%" | ||
!style="width:1px"|# | !style="width:1px"|# | ||
| − | !style="width: | + | !style="width:150px"|Formation |
!Normal Battle Node | !Normal Battle Node | ||
!style="width:1px"|AD/AP<br>AS/AS+ | !style="width:1px"|AD/AP<br>AS/AS+ | ||
| Line 1,252: | Line 1,252: | ||
|- | |- | ||
!style="width:1px"|# | !style="width:1px"|# | ||
| − | !style="width: | + | !style="width:150px"|Formation |
!Normal Battle Node | !Normal Battle Node | ||
!style="width:1px"|AD/AP<br>AS/AS+ | !style="width:1px"|AD/AP<br>AS/AS+ | ||
| Line 1,259: | Line 1,259: | ||
{|class="wikitable" style="width:100%" | {|class="wikitable" style="width:100%" | ||
!style="width:1px"|# | !style="width:1px"|# | ||
| − | !style="width: | + | !style="width:150px"|Formation |
!Normal Battle Node | !Normal Battle Node | ||
!style="width:1px"|AD/AP<br>AS/AS+ | !style="width:1px"|AD/AP<br>AS/AS+ | ||
| Line 1,273: | Line 1,273: | ||
|- | |- | ||
!style="width:1px"|# | !style="width:1px"|# | ||
| − | !style="width: | + | !style="width:150px"|Formation |
!Normal Battle Node | !Normal Battle Node | ||
!style="width:1px"|AD/AP<br>AS/AS+ | !style="width:1px"|AD/AP<br>AS/AS+ | ||
| Line 1,283: | Line 1,283: | ||
|- | |- | ||
|style="text-align:center"|J | |style="text-align:center"|J | ||
| − | |colspan="3" style="text-align:center"|<span lang="ja">気のせいだった。</span><br>Must be my imagination. | + | |colspan="3" style="text-align:center"|<span lang="ja">気のせいだった。<br>大規模艦隊の……応急修理に適した泊地です。</span><br>Must be my imagination.<br>This is... a suitable anchorage<br>for emergency repairs on large fleets. |
|- | |- | ||
!style="width:1px"|# | !style="width:1px"|# | ||
| Line 1,291: | Line 1,291: | ||
{|class="wikitable" style="width:100%" | {|class="wikitable" style="width:100%" | ||
!style="width:1px"|# | !style="width:1px"|# | ||
| − | !style="width: | + | !style="width:150px"|Formation |
!Night Battle Node | !Night Battle Node | ||
!style="width:1px"|AD/AP<br>AS/AS+ | !style="width:1px"|AD/AP<br>AS/AS+ | ||
| Line 1,305: | Line 1,305: | ||
|- | |- | ||
!style="width:1px"|# | !style="width:1px"|# | ||
| − | !style="width: | + | !style="width:150px"|Formation |
!Night Battle Node | !Night Battle Node | ||
!style="width:1px"|AD/AP<br>AS/AS+ | !style="width:1px"|AD/AP<br>AS/AS+ | ||
| Line 1,312: | Line 1,312: | ||
{|class="wikitable" style="width:100%" | {|class="wikitable" style="width:100%" | ||
!style="width:1px"|# | !style="width:1px"|# | ||
| − | !style="width: | + | !style="width:150px"|Formation |
!Boss Battle Node | !Boss Battle Node | ||
!style="width:1px"|AD/AP<br>AS/AS+ | !style="width:1px"|AD/AP<br>AS/AS+ | ||
| Line 1,326: | Line 1,326: | ||
|- | |- | ||
!style="width:1px"|# | !style="width:1px"|# | ||
| − | !style="width: | + | !style="width:150px"|Formation |
!Boss Battle Node | !Boss Battle Node | ||
!style="width:1px"|AD/AP<br>AS/AS+ | !style="width:1px"|AD/AP<br>AS/AS+ | ||
| Line 1,333: | Line 1,333: | ||
{|class="wikitable" style="width:100%" | {|class="wikitable" style="width:100%" | ||
!style="width:1px"|# | !style="width:1px"|# | ||
| − | !style="width: | + | !style="width:150px"|Formation |
!Normal Battle Node | !Normal Battle Node | ||
!style="width:1px"|AD/AP<br>AS/AS+ | !style="width:1px"|AD/AP<br>AS/AS+ | ||
| Line 1,351: | Line 1,351: | ||
|- | |- | ||
!style="width:1px"|# | !style="width:1px"|# | ||
| − | !style="width: | + | !style="width:150px"|Formation |
!Normal Battle Node | !Normal Battle Node | ||
!style="width:1px"|AD/AP<br>AS/AS+ | !style="width:1px"|AD/AP<br>AS/AS+ | ||
| Line 1,358: | Line 1,358: | ||
{|class="wikitable" style="width:100%" | {|class="wikitable" style="width:100%" | ||
!style="width:1px"|# | !style="width:1px"|# | ||
| − | !style="width: | + | !style="width:150px"|Formation |
!Normal Battle Node | !Normal Battle Node | ||
!style="width:1px"|AD/AP<br>AS/AS+ | !style="width:1px"|AD/AP<br>AS/AS+ | ||
| Line 1,368: | Line 1,368: | ||
|- | |- | ||
!style="width:1px"|# | !style="width:1px"|# | ||
| − | !style="width: | + | !style="width:150px"|Formation |
!Normal Battle Node | !Normal Battle Node | ||
!style="width:1px"|AD/AP<br>AS/AS+ | !style="width:1px"|AD/AP<br>AS/AS+ | ||
| Line 1,375: | Line 1,375: | ||
{|class="wikitable" style="width:100%" | {|class="wikitable" style="width:100%" | ||
!style="width:1px"|# | !style="width:1px"|# | ||
| − | !style="width: | + | !style="width:150px"|Formation |
!Air Defense Node | !Air Defense Node | ||
!style="width:1px"|AD/AP<br>AS/AS+ | !style="width:1px"|AD/AP<br>AS/AS+ | ||
| Line 1,397: | Line 1,397: | ||
|- | |- | ||
!style="width:1px"|# | !style="width:1px"|# | ||
| − | !style="width: | + | !style="width:150px"|Formation |
!Air Defense Node | !Air Defense Node | ||
!style="width:1px"|AD/AP<br>AS/AS+ | !style="width:1px"|AD/AP<br>AS/AS+ | ||
| Line 1,404: | Line 1,404: | ||
{|class="wikitable" style="width:100%" | {|class="wikitable" style="width:100%" | ||
!style="width:1px"|# | !style="width:1px"|# | ||
| − | !style="width: | + | !style="width:150px"|Formation |
!Air Defense Node | !Air Defense Node | ||
!style="width:1px"|AD/AP<br>AS/AS+ | !style="width:1px"|AD/AP<br>AS/AS+ | ||
| Line 1,418: | Line 1,418: | ||
|- | |- | ||
!style="width:1px"|# | !style="width:1px"|# | ||
| − | !style="width: | + | !style="width:150px"|Formation |
!Air Defense Node | !Air Defense Node | ||
!style="width:1px"|AD/AP<br>AS/AS+ | !style="width:1px"|AD/AP<br>AS/AS+ | ||
| Line 1,425: | Line 1,425: | ||
{|class="wikitable" style="width:100%" | {|class="wikitable" style="width:100%" | ||
!style="width:1px"|# | !style="width:1px"|# | ||
| − | !style="width: | + | !style="width:150px"|Formation |
!Normal Battle Node | !Normal Battle Node | ||
!style="width:1px"|AD/AP<br>AS/AS+ | !style="width:1px"|AD/AP<br>AS/AS+ | ||
| Line 1,443: | Line 1,443: | ||
|- | |- | ||
!style="width:1px"|# | !style="width:1px"|# | ||
| − | !style="width: | + | !style="width:150px"|Formation |
!Normal Battle Node | !Normal Battle Node | ||
!style="width:1px"|AD/AP<br>AS/AS+ | !style="width:1px"|AD/AP<br>AS/AS+ | ||
| Line 1,450: | Line 1,450: | ||
{|class="wikitable" style="width:100%" | {|class="wikitable" style="width:100%" | ||
!style="width:1px"|# | !style="width:1px"|# | ||
| − | !style="width: | + | !style="width:150px"|Formation |
!Normal Battle Node | !Normal Battle Node | ||
!style="width:1px"|AD/AP<br>AS/AS+ | !style="width:1px"|AD/AP<br>AS/AS+ | ||
|- | |- | ||
!style="width:1px"|# | !style="width:1px"|# | ||
| − | !style="width: | + | !style="width:150px"|Formation |
!Normal Battle Node | !Normal Battle Node | ||
!style="width:1px"|AD/AP<br>AS/AS+ | !style="width:1px"|AD/AP<br>AS/AS+ | ||
| Line 1,462: | Line 1,462: | ||
{|class="wikitable" style="width:100%" | {|class="wikitable" style="width:100%" | ||
!style="width:1px"|# | !style="width:1px"|# | ||
| − | !style="width: | + | !style="width:150px"|Formation |
!Air Defense Node | !Air Defense Node | ||
!style="width:1px"|AD/AP<br>AS/AS+ | !style="width:1px"|AD/AP<br>AS/AS+ | ||
| Line 1,488: | Line 1,488: | ||
|- | |- | ||
!style="width:1px"|# | !style="width:1px"|# | ||
| − | !style="width: | + | !style="width:150px"|Formation |
!Air Defense Node | !Air Defense Node | ||
!style="width:1px"|AD/AP<br>AS/AS+ | !style="width:1px"|AD/AP<br>AS/AS+ | ||
| Line 1,495: | Line 1,495: | ||
{|class="wikitable" style="width:100%" | {|class="wikitable" style="width:100%" | ||
!style="width:1px"|# | !style="width:1px"|# | ||
| − | !style="width: | + | !style="width:150px"|Formation |
!Normal Battle Node | !Normal Battle Node | ||
!style="width:1px"|AD/AP<br>AS/AS+ | !style="width:1px"|AD/AP<br>AS/AS+ | ||
| Line 1,509: | Line 1,509: | ||
|- | |- | ||
!style="width:1px"|# | !style="width:1px"|# | ||
| − | !style="width: | + | !style="width:150px"|Formation |
!Normal Battle Node | !Normal Battle Node | ||
!style="width:1px"|AD/AP<br>AS/AS+ | !style="width:1px"|AD/AP<br>AS/AS+ | ||
| Line 1,516: | Line 1,516: | ||
{|class="wikitable" style="width:100%" | {|class="wikitable" style="width:100%" | ||
!style="width:1px"|# | !style="width:1px"|# | ||
| − | !style="width: | + | !style="width:150px"|Formation |
!Air Defense Node | !Air Defense Node | ||
!style="width:1px"|AD/AP<br>AS/AS+ | !style="width:1px"|AD/AP<br>AS/AS+ | ||
|- | |- | ||
!style="width:1px"|# | !style="width:1px"|# | ||
| − | !style="width: | + | !style="width:150px"|Formation |
!Air Defense Node | !Air Defense Node | ||
!style="width:1px"|AD/AP<br>AS/AS+ | !style="width:1px"|AD/AP<br>AS/AS+ | ||
| Line 1,528: | Line 1,528: | ||
{|class="wikitable" style="width:100%" | {|class="wikitable" style="width:100%" | ||
!style="width:1px"|# | !style="width:1px"|# | ||
| − | !style="width: | + | !style="width:150px"|Formation |
!Air Defense Node | !Air Defense Node | ||
!style="width:1px"|AD/AP<br>AS/AS+ | !style="width:1px"|AD/AP<br>AS/AS+ | ||
| Line 1,554: | Line 1,554: | ||
|- | |- | ||
!style="width:1px"|# | !style="width:1px"|# | ||
| − | !style="width: | + | !style="width:150px"|Formation |
!Air Defense Node | !Air Defense Node | ||
!style="width:1px"|AD/AP<br>AS/AS+ | !style="width:1px"|AD/AP<br>AS/AS+ | ||
| Line 1,572: | Line 1,572: | ||
{|class="wikitable" style="width:100%" | {|class="wikitable" style="width:100%" | ||
!style="width:1px"|# | !style="width:1px"|# | ||
| − | !style="width: | + | !style="width:150px"|Formation |
!Air Defense Node | !Air Defense Node | ||
!style="width:1px"|AD/AP<br>AS/AS+ | !style="width:1px"|AD/AP<br>AS/AS+ | ||
| Line 1,598: | Line 1,598: | ||
|- | |- | ||
!style="width:1px"|# | !style="width:1px"|# | ||
| − | !style="width: | + | !style="width:150px"|Formation |
!Air Defense Node | !Air Defense Node | ||
!style="width:1px"|AD/AP<br>AS/AS+ | !style="width:1px"|AD/AP<br>AS/AS+ | ||
| Line 1,605: | Line 1,605: | ||
{|class="wikitable" style="width:100%" | {|class="wikitable" style="width:100%" | ||
!style="width:1px"|# | !style="width:1px"|# | ||
| − | !style="width: | + | !style="width:150px"|Formation |
!Boss Battle Node | !Boss Battle Node | ||
!style="width:1px"|AD/AP<br>AS/AS+ | !style="width:1px"|AD/AP<br>AS/AS+ | ||
| Line 1,615: | Line 1,615: | ||
|- | |- | ||
!style="width:1px"|# | !style="width:1px"|# | ||
| − | !style="width: | + | !style="width:150px"|Formation |
!Boss Battle Node | !Boss Battle Node | ||
!style="width:1px"|AD/AP<br>AS/AS+ | !style="width:1px"|AD/AP<br>AS/AS+ | ||
| Line 1,641: | Line 1,641: | ||
{|class="wikitable" style="width:100%" | {|class="wikitable" style="width:100%" | ||
!style="width:1px"|# | !style="width:1px"|# | ||
| − | !style="width: | + | !style="width:150px"|Formation |
!Normal Battle Node | !Normal Battle Node | ||
!style="width:1px"|AD/AP<br>AS/AS+ | !style="width:1px"|AD/AP<br>AS/AS+ | ||
| Line 1,659: | Line 1,659: | ||
|- | |- | ||
!style="width:1px"|# | !style="width:1px"|# | ||
| − | !style="width: | + | !style="width:150px"|Formation |
!Normal Battle Node | !Normal Battle Node | ||
!style="width:1px"|AD/AP<br>AS/AS+ | !style="width:1px"|AD/AP<br>AS/AS+ | ||
| Line 1,666: | Line 1,666: | ||
{|class="wikitable" style="width:100%" | {|class="wikitable" style="width:100%" | ||
!style="width:1px"|# | !style="width:1px"|# | ||
| − | !style="width: | + | !style="width:150px"|Formation |
!Normal Battle Node | !Normal Battle Node | ||
!style="width:1px"|AD/AP<br>AS/AS+ | !style="width:1px"|AD/AP<br>AS/AS+ | ||
| Line 1,680: | Line 1,680: | ||
|- | |- | ||
!style="width:1px"|# | !style="width:1px"|# | ||
| − | !style="width: | + | !style="width:150px"|Formation |
!Normal Battle Node | !Normal Battle Node | ||
!style="width:1px"|AD/AP<br>AS/AS+ | !style="width:1px"|AD/AP<br>AS/AS+ | ||
| Line 1,698: | Line 1,698: | ||
{|class="wikitable" style="width:100%" | {|class="wikitable" style="width:100%" | ||
!style="width:1px"|# | !style="width:1px"|# | ||
| − | !style="width: | + | !style="width:150px"|Formation |
!Normal Battle Node | !Normal Battle Node | ||
!style="width:1px"|AD/AP<br>AS/AS+ | !style="width:1px"|AD/AP<br>AS/AS+ | ||
| Line 1,708: | Line 1,708: | ||
|- | |- | ||
!style="width:1px"|# | !style="width:1px"|# | ||
| − | !style="width: | + | !style="width:150px"|Formation |
!Normal Battle Node | !Normal Battle Node | ||
!style="width:1px"|AD/AP<br>AS/AS+ | !style="width:1px"|AD/AP<br>AS/AS+ | ||
| Line 1,718: | Line 1,718: | ||
|- | |- | ||
|style="text-align:center"|X1 | |style="text-align:center"|X1 | ||
| − | |colspan="3" style="text-align:center"|<span lang="ja">敵影を見ず。 | + | |colspan="3" style="text-align:center"|<span lang="ja">敵影を見ず。</span><br>No enemy spotted. |
|- | |- | ||
!style="width:1px"|# | !style="width:1px"|# | ||
| Line 1,726: | Line 1,726: | ||
{|class="wikitable" style="width:100%" | {|class="wikitable" style="width:100%" | ||
!style="width:1px"|# | !style="width:1px"|# | ||
| − | !style="width: | + | !style="width:150px"|Formation |
!Normal Battle Node | !Normal Battle Node | ||
!style="width:1px"|AD/AP<br>AS/AS+ | !style="width:1px"|AD/AP<br>AS/AS+ | ||
| Line 1,736: | Line 1,736: | ||
|- | |- | ||
!style="width:1px"|# | !style="width:1px"|# | ||
| − | !style="width: | + | !style="width:150px"|Formation |
!Normal Battle Node | !Normal Battle Node | ||
!style="width:1px"|AD/AP<br>AS/AS+ | !style="width:1px"|AD/AP<br>AS/AS+ | ||
| Line 1,743: | Line 1,743: | ||
{|class="wikitable" style="width:100%" | {|class="wikitable" style="width:100%" | ||
!style="width:1px"|# | !style="width:1px"|# | ||
| − | !style="width: | + | !style="width:150px"|Formation |
!Air Defense Node | !Air Defense Node | ||
!style="width:1px"|AD/AP<br>AS/AS+ | !style="width:1px"|AD/AP<br>AS/AS+ | ||
| Line 1,757: | Line 1,757: | ||
|- | |- | ||
!style="width:1px"|# | !style="width:1px"|# | ||
| − | !style="width: | + | !style="width:150px"|Formation |
!Air Defense Node | !Air Defense Node | ||
!style="width:1px"|AD/AP<br>AS/AS+ | !style="width:1px"|AD/AP<br>AS/AS+ | ||
| Line 1,764: | Line 1,764: | ||
{|class="wikitable" style="width:100%" | {|class="wikitable" style="width:100%" | ||
!style="width:1px"|# | !style="width:1px"|# | ||
| − | !style="width: | + | !style="width:150px"|Formation |
!Boss Battle Node | !Boss Battle Node | ||
!style="width:1px"|AD/AP<br>AS/AS+ | !style="width:1px"|AD/AP<br>AS/AS+ | ||
| Line 1,778: | Line 1,778: | ||
|- | |- | ||
!style="width:1px"|# | !style="width:1px"|# | ||
| − | !style="width: | + | !style="width:150px"|Formation |
!Boss Battle Node | !Boss Battle Node | ||
!style="width:1px"|AD/AP<br>AS/AS+ | !style="width:1px"|AD/AP<br>AS/AS+ | ||
| Line 1,785: | Line 1,785: | ||
{|class="wikitable" style="width:100%" | {|class="wikitable" style="width:100%" | ||
!style="width:1px"|# | !style="width:1px"|# | ||
| − | !style="width: | + | !style="width:150px"|Formation |
!Normal Battle Node | !Normal Battle Node | ||
!style="width:1px"|AD/AP<br>AS/AS+ | !style="width:1px"|AD/AP<br>AS/AS+ | ||
| Line 1,799: | Line 1,799: | ||
|- | |- | ||
!style="width:1px"|# | !style="width:1px"|# | ||
| − | !style="width: | + | !style="width:150px"|Formation |
!Normal Battle Node | !Normal Battle Node | ||
!style="width:1px"|AD/AP<br>AS/AS+ | !style="width:1px"|AD/AP<br>AS/AS+ | ||
| Line 1,806: | Line 1,806: | ||
{|class="wikitable" style="width:100%" | {|class="wikitable" style="width:100%" | ||
!style="width:1px"|# | !style="width:1px"|# | ||
| − | !style="width: | + | !style="width:150px"|Formation |
!Normal Battle Node | !Normal Battle Node | ||
!style="width:1px"|AD/AP<br>AS/AS+ | !style="width:1px"|AD/AP<br>AS/AS+ | ||
| Line 1,820: | Line 1,820: | ||
|- | |- | ||
!style="width:1px"|# | !style="width:1px"|# | ||
| − | !style="width: | + | !style="width:150px"|Formation |
!Normal Battle Node | !Normal Battle Node | ||
!style="width:1px"|AD/AP<br>AS/AS+ | !style="width:1px"|AD/AP<br>AS/AS+ | ||
| Line 1,841: | Line 1,841: | ||
|- | |- | ||
|style="text-align:center"|Y4 | |style="text-align:center"|Y4 | ||
| − | |colspan="3" style="text-align:center"|<span lang="ja">敵影を見ず。 | + | |colspan="3" style="text-align:center"|<span lang="ja">敵影を見ず。</span><br>No enemy spotted. |
|- | |- | ||
!style="width:1px"|# | !style="width:1px"|# | ||
| Line 1,849: | Line 1,849: | ||
{|class="wikitable" style="width:100%" | {|class="wikitable" style="width:100%" | ||
!style="width:1px"|# | !style="width:1px"|# | ||
| − | !style="width: | + | !style="width:150px"|Formation |
!Normal Battle Node | !Normal Battle Node | ||
!style="width:1px"|AD/AP<br>AS/AS+ | !style="width:1px"|AD/AP<br>AS/AS+ | ||
| Line 1,859: | Line 1,859: | ||
|- | |- | ||
!style="width:1px"|# | !style="width:1px"|# | ||
| − | !style="width: | + | !style="width:150px"|Formation |
!Normal Battle Node | !Normal Battle Node | ||
!style="width:1px"|AD/AP<br>AS/AS+ | !style="width:1px"|AD/AP<br>AS/AS+ | ||
| Line 1,866: | Line 1,866: | ||
{|class="wikitable" style="width:100%" | {|class="wikitable" style="width:100%" | ||
!style="width:1px"|# | !style="width:1px"|# | ||
| − | !style="width: | + | !style="width:150px"|Formation |
!Boss Battle Node | !Boss Battle Node | ||
!style="width:1px"|AD/AP<br>AS/AS+ | !style="width:1px"|AD/AP<br>AS/AS+ | ||
| Line 1,880: | Line 1,880: | ||
|- | |- | ||
!style="width:1px"|# | !style="width:1px"|# | ||
| − | !style="width: | + | !style="width:150px"|Formation |
!Boss Battle Node | !Boss Battle Node | ||
!style="width:1px"|AD/AP<br>AS/AS+ | !style="width:1px"|AD/AP<br>AS/AS+ | ||
| Line 1,887: | Line 1,887: | ||
{|class="wikitable" style="width:100%" | {|class="wikitable" style="width:100%" | ||
!style="width:1px"|# | !style="width:1px"|# | ||
| − | !style="width: | + | !style="width:150px"|Formation |
!Normal Battle Node | !Normal Battle Node | ||
!style="width:1px"|AD/AP<br>AS/AS+ | !style="width:1px"|AD/AP<br>AS/AS+ | ||
| Line 1,897: | Line 1,897: | ||
|- | |- | ||
!style="width:1px"|# | !style="width:1px"|# | ||
| − | !style="width: | + | !style="width:150px"|Formation |
!Normal Battle Node | !Normal Battle Node | ||
!style="width:1px"|AD/AP<br>AS/AS+ | !style="width:1px"|AD/AP<br>AS/AS+ | ||
| Line 1,904: | Line 1,904: | ||
{|class="wikitable" style="width:100%;margin-bottom:240px !important" | {|class="wikitable" style="width:100%;margin-bottom:240px !important" | ||
!style="width:1px"|# | !style="width:1px"|# | ||
| − | !style="width: | + | !style="width:150px"|Formation |
!Normal Battle Node | !Normal Battle Node | ||
!style="width:1px"|AD/AP<br>AS/AS+ | !style="width:1px"|AD/AP<br>AS/AS+ | ||
| Line 1,918: | Line 1,918: | ||
|- | |- | ||
!style="width:1px"|# | !style="width:1px"|# | ||
| − | !style="width: | + | !style="width:150px"|Formation |
!Normal Battle Node | !Normal Battle Node | ||
!style="width:1px"|AD/AP<br>AS/AS+ | !style="width:1px"|AD/AP<br>AS/AS+ | ||
| Line 1,979: | Line 1,979: | ||
{|class="wikitable" style="width:100%" | {|class="wikitable" style="width:100%" | ||
!style="width:1px"|# | !style="width:1px"|# | ||
| − | !style="width: | + | !style="width:150px"|Formation |
!Air Raids | !Air Raids | ||
!style="width:1px"|AD/AP<br>AS/AS+ | !style="width:1px"|AD/AP<br>AS/AS+ | ||
| Line 2,005: | Line 2,005: | ||
|- | |- | ||
!style="width:1px"|# | !style="width:1px"|# | ||
| − | !style="width: | + | !style="width:150px"|Formation |
!Air Raids | !Air Raids | ||
!style="width:1px"|AD/AP<br>AS/AS+ | !style="width:1px"|AD/AP<br>AS/AS+ | ||
| Line 2,012: | Line 2,012: | ||
{|class="wikitable" style="width:100%" | {|class="wikitable" style="width:100%" | ||
!style="width:1px"|# | !style="width:1px"|# | ||
| − | !style="width: | + | !style="width:150px"|Formation |
!Air Defense Node | !Air Defense Node | ||
!style="width:1px"|AD/AP<br>AS/AS+ | !style="width:1px"|AD/AP<br>AS/AS+ | ||
| Line 2,034: | Line 2,034: | ||
|- | |- | ||
!style="width:1px"|# | !style="width:1px"|# | ||
| − | !style="width: | + | !style="width:150px"|Formation |
!Air Defense Node | !Air Defense Node | ||
!style="width:1px"|AD/AP<br>AS/AS+ | !style="width:1px"|AD/AP<br>AS/AS+ | ||
| Line 2,041: | Line 2,041: | ||
{|class="wikitable" style="width:100%" | {|class="wikitable" style="width:100%" | ||
!style="width:1px"|# | !style="width:1px"|# | ||
| − | !style="width: | + | !style="width:150px"|Formation |
!Normal Battle Node | !Normal Battle Node | ||
!style="width:1px"|AD/AP<br>AS/AS+ | !style="width:1px"|AD/AP<br>AS/AS+ | ||
| Line 2,059: | Line 2,059: | ||
|- | |- | ||
!style="width:1px"|# | !style="width:1px"|# | ||
| − | !style="width: | + | !style="width:150px"|Formation |
!Normal Battle Node | !Normal Battle Node | ||
!style="width:1px"|AD/AP<br>AS/AS+ | !style="width:1px"|AD/AP<br>AS/AS+ | ||
| Line 2,069: | Line 2,069: | ||
|- | |- | ||
|style="text-align:center"|C | |style="text-align:center"|C | ||
| − | |colspan="3" style="text-align:center"|<span lang="ja"> | + | |colspan="3" style="text-align:center"|<span lang="ja">艦隊の針路を選択できます。提督、どちらの針路をとられますか?</span><br>You can decide the fleet's course. Admiral, which heading should we take? |
|- | |- | ||
!style="width:1px"|# | !style="width:1px"|# | ||
| Line 2,077: | Line 2,077: | ||
{|class="wikitable" style="width:100%" | {|class="wikitable" style="width:100%" | ||
!style="width:1px"|# | !style="width:1px"|# | ||
| − | !style="width: | + | !style="width:150px"|Formation |
!Air Defense Node | !Air Defense Node | ||
!style="width:1px"|AD/AP<br>AS/AS+ | !style="width:1px"|AD/AP<br>AS/AS+ | ||
| Line 2,099: | Line 2,099: | ||
|- | |- | ||
!style="width:1px"|# | !style="width:1px"|# | ||
| − | !style="width: | + | !style="width:150px"|Formation |
!Air Defense Node | !Air Defense Node | ||
!style="width:1px"|AD/AP<br>AS/AS+ | !style="width:1px"|AD/AP<br>AS/AS+ | ||
| Line 2,106: | Line 2,106: | ||
{|class="wikitable" style="width:100%" | {|class="wikitable" style="width:100%" | ||
!style="width:1px"|# | !style="width:1px"|# | ||
| − | !style="width: | + | !style="width:150px"|Formation |
!Normal Battle Node | !Normal Battle Node | ||
!style="width:1px"|AD/AP<br>AS/AS+ | !style="width:1px"|AD/AP<br>AS/AS+ | ||
| Line 2,124: | Line 2,124: | ||
|- | |- | ||
!style="width:1px"|# | !style="width:1px"|# | ||
| − | !style="width: | + | !style="width:150px"|Formation |
!Normal Battle Node | !Normal Battle Node | ||
!style="width:1px"|AD/AP<br>AS/AS+ | !style="width:1px"|AD/AP<br>AS/AS+ | ||
| Line 2,131: | Line 2,131: | ||
{|class="wikitable" style="width:100%" | {|class="wikitable" style="width:100%" | ||
!style="width:1px"|# | !style="width:1px"|# | ||
| − | !style="width: | + | !style="width:150px"|Formation |
!Air Defense Node | !Air Defense Node | ||
!style="width:1px"|AD/AP<br>AS/AS+ | !style="width:1px"|AD/AP<br>AS/AS+ | ||
| Line 2,153: | Line 2,153: | ||
|- | |- | ||
!style="width:1px"|# | !style="width:1px"|# | ||
| − | !style="width: | + | !style="width:150px"|Formation |
!Air Defense Node | !Air Defense Node | ||
!style="width:1px"|AD/AP<br>AS/AS+ | !style="width:1px"|AD/AP<br>AS/AS+ | ||
| Line 2,160: | Line 2,160: | ||
{|class="wikitable" style="width:100%" | {|class="wikitable" style="width:100%" | ||
!style="width:1px"|# | !style="width:1px"|# | ||
| − | !style="width: | + | !style="width:150px"|Formation |
!Air Defense Node | !Air Defense Node | ||
!style="width:1px"|AD/AP<br>AS/AS+ | !style="width:1px"|AD/AP<br>AS/AS+ | ||
| Line 2,186: | Line 2,186: | ||
|- | |- | ||
!style="width:1px"|# | !style="width:1px"|# | ||
| − | !style="width: | + | !style="width:150px"|Formation |
!Air Defense Node | !Air Defense Node | ||
!style="width:1px"|AD/AP<br>AS/AS+ | !style="width:1px"|AD/AP<br>AS/AS+ | ||
| Line 2,193: | Line 2,193: | ||
{|class="wikitable" style="width:100%" | {|class="wikitable" style="width:100%" | ||
!style="width:1px"|# | !style="width:1px"|# | ||
| − | !style="width: | + | !style="width:150px"|Formation |
!Normal Battle Node | !Normal Battle Node | ||
!style="width:1px"|AD/AP<br>AS/AS+ | !style="width:1px"|AD/AP<br>AS/AS+ | ||
| Line 2,207: | Line 2,207: | ||
|- | |- | ||
!style="width:1px"|# | !style="width:1px"|# | ||
| − | !style="width: | + | !style="width:150px"|Formation |
!Normal Battle Node | !Normal Battle Node | ||
!style="width:1px"|AD/AP<br>AS/AS+ | !style="width:1px"|AD/AP<br>AS/AS+ | ||
| Line 2,214: | Line 2,214: | ||
{|class="wikitable" style="width:100%" | {|class="wikitable" style="width:100%" | ||
!style="width:1px"|# | !style="width:1px"|# | ||
| − | !style="width: | + | !style="width:150px"|Formation |
!Normal Battle Node | !Normal Battle Node | ||
!style="width:1px"|AD/AP<br>AS/AS+ | !style="width:1px"|AD/AP<br>AS/AS+ | ||
| Line 2,228: | Line 2,228: | ||
|- | |- | ||
!style="width:1px"|# | !style="width:1px"|# | ||
| − | !style="width: | + | !style="width:150px"|Formation |
!Normal Battle Node | !Normal Battle Node | ||
!style="width:1px"|AD/AP<br>AS/AS+ | !style="width:1px"|AD/AP<br>AS/AS+ | ||
| Line 2,238: | Line 2,238: | ||
|- | |- | ||
|style="text-align:center"|J | |style="text-align:center"|J | ||
| − | |colspan="3" style="text-align:center"|<span lang="ja">気のせいだった。</span><br>Must be my imagination. | + | |colspan="3" style="text-align:center"|<span lang="ja">気のせいだった。<br>大規模艦隊の……応急修理に適した泊地です。</span><br>Must be my imagination.<br>This is... a suitable anchorage<br>for emergency repairs on large fleets. |
|- | |- | ||
!style="width:1px"|# | !style="width:1px"|# | ||
| Line 2,246: | Line 2,246: | ||
{|class="wikitable" style="width:100%" | {|class="wikitable" style="width:100%" | ||
!style="width:1px"|# | !style="width:1px"|# | ||
| − | !style="width: | + | !style="width:150px"|Formation |
!Night Battle Node | !Night Battle Node | ||
!style="width:1px"|AD/AP<br>AS/AS+ | !style="width:1px"|AD/AP<br>AS/AS+ | ||
| Line 2,260: | Line 2,260: | ||
|- | |- | ||
!style="width:1px"|# | !style="width:1px"|# | ||
| − | !style="width: | + | !style="width:150px"|Formation |
!Night Battle Node | !Night Battle Node | ||
!style="width:1px"|AD/AP<br>AS/AS+ | !style="width:1px"|AD/AP<br>AS/AS+ | ||
| Line 2,267: | Line 2,267: | ||
{|class="wikitable" style="width:100%" | {|class="wikitable" style="width:100%" | ||
!style="width:1px"|# | !style="width:1px"|# | ||
| − | !style="width: | + | !style="width:150px"|Formation |
!Boss Battle Node | !Boss Battle Node | ||
!style="width:1px"|AD/AP<br>AS/AS+ | !style="width:1px"|AD/AP<br>AS/AS+ | ||
| Line 2,281: | Line 2,281: | ||
|- | |- | ||
!style="width:1px"|# | !style="width:1px"|# | ||
| − | !style="width: | + | !style="width:150px"|Formation |
!Boss Battle Node | !Boss Battle Node | ||
!style="width:1px"|AD/AP<br>AS/AS+ | !style="width:1px"|AD/AP<br>AS/AS+ | ||
| Line 2,288: | Line 2,288: | ||
{|class="wikitable" style="width:100%" | {|class="wikitable" style="width:100%" | ||
!style="width:1px"|# | !style="width:1px"|# | ||
| − | !style="width: | + | !style="width:150px"|Formation |
!Normal Battle Node | !Normal Battle Node | ||
!style="width:1px"|AD/AP<br>AS/AS+ | !style="width:1px"|AD/AP<br>AS/AS+ | ||
| Line 2,306: | Line 2,306: | ||
|- | |- | ||
!style="width:1px"|# | !style="width:1px"|# | ||
| − | !style="width: | + | !style="width:150px"|Formation |
!Normal Battle Node | !Normal Battle Node | ||
!style="width:1px"|AD/AP<br>AS/AS+ | !style="width:1px"|AD/AP<br>AS/AS+ | ||
| Line 2,313: | Line 2,313: | ||
{|class="wikitable" style="width:100%" | {|class="wikitable" style="width:100%" | ||
!style="width:1px"|# | !style="width:1px"|# | ||
| − | !style="width: | + | !style="width:150px"|Formation |
!Normal Battle Node | !Normal Battle Node | ||
!style="width:1px"|AD/AP<br>AS/AS+ | !style="width:1px"|AD/AP<br>AS/AS+ | ||
| Line 2,323: | Line 2,323: | ||
|- | |- | ||
!style="width:1px"|# | !style="width:1px"|# | ||
| − | !style="width: | + | !style="width:150px"|Formation |
!Normal Battle Node | !Normal Battle Node | ||
!style="width:1px"|AD/AP<br>AS/AS+ | !style="width:1px"|AD/AP<br>AS/AS+ | ||
| Line 2,330: | Line 2,330: | ||
{|class="wikitable" style="width:100%" | {|class="wikitable" style="width:100%" | ||
!style="width:1px"|# | !style="width:1px"|# | ||
| − | !style="width: | + | !style="width:150px"|Formation |
!Air Defense Node | !Air Defense Node | ||
!style="width:1px"|AD/AP<br>AS/AS+ | !style="width:1px"|AD/AP<br>AS/AS+ | ||
| Line 2,352: | Line 2,352: | ||
|- | |- | ||
!style="width:1px"|# | !style="width:1px"|# | ||
| − | !style="width: | + | !style="width:150px"|Formation |
!Air Defense Node | !Air Defense Node | ||
!style="width:1px"|AD/AP<br>AS/AS+ | !style="width:1px"|AD/AP<br>AS/AS+ | ||
| Line 2,359: | Line 2,359: | ||
{|class="wikitable" style="width:100%" | {|class="wikitable" style="width:100%" | ||
!style="width:1px"|# | !style="width:1px"|# | ||
| − | !style="width: | + | !style="width:150px"|Formation |
!Air Defense Node | !Air Defense Node | ||
!style="width:1px"|AD/AP<br>AS/AS+ | !style="width:1px"|AD/AP<br>AS/AS+ | ||
| Line 2,385: | Line 2,385: | ||
|- | |- | ||
!style="width:1px"|# | !style="width:1px"|# | ||
| − | !style="width: | + | !style="width:150px"|Formation |
!Air Defense Node | !Air Defense Node | ||
!style="width:1px"|AD/AP<br>AS/AS+ | !style="width:1px"|AD/AP<br>AS/AS+ | ||
| Line 2,392: | Line 2,392: | ||
{|class="wikitable" style="width:100%" | {|class="wikitable" style="width:100%" | ||
!style="width:1px"|# | !style="width:1px"|# | ||
| − | !style="width: | + | !style="width:150px"|Formation |
!Normal Battle Node | !Normal Battle Node | ||
!style="width:1px"|AD/AP<br>AS/AS+ | !style="width:1px"|AD/AP<br>AS/AS+ | ||
| Line 2,410: | Line 2,410: | ||
|- | |- | ||
!style="width:1px"|# | !style="width:1px"|# | ||
| − | !style="width: | + | !style="width:150px"|Formation |
!Normal Battle Node | !Normal Battle Node | ||
!style="width:1px"|AD/AP<br>AS/AS+ | !style="width:1px"|AD/AP<br>AS/AS+ | ||
| Line 2,417: | Line 2,417: | ||
{|class="wikitable" style="width:100%" | {|class="wikitable" style="width:100%" | ||
!style="width:1px"|# | !style="width:1px"|# | ||
| − | !style="width: | + | !style="width:150px"|Formation |
!Normal Battle Node | !Normal Battle Node | ||
!style="width:1px"|AD/AP<br>AS/AS+ | !style="width:1px"|AD/AP<br>AS/AS+ | ||
| Line 2,431: | Line 2,431: | ||
|- | |- | ||
!style="width:1px"|# | !style="width:1px"|# | ||
| − | !style="width: | + | !style="width:150px"|Formation |
!Normal Battle Node | !Normal Battle Node | ||
!style="width:1px"|AD/AP<br>AS/AS+ | !style="width:1px"|AD/AP<br>AS/AS+ | ||
| Line 2,438: | Line 2,438: | ||
{|class="wikitable" style="width:100%" | {|class="wikitable" style="width:100%" | ||
!style="width:1px"|# | !style="width:1px"|# | ||
| − | !style="width: | + | !style="width:150px"|Formation |
!Air Defense Node | !Air Defense Node | ||
!style="width:1px"|AD/AP<br>AS/AS+ | !style="width:1px"|AD/AP<br>AS/AS+ | ||
| Line 2,460: | Line 2,460: | ||
|- | |- | ||
!style="width:1px"|# | !style="width:1px"|# | ||
| − | !style="width: | + | !style="width:150px"|Formation |
!Air Defense Node | !Air Defense Node | ||
!style="width:1px"|AD/AP<br>AS/AS+ | !style="width:1px"|AD/AP<br>AS/AS+ | ||
| Line 2,467: | Line 2,467: | ||
{|class="wikitable" style="width:100%" | {|class="wikitable" style="width:100%" | ||
!style="width:1px"|# | !style="width:1px"|# | ||
| − | !style="width: | + | !style="width:150px"|Formation |
!Normal Battle Node | !Normal Battle Node | ||
!style="width:1px"|AD/AP<br>AS/AS+ | !style="width:1px"|AD/AP<br>AS/AS+ | ||
| Line 2,481: | Line 2,481: | ||
|- | |- | ||
!style="width:1px"|# | !style="width:1px"|# | ||
| − | !style="width: | + | !style="width:150px"|Formation |
!Normal Battle Node | !Normal Battle Node | ||
!style="width:1px"|AD/AP<br>AS/AS+ | !style="width:1px"|AD/AP<br>AS/AS+ | ||
| Line 2,488: | Line 2,488: | ||
{|class="wikitable" style="width:100%" | {|class="wikitable" style="width:100%" | ||
!style="width:1px"|# | !style="width:1px"|# | ||
| − | !style="width: | + | !style="width:150px"|Formation |
!Air Defense Node | !Air Defense Node | ||
!style="width:1px"|AD/AP<br>AS/AS+ | !style="width:1px"|AD/AP<br>AS/AS+ | ||
|- | |- | ||
!style="width:1px"|# | !style="width:1px"|# | ||
| − | !style="width: | + | !style="width:150px"|Formation |
!Air Defense Node | !Air Defense Node | ||
!style="width:1px"|AD/AP<br>AS/AS+ | !style="width:1px"|AD/AP<br>AS/AS+ | ||
| Line 2,500: | Line 2,500: | ||
{|class="wikitable" style="width:100%" | {|class="wikitable" style="width:100%" | ||
!style="width:1px"|# | !style="width:1px"|# | ||
| − | !style="width: | + | !style="width:150px"|Formation |
!Air Defense Node | !Air Defense Node | ||
!style="width:1px"|AD/AP<br>AS/AS+ | !style="width:1px"|AD/AP<br>AS/AS+ | ||
| Line 2,522: | Line 2,522: | ||
|- | |- | ||
!style="width:1px"|# | !style="width:1px"|# | ||
| − | !style="width: | + | !style="width:150px"|Formation |
!Air Defense Node | !Air Defense Node | ||
!style="width:1px"|AD/AP<br>AS/AS+ | !style="width:1px"|AD/AP<br>AS/AS+ | ||
| Line 2,540: | Line 2,540: | ||
{|class="wikitable" style="width:100%" | {|class="wikitable" style="width:100%" | ||
!style="width:1px"|# | !style="width:1px"|# | ||
| − | !style="width: | + | !style="width:150px"|Formation |
!Air Defense Node | !Air Defense Node | ||
!style="width:1px"|AD/AP<br>AS/AS+ | !style="width:1px"|AD/AP<br>AS/AS+ | ||
| Line 2,562: | Line 2,562: | ||
|- | |- | ||
!style="width:1px"|# | !style="width:1px"|# | ||
| − | !style="width: | + | !style="width:150px"|Formation |
!Air Defense Node | !Air Defense Node | ||
!style="width:1px"|AD/AP<br>AS/AS+ | !style="width:1px"|AD/AP<br>AS/AS+ | ||
| Line 2,569: | Line 2,569: | ||
{|class="wikitable" style="width:100%" | {|class="wikitable" style="width:100%" | ||
!style="width:1px"|# | !style="width:1px"|# | ||
| − | !style="width: | + | !style="width:150px"|Formation |
!Boss Battle Node | !Boss Battle Node | ||
!style="width:1px"|AD/AP<br>AS/AS+ | !style="width:1px"|AD/AP<br>AS/AS+ | ||
| Line 2,579: | Line 2,579: | ||
|- | |- | ||
!style="width:1px"|# | !style="width:1px"|# | ||
| − | !style="width: | + | !style="width:150px"|Formation |
!Boss Battle Node | !Boss Battle Node | ||
!style="width:1px"|AD/AP<br>AS/AS+ | !style="width:1px"|AD/AP<br>AS/AS+ | ||
| Line 2,605: | Line 2,605: | ||
{|class="wikitable" style="width:100%" | {|class="wikitable" style="width:100%" | ||
!style="width:1px"|# | !style="width:1px"|# | ||
| − | !style="width: | + | !style="width:150px"|Formation |
!Normal Battle Node | !Normal Battle Node | ||
!style="width:1px"|AD/AP<br>AS/AS+ | !style="width:1px"|AD/AP<br>AS/AS+ | ||
| Line 2,623: | Line 2,623: | ||
|- | |- | ||
!style="width:1px"|# | !style="width:1px"|# | ||
| − | !style="width: | + | !style="width:150px"|Formation |
!Normal Battle Node | !Normal Battle Node | ||
!style="width:1px"|AD/AP<br>AS/AS+ | !style="width:1px"|AD/AP<br>AS/AS+ | ||
| Line 2,630: | Line 2,630: | ||
{|class="wikitable" style="width:100%" | {|class="wikitable" style="width:100%" | ||
!style="width:1px"|# | !style="width:1px"|# | ||
| − | !style="width: | + | !style="width:150px"|Formation |
!Normal Battle Node | !Normal Battle Node | ||
!style="width:1px"|AD/AP<br>AS/AS+ | !style="width:1px"|AD/AP<br>AS/AS+ | ||
| Line 2,644: | Line 2,644: | ||
|- | |- | ||
!style="width:1px"|# | !style="width:1px"|# | ||
| − | !style="width: | + | !style="width:150px"|Formation |
!Normal Battle Node | !Normal Battle Node | ||
!style="width:1px"|AD/AP<br>AS/AS+ | !style="width:1px"|AD/AP<br>AS/AS+ | ||
| Line 2,662: | Line 2,662: | ||
{|class="wikitable" style="width:100%" | {|class="wikitable" style="width:100%" | ||
!style="width:1px"|# | !style="width:1px"|# | ||
| − | !style="width: | + | !style="width:150px"|Formation |
!Normal Battle Node | !Normal Battle Node | ||
!style="width:1px"|AD/AP<br>AS/AS+ | !style="width:1px"|AD/AP<br>AS/AS+ | ||
| Line 2,672: | Line 2,672: | ||
|- | |- | ||
!style="width:1px"|# | !style="width:1px"|# | ||
| − | !style="width: | + | !style="width:150px"|Formation |
!Normal Battle Node | !Normal Battle Node | ||
!style="width:1px"|AD/AP<br>AS/AS+ | !style="width:1px"|AD/AP<br>AS/AS+ | ||
| Line 2,682: | Line 2,682: | ||
|- | |- | ||
|style="text-align:center"|X1 | |style="text-align:center"|X1 | ||
| − | |colspan="3" style="text-align:center"|<span lang="ja">敵影を見ず。 | + | |colspan="3" style="text-align:center"|<span lang="ja">敵影を見ず。</span><br>No enemy spotted. |
|- | |- | ||
!style="width:1px"|# | !style="width:1px"|# | ||
| Line 2,690: | Line 2,690: | ||
{|class="wikitable" style="width:100%" | {|class="wikitable" style="width:100%" | ||
!style="width:1px"|# | !style="width:1px"|# | ||
| − | !style="width: | + | !style="width:150px"|Formation |
!Normal Battle Node | !Normal Battle Node | ||
!style="width:1px"|AD/AP<br>AS/AS+ | !style="width:1px"|AD/AP<br>AS/AS+ | ||
| Line 2,700: | Line 2,700: | ||
|- | |- | ||
!style="width:1px"|# | !style="width:1px"|# | ||
| − | !style="width: | + | !style="width:150px"|Formation |
!Normal Battle Node | !Normal Battle Node | ||
!style="width:1px"|AD/AP<br>AS/AS+ | !style="width:1px"|AD/AP<br>AS/AS+ | ||
| Line 2,707: | Line 2,707: | ||
{|class="wikitable" style="width:100%" | {|class="wikitable" style="width:100%" | ||
!style="width:1px"|# | !style="width:1px"|# | ||
| − | !style="width: | + | !style="width:150px"|Formation |
!Air Defense Node | !Air Defense Node | ||
!style="width:1px"|AD/AP<br>AS/AS+ | !style="width:1px"|AD/AP<br>AS/AS+ | ||
| Line 2,729: | Line 2,729: | ||
|- | |- | ||
!style="width:1px"|# | !style="width:1px"|# | ||
| − | !style="width: | + | !style="width:150px"|Formation |
!Air Defense Node | !Air Defense Node | ||
!style="width:1px"|AD/AP<br>AS/AS+ | !style="width:1px"|AD/AP<br>AS/AS+ | ||
| Line 2,736: | Line 2,736: | ||
{|class="wikitable" style="width:100%" | {|class="wikitable" style="width:100%" | ||
!style="width:1px"|# | !style="width:1px"|# | ||
| − | !style="width: | + | !style="width:150px"|Formation |
!Boss Battle Node | !Boss Battle Node | ||
!style="width:1px"|AD/AP<br>AS/AS+ | !style="width:1px"|AD/AP<br>AS/AS+ | ||
| Line 2,750: | Line 2,750: | ||
|- | |- | ||
!style="width:1px"|# | !style="width:1px"|# | ||
| − | !style="width: | + | !style="width:150px"|Formation |
!Boss Battle Node | !Boss Battle Node | ||
!style="width:1px"|AD/AP<br>AS/AS+ | !style="width:1px"|AD/AP<br>AS/AS+ | ||
| Line 2,757: | Line 2,757: | ||
{|class="wikitable" style="width:100%" | {|class="wikitable" style="width:100%" | ||
!style="width:1px"|# | !style="width:1px"|# | ||
| − | !style="width: | + | !style="width:150px"|Formation |
!Normal Battle Node | !Normal Battle Node | ||
!style="width:1px"|AD/AP<br>AS/AS+ | !style="width:1px"|AD/AP<br>AS/AS+ | ||
| Line 2,771: | Line 2,771: | ||
|- | |- | ||
!style="width:1px"|# | !style="width:1px"|# | ||
| − | !style="width: | + | !style="width:150px"|Formation |
!Normal Battle Node | !Normal Battle Node | ||
!style="width:1px"|AD/AP<br>AS/AS+ | !style="width:1px"|AD/AP<br>AS/AS+ | ||
| Line 2,778: | Line 2,778: | ||
{|class="wikitable" style="width:100%" | {|class="wikitable" style="width:100%" | ||
!style="width:1px"|# | !style="width:1px"|# | ||
| − | !style="width: | + | !style="width:150px"|Formation |
!Normal Battle Node | !Normal Battle Node | ||
!style="width:1px"|AD/AP<br>AS/AS+ | !style="width:1px"|AD/AP<br>AS/AS+ | ||
| Line 2,792: | Line 2,792: | ||
|- | |- | ||
!style="width:1px"|# | !style="width:1px"|# | ||
| − | !style="width: | + | !style="width:150px"|Formation |
!Normal Battle Node | !Normal Battle Node | ||
!style="width:1px"|AD/AP<br>AS/AS+ | !style="width:1px"|AD/AP<br>AS/AS+ | ||
| Line 2,813: | Line 2,813: | ||
|- | |- | ||
|style="text-align:center"|Y4 | |style="text-align:center"|Y4 | ||
| − | |colspan="3" style="text-align:center"|<span lang="ja">敵影を見ず。 | + | |colspan="3" style="text-align:center"|<span lang="ja">敵影を見ず。</span><br>No enemy spotted. |
|- | |- | ||
!style="width:1px"|# | !style="width:1px"|# | ||
| Line 2,821: | Line 2,821: | ||
{|class="wikitable" style="width:100%" | {|class="wikitable" style="width:100%" | ||
!style="width:1px"|# | !style="width:1px"|# | ||
| − | !style="width: | + | !style="width:150px"|Formation |
!Normal Battle Node | !Normal Battle Node | ||
!style="width:1px"|AD/AP<br>AS/AS+ | !style="width:1px"|AD/AP<br>AS/AS+ | ||
| Line 2,835: | Line 2,835: | ||
|- | |- | ||
!style="width:1px"|# | !style="width:1px"|# | ||
| − | !style="width: | + | !style="width:150px"|Formation |
!Normal Battle Node | !Normal Battle Node | ||
!style="width:1px"|AD/AP<br>AS/AS+ | !style="width:1px"|AD/AP<br>AS/AS+ | ||
| Line 2,842: | Line 2,842: | ||
{|class="wikitable" style="width:100%" | {|class="wikitable" style="width:100%" | ||
!style="width:1px"|# | !style="width:1px"|# | ||
| − | !style="width: | + | !style="width:150px"|Formation |
!Boss Battle Node | !Boss Battle Node | ||
!style="width:1px"|AD/AP<br>AS/AS+ | !style="width:1px"|AD/AP<br>AS/AS+ | ||
| Line 2,856: | Line 2,856: | ||
|- | |- | ||
!style="width:1px"|# | !style="width:1px"|# | ||
| − | !style="width: | + | !style="width:150px"|Formation |
!Boss Battle Node | !Boss Battle Node | ||
!style="width:1px"|AD/AP<br>AS/AS+ | !style="width:1px"|AD/AP<br>AS/AS+ | ||
| Line 2,863: | Line 2,863: | ||
{|class="wikitable" style="width:100%" | {|class="wikitable" style="width:100%" | ||
!style="width:1px"|# | !style="width:1px"|# | ||
| − | !style="width: | + | !style="width:150px"|Formation |
!Normal Battle Node | !Normal Battle Node | ||
!style="width:1px"|AD/AP<br>AS/AS+ | !style="width:1px"|AD/AP<br>AS/AS+ | ||
| Line 2,873: | Line 2,873: | ||
|- | |- | ||
!style="width:1px"|# | !style="width:1px"|# | ||
| − | !style="width: | + | !style="width:150px"|Formation |
!Normal Battle Node | !Normal Battle Node | ||
!style="width:1px"|AD/AP<br>AS/AS+ | !style="width:1px"|AD/AP<br>AS/AS+ | ||
| Line 2,880: | Line 2,880: | ||
{|class="wikitable" style="width:100%;margin-bottom:240px !important" | {|class="wikitable" style="width:100%;margin-bottom:240px !important" | ||
!style="width:1px"|# | !style="width:1px"|# | ||
| − | !style="width: | + | !style="width:150px"|Formation |
!Normal Battle Node | !Normal Battle Node | ||
!style="width:1px"|AD/AP<br>AS/AS+ | !style="width:1px"|AD/AP<br>AS/AS+ | ||
| Line 2,894: | Line 2,894: | ||
|- | |- | ||
!style="width:1px"|# | !style="width:1px"|# | ||
| − | !style="width: | + | !style="width:150px"|Formation |
!Normal Battle Node | !Normal Battle Node | ||
!style="width:1px"|AD/AP<br>AS/AS+ | !style="width:1px"|AD/AP<br>AS/AS+ | ||
| Line 2,955: | Line 2,955: | ||
{|class="wikitable" style="width:100%" | {|class="wikitable" style="width:100%" | ||
!style="width:1px"|# | !style="width:1px"|# | ||
| − | !style="width: | + | !style="width:150px"|Formation |
!Air Raids | !Air Raids | ||
!style="width:1px"|AD/AP<br>AS/AS+ | !style="width:1px"|AD/AP<br>AS/AS+ | ||
| Line 2,973: | Line 2,973: | ||
|- | |- | ||
!style="width:1px"|# | !style="width:1px"|# | ||
| − | !style="width: | + | !style="width:150px"|Formation |
!Air Raids | !Air Raids | ||
!style="width:1px"|AD/AP<br>AS/AS+ | !style="width:1px"|AD/AP<br>AS/AS+ | ||
| Line 2,980: | Line 2,980: | ||
{|class="wikitable" style="width:100%" | {|class="wikitable" style="width:100%" | ||
!style="width:1px"|# | !style="width:1px"|# | ||
| − | !style="width: | + | !style="width:150px"|Formation |
!Air Defense Node | !Air Defense Node | ||
!style="width:1px"|AD/AP<br>AS/AS+ | !style="width:1px"|AD/AP<br>AS/AS+ | ||
| Line 2,994: | Line 2,994: | ||
|- | |- | ||
!style="width:1px"|# | !style="width:1px"|# | ||
| − | !style="width: | + | !style="width:150px"|Formation |
!Air Defense Node | !Air Defense Node | ||
!style="width:1px"|AD/AP<br>AS/AS+ | !style="width:1px"|AD/AP<br>AS/AS+ | ||
| Line 3,001: | Line 3,001: | ||
{|class="wikitable" style="width:100%" | {|class="wikitable" style="width:100%" | ||
!style="width:1px"|# | !style="width:1px"|# | ||
| − | !style="width: | + | !style="width:150px"|Formation |
!Normal Battle Node | !Normal Battle Node | ||
!style="width:1px"|AD/AP<br>AS/AS+ | !style="width:1px"|AD/AP<br>AS/AS+ | ||
| Line 3,015: | Line 3,015: | ||
|- | |- | ||
!style="width:1px"|# | !style="width:1px"|# | ||
| − | !style="width: | + | !style="width:150px"|Formation |
!Normal Battle Node | !Normal Battle Node | ||
!style="width:1px"|AD/AP<br>AS/AS+ | !style="width:1px"|AD/AP<br>AS/AS+ | ||
| Line 3,025: | Line 3,025: | ||
|- | |- | ||
|style="text-align:center"|C | |style="text-align:center"|C | ||
| − | |colspan="3" style="text-align:center"|<span lang="ja"> | + | |colspan="3" style="text-align:center"|<span lang="ja">艦隊の針路を選択できます。提督、どちらの針路をとられますか?</span><br>You can decide the fleet's course. Admiral, which heading should we take? |
|- | |- | ||
!style="width:1px"|# | !style="width:1px"|# | ||
| Line 3,033: | Line 3,033: | ||
{|class="wikitable" style="width:100%" | {|class="wikitable" style="width:100%" | ||
!style="width:1px"|# | !style="width:1px"|# | ||
| − | !style="width: | + | !style="width:150px"|Formation |
!Air Defense Node | !Air Defense Node | ||
!style="width:1px"|AD/AP<br>AS/AS+ | !style="width:1px"|AD/AP<br>AS/AS+ | ||
| Line 3,047: | Line 3,047: | ||
|- | |- | ||
!style="width:1px"|# | !style="width:1px"|# | ||
| − | !style="width: | + | !style="width:150px"|Formation |
!Air Defense Node | !Air Defense Node | ||
!style="width:1px"|AD/AP<br>AS/AS+ | !style="width:1px"|AD/AP<br>AS/AS+ | ||
| Line 3,054: | Line 3,054: | ||
{|class="wikitable" style="width:100%" | {|class="wikitable" style="width:100%" | ||
!style="width:1px"|# | !style="width:1px"|# | ||
| − | !style="width: | + | !style="width:150px"|Formation |
!Normal Battle Node | !Normal Battle Node | ||
!style="width:1px"|AD/AP<br>AS/AS+ | !style="width:1px"|AD/AP<br>AS/AS+ | ||
| Line 3,068: | Line 3,068: | ||
|- | |- | ||
!style="width:1px"|# | !style="width:1px"|# | ||
| − | !style="width: | + | !style="width:150px"|Formation |
!Normal Battle Node | !Normal Battle Node | ||
!style="width:1px"|AD/AP<br>AS/AS+ | !style="width:1px"|AD/AP<br>AS/AS+ | ||
| Line 3,075: | Line 3,075: | ||
{|class="wikitable" style="width:100%" | {|class="wikitable" style="width:100%" | ||
!style="width:1px"|# | !style="width:1px"|# | ||
| − | !style="width: | + | !style="width:150px"|Formation |
!Air Defense Node | !Air Defense Node | ||
!style="width:1px"|AD/AP<br>AS/AS+ | !style="width:1px"|AD/AP<br>AS/AS+ | ||
| Line 3,089: | Line 3,089: | ||
|- | |- | ||
!style="width:1px"|# | !style="width:1px"|# | ||
| − | !style="width: | + | !style="width:150px"|Formation |
!Air Defense Node | !Air Defense Node | ||
!style="width:1px"|AD/AP<br>AS/AS+ | !style="width:1px"|AD/AP<br>AS/AS+ | ||
| Line 3,096: | Line 3,096: | ||
{|class="wikitable" style="width:100%" | {|class="wikitable" style="width:100%" | ||
!style="width:1px"|# | !style="width:1px"|# | ||
| − | !style="width: | + | !style="width:150px"|Formation |
!Air Defense Node | !Air Defense Node | ||
!style="width:1px"|AD/AP<br>AS/AS+ | !style="width:1px"|AD/AP<br>AS/AS+ | ||
| Line 3,114: | Line 3,114: | ||
|- | |- | ||
!style="width:1px"|# | !style="width:1px"|# | ||
| − | !style="width: | + | !style="width:150px"|Formation |
!Air Defense Node | !Air Defense Node | ||
!style="width:1px"|AD/AP<br>AS/AS+ | !style="width:1px"|AD/AP<br>AS/AS+ | ||
| Line 3,121: | Line 3,121: | ||
{|class="wikitable" style="width:100%" | {|class="wikitable" style="width:100%" | ||
!style="width:1px"|# | !style="width:1px"|# | ||
| − | !style="width: | + | !style="width:150px"|Formation |
!Normal Battle Node | !Normal Battle Node | ||
!style="width:1px"|AD/AP<br>AS/AS+ | !style="width:1px"|AD/AP<br>AS/AS+ | ||
| Line 3,135: | Line 3,135: | ||
|- | |- | ||
!style="width:1px"|# | !style="width:1px"|# | ||
| − | !style="width: | + | !style="width:150px"|Formation |
!Normal Battle Node | !Normal Battle Node | ||
!style="width:1px"|AD/AP<br>AS/AS+ | !style="width:1px"|AD/AP<br>AS/AS+ | ||
| Line 3,142: | Line 3,142: | ||
{|class="wikitable" style="width:100%" | {|class="wikitable" style="width:100%" | ||
!style="width:1px"|# | !style="width:1px"|# | ||
| − | !style="width: | + | !style="width:150px"|Formation |
!Normal Battle Node | !Normal Battle Node | ||
!style="width:1px"|AD/AP<br>AS/AS+ | !style="width:1px"|AD/AP<br>AS/AS+ | ||
| Line 3,156: | Line 3,156: | ||
|- | |- | ||
!style="width:1px"|# | !style="width:1px"|# | ||
| − | !style="width: | + | !style="width:150px"|Formation |
!Normal Battle Node | !Normal Battle Node | ||
!style="width:1px"|AD/AP<br>AS/AS+ | !style="width:1px"|AD/AP<br>AS/AS+ | ||
| Line 3,166: | Line 3,166: | ||
|- | |- | ||
|style="text-align:center"|J | |style="text-align:center"|J | ||
| − | |colspan="3" style="text-align:center"|<span lang="ja">気のせいだった。</span><br>Must be my imagination. | + | |colspan="3" style="text-align:center"|<span lang="ja">気のせいだった。<br>大規模艦隊の……応急修理に適した泊地です。</span><br>Must be my imagination.<br>This is... a suitable anchorage<br>for emergency repairs on large fleets. |
|- | |- | ||
!style="width:1px"|# | !style="width:1px"|# | ||
| Line 3,174: | Line 3,174: | ||
{|class="wikitable" style="width:100%" | {|class="wikitable" style="width:100%" | ||
!style="width:1px"|# | !style="width:1px"|# | ||
| − | !style="width: | + | !style="width:150px"|Formation |
!Night Battle Node | !Night Battle Node | ||
!style="width:1px"|AD/AP<br>AS/AS+ | !style="width:1px"|AD/AP<br>AS/AS+ | ||
| Line 3,188: | Line 3,188: | ||
|- | |- | ||
!style="width:1px"|# | !style="width:1px"|# | ||
| − | !style="width: | + | !style="width:150px"|Formation |
!Night Battle Node | !Night Battle Node | ||
!style="width:1px"|AD/AP<br>AS/AS+ | !style="width:1px"|AD/AP<br>AS/AS+ | ||
| Line 3,195: | Line 3,195: | ||
{|class="wikitable" style="width:100%" | {|class="wikitable" style="width:100%" | ||
!style="width:1px"|# | !style="width:1px"|# | ||
| − | !style="width: | + | !style="width:150px"|Formation |
!Boss Battle Node | !Boss Battle Node | ||
!style="width:1px"|AD/AP<br>AS/AS+ | !style="width:1px"|AD/AP<br>AS/AS+ | ||
| Line 3,209: | Line 3,209: | ||
|- | |- | ||
!style="width:1px"|# | !style="width:1px"|# | ||
| − | !style="width: | + | !style="width:150px"|Formation |
!Boss Battle Node | !Boss Battle Node | ||
!style="width:1px"|AD/AP<br>AS/AS+ | !style="width:1px"|AD/AP<br>AS/AS+ | ||
| Line 3,216: | Line 3,216: | ||
{|class="wikitable" style="width:100%" | {|class="wikitable" style="width:100%" | ||
!style="width:1px"|# | !style="width:1px"|# | ||
| − | !style="width: | + | !style="width:150px"|Formation |
!Normal Battle Node | !Normal Battle Node | ||
!style="width:1px"|AD/AP<br>AS/AS+ | !style="width:1px"|AD/AP<br>AS/AS+ | ||
| Line 3,230: | Line 3,230: | ||
|- | |- | ||
!style="width:1px"|# | !style="width:1px"|# | ||
| − | !style="width: | + | !style="width:150px"|Formation |
!Normal Battle Node | !Normal Battle Node | ||
!style="width:1px"|AD/AP<br>AS/AS+ | !style="width:1px"|AD/AP<br>AS/AS+ | ||
| Line 3,237: | Line 3,237: | ||
{|class="wikitable" style="width:100%" | {|class="wikitable" style="width:100%" | ||
!style="width:1px"|# | !style="width:1px"|# | ||
| − | !style="width: | + | !style="width:150px"|Formation |
!Normal Battle Node | !Normal Battle Node | ||
!style="width:1px"|AD/AP<br>AS/AS+ | !style="width:1px"|AD/AP<br>AS/AS+ | ||
| Line 3,247: | Line 3,247: | ||
|- | |- | ||
!style="width:1px"|# | !style="width:1px"|# | ||
| − | !style="width: | + | !style="width:150px"|Formation |
!Normal Battle Node | !Normal Battle Node | ||
!style="width:1px"|AD/AP<br>AS/AS+ | !style="width:1px"|AD/AP<br>AS/AS+ | ||
| Line 3,254: | Line 3,254: | ||
{|class="wikitable" style="width:100%" | {|class="wikitable" style="width:100%" | ||
!style="width:1px"|# | !style="width:1px"|# | ||
| − | !style="width: | + | !style="width:150px"|Formation |
!Air Defense Node | !Air Defense Node | ||
!style="width:1px"|AD/AP<br>AS/AS+ | !style="width:1px"|AD/AP<br>AS/AS+ | ||
| Line 3,272: | Line 3,272: | ||
|- | |- | ||
!style="width:1px"|# | !style="width:1px"|# | ||
| − | !style="width: | + | !style="width:150px"|Formation |
!Air Defense Node | !Air Defense Node | ||
!style="width:1px"|AD/AP<br>AS/AS+ | !style="width:1px"|AD/AP<br>AS/AS+ | ||
| Line 3,279: | Line 3,279: | ||
{|class="wikitable" style="width:100%" | {|class="wikitable" style="width:100%" | ||
!style="width:1px"|# | !style="width:1px"|# | ||
| − | !style="width: | + | !style="width:150px"|Formation |
!Air Defense Node | !Air Defense Node | ||
!style="width:1px"|AD/AP<br>AS/AS+ | !style="width:1px"|AD/AP<br>AS/AS+ | ||
|- | |- | ||
!style="width:1px"|# | !style="width:1px"|# | ||
| − | !style="width: | + | !style="width:150px"|Formation |
!Air Defense Node | !Air Defense Node | ||
!style="width:1px"|AD/AP<br>AS/AS+ | !style="width:1px"|AD/AP<br>AS/AS+ | ||
| Line 3,291: | Line 3,291: | ||
{|class="wikitable" style="width:100%" | {|class="wikitable" style="width:100%" | ||
!style="width:1px"|# | !style="width:1px"|# | ||
| − | !style="width: | + | !style="width:150px"|Formation |
!Normal Battle Node | !Normal Battle Node | ||
!style="width:1px"|AD/AP<br>AS/AS+ | !style="width:1px"|AD/AP<br>AS/AS+ | ||
| Line 3,305: | Line 3,305: | ||
|- | |- | ||
!style="width:1px"|# | !style="width:1px"|# | ||
| − | !style="width: | + | !style="width:150px"|Formation |
!Normal Battle Node | !Normal Battle Node | ||
!style="width:1px"|AD/AP<br>AS/AS+ | !style="width:1px"|AD/AP<br>AS/AS+ | ||
| Line 3,312: | Line 3,312: | ||
{|class="wikitable" style="width:100%" | {|class="wikitable" style="width:100%" | ||
!style="width:1px"|# | !style="width:1px"|# | ||
| − | !style="width: | + | !style="width:150px"|Formation |
!Normal Battle Node | !Normal Battle Node | ||
!style="width:1px"|AD/AP<br>AS/AS+ | !style="width:1px"|AD/AP<br>AS/AS+ | ||
| Line 3,322: | Line 3,322: | ||
|- | |- | ||
!style="width:1px"|# | !style="width:1px"|# | ||
| − | !style="width: | + | !style="width:150px"|Formation |
!Normal Battle Node | !Normal Battle Node | ||
!style="width:1px"|AD/AP<br>AS/AS+ | !style="width:1px"|AD/AP<br>AS/AS+ | ||
| Line 3,329: | Line 3,329: | ||
{|class="wikitable" style="width:100%" | {|class="wikitable" style="width:100%" | ||
!style="width:1px"|# | !style="width:1px"|# | ||
| − | !style="width: | + | !style="width:150px"|Formation |
!Air Defense Node | !Air Defense Node | ||
!style="width:1px"|AD/AP<br>AS/AS+ | !style="width:1px"|AD/AP<br>AS/AS+ | ||
| Line 3,347: | Line 3,347: | ||
|- | |- | ||
!style="width:1px"|# | !style="width:1px"|# | ||
| − | !style="width: | + | !style="width:150px"|Formation |
!Air Defense Node | !Air Defense Node | ||
!style="width:1px"|AD/AP<br>AS/AS+ | !style="width:1px"|AD/AP<br>AS/AS+ | ||
| Line 3,354: | Line 3,354: | ||
{|class="wikitable" style="width:100%" | {|class="wikitable" style="width:100%" | ||
!style="width:1px"|# | !style="width:1px"|# | ||
| − | !style="width: | + | !style="width:150px"|Formation |
!Normal Battle Node | !Normal Battle Node | ||
!style="width:1px"|AD/AP<br>AS/AS+ | !style="width:1px"|AD/AP<br>AS/AS+ | ||
| Line 3,368: | Line 3,368: | ||
|- | |- | ||
!style="width:1px"|# | !style="width:1px"|# | ||
| − | !style="width: | + | !style="width:150px"|Formation |
!Normal Battle Node | !Normal Battle Node | ||
!style="width:1px"|AD/AP<br>AS/AS+ | !style="width:1px"|AD/AP<br>AS/AS+ | ||
| Line 3,375: | Line 3,375: | ||
{|class="wikitable" style="width:100%" | {|class="wikitable" style="width:100%" | ||
!style="width:1px"|# | !style="width:1px"|# | ||
| − | !style="width: | + | !style="width:150px"|Formation |
!Air Defense Node | !Air Defense Node | ||
!style="width:1px"|AD/AP<br>AS/AS+ | !style="width:1px"|AD/AP<br>AS/AS+ | ||
|- | |- | ||
!style="width:1px"|# | !style="width:1px"|# | ||
| − | !style="width: | + | !style="width:150px"|Formation |
!Air Defense Node | !Air Defense Node | ||
!style="width:1px"|AD/AP<br>AS/AS+ | !style="width:1px"|AD/AP<br>AS/AS+ | ||
| Line 3,387: | Line 3,387: | ||
{|class="wikitable" style="width:100%" | {|class="wikitable" style="width:100%" | ||
!style="width:1px"|# | !style="width:1px"|# | ||
| − | !style="width: | + | !style="width:150px"|Formation |
!Air Defense Node | !Air Defense Node | ||
!style="width:1px"|AD/AP<br>AS/AS+ | !style="width:1px"|AD/AP<br>AS/AS+ | ||
| Line 3,405: | Line 3,405: | ||
|- | |- | ||
!style="width:1px"|# | !style="width:1px"|# | ||
| − | !style="width: | + | !style="width:150px"|Formation |
!Air Defense Node | !Air Defense Node | ||
!style="width:1px"|AD/AP<br>AS/AS+ | !style="width:1px"|AD/AP<br>AS/AS+ | ||
| Line 3,423: | Line 3,423: | ||
{|class="wikitable" style="width:100%" | {|class="wikitable" style="width:100%" | ||
!style="width:1px"|# | !style="width:1px"|# | ||
| − | !style="width: | + | !style="width:150px"|Formation |
!Air Defense Node | !Air Defense Node | ||
!style="width:1px"|AD/AP<br>AS/AS+ | !style="width:1px"|AD/AP<br>AS/AS+ | ||
| Line 3,441: | Line 3,441: | ||
|- | |- | ||
!style="width:1px"|# | !style="width:1px"|# | ||
| − | !style="width: | + | !style="width:150px"|Formation |
!Air Defense Node | !Air Defense Node | ||
!style="width:1px"|AD/AP<br>AS/AS+ | !style="width:1px"|AD/AP<br>AS/AS+ | ||
| Line 3,448: | Line 3,448: | ||
{|class="wikitable" style="width:100%" | {|class="wikitable" style="width:100%" | ||
!style="width:1px"|# | !style="width:1px"|# | ||
| − | !style="width: | + | !style="width:150px"|Formation |
!Boss Battle Node | !Boss Battle Node | ||
!style="width:1px"|AD/AP<br>AS/AS+ | !style="width:1px"|AD/AP<br>AS/AS+ | ||
| Line 3,458: | Line 3,458: | ||
|- | |- | ||
!style="width:1px"|# | !style="width:1px"|# | ||
| − | !style="width: | + | !style="width:150px"|Formation |
!Boss Battle Node | !Boss Battle Node | ||
!style="width:1px"|AD/AP<br>AS/AS+ | !style="width:1px"|AD/AP<br>AS/AS+ | ||
| Line 3,484: | Line 3,484: | ||
{|class="wikitable" style="width:100%" | {|class="wikitable" style="width:100%" | ||
!style="width:1px"|# | !style="width:1px"|# | ||
| − | !style="width: | + | !style="width:150px"|Formation |
!Normal Battle Node | !Normal Battle Node | ||
!style="width:1px"|AD/AP<br>AS/AS+ | !style="width:1px"|AD/AP<br>AS/AS+ | ||
| Line 3,502: | Line 3,502: | ||
|- | |- | ||
!style="width:1px"|# | !style="width:1px"|# | ||
| − | !style="width: | + | !style="width:150px"|Formation |
!Normal Battle Node | !Normal Battle Node | ||
!style="width:1px"|AD/AP<br>AS/AS+ | !style="width:1px"|AD/AP<br>AS/AS+ | ||
| Line 3,509: | Line 3,509: | ||
{|class="wikitable" style="width:100%" | {|class="wikitable" style="width:100%" | ||
!style="width:1px"|# | !style="width:1px"|# | ||
| − | !style="width: | + | !style="width:150px"|Formation |
!Normal Battle Node | !Normal Battle Node | ||
!style="width:1px"|AD/AP<br>AS/AS+ | !style="width:1px"|AD/AP<br>AS/AS+ | ||
| Line 3,523: | Line 3,523: | ||
|- | |- | ||
!style="width:1px"|# | !style="width:1px"|# | ||
| − | !style="width: | + | !style="width:150px"|Formation |
!Normal Battle Node | !Normal Battle Node | ||
!style="width:1px"|AD/AP<br>AS/AS+ | !style="width:1px"|AD/AP<br>AS/AS+ | ||
| Line 3,541: | Line 3,541: | ||
{|class="wikitable" style="width:100%" | {|class="wikitable" style="width:100%" | ||
!style="width:1px"|# | !style="width:1px"|# | ||
| − | !style="width: | + | !style="width:150px"|Formation |
!Normal Battle Node | !Normal Battle Node | ||
!style="width:1px"|AD/AP<br>AS/AS+ | !style="width:1px"|AD/AP<br>AS/AS+ | ||
| Line 3,551: | Line 3,551: | ||
|- | |- | ||
!style="width:1px"|# | !style="width:1px"|# | ||
| − | !style="width: | + | !style="width:150px"|Formation |
!Normal Battle Node | !Normal Battle Node | ||
!style="width:1px"|AD/AP<br>AS/AS+ | !style="width:1px"|AD/AP<br>AS/AS+ | ||
| Line 3,561: | Line 3,561: | ||
|- | |- | ||
|style="text-align:center"|X1 | |style="text-align:center"|X1 | ||
| − | |colspan="3" style="text-align:center"|<span lang="ja">敵影を見ず。 | + | |colspan="3" style="text-align:center"|<span lang="ja">敵影を見ず。</span><br>No enemy spotted. |
|- | |- | ||
!style="width:1px"|# | !style="width:1px"|# | ||
| Line 3,569: | Line 3,569: | ||
{|class="wikitable" style="width:100%" | {|class="wikitable" style="width:100%" | ||
!style="width:1px"|# | !style="width:1px"|# | ||
| − | !style="width: | + | !style="width:150px"|Formation |
!Normal Battle Node | !Normal Battle Node | ||
!style="width:1px"|AD/AP<br>AS/AS+ | !style="width:1px"|AD/AP<br>AS/AS+ | ||
| Line 3,579: | Line 3,579: | ||
|- | |- | ||
!style="width:1px"|# | !style="width:1px"|# | ||
| − | !style="width: | + | !style="width:150px"|Formation |
!Normal Battle Node | !Normal Battle Node | ||
!style="width:1px"|AD/AP<br>AS/AS+ | !style="width:1px"|AD/AP<br>AS/AS+ | ||
| Line 3,586: | Line 3,586: | ||
{|class="wikitable" style="width:100%" | {|class="wikitable" style="width:100%" | ||
!style="width:1px"|# | !style="width:1px"|# | ||
| − | !style="width: | + | !style="width:150px"|Formation |
!Air Defense Node | !Air Defense Node | ||
!style="width:1px"|AD/AP<br>AS/AS+ | !style="width:1px"|AD/AP<br>AS/AS+ | ||
| Line 3,600: | Line 3,600: | ||
|- | |- | ||
!style="width:1px"|# | !style="width:1px"|# | ||
| − | !style="width: | + | !style="width:150px"|Formation |
!Air Defense Node | !Air Defense Node | ||
!style="width:1px"|AD/AP<br>AS/AS+ | !style="width:1px"|AD/AP<br>AS/AS+ | ||
| Line 3,607: | Line 3,607: | ||
{|class="wikitable" style="width:100%" | {|class="wikitable" style="width:100%" | ||
!style="width:1px"|# | !style="width:1px"|# | ||
| − | !style="width: | + | !style="width:150px"|Formation |
!Boss Battle Node | !Boss Battle Node | ||
!style="width:1px"|AD/AP<br>AS/AS+ | !style="width:1px"|AD/AP<br>AS/AS+ | ||
| Line 3,621: | Line 3,621: | ||
|- | |- | ||
!style="width:1px"|# | !style="width:1px"|# | ||
| − | !style="width: | + | !style="width:150px"|Formation |
!Boss Battle Node | !Boss Battle Node | ||
!style="width:1px"|AD/AP<br>AS/AS+ | !style="width:1px"|AD/AP<br>AS/AS+ | ||
| Line 3,628: | Line 3,628: | ||
{|class="wikitable" style="width:100%" | {|class="wikitable" style="width:100%" | ||
!style="width:1px"|# | !style="width:1px"|# | ||
| − | !style="width: | + | !style="width:150px"|Formation |
!Normal Battle Node | !Normal Battle Node | ||
!style="width:1px"|AD/AP<br>AS/AS+ | !style="width:1px"|AD/AP<br>AS/AS+ | ||
| Line 3,642: | Line 3,642: | ||
|- | |- | ||
!style="width:1px"|# | !style="width:1px"|# | ||
| − | !style="width: | + | !style="width:150px"|Formation |
!Normal Battle Node | !Normal Battle Node | ||
!style="width:1px"|AD/AP<br>AS/AS+ | !style="width:1px"|AD/AP<br>AS/AS+ | ||
| Line 3,649: | Line 3,649: | ||
{|class="wikitable" style="width:100%" | {|class="wikitable" style="width:100%" | ||
!style="width:1px"|# | !style="width:1px"|# | ||
| − | !style="width: | + | !style="width:150px"|Formation |
!Normal Battle Node | !Normal Battle Node | ||
!style="width:1px"|AD/AP<br>AS/AS+ | !style="width:1px"|AD/AP<br>AS/AS+ | ||
| Line 3,663: | Line 3,663: | ||
|- | |- | ||
!style="width:1px"|# | !style="width:1px"|# | ||
| − | !style="width: | + | !style="width:150px"|Formation |
!Normal Battle Node | !Normal Battle Node | ||
!style="width:1px"|AD/AP<br>AS/AS+ | !style="width:1px"|AD/AP<br>AS/AS+ | ||
| Line 3,684: | Line 3,684: | ||
|- | |- | ||
|style="text-align:center"|Y4 | |style="text-align:center"|Y4 | ||
| − | |colspan="3" style="text-align:center"|<span lang="ja">敵影を見ず。 | + | |colspan="3" style="text-align:center"|<span lang="ja">敵影を見ず。</span><br>No enemy spotted. |
|- | |- | ||
!style="width:1px"|# | !style="width:1px"|# | ||
| Line 3,692: | Line 3,692: | ||
{|class="wikitable" style="width:100%" | {|class="wikitable" style="width:100%" | ||
!style="width:1px"|# | !style="width:1px"|# | ||
| − | !style="width: | + | !style="width:150px"|Formation |
!Normal Battle Node | !Normal Battle Node | ||
!style="width:1px"|AD/AP<br>AS/AS+ | !style="width:1px"|AD/AP<br>AS/AS+ | ||
| Line 3,706: | Line 3,706: | ||
|- | |- | ||
!style="width:1px"|# | !style="width:1px"|# | ||
| − | !style="width: | + | !style="width:150px"|Formation |
!Normal Battle Node | !Normal Battle Node | ||
!style="width:1px"|AD/AP<br>AS/AS+ | !style="width:1px"|AD/AP<br>AS/AS+ | ||
| Line 3,713: | Line 3,713: | ||
{|class="wikitable" style="width:100%" | {|class="wikitable" style="width:100%" | ||
!style="width:1px"|# | !style="width:1px"|# | ||
| − | !style="width: | + | !style="width:150px"|Formation |
!Boss Battle Node | !Boss Battle Node | ||
!style="width:1px"|AD/AP<br>AS/AS+ | !style="width:1px"|AD/AP<br>AS/AS+ | ||
| Line 3,727: | Line 3,727: | ||
|- | |- | ||
!style="width:1px"|# | !style="width:1px"|# | ||
| − | !style="width: | + | !style="width:150px"|Formation |
!Boss Battle Node | !Boss Battle Node | ||
!style="width:1px"|AD/AP<br>AS/AS+ | !style="width:1px"|AD/AP<br>AS/AS+ | ||
| Line 3,734: | Line 3,734: | ||
{|class="wikitable" style="width:100%" | {|class="wikitable" style="width:100%" | ||
!style="width:1px"|# | !style="width:1px"|# | ||
| − | !style="width: | + | !style="width:150px"|Formation |
!Normal Battle Node | !Normal Battle Node | ||
!style="width:1px"|AD/AP<br>AS/AS+ | !style="width:1px"|AD/AP<br>AS/AS+ | ||
| Line 3,744: | Line 3,744: | ||
|- | |- | ||
!style="width:1px"|# | !style="width:1px"|# | ||
| − | !style="width: | + | !style="width:150px"|Formation |
!Normal Battle Node | !Normal Battle Node | ||
!style="width:1px"|AD/AP<br>AS/AS+ | !style="width:1px"|AD/AP<br>AS/AS+ | ||
| Line 3,751: | Line 3,751: | ||
{|class="wikitable" style="width:100%;margin-bottom:240px !important" | {|class="wikitable" style="width:100%;margin-bottom:240px !important" | ||
!style="width:1px"|# | !style="width:1px"|# | ||
| − | !style="width: | + | !style="width:150px"|Formation |
!Normal Battle Node | !Normal Battle Node | ||
!style="width:1px"|AD/AP<br>AS/AS+ | !style="width:1px"|AD/AP<br>AS/AS+ | ||
| Line 3,765: | Line 3,765: | ||
|- | |- | ||
!style="width:1px"|# | !style="width:1px"|# | ||
| − | !style="width: | + | !style="width:150px"|Formation |
!Normal Battle Node | !Normal Battle Node | ||
!style="width:1px"|AD/AP<br>AS/AS+ | !style="width:1px"|AD/AP<br>AS/AS+ | ||
Latest revision as of 08:58, 26 May 2021
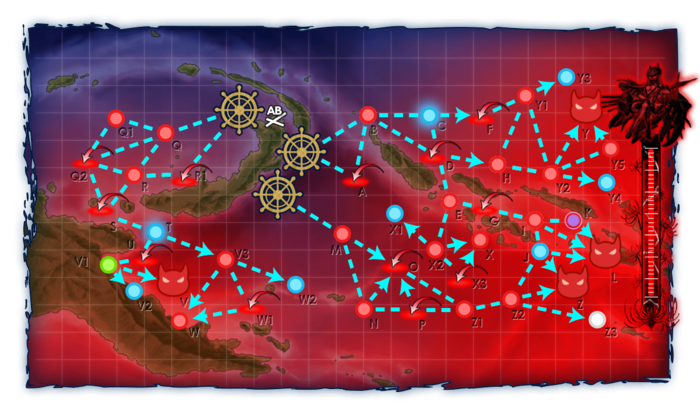
E-4 Hard AB
| # | Formation | Air Raids | AD/AP AS/AS+ |
|---|---|---|---|
| AB | Diamond | 67/133 297/594 | |
| Diamond | 76/151 338/675 | ||
| Diamond | 80/160 359/717 | ||
| Diamond | 85/169 380/759 | ||
| Diamond | 96/192 431/861 | ||
| # | Formation | Air Raids | AD/AP AS/AS+ |
E-4 Hard A: 深海任務部隊 海月空母艦載機群 (PoiDB)
| # | Formation | Air Defense Node | AD/AP AS/AS+ |
|---|---|---|---|
| A | Diamond Phases: 1, 3, 4 |
138/275 618/1236 | |
| Diamond Phases: 1, 2, 3, 4 |
141/281 630/1260 | ||
| Diamond Phases: 1, 3, 4 |
161/321 722/1443 | ||
| # | Formation | Air Defense Node | AD/AP AS/AS+ |
E-4 Hard B: ショートランド沖 深海前方哨戒線 (PoiDB)
| # | Formation | Normal Battle Node | AD/AP AS/AS+ |
|---|---|---|---|
| B | Echelon Line Abreast Phases: 1, 2, 3, 4 |
0/0 0/0 | |
| Echelon Line Abreast Phases: 1, 3, 4 |
0/0 0/0 | ||
| Echelon Line Abreast Phases: 1, 3, 4 |
0/0 0/0 | ||
| # | Formation | Normal Battle Node | AD/AP AS/AS+ |
E-4 Hard C
| # | Selection Node | ||
|---|---|---|---|
| C | 艦隊の針路を選択できます。提督、どちらの針路をとられますか? You can decide the fleet's course. Admiral, which heading should we take? | ||
| # | Selection Node | ||
E-4 Hard D: 深海任務部隊 海月空母艦載機群 (PoiDB)
| # | Formation | Air Defense Node | AD/AP AS/AS+ |
|---|---|---|---|
| D | Diamond Phases: 1, 3, 4 |
138/275 618/1236 | |
| Diamond Phases: 1, 3, 4 |
141/281 630/1260 | ||
| Diamond Phases: 1, 2, 3, 4 |
161/321 722/1443 | ||
| # | Formation | Air Defense Node | AD/AP AS/AS+ |
E-4 Hard E: ショートランド泊地沖 深海哨戒線 (PoiDB)
| # | Formation | Normal Battle Node | AD/AP AS/AS+ |
|---|---|---|---|
| E | Echelon Line Abreast Phases: 1, 3, 4 |
0/0 0/0 | |
| Echelon Line Abreast Phases: 1, 3, 4 |
0/0 0/0 | ||
| Echelon Line Abreast Phases: 1, 3, 4 |
0/0 0/0 | ||
| # | Formation | Normal Battle Node | AD/AP AS/AS+ |
E-4 Hard F: 深海任務部隊 海月空母艦載機群 (PoiDB)
| # | Formation | Air Defense Node | AD/AP AS/AS+ |
|---|---|---|---|
| F | Diamond Phases: 3, 4 |
138/275 618/1236 | |
| Diamond Phases: 3, 4 |
141/281 630/1260 | ||
| Diamond Phases: 3, 4 |
161/321 722/1443 | ||
| # | Formation | Air Defense Node | AD/AP AS/AS+ |
E-4 Hard G: 深海ソロモン方面 基地航空隊 (PoiDB)
| # | Formation | Air Defense Node | AD/AP AS/AS+ |
|---|---|---|---|
| G | Diamond Phases: 1, 3, 4 |
69/137 308/615 | |
| Diamond Phases: 1, 3, 4 |
67/133 297/594 | ||
| Diamond Phases: 1, 3, 4 |
76/151 338/675 | ||
| Diamond Phases: 1, 3, 4 |
80/160 359/717 | ||
| Diamond Phases: 1, 3, 4 |
85/169 380/759 | ||
| # | Formation | Air Defense Node | AD/AP AS/AS+ |
E-4 Hard H: 深海任務部隊 機動部隊先遣集団 (PoiDB)
| # | Formation | Normal Battle Node | AD/AP AS/AS+ |
|---|---|---|---|
| H | Cruising Formation 3 Phases: 1, 3, 4 |
52/103 231/462 | |
| Cruising Formation 3 Phases: 3 |
72/143 321/642 | ||
| # | Formation | Normal Battle Node | AD/AP AS/AS+ |
E-4 Hard I: 深海艦隊 鉄底海峡前衛哨戒部隊 (PoiDB)
| # | Formation | Normal Battle Node | AD/AP AS/AS+ |
|---|---|---|---|
| I | Line Ahead Vanguard Phases: 1, 3, 4 |
0/0 0/0 | |
| Line Ahead Phases: 1 |
0/0 0/0 | ||
| # | Formation | Normal Battle Node | AD/AP AS/AS+ |
E-4 Hard J
| # | Empty Node | ||
|---|---|---|---|
| J | 気のせいだった。 大規模艦隊の……応急修理に適した泊地です。 Must be my imagination. This is... a suitable anchorage for emergency repairs on large fleets. | ||
| # | Empty Node | ||
E-4 Hard K: 深海艦隊 鉄底海峡警備任務部隊 (PoiDB)
| # | Formation | Night Battle Node | AD/AP AS/AS+ |
|---|---|---|---|
| K | Line Ahead Echelon Phases: 1, 3, 4 |
0/0 0/0 | |
| Line Ahead Phases: 1 |
0/0 0/0 | ||
| # | Formation | Night Battle Node | AD/AP AS/AS+ |
E-4 Hard L: 深海任務部隊 空母機動部隊 (PoiDB)
| # | Formation | Boss Battle Node | AD/AP AS/AS+ |
|---|---|---|---|
| L | Cruising Formation 4 Phases: 1, 3, 4 |
133/265 594/1188 | |
| Cruising Formation 4 Phases: 1 (Final)
|
149/297 666/1332 | ||
| # | Formation | Boss Battle Node | AD/AP AS/AS+ |
E-4 Hard M: 深海潜水艦隊 ソロモン海哨戒線 (PoiDB)
| # | Formation | Normal Battle Node | AD/AP AS/AS+ |
|---|---|---|---|
| M | Echelon Line Abreast Phases: 3, 4 |
0/0 0/0 | |
| Echelon Line Abreast Phases: 3, 4 |
0/0 0/0 | ||
| Echelon Line Abreast Phases: 2, 3, 4 |
0/0 0/0 | ||
| # | Formation | Normal Battle Node | AD/AP AS/AS+ |
E-4 Hard N: 深海艦隊 水上打撃部隊 第II集団 (PoiDB)
| # | Formation | Normal Battle Node | AD/AP AS/AS+ |
|---|---|---|---|
| N | Line Ahead Double Line Vanguard Phases: 3, 4 |
0/0 0/0 | |
| # | Formation | Normal Battle Node | AD/AP AS/AS+ |
E-4 Hard O: 深海ソロモン方面 基地航空隊 (PoiDB)
| # | Formation | Air Defense Node | AD/AP AS/AS+ |
|---|---|---|---|
| O | Diamond Phases: 3, 4 |
69/137 308/615 | |
| Diamond Phases: 3, 4 |
67/133 297/594 | ||
| Diamond Phases: 3, 4 |
76/151 338/675 | ||
| Diamond Phases: 2, 3, 4 |
80/160 359/717 | ||
| Diamond Phases: 3, 4 |
85/169 380/759 | ||
| # | Formation | Air Defense Node | AD/AP AS/AS+ |
E-4 Hard P: 深海ソロモン方面 基地航空隊 (PoiDB)
| # | Formation | Air Defense Node | AD/AP AS/AS+ |
|---|---|---|---|
| P | Diamond Phases: 3, 4 |
69/137 308/615 | |
| Diamond Phases: 3, 4 |
67/133 297/594 | ||
| Diamond | 76/151 338/675 | ||
| Diamond Phases: 3, 4 |
80/160 359/717 | ||
| Diamond Phases: 3 |
85/169 380/759 | ||
| # | Formation | Air Defense Node | AD/AP AS/AS+ |
E-4 Hard Q: ビスマルク海 深海哨戒線 A群 (PoiDB)
| # | Formation | Normal Battle Node | AD/AP AS/AS+ |
|---|---|---|---|
| Q | Echelon Line Abreast Phases: 2, 3, 4 |
0/0 0/0 | |
| Echelon Line Abreast Phases: 2, 3, 4 |
0/0 0/0 | ||
| Echelon Line Abreast Phases: 2, 3, 4 |
0/0 0/0 | ||
| # | Formation | Normal Battle Node | AD/AP AS/AS+ |
E-4 Hard Q1 (PoiDB)
| # | Formation | Normal Battle Node | AD/AP AS/AS+ |
|---|---|---|---|
| # | Formation | Normal Battle Node | AD/AP AS/AS+ |
E-4 Hard Q2: 深海ニューギニア方面 基地航空隊 (PoiDB)
| # | Formation | Air Defense Node | AD/AP AS/AS+ |
|---|---|---|---|
| Q2 | Diamond Phases: 2, 3, 4 |
35/69 153/306 | |
| Diamond Phases: 2, 3, 4 |
39/78 174/348 | ||
| Diamond Phases: 2, 3, 4 |
44/87 195/390 | ||
| Diamond Phases: 2, 3, 4 |
49/97 216/432 | ||
| Diamond Phases: 2, 3, 4 |
60/119 267/534 | ||
| # | Formation | Air Defense Node | AD/AP AS/AS+ |
E-4 Hard R: 深海艦隊 ビスマルク海方面部隊 (PoiDB)
| # | Formation | Normal Battle Node | AD/AP AS/AS+ |
|---|---|---|---|
| R | Diamond Phases: 3 |
0/0 0/0 | |
| Line Ahead Vanguard Phases: 2 |
0/0 0/0 | ||
| # | Formation | Normal Battle Node | AD/AP AS/AS+ |
E-4 Hard R1: 深海ニューギニア方面 基地航空隊 (PoiDB)
| # | Formation | Air Defense Node | AD/AP AS/AS+ |
|---|---|---|---|
| R1 | Diamond Phases: 2 |
39/78 174/348 | |
| Diamond | 44/87 195/390 | ||
| # | Formation | Air Defense Node | AD/AP AS/AS+ |
E-4 Hard S: 深海ニューギニア方面 基地航空隊 (PoiDB)
| # | Formation | Air Defense Node | AD/AP AS/AS+ |
|---|---|---|---|
| S | Diamond Phases: 2, 3, 4 |
35/69 153/306 | |
| Diamond Phases: 2, 3, 4 |
39/78 174/348 | ||
| Diamond Phases: 2, 3, 4 |
44/87 195/390 | ||
| Diamond Phases: 2, 3, 4 |
49/97 216/432 | ||
| Diamond Phases: 2, 3, 4 |
60/119 267/534 | ||
| # | Formation | Air Defense Node | AD/AP AS/AS+ |
E-4 Hard T
| # | Selection Node | ||
|---|---|---|---|
| T | 艦隊の針路を選択できます。提督、どちらの針路をとられますか? You can decide the fleet's course. Admiral, which heading should we take? | ||
| # | Selection Node | ||
E-4 Hard U: 深海ニューギニア方面 基地航空隊 (PoiDB)
| # | Formation | Air Defense Node | AD/AP AS/AS+ |
|---|---|---|---|
| U | Diamond Phases: 2, 3, 4 |
35/69 153/306 | |
| Diamond Phases: 2 |
39/78 174/348 | ||
| Diamond Phases: 2, 3, 4 |
44/87 195/390 | ||
| Diamond Phases: 2, 4 |
49/97 216/432 | ||
| Diamond Phases: 2, 3, 4 |
60/119 267/534 | ||
| # | Formation | Air Defense Node | AD/AP AS/AS+ |
E-4 Hard V: 深海艦隊 ビスマルク海方面旗艦 (PoiDB)
| # | Formation | Boss Battle Node | AD/AP AS/AS+ |
|---|---|---|---|
| V | Line Ahead Echelon Vanguard Phases: 2, 4 |
0/0 0/0 | |
| # | Formation | Boss Battle Node | AD/AP AS/AS+ |
E-4 Hard V1
| # | Landing Node | ||
|---|---|---|---|
| # | Landing Node | ||
E-4 Hard V2
| # | Empty Node | ||
|---|---|---|---|
| V2 | 敵影を見ず。 No enemy spotted. | ||
| # | Empty Node | ||
E-4 Hard V3: 深海艦隊 ビスマルク海 軽空母群 (PoiDB)
| # | Formation | Normal Battle Node | AD/AP AS/AS+ |
|---|---|---|---|
| V3 | Diamond Phases: 3, 4 |
45/89 198/396 | |
| Diamond Phases: 3, 4 |
45/89 198/396 | ||
| Diamond Phases: 3, 4 |
51/101 225/450 | ||
| # | Formation | Normal Battle Node | AD/AP AS/AS+ |
E-4 Hard W: 深海艦隊 ビスマルク海方面拠点 (PoiDB)
| # | Formation | Normal Battle Node | AD/AP AS/AS+ |
|---|---|---|---|
| W | Cruising Formation 4 Phases: 3 |
50/99 222/444 | |
| Cruising Formation 4 Phases: 4 |
61/121 270/540 | ||
| # | Formation | Normal Battle Node | AD/AP AS/AS+ |
E-4 Hard W2
| # | Empty Node | ||
|---|---|---|---|
| W2 | 敵影を見ず。 No enemy spotted. | ||
| # | Empty Node | ||
E-4 Hard X: 深海艦隊 水雷戦隊 A集団 (PoiDB)
| # | Formation | Normal Battle Node | AD/AP AS/AS+ |
|---|---|---|---|
| X | Line Ahead Double Line Vanguard Phases: 3, 4 |
0/0 0/0 | |
| # | Formation | Normal Battle Node | AD/AP AS/AS+ |
E-4 Hard X1
| # | Empty Node | ||
|---|---|---|---|
| X1 | 敵影を見ず。 No enemy spotted. | ||
| # | Empty Node | ||
E-4 Hard X2: 深海艦隊 水雷戦隊 B集団 (PoiDB)
| # | Formation | Normal Battle Node | AD/AP AS/AS+ |
|---|---|---|---|
| X2 | Line Ahead Double Line Vanguard Phases: 3, 4 |
0/0 0/0 | |
| # | Formation | Normal Battle Node | AD/AP AS/AS+ |
E-4 Hard X3: 深海ソロモン方面 基地航空隊 (PoiDB)
| # | Formation | Air Defense Node | AD/AP AS/AS+ |
|---|---|---|---|
| X3 | Diamond | 69/137 308/615 | |
| Diamond Phases: 3 |
67/133 297/594 | ||
| Diamond Phases: 3 |
76/151 338/675 | ||
| Diamond Phases: 3 |
80/160 359/717 | ||
| Diamond | 85/169 380/759 | ||
| # | Formation | Air Defense Node | AD/AP AS/AS+ |
E-4 Hard Y: 深海任務部隊 海月空母機動部隊 (PoiDB)
| # | Formation | Boss Battle Node | AD/AP AS/AS+ |
|---|---|---|---|
| Y | Cruising Formation 4 Phases: 3, 4 |
141/281 630/1260 | |
| Cruising Formation 4 Phases: 3 (Final)
|
161/321 720/1440 | ||
| # | Formation | Boss Battle Node | AD/AP AS/AS+ |
E-4 Hard Y1: 深海任務部隊 前衛警戒群 (PoiDB)
| # | Formation | Normal Battle Node | AD/AP AS/AS+ |
|---|---|---|---|
| Y1 | Line Ahead Vanguard Phases: 3, 4 |
0/0 0/0 | |
| Line Ahead Phases: 3 |
0/0 0/0 | ||
| # | Formation | Normal Battle Node | AD/AP AS/AS+ |
E-4 Hard Y2: 深海任務部隊 機動部隊前衛集団 (PoiDB)
| # | Formation | Normal Battle Node | AD/AP AS/AS+ |
|---|---|---|---|
| Y2 | Cruising Formation 3 Phases: 3, 4 |
96/191 429/858 | |
| Cruising Formation 3 Phases: 3 |
116/231 519/1038 | ||
| # | Formation | Normal Battle Node | AD/AP AS/AS+ |
E-4 Hard Y3
| # | Empty Node | ||
|---|---|---|---|
| Y3 | 敵影を見ず。 No enemy spotted. | ||
| # | Empty Node | ||
E-4 Hard Y4
| # | Empty Node | ||
|---|---|---|---|
| Y4 | 敵影を見ず。 No enemy spotted. | ||
| # | Empty Node | ||
E-4 Hard Y5: 深海任務部隊 随伴補給艦集団 (PoiDB)
| # | Formation | Normal Battle Node | AD/AP AS/AS+ |
|---|---|---|---|
| Y5 | Line Ahead Diamond Phases: 3, 4 |
0/0 0/0 | |
| Line Ahead Phases: 3 |
0/0 0/0 | ||
| # | Formation | Normal Battle Node | AD/AP AS/AS+ |
E-4 Hard Z: 深海艦隊 増援部隊 旗艦集団 (PoiDB)
| # | Formation | Boss Battle Node | AD/AP AS/AS+ |
|---|---|---|---|
| Z | Cruising Formation 4 Phases: 4 |
89/177 396/792 | |
| Cruising Formation 4 Phases: 4 (Final)
|
101/201 450/900 | ||
| # | Formation | Boss Battle Node | AD/AP AS/AS+ |
E-4 Hard Z1: 深海艦隊 増援部隊 先遣警戒群 (PoiDB)
| # | Formation | Normal Battle Node | AD/AP AS/AS+ |
|---|---|---|---|
| Z1 | Line Ahead Diamond Vanguard Phases: 4 |
51/101 225/450 | |
| # | Formation | Normal Battle Node | AD/AP AS/AS+ |
E-4 Hard Z2: 深海艦隊 増援部隊 前衛集団 (PoiDB)
| # | Formation | Normal Battle Node | AD/AP AS/AS+ |
|---|---|---|---|
| Z2 | Cruising Formation 4 Phases: 4 |
89/177 396/792 | |
| Cruising Formation 4 Phases: 4 |
101/201 450/900 | ||
| # | Formation | Normal Battle Node | AD/AP AS/AS+ |
E-4 Medium AB
| # | Formation | Air Raids | AD/AP AS/AS+ |
|---|---|---|---|
| AB | Diamond | 55/110 246/492 | |
| Diamond | 60/119 267/534 | ||
| Diamond | 67/133 297/594 | ||
| Diamond | 76/151 338/675 | ||
| Diamond | 80/160 359/717 | ||
| # | Formation | Air Raids | AD/AP AS/AS+ |
E-4 Medium A: 深海任務部隊 海月空母艦載機群 (PoiDB)
| # | Formation | Air Defense Node | AD/AP AS/AS+ |
|---|---|---|---|
| A | Diamond Phases: 3, 4 |
109/217 486/972 | |
| Diamond Phases: 1, 3, 4 |
132/263 590/1179 | ||
| Diamond Phases: 1, 3, 4 |
155/309 693/1386 | ||
| # | Formation | Air Defense Node | AD/AP AS/AS+ |
E-4 Medium B: ショートランド沖 深海前方哨戒線 (PoiDB)
| # | Formation | Normal Battle Node | AD/AP AS/AS+ |
|---|---|---|---|
| B | Echelon Line Abreast Phases: 1, 3, 4 |
0/0 0/0 | |
| Echelon Line Abreast Phases: 1, 3, 4 |
0/0 0/0 | ||
| Echelon Line Abreast Phases: 1, 3, 4 |
0/0 0/0 | ||
| # | Formation | Normal Battle Node | AD/AP AS/AS+ |
E-4 Medium C
| # | Selection Node | ||
|---|---|---|---|
| C | 艦隊の針路を選択できます。提督、どちらの針路をとられますか? You can decide the fleet's course. Admiral, which heading should we take? | ||
| # | Selection Node | ||
E-4 Medium D: 深海任務部隊 海月空母艦載機群 (PoiDB)
| # | Formation | Air Defense Node | AD/AP AS/AS+ |
|---|---|---|---|
| D | Diamond Phases: 1, 3, 4 |
109/217 486/972 | |
| Diamond Phases: 1, 3, 4 |
132/263 590/1179 | ||
| Diamond Phases: 1, 3, 4 |
155/309 693/1386 | ||
| # | Formation | Air Defense Node | AD/AP AS/AS+ |
E-4 Medium E: ショートランド泊地沖 深海哨戒線 (PoiDB)
| # | Formation | Normal Battle Node | AD/AP AS/AS+ |
|---|---|---|---|
| E | Echelon Line Abreast Phases: 1, 3, 4 |
0/0 0/0 | |
| Echelon Line Abreast Phases: 1, 3, 4 |
0/0 0/0 | ||
| Echelon Line Abreast Phases: 1, 3, 4 |
0/0 0/0 | ||
| # | Formation | Normal Battle Node | AD/AP AS/AS+ |
E-4 Medium F: 深海任務部隊 海月空母艦載機群 (PoiDB)
| # | Formation | Air Defense Node | AD/AP AS/AS+ |
|---|---|---|---|
| F | Diamond Phases: 3, 4 |
109/217 486/972 | |
| Diamond Phases: 3, 4 |
132/263 590/1179 | ||
| Diamond Phases: 3, 4 |
155/309 693/1386 | ||
| # | Formation | Air Defense Node | AD/AP AS/AS+ |
E-4 Medium G: 深海ソロモン方面 基地航空隊 (PoiDB)
| # | Formation | Air Defense Node | AD/AP AS/AS+ |
|---|---|---|---|
| G | Diamond Phases: 1, 3, 4 |
55/110 246/492 | |
| Diamond Phases: 1, 3, 4 |
60/119 267/534 | ||
| Diamond Phases: 1, 3, 4 |
69/137 308/615 | ||
| Diamond Phases: 1, 3, 4 |
67/133 297/594 | ||
| # | Formation | Air Defense Node | AD/AP AS/AS+ |
E-4 Medium H: 深海任務部隊 機動部隊先遣集団 (PoiDB)
| # | Formation | Normal Battle Node | AD/AP AS/AS+ |
|---|---|---|---|
| H | Cruising Formation 3 | 32/63 140/279 | |
| Cruising Formation 3 | 47/93 207/414 | ||
| # | Formation | Normal Battle Node | AD/AP AS/AS+ |
E-4 Medium I: 深海艦隊 鉄底海峡前衛哨戒部隊 (PoiDB)
| # | Formation | Normal Battle Node | AD/AP AS/AS+ |
|---|---|---|---|
| I | Line Ahead Vanguard Phases: 1, 3, 4 |
0/0 0/0 | |
| Line Ahead Phases: 1 |
0/0 0/0 | ||
| # | Formation | Normal Battle Node | AD/AP AS/AS+ |
E-4 Medium J
| # | Empty Node | ||
|---|---|---|---|
| J | 気のせいだった。 大規模艦隊の……応急修理に適した泊地です。 Must be my imagination. This is... a suitable anchorage for emergency repairs on large fleets. | ||
| # | Empty Node | ||
E-4 Medium K: 深海艦隊 鉄底海峡警備任務部隊 (PoiDB)
| # | Formation | Night Battle Node | AD/AP AS/AS+ |
|---|---|---|---|
| K | Line Ahead Echelon Phases: 1 |
0/0 0/0 | |
| Line Ahead Phases: 1 |
0/0 0/0 | ||
| # | Formation | Night Battle Node | AD/AP AS/AS+ |
E-4 Medium L: 深海任務部隊 空母機動部隊 (PoiDB)
| # | Formation | Boss Battle Node | AD/AP AS/AS+ |
|---|---|---|---|
| L | Cruising Formation 4 Phases: 1, 3, 4 |
73/146 327/654 | |
| Cruising Formation 4 Phases: 1 (Final)
|
93/186 417/834 | ||
| # | Formation | Boss Battle Node | AD/AP AS/AS+ |
E-4 Medium M: 深海潜水艦隊 ソロモン海哨戒線 (PoiDB)
| # | Formation | Normal Battle Node | AD/AP AS/AS+ |
|---|---|---|---|
| M | Echelon Line Abreast Phases: 3, 4 |
0/0 0/0 | |
| Echelon Line Abreast Phases: 3, 4 |
0/0 0/0 | ||
| Echelon Line Abreast Phases: 3, 4 |
0/0 0/0 | ||
| # | Formation | Normal Battle Node | AD/AP AS/AS+ |
E-4 Medium N: 深海艦隊 水上打撃部隊 第II集団 (PoiDB)
| # | Formation | Normal Battle Node | AD/AP AS/AS+ |
|---|---|---|---|
| N | Line Ahead Double Line Vanguard Phases: 3, 4 |
0/0 0/0 | |
| # | Formation | Normal Battle Node | AD/AP AS/AS+ |
E-4 Medium O: 深海ソロモン方面 基地航空隊 (PoiDB)
| # | Formation | Air Defense Node | AD/AP AS/AS+ |
|---|---|---|---|
| O | Diamond Phases: 3, 4 |
55/110 246/492 | |
| Diamond Phases: 3, 4 |
60/119 267/534 | ||
| Diamond Phases: 3, 4 |
69/137 308/615 | ||
| Diamond Phases: 3, 4 |
67/133 297/594 | ||
| # | Formation | Air Defense Node | AD/AP AS/AS+ |
E-4 Medium P: 深海ソロモン方面 基地航空隊 (PoiDB)
| # | Formation | Air Defense Node | AD/AP AS/AS+ |
|---|---|---|---|
| P | Diamond | 60/119 267/534 | |
| Diamond | 69/137 308/615 | ||
| # | Formation | Air Defense Node | AD/AP AS/AS+ |
E-4 Medium Q: ビスマルク海 深海哨戒線 A群 (PoiDB)
| # | Formation | Normal Battle Node | AD/AP AS/AS+ |
|---|---|---|---|
| Q | Echelon Line Abreast Phases: 2, 3, 4 |
0/0 0/0 | |
| Echelon Line Abreast Phases: 2, 3, 4 |
0/0 0/0 | ||
| Echelon Line Abreast Phases: 2, 3, 4 |
0/0 0/0 | ||
| # | Formation | Normal Battle Node | AD/AP AS/AS+ |
E-4 Medium Q1 (PoiDB)
| # | Formation | Normal Battle Node | AD/AP AS/AS+ |
|---|---|---|---|
| # | Formation | Normal Battle Node | AD/AP AS/AS+ |
E-4 Medium Q2: 深海ニューギニア方面 基地航空隊 (PoiDB)
| # | Formation | Air Defense Node | AD/AP AS/AS+ |
|---|---|---|---|
| Q2 | Diamond Phases: 2, 3, 4 |
23/46 102/204 | |
| Diamond Phases: 2, 3, 4 |
28/55 123/246 | ||
| Diamond Phases: 2, 3, 4 |
35/69 153/306 | ||
| Diamond Phases: 2, 3, 4 |
39/78 174/348 | ||
| Diamond Phases: 2, 3, 4 |
44/87 195/390 | ||
| # | Formation | Air Defense Node | AD/AP AS/AS+ |
E-4 Medium R: 深海艦隊 ビスマルク海方面部隊 (PoiDB)
| # | Formation | Normal Battle Node | AD/AP AS/AS+ |
|---|---|---|---|
| R | Diamond Phases: 3 |
0/0 0/0 | |
| Line Ahead Vanguard Phases: 2 |
0/0 0/0 | ||
| # | Formation | Normal Battle Node | AD/AP AS/AS+ |
E-4 Medium R1 (PoiDB)
| # | Formation | Air Defense Node | AD/AP AS/AS+ |
|---|---|---|---|
| # | Formation | Air Defense Node | AD/AP AS/AS+ |
E-4 Medium S: 深海ニューギニア方面 基地航空隊 (PoiDB)
| # | Formation | Air Defense Node | AD/AP AS/AS+ |
|---|---|---|---|
| S | Diamond Phases: 2, 3, 4 |
23/46 102/204 | |
| Diamond Phases: 2, 3, 4 |
28/55 123/246 | ||
| Diamond Phases: 2, 3, 4 |
35/69 153/306 | ||
| Diamond Phases: 2, 3, 4 |
39/78 174/348 | ||
| Diamond Phases: 2, 3, 4 |
44/87 195/390 | ||
| # | Formation | Air Defense Node | AD/AP AS/AS+ |
E-4 Medium T
| # | Selection Node | ||
|---|---|---|---|
| T | 艦隊の針路を選択できます。提督、どちらの針路をとられますか? You can decide the fleet's course. Admiral, which heading should we take? | ||
| # | Selection Node | ||
E-4 Medium U: 深海ニューギニア方面 基地航空隊 (PoiDB)
| # | Formation | Air Defense Node | AD/AP AS/AS+ |
|---|---|---|---|
| U | Diamond Phases: 2 |
23/46 102/204 | |
| Diamond Phases: 2 |
28/55 123/246 | ||
| Diamond Phases: 2 |
35/69 153/306 | ||
| Diamond Phases: 2 |
39/78 174/348 | ||
| Diamond Phases: 2 |
44/87 195/390 | ||
| # | Formation | Air Defense Node | AD/AP AS/AS+ |
E-4 Medium V: 深海艦隊 ビスマルク海方面旗艦 (PoiDB)
| # | Formation | Boss Battle Node | AD/AP AS/AS+ |
|---|---|---|---|
| V | Line Ahead Echelon Vanguard Phases: 2 |
0/0 0/0 | |
| # | Formation | Boss Battle Node | AD/AP AS/AS+ |
E-4 Medium V1
| # | Landing Node | ||
|---|---|---|---|
| # | Landing Node | ||
E-4 Medium V2
| # | Empty Node | ||
|---|---|---|---|
| V2 | 敵影を見ず。 No enemy spotted. | ||
| # | Empty Node | ||
E-4 Medium V3: 深海艦隊 ビスマルク海 軽空母群 (PoiDB)
| # | Formation | Normal Battle Node | AD/AP AS/AS+ |
|---|---|---|---|
| V3 | Diamond Phases: 3, 4 |
43/85 189/378 | |
| Diamond Phases: 3, 4 |
36/72 161/321 | ||
| Diamond Phases: 3, 4 |
45/89 198/396 | ||
| # | Formation | Normal Battle Node | AD/AP AS/AS+ |
E-4 Medium W: 深海艦隊 ビスマルク海方面拠点 (PoiDB)
| # | Formation | Normal Battle Node | AD/AP AS/AS+ |
|---|---|---|---|
| W | Cruising Formation 4 Phases: 3 |
25/49 108/216 | |
| Cruising Formation 4 Phases: 4 |
45/89 198/396 | ||
| # | Formation | Normal Battle Node | AD/AP AS/AS+ |
E-4 Medium W2
| # | Empty Node | ||
|---|---|---|---|
| W2 | 敵影を見ず。 No enemy spotted. | ||
| # | Empty Node | ||
E-4 Medium X: 深海艦隊 水雷戦隊 A集団 (PoiDB)
| # | Formation | Normal Battle Node | AD/AP AS/AS+ |
|---|---|---|---|
| X | Line Ahead Double Line Vanguard Phases: 3 |
0/0 0/0 | |
| # | Formation | Normal Battle Node | AD/AP AS/AS+ |
E-4 Medium X1
| # | Empty Node | ||
|---|---|---|---|
| X1 | 敵影を見ず。 No enemy spotted. | ||
| # | Empty Node | ||
E-4 Medium X2: 深海艦隊 水雷戦隊 B集団 (PoiDB)
| # | Formation | Normal Battle Node | AD/AP AS/AS+ |
|---|---|---|---|
| X2 | Line Ahead Double Line Vanguard Phases: 3 |
0/0 0/0 | |
| # | Formation | Normal Battle Node | AD/AP AS/AS+ |
E-4 Medium X3: 深海ソロモン方面 基地航空隊 (PoiDB)
| # | Formation | Air Defense Node | AD/AP AS/AS+ |
|---|---|---|---|
| X3 | Diamond | 55/110 246/492 | |
| Diamond | 69/137 308/615 | ||
| # | Formation | Air Defense Node | AD/AP AS/AS+ |
E-4 Medium Y: 深海任務部隊 海月空母機動部隊 (PoiDB)
| # | Formation | Boss Battle Node | AD/AP AS/AS+ |
|---|---|---|---|
| Y | Cruising Formation 4 Phases: 3, 4 |
117/233 522/1044 | |
| Cruising Formation 4 Phases: 3 (Final)
|
132/263 590/1179 | ||
| # | Formation | Boss Battle Node | AD/AP AS/AS+ |
E-4 Medium Y1: 深海任務部隊 前衛警戒群 (PoiDB)
| # | Formation | Normal Battle Node | AD/AP AS/AS+ |
|---|---|---|---|
| Y1 | Line Ahead Vanguard Phases: 3, 4 |
0/0 0/0 | |
| Line Ahead Phases: 3 |
0/0 0/0 | ||
| # | Formation | Normal Battle Node | AD/AP AS/AS+ |
E-4 Medium Y2: 深海任務部隊 機動部隊前衛集団 (PoiDB)
| # | Formation | Normal Battle Node | AD/AP AS/AS+ |
|---|---|---|---|
| Y2 | Cruising Formation 3 Phases: 3, 4 |
74/147 329/657 | |
| Cruising Formation 3 Phases: 3 |
89/177 396/792 | ||
| # | Formation | Normal Battle Node | AD/AP AS/AS+ |
E-4 Medium Y3
| # | Empty Node | ||
|---|---|---|---|
| Y3 | 敵影を見ず。 No enemy spotted. | ||
| # | Empty Node | ||
E-4 Medium Y4
| # | Empty Node | ||
|---|---|---|---|
| Y4 | 敵影を見ず。 No enemy spotted. | ||
| # | Empty Node | ||
E-4 Medium Y5: 深海任務部隊 随伴補給艦集団 (PoiDB)
| # | Formation | Normal Battle Node | AD/AP AS/AS+ |
|---|---|---|---|
| Y5 | Line Ahead Diamond |
0/0 0/0 | |
| # | Formation | Normal Battle Node | AD/AP AS/AS+ |
E-4 Medium Z: 深海艦隊 増援部隊 旗艦集団 (PoiDB)
| # | Formation | Boss Battle Node | AD/AP AS/AS+ |
|---|---|---|---|
| Z | Cruising Formation 4 Phases: 4 |
72/143 321/642 | |
| Cruising Formation 4 Phases: 4 (Final)
|
89/177 396/792 | ||
| # | Formation | Boss Battle Node | AD/AP AS/AS+ |
E-4 Medium Z1: 深海艦隊 増援部隊 先遣警戒群 (PoiDB)
| # | Formation | Normal Battle Node | AD/AP AS/AS+ |
|---|---|---|---|
| Z1 | Line Ahead Diamond Vanguard Phases: 4 |
45/89 198/396 | |
| # | Formation | Normal Battle Node | AD/AP AS/AS+ |
E-4 Medium Z2: 深海艦隊 増援部隊 前衛集団 (PoiDB)
| # | Formation | Normal Battle Node | AD/AP AS/AS+ |
|---|---|---|---|
| Z2 | Cruising Formation 4 Phases: 4 |
72/143 321/642 | |
| Cruising Formation 4 Phases: 4 |
89/177 396/792 | ||
| # | Formation | Normal Battle Node | AD/AP AS/AS+ |
E-4 Easy AB
| # | Formation | Air Raids | AD/AP AS/AS+ |
|---|---|---|---|
| AB | Diamond | 44/87 195/390 | |
| Diamond | 55/110 246/492 | ||
| Diamond | 60/119 267/534 | ||
| Diamond | 23/46 102/204 | ||
| Diamond | 67/133 297/594 | ||
| # | Formation | Air Raids | AD/AP AS/AS+ |
E-4 Easy A: 深海任務部隊 海月空母艦載機群 (PoiDB)
| # | Formation | Air Defense Node | AD/AP AS/AS+ |
|---|---|---|---|
| A | Diamond Phases: 1, 3, 4 |
46/92 206/411 | |
| Diamond Phases: 1, 3, 4 |
69/138 309/618 | ||
| Diamond Phases: 1, 3, 4 |
109/217 486/972 | ||
| Diamond Phases: 1, 3, 4 |
92/184 413/825 | ||
| # | Formation | Air Defense Node | AD/AP AS/AS+ |
E-4 Easy B: ショートランド沖 深海前方哨戒線 (PoiDB)
| # | Formation | Normal Battle Node | AD/AP AS/AS+ |
|---|---|---|---|
| B | Echelon Line Abreast Phases: 1, 2, 3, 4 |
0/0 0/0 | |
| Echelon Line Abreast Phases: 1, 3, 4 |
0/0 0/0 | ||
| Echelon Line Abreast Phases: 1, 3, 4 |
0/0 0/0 | ||
| # | Formation | Normal Battle Node | AD/AP AS/AS+ |
E-4 Easy C
| # | Selection Node | ||
|---|---|---|---|
| C | 艦隊の針路を選択できます。提督、どちらの針路をとられますか? You can decide the fleet's course. Admiral, which heading should we take? | ||
| # | Selection Node | ||
E-4 Easy D: 深海任務部隊 海月空母艦載機群 (PoiDB)
| # | Formation | Air Defense Node | AD/AP AS/AS+ |
|---|---|---|---|
| D | Diamond Phases: 1, 3, 4 |
46/92 206/411 | |
| Diamond Phases: 1, 3, 4 |
69/138 309/618 | ||
| Diamond Phases: 1, 3, 4 |
109/217 486/972 | ||
| Diamond Phases: 1, 3, 4 |
92/184 413/825 | ||
| # | Formation | Air Defense Node | AD/AP AS/AS+ |
E-4 Easy E: ショートランド泊地沖 深海哨戒線 (PoiDB)
| # | Formation | Normal Battle Node | AD/AP AS/AS+ |
|---|---|---|---|
| E | Echelon Line Abreast Phases: 1, 3 |
0/0 0/0 | |
| Echelon Line Abreast Phases: 1, 3, 4 |
0/0 0/0 | ||
| Echelon Line Abreast Phases: 1, 3, 4 |
0/0 0/0 | ||
| # | Formation | Normal Battle Node | AD/AP AS/AS+ |
E-4 Easy F: 深海任務部隊 海月空母艦載機群 (PoiDB)
| # | Formation | Air Defense Node | AD/AP AS/AS+ |
|---|---|---|---|
| F | Diamond Phases: 3, 4 |
46/92 206/411 | |
| Diamond Phases: 3 |
69/138 309/618 | ||
| Diamond Phases: 3, 4 |
109/217 486/972 | ||
| Diamond Phases: 3, 4 |
92/184 413/825 | ||
| # | Formation | Air Defense Node | AD/AP AS/AS+ |
E-4 Easy G: 深海ソロモン方面 基地航空隊 (PoiDB)
| # | Formation | Air Defense Node | AD/AP AS/AS+ |
|---|---|---|---|
| G | Diamond Phases: 1, 3, 4 |
44/87 195/390 | |
| Diamond Phases: 1 |
17/33 72/144 | ||
| Diamond Phases: 1, 3 |
55/110 246/492 | ||
| Diamond Phases: 1, 3, 4 |
60/119 267/534 | ||
| Diamond Phases: 1, 3 |
67/133 297/594 | ||
| # | Formation | Air Defense Node | AD/AP AS/AS+ |
E-4 Easy H: 深海任務部隊 機動部隊先遣集団 (PoiDB)
| # | Formation | Normal Battle Node | AD/AP AS/AS+ |
|---|---|---|---|
| H | Cruising Formation 3 Phases: 1, 3 |
32/63 140/279 | |
| Cruising Formation 3 Phases: 3 |
32/63 140/279 | ||
| # | Formation | Normal Battle Node | AD/AP AS/AS+ |
E-4 Easy I: 深海艦隊 鉄底海峡前衛哨戒部隊 (PoiDB)
| # | Formation | Normal Battle Node | AD/AP AS/AS+ |
|---|---|---|---|
| I | Line Ahead Vanguard Phases: 1, 3, 4 |
0/0 0/0 | |
| Line Ahead Phases: 1 |
0/0 0/0 | ||
| # | Formation | Normal Battle Node | AD/AP AS/AS+ |
E-4 Easy J
| # | Empty Node | ||
|---|---|---|---|
| J | 気のせいだった。 大規模艦隊の……応急修理に適した泊地です。 Must be my imagination. This is... a suitable anchorage for emergency repairs on large fleets. | ||
| # | Empty Node | ||
E-4 Easy K: 深海艦隊 鉄底海峡警備任務部隊 (PoiDB)
| # | Formation | Night Battle Node | AD/AP AS/AS+ |
|---|---|---|---|
| K | Line Ahead Echelon Phases: 1 |
0/0 0/0 | |
| Line Ahead Phases: 1 |
0/0 0/0 | ||
| # | Formation | Night Battle Node | AD/AP AS/AS+ |
E-4 Easy L: 深海任務部隊 空母機動部隊 (PoiDB)
| # | Formation | Boss Battle Node | AD/AP AS/AS+ |
|---|---|---|---|
| L | Cruising Formation 4 Phases: 1, 4 |
65/129 288/576 | |
| Cruising Formation 4 Phases: 1 (Final)
|
85/169 378/756 | ||
| # | Formation | Boss Battle Node | AD/AP AS/AS+ |
E-4 Easy M: 深海潜水艦隊 ソロモン海哨戒線 (PoiDB)
| # | Formation | Normal Battle Node | AD/AP AS/AS+ |
|---|---|---|---|
| M | Echelon Line Abreast Phases: 3, 4 |
0/0 0/0 | |
| Echelon Line Abreast Phases: 3, 4 |
0/0 0/0 | ||
| Echelon Line Abreast Phases: 3, 4 |
0/0 0/0 | ||
| # | Formation | Normal Battle Node | AD/AP AS/AS+ |
E-4 Easy N: 深海艦隊 水上打撃部隊 第II集団 (PoiDB)
| # | Formation | Normal Battle Node | AD/AP AS/AS+ |
|---|---|---|---|
| N | Line Ahead Double Line Vanguard Phases: 3, 4 |
0/0 0/0 | |
| # | Formation | Normal Battle Node | AD/AP AS/AS+ |
E-4 Easy O: 深海ソロモン方面 基地航空隊 (PoiDB)
| # | Formation | Air Defense Node | AD/AP AS/AS+ |
|---|---|---|---|
| O | Diamond Phases: 3, 4 |
44/87 195/390 | |
| Diamond Phases: 3, 4 |
55/110 246/492 | ||
| Diamond Phases: 3, 4 |
60/119 267/534 | ||
| Diamond Phases: 3, 4 |
67/133 297/594 | ||
| # | Formation | Air Defense Node | AD/AP AS/AS+ |
E-4 Easy P: 深海ソロモン方面 基地航空隊 (PoiDB)
| # | Formation | Air Defense Node | AD/AP AS/AS+ |
|---|---|---|---|
| P | Diamond Phases: 4 |
44/87 195/390 | |
| Diamond Phases: 4 |
17/33 72/144 | ||
| Diamond Phases: 4 |
55/110 246/492 | ||
| Diamond Phases: 3 |
60/119 267/534 | ||
| Diamond Phases: 3, 4 |
67/133 297/594 | ||
| # | Formation | Air Defense Node | AD/AP AS/AS+ |
E-4 Easy Q: ビスマルク海 深海哨戒線 A群 (PoiDB)
| # | Formation | Normal Battle Node | AD/AP AS/AS+ |
|---|---|---|---|
| Q | Echelon Line Abreast Phases: 2, 3 |
0/0 0/0 | |
| Echelon Line Abreast Phases: 2, 3, 4 |
0/0 0/0 | ||
| Echelon Line Abreast Phases: 2, 3 |
0/0 0/0 | ||
| # | Formation | Normal Battle Node | AD/AP AS/AS+ |
E-4 Easy Q1: ビスマルク海 深海哨戒線 B群 (PoiDB)
| # | Formation | Normal Battle Node | AD/AP AS/AS+ |
|---|---|---|---|
| Q1 | Line Abreast | 0/0 0/0 | |
| Echelon Line Abreast |
0/0 0/0 | ||
| # | Formation | Normal Battle Node | AD/AP AS/AS+ |
E-4 Easy Q2: 深海ニューギニア方面 基地航空隊 (PoiDB)
| # | Formation | Air Defense Node | AD/AP AS/AS+ |
|---|---|---|---|
| Q2 | Diamond Phases: 2, 3 |
12/23 51/102 | |
| Diamond Phases: 2, 3 |
17/33 72/144 | ||
| Diamond Phases: 2, 3, 4 |
23/46 102/204 | ||
| Diamond Phases: 2, 3 |
28/55 123/246 | ||
| # | Formation | Air Defense Node | AD/AP AS/AS+ |
E-4 Easy R: 深海艦隊 ビスマルク海方面部隊 (PoiDB)
| # | Formation | Normal Battle Node | AD/AP AS/AS+ |
|---|---|---|---|
| R | Diamond Phases: 3 |
0/0 0/0 | |
| Line Ahead Vanguard Phases: 2 |
0/0 0/0 | ||
| # | Formation | Normal Battle Node | AD/AP AS/AS+ |
E-4 Easy R1 (PoiDB)
| # | Formation | Air Defense Node | AD/AP AS/AS+ |
|---|---|---|---|
| # | Formation | Air Defense Node | AD/AP AS/AS+ |
E-4 Easy S: 深海ニューギニア方面 基地航空隊 (PoiDB)
| # | Formation | Air Defense Node | AD/AP AS/AS+ |
|---|---|---|---|
| S | Diamond Phases: 2, 3 |
12/23 51/102 | |
| Diamond Phases: 2, 3 |
17/33 72/144 | ||
| Diamond Phases: 2, 3, 4 |
23/46 102/204 | ||
| Diamond Phases: 2, 3 |
28/55 123/246 | ||
| # | Formation | Air Defense Node | AD/AP AS/AS+ |
E-4 Easy T
| # | Selection Node | ||
|---|---|---|---|
| T | 艦隊の針路を選択できます。提督、どちらの針路をとられますか? You can decide the fleet's course. Admiral, which heading should we take? | ||
| # | Selection Node | ||
E-4 Easy U: 深海ニューギニア方面 基地航空隊 (PoiDB)
| # | Formation | Air Defense Node | AD/AP AS/AS+ |
|---|---|---|---|
| U | Diamond Phases: 2 |
12/23 51/102 | |
| Diamond Phases: 2 |
17/33 72/144 | ||
| Diamond Phases: 2 |
23/46 102/204 | ||
| Diamond Phases: 2 |
28/55 123/246 | ||
| # | Formation | Air Defense Node | AD/AP AS/AS+ |
E-4 Easy V: 深海艦隊 ビスマルク海方面旗艦 (PoiDB)
| # | Formation | Boss Battle Node | AD/AP AS/AS+ |
|---|---|---|---|
| V | Line Ahead Echelon Vanguard Phases: 2 |
0/0 0/0 | |
| # | Formation | Boss Battle Node | AD/AP AS/AS+ |
E-4 Easy V1
| # | Landing Node | ||
|---|---|---|---|
| # | Landing Node | ||
E-4 Easy V2
| # | Empty Node | ||
|---|---|---|---|
| V2 | 敵影を見ず。 No enemy spotted. | ||
| # | Empty Node | ||
E-4 Easy V3: 深海艦隊 ビスマルク海 軽空母群 (PoiDB)
| # | Formation | Normal Battle Node | AD/AP AS/AS+ |
|---|---|---|---|
| V3 | Diamond Phases: 3 |
36/72 161/321 | |
| Diamond Phases: 3, 4 |
43/85 189/378 | ||
| Diamond Phases: 3 |
36/72 161/321 | ||
| # | Formation | Normal Battle Node | AD/AP AS/AS+ |
E-4 Easy W: 深海艦隊 ビスマルク海方面拠点 (PoiDB)
| # | Formation | Normal Battle Node | AD/AP AS/AS+ |
|---|---|---|---|
| W | Cruising Formation 4 Phases: 3 |
25/49 108/216 | |
| Cruising Formation 4 Phases: 4 |
45/89 198/396 | ||
| # | Formation | Normal Battle Node | AD/AP AS/AS+ |
E-4 Easy W2
| # | Empty Node | ||
|---|---|---|---|
| W2 | 敵影を見ず。 No enemy spotted. | ||
| # | Empty Node | ||
E-4 Easy X: 深海艦隊 水雷戦隊 A集団 (PoiDB)
| # | Formation | Normal Battle Node | AD/AP AS/AS+ |
|---|---|---|---|
| X | Line Ahead Double Line Vanguard Phases: 3 |
0/0 0/0 | |
| # | Formation | Normal Battle Node | AD/AP AS/AS+ |
E-4 Easy X1
| # | Empty Node | ||
|---|---|---|---|
| X1 | 敵影を見ず。 No enemy spotted. | ||
| # | Empty Node | ||
E-4 Easy X2: 深海艦隊 水雷戦隊 B集団 (PoiDB)
| # | Formation | Normal Battle Node | AD/AP AS/AS+ |
|---|---|---|---|
| X2 | Line Ahead Double Line Vanguard Phases: 3, 4 |
0/0 0/0 | |
| # | Formation | Normal Battle Node | AD/AP AS/AS+ |
E-4 Easy X3: 深海ソロモン方面 基地航空隊 (PoiDB)
| # | Formation | Air Defense Node | AD/AP AS/AS+ |
|---|---|---|---|
| X3 | Diamond Phases: 3 |
44/87 195/390 | |
| Diamond | 17/33 72/144 | ||
| Diamond Phases: 3 |
60/119 267/534 | ||
| Diamond | 67/133 297/594 | ||
| # | Formation | Air Defense Node | AD/AP AS/AS+ |
E-4 Easy Y: 深海任務部隊 海月空母機動部隊 (PoiDB)
| # | Formation | Boss Battle Node | AD/AP AS/AS+ |
|---|---|---|---|
| Y | Cruising Formation 4 Phases: 3, 4 |
62/124 278/555 | |
| Cruising Formation 4 Phases: 3 (Final)
|
77/154 345/690 | ||
| # | Formation | Boss Battle Node | AD/AP AS/AS+ |
E-4 Easy Y1: 深海任務部隊 前衛警戒群 (PoiDB)
| # | Formation | Normal Battle Node | AD/AP AS/AS+ |
|---|---|---|---|
| Y1 | Line Ahead Vanguard Phases: 3, 4 |
0/0 0/0 | |
| Line Ahead Phases: 3 |
0/0 0/0 | ||
| # | Formation | Normal Battle Node | AD/AP AS/AS+ |
E-4 Easy Y2: 深海任務部隊 機動部隊前衛集団 (PoiDB)
| # | Formation | Normal Battle Node | AD/AP AS/AS+ |
|---|---|---|---|
| Y2 | Cruising Formation 3 Phases: 3, 4 |
53/105 234/468 | |
| Cruising Formation 3 Phases: 3 |
68/135 302/603 | ||
| # | Formation | Normal Battle Node | AD/AP AS/AS+ |
E-4 Easy Y3
| # | Empty Node | ||
|---|---|---|---|
| Y3 | 敵影を見ず。 No enemy spotted. | ||
| # | Empty Node | ||
E-4 Easy Y4
| # | Empty Node | ||
|---|---|---|---|
| Y4 | 敵影を見ず。 No enemy spotted. | ||
| # | Empty Node | ||
E-4 Easy Y5: 深海任務部隊 随伴補給艦集団 (PoiDB)
| # | Formation | Normal Battle Node | AD/AP AS/AS+ |
|---|---|---|---|
| Y5 | Line Ahead Diamond Phases: 3 |
0/0 0/0 | |
| Line Ahead | 0/0 0/0 | ||
| # | Formation | Normal Battle Node | AD/AP AS/AS+ |
E-4 Easy Z: 深海艦隊 増援部隊 旗艦集団 (PoiDB)
| # | Formation | Boss Battle Node | AD/AP AS/AS+ |
|---|---|---|---|
| Z | Cruising Formation 4 Phases: 4 |
44/88 197/393 | |
| Cruising Formation 4 Phases: 4 (Final)
|
72/143 321/642 | ||
| # | Formation | Boss Battle Node | AD/AP AS/AS+ |
E-4 Easy Z1: 深海艦隊 増援部隊 先遣警戒群 (PoiDB)
| # | Formation | Normal Battle Node | AD/AP AS/AS+ |
|---|---|---|---|
| Z1 | Line Ahead Diamond Vanguard Phases: 4 |
45/89 198/396 | |
| # | Formation | Normal Battle Node | AD/AP AS/AS+ |
E-4 Easy Z2: 深海艦隊 増援部隊 前衛集団 (PoiDB)
| # | Formation | Normal Battle Node | AD/AP AS/AS+ |
|---|---|---|---|
| Z2 | Cruising Formation 4 Phases: 4 |
44/88 197/393 | |
| Cruising Formation 4 Phases: 4 |
72/143 321/642 | ||
| # | Formation | Normal Battle Node | AD/AP AS/AS+ |
E-4 Casual AB
| # | Formation | Air Raids | AD/AP AS/AS+ |
|---|---|---|---|
| AB | Diamond | 44/87 195/390 | |
| Diamond | 55/110 246/492 | ||
| Diamond | 23/46 102/204 | ||
| # | Formation | Air Raids | AD/AP AS/AS+ |
E-4 Casual A: 深海任務部隊 海月空母艦載機群 (PoiDB)
| # | Formation | Air Defense Node | AD/AP AS/AS+ |
|---|---|---|---|
| A | Diamond Phases: 1, 3, 4 |
46/92 206/411 | |
| Diamond Phases: 1, 3, 4 |
69/138 309/618 | ||
| # | Formation | Air Defense Node | AD/AP AS/AS+ |
E-4 Casual B: ショートランド沖 深海前方哨戒線 (PoiDB)
| # | Formation | Normal Battle Node | AD/AP AS/AS+ |
|---|---|---|---|
| B | Echelon Line Abreast Phases: 1, 3, 4 |
0/0 0/0 | |
| Echelon Line Abreast Phases: 1, 2, 3, 4 |
0/0 0/0 | ||
| # | Formation | Normal Battle Node | AD/AP AS/AS+ |
E-4 Casual C
| # | Selection Node | ||
|---|---|---|---|
| C | 艦隊の針路を選択できます。提督、どちらの針路をとられますか? You can decide the fleet's course. Admiral, which heading should we take? | ||
| # | Selection Node | ||
E-4 Casual D: 深海任務部隊 海月空母艦載機群 (PoiDB)
| # | Formation | Air Defense Node | AD/AP AS/AS+ |
|---|---|---|---|
| D | Diamond Phases: 1, 3, 4 |
46/92 206/411 | |
| Diamond Phases: 1, 3 |
69/138 309/618 | ||
| # | Formation | Air Defense Node | AD/AP AS/AS+ |
E-4 Casual E: ショートランド泊地沖 深海哨戒線 (PoiDB)
| # | Formation | Normal Battle Node | AD/AP AS/AS+ |
|---|---|---|---|
| E | Echelon Line Abreast Phases: 1, 3, 4 |
0/0 0/0 | |
| Echelon Line Abreast Phases: 1, 3 |
0/0 0/0 | ||
| # | Formation | Normal Battle Node | AD/AP AS/AS+ |
E-4 Casual F: 深海任務部隊 海月空母艦載機群 (PoiDB)
| # | Formation | Air Defense Node | AD/AP AS/AS+ |
|---|---|---|---|
| F | Diamond Phases: 3, 4 |
46/92 206/411 | |
| Diamond Phases: 3, 4 |
69/138 309/618 | ||
| # | Formation | Air Defense Node | AD/AP AS/AS+ |
E-4 Casual G: 深海ソロモン方面 基地航空隊 (PoiDB)
| # | Formation | Air Defense Node | AD/AP AS/AS+ |
|---|---|---|---|
| G | Diamond Phases: 1, 3 |
44/87 195/390 | |
| Diamond Phases: 1, 4 |
17/33 72/144 | ||
| Diamond Phases: 1 |
55/110 246/492 | ||
| # | Formation | Air Defense Node | AD/AP AS/AS+ |
E-4 Casual H: 深海任務部隊 機動部隊先遣集団 (PoiDB)
| # | Formation | Normal Battle Node | AD/AP AS/AS+ |
|---|---|---|---|
| H | Cruising Formation 3 Phases: 1, 3 |
24/47 104/207 | |
| Cruising Formation 3 | 32/63 140/279 | ||
| # | Formation | Normal Battle Node | AD/AP AS/AS+ |
E-4 Casual I: 深海艦隊 鉄底海峡前衛哨戒部隊 (PoiDB)
| # | Formation | Normal Battle Node | AD/AP AS/AS+ |
|---|---|---|---|
| I | Line Ahead Vanguard Phases: 1, 3, 4 |
0/0 0/0 | |
| Line Ahead Phases: 1 |
0/0 0/0 | ||
| # | Formation | Normal Battle Node | AD/AP AS/AS+ |
E-4 Casual J
| # | Empty Node | ||
|---|---|---|---|
| J | 気のせいだった。 大規模艦隊の……応急修理に適した泊地です。 Must be my imagination. This is... a suitable anchorage for emergency repairs on large fleets. | ||
| # | Empty Node | ||
E-4 Casual K: 深海艦隊 鉄底海峡警備任務部隊 (PoiDB)
| # | Formation | Night Battle Node | AD/AP AS/AS+ |
|---|---|---|---|
| K | Line Ahead Echelon Phases: 1, 3 |
0/0 0/0 | |
| Line Ahead Phases: 1 |
0/0 0/0 | ||
| # | Formation | Night Battle Node | AD/AP AS/AS+ |
E-4 Casual L: 深海任務部隊 空母機動部隊 (PoiDB)
| # | Formation | Boss Battle Node | AD/AP AS/AS+ |
|---|---|---|---|
| L | Cruising Formation 4 Phases: 1, 3, 4 |
51/102 228/456 | |
| Cruising Formation 4 Phases: 1 (Final)
|
55/109 243/486 | ||
| # | Formation | Boss Battle Node | AD/AP AS/AS+ |
E-4 Casual M: 深海潜水艦隊 ソロモン海哨戒線 (PoiDB)
| # | Formation | Normal Battle Node | AD/AP AS/AS+ |
|---|---|---|---|
| M | Echelon Line Abreast Phases: 3, 4 |
0/0 0/0 | |
| Echelon Line Abreast Phases: 4 |
0/0 0/0 | ||
| # | Formation | Normal Battle Node | AD/AP AS/AS+ |
E-4 Casual N: 深海艦隊 水上打撃部隊 第II集団 (PoiDB)
| # | Formation | Normal Battle Node | AD/AP AS/AS+ |
|---|---|---|---|
| N | Line Ahead Double Line Vanguard Phases: 4 |
0/0 0/0 | |
| # | Formation | Normal Battle Node | AD/AP AS/AS+ |
E-4 Casual O: 深海ソロモン方面 基地航空隊 (PoiDB)
| # | Formation | Air Defense Node | AD/AP AS/AS+ |
|---|---|---|---|
| O | Diamond Phases: 3, 4 |
44/87 195/390 | |
| Diamond Phases: 3, 4 |
17/33 72/144 | ||
| Diamond Phases: 4 |
55/110 246/492 | ||
| # | Formation | Air Defense Node | AD/AP AS/AS+ |
E-4 Casual P (PoiDB)
| # | Formation | Air Defense Node | AD/AP AS/AS+ |
|---|---|---|---|
| # | Formation | Air Defense Node | AD/AP AS/AS+ |
E-4 Casual Q: ビスマルク海 深海哨戒線 A群 (PoiDB)
| # | Formation | Normal Battle Node | AD/AP AS/AS+ |
|---|---|---|---|
| Q | Echelon Line Abreast Phases: 2, 3 |
0/0 0/0 | |
| Echelon Line Abreast Phases: 2, 3 |
0/0 0/0 | ||
| # | Formation | Normal Battle Node | AD/AP AS/AS+ |
E-4 Casual Q1: ビスマルク海 深海哨戒線 B群 (PoiDB)
| # | Formation | Normal Battle Node | AD/AP AS/AS+ |
|---|---|---|---|
| Q1 | Echelon Line Abreast Phases: 2 |
0/0 0/0 | |
| # | Formation | Normal Battle Node | AD/AP AS/AS+ |
E-4 Casual Q2: 深海ニューギニア方面 基地航空隊 (PoiDB)
| # | Formation | Air Defense Node | AD/AP AS/AS+ |
|---|---|---|---|
| Q2 | Diamond Phases: 2, 3 |
12/23 51/102 | |
| Diamond Phases: 2, 3 |
17/33 72/144 | ||
| Diamond Phases: 2, 3 |
23/46 102/204 | ||
| # | Formation | Air Defense Node | AD/AP AS/AS+ |
E-4 Casual R: 深海艦隊 ビスマルク海方面部隊 (PoiDB)
| # | Formation | Normal Battle Node | AD/AP AS/AS+ |
|---|---|---|---|
| R | Diamond Phases: 3 |
0/0 0/0 | |
| Line Ahead Vanguard Phases: 2 |
0/0 0/0 | ||
| # | Formation | Normal Battle Node | AD/AP AS/AS+ |
E-4 Casual R1 (PoiDB)
| # | Formation | Air Defense Node | AD/AP AS/AS+ |
|---|---|---|---|
| # | Formation | Air Defense Node | AD/AP AS/AS+ |
E-4 Casual S: 深海ニューギニア方面 基地航空隊 (PoiDB)
| # | Formation | Air Defense Node | AD/AP AS/AS+ |
|---|---|---|---|
| S | Diamond Phases: 2, 3 |
12/23 51/102 | |
| Diamond Phases: 2, 3 |
17/33 72/144 | ||
| Diamond Phases: 2, 3 |
23/46 102/204 | ||
| # | Formation | Air Defense Node | AD/AP AS/AS+ |
E-4 Casual T
| # | Selection Node | ||
|---|---|---|---|
| T | 艦隊の針路を選択できます。提督、どちらの針路をとられますか? You can decide the fleet's course. Admiral, which heading should we take? | ||
| # | Selection Node | ||
E-4 Casual U: 深海ニューギニア方面 基地航空隊 (PoiDB)
| # | Formation | Air Defense Node | AD/AP AS/AS+ |
|---|---|---|---|
| U | Diamond Phases: 2 |
12/23 51/102 | |
| Diamond Phases: 2 |
17/33 72/144 | ||
| Diamond Phases: 2 |
23/46 102/204 | ||
| # | Formation | Air Defense Node | AD/AP AS/AS+ |
E-4 Casual V: 深海艦隊 ビスマルク海方面旗艦 (PoiDB)
| # | Formation | Boss Battle Node | AD/AP AS/AS+ |
|---|---|---|---|
| V | Line Ahead Echelon Vanguard Phases: 2 |
0/0 0/0 | |
| # | Formation | Boss Battle Node | AD/AP AS/AS+ |
E-4 Casual V1
| # | Landing Node | ||
|---|---|---|---|
| # | Landing Node | ||
E-4 Casual V2
| # | Empty Node | ||
|---|---|---|---|
| V2 | 敵影を見ず。 No enemy spotted. | ||
| # | Empty Node | ||
E-4 Casual V3: 深海艦隊 ビスマルク海 軽空母群 (PoiDB)
| # | Formation | Normal Battle Node | AD/AP AS/AS+ |
|---|---|---|---|
| V3 | Diamond Phases: 3 |
36/72 161/321 | |
| Diamond Phases: 3 |
43/85 189/378 | ||
| Diamond Phases: 3 |
36/72 161/321 | ||
| # | Formation | Normal Battle Node | AD/AP AS/AS+ |
E-4 Casual W: 深海艦隊 ビスマルク海方面拠点 (PoiDB)
| # | Formation | Normal Battle Node | AD/AP AS/AS+ |
|---|---|---|---|
| W | Cruising Formation 4 Phases: 3 |
11/22 48/96 | |
| Cruising Formation 4 | 15/29 63/126 | ||
| # | Formation | Normal Battle Node | AD/AP AS/AS+ |
E-4 Casual W2
| # | Empty Node | ||
|---|---|---|---|
| W2 | 敵影を見ず。 No enemy spotted. | ||
| # | Empty Node | ||
E-4 Casual X: 深海艦隊 水雷戦隊 A集団 (PoiDB)
| # | Formation | Normal Battle Node | AD/AP AS/AS+ |
|---|---|---|---|
| X | Line Ahead Double Line Vanguard Phases: 3 |
0/0 0/0 | |
| # | Formation | Normal Battle Node | AD/AP AS/AS+ |
E-4 Casual X1
| # | Empty Node | ||
|---|---|---|---|
| X1 | 敵影を見ず。 No enemy spotted. | ||
| # | Empty Node | ||
E-4 Casual X2: 深海艦隊 水雷戦隊 B集団 (PoiDB)
| # | Formation | Normal Battle Node | AD/AP AS/AS+ |
|---|---|---|---|
| X2 | Line Ahead Double Line Vanguard Phases: 3 |
0/0 0/0 | |
| # | Formation | Normal Battle Node | AD/AP AS/AS+ |
E-4 Casual X3: 深海ソロモン方面 基地航空隊 (PoiDB)
| # | Formation | Air Defense Node | AD/AP AS/AS+ |
|---|---|---|---|
| X3 | Diamond | 44/87 195/390 | |
| Diamond | 55/110 246/492 | ||
| # | Formation | Air Defense Node | AD/AP AS/AS+ |
E-4 Casual Y: 深海任務部隊 海月空母機動部隊 (PoiDB)
| # | Formation | Boss Battle Node | AD/AP AS/AS+ |
|---|---|---|---|
| Y | Cruising Formation 4 Phases: 3, 4 |
46/92 206/411 | |
| Cruising Formation 4 Phases: 3 (Final)
|
52/103 230/459 | ||
| # | Formation | Boss Battle Node | AD/AP AS/AS+ |
E-4 Casual Y1: 深海任務部隊 前衛警戒群 (PoiDB)
| # | Formation | Normal Battle Node | AD/AP AS/AS+ |
|---|---|---|---|
| Y1 | Line Ahead Vanguard Phases: 3, 4 |
0/0 0/0 | |
| Line Ahead Phases: 3 |
0/0 0/0 | ||
| # | Formation | Normal Battle Node | AD/AP AS/AS+ |
E-4 Casual Y2: 深海任務部隊 機動部隊前衛集団 (PoiDB)
| # | Formation | Normal Battle Node | AD/AP AS/AS+ |
|---|---|---|---|
| Y2 | Cruising Formation 3 Phases: 3, 4 |
15/30 66/132 | |
| Cruising Formation 3 Phases: 3 |
21/41 90/180 | ||
| # | Formation | Normal Battle Node | AD/AP AS/AS+ |
E-4 Casual Y3
| # | Empty Node | ||
|---|---|---|---|
| Y3 | 敵影を見ず。 No enemy spotted. | ||
| # | Empty Node | ||
E-4 Casual Y4
| # | Empty Node | ||
|---|---|---|---|
| Y4 | 敵影を見ず。 No enemy spotted. | ||
| # | Empty Node | ||
E-4 Casual Y5: 深海任務部隊 随伴補給艦集団 (PoiDB)
| # | Formation | Normal Battle Node | AD/AP AS/AS+ |
|---|---|---|---|
| Y5 | Line Ahead Diamond |
0/0 0/0 | |
| Line Ahead | 0/0 0/0 | ||
| # | Formation | Normal Battle Node | AD/AP AS/AS+ |
E-4 Casual Z: 深海艦隊 増援部隊 旗艦集団 (PoiDB)
| # | Formation | Boss Battle Node | AD/AP AS/AS+ |
|---|---|---|---|
| Z | Cruising Formation 4 Phases: 4 |
6/11 24/48 | |
| Cruising Formation 4 Phases: 4 (Final)
|
17/33 72/144 | ||
| # | Formation | Boss Battle Node | AD/AP AS/AS+ |
E-4 Casual Z1: 深海艦隊 増援部隊 先遣警戒群 (PoiDB)
| # | Formation | Normal Battle Node | AD/AP AS/AS+ |
|---|---|---|---|
| Z1 | Line Ahead Diamond Vanguard Phases: 4 |
36/72 161/321 | |
| # | Formation | Normal Battle Node | AD/AP AS/AS+ |
E-4 Casual Z2: 深海艦隊 増援部隊 前衛集団 (PoiDB)
| # | Formation | Normal Battle Node | AD/AP AS/AS+ |
|---|---|---|---|
| Z2 | Cruising Formation 4 Phases: 4 |
6/11 24/48 | |
| Cruising Formation 4 Phases: 4 |
17/33 72/144 | ||
| # | Formation | Normal Battle Node | AD/AP AS/AS+ |