- Welcome to the Kancolle Wiki!
- If you have any questions regarding site content, account registration, etc., please visit the KanColle Wiki Discord
Difference between revisions of "World 2/2-2/Enemy comps"
Jump to navigation
Jump to search
com>Kruss |
|||
| (19 intermediate revisions by 5 users not shown) | |||
| Line 1: | Line 1: | ||
| − | |||
{{Section}} | {{Section}} | ||
| − | {{Map/Image| | + | {{Map/Image|page=World 2/2-2|{{Map/ImageNode|Start||2-2|x=226|y=101}}{{Map/ImageNode|A||2-2|x=88|y=227}}{{Map/ImageNode|B||2-2|x=194|y=274}}{{Map/ImageNode|C||2-2|x=274|y=202}}{{Map/ImageNode|D||2-2|x=321|y=298}}{{Map/ImageNode|E||2-2|x=377|y=241}}{{Map/ImageNode|F||2-2|x=403|y=142}}{{Map/ImageNode|G||2-2|x=463|y=203}}{{Map/ImageNode|H||2-2|x=523|y=176}}{{Map/ImageNode|I||2-2|x=560|y=94}}{{Map/ImageNode|J||2-2|x=610|y=202}}{{Map/ImageNode|K||2-2|x=521|y=293}}}} |
| − | {{Map/ImageNode|A|x= | + | <div class="map-nodes"> |
| − | {{Map/ImageNode|E|x= | + | {{Map/Nodes|page=World 2/2-2 |
| − | {{Map/ImageNode| | + | |A |
| − | {{Map/ImageNode|G|x= | + | |Resource |
| − | {{Map/ImageNode| | + | |Bauxite |
| − | {{Map/ImageNode| | + | |10~20 |
| − | {{Map/ImageNode| | ||
}} | }} | ||
| − | + | {{Map/Nodes|page=World 2/2-2|name=敵上陸船団 | |
| − | {{Map/Nodes|name= | + | |B |
| − | | | + | |Normal/BaseXP |
| − | |Normal | + | |{{Formation|Double Line}} |
| − | |{{Formation|Line | + | |150 |
| − | |Light Cruiser | + | |Light Cruiser Ho-Class/Elite |
| − | | | + | |Transport Ship Wa-Class |
| − | | | + | |Transport Ship Wa-Class |
| − | |Destroyer | + | |Destroyer I-Class/Late Model |
| + | |Destroyer I-Class | ||
| + | |Destroyer I-Class | ||
| + | |- | ||
| + | |B | ||
| + | |Normal/BaseXP | ||
| + | |{{Formation|Diamond}} | ||
| + | |150 | ||
| + | |Transport Ship Wa-Class | ||
| + | |Transport Ship Wa-Class | ||
| + | |Light Cruiser Ho-Class/Elite | ||
| + | |Destroyer I-Class/Late Model | ||
| + | |Destroyer I-Class | ||
| + | |Destroyer I-Class | ||
| + | |- | ||
| + | |B | ||
| + | |Normal/BaseXP | ||
| + | |{{Formation|Diamond}} | ||
| + | |150 | ||
| + | |Transport Ship Wa-Class/Elite | ||
| + | |Transport Ship Wa-Class/Elite | ||
| + | |Light Cruiser Ho-Class/Elite | ||
| + | |Destroyer I-Class/Late Model | ||
|Destroyer I-Class | |Destroyer I-Class | ||
|Destroyer I-Class | |Destroyer I-Class | ||
|- | |- | ||
| − | | | + | |B |
| − | |Normal | + | |Normal/BaseXP |
| − | |{{Formation|Line | + | |{{Formation|Double Line}} |
| − | |Light Cruiser | + | |180 |
| − | | | + | |Light Cruiser Ho-Class/Elite |
| − | | | + | |Transport Ship Wa-Class/Elite |
| − | |Destroyer | + | |Transport Ship Wa-Class/Elite |
| + | |Destroyer I-Class/Late Model | ||
|Destroyer I-Class | |Destroyer I-Class | ||
|Destroyer I-Class | |Destroyer I-Class | ||
|- | |- | ||
| − | | | + | |B |
| − | |Normal | + | |Normal/BaseXP |
| − | |{{Formation|Line | + | |{{Formation|Double Line}} |
| − | | | + | |200 |
| − | | | + | |Light Cruiser Ho-Class/Elite |
| − | |Destroyer | + | |Transport Ship Wa-Class/Elite |
| − | |Destroyer | + | |Transport Ship Wa-Class/Elite |
| − | |Destroyer | + | |Destroyer I-Class/Late Model |
| − | |Destroyer | + | |Destroyer I-Class/Late Model |
| + | |Destroyer I-Class/Late Model | ||
| + | |- | ||
| + | |B | ||
| + | |Normal/BaseXP | ||
| + | |{{Formation|Diamond}} | ||
| + | |200 | ||
| + | |Transport Ship Wa-Class/Elite | ||
| + | |Transport Ship Wa-Class/Elite | ||
| + | |Light Cruiser Ho-Class/Elite | ||
| + | |Destroyer I-Class/Late Model | ||
| + | |Destroyer I-Class/Late Model | ||
| + | |Destroyer I-Class/Late Model | ||
| + | }} | ||
| + | {{Map/Nodes|page=World 2/2-2|name= | ||
| + | |C | ||
| + | |Empty | ||
}} | }} | ||
| − | {{Map/Nodes|name= | + | {{Map/Nodes|page=World 2/2-2|name=敵上陸船団 |
|D | |D | ||
| − | |Normal | + | |Normal/BaseXP |
|{{Formation|Double Line}} | |{{Formation|Double Line}} | ||
| − | | | + | |170 |
| − | |Light Cruiser | + | |Light Cruiser Ho-Class/Elite |
| − | |||
| − | |||
|Transport Ship Wa-Class | |Transport Ship Wa-Class | ||
|Transport Ship Wa-Class | |Transport Ship Wa-Class | ||
| + | |Destroyer I-Class/Late Model | ||
| + | |Destroyer I-Class | ||
| + | |Destroyer I-Class | ||
|- | |- | ||
|D | |D | ||
| − | |Normal | + | |Normal/BaseXP |
| − | |{{Formation| | + | |{{Formation|Diamond}} |
| − | | | + | |170 |
| − | |||
| − | |||
| − | |||
|Transport Ship Wa-Class | |Transport Ship Wa-Class | ||
|Transport Ship Wa-Class | |Transport Ship Wa-Class | ||
| + | |Light Cruiser Ho-Class/Elite | ||
| + | |Destroyer I-Class/Late Model | ||
| + | |Destroyer I-Class | ||
| + | |Destroyer I-Class | ||
| + | |- | ||
| + | |D | ||
| + | |Normal/BaseXP | ||
| + | |{{Formation|Double Line}} | ||
| + | |200 | ||
| + | |Light Cruiser Ho-Class/Elite | ||
| + | |Transport Ship Wa-Class/Elite | ||
| + | |Transport Ship Wa-Class/Elite | ||
| + | |Destroyer I-Class/Late Model | ||
| + | |Destroyer I-Class | ||
| + | |Destroyer I-Class | ||
| + | |- | ||
| + | |D | ||
| + | |Normal/BaseXP | ||
| + | |{{Formation|Diamond}} | ||
| + | |200 | ||
| + | |Transport Ship Wa-Class/Elite | ||
| + | |Transport Ship Wa-Class/Elite | ||
| + | |Light Cruiser Ho-Class/Elite | ||
| + | |Destroyer I-Class/Late Model | ||
| + | |Destroyer I-Class | ||
| + | |Destroyer I-Class | ||
|- | |- | ||
|D | |D | ||
| − | |Normal | + | |Normal/BaseXP |
|{{Formation|Double Line}} | |{{Formation|Double Line}} | ||
| − | | | + | |220 |
| − | |Destroyer | + | |Light Cruiser Ho-Class/Elite |
| − | |Destroyer | + | |Transport Ship Wa-Class/Elite |
| − | |Transport Ship Wa-Class | + | |Transport Ship Wa-Class/Elite |
| − | |Transport Ship Wa-Class | + | |Destroyer I-Class/Late Model |
| − | | | + | |Destroyer I-Class/Late Model |
| + | |Destroyer I-Class/Late Model | ||
| + | |- | ||
| + | |D | ||
| + | |Normal/BaseXP | ||
| + | |{{Formation|Diamond}} | ||
| + | |220 | ||
| + | |Transport Ship Wa-Class/Elite | ||
| + | |Transport Ship Wa-Class/Elite | ||
| + | |Light Cruiser Ho-Class/Elite | ||
| + | |Destroyer I-Class/Late Model | ||
| + | |Destroyer I-Class/Late Model | ||
| + | |Destroyer I-Class/Late Model | ||
}} | }} | ||
| − | {{Map/Nodes|name= | + | |
| − | | | + | {{Map/Nodes|page=World 2/2-2|name=敵水雷戦隊 |
| − | | | + | |E |
| − | |{{Formation|Line Ahead}}{{Formation|Double Line}} | + | |Normal/BaseXP |
| − | | | + | |{{Formation|Line Ahead}}<br>{{Formation|Double Line}} |
| − | | | + | |100 |
| − | |Light Cruiser | + | |Light Cruiser Ho-Class |
| − | | | + | |Torpedo Cruiser Chi-Class |
| − | |Destroyer | + | |Torpedo Cruiser Chi-Class |
| − | |Destroyer | + | |Destroyer I-Class |
| + | |Destroyer I-Class | ||
| + | |Destroyer I-Class | ||
| + | |- | ||
| + | |E | ||
| + | |Normal/BaseXP | ||
| + | |{{Formation|Line Ahead}}<br>{{Formation|Double Line}} | ||
| + | |110 | ||
| + | |Light Cruiser Ho-Class/Elite | ||
| + | |Torpedo Cruiser Chi-Class | ||
| + | |Torpedo Cruiser Chi-Class | ||
| + | |Destroyer I-Class | ||
| + | |Destroyer I-Class | ||
| + | |Destroyer I-Class | ||
|- | |- | ||
| − | | | + | |E |
| − | | | + | |Normal/BaseXP |
| − | |{{Formation|Line Ahead}} | + | |{{Formation|Line Ahead}}<br>{{Formation|Double Line}} |
| − | | | + | |130 |
| − | | | + | |Light Cruiser Ho-Class/Elite |
| + | |Torpedo Cruiser Chi-Class/Elite | ||
|Torpedo Cruiser Chi-Class/Elite | |Torpedo Cruiser Chi-Class/Elite | ||
| − | | | + | |Destroyer I-Class |
| − | |Destroyer | + | |Destroyer I-Class |
| − | |Destroyer | + | |Destroyer I-Class |
| − | |- | + | }} |
| + | {{Map/Nodes|page=World 2/2-2|name= | ||
|F | |F | ||
| − | | | + | |Resource |
| − | | | + | |Bauxite |
| − | + | |15~35 | |
| − | |||
| − | |||
| − | |||
| − | |||
| − | | | ||
}} | }} | ||
| − | {{Map/Nodes|name= | + | |
| + | {{Map/Nodes|page=World 2/2-2|name=敵水上打撃部隊 | ||
|G | |G | ||
| − | |Normal | + | |Normal/BaseXP |
| − | |{{Formation|Double Line}} | + | |{{Formation|Line Ahead}}<br>{{Formation|Double Line}} |
| + | |150 | ||
| + | |Battleship Ru-Class | ||
|Battleship Ru-Class | |Battleship Ru-Class | ||
| − | | | + | |Light Cruiser Ho-Class/Elite |
| − | |Destroyer | + | |Destroyer I-Class |
| − | | | + | |Destroyer I-Class |
| − | | | + | |Destroyer I-Class |
| − | |||
|- | |- | ||
|G | |G | ||
| − | |Normal | + | |Normal/BaseXP |
| − | |{{Formation|Double Line}} | + | |{{Formation|Line Ahead}}<br>{{Formation|Double Line}} |
| + | |160 | ||
| + | |Battleship Ru-Class/Elite | ||
|Battleship Ru-Class | |Battleship Ru-Class | ||
| − | |Light Cruiser | + | |Light Cruiser Ho-Class/Elite |
| − | |Destroyer | + | |Destroyer I-Class/Late Model |
| − | |Destroyer | + | |Destroyer I-Class |
| − | | | + | |Destroyer I-Class |
| − | |||
|- | |- | ||
|G | |G | ||
| − | |Normal | + | |Normal/BaseXP |
| − | |{{Formation|Double Line}} | + | |{{Formation|Line Ahead}}<br>{{Formation|Double Line}} |
| − | |Heavy Cruiser Ri-Class | + | |180 |
| − | |Heavy Cruiser Ri-Class | + | |Battleship Ru-Class/Elite |
| − | | | + | |Battleship Ru-Class/Elite |
| − | | | + | |Heavy Cruiser Ri-Class/Elite |
| − | | | + | |Light Cruiser Ho-Class/Elite |
| − | | | + | |Destroyer I-Class/Late Model |
| + | |Destroyer I-Class/Late Model | ||
| + | }} | ||
| + | {{Map/Nodes|page=World 2/2-2|name= | ||
| + | |H | ||
| + | |Empty | ||
| + | }} | ||
| + | {{Map/Nodes|page=World 2/2-2|name= | ||
| + | |I | ||
| + | |Empty | ||
| + | }} | ||
| + | |||
| + | {{Map/Nodes|page=World 2/2-2|name= | ||
| + | |J | ||
| + | |Resource | ||
| + | |Itorch | ||
| + | |1 | ||
| + | }} | ||
| + | |||
| + | {{Map/Nodes|page=World 2/2-2|name=敵通商破壊機動部隊 主力艦隊 | ||
| + | |K | ||
| + | |Boss/BaseXP | ||
| + | |{{Formation|Line Ahead}} | ||
| + | |170 | ||
| + | |Heavy Cruiser Ri-Class/Elite | ||
| + | |Heavy Cruiser Ri-Class/Elite | ||
| + | |Light Cruiser Ho-Class/Elite | ||
| + | |Destroyer I-Class | ||
| + | |Destroyer I-Class | ||
| + | |Destroyer I-Class | ||
| + | |- | ||
| + | |K | ||
| + | |Boss/BaseXP | ||
| + | |{{Formation|Diamond}} | ||
| + | |160 | ||
| + | |Light Carrier Nu-Class/Elite | ||
| + | |Heavy Cruiser Ri-Class/Elite | ||
| + | |Light Cruiser Ho-Class | ||
| + | |Destroyer I-Class | ||
| + | |Destroyer I-Class | ||
| + | |Destroyer I-Class | ||
| + | |- | ||
| + | |K | ||
| + | |Boss/BaseXP | ||
| + | |{{Formation|Line Ahead}}<br>{{Formation|Diamond}} | ||
| + | |180 | ||
| + | |Light Carrier Nu-Class/Elite | ||
| + | |Heavy Cruiser Ri-Class/Elite | ||
| + | |Heavy Cruiser Ri-Class/Elite | ||
| + | |Destroyer I-Class/Late Model | ||
| + | |Destroyer I-Class | ||
| + | |Destroyer I-Class | ||
| + | |- | ||
| + | |K | ||
| + | |Boss/BaseXP | ||
| + | |{{Formation|Line Ahead}}<br>{{Formation|Diamond}} | ||
| + | |200 | ||
| + | |Standard Carrier Wo-Class/Elite | ||
| + | |Heavy Cruiser Ri-Class/Elite | ||
| + | |Heavy Cruiser Ri-Class/Elite | ||
| + | |Light Cruiser He-Class/Elite | ||
| + | |Destroyer I-Class/Late Model | ||
| + | |Destroyer I-Class/Late Model | ||
|- | |- | ||
| − | | | + | |K |
| − | | | + | |Boss/BaseXP |
| − | |{{Formation| | + | |{{Formation|Line Ahead}}<br>{{Formation|Diamond}} |
| − | | | + | |220 |
| − | | | + | |Standard Carrier Wo-Class/Elite |
| − | | | + | |Battleship Ru-Class/Elite |
| − | | | + | |Battleship Ru-Class/Elite |
| − | | | + | |Light Cruiser He-Class/Elite |
| − | | | + | |Destroyer I-Class/Late Model |
| + | |Destroyer I-Class/Late Model | ||
}} | }} | ||
| + | |||
</div> <!-- overflow --> | </div> <!-- overflow --> | ||
{{SectionEnd}} | {{SectionEnd}} | ||
Latest revision as of 13:03, 6 November 2022
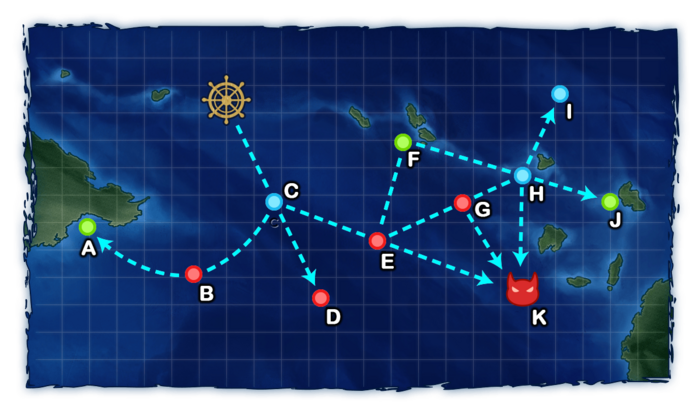
2-2 A
| # | Resource Node | ||
|---|---|---|---|
| A | Gained 10~20 | ||
| # | Resource Node | ||
2-2 B: 敵上陸船団 (PoiDB)
| # | Enemy Form. |
Base EXP | Normal Battle Node | AD/AP AS/AS+ |
|---|---|---|---|---|
| B | Double Line | 150 | 0/0 0/0 | |
| Diamond | 150 | 0/0 0/0 | ||
| Diamond | 150 | 0/0 0/0 | ||
| Double Line | 180 | 0/0 0/0 | ||
| Double Line | 200 | 0/0 0/0 | ||
| Diamond | 200 | 0/0 0/0 | ||
| # | Enemy Form. |
Base EXP | Normal Battle Node | AD/AP AS/AS+ |
2-2 C
| # | Empty Node | ||
|---|---|---|---|
| C | 気のせいだった。/敵影を見ず。/穏やかな海です。/穏やかな海峡です。/警戒が必要です。/静かな海です。 Must be my imagination./No enemy spotted./Calm seas./Calm straits./Be alert./Peaceful seas. | ||
| # | Empty Node | ||
2-2 D: 敵上陸船団 (PoiDB)
| # | Enemy Form. |
Base EXP | Normal Battle Node | AD/AP AS/AS+ |
|---|---|---|---|---|
| D | Double Line | 170 | 0/0 0/0 | |
| Diamond | 170 | 0/0 0/0 | ||
| Double Line | 200 | 0/0 0/0 | ||
| Diamond | 200 | 0/0 0/0 | ||
| Double Line | 220 | 0/0 0/0 | ||
| Diamond | 220 | 0/0 0/0 | ||
| # | Enemy Form. |
Base EXP | Normal Battle Node | AD/AP AS/AS+ |
2-2 E: 敵水雷戦隊 (PoiDB)
| # | Enemy Form. |
Base EXP | Normal Battle Node | AD/AP AS/AS+ |
|---|---|---|---|---|
| E | Line Ahead Double Line |
100 | 0/0 0/0 | |
| Line Ahead Double Line |
110 | 0/0 0/0 | ||
| Line Ahead Double Line |
130 | 0/0 0/0 | ||
| # | Enemy Form. |
Base EXP | Normal Battle Node | AD/AP AS/AS+ |
2-2 F
| # | Resource Node | ||
|---|---|---|---|
| F | Gained 15~35 | ||
| # | Resource Node | ||
2-2 G: 敵水上打撃部隊 (PoiDB)
| # | Enemy Form. |
Base EXP | Normal Battle Node | AD/AP AS/AS+ |
|---|---|---|---|---|
| G | Line Ahead Double Line |
150 | 0/0 0/0 | |
| Line Ahead Double Line |
160 | 0/0 0/0 | ||
| Line Ahead Double Line |
180 | 0/0 0/0 | ||
| # | Enemy Form. |
Base EXP | Normal Battle Node | AD/AP AS/AS+ |
2-2 H
| # | Empty Node | ||
|---|---|---|---|
| H | 気のせいだった。/敵影を見ず。/穏やかな海です。/穏やかな海峡です。/警戒が必要です。/静かな海です。 Must be my imagination./No enemy spotted./Calm seas./Calm straits./Be alert./Peaceful seas. | ||
| # | Empty Node | ||
2-2 I
| # | Empty Node | ||
|---|---|---|---|
| I | 気のせいだった。/敵影を見ず。/穏やかな海です。/穏やかな海峡です。/警戒が必要です。/静かな海です。 Must be my imagination./No enemy spotted./Calm seas./Calm straits./Be alert./Peaceful seas. | ||
| # | Empty Node | ||
2-2 J
| # | Resource Node | ||
|---|---|---|---|
| J | Gained 1 | ||
| # | Resource Node | ||
2-2 K: 敵通商破壊機動部隊 主力艦隊 (PoiDB)
| # | Enemy Form. |
Base EXP | Boss Battle Node | AD/AP AS/AS+ |
|---|---|---|---|---|
| K | Line Ahead | 170 | 0/0 0/0 | |
| Diamond | 160 | 9/17 36/72 | ||
| Line Ahead Diamond |
180 | 9/17 36/72 | ||
| Line Ahead Diamond |
200 | 10/19 41/81 | ||
| Line Ahead Diamond |
220 | 10/19 41/81 | ||
| # | Enemy Form. |
Base EXP | Boss Battle Node | AD/AP AS/AS+ |