- Welcome to the Kancolle Wiki!
- If you have any questions regarding site content, account registration, etc., please visit the KanColle Wiki Discord
Difference between revisions of "Spring 2021 Event/E-5/Enemy comps"
< Spring 2021 Event | E-5
Jump to navigation
Jump to search
| (One intermediate revision by the same user not shown) | |||
| Line 46: | Line 46: | ||
{|class="wikitable" style="width:100%" | {|class="wikitable" style="width:100%" | ||
!style="width:1px"|# | !style="width:1px"|# | ||
| − | !style="width: | + | !style="width:150px"|Formation |
!Air Raids | !Air Raids | ||
!style="width:1px"|AD/AP<br>AS/AS+ | !style="width:1px"|AD/AP<br>AS/AS+ | ||
| Line 72: | Line 72: | ||
|- | |- | ||
!style="width:1px"|# | !style="width:1px"|# | ||
| − | !style="width: | + | !style="width:150px"|Formation |
!Air Raids | !Air Raids | ||
!style="width:1px"|AD/AP<br>AS/AS+ | !style="width:1px"|AD/AP<br>AS/AS+ | ||
| Line 79: | Line 79: | ||
{|class="wikitable" style="width:100%" | {|class="wikitable" style="width:100%" | ||
!style="width:1px"|# | !style="width:1px"|# | ||
| − | !style="width: | + | !style="width:150px"|Formation |
!Normal Battle Node | !Normal Battle Node | ||
!style="width:1px"|AD/AP<br>AS/AS+ | !style="width:1px"|AD/AP<br>AS/AS+ | ||
| Line 97: | Line 97: | ||
|- | |- | ||
!style="width:1px"|# | !style="width:1px"|# | ||
| − | !style="width: | + | !style="width:150px"|Formation |
!Normal Battle Node | !Normal Battle Node | ||
!style="width:1px"|AD/AP<br>AS/AS+ | !style="width:1px"|AD/AP<br>AS/AS+ | ||
| Line 104: | Line 104: | ||
{|class="wikitable" style="width:100%" | {|class="wikitable" style="width:100%" | ||
!style="width:1px"|# | !style="width:1px"|# | ||
| − | !style="width: | + | !style="width:150px"|Formation |
!Air Defense Node | !Air Defense Node | ||
!style="width:1px"|AD/AP<br>AS/AS+ | !style="width:1px"|AD/AP<br>AS/AS+ | ||
| Line 130: | Line 130: | ||
|- | |- | ||
!style="width:1px"|# | !style="width:1px"|# | ||
| − | !style="width: | + | !style="width:150px"|Formation |
!Air Defense Node | !Air Defense Node | ||
!style="width:1px"|AD/AP<br>AS/AS+ | !style="width:1px"|AD/AP<br>AS/AS+ | ||
| Line 137: | Line 137: | ||
{|class="wikitable" style="width:100%" | {|class="wikitable" style="width:100%" | ||
!style="width:1px"|# | !style="width:1px"|# | ||
| − | !style="width: | + | !style="width:150px"|Formation |
!Normal Battle Node | !Normal Battle Node | ||
!style="width:1px"|AD/AP<br>AS/AS+ | !style="width:1px"|AD/AP<br>AS/AS+ | ||
| Line 151: | Line 151: | ||
|- | |- | ||
!style="width:1px"|# | !style="width:1px"|# | ||
| − | !style="width: | + | !style="width:150px"|Formation |
!Normal Battle Node | !Normal Battle Node | ||
!style="width:1px"|AD/AP<br>AS/AS+ | !style="width:1px"|AD/AP<br>AS/AS+ | ||
| Line 158: | Line 158: | ||
{|class="wikitable" style="width:100%" | {|class="wikitable" style="width:100%" | ||
!style="width:1px"|# | !style="width:1px"|# | ||
| − | !style="width: | + | !style="width:150px"|Formation |
!Normal Battle Node | !Normal Battle Node | ||
!style="width:1px"|AD/AP<br>AS/AS+ | !style="width:1px"|AD/AP<br>AS/AS+ | ||
| Line 172: | Line 172: | ||
|- | |- | ||
!style="width:1px"|# | !style="width:1px"|# | ||
| − | !style="width: | + | !style="width:150px"|Formation |
!Normal Battle Node | !Normal Battle Node | ||
!style="width:1px"|AD/AP<br>AS/AS+ | !style="width:1px"|AD/AP<br>AS/AS+ | ||
| Line 182: | Line 182: | ||
|- | |- | ||
|style="text-align:center"|E | |style="text-align:center"|E | ||
| − | |colspan="3" style="text-align:center"|<span lang="ja">気のせいだった。</span><br>Must be my imagination. | + | |colspan="3" style="text-align:center"|<span lang="ja">気のせいだった。<br>対水上、対空、それぞれ見張りを厳とせよ!</span><br>Must be my imagination.<br>Be on high alert<br>for surface and air threats! |
|- | |- | ||
!style="width:1px"|# | !style="width:1px"|# | ||
| Line 190: | Line 190: | ||
{|class="wikitable" style="width:100%" | {|class="wikitable" style="width:100%" | ||
!style="width:1px"|# | !style="width:1px"|# | ||
| − | !style="width: | + | !style="width:150px"|Formation |
!Normal Battle Node | !Normal Battle Node | ||
!style="width:1px"|AD/AP<br>AS/AS+ | !style="width:1px"|AD/AP<br>AS/AS+ | ||
| Line 200: | Line 200: | ||
|- | |- | ||
!style="width:1px"|# | !style="width:1px"|# | ||
| − | !style="width: | + | !style="width:150px"|Formation |
!Normal Battle Node | !Normal Battle Node | ||
!style="width:1px"|AD/AP<br>AS/AS+ | !style="width:1px"|AD/AP<br>AS/AS+ | ||
| Line 207: | Line 207: | ||
{|class="wikitable" style="width:100%" | {|class="wikitable" style="width:100%" | ||
!style="width:1px"|# | !style="width:1px"|# | ||
| − | !style="width: | + | !style="width:150px"|Formation |
!Air Defense Node | !Air Defense Node | ||
!style="width:1px"|AD/AP<br>AS/AS+ | !style="width:1px"|AD/AP<br>AS/AS+ | ||
| Line 233: | Line 233: | ||
|- | |- | ||
!style="width:1px"|# | !style="width:1px"|# | ||
| − | !style="width: | + | !style="width:150px"|Formation |
!Air Defense Node | !Air Defense Node | ||
!style="width:1px"|AD/AP<br>AS/AS+ | !style="width:1px"|AD/AP<br>AS/AS+ | ||
| Line 240: | Line 240: | ||
{|class="wikitable" style="width:100%" | {|class="wikitable" style="width:100%" | ||
!style="width:1px"|# | !style="width:1px"|# | ||
| − | !style="width: | + | !style="width:150px"|Formation |
!Normal Battle Node | !Normal Battle Node | ||
!style="width:1px"|AD/AP<br>AS/AS+ | !style="width:1px"|AD/AP<br>AS/AS+ | ||
| Line 258: | Line 258: | ||
|- | |- | ||
!style="width:1px"|# | !style="width:1px"|# | ||
| − | !style="width: | + | !style="width:150px"|Formation |
!Normal Battle Node | !Normal Battle Node | ||
!style="width:1px"|AD/AP<br>AS/AS+ | !style="width:1px"|AD/AP<br>AS/AS+ | ||
| Line 265: | Line 265: | ||
{|class="wikitable" style="width:100%" | {|class="wikitable" style="width:100%" | ||
!style="width:1px"|# | !style="width:1px"|# | ||
| − | !style="width: | + | !style="width:150px"|Formation |
!Normal Battle Node | !Normal Battle Node | ||
!style="width:1px"|AD/AP<br>AS/AS+ | !style="width:1px"|AD/AP<br>AS/AS+ | ||
| Line 275: | Line 275: | ||
|- | |- | ||
!style="width:1px"|# | !style="width:1px"|# | ||
| − | !style="width: | + | !style="width:150px"|Formation |
!Normal Battle Node | !Normal Battle Node | ||
!style="width:1px"|AD/AP<br>AS/AS+ | !style="width:1px"|AD/AP<br>AS/AS+ | ||
| Line 282: | Line 282: | ||
{|class="wikitable" style="width:100%" | {|class="wikitable" style="width:100%" | ||
!style="width:1px"|# | !style="width:1px"|# | ||
| − | !style="width: | + | !style="width:150px"|Formation |
!Boss Battle Node | !Boss Battle Node | ||
!style="width:1px"|AD/AP<br>AS/AS+ | !style="width:1px"|AD/AP<br>AS/AS+ | ||
| Line 296: | Line 296: | ||
|- | |- | ||
!style="width:1px"|# | !style="width:1px"|# | ||
| − | !style="width: | + | !style="width:150px"|Formation |
!Boss Battle Node | !Boss Battle Node | ||
!style="width:1px"|AD/AP<br>AS/AS+ | !style="width:1px"|AD/AP<br>AS/AS+ | ||
| Line 306: | Line 306: | ||
|- | |- | ||
|style="text-align:center"|J1 | |style="text-align:center"|J1 | ||
| − | |colspan="3" style="text-align:center"|<span lang="ja">気のせいだった。</span><br>Must be my imagination. | + | |colspan="3" style="text-align:center"|<span lang="ja">気のせいだった。<br>これより敵補給船団を捜索、撃滅する!敵の兵站を遮断する!</span><br>Must be my imagination.<br>Now proceeding to search and destroy<br>the enemy supply convoy!<br>Cut off the enemy's supply lines! |
|- | |- | ||
!style="width:1px"|# | !style="width:1px"|# | ||
| Line 317: | Line 317: | ||
|- | |- | ||
|style="text-align:center"|J2 | |style="text-align:center"|J2 | ||
| − | |colspan="3" style="text-align:center"|<span lang="ja">敵影を見ず。</span><br>No enemy spotted. | + | |colspan="3" style="text-align:center"|<span lang="ja">敵影を見ず。<br>これより敵補給船団を捜索、撃滅する!敵の兵站を遮断する!</span><br>No enemy spotted.<br>Now proceeding to search and destroy<br>the enemy supply convoy!<br>Cut off the enemy's supply lines! |
|- | |- | ||
!style="width:1px"|# | !style="width:1px"|# | ||
| Line 325: | Line 325: | ||
{|class="wikitable" style="width:100%" | {|class="wikitable" style="width:100%" | ||
!style="width:1px"|# | !style="width:1px"|# | ||
| − | !style="width: | + | !style="width:150px"|Formation |
!Normal Battle Node | !Normal Battle Node | ||
!style="width:1px"|AD/AP<br>AS/AS+ | !style="width:1px"|AD/AP<br>AS/AS+ | ||
| Line 343: | Line 343: | ||
|- | |- | ||
!style="width:1px"|# | !style="width:1px"|# | ||
| − | !style="width: | + | !style="width:150px"|Formation |
!Normal Battle Node | !Normal Battle Node | ||
!style="width:1px"|AD/AP<br>AS/AS+ | !style="width:1px"|AD/AP<br>AS/AS+ | ||
| Line 350: | Line 350: | ||
{|class="wikitable" style="width:100%" | {|class="wikitable" style="width:100%" | ||
!style="width:1px"|# | !style="width:1px"|# | ||
| − | !style="width: | + | !style="width:150px"|Formation |
!Normal Battle Node | !Normal Battle Node | ||
!style="width:1px"|AD/AP<br>AS/AS+ | !style="width:1px"|AD/AP<br>AS/AS+ | ||
| Line 368: | Line 368: | ||
|- | |- | ||
!style="width:1px"|# | !style="width:1px"|# | ||
| − | !style="width: | + | !style="width:150px"|Formation |
!Normal Battle Node | !Normal Battle Node | ||
!style="width:1px"|AD/AP<br>AS/AS+ | !style="width:1px"|AD/AP<br>AS/AS+ | ||
| Line 375: | Line 375: | ||
{|class="wikitable" style="width:100%" | {|class="wikitable" style="width:100%" | ||
!style="width:1px"|# | !style="width:1px"|# | ||
| − | !style="width: | + | !style="width:150px"|Formation |
!Air Defense Node | !Air Defense Node | ||
!style="width:1px"|AD/AP<br>AS/AS+ | !style="width:1px"|AD/AP<br>AS/AS+ | ||
| Line 393: | Line 393: | ||
|- | |- | ||
!style="width:1px"|# | !style="width:1px"|# | ||
| − | !style="width: | + | !style="width:150px"|Formation |
!Air Defense Node | !Air Defense Node | ||
!style="width:1px"|AD/AP<br>AS/AS+ | !style="width:1px"|AD/AP<br>AS/AS+ | ||
| Line 400: | Line 400: | ||
{|class="wikitable" style="width:100%" | {|class="wikitable" style="width:100%" | ||
!style="width:1px"|# | !style="width:1px"|# | ||
| − | !style="width: | + | !style="width:150px"|Formation |
!Air Defense Node | !Air Defense Node | ||
!style="width:1px"|AD/AP<br>AS/AS+ | !style="width:1px"|AD/AP<br>AS/AS+ | ||
| Line 426: | Line 426: | ||
|- | |- | ||
!style="width:1px"|# | !style="width:1px"|# | ||
| − | !style="width: | + | !style="width:150px"|Formation |
!Air Defense Node | !Air Defense Node | ||
!style="width:1px"|AD/AP<br>AS/AS+ | !style="width:1px"|AD/AP<br>AS/AS+ | ||
| Line 433: | Line 433: | ||
{|class="wikitable" style="width:100%" | {|class="wikitable" style="width:100%" | ||
!style="width:1px"|# | !style="width:1px"|# | ||
| − | !style="width: | + | !style="width:150px"|Formation |
!Normal Battle Node | !Normal Battle Node | ||
!style="width:1px"|AD/AP<br>AS/AS+ | !style="width:1px"|AD/AP<br>AS/AS+ | ||
| Line 447: | Line 447: | ||
|- | |- | ||
!style="width:1px"|# | !style="width:1px"|# | ||
| − | !style="width: | + | !style="width:150px"|Formation |
!Normal Battle Node | !Normal Battle Node | ||
!style="width:1px"|AD/AP<br>AS/AS+ | !style="width:1px"|AD/AP<br>AS/AS+ | ||
| Line 457: | Line 457: | ||
|- | |- | ||
|style="text-align:center"|P | |style="text-align:center"|P | ||
| − | |colspan="3" style="text-align:center"|<span lang="ja">敵影を見ず。</span><br>No enemy spotted. | + | |colspan="3" style="text-align:center"|<span lang="ja">敵影を見ず。<br>我が艦隊は、これより敵艦隊を撃滅する!対水上見張りを厳に!合戦用意!艦隊、突入!</span><br>No enemy spotted.<br>Our fleet will now destroy the enemy fleet.<br>Stay on high alert for surface threats!<br>Battle stations! Fleet, move in! |
|- | |- | ||
!style="width:1px"|# | !style="width:1px"|# | ||
| Line 476: | Line 476: | ||
{|class="wikitable" style="width:100%" | {|class="wikitable" style="width:100%" | ||
!style="width:1px"|# | !style="width:1px"|# | ||
| − | !style="width: | + | !style="width:150px"|Formation |
!Normal Battle Node | !Normal Battle Node | ||
!style="width:1px"|AD/AP<br>AS/AS+ | !style="width:1px"|AD/AP<br>AS/AS+ | ||
| Line 490: | Line 490: | ||
|- | |- | ||
!style="width:1px"|# | !style="width:1px"|# | ||
| − | !style="width: | + | !style="width:150px"|Formation |
!Normal Battle Node | !Normal Battle Node | ||
!style="width:1px"|AD/AP<br>AS/AS+ | !style="width:1px"|AD/AP<br>AS/AS+ | ||
| Line 497: | Line 497: | ||
{|class="wikitable" style="width:100%" | {|class="wikitable" style="width:100%" | ||
!style="width:1px"|# | !style="width:1px"|# | ||
| − | !style="width: | + | !style="width:150px"|Formation |
!Normal Battle Node | !Normal Battle Node | ||
!style="width:1px"|AD/AP<br>AS/AS+ | !style="width:1px"|AD/AP<br>AS/AS+ | ||
| Line 507: | Line 507: | ||
|- | |- | ||
!style="width:1px"|# | !style="width:1px"|# | ||
| − | !style="width: | + | !style="width:150px"|Formation |
!Normal Battle Node | !Normal Battle Node | ||
!style="width:1px"|AD/AP<br>AS/AS+ | !style="width:1px"|AD/AP<br>AS/AS+ | ||
| Line 514: | Line 514: | ||
{|class="wikitable" style="width:100%" | {|class="wikitable" style="width:100%" | ||
!style="width:1px"|# | !style="width:1px"|# | ||
| − | !style="width: | + | !style="width:150px"|Formation |
!Air Defense Node | !Air Defense Node | ||
!style="width:1px"|AD/AP<br>AS/AS+ | !style="width:1px"|AD/AP<br>AS/AS+ | ||
| Line 532: | Line 532: | ||
|- | |- | ||
!style="width:1px"|# | !style="width:1px"|# | ||
| − | !style="width: | + | !style="width:150px"|Formation |
!Air Defense Node | !Air Defense Node | ||
!style="width:1px"|AD/AP<br>AS/AS+ | !style="width:1px"|AD/AP<br>AS/AS+ | ||
| Line 539: | Line 539: | ||
{|class="wikitable" style="width:100%" | {|class="wikitable" style="width:100%" | ||
!style="width:1px"|# | !style="width:1px"|# | ||
| − | !style="width: | + | !style="width:150px"|Formation |
!Normal Battle Node | !Normal Battle Node | ||
!style="width:1px"|AD/AP<br>AS/AS+ | !style="width:1px"|AD/AP<br>AS/AS+ | ||
| Line 553: | Line 553: | ||
|- | |- | ||
!style="width:1px"|# | !style="width:1px"|# | ||
| − | !style="width: | + | !style="width:150px"|Formation |
!Normal Battle Node | !Normal Battle Node | ||
!style="width:1px"|AD/AP<br>AS/AS+ | !style="width:1px"|AD/AP<br>AS/AS+ | ||
| Line 560: | Line 560: | ||
{|class="wikitable" style="width:100%" | {|class="wikitable" style="width:100%" | ||
!style="width:1px"|# | !style="width:1px"|# | ||
| − | !style="width: | + | !style="width:150px"|Formation |
!Normal Battle Node | !Normal Battle Node | ||
!style="width:1px"|AD/AP<br>AS/AS+ | !style="width:1px"|AD/AP<br>AS/AS+ | ||
| Line 574: | Line 574: | ||
|- | |- | ||
!style="width:1px"|# | !style="width:1px"|# | ||
| − | !style="width: | + | !style="width:150px"|Formation |
!Normal Battle Node | !Normal Battle Node | ||
!style="width:1px"|AD/AP<br>AS/AS+ | !style="width:1px"|AD/AP<br>AS/AS+ | ||
| Line 581: | Line 581: | ||
{|class="wikitable" style="width:100%" | {|class="wikitable" style="width:100%" | ||
!style="width:1px"|# | !style="width:1px"|# | ||
| − | !style="width: | + | !style="width:150px"|Formation |
!Normal Battle Node | !Normal Battle Node | ||
!style="width:1px"|AD/AP<br>AS/AS+ | !style="width:1px"|AD/AP<br>AS/AS+ | ||
| Line 595: | Line 595: | ||
|- | |- | ||
!style="width:1px"|# | !style="width:1px"|# | ||
| − | !style="width: | + | !style="width:150px"|Formation |
!Normal Battle Node | !Normal Battle Node | ||
!style="width:1px"|AD/AP<br>AS/AS+ | !style="width:1px"|AD/AP<br>AS/AS+ | ||
| Line 613: | Line 613: | ||
{|class="wikitable" style="width:100%" | {|class="wikitable" style="width:100%" | ||
!style="width:1px"|# | !style="width:1px"|# | ||
| − | !style="width: | + | !style="width:150px"|Formation |
!Boss Battle Node | !Boss Battle Node | ||
!style="width:1px"|AD/AP<br>AS/AS+ | !style="width:1px"|AD/AP<br>AS/AS+ | ||
| Line 627: | Line 627: | ||
|- | |- | ||
!style="width:1px"|# | !style="width:1px"|# | ||
| − | !style="width: | + | !style="width:150px"|Formation |
!Boss Battle Node | !Boss Battle Node | ||
!style="width:1px"|AD/AP<br>AS/AS+ | !style="width:1px"|AD/AP<br>AS/AS+ | ||
| Line 634: | Line 634: | ||
{|class="wikitable" style="width:100%" | {|class="wikitable" style="width:100%" | ||
!style="width:1px"|# | !style="width:1px"|# | ||
| − | !style="width: | + | !style="width:150px"|Formation |
!Normal Battle Node | !Normal Battle Node | ||
!style="width:1px"|AD/AP<br>AS/AS+ | !style="width:1px"|AD/AP<br>AS/AS+ | ||
| Line 652: | Line 652: | ||
|- | |- | ||
!style="width:1px"|# | !style="width:1px"|# | ||
| − | !style="width: | + | !style="width:150px"|Formation |
!Normal Battle Node | !Normal Battle Node | ||
!style="width:1px"|AD/AP<br>AS/AS+ | !style="width:1px"|AD/AP<br>AS/AS+ | ||
| Line 670: | Line 670: | ||
|- | |- | ||
|style="text-align:center"|W | |style="text-align:center"|W | ||
| − | |colspan="3" style="text-align:center"|<span lang="ja">気のせいだった。</span><br>Must be my imagination. | + | |colspan="3" style="text-align:center"|<span lang="ja">気のせいだった。<br>我が艦隊は、これより敵艦隊を撃滅する!対水上見張りを厳に!合戦用意!艦隊、突入!</span><br>Must be my imagination.<br>Our fleet will now destroy the enemy fleet.<br>Stay on high alert for surface threats!<br>Battle stations! Fleet, move in! |
|- | |- | ||
!style="width:1px"|# | !style="width:1px"|# | ||
| Line 678: | Line 678: | ||
{|class="wikitable" style="width:100%" | {|class="wikitable" style="width:100%" | ||
!style="width:1px"|# | !style="width:1px"|# | ||
| − | !style="width: | + | !style="width:150px"|Formation |
!Normal Battle Node | !Normal Battle Node | ||
!style="width:1px"|AD/AP<br>AS/AS+ | !style="width:1px"|AD/AP<br>AS/AS+ | ||
| Line 688: | Line 688: | ||
|- | |- | ||
!style="width:1px"|# | !style="width:1px"|# | ||
| − | !style="width: | + | !style="width:150px"|Formation |
!Normal Battle Node | !Normal Battle Node | ||
!style="width:1px"|AD/AP<br>AS/AS+ | !style="width:1px"|AD/AP<br>AS/AS+ | ||
| Line 695: | Line 695: | ||
{|class="wikitable" style="width:100%" | {|class="wikitable" style="width:100%" | ||
!style="width:1px"|# | !style="width:1px"|# | ||
| − | !style="width: | + | !style="width:150px"|Formation |
!Normal Battle Node | !Normal Battle Node | ||
!style="width:1px"|AD/AP<br>AS/AS+ | !style="width:1px"|AD/AP<br>AS/AS+ | ||
| Line 705: | Line 705: | ||
|- | |- | ||
!style="width:1px"|# | !style="width:1px"|# | ||
| − | !style="width: | + | !style="width:150px"|Formation |
!Normal Battle Node | !Normal Battle Node | ||
!style="width:1px"|AD/AP<br>AS/AS+ | !style="width:1px"|AD/AP<br>AS/AS+ | ||
| Line 712: | Line 712: | ||
{|class="wikitable" style="width:100%" | {|class="wikitable" style="width:100%" | ||
!style="width:1px"|# | !style="width:1px"|# | ||
| − | !style="width: | + | !style="width:150px"|Formation |
!Boss Battle Node | !Boss Battle Node | ||
!style="width:1px"|AD/AP<br>AS/AS+ | !style="width:1px"|AD/AP<br>AS/AS+ | ||
| Line 726: | Line 726: | ||
|- | |- | ||
!style="width:1px"|# | !style="width:1px"|# | ||
| − | !style="width: | + | !style="width:150px"|Formation |
!Boss Battle Node | !Boss Battle Node | ||
!style="width:1px"|AD/AP<br>AS/AS+ | !style="width:1px"|AD/AP<br>AS/AS+ | ||
| Line 733: | Line 733: | ||
{|class="wikitable" style="width:100%;margin-bottom:290px !important" | {|class="wikitable" style="width:100%;margin-bottom:290px !important" | ||
!style="width:1px"|# | !style="width:1px"|# | ||
| − | !style="width: | + | !style="width:150px"|Formation |
!Night Battle Node | !Night Battle Node | ||
!style="width:1px"|AD/AP<br>AS/AS+ | !style="width:1px"|AD/AP<br>AS/AS+ | ||
| Line 743: | Line 743: | ||
|- | |- | ||
!style="width:1px"|# | !style="width:1px"|# | ||
| − | !style="width: | + | !style="width:150px"|Formation |
!Night Battle Node | !Night Battle Node | ||
!style="width:1px"|AD/AP<br>AS/AS+ | !style="width:1px"|AD/AP<br>AS/AS+ | ||
| Line 794: | Line 794: | ||
{|class="wikitable" style="width:100%" | {|class="wikitable" style="width:100%" | ||
!style="width:1px"|# | !style="width:1px"|# | ||
| − | !style="width: | + | !style="width:150px"|Formation |
!Air Raids | !Air Raids | ||
!style="width:1px"|AD/AP<br>AS/AS+ | !style="width:1px"|AD/AP<br>AS/AS+ | ||
| Line 820: | Line 820: | ||
|- | |- | ||
!style="width:1px"|# | !style="width:1px"|# | ||
| − | !style="width: | + | !style="width:150px"|Formation |
!Air Raids | !Air Raids | ||
!style="width:1px"|AD/AP<br>AS/AS+ | !style="width:1px"|AD/AP<br>AS/AS+ | ||
| Line 827: | Line 827: | ||
{|class="wikitable" style="width:100%" | {|class="wikitable" style="width:100%" | ||
!style="width:1px"|# | !style="width:1px"|# | ||
| − | !style="width: | + | !style="width:150px"|Formation |
!Normal Battle Node | !Normal Battle Node | ||
!style="width:1px"|AD/AP<br>AS/AS+ | !style="width:1px"|AD/AP<br>AS/AS+ | ||
| Line 845: | Line 845: | ||
|- | |- | ||
!style="width:1px"|# | !style="width:1px"|# | ||
| − | !style="width: | + | !style="width:150px"|Formation |
!Normal Battle Node | !Normal Battle Node | ||
!style="width:1px"|AD/AP<br>AS/AS+ | !style="width:1px"|AD/AP<br>AS/AS+ | ||
| Line 852: | Line 852: | ||
{|class="wikitable" style="width:100%" | {|class="wikitable" style="width:100%" | ||
!style="width:1px"|# | !style="width:1px"|# | ||
| − | !style="width: | + | !style="width:150px"|Formation |
!Air Defense Node | !Air Defense Node | ||
!style="width:1px"|AD/AP<br>AS/AS+ | !style="width:1px"|AD/AP<br>AS/AS+ | ||
| Line 874: | Line 874: | ||
|- | |- | ||
!style="width:1px"|# | !style="width:1px"|# | ||
| − | !style="width: | + | !style="width:150px"|Formation |
!Air Defense Node | !Air Defense Node | ||
!style="width:1px"|AD/AP<br>AS/AS+ | !style="width:1px"|AD/AP<br>AS/AS+ | ||
| Line 881: | Line 881: | ||
{|class="wikitable" style="width:100%" | {|class="wikitable" style="width:100%" | ||
!style="width:1px"|# | !style="width:1px"|# | ||
| − | !style="width: | + | !style="width:150px"|Formation |
!Normal Battle Node | !Normal Battle Node | ||
!style="width:1px"|AD/AP<br>AS/AS+ | !style="width:1px"|AD/AP<br>AS/AS+ | ||
| Line 895: | Line 895: | ||
|- | |- | ||
!style="width:1px"|# | !style="width:1px"|# | ||
| − | !style="width: | + | !style="width:150px"|Formation |
!Normal Battle Node | !Normal Battle Node | ||
!style="width:1px"|AD/AP<br>AS/AS+ | !style="width:1px"|AD/AP<br>AS/AS+ | ||
| Line 902: | Line 902: | ||
{|class="wikitable" style="width:100%" | {|class="wikitable" style="width:100%" | ||
!style="width:1px"|# | !style="width:1px"|# | ||
| − | !style="width: | + | !style="width:150px"|Formation |
!Normal Battle Node | !Normal Battle Node | ||
!style="width:1px"|AD/AP<br>AS/AS+ | !style="width:1px"|AD/AP<br>AS/AS+ | ||
| Line 916: | Line 916: | ||
|- | |- | ||
!style="width:1px"|# | !style="width:1px"|# | ||
| − | !style="width: | + | !style="width:150px"|Formation |
!Normal Battle Node | !Normal Battle Node | ||
!style="width:1px"|AD/AP<br>AS/AS+ | !style="width:1px"|AD/AP<br>AS/AS+ | ||
| Line 926: | Line 926: | ||
|- | |- | ||
|style="text-align:center"|E | |style="text-align:center"|E | ||
| − | |colspan="3" style="text-align:center"|<span lang="ja">気のせいだった。</span><br>Must be my imagination. | + | |colspan="3" style="text-align:center"|<span lang="ja">気のせいだった。<br>対水上、対空、それぞれ見張りを厳とせよ!</span><br>Must be my imagination.<br>Be on high alert<br>for surface and air threats! |
|- | |- | ||
!style="width:1px"|# | !style="width:1px"|# | ||
| Line 934: | Line 934: | ||
{|class="wikitable" style="width:100%" | {|class="wikitable" style="width:100%" | ||
!style="width:1px"|# | !style="width:1px"|# | ||
| − | !style="width: | + | !style="width:150px"|Formation |
!Normal Battle Node | !Normal Battle Node | ||
!style="width:1px"|AD/AP<br>AS/AS+ | !style="width:1px"|AD/AP<br>AS/AS+ | ||
| Line 944: | Line 944: | ||
|- | |- | ||
!style="width:1px"|# | !style="width:1px"|# | ||
| − | !style="width: | + | !style="width:150px"|Formation |
!Normal Battle Node | !Normal Battle Node | ||
!style="width:1px"|AD/AP<br>AS/AS+ | !style="width:1px"|AD/AP<br>AS/AS+ | ||
| Line 951: | Line 951: | ||
{|class="wikitable" style="width:100%" | {|class="wikitable" style="width:100%" | ||
!style="width:1px"|# | !style="width:1px"|# | ||
| − | !style="width: | + | !style="width:150px"|Formation |
!Air Defense Node | !Air Defense Node | ||
!style="width:1px"|AD/AP<br>AS/AS+ | !style="width:1px"|AD/AP<br>AS/AS+ | ||
| Line 973: | Line 973: | ||
|- | |- | ||
!style="width:1px"|# | !style="width:1px"|# | ||
| − | !style="width: | + | !style="width:150px"|Formation |
!Air Defense Node | !Air Defense Node | ||
!style="width:1px"|AD/AP<br>AS/AS+ | !style="width:1px"|AD/AP<br>AS/AS+ | ||
| Line 980: | Line 980: | ||
{|class="wikitable" style="width:100%" | {|class="wikitable" style="width:100%" | ||
!style="width:1px"|# | !style="width:1px"|# | ||
| − | !style="width: | + | !style="width:150px"|Formation |
!Normal Battle Node | !Normal Battle Node | ||
!style="width:1px"|AD/AP<br>AS/AS+ | !style="width:1px"|AD/AP<br>AS/AS+ | ||
| Line 998: | Line 998: | ||
|- | |- | ||
!style="width:1px"|# | !style="width:1px"|# | ||
| − | !style="width: | + | !style="width:150px"|Formation |
!Normal Battle Node | !Normal Battle Node | ||
!style="width:1px"|AD/AP<br>AS/AS+ | !style="width:1px"|AD/AP<br>AS/AS+ | ||
| Line 1,005: | Line 1,005: | ||
{|class="wikitable" style="width:100%" | {|class="wikitable" style="width:100%" | ||
!style="width:1px"|# | !style="width:1px"|# | ||
| − | !style="width: | + | !style="width:150px"|Formation |
!Normal Battle Node | !Normal Battle Node | ||
!style="width:1px"|AD/AP<br>AS/AS+ | !style="width:1px"|AD/AP<br>AS/AS+ | ||
| Line 1,015: | Line 1,015: | ||
|- | |- | ||
!style="width:1px"|# | !style="width:1px"|# | ||
| − | !style="width: | + | !style="width:150px"|Formation |
!Normal Battle Node | !Normal Battle Node | ||
!style="width:1px"|AD/AP<br>AS/AS+ | !style="width:1px"|AD/AP<br>AS/AS+ | ||
| Line 1,022: | Line 1,022: | ||
{|class="wikitable" style="width:100%" | {|class="wikitable" style="width:100%" | ||
!style="width:1px"|# | !style="width:1px"|# | ||
| − | !style="width: | + | !style="width:150px"|Formation |
!Boss Battle Node | !Boss Battle Node | ||
!style="width:1px"|AD/AP<br>AS/AS+ | !style="width:1px"|AD/AP<br>AS/AS+ | ||
| Line 1,036: | Line 1,036: | ||
|- | |- | ||
!style="width:1px"|# | !style="width:1px"|# | ||
| − | !style="width: | + | !style="width:150px"|Formation |
!Boss Battle Node | !Boss Battle Node | ||
!style="width:1px"|AD/AP<br>AS/AS+ | !style="width:1px"|AD/AP<br>AS/AS+ | ||
| Line 1,046: | Line 1,046: | ||
|- | |- | ||
|style="text-align:center"|J1 | |style="text-align:center"|J1 | ||
| − | |colspan="3" style="text-align:center"|<span lang="ja">気のせいだった。</span><br>Must be my imagination. | + | |colspan="3" style="text-align:center"|<span lang="ja">気のせいだった。<br>これより敵補給船団を捜索、撃滅する!敵の兵站を遮断する!</span><br>Must be my imagination.<br>Now proceeding to search and destroy<br>the enemy supply convoy!<br>Cut off the enemy's supply lines! |
|- | |- | ||
!style="width:1px"|# | !style="width:1px"|# | ||
| Line 1,057: | Line 1,057: | ||
|- | |- | ||
|style="text-align:center"|J2 | |style="text-align:center"|J2 | ||
| − | |colspan="3" style="text-align:center"|<span lang="ja">敵影を見ず。</span><br>No enemy spotted. | + | |colspan="3" style="text-align:center"|<span lang="ja">敵影を見ず。<br>これより敵補給船団を捜索、撃滅する!敵の兵站を遮断する!</span><br>No enemy spotted.<br>Now proceeding to search and destroy<br>the enemy supply convoy!<br>Cut off the enemy's supply lines! |
|- | |- | ||
!style="width:1px"|# | !style="width:1px"|# | ||
| Line 1,065: | Line 1,065: | ||
{|class="wikitable" style="width:100%" | {|class="wikitable" style="width:100%" | ||
!style="width:1px"|# | !style="width:1px"|# | ||
| − | !style="width: | + | !style="width:150px"|Formation |
!Normal Battle Node | !Normal Battle Node | ||
!style="width:1px"|AD/AP<br>AS/AS+ | !style="width:1px"|AD/AP<br>AS/AS+ | ||
| Line 1,083: | Line 1,083: | ||
|- | |- | ||
!style="width:1px"|# | !style="width:1px"|# | ||
| − | !style="width: | + | !style="width:150px"|Formation |
!Normal Battle Node | !Normal Battle Node | ||
!style="width:1px"|AD/AP<br>AS/AS+ | !style="width:1px"|AD/AP<br>AS/AS+ | ||
| Line 1,090: | Line 1,090: | ||
{|class="wikitable" style="width:100%" | {|class="wikitable" style="width:100%" | ||
!style="width:1px"|# | !style="width:1px"|# | ||
| − | !style="width: | + | !style="width:150px"|Formation |
!Normal Battle Node | !Normal Battle Node | ||
!style="width:1px"|AD/AP<br>AS/AS+ | !style="width:1px"|AD/AP<br>AS/AS+ | ||
| Line 1,108: | Line 1,108: | ||
|- | |- | ||
!style="width:1px"|# | !style="width:1px"|# | ||
| − | !style="width: | + | !style="width:150px"|Formation |
!Normal Battle Node | !Normal Battle Node | ||
!style="width:1px"|AD/AP<br>AS/AS+ | !style="width:1px"|AD/AP<br>AS/AS+ | ||
| Line 1,115: | Line 1,115: | ||
{|class="wikitable" style="width:100%" | {|class="wikitable" style="width:100%" | ||
!style="width:1px"|# | !style="width:1px"|# | ||
| − | !style="width: | + | !style="width:150px"|Formation |
!Air Defense Node | !Air Defense Node | ||
!style="width:1px"|AD/AP<br>AS/AS+ | !style="width:1px"|AD/AP<br>AS/AS+ | ||
| Line 1,129: | Line 1,129: | ||
|- | |- | ||
!style="width:1px"|# | !style="width:1px"|# | ||
| − | !style="width: | + | !style="width:150px"|Formation |
!Air Defense Node | !Air Defense Node | ||
!style="width:1px"|AD/AP<br>AS/AS+ | !style="width:1px"|AD/AP<br>AS/AS+ | ||
| Line 1,136: | Line 1,136: | ||
{|class="wikitable" style="width:100%" | {|class="wikitable" style="width:100%" | ||
!style="width:1px"|# | !style="width:1px"|# | ||
| − | !style="width: | + | !style="width:150px"|Formation |
!Air Defense Node | !Air Defense Node | ||
!style="width:1px"|AD/AP<br>AS/AS+ | !style="width:1px"|AD/AP<br>AS/AS+ | ||
| Line 1,158: | Line 1,158: | ||
|- | |- | ||
!style="width:1px"|# | !style="width:1px"|# | ||
| − | !style="width: | + | !style="width:150px"|Formation |
!Air Defense Node | !Air Defense Node | ||
!style="width:1px"|AD/AP<br>AS/AS+ | !style="width:1px"|AD/AP<br>AS/AS+ | ||
| Line 1,165: | Line 1,165: | ||
{|class="wikitable" style="width:100%" | {|class="wikitable" style="width:100%" | ||
!style="width:1px"|# | !style="width:1px"|# | ||
| − | !style="width: | + | !style="width:150px"|Formation |
!Normal Battle Node | !Normal Battle Node | ||
!style="width:1px"|AD/AP<br>AS/AS+ | !style="width:1px"|AD/AP<br>AS/AS+ | ||
| Line 1,179: | Line 1,179: | ||
|- | |- | ||
!style="width:1px"|# | !style="width:1px"|# | ||
| − | !style="width: | + | !style="width:150px"|Formation |
!Normal Battle Node | !Normal Battle Node | ||
!style="width:1px"|AD/AP<br>AS/AS+ | !style="width:1px"|AD/AP<br>AS/AS+ | ||
| Line 1,189: | Line 1,189: | ||
|- | |- | ||
|style="text-align:center"|P | |style="text-align:center"|P | ||
| − | |colspan="3" style="text-align:center"|<span lang="ja">敵影を見ず。</span><br>No enemy spotted. | + | |colspan="3" style="text-align:center"|<span lang="ja">敵影を見ず。<br>我が艦隊は、これより敵艦隊を撃滅する!対水上見張りを厳に!合戦用意!艦隊、突入!</span><br>No enemy spotted.<br>Our fleet will now destroy the enemy fleet.<br>Stay on high alert for surface threats!<br>Battle stations! Fleet, move in! |
|- | |- | ||
!style="width:1px"|# | !style="width:1px"|# | ||
| Line 1,208: | Line 1,208: | ||
{|class="wikitable" style="width:100%" | {|class="wikitable" style="width:100%" | ||
!style="width:1px"|# | !style="width:1px"|# | ||
| − | !style="width: | + | !style="width:150px"|Formation |
!Normal Battle Node | !Normal Battle Node | ||
!style="width:1px"|AD/AP<br>AS/AS+ | !style="width:1px"|AD/AP<br>AS/AS+ | ||
| Line 1,222: | Line 1,222: | ||
|- | |- | ||
!style="width:1px"|# | !style="width:1px"|# | ||
| − | !style="width: | + | !style="width:150px"|Formation |
!Normal Battle Node | !Normal Battle Node | ||
!style="width:1px"|AD/AP<br>AS/AS+ | !style="width:1px"|AD/AP<br>AS/AS+ | ||
| Line 1,229: | Line 1,229: | ||
{|class="wikitable" style="width:100%" | {|class="wikitable" style="width:100%" | ||
!style="width:1px"|# | !style="width:1px"|# | ||
| − | !style="width: | + | !style="width:150px"|Formation |
!Normal Battle Node | !Normal Battle Node | ||
!style="width:1px"|AD/AP<br>AS/AS+ | !style="width:1px"|AD/AP<br>AS/AS+ | ||
| Line 1,239: | Line 1,239: | ||
|- | |- | ||
!style="width:1px"|# | !style="width:1px"|# | ||
| − | !style="width: | + | !style="width:150px"|Formation |
!Normal Battle Node | !Normal Battle Node | ||
!style="width:1px"|AD/AP<br>AS/AS+ | !style="width:1px"|AD/AP<br>AS/AS+ | ||
| Line 1,246: | Line 1,246: | ||
{|class="wikitable" style="width:100%" | {|class="wikitable" style="width:100%" | ||
!style="width:1px"|# | !style="width:1px"|# | ||
| − | !style="width: | + | !style="width:150px"|Formation |
!Air Defense Node | !Air Defense Node | ||
!style="width:1px"|AD/AP<br>AS/AS+ | !style="width:1px"|AD/AP<br>AS/AS+ | ||
| Line 1,260: | Line 1,260: | ||
|- | |- | ||
!style="width:1px"|# | !style="width:1px"|# | ||
| − | !style="width: | + | !style="width:150px"|Formation |
!Air Defense Node | !Air Defense Node | ||
!style="width:1px"|AD/AP<br>AS/AS+ | !style="width:1px"|AD/AP<br>AS/AS+ | ||
| Line 1,267: | Line 1,267: | ||
{|class="wikitable" style="width:100%" | {|class="wikitable" style="width:100%" | ||
!style="width:1px"|# | !style="width:1px"|# | ||
| − | !style="width: | + | !style="width:150px"|Formation |
!Normal Battle Node | !Normal Battle Node | ||
!style="width:1px"|AD/AP<br>AS/AS+ | !style="width:1px"|AD/AP<br>AS/AS+ | ||
| Line 1,281: | Line 1,281: | ||
|- | |- | ||
!style="width:1px"|# | !style="width:1px"|# | ||
| − | !style="width: | + | !style="width:150px"|Formation |
!Normal Battle Node | !Normal Battle Node | ||
!style="width:1px"|AD/AP<br>AS/AS+ | !style="width:1px"|AD/AP<br>AS/AS+ | ||
| Line 1,288: | Line 1,288: | ||
{|class="wikitable" style="width:100%" | {|class="wikitable" style="width:100%" | ||
!style="width:1px"|# | !style="width:1px"|# | ||
| − | !style="width: | + | !style="width:150px"|Formation |
!Normal Battle Node | !Normal Battle Node | ||
!style="width:1px"|AD/AP<br>AS/AS+ | !style="width:1px"|AD/AP<br>AS/AS+ | ||
| Line 1,302: | Line 1,302: | ||
|- | |- | ||
!style="width:1px"|# | !style="width:1px"|# | ||
| − | !style="width: | + | !style="width:150px"|Formation |
!Normal Battle Node | !Normal Battle Node | ||
!style="width:1px"|AD/AP<br>AS/AS+ | !style="width:1px"|AD/AP<br>AS/AS+ | ||
| Line 1,309: | Line 1,309: | ||
{|class="wikitable" style="width:100%" | {|class="wikitable" style="width:100%" | ||
!style="width:1px"|# | !style="width:1px"|# | ||
| − | !style="width: | + | !style="width:150px"|Formation |
!Normal Battle Node | !Normal Battle Node | ||
!style="width:1px"|AD/AP<br>AS/AS+ | !style="width:1px"|AD/AP<br>AS/AS+ | ||
| Line 1,323: | Line 1,323: | ||
|- | |- | ||
!style="width:1px"|# | !style="width:1px"|# | ||
| − | !style="width: | + | !style="width:150px"|Formation |
!Normal Battle Node | !Normal Battle Node | ||
!style="width:1px"|AD/AP<br>AS/AS+ | !style="width:1px"|AD/AP<br>AS/AS+ | ||
| Line 1,341: | Line 1,341: | ||
{|class="wikitable" style="width:100%" | {|class="wikitable" style="width:100%" | ||
!style="width:1px"|# | !style="width:1px"|# | ||
| − | !style="width: | + | !style="width:150px"|Formation |
!Boss Battle Node | !Boss Battle Node | ||
!style="width:1px"|AD/AP<br>AS/AS+ | !style="width:1px"|AD/AP<br>AS/AS+ | ||
| Line 1,355: | Line 1,355: | ||
|- | |- | ||
!style="width:1px"|# | !style="width:1px"|# | ||
| − | !style="width: | + | !style="width:150px"|Formation |
!Boss Battle Node | !Boss Battle Node | ||
!style="width:1px"|AD/AP<br>AS/AS+ | !style="width:1px"|AD/AP<br>AS/AS+ | ||
| Line 1,362: | Line 1,362: | ||
{|class="wikitable" style="width:100%" | {|class="wikitable" style="width:100%" | ||
!style="width:1px"|# | !style="width:1px"|# | ||
| − | !style="width: | + | !style="width:150px"|Formation |
!Normal Battle Node | !Normal Battle Node | ||
!style="width:1px"|AD/AP<br>AS/AS+ | !style="width:1px"|AD/AP<br>AS/AS+ | ||
| Line 1,380: | Line 1,380: | ||
|- | |- | ||
!style="width:1px"|# | !style="width:1px"|# | ||
| − | !style="width: | + | !style="width:150px"|Formation |
!Normal Battle Node | !Normal Battle Node | ||
!style="width:1px"|AD/AP<br>AS/AS+ | !style="width:1px"|AD/AP<br>AS/AS+ | ||
| Line 1,398: | Line 1,398: | ||
|- | |- | ||
|style="text-align:center"|W | |style="text-align:center"|W | ||
| − | |colspan="3" style="text-align:center"|<span lang="ja">気のせいだった。</span><br>Must be my imagination. | + | |colspan="3" style="text-align:center"|<span lang="ja">気のせいだった。<br>我が艦隊は、これより敵艦隊を撃滅する!対水上見張りを厳に!合戦用意!艦隊、突入!</span><br>Must be my imagination.<br>Our fleet will now destroy the enemy fleet.<br>Stay on high alert for surface threats!<br>Battle stations! Fleet, move in! |
|- | |- | ||
!style="width:1px"|# | !style="width:1px"|# | ||
| Line 1,406: | Line 1,406: | ||
{|class="wikitable" style="width:100%" | {|class="wikitable" style="width:100%" | ||
!style="width:1px"|# | !style="width:1px"|# | ||
| − | !style="width: | + | !style="width:150px"|Formation |
!Normal Battle Node | !Normal Battle Node | ||
!style="width:1px"|AD/AP<br>AS/AS+ | !style="width:1px"|AD/AP<br>AS/AS+ | ||
| Line 1,416: | Line 1,416: | ||
|- | |- | ||
!style="width:1px"|# | !style="width:1px"|# | ||
| − | !style="width: | + | !style="width:150px"|Formation |
!Normal Battle Node | !Normal Battle Node | ||
!style="width:1px"|AD/AP<br>AS/AS+ | !style="width:1px"|AD/AP<br>AS/AS+ | ||
| Line 1,423: | Line 1,423: | ||
{|class="wikitable" style="width:100%" | {|class="wikitable" style="width:100%" | ||
!style="width:1px"|# | !style="width:1px"|# | ||
| − | !style="width: | + | !style="width:150px"|Formation |
!Normal Battle Node | !Normal Battle Node | ||
!style="width:1px"|AD/AP<br>AS/AS+ | !style="width:1px"|AD/AP<br>AS/AS+ | ||
| Line 1,433: | Line 1,433: | ||
|- | |- | ||
!style="width:1px"|# | !style="width:1px"|# | ||
| − | !style="width: | + | !style="width:150px"|Formation |
!Normal Battle Node | !Normal Battle Node | ||
!style="width:1px"|AD/AP<br>AS/AS+ | !style="width:1px"|AD/AP<br>AS/AS+ | ||
| Line 1,440: | Line 1,440: | ||
{|class="wikitable" style="width:100%" | {|class="wikitable" style="width:100%" | ||
!style="width:1px"|# | !style="width:1px"|# | ||
| − | !style="width: | + | !style="width:150px"|Formation |
!Boss Battle Node | !Boss Battle Node | ||
!style="width:1px"|AD/AP<br>AS/AS+ | !style="width:1px"|AD/AP<br>AS/AS+ | ||
| Line 1,454: | Line 1,454: | ||
|- | |- | ||
!style="width:1px"|# | !style="width:1px"|# | ||
| − | !style="width: | + | !style="width:150px"|Formation |
!Boss Battle Node | !Boss Battle Node | ||
!style="width:1px"|AD/AP<br>AS/AS+ | !style="width:1px"|AD/AP<br>AS/AS+ | ||
| Line 1,461: | Line 1,461: | ||
{|class="wikitable" style="width:100%;margin-bottom:290px !important" | {|class="wikitable" style="width:100%;margin-bottom:290px !important" | ||
!style="width:1px"|# | !style="width:1px"|# | ||
| − | !style="width: | + | !style="width:150px"|Formation |
!Night Battle Node | !Night Battle Node | ||
!style="width:1px"|AD/AP<br>AS/AS+ | !style="width:1px"|AD/AP<br>AS/AS+ | ||
| Line 1,471: | Line 1,471: | ||
|- | |- | ||
!style="width:1px"|# | !style="width:1px"|# | ||
| − | !style="width: | + | !style="width:150px"|Formation |
!Night Battle Node | !Night Battle Node | ||
!style="width:1px"|AD/AP<br>AS/AS+ | !style="width:1px"|AD/AP<br>AS/AS+ | ||
| Line 1,522: | Line 1,522: | ||
{|class="wikitable" style="width:100%" | {|class="wikitable" style="width:100%" | ||
!style="width:1px"|# | !style="width:1px"|# | ||
| − | !style="width: | + | !style="width:150px"|Formation |
!Air Raids | !Air Raids | ||
!style="width:1px"|AD/AP<br>AS/AS+ | !style="width:1px"|AD/AP<br>AS/AS+ | ||
| Line 1,548: | Line 1,548: | ||
|- | |- | ||
!style="width:1px"|# | !style="width:1px"|# | ||
| − | !style="width: | + | !style="width:150px"|Formation |
!Air Raids | !Air Raids | ||
!style="width:1px"|AD/AP<br>AS/AS+ | !style="width:1px"|AD/AP<br>AS/AS+ | ||
| Line 1,555: | Line 1,555: | ||
{|class="wikitable" style="width:100%" | {|class="wikitable" style="width:100%" | ||
!style="width:1px"|# | !style="width:1px"|# | ||
| − | !style="width: | + | !style="width:150px"|Formation |
!Normal Battle Node | !Normal Battle Node | ||
!style="width:1px"|AD/AP<br>AS/AS+ | !style="width:1px"|AD/AP<br>AS/AS+ | ||
| Line 1,573: | Line 1,573: | ||
|- | |- | ||
!style="width:1px"|# | !style="width:1px"|# | ||
| − | !style="width: | + | !style="width:150px"|Formation |
!Normal Battle Node | !Normal Battle Node | ||
!style="width:1px"|AD/AP<br>AS/AS+ | !style="width:1px"|AD/AP<br>AS/AS+ | ||
| Line 1,580: | Line 1,580: | ||
{|class="wikitable" style="width:100%" | {|class="wikitable" style="width:100%" | ||
!style="width:1px"|# | !style="width:1px"|# | ||
| − | !style="width: | + | !style="width:150px"|Formation |
!Air Defense Node | !Air Defense Node | ||
!style="width:1px"|AD/AP<br>AS/AS+ | !style="width:1px"|AD/AP<br>AS/AS+ | ||
| Line 1,606: | Line 1,606: | ||
|- | |- | ||
!style="width:1px"|# | !style="width:1px"|# | ||
| − | !style="width: | + | !style="width:150px"|Formation |
!Air Defense Node | !Air Defense Node | ||
!style="width:1px"|AD/AP<br>AS/AS+ | !style="width:1px"|AD/AP<br>AS/AS+ | ||
| Line 1,613: | Line 1,613: | ||
{|class="wikitable" style="width:100%" | {|class="wikitable" style="width:100%" | ||
!style="width:1px"|# | !style="width:1px"|# | ||
| − | !style="width: | + | !style="width:150px"|Formation |
!Normal Battle Node | !Normal Battle Node | ||
!style="width:1px"|AD/AP<br>AS/AS+ | !style="width:1px"|AD/AP<br>AS/AS+ | ||
| Line 1,627: | Line 1,627: | ||
|- | |- | ||
!style="width:1px"|# | !style="width:1px"|# | ||
| − | !style="width: | + | !style="width:150px"|Formation |
!Normal Battle Node | !Normal Battle Node | ||
!style="width:1px"|AD/AP<br>AS/AS+ | !style="width:1px"|AD/AP<br>AS/AS+ | ||
| Line 1,634: | Line 1,634: | ||
{|class="wikitable" style="width:100%" | {|class="wikitable" style="width:100%" | ||
!style="width:1px"|# | !style="width:1px"|# | ||
| − | !style="width: | + | !style="width:150px"|Formation |
!Normal Battle Node | !Normal Battle Node | ||
!style="width:1px"|AD/AP<br>AS/AS+ | !style="width:1px"|AD/AP<br>AS/AS+ | ||
| Line 1,648: | Line 1,648: | ||
|- | |- | ||
!style="width:1px"|# | !style="width:1px"|# | ||
| − | !style="width: | + | !style="width:150px"|Formation |
!Normal Battle Node | !Normal Battle Node | ||
!style="width:1px"|AD/AP<br>AS/AS+ | !style="width:1px"|AD/AP<br>AS/AS+ | ||
| Line 1,658: | Line 1,658: | ||
|- | |- | ||
|style="text-align:center"|E | |style="text-align:center"|E | ||
| − | |colspan="3" style="text-align:center"|<span lang="ja">気のせいだった。</span><br>Must be my imagination. | + | |colspan="3" style="text-align:center"|<span lang="ja">気のせいだった。<br>対水上、対空、それぞれ見張りを厳とせよ!</span><br>Must be my imagination.<br>Be on high alert<br>for surface and air threats! |
|- | |- | ||
!style="width:1px"|# | !style="width:1px"|# | ||
| Line 1,666: | Line 1,666: | ||
{|class="wikitable" style="width:100%" | {|class="wikitable" style="width:100%" | ||
!style="width:1px"|# | !style="width:1px"|# | ||
| − | !style="width: | + | !style="width:150px"|Formation |
!Normal Battle Node | !Normal Battle Node | ||
!style="width:1px"|AD/AP<br>AS/AS+ | !style="width:1px"|AD/AP<br>AS/AS+ | ||
| Line 1,676: | Line 1,676: | ||
|- | |- | ||
!style="width:1px"|# | !style="width:1px"|# | ||
| − | !style="width: | + | !style="width:150px"|Formation |
!Normal Battle Node | !Normal Battle Node | ||
!style="width:1px"|AD/AP<br>AS/AS+ | !style="width:1px"|AD/AP<br>AS/AS+ | ||
| Line 1,683: | Line 1,683: | ||
{|class="wikitable" style="width:100%" | {|class="wikitable" style="width:100%" | ||
!style="width:1px"|# | !style="width:1px"|# | ||
| − | !style="width: | + | !style="width:150px"|Formation |
!Air Defense Node | !Air Defense Node | ||
!style="width:1px"|AD/AP<br>AS/AS+ | !style="width:1px"|AD/AP<br>AS/AS+ | ||
| Line 1,705: | Line 1,705: | ||
|- | |- | ||
!style="width:1px"|# | !style="width:1px"|# | ||
| − | !style="width: | + | !style="width:150px"|Formation |
!Air Defense Node | !Air Defense Node | ||
!style="width:1px"|AD/AP<br>AS/AS+ | !style="width:1px"|AD/AP<br>AS/AS+ | ||
| Line 1,712: | Line 1,712: | ||
{|class="wikitable" style="width:100%" | {|class="wikitable" style="width:100%" | ||
!style="width:1px"|# | !style="width:1px"|# | ||
| − | !style="width: | + | !style="width:150px"|Formation |
!Normal Battle Node | !Normal Battle Node | ||
!style="width:1px"|AD/AP<br>AS/AS+ | !style="width:1px"|AD/AP<br>AS/AS+ | ||
| Line 1,726: | Line 1,726: | ||
|- | |- | ||
!style="width:1px"|# | !style="width:1px"|# | ||
| − | !style="width: | + | !style="width:150px"|Formation |
!Normal Battle Node | !Normal Battle Node | ||
!style="width:1px"|AD/AP<br>AS/AS+ | !style="width:1px"|AD/AP<br>AS/AS+ | ||
| Line 1,733: | Line 1,733: | ||
{|class="wikitable" style="width:100%" | {|class="wikitable" style="width:100%" | ||
!style="width:1px"|# | !style="width:1px"|# | ||
| − | !style="width: | + | !style="width:150px"|Formation |
!Normal Battle Node | !Normal Battle Node | ||
!style="width:1px"|AD/AP<br>AS/AS+ | !style="width:1px"|AD/AP<br>AS/AS+ | ||
| Line 1,743: | Line 1,743: | ||
|- | |- | ||
!style="width:1px"|# | !style="width:1px"|# | ||
| − | !style="width: | + | !style="width:150px"|Formation |
!Normal Battle Node | !Normal Battle Node | ||
!style="width:1px"|AD/AP<br>AS/AS+ | !style="width:1px"|AD/AP<br>AS/AS+ | ||
| Line 1,750: | Line 1,750: | ||
{|class="wikitable" style="width:100%" | {|class="wikitable" style="width:100%" | ||
!style="width:1px"|# | !style="width:1px"|# | ||
| − | !style="width: | + | !style="width:150px"|Formation |
!Boss Battle Node | !Boss Battle Node | ||
!style="width:1px"|AD/AP<br>AS/AS+ | !style="width:1px"|AD/AP<br>AS/AS+ | ||
| Line 1,764: | Line 1,764: | ||
|- | |- | ||
!style="width:1px"|# | !style="width:1px"|# | ||
| − | !style="width: | + | !style="width:150px"|Formation |
!Boss Battle Node | !Boss Battle Node | ||
!style="width:1px"|AD/AP<br>AS/AS+ | !style="width:1px"|AD/AP<br>AS/AS+ | ||
| Line 1,774: | Line 1,774: | ||
|- | |- | ||
|style="text-align:center"|J1 | |style="text-align:center"|J1 | ||
| − | |colspan="3" style="text-align:center"|<span lang="ja">気のせいだった。</span><br>Must be my imagination. | + | |colspan="3" style="text-align:center"|<span lang="ja">気のせいだった。<br>これより敵補給船団を捜索、撃滅する!敵の兵站を遮断する!</span><br>Must be my imagination.<br>Now proceeding to search and destroy<br>the enemy supply convoy!<br>Cut off the enemy's supply lines! |
|- | |- | ||
!style="width:1px"|# | !style="width:1px"|# | ||
| Line 1,785: | Line 1,785: | ||
|- | |- | ||
|style="text-align:center"|J2 | |style="text-align:center"|J2 | ||
| − | |colspan="3" style="text-align:center"|<span lang="ja">敵影を見ず。</span><br>No enemy spotted. | + | |colspan="3" style="text-align:center"|<span lang="ja">敵影を見ず。<br>これより敵補給船団を捜索、撃滅する!敵の兵站を遮断する!</span><br>No enemy spotted.<br>Now proceeding to search and destroy<br>the enemy supply convoy!<br>Cut off the enemy's supply lines! |
|- | |- | ||
!style="width:1px"|# | !style="width:1px"|# | ||
| Line 1,793: | Line 1,793: | ||
{|class="wikitable" style="width:100%" | {|class="wikitable" style="width:100%" | ||
!style="width:1px"|# | !style="width:1px"|# | ||
| − | !style="width: | + | !style="width:150px"|Formation |
!Normal Battle Node | !Normal Battle Node | ||
!style="width:1px"|AD/AP<br>AS/AS+ | !style="width:1px"|AD/AP<br>AS/AS+ | ||
| Line 1,811: | Line 1,811: | ||
|- | |- | ||
!style="width:1px"|# | !style="width:1px"|# | ||
| − | !style="width: | + | !style="width:150px"|Formation |
!Normal Battle Node | !Normal Battle Node | ||
!style="width:1px"|AD/AP<br>AS/AS+ | !style="width:1px"|AD/AP<br>AS/AS+ | ||
| Line 1,818: | Line 1,818: | ||
{|class="wikitable" style="width:100%" | {|class="wikitable" style="width:100%" | ||
!style="width:1px"|# | !style="width:1px"|# | ||
| − | !style="width: | + | !style="width:150px"|Formation |
!Normal Battle Node | !Normal Battle Node | ||
!style="width:1px"|AD/AP<br>AS/AS+ | !style="width:1px"|AD/AP<br>AS/AS+ | ||
| Line 1,836: | Line 1,836: | ||
|- | |- | ||
!style="width:1px"|# | !style="width:1px"|# | ||
| − | !style="width: | + | !style="width:150px"|Formation |
!Normal Battle Node | !Normal Battle Node | ||
!style="width:1px"|AD/AP<br>AS/AS+ | !style="width:1px"|AD/AP<br>AS/AS+ | ||
| Line 1,843: | Line 1,843: | ||
{|class="wikitable" style="width:100%" | {|class="wikitable" style="width:100%" | ||
!style="width:1px"|# | !style="width:1px"|# | ||
| − | !style="width: | + | !style="width:150px"|Formation |
!Air Defense Node | !Air Defense Node | ||
!style="width:1px"|AD/AP<br>AS/AS+ | !style="width:1px"|AD/AP<br>AS/AS+ | ||
| Line 1,857: | Line 1,857: | ||
|- | |- | ||
!style="width:1px"|# | !style="width:1px"|# | ||
| − | !style="width: | + | !style="width:150px"|Formation |
!Air Defense Node | !Air Defense Node | ||
!style="width:1px"|AD/AP<br>AS/AS+ | !style="width:1px"|AD/AP<br>AS/AS+ | ||
| Line 1,864: | Line 1,864: | ||
{|class="wikitable" style="width:100%" | {|class="wikitable" style="width:100%" | ||
!style="width:1px"|# | !style="width:1px"|# | ||
| − | !style="width: | + | !style="width:150px"|Formation |
!Air Defense Node | !Air Defense Node | ||
!style="width:1px"|AD/AP<br>AS/AS+ | !style="width:1px"|AD/AP<br>AS/AS+ | ||
| Line 1,890: | Line 1,890: | ||
|- | |- | ||
!style="width:1px"|# | !style="width:1px"|# | ||
| − | !style="width: | + | !style="width:150px"|Formation |
!Air Defense Node | !Air Defense Node | ||
!style="width:1px"|AD/AP<br>AS/AS+ | !style="width:1px"|AD/AP<br>AS/AS+ | ||
| Line 1,897: | Line 1,897: | ||
{|class="wikitable" style="width:100%" | {|class="wikitable" style="width:100%" | ||
!style="width:1px"|# | !style="width:1px"|# | ||
| − | !style="width: | + | !style="width:150px"|Formation |
!Normal Battle Node | !Normal Battle Node | ||
!style="width:1px"|AD/AP<br>AS/AS+ | !style="width:1px"|AD/AP<br>AS/AS+ | ||
| Line 1,911: | Line 1,911: | ||
|- | |- | ||
!style="width:1px"|# | !style="width:1px"|# | ||
| − | !style="width: | + | !style="width:150px"|Formation |
!Normal Battle Node | !Normal Battle Node | ||
!style="width:1px"|AD/AP<br>AS/AS+ | !style="width:1px"|AD/AP<br>AS/AS+ | ||
| Line 1,921: | Line 1,921: | ||
|- | |- | ||
|style="text-align:center"|P | |style="text-align:center"|P | ||
| − | |colspan="3" style="text-align:center"|<span lang="ja">敵影を見ず。</span><br>No enemy spotted. | + | |colspan="3" style="text-align:center"|<span lang="ja">敵影を見ず。<br>我が艦隊は、これより敵艦隊を撃滅する!対水上見張りを厳に!合戦用意!艦隊、突入!</span><br>No enemy spotted.<br>Our fleet will now destroy the enemy fleet.<br>Stay on high alert for surface threats!<br>Battle stations! Fleet, move in! |
|- | |- | ||
!style="width:1px"|# | !style="width:1px"|# | ||
| Line 1,940: | Line 1,940: | ||
{|class="wikitable" style="width:100%" | {|class="wikitable" style="width:100%" | ||
!style="width:1px"|# | !style="width:1px"|# | ||
| − | !style="width: | + | !style="width:150px"|Formation |
!Normal Battle Node | !Normal Battle Node | ||
!style="width:1px"|AD/AP<br>AS/AS+ | !style="width:1px"|AD/AP<br>AS/AS+ | ||
| Line 1,954: | Line 1,954: | ||
|- | |- | ||
!style="width:1px"|# | !style="width:1px"|# | ||
| − | !style="width: | + | !style="width:150px"|Formation |
!Normal Battle Node | !Normal Battle Node | ||
!style="width:1px"|AD/AP<br>AS/AS+ | !style="width:1px"|AD/AP<br>AS/AS+ | ||
| Line 1,961: | Line 1,961: | ||
{|class="wikitable" style="width:100%" | {|class="wikitable" style="width:100%" | ||
!style="width:1px"|# | !style="width:1px"|# | ||
| − | !style="width: | + | !style="width:150px"|Formation |
!Normal Battle Node | !Normal Battle Node | ||
!style="width:1px"|AD/AP<br>AS/AS+ | !style="width:1px"|AD/AP<br>AS/AS+ | ||
| Line 1,971: | Line 1,971: | ||
|- | |- | ||
!style="width:1px"|# | !style="width:1px"|# | ||
| − | !style="width: | + | !style="width:150px"|Formation |
!Normal Battle Node | !Normal Battle Node | ||
!style="width:1px"|AD/AP<br>AS/AS+ | !style="width:1px"|AD/AP<br>AS/AS+ | ||
| Line 1,978: | Line 1,978: | ||
{|class="wikitable" style="width:100%" | {|class="wikitable" style="width:100%" | ||
!style="width:1px"|# | !style="width:1px"|# | ||
| − | !style="width: | + | !style="width:150px"|Formation |
!Air Defense Node | !Air Defense Node | ||
!style="width:1px"|AD/AP<br>AS/AS+ | !style="width:1px"|AD/AP<br>AS/AS+ | ||
| Line 1,992: | Line 1,992: | ||
|- | |- | ||
!style="width:1px"|# | !style="width:1px"|# | ||
| − | !style="width: | + | !style="width:150px"|Formation |
!Air Defense Node | !Air Defense Node | ||
!style="width:1px"|AD/AP<br>AS/AS+ | !style="width:1px"|AD/AP<br>AS/AS+ | ||
| Line 1,999: | Line 1,999: | ||
{|class="wikitable" style="width:100%" | {|class="wikitable" style="width:100%" | ||
!style="width:1px"|# | !style="width:1px"|# | ||
| − | !style="width: | + | !style="width:150px"|Formation |
!Normal Battle Node | !Normal Battle Node | ||
!style="width:1px"|AD/AP<br>AS/AS+ | !style="width:1px"|AD/AP<br>AS/AS+ | ||
| Line 2,013: | Line 2,013: | ||
|- | |- | ||
!style="width:1px"|# | !style="width:1px"|# | ||
| − | !style="width: | + | !style="width:150px"|Formation |
!Normal Battle Node | !Normal Battle Node | ||
!style="width:1px"|AD/AP<br>AS/AS+ | !style="width:1px"|AD/AP<br>AS/AS+ | ||
| Line 2,020: | Line 2,020: | ||
{|class="wikitable" style="width:100%" | {|class="wikitable" style="width:100%" | ||
!style="width:1px"|# | !style="width:1px"|# | ||
| − | !style="width: | + | !style="width:150px"|Formation |
!Normal Battle Node | !Normal Battle Node | ||
!style="width:1px"|AD/AP<br>AS/AS+ | !style="width:1px"|AD/AP<br>AS/AS+ | ||
| Line 2,034: | Line 2,034: | ||
|- | |- | ||
!style="width:1px"|# | !style="width:1px"|# | ||
| − | !style="width: | + | !style="width:150px"|Formation |
!Normal Battle Node | !Normal Battle Node | ||
!style="width:1px"|AD/AP<br>AS/AS+ | !style="width:1px"|AD/AP<br>AS/AS+ | ||
| Line 2,041: | Line 2,041: | ||
{|class="wikitable" style="width:100%" | {|class="wikitable" style="width:100%" | ||
!style="width:1px"|# | !style="width:1px"|# | ||
| − | !style="width: | + | !style="width:150px"|Formation |
!Normal Battle Node | !Normal Battle Node | ||
!style="width:1px"|AD/AP<br>AS/AS+ | !style="width:1px"|AD/AP<br>AS/AS+ | ||
| Line 2,055: | Line 2,055: | ||
|- | |- | ||
!style="width:1px"|# | !style="width:1px"|# | ||
| − | !style="width: | + | !style="width:150px"|Formation |
!Normal Battle Node | !Normal Battle Node | ||
!style="width:1px"|AD/AP<br>AS/AS+ | !style="width:1px"|AD/AP<br>AS/AS+ | ||
| Line 2,073: | Line 2,073: | ||
{|class="wikitable" style="width:100%" | {|class="wikitable" style="width:100%" | ||
!style="width:1px"|# | !style="width:1px"|# | ||
| − | !style="width: | + | !style="width:150px"|Formation |
!Boss Battle Node | !Boss Battle Node | ||
!style="width:1px"|AD/AP<br>AS/AS+ | !style="width:1px"|AD/AP<br>AS/AS+ | ||
| Line 2,087: | Line 2,087: | ||
|- | |- | ||
!style="width:1px"|# | !style="width:1px"|# | ||
| − | !style="width: | + | !style="width:150px"|Formation |
!Boss Battle Node | !Boss Battle Node | ||
!style="width:1px"|AD/AP<br>AS/AS+ | !style="width:1px"|AD/AP<br>AS/AS+ | ||
| Line 2,094: | Line 2,094: | ||
{|class="wikitable" style="width:100%" | {|class="wikitable" style="width:100%" | ||
!style="width:1px"|# | !style="width:1px"|# | ||
| − | !style="width: | + | !style="width:150px"|Formation |
!Normal Battle Node | !Normal Battle Node | ||
!style="width:1px"|AD/AP<br>AS/AS+ | !style="width:1px"|AD/AP<br>AS/AS+ | ||
| Line 2,112: | Line 2,112: | ||
|- | |- | ||
!style="width:1px"|# | !style="width:1px"|# | ||
| − | !style="width: | + | !style="width:150px"|Formation |
!Normal Battle Node | !Normal Battle Node | ||
!style="width:1px"|AD/AP<br>AS/AS+ | !style="width:1px"|AD/AP<br>AS/AS+ | ||
| Line 2,130: | Line 2,130: | ||
|- | |- | ||
|style="text-align:center"|W | |style="text-align:center"|W | ||
| − | |colspan="3" style="text-align:center"|<span lang="ja">気のせいだった。</span><br>Must be my imagination. | + | |colspan="3" style="text-align:center"|<span lang="ja">気のせいだった。<br>我が艦隊は、これより敵艦隊を撃滅する!対水上見張りを厳に!合戦用意!艦隊、突入!</span><br>Must be my imagination.<br>Our fleet will now destroy the enemy fleet.<br>Stay on high alert for surface threats!<br>Battle stations! Fleet, move in! |
|- | |- | ||
!style="width:1px"|# | !style="width:1px"|# | ||
| Line 2,138: | Line 2,138: | ||
{|class="wikitable" style="width:100%" | {|class="wikitable" style="width:100%" | ||
!style="width:1px"|# | !style="width:1px"|# | ||
| − | !style="width: | + | !style="width:150px"|Formation |
!Normal Battle Node | !Normal Battle Node | ||
!style="width:1px"|AD/AP<br>AS/AS+ | !style="width:1px"|AD/AP<br>AS/AS+ | ||
| Line 2,148: | Line 2,148: | ||
|- | |- | ||
!style="width:1px"|# | !style="width:1px"|# | ||
| − | !style="width: | + | !style="width:150px"|Formation |
!Normal Battle Node | !Normal Battle Node | ||
!style="width:1px"|AD/AP<br>AS/AS+ | !style="width:1px"|AD/AP<br>AS/AS+ | ||
| Line 2,155: | Line 2,155: | ||
{|class="wikitable" style="width:100%" | {|class="wikitable" style="width:100%" | ||
!style="width:1px"|# | !style="width:1px"|# | ||
| − | !style="width: | + | !style="width:150px"|Formation |
!Normal Battle Node | !Normal Battle Node | ||
!style="width:1px"|AD/AP<br>AS/AS+ | !style="width:1px"|AD/AP<br>AS/AS+ | ||
| Line 2,165: | Line 2,165: | ||
|- | |- | ||
!style="width:1px"|# | !style="width:1px"|# | ||
| − | !style="width: | + | !style="width:150px"|Formation |
!Normal Battle Node | !Normal Battle Node | ||
!style="width:1px"|AD/AP<br>AS/AS+ | !style="width:1px"|AD/AP<br>AS/AS+ | ||
| Line 2,172: | Line 2,172: | ||
{|class="wikitable" style="width:100%" | {|class="wikitable" style="width:100%" | ||
!style="width:1px"|# | !style="width:1px"|# | ||
| − | !style="width: | + | !style="width:150px"|Formation |
!Boss Battle Node | !Boss Battle Node | ||
!style="width:1px"|AD/AP<br>AS/AS+ | !style="width:1px"|AD/AP<br>AS/AS+ | ||
| Line 2,186: | Line 2,186: | ||
|- | |- | ||
!style="width:1px"|# | !style="width:1px"|# | ||
| − | !style="width: | + | !style="width:150px"|Formation |
!Boss Battle Node | !Boss Battle Node | ||
!style="width:1px"|AD/AP<br>AS/AS+ | !style="width:1px"|AD/AP<br>AS/AS+ | ||
| Line 2,193: | Line 2,193: | ||
{|class="wikitable" style="width:100%;margin-bottom:290px !important" | {|class="wikitable" style="width:100%;margin-bottom:290px !important" | ||
!style="width:1px"|# | !style="width:1px"|# | ||
| − | !style="width: | + | !style="width:150px"|Formation |
!Night Battle Node | !Night Battle Node | ||
!style="width:1px"|AD/AP<br>AS/AS+ | !style="width:1px"|AD/AP<br>AS/AS+ | ||
| Line 2,203: | Line 2,203: | ||
|- | |- | ||
!style="width:1px"|# | !style="width:1px"|# | ||
| − | !style="width: | + | !style="width:150px"|Formation |
!Night Battle Node | !Night Battle Node | ||
!style="width:1px"|AD/AP<br>AS/AS+ | !style="width:1px"|AD/AP<br>AS/AS+ | ||
| Line 2,254: | Line 2,254: | ||
{|class="wikitable" style="width:100%" | {|class="wikitable" style="width:100%" | ||
!style="width:1px"|# | !style="width:1px"|# | ||
| − | !style="width: | + | !style="width:150px"|Formation |
!Air Raids | !Air Raids | ||
!style="width:1px"|AD/AP<br>AS/AS+ | !style="width:1px"|AD/AP<br>AS/AS+ | ||
| Line 2,272: | Line 2,272: | ||
|- | |- | ||
!style="width:1px"|# | !style="width:1px"|# | ||
| − | !style="width: | + | !style="width:150px"|Formation |
!Air Raids | !Air Raids | ||
!style="width:1px"|AD/AP<br>AS/AS+ | !style="width:1px"|AD/AP<br>AS/AS+ | ||
| Line 2,279: | Line 2,279: | ||
{|class="wikitable" style="width:100%" | {|class="wikitable" style="width:100%" | ||
!style="width:1px"|# | !style="width:1px"|# | ||
| − | !style="width: | + | !style="width:150px"|Formation |
!Normal Battle Node | !Normal Battle Node | ||
!style="width:1px"|AD/AP<br>AS/AS+ | !style="width:1px"|AD/AP<br>AS/AS+ | ||
| Line 2,293: | Line 2,293: | ||
|- | |- | ||
!style="width:1px"|# | !style="width:1px"|# | ||
| − | !style="width: | + | !style="width:150px"|Formation |
!Normal Battle Node | !Normal Battle Node | ||
!style="width:1px"|AD/AP<br>AS/AS+ | !style="width:1px"|AD/AP<br>AS/AS+ | ||
| Line 2,300: | Line 2,300: | ||
{|class="wikitable" style="width:100%" | {|class="wikitable" style="width:100%" | ||
!style="width:1px"|# | !style="width:1px"|# | ||
| − | !style="width: | + | !style="width:150px"|Formation |
!Air Defense Node | !Air Defense Node | ||
!style="width:1px"|AD/AP<br>AS/AS+ | !style="width:1px"|AD/AP<br>AS/AS+ | ||
| Line 2,318: | Line 2,318: | ||
|- | |- | ||
!style="width:1px"|# | !style="width:1px"|# | ||
| − | !style="width: | + | !style="width:150px"|Formation |
!Air Defense Node | !Air Defense Node | ||
!style="width:1px"|AD/AP<br>AS/AS+ | !style="width:1px"|AD/AP<br>AS/AS+ | ||
| Line 2,325: | Line 2,325: | ||
{|class="wikitable" style="width:100%" | {|class="wikitable" style="width:100%" | ||
!style="width:1px"|# | !style="width:1px"|# | ||
| − | !style="width: | + | !style="width:150px"|Formation |
!Normal Battle Node | !Normal Battle Node | ||
!style="width:1px"|AD/AP<br>AS/AS+ | !style="width:1px"|AD/AP<br>AS/AS+ | ||
| Line 2,343: | Line 2,343: | ||
|- | |- | ||
!style="width:1px"|# | !style="width:1px"|# | ||
| − | !style="width: | + | !style="width:150px"|Formation |
!Normal Battle Node | !Normal Battle Node | ||
!style="width:1px"|AD/AP<br>AS/AS+ | !style="width:1px"|AD/AP<br>AS/AS+ | ||
| Line 2,350: | Line 2,350: | ||
{|class="wikitable" style="width:100%" | {|class="wikitable" style="width:100%" | ||
!style="width:1px"|# | !style="width:1px"|# | ||
| − | !style="width: | + | !style="width:150px"|Formation |
!Normal Battle Node | !Normal Battle Node | ||
!style="width:1px"|AD/AP<br>AS/AS+ | !style="width:1px"|AD/AP<br>AS/AS+ | ||
| Line 2,364: | Line 2,364: | ||
|- | |- | ||
!style="width:1px"|# | !style="width:1px"|# | ||
| − | !style="width: | + | !style="width:150px"|Formation |
!Normal Battle Node | !Normal Battle Node | ||
!style="width:1px"|AD/AP<br>AS/AS+ | !style="width:1px"|AD/AP<br>AS/AS+ | ||
| Line 2,374: | Line 2,374: | ||
|- | |- | ||
|style="text-align:center"|E | |style="text-align:center"|E | ||
| − | |colspan="3" style="text-align:center"|<span lang="ja">気のせいだった。</span><br>Must be my imagination. | + | |colspan="3" style="text-align:center"|<span lang="ja">気のせいだった。<br>対水上、対空、それぞれ見張りを厳とせよ!</span><br>Must be my imagination.<br>Be on high alert<br>for surface and air threats! |
|- | |- | ||
!style="width:1px"|# | !style="width:1px"|# | ||
| Line 2,382: | Line 2,382: | ||
{|class="wikitable" style="width:100%" | {|class="wikitable" style="width:100%" | ||
!style="width:1px"|# | !style="width:1px"|# | ||
| − | !style="width: | + | !style="width:150px"|Formation |
!Normal Battle Node | !Normal Battle Node | ||
!style="width:1px"|AD/AP<br>AS/AS+ | !style="width:1px"|AD/AP<br>AS/AS+ | ||
| Line 2,392: | Line 2,392: | ||
|- | |- | ||
!style="width:1px"|# | !style="width:1px"|# | ||
| − | !style="width: | + | !style="width:150px"|Formation |
!Normal Battle Node | !Normal Battle Node | ||
!style="width:1px"|AD/AP<br>AS/AS+ | !style="width:1px"|AD/AP<br>AS/AS+ | ||
| Line 2,399: | Line 2,399: | ||
{|class="wikitable" style="width:100%" | {|class="wikitable" style="width:100%" | ||
!style="width:1px"|# | !style="width:1px"|# | ||
| − | !style="width: | + | !style="width:150px"|Formation |
!Air Defense Node | !Air Defense Node | ||
!style="width:1px"|AD/AP<br>AS/AS+ | !style="width:1px"|AD/AP<br>AS/AS+ | ||
| Line 2,417: | Line 2,417: | ||
|- | |- | ||
!style="width:1px"|# | !style="width:1px"|# | ||
| − | !style="width: | + | !style="width:150px"|Formation |
!Air Defense Node | !Air Defense Node | ||
!style="width:1px"|AD/AP<br>AS/AS+ | !style="width:1px"|AD/AP<br>AS/AS+ | ||
| Line 2,424: | Line 2,424: | ||
{|class="wikitable" style="width:100%" | {|class="wikitable" style="width:100%" | ||
!style="width:1px"|# | !style="width:1px"|# | ||
| − | !style="width: | + | !style="width:150px"|Formation |
!Normal Battle Node | !Normal Battle Node | ||
!style="width:1px"|AD/AP<br>AS/AS+ | !style="width:1px"|AD/AP<br>AS/AS+ | ||
| Line 2,442: | Line 2,442: | ||
|- | |- | ||
!style="width:1px"|# | !style="width:1px"|# | ||
| − | !style="width: | + | !style="width:150px"|Formation |
!Normal Battle Node | !Normal Battle Node | ||
!style="width:1px"|AD/AP<br>AS/AS+ | !style="width:1px"|AD/AP<br>AS/AS+ | ||
| Line 2,449: | Line 2,449: | ||
{|class="wikitable" style="width:100%" | {|class="wikitable" style="width:100%" | ||
!style="width:1px"|# | !style="width:1px"|# | ||
| − | !style="width: | + | !style="width:150px"|Formation |
!Normal Battle Node | !Normal Battle Node | ||
!style="width:1px"|AD/AP<br>AS/AS+ | !style="width:1px"|AD/AP<br>AS/AS+ | ||
| Line 2,459: | Line 2,459: | ||
|- | |- | ||
!style="width:1px"|# | !style="width:1px"|# | ||
| − | !style="width: | + | !style="width:150px"|Formation |
!Normal Battle Node | !Normal Battle Node | ||
!style="width:1px"|AD/AP<br>AS/AS+ | !style="width:1px"|AD/AP<br>AS/AS+ | ||
| Line 2,466: | Line 2,466: | ||
{|class="wikitable" style="width:100%" | {|class="wikitable" style="width:100%" | ||
!style="width:1px"|# | !style="width:1px"|# | ||
| − | !style="width: | + | !style="width:150px"|Formation |
!Boss Battle Node | !Boss Battle Node | ||
!style="width:1px"|AD/AP<br>AS/AS+ | !style="width:1px"|AD/AP<br>AS/AS+ | ||
| Line 2,480: | Line 2,480: | ||
|- | |- | ||
!style="width:1px"|# | !style="width:1px"|# | ||
| − | !style="width: | + | !style="width:150px"|Formation |
!Boss Battle Node | !Boss Battle Node | ||
!style="width:1px"|AD/AP<br>AS/AS+ | !style="width:1px"|AD/AP<br>AS/AS+ | ||
| Line 2,490: | Line 2,490: | ||
|- | |- | ||
|style="text-align:center"|J1 | |style="text-align:center"|J1 | ||
| − | |colspan="3" style="text-align:center"|<span lang="ja">気のせいだった。</span><br>Must be my imagination. | + | |colspan="3" style="text-align:center"|<span lang="ja">気のせいだった。<br>これより敵補給船団を捜索、撃滅する!敵の兵站を遮断する!</span><br>Must be my imagination.<br>Now proceeding to search and destroy<br>the enemy supply convoy!<br>Cut off the enemy's supply lines! |
|- | |- | ||
!style="width:1px"|# | !style="width:1px"|# | ||
| Line 2,501: | Line 2,501: | ||
|- | |- | ||
|style="text-align:center"|J2 | |style="text-align:center"|J2 | ||
| − | |colspan="3" style="text-align:center"|<span lang="ja">敵影を見ず。</span><br>No enemy spotted. | + | |colspan="3" style="text-align:center"|<span lang="ja">敵影を見ず。<br>これより敵補給船団を捜索、撃滅する!敵の兵站を遮断する!</span><br>No enemy spotted.<br>Now proceeding to search and destroy<br>the enemy supply convoy!<br>Cut off the enemy's supply lines! |
|- | |- | ||
!style="width:1px"|# | !style="width:1px"|# | ||
| Line 2,509: | Line 2,509: | ||
{|class="wikitable" style="width:100%" | {|class="wikitable" style="width:100%" | ||
!style="width:1px"|# | !style="width:1px"|# | ||
| − | !style="width: | + | !style="width:150px"|Formation |
!Normal Battle Node | !Normal Battle Node | ||
!style="width:1px"|AD/AP<br>AS/AS+ | !style="width:1px"|AD/AP<br>AS/AS+ | ||
| Line 2,523: | Line 2,523: | ||
|- | |- | ||
!style="width:1px"|# | !style="width:1px"|# | ||
| − | !style="width: | + | !style="width:150px"|Formation |
!Normal Battle Node | !Normal Battle Node | ||
!style="width:1px"|AD/AP<br>AS/AS+ | !style="width:1px"|AD/AP<br>AS/AS+ | ||
| Line 2,530: | Line 2,530: | ||
{|class="wikitable" style="width:100%" | {|class="wikitable" style="width:100%" | ||
!style="width:1px"|# | !style="width:1px"|# | ||
| − | !style="width: | + | !style="width:150px"|Formation |
!Normal Battle Node | !Normal Battle Node | ||
!style="width:1px"|AD/AP<br>AS/AS+ | !style="width:1px"|AD/AP<br>AS/AS+ | ||
| Line 2,544: | Line 2,544: | ||
|- | |- | ||
!style="width:1px"|# | !style="width:1px"|# | ||
| − | !style="width: | + | !style="width:150px"|Formation |
!Normal Battle Node | !Normal Battle Node | ||
!style="width:1px"|AD/AP<br>AS/AS+ | !style="width:1px"|AD/AP<br>AS/AS+ | ||
| Line 2,551: | Line 2,551: | ||
{|class="wikitable" style="width:100%" | {|class="wikitable" style="width:100%" | ||
!style="width:1px"|# | !style="width:1px"|# | ||
| − | !style="width: | + | !style="width:150px"|Formation |
!Air Defense Node | !Air Defense Node | ||
!style="width:1px"|AD/AP<br>AS/AS+ | !style="width:1px"|AD/AP<br>AS/AS+ | ||
| Line 2,565: | Line 2,565: | ||
|- | |- | ||
!style="width:1px"|# | !style="width:1px"|# | ||
| − | !style="width: | + | !style="width:150px"|Formation |
!Air Defense Node | !Air Defense Node | ||
!style="width:1px"|AD/AP<br>AS/AS+ | !style="width:1px"|AD/AP<br>AS/AS+ | ||
| Line 2,572: | Line 2,572: | ||
{|class="wikitable" style="width:100%" | {|class="wikitable" style="width:100%" | ||
!style="width:1px"|# | !style="width:1px"|# | ||
| − | !style="width: | + | !style="width:150px"|Formation |
!Air Defense Node | !Air Defense Node | ||
!style="width:1px"|AD/AP<br>AS/AS+ | !style="width:1px"|AD/AP<br>AS/AS+ | ||
| Line 2,590: | Line 2,590: | ||
|- | |- | ||
!style="width:1px"|# | !style="width:1px"|# | ||
| − | !style="width: | + | !style="width:150px"|Formation |
!Air Defense Node | !Air Defense Node | ||
!style="width:1px"|AD/AP<br>AS/AS+ | !style="width:1px"|AD/AP<br>AS/AS+ | ||
| Line 2,597: | Line 2,597: | ||
{|class="wikitable" style="width:100%" | {|class="wikitable" style="width:100%" | ||
!style="width:1px"|# | !style="width:1px"|# | ||
| − | !style="width: | + | !style="width:150px"|Formation |
!Normal Battle Node | !Normal Battle Node | ||
!style="width:1px"|AD/AP<br>AS/AS+ | !style="width:1px"|AD/AP<br>AS/AS+ | ||
| Line 2,611: | Line 2,611: | ||
|- | |- | ||
!style="width:1px"|# | !style="width:1px"|# | ||
| − | !style="width: | + | !style="width:150px"|Formation |
!Normal Battle Node | !Normal Battle Node | ||
!style="width:1px"|AD/AP<br>AS/AS+ | !style="width:1px"|AD/AP<br>AS/AS+ | ||
| Line 2,621: | Line 2,621: | ||
|- | |- | ||
|style="text-align:center"|P | |style="text-align:center"|P | ||
| − | |colspan="3" style="text-align:center"|<span lang="ja">敵影を見ず。</span><br>No enemy spotted. | + | |colspan="3" style="text-align:center"|<span lang="ja">敵影を見ず。<br>我が艦隊は、これより敵艦隊を撃滅する!対水上見張りを厳に!合戦用意!艦隊、突入!</span><br>No enemy spotted.<br>Our fleet will now destroy the enemy fleet.<br>Stay on high alert for surface threats!<br>Battle stations! Fleet, move in! |
|- | |- | ||
!style="width:1px"|# | !style="width:1px"|# | ||
| Line 2,640: | Line 2,640: | ||
{|class="wikitable" style="width:100%" | {|class="wikitable" style="width:100%" | ||
!style="width:1px"|# | !style="width:1px"|# | ||
| − | !style="width: | + | !style="width:150px"|Formation |
!Normal Battle Node | !Normal Battle Node | ||
!style="width:1px"|AD/AP<br>AS/AS+ | !style="width:1px"|AD/AP<br>AS/AS+ | ||
| Line 2,658: | Line 2,658: | ||
|- | |- | ||
!style="width:1px"|# | !style="width:1px"|# | ||
| − | !style="width: | + | !style="width:150px"|Formation |
!Normal Battle Node | !Normal Battle Node | ||
!style="width:1px"|AD/AP<br>AS/AS+ | !style="width:1px"|AD/AP<br>AS/AS+ | ||
| Line 2,665: | Line 2,665: | ||
{|class="wikitable" style="width:100%" | {|class="wikitable" style="width:100%" | ||
!style="width:1px"|# | !style="width:1px"|# | ||
| − | !style="width: | + | !style="width:150px"|Formation |
!Normal Battle Node | !Normal Battle Node | ||
!style="width:1px"|AD/AP<br>AS/AS+ | !style="width:1px"|AD/AP<br>AS/AS+ | ||
| Line 2,679: | Line 2,679: | ||
|- | |- | ||
!style="width:1px"|# | !style="width:1px"|# | ||
| − | !style="width: | + | !style="width:150px"|Formation |
!Normal Battle Node | !Normal Battle Node | ||
!style="width:1px"|AD/AP<br>AS/AS+ | !style="width:1px"|AD/AP<br>AS/AS+ | ||
| Line 2,686: | Line 2,686: | ||
{|class="wikitable" style="width:100%" | {|class="wikitable" style="width:100%" | ||
!style="width:1px"|# | !style="width:1px"|# | ||
| − | !style="width: | + | !style="width:150px"|Formation |
!Air Defense Node | !Air Defense Node | ||
!style="width:1px"|AD/AP<br>AS/AS+ | !style="width:1px"|AD/AP<br>AS/AS+ | ||
| Line 2,700: | Line 2,700: | ||
|- | |- | ||
!style="width:1px"|# | !style="width:1px"|# | ||
| − | !style="width: | + | !style="width:150px"|Formation |
!Air Defense Node | !Air Defense Node | ||
!style="width:1px"|AD/AP<br>AS/AS+ | !style="width:1px"|AD/AP<br>AS/AS+ | ||
| Line 2,707: | Line 2,707: | ||
{|class="wikitable" style="width:100%" | {|class="wikitable" style="width:100%" | ||
!style="width:1px"|# | !style="width:1px"|# | ||
| − | !style="width: | + | !style="width:150px"|Formation |
!Normal Battle Node | !Normal Battle Node | ||
!style="width:1px"|AD/AP<br>AS/AS+ | !style="width:1px"|AD/AP<br>AS/AS+ | ||
| Line 2,721: | Line 2,721: | ||
|- | |- | ||
!style="width:1px"|# | !style="width:1px"|# | ||
| − | !style="width: | + | !style="width:150px"|Formation |
!Normal Battle Node | !Normal Battle Node | ||
!style="width:1px"|AD/AP<br>AS/AS+ | !style="width:1px"|AD/AP<br>AS/AS+ | ||
| Line 2,728: | Line 2,728: | ||
{|class="wikitable" style="width:100%" | {|class="wikitable" style="width:100%" | ||
!style="width:1px"|# | !style="width:1px"|# | ||
| − | !style="width: | + | !style="width:150px"|Formation |
!Normal Battle Node | !Normal Battle Node | ||
!style="width:1px"|AD/AP<br>AS/AS+ | !style="width:1px"|AD/AP<br>AS/AS+ | ||
| Line 2,742: | Line 2,742: | ||
|- | |- | ||
!style="width:1px"|# | !style="width:1px"|# | ||
| − | !style="width: | + | !style="width:150px"|Formation |
!Normal Battle Node | !Normal Battle Node | ||
!style="width:1px"|AD/AP<br>AS/AS+ | !style="width:1px"|AD/AP<br>AS/AS+ | ||
| Line 2,749: | Line 2,749: | ||
{|class="wikitable" style="width:100%" | {|class="wikitable" style="width:100%" | ||
!style="width:1px"|# | !style="width:1px"|# | ||
| − | !style="width: | + | !style="width:150px"|Formation |
!Normal Battle Node | !Normal Battle Node | ||
!style="width:1px"|AD/AP<br>AS/AS+ | !style="width:1px"|AD/AP<br>AS/AS+ | ||
| Line 2,763: | Line 2,763: | ||
|- | |- | ||
!style="width:1px"|# | !style="width:1px"|# | ||
| − | !style="width: | + | !style="width:150px"|Formation |
!Normal Battle Node | !Normal Battle Node | ||
!style="width:1px"|AD/AP<br>AS/AS+ | !style="width:1px"|AD/AP<br>AS/AS+ | ||
| Line 2,781: | Line 2,781: | ||
{|class="wikitable" style="width:100%" | {|class="wikitable" style="width:100%" | ||
!style="width:1px"|# | !style="width:1px"|# | ||
| − | !style="width: | + | !style="width:150px"|Formation |
!Boss Battle Node | !Boss Battle Node | ||
!style="width:1px"|AD/AP<br>AS/AS+ | !style="width:1px"|AD/AP<br>AS/AS+ | ||
| Line 2,795: | Line 2,795: | ||
|- | |- | ||
!style="width:1px"|# | !style="width:1px"|# | ||
| − | !style="width: | + | !style="width:150px"|Formation |
!Boss Battle Node | !Boss Battle Node | ||
!style="width:1px"|AD/AP<br>AS/AS+ | !style="width:1px"|AD/AP<br>AS/AS+ | ||
| Line 2,802: | Line 2,802: | ||
{|class="wikitable" style="width:100%" | {|class="wikitable" style="width:100%" | ||
!style="width:1px"|# | !style="width:1px"|# | ||
| − | !style="width: | + | !style="width:150px"|Formation |
!Normal Battle Node | !Normal Battle Node | ||
!style="width:1px"|AD/AP<br>AS/AS+ | !style="width:1px"|AD/AP<br>AS/AS+ | ||
| Line 2,820: | Line 2,820: | ||
|- | |- | ||
!style="width:1px"|# | !style="width:1px"|# | ||
| − | !style="width: | + | !style="width:150px"|Formation |
!Normal Battle Node | !Normal Battle Node | ||
!style="width:1px"|AD/AP<br>AS/AS+ | !style="width:1px"|AD/AP<br>AS/AS+ | ||
| Line 2,838: | Line 2,838: | ||
|- | |- | ||
|style="text-align:center"|W | |style="text-align:center"|W | ||
| − | |colspan="3" style="text-align:center"|<span lang="ja">気のせいだった。</span><br>Must be my imagination. | + | |colspan="3" style="text-align:center"|<span lang="ja">気のせいだった。<br>我が艦隊は、これより敵艦隊を撃滅する!対水上見張りを厳に!合戦用意!艦隊、突入!</span><br>Must be my imagination.<br>Our fleet will now destroy the enemy fleet.<br>Stay on high alert for surface threats!<br>Battle stations! Fleet, move in! |
|- | |- | ||
!style="width:1px"|# | !style="width:1px"|# | ||
| Line 2,846: | Line 2,846: | ||
{|class="wikitable" style="width:100%" | {|class="wikitable" style="width:100%" | ||
!style="width:1px"|# | !style="width:1px"|# | ||
| − | !style="width: | + | !style="width:150px"|Formation |
!Normal Battle Node | !Normal Battle Node | ||
!style="width:1px"|AD/AP<br>AS/AS+ | !style="width:1px"|AD/AP<br>AS/AS+ | ||
| Line 2,856: | Line 2,856: | ||
|- | |- | ||
!style="width:1px"|# | !style="width:1px"|# | ||
| − | !style="width: | + | !style="width:150px"|Formation |
!Normal Battle Node | !Normal Battle Node | ||
!style="width:1px"|AD/AP<br>AS/AS+ | !style="width:1px"|AD/AP<br>AS/AS+ | ||
| Line 2,863: | Line 2,863: | ||
{|class="wikitable" style="width:100%" | {|class="wikitable" style="width:100%" | ||
!style="width:1px"|# | !style="width:1px"|# | ||
| − | !style="width: | + | !style="width:150px"|Formation |
!Normal Battle Node | !Normal Battle Node | ||
!style="width:1px"|AD/AP<br>AS/AS+ | !style="width:1px"|AD/AP<br>AS/AS+ | ||
| Line 2,873: | Line 2,873: | ||
|- | |- | ||
!style="width:1px"|# | !style="width:1px"|# | ||
| − | !style="width: | + | !style="width:150px"|Formation |
!Normal Battle Node | !Normal Battle Node | ||
!style="width:1px"|AD/AP<br>AS/AS+ | !style="width:1px"|AD/AP<br>AS/AS+ | ||
| Line 2,880: | Line 2,880: | ||
{|class="wikitable" style="width:100%" | {|class="wikitable" style="width:100%" | ||
!style="width:1px"|# | !style="width:1px"|# | ||
| − | !style="width: | + | !style="width:150px"|Formation |
!Boss Battle Node | !Boss Battle Node | ||
!style="width:1px"|AD/AP<br>AS/AS+ | !style="width:1px"|AD/AP<br>AS/AS+ | ||
| Line 2,894: | Line 2,894: | ||
|- | |- | ||
!style="width:1px"|# | !style="width:1px"|# | ||
| − | !style="width: | + | !style="width:150px"|Formation |
!Boss Battle Node | !Boss Battle Node | ||
!style="width:1px"|AD/AP<br>AS/AS+ | !style="width:1px"|AD/AP<br>AS/AS+ | ||
| Line 2,901: | Line 2,901: | ||
{|class="wikitable" style="width:100%;margin-bottom:290px !important" | {|class="wikitable" style="width:100%;margin-bottom:290px !important" | ||
!style="width:1px"|# | !style="width:1px"|# | ||
| − | !style="width: | + | !style="width:150px"|Formation |
!Night Battle Node | !Night Battle Node | ||
!style="width:1px"|AD/AP<br>AS/AS+ | !style="width:1px"|AD/AP<br>AS/AS+ | ||
| Line 2,911: | Line 2,911: | ||
|- | |- | ||
!style="width:1px"|# | !style="width:1px"|# | ||
| − | !style="width: | + | !style="width:150px"|Formation |
!Night Battle Node | !Night Battle Node | ||
!style="width:1px"|AD/AP<br>AS/AS+ | !style="width:1px"|AD/AP<br>AS/AS+ | ||
Latest revision as of 08:58, 26 May 2021
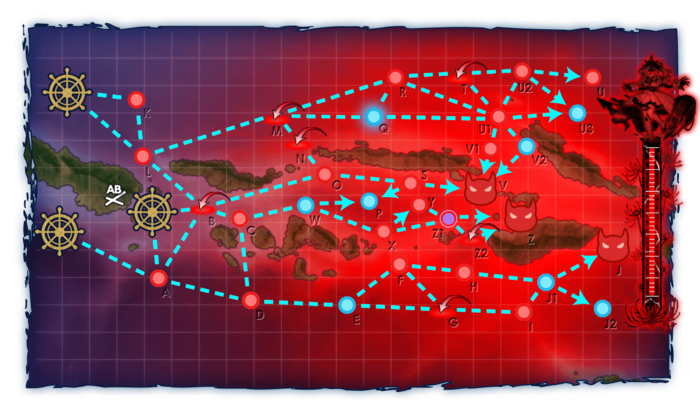
E-5 Hard AB
| # | Formation | Air Raids | AD/AP AS/AS+ |
|---|---|---|---|
| AB | Diamond | 67/133 297/594 | |
| Diamond | 76/151 338/675 | ||
| Diamond | 80/160 359/717 | ||
| Diamond | 85/169 380/759 | ||
| Diamond | 96/192 431/861 | ||
| # | Formation | Air Raids | AD/AP AS/AS+ |
E-5 Hard A: ショートランド泊地沖 深海哨戒A線 (PoiDB)
| # | Formation | Normal Battle Node | AD/AP AS/AS+ |
|---|---|---|---|
| A | Echelon Line Abreast Phases: 1, 2, 3 |
0/0 0/0 | |
| Echelon Line Abreast Phases: 1, 2, 3 |
0/0 0/0 | ||
| Echelon Line Abreast Phases: 1, 2, 3 |
0/0 0/0 | ||
| # | Formation | Normal Battle Node | AD/AP AS/AS+ |
E-5 Hard B: 深海ソロモン方面 基地航空隊 (PoiDB)
| # | Formation | Air Defense Node | AD/AP AS/AS+ |
|---|---|---|---|
| B | Diamond Phases: 2, 3 |
69/137 308/615 | |
| Diamond Phases: 2, 3 |
67/133 297/594 | ||
| Diamond Phases: 3 |
76/151 338/675 | ||
| Diamond Phases: 2, 3 |
80/160 359/717 | ||
| Diamond Phases: 3 |
85/169 380/759 | ||
| # | Formation | Air Defense Node | AD/AP AS/AS+ |
E-5 Hard C: ショートランド泊地沖 深海哨戒C線 (PoiDB)
| # | Formation | Normal Battle Node | AD/AP AS/AS+ |
|---|---|---|---|
| C | Echelon Line Abreast Phases: 3 |
0/0 0/0 | |
| Echelon Phases: 3 |
0/0 0/0 | ||
| # | Formation | Normal Battle Node | AD/AP AS/AS+ |
E-5 Hard D: 深海艦隊 ソロモン南方哨戒部隊 (PoiDB)
| # | Formation | Normal Battle Node | AD/AP AS/AS+ |
|---|---|---|---|
| D | Line Ahead Vanguard Phases: 1, 2, 3 |
0/0 0/0 | |
| Line Ahead Phases: 1, 2, 3 |
0/0 0/0 | ||
| # | Formation | Normal Battle Node | AD/AP AS/AS+ |
E-5 Hard E
| # | Empty Node | ||
|---|---|---|---|
| E | 気のせいだった。 対水上、対空、それぞれ見張りを厳とせよ! Must be my imagination. Be on high alert for surface and air threats! | ||
| # | Empty Node | ||
E-5 Hard F: 深海艦隊 ソロモン南部警備部隊 (PoiDB)
| # | Formation | Normal Battle Node | AD/AP AS/AS+ |
|---|---|---|---|
| F | Line Ahead Echelon Vanguard Phases: 1, 2, 3 |
0/0 0/0 | |
| # | Formation | Normal Battle Node | AD/AP AS/AS+ |
E-5 Hard G: 深海ソロモン方面 基地航空隊 (PoiDB)
| # | Formation | Air Defense Node | AD/AP AS/AS+ |
|---|---|---|---|
| G | Diamond Phases: 1, 2, 3 |
69/137 308/615 | |
| Diamond Phases: 1, 2, 3 |
67/133 297/594 | ||
| Diamond Phases: 1, 2, 3 |
76/151 338/675 | ||
| Diamond Phases: 1, 2, 3 |
80/160 359/717 | ||
| Diamond Phases: 1, 2, 3 |
85/169 380/759 | ||
| # | Formation | Air Defense Node | AD/AP AS/AS+ |
E-5 Hard H: 深海艦隊 支援護衛空母群 I群 (PoiDB)
| # | Formation | Normal Battle Node | AD/AP AS/AS+ |
|---|---|---|---|
| H | Diamond Phases: 1, 3 |
87/173 387/774 | |
| Diamond Phases: 1, 3 |
80/160 359/717 | ||
| Diamond Phases: 1, 3 |
95/189 423/846 | ||
| # | Formation | Normal Battle Node | AD/AP AS/AS+ |
E-5 Hard I: 深海艦隊 ソロモン東部警備部隊 (PoiDB)
| # | Formation | Normal Battle Node | AD/AP AS/AS+ |
|---|---|---|---|
| I | Line Ahead Echelon Vanguard Phases: 1, 2, 3 |
0/0 0/0 | |
| # | Formation | Normal Battle Node | AD/AP AS/AS+ |
E-5 Hard J: 深海艦隊 ソロモン兵站輸送部隊 (PoiDB)
| # | Formation | Boss Battle Node | AD/AP AS/AS+ |
|---|---|---|---|
| J | Cruising Formation 3 Phases: 1, 2, 3 |
0/0 0/0 | |
| Cruising Formation 3 Phases: 1 (Final)
|
45/89 198/396 | ||
| # | Formation | Boss Battle Node | AD/AP AS/AS+ |
E-5 Hard J1
| # | Empty Node | ||
|---|---|---|---|
| J1 | 気のせいだった。 これより敵補給船団を捜索、撃滅する!敵の兵站を遮断する! Must be my imagination. Now proceeding to search and destroy the enemy supply convoy! Cut off the enemy's supply lines! | ||
| # | Empty Node | ||
E-5 Hard J2
| # | Empty Node | ||
|---|---|---|---|
| J2 | 敵影を見ず。 これより敵補給船団を捜索、撃滅する!敵の兵站を遮断する! No enemy spotted. Now proceeding to search and destroy the enemy supply convoy! Cut off the enemy's supply lines! | ||
| # | Empty Node | ||
E-5 Hard K: 深海潜水艦隊 前進襲撃群狼集団 (PoiDB)
| # | Formation | Normal Battle Node | AD/AP AS/AS+ |
|---|---|---|---|
| K | Echelon Line Abreast Phases: 2, 3 |
0/0 0/0 | |
| Echelon Line Abreast Phases: 2, 3 |
0/0 0/0 | ||
| Echelon Line Abreast Phases: 2, 3 |
0/0 0/0 | ||
| # | Formation | Normal Battle Node | AD/AP AS/AS+ |
E-5 Hard L: ショートランド泊地沖 深海哨戒B線 (PoiDB)
| # | Formation | Normal Battle Node | AD/AP AS/AS+ |
|---|---|---|---|
| L | Echelon Line Abreast Phases: 2, 3 |
0/0 0/0 | |
| Echelon Line Abreast Phases: 2, 3 |
0/0 0/0 | ||
| Echelon Line Abreast Phases: 2, 3 |
0/0 0/0 | ||
| # | Formation | Normal Battle Node | AD/AP AS/AS+ |
E-5 Hard M: 深海任務部隊 空母艦載機群 (PoiDB)
| # | Formation | Air Defense Node | AD/AP AS/AS+ |
|---|---|---|---|
| M | Diamond Phases: 2, 3 |
102/203 456/912 | |
| Diamond Phases: 2, 3 |
138/275 617/1233 | ||
| Diamond Phases: 2 |
203/406 912/1824 | ||
| # | Formation | Air Defense Node | AD/AP AS/AS+ |
E-5 Hard N: 深海ソロモン方面 基地航空隊 (PoiDB)
| # | Formation | Air Defense Node | AD/AP AS/AS+ |
|---|---|---|---|
| N | Diamond Phases: 3 |
69/137 308/615 | |
| Diamond Phases: 3 |
67/133 297/594 | ||
| Diamond Phases: 3 |
76/151 338/675 | ||
| Diamond Phases: 3 |
80/160 359/717 | ||
| Diamond Phases: 3 |
85/169 380/759 | ||
| # | Formation | Air Defense Node | AD/AP AS/AS+ |
E-5 Hard O: 深海艦隊 ソロモン北側哨戒部隊 (PoiDB)
| # | Formation | Normal Battle Node | AD/AP AS/AS+ |
|---|---|---|---|
| O | Line Ahead Vanguard Phases: 3 |
0/0 0/0 | |
| Line Ahead Phases: 3 |
0/0 0/0 | ||
| # | Formation | Normal Battle Node | AD/AP AS/AS+ |
E-5 Hard P
| # | Empty Node | ||
|---|---|---|---|
| P | 敵影を見ず。 我が艦隊は、これより敵艦隊を撃滅する!対水上見張りを厳に!合戦用意!艦隊、突入! No enemy spotted. Our fleet will now destroy the enemy fleet. Stay on high alert for surface threats! Battle stations! Fleet, move in! | ||
| # | Empty Node | ||
E-5 Hard Q
| # | Selection Node | ||
|---|---|---|---|
| Q | 艦隊の針路を選択できます。提督、どちらの針路をとられますか? You can decide the fleet's course. Admiral, which heading should we take? | ||
| # | Selection Node | ||
E-5 Hard R: 深海機動部隊 前衛警戒潜水艦 (PoiDB)
| # | Formation | Normal Battle Node | AD/AP AS/AS+ |
|---|---|---|---|
| R | Echelon Line Abreast Phases: 3 |
0/0 0/0 | |
| Echelon Phases: 3 |
0/0 0/0 | ||
| # | Formation | Normal Battle Node | AD/AP AS/AS+ |
E-5 Hard S: 深海任務部隊 巡洋艦戦隊B集団 (PoiDB)
| # | Formation | Normal Battle Node | AD/AP AS/AS+ |
|---|---|---|---|
| S | Cruising Formation 4 Phases: 3 |
0/0 0/0 | |
| # | Formation | Normal Battle Node | AD/AP AS/AS+ |
E-5 Hard T: 深海任務部隊 空母艦載機群 (PoiDB)
| # | Formation | Air Defense Node | AD/AP AS/AS+ |
|---|---|---|---|
| T | Diamond Phases: 2, 3 |
138/275 617/1233 | |
| Diamond Phases: 2, 3 |
168/335 752/1503 | ||
| Diamond Phases: 2, 3 |
203/406 912/1824 | ||
| # | Formation | Air Defense Node | AD/AP AS/AS+ |
E-5 Hard U: 深海任務部隊 増援主力集団 (PoiDB)
| # | Formation | Normal Battle Node | AD/AP AS/AS+ |
|---|---|---|---|
| U | Cruising Formation 3 Phases: 2, 3 |
168/335 752/1503 | |
| Cruising Formation 3 Phases: 2, 3 |
203/406 912/1824 | ||
| # | Formation | Normal Battle Node | AD/AP AS/AS+ |
E-5 Hard U1: 深海任務部隊 巡洋艦戦隊A集団 (PoiDB)
| # | Formation | Normal Battle Node | AD/AP AS/AS+ |
|---|---|---|---|
| U1 | Cruising Formation 4 Phases: 2, 3 |
0/0 0/0 | |
| Cruising Formation 4 Phases: 2 |
0/0 0/0 | ||
| # | Formation | Normal Battle Node | AD/AP AS/AS+ |
E-5 Hard U2: 深海任務部隊 増援前衛集団 (PoiDB)
| # | Formation | Normal Battle Node | AD/AP AS/AS+ |
|---|---|---|---|
| U2 | Cruising Formation 3 Phases: 2, 3 |
55/109 245/489 | |
| Cruising Formation 3 Phases: 2, 3 |
91/181 405/810 | ||
| # | Formation | Normal Battle Node | AD/AP AS/AS+ |
E-5 Hard U3
| # | Empty Node | ||
|---|---|---|---|
| U3 | 敵影を見ず。 No enemy spotted. | ||
| # | Empty Node | ||
E-5 Hard V: 深海任務部隊 中央水上打撃群 (PoiDB)
| # | Formation | Boss Battle Node | AD/AP AS/AS+ |
|---|---|---|---|
| V | Cruising Formation 4 Phases: 2, 3 |
0/0 0/0 | |
| Cruising Formation 4 Phases: 2 (Final)
|
0/0 0/0 | ||
| # | Formation | Boss Battle Node | AD/AP AS/AS+ |
E-5 Hard V1: 深海艦隊 支援護衛空母群 II群 (PoiDB)
| # | Formation | Normal Battle Node | AD/AP AS/AS+ |
|---|---|---|---|
| V1 | Diamond | 87/173 387/774 | |
| Diamond Phases: 3 |
80/160 359/717 | ||
| Diamond Phases: 3 |
95/189 423/846 | ||
| # | Formation | Normal Battle Node | AD/AP AS/AS+ |
E-5 Hard V2
| # | Repair Node | ||
|---|---|---|---|
| # | Repair Node | ||
E-5 Hard W
| # | Empty Node | ||
|---|---|---|---|
| W | 気のせいだった。 我が艦隊は、これより敵艦隊を撃滅する!対水上見張りを厳に!合戦用意!艦隊、突入! Must be my imagination. Our fleet will now destroy the enemy fleet. Stay on high alert for surface threats! Battle stations! Fleet, move in! | ||
| # | Empty Node | ||
E-5 Hard X: 深海艦隊 ソロモン中央警備部隊 (PoiDB)
| # | Formation | Normal Battle Node | AD/AP AS/AS+ |
|---|---|---|---|
| X | Line Ahead Double Line Echelon Phases: 3 |
0/0 0/0 | |
| # | Formation | Normal Battle Node | AD/AP AS/AS+ |
E-5 Hard Y: 深海艦隊 沈没水上機母艦 (PoiDB)
| # | Formation | Normal Battle Node | AD/AP AS/AS+ |
|---|---|---|---|
| Y | Line Ahead Diamond Vanguard Phases: 3 |
36/72 161/321 | |
| # | Formation | Normal Battle Node | AD/AP AS/AS+ |
E-5 Hard Z: 深海艦隊 鉄底海峡 任務部隊旗艦 (PoiDB)
| # | Formation | Boss Battle Node | AD/AP AS/AS+ |
|---|---|---|---|
| Z | Cruising Formation 4 Phases: 3 |
0/0 0/0 | |
| Cruising Formation 4 Phases: 3 (Final)
|
0/0 0/0 | ||
| # | Formation | Boss Battle Node | AD/AP AS/AS+ |
E-5 Hard Z1: 深海任務部隊 鉄底海峡重巡戦隊 (PoiDB)
| # | Formation | Night Battle Node | AD/AP AS/AS+ |
|---|---|---|---|
| Z1 | Line Ahead Double Line Echelon Phases: 3 |
0/0 0/0 | |
| # | Formation | Night Battle Node | AD/AP AS/AS+ |
E-5 Medium AB
| # | Formation | Air Raids | AD/AP AS/AS+ |
|---|---|---|---|
| AB | Diamond | 55/110 246/492 | |
| Diamond | 60/119 267/534 | ||
| Diamond | 67/133 297/594 | ||
| Diamond | 76/151 338/675 | ||
| Diamond | 80/160 359/717 | ||
| # | Formation | Air Raids | AD/AP AS/AS+ |
E-5 Medium A: ショートランド泊地沖 深海哨戒A線 (PoiDB)
| # | Formation | Normal Battle Node | AD/AP AS/AS+ |
|---|---|---|---|
| A | Echelon Line Abreast Phases: 1, 2, 3 |
0/0 0/0 | |
| Echelon Line Abreast Phases: 1, 2, 3 |
0/0 0/0 | ||
| Echelon Line Abreast Phases: 1, 2, 3 |
0/0 0/0 | ||
| # | Formation | Normal Battle Node | AD/AP AS/AS+ |
E-5 Medium B: 深海ソロモン方面 基地航空隊 (PoiDB)
| # | Formation | Air Defense Node | AD/AP AS/AS+ |
|---|---|---|---|
| B | Diamond Phases: 3 |
55/110 246/492 | |
| Diamond Phases: 2, 3 |
60/119 267/534 | ||
| Diamond Phases: 3 |
69/137 308/615 | ||
| Diamond Phases: 3 |
67/133 297/594 | ||
| # | Formation | Air Defense Node | AD/AP AS/AS+ |
E-5 Medium C: ショートランド泊地沖 深海哨戒C線 (PoiDB)
| # | Formation | Normal Battle Node | AD/AP AS/AS+ |
|---|---|---|---|
| C | Echelon Line Abreast Phases: 3 |
0/0 0/0 | |
| Echelon Phases: 3 |
0/0 0/0 | ||
| # | Formation | Normal Battle Node | AD/AP AS/AS+ |
E-5 Medium D: 深海艦隊 ソロモン南方哨戒部隊 (PoiDB)
| # | Formation | Normal Battle Node | AD/AP AS/AS+ |
|---|---|---|---|
| D | Line Ahead Vanguard Phases: 1, 2, 3 |
0/0 0/0 | |
| Line Ahead Phases: 1, 2, 3 |
0/0 0/0 | ||
| # | Formation | Normal Battle Node | AD/AP AS/AS+ |
E-5 Medium E
| # | Empty Node | ||
|---|---|---|---|
| E | 気のせいだった。 対水上、対空、それぞれ見張りを厳とせよ! Must be my imagination. Be on high alert for surface and air threats! | ||
| # | Empty Node | ||
E-5 Medium F: 深海艦隊 ソロモン南部警備部隊 (PoiDB)
| # | Formation | Normal Battle Node | AD/AP AS/AS+ |
|---|---|---|---|
| F | Line Ahead Echelon Vanguard Phases: 1, 3 |
0/0 0/0 | |
| # | Formation | Normal Battle Node | AD/AP AS/AS+ |
E-5 Medium G: 深海ソロモン方面 基地航空隊 (PoiDB)
| # | Formation | Air Defense Node | AD/AP AS/AS+ |
|---|---|---|---|
| G | Diamond Phases: 1, 2, 3 |
55/110 246/492 | |
| Diamond Phases: 1, 2 |
60/119 267/534 | ||
| Diamond Phases: 1 |
69/137 308/615 | ||
| Diamond Phases: 1, 2 |
67/133 297/594 | ||
| # | Formation | Air Defense Node | AD/AP AS/AS+ |
E-5 Medium H: 深海艦隊 支援護衛空母群 I群 (PoiDB)
| # | Formation | Normal Battle Node | AD/AP AS/AS+ |
|---|---|---|---|
| H | Diamond Phases: 3 |
85/169 378/756 | |
| Diamond | 72/143 321/642 | ||
| Diamond | 87/173 387/774 | ||
| # | Formation | Normal Battle Node | AD/AP AS/AS+ |
E-5 Medium I: 深海艦隊 ソロモン東部警備部隊 (PoiDB)
| # | Formation | Normal Battle Node | AD/AP AS/AS+ |
|---|---|---|---|
| I | Line Ahead Echelon Vanguard Phases: 1, 2, 3 |
0/0 0/0 | |
| # | Formation | Normal Battle Node | AD/AP AS/AS+ |
E-5 Medium J: 深海艦隊 ソロモン兵站輸送部隊 (PoiDB)
| # | Formation | Boss Battle Node | AD/AP AS/AS+ |
|---|---|---|---|
| J | Cruising Formation 3 Phases: 1, 2, 3 |
0/0 0/0 | |
| Cruising Formation 3 Phases: 1 (Final)
|
36/72 161/321 | ||
| # | Formation | Boss Battle Node | AD/AP AS/AS+ |
E-5 Medium J1
| # | Empty Node | ||
|---|---|---|---|
| J1 | 気のせいだった。 これより敵補給船団を捜索、撃滅する!敵の兵站を遮断する! Must be my imagination. Now proceeding to search and destroy the enemy supply convoy! Cut off the enemy's supply lines! | ||
| # | Empty Node | ||
E-5 Medium J2
| # | Empty Node | ||
|---|---|---|---|
| J2 | 敵影を見ず。 これより敵補給船団を捜索、撃滅する!敵の兵站を遮断する! No enemy spotted. Now proceeding to search and destroy the enemy supply convoy! Cut off the enemy's supply lines! | ||
| # | Empty Node | ||
E-5 Medium K: 深海潜水艦隊 前進襲撃群狼集団 (PoiDB)
| # | Formation | Normal Battle Node | AD/AP AS/AS+ |
|---|---|---|---|
| K | Echelon Line Abreast Phases: 3 |
0/0 0/0 | |
| Echelon Line Abreast |
0/0 0/0 | ||
| Echelon Line Abreast |
0/0 0/0 | ||
| # | Formation | Normal Battle Node | AD/AP AS/AS+ |
E-5 Medium L: ショートランド泊地沖 深海哨戒B線 (PoiDB)
| # | Formation | Normal Battle Node | AD/AP AS/AS+ |
|---|---|---|---|
| L | Echelon Line Abreast Phases: 2, 3 |
0/0 0/0 | |
| Echelon Line Abreast Phases: 2, 3 |
0/0 0/0 | ||
| Echelon Line Abreast Phases: 2, 3 |
0/0 0/0 | ||
| # | Formation | Normal Battle Node | AD/AP AS/AS+ |
E-5 Medium M: 深海任務部隊 空母艦載機群 (PoiDB)
| # | Formation | Air Defense Node | AD/AP AS/AS+ |
|---|---|---|---|
| M | Diamond Phases: 2, 3 |
86/171 383/765 | |
| Diamond Phases: 2, 3 |
109/217 486/972 | ||
| # | Formation | Air Defense Node | AD/AP AS/AS+ |
E-5 Medium N: 深海ソロモン方面 基地航空隊 (PoiDB)
| # | Formation | Air Defense Node | AD/AP AS/AS+ |
|---|---|---|---|
| N | Diamond Phases: 3 |
55/110 246/492 | |
| Diamond Phases: 3 |
60/119 267/534 | ||
| Diamond Phases: 3 |
69/137 308/615 | ||
| Diamond Phases: 3 |
67/133 297/594 | ||
| # | Formation | Air Defense Node | AD/AP AS/AS+ |
E-5 Medium O: 深海艦隊 ソロモン北側哨戒部隊 (PoiDB)
| # | Formation | Normal Battle Node | AD/AP AS/AS+ |
|---|---|---|---|
| O | Line Ahead Vanguard Phases: 3 |
0/0 0/0 | |
| Line Ahead Phases: 3 |
0/0 0/0 | ||
| # | Formation | Normal Battle Node | AD/AP AS/AS+ |
E-5 Medium P
| # | Empty Node | ||
|---|---|---|---|
| P | 敵影を見ず。 我が艦隊は、これより敵艦隊を撃滅する!対水上見張りを厳に!合戦用意!艦隊、突入! No enemy spotted. Our fleet will now destroy the enemy fleet. Stay on high alert for surface threats! Battle stations! Fleet, move in! | ||
| # | Empty Node | ||
E-5 Medium Q
| # | Selection Node | ||
|---|---|---|---|
| Q | 艦隊の針路を選択できます。提督、どちらの針路をとられますか? You can decide the fleet's course. Admiral, which heading should we take? | ||
| # | Selection Node | ||
E-5 Medium R: 深海機動部隊 前衛警戒潜水艦 (PoiDB)
| # | Formation | Normal Battle Node | AD/AP AS/AS+ |
|---|---|---|---|
| R | Echelon Line Abreast Phases: 3 |
0/0 0/0 | |
| Echelon Phases: 3 |
0/0 0/0 | ||
| # | Formation | Normal Battle Node | AD/AP AS/AS+ |
E-5 Medium S: 深海任務部隊 巡洋艦戦隊B集団 (PoiDB)
| # | Formation | Normal Battle Node | AD/AP AS/AS+ |
|---|---|---|---|
| S | Cruising Formation 4 Phases: 3 |
0/0 0/0 | |
| # | Formation | Normal Battle Node | AD/AP AS/AS+ |
E-5 Medium T: 深海任務部隊 空母艦載機群 (PoiDB)
| # | Formation | Air Defense Node | AD/AP AS/AS+ |
|---|---|---|---|
| T | Diamond Phases: 3 |
86/171 383/765 | |
| Diamond | 109/217 486/972 | ||
| # | Formation | Air Defense Node | AD/AP AS/AS+ |
E-5 Medium U: 深海任務部隊 増援主力集団 (PoiDB)
| # | Formation | Normal Battle Node | AD/AP AS/AS+ |
|---|---|---|---|
| U | Cruising Formation 3 Phases: 2, 3 |
109/217 486/972 | |
| Cruising Formation 3 Phases: 2, 3 |
148/295 662/1323 | ||
| # | Formation | Normal Battle Node | AD/AP AS/AS+ |
E-5 Medium U1: 深海任務部隊 巡洋艦戦隊A集団 (PoiDB)
| # | Formation | Normal Battle Node | AD/AP AS/AS+ |
|---|---|---|---|
| U1 | Cruising Formation 4 Phases: 2, 3 |
0/0 0/0 | |
| Cruising Formation 4 Phases: 2 |
0/0 0/0 | ||
| # | Formation | Normal Battle Node | AD/AP AS/AS+ |
E-5 Medium U2: 深海任務部隊 増援前衛集団 (PoiDB)
| # | Formation | Normal Battle Node | AD/AP AS/AS+ |
|---|---|---|---|
| U2 | Cruising Formation 3 Phases: 2, 3 |
56/111 249/498 | |
| Cruising Formation 3 Phases: 3 |
42/84 188/375 | ||
| # | Formation | Normal Battle Node | AD/AP AS/AS+ |
E-5 Medium U3
| # | Empty Node | ||
|---|---|---|---|
| U3 | 敵影を見ず。 No enemy spotted. | ||
| # | Empty Node | ||
E-5 Medium V: 深海任務部隊 中央水上打撃群 (PoiDB)
| # | Formation | Boss Battle Node | AD/AP AS/AS+ |
|---|---|---|---|
| V | Cruising Formation 4 Phases: 2, 3 |
0/0 0/0 | |
| Cruising Formation 4 Phases: 2 (Final)
|
0/0 0/0 | ||
| # | Formation | Boss Battle Node | AD/AP AS/AS+ |
E-5 Medium V1: 深海艦隊 支援護衛空母群 II群 (PoiDB)
| # | Formation | Normal Battle Node | AD/AP AS/AS+ |
|---|---|---|---|
| V1 | Diamond Phases: 2, 3 |
85/169 378/756 | |
| Diamond Phases: 2 |
72/143 321/642 | ||
| Diamond Phases: 2, 3 |
87/173 387/774 | ||
| # | Formation | Normal Battle Node | AD/AP AS/AS+ |
E-5 Medium V2
| # | Repair Node | ||
|---|---|---|---|
| # | Repair Node | ||
E-5 Medium W
| # | Empty Node | ||
|---|---|---|---|
| W | 気のせいだった。 我が艦隊は、これより敵艦隊を撃滅する!対水上見張りを厳に!合戦用意!艦隊、突入! Must be my imagination. Our fleet will now destroy the enemy fleet. Stay on high alert for surface threats! Battle stations! Fleet, move in! | ||
| # | Empty Node | ||
E-5 Medium X: 深海艦隊 ソロモン中央警備部隊 (PoiDB)
| # | Formation | Normal Battle Node | AD/AP AS/AS+ |
|---|---|---|---|
| X | Line Ahead Double Line Echelon Phases: 3 |
0/0 0/0 | |
| # | Formation | Normal Battle Node | AD/AP AS/AS+ |
E-5 Medium Y: 深海艦隊 沈没水上機母艦 (PoiDB)
| # | Formation | Normal Battle Node | AD/AP AS/AS+ |
|---|---|---|---|
| Y | Line Ahead Diamond Vanguard Phases: 3 |
30/59 132/264 | |
| # | Formation | Normal Battle Node | AD/AP AS/AS+ |
E-5 Medium Z: 深海艦隊 鉄底海峡 任務部隊旗艦 (PoiDB)
| # | Formation | Boss Battle Node | AD/AP AS/AS+ |
|---|---|---|---|
| Z | Cruising Formation 4 Phases: 3 |
0/0 0/0 | |
| Cruising Formation 4 Phases: 3 (Final)
|
?/? ?/? | ||
| # | Formation | Boss Battle Node | AD/AP AS/AS+ |
E-5 Medium Z1: 深海任務部隊 鉄底海峡重巡戦隊 (PoiDB)
| # | Formation | Night Battle Node | AD/AP AS/AS+ |
|---|---|---|---|
| Z1 | Line Ahead Double Line Echelon Phases: 3 |
0/0 0/0 | |
| # | Formation | Night Battle Node | AD/AP AS/AS+ |
E-5 Easy AB
| # | Formation | Air Raids | AD/AP AS/AS+ |
|---|---|---|---|
| AB | Diamond | 44/87 195/390 | |
| Diamond | 55/110 246/492 | ||
| Diamond | 60/119 267/534 | ||
| Diamond | 23/46 102/204 | ||
| Diamond | 67/133 297/594 | ||
| # | Formation | Air Raids | AD/AP AS/AS+ |
E-5 Easy A: ショートランド泊地沖 深海哨戒A線 (PoiDB)
| # | Formation | Normal Battle Node | AD/AP AS/AS+ |
|---|---|---|---|
| A | Echelon Line Abreast Phases: 1, 3 |
0/0 0/0 | |
| Echelon Line Abreast Phases: 1, 3 |
0/0 0/0 | ||
| Echelon Line Abreast Phases: 1, 3 |
0/0 0/0 | ||
| # | Formation | Normal Battle Node | AD/AP AS/AS+ |
E-5 Easy B: 深海ソロモン方面 基地航空隊 (PoiDB)
| # | Formation | Air Defense Node | AD/AP AS/AS+ |
|---|---|---|---|
| B | Diamond Phases: 3 |
44/87 195/390 | |
| Diamond Phases: 3 |
17/33 72/144 | ||
| Diamond Phases: 3 |
55/110 246/492 | ||
| Diamond Phases: 3 |
60/119 267/534 | ||
| Diamond Phases: 3 |
67/133 297/594 | ||
| # | Formation | Air Defense Node | AD/AP AS/AS+ |
E-5 Easy C: ショートランド泊地沖 深海哨戒C線 (PoiDB)
| # | Formation | Normal Battle Node | AD/AP AS/AS+ |
|---|---|---|---|
| C | Echelon Line Abreast Phases: 3 |
0/0 0/0 | |
| Echelon Phases: 3 |
0/0 0/0 | ||
| # | Formation | Normal Battle Node | AD/AP AS/AS+ |
E-5 Easy D: 深海艦隊 ソロモン南方哨戒部隊 (PoiDB)
| # | Formation | Normal Battle Node | AD/AP AS/AS+ |
|---|---|---|---|
| D | Line Ahead Vanguard Phases: 1, 3 |
0/0 0/0 | |
| Line Ahead Phases: 1, 3 |
0/0 0/0 | ||
| # | Formation | Normal Battle Node | AD/AP AS/AS+ |
E-5 Easy E
| # | Empty Node | ||
|---|---|---|---|
| E | 気のせいだった。 対水上、対空、それぞれ見張りを厳とせよ! Must be my imagination. Be on high alert for surface and air threats! | ||
| # | Empty Node | ||
E-5 Easy F: 深海艦隊 ソロモン南部警備部隊 (PoiDB)
| # | Formation | Normal Battle Node | AD/AP AS/AS+ |
|---|---|---|---|
| F | Line Ahead Echelon Vanguard Phases: 1, 3 |
0/0 0/0 | |
| # | Formation | Normal Battle Node | AD/AP AS/AS+ |
E-5 Easy G: 深海ソロモン方面 基地航空隊 (PoiDB)
| # | Formation | Air Defense Node | AD/AP AS/AS+ |
|---|---|---|---|
| G | Diamond Phases: 1, 3 |
44/87 195/390 | |
| Diamond Phases: 1, 3 |
55/110 246/492 | ||
| Diamond Phases: 1, 3 |
60/119 267/534 | ||
| Diamond Phases: 1, 3 |
67/133 297/594 | ||
| # | Formation | Air Defense Node | AD/AP AS/AS+ |
E-5 Easy H: 深海艦隊 支援護衛空母群 I群 (PoiDB)
| # | Formation | Normal Battle Node | AD/AP AS/AS+ |
|---|---|---|---|
| H | Diamond Phases: 3 |
36/72 161/321 | |
| Diamond Phases: 3 |
78/156 350/699 | ||
| # | Formation | Normal Battle Node | AD/AP AS/AS+ |
E-5 Easy I: 深海艦隊 ソロモン東部警備部隊 (PoiDB)
| # | Formation | Normal Battle Node | AD/AP AS/AS+ |
|---|---|---|---|
| I | Line Ahead Echelon Vanguard Phases: 1, 3 |
0/0 0/0 | |
| # | Formation | Normal Battle Node | AD/AP AS/AS+ |
E-5 Easy J: 深海艦隊 ソロモン兵站輸送部隊 (PoiDB)
| # | Formation | Boss Battle Node | AD/AP AS/AS+ |
|---|---|---|---|
| J | Cruising Formation 3 Phases: 1, 3 |
0/0 0/0 | |
| Cruising Formation 3 Phases: 1 (Final)
|
9/17 36/72 | ||
| # | Formation | Boss Battle Node | AD/AP AS/AS+ |
E-5 Easy J1
| # | Empty Node | ||
|---|---|---|---|
| J1 | 気のせいだった。 これより敵補給船団を捜索、撃滅する!敵の兵站を遮断する! Must be my imagination. Now proceeding to search and destroy the enemy supply convoy! Cut off the enemy's supply lines! | ||
| # | Empty Node | ||
E-5 Easy J2
| # | Empty Node | ||
|---|---|---|---|
| J2 | 敵影を見ず。 これより敵補給船団を捜索、撃滅する!敵の兵站を遮断する! No enemy spotted. Now proceeding to search and destroy the enemy supply convoy! Cut off the enemy's supply lines! | ||
| # | Empty Node | ||
E-5 Easy K: 深海潜水艦隊 前進襲撃群狼集団 (PoiDB)
| # | Formation | Normal Battle Node | AD/AP AS/AS+ |
|---|---|---|---|
| K | Echelon Line Abreast |
0/0 0/0 | |
| Echelon Line Abreast Phases: 3 |
0/0 0/0 | ||
| Echelon Line Abreast |
0/0 0/0 | ||
| # | Formation | Normal Battle Node | AD/AP AS/AS+ |
E-5 Easy L: ショートランド泊地沖 深海哨戒B線 (PoiDB)
| # | Formation | Normal Battle Node | AD/AP AS/AS+ |
|---|---|---|---|
| L | Echelon Line Abreast Phases: 2, 3 |
0/0 0/0 | |
| Echelon Line Abreast Phases: 2, 3 |
0/0 0/0 | ||
| Echelon Line Abreast Phases: 2, 3 |
0/0 0/0 | ||
| # | Formation | Normal Battle Node | AD/AP AS/AS+ |
E-5 Easy M: 深海任務部隊 空母艦載機群 (PoiDB)
| # | Formation | Air Defense Node | AD/AP AS/AS+ |
|---|---|---|---|
| M | Diamond Phases: 2, 3 |
73/145 326/651 | |
| Diamond Phases: 2, 3 |
96/191 429/858 | ||
| # | Formation | Air Defense Node | AD/AP AS/AS+ |
E-5 Easy N: 深海ソロモン方面 基地航空隊 (PoiDB)
| # | Formation | Air Defense Node | AD/AP AS/AS+ |
|---|---|---|---|
| N | Diamond Phases: 3 |
44/87 195/390 | |
| Diamond Phases: 3 |
17/33 72/144 | ||
| Diamond Phases: 3 |
55/110 246/492 | ||
| Diamond Phases: 3 |
60/119 267/534 | ||
| Diamond | 67/133 297/594 | ||
| # | Formation | Air Defense Node | AD/AP AS/AS+ |
E-5 Easy O: 深海艦隊 ソロモン北側哨戒部隊 (PoiDB)
| # | Formation | Normal Battle Node | AD/AP AS/AS+ |
|---|---|---|---|
| O | Line Ahead Vanguard Phases: 3 |
0/0 0/0 | |
| Line Ahead Phases: 3 |
0/0 0/0 | ||
| # | Formation | Normal Battle Node | AD/AP AS/AS+ |
E-5 Easy P
| # | Empty Node | ||
|---|---|---|---|
| P | 敵影を見ず。 我が艦隊は、これより敵艦隊を撃滅する!対水上見張りを厳に!合戦用意!艦隊、突入! No enemy spotted. Our fleet will now destroy the enemy fleet. Stay on high alert for surface threats! Battle stations! Fleet, move in! | ||
| # | Empty Node | ||
E-5 Easy Q
| # | Selection Node | ||
|---|---|---|---|
| Q | 艦隊の針路を選択できます。提督、どちらの針路をとられますか? You can decide the fleet's course. Admiral, which heading should we take? | ||
| # | Selection Node | ||
E-5 Easy R: 深海機動部隊 前衛警戒潜水艦 (PoiDB)
| # | Formation | Normal Battle Node | AD/AP AS/AS+ |
|---|---|---|---|
| R | Echelon Line Abreast Phases: 3 |
0/0 0/0 | |
| Echelon Phases: 3 |
0/0 0/0 | ||
| # | Formation | Normal Battle Node | AD/AP AS/AS+ |
E-5 Easy S: 深海任務部隊 巡洋艦戦隊B集団 (PoiDB)
| # | Formation | Normal Battle Node | AD/AP AS/AS+ |
|---|---|---|---|
| S | Cruising Formation 4 Phases: 3 |
0/0 0/0 | |
| # | Formation | Normal Battle Node | AD/AP AS/AS+ |
E-5 Easy T: 深海任務部隊 空母艦載機群 (PoiDB)
| # | Formation | Air Defense Node | AD/AP AS/AS+ |
|---|---|---|---|
| T | Diamond Phases: 3 |
73/145 326/651 | |
| Diamond Phases: 3 |
96/191 429/858 | ||
| # | Formation | Air Defense Node | AD/AP AS/AS+ |
E-5 Easy U: 深海任務部隊 増援主力集団 (PoiDB)
| # | Formation | Normal Battle Node | AD/AP AS/AS+ |
|---|---|---|---|
| U | Cruising Formation 3 Phases: 3 |
96/191 429/858 | |
| Cruising Formation 3 Phases: 3 |
122/244 548/1095 | ||
| # | Formation | Normal Battle Node | AD/AP AS/AS+ |
E-5 Easy U1: 深海任務部隊 巡洋艦戦隊A集団 (PoiDB)
| # | Formation | Normal Battle Node | AD/AP AS/AS+ |
|---|---|---|---|
| U1 | Cruising Formation 4 Phases: 2, 3 |
0/0 0/0 | |
| Cruising Formation 4 Phases: 2 |
0/0 0/0 | ||
| # | Formation | Normal Battle Node | AD/AP AS/AS+ |
E-5 Easy U2: 深海任務部隊 増援前衛集団 (PoiDB)
| # | Formation | Normal Battle Node | AD/AP AS/AS+ |
|---|---|---|---|
| U2 | Cruising Formation 3 Phases: 3 |
56/111 248/495 | |
| Cruising Formation 3 Phases: 3 |
42/83 186/372 | ||
| # | Formation | Normal Battle Node | AD/AP AS/AS+ |
E-5 Easy U3
| # | Empty Node | ||
|---|---|---|---|
| U3 | 敵影を見ず。 No enemy spotted. | ||
| # | Empty Node | ||
E-5 Easy V: 深海任務部隊 中央水上打撃群 (PoiDB)
| # | Formation | Boss Battle Node | AD/AP AS/AS+ |
|---|---|---|---|
| V | Cruising Formation 4 Phases: 2, 3 |
0/0 0/0 | |
| Cruising Formation 4 Phases: 2 (Final)
|
0/0 0/0 | ||
| # | Formation | Boss Battle Node | AD/AP AS/AS+ |
E-5 Easy V1: 深海艦隊 支援護衛空母群 II群 (PoiDB)
| # | Formation | Normal Battle Node | AD/AP AS/AS+ |
|---|---|---|---|
| V1 | Diamond Phases: 2, 3 |
43/85 189/378 | |
| Diamond Phases: 2 |
36/72 161/321 | ||
| Diamond Phases: 2, 3 |
78/156 350/699 | ||
| # | Formation | Normal Battle Node | AD/AP AS/AS+ |
E-5 Easy V2
| # | Repair Node | ||
|---|---|---|---|
| # | Repair Node | ||
E-5 Easy W
| # | Empty Node | ||
|---|---|---|---|
| W | 気のせいだった。 我が艦隊は、これより敵艦隊を撃滅する!対水上見張りを厳に!合戦用意!艦隊、突入! Must be my imagination. Our fleet will now destroy the enemy fleet. Stay on high alert for surface threats! Battle stations! Fleet, move in! | ||
| # | Empty Node | ||
E-5 Easy X: 深海艦隊 ソロモン中央警備部隊 (PoiDB)
| # | Formation | Normal Battle Node | AD/AP AS/AS+ |
|---|---|---|---|
| X | Line Ahead Double Line Echelon Phases: 3 |
0/0 0/0 | |
| # | Formation | Normal Battle Node | AD/AP AS/AS+ |
E-5 Easy Y: 深海艦隊 沈没水上機母艦 (PoiDB)
| # | Formation | Normal Battle Node | AD/AP AS/AS+ |
|---|---|---|---|
| Y | Line Ahead Diamond Vanguard Phases: 3 |
21/42 93/186 | |
| # | Formation | Normal Battle Node | AD/AP AS/AS+ |
E-5 Easy Z: 深海艦隊 鉄底海峡 任務部隊旗艦 (PoiDB)
| # | Formation | Boss Battle Node | AD/AP AS/AS+ |
|---|---|---|---|
| Z | Cruising Formation 4 Phases: 3 |
0/0 0/0 | |
| Cruising Formation 4 Phases: 3 (Final)
|
0/0 0/0 | ||
| # | Formation | Boss Battle Node | AD/AP AS/AS+ |
E-5 Easy Z1: 深海任務部隊 鉄底海峡重巡戦隊 (PoiDB)
| # | Formation | Night Battle Node | AD/AP AS/AS+ |
|---|---|---|---|
| Z1 | Line Ahead Double Line Echelon Phases: 3 |
0/0 0/0 | |
| # | Formation | Night Battle Node | AD/AP AS/AS+ |
E-5 Casual AB
| # | Formation | Air Raids | AD/AP AS/AS+ |
|---|---|---|---|
| AB | Diamond | 44/87 195/390 | |
| Diamond | 55/110 246/492 | ||
| Diamond | 23/46 102/204 | ||
| # | Formation | Air Raids | AD/AP AS/AS+ |
E-5 Casual A: ショートランド泊地沖 深海哨戒A線 (PoiDB)
| # | Formation | Normal Battle Node | AD/AP AS/AS+ |
|---|---|---|---|
| A | Echelon Line Abreast Phases: 1, 3 |
0/0 0/0 | |
| Echelon Line Abreast Phases: 1, 3 |
0/0 0/0 | ||
| # | Formation | Normal Battle Node | AD/AP AS/AS+ |
E-5 Casual B: 深海ソロモン方面 基地航空隊 (PoiDB)
| # | Formation | Air Defense Node | AD/AP AS/AS+ |
|---|---|---|---|
| B | Diamond Phases: 3 |
44/87 195/390 | |
| Diamond Phases: 3 |
17/33 72/144 | ||
| Diamond Phases: 3 |
55/110 246/492 | ||
| # | Formation | Air Defense Node | AD/AP AS/AS+ |
E-5 Casual C: ショートランド泊地沖 深海哨戒C線 (PoiDB)
| # | Formation | Normal Battle Node | AD/AP AS/AS+ |
|---|---|---|---|
| C | Echelon Phases: 3 |
0/0 0/0 | |
| Echelon Phases: 3 |
0/0 0/0 | ||
| Line Abreast Phases: 3 |
0/0 0/0 | ||
| # | Formation | Normal Battle Node | AD/AP AS/AS+ |
E-5 Casual D: 深海艦隊 ソロモン南方哨戒部隊 (PoiDB)
| # | Formation | Normal Battle Node | AD/AP AS/AS+ |
|---|---|---|---|
| D | Line Ahead Vanguard Phases: 1, 3 |
0/0 0/0 | |
| Line Ahead Phases: 1, 3 |
0/0 0/0 | ||
| # | Formation | Normal Battle Node | AD/AP AS/AS+ |
E-5 Casual E
| # | Empty Node | ||
|---|---|---|---|
| E | 気のせいだった。 対水上、対空、それぞれ見張りを厳とせよ! Must be my imagination. Be on high alert for surface and air threats! | ||
| # | Empty Node | ||
E-5 Casual F: 深海艦隊 ソロモン南部警備部隊 (PoiDB)
| # | Formation | Normal Battle Node | AD/AP AS/AS+ |
|---|---|---|---|
| F | Line Ahead Echelon Vanguard Phases: 1, 3 |
0/0 0/0 | |
| # | Formation | Normal Battle Node | AD/AP AS/AS+ |
E-5 Casual G: 深海ソロモン方面 基地航空隊 (PoiDB)
| # | Formation | Air Defense Node | AD/AP AS/AS+ |
|---|---|---|---|
| G | Diamond Phases: 1, 3 |
44/87 195/390 | |
| Diamond Phases: 1, 3 |
17/33 72/144 | ||
| Diamond Phases: 1, 3 |
55/110 246/492 | ||
| # | Formation | Air Defense Node | AD/AP AS/AS+ |
E-5 Casual H: 深海艦隊 支援護衛空母群 I群 (PoiDB)
| # | Formation | Normal Battle Node | AD/AP AS/AS+ |
|---|---|---|---|
| H | Diamond Phases: 1 |
36/72 161/321 | |
| Diamond Phases: 1, 3 |
43/85 189/378 | ||
| Diamond Phases: 1 |
36/72 161/321 | ||
| # | Formation | Normal Battle Node | AD/AP AS/AS+ |
E-5 Casual I: 深海艦隊 ソロモン東部警備部隊 (PoiDB)
| # | Formation | Normal Battle Node | AD/AP AS/AS+ |
|---|---|---|---|
| I | Line Ahead Echelon Vanguard Phases: 1, 3 |
0/0 0/0 | |
| # | Formation | Normal Battle Node | AD/AP AS/AS+ |
E-5 Casual J: 深海艦隊 ソロモン兵站輸送部隊 (PoiDB)
| # | Formation | Boss Battle Node | AD/AP AS/AS+ |
|---|---|---|---|
| J | Cruising Formation 3 Phases: 1, 3 |
0/0 0/0 | |
| Cruising Formation 3 Phases: 1 (Final)
|
3/6 12/24 | ||
| # | Formation | Boss Battle Node | AD/AP AS/AS+ |
E-5 Casual J1
| # | Empty Node | ||
|---|---|---|---|
| J1 | 気のせいだった。 これより敵補給船団を捜索、撃滅する!敵の兵站を遮断する! Must be my imagination. Now proceeding to search and destroy the enemy supply convoy! Cut off the enemy's supply lines! | ||
| # | Empty Node | ||
E-5 Casual J2
| # | Empty Node | ||
|---|---|---|---|
| J2 | 敵影を見ず。 これより敵補給船団を捜索、撃滅する!敵の兵站を遮断する! No enemy spotted. Now proceeding to search and destroy the enemy supply convoy! Cut off the enemy's supply lines! | ||
| # | Empty Node | ||
E-5 Casual K: 深海潜水艦隊 前進襲撃群狼集団 (PoiDB)
| # | Formation | Normal Battle Node | AD/AP AS/AS+ |
|---|---|---|---|
| K | Echelon Line Abreast Phases: 2, 3 |
0/0 0/0 | |
| Echelon Line Abreast |
0/0 0/0 | ||
| # | Formation | Normal Battle Node | AD/AP AS/AS+ |
E-5 Casual L: ショートランド泊地沖 深海哨戒B線 (PoiDB)
| # | Formation | Normal Battle Node | AD/AP AS/AS+ |
|---|---|---|---|
| L | Echelon Line Abreast Phases: 2, 3 |
0/0 0/0 | |
| Echelon Line Abreast Phases: 2, 3 |
0/0 0/0 | ||
| # | Formation | Normal Battle Node | AD/AP AS/AS+ |
E-5 Casual M: 深海任務部隊 空母艦載機群 (PoiDB)
| # | Formation | Air Defense Node | AD/AP AS/AS+ |
|---|---|---|---|
| M | Diamond Phases: 2, 3 |
?/? ?/? | |
| Diamond Phases: 2, 3 |
?/? ?/? | ||
| # | Formation | Air Defense Node | AD/AP AS/AS+ |
E-5 Casual N: 深海ソロモン方面 基地航空隊 (PoiDB)
| # | Formation | Air Defense Node | AD/AP AS/AS+ |
|---|---|---|---|
| N | Diamond Phases: 3 |
44/87 195/390 | |
| Diamond Phases: 3 |
17/33 72/144 | ||
| Diamond Phases: 3 |
55/110 246/492 | ||
| # | Formation | Air Defense Node | AD/AP AS/AS+ |
E-5 Casual O: 深海艦隊 ソロモン北側哨戒部隊 (PoiDB)
| # | Formation | Normal Battle Node | AD/AP AS/AS+ |
|---|---|---|---|
| O | Line Ahead Vanguard Phases: 3 |
0/0 0/0 | |
| Line Ahead Phases: 3 |
0/0 0/0 | ||
| # | Formation | Normal Battle Node | AD/AP AS/AS+ |
E-5 Casual P
| # | Empty Node | ||
|---|---|---|---|
| P | 敵影を見ず。 我が艦隊は、これより敵艦隊を撃滅する!対水上見張りを厳に!合戦用意!艦隊、突入! No enemy spotted. Our fleet will now destroy the enemy fleet. Stay on high alert for surface threats! Battle stations! Fleet, move in! | ||
| # | Empty Node | ||
E-5 Casual Q
| # | Selection Node | ||
|---|---|---|---|
| Q | 艦隊の針路を選択できます。提督、どちらの針路をとられますか? You can decide the fleet's course. Admiral, which heading should we take? | ||
| # | Selection Node | ||
E-5 Casual R: 深海機動部隊 前衛警戒潜水艦 (PoiDB)
| # | Formation | Normal Battle Node | AD/AP AS/AS+ |
|---|---|---|---|
| R | Line Abreast Phases: 3 |
0/0 0/0 | |
| Echelon Phases: 3 |
0/0 0/0 | ||
| Echelon Phases: 3 |
0/0 0/0 | ||
| # | Formation | Normal Battle Node | AD/AP AS/AS+ |
E-5 Casual S: 深海任務部隊 巡洋艦戦隊B集団 (PoiDB)
| # | Formation | Normal Battle Node | AD/AP AS/AS+ |
|---|---|---|---|
| S | Cruising Formation 4 Phases: 3 |
0/0 0/0 | |
| Cruising Formation 4 | 0/0 0/0 | ||
| # | Formation | Normal Battle Node | AD/AP AS/AS+ |
E-5 Casual T: 深海任務部隊 空母艦載機群 (PoiDB)
| # | Formation | Air Defense Node | AD/AP AS/AS+ |
|---|---|---|---|
| T | Diamond Phases: 2, 3 |
?/? ?/? | |
| Diamond Phases: 3 |
?/? ?/? | ||
| # | Formation | Air Defense Node | AD/AP AS/AS+ |
E-5 Casual U: 深海任務部隊 増援主力集団 (PoiDB)
| # | Formation | Normal Battle Node | AD/AP AS/AS+ |
|---|---|---|---|
| U | Cruising Formation 3 Phases: 2, 3 |
50/99 222/444 | |
| Cruising Formation 3 Phases: 3 |
73/145 326/651 | ||
| # | Formation | Normal Battle Node | AD/AP AS/AS+ |
E-5 Casual U1: 深海任務部隊 巡洋艦戦隊A集団 (PoiDB)
| # | Formation | Normal Battle Node | AD/AP AS/AS+ |
|---|---|---|---|
| U1 | Cruising Formation 4 Phases: 2, 3 |
0/0 0/0 | |
| Cruising Formation 4 Phases: 2 |
0/0 0/0 | ||
| # | Formation | Normal Battle Node | AD/AP AS/AS+ |
E-5 Casual U2: 深海任務部隊 増援前衛集団 (PoiDB)
| # | Formation | Normal Battle Node | AD/AP AS/AS+ |
|---|---|---|---|
| U2 | Cruising Formation 3 Phases: 2, 3 |
24/47 104/207 | |
| Cruising Formation 3 Phases: 2, 3 |
33/65 144/288 | ||
| # | Formation | Normal Battle Node | AD/AP AS/AS+ |
E-5 Casual U3
| # | Empty Node | ||
|---|---|---|---|
| U3 | 敵影を見ず。 No enemy spotted. | ||
| # | Empty Node | ||
E-5 Casual V: 深海任務部隊 中央水上打撃群 (PoiDB)
| # | Formation | Boss Battle Node | AD/AP AS/AS+ |
|---|---|---|---|
| V | Cruising Formation 3 Phases: 2, 3 |
0/0 0/0 | |
| Cruising Formation 3 Phases: 2 (Final)
|
0/0 0/0 | ||
| # | Formation | Boss Battle Node | AD/AP AS/AS+ |
E-5 Casual V1: 深海艦隊 支援護衛空母群 II群 (PoiDB)
| # | Formation | Normal Battle Node | AD/AP AS/AS+ |
|---|---|---|---|
| V1 | Diamond Phases: 2, 3 |
36/72 161/321 | |
| Diamond Phases: 2, 3 |
43/85 189/378 | ||
| Diamond Phases: 2, 3 |
36/72 161/321 | ||
| # | Formation | Normal Battle Node | AD/AP AS/AS+ |
E-5 Casual V2
| # | Repair Node | ||
|---|---|---|---|
| # | Repair Node | ||
E-5 Casual W
| # | Empty Node | ||
|---|---|---|---|
| W | 気のせいだった。 我が艦隊は、これより敵艦隊を撃滅する!対水上見張りを厳に!合戦用意!艦隊、突入! Must be my imagination. Our fleet will now destroy the enemy fleet. Stay on high alert for surface threats! Battle stations! Fleet, move in! | ||
| # | Empty Node | ||
E-5 Casual X: 深海艦隊 ソロモン中央警備部隊 (PoiDB)
| # | Formation | Normal Battle Node | AD/AP AS/AS+ |
|---|---|---|---|
| X | Line Ahead Double Line Echelon Phases: 3 |
0/0 0/0 | |
| # | Formation | Normal Battle Node | AD/AP AS/AS+ |
E-5 Casual Y: 深海艦隊 沈没水上機母艦 (PoiDB)
| # | Formation | Normal Battle Node | AD/AP AS/AS+ |
|---|---|---|---|
| Y | Line Ahead Diamond Vanguard Phases: 3 |
21/42 93/186 | |
| # | Formation | Normal Battle Node | AD/AP AS/AS+ |
E-5 Casual Z: 深海艦隊 鉄底海峡 任務部隊旗艦 (PoiDB)
| # | Formation | Boss Battle Node | AD/AP AS/AS+ |
|---|---|---|---|
| Z | Cruising Formation 4 Phases: 3 |
0/0 0/0 | |
| Cruising Formation 4 Phases: 3 (Final)
|
0/0 0/0 | ||
| # | Formation | Boss Battle Node | AD/AP AS/AS+ |
E-5 Casual Z1: 深海任務部隊 鉄底海峡重巡戦隊 (PoiDB)
| # | Formation | Night Battle Node | AD/AP AS/AS+ |
|---|---|---|---|
| Z1 | Line Ahead Double Line Echelon Phases: 3 |
0/0 0/0 | |
| # | Formation | Night Battle Node | AD/AP AS/AS+ |