- Welcome to the Kancolle Wiki!
- If you have any questions regarding site content, account registration, etc., please visit the KanColle Wiki Discord
Difference between revisions of "Sandbox"
Jump to navigation
Jump to search
>CDRW |
>CDRW |
||
| Line 1: | Line 1: | ||
{{sandbox}} | {{sandbox}} | ||
| + | ==Mobile hide test== | ||
| + | *This image should be hidden in mobile version | ||
| + | <span class="mobile-hide"> | ||
| + | [[File:20131217pollresult.png|left]] | ||
| + | </span> | ||
| + | ==Text table== | ||
| − | + | <div class="mw-customtoggle-1_1_enemy wikia-menu-button">Show this text table in my PC browser!</div> | |
| − | |||
| − | |||
| − | |||
| − | |||
| − | |||
| − | |||
| − | |||
| − | |||
| − | |||
| − | |||
| − | |||
| − | |||
| − | |||
| − | |||
| − | |||
| − | |||
| − | |||
| − | |||
| − | |||
| − | |||
| − | |||
| − | |||
| − | |||
| − | |||
| − | |||
| − | |||
| − | |||
| − | |||
| − | |||
| − | |||
| − | |||
| − | |||
| − | |||
| − | |||
| − | |||
| − | |||
| − | |||
| − | |||
| − | |||
| − | |||
| − | |||
| − | |||
| − | |||
| − | |||
| − | |||
| − | |||
| − | |||
| − | |||
| − | |||
| − | |||
| − | |||
| − | |||
| − | |||
| − | |||
| − | |||
| − | |||
| − | |||
| − | |||
| − | |||
| − | |||
| − | |||
| − | |||
| − | |||
| − | |||
| − | |||
| − | |||
| − | |||
| − | |||
| − | |||
| − | |||
| − | |||
| − | |||
| − | |||
| − | |||
| − | |||
| − | |||
| − | |||
| − | |||
| − | |||
| − | |||
| − | |||
| − | |||
| − | |||
| − | |||
| − | |||
| − | |||
| − | <div class="mw-customtoggle- | ||
| − | |||
| − | |||
| − | |||
| − | |||
| − | |||
| − | |||
| − | |||
| − | |||
| − | |||
| − | |||
| − | |||
| − | |||
| − | |||
| − | |||
| − | |||
| − | |||
| − | |||
| − | |||
| − | |||
| − | |||
| − | |||
| − | |||
| − | |||
| − | |||
| − | |||
| − | |||
| − | |||
| − | |||
| − | |||
| − | |||
| − | |||
| − | |||
| − | |||
| − | |||
| − | |||
| − | |||
| − | |||
| − | |||
| − | |||
| − | |||
| − | |||
| − | |||
| − | |||
| − | |||
| − | |||
| − | |||
| − | |||
| − | |||
| − | |||
| − | |||
| − | |||
| − | |||
| − | |||
| − | |||
| − | |||
| − | |||
| − | |||
| − | |||
| − | |||
| − | |||
| − | |||
| − | |||
| − | |||
| − | |||
| − | |||
| − | |||
| − | |||
| − | {| border="0" cellpadding="1" cellspacing="1 | + | {| class="article-table mw-collapsible mw-collapsed" id="mw-customcollapsible-1_1_enemy" border="0" cellpadding="1" cellspacing="1" style="width:100%;" |
|- | |- | ||
| − | ! scope="col" style="text-align:center;"|Area | + | ! scope="col" style="text-align: center;"|Area |
| − | ! scope="col" style="text-align:center;"|Pattern | + | ! scope="col" style="text-align: center;"|Pattern |
| − | ! scope="col" style="text-align:center;"|Encountered | + | ! scope="col" style="text-align: center;"|Encountered vessels |
| − | ! scope="col" style="text-align:center;"|Formation | + | ! scope="col" style="text-align: center;"|Formation |
|- | |- | ||
| − | + | | colspan="1" rowspan="3" style="text-align: center;"|A<br />敵偵察艦 | |
| − | |||
| − | |||
| − | |||
| − | |||
| − | |||
| − | |||
| − | |||
| − | |||
| − | |||
| − | |||
| − | |||
| − | |||
| − | |||
| − | |||
| − | |||
| − | | colspan="1" rowspan="3" style="text-align:center;"| | ||
| style="text-align: center;"|Pattern 1 | | style="text-align: center;"|Pattern 1 | ||
| − | |[[ | + | |[[Enemy_vessel#Destroyers|DD I-class]] |
| − | | | + | | style="text-align: center;"|N/A |
|- | |- | ||
| style="text-align: center;"|Pattern 2 | | style="text-align: center;"|Pattern 2 | ||
| − | |[[ | + | |[[Enemy_vessel#Destroyers|DD Ro-class]] |
| + | | style="text-align: center;"|N/A | ||
|- | |- | ||
| style="text-align: center;"|Pattern 3 | | style="text-align: center;"|Pattern 3 | ||
| − | |[[ | + | |[[Enemy_vessel#Destroyers|DD Ha-class]] |
| + | | style="text-align: center;"|N/A | ||
|- | |- | ||
| − | + | | colspan="1" rowspan="3"|B<br />敵はぐれ艦隊 | |
| − | |||
| − | |||
| − | |||
| − | |||
| − | |||
| − | |||
| − | | colspan="1" rowspan="3 | ||
| style="text-align: center;"|Pattern 1 | | style="text-align: center;"|Pattern 1 | ||
| − | |[[ | + | | |
| − | | style="text-align: center;"| | + | |
| + | [[Enemy_vessel#Destroyers|DD I-class]] x2 | ||
| + | | style="text-align: center;"|N/A | ||
|- | |- | ||
| style="text-align: center;"|Pattern 2 | | style="text-align: center;"|Pattern 2 | ||
| − | |[[ | + | |[[Enemy_vessel#Destroyers|DD Ro-class]], [[Enemy_vessel#Destroyers|DD I-class]] |
| − | | style="text-align: center;"| | + | | style="text-align: center;"|N/A |
|- | |- | ||
| style="text-align: center;"|Pattern 3 | | style="text-align: center;"|Pattern 3 | ||
| − | |[[ | + | |[[Enemy_vessel#Destroyers|DD Ha-class]] x2 |
| − | | style="text-align: center;"| | + | | style="text-align: center;"|N/A |
|- | |- | ||
| − | | colspan="1" rowspan=" | + | | colspan="1" rowspan="4" style="text-align: center;"|'''<span class="wikicolor" style="color:Red">C<br />敵主力艦隊</span>''' |
| style="text-align: center;"|Pattern 1 | | style="text-align: center;"|Pattern 1 | ||
| − | |[[ | + | |[[Enemy_vessel#Light_Cruisers|CL Ho-class]], [[Enemy_vessel#Destroyers|DD I-class]] x2 |
| − | | style="text-align: center;"| | + | | style="text-align: center;"|N/A |
|- | |- | ||
| style="text-align: center;"|Pattern 2 | | style="text-align: center;"|Pattern 2 | ||
| − | |[[ | + | |[[Enemy_vessel#Light_Cruisers|CL Ho-class]], [[Enemy_vessel#Destroyers|DD Ro-class]] x2 |
| − | | style="text-align: center;"| | + | | style="text-align: center;"|N/A |
|- | |- | ||
| style="text-align: center;"|Pattern 3 | | style="text-align: center;"|Pattern 3 | ||
| − | |[[ | + | |[[Enemy_vessel#Light_Cruisers|CL Ho-class]], [[Enemy_vessel#Destroyers|DD Ha-class]] x2 |
| − | | style="text-align: center;"| | + | | style="text-align: center;"|N/A |
|- | |- | ||
| − | + | | style="text-align: center;"|Pattern 4 | |
| − | + | |[[Enemy_vessel#Light_Cruisers|CL Ho-class]], [[Enemy_vessel#Destroyers|DD Ro-class]] x2, [[Enemy_vessel#Destroyers|DD Ha-class]] | |
| − | |||
| − | |||
| − | |||
| − | |||
| − | |||
| − | |||
| − | | style="text-align: center;"|Pattern | ||
| − | |[[ | ||
| − | |||
| − | |||
| − | |||
| − | |||
| style="text-align: center;"|{{Template:LineAhead}} | | style="text-align: center;"|{{Template:LineAhead}} | ||
|} | |} | ||
| − | |||
| − | |||
| − | |||
| − | |||
| − | |||
| − | |||
| − | |||
| − | |||
| − | |||
| − | |||
| − | |||
| − | |||
| − | |||
| − | |||
| − | |||
| − | |||
| − | |||
| − | |||
| − | |||
| − | |||
| − | |||
| − | |||
| − | |||
| − | |||
| − | |||
| − | |||
| − | |||
| − | |||
| − | |||
| − | |||
| − | |||
| − | |||
| − | |||
| − | |||
| − | |||
| − | |||
| − | |||
| − | |||
| − | |||
| − | |||
| − | |||
| − | |||
| − | |||
| − | |||
| − | |||
| − | |||
| − | |||
| − | |||
| − | |||
| − | |||
| − | |||
| − | |||
| − | |||
| − | |||
| − | |||
| − | |||
| − | |||
| − | |||
| − | |||
| − | |||
| − | |||
| − | |||
| − | |||
| − | |||
| − | |||
| − | |||
| − | |||
| − | |||
| − | |||
| − | |||
| − | |||
| − | |||
| − | |||
| − | |||
| − | |||
| − | |||
| − | |||
| − | |||
| − | |||
| − | |||
| − | |||
| − | |||
| − | |||
| − | |||
| − | |||
| − | |||
| − | |||
| − | |||
| − | |||
| − | |||
| − | |||
| − | |||
| − | |||
| − | |||
| − | |||
| − | |||
| − | |||
| − | |||
| − | |||
| − | |||
| − | |||
| − | |||
| − | |||
| − | |||
| − | |||
| − | |||
| − | |||
| − | |||
| − | |||
| − | |||
| − | |||
| − | |||
| − | |||
| − | |||
| − | |||
| − | |||
| − | |||
| − | |||
| − | |||
| − | |||
| − | |||
| − | |||
| − | |||
| − | |||
| − | |||
| − | |||
| − | |||
| − | |||
| − | |||
| − | |||
| − | |||
| − | |||
| − | |||
| − | |||
| − | |||
| − | |||
| − | |||
| − | |||
| − | |||
| − | |||
| − | |||
| − | |||
| − | |||
| − | |||
| − | |||
| − | |||
| − | |||
| − | |||
| − | |||
| − | |||
| − | |||
| − | |||
| − | |||
| − | |||
| − | |||
| − | |||
| − | |||
| − | |||
| − | |||
| − | |||
| − | |||
| − | |||
| − | |||
| − | |||
| − | |||
| − | |||
| − | |||
| − | |||
| − | |||
| − | |||
| − | |||
| − | |||
| − | |||
| − | |||
| − | |||
| − | |||
| − | |||
| − | |||
| − | |||
| − | |||
| − | |||
| − | |||
| − | |||
| − | |||
| − | |||
| − | |||
| − | |||
| − | |||
| − | |||
| − | |||
| − | |||
| − | |||
| − | |||
| − | |||
| − | |||
| − | |||
| − | |||
| − | |||
| − | |||
| − | |||
| − | |||
| − | |||
| − | |||
| − | |||
| − | |||
| − | |||
| − | |||
| − | |||
| − | |||
| − | |||
| − | |||
| − | |||
| − | |||
| − | |||
| − | |||
| − | |||
| − | |||
| − | |||
| − | |||
| − | |||
| − | |||
| − | |||
| − | |||
| − | |||
| − | |||
| − | |||
| − | |||
| − | |||
| − | |||
| − | |||
| − | |||
| − | |||
| − | |||
| − | |||
| − | |||
| − | |||
| − | |||
| − | |||
| − | |||
| − | |||
| − | |||
| − | |||
| − | |||
| − | |||
| − | |||
| − | |||
| − | |||
| − | |||
| − | |||
| − | |||
| − | |||
| − | |||
| − | |||
| − | |||
| − | |||
| − | |||
| − | |||
| − | |||
| − | |||
| − | |||
| − | |||
| − | |||
| − | |||
| − | |||
| − | |||
| − | |||
| − | |||
| − | |||
| − | |||
| − | |||
| − | |||
| − | |||
| − | |||
| − | |||
| − | |||
| − | |||
| − | |||
| − | |||
| − | |||
| − | |||
| − | |||
| − | |||
| − | |||
| − | |||
| − | |||
| − | |||
| − | |||
| − | |||
| − | |||
| − | |||
| − | |||
| − | |||
| − | |||
| − | |||
| − | |||
| − | |||
| − | |||
| − | |||
| − | |||
| − | |||
| − | |||
| − | |||
| − | |||
| − | |||
| − | |||
| − | |||
| − | |||
| − | |||
| − | |||
| − | |||
| − | |||
| − | |||
| − | |||
| − | |||
| − | |||
| − | |||
| − | |||
| − | |||
| − | |||
| − | |||
| − | |||
| − | |||
| − | |||
| − | |||
| − | |||
| − | |||
| − | |||
| − | |||
| − | |||
| − | |||
| − | |||
| − | |||
| − | |||
| − | |||
| − | |||
| − | |||
| − | |||
| − | |||
| − | |||
| − | |||
| − | |||
| − | |||
| − | |||
| − | |||
| − | |||
| − | |||
| − | |||
| − | |||
| − | |||
| − | |||
| − | |||
| − | |||
| − | |||
| − | |||
| − | |||
| − | |||
| − | |||
| − | |||
| − | |||
| − | |||
| − | |||
| − | |||
| − | |||
| − | |||
| − | |||
| − | |||
| − | |||
| − | |||
| − | |||
| − | |||
| − | |||
| − | |||
| − | |||
| − | |||
| − | |||
| − | |||
| − | |||
| − | |||
| − | |||
| − | |||
| − | |||
| − | |||
| − | |||
| − | |||
| − | |||
| − | |||
| − | |||
| − | |||
| − | |||
| − | |||
| − | |||
| − | |||
| − | |||
| − | |||
| − | |||
| − | |||
| − | |||
| − | |||
| − | |||
| − | |||
| − | |||
| − | |||
| − | |||
| − | |||
| − | |||
| − | |||
| − | |||
| − | |||
| − | |||
| − | |||
| − | |||
| − | |||
| − | |||
| − | |||
| − | |||
| − | |||
| − | |||
| − | |||
| − | |||
| − | |||
| − | |||
| − | |||
| − | |||
| − | |||
| − | |||
| − | |||
| − | |||
| − | |||
| − | |||
| − | |||
| − | |||
| − | |||
| − | |||
| − | |||
| − | |||
| − | |||
| − | |||
| − | |||
| − | |||
| − | |||
| − | |||
| − | |||
| − | |||
| − | |||
| − | |||
| − | |||
| − | |||
| − | |||
| − | |||
| − | |||
| − | |||
| − | |||
| − | |||
| − | |||
| − | |||
| − | |||
| − | |||
| − | |||
| − | |||
| − | |||
| − | |||
| − | |||
| − | |||
| − | |||
| − | |||
| − | |||
| − | |||
| − | |||
| − | |||
| − | |||
| − | |||
| − | |||
| − | |||
| − | |||
| − | |||
| − | |||
| − | |||
| − | |||
| − | |||
| − | |||
| − | |||
| − | |||
| − | |||
| − | |||
| − | |||
| − | |||
| − | |||
| − | |||
| − | |||
| − | |||
| − | |||
| − | |||
| − | |||
| − | |||
| − | |||
| − | |||
| − | |||
| − | |||
| − | |||
| − | |||
| − | |||
| − | |||
| − | |||
| − | |||
| − | |||
| − | |||
| − | |||
| − | |||
| − | |||
| − | |||
| − | |||
| − | |||
| − | |||
| − | |||
| − | |||
| − | |||
| − | |||
| − | |||
| − | |||
| − | |||
| − | |||
| − | |||
| − | |||
| − | |||
| − | |||
| − | |||
| − | |||
| − | |||
| − | |||
| − | |||
| − | |||
| − | |||
| − | |||
| − | |||
Revision as of 02:37, 19 December 2013
Welcome to the Kancolle Wiki sandbox!
This page exists so that you can practice editing or formatting (see Help:Editing) without changing any serious content. Feel free to try wiki editing out here first.
Wiki allows for rather complicated formatting. It can look overwhelming when you begin, but don't let it worry you. Just start with the basics... enter some text, and learn the other pieces as you go. Your content contributions are welcome and important. The wiki is a collaborative effort and others can help with formatting and other improvements.
Best wishes!
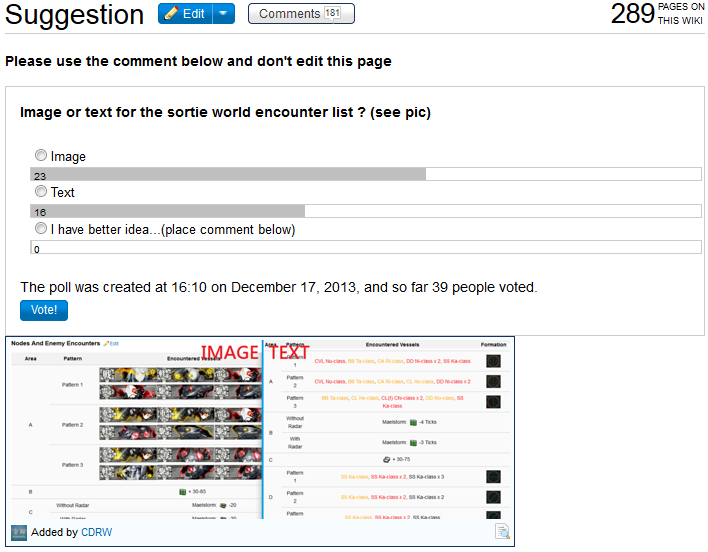
Mobile hide test
- This image should be hidden in mobile version

Text table
| Area | Pattern | Encountered vessels | Formation |
|---|---|---|---|
| A 敵偵察艦 |
Pattern 1 | DD I-class | N/A |
| Pattern 2 | DD Ro-class | N/A | |
| Pattern 3 | DD Ha-class | N/A | |
| B 敵はぐれ艦隊 |
Pattern 1 |
DD I-class x2 |
N/A |
| Pattern 2 | DD Ro-class, DD I-class | N/A | |
| Pattern 3 | DD Ha-class x2 | N/A | |
| C 敵主力艦隊 |
Pattern 1 | CL Ho-class, DD I-class x2 | N/A |
| Pattern 2 | CL Ho-class, DD Ro-class x2 | N/A | |
| Pattern 3 | CL Ho-class, DD Ha-class x2 | N/A | |
| Pattern 4 | CL Ho-class, DD Ro-class x2, DD Ha-class |