- Welcome to the Kancolle Wiki!
- If you have any questions regarding site content, account registration, etc., please visit the KanColle Wiki Discord
Difference between revisions of "Fall 2013 Event"
Jump to navigation
Jump to search
>Lycanous |
|||
| Line 125: | Line 125: | ||
====Branching rules==== | ====Branching rules==== | ||
*B <math>\longrightarrow</math> D if your fleet has only high-speed ship (no Nagato-class, Fusou-class, etc) with 2 Kongou-class ships | *B <math>\longrightarrow</math> D if your fleet has only high-speed ship (no Nagato-class, Fusou-class, etc) with 2 Kongou-class ships | ||
| − | |||
*B <math>\longrightarrow</math> E if your fleet is without 2 Kongou-class ships. | *B <math>\longrightarrow</math> E if your fleet is without 2 Kongou-class ships. | ||
*A <math>\longrightarrow</math> B If your fleet is either full high-speed or low-speed. | *A <math>\longrightarrow</math> B If your fleet is either full high-speed or low-speed. | ||
*A <math>\longrightarrow</math> C If your fleet is mixed. | *A <math>\longrightarrow</math> C If your fleet is mixed. | ||
{{clear}} | {{clear}} | ||
| + | |||
===Tips=== | ===Tips=== | ||
*Equip one of your ships with any type of Radar to lessen the effect of whirlpool at H. | *Equip one of your ships with any type of Radar to lessen the effect of whirlpool at H. | ||
Revision as of 11:45, 17 November 2013
The Fall 2013 event started on November 1st and will last until November 27th 09:00 JST. Please put useful information, such as drops and walkthrough from the official twitter as well as other sources.
Official Twitter

Information from the official Twitter so far.
- Event Name 【決戦!鉄底海峡を抜けて!】
- There will be an event with special maps and shipdaughter rewards for completion.
- Five new ships (SS I-19, SS I-8, CL Agano, CL Noshiro, and BB Musashi) will be added to the game.
- Kongou will receive a second remodeling at level 75. It buffs her stats a little with a new art. However, it increases her fuel consumption to be just a little higher than Nagato.
- Some event maps will have a day time battle after the night battle or night battle only. So be ware of enemy torpedo ships and plan your fleet accordingly.
- Event lasts 20 days from Nov 1st, extended until 11/27.
- Requires at least 75% sortie win ratio to participate.
- At least 5 free ship slots for new girls to join your fleet before sortie.
- At least 20 free equipment slots before sortie.
- New Expeditions and Quests.
- New equipment, Ju87C Kai. Obtainable from the second new submarine expedition quest (第二次潜水艦派遣作戦).
- Type 3 sonar and depth charge effectiveness will be increased.
Map details
Before you embark on E-2 and beyond, please remember that Compass and RNG are NOT on your side. So, keep frosty and don't let frustration overcome you. Too many admirals have sunk their ships or run of resources. Rest, calm down, and plan properly if needed. Don't be one of them.
E-1 - サーモン諸島海域 (Solomon Islands)

E-1

- Focused on day battle
- Boss health does not regenerate
- Friendly for newer admirals
- Difficulty will be around that of World 2
- Rewards I-19 upon clearing
Tips
- Have at least 1 DD or 1 CL (e.g Isuzu Kai 2) fully equipped with depth charges and sonars. Node B consists of 1-3 submarines only.
- Node B has submarines while node C has light aircraft carriers. Plan accordingly.
- Recommended formation: line abreast on node B and line ahead on all other nodes.
E-2 - ルンバ沖海域 (Lunga Point)

E-2

- Focused on night battle (start battle at night)
- Boss health does not regenerate
- Friendly for newer admirals
- Rewards CL Noshiro upon clearing
- Day battle condition for node J and K (dead end and boss): enemy elite DD survived
- Do not get frustrated when you fail to sink the boss continuously. The health does not regenerate.
Branching rules
- B [math]\displaystyle{ \longrightarrow }[/math] E if you have 3+ BB
Tips
- Bring your entire fleet sparkling.
- Use a fleet of DD/CL/CLT/CA and equip them so that they can trigger double-attack. Many players find Double-attack more useful than cut-ins because it almost always guarantees a critical which one-hits most ships, including the boss. See combat on double-attack and cut-ins requirement.
- If you want to conserve resources, use a SS as your flagship and and equip her with 2 turbines. However, reaching the boss is difficult because enemy CL have depth charge/sonar equipped.
- Recommended Formation: line abreast on non-boss nodes and line ahead on boss node. line abreast on boss node can be useful if your ships have barely taken damage and want to reduce the likelihood of destroying the two elite DD.
- Recommended Equipment: Sets of equipment which trigger double-attack with radar/turbine on the remaining slot(s).
- If you end up at E, the ASW formation is ideal for handling the subs waiting there.
E-3 - サンタクロース諸島海域 (Santa Cruz Islands)

E-3

- Focused on day battle
- Boss health regenerates at a rate of 1.5%/hour and complete boss kill removes 20% of the health bar.
- Boss health will NOT stop regenerating once the bar is fully depleted. It must be killed one more time to win (if you depleted the Boss' health and you did not sink the boss during day, you can try to sink it during night battle and it will clear the stage).
- Only for experienced admirals but new admirals should still try after leveling up and saving up some resource for some time.
- Rewards equipment package (furniture craft item, emergency repair kit, full repair kit, 53cm oxygen torpedo)
Branching rules
- A certain fleet formation is needed in order to reach the boss (or else you'll get sent to node G, H, or I), so far the confirmed ones are:
- 「CVLx1 CVx2 BBx1 CLTx2」
- 「BBVx1 BBx1 CVx2 CLTx2」
- 「BBVx1 BBx1 CVx2 CLTx1 DDx1」
- 「BBVx1 BBx1 CVx2 CAx1 DDx1」
- 「BBVx2 CLTx2 CVx2」
- 「DDx1 BBx1 CLTx2 CVx2」
- Possible alternative branching rules: having at least one CAV or BBV will provide a chance to jump from the north route to the south route, and vice versa. In addition, at node E, any composition with 2 or more non-aviation battleships goes directly to I.[1]
Tips
- Recommended Formation:
- If your fleet has high AA, line abreast on node C (enemy SS) and line ahead on all other nodes.
- If your fleet has low AA, use ring formation on node A, E, G, H, and I because there are CV and CVL. Line ahead for boss node J.
- Recommended Equipment:
- For CV/CVL: air superiority fighter (green) planes for AA. Dive bomber (red) planes are better than torpedo bomber (blue) planes because it deal more damage against BB and CV. A recon (yellow) plane is enough in your fleet, but not really necessary.
E-4 - アイアンボトムサウンド (Ironbottom Sound)

E-4

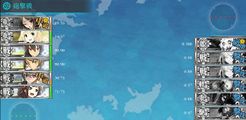
E-4 day battle clear
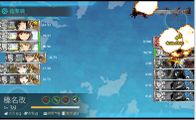
E-4 day battle clear
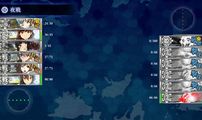
E-4 night battle clear

.jpg)
.jpg)
- Focused on night battle (start battle at night)
- Boss health regenerates at a rate of 2.1%/hour and complete boss kill removes 17.2% of the health bar.
- Boss health bar will keep regenerating even when the bar has been fully depleted.
- Only for experienced admirals
- Need a flagship sink to clear
- Theme: Night battles and airfield bombardment
- Night battle and the following day battle is considered as ONE battle. So, don't worry if you have heavily damaged ships at night.
- Day battle won't occur if both the second and third ship in the enemy fleet are sunk.
- Type 3 ammo deals bonus damage against Airport Boss (Historical reference to Henderson Airfield). You WILL need it, as most player typically went with four type 3 ammo for the boss battle.
- Rewards I-8 upon clearing.
Branching rules
- C [math]\displaystyle{ \longrightarrow }[/math] F if you have 2 Kongou-class BBs
- D [math]\displaystyle{ \longrightarrow }[/math] G if you have 3+ BB
Tips
- To increase the chances of your ships surviving with enough health, use line abreast on non-boss nodes and line ahead on boss node.
- Recommended equipment:
- Sets of equipment which trigger double-attack with Type 3 ammo on the remaining slots. If you don't have Type 3 ammo, use turbines/radars to improvise.
- For Ooi/Kitakami, equip midget sub on the last slot (even though torpedoes don't hit the boss) in order to kill other enemies if you trigger day fight.
- For BB, equip each one with 46cm main cannon so they can hit the boss' planes if you trigger day fight.
- If you want to conserve resources or you're running out of resources, a full DD or 4DD 2CLT fleet can be used to deplete the bosses HP to 0. Equip them to trigger double-attack and use line abreast on all nodes and Line Ahead on boss nodes. Note you won't be able to use the shortcut (C -> F) with this fleet setup.
- Stay frosty. The final kill might be hard. Don't take too much risk.
E-5 - サーモン海域最深部 (Ironbottom Sound, Final Stage)
- Unlocked after clearing E-4
- Boss health regenerates at a rate of 2.9%/hour and complete boss kill removes 14.5% of the health bar.
- Boss health bar will keep regenerating even when the bar has been fully depleted.
- Focused on night battle
- Boss fight starts as normal (day + night).
- Need to sink boss to clear map
- Rewards Musashi upon clearing


Branching rules
- B [math]\displaystyle{ \longrightarrow }[/math] D if your fleet has only high-speed ship (no Nagato-class, Fusou-class, etc) with 2 Kongou-class ships
- B [math]\displaystyle{ \longrightarrow }[/math] E if your fleet is without 2 Kongou-class ships.
- A [math]\displaystyle{ \longrightarrow }[/math] B If your fleet is either full high-speed or low-speed.
- A [math]\displaystyle{ \longrightarrow }[/math] C If your fleet is mixed.
Tips
- Equip one of your ships with any type of Radar to lessen the effect of whirlpool at H.
More information
- Obligatory day battle advance after night battle (counted as one battle and only happen when certain conditions are met)
- Support fleet available for day battle (expedition 109,110)
- Yuugumo-class DD, Maikaze and Hatsukaze are possible to be dropped from boss node of earlier part of event map
- Suzuya, Kumano, Shoukaku, and Zuikaku are possible to be dropped from boss node of later part of event map
- Nagato, Zuihou, and Mikuma are possible to be dropped from boss node of event map (very small chance)
- Agano drops from E-3, E-4 and E-5 boss nodes. finish the boss battle with S rank for the highest chance.