- Welcome to the Kancolle Wiki!
- If you have any questions regarding site content, account registration, etc., please visit the KanColle Wiki Discord
Difference between revisions of "Tutorial:Leveling"
>Ninthsense (Added 2-4 Guide) |
>Ninthsense |
||
| Line 53: | Line 53: | ||
<div class="mw-collapsible mw-collapsed" style="width:100%"> | <div class="mw-collapsible mw-collapsed" style="width:100%"> | ||
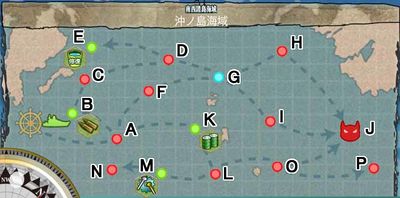
[[World 2#World_2-4:_.E6.B2.96.E3.83.8E.E5.B3.B6.E6.B5.B7.E5.9F.9F_Okinoshima_Island|'''2-4A''']]: [Base XP: '''300''', Node(s): '''1'''] | [[World 2#World_2-4:_.E6.B2.96.E3.83.8E.E5.B3.B6.E6.B5.B7.E5.9F.9F_Okinoshima_Island|'''2-4A''']]: [Base XP: '''300''', Node(s): '''1'''] | ||
| + | <div class="mw-collapsible-content"> | ||
[[File:2-4 Map.jpg|thumb|400x400px]] | [[File:2-4 Map.jpg|thumb|400x400px]] | ||
<u>Overview</u>: A map that's not too difficult for low level admirals who have the right vessels. This map is generally for leveling ships that are armor and firepower heavy. Eg CA(V), BB(V), CV(L). The node offers a decent amount of exp at the cost of morale so be aware of that. Not as effective as 3-2 so use it as a leveling spot with the goal of clearing 2-4 to advance to 3-2. | <u>Overview</u>: A map that's not too difficult for low level admirals who have the right vessels. This map is generally for leveling ships that are armor and firepower heavy. Eg CA(V), BB(V), CV(L). The node offers a decent amount of exp at the cost of morale so be aware of that. Not as effective as 3-2 so use it as a leveling spot with the goal of clearing 2-4 to advance to 3-2. | ||
| Line 65: | Line 66: | ||
* Enemy fleet does not have any air power, so there is no need for fighter (green) planes: Use torpedo (blue) and dive (red) bombers instead. | * Enemy fleet does not have any air power, so there is no need for fighter (green) planes: Use torpedo (blue) and dive (red) bombers instead. | ||
* Never go past the 2nd node. 3rd node will have enemy carriers and battleships and is unsuitable for farming. | * Never go past the 2nd node. 3rd node will have enemy carriers and battleships and is unsuitable for farming. | ||
| − | |||
<u>Notes</u>: The nodes after the first are progressively more difficult. You can try them out to get a feeling for the difficulty. Take your time to let your ships recover from fatigue. | <u>Notes</u>: The nodes after the first are progressively more difficult. You can try them out to get a feeling for the difficulty. Take your time to let your ships recover from fatigue. | ||
</div> | </div> | ||
| Line 315: | Line 315: | ||
* For more experienced Admirals that do not need ships drops, leveling speed can also be increased by sortieing with maxed out ship slots so that you do not waste time getting new ships. | * For more experienced Admirals that do not need ships drops, leveling speed can also be increased by sortieing with maxed out ship slots so that you do not waste time getting new ships. | ||
* Using spare level 1 ship drops can help reduce the cost of sorties. This is usually used with the objective of focusing XP on a single ship as it takes other slots away from being able to gain XP. When the ship is heavily damaged or runs out of supplies (fuel/ammo), they can be used as modernization fodder or scrapped. <u>Examples:</u> | * Using spare level 1 ship drops can help reduce the cost of sorties. This is usually used with the objective of focusing XP on a single ship as it takes other slots away from being able to gain XP. When the ship is heavily damaged or runs out of supplies (fuel/ammo), they can be used as modernization fodder or scrapped. <u>Examples:</u> | ||
| − | + | ** Spare BB can be used (e.g Map 3-2A) to grant double shelling without having to resupply them. | |
| − | ** Spare BB can be used (e.g Map 3-2A) to grant double shelling without having to resupply them. | + | ** BB/CV + spare ships can be used in 2-4 |
| − | ** BB/CV + spare ships can be used in 2-4 | ||
==Other notes and tricks== | ==Other notes and tricks== | ||
| Line 328: | Line 327: | ||
===XP Mechanics=== | ===XP Mechanics=== | ||
| − | *Flagship gives 50% extra | + | *Flagship gives 50% extra XP. |
| − | *MVP gives double | + | *MVP gives double XP. Can be combined with Flagship bonus for total of 3x bonus. |
*MVP is awarded to the ship that does the most total damage with ties going to ship in highest slot. | *MVP is awarded to the ship that does the most total damage with ties going to ship in highest slot. | ||
| − | * S rank gives 20% extra xp; C/D- ranks have | + | * S rank gives 20% extra xp; C/D- ranks have XP penalty |
*Placing a ship at flagship and achieving MVP grants the most XP. This is useful for quickly leveling up a single ship or focusing XP on more resource expensive ships to reduce the resource costs of leveling it up. | *Placing a ship at flagship and achieving MVP grants the most XP. This is useful for quickly leveling up a single ship or focusing XP on more resource expensive ships to reduce the resource costs of leveling it up. | ||
| Line 349: | Line 348: | ||
*HQ XP increases the most when you achieve victory at a boss node. | *HQ XP increases the most when you achieve victory at a boss node. | ||
* Earlier on, It can help to try to reduce HQ XP gain as certain maps like event maps can get more difficult at certain HQ tiers. | * Earlier on, It can help to try to reduce HQ XP gain as certain maps like event maps can get more difficult at certain HQ tiers. | ||
| − | * More details on the topic can be found on the [[Experience and Rank]] | + | * More details on the topic can be found on the [[Experience and Rank|Experience and Rankings]] page. |
| + | |||
| + | ==== Artillery Spotting ==== | ||
| + | * Artillery spotting helps increase the chances of doing damage and the amount of damage done. | ||
| + | * Achieve air superiority an air phase to utilize it. | ||
| + | * Double attack, Mixed and Cut-in will vary damage outputs. | ||
| + | * Typically put Double attack (with Radar) or Mixed (AP) on the ship you want to MVP. | ||
| + | * Cut-in setup can be good for supporting ships as it helps boost accuracy and damage slightly but does not have chance for high amounts of damage like the other modes. | ||
| + | ==== Carrier Equipment Configuration ==== | ||
| + | * Torpedo bombers tend to do more damage on average. Dive bombers have more consistent damage. | ||
| + | * Both contribute similar amounts to shelling damage (Dive bomb stat adds +2 firepower and Torpedo stat adds 1.5 firepower). | ||
| + | * You can place torpedo bombers on a carrier you want to MVP, and weaker or less bombers on other carriers. | ||
| + | * A Saiun on any carrier avoids getting T crossed (both sides do much less damage). It is often useful to help you achieve consistent results. | ||
===Formation=== | ===Formation=== | ||
| − | * [[Combat#Formation_Modifiers|Formations]] can help you achieve the best results. Double line reduces firepower but can help if you are having issues with accuracy. | + | * [[Combat#Formation_Modifiers|Formations]] can help you achieve the best results. Double line reduces firepower but can help if you are having issues with accuracy (Carriers tend to be less accurate in shelling). |
* Formations can also be used to help influence damage and be used to help certain ships be more likely to achieve MVP. | * Formations can also be used to help influence damage and be used to help certain ships be more likely to achieve MVP. | ||
Revision as of 22:08, 1 January 2015
| This article is missing some information. You can help by adopting it and adding the missing information. |
| This article is open for adoption. |
This is a guide to leveling your ship girls effectively through sorties. Experience (XP) increases the level of ships, which leads to increases stats of Evasion, LOS, and ASW, as well as passive accuracy increases. Leveling ships can also unlock remodels at higher levels.
Suggested places to level:
- 1-5: [Base XP: 150, Node(s): 3] Lower level Admirals who haven't cleared 2-4 yet. Good place to level DD/CL early on.
- 2-4A: [Base XP: 300, Node(s): 1] Typically used for admirals that have not cleared 2-4 yet.
- 3-2A: [Base XP: 320, Node(s): 1] Often the default place to level. Features decent xp gain and very easy enemies. Is very versatile and can be used to level all types of ships. A good goal for newer admirals is to clear 2-4 to unlock the path to 3-2 for easy leveling and preparations for events and following maps.
- 4-1: [Base XP: 310, Node(s): 1~2]
- 4-3: [Base XP: 330, Node(s): 3] A more challenging place to level. The main focus is to level a specific ship with ASW capabilities (DD, CL) at a fast pace by placing as flagship and achieving MVP.
- 5-2: [Base XP: 380, Node(s): 3~4]
- 5-3: [Base XP: 400, Node(s): 1] For submarines. Will increase sortie losses.
- 5-4A: [Base XP: 420, Node(s): 1] A good way to level up the expensive Yamato class. 2 CV/L goes to easier node and SS can be used to tank most of enemy fire.
- 5-4: [Base XP: 420, Node(s): 3] A relatively easy map in comparison to base XP. Can be cleared for both HQ xp and Ship xp.
For editors: Place data in following collapsable form first and we can add to tabbed form later.
Place in table later after more complete:
Overview:
A relatively easy map.
Suggested Composition: 4+ DD/CL (Other classes can be included as well)
Equipment: Focus on ASW equipment such as sonars and depth charges as you will only face SS.
Guide:
- The first three nodes are relatively easy and it is recommended that you end after 3 nodes. Use formation Line Abreast.
- 4 or less ships will head to C; more than that will head to D.
- The boss node can be reached if you use a composition of 4 ships composing of: 1 CVL or AV, 2 or less CL, DD. A BBV can also be added for an additional shelling phase)
Tips:
- All the non dead end nodes are composed of SS.
- F and G are dead end nodes that have strong enemy ships.
- Use the formation Line Abreast as this is the strongest ASW formation. (Requires a minimum of 4 ships)
- Third node has the possibility to drop SS with S rank.
- Going to boss node allows more chances to drop SS. However this also gives a lot of HQ xp, which can make it difficult later as events often increase in difficulty.
Pros: Easy, and simple to unlock Cons: Low Base XP
Notes: Increases in difficulty at HQ levels 40 and 80 with higher chance to get SS as drop. Map overview. First node switches to Elite SS after level 80 which makes the map more difficult after that point.General Tips
- Maps have a base XP, which is typically the same for all nodes. Higher base XP maps can be faster leveling and/or more resource efficient.
- Leveling speed, cycling ships
- Resource cost: Submarines, Destroyers and Light Cruisers have relatively low consumption.
- Modernization: Improves the primary four stats of your ships. AA tends to be difficult to modernize but also the least effective for farming xp. Firepower and shields can help the most. Stats gained during modernization are lost upon remodel, so typically modernization is used after the first remodel.
- For more experienced Admirals that do not need ships drops, leveling speed can also be increased by sortieing with maxed out ship slots so that you do not waste time getting new ships.
- Using spare level 1 ship drops can help reduce the cost of sorties. This is usually used with the objective of focusing XP on a single ship as it takes other slots away from being able to gain XP. When the ship is heavily damaged or runs out of supplies (fuel/ammo), they can be used as modernization fodder or scrapped. Examples:
- Spare BB can be used (e.g Map 3-2A) to grant double shelling without having to resupply them.
- BB/CV + spare ships can be used in 2-4
Other notes and tricks
Submarines as tanks
Submarines draw fire from all ships that can target it (DD, CL) This helps to prevent damage to other ships and lowers your repair costs as submarines have very low repair costs. Early on, submarines can be obtained through construction or on the map 1-5. They have low sortie costs.
Sinking
Avoid sinking ships by ending sorties if a ship is heavily damaged. Do not deploy ships that are heavily damaged. Ships entering a new node at Medium damage will not sink, having flagship heavily damaged during sortie will force your fleet return to base and needs immediate repair/change to continue.
XP Mechanics
- Flagship gives 50% extra XP.
- MVP gives double XP. Can be combined with Flagship bonus for total of 3x bonus.
- MVP is awarded to the ship that does the most total damage with ties going to ship in highest slot.
- S rank gives 20% extra xp; C/D- ranks have XP penalty
- Placing a ship at flagship and achieving MVP grants the most XP. This is useful for quickly leveling up a single ship or focusing XP on more resource expensive ships to reduce the resource costs of leveling it up.
- Night battle can increase rank and resulting XP. This is recommended for losing ranks (C-) but not for winning ranks (B+). Night battles increase fatigue and cost 1 bar of ammo. An exception can be when you want to give your flagship another chance to get MVP.
Morale considerations
Morale affects ship performance like accuracy and evasion which can affect rank and help influence MVP -CVL premptive strike is not influenced by morale
Difference between HQ XP and Ship XP
- HQ XP and ship XP are different things.
- HQ XP increases the most when you achieve victory at a boss node.
- Earlier on, It can help to try to reduce HQ XP gain as certain maps like event maps can get more difficult at certain HQ tiers.
- More details on the topic can be found on the Experience and Rankings page.
Artillery Spotting
- Artillery spotting helps increase the chances of doing damage and the amount of damage done.
- Achieve air superiority an air phase to utilize it.
- Double attack, Mixed and Cut-in will vary damage outputs.
- Typically put Double attack (with Radar) or Mixed (AP) on the ship you want to MVP.
- Cut-in setup can be good for supporting ships as it helps boost accuracy and damage slightly but does not have chance for high amounts of damage like the other modes.
Carrier Equipment Configuration
- Torpedo bombers tend to do more damage on average. Dive bombers have more consistent damage.
- Both contribute similar amounts to shelling damage (Dive bomb stat adds +2 firepower and Torpedo stat adds 1.5 firepower).
- You can place torpedo bombers on a carrier you want to MVP, and weaker or less bombers on other carriers.
- A Saiun on any carrier avoids getting T crossed (both sides do much less damage). It is often useful to help you achieve consistent results.
Formation
- Formations can help you achieve the best results. Double line reduces firepower but can help if you are having issues with accuracy (Carriers tend to be less accurate in shelling).
- Formations can also be used to help influence damage and be used to help certain ships be more likely to achieve MVP.
Range
Range determines which ships attack first. This can be influenced by the range of equipment such as SCAMP and secondary guns. Increasing the range can help influence which ships have a better chance of MVP.
Sortie for loss
- For a non-critically damaged ship close to level, it is possible to solo a node at 5-5 for D rank of 945 XP and also unlocks damaged art if not already unlocked.
- 5-3 can be used for low level SS (80% to SS node for quick D rank XP)
- This will reduce your sortie win ratio, which can effect your event participation eligibility. (Try to maintain ~85% win rate to be safe)
Links to other Guides
- (Japanese) http://kankoreshuukai.blog.jp/archives/1410107.html
- http://kancolle.wikia.com/wiki/User_blog:Ofi123/Powerleveling_kanmusus
Other ways to level
- PvP - can give high amounts of XP with no need to repair and low HQ xp gained.
- Only refreshes twice a day for a maximum of 10 opponents per day.
- Targeted admiral might change his fleet composition while you are initiating attack.
- Different ship types may appear with various base XP gain depending on battle rank achievement and total level of 2 first ships on your opponent fleet.
- Expeditions - Can be a source of xp for lower level ships.
- Expeditions 22, 23 focus on xp instead of resources, but these specific expeditions are not recommended in general as they are very slow and resource inefficient as well as taking away the use of a fleet in gathering resources.
- Sparkling can help achieve Great Sucess, which doubles the XP gain
- It can be useful to combine leveling with sparkling to help increase your resources.


