- Welcome to the Kancolle Wiki!
- If you have any questions regarding site content, account registration, etc., please visit the KanColle Wiki Discord
Difference between revisions of "User:Minhfongboy/KC Phase 2 Ranking"
Minhfongboy (talk | contribs) |
Minhfongboy (talk | contribs) m |
||
| Line 1: | Line 1: | ||
| − | <font color = "red">''' | + | <font color = "red">'''VERSION 2.0.1'''</font> - Last updated: '''Aug 18 2022''' |
| − | |||
| − | |||
| − | |||
==General== | ==General== | ||
[[File:MFB_Ranking_Meme.png|thumb|center]] | [[File:MFB_Ranking_Meme.png|thumb|center]] | ||
| − | Looking for a ranking way that is resource-efficient, bucket-efficient, time-efficient, or bauxite-friendly? I guess this blog can help you. | + | Looking for a ranking way that is resource-efficient, bucket-efficient, time-efficient, or bauxite-friendly? I guess this blog can help you.<br/> |
| − | <br/> | ||
| − | |||
| − | |||
| − | |||
| − | |||
{| class = "wikitable" style="text-align: center;" | {| class = "wikitable" style="text-align: center;" | ||
| Line 26: | Line 18: | ||
|} | |} | ||
| − | == | + | ==Efficiency Summary== |
| + | '''<u>Bucket usage scale:</u>''' | ||
| + | *'''Low''': '''Nearly not using buckets in 10-20 runs ''' | ||
| + | *<font color="blue">'''Average: Using buckets in 3-5 runs</font>''' | ||
| + | *<font color="red">'''High: Using buckets in every run (High chance)</font>''' | ||
| + | <br/><br/> | ||
| + | {| class = "wikitable" style="text-align: center;" | ||
| + | !Map | ||
| + | !Rpt gain / hour | ||
| + | |- | ||
| + | |6-3 | ||
| + | |<font color="red">'''26.16'''</font> | ||
| + | |- | ||
| + | |3-2 | ||
| + | |<font color="blue">'''26'''</font> | ||
| + | |- | ||
| + | |4-4 | ||
| + | |<font color="blue">'''24'''</font> | ||
| + | |- | ||
| + | |7-1 | ||
| + | |'''22.05''' | ||
| + | |- | ||
| + | |7-3 | ||
| + | |'''20.16''' | ||
| + | |} | ||
| + | {| class = "wikitable" style="text-align: center;" | ||
| + | !Map | ||
| + | !Bucket usage & resource consumption | ||
| + | |- | ||
| + | |6-3 | ||
| + | |<font color="red">'''High'''</font>, but very cheap resource consumption otherwise | ||
| + | |- | ||
| + | |3-2 | ||
| + | |<font color="blue">'''Average'''</font> - <font color ="red">'''High'''</font>, cheap resource consumption otherwise | ||
| + | |- | ||
| + | |7-3 | ||
| + | |<font color="blue">'''Average'''</font> - <font color ="red">'''High'''</font>, depends on comp, between 7-2 & 4-4 usage | ||
| + | |- | ||
| + | |4-4 | ||
| + | |<font color="blue">'''Average'''</font>, resource cost is cheaper than 7-2 a bit, saving more ammo, also bauxite-saving like 7-2 (Assuming you do the trick) | ||
| + | |- | ||
| + | |7-1 | ||
| + | |'''Low''' - <font color ="blue">'''Average'''</font>, very cheap consumption otherwise | ||
| + | |} | ||
| + | |||
| + | ==Ranking Map== | ||
===Map 7-1: Brunei Anchorage=== | ===Map 7-1: Brunei Anchorage=== | ||
<div class="mw-collapsible mw-collapsed" style="width:100%"> | <div class="mw-collapsible mw-collapsed" style="width:100%"> | ||
| Line 97: | Line 134: | ||
**If going through maelstrom node G : '''70 fuel 60 ammo''' (1 Radar), '''55 fuel 60 ammo''' (6 Radars) | **If going through maelstrom node G : '''70 fuel 60 ammo''' (1 Radar), '''55 fuel 60 ammo''' (6 Radars) | ||
**'''Conclusion: cheap = 7-1, but may sacrifice a bit of more fuel if you hit node G too often''' | **'''Conclusion: cheap = 7-1, but may sacrifice a bit of more fuel if you hit node G too often''' | ||
| − | |||
| − | |||
| − | |||
| − | |||
| − | |||
| − | |||
| − | |||
| − | |||
| − | |||
| − | |||
| − | |||
| − | |||
| − | |||
| − | |||
| − | |||
| − | |||
| − | |||
| − | |||
| − | |||
| − | |||
| − | |||
| − | |||
| − | |||
| − | |||
| − | |||
| − | |||
| − | |||
| − | |||
| − | |||
| − | |||
| − | |||
| − | |||
| − | |||
| − | |||
| − | |||
| − | |||
| − | |||
| − | |||
| − | |||
| − | |||
| − | |||
| − | |||
| − | |||
| − | |||
| − | |||
| − | |||
| − | |||
| − | |||
| − | |||
| − | |||
<br/> | <br/> | ||
---- | ---- | ||
| Line 227: | Line 214: | ||
<br/> | <br/> | ||
| − | |||
| − | |||
| − | |||
| − | |||
| − | |||
| − | |||
| − | |||
| − | |||
| − | |||
| − | |||
| − | |||
| − | |||
| − | |||
| − | |||
| − | |||
| − | |||
| − | |||
| − | |||
| − | |||
| − | |||
| − | |||
| − | |||
| − | |||
| − | |||
| − | |||
| − | |||
| − | |||
| − | |||
| − | |||
| − | |||
| − | |||
| − | |||
| − | |||
| − | |||
| − | |||
| − | |||
| − | |||
| − | |||
| − | |||
---- | ---- | ||
</div></div> | </div></div> | ||
| Line 298: | Line 246: | ||
---- | ---- | ||
</div></div> | </div></div> | ||
| − | |||
| − | |||
| − | |||
| − | |||
| − | |||
| − | |||
| − | |||
| − | |||
| − | |||
| − | |||
| − | |||
| − | |||
| − | |||
| − | |||
| − | |||
| − | |||
| − | |||
| − | |||
| − | |||
| − | |||
| − | |||
| − | |||
| − | |||
| − | |||
| − | |||
| − | |||
| − | |||
| − | |||
| − | |||
| − | |||
| − | |||
| − | |||
| − | |||
| − | |||
| − | |||
| − | |||
| − | |||
| − | |||
| − | |||
| − | |||
| − | |||
| − | |||
| − | |||
| − | |||
| − | |||
| − | |||
| − | |||
| − | |||
| − | |||
| − | |||
| − | |||
| − | |||
| − | |||
| − | |||
| − | |||
| − | |||
| − | |||
| − | |||
| − | |||
| − | |||
| − | |||
| − | |||
| − | |||
| − | |||
| − | |||
| − | |||
| − | |||
| − | |||
| − | |||
| − | |||
| − | |||
| − | |||
| − | |||
| − | |||
| − | |||
| − | |||
| − | |||
| − | |||
| − | |||
| − | |||
| − | |||
| − | |||
| − | |||
| − | |||
| − | |||
| − | |||
| − | |||
| − | |||
| − | |||
| − | |||
| − | |||
| − | |||
| − | |||
| − | |||
| − | |||
| − | |||
| − | |||
| − | |||
| − | |||
| − | |||
| − | |||
| − | |||
| − | |||
| − | |||
| − | |||
| − | |||
| − | |||
| − | |||
| − | |||
| − | |||
| − | |||
| − | |||
| − | |||
| − | |||
| − | |||
| − | |||
| − | |||
| − | |||
| − | |||
| − | |||
| − | |||
| − | |||
| − | |||
| − | |||
==Managing quarterly sortie quests ranking points== | ==Managing quarterly sortie quests ranking points== | ||
Revision as of 18:45, 18 August 2022
VERSION 2.0.1 - Last updated: Aug 18 2022
General

Looking for a ranking way that is resource-efficient, bucket-efficient, time-efficient, or bauxite-friendly? I guess this blog can help you.
| Server | T500 Record | T100 Record |
|---|---|---|
| Brunei | 4015 | 4577 |
| Hashi | 4755 | 5866 |
Efficiency Summary
Bucket usage scale:
- Low: Nearly not using buckets in 10-20 runs
- Average: Using buckets in 3-5 runs
- High: Using buckets in every run (High chance)
| Map | Rpt gain / hour |
|---|---|
| 6-3 | 26.16 |
| 3-2 | 26 |
| 4-4 | 24 |
| 7-1 | 22.05 |
| 7-3 | 20.16 |
| Map | Bucket usage & resource consumption |
|---|---|
| 6-3 | High, but very cheap resource consumption otherwise |
| 3-2 | Average - High, cheap resource consumption otherwise |
| 7-3 | Average - High, depends on comp, between 7-2 & 4-4 usage |
| 4-4 | Average, resource cost is cheaper than 7-2 a bit, saving more ammo, also bauxite-saving like 7-2 (Assuming you do the trick) |
| 7-1 | Low - Average, very cheap consumption otherwise |
Ranking Map
Map 7-1: Brunei Anchorage
Click expand to show
- Chosen by most people, this is the default map to rank until you are bored of it and feel like trying other maps below.
- This map is also my in-game server btw, Brunei ftw anyone?
- Map 7-1 in general is occupied by enemy submarine with only one surface node on the way that can potentially damage your ships. Therefore, high-level ships are required if you want consistency, in order to deal with enemies in that surface node and evade the closing torpedo in case they launch at your ships.
- Boss node can drop a certain rare DDs such as Arashi
 , Hagikaze
 , Sagiri
Comp

- All submarine nodes should be straightforward, the only problem you will encounter is the surface node G as stated earlier.
- Stacking and improving sonars will help out a lot for this map, not only do they increase torpedo evasion rate when improved, bringing more sonars will also grant a lot of damage, up to the point that even if your ships are Chuuha or Taiha, they will still be able to deal enough damage to blow up the sub.
- 3 Sonar +9 is the best option, or exchange one sonar for depth charge to enable 1.15x ASW damage.
- High-firepower DDs are preferred in order to take out surface enemies faster.
- DD with 69 firepower or more guarantees knocking out DD Ro-Class Late Model and Chuuha CL Ho-Class under parallel, make sure to bring them if you wanna maximize potential hits.
- There are also two tricks to counter node G overtime
- Make use of damecon and damegami. There is a very small chance that the submarine nodes after node G will hurt you. Most of the times, you will just take them out before they get a chance to launch torpedo and hurt your ship (The task is even easier if your ships have a bunch of improved sonars), therefore, even if you get Taiha in node G, you can still advance towards the boss node without consuming damecon at the end (It's still possible, but very unlikely).
- This works best if all the ships you bring have RE punched as you can drop a damecon in the RE slot without occupying any potential equipment slot that gimp your fleet performance.
- Still, avoid advancing after node G if the enemies hit two of your ships down to Taiha, as your total ASW power at that point would cripple and you may increase the chance of the enemy submarine actually hitting your Taiha ships to death should you advance further, keep in mind about this.
- Auto-sparkling on the way to the boss. Generally, the CL you use would be Abukuma Kai Ni
 or Yuubari Kai Ni Toku
 . One DD put as the flagship should always be sparkled after the first node, while that CL will always be sparkled after node G as she has more strikes against enemies than the other DDs. Now, if we can control MVP to land on the other three DDs, they should alway be automatically sparkled overtime on the way to the boss. The best way to do this is trying to nerf ASW damage of the DD flagship a bit, make her have less ASW damage than the other three DDs (But still strong enough to take out enemy Submarine under Red T), i.e : DD Flagship carries Sonar + DC only, while the other 3 DDs carry 2 Sonars + DC, this will give the other 3 DDs higher ASW damage output.
- It goes without saying that the second trick requires you to sortie the fleet at 49 morale.
- Some people don't really wanna risk the use of damecon despite having a very low chance to actually consume it, they simply turn back home if they get Taiha at node G. I suppose that's fine too if you wanna play safe or try to save damecon for the future.
- Make use of damecon and damegami. There is a very small chance that the submarine nodes after node G will hurt you. Most of the times, you will just take them out before they get a chance to launch torpedo and hurt your ship (The task is even easier if your ships have a bunch of improved sonars), therefore, even if you get Taiha in node G, you can still advance towards the boss node without consuming damecon at the end (It's still possible, but very unlikely).
- Formation: Line Ahead at node G, Line Abreast for anywhere else
Efficiency
- Assuming all nodes are scored with S rank, one full run of 7-1 will give 140 x 3 + 1680 = 2100 HQ exp = 1.47 Ranking pt (will be abbreviated as rpt from here on)
- One full run of 7-1 requires at least 4 minutes, ideally, one can do 60 : 4 = 15 runs / hour, which gives 1.47 x 15 = 22.05 rpt / hour
- Bucket usage: Low -> Average
- Resource usage: 50 fuel and 54 ammo when supplying for each 7-1 boss run, fairly cheap
Map 3-2: The Kis Island
Click expand to show
- Remember the good old map 3-2 in phase 1 that was random as hell ? Well.... in phase 2, it's more tolerable, with a certain composition, you now can secure the boss routing, no more random compass !
- But then, pre-boss is still painful. Dodging closing torpedo is amusing as usual, sometimes your ships can miss entirely and take all the closing torpedo from the enemies too which hurts a lot (Gotta love those Late Model DD evasion !)
- On a side note, ranking in 3-2 is considered to be very quick. You gain the same amount of point in 7-1 in just 3 minutes, thus giving you more points in an hour compared to 7-1.
- However, you need to be in late-game stage in order to obtain necessary item and equipment to make 3-2 ranking more consistent (See below).
- Boss node always contains either 1 or 2 enemy transport ships, making this map a great choice to rank while getting 50 transport kills on the way.
- Shimakaze
 has been reported to also drop here. It would be a great option to farm her here in case you need Type 22 Surface Radar
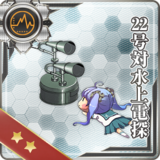
- Shimakaze
- Lastly, the comp said below can make you go either E or G, but will never go to H. Keep in mind that node G is a maelstrom node that wipe out some bar of your remaining fuel, you may wanna bring a bunch of radars to counter the loss.
Comp

- Skipping node H completely which contains enemy Battleship, but requires all members of the fleet to have Fast+ speed. This can be done by giving them one Turbine + one boiler.
- Ideally, you will want to punch RE on all of them, so that they can carry two guns, or one gun one radar for more firepower and accuracy.
- Since you need RE and a lot of turbine and boiler to make it work overtime, this map is totally not for early rankers.
- As you will only fight two battles including boss, this is the faster alternative map to get rpt. But in exchange, it's kinda hard to reach the boss node reliably, as enemies in node C can critically damage your ships with their closing torpedo.
- Also, bucket usage will be increased compared to the other maps. A pretty good chance your ships will take the closing torpedo from the enemies, so you better prepare a lot of buckets before attempting, as you will see it happening a lot.
- A way to reduce the bucket usage is making strong DDs always hit the strong enemies last (Any DDs with around 69 firepower). CLT Chi-Class, CL Ho-Class and He Class are often the ones left alive after shelling finished, who will then proceed to launch torpedo and damage your girls. If your strong DDs alway perform the shelling last, they will have a higher chance of taking those enemies out before the closing torpedo phase, compared to the weaker DDs.
- In order to achieve this, Fletcher gun (5in GFCS) or radars with medium range are required. The idea is like in the image above, just let weaker DDs carry the medium-range radars so they will shell first, the ones without medium-range radars will alway shell last in this case in order to nuke those nasty CLT and CL and shut them up. Ideally you will need 2-3 strong DDs to shell last so only 2-3 medium-range radars are required, which is not much actually.
- Interesting note: Ranking this map is also a good way to damage your bucket if your bucket is nearly capped, or just feel like damaging someone for some reason.
- Morale will be drained very quickly as a side effect, due to only fighting two battles. You may need to rotate the ships a lot if you wanna rank in 3-2 repeatedly.
- Only 1 radar is needed to skip node H, but it seems that if you bring more radars, the higher chance you will go to E instead of G? (Up to 6 radars, it's like 50/50?)
- Formation: Line Ahead at all nodes.
Efficiency
- Assuming all nodes are scored with S rank, one full run of 3-2 will give 120 + 1740 = 1860 HQ exp = 1.3 rpt
- One full run of 3-2 requires at least 3 minutes, ideally, one can do 60 : 3 = 20 runs / hour, which gives 1.3 x 20 = 26 rpt / hour
- Bucket usage: Average -> High (Pretty much that you should only attempt this if you have bucket to spare)
- Resource usage when supplying (Assuming the boss fight ended at day)
- If going through node E: 50 fuel 60 ammo
- If going through maelstrom node G : 70 fuel 60 ammo (1 Radar), 55 fuel 60 ammo (6 Radars)
- Conclusion: cheap = 7-1, but may sacrifice a bit of more fuel if you hit node G too often
Map 4-4: Kasugadama Island
Click expand to show
- 4-4 is pretty much a comfortable map that you can chill out and let your ships gain level here while you go do something else like I don't know, reading a book?
- Well....at least until the boss node where Armored Carrier Princess and BB Ta-class can turn the table and decide to steal some of your bucket whenever they feel like it.
- And... its just much worse if you happened to roll Line Ahead comp at the boss node, oh boy.... Did I mention there are 2 Ta-class at the boss node too? Yeah.... Two.....
- Generally people choose this map to rank instead when they are bored of 7-1 (Or maybe they need a bit faster rpt gain)
- Clearing 4-4 boss counts towards Weekly World 4 Quest
- Boss node sometimes contains a transport ship for you to kill
- Boss node also drops a lot of rare ships such as Nagato
 , Mutsu
 , Shoukaku
 , Zuikaku
 and Taigei
Comp

- Air power: 150+ for AS+
- DD can be replaced with DE for even lower consumption, but may increase the chance of retreating
- As 4-4 doesn't feature a lot of enemy carriers (Even Armored Carrier Princess's planes hardly damage you during airstrike), AACI is not really needed, so you should pack at least 4 OASW to help bypass the submarine node E easier
- Any CVLs works, but I will recommend small-slot CVL like Suzukuma (15/12/12/8). I know you would ask, Isn't that the bigger the slot is, the better the airstrike damage? Well yeah... but you should realize the pre-boss don't really pose as threat much, not until you actually reach the boss node, so you don't need a large amount of plane to begin with (This is not 3-4, in 3-4, you actually need big slots to nuke enemy BB pre-boss during airstrike). It would be better if you try to save bauxite on the way too, and the best way to do this is making use of good old 5-4 trick, putting plane in the slot <= 17.
- Kinda hard to explain with number, but just get the basic idea: If you gain AS+, then during the fighter combat phase, you will not lose any planes as long as the plane in that slot is <= 17. If the slot is 18 or higher, they will start having a chance of getting shotdown during fighter combat. This trick was abused a lot back in 5-4 phase 1 to conserve bauxite and it still works for this new 4-4.
- This means, Suzuya Carrier Kai Ni
 , Kumano Carrier Kai Ni
 and Zuihou Kai Ni B
 are all good candidates as they all have perfect slot size (Not much for Zuihou as her first slot is 18, but only small chance that slot will lose one so don't worry much). Obviously, the bigger slot, like Intrepid's 40 slot, the higher the chance of the plane occupying that slot will get shotdown during fighter combat, thus losing more bauxite.
 - Type 97 Torpedo Bomber (Tomonaga Squadron)
 occupying 17 slot should be able to take out enemy CA Ri-class Flagship most of the times, but unlikely to take out BB Ta-class or Armored Carrier Princess at the boss node, so you might let your ships vulnerable during the boss fight. If you are lucky, your CVL will just take those Ta out and you get away with no damage, otherwise, you need to pay bucket. At least you save bauxite this time though, and the fleet is way cheaper than the 3-4 one in general, so it's a good trade-off
 - Of course, the 17-slot trick only works for fighter combat phase. The fleet AA phase followed after fighter combat is irrelevant, you will still lose plane in this phase (Worse if the enemies are in diamond formation), so better pray the enemies won't suddenly roll high fixed shotdown to knock your plane off.
- Formation: Line Abreast at node E, Line Ahead at the other nodes
Efficiency
- Assuming all nodes are scored with S rank, one full run of 4-4 will give 170 x 3 + 2340 = 2850 HQ exp = 2 rpt
- One full run of 4-4 requires at least 5 minutes, ideally, one can do 60 : 5 = 12 runs / hour, which gives 2 x 12 = 24 rpt / hour
- Bucket usage: Average
- Resource usage: Assuming no night battle needed, it costs 150 fuel and 135 ammo when supplying, more expensive than 7-1, but way cheaper than 3-4.
Map 7-3: Penang
Click expand to show
- For a limited time, 2nd boss node of this map drops a lot of good drops such as DEs (Hirato
 , Fukae
 or event-only ships Pola
 , Gambier Bay
 . Due to this, this map has become a new potential ranking area while farming on the way.
 - While it's possible to rank with Fast+ fleet (meaning no historicals required), it's not entirely recommended due to high bucket usage and handicapped equipment slots that are occupied with turbine and boiler. Therefore, it's better to farm Kamikaze
 who drops on this map, then sortie the fleet with her for an easier time ranking. Don't worry about her drop rate though because her drop rate is pretty high actually, like 4-5%
 - All the comps below are historical fleets. So like I said, farm Kamikaze before you attempt to rank here !
Comp
There are 3 comps you can use to rank, but the first comp (known as the standard comp) is already put as the recommended comp on the 7-3 page, and since this comp is fairly simple and straight forward, I will just skip talking about it and bring to you another two comps below instead, which may look new to you guys.

- Okay, like the title said, this comp saves some buckets compared to the variant 1 above. The reason is that you get to bring even more opening shots, this will help reduce enemy shelling.
- In exchange, however, you will go through a submarine node before going to the boss. It's not much of a threat though so you will be fine if you can pack some OASW on the way.
- This comp has more notes, as stated in the image:
- You can improve sonars then stack them on your girls to increase torpedo evasion, which is one of the factors that damages your girls and costs you buckets
- Equipping 203mm/53 Twin Gun Mount
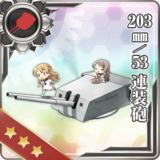 (Zara gun) on your Haguro and Ashigara to force them to alway shoot first, taking enemies out faster
 - Seaplane bombers (Better if they have AA resistance) are brought to help bomb enemies as well so your Haguro and Ashigara can aim at CA Ne Elite and CL Tsu Elite and take them out before the torpedo phase.
- Final extra note: If you want, you can rig the MVP on Kamikaze everytime by giving her the strongest OASW setup. This way, before going to the boss node, she will nearly alway get the MVP and sparkle herself up so that she can dodge better at the boss node (She is pretty fragile, don't you agree?)
- It goes without saying you need to sortie at 49 morale obviously.

- This comp trades the reduced bucket usage for faster sortie (Less time consumed compared to the other comps, that's why I nicknamed this comp as "rush hour" comp)
- Seaplane bombers (Better if they have AA resistance) are brought to help bomb enemies as well so your CA(V) can aim at CA Ne Elite and CL Tsu Elite and take them out before the torpedo phase (Although this is less likely to happen compared to the variant 2 comp, as you have less opening this time)
- This comp, while it's fast, can cause some issue preboss as you only have 4 ships, so Kamikaze becomes more vulnerable, might cause retreat if she got an unlucky snipe.
- This comp also has one more note as stated in the image: Bulge your CA(V) if you can to increase survivability
- Formation : Line Abreast at node J, Line Ahead at other nodes
Efficiency
- Assuming all nodes are scored with S rank, one full run of 7-3 (If variant 2 comp is used) will give 160 x 3 + 1920 = 2400 HQ exp = 1.68 rpt
- One full run of 7-3 requires at least 5 minutes, ideally, one can do 60 : 5 = 12 runs / hour, which gives 1.68 x 12 = 20.16 rpt / hour
- This assumes the normal Variant 2 comp. Using 4-ship comp (Variant 3) can gain point a little faster
- Bucket usage: Average -> High (Depends on variant 2 or 3 comp)
- Resource usage: Assuming no night battle needed, it would cost 125 fuel 190 ammo when supplying (Variant 2) or 102 fuel 126 ammo (Variant 3). Variant 2 is slightly cheaper than 7-2 while variant 3 is slightly cheaper than 4-4.
Map 6-3: Operation K
Click expand to show
- Notice how ever since the remodel of Ise Kai Ni
 , the devmat has been significantly decreased? Maybe it was not seen clearly that time, but with the latest remodels such as Yahagi Kai Ni
 or Mogami Kai Ni
 , the impact has become much stronger. In fact, in just the recent two years (2019-2020), the player can blow as much as up to 2000 devmat just for remodel alone! This caused some issue for whoever didn't stockpile a lot of devmat beforehand.
 - Well, you must be wondering how to farm devmat in order to balance out those remodel cost? You have come to the right place then, because I have this particular thing which might interest you.
- In map 6-3, there are 2 aerial resource nodes you can hit in order to obtain some good stuffs (Devmat is one of them). One may attempt to hit those nodes to farm devmat, which is fine by me, but there is a twist: You gotta win the boss fight in order to obtain those stuffs, which might be a problem for some players.
- Don't worry, I have a good composition for you if you wanna win that boss node. In a sense, while you are farming devmat there, you passively do ranking on that map too! That's why I will call this article as 6-3 ranking.
- Note one important thing before we go into the details: The comp is very cheap to rank when it comes to resource, but will increase the bucket usage a lot. I will only recommend this if you have many buckets to spare!. In a sense, ranking this map means you are converting buckets into devmats.
Comp

- As of now, it's recommended to have 4 married strong DDs and CL Agano class K2 for 5 OASWs in total. The submarine node is known to cause many issues if you don't have OASW to shut them up, let alone the next preboss surface node. You need strong DDs that can hit over 90 damage (Including equipment, parallel) at day to bypass the second node reliably as well. Therefore, marrying strong DDs is a good choice if you wanna invest on this comp for ranking and farming in the future
- If you don't marry multiple ships like in the comp, you can still try to go without OASWs or use less-firepower DDs. Expect some issues if you do so though.
- If you do marry them, try to push them to the level that they can OASW with one Type 4 Passive Sonar
 . This way you can keep night DA as well.
- You only need to win the boss fight, which means only A or B rank required. If you already got A or B by the end of the day battle, just retreat back to the base, as there is not much point going for S rank unless you want Unryuu

- Recommended to use the seaplane bombers with AA resistance to avoid getting shot down by CL Tsu-class
- Be careful of the C node as it's a submarine node without warning. A lot of players tend to click Line Ahead here by mistake (Even I did here and there.....)
- Formation : Line Abreast at node C, Line Ahead at node E and the boss node
Efficiency
- Assuming all nodes are scored with S rank, one full run of 6-3 will give 180 x 2 + 2760 = 3120 HQ exp = 2.18 rpt
- One full run of 6-3 requires at least 5 minutes, ideally, one can do 60 : 5 = 12 runs / hour, which gives 2.18 x 12 = 26.16 rpt / hour
- Bucket usage: High (The preboss and the boss can damage your girls easily)
- Resource usage: Assuming no night battle needed, it would cost 60 fuel 65 ammo when supplying. Very low consumption
Managing quarterly sortie quests ranking points
Credit to Keshak#7576 (discord). This is one of the recommended strategies to shoot ranking cannons.
As of current, there are 7 quarterly quests giving ranking points, known as cannon. A total of 2050 point can be obtained by completing all of those.
The following is the list of quarterly sortie quests. Bold indicates cannon quests
- At the beginning of the quarterly (unlocked by default): Bq3 and Bq13
- Unlocked by weekly or monthly quests:
- Bq1 needs Bm6 (Monthly 4-2)
- Bq2 needs Bw2 (Weekly carriers)
- Bq5 needs D11 (Tokyo Express 2)
- Bq7 needs Bw9: (Weekly 5-2)
- Bq8 needs D11 (Tokyo Express 2)
- Bq9 needs D11: (Tokyo Express 2)
- Bq11 needs Bm8 (Monthly supply lines)
- Unlocked by other quarterlies:
- Bq4 needs Bq3
- Bq6 needs Bq5
- Bq10 needs Bq2
- Bq12 needs Bq11
Recommended course of actions
- 1. Do all weeklies
- 2. Do Bm1: “Monthly Myoukou 2-5”
- 3. Do Bm5: “Monthly 1-5”
- 4. Do Bm8: “Monthly supply lines”
- 5. Do Bq11: “Newbie cannon” (80 rpt must be “sacrificed”)
- 6. At this point 5 big cannons are unlocked
- 6.1. Bq2 do everything but 6-3 run
- 6.2. Bq7 do everything but 5-4 run
- 6.3. Bq8 do everything but one 1-5 run
- 6.4. Bq12 do everything but 4-2 run
- 6.5. Bq13 do everything but 5-4 run
- 7. Bq10 remains locked until Bq2 is done
- 8. Clear all EOs and farm ranking points as usual
- 9. When the end of the month is close, calculate how many rpt you need to reach your desired position and fire the cannons you need.
Trivia
Ranking plan
- As of September 2020, many quarterly quests that give ranking points have been released. This has directly affected the ranking pressure across all servers as nowaday T500 may requires as much effort as Phase 1 T100. However, this can also be a good thing as if you do all those quarterlies and EO in one single month, you can stack up to 3000 points pretty easily. With a couple of more sortie, you are guaranteed to hit T500 as well. So my advice is If your life is very busy, just focus all quarterlies in one month and clear all the EO that month too, this way, at least you will get ranking rewards every 3 months
- Of course it is still possible to rank every month and spread out quarterlies to get enough point buff (i.e each month you only do 2-3 quarterlies for around 600 points), but will require much more points from daily sortie for T500 nowaday if you wanna catch up. Plan your schedule accordingly to your server if you spam daily. You are gonna need like 3500 for T500 (Hashi will need more obviously)
Regarding the EO and Quest cannon
- For EO cannon, you can shoot anytime in a month to gain rpt, but note that if you shoot in the last day of the month, between 22:00 - 00:00 JST of the next month, it will not be counted for anything !
- For quest cannon
- Shooting it anytime before 14:00 JST of the last day of any month will give rpt to that month
- Shooting it after 14:00 JST of the last day of any month, as long as that month is NOT the last month of the quarter, will give rpt to the following month
- Shooting it after 14:00 JST of the last day of the last month in a quarter will just simply waste it, not counted for anything
- For reference, 4 quarters in KC are month 12-1-2 / 3-4-5 / 6-7-8 / 9-10-11
Example:
- Right now it's July, it belongs to quarter 6-7-8. I have the Z cannon available giving 350 points.
- If I shoot it anytime in July before 7/31 14:00 JST, I will have 350 points for July
- If I shoot it after 7/31 14:00 JST, but before August coming, I will have 350 points for August
- If I shoot it after 8/31 14:00 JST, I will get nothing out of it, as August is already the last month of the quarter