World 5/5-5
< World 5
World 5-5:【Extra Operation】サーモン海域北方 Northern Salmon Sea Area

| Strategy Name | 第二次サーモン海戦 (Second Battle of the Solomon Sea)
| ||
| Difficulty | ☆☆☆☆☆☆☆☆☆☆☆
| ||
| Item | |||
| Strategy Content | 南方海域に敵の有力な機動部隊の接近が確認された。空母機動部隊を以て、これを迎撃せよ!
The approach of a powerful enemy task force has been confirmed in southern waters. Form a carrier task force and intercept it! | ||
| 5-5 North route | ||
| Fleet | 4-6(F)BB(V)/CV(L), 0-2CA(V) | |
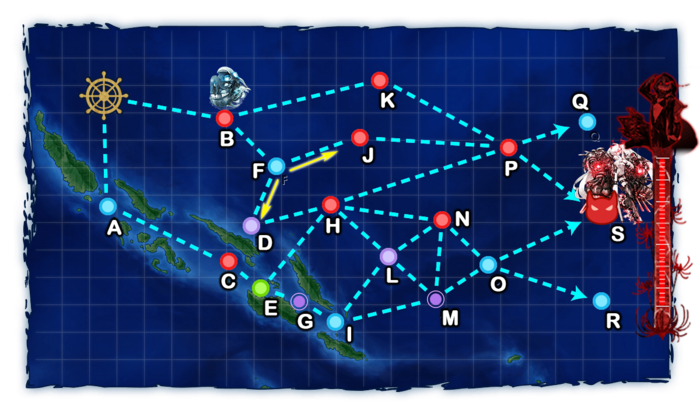
| Route | B K P S | |
| Other Notes | 35% chance of off-routing if 5 or more (F)BB(V)s/CV(L)s are used or if a SS(V) is used. | |
| AP | AS | AS+ |
| 175 | 392 | 784 |
| 5-5 Middle route | ||
| Fleet | 2(F)BB(V), 2DD, 1CA(V), 1CLT/CA(V) | |
| Route | B F D H N O S | |
| Other Notes | ||
| AP | AS | AS+ |
| 175 | 392 | 784 |
| 5-5 South route | ||
| Fleet | 2(F)BB(V)/CV(L), 4DD 2(F)BB(V)/CV(L), 2XX, 2DD (XX can't be (F)BB(V)/CV(L)) | |
| Route | A C E G I M O S | |
| Other Notes | If using less than 4 DDs, fleet must have 4 Drums/Landing Craft equipped on 4 ships. | |
| AP | AS | AS+ |
| 175 | 392 | 784 |
Map Unlocking & Progression
5-5 is unlocked after clearing 5-4 HP bar and 6-1.
To clear the map, the boss's flagship must be sunk 5 times.
- Support Expeditions are available on this map.
- Clearing this map rewards 200 Ranking points and a medal.
- The map will reset at midnight JST at the beginning of every month.
Stage Guide
| 5-5 Branching Rules | ||
|---|---|---|
| Nodes | Rules | |
| Start | A |
|
B | ||
B |
F |
|
K | ||
E |
G |
|
H | ||
H |
L |
|
N | ||
P | ||
I |
L |
|
M | ||
L |
N |
|
M |
L |
|
O | ||
N |
M |
|
O | ||
O |
R |
|
S | ||
P |
Q |
|
S | ||
Tips
- 5-5 is arguably the most difficult non-event map in the game.
- The enemy composition at the boss node will be locked into either formation 5 or 6 after clearing.
- If you are planning on clearing any quests that require you to clear 5-5 with an A/S-Rank, it is recommended that you attempt these quests after clearing 5-5 for the month, as the post-clear boss compositions are significantly easier than the pre-clear comps. The fleet composition restrictions for most of these quests mean that your fleet will face some difficulty in defeating the pre-clear comps.
- This is especially true if said quests require 2DDs, as DDs will face difficulty to deal any significant damage to the pre-clear boss comps during the daytime battle.
- Please note that Submarine Yo-Class at the boss node will be in Elite form post-clear, so a dedicated ASW or even OASW ship must be brought if one wishes to secure an S-rank.
- The enemy composition at the boss node will be locked into either formation 5 or 6 after clearing.
- Node B is a submarine node.
- Nodes G and M are Night Nodes.
- Pre-boss Node P has the chance of containing an Elite Re-class in Line Ahead.
- Depending on your choice of ships (and also dependent on engagement modifiers & enemy fleet formation), bulges equipped in Reinforcement Expansion may improve survivability against opening torpedoes.
- The Special Attacks (Touch) are good options to consider if you want to clear out enemies at the boss node easier.
- As every World 5 map, Support Expeditions are available to help you clear the map, something often useful to clear harder quests.
It can be advisable to display the enemy composition preview when reaching the boss, to make sure it is the easiest composition, resetting the game otherwise.
Recommended Fleets
- BBs using "Special Attacks" (Touches) are recommended for every fleet.
- Equipping the flagship with at least one Very Long range gun is recommended to trigger the Touch 1st.
- Regarding DDs :
- 2(F)BB(V), 1CL/CA(V), 1CLT/CA(V), 2DD
- Route = B F D H N O S
- LoS required: ≥ 67 (Cn2)
- Easier preboss, but will struggle against the double Re-Elite boss node formations.
- Node D is a maelstrom node. It's recommended to bring some radars to reduce fuel losses.
- CAVs can provide fighter power.
- CLTs and Opening Torpedo Salvo capable CLs can enable powerful opening attacks.


Strongest, but also costlier fleets. The biggest threat here is the Re-class on node P.
- 4-6BB(V)/CV(L), 0-2CA(V)
- Route = B K P S
- CAVs can provide fighter power, allowing for optimized set-ups on CVs.
- One CA can be used for AACI
- 4BB(V)/CV(L), 2DD
- Route = B F J P S
- A route negligibly easier than the previous one.
- F is a choice node. For the above fleet, routing to J is recommended as D is a maelstrom node, and fleet comp will route to P after H anyway.
- LoS required: ≥ 81 (Cn2)
- Using more than 4BB(V)/CV(L) or 1 SS(V) gives a 35% chance of off-routing to node Q
- Ise Kai Ni & Hyuuga Kai Ni are good options to get additional fighter power, however, they are weaker in terms of firepower compared to most BBs.
- SPB should not be used in smaller slots due to the potential presence of multiple Light Cruiser Tsu-Class along this route.
A weaker fleet with a lower bauxite consumption compared to other fleets.
- 2(F)BB(V)/CV(L), 4DD
- 2(F)BB(V)/CV(L), 2XX, 2DD (XX can't be (F)BB(V)/CV(L))
- Route = A C E G I M O S
- LoS required: ≥ 67 (Cn2)
- The first battle is a relatively easy enemy torpedo squadron, but the next two battles are fairly dangerous Night Nodes.
- When less than 4 DD are used, 4
 Drum
Drum carrying ship are required to route to the boss.
Not recommended.
- 6SS(V)
- Route = B K P S
- LoS required: ≥ 81 (Cn2)
- Has a lower chance of reaching the boss node due to random off-routings, and difficulties killing the boss regardless of its composition.
- Has a low resource cost.
- Using 6 strong submarines (maybe having REs) utilizing Submarine Cut-ins can be a solution to slowly clear the map for cheap.
Resource Nodes
E is a "Special Resource Node" rewarding fuel ![]() .
.
- See here for more details.
Enemy Compositions
5-5 A
| # | Empty Node | ||
|---|---|---|---|
| A | 気のせいだった。/敵影を見ず。/穏やかな海です。/穏やかな海峡です。/警戒が必要です。/静かな海です。 Must be my imagination./No enemy spotted./Calm seas./Calm straits./Be alert./Peaceful seas. | ||
| # | Empty Node | ||
5-5 B: 深海南方潜水艦隊 哨戒線 (PoiDB)
| # | Enemy Form. |
Base EXP | Normal Battle Node | AD/AP AS/AS+ |
|---|---|---|---|---|
| B | Echelon Line Abreast |
200 | 0/0 0/0 | |
| Echelon Line Abreast |
220 | 0/0 0/0 | ||
| Echelon Line Abreast |
250 | 0/0 0/0 | ||
| # | Enemy Form. |
Base EXP | Normal Battle Node | AD/AP AS/AS+ |
5-5 C: 敵哨戒水雷戦隊 (PoiDB)
| # | Enemy Form. |
Base EXP | Normal Battle Node | AD/AP AS/AS+ |
|---|---|---|---|---|
| C | Line Ahead Double Line |
130 | 0/0 0/0 | |
| Line Ahead Double Line |
160 | 0/0 0/0 | ||
| Line Ahead Double Line |
170 | 0/0 0/0 | ||
| # | Enemy Form. |
Base EXP | Normal Battle Node | AD/AP AS/AS+ |
5-5 D
| # | Maelstrom Node | ||
|---|---|---|---|
| D | Lost ?% | ||
| # | Maelstrom Node | ||
5-5 E
| # | Resource Node | ||
|---|---|---|---|
| E | Gained 40 | ||
| # | Resource Node | ||
5-5 F
| # | Selection Node | ||
|---|---|---|---|
| F | 艦隊の針路を選択できます。提督、どちらの針路をとられますか? You can decide the fleet's course. Admiral, which heading should we take? | ||
| # | Selection Node | ||
5-5 G: 敵哨戒重巡戦隊 (PoiDB)
| # | Enemy Form. |
Base EXP | Night Battle Node | AD/AP AS/AS+ |
|---|---|---|---|---|
| G | Line Ahead Echelon |
180 | 0/0 0/0 | |
| Line Ahead Echelon |
190 | 0/0 0/0 | ||
| Line Ahead Echelon |
200 | 0/0 0/0 | ||
| # | Enemy Form. |
Base EXP | Night Battle Node | AD/AP AS/AS+ |
5-5 H: 敵機動部隊 C群 (PoiDB)
| # | Enemy Form. |
Base EXP | Normal Battle Node | AD/AP AS/AS+ |
|---|---|---|---|---|
| H | Double Line Diamond |
380 | 16/31 69/138 | |
| Double Line Diamond |
400 | 42/84 188/375 | ||
| Double Line Diamond |
420 | 69/137 306/612 | ||
| # | Enemy Form. |
Base EXP | Normal Battle Node | AD/AP AS/AS+ |
5-5 I
| # | Empty Node | ||
|---|---|---|---|
| I | 気のせいだった。/敵影を見ず。/穏やかな海です。/穏やかな海峡です。/警戒が必要です。/静かな海です。 Must be my imagination./No enemy spotted./Calm seas./Calm straits./Be alert./Peaceful seas. | ||
| # | Empty Node | ||
5-5 J: 敵機動部隊 B群 (PoiDB)
| # | Enemy Form. |
Base EXP | Normal Battle Node | AD/AP AS/AS+ |
|---|---|---|---|---|
| J | Double Line Diamond |
400 | 42/84 188/375 | |
| Double Line Diamond |
430 | 69/137 306/612 | ||
| Double Line Diamond |
450 | 69/137 306/612 | ||
| # | Enemy Form. |
Base EXP | Normal Battle Node | AD/AP AS/AS+ |
5-5 K: 敵機動部隊 A群 (PoiDB)
| # | Enemy Form. |
Base EXP | Normal Battle Node | AD/AP AS/AS+ |
|---|---|---|---|---|
| K | Double Line Diamond |
400 | 42/84 188/375 | |
| Double Line Diamond |
420 | 69/137 306/612 | ||
| Double Line Diamond |
450 | 76/152 341/681 | ||
| # | Enemy Form. |
Base EXP | Normal Battle Node | AD/AP AS/AS+ |
5-5 L
| # | Maelstrom Node | ||
|---|---|---|---|
| L | Lost ?% | ||
| # | Maelstrom Node | ||
5-5 M: 敵新鋭戦艦戦隊 (PoiDB)
| # | Enemy Form. |
Base EXP | Night Battle Node | AD/AP AS/AS+ |
|---|---|---|---|---|
| M | Line Ahead Double Line Echelon |
450 | 0/0 0/0 | |
| Line Ahead Double Line Echelon |
460 | 0/0 0/0 | ||
| Line Ahead Double Line Echelon |
480 | 0/0 0/0 | ||
| # | Enemy Form. |
Base EXP | Night Battle Node | AD/AP AS/AS+ |
5-5 N: 深海南方任務部隊 重水雷戦隊 (PoiDB)
| # | Enemy Form. |
Base EXP | Normal Battle Node | AD/AP AS/AS+ |
|---|---|---|---|---|
| N | Line Ahead Double Line Echelon |
280 | 0/0 0/0 | |
| Line Ahead Double Line Echelon |
350 | 0/0 0/0 | ||
| # | Enemy Form. |
Base EXP | Normal Battle Node | AD/AP AS/AS+ |
5-5 O
| # | Empty Node | ||
|---|---|---|---|
| O | 気のせいだった。/敵影を見ず。/穏やかな海です。/穏やかな海峡です。/警戒が必要です。/静かな海です。 Must be my imagination./No enemy spotted./Calm seas./Calm straits./Be alert./Peaceful seas. | ||
| # | Empty Node | ||
5-5 P: 深海南方任務部隊 水上打撃群 (PoiDB)
| # | Enemy Form. |
Base EXP | Normal Battle Node | AD/AP AS/AS+ |
|---|---|---|---|---|
| P | Line Ahead Double Line |
500 | 32/63 141/282 | |
| Line Ahead | 520 | 36/72 161/321 | ||
| Double Line | 530 | 36/72 161/321 | ||
| Line Ahead Double Line |
550 | 36/72 161/321 | ||
| # | Enemy Form. |
Base EXP | Normal Battle Node | AD/AP AS/AS+ |
5-5 Q
| # | Empty Node | ||
|---|---|---|---|
| Q | 気のせいだった。/敵影を見ず。/穏やかな海です。/穏やかな海峡です。/警戒が必要です。/静かな海です。 Must be my imagination./No enemy spotted./Calm seas./Calm straits./Be alert./Peaceful seas. | ||
| # | Empty Node | ||
5-5 R
| # | Empty Node | ||
|---|---|---|---|
| R | 気のせいだった。/敵影を見ず。/穏やかな海です。/穏やかな海峡です。/警戒が必要です。/静かな海です。 Must be my imagination./No enemy spotted./Calm seas./Calm straits./Be alert./Peaceful seas. | ||
| # | Empty Node | ||
5-5 S: 深海南方任務部隊 本隊 (PoiDB)
| # | Enemy Form. |
Base EXP | Boss Battle Node | AD/AP AS/AS+ |
|---|---|---|---|---|
| S | Diamond | 700 | 50/100 224/447 | |
| Diamond | 700 | 84/168 377/753 | ||
| Double Line | 700 | 88/175 392/783 | ||
| Line Ahead | 770 | 88/175 392/783 | ||
| Diamond (Clear)
|
600 | 80/159 356/711 | ||
| Double Line (Clear)
|
600 | 64/128 287/573 | ||
| # | Enemy Form. |
Base EXP | Boss Battle Node | AD/AP AS/AS+ |
Ship Drops
This map currently has "limited-time" drops that don't appear in the table below, see Drop List for more info.
| Ship drops | |||||||||||||||||||||||||||||||||||||||||||||||||||||||||||||||||||||||||||||||||||||||||||||||||||
|---|---|---|---|---|---|---|---|---|---|---|---|---|---|---|---|---|---|---|---|---|---|---|---|---|---|---|---|---|---|---|---|---|---|---|---|---|---|---|---|---|---|---|---|---|---|---|---|---|---|---|---|---|---|---|---|---|---|---|---|---|---|---|---|---|---|---|---|---|---|---|---|---|---|---|---|---|---|---|---|---|---|---|---|---|---|---|---|---|---|---|---|---|---|---|---|---|---|---|---|
| Type | Ship? | B | C | G | H | J | K | M | N | P | S | ||||||||||||||||||||||||||||||||||||||||||||||||||||||||||||||||||||||||||||||||||||||||
| DD | Uzuki | ✓ | |||||||||||||||||||||||||||||||||||||||||||||||||||||||||||||||||||||||||||||||||||||||||||||||||
| DD | Hatsukaze | ✓ | |||||||||||||||||||||||||||||||||||||||||||||||||||||||||||||||||||||||||||||||||||||||||||||||||
| DD | Maikaze | ✓ | ✓ | ||||||||||||||||||||||||||||||||||||||||||||||||||||||||||||||||||||||||||||||||||||||||||||||||
| CL | Agano | ✓ | |||||||||||||||||||||||||||||||||||||||||||||||||||||||||||||||||||||||||||||||||||||||||||||||||
| AS | Taigei | ✓ | |||||||||||||||||||||||||||||||||||||||||||||||||||||||||||||||||||||||||||||||||||||||||||||||||
| DD | Yayoi | ✓ | |||||||||||||||||||||||||||||||||||||||||||||||||||||||||||||||||||||||||||||||||||||||||||||||||
| DD | Yukikaze | ✓ | |||||||||||||||||||||||||||||||||||||||||||||||||||||||||||||||||||||||||||||||||||||||||||||||||
| DD | Hamakaze | ✓ | |||||||||||||||||||||||||||||||||||||||||||||||||||||||||||||||||||||||||||||||||||||||||||||||||
| DD | Akigumo | ✓ | ✓ | ✓ | ✓ | ||||||||||||||||||||||||||||||||||||||||||||||||||||||||||||||||||||||||||||||||||||||||||||||
| DD | Yuugumo | ✓ | |||||||||||||||||||||||||||||||||||||||||||||||||||||||||||||||||||||||||||||||||||||||||||||||||
| DD | Makigumo | ✓ | ✓ | ✓ | ✓ | ||||||||||||||||||||||||||||||||||||||||||||||||||||||||||||||||||||||||||||||||||||||||||||||
| CL | Nagara | ✓ | ✓ | ✓ | ✓ | ✓ | ✓ | ✓ | ✓ | ✓ | |||||||||||||||||||||||||||||||||||||||||||||||||||||||||||||||||||||||||||||||||||||||||
| CA | Myoukou | ✓ | ✓ | ✓ | ✓ | ✓ | ✓ | ✓ | ✓ | ✓ | |||||||||||||||||||||||||||||||||||||||||||||||||||||||||||||||||||||||||||||||||||||||||
| CA | Takao | ✓ | ✓ | ✓ | ✓ | ✓ | ✓ | ✓ | ✓ | ✓ | |||||||||||||||||||||||||||||||||||||||||||||||||||||||||||||||||||||||||||||||||||||||||
| CA | Atago | ✓ | ✓ | ✓ | ✓ | ✓ | ✓ | ✓ | ✓ | ✓ | |||||||||||||||||||||||||||||||||||||||||||||||||||||||||||||||||||||||||||||||||||||||||
| CA | Suzuya | ✓ | ✓ | ||||||||||||||||||||||||||||||||||||||||||||||||||||||||||||||||||||||||||||||||||||||||||||||||
| CA | Kumano | ✓ | ✓ | ||||||||||||||||||||||||||||||||||||||||||||||||||||||||||||||||||||||||||||||||||||||||||||||||
| CA | Tone | ✓ | ✓ | ✓ | ✓ | ✓ | ✓ | ✓ | ✓ | ✓ | |||||||||||||||||||||||||||||||||||||||||||||||||||||||||||||||||||||||||||||||||||||||||
| CA | Chikuma | ✓ | ✓ | ✓ | ✓ | ✓ | ✓ | ✓ | ✓ | ✓ | |||||||||||||||||||||||||||||||||||||||||||||||||||||||||||||||||||||||||||||||||||||||||
| CVL | Ryuujou | ✓ | ✓ | ✓ | ✓ | ✓ | ✓ | ✓ | ✓ | ✓ | |||||||||||||||||||||||||||||||||||||||||||||||||||||||||||||||||||||||||||||||||||||||||
| CVL | Zuihou | ✓ | |||||||||||||||||||||||||||||||||||||||||||||||||||||||||||||||||||||||||||||||||||||||||||||||||
| FBB | Hiei | ✓ | ✓ | ✓ | ✓ | ✓ | ✓ | ✓ | ✓ | ||||||||||||||||||||||||||||||||||||||||||||||||||||||||||||||||||||||||||||||||||||||||||
| FBB | Kirishima | ✓ | ✓ | ✓ | ✓ | ✓ | ✓ | ✓ | ✓ | ||||||||||||||||||||||||||||||||||||||||||||||||||||||||||||||||||||||||||||||||||||||||||
| BB | Mutsu | ✓ | |||||||||||||||||||||||||||||||||||||||||||||||||||||||||||||||||||||||||||||||||||||||||||||||||
| CV | Shoukaku | ✓ | |||||||||||||||||||||||||||||||||||||||||||||||||||||||||||||||||||||||||||||||||||||||||||||||||
| CV | Zuikaku | ✓ | |||||||||||||||||||||||||||||||||||||||||||||||||||||||||||||||||||||||||||||||||||||||||||||||||
| SS | I-8 | ✓ | |||||||||||||||||||||||||||||||||||||||||||||||||||||||||||||||||||||||||||||||||||||||||||||||||
| SS | I-19 | ✓ | |||||||||||||||||||||||||||||||||||||||||||||||||||||||||||||||||||||||||||||||||||||||||||||||||
| SS | I-58 | ✓ | |||||||||||||||||||||||||||||||||||||||||||||||||||||||||||||||||||||||||||||||||||||||||||||||||
| DD | Mutsuki | ✓ | ✓ | ✓ | ✓ | ✓ | ✓ | ✓ | ✓ | ✓ | |||||||||||||||||||||||||||||||||||||||||||||||||||||||||||||||||||||||||||||||||||||||||
| DD | Mochizuki | ✓ | ✓ | ✓ | ✓ | ✓ | ✓ | ✓ | ✓ | ✓ | |||||||||||||||||||||||||||||||||||||||||||||||||||||||||||||||||||||||||||||||||||||||||
| DD | Ayanami | ✓ | ✓ | ✓ | ✓ | ✓ | ✓ | ✓ | ✓ | ✓ | |||||||||||||||||||||||||||||||||||||||||||||||||||||||||||||||||||||||||||||||||||||||||
| DD | Shikinami | ✓ | ✓ | ✓ | ✓ | ✓ | ✓ | ✓ | ✓ | ✓ | |||||||||||||||||||||||||||||||||||||||||||||||||||||||||||||||||||||||||||||||||||||||||
| DD | Shiratsuyu | ✓ | ✓ | ✓ | ✓ | ✓ | ✓ | ✓ | ✓ | ✓ | |||||||||||||||||||||||||||||||||||||||||||||||||||||||||||||||||||||||||||||||||||||||||
| DD | Shigure | ✓ | ✓ | ✓ | ✓ | ✓ | ✓ | ✓ | ✓ | ✓ | |||||||||||||||||||||||||||||||||||||||||||||||||||||||||||||||||||||||||||||||||||||||||
| DD | Suzukaze | ✓ | ✓ | ✓ | ✓ | ✓ | ✓ | ✓ | ✓ | ✓ | |||||||||||||||||||||||||||||||||||||||||||||||||||||||||||||||||||||||||||||||||||||||||
| DD | Kagerou | ✓ | ✓ | ✓ | ✓ | ✓ | ✓ | ✓ | ✓ | ✓ | |||||||||||||||||||||||||||||||||||||||||||||||||||||||||||||||||||||||||||||||||||||||||
| CL | Yura | ✓ | ✓ | ✓ | ✓ | ✓ | ✓ | ✓ | ✓ | ✓ | |||||||||||||||||||||||||||||||||||||||||||||||||||||||||||||||||||||||||||||||||||||||||
| CL | Jintsuu | ✓ | ✓ | ✓ | ✓ | ✓ | ✓ | ✓ | ✓ | ✓ | |||||||||||||||||||||||||||||||||||||||||||||||||||||||||||||||||||||||||||||||||||||||||
| CA | Haguro | ✓ | ✓ | ✓ | ✓ | ✓ | ✓ | ✓ | ✓ | ✓ | |||||||||||||||||||||||||||||||||||||||||||||||||||||||||||||||||||||||||||||||||||||||||
| CA | Maya | ✓ | ✓ | ✓ | ✓ | ✓ | ✓ | ✓ | ✓ | ✓ | |||||||||||||||||||||||||||||||||||||||||||||||||||||||||||||||||||||||||||||||||||||||||
| SS | I-168 | ✓ | |||||||||||||||||||||||||||||||||||||||||||||||||||||||||||||||||||||||||||||||||||||||||||||||||
| AV | Chitose | ✓ | ✓ | ✓ | ✓ | ✓ | ✓ | ✓ | ✓ | ✓ | |||||||||||||||||||||||||||||||||||||||||||||||||||||||||||||||||||||||||||||||||||||||||